
WXB860BY - Washing machine SIEMENS - Free user manual and instructions
Find the device manual for free WXB860BY SIEMENS in PDF.


| Product Type | Freestanding Washing Machine |
| Brand | Siemens |
| Model | WXB860BY |
| Dimensions (Width x Height x Depth) | 59.5 cm x 85.0 cm x 56 cm |
| Weight | Approx. 70 kg |
| Maximum Load Capacity | 4.5 kg (cottons), 2.25 kg (synthetics), 2.0 kg (delicates/woollens) |
| Energy Efficiency Class | Not specified in manual; typical for era: A |
| Power Supply | AC mains via earthed socket; voltage per nameplate (typically 220-240 V) |
| Water Pressure (min/max) | 1 bar / 10 bar |
| Spin Speed | Adjustable: 600, 800, 1000, or 1200 rpm (model dependent) |
| Programmes | Cottons, Synthetics, Delicates, Woollens, Stains/Intensive, Rinse, Spin, Pump |
| Temperature Selection | Cold, 30°C, 40°C, 60°C, 90°C (max 60°C for delicates, 40°C for woollens) |
| Additional Functions | Rinse hold, reduced spin speed, prewash (on some programmes) |
| Control Panel | Rotary programme selector, temperature selector, start button, indicator lights |
| Detergent Drawer | 3 compartments: prewash (I), main wash (II), fabric softener (⚙) |
| Safety Features | Door lock, child-proof door, anti-flood system (recommend tap closure), safety instructions |
| Installation Requirements | Level floor, transport securing devices removal, proper water and electrical connections |
| Maintenance | Clean detergent drawer, pump filter, inlet filters; descaling optional; frost protection |
| Noise Level (Wash/Spin) | Not specified; typical for front-loaders: approx. 55-75 dB |
Frequently Asked Questions - WXB860BY SIEMENS
User questions about WXB860BY SIEMENS
0 question about this device. Answer the ones you know or ask your own.
Ask a new question about this device
Download the instructions for your Washing machine in PDF format for free! Find your manual WXB860BY - SIEMENS and take your electronic device back in hand. On this page are published all the documents necessary for the use of your device. WXB860BY by SIEMENS.
USER MANUAL WXB860BY SIEMENS
natural_image
Front view of a silver washing machine with control panel and rotary dial (no visible text or symbols)electronic with temperature selector
| Points to remember | Notes on safety and general warnings 3. . . . . . . . . . . . . . . . . . . . . . . . . . . . . . . . . . . . . . . . . . . . . . . . . . . . . . . . . . . . . . . . . . . . . . . . . . . . . . . . . . . . . . . . . . . . . . . . . . . . . | Page |
| Notes on the removal and disposal of packaging 4. . . . . . . . . . . . . . . . . . . . . . . . . . . . . . . . . . . . . . . . . . . . . . . . . . . . . . . . . . . . . . . . . . . . . . . . . . . . . . . . . . . . . . . . . . . . . . . . . . . | 8 | |
| Installation instructions | Removing the transport securing devices 5. . . . . . . . . . . . . . . . . . . . . . . . . . . . . . . . . . . . . . . . . . . . . . . . . . . . . . . . . . . . . . . . . . . . . . . . . . . . . . . . . . . . . . . . . . . . . . . . . . . ..Appliance outlet 7Connecting to the power supply | 8 |
| Your new washing machine | Getting to know your new appliance . . . . . . . . . . . . . . . . . . . . . . . . . . . . . . . . . . . . . . . . . . . . . . . . . . . . . . . . . . . . . . . . . . . . . . . . . . . . . . . . . . . . . . . . . . . . . . . . . . .Washing machine status indicator lights . . . . . . . . . . . . . . . . . . . . . . . . . . . . . . . . . . . . . . . . . . . . . . . . . . . . . . . . . . . . . . . . . . . . . . . . . . . . . . . . . . . . . . . . . . . . . . . . . . . Function and «Start» selection button | 9101010. . . . |
| Notes on detergent / Preparing the laundry | Detergents and softeners . . . . . . . . . . . . . . . . . . . . . . . . . . . . . . . . . . . . . . . . . . . . . . . . . . . . . . . . . . . . . . . . . . . . . . . . . . . . . . . . . . . . . . . . . . . . . . . . . . . Preparing the laundry 12. . . . . . . . . . . . . . . . . . . . . . . . . . . . . . . . . . . . . . . . . . . . | 11 |
| First washing cycle | First washing cycle . . . . . . . . . . . . . . . . . . . . . . . . . . . . . . . . . . . . . . . . . . . . . . . . . . . . . . . . . . . . . . . . . . . . . . . . . . . . . . . . | 14 |
| Wash | Washing / Opening the door / Loading the machine / Shutting the door . . . . . . . . . . . . . . . . . . . . . . . . . . . . . . . . . . . . . . . . . . . . . . . . . . . . . . . . . . . . . . . . . . . . . . . . . . . . . . . . . . . . . . . . . . . . . . . . . . . Wash the laundry . . . . . . . . . . . . . . . . . . . . . . . . . . . . . . . . . . . . . . . . . . . . . . . . . . . . . . . . . . . . . . . . . . . . . . . . . . . . . . . . . . . . . . . . . . . . . Taking the laundry out of the machine | 151617. . . |
| Cleaning Maintenance Frost protection | Cleaning/Maintenance/Frostprotection | 18 |
| Malfunctions | Malfunctions with simple solutions. 21After-Sales Service. 22Technical data. 22Consumption data. 23 | 21222223 |
This appliance complies with the industry safety regulations.
Points to remember before putting the appliance into operation:
! Read the enclosed instructions before putting the appliance into operation. They contain important information and advice for installation, use and safety of the appliance.
! Keep the user documentation for the appliance so that later owners can use it.
! Install the appliance as described in the installation instructions. Remove the transport securing devices and keep them.
! If the appliance shows any sign of damage or imperfection it must not be connected to the power supply. If in doubt contact the After-sales Service or the Distributor that sold the appliance.
! A damaged power cable must be replaced with another special cable available from the Manufacturer's Customer Service.
Points to remember when washing clothes:
! The appliance must only be operated using cold water from the water mains.
! The appliance may only be used for items that may be washed in a domestic washing machine.
! Never leave children unsupervised with the appliance.
! Keep pets away from the appliance.
! Take care when pumping out hot water.
! A flashing light does not indicate a fault. See the section: «Washing machine status indicator lights».
Maintenance and care of the appliance:
! Do not climb onto the appliance.
! Do not use the door as a footrest or stand on it.
Points to remember when moving the machine:
! Fit the transport securing devices.
! Empty any remaining water from inside the appliance.
! Take care when moving the appliance Do not use the front components or controls on the appliance as a lifting aid.

Notes on the removal and disposal of packaging
Removal and disposal of packaging material for a new appliance
!Remove and dispose of packaging in accordance with current legislation. !Packaging material is not a toy.
Reprocessing and reusing materials saves raw materials and reduces waste. All packaging material used is environmentally friendly and can be recycled or reused. The cardboard packaging consists of 80% to 100% recycled paper. The transparent protective film is polyethylene (PE), the fastening bands are polypropylene (PP) and the chlorofluorocarbon-free (CFC) moulded pieces are polystyrene foam (PS). These materials are made of pure hydrocarbons and can be recycled.
Disposal of an old appliance
!The old appliance must be made unusable before it is disposed of: Disconnect from the mains power supply. Cut off the connecting cable and remove it together with the mains plug. Remove the door locks and fastenings or make them unusable so that children cannot shut themselves inside and suffocate.
Worn-out appliances contain valuable materials that can be recovered, if the appliance is taken to an official recyclable waste recovery centre (a public tip or recycling centre, for example). Actively contribute to the protection of the environment by ensuring that your old appliance is disposed of in a way that respects the environment.
Protecting the environment / Hints on saving energy
The most economical and environmentally friendly way to use the machine is always to wash the maximum amount of laundry: Cottons/coloureds (hard-wearing fabrics) 4.50 kg / 9.9 lb Synthetics 2.25 kg / 5.0 lb Delicates and woollens 2.00 kg / 4.4 lb
How to save energy
The variable capacity automatic system reduces the amount of water and energy consumed accordingly if the amount of laundry loaded into the machine is small. Select the «Stains / Intensive» 60° C programme instead of «Cotton / Coloureds 90° C (hard-wearing fabrics). The program uses the longest wash cycle to reduce energy consumption whilst achieving the same results as washing at 90° C.
- How to save water, energy and detergent: Omit the prewash programme for lightly or normally soiled laundry.
- How to save energy and time:
Select the short programme suitable for the fabric if items are lightly soiled.
How to save detergent:
Measure the detergent according to the water hardness, degree of soiling and amount of laundry, and follow the instructions on the detergent package.
Removing the transport securing devices
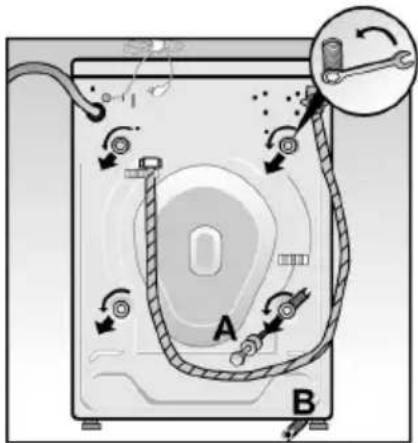
! Remove all the transport securing devices from the back of the machine before starting the appliance for the first time.
! Caution. Risk of injury through spanner slipping.
○ Loosen and remove the 4 fastening bolts «A», the tie bar and the seal.
○ Next remove the four spacers «B» which will have fallen to the floor. Gently tilt the appliance forward.
- Fit the protective covers «C» which are in the bag accompanying the appliance documentation.
! Keep the transport securing devices in case you need to move the appliance in future.

The appliance should only be moved with the transport securing devices in place. To fit them, remove the back panel «D» from the appliance and carry out the operations given above in reverse order.
Installing the appliance
! When installing the appliance and connecting the water and electricity supplies, the following should all be to hand: safety instructions, warnings, general advice and information, and standards or requirements from water and electricity suppliers.
! Take care when lifting the appliance. Risk of injury.
! Do not lift the appliance by the controls or protruding components.
! If you are in any doubt, commission a qualified person to connect the appliance to the water and electricity supplies.
All appliances are rigorously tested at the factory under normal working conditions. The appliance or the outlet hose may still be damp or contain residual water as a result of these tests.
Installing the unit
The appliance must be placed on a firm flat surface to ensure that it is stable during spinning.
Soft floor coverings, such as carpets or foam-backed flooring are not suitable surfaces for installation.
!If you have a wooden joist floor, the appliance must be placed on a water-resistant wooden board, 30 mm thick. It must be screwed to the floor. The appliance should be installed in a corner of the room if possible. Secure the appliance to the floor using fastening brackets fitted to the machine's feet (especially if the machine is a combined washer/dryer).
!If the machine is placed on a pedestal or raised base, the feet must be fixed using brackets to prevent the machine from shifting during the spin cycle.
The fastening brackets are available as a spare parts set from your specialist distributor.
Aligning the appliance

!The appliance must sit firmly and horizontally on the four feet without rocking.
Use a spirit level to ensure that all four sides of the appliance are level.
Correct any imbalance by adjusting the height of the feet.
○ Loosen the locknuts.
○ Adjust the height of the feet.
- Tighten the locknuts securely so that the height set is retained.
Connecting to the water supply

natural_image
Diagram showing pipe fittings and a valve assembly with directional arrows (no text or labels)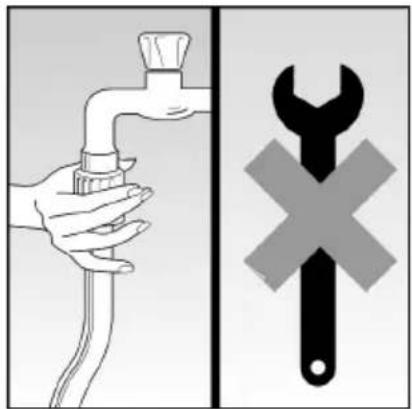
A pipe or standard domestic fresh-water hose is required for the water supply, with a minimum pressure of 1 bar (water must flow at a rate of approximately 8 litres per minute with the tap fully open).
If the pressure is higher than 10 bar, a pressure reducing valve must be inserted between the appliance and the water supply.
!Never connect the appliance to the mixer tap of an unpressurized water heater. If in doubt have connections made by a qualified technician.
!Caution. Connections between the appliance and the water supply must be able to withstand the full water pressure. Check the ring seal with the tap fully open.
! Remove the filter located at the end of the solenoid valve only when it needs cleaning. The other filter, located at the end of the pipe inside the plastic locknut which screws onto tap, should be cleaned in its tube (it cannot be removed).
! To avoid damage caused by leaks and flooding, the tap should always be closed after the appliance has completed a cycle and especially during long absences.
! Hand-tighten the plastic hose connection locknuts.
Appliance outlet
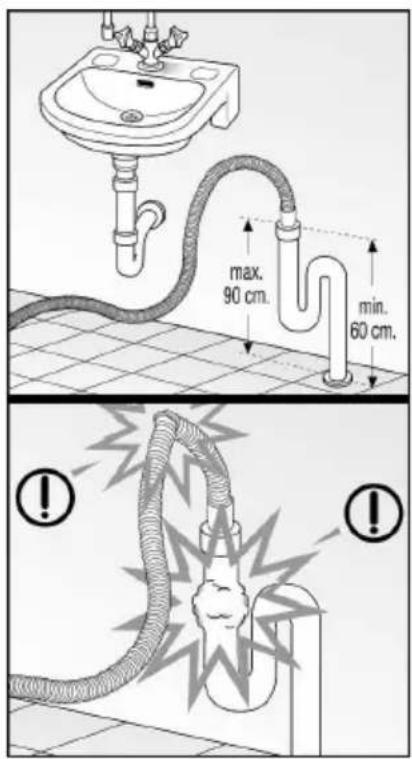
! Take care when fitting and connecting the appliance to the water outlet system that the hose is not bent or twisted. Do not pull on the hose.
! If the water is discharged via a sink, ensure that the outlet hose cannot be dislodged. Check also that the water drains away quickly enough. Ensure that the sink plug is not preventing drainage. Risk of flooding..

Connecting to the power supply

natural_image
Illustration of a two-wheeler washing machine with open doors and buttons, showing front and back views (no text or symbols)
natural_image
Illustration of a hand inserting a plug into an electrical outlet with water droplets (no text or symbols)!The appliance must only be connected to an A.C. mains supply via a correctly installed earthed socket.
!The voltage given on the appliance nameplate must match that of the power supply where the appliance is installed.
!The power rating and the fuse or circuit breaker required are given on the appliance nameplate.
!Check that the socket and the plug on the machine are compatible, that the cables have a sufficient diameter and that it is earthed correctly.
!Never use multiple plugs, sockets or connectors or extension cables.
!If using a residual current-operated circuit breaker, it must display the symbol. Only this type of protective switch will ensure compliance with current regulations.
!Remove the appliance plug from the socket, holding onto the body of the plug.
!In order to fulfil the safety regulations, the plug of the appliance must be accessible for the user; if this cannot be guaranteed, there must be incorporated in the fixed wiring a means for disconnection from the supply having a contact separation of at least 3 mm in all poles
Getting to know your new appliance

- Protective plate (lid).
- Detergent and softener drawer.
4 3. Control panel (printed keys, symbols or full text, depending on model).
6 4. Rating plate. - Door.
- Door opener.
- Outlet pump (water outlet filter), behind the kick panel.
- Kick panel.
-
Height adjustable feet for aligning the appliance.
-
Water outlet pipe.
-
Water inlet hose.

(according to model)
-
Programme selector.
-
Washing machine status indicator lights
-
Temperature selector –
-
– «Rinse hold» button
-
800600/1000600- «Spin» button.
-
◊ - «Start» button

Programme and temperature selectors
The programme selector is used to select and adjust programmes. Turn the selector clockwise (to the right). Align the setting mark with the programme required.
See the programme table below.
The temperature selector is used to select the wash temperature. The
maximum programme temperature is set at 60irc C for delicates and 40irc C for woollens, even if a higher temperature has been selected, so as to avoid damaging delicate items.
Use cold wash or low temperature programs if the type of laundry and degree of soiling permits. Washing at
60irc C consumes approximately half as much energy as washing at 90irc C.
If the washing is very soiled and needs to be washed at 90irc C, turn the rotary selector until it clicks into the 90 position. This will require some extra effort. It is not a fault but is because it is regarded as a safety measure.
Washing machine status indicator lights
The «Wash♡/Ready» ⏻ indicator light flashes when the required programme has been selected. This indicator light remains lit when the «Start ⏻» button is pressed and the programme begins.
The «Rinse 🎨» indicator light comes on (set) during the rinse programme.
While the washing machine is spinning and emptying out the water, the «Spin ∅/Finished→I» indicator light remains lit. The indicator light flashes when the programme is completed. To turn the machine off, set the programme selector to «Stop»
Function and «Start» selection button
◇ - Start
The appliance starts the programme selected when the button is pressed. The «Wash/Ready» indicator light comes on. Preselect the wash programme.
Caution: To prevent damage to the appliance do not start the machine if the door is not properly shut, even if the «Wash 📊/Ready ⏻» indicator light is on and the «Start ⏱» button is depressed.
The door of the washing machine cannot be opened during the washing cycle. The machine must first be switched off before the door can be opened (programme selector on «Stop»). Check that the «Spin ∅/Finished→I» indicator light has gone out. The door can be opened after 2 minutes.
- Rinse hold
When this button is pressed, the function indicator light comes on and the laundry remains in the last rinsing water to avoid creasing.
8 0 0 / ^ 1 0 0 0 - Spin 6 0 0 / ^ 6 0 0
The function indicator light comes on when this button is pressed. The spin cycle in the wash programme for hard-wearing white and coloured items is carried out at a lower speed.
In the delicates and woollens programme, the spin cycle is automatically carried out with the least number of spins, regardless of whether this button has been pressed
Detergent quantity
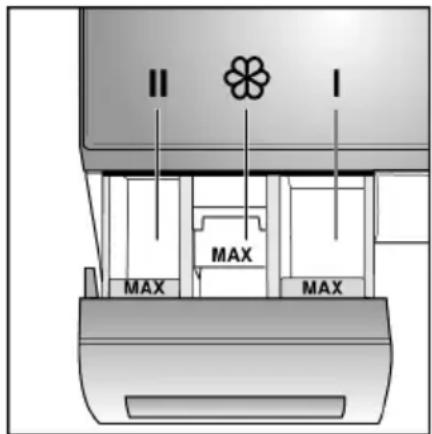
You can use all powder and liquid detergents suitable for front-loading washing machines.
!Do not use hand washing detergents because they produce too much foam.
!Do not use solvent-based detergents in automatic washing machines. Risk of explosion.
! Do not use washing performance enhancers, stain removers or sprays near the machine as they could damage the machine.
! Store detergents and additives in a safe place out of the reach of children.
Only the correct dosage of detergent ensures good washing results. Follow the instructions on the detergent packaging.
Use the dispenser provided with the packaging, such as a detergent ball or sachet, for liquid detergent.
Never exceed the maximum mark, «MAX», on the dispenser.
The quantity of detergent required depends on:
- the water hardness.
– the degree of soiling.
– the amount of washing.
– the dosage recommended for the type of detergent.
Insufficient detergent will not be noticed until the laundry has been washed several times in the same way:
- The laundry turns grey or is not clean.
– Greyish brown spots may form on the laundry.
– Lime scale may start to form on the appliance heating elements.
An excessive amount of detergent may cause:
– Unnecessary environmental pollution.
- Slower washing movement in the machine due to the formation of foam leading to poor washing results.
The detergent dosage given on the packaging is based on a full washing machine load.
The quantity of detergent should be reduced for smaller loads or laundry that is lightly soiled.
Hints

Fabric softeners
Put the fabric softener in the chamber marked ⚙. Do not exceed the «MAX» marking (maximum to the lower edge of the piece A) because the softener will be flushed into the water with the detergent at the start of the washing cycle and so have no effect in the fabric softening cycle. Thicker fabric softeners should first be diluted with a little water.
Bleaching agents, stain removers
Powdered bleaching agents and stain removers can be added. First put the detergent in the drawer. Next add the powdered bleaching agent or stain remover to the II chamber.
Preparing the laundry
Sorting the laundry

natural_image
Illustration of two hands performing a medical procedure on a patient's arm (no text or symbols visible)- Sort the laundry according to the symbols on the labels.
!Items made of or containing, wool must have «Will not shrink» or «Machine washable» on the label. Otherwise there is a risk of the wool shrinking.
Only items displaying the following symbols should be machine washed:
Hard-wearing white fabrics

Coloured fabrics (hard-wearing colour-fast fabrics)

Delicate items and coloured fabrics

Very delicate items

Hand washable or machine washable at 30°C, wool, cold

Items showing the following symbols should not be washed in the machine:
Do not wash at home

- Sort the laundry into colours. Wash white and coloured items separately, otherwise whites may take on colour.
!Any new coloured items should be washed separately. Risk of colour running.
- Sort the laundry according to the maximum permitted load for the machine. Do not overload the machine. Overloading the machine leads to poor washing results.
Maximum washing loads permitted:
Soiled or very soiled hard-wearing white laundry/colourfast and hard-wearing laundryw4.50 kg / 9.9 lb
Syntheticsw2.25 kg /
5 lb
Delicates and woollensw2.00 kg
/4.8 lb
Practical advice

natural_image
Illustration of a hand using scissors to cut fabric, with an inset showing magnified detail of the object (no text or symbols present)Remove all foreign material and metal objects from the items, for example, safety pins, fasteners, clips, etc.
○ Brush sand out of pockets, cuffs and turnups.
- Close zips and fasten buttons on duvet covers and pillow cases.
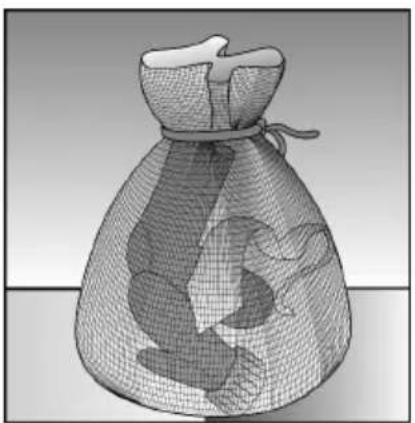
- Remove curtain hooks or tie in a net or bag.
- Wash particularly delicate items, such as tights or lace curtains, and small items, such as socks and handkerchieves, in a net, pillow case or cushion cover.
Turn trousers and knitted items (for example knitwear, T-shirts, sweatshirts, etc.) inside out.
- Ensure that fasteners with inserts (hoops, etc.) can be washed in a machine.
!wPlace items with inserts in a pillowcase, for example, to prevent them from becoming detached during washing and falling through the perforations in the drum, causing damage to the machine.
natural_image
Illustration of a mesh bag filled with fish and leaves, no text or symbols presentRemoving stains
If possible, stains should be treated or removed as soon as they occur.
Try first with soap and water. Do not rub the material. Dried on stains will only be removed after several washes.

natural_image
Diagram of a washing machine interior with mechanical components and a close-up inset showing a wrench tool (no text or symbols present)
natural_image
Illustration of a hand adjusting a faucet handle on a tiled floor (no text or symbols)
natural_image
Illustration of a hand inserting a plastic into a drawer into a machine (no text or symbols visible)Carry out the first wash without any laundry in the machine to remove residual water left from testing the machine at the factory.
☐ Check that the transport security devices have been removed from at the back of the machine (refer to the removal instructions for the machine).
- Open the water tap.
Open the detergent drawer as far as it will go.
Pour approximately one litre of water into chamber II of the drawer
- Put standard detergent in chamber II using the measuring cup. Never use detergent for delicate or woollen items because it produces too much foam.
Turn the programme selector to the right (clockwise) to the «Cotton 90° C» programme. The «Wash 📋/Ready ⏻» indicator light flashes.
Press the «Start 🔒» button. The programme starts and the «Wash 📊/Ready ⏻» indicator light stays on.
When the programme has finished, the «Spin∅/Finished →» indicator light starts flashing. Set the programme selector to «Stop» and the light goes out.
Washing / Opening the door / Loading the machine / Shutting the door
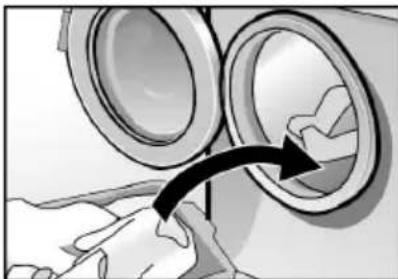
Opening the door

natural_image
Hand inserting a plastic into a washing machine drum (no text or symbols visible)Put the laundry in the washing machine
natural_image
Illustration of a hand pressing down on a mechanical component with a curved arrow indicating motion (no text or symbols)Shutting the door
Adding the detergent and turning the tap on

natural_image
Illustration of a hand using a tool to adjust or install a wall-mounted component, with no visible text or symbols.○ Pull the door catch towards you.
!Items which have been pre-treated with detergents containing solvents, for example stain removers, cleaning fluids, etc., should be left to dry in the open air before washing. Risk of explosion.
! Check that there are no foreign bodies or animals inside the drum before putting the washing in.
Place the laundry loosely and unfolded in the drum. Mix large and small items.
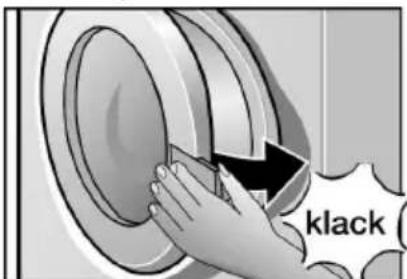
! Shut the door, taking care to ensure that no items are trapped between the door and the rubber seal.
- Shut the door pressing it against the door frame until the door lock can be heard to engage.
- Put detergent in chamberII of the drawer.
Do not exceed the maximum mark (MAX).
- Chamber I: Prewash detergent.
- Chamber II: Main wash detergent, water softener, starch, bleach and stain remover.
- Chamber ⚙: Additives for the final rinse, for example fabric softeners.
Washing the laundry
Selecting a wash programme
See the programme table below.
Heavily soiled whites, 90 °C
Intensive wash programme for hard-wearing cotton or linen items.
Stains / Intensive, 60 °C
Energy-saving programme. The longest washing cycle reduces energy consumption.
Whites and coloureds, hard-wearing fabrics and colourfast, 60 °C, with pre-wash.
For heavily soiled laundry.
Coloureds, 30, 40, 60 °C
Hard-wearing fabrics.
«Synthetics» - ?
Delicates, 30, 40, 60 °C (synthetics)
For washing delicate cottons, synthetic or mixed fibre fabrics.
«Woollens, delicates» – Ⓧ–
Very delicate, 30 °C
For washing very delicate cotton garments, synthetic or mixed fibre fabrics, curtains. These programmes have no spin cycle between rinsing cycles.
Woollens, 30 °C, cold
For machine washable woollens or wool mixtures.
Additional programmes
Rinse -
Rinse cycle with low-energy spin. Can also be used for delicate items.
Spin - ©
Extra spin cycle, washing or rinsing water is pumped out before spinning the laundry.
Pumping (emptied) -
Pumps out the rinse water if «Rinse hold ☐/∅» has been selected. For careful washing of delicate items.
Additional functions
Rinse hold
The laundry remains in the water after the final.
Spin 800↓/1200↓600↓
Reduces the spin speed.
Starting a programme
Turn the programme selector to the required wash programme.
The «Wash 📋/Ready 🔊» indicator light flashes.
○ Selecting the required spin speed. Ensures careful washing by automatically limiting the maximum spin speed in the «Delicates (synthetics)», «Very delicate» and «Woollens» wash programmes.
- Set to the required temperature using the temperature selector.
Press the additional function button(s) to activate them. The corresponding indicator light comes on.
Press the «Start 🔒» button
The «Wash 🤨/Ready 🔒» indicator light comes on. The wash programme starts.
The «Wash 🤨/Ready 🔒» indicator light remains lit throughout the wash programme selected.
Modifying a selected programme
If you have selected and started an incorrect wash programme it can be corrected in the following way:
O Turn the programme selector to «Stop».
Set the programme selector to the position for the required programme. The «Wash 🤨/Ready ⏻» indicator light flashes.
Press the «Start» button
The «Wash 🎨/Ready» indicator light comes on. The newly selected programme starts.
Interrupting a wash programme
If you should wish to stop a programme already in progress:
Turn the programme selector to «Stop».
Turn the programme selector to the «Pumping 🎨» or «Spin Ⓐ» programme position.
The «Spin Ⓐ/Finished→I» indicator light flashes.
If selecting the «Spin» function, adjust the required spin speed (do not select the «Rinse hold □/∅» option.):
Press the «Start①» button. The «Spin ⑥/Finished →I» indicator light light comes on.
Wash programme end / Taking the laundry out of the machine
The «Spin Ⓐ/Finished →I» indicator light flashes.
- Turn the programme selector to «Stop».
If necessary:
○ Select an additional programme («Pump 🎨», «Spin Ⓗ» or «Rinse 🌐»).
Press the «Start ◆» button.
When the additional programme selected has finished, turn the programme selector to «Stop».
Taking the laundry out of the machine
○ Close the tap.
- Open the door.
If the door cannot be opened:
Wait 2 minutes (the machine's safety device is activated)
or:
If the «Rinse hold ☐/∅» option was selected, there will still be water inside the appliance.
Select an additional programme («Pump » or «Spin ») to pump out the water.
- Take the laundry out of the machine.
!Remove any foreign material or metal objects (clips, fasteners, money, etc.) which may have collected in the drum or rubber seal. Risk of rusting.
Leave the door open so that air can circulate inside and dry the appliance.
Cleaning the outside of the appliance
!Disconnect the appliance from the mains and shut off the water supply before carrying out any maintenance work.
! Do not use solvents. These products can damage the washing machine's components, produce noxious fumes and may cause an explosion.
! Do not clean the appliance with a water jet.
Clean the body of the appliance and the controls with lukewarm soapy water or a standard cleaning agent only. Do not use scouring products. Dry it with a soft cloth.
Cleaning the detergent drawer

natural_image
Diagram of a mechanical component with two black arrows indicating direction, no text or symbols present-
Remove the drawer from the appliance. Disengage it by pressing down on the tab at the back of the drawer in the fabric softener section. Hold the tab down and pull the drawer out of the appliance.
-
Clean all the parts and components under running water.
-
Replace the drawer.

natural_image
3D diagram of a mechanical component with an arrow indicating direction (no text or symbols)
natural_image
Diagram showing a mechanical device interacting with a person, with an arrow indicating rotational motion (no text or symbols present)Descaling the appliance
Descaling is not normally necessary if the correct dosage of detergent has been used.
! Descaling agents contain acids which may attack the components and insides of the appliance or cause discolouration in the laundry. If you wish to descale the machine anyway, follow the manufacturer's instructions closely.
Cleaning the drum
Water inlet hose
Cleaning the water pump

natural_image
Illustration of hands holding a mechanical component with directional arrows indicating rotation (no text or symbols)
natural_image
Hand pressing a circular component on a base, with a curved arrow indicating rotation (no text or symbols)
Rust stains should be cleaned using chlorine-free detergents (look at the list of substances contained in the product on the packaging.) Never use wire wool.
It is recommended that the condition of the hose be checked every 5 years to prevent the risk of damage caused by leaks or flooding.
Cleaning is necessary:
☐ If the pump is blocked by foreign material (for example buttons, fasteners, clips, etc.) or if used water is not drained.
○ After washing fluffy items.
All water must be removed from inside the appliance before cleaning the pump. As much as 20 litres / 4.4 gal of water may remain if the pump is obstructed.
Procedure
- Remove the base board from the front of the washing machine, turning the plastic screw heads using a coin.
! Risk of burning. Allow the used water to cool down - Place a shallow container under the drainage pump cover (outlet filter). Loosen the cover without removing it completely to allow the water to empty gradually. Close the drainage pump cover when the container is full. Repeat the operation until all the water has been emptied. Use a suitable container to remove any remaining water which may spill on the floor.
- Loosen the drainage pump cover completely.
- Remove any foreign material or fluff which may have collected there. Wipe the inside of the pump. The blades must move freely.
- Loosen and fit the drainage pump cover in place. Ensure that it is correctly closed.
- Fit the base board in place.
- Pour 2 litres / 3.5 pt of water into the detergent drawer and start the «Pumping (emptied) » additional programme. This will prevent the detergent from being flushed out before being used in the next wash.
Wiping the appliance's water inlet filters

natural_image
Illustration of a faucet being adjusted for water flow, showing mechanical components and fluid direction (no text or symbols)
natural_image
Diagram of a pipe connection with a black arrow indicating direction (no text or symbols present)
natural_image
Illustration of a hand using a tool to adjust a pipe fitting into a valve (no text or symbols present)Frost protection
The appliance's water inlet filters must be cleaned with the tap is open and no water flowing into the appliance.
The filters are located in the hose connection joining the water supply pipe to the domestic water supply, and in the solenoid valve connection at the back of the machine.
Procedure
- First let the water pressure out of the supply pipe:
○ Close the tap.
Turn the programme selector to any wash programme (except «Spin ©» or «Pump 🎨»)
Press the «Start ◆» button. Allow the machine to operate for 40 seconds.
Turn the selector to «Stop».
- Loosen the supply pipe from the tap. Rinse the filter under running water.
- Reconnect the pipe to the tap fitting.
- Remove the water supply hose from its connection on the back of the appliance.
- Remove the filter using flat pliers; wipe it and replace it.
- Tighten and fit the pipe on its coupling.
- Open the tap and check that there are no water leaks.
- Close the tap.
If the machine has been installed in an area where it is not protected against low temperatures, residual water must be removed from the pump and the fresh-water hose after each wash cycle.
Empty the water from the pump:
See the «Cleaning the pump» section.
Empty the water from the water inlet hose:
- Close the tap.
- Loosen the supply pipe from the tap. Place the end of the hose in a container.
- Select any wash programme for 40 seconds. Any water remaining in the hose is drained.
- Reconnect the pipe to the closed tap.
Malfunctions with simple solutions
! Repairs to electrical appliances must only be carried out by qualified specialists. Repairs carried out incorrectly can be dangerous.
| Malfunction | Possible cause / Remedy |
| The On/Off light does not come on | -kThe appliance plug is not inserted in the socket or not fully inserted in the socket. |
| -kThe fuse has blown. | |
| -kElectrical power failure. | |
| Electrical power failure | In the event of a power failure or appliance malfunction, emergency draining is possible (refer to the «Cleaning the discharge pump» section, so that the laundry can be removed from the machine). |
| The wash cycle does not start | The «Start ◇» button is not depressed.The door is not closed. |
| Machine does not fill with water | This is not a malfunction. The water remains below the visible area in the machine. |
| Washing result is unsatisfactory | Abnormally high degree of soiling.Insufficient detergent. Measure the detergent according to the manufacturer's instructions.Select the most appropriate temperature and wash programme for the laundry. |
| Foam comes out of the detergent drawer | Too much detergent was used. Switch the machine off for 5 - 10 minutes. Prevent foam building up by putting a tablespoon of fabric softener and half a litre / 1 pt of water into the detergent drawer. Reduce the detergent dosage in the next wash. |
| Foam is visible after the final rinse | Some detergents produce a large quantity of foam although this has no effect on the rinsing result. |
| Unexpected motor noises | This is not a malfunction. During the heating stage, the motor produces noises characteristic of starting. |
| Pump noises | This is not a malfunction. These noises are characteristic of the machine starting and the pump discharging. |
| The machine vibrates when washing or spinning | The transport securing devices have not been removed. See the machine installation instructions.The adjustable feet on the machine were not fixed during installation of the appliance. Align the machine using a spirit level and fix the feet as indicated in the installation instructions. |
| The appliance does not spin or drain the used water. | The outlet pump is blocked. The outlet pipe is bent or blocked. |
| The door does not open | The safety device is activated. The «Rinse hold ☐/∅» option has been selected. |
| The machine does not fill with water | The tap is closed. The water inlet filters are dirty. |

natural_image
Illustration of a washing machine with two doors open, showing front and back views (no text or symbols)Before calling the After-Sales Service, check whether you can solve the problem yourself. (See the «Problems with simple solutions» section). This will avoid unnecessary cost as technical expenses are not covered by the warranty.
!If a malfunction occurs despite following the instructions given above, disconnect the appliance, pull the plug out of the socket and close the tap, then contact the After-sales Service.
If requesting the assistance of the After-sales Service, remember to give the product number (E-Nr.) and the production number (FD). Both numbers are located on the nameplate, located inside the door frame of the door and on the plate located behind the base board on the front of the machine at the bottom.
Note the numbers of your machine here

Giving the correct product and production numbers helps to avoid wasted journeys for our technicians. Which will save you unnecessary expense.
Technical data

a – Widthf59.5 cm b – Heightf85.0 cm c – Depthf56 cm Weight fapprox. 70 kg Drum capacity Weight of dry laundryfaccording to the Voltagefnameplate Fuse Water pressuref1–10 bar
| Programme | Size of labor | Consumption ** | ||
| Current Water | Duration | |||
| Coloureds 40°C | 4.50 kg*2.00 kg | 0.60 kWh0.45 kWh | 54 |33 | | 118 min70 min |
| Coloureds 60°C | 4.50 kg*2.00 kg | 0.86 kWh0.60 kWh | 54 |33 | | 118 min70 min |
| Whites 90°C 4.50 kg 1.70 KWh 61 l 118 min | ||||
| Delicates 40°C 2.25 kg* 0.40 KWh 50 l 75 min | ||||
| Very delicate 230°C | 2.00 kg | 0.30 KWh | 55 | | 50 min |
| Woollens 30°C | 2.00 kg* 0.20 KWh | 35 l 60 min | ||
* Test programmes in accordance with EN 60456: 1999 e IEC 456 Ed. 3 1998: 02
** The consumption values provided in the table above are indicative only and may vary according to pressure, water hardness and temperature, the ambient temperature where the appliance has been installed, the type and size of load, the detergent used, fluctuations in mains voltage and the additional functions selected.
| Страница | ||
| Съвети за работа с пералнята машина | Мерки за безопасност и общи препоръки. 25. . . . .Съвети за изхвърляне и рециклиране на опаковъчните материали . . . . . . . . . . . . . . . . . . . . . . . . . . . . . . . . . . . . . . . . . . . . . . . . . . . . . . . . . . . . . . . . . . . . . . . . . . . . . . . . . . . . . . . . . . . . . . . . . . . . | 26 |
| Опазване на околната среда / Съвети за пестене на енергия 26. . . . . . . . . . . . . . . . . . . . . . . . . . . . . . . . . . . . . . . . . . . . . . . . . . . . . . . . . . . . . . . . . . . . . . . . . . . . . . . . . . . . . . . . . . . . . . . . . . . . | ||
| Инструкции за монта | Отстраняване на транспортните болтове 27. . . . . . . . . . . . . . . . . . . . . . . . . . . . . . . . . . . . . . . . . . . . . . . . . . . . . . . . . . . . . . . . . . . . . . . . . . . . . . . . . . . . . . . . . . . . . . . . . . . | 127 |
| Инсталиране на машината . . . . . . . . . . . . . . . . . . . . . . . . . . . . . . . . . . . . . . . . . . . . . . . . . . . . . . . . . . . . . . . . . . . . . . . . . . . . . . . . . . . . . . . . . . . . . . . . . . .Регулиране положението на пералнята машина 28. . Включване към водопроводната мрежа . . . . . . . . . . . . . . . . . . . . . . . . . . . . . . . . . . . . . . . . . . . . . . . . . . . . . . . . . . . . . . . . . . . . . . . . . . . . . . . . . . . . . . . . . . . . . . . . . . .Оттичане на водата . . . . . . . . . . . . . . . . . . . . . . . . . . . . . . . . . . . . . . . . . . . . . . . . . . . . . . . . . . . . . . . . . . . . . . . . . . . . . . . . Свързване към елекрическата мрежа . . . . . . . . . . . . . . . . . . . . . . . . . . . . . . . . . . . . . . . . . . . . . . . . . . | 293030 | |
| Описание на Вашата пералня машина | Описание и технически характеристики . . . . . . . . . . . . . . . . . . . . . . . . . . . . . . . . . . . . . . . . . . . . . . . . . . . . . . . . . . . . . . .Команди за избор на програма и температура .. 32Светлинни индикатори за функционирането на пералнята машина . . . . . . . . . . . . . . . . . . . . . . . . . . . . . . . . . . . . . . . . . . . .Бутони за избор на функция и бутон «старт». .. 32 | 31323232 |
| Съвети за избор на прах за пране / Подготовка за пране | Перилни препарати и омекотители . . . . . . . . . . . . . . . . . . . . . . . . . . . . . . . . . . . . . . . . . . . . . . . . . . . . . . . . . . . . . . . . . . . . . . . . . . . . . . . . | 3334 |
| Подготовка на дрехите за пране . . . . . . . . . . . . . . . . . . . . . . . . . . . . . . . . . . . . . . . . . . . . . . | 34 | |
| Първо пране с пералнята машина | Първо пране с пералнята машина . . . . . . . . . . . . . . . . . . . . . . . . . . . . | 36 |
| Работа с пералнята машина | Пране/Отваряне на вратата/Зареждане/ Затваряне на вратата ..... 37Работа на пералнята машина ..... 38Край на програмата/ Изваждане на дрехите от машината ..... 39 | 373839 |
| Почистване/Поддръжка/Предпазване от замръзване | Почистване/Поддръжка/ Предпазване от замръзване ..... 40 | 40 |
| Повреди и неизправности | Повреди или неизправности, лесни за отстраняване ..... 43Сервиз и поддръжка ..... 44Технически характеристики ..... 44Разход на енергия ..... 45 | 434444445 |

natural_image
Diagram of a plumbing fixture with pipe fittings and directional arrows indicating movement (no text or symbols)
natural_image
Illustration of a washing machine with two doors open, showing front and back views (no text or symbols)natural_image
Illustration of a hand inserting a plug into an electrical outlet with raindrops falling (no text or symbols)
natural_image
Illustration of two hands performing a medical procedure on a patient's arm (no text or symbols visible)natural_image
Illustration of a hand using scissors to cut fabric, with an inset showing magnified detail of the process (no text or symbols)natural_image
Illustration of a wire mesh bag filled with internal objects, no text or symbols presentnatural_image
Diagram of a washing machine interior showing mechanical components and wiring, with no visible text or symbols.
natural_image
Illustration of a hand adjusting a pipe fitting on a tiled floor (no text or symbols)
natural_image
Illustration of a hand inserting a plastic into a drawer into a machine (no text or symbols visible)natural_image
Hand inserting a card into a washing machine (no text or symbols visible)natural_image
Illustration of a hand pressing down on a mechanical component with two circular parts, one being tilted (no text or symbols)natural_image
Illustration of a kitchen sink with hand cleaning a pipe and valve (no text or symbols)natural_image
Two-step diagram showing a mechanical device with arrows indicating process flow (no text or symbols present)natural_image
Diagram showing a person operating machinery with a rotating arrow indicating motion (no text or symbols present)natural_image
Illustration of hands holding a mechanical component with directional arrows indicating rotation (no text or symbols)natural_image
Hand turning a valve on a tiled floor, no text or symbols visibleНачин на действие
natural_image
Illustration of a faucet being adjusted for valve positioning, showing mechanical assembly and tool (no text or symbols)
natural_image
Diagram of a pipe outlet with a black arrow indicating direction (no text or symbols present)
natural_image
Illustration of a hand using a tool to connect a pipe fitting into a wall socket, with another close-up showing hands holding a screwdriver (no text or symbols present)natural_image
Illustration of a two-wheeler washing machine with open doors and buttons, showing front and back views (no text or symbols)
Instalace prístroje
natural_image
Diagram showing pipe fittings and a valve assembly with directional arrows (no text or labels)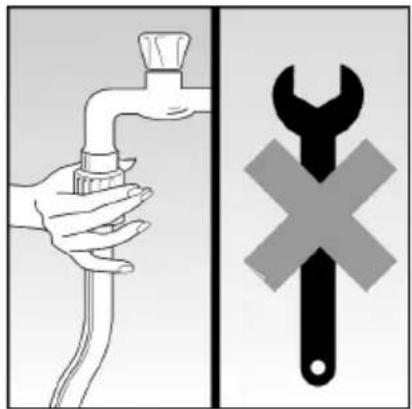
natural_image
Illustration of a two-wheeler washing machine with open doors and black arrows indicating air flow (no text or symbols)
natural_image
Illustration of a hand inserting a plug into an electrical outlet with raindrops falling (no text or symbols)natural_image
Illustration of two hands performing a medical procedure on a patient's abdomen (no text or symbols present)natural_image
Medical procedure illustration showing hand positioning technique with magnified inset (no text or symbols)
natural_image
3D wireframe model of a bag filled with fish, no text or symbols visiblenatural_image
Diagram of a washing machine interior showing mechanical components and wiring (no text or labels)
natural_image
Illustration of a hand adjusting a pipe fitting on a tiled floor (no text or symbols)
natural_image
Illustration of a hand inserting a plastic into a drawer into a machine (no text or symbols visible)natural_image
Hand inserting a plastic into a washing machine drum (no text or symbols visible)natural_image
Illustration of a mechanical component with two circular parts and an arrow indicating rotation (no text or symbols)natural_image
Illustration of a kitchen sink with hand removing a pipe into the sink (no text or symbols)natural_image
Diagram of a mechanical component with two black arrows indicating direction, no text or symbols presentnatural_image
3D diagram of a mechanical component with an arrow indicating direction (no text or symbols)
natural_image
Diagram showing a mechanical device with a rotating arrow and a person interacting with it (no text or symbols present)natural_image
Illustration of hands holding a mechanical component with directional arrows indicating rotation (no text or symbols)natural_image
Hand holding a valve mechanism in a kitchen setting (no text or symbols visible)Způsob provedení
natural_image
Illustration of a two-wheeler washing machine with open doors and wheels (no text or symbols)- Points to remember before putting the appliance into operation:
- Points to remember when washing clothes:
- Maintenance and care of the appliance:
- Points to remember when moving the machine:
- Notes on the removal and disposal of packaging
- Removal and disposal of packaging material for a new appliance
- Disposal of an old appliance
- Protecting the environment / Hints on saving energy
- Removing the transport securing devices
- Installing the appliance
- Installing the unit
- Aligning the appliance
- Connecting to the water supply
- Appliance outlet
- Connecting to the power supply
- Getting to know your new appliance
- Programme and temperature selectors
- Washing machine status indicator lights
- Function and «Start» selection button
- ◇ - Start
- - Rinse hold
- Hints
- Fabric softeners
- Bleaching agents, stain removers
- Preparing the laundry
- Sorting the laundry
- Practical advice
- Removing stains
- Washing / Opening the door / Loading the machine / Shutting the door
- Opening the door
- Put the laundry in the washing machine
- Shutting the door
- Adding the detergent and turning the tap on
- Washing the laundry
- Selecting a wash programme
- Heavily soiled whites, 90 °C
- Stains / Intensive, 60 °C
- Whites and coloureds, hard-wearing fabrics and colourfast, 60 °C, with pre-wash.
- Coloureds, 30, 40, 60 °C
- Delicates, 30, 40, 60 °C (synthetics)
- Very delicate, 30 °C
- Additional programmes
- Pumping (emptied) -
- Additional functions
- Rinse hold
- Starting a programme
- Modifying a selected programme
- Interrupting a wash programme
- Wash programme end / Taking the laundry out of the machine
- Taking the laundry out of the machine
- Cleaning the outside of the appliance
- Cleaning the detergent drawer
- Descaling the appliance
- Cleaning the drum
- Water inlet hose
- Cleaning the water pump
- Procedure
- Wiping the appliance's water inlet filters
- Frost protection
- Empty the water from the pump:
- Empty the water from the water inlet hose:
- Malfunctions with simple solutions
- Technical data
- Начин на действие
- Instalace prístroje
- Způsob provedení
Brand : SIEMENS
Model : WXB860BY
Category : Washing machine