BIGROC 5c - NAS Rocstor - Free user manual and instructions
Find the device manual for free BIGROC 5c Rocstor in PDF.


| Product Type | 4-Bay RAID System (1U Rack Mount) |
| Model | Bigroc 5C |
| Dimensions (W x D x H) | 11.9 x 17.3 x 1.7 in (440 x 302 x 53.5 mm) |
| Weight (without HDDs) | 10 lbs (4.5 kg) |
| Power Supply | Input 220/110V AC (manual switch) |
| Cooling | 3 x 40x40x10 mm silent fans |
| Drive Bays | 4 x 3.5" SATA (hot-swappable, tray-less) |
| Supported RAID Modes | RAID 0, 1, 5, 10, JBOD, Span, Clone, with optional Hot Spare |
| Data Transfer Speeds | USB 3.0: up to 5000 Mbit/s; eSATA: up to 3000 Mbit/s; FireWire 800: up to 800 Mbit/s; FireWire 400: up to 400 Mbit/s |
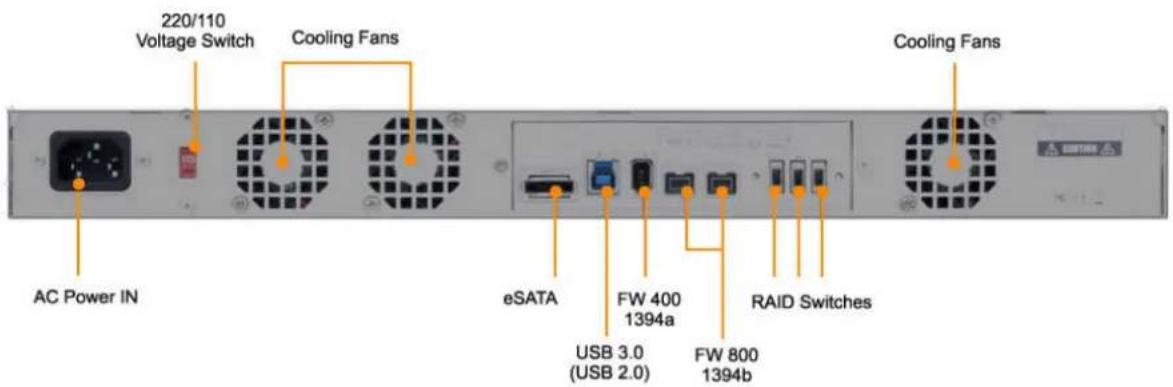
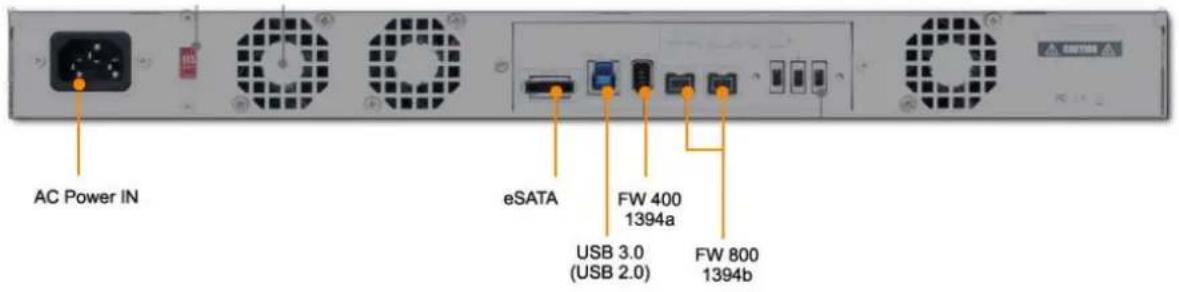
| Connectors | eSATA x1, USB 3.0 x1, FireWire 400 x1, FireWire 800 x2 |
| LED Indicators | Power (blue), Connection/Access (white), Health (red), RAID Alert (red) |
| Material | Aluminum alloy case with heat dissipation |
| Included Accessories | USB 3.0 cable, FireWire 400/800 cables, eSATA cable, power cord, Quick Start Guide |
| System Requirements (Minimum) | Mac OS 10.5+ or Windows XP+, 1 GB RAM, available port |
| Warranty | 1 year parts and labor |
| Technical Support | Free 2-year phone support (US/Canada: 888-877-7716) |
| Hot-Swap and Rebuild | Supports online and offline rebuild; hot-swap in RAID 1, 5, 10, Clone, Hot Spare |
| Form Factor | 1U rack mount (desktop optional) |
Frequently Asked Questions - BIGROC 5c Rocstor
User questions about BIGROC 5c Rocstor
0 question about this device. Answer the ones you know or ask your own.
Ask a new question about this device
Download the instructions for your NAS in PDF format for free! Find your manual BIGROC 5c - Rocstor and take your electronic device back in hand. On this page are published all the documents necessary for the use of your device. BIGROC 5c by Rocstor.
USER MANUAL BIGROC 5c Rocstor
natural_image
Black rectangular electronic device with gold stripe and white top, no visible text or symbolsBIGROC 5C
User Manual
4-Bay RAID - 1U Rack Mount System
eSATA, 2xFireWire 800, FireWire 400 & USB 3.0
TABLE OF CONTENTS
IMPORTANT NOTICES....5
SAFETY NOTICES 5
GENERAL NOTICES....5
CAPACITY DISCLAIMER....5
CARE AND HANDLING....5
PRECAUTIONS FOR THE RAID SYSTEM 6
GENERAL......8
INTRODUCTION....8
BOX CONTENT....9
SPECIAL FEATURES....10
MINIMUM SYSYTEM REQUIREMENTS....11
CONNECTORS....12
SYSTEM VIEWS ....14
CONNECTING THE BIGROC RAID SYSTEM TO A COMPUTER....15
CONNECTING MULTIPLE DEVICES....16
SAFE REMOVAL OF THE RAID SAYSTEM 17
RAID MODES....18
RAID MODE COMPARISON LIST 18
NUMBER OF DISKS SUPPORTING EACH RAID MODE....18
RAID 0 (STRIPING)....19
RAID 1 (MIRRORING)....20
SPAN 21
RAID 5 ....ERROR! BOOKMARK NOT DEFINED.2
RAID 10 (1+0)....23
JBOD 24
EXTERNAL BOOTUP (PC AND MAC) 27
DISK VOLUM OVER 2TB 28
GLOSSORY 29
eSATA PCI EXPRESS CARD INSTALLATION....30
SYSTEM REQUIREMENTS 30
HARDWARE INSTALLATION....30
DRIVER INSTALLATION 30
VERIFY DRIVER INSTALLATION ....31
QUESTIONS & ANSWERS CONCERNING RAID SYSTEMS ....33
SPECIFICATIONS....36
PARTITIONING AND FORMATTING THE BIGROC 4-BAY DRIVE ON A MAC OS ....37
INSTRUCTIONS FOR PARTITIONING AND FORMATING FAT 32 TO HFS+ (MAC)....38
PARTITIONING AND FORMATTING THE BIGROC 4-BAY DRIVE ON A WINDOWS OS....47
INSTRUCTIONS FOR PARTITIONING AND FORMATING FAT 32 TO HFS+ ....50
KNOWLEDGE BASE ....57
INTRODUCTION TO FORMATTING....61
LIMITED WARRANTY 63
TECHNICAL SUPPORT......67
TRADEMARKS ACKNOWLEDGEMENTS ....68
COPYRIGHTS......68
CONTACT INFORMATION ....69
NOTES:
IMPORTANT NOTICES
Safety Notices
- The warranty is void if an unauthorized person attempts and/or repairs the hard disk drive.
- Read all Manuals and instructions carefully before using the device.
- Do not spill any liquid or insert any object into the device.
- Use the device within the specifications indicated, including but not limited to: power requirements, temperature, humidity, sunlight and magnetism from other devices such as computers and televisions.
- Please visit the Rocstor website, www.rocstor.com for further information concerning specifications and use of the device.
General Notices
- Consistently make multiple backup copies of your data for your protection. Hard disk drives are subject to failure at any time.
- Rocstorage, Inc. shall not be held liable for loss of data or the restoration or recovery of data on the device. Please view complete Limited Warranty Information in this manual or on the Rocstor website (www.rocstor.com) for further details.
Capacity Disclaimer
Actual accessible hard drive capacity will indicate up to 10% lower than stated under different Operating Systems and formatting.
The storage volume is measured in total bytes before formatting. References to round numbers of gigabytes or terabytes are an approximation only. For example, a disk drive labeled as having 500GB (gigabytes) has space for approximately 500,000,000,000 bytes before formatting. After formatting, the drive capacity is reduced by about 5% to 10% depending on the operating system and formatting used.
Care and Handling
The following instructions concern the proper care and handling of the Bigroc 4-Bay RAID. Please take a moment to review these instructions.
- As with any storage solution, it is recommended that all data be backed up regularly.
- Ensure that you follow the proper removal procedure to disconnect the RAID.
- Do not move or disconnect this device from your computer while it is reading or writing data. This may cause damage to the RAID.
- Do not place this device near a heat source or expose it to direct flame.
- Do not place the device near any equipment generating strong electromagnetic fields.
Exposure to strong electromagnetic fields may cause the device to malfunction or data to be corrupted.
- Do not drop or cause shock to your RAID.
- Do not spill any liquid or insert any object into the device.
- Do not attempt to disassemble and service the Rocpro drive during the warranty period.
- Please read the Safety Notices and Limited Warranty information in this Manual and on the Rocstor website (www.rocstor.com) for further details.

PRECAUTIONS FOR THE RAID SYSTEM
The main circuit board of the RAID System is susceptible to static electricity. Proper grounding is required to prevent electrical damage to the RAID System unit or other connected devices, including the host computer. Always place the RAID System unit on a smooth surface and avoid all dramatic movement, vibration and percussion.
- Any loss, corruption, or destruction of data is the sole responsibility of the owner/user(s). Under no circumstances will the manufacturer be held liable for the recovery, restoration, loss ... of any data.
- Installation of RAID MASTER Software in the host computer is required for proper operation.
- Do NOT allow water to enter the RAID System unit.
- Installation of additional equipment in the host computer may be required. Visit our website to download the latest product information updates.
- Do NOT attempt to service this unit yourself. Disassembling the RAID System's inner parts will expose you to dangerous voltages or other hazards.
- Do NOT block the ventilation. Proper airflow is required to ensure reliable operation and to prevent overheating.
- Do unplug the RAID System unit from the electrical outlet when not in use to provide an ecological friendly environment.
- Use only the power supply cable provided with the RAID System unit.

Please thoroughly read and follow the instructions provided in this manual. Failure to do so may result in damage to the RAID System, and any or all of the connected devices.


GENERAL
Introduction
Bigroc 5C
4 - Bay Desktop RAID
2xFireWire 800, FireWire 400, eSATA and USB 3.0 (USB 2.0 & 1.1)
The new Bigroc 4-Bay RAID system provides massive storage capacity and advanced RAID configuration in a compact storage device. The Bigroc delivers extraordinary performance and reliability for both Mac and PC users. Specifically designed for demanding audio/video professionals, the new Bigroc contains fast SATA high capacity 3.5" drives in heat dissipating aluminum case. Silent fans assure quiet operation while providing maximum airflow for cooling purposes. The tray-less function ensures swift and simple hot-swapping.
Provides JBOD, RAID 0 (Striping), RAID 1 (Mirroring), Span, Clone, RAID 5, RAID 10 (1+0) and optional Hot-Spare for effective storage management. Supports Automatic Rebuild in Raid 1+HotSpare, Clone + Hot-Spare, and RAID 5+HotSpare.
Choose Rocstor drives and store your future.




BOX CONTENTS
• 4-Bay RAID 1U Rack Mount System
- USB 3.0 cable,
• 6-pin to6-pin FireWire 400 (1394a) cable
• 9-pin to 9-pin FireWire 800 (1394b) cable
- eSATA cable
• US power cable
- Quick Start Guide
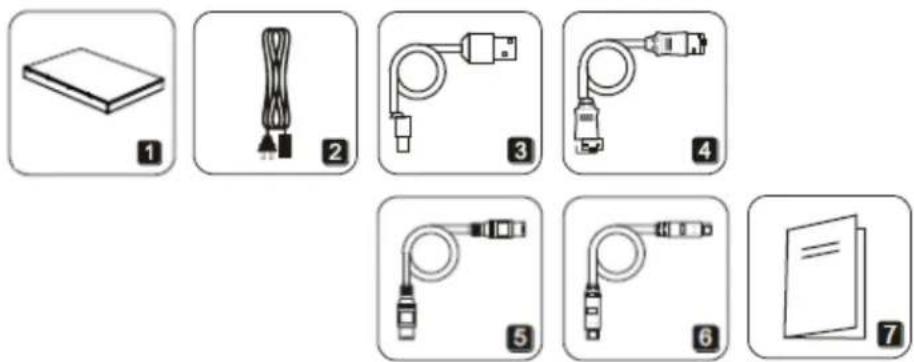
1.4 Bay Enclosure
2. Power cord
3. USB 3.0 cable
- eSATA cable
- 1394a cable
- 1394b cable
- User manual
Please keep (store) all package contents and packaging material during the limited warranty period.
SPECIAL FEATURES
- Supports current SATA II compliant HDDs, fully backward compatible with SATA 1.0 and SATA 1.0a compliant HDDs
- Connects flexibly via an eSATA, USB 3.0 (2.0), 1394a or 1394b port
- Provides JBOD, RAID 0 (Striping), RAID 1 (Mirroring), Span, Clone, RAID 5, RAID 10 (1+0) Supports Automatic Rebuild in Raid 1+HotSpare, Clone + Hot-Spare, and RAID 5+HotSpare.
- Configures RAID modes via switches; no IT expertise required.
• Monitors system status via LED indicators - Features a tray-less function and user-friendly design enables effortless HDD hot-swapping
- Maximizes airflow with silent fans and mechanical designs
• Supports hot-plug and HDD hot-swap
• Supports both online and offline rebuild

Any loss, corruption, or destruction of data is the sole responsibility of the user of the RAID System. Under no circumstances will the manufacturer be held liable for the recovery or restoration of any data.
MINIMUM SYSTEM REQUIREMENTS
Mac Users:
Hardware: eSATA* or FireWire* (400 or 800) or USB 2.0 port(s.)
Mac: PowerPC or Intel processor running Mac OS 10.5 and later
RAM: 1 GB RAM
Window Users:
Hardware: eSATA* or FireWire* (400 or 800) or USB 2.0 port(s.)
Operating Systems: Microsoft Windows XP, 2003, Vista, Widows 7, 8
CPU: 266 MHz (Vista 800 MHz)
RAM: 1 GB RAM

3.5" SATA compatible hard drive is required for the RAID System unit. Once the HDDs are formatted, the actual available storage capacity can vary depending on the selected operating environment (normally 5-10 % less).
* Many computers do not come with factory installed FireWire 800 or eSATA ports. Therefore, you may need to purchase a PCI, PCI-X or PCI-Express card to use these ports. Rocstor offers a variety of accessories to work with PC Windows or Mac based Computers. Please visit us at www.ROCSTOR.com
CONNECTORS
• FireWire 800 (IEEE 1394b) port x2
• FireWire 400 (IEEE 1394a) port x1
USB 3.0 port x1
- eSATA port x1
SYSTEM VIEWS
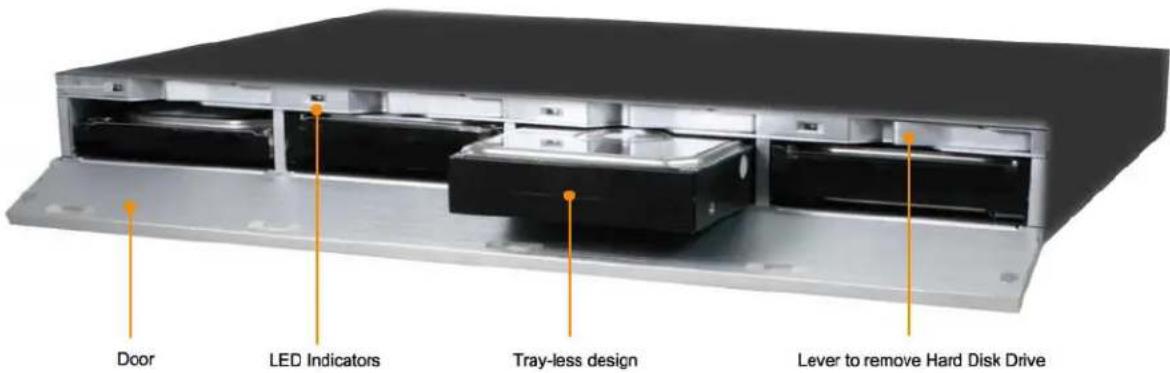
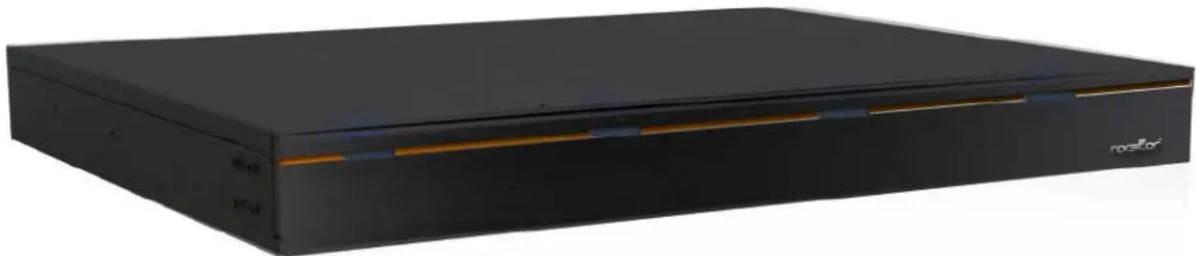
Front View
The status indication of each LED indicator is listed under the LED INDICATORS section below.
Rear View
INSERTING/REPLACING THE HARD DRIVES IN THE RAID SYSTEM
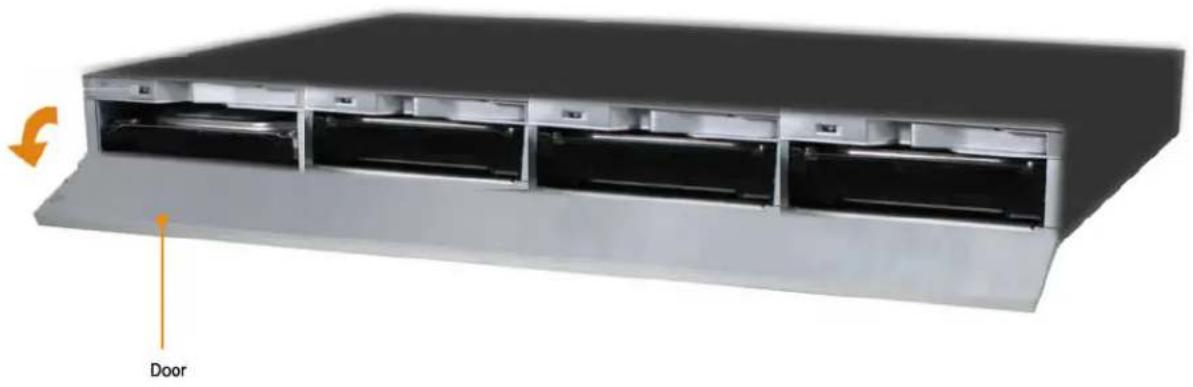
Place the system with its front view facing you. Open the front panel door.
natural_image
3D rendering of a multi-panel air conditioner unit with labeled door (no text or symbols on the device itself)Insert the hard drive(s) as indicated in the image below:
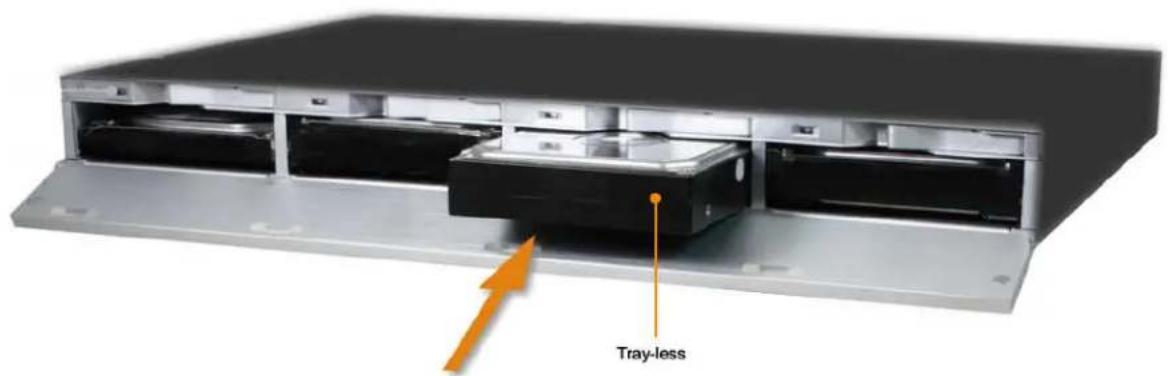
To insert hard drive, slide the hard drive into its slot firmly
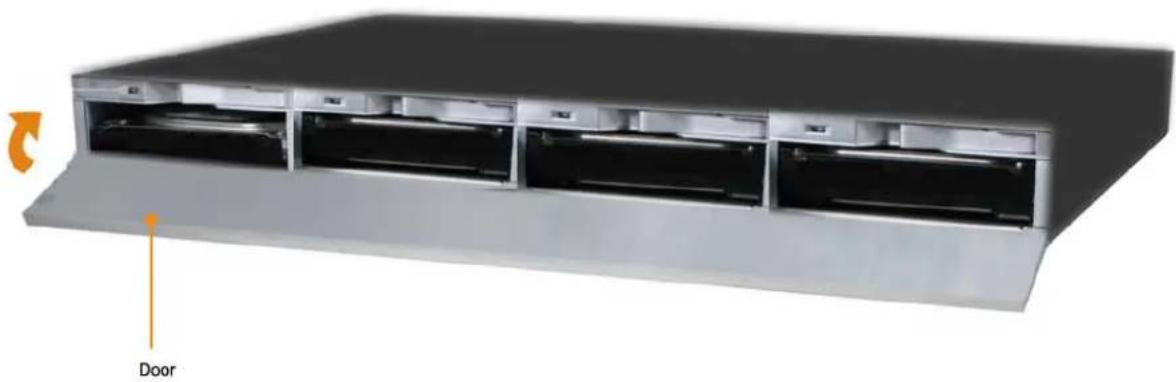
Closing the front panel:
natural_image
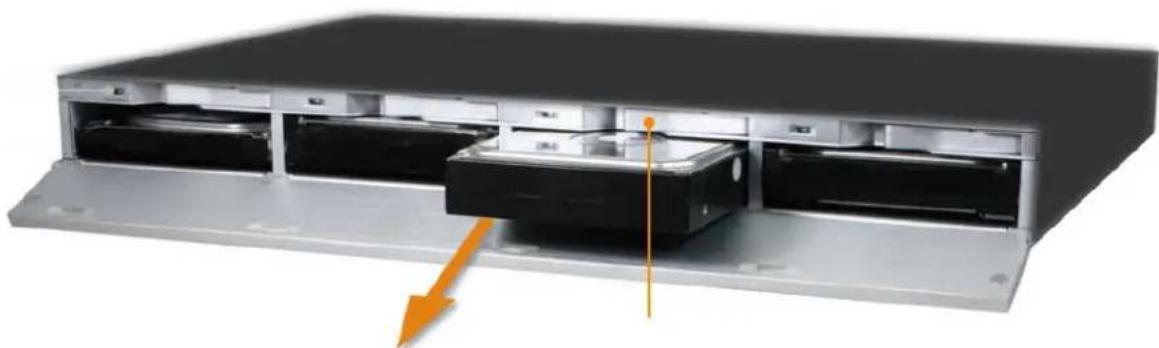
3D rendering of a server rack with multiple doors and ventilation slots, labeled 'Door' with an orange arrow indicating rotation (no text or symbols on the device itself)To remove the hard drive(s) simple pull the lever above the hard drive slot; the hard drive will slide out and ready to be removed.
natural_image
Interior view of a server rack unit with multiple drive bays and an orange arrow indicating compression (no text or symbols)To remove the hard drive, PULL the Lever and remove the Hard drive

IMPORTANT NOTE: all hard drives installed MUST be RAID compatible hard drives, with same capacities and speeds of 7,200 R.P.M. or higher and preferably from the same manufacturer of hard drives.
CONNECTING THE RAID SYSTEM TO A COMPUTER
Complete the following steps to connect the RAID System to a host computer.

The RAID System should only be connected to a host computer via one interface only. Connect the AC/DC power adapter.
Insert both ends of the USB 2.0, eSATA, FireWire 400, or Fire Wire 800 cable(s) into the corresponding port of the RAID System and the host. Use only ONE connection cable.
You are now ready to begin using your RAID System!
natural_image
Exterior view of a black rectangular electronic device with gold contacts and a logo on the front panel (no readable text or symbols beyond branding)
Due to compatibility issues, if you use the eSATA interface to do the data transfer, the Silicon Image eSATA host controller is highly recommended.
Connecting Multiple Devices
Using FireWire 400 or 800, you can connect other computer hardware or digital devices to your RAID System. This connection is called “Daisy chain.” Items which may be connected might be such as digital video camera, another HD or DVD writer. However, you must use the same interface in order for Daisy Chain to work. The computer will not recognize the different interfaces if they are all used at the same time. In addition, if a mix of connections is used, the resulting speed will be limited to the lowest one available.

When only one of the FireWire connectors is plugged in, the other FireWire connector will be viewed as a "daisy chain" port. When only one of the USB or eSATA connectors is plugged in, the connector will be viewed as it's originate port, either USB or eSATA respectively.
SAFE REMOVAL OF THE RAID SYSTEM
Safe removal of the RAID System from the host controller is highly recommended, especially when switching interfaces. In order to safely remove your RAID System from the host controller, you would need to eject the device on your host controller system.

If using a MAC System, safe removal of the RAID System from the host for all interfaces is necessary.

If using a PC System, safe removal of the RAID System from the host depends on the interface. Most current USB and FireWire host controllers handle USB and FireWire devices as external devices; thus, it is highly recommended that the RAID System be safely removed from the host if you are using either one of the interfaces. However, if you are using the eSATA interface, safe removal of the RAID System from the host is unnecessary because most hosts do not support it.
RAID MODES
A Redundant Array of Independent (or Inexpensive) Disks (RAID) is a system that utilizes multiple hard drives to share or replicate data among the disks. The benefit, depending on the selected RAID Mode (combinations of disks), is one or more of the following: increased data integrity, fault-tolerance, and throughput or capacity when compared to single drives.

Deleting the current partition prior to changing RAID modes is highly recommended.

Identical RAID Compatible hard drives with the same capacity and speeds (Not less than 7,200rpm - from the same manufacturer is recommended) must be utilized.
RAID Mode Comparison List
| RAID mode | Size | Safe | Fast |
| RAID 0 (Striping) | ★ | ★★★★★ | |
| RAID 1 (Mirroring) | ★★ | ★ | |
| RAID 5 | ★★★ | ★★★ | |
| RAID 1+0 (10) | ★★★★★ | ★★★ |
NUMBER OF DISKS SUPPORTING EACH RAID MODE
| RAID Modes Number of Disk in RAID | |
| RAID 0 (Striping) | 2 to 4 |
| RAID 1 (Mirroring) | 2 |
| Span | 2 to 4 |
| Clone | 2 to 4 |
| RAID 5 | 3 or 4 |
| RAID 1+0 | 4 |
| JBOD | 1 to 4 |
RAID 0 (Striping)
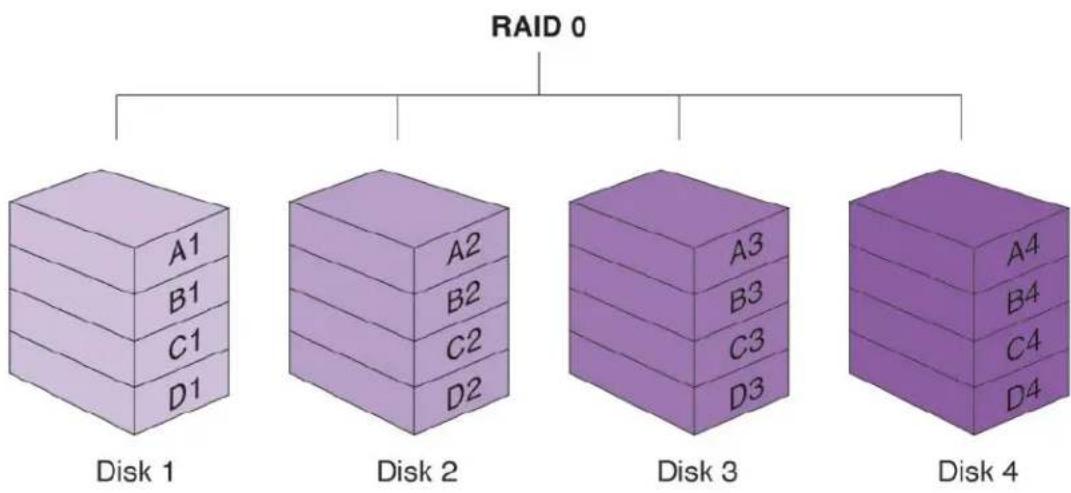
RAID 0 (Striping) is a performance-oriented, non-redundant data mapping technique. It combines multiple hard drives into a single logical unit. Instead of seeing several different hard drives, the operating system sees only one large drive. Striping splits data evenly across two or more disks simultaneously, dramatically increasing performance.
Switch Setting for RAID 0 (Striping)
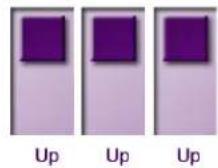
Striping can be implemented in disks of differing sizes, but the storage space added to the array by each disk is limited to the size of the smallest disk. Although Striping is an easily implemented simple configuration, Striping should never be used for mission critical applications. The speed of operation is excellent in comparison to other RAID modes.

In Striping mode, it is not possible to see the HDDs as more than one unit. If you choose to insert all 4 HDDs, it will still be viewed as one single storage unit. When you choose to insert only two HDDs, there is not limitation on the order of drive insertion or the slot number.
flowchart
graph TD
    RAID0["RAID 0"] --> A1["A1"]
    RAID0 --> B1["B1"]
    RAID0 --> C1["C1"]
    RAID0 --> D1["D1"]
    RAID0 --> A2["A2"]
    RAID0 --> B2["B2"]
    RAID0 --> C2["C2"]
    RAID0 --> D2["D2"]
    RAID0 --> A3["A3"]
    RAID0 --> B3["B3"]
    RAID0 --> C3["C3"]
    RAID0 --> D3["D3"]
    RAID0 --> A4["A4"]
    RAID0 --> B4["B4"]
    RAID0 --> C4["C4"]
    RAID0 --> D4["D4"]

In Striping mode, if one disk in the RAID System fails, all data in installed disks will be lost.

When operating under Striping mode, it is not recommended to do HDD Hot Swap. Any attempt to do so may result in complete loss of all data.

Always maintain a Backup of your files/data
RAID 1 (Mirroring)
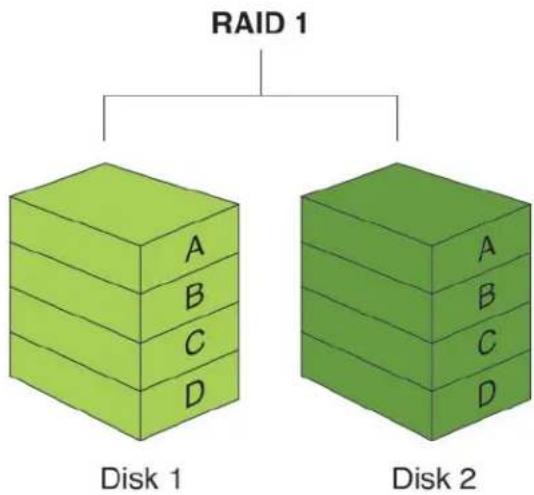
RAID 1 (Mirroring) consists of at least two drives storing duplicate copies of the same data. In this mode, the data is simultaneously written to two disks. Thus, the storage capacity of a two-disk array is combined into a single disk and the capacity is limited to the size of the smallest disk. The speed of operation is slower in comparison to other RAID modes.
Switch Setting for RAID 1 (Mirroring)
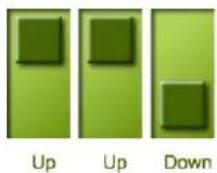
During rebuild, the first HDD inserted into one of the HDD slots is recognized by the RAID System as the source HDD. To rebuild existing data from a source HDD to a backup HDD (target HDD), the source HDD must first be inserted into one of the HDD slots. After the host detects the source HDD, the target HDD should then be inserted in one of the other HDD slot. The RAID System will then recognize the target HDD and the rebuild process will begin when the HDD LED starts blinking.

In Mirroring mode, only 2 HDDs are allowed for the function to perform properly. There is no limitation on the order of insertion or the slot number. However, if all 4 HDDs are inserted, the RAID System can only do Mirroring in the HDDs positioned in HDD 1 and HDD 2. It is not possible to process two sets of HDDs at the same time.
flowchart
graph TD
    RAID1["RAID 1"] --> A1["A"]
    RAID1 --> B1["B"]
    RAID1 --> C1["C"]
    RAID1 --> D1["D"]
    RAID1 --> A2["A"]
    RAID1 --> B2["B"]
    RAID1 --> C2["C"]
    RAID1 --> D2["D"]
    RAID1 --> A3["A"]
    RAID1 --> B3["B"]
    RAID1 --> C3["C"]
    RAID1 --> D3["D"]

In Mirroring mode, if one of the disks fails, either source or backup, the data is still available. However, if the source disk fails during the rebuild process, the data in both disks will be lost.

It is NOT recommended to do Hot Swap for the source disk during the rebuild process because the data in both disks will be lost.
SPAN (combine Mode)
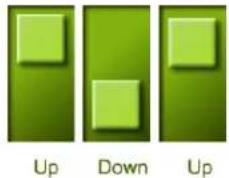
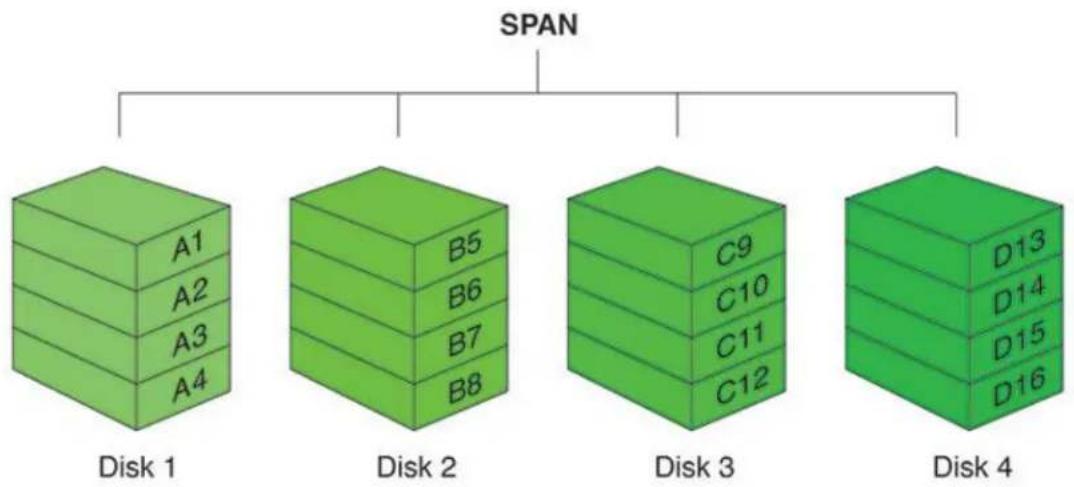
Spanning provides another maximum capacity solution, which some call it as "Large". Spanning combines multiple hard drives into a single logical unit. Unlike Striping, Spanning writes data to the first physical drive until it reaches full capacity. When the first disk reaches full capacity, data is written to the second physical disk. Spanning provides the maximum possible storage capacity, but does not increase performance.
Switch Setting for SPAN (Combine Mode)
flowchart
graph TD
    A["SPAN"] --> B["Disk 1"]
    A --> C["Disk 2"]
    A --> D["Disk 3"]
    A --> E["Disk 4"]
    B --> F["A1"]
    B --> G["A2"]
    B --> H["A3"]
    B --> I["A4"]
    C --> J["B5"]
    C --> K["B6"]
    C --> L["B7"]
    C --> M["B8"]
    D --> N["C9"]
    D --> O["C10"]
    D --> P["C11"]
    D --> Q["C12"]
    E --> R["D13"]
    E --> S["D14"]
    E --> T["D15"]
    E --> U["D16"]
RAID 5
RAID 5 uses block-level striping with parity data distributed across all member disks. It is also called Parity RAID. Every time a block is written to a disk in a RAID 5 disk array, a parity block is generated within the same stripe. A block is composed of many consecutive sectors on a disk. A series of blocks (a block from each of the disks in an array) is collectively called a "stripe." The parity information inside the parity block is not the identical copy of the source data. It is generated via parity calculation. RAID 5 mode provides decent data protection and fault tolerance. The speed of operation is average in comparison to other RAID modes.
Switch Setting for RAID 5
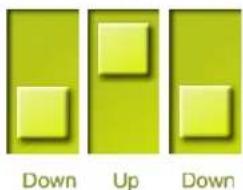

Three or four disks are supported by RAID 5. The storage capacity will become all disks in total, minus 1. The capacity is limited to the size of the smallest disks.
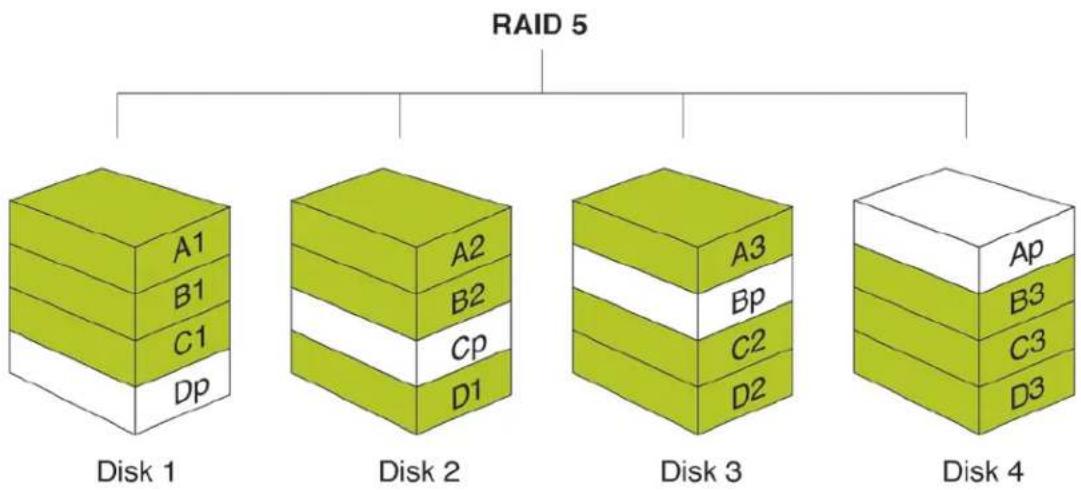
flowchart
graph TD
    RAID5["RAID 5"] --> A1["A1"]
    RAID5 --> B1["B1"]
    RAID5 --> C1["C1"]
    RAID5 --> Dp["Dp"]
    RAID5 --> A2["A2"]
    RAID5 --> B2["B2"]
    RAID5 --> Cp["Cp"]
    RAID5 --> D1["D1"]
    RAID5 --> A3["A3"]
    RAID5 --> Bp["Bp"]
    RAID5 --> C2["C2"]
    RAID5 --> D2["D2"]
    RAID5 --> Ap["Ap"]
    RAID5 --> B3["B3"]
    RAID5 --> C3["C3"]
    RAID5 --> D3["D3"]

If one of the disks fails, the data can be reconstructed through parity calculation once the broken disk is replaced with a new one.
RAID 10 (1+0)
In RAID 1+0, the data is first mirrored and then striped. Under this RAID Mode, it provides another way to achieve higher performance and data security, while increasing complexity. It is usually called “a mirror of stripes.” RAID 1+0 mode provides excellent data protection and fault tolerance. The speed of operation is fast in comparison to other RAID modes (except RAID 0).
Switch Setting for RAID 10 (1+0)
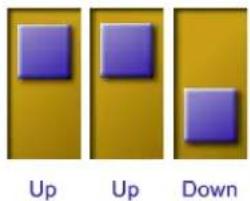
The key difference between RAID 1+0 and RAID 1+0 is that RAID 1+0 creates a striped set from a series of mirrored drives. In a failed disk situation, RAID 1+0 performs better because all the remaining disks can continue to be used. The array can sustain multiple drive losses as long as none of the mirror set loses all of its drives.

Under the RAID 1+0 Mode, 4 HDDs in an array are required. However, the storage capacity is only 2 HDDs and is limited to size of the smallest HDD.
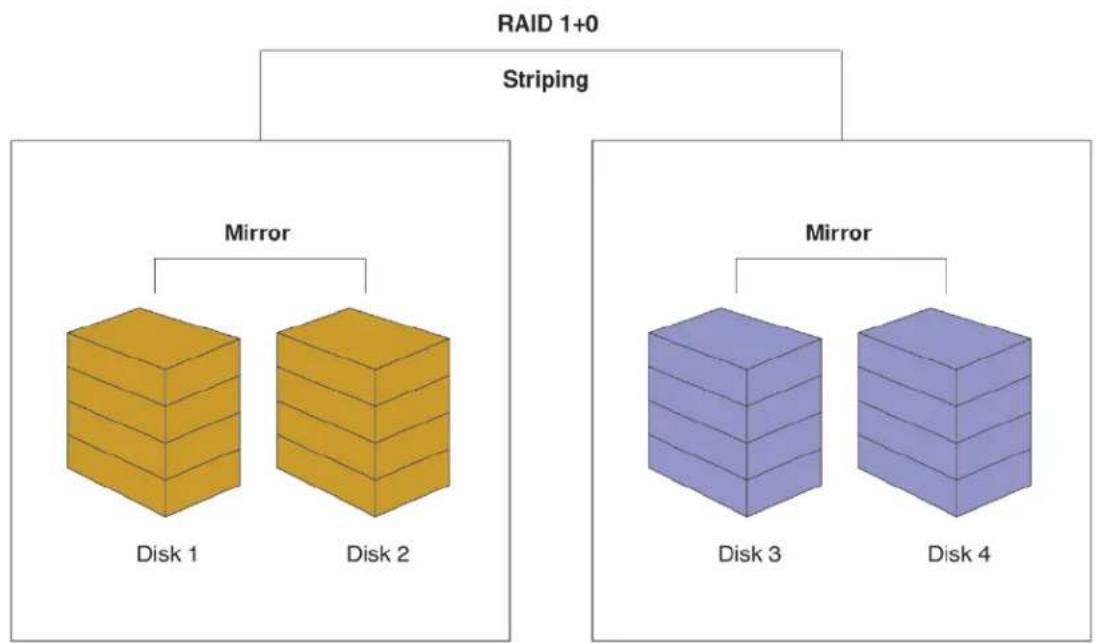
flowchart
graph TD
    A["RAID 1+0"] --> B["Mirror"]
    A --> C["Striping"]
    B --> D["Disk 1"]
    B --> E["Disk 2"]
    C --> F["Mirror"]
    C --> G["Disk 3"]
    C --> H["Disk 4"]

In RAID 10 (1+0) mode, if any 2 of the 4 disks fail at the same time, the data can still be reconstructed when they are replaced with new HDDs. However, if both failed disks are in either HDD slots 2 & 3 or 1 & 4, the data will be lost.
JBOD (JUST A BUNCH OF DISKS)
Just a Bunch of Disks (JBOD) refers to a group of hard drives. In JBOD, the number of logical drives is equal to the number of physical drives. This mode allows the RAID System to operate as a multi-disk storage enclosure, but provides no data redundancy.

Under the RAID MASTER, JBOD Mode is not listed as an option and the hard drives can be operated as JBOD simply in its original “unreleased” format.
Switch Setting for JBOD
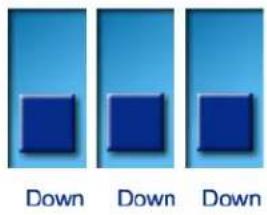

HOT SWAP
Hard Drive Hot Swap refers to the ability to add or remove a device from the host computer without powering off the device; the system will automatically recognize the change after the Hot Swapping is completed.
Striping, Span and JBOD modes: it is not recommended to perform Hot Swapping when the hard drive is transferring data. Any attempt to do so may result in complete loss of all data.
Under RAID 1, Clone, RAID 5, or RAID 1+0, any attempt of Hot Swapping may terminate the data transfer when using the USB2.0 connection. Please resume the data transfer without Hot Swapping.
POWER On/Off LED x 1
| Indicators | Color |
| Power on | Blue |
| Power off | None |
RAID ALERT LED x 1
| Indicators | Color |
| Healthy | None |
| Rebuild | Blink Red |
| Broken or Degrade | Red |
| Fan Error | Flash Red |
Hard Disk Drive LED x 4
There are 2 LED lights for each Hard Disk Drive slot. The left LED indicates “Connection/Access” and the right one indicates “Health”.
The Connection/Access LED is only one-color (white). When the hard drive is connected, the white LED will be on. When hard drive is healthy and not being accessed, white LED color will be on. When the hard drive is being accessed, the white LED will flash.
The Health LED is only one color (red). The red color is for Health condition of the hard drive. When the hard drive is not healthy, the red LED will be on.
| Indicator | HDD (1, 2, 3, 4) | RAID mode | ||
| Left(Connection/Access) | Right(Health) | |||
| Disk Not Detected | None | None | All modes | |
| Disk Detected | White | None | All modes | |
| Disk Not Healthy | White | Red | All modes | |
| Data Access | Flash White | None | All modes | |
| Disk Rebuild | Source Disk | Flash White None | RAID 1, RAID 5, RAID 1+0, Clone | |
| Target Disk | Flash White | Blink Red | ||
| RAID Alert | Blink Red | |||
EXTERNAL BOOTUP
External Bootup may be required if the user has two different operating systems set up in both the host computer and the RAID System.
PC
The External Bootup with different interface:
| OS \ Interfaces | USB 2.0 | FireWire | eSATA |
| Windows | No | No | Yes |
| DOS | Yes | No | Yes |
| Linux | No | No | Yes |
MAC
The External Bootup varies with different platform and interfaces:
| Platform \ Interfaces | USB 2.0 | FireWire | eSATA | ||
| Mac driver Built-in | No driver Built-in | ||||
| Power PC CPU (G4 or Later) | No | No | Yes | No | |
| Intel-based CPU | CoreDuo | Yes | No | Yes | No |
| Core2Duo Or Later | Yes | Yes | Yes | No | |
DISK VOLUME OVER 2TB
The 2+TB hard drive support is determined by the chipset used in the device and the operating system itself. The RAID System supports and recognizes 2+TB hard drives, but the actual 2+TB support will vary depending on the different operating systems used.
| OS | USB | FireWire | eSATA | |
| Windows | Windows 2000, XP, or older | No | No | No |
| Windows XP 64-bit, Windows 2003 32-bit/64-bit (SP1 and SP2) | Yes No Yes | |||
| Windows Vista, Windows 2008 32-bit/64-bit | Yes | Yes | Yes | |
| Linux | Linux 32-bit/64-bit | Yes* | No | Yes* |
| Mac | Mac OS 9/10.1/10.2 | No | No | No |
| Mac OS 10.3/10.4/10.5 | Yes | Yes | Yes | |
* Depends on the Linux version. Please see the chart below:
| Linux OS | USB | eSATA |
| Linux Fedora Core 8 / 32-bit | No | Yes |
| Linux Fedora Core 8 / 64-bit | No | Yes |
| Linux Fedora 10 / 64-bit | Yes | Yes |
GLOSSARY
EXTERNAL BOOTUP
External Bootup may be required if the user has two different operating systems set up in both the host computer and the RAID System.
PC
The External Bootup with different interface:
| OS \ Interfaces | USB 2.0 | FireWire | eSATA |
| Windows | No | No | Yes |
| DOS | Yes | No | Yes |
| Linux | No | No | Yes |
MAC
The External Bootup varies with different platform and interfaces:
| Platform \ Interfaces | USB 2.0 | FireWire | eSATA | |
| Mac driver built-in | No driver built-in | |||
| Power PC CPU (G4 or Later) | No | No | Yes | No |
| Intel-based CPU | Yes | No | Yes | No |

If the computer does not come with eSATA interface and an optional eSATA card is added; it is highly recommended you choose a card that comes with a built-in drive and operating system.
Disk Volume Over 2TB
The 2+TB HDD support is determined by the chipset used in the device and the operating system itself. The RAID System supports and recognizes 2+TB HDDs, but the actual 2+TB support will vary depending on the different operating systems used.
| OS | USB | FireWire | eSATA | |
| Windows | Windows 2000, XP, or older | No | No | No |
| Windows XP 64-bit, Windows 2003 32-bit/64-bit (SP1 and SP2) | Yes No Yes | |||
| Windows Vista, Windows 2008 32-bit/64-bit | Yes | Yes | Yes | |
| Linux | Linux 32-bit/64-bit | No | No | No |
| Mac | Mac OS 9/10.1/10.2 | No | No | No |
| Mac OS 10.3/10.4/10.5 | Yes | Yes | Yes | |
ESATA PCI EXPRESS CARD INSTALLATION
Complete the steps provided in this section to install the eSATA PCI Express Card to use with the RAID System. The eSATA PCI Express Card provides a host computer with two Windows and Mac compatible eSATA ports.
System Requirements Windows 2000 or later 32-bit/64-bit OS
• Mac OS 10.4.x or later
• An available PCI-Express slot
• CD-ROM or DVD-ROM drive
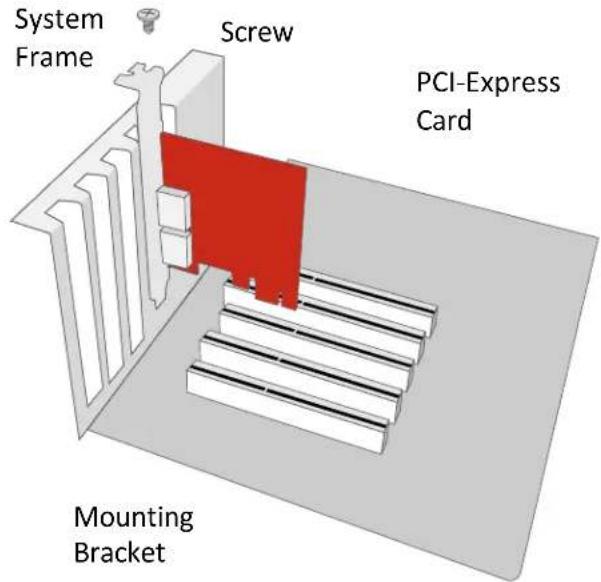
Hardware Installation
- Power "off" and unplug your computer.
- Remove the housing of your computer and locate an available PCI-Express slot on your motherboard.
- Insert the card in the available PCI-Express slot. Ensure that the card is firmly seated in the slot.
- Replace the housing of your computer.
Driver Installation
Follow the provided prompts to complete the driver installation.
In the Windows system, the “Add New Hardware Wizard” will open automatically. Insert the installation CD included in the package, navigate to and open the installation file.
For Mac OS, insert the installation CD and locate the Mac driver installation file. Follow the provided prompts to complete the driver installation.

Please refer to User's Manual for eSATA Host Card on our website.
Verify Driver Installation
Mac OS:
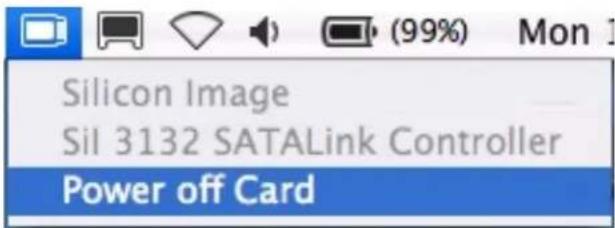

If a driver installation failure error message appears after restarting the computer, follow the recommendations provided in the error message.
Windows OS:
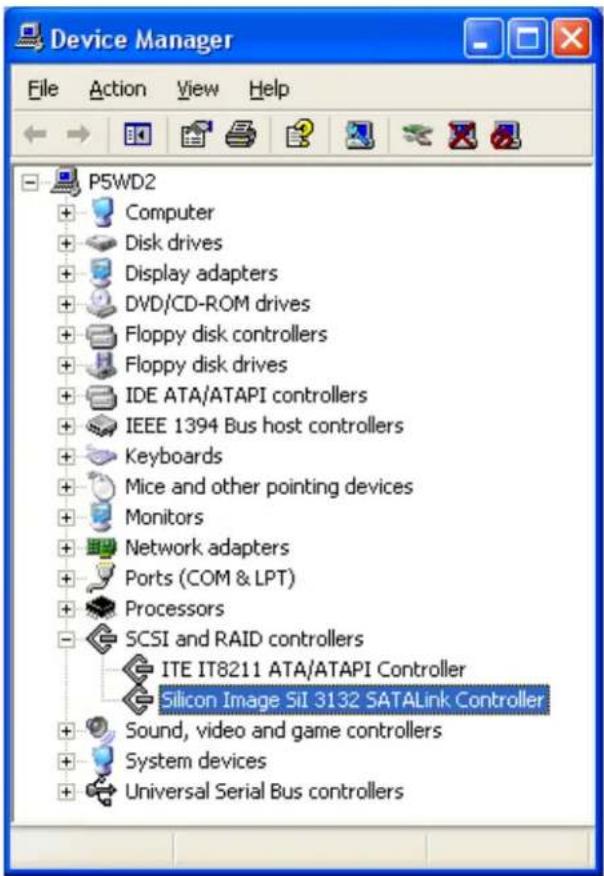
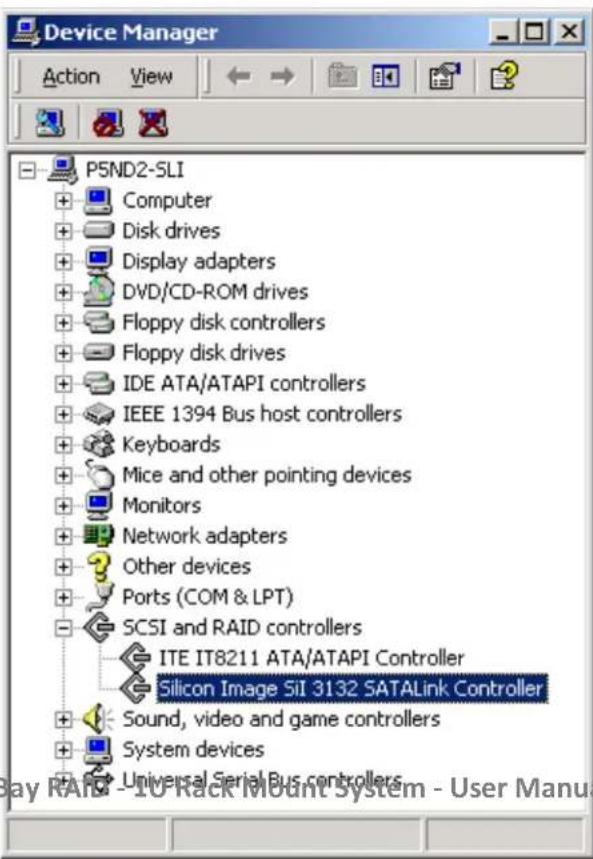
- Right-click the My Computer icon on your desktop and choose Manage from the pop-up menu.
- Double-click Device Manager.
- Double-click SCSI and RAID controllers.
- Verify that the Sil 3132 SATALink Controller appears, as shown below.
Windows 2003 and XP:
Windows 2000:
BIGROC 5C - 4Bay RAN - 10 Rack Mount System - User Manual
QUESTIONS & ANSWERS CONCERNING RAID SYSTEMS
Selecting the Proper RAID Mode
Q: How do I choose the proper RAID mode for my RAID System based on the tasks I need to perform?
A: This RAID System is considered a “Mass Storage” device; which means its capacity size is sufficient for data management; the different RAID mode settings can help the user to administer the enormous data storage from the combined capacities of the hard drives. It is highly recommended to choose the RAID mode based on the essential factor (use) to complete your task. The most common three factors are capacity size, speed, and data protection. For example, if using the RAID System to simply watch movies (films) for enjoyment, the RAID 0 mode is perfect because it can maintain a decent speed and still have a large storage capacity. However, if the use requires you to process large files and to have a high volume of data access such as for a graphic designer or movie (film) editing, it’ll be more efficient to choose RAID 5 has the ability to do hard drive hot-swap without affecting the data itself, combine with a higher level of data protection. Lastly, if the work requires instant and continuous backup of data (such as for a writer or editor,) then RAID 1+0 would be the best choice since it can provide both data protection and speed with less storage capacity.
Hard Disk Drive (HDD) Capacity
Q: All my HDDs are at least 1 TB or above. Will the RAID be able to support the gigantic storage capacity?
A: Yes, the Bigroc 4-Bay RAID will be able to support any HDDs over 1 TB size capacity. However, older host systems cannot support over 2TB of total capacity. Newer systems such as the Mac OS 10.3 and newer, and PC Windows Vista or newer can handle HDDs over 1 TB. In addition, based on the host system you have, there may be limitations on the port connections when the storage size is over 2TB. Please see the chart below.
| OS | USB | FireWire | eSATA | |
| Windows | Windows 2000, XP, or older | No | No | No |
| Windows XP 64-bit, Windows 2003 32-bit/64-bit (SP1 and SP2) | Yes No Yes | |||
| Windows 7, Vista, Windows 2008 32-bit/64-bit | Yes Yes Yes | |||
| Linux | Linux 32-bit/64-bit | Yes* | No | Yes* |
| Mac | Mac OS 9/10.1/10.2 | No | No | No |
| Mac OS 10.3/10.4/10.5 | Yes | Yes | Yes | |
* Depends on the Linux version. Please see the chart below:
| Linux OS | USB | eSATA |
| Linux Fedora Core 8 / 32-bit | No | Yes |
| Linux Fedora Core 8 / 64-bit | No | Yes |
| Linux Fedora 10 / 64-bit | Yes | Yes |
Discrepancy in Reported and Actual Size Capacity
Q: I have a 750GB HDD, why does the RAID only recognize the HDD available space as less than 750GB?
A: Many customers are confused by their host system when it reports a discrepancy between reported capacity and actual capacity. Several factors can come into play when your host system views and reports the capacity of a hard drive. There are actually two different numbering systems used to express units of storage capacity:
Binary: provides that a kilobyte is equal to 1024 bytes; and Decimal: provides that a kilobyte is equal to 1000 bytes.
Capacity Disclaimer
Actual accessible hard drive capacity will indicate up to 10% lower than stated under different Operating Systems and formatting.
The storage volume is measured in total bytes before formatting. References to round numbers of gigabytes or terabytes are an approximation only. For example, a disk drive labeled as having 500GB (gigabytes) has space for approximately 500,000,000,000 bytes before formatting. After formatting, the drive capacity is reduced by about 5% to 10% depending on the operating system and formatting used.
Q: I would like to format my hard drives with the FAT (a.k.a. File Allocation Table) format, which can be read and written by both Mac and PC. Is there any limitation on its capacity?
A: Yes, please check the table below for reference.
| File System | NTFS | FAT32 | FAT (Format by Win2000 / WinXP) | FAT16 |
| Capacity Limitation | Vista: 16384TB XP: 2TB | Windows: 32GB Mac: 2TB | 4GB | 2GB |
RAID 0
Q: If I have 4 HDDs, can I create two sets of storage units by using RAID 0 Mode?
A: The Bigroc 4-Bay is designed to support 4 HDDs, but it cannot create or support two sets of storage units under RAID 0 mode.
Rebuild
Q: Does the RAID have to be connected to the host computer when it is in Rebuild Mode?
A: No. The RAID can support off-line Rebuild, which means it can perform the Rebuild function without being connected to a host computer.
Q: I replaced a hard drive with the new one when the RAID System is rebuilding and a warning notice of "the device is not safely removed" pops out. What should I do?
A: This only occurs when the RAID System is connected under the USB 2.0 interface. Please ignore the warning and continue the rebuilding process.
SPECIFICATIONS
| Model Name | Bigroc 5C 4-Bay |
| Connector | eSATA x 1, USB 2.0 x 1, 1394a x 1, FireWire 800 (1394b) x 2 |
| HDD Support | 3.5” SATA HDD**Identical HDD recommended – same manufacturer, capacity and RPM |
| RAID Level | RAID 0 (Striping), RAID 1 (Mirroring), RAID 5, RAID 5+HotSpare, RAID 1+0,JBOD |
| Data Transfer Speed | eSATA: up to 3,000Mbit/secUSB 3.0: up to 5,000Mbit/secFireWire 400 (1394a): up to 400Mbit/secFireWire 800 (1394b): up to 800Mbit/sec |
| LED Indicators | Power / Connection / Health / Access / Rebuild / RAID Alert |
| Power Supply | Input: 220 / 110 Manual switch |
| FAN | Dimension: 40 x 40 x 10 mm x 3 |
| Dimension | 11.9 x 17.3 x 1.7 inches – 440 x 302 x 53.5 mm |
| Weight (without HDD) | 10LB (4.5 KGS) without hard drives |
PARTITIONING AND FORMATTING THE BIGROC 4-BAY DRIVE ON A MAC OS
All Rocstor drives are factory formatted with HFS+, unless otherwise stated on the retail box.

WARNING: Initializing, Formatting, Configuring or Partitioning the Bigroc 4-Bay RAID will destroy all of its data. To protect your data, back it up before initializing, formatting, configuring or partitioning this device.
IMPORTANT NOTES:
- All programs should be closed before beginning.
- Connect the Bigroc 4-Bay RAID to your computer using the appropriate cable(s).
- "Click" means left click. "Right Click" will be so labeled.
- Some computes are set so a single "click will perform the task, such as opening a window. Depending on your mouse setting, you may have to double click to get to the next window. If a single click does not open the next window, please double click.
- ALL RAID UNITS ARE SHIPPED FROM THE FACTORY CONFIGURED: RAID 0 (STRIPING).
INSTRUCTIONS FOR PARTITIONING AND FORMATIING
- Connect the Bigroc 4-Bay RAID to the computer via a port.
- Turn ON the Bigroc 4-Bay RAID.
- Reconfigure the Bigroc 4-Bay for a specific RAID mode
- Reformat the Bigroc 4-Bay RAID by following these instructions: a) Initialize
INSTRUCTIONS FOR PARTITIONING AND FORMATTING FROM FAT32 to HFS+: "Mac"
- Connect the Rocstor drive to the computer via a port.
- The drive will appear as an icon on the Desktop on the middle right side (figure 1.0 below) the icon will represent the method of connection (USB or FireWire).

Figure 1.0
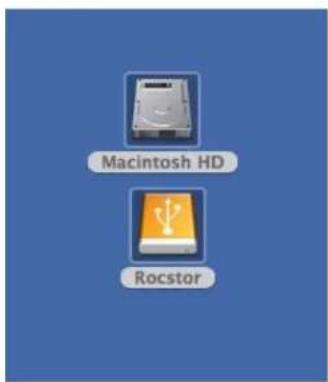
USB Connection
Figure 1.1
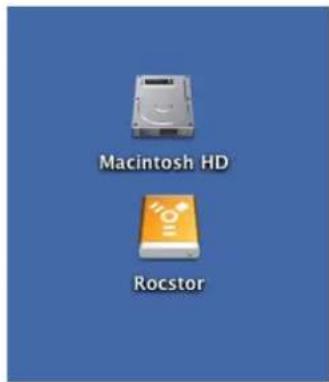
FireWire Connection
Figure 1.2
Note: If the Hard Drive is connected via USB port, the desktop would indicate the USB ⚪ (figure 1.1) if it is connected via FireWire ⚫ port, it would then indicate FireWire as (figure 1.2) on the "Macintosh HD" icon. The same procedures would also apply to the following steps.
- Once the icon appears on the "Desktop" click on the "Macintosh HD" icon (figure 2.0)
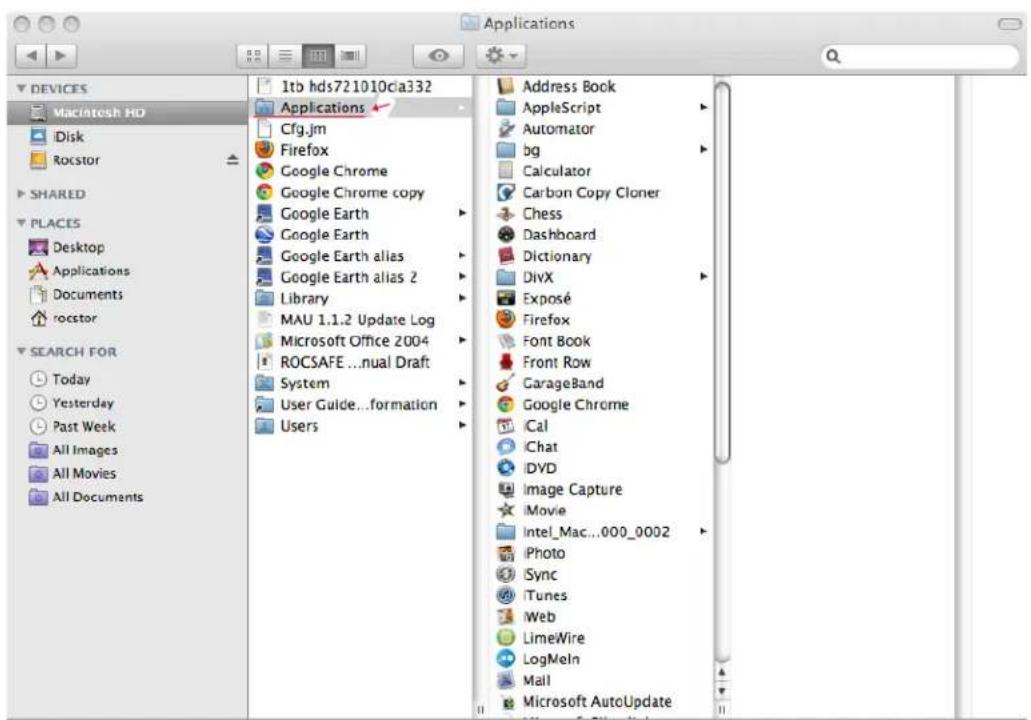
Figure 2.0
- In the "Macintosh HD" menu, click on the "Applications" icon.
- In the "Applications" menu, click on the "Utilities" icon (figure 3.0.)
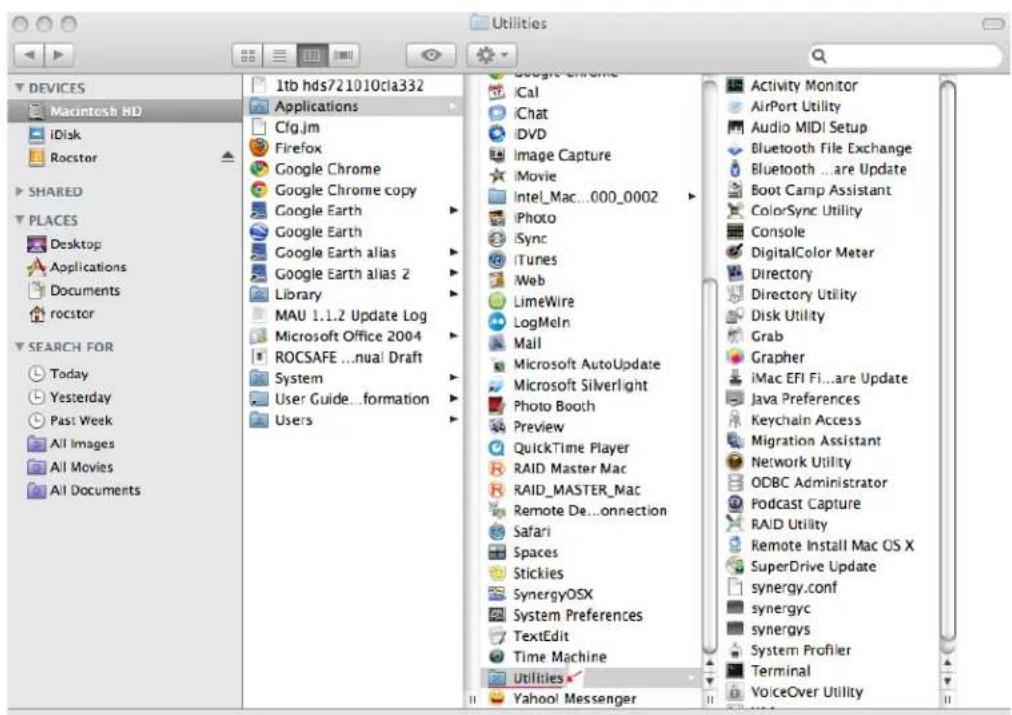
Figure 3.0
- In the "Utilities" menu, click on the "Disk Utility" icon (figure 4.0.)
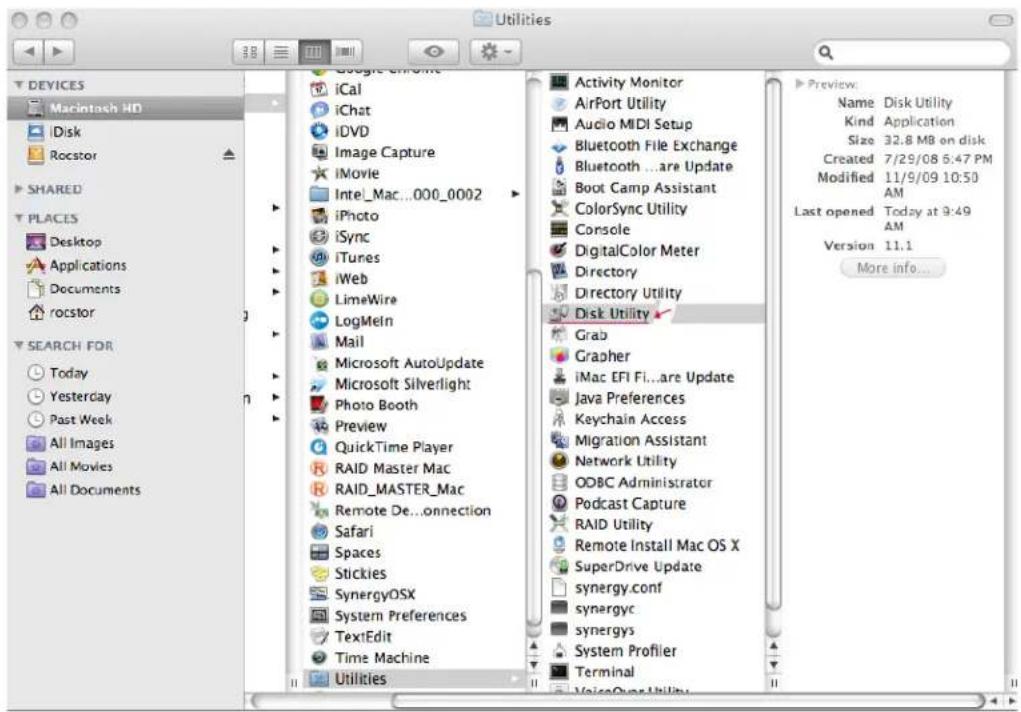
Figure 4.0
- On the left side of the "Disk Utility" menu is a list of available drives (figure 5.0.) One will show as Rocstor drive. Click on the icon showing the disk capacity (figure 5.1.)
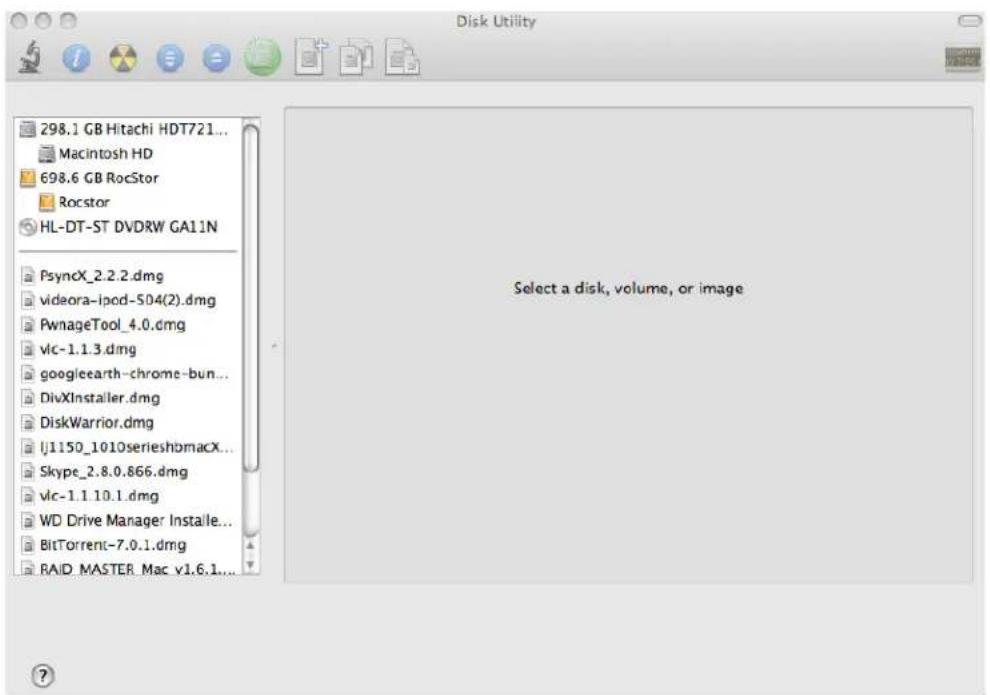
Figure 5.0
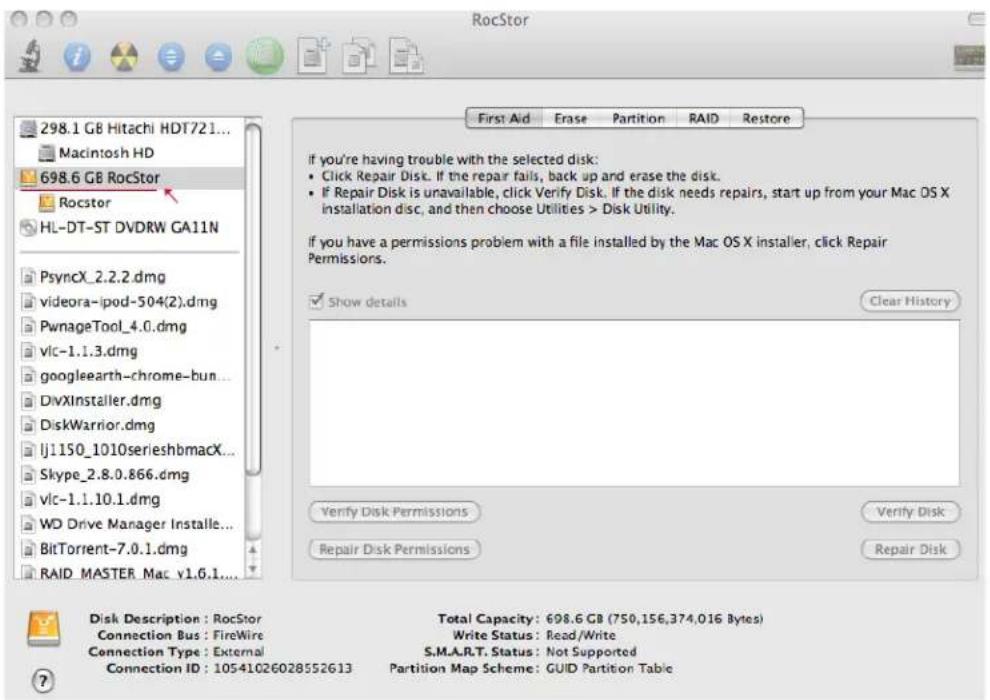
Figure 5.1
- You are now in the Rocstor menu. Click on the "Partition" tab and then click the "Current" tab under "Volume Scheme." A drop down "Partition" menu will appear.
- In the "Partition" menu, you may select any number of partitions available under "Volume Scheme."
- If you are using Panther proceed to #13 below.
- If you are using Tiger, Leopard, Snow Leopard or Lion click on Options on the lower center of the window. Select the Partition Scheme for your Rocstor drive. Suggest you select "Apple Partition Map" for Tiger, Leopard, Snow Leopard and GUID partition table for Lion, (figure 6.0) and then click OK.
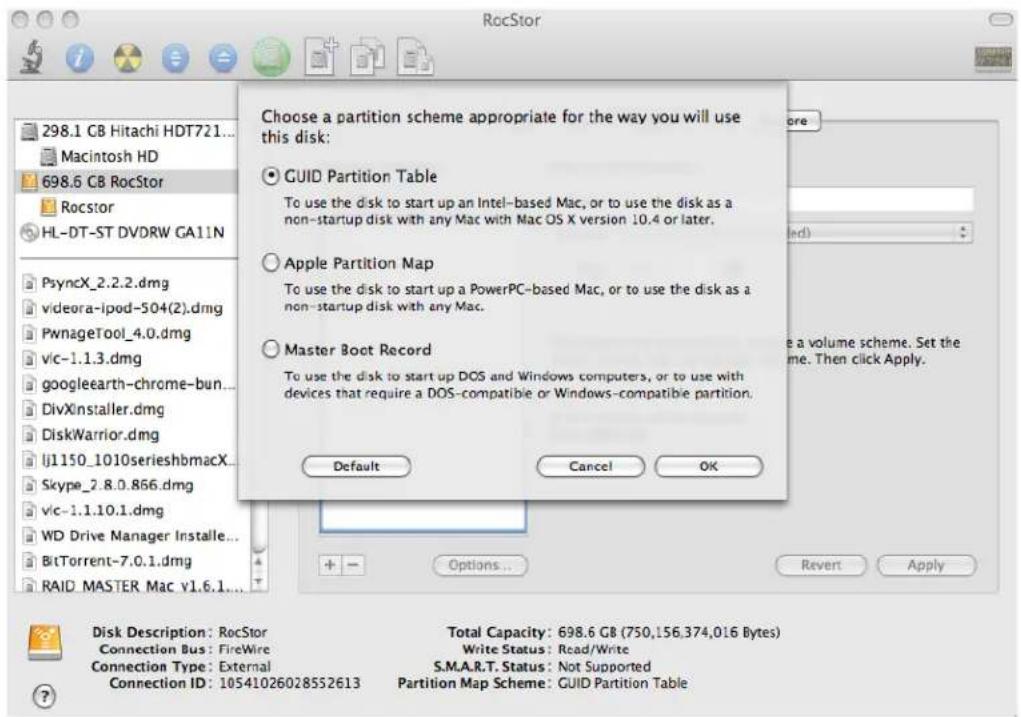
Figure 6.0
- Volume Information: select a name for your drive (figure 7.0.)
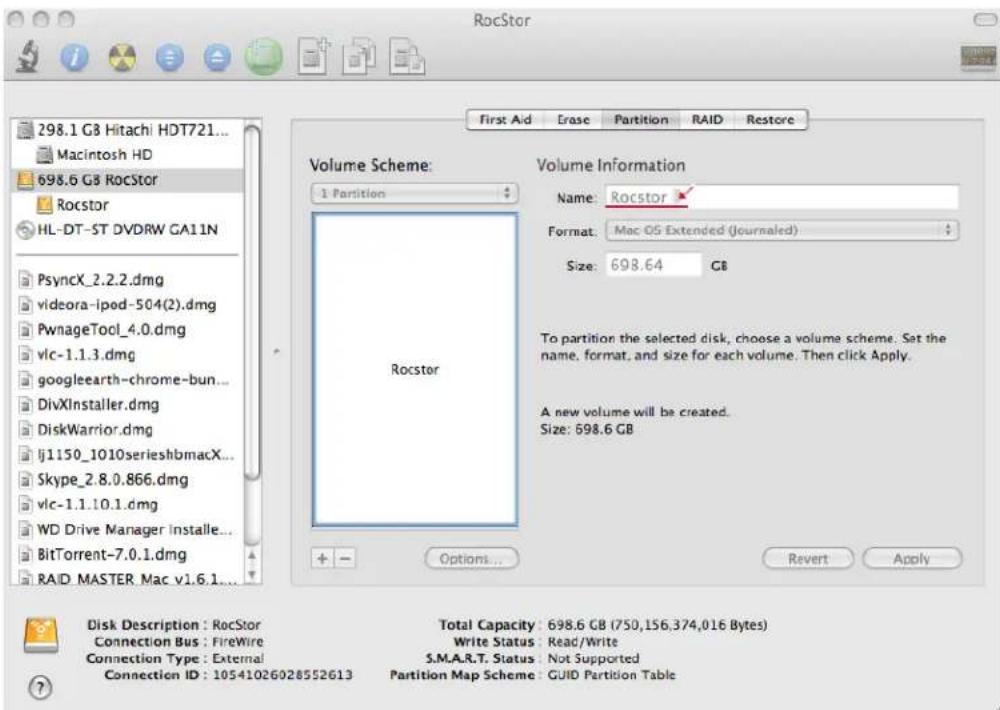
Figure 7.0
-
Format: Click on either the "Format" area or the Blue up/down arrows. Select Mac OS extended (journal).
-
After selecting the type of format, click the "Apply" tab in the lower right of the screen, (figure 7.1.) On the next screen, Partition Disk, click "Partition" (figure 8.0)
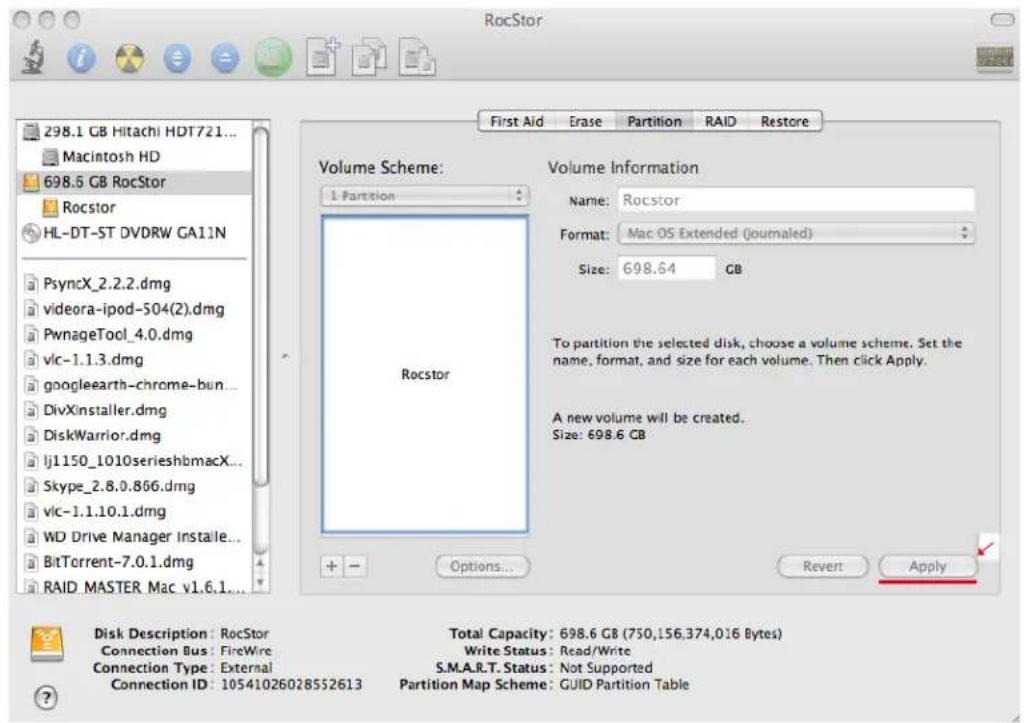
Figure 7.1
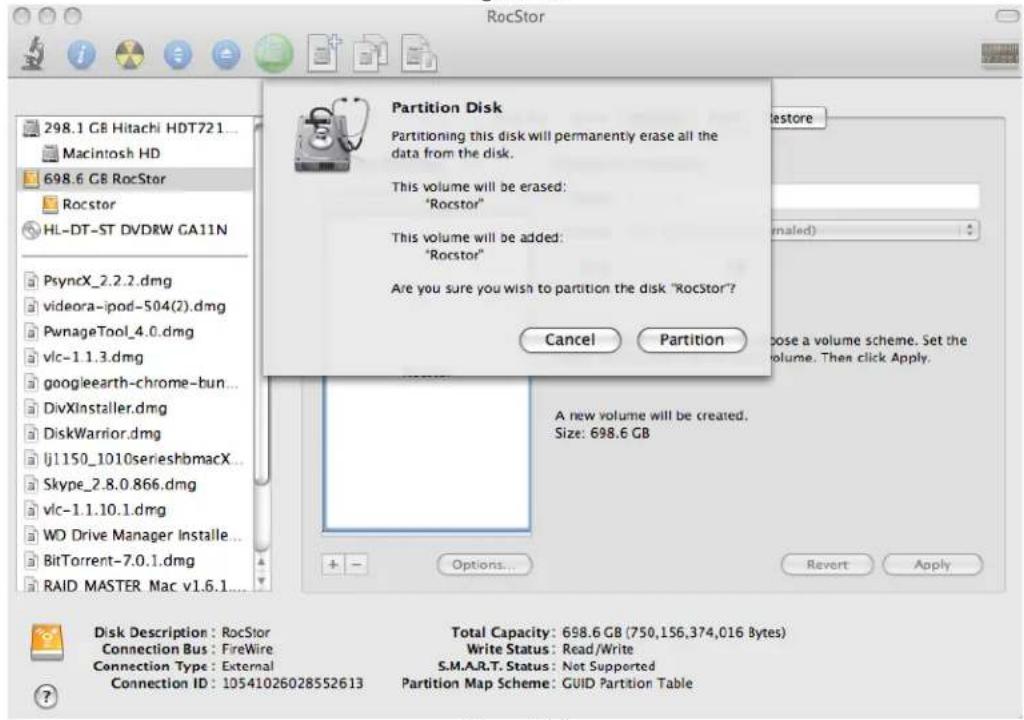
Figure 8.0
- The drive will begin to format (figure 8.1) and upon completion; the same icon that first appeared on the Desktop will reappear with your designed name on the Desktop (figure 9.0)
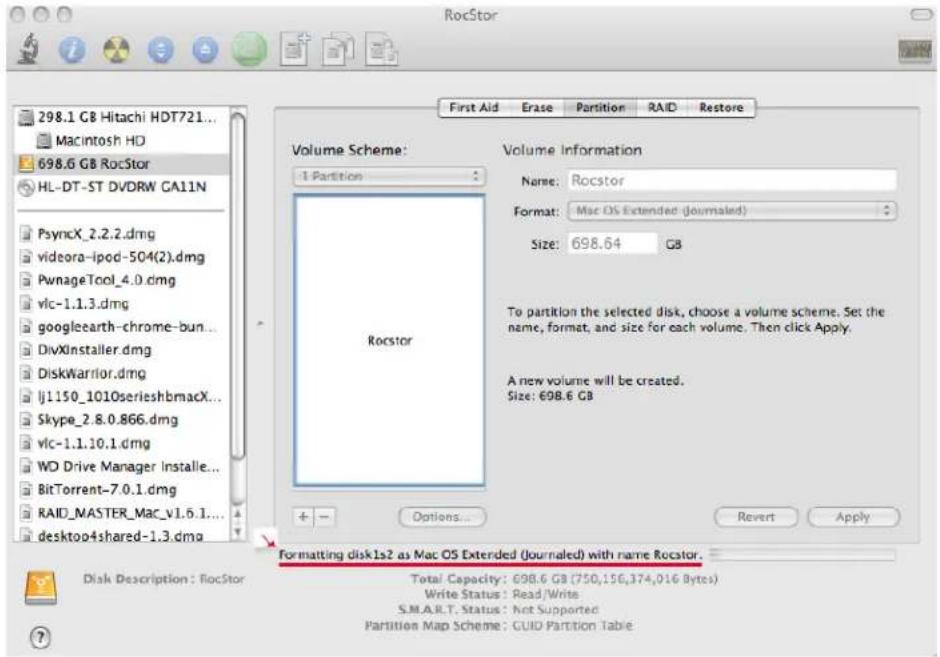
Figure 8.1
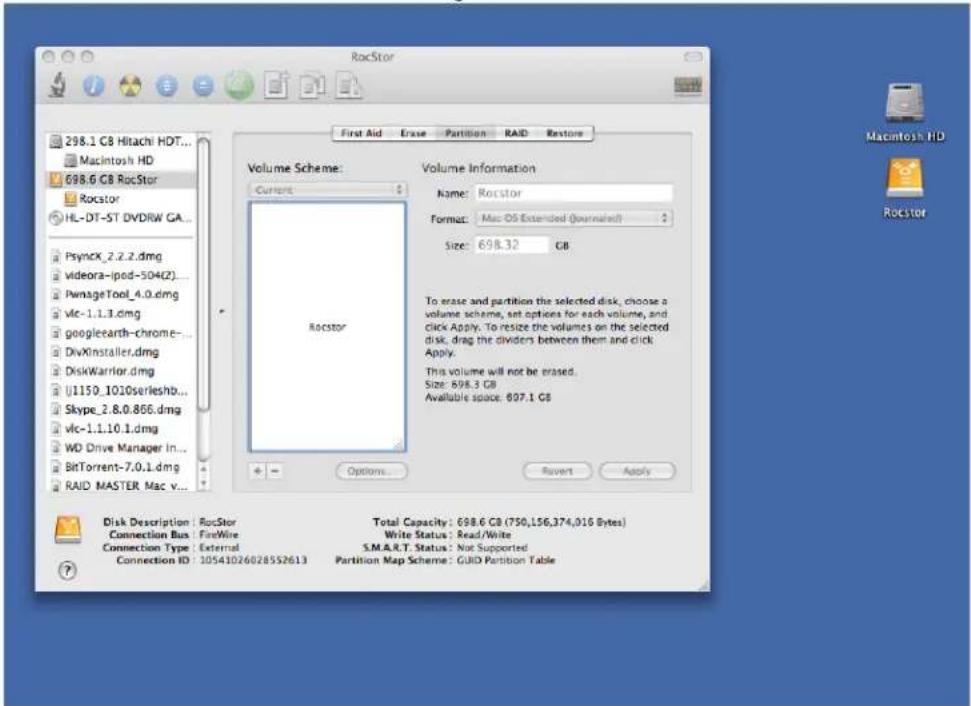
Figure 9.0
- You can now Exit or close to return to the desktop.
PARTITIONING AND FORMATTING THE BIGROC DRIVE ON WINDOWS 2000, XP AND VISTA and Windows 7
All Rocstor drives are factory formatted with FAT32, unless otherwise stated on the retail box.
WARNING: Formatting and Partitioning the Bigroc Drive will destroy all of its data. To protect your data, back it up before formatting or partitioning this device.
IMPORTANT NOTES:
- All programs should be closed before beginning.
- Connect the Rocstor hard disk drive to your computer using the appropriate cables.
- Turn ON the Rocstor hard disk drive.
- The initial goal is to reach the Control Panel. If you know how to get there, skip this section and go directly to Instruction 1 (Instructions for Partitioning and Formatting from FAT 32 to NTFS.) A fast way of reaching "Disk Management" is to right click "My Computer" icon and left click on "Manage" in the drop down menu. The next window is "Computer Management."
In the left menu, click "Disk Management." - The ultimate goal is to reach Disk Management. If you know how to get there, skip this section and go directly to Instruction 4 (Instructions for Partitioning and Formatting from FAT 32 to NTFS).
- Due to different views that are possible on Windows operating systems (2000, XP, Vista, Windows 7), we will provide various ways of reaching the Control Panel.
- "Click" means left click. "Right Click" will be so labeled.
- Some computers are set so a single "click" will perform the task, such as opening a window. Depending on your mouse setting, you may have to double click to get to the next window. If a single click does not open the next window, please double click.
DIFFERENT WAYS TO GET TO THE CONTROL PANEL:
(You may use any one of the following methods)
- If the icon "My Computer" shows on your desktop, click or double click on the icon. Under "Other Places" click on "Control Panel."
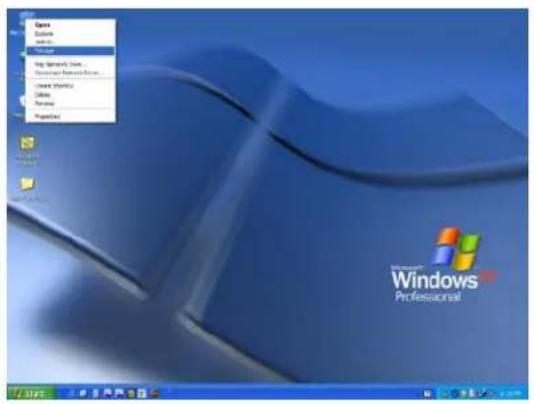
Under Windows XP
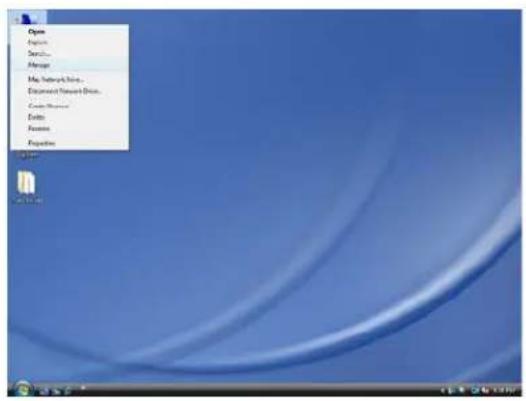
under Vista/Windows 7 OS
- If the icon "My Computer" does not show on your desktop, click on the Start icon on the lower left of your screen. If the Control Panel link is displayed, click on the Control Panel link.
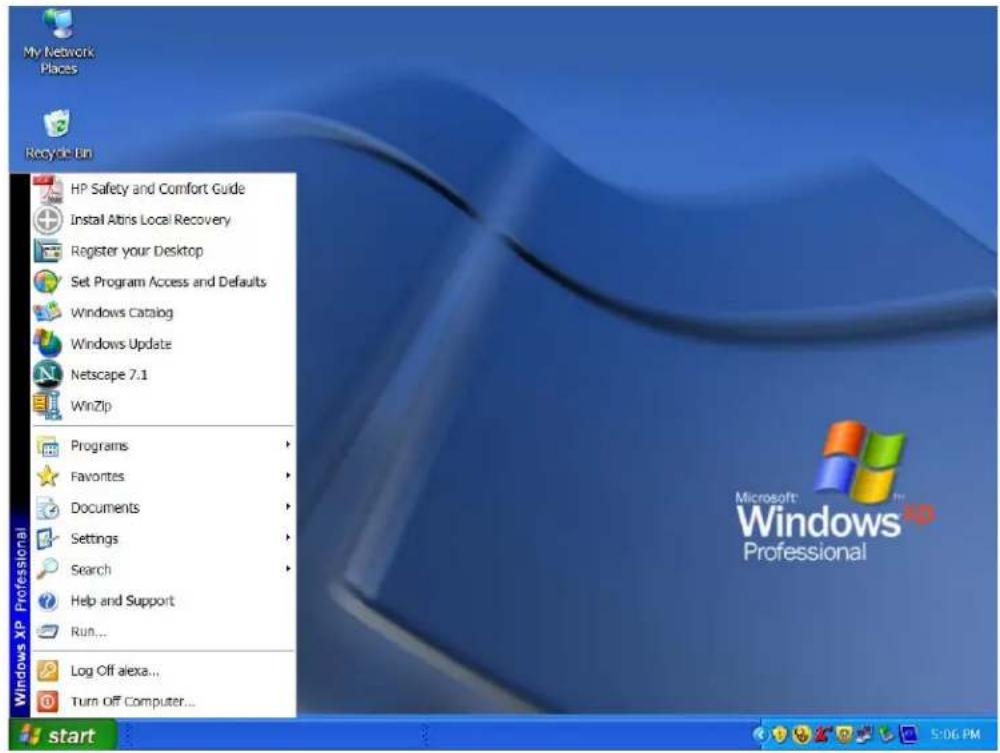
-
If the icon "My Computer" does not show on your desktop, click on the Start icon on the lower left of your screen. If the Control Panel link is not displayed, click on the Settings link and then click on the Control Panel link.
-
Click on the Start icon on the lower left of your screen. Click on Run. Delete anything listed in the Open window. Type the following: compmgmt.msc and then click OK. Skip to INSTRUCTION # 4 (Instructions for Partitioning and Formatting from FAT 32 to NTFS {page 24}).
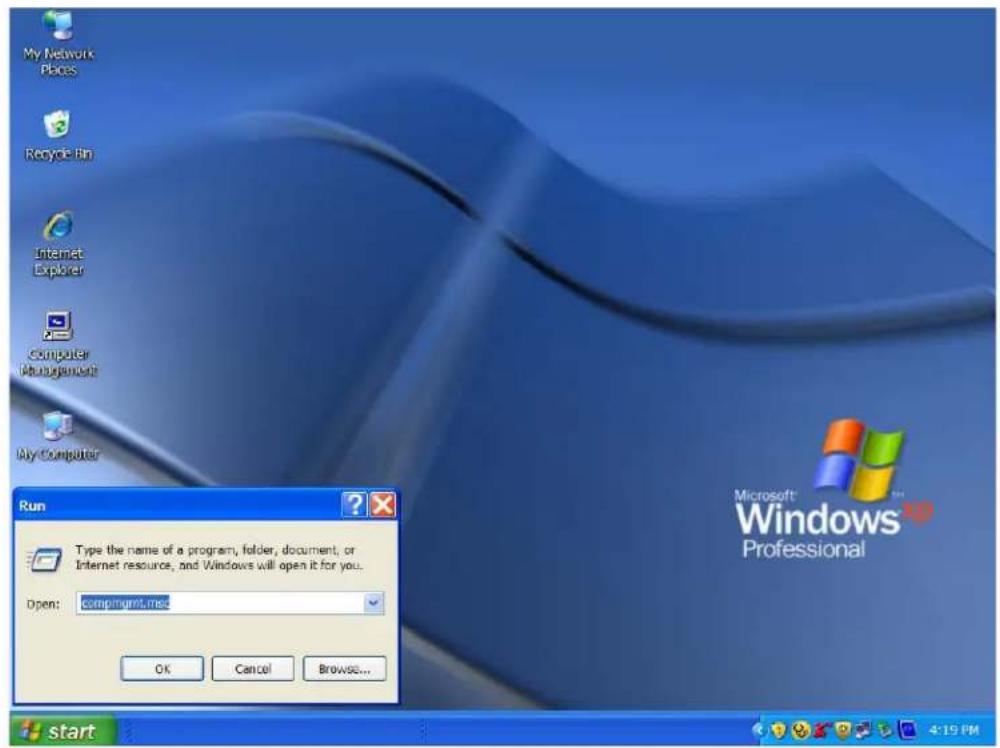
INSTRUCTIONS UPON REACHING CONTROL PANEL
a. After reaching the Control Panel, click on Administrative Tools.
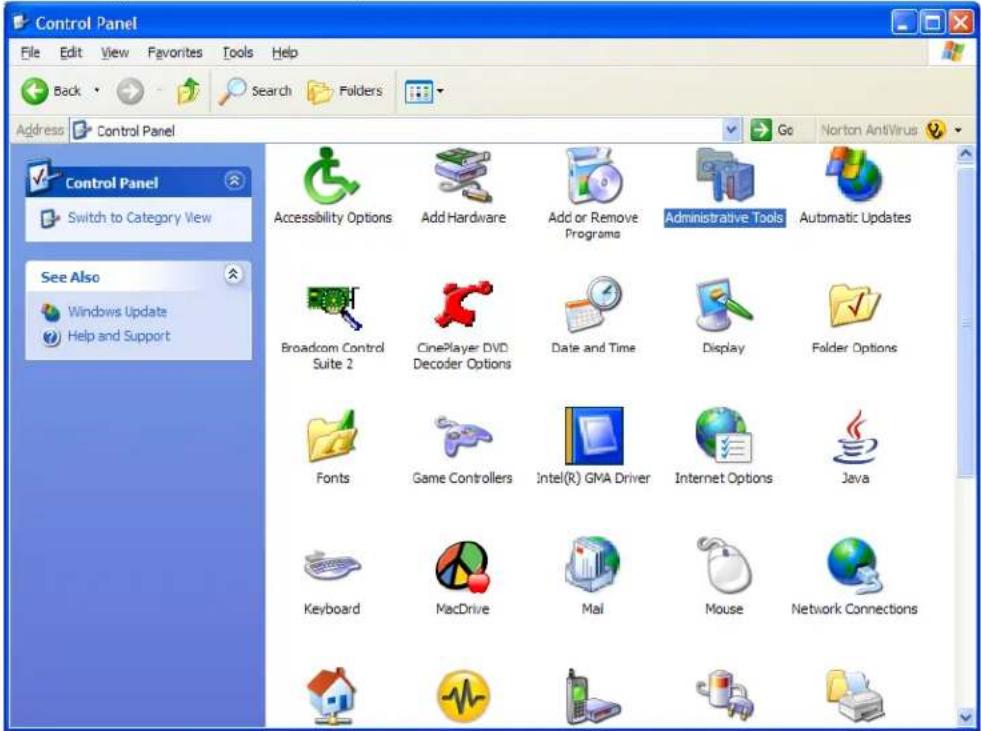
b. After reaching Administrative Tools, click on Computer Management.
c. After reaching Computer Management, click on Disk Management.
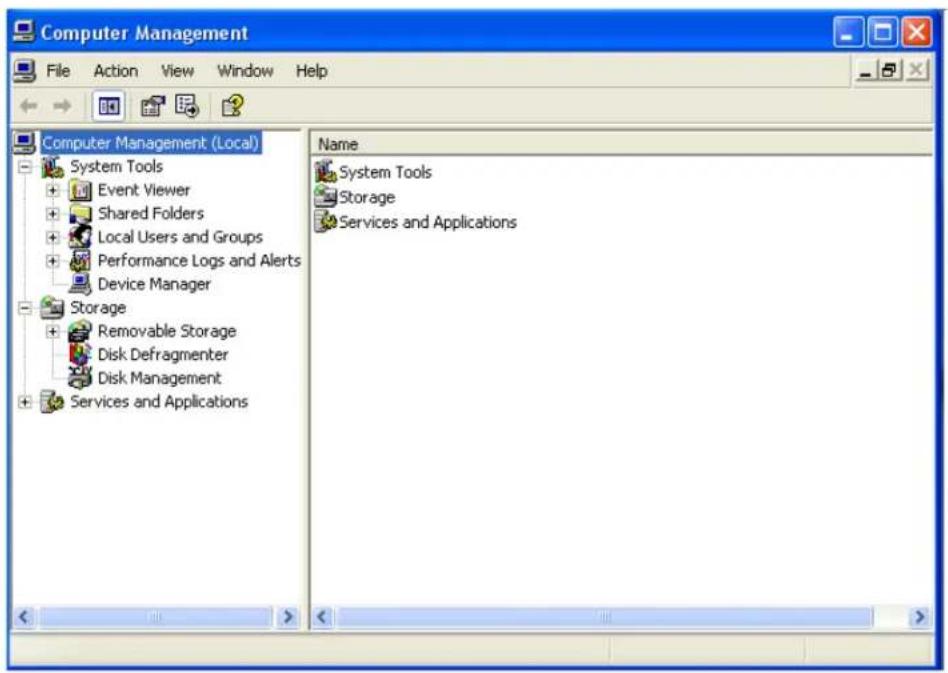
INSTRUCTIONS FOR PARTITIONING AND FORMATTING FROM FAT32 to NTFS
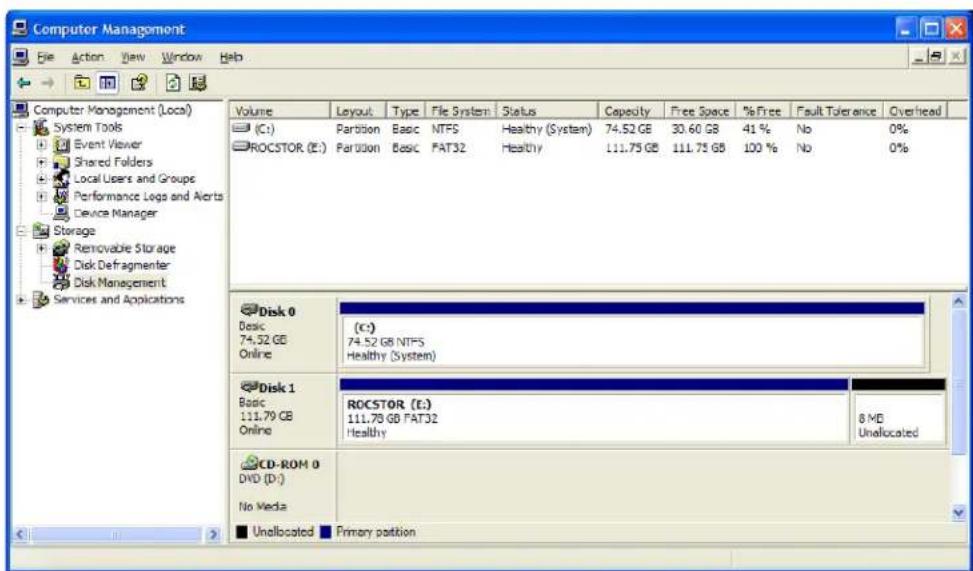
- In the "Disk Management" window, right click the Rocstor drive in the upper portion of the menu to highlight it. In the drop down menu, select "Delete Partition."
WARNING: Formatting and Partitioning the Bigroc Drive will destroy all of its data. To protect your data, back it up before formatting or partitioning this device.
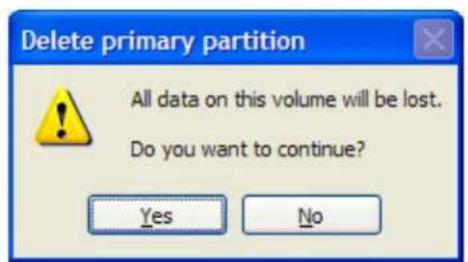
- The next window is "Delete primary partition." Click on Yes.
-
At this point the Rocstor drive will not show up on the "Disk Management Volume" window in the upper menu.
-
The Rocstor drive will show up in the lower menu as an "Unallocated" disk.
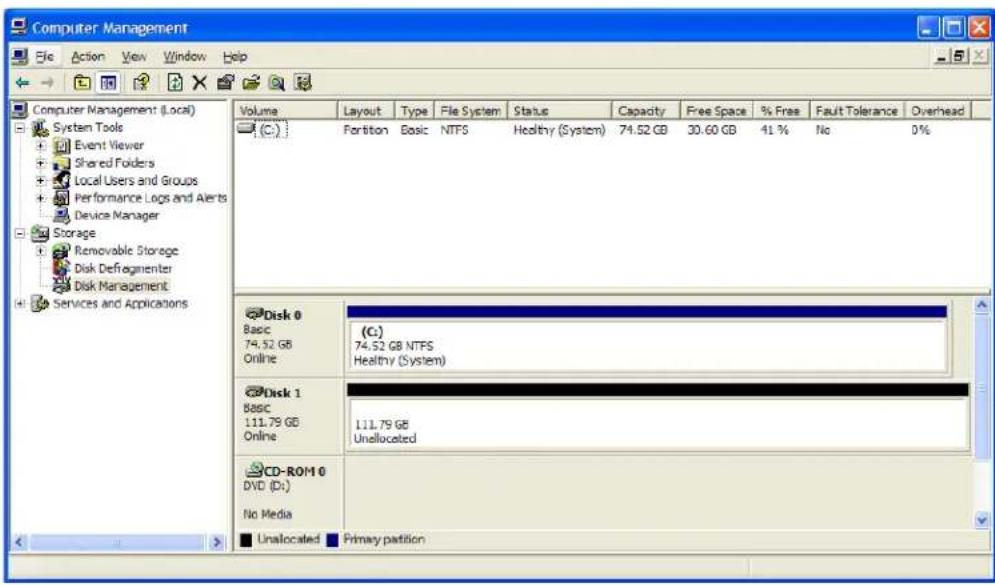
- Right click anywhere in the "Unallocated" disk area in the lower menu.
- Click on "New Partition."
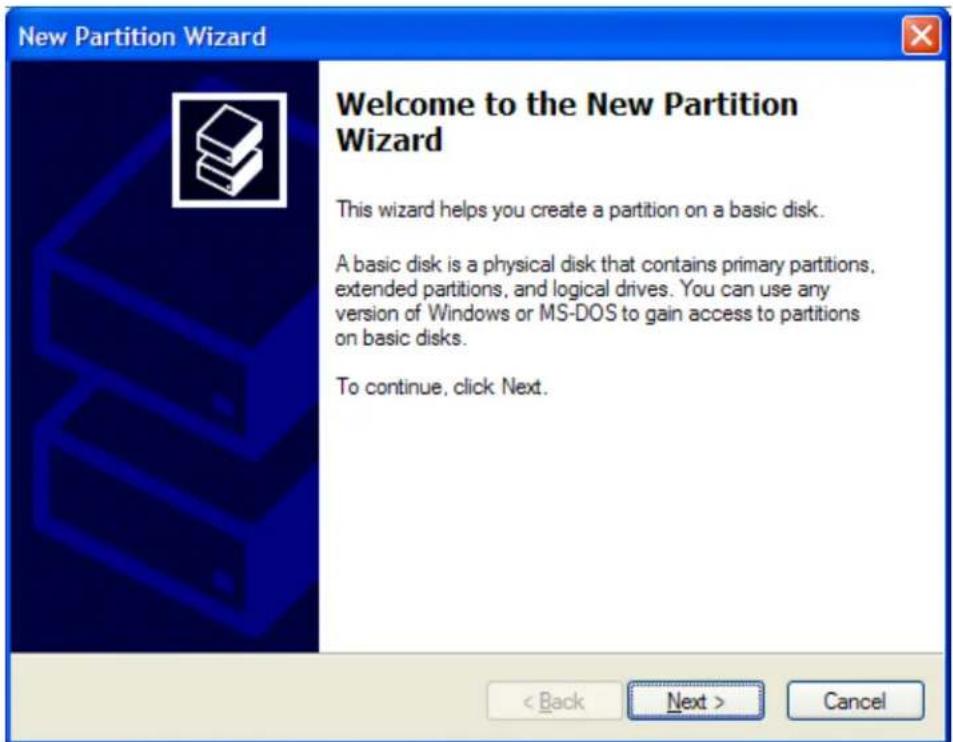
- You are taken to "Welcome to the New Partition Wizard." Click "Next".
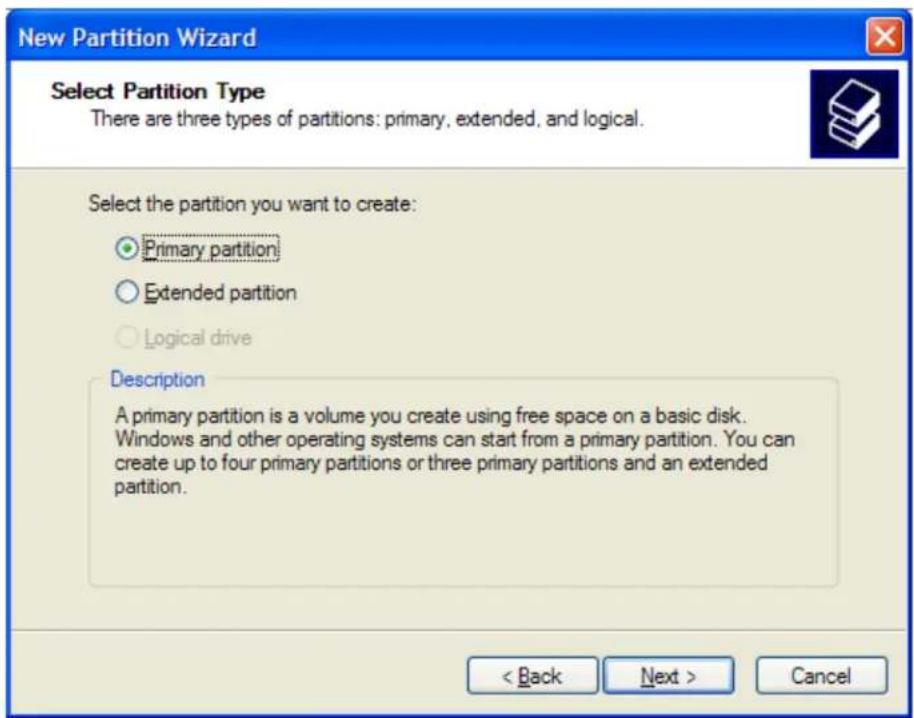
- Click on "Primary partition" (it should be selected as the default partition). Click "Next".
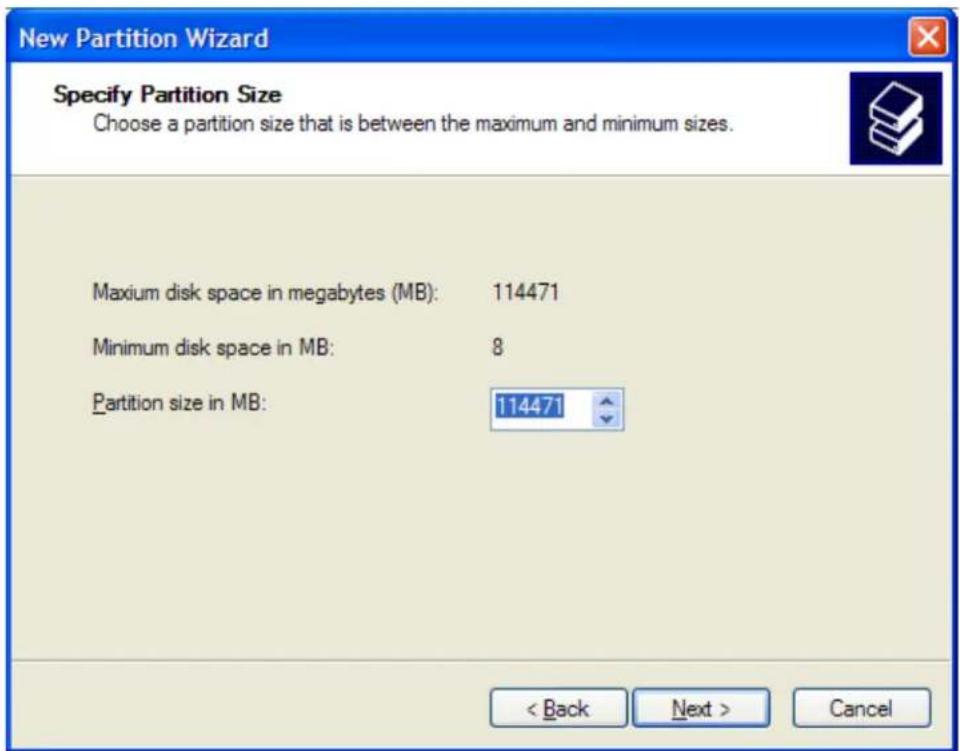
- Under "Specific Partition Size," click Next to accept the default setting, which is the maximum size allowed.
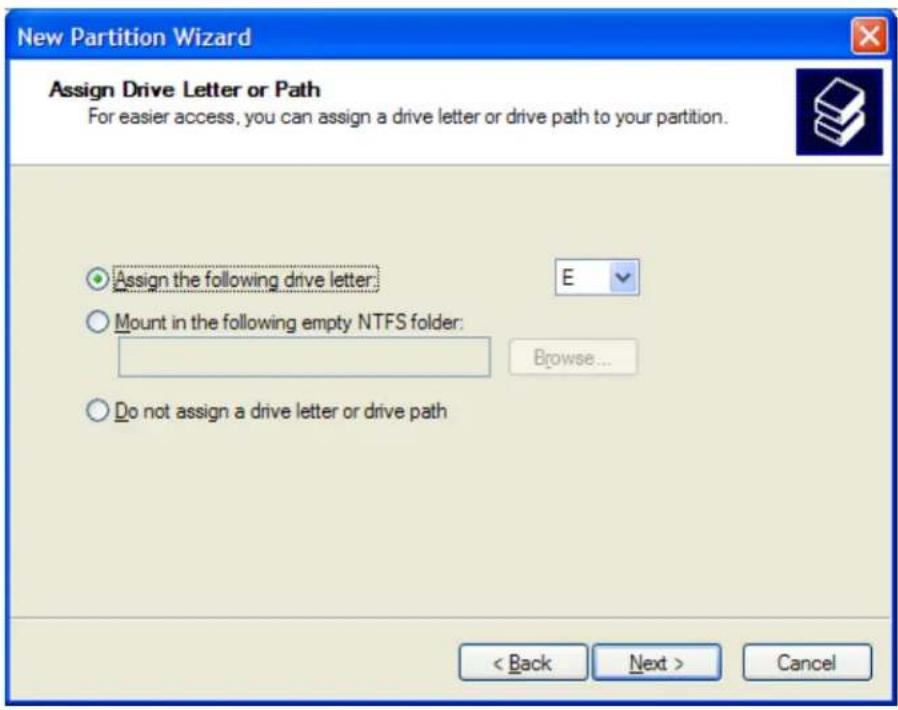
- Under "Assign Drive Letter or Path," accept the default letter and click "Next".
- In the "Format Partition," accept the default setting.
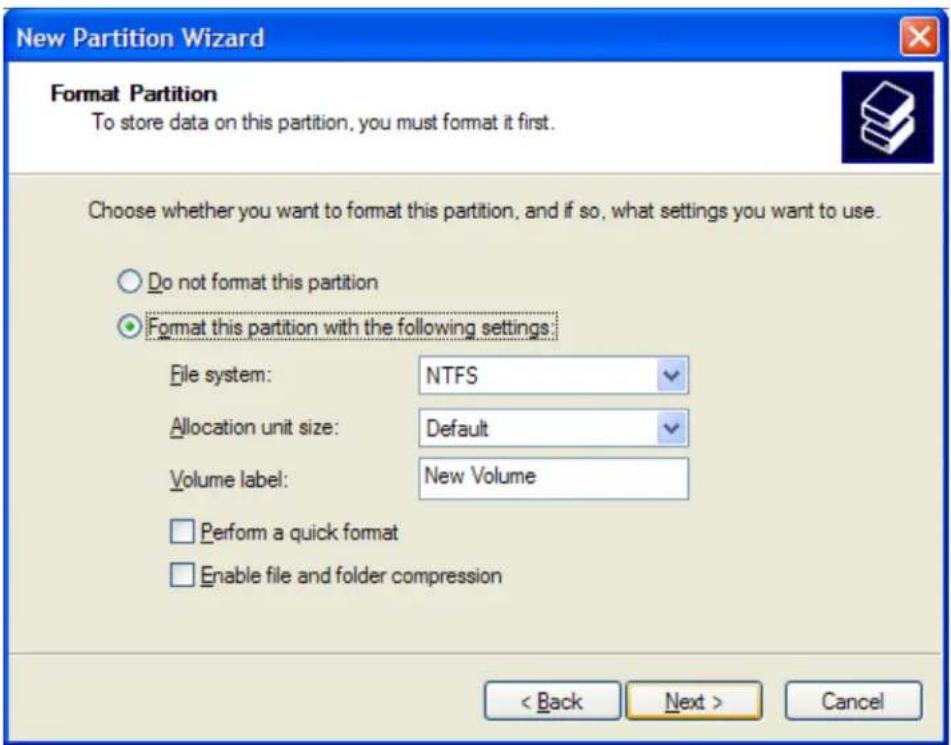
- The "Volume label" can be changed to any name up to 11 characters.
-
Suggest that "Quick Format" be selected and then click "Next".
-
You now reached the "Completing the New Partition Wizard" screen. It displays the various settings you previously selected. If you are satisfied with your selections, click "Finish" to complete the new formatting. At this time the Rocstor disk drive is being formatted, which may take a few minutes.
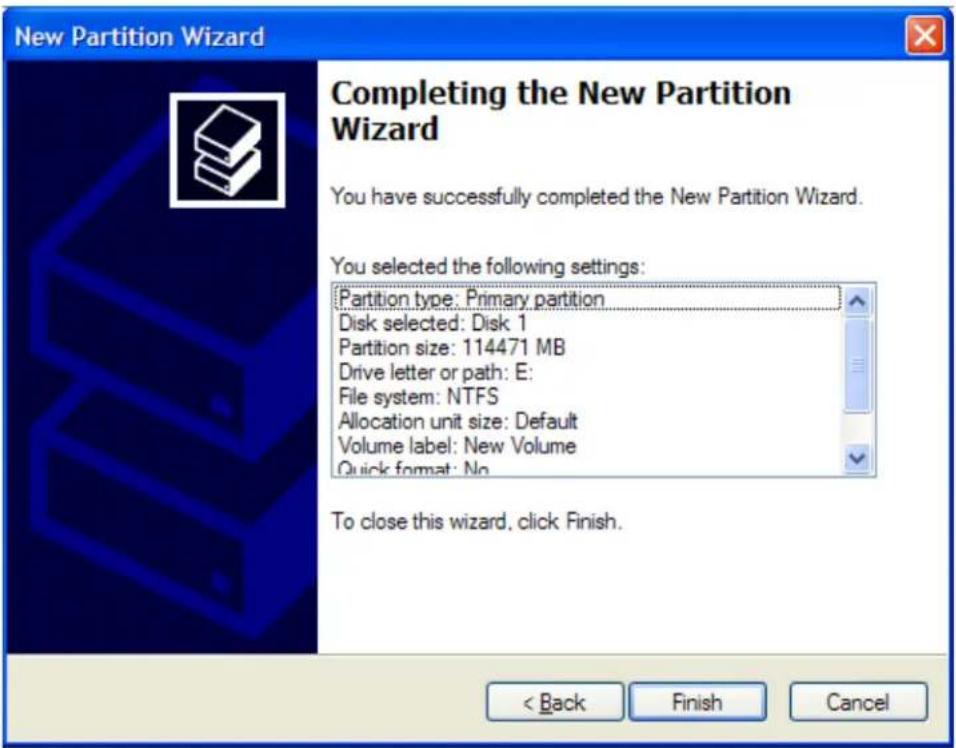
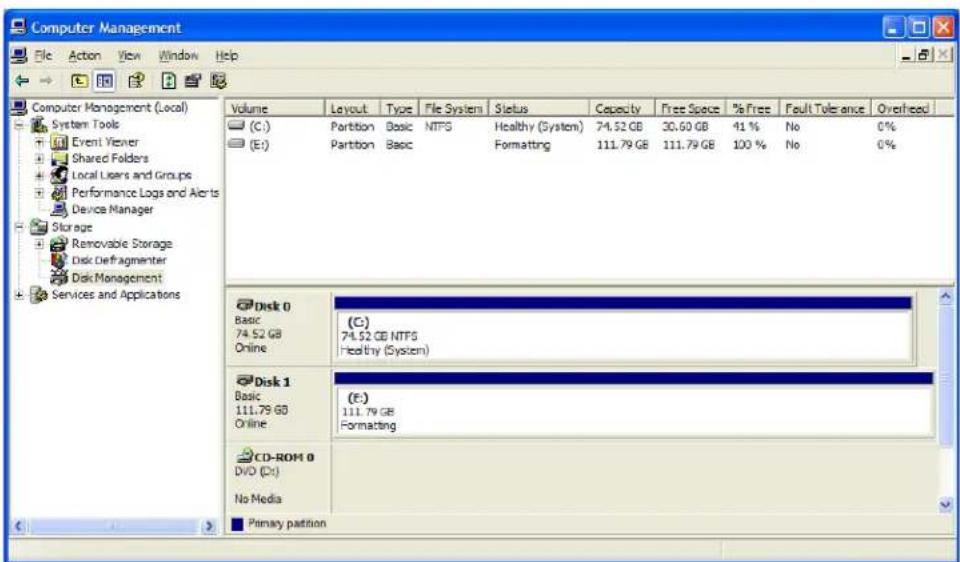
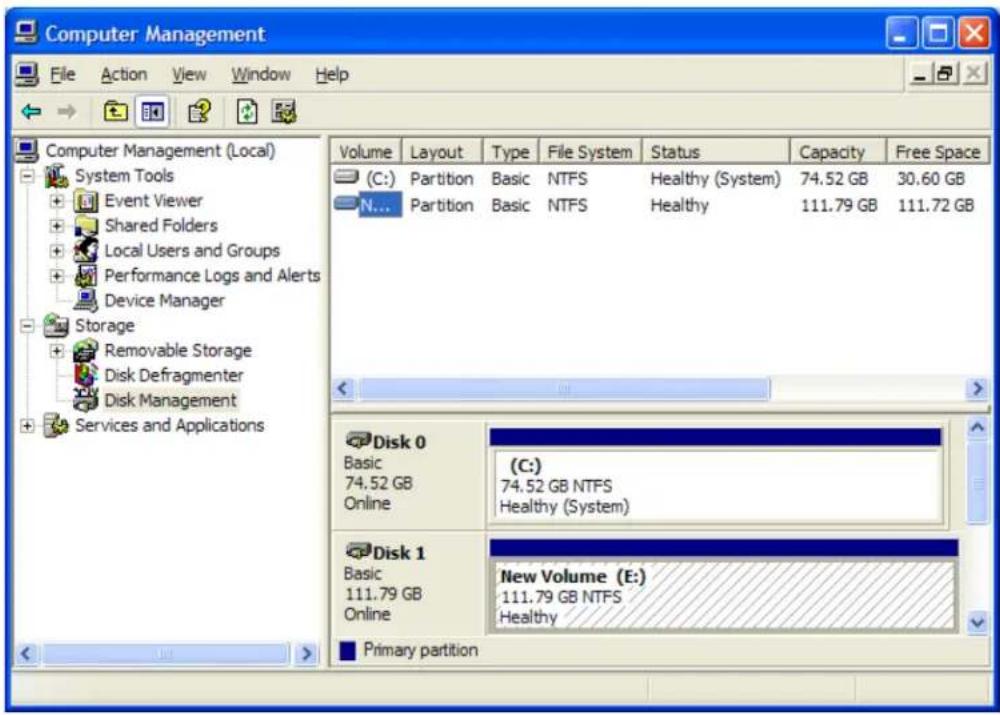
- You will return automatically to the "Disk Management" window and will see the newly formatted Rocstor disk on the screen with the name you selected. If no new name was entered in the "Volume label," the Rocstor drive will show up as "New Volume." To
rename the volume at this time, right click "New Volume" and click "Properties." You can now change the volume name up to 11 characters. Click OK.
- You can also change the name at any time in the future by reaching the "Properties" menu of the Rocstor drive.
- You can now Exit or close to return to the desktop.
KNOWLEDGE BASE
Introductions: Interfaces (ports) and Cables
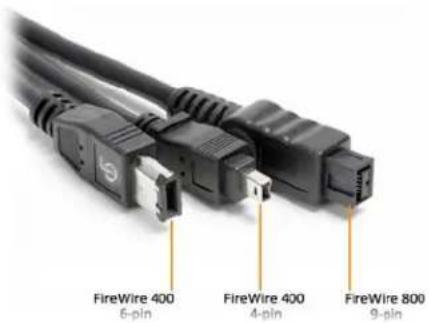
FireWire is Apple Inc.'s brand name for the IEEE 1394 interface (although the 1394 standard also defines a backplane interface). FireWire is also known as i.LINK (Sony's name) and DV (Panasonic's name, not to be confused with DV camcorder tapes). It is a serial bus interface standard for high-speed communications and isochronous real-time data transfer, frequently used in a personal computer and digital audio / digital video devices.
Standards and versions
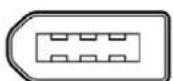
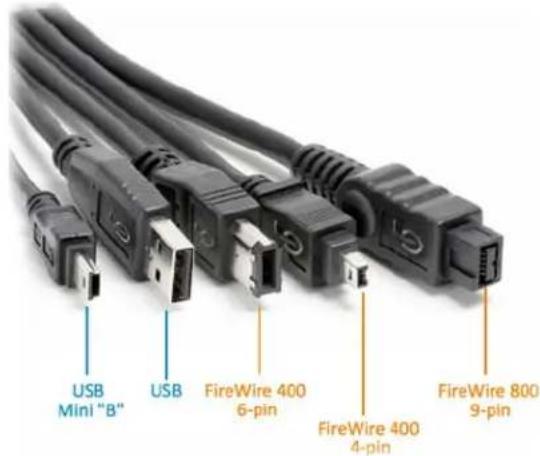
FireWire 400 (IEEE 1394) 6-Pin connector can transfer data between devices at 100, 200, or 400 Mbits/s half-duplex data rates (the actual transfer rates are 98.304, 196.608, and 393.216 Mbits/s, i.e. 12.288, 24.576 and 49.152 megabytes per second respectively). These different transfer modes are commonly referred to as S100, S200, and S400.
Cable length is limited to 14.8 ft (4.5 meters), although up to 16 cables can be daisy-chained using active repeaters, external hubs, or internal hubs often present in FireWire equipment. The S400 standard limits any configuration's maximum cable length to 230Ft (72 meters.) The 6-pin connector is commonly found on desktop computers and can supply the connected device with power.
The 6-pin powered connector adds power output to support external devices. Typically a device can pull about 7 to 8 watts from the port. However, the voltage varies significantly from different devices. Voltage is specified as unregulated and should nominally be about 25 volts (range 24 to 30). Apple's implementation on laptops is typically related to battery power and can be as low as 9 V but more likely about 12 V.
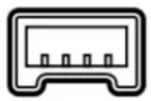
FireWire 400 (IEEE 1394a)
1394a also standardized the 4 pin connector already widely in use. The 4-pin version is used on many consumer devices such as camcorders, some laptops and other small FireWire devices. Though fully data compatible with 6-pin interfaces, it lacks power connectors.
FireWire 800 (IEEE 1394b) 9-pin FireWire 800/3200 (IEEE 1394b) connector was introduced commercially by Apple in 2003. This newer 1394 specification (1394b) and corresponding products allow a transfer rate of 786.432 Mbits/sec full-duplex via a new encoding scheme termed beta mode. It is backwards compatible to the slower rates and 6-pin connectors of FireWire 400. However, while the IEEE 1394a and IEEE 1394b standards are compatible, the FireWire 800's connector is different from FireWire 400's connector, making the two cables incompatible. An adapter or adapter cable, purchased from a local electronics store allows the connection of older devices to the newer port.

The full IEEE 1394b specification supports data rates up to 3200 Mbits/sec over beta-mode optical connections up to 320 Ft (100 meters) in length.
Universal Serial Bus (USB) is a serial bus standard to interface devices. USB was designed to allow peripherals to be connected using a single standardized interface socket and to improve Plug-and-play capabilities by allowing devices to be connected and disconnected without rebooting the computer (hot-swapping). Other convenient features include providing power to low-consumption devices without the need for an external power supply and allowing many devices to be used without requiring manufacturer specific, individual device drivers to be installed.
USB can connect computer peripherals such as external hard drives storage devices, keyboards, PDAs, scanners, digital cameras, printers, personal media players and flash drives. For many of those devices USB has become the standard connection method.
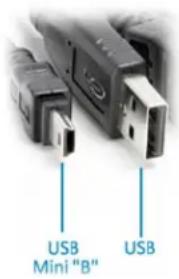
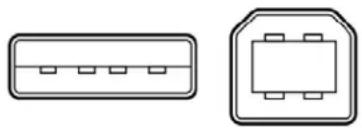
natural_image
Two schematic diagrams of electronic components with no text or symbolsUSB supports three data transfer rates:
- USB 2.0: A Hi-Speed rate of 480 Mbits/s (60 MB/s). All Rocstor devices are integrated with USB 2.0, Hi-Speed.
• USB 1.1: A Full Speed rate of 12 Mbits/s (1.5 MB/s). All USB Hubs support Full Speed.
• USB 1.0: A Low Speed rate of 1.5 Mbits/s (187 KB/s)
Serial Advanced Technology Attachment (SATA) is a computer bus primarily designed for transfer of data between a computer and storage devices (like hard disk drives or optical drives).
The main benefits are faster transfers, ability to remove or add devices while operating (hot-swapping), thinner cables that let air cooling work more efficiently, and more reliable operation with tighter data integrity checks than the older Parallel ATA interface.
SATA 1.5 GB/s and SATA 3 GB/s
SATA is designed to be backward and forward compatible with future revisions of the SATA standard.
External SATA
Maximum cable length is 6.6 Ft (2 meters). USB and FireWire allow longer distances. This table shows the real speed of SATA 1.5 Gbits/s and SATA 3 GB/s:
| SATA 1.5 Gbits/s | SATA 3 Gbits/s | |
| Frequency 1500 MHz 3000 MHz | ||
| Bits/clock 1 1 | ||
| 8b10b encoding 80% 80% | ||
| Bits/Byte 8 8 | ||
| Real speed | 150 MB/s | 300 MB/s |
SATA offers performance as high as 3.0 GB/sec per device with the current specification. It also offers new features such as hot swapping.
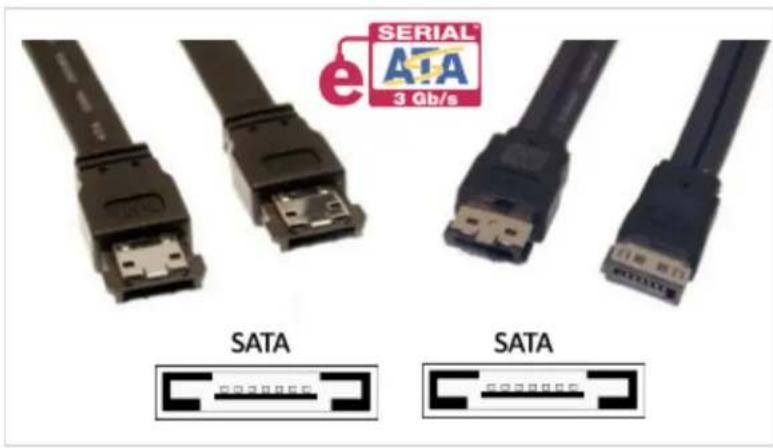
Comparison Chart:
| Raw Bandwidth(Mbits/s) | Transfer Speed(Mbits/s) | Max. Cable Length Feet (meters) | Power Provided | Device per channel | |
| SAS | 3000 | 375 | 26 Ft (8 m) | No | 4 |
| eSATA | 3000 | 375 | 6.5 Ft (2 m) | No | 1 (15 W/ port multiplier) |
| SATA 300 | 3000 | 375 | 3.3 Ft (1 m) | No | 1 per line |
| SATA 150 | 1500 | 187.5 | 3.3 Ft (1 m) | No | 1 per line |
| PATA (133) | 1064 | 133 | 18 inches (0.46 meters) | No | 2 |
| FireWire 3200 | 3144 | 393 | 100; (Cables available for 100m+) | 12–25 V, 15 W | 63 |
| FireWire 800 | 786 | 98.25 | 100 [11] m | 12–25 V, 15 W | 63 |
| FireWire 400 | 393 | 49.13 | 15 Ft (4.5 m) | 12–25 V, 15 W | 63 |
| USB 2.0 | 480 | 60 | 5 [14] m | 5 V, 2.5 W | 127 |
| USB 3.0 | 4800 | 600 | TBD | 5 V, 2.5 W | 127 |
| Ultra -320 SCSI | 2560 | 320 | 39 Ft (12 m) | No | 16 |
| Fiber Channel | 126 | ||||
| Over Copper Cable 16777216 with switch | 400 | 39 Ft (12 m) | No | ||
| Fiber Channel | 126 | ||||
| Over Fiber | 10520 | 2000 | 6.5- 164000 Ft (2–50000 m) | No | 16777216 with switches |
| Infiniband | >32 Ft (>10 m) Copper | 1 with point to point | |||
| 12x quad-rate | 120000 | 12000 | <32,800 Ft (<10000 m) Fiber | No | Many W/switched Fabric |
INTRODUCTION TO FORMATTING
File Allocation Table (FAT)
FAT is a file system developed by Microsoft for MS-DOS and is the primary file system for consumer versions of Microsoft Windows.
The FAT file system is relatively uncomplicated and is supported by virtually all existing operating systems for personal computers. This makes it an ideal format for hard drives and other storage devices and a convenient way of sharing data between disparate operating systems installed on the same computer (a dual boot environment).
FAT 32 is a disk formatting scheme which allows a maximum file size of 4 GB. Larger files require another formatting type such as HFS+ or NTFS.
Microsoft's Scan-Disk utility, included with Windows 95/98, places a volume limit of 127.53 gigabytes.
FAT 32 was introduced with Windows 95 OSR2. Windows 98 introduced a utility to convert existing hard disks from FAT16 to FAT32 without loss of data. In the NT line, native support for FAT32 arrived in Windows 2000.
Windows 2000 and Windows XP can read and write to FAT32 file systems of any size, but the format program included in Windows 2000 and higher can only create FAT32 file systems of 32 GB or less. This limitation is by design and was imposed because many tasks on very large FAT32 files become slow and inefficient when file systems exceed 32GB. This limitation can be bypassed when using the Windows command line Format utility or by using third-party formatting utilities.
The maximum possible size for a file on a FAT32 volume is 4 GB minus 1 byte. Video capture and editing applications and some other software can easily exceed this limit.
Until mid-2006, those who run dual boot systems or who move external data drives between computers with different operating systems had little choice but to stick with FAT32. Since then, full support for NTFS has become available in Linux and many other operating systems by installing the FUSE library (on Linux) together with the NTFS-3G application. Data exchange is also possible between Windows and Linux by using the Linux-native ext2 or ext3 file systems through the use of external drivers for Windows, such as ext2 IFS. However, Windows cannot boot from ext2 or ext3 partitions.
HFS Plus or HFS+
This is a file system developed by Apple Inc. to replace their Hierarchical File System (HFS) as the primary file system used in Macintosh computers (or other systems running Mac OS). It is also one of the formats used by the iPod digital music player. HFS Plus is also referred to as Mac OS Extended (or, erroneously, "HFS Extended"), where its predecessor, HFS is also referred to as Mac OS Standard (or, erroneously, as "HFS Standard"). During development, Apple referred to this file system with the codename Sequoia.
HFS Plus is an improved version of HFS, supporting much larger files (block addresses are 32-bit length instead of 16-bit) and using Unicode (instead of Mac OS Roman or any of several other character sets) for naming the items (files, folders). Names were normalized to a form very nearly the same as NFD (there are some minor differences derived from the fact that the HFS Plus format was finalized before Unicode had standardized the NFD format). HFS Plus permits filenames up to 255 UTF-16 characters in length, and n-forked files similar to NTFS, though almost no software takes advantage of forks other than the data fork and resource fork. HFS Plus also uses a full 32-bit allocation mapping table, rather than HFS's 16 bits. This was a serious limitation of HFS, meaning that no disk could support more than 65,536 allocation blocks under HFS. When disks were small, this was of little consequence, but as larger-capacity drives became available, it meant that the smallest amount of space that any file could occupy (a single allocation block) became excessively large, wasting significant amounts of space. For example, on a 1 GB disk, the allocation block size under HFS is 16 KB, so even a 1 byte file would take up 16 KB of disk space.
HFS Plus volumes are divided into sectors (called logical blocks in HFS), that are usually 512 bytes in size. These sectors are then grouped together into allocation blocks which can contain one or more sectors. The number of allocation blocks depends on the total size of the volume. HFS Plus uses a larger value to address allocation blocks than HFS, 32 bits rather than 16 bits. This means it can access 4,294,967,296 (=2 ^32 ) allocation blocks rather than the 65,536 (=2 ^16 ) allocation blocks available to HFS.
LIMITED WARRANTY
This Limited Warranty is provided by Rocstorage, Inc. (hereinafter: Rocstor) for all lines of products.
General Terms
EXCEPT AS EXPRESSLY SET FORTH IN THIS LIMITED WARRANTY, ROCSTOR MAKES NO OTHER WARRANTIES OR CONDITIONS, EXPRESS OR IMPLIED, INCLUDING ANY IMPLIED WARRANTIES OF MERCHANTABILITY AND FITNESS FOR A PARCTICULAR PURPOSE. ROCSTOR EXPRESSLY DISCLAIMS ALL WARRANTIES AND CONDITIONS NOT STATED IN THIS LIMITED WARRANTY. ANY IMPLIED WARRANTIES THAT MAY BE IMPOSED BY LAW ARE LIMITED IN DURATION TO THE LIMITED WARRANTY PERIOD. SOME STATES OR COUNTRIES DO NOT ALLOW A LIMITATION ON HOW LONG AN IMPLIED WARRANTY LASTS OR THE EXCLUSION OR LIMITATION OF INCIDENTAL OR CONSEQUENTIAL DAMAGES FOR CONSUMER PRODUCTS. IN SUCH STATES OR COUNTRIES, SOME EXCLUSIONS OR LIMITATIONS OF THIS LIMITED WARRANTY MAY NOT APPLY TO YOU.
This Limited Warranty applies to the Rocstor branded hardware products sold by or leased from Rocstorage, Inc., its worldwide subsidiaries, affiliates, authorized resellers, or country distributors (collectively referred to in this Limited Warranty as "Rocstor") with this Limited Warranty. This Limited Warranty is applicable in all countries and may be enforced in any country where Rocstor or its authorized service providers offer warranty service subject to the terms and conditions set forth in this Limited Warranty. However, warranty service availability and response times may vary from country to country and may also be subject to registration requirements in the country of purchase.
Rocstor warrants that the Rocstor hardware product and all the internal components of the product that you have purchased or leased from Rocstor are free from defects in materials or workmanship under normal use during the Limited Warranty Period. The Limited Warranty Period starts on the date of purchase or lease from Rocstor. Your dated sales or delivery receipt, showing the date of purchase or lease of the product, is your proof of the purchase or lease date. You may be required to provide proof of purchase or lease as a condition of receiving warranty service. You are entitled to warranty service according to the terms and conditions of this document if a repair to your Rocstor branded hardware is required within the Limited Warranty Period. This Limited Warranty extends only to the original purchaser or lessee of this Rocstor branded product and is not transferable to anyone who obtains ownership of the Rocstor branded product from the original purchaser or lessee.
Rocstor products are manufactured using new materials or new and used materials equivalent to new in performance and reliability. Spare parts may be new or equivalent to new. Spare parts are warranted to be free from defects in material or workmanship for thirty (30) days or for the remainder of the Limited Warranty Period of the Rocstor hardware product in which they are installed, whichever is longer.
Rocstor's Obligation under the Limited Warranty
During the Limited Warranty Period, Rocstor will repair or replace the defective component parts or the hardware product. All component parts or hardware products removed under this Limited Warranty become the property of Rocstor. The replacement part or product takes on either the Limited Warranty status of the removed part or product or the thirty (30) day limited warranty of the spare part. In the unlikely event that your Rocstor product has a recurring failure, Rocstor, at its discretion, may elect to provide you with a replacement unit of Rocstor's choosing that is at least equivalent to your Rocstor branded product in hardware performance. Rocstor reserves the right to elect, at its sole discretion, to give you a refund of your purchase price or lease payments (less interest) instead of a replacement. This is your exclusive remedy for defective products. The original Limited Warranty is not extended when the product, or a part of the product, is repaired or replaced during the Limited Warranty period. Rocstor shall not be responsible or liable for backing up any data that is on a drive being returned for service
YOU SHOULD MAKE PERIODIC BACKUP COPIES OF THE DATA STORED ON YOUR HARD DRIVE OR OTHER STORAGE DEVICES AS A PRECAUTION AGAINST POSSIBLE FAILURES, ALTERATION, OR LOSS OF THE DATA. BEFORE RETURNING ANY UNIT FOR SERVICE, BE SURE TO BACK UP DATA AND REMOVE ANY CONFIDENTIAL, PROPRIETARY, OR PERSONAL INFORMATION. ROCSTOR IS NOT RESPONSIBLE FOR DAMAGE TO OR LOSS OF ANY PROGRAMS, DATA, OR REMOVABLE STORAGE MEDIA. ROCSTOR IS NOT RESPONSIBLE FOR THE RESTORATION OR REINSTALLATION OF ANY PROGRAMS OR DATA OTHER THAN SOFTWARE INSTALLED BY ROCSTOR WHEN THE PRODUCT WAS MANUFACTURED.
Rocstor does not warrant that the operation of this product will be uninterrupted or error-free. Rocstor is not responsible for damage that occurs as a result of your failure to follow the instructions that came with the Rocstor branded product.
This Limited Warranty does not apply to expendable parts. This Limited Warranty does not extend to any product from which the serial number has been removed or that has been damaged or rendered defective (a) as a result of accident, misuse, abuse, or other external causes; (b) by operation outside the usage parameters stated in the user documentation that shipped with the product and/or posted on the Rocstor website; (c) by the use of parts not manufactured or sold by Rocstor; (d) as a result of normal wear; or (e) by modification or service by anyone other than (i) Rocstor, (ii) a Rocstor authorized service provider, or (iii) your own installation of end-user replaceable Rocstor or Rocstor approved parts if available for your product in the servicing country.
These terms and conditions constitute the complete and exclusive limited warranty agreement between Rocstor and you regarding the Rocstor branded product you have purchased or leased. These terms and conditions supersede any prior agreements or representations including representations made in Rocstor sales literature or advice given to you by Rocstor or an agent or employee of Rocstor-that may have been made in connection with your purchase or lease of the Rocstor branded product. No change to the conditions of this Limited Warranty is valid unless it is made in writing and signed by an authorized representative of Rocstor.
Buyer's Obligation under the Warranty
The person requesting coverage under this warranty shall prove that he or she is the original purchaser and declares that the product has not been sold, leased, bartered or otherwise changed possession. The purchaser shall frequently backup the Rocpro hard drive and backup the data immediately prior to returning the drive for warranty service.
The buyer must notify Rocstor and show proof of notification, through any reasonable means of communication. See full street address email address and toll free phone numbers below or updated contact information are available on Rocstor.com website. The notification shall identify any defect, malfunction, or nonconformity promptly upon discovery. Rocstor will acknowledge receipt of the communication and issue a Return Merchandise Authorization (RMA) code. The buyer is obligated to securely and safely package(s) the product, preferably in the original packing materials, WITH THE RMA number, and deliver it together with a copy of the original purchase receipt and a description of the problem to the Rocstor home office. Buyer is responsible for the product until it is received by Rocstor. It is recommended that the product be insured during transportation by the sender. You must prepay any shipping charges, taxes, or duties associated with transportation of the product. In addition, you are responsible for insuring any product shipped or returned for service. You assume risk of loss during shipping.
Limitation of Damages (Liability)
IF YOUR ROCSTOR BRANDED HARDWARE PRODUCT FAILS TO WORK AS WARRANTED ABOVE, THE ORIGINAL PURCHASER'S SOLE AND EXCLUSIVE REMEDY SHALL BE REPAIR OR REPLACEMENT. ROCSTOR'S MAXIMUM LIABILITY UNDER THIS LIMITED WARRANTY IS EXPRESSLY LIMITED TO THE LESSER OF THE PRICE YOU HAVE PAID FOR THE PRODUCT OR THE COST OF REPAIR OR REPLACEMENT OF ANY ROCSTOR HARDWARE COMPONENTS THAT MALFUNCTION IN CONDITIONS OF NORMAL USE. ROCSTOR IS NOT LIABILE FOR ANY DAMAGE TO ANY OTHER PRODUCT CONNECTED TO A ROCSTOR PRODUCT.
Limitation on Consequential Damages
ROCSTOR IS NOT LIABLE FOR ANY DAMAGES CAUSED BY THE PRODUCT OR THE FAILURE OF THE PRODUCT TO PERFORM, INCLUDING ANY LOST PROFITS OR SAVINGS OR SPECIAL, INCIDENTAL OR CONSEQUENTIAL DAMAGES. ROCSTOR IS NOT LIABLE FOR ANY CLAIM MADE BY A THIRD PARTY OR MADE BY YOU FOR A THIRD PARTY. THIS LIMITATION OF LIABILITY ALSO APPLIES WHETHER DAMAGES ARE SOUGHT OR A CLAIM IS MADE UNDER THIS LIMITED WARRANTY OR AS A TORT CLAIM (INCLUDING NEGLIGENCE AND STRICT PRODUCT LIABILITY), A CONTRACT CLAIM OR ANY OTHER CLAIM. THIS LIMITATION OF LIABILITY CANNOT BE WAIVED OR AMENDED BY ANY PERSON. THIS LIMITATION OF LIABILITY WILL BE EFFECTIVE EVEN IF YOU HAVE ADVISED ROCSTOR OR AN AUTHORIZED REPRESENTATIVE OF ROCSTOR OF THE POSSIBILITY OF ANY SUCH DAMAGES.
THIS LIMITED WARRANTY GIVES YOU SPECIFIC LEGAL RIGHTS. YOU MAY ALSO HAVE OTHER RIGHTS THAT MAY VARY FROM STATE TO STATE OR FROM COUNTRY TO COUNTRY. YOU ARE ADVISED TO CONSULT APPLICABLE STATE OR COUNTRY LAWS FOR A FULL DETERMINATION OF YOUR RIGHTS.
Disclaimer
We accept no liability for any loss of data, damages and the inability of Rocstor products to work with any third party equipment. Nor can Rocstor accept any liability or responsibility for software or third party hardware products.
Limited Warranty Period
The limited warranty period for the Bigroc 4-Bay RAID is one (1) Year Parts and Labor. This Limited Warranty extends only to the original purchaser or lessee of this Rocstor branded product and is not transferable to anyone who obtains ownership of the Rocstor branded product from the original purchaser or lessee.
Types of Limited Warranty Service
Your Rocstor Limited Warranty consists of repair or replacement of defective parts, including hard drives identified by Rocstor Support Organization as “pre-failure.”
Carry-in Limited Warranty Service Available Monday - Friday
Under the terms of carry-in service, you may be required to deliver your Rocstor product to the Rocstor Service Center or an authorized service location for warranty repair. You must prepay any shipping charges, taxes or duties associated with transportation of the product. In addition, you are responsible for insuring any product shipped or returned for service. You assume risk of loss during shipping.
YOU SHOULD MAKE PERIODIC BACKUP COPIES OF THE DATA STORED ON YOUR HARD DRIVE OR OTHER STORAGE DEVICES AS A PRECAUTION AGAINST POSSIBLE FAILURES, ALTERATION OR LOSS OF THE DATA. BEFORE RETURNING ANY UNIT FOR SERVICE, BE SURE TO BACK UP DATA AND REMOVE ANY CONFIDENTIAL, PROPRIETARY OR PERSONAL INFORMATION. ROCSTORAGE IS NOT RESPONSIBLE FOR DAMAGE TO OR LOSS OF ANY PROGRAMS, DATA OR REMOVABLE STORAGE MEDIA. ROCSTORAGE IS NOT RESPONSIBLE FOR THE RESTORATION OR REINSTALLATION OF ANY PROGRAMS OR DATA OTHER THAN SOFTWARE INSTALLED BY ROCSTORAGE WHEN THE PRODUCT WAS MANUFACTURED.
Rocstorage shall not be responsible or liable for backing up any data that is on a drive being returned for service.
Expect that all data on the drive will be destroyed and not retrievable when returned for warranty service. Rocstor Replaceable Parts Program
Where available, the Rocstor Replaceable Parts program ships approved replacement parts directly to you to fulfill your warranty. This will save considerable repair time. After you call the Rocstor Technical Support Center at 888.877.8777 a replaceable part can be sent directly to you. Once the part arrives, call the Rocstor Technical Support Center. A technician will assist you over the phone to ensure that the installation is quick and easy.
Service Upgrades
Rocstor offers extra coverage for your product. For information on service upgrades, visit www.rocstor.com.
Service upgrades purchased in one country are not transferable to another country.
Capacity Disclaimer
Actual accessible hard drive capacity will indicate up to 10% lower than stated under different Operating Systems and formatting.
The storage volume is measured in total bytes before formatting. References to round numbers of gigabytes or terabytes are an approximation only. For example, a disk drive labeled as having 500GB (Gigabytes) has space for approximately 500,000,000 bytes before formatting. After formatting, the drive capacity is reduced by about 5% to 10% depending on the operating system and formatting used or "1GB = 1,000,000,000 bytes.
Options and Software
The Limited Warranty terms and conditions for Rocstor options are as indicated in the Limited Warranty applicable to Rocstor options. ROCSTOR DOES NOT WARRANTY SOFTWARE PRODUCTS, INCLUDING ANY SOFTWARE PRODUCTS OR THE OPERATING SYSTEM PREINSTALLED BY ROCSTOR. Rocstor's only obligations with respect to software distributed by Rocstor under the Rocstor brand name are set forth in the applicable end-user license or program license agreement. Non-Rocstor hardware and software products are provided "AS IS" and without any Warranty. However, non-Rocstor manufacturers, suppliers or publishers may provide their own warranties directly to you.
The data stored in Rocstor and Rocsecure storage product lines are not guaranteed by Rocstor (or the hard disk manufacturer.) We are not responsible for any loss of data. Always back up data regularly
TECHNICAL SUPPORT
Software Technical Support
Software technical support is defined as assistance with questions and issues about the software that was either preinstalled by Rocstor on the Rocstor branded product or that was included with the Rocstor branded product at the time of your purchase or lease of the product. Technical support for software is available for the first ninety (90) days from date of product purchase or lease. Your dated sales or delivery receipt, showing the date of purchase or lease of the product, is your proof of the purchase or lease date. You may be required to provide proof of purchase or lease as a condition of receiving software technical support. After the first ninety (90) days, technical support for software that was either preinstalled by Rocstor on the Rocstor branded product or included with the Rocstor branded product at the time of your purchase or lease of the product is available for a fee.
WARNING: The individual user should take care to determine prior to use whether this device is suitable, adequate or safe for the use intended. Since individual applications are subject to great variation, the manufacturer “Rocstor” makes no representation or warranty as to the suitability or fitness of these devices for any specific application.
Technical Support
The Bigroc 4-Bay RAID is backed by free telephone technical support for two (2) years from the date of purchase. Please register your product with Rocstor. To register, fill in the Limited Warranty Registration form in the Support tab at www.rocstor.com.
Free telephone technical support is available weekdays from 9 AM until 6 PM Pacific Standard Time. Customers in the United States and Canada can call toll-free: (888) 877-8777; all others must call (818) 449-2000.
When calling for support, please have the product's serial number (printed on the label on the bottom of the drive) and system hardware information available.
TRADEMARKS ACKNOWLEDGEMENTS
© 2012, Rocstorage, Inc; acknowledges the following trademarks for company names or products mentioned within the Rocstor site, portal pages and Articles/text/manuals:
Rocstor, Rocsecure and Rocpower are registered trademarks of Rocstorage, Inc. Rocpro, Rocport, Rocbit, Rocsafe ... are the trademarks of Rocstorage, Inc. "store your future", "secure your future" and "power your future" are the slogan marks of Rocstorage, Inc.
Apple, the Apple logo, Mac, Power Macintosh, FireWire, and Mac Pro, Leopard ... are trademarks of Apple Computer, Inc. in the United States and other countries.
Microsoft, MS-DOS, Windows CE, Windows NT, Windows 98, Soft Windows, Vista ... are registered trademarks of Microsoft Corporation in the United States and other countries.
Intel, Itanium, Pentium XXX, Celeron, and Xeon MMX ... are registered U.S. trademarks of Intel Corporation or its subsidiaries in the United States and other countries.
This product is (may also be) integrated with SATA hard drives from the following
manufactures: Seagate, Samsung, Western Digital, Hitachi, Toshiba, Fujitsu ...
All other names are trademarks of their respective companies.
Rocstor wishes to acknowledge the use of tables, charts, graphs and texts from the Wikipedia website. © 2000 - 2012
COPYRIGHTS
© 2013 Rocstorage, Inc. This Manual is protected by United States copyright law and may not be reproduced, distributed, transmitted, displayed, published or broadcast without the prior written permission of Rocstorage, Inc. You may not alter or remove any trademark, copyright or other notice from copies of this Manual.
Assembled and integrated in U.S.A. using domestic and / or foreign components.
CONTACT INFORMATION
Corporate Headquarters
8130 Remmet Avenue
Canoga Park, CA 91304-4129
Office: +1 (818) 449-2000
Email: info@Rocstor.com
Technical Support / RMA
Tel: (888) 877-7716 (USA and Canada)
Tel: +1 (818) 449-2000 (Domestic and Internationals)
Hours: 9:00 am - 5:00 pm PST
Mon - Fri (excluding holidays)
Email: support@Rocstor.com
Sales Info
Hours: 8:00 am - 5:00 pm PST
Mon - Fri (excluding holidays)
Email: sales@Rocstor.com
Tel: (888) 877-7716
Fax: (818) 884-8777
Corporate, Government and Academic Customers
Our Corporate Sales Team's goal is to help our U.S.A. and Canadian customers find a storage solution that best serves their needs. We will help you determine your best purchasing options. For more information please contact the appropriate department below or call us at +1 (888) 877-7716
General sales information: sales@Rocstor.com
Corporate sales information: corporate_sales@Rocstor.com
Educational sales information: academic_sales@Rocstor.com
Federal, State & Local government sales information:
government_sales@Rocstor.com
Resellers/Business Development/OEM Partners
All Channel National and International Resellers, VARs, Consultants ... contact Rocstor Channel Sales:
In U.S., call: 888.877.7716
Out of USA call +1.818.449.2000
Email: reseller_info@Rocstor.com
Thank you for purchasing the Bigroc 5C 4-Bay RAID.
Ver.0301L
- BIGROC 5C
- TABLE OF CONTENTS
- IMPORTANT NOTICES....5
- PRECAUTIONS FOR THE RAID SYSTEM 6
- GENERAL......8
- SYSTEM VIEWS ....14
- CONNECTING THE BIGROC RAID SYSTEM TO A COMPUTER....15
- RAID MODES....18
- GLOSSORY 29
- eSATA PCI EXPRESS CARD INSTALLATION....30
- IMPORTANT NOTICES
- Safety Notices
- General Notices
- Capacity Disclaimer
- Care and Handling
- PRECAUTIONS FOR THE RAID SYSTEM
- GENERAL
- Introduction
- BOX CONTENTS
- SPECIAL FEATURES
- MINIMUM SYSTEM REQUIREMENTS
- Mac Users:
- Window Users:
- CONNECTORS
- SYSTEM VIEWS
- Front View
- Rear View
- INSERTING/REPLACING THE HARD DRIVES IN THE RAID SYSTEM
- CONNECTING THE RAID SYSTEM TO A COMPUTER
- Connecting Multiple Devices
- SAFE REMOVAL OF THE RAID SYSTEM
- RAID MODES
- RAID 0 (Striping)
- RAID 1 (Mirroring)
- SPAN (combine Mode)
- RAID 5
- RAID 10 (1+0)
- JBOD (JUST A BUNCH OF DISKS)
- HOT SWAP
- Hard Disk Drive LED x 4
- EXTERNAL BOOTUP
- PC
- MAC
- DISK VOLUME OVER 2TB
- GLOSSARY
- ESATA PCI EXPRESS CARD INSTALLATION
- System Requirements Windows 2000 or later 32-bit/64-bit OS
- Hardware Installation
- Driver Installation
- Verify Driver Installation
- Mac OS:
- Windows OS:
- QUESTIONS & ANSWERS CONCERNING RAID SYSTEMS
- Discrepancy in Reported and Actual Size Capacity
- RAID 0
- Rebuild
- SPECIFICATIONS
- PARTITIONING AND FORMATTING THE BIGROC 4-BAY DRIVE ON A MAC OS
- IMPORTANT NOTES:
- INSTRUCTIONS FOR PARTITIONING AND FORMATIING
- INSTRUCTIONS FOR PARTITIONING AND FORMATTING FROM FAT32 to HFS+: "Mac"
- PARTITIONING AND FORMATTING THE BIGROC DRIVE ON WINDOWS 2000, XP AND VISTA and Windows 7
- DIFFERENT WAYS TO GET TO THE CONTROL PANEL:
- INSTRUCTIONS UPON REACHING CONTROL PANEL
- INSTRUCTIONS FOR PARTITIONING AND FORMATTING FROM FAT32 to NTFS
- KNOWLEDGE BASE
- Introductions: Interfaces (ports) and Cables
- Standards and versions
- FireWire 400 (IEEE 1394a)
- USB supports three data transfer rates:
- SATA 1.5 GB/s and SATA 3 GB/s
- INTRODUCTION TO FORMATTING
- File Allocation Table (FAT)
- HFS Plus or HFS+
- LIMITED WARRANTY
- General Terms
- Rocstor's Obligation under the Limited Warranty
- Buyer's Obligation under the Warranty
- Limitation of Damages (Liability)
- Limitation on Consequential Damages
- Disclaimer
- Limited Warranty Period
- Types of Limited Warranty Service
- Carry-in Limited Warranty Service Available Monday - Friday
- Expect that all data on the drive will be destroyed and not retrievable when returned for warranty service. Rocstor Replaceable Parts Program
- Service Upgrades
- Options and Software
- TECHNICAL SUPPORT
- Software Technical Support
- TRADEMARKS ACKNOWLEDGEMENTS
- COPYRIGHTS
- CONTACT INFORMATION
- Corporate Headquarters
- Technical Support / RMA
- Sales Info
- Corporate, Government and Academic Customers
- Resellers/Business Development/OEM Partners
Brand : Rocstor
Model : BIGROC 5c
Category : NAS