
TF10CH - Pump CDA - Free user manual and instructions
Find the device manual for free TF10CH CDA in PDF.


| Product Type | Single lever filter tap with dual water supply (filtered and unfiltered) |
| Brand | CDA |
| Model | TF10CH |
| Mounting Hole Diameter | 35 mm |
| Operating Pressure (Hot/Cold) | Minimum 0.5 / 1.0 bar; Maximum 5.5 bar |
| Maximum Hot Water Temperature | 70°C (recommended 46°C) |
| Filtered Water Flow Rate | 2–3 L/min |
| Filter Cartridge Life | Maximum 6 months |
| Warranty (Product) | 5 years on materials and workmanship; 2 years on working parts/valves; 1 year on decorative finish and O-rings |
| Care Instructions | Clean with soft damp cloth and mild detergent; avoid abrasives, solvents, and harsh chemicals |
| Installation Requirements | Flush supply pipes before installation; use isolation valves and strainers recommended; requires 35 mm tap hole |
| Water Supply Connections | Hot (12" flexi pipe), Cold (12" flexi pipe), Filtered (14" flexi pipe) |
| Filter Type | Dual stage cartridge for taste, clarity, and odor improvement |
| Included Components | Tap body, seals, fixing hardware, flexi pipes, filter cartridge, bracket, pushfit connectors, isolator valve |
| Compliance | WRAS approved or manufactured according to European standards |
Frequently Asked Questions - TF10CH CDA
User questions about TF10CH CDA
0 question about this device. Answer the ones you know or ask your own.
Ask a new question about this device
Download the instructions for your Pump in PDF format for free! Find your manual TF10CH - CDA and take your electronic device back in hand. On this page are published all the documents necessary for the use of your device. TF10CH by CDA.
USER MANUAL TF10CH CDA
TF10 - Single lever filter tap
5 Year warranty:
In the unlikely event that you should experience any defect in the materials or workmanship of your new CDA mixer within FIVE years of purchase, the purchaser's sole remedy shall be the replacement (at the manufacturer's discretion) of all or any part of the product that is defective. All working parts and valves are guaranteed for a period of TWO years from purchase. Decorative surface finishes and O-rings are guaranteed for ONE year from the date of purchase provided that our advice concerning care has been observed. This is provided that the mixer has been used for normal domestic purposes in the UK and that the care, installation and maintenance instructions have been observed. The warranty extends to the original purchaser only. You should retain a copy of your dated invoice as proof of purchase to validate any claims under this guarantee.
Care Instructions for your Kitchen Sink Mixer:
To maintain the appearance of this tap, ensure that it is regularly cleaned only using a clean, soft damp cloth. A solution of warm water and a mild liquid detergent may be used where necessary, and then the fitting rinsed thoroughly and wiped dry. Any other cleaning action will invalidate your warranty. If the tap has a diffuser it should be cleaned periodically.
Abrasive cleaners, scouring cleaners and acidic cleaners must not be used under any circumstances. Avoid contact with all solvents (including chlorinated solvents, ketones or acetones as these may result in surface deterioration or etching). Also avoid contact with any harsh household chemicals such as oven cleaners, drain cleaners, rust removers, paint strippers and toilet bowl cleaners, bar keepers friend or Brasso.
Important Technical Data:
Minimum hot / cold operating pressure 0.5 / 1.0 bar | Maximum hot water temperature 70°C*
Maximum operating pressure 5.5 bar* Recommended hot water temperature 46°C
*If these temperatures or pressures are exceeded, even for short periods, damage can result.
CDA taps are either WRAS approved or manufactured in accordance with recognised European standards. Please ensure that your Kitchen mixer is fitted in accordance with Local Water Byelaws.
These installation guidelines have been prepared for your direction and you must exercise due care at all times. We do not accept responsibility for problems that may occur through improper installation. Whilst assembling the tap take care not to accidentally loosen any screwed assemblies.
Installation Preparation:
Before installing the new mixer it is essential that you thoroughly flush through the supply pipes in order to remove any remaining solder, swarf or impurities from your system. Failure to carry out this simple procedure could cause problems or damage to the workings of the mixertap.
We strongly recommend installing particle filter strainers and isolation valves to both the hot and cold feed pipes in an accessible position. This will help to prevent premature failure of the valves and ease any future maintenance.
All parts should be removed from their packaging and inspected for completeness any transport damage prior to installation.
Shut off your water heating system and ensure that your mains stopcock is closed. Open the lowest hot and cold taps in the house and allow the water to run until the cold-water storage tank and pipes are fully empty. Please note, the hot water storage cylinder (if applicable) will always remain full.
This mixertap requires a 35mm∅ tap hole, if replacing an existing tap, remove the tap & clean the end of the feed pipes using wire wool the tap hole area should be free from dirt and sealant.
This tap can be used in conjunction with a water softening system and will remove the need for a separate drinking water tap. In this instance the isolator valve (U) must cut into the unsoftened cold mains supply.
Loosely position the tap and tail pipes to check if any alteration to the existing pipework is required, if this is the case do this now.
Stage 1 – install the tap:
- Screw the fixing stud (F) into the base of the tap (A).
- Place the upper sink seal (B) on the base of the tap (A).
- Screw the hot (H), cold (I) & filtered (J) water tail pipes into the base of the tap (A). Note: the drawing key identifies water inlets.
- Place the tap (A) and seal (B) centrally to the tap hole, passing the fixing stud (F) and tail pipes (H, I & J) through the sink.
- Pass the rubber horseshoe (D) then the metal horseshoe (E) over the fixing stud (F). Note: if the tap is to be fitted to a stainless steel sink then the white triangular plate (C) can be fitted where shown to improve the stability of the tap.
- Using a spanner tighten fixing nut (G) onto the fixing stud (F) securing the tap (A).
- Connect the flexible 12 " hot pipe (H) to the hot water supply using the appropriate sized compression fittings.
- Place the 14 " rubber seal (J1) into flexi pipe (J), now tighten the 14 " pushfit (K) into the end of the flexible filtered water pipe (J). Note PTFE tape can be used on the thread of pushfit (K) to ensure a water tight joint.
- Using compression nuts (S) and olives (T) connect the 3-way tee (U) as shown to the 15mm cold water supply feed.
- Attach a short stub of 15mm pipe (3) to the 3-way tee (U) as shown using compression nuts (S) and olives (T).
- Connect the flexible 12 " cold pipe (I) to the 15mm pipe stub (3) using the appropriate sized compression fittings (1 & 2).
Stage 2 – install the filter:
- Locate a convenient position to install the filter (N), remembering that it must be accessible when it is to be changed and functions best when mounted vertically.
- Screw the filter bracket (P) to the cupboard wall using screws (O), if attaching the bracket to an interior wall use rawl plugs also.
- Remove the dust caps from the ends of the filter (N) and write the installation date onto its label. Firmly push the pushfit connectors (M & Q) onto each end of the filter.
- Clip the filter (N) into its bracket (P) noting the direction of flow through the filter (N) towards the tap (A).
- Cut the blue flexible pipe (L) so it is slightly longer than the required lengths to and from the filter unit (N). When cutting the pipe use a sharp Stanley knife, ensuring that the pipe is cut cleanly and square at all ends.
- Firmly push the blue pipe (L) apx. 12mm into the pushfit connector (K) and push fit connector (M).
- Screw the large pushfit adaptor (R) onto the 3 way tee (U)
- Firmly push the blue pipe (L) apx. 12mm into the pushfit connector (Q) and push fit adaptor (R).
After installation:
Once you have visually checked the new fittings and connections, ensure that all taps are closed except the new mixer tap, which should be left open. Turn on the water supply at the mains stop cock. As the system starts to refill, check carefully for leaks. Once you are fully satisfied that there are no leaks, turn on the water heating. Clean the tap to remove any marks created during installation as instructed then replace the bag that has been provided to protect the tap until it is ready for use.
Stage 3 – setting the tap up:
- The filtered drinking water system performs at a maximum of 2-3 L/min. Turn the tap fully on to filtered water, now the turn the lever on the 3-way valve (U) to adjust the flow of filtered water to the correct level. Note when the filter is new it will take a moment to pull any air though the system, you may notice some carbon discoloration in the water at this point, this is normal and will pass with flushing.
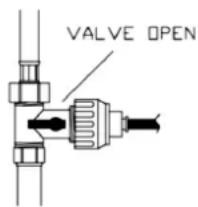
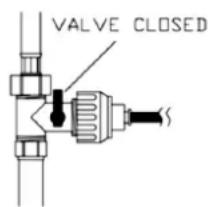
Using the tap:
For best results when using the filtered water always run the tap for a few moments. Running the tap will help to flush the system through and make the water cooler for drinking, if the tap has not been used for several hours then flush the tap for longer. When comparing the taste of filtered and unfiltered water always taste the filtered water first.
The dual stage filter is designed to improve the taste, clarity and odour of drinking water, the filter also the help to reduce the level of chemical impurities and lime scale build up on kettles and cookware in low-moderate scale regions.
Each filter cartridge has a maximum 6-month life. For replacement filters call 01949 862012.
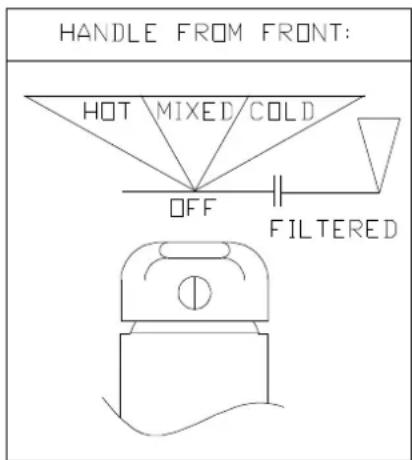
To select filtered water turn the lever off, then fully right past the 'click' to select filtered water, tilt the lever to control the filtered water flow.
To select hot, cold or mixed water turn the lever off, now turn to the left past the 'click' to select non filtered water, tilt the lever to control the hot, cold or mixed water flow.
The tap will not switch from filtered to non filtered water without the tap being turned off first.
| Key | Description Qty. | |
| A | Tap body 1 | |
| B | Upper sink / worktop seal 1 | |
| C | White triangular stabilizing plate (for use with stainless sinks only) | 1 |
| D | Rubber horseshoe 1 | |
| E | Metal horseshoe 1 | |
| F | Fixing stud 1 | |
| G | Fixing nut 1 | |
| H | Hot water 12 " flexi pipe with non return valve insert | 1 |
| I | Cold water 12 " flexi pipe with non return insert | 1 |
| J | Filter water 14 " flexi pipe 1 | |
| J1 | 14 " rubber seal | 1 |
| K | 14 " Pushfit connector | 1 |
| L | Blue flexible pipe | 1m |
| M | Pushfit connector | 1 |
| N | Filter cartridge | 1 |
| O | Self tapping screws | 2 |
| P | Filter cartridge bracket | 1 |
| Q | Pushfit connector | 1 |
| R | Valve pushfit adaptor | 1 |
| S | Compression nuts | 2 |
| T | Compression olives | 2 |
| U | Isolator valve | 1 |
| 1 | 15mm Compression olive | Not supplied |
| 2 | 15mm Compression nut | |
| 3 | Stub of 15mm pipe |
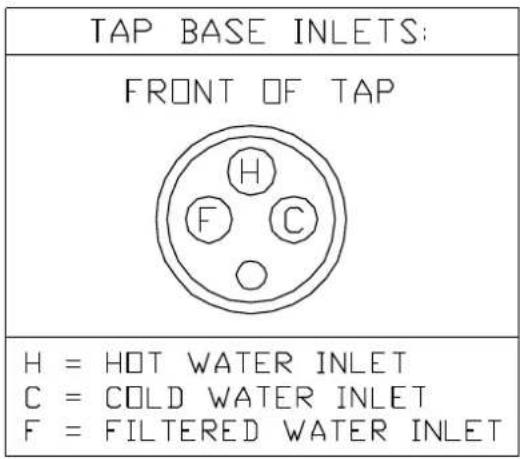

flowchart
graph TD
    A["Feed Inlet"] --> B["Filtered Water Filter"]
    B --> C["Hot Flow"]
    C --> D["Cooling Pipe"]
    D --> E["Pulling"]
    E --> F["PUSH RING TOWARDS FITTING"]
    F --> G["PUSH RING TOWARDS FITTING"]
    G --> H["To Release Pipe"]
    style A fill:#f9f,stroke:#333
    style B fill:#ccf,stroke:#333
    style C fill:#cfc,stroke:#333
    style D fill:#fcc,stroke:#333
    style E fill:#cff,stroke:#333
    style F fill:#ffc,stroke:#333
    style G fill:#cfc,stroke:#333
    style H fill:#fcc,stroke:#333
Brand : CDA
Model : TF10CH
Category : Pump