SuperChassis 933E1-R760B - Computer Case Supermicro - Free user manual and instructions
Find the device manual for free SuperChassis 933E1-R760B Supermicro in PDF.


| Product Type | 3U Rackmount Chassis |
| Brand | Supermicro |
| Model | SuperChassis 933E1-R760B |
| Form Factor | 3U Rackmount |
| Supported Motherboard | SSI EEB (12" x 13") |
| Drive Bays | 8x 3.5" Hot-Swap SATA/SAS (via backplane) |
| Power Supply | 760W Redundant (2+1) with PFC |
| Expansion Slots | 7x Full-height, Full-length |
| Cooling | 3x 8cm PWM fans (middle/exhaust) |
| Front I/O | 2x USB 3.0, 1x Power Button, 1x Reset Button |
| Indicator LEDs | Power, HDD Activity, Network Activity, Overheat |
| Security | Front bezel lock, intrusion switch |
| Dimensions (W x H x D) | 17.2" x 5.2" x 25.5" (437mm x 132mm x 648mm) |
| Weight | 35 lbs (15.9 kg) with PSU |
| Rack Mount Kit | Includes adjustable rails |
| Supported Power Supply Type | Redundant module |
| Backplane | Single expander (SAS2/SATA3) |
| Maintenance | Tool-less drive trays, slide-out motherboard tray |
| Cleaning | Compressed air for dust removal; avoid liquids |
| Maximum Motherboard Size | 12" x 13" (SSI EEB) |
Frequently Asked Questions - SuperChassis 933E1-R760B Supermicro
User questions about SuperChassis 933E1-R760B Supermicro
0 question about this device. Answer the ones you know or ask your own.
Ask a new question about this device
Download the instructions for your Computer Case in PDF format for free! Find your manual SuperChassis 933E1-R760B - Supermicro and take your electronic device back in hand. On this page are published all the documents necessary for the use of your device. SuperChassis 933E1-R760B by Supermicro.
USER MANUAL SuperChassis 933E1-R760B Supermicro
natural_image
Front view of a server rack unit with multiple drive bays and indicator lights (no visible text or labels)SC933S1-R760B
SC933S2-R760B
SC933T-R760B
SC933E1-R760B
SC933E2-R760B
USER'S MANUAL
2.0a
The information in this User's Manual has been carefully reviewed and is believed to be accurate. The vendor assumes no responsibility for any inaccuracies that may be contained in this document, makes no commitment to update or to keep current the information in this manual, or to notify any person or organization of the updates. Please Note: For the most up-to-date version of this manual, please see our web site at www.supermicro.com.
Super Micro Computer, Inc. ("Supermicro") reserves the right to make changes to the product described in this manual at any time and without notice. This product, including software, if any, and documentation may not, in whole or in part, be copied, photocopied, reproduced, translated or reduced to any medium or machine without prior written consent.
IN NO EVENT WILL SUPERMICRO BE LIABLE FOR DIRECT, INDIRECT, SPECIAL, INCIDENTAL, SPECULATIVE OR CONSEQUENTIAL DAMAGES ARISING FROM THE USE OR INABILITY TO USE THIS PRODUCT OR DOCUMENTATION, EVEN IF ADVISED OF THE POSSIBILITY OF SUCH DAMAGES. IN PARTICULAR, SUPERMICRO SHALL NOT HAVE LIABILITY FOR ANY HARDWARE, SOFTWARE, OR DATA STORED OR USED WITH THE PRODUCT, INCLUDING THE COSTS OF REPAIRING, REPLACING, INTEGRATING, INSTALLING OR RECOVERING SUCH HARDWARE, SOFTWARE, OR DATA.
Any disputes arising between manufacturer and customer shall be governed by the laws of Santa Clara County in the State of California, USA. The State of California, County of Santa Clara shall be the exclusive venue for the resolution of any such disputes. Super Micro's total liability for all claims will not exceed the price paid for the hardware product.
Manual Revision 2.0a
Release Date: February 22, 2008
Unless you request and receive written permission from SUPER MICRO COMPUTER, you may not copy any part of this document.
Information in this document is subject to change without notice. Other products and companies referred to herein are trademarks or registered trademarks of their respective companies or mark holders.
Copyright © 2008 by SUPER MICRO COMPUTER INC.
All rights reserved.
Printed in the United States of America
Preface
About This Manual
This manual is written for professional system integrators and PC technicians. It provides information for the installation and use of the SC933 chassis. Installation and maintenance should be performed by experienced technicians only.
This Supermicro SC933 chassis features a unique and highly-optimized design for dual-core Xeon platforms. The chassis is equipped with a 760W high efficiency power supply for superb power savings. High performance fans provide ample optimized cooling for FB-DIMM memory modules and hot-swap drive bays offers maximum storage capacity.
This document lists compatible parts available when this document was published. Always refer to the our Web site for updates on supported parts and configurations.
Manual Organization
Chapter 1 Introduction
The first chapter provides a checklist of the main components included with this chassis and describes the main features of the SC933 chassis. This chapter also includes contact information.
Chapter 2 System Safety
This chapter lists warnings, precautions, and system safety. It recommended that you thoroughly familiarize yourself installing and servicing this chassis safety precautions.
Chapter 3 Chassis Components
Refer here for details on this chassis model including the fans, bays, airflow shields, and other components.
Chapter 4 Chassis Setup and Maintenance
Follow the procedures given in this chapter when installing, removing, or reconfiguring your chassis.
Chapter 5 Rack Installation
Refer to this chapter for detailed information on chassis rack installation. You should follow the procedures given in this chapter when installing, removing or reconfiguring your chassis into a rack environment.
Appendices
This section lists compatible cables, power supply specifications, and compatible backplanes. Not all compatible backplanes are listed. Refer to our Web site for the latest compatible backplane information.
Table of Contents
Chapter 1 Introduction
1-1 Overview 1-1
1-2 Shipping List.... 1-1
Part Numbers 1-1
1-3 Where to get Replacement Components 1-2
1-4 Contacting Supermicro 1-3
1-5 Returning Merchandise for Service 1-4
Chapter 2 System Safety
2-1 Overview 2-1
2-2 Warnings and Precautions 2-1
2-3 Preparing for Setup 2-1
2-4 Electrical Safety Precautions 2-2
2-5 General Safety Precautions 2-3
2-6 System Safety 2-3
Chapter 3 System Interface
3-1 Overview 3-1
3-2 Control Panel Buttons 3-2
3-3 Control Panel LEDs 3-2
3-4 Drive Carrier LEDs 3-4
SAS Drives 3-4
Chapter 4 Chassis Setup and Maintenance
4-1 Overview 4-1
Installation Procedures 4-1
4-2 Removing the Chassis Cover 4-2
4-3 Installing Hard Drives 4-3
4-4 Installing the Motherboard 4-5
I/O shield 4-5
Permanent and Optional Standoffs 4-5
4-5 Installing the Air Shroud 4-7
4-6 Installing System Fans 4-9
4-7 Replacing Power Supply 4-11
Chapter 5 Rack Installation
5-1 Overview 5-1
5-2 Unpacking the System 5-1
5-3 Preparing for Setup 5-1
Choosing a Setup Location 5-1
Rack Precautions 5-2
General Server Precautions 5-2
Rack Mounting Considerations 5-3
Ambient Operating Temperature 5-3
Mechanical Loading 5-3
Circuit Overloading 5-3
Reliable Ground 5-3
5-4 Rack Mounting Instructions 5-4
Identifying the Sections of the Rack Rails 5-4
Inner Rail Extension 5-4
Appendix A Cables, Screws, and other Accessories
Appendix B SC933 Power Supply Specifications
Appendix C SAS-933EL Backplane Specifications
Appendix D SATA-933 Backplane Specifications
Chapter 1
Introduction
1-1 Overview
Supermicro's SC933 3U chassis features a unique and highly-optimized design. The chassis is equipped with high efficiency power supply. High performance fans provide ample optimized cooling for FB-DIMM memory modules and four hot-swap drive bays offer maximum storage capacity.
1-2 Shipping List
Part Numbers
Please visit the following link for the latest shipping lists and part numbers for your particular chassis model http://www.supermicro.com/
| SC933 Chassis | ||||
| Model CPU HDD I/O Slots | Power Supply | |||
| SC933E2-R760B | DP Xeon, UP P4 | 15x SAS Bays (+) 2x 28-Port SAS Expander | Six expansion slots | 760W (Redundant) |
| SC933E1-R760B | DP Xeon, UP P4 | 15x SAS Bays (+) 1x 28-Port SAS Expander | Six expansion slots | 760W (Redundant) |
| SC933S2-R760B | DP Xeon, UP P4 | 7+7 U320 SCSI | Six expansion slots | 760W (Redundant) |
| SSC933S1-R760B | DP Xeon 14x U320 SCSI | Six expansion slots | 760W (Redundant) | |
| SC933T-R760B | DP Xeon, UP P4 | 15x SAS | Six expansion slots | 760W (Redundant) |
Legend:
DP = Dual Processor Support
FF = Full-height, Full-length
P4 = Pentium® 4 CPU
UP = Single Processor Support
1-3 Where to get Replacement Components
Though not frequently, you may need replacement parts for your system. To ensure the highest level of professional service and technical support, we strongly recommend purchasing exclusively from our Supermicro Authorized Distributors / System Integrators / Resellers. A list of Supermicro Authorized Distributors / System Integrators /Reseller can be found at: http://www.supermicro.com. Click the Where to Buy link.
1-4 Contacting Supermicro
Headquarters
Address: Super Micro Computer, Inc.
980 Rock Ave.
San Jose, CA 95131 U.S.A.
Tel: +1 (408) 503-8000
Fax: +1 (408) 503-8008
Email: marketing@supermicro.com (General Information)
support@supermicro.com (Technical Support)
Web Site: www.supermicro.com
Europe
Address: Super Micro Computer B.V.
's-Hertogenbosch, The Netherlands
Tel: +31 (0) 73-6400390
Fax: +31 (0) 73-6416525
Email: sales@supermicro.nl (General Information)
support@supermicro.nl (Technical Support)
rma@supermicro.nl (Customer Support)
Asia-Pacific
Address: Super Micro Computer, Inc.
4F, No. 232-1, Liancheng Rd.
Chung-Ho 235, Taipei County
Taiwan, R.O.C.
Tel: +886-(2) 8226-3990
Fax: +886-(2) 8226-3991
Web Site: www.supermicro.com.tw
Technical Support:
Email: support@supermicro.com.tw
Tel: 886-2-8226-1900
1-5 Returning Merchandise for Service
A receipt or copy of your invoice marked with the date of purchase is required before any warranty service will be rendered. You can obtain service by calling your vendor for a Returned Merchandise Authorization (RMA) number. When returning to the manufacturer, the RMA number should be prominently displayed on the outside of the shipping carton, and mailed prepaid or hand-carried. Shipping and handling charges will be applied for all orders that must be mailed when service is complete.
For faster service, RMA authorizations may be requested online (http://www.supermicro.com/support/rma/).
Whenever possible, repack the chassis in the original Supermicro carton, using the original packaging material. If these are no longer available, be sure to pack the chassis securely, using packaging material to surround the chassis so that it does not shift within the carton and become damaged during shipping.
This warranty only covers normal consumer use and does not cover damages in - curred in shipping or from failure due to the alteration, misuse, abuse or improper maintenance of products.
During the warranty period, contact your distributor first for any product problems.
Chapter 2
System Safety
2-1 Overview
This chapter provides a quick setup checklist to get your chassis up and running. Following the steps in order given should enable you to have your chassis setup and operational within a minimal amount of time. This quick set up assumes that you are an experienced technician, famailiar with common concepts and terminology.
2-2 Warnings and Precautions
You should inspect the box the chassis was shipped in and note if it was damaged in any way. If the chassis itself shows damage, file a damage claim with carrier who delivered your system.
Decide on a suitable location for the rack unit that will hold that chassis. It should be situated in a clean, dust-free area that is well ventilated. Avoid areas where heat, electrical noise and eletromagnetic fields are generated.
You will also need it placed near at least one grounded power outlet. When configured, the SC933 chassis includes two power supplies. "R" models a redundant power supply and require two grounded outlets.
2-3 Preparing for Setup
The SC933 Chassis includes a set of rail assemblies, including mounting brackets and mounting screws you will need to install the systems into the rack. Please read this manual in its entirety before you begin the installation procedure.
2-4 Electrical Safety Precautions
Basic electrical safety precautions should be followed to protect yourself from harm and the SC933 from damage:
- Be aware of the locations of the power on/off switch on the chassis as well as the room's emergency power-off switch, disconnection switch or electrical outlet. If an electrical accident occurs, you can then quickly remove power from the system.
- Do not work alone when working with high voltage components.
- Power should always be disconnected from the system when removing or installing main system components, such as the motherboard, memory modules and the DVD-ROM and floppy drives (not necessary for hot swappable drives). When disconnecting power, you should first power down the system with the operating system and then unplug the power cords from all the power supply modules in the system.
- When working around exposed electrical circuits, another person who is familiar with the power-off controls should be nearby to switch off the power, if necessary.
- Use only one hand when working with powered-on electrical equipment. This is to avoid making a complete circuit, which will cause electrical shock. Use extreme caution when using metal tools, which can easily damage any electrical components or circuit boards they come into contact with.
- Do not use mats designed to decrease electrostatic discharge as protection from electrical shock. Instead, use rubber mats that have been specifically designed as electrical insulators.
- The power supply power cord must include a grounding plug and must be plugged into grounded electrical outlets.
- Motherboard Battery: CAUTION - There is a danger of explosion if the onboard battery is installed upside down, which will reverse its polarities. This battery must be replaced only with the same or an equivalent type recommended by the manufacturer. Dispose of used batteries according to the manufacturer's instructions.
- DVD-ROM Laser: CAUTION - this server may have come equipped with a DVD-ROM drive. To prevent direct exposure to the laser beam and hazardous radiation exposure, do not open the enclosure or use the unit in any unconventional way.
2-5 General Safety Precautions
- Keep the area around the chassis clean and free of clutter.
- Place the chassis top cover and any system components that have been-removed away from the system or on a table so that they won't accidentally be stepped on.
- While working on the system, do not wear loose clothing such as neckties and unbuttoned shirt sleeves, which can come into contact with electrical circuits or be pulled into a cooling fan.
- Remove any jewelry or metal objects from your body, which are excellent metal conductors that can create short circuits and harm you if they come into contact with printed circuit boards or areas where power is present.
- After accessing the inside of the system, close the system back up and secure it to the rack unit with the retention screws after ensuring that all connections have been made.
2-6 System Safety
Electrostatic discharge (ESD) is generated by two objects with different electrical charges coming into contact with each other. An electrical discharge is created to neutralize this difference, which can damage electronic components and printed circuit boards. The following measures are generally sufficient to neutralize this difference before contact is made to protect your equipment from ESD:
- Do not use mats designed to decrease electrostatic discharge as protection from electrical shock. Instead, use rubber mats that have been specifically designed as electrical insulators.
- Use a grounded wrist strap designed to prevent static discharge.
-
Keep all components and printed circuit boards (PCBs) in their antistatic bags until ready for use.
-
Touch a grounded metal object before removing any board from its antistatic bag.
- Do not let components or PCBs come into contact with your clothing, which may retain a charge even if you are wearing a wrist strap.
- Handle a board by its edges only; do not touch its components, peripheral chips, memory modules or contacts.
- When handling chips or modules, avoid touching their pins.
- Put the motherboard and peripherals back into their antistatic bags when not in use.
- For grounding purposes, make sure your computer chassis provides excellent conductivity between the power supply, the case, the mounting fasteners and the motherboard.
Chapter 3
System Interface
3-1 Overview
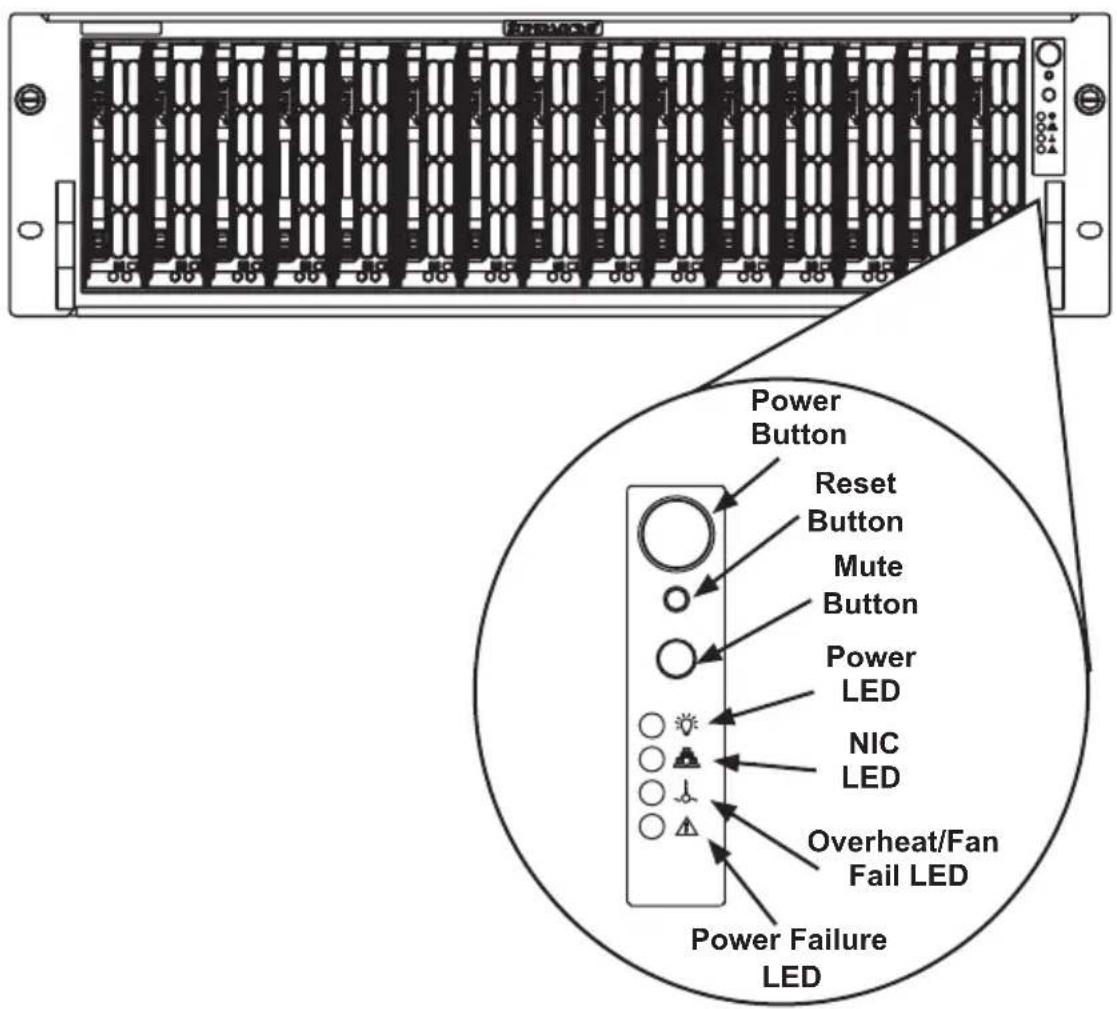
There are several LEDs on the control panel as well as others on the drive carriers to keep you constantly informed of the overall status of the system as well as the activity and health of specific components. Most SC933 models are two buttons on the chassis control panel: a reset button and an on/off switch. This chapter explains the meanings of all LED indicators and the appropriate response you may need to take.
3-2 Control Panel Buttons
There are two push-buttons located on the front of the chassis. These are (in order from left to right) a reset button and a power on/off button.

- Reset: The reset button is used to reboot the system.
- Power: The main power switch is used to apply or remove power from the power supply to the server system. Turning off system power with this button removes the main power but keeps standby power supplied to the system. Therefore, you must unplug system before servicing.
- Mute: The Mute button allows the system to be silenced quickly.
3-3 Control Panel LEDs
The control panel located on the front of the SC933 chassis has five LEDs. These LEDs provide you with critical information related to different parts of the system. This section explains what each LED indicates when illuminated and any corrective action you may need to take.

- Power: Indicates power is being supplied to the system's power supply units. This LED should norbally be illuminated when the system is operating.

- Overheat/Fan Fail: When this LED flashes it indicates a fan failure. When continuously on (not flashing) it indicates an overheat condition, which may be caused by cables obstructing the airflow in the system or the ambient room temperature being too warm. Check the routing of the cables and make sure all fans are present and operating normally. You should also check to make sure that the chassis covers are installed. Finally, verify that the heatsinks are installed properly. This LED will remain flashing or on as long as the overheat condition exists.
- NIC1: Indicates network activity on GLAN1 when flashing.

- HDD: Indicates IDE channel activity. SAS drive, SCSI drive, and/or DVD-ROM drive activity when flashing.

- Power Fail: Indicates a power failure to the system's power supply units.
3-4 Drive Carrier LEDs
Your chassis uses SAS or SCSI drives, but not both.
SAS Drives
Each SAS drive carrier has two LEDs.
- Green: Each Serial SAS drive carrier has a green LED. When illuminated, this green LED (on the front of the SAS drive carrier) indicates drive activity.
A connection to the SAS backplane enables this LED to blink on and off when that particular drive is being accessed. - Red: The red LED indicates a SAS drive failure. If one of the SAS drives fail, you should be notified by your system management software.
SCSI Drives
Each SCSI drive carrier has two LEDs.
- Green: When illuminated, the green LED on the front of the SCSI drive carrier indicates drive activity. A connection to the SCSI SCA backplane enables this LED to blink on and off when that particular drive is being accessed.
- Red: The SAF-TE compliant backplane activates the red LED to indicate a drive failure. If one of the SCSI drives fail, you should be notified by your system management software.
If your system supports more drives than are currently being utilized, the LEDs which are designated for unused drives will remain unlit.
Chapter 4
Chassis Setup and Maintenance
4-1 Overview
This chapter covers the steps required to install components and perform maintenance on the chassis. The only tool you will need to install components and perform maintenance is a Phillips screwdriver. Print this page to use as a reference while setting up your chassis.
Installation Procedures
- Overview
- Removing the Chassis Cover
• Installing Hard Drives
• Installing the Motherboard (I/O Shield, Standoffs, Add-on /Expansion Setup)
• Installing the Air Shroud
• Installing System Fans
• Replacing the Power Supply

Review the warnings and precautions listed in the manual before setting up or servicing this chassis. These include information in Chapter 2: System Safety and the warning/precautions listed in the setup instructions.
4-2 Removing the Chassis Cover
Release Tab
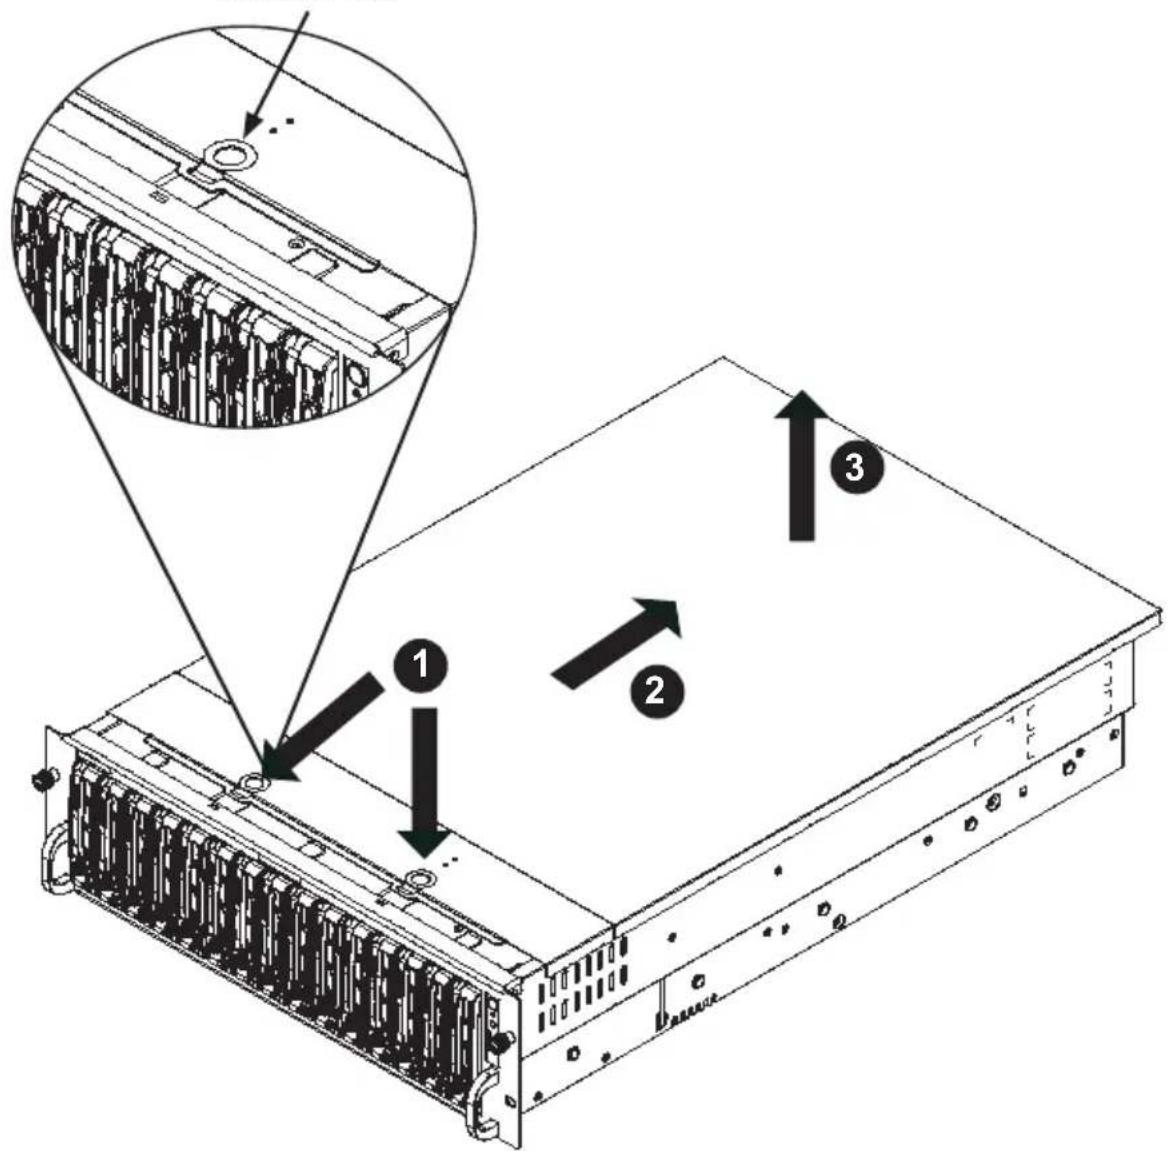
Figure 4-1: Removing the Chassis Cover
Removing the Chassis Cover:
- Press the release tabs to remove the cover from the locked position. Press both tabs at the same time.
- Once the top cover is released from the locked position, slide the cover toward the rear of the chassis.
- Lift the cover off the chassis.

Warning: Except for short periods of time, do NOT operate the server without the cover in place. The chassis cover must be in place to allow proper airflow and prevent overheating.
4-3 Installing Hard Drives
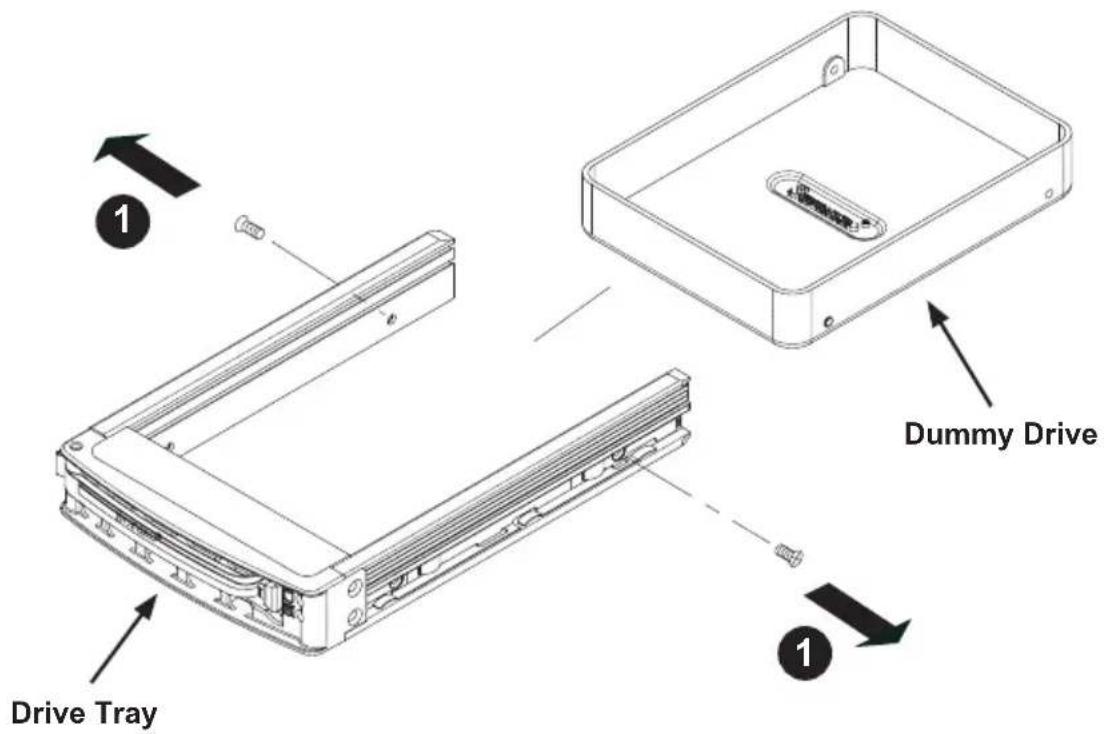
Figure 4-2: Removing Dummy Drive from Tray
Removing Hard Drive Trays from the Chassis
- Press the release button on the drive tray. This extends the drive bay handle.
- Use the handle to pull the drive out of the chassis.
The drives are mounted in drive trays to simplify their installation and removal from the chassis. These trays also help promote proper airflow for the drive bays.

Warning: Except for short periods of time (swapping hard drives), do not operate the server with the hard drives empty.
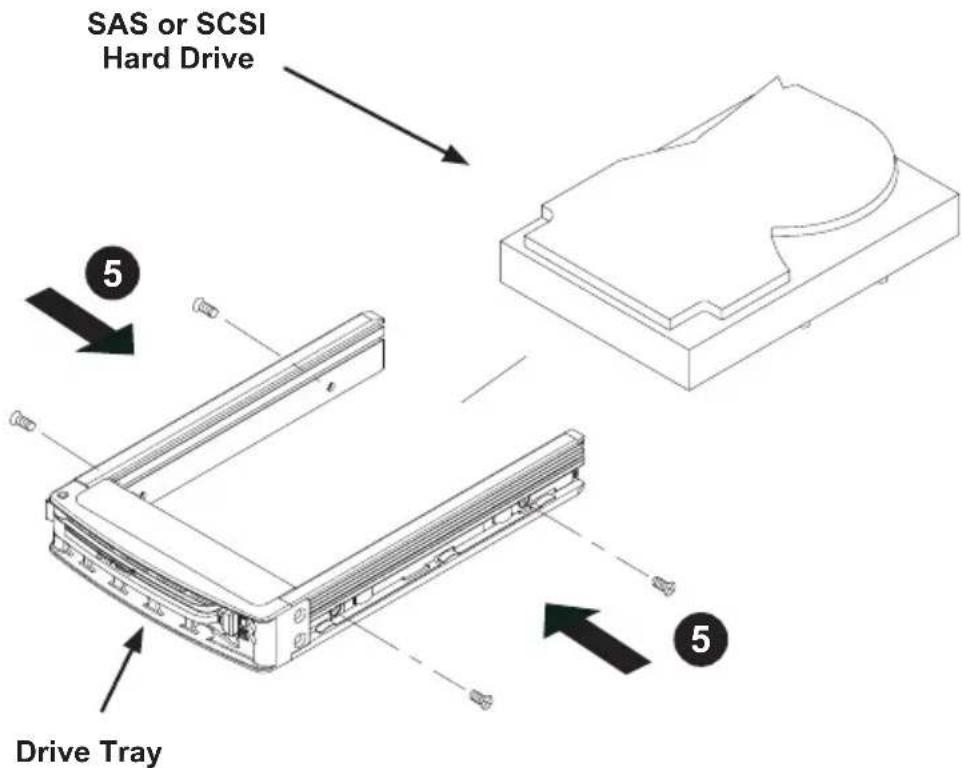
Figure 4-3: Removing Hard Drive
Installing a Hard Drive to the Hard Drive Tray
-
Remove the two screws securing the dummy drive to the drive tray and remove the dummy drive.
-
Place the hard drive tray on a flat surface such as a desk, table or work bench.
-
Slide the hard drive into the tray with the printed circuit board side facing down.
-
Carefully align the mounting holes in both the drive tray and the hard drive.
-
Secure the hard drive to the tray using four screws.
-
Replace the drive tray into the chassis. Make sure to close the drive tray handle to lock the drive tray into place.
4-4 Installing the Motherboard
The I/O shield holds the motherboard ports in place. Install the I/O shield before you install the motherboard.
I/O shield
Installing the I/O Shield
- Review the documentation that came with your motherboard. Become familiar with component placement, requirements, and precautions.
- Open the chassis cover.
- With the illustrations facing the outside of the chassis, place the shield into the space provided.
- Once installed, the motherboard will hold the I/O shield in place.
Permanent and Optional Standoffs
Standoffs prevent short circuits by securing space between the motherboard and the chassis surface. The SC933 chassis includes permanent standoffs in locations used by most motherboards. These standoffs accept the rounded Phillips head screws included in the SC933 accessories packaging.
Some motherboards require additional screws for heatsinks, general components and/or non-standard security. Optional standoffs are included to these mother boards. To use an optional standoff, you must place the hexagonal screw through the bottom the chassis and secure the screw with the hexagon nut (rounded side up).
Installing the Motherboard:
- Review the documentation that came with your motherboard. Become familiar with component placement, requirements, precautions, and cable connec-tions.
- Open the chassis cover.
- As required by your motherboard, install standoffs in any areas that do not have a permanent standoff. To do this.
A. Place a hexagonal standoff screw through the bottom the chassis.
B. Secure the screw with the hexagon nut (rounded side up). - Lay the motherboard on the chassis aligning the permanent and optional standoffs
- Secure the motherboard to the chassis using the rounded, Phillips head screws.
- Secure the CPU(s), heatsinks, and other components to the motherboard as described in the motherboard documentation.
- Connect the cables between the motherboard, backplane, chassis, front panel, and power supply, as needed. Also, the fans may be temporarily removed to allow access to the backplane ports.
Add-on Card/Expansion Slot Setup
SC933 chassis include I/O slots for add-on cards and expansion cards. It provides six low profile add-on card slots
Installing Add-on and Expansion Cards
- Disconnect the power supply, lay the chassis on a flat surface, and open the chassis cover.
- Remove the screw holding the cover in place for each low profile add-on/expansion card slot you want to use. Keep this screw for later use.
- Connect the add-on cards and/or expansion cards to the mother board.
- Secure each card to the chassis using the card's L bracket and the screw previously removed.
4-5 Installing the Air Shroud
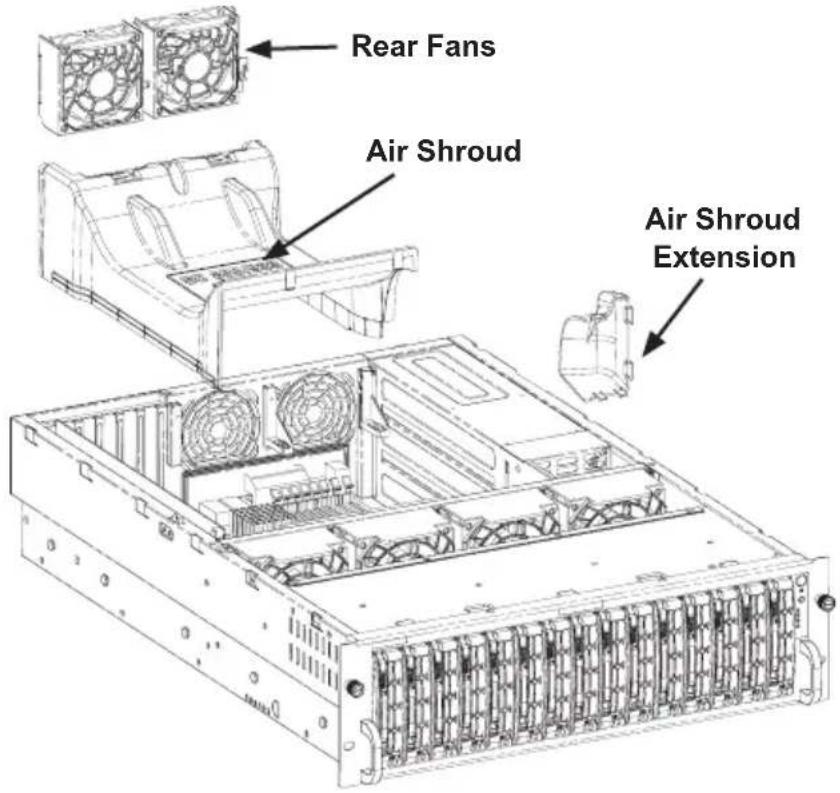
Figure 4-4: Air Shroud for SC933 Chassis
Air shrouds concentrate airflow to maximize fan efficiency. The SC933 chassis air shroud does not require tools to set up
Installing the Air Shroud
- If necessary, remove the rear fan by pressing the fan release tab and pulling the fan from the chassis.
- Move the cables from the power supply and power distributor to the bottom of the chassis. You may have to bind the cables together.
- Slide the air shroud extension into the groove behind the fan closest to the power supply. The extension should almost touch the side of the chassis.
- Slide the air shroud into the chassis. The air shroud connects to the air shroud extension, the two front fans, and two rear fans.
- The air shroud includes perforations on the bottom. These perforations can be removed if motherboard components interfere with the air shroud placement. Do not remove more perforations than necessary.
- Install the rear fans by sliding each fan into the fan housing on the chassis.
Checking the Server's Air Flow
- Make sure there are no objects to obstruct airflow in and out of the server. In addition, if you are using a front bezel, make sure the bezel's filter is replaced periodically.
- Do not operate the server without drives or drive trays in the drive bays. Use only recommended server parts.
- Make sure no wires or foreign objects obstruct air flow through the chassis. Pull all excess cabling out of the airflow path or use shorter cables.
- The control panel LEDs inform you of system status. See “Chapter 3: System Interface” for details on the LEDs and the control panel buttons
- In most cases, the chassis power supply and fans are pre-installed. If you need to install fans continue to the Systems Fan section of this chapter. If the chassis will be installed into a rack, continue to the next chapter for rack installation instructions.
4-6 Installing System Fans
Six heavy duty fans provide cooling for the chassis. These fans circulate air through the chassis as a means of lowering the chassis internal temperature.
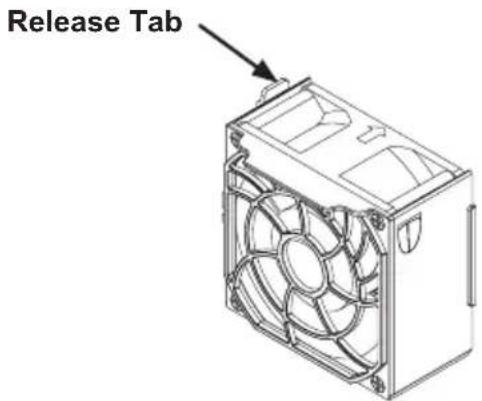
Figure 4-16: System Fan
Replacing a System Fan
- If necessary, open the chassis while the power is running to determine which fan has failed. (Never run the server for an extended period of time with the chassis open.)
- Turn off the power to the system and unplug the system from the outlet.
- Remove the failed fan's power cord from the motherboard.
- Press the fan release tab to lift the failed fan from the chassis and pull it completely from the chassis.
- Place the new fan into the vacant space in the housing while making sure the arrows on the top of the fan (indicating air direction) point in the same direction as the arrows on the other fans.
- Power up the system and check that the fan is working properly before replacing the chassis cover.
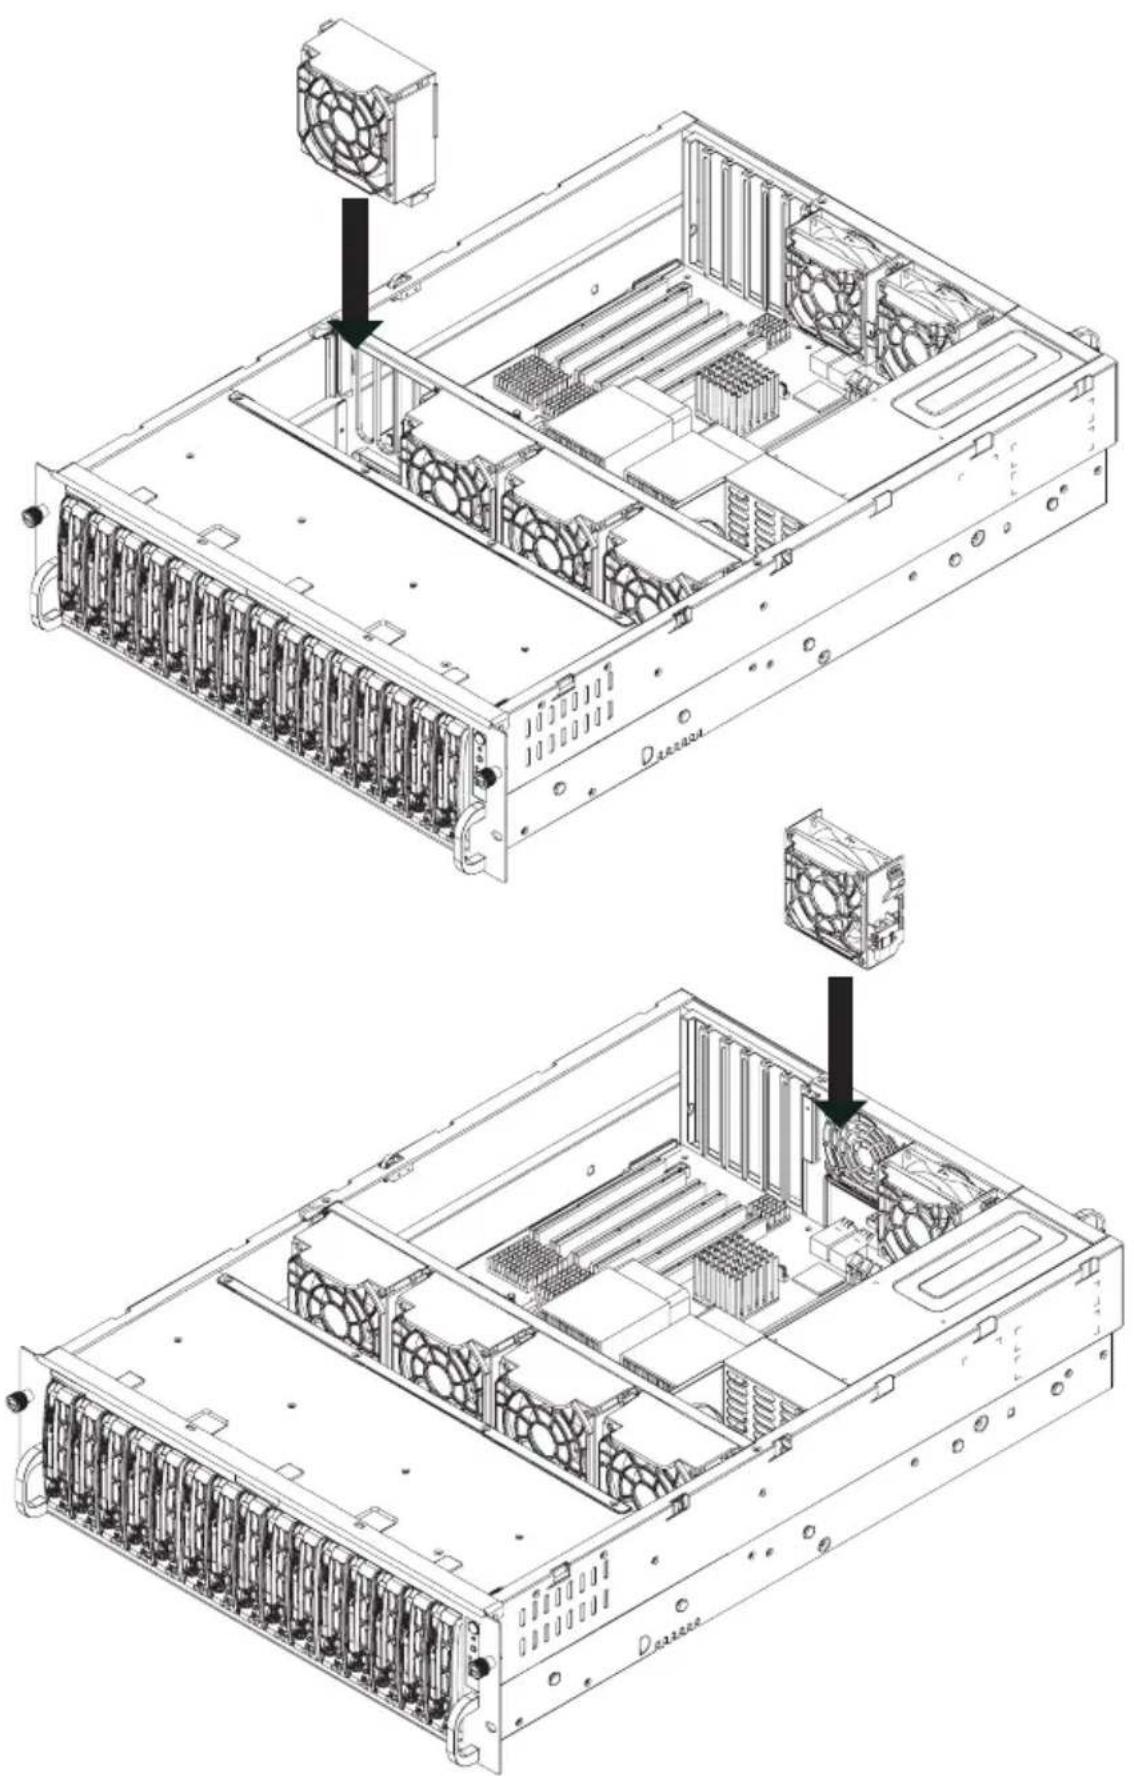
Figure 4-5: Placing the System Fan
4-7 Replacing Power Supply
The SC933 Chassis has an auto-switching power supply. This enables it to automatically sense and operate at a 100v to 240v input voltage. An amber light illuminates on the power supply when the power is off. An illuminated green light indicates that the power supply is operating.
The SC933 chassis includes a redundant power supply that can be changed without powering down the system. In the unlikely event that one is necessary, a new unit can be ordered directly from Supermicro (see contact information in the Preface).
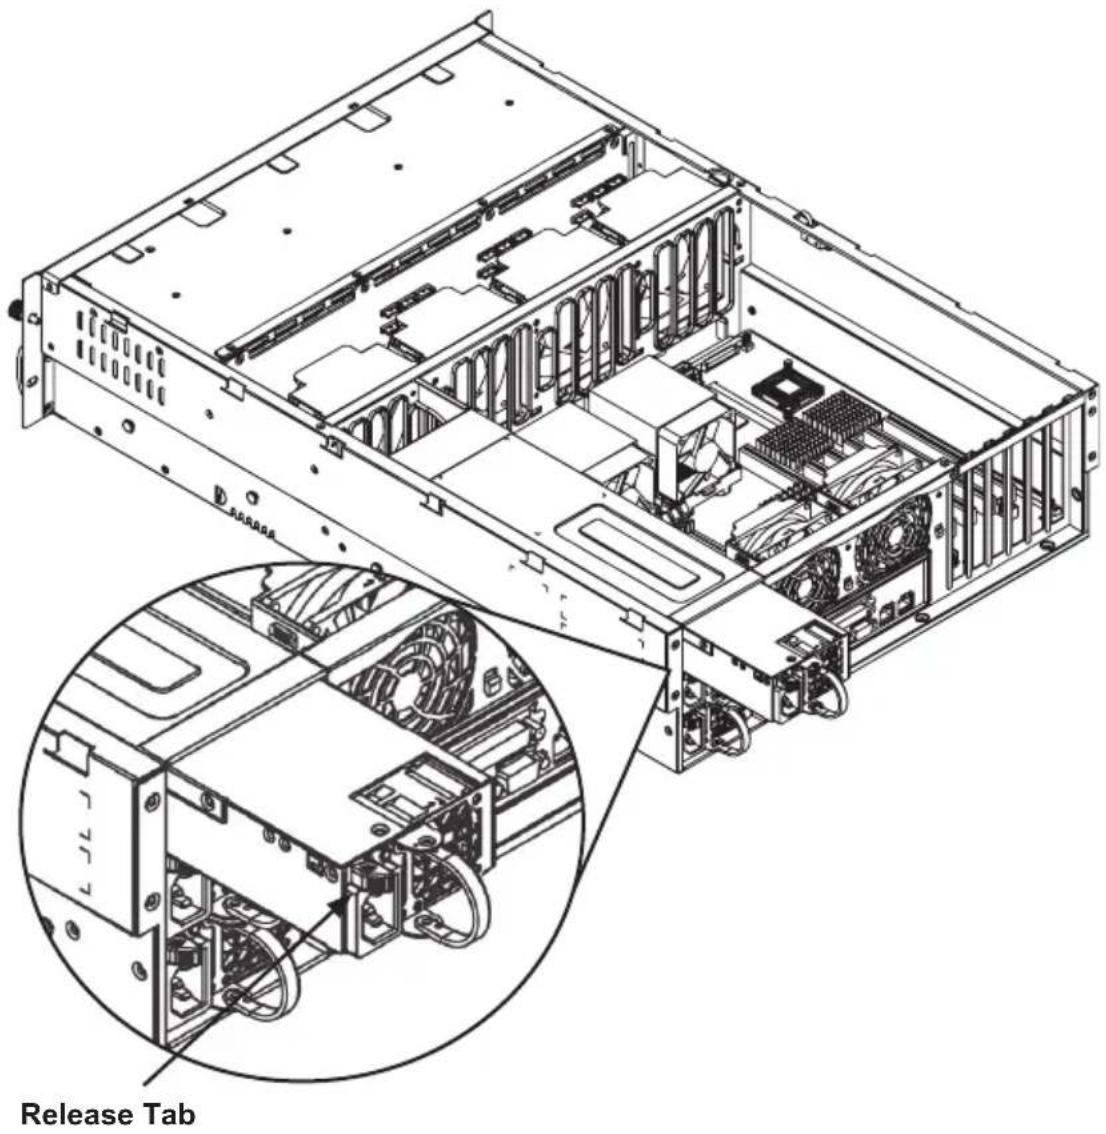
Figure 4-6: Removing the Power Supply
Changing the Power Supply
- This chassis includes a redundant power supply (at least two power modules), you can leave the server running and remove only one power supply.
- Push the release tab (on the back of the power supply), as illustrated.
- Pull the power supply out using the handle provided.
- Change the failed power module with the same model.
- Push the new power supply module into the power bay until you hear a click.
- Plug the AC power cord back into the module and power up the server.
natural_image
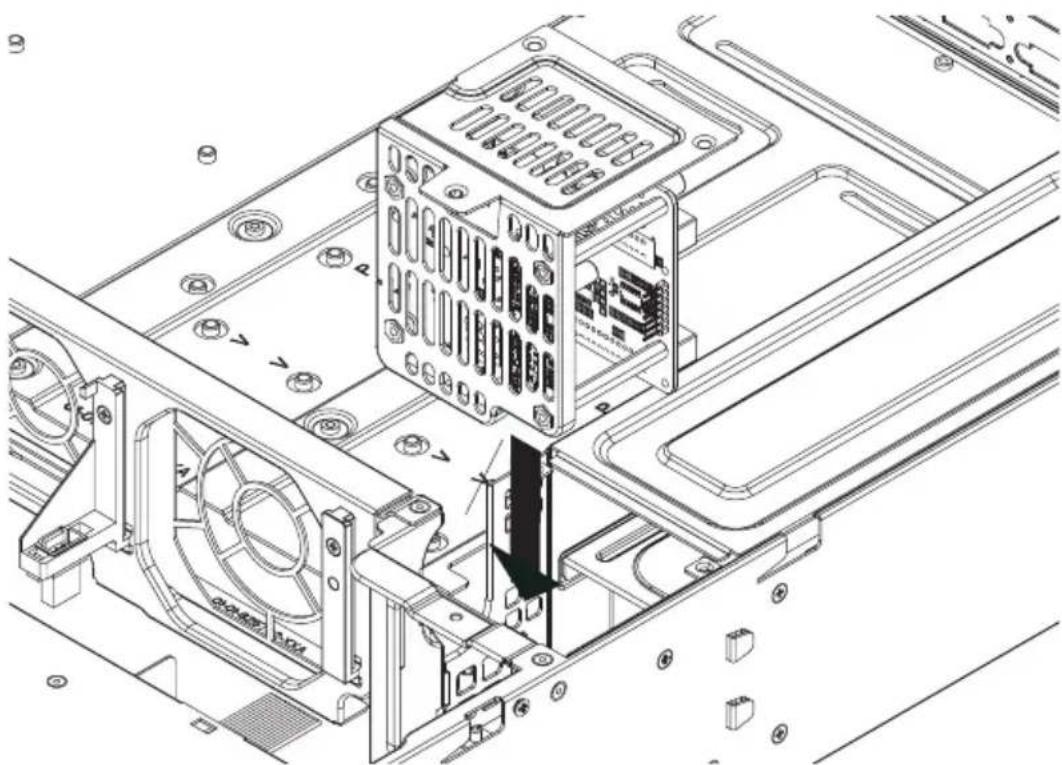
Technical line drawing of a computer tower internal structure showing ventilation and mounting components (no text or symbols)Figure 4-7: Changing the Power Distributor
Server chassis that are 2U or more high require a power distributor. The power distributor provides failover and power supply redundancy. In the unlikely event you must change the power distributor, do following.
Changing the Power Distributor
- Power down the server and remove the plug from the wall socket or power strip.
- Remove all cable connections to the power supply from the motherboard, backplane, and other components. Also, remove both power supplies.
- Locate the power distributor between the power supply and the fan row.
- Remove the three screws securing the power supply.
- Gently pull the power distributor from the chassis. Gently guide all the cables through the power distributor housing.
- Slide the new power distributor module into the power distributor housing. Make that you slide the cables through the bottom of the housing.
- Reconnect all the power cables, replace the power supply, and insert the plug into the wall.
Notes
Chapter 5
Rack Installation
5-1 Overview
This chapter provides a quick setup checklist to get your chassis up and running. Following these steps in the order given should enable you to have the system operational within a minimum amount of time.
5-2 Unpacking the System
You should inspect the box the chassis was shipped in and note if it was damaged in any way. If the chassis itself shows damage you should file a damage claim with the carrier who delivered it.
Decide on a suitable location for the rack unit that will hold your chassis. It should be situated in a clean, dust-free area that is well ventilated. Avoid areas where heat, electrical noise and electromagnetic fields are generated. You will also need it placed near a grounded power outlet. Be sure to read the Rack and Server Precautions in the next section.
5-3 Preparing for Setup
The box your chassis was shipped in should include two sets of rail assemblies, two rail mounting brackets and the mounting screws you will need to install the system into the rack. Please read this section in its entirety before you begin the installation procedure outlined in the sections that follow.
Choosing a Setup Location
- Leave enough clearance in front of the rack to enable you to open the front door completely (\~25 inches).
- Leave approximately 30 inches of clearance in the back of the rack to allow for sufficient airflow and ease in servicing.
- This product is for installation only in a Restricted Access Location (dedicated equipment rooms, service closets and the like).

Warnings and Precautions!

Rack Precautions
- Ensure that the leveling jacks on the bottom of the rack are fully extended to the floor with the full weight of the rack resting on them.
- In single rack installation, stabilizers should be attached to the rack.
- In multiple rack installations, the racks should be coupled together.
- Always make sure the rack is stable before extending a component from the rack.
- You should extend only one component at a time - extending two or more simultaneously may cause the rack to become unstable.
General Server Precautions
- Review the electrical and general safety precautions that came with the components you are adding to your chassis.
- Determine the placement of each component in the rack before you install the rails.
- Install the heaviest server components on the bottom of the rack first, and then work up.
- Use a regulating uninterruptible power supply (UPS) to protect the server from power surges, voltage spikes and to keep your system operating in case of a power failure.
- Allow the hot plug hard drives and power supply modules to cool before touching them.
- Always keep the rack's front door and all panels and components on the servers closed when not servicing to maintain proper cooling.
Rack Mounting Considerations
Ambient Operating Temperature
If installed in a closed or multi-unit rack assembly, the ambient operating temperature of the rack environment may be greater than the ambient temperature of the room. Therefore, consideration should be given to installing the equipment in an environment compatible with the manufacturer's maximum rated ambient temperature (Tmra).
Reduced Airflow
Equipment should be mounted into a rack so that the amount of airflow required for safe operation is not compromised.
Mechanical Loading
Equipment should be mounted into a rack so that a hazardous condition does not arise due to uneven mechanical loading.
Circuit Overloading
Consideration should be given to the connection of the equipment to the power supply circuitry and the effect that any possible overloading of circuits might have on overcurrent protection and power supply wiring. Appropriate consideration of equipment nameplate ratings should be used when addressing this concern.
Reliable Ground
A reliable ground must be maintained at all times. To ensure this, the rack itself should be grounded. Particular attention should be given to power supply connections other than the direct connections to the branch circuit (i.e. the use of power strips, etc.).
5-4 Rack Mounting Instructions
This section provides information on installing the SC933 chassis into a rack unit with the rails provided. There are a variety of rack units on the market, which may mean the assembly procedure will differ slightly. You should also refer to the installation instructions that came with the rack unit you are using.
NOTE: This rail will fit a rack between 28" and 33.67" deep.
Identifying the Sections of the Rack Rails
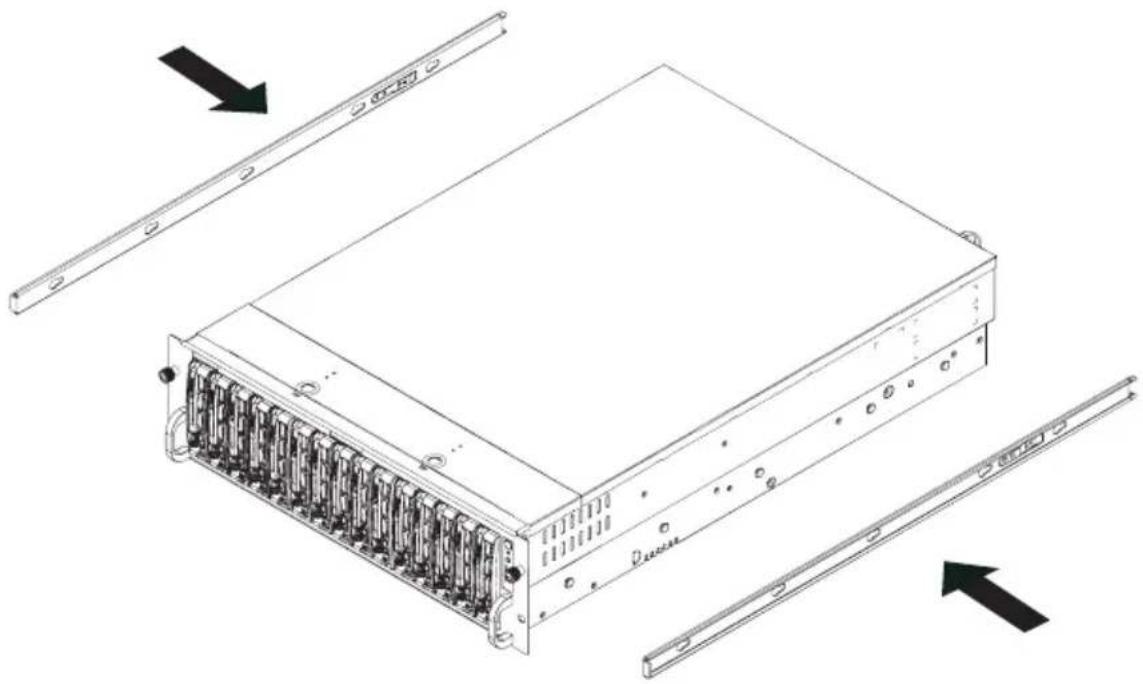
The chassis package includes two rack rail assemblies: an inner fixed chassis rail that secures directly to the server chassis and an outer fixed rack rail that secures directly to the rack itself.
natural_image
Technical line drawing of a server rack unit with two parallel plates and directional arrows indicating assembly or movement (no text or symbols present)Figure 5-1: Identifying the Sections of the Rack Rails (right side rail shown)
Inner Rail Extension
The SC933 chassis includes a set of inner rails in two sections: inner rails and inner rail extensions. The inner rails are preattached and do not interfere with normal use of the chassis if you decide not to use a server rack. Attach the inner rail extension to stabilize the chassis within the rack.
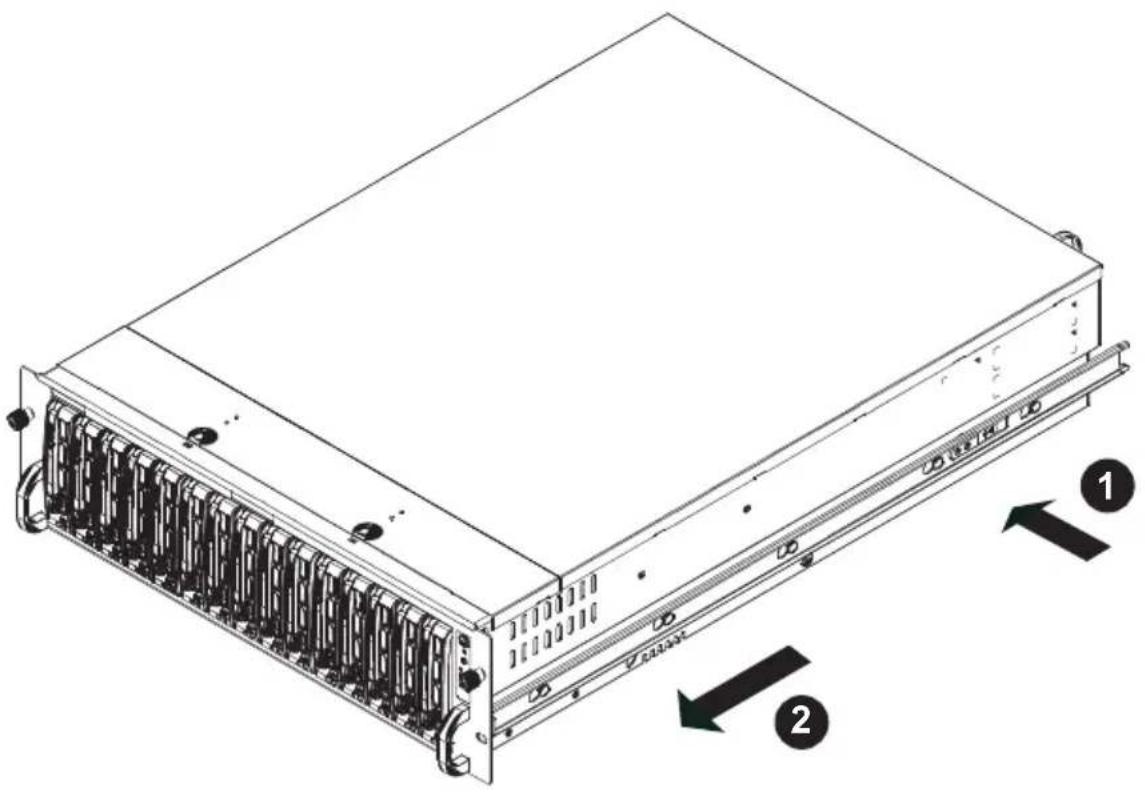
Figure 5-2: Identifying the Sections of the Rack Rails (right side rail shown)
Installing the Inner Rails
- Place the inner rack extensions on the side of the chassis aligning the hooks of the chassis with the rail extension holes. Make sure the extension faces "outward" just like the preattached inner rail.
- Slide the extension toward the front of the chassis.
- Secure the chassis with 1 screws as illustrated.
- Repeat steps 1-3 for the other inner rail extension.
natural_image
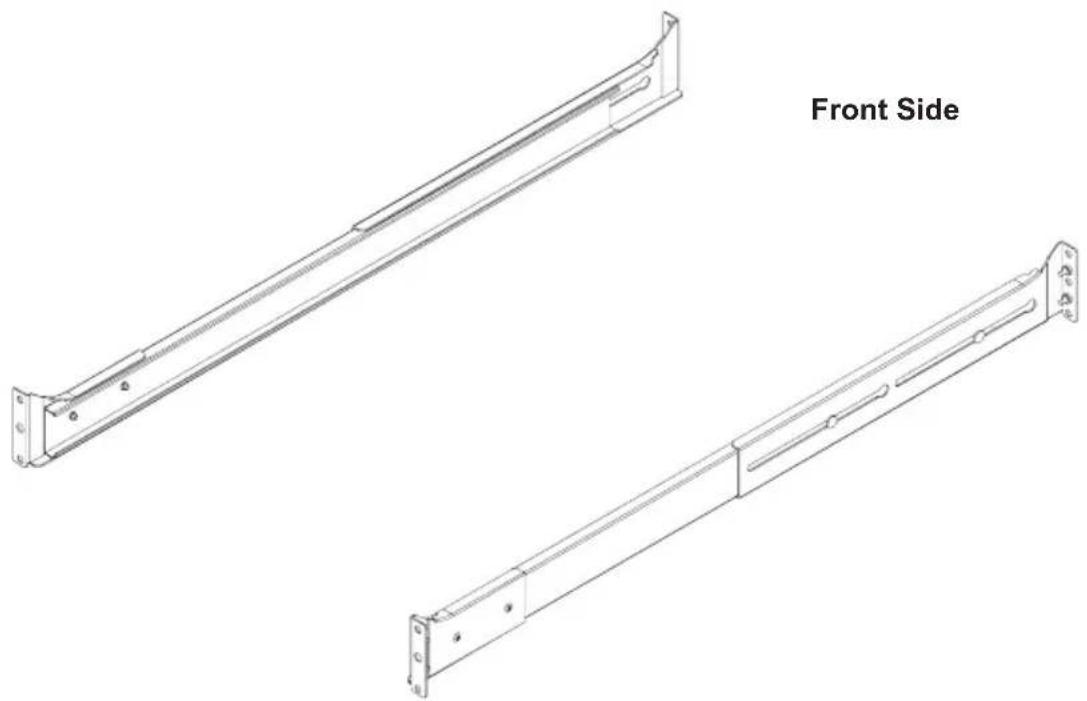
Technical line drawing of two metal bracket components, labeled 'Front Side' (no other text or symbols)Figure 5-3: Assembling the Outer Rails
Installing the Outer Rails to the Rack
- Attach the short bracket to the outside of the long bracket. You must align the pins with the slides. Also, both bracket ends must face the same direction.
- Adjust both the short and long brackets to the proper distance so that the rail fits snugly into the rack.
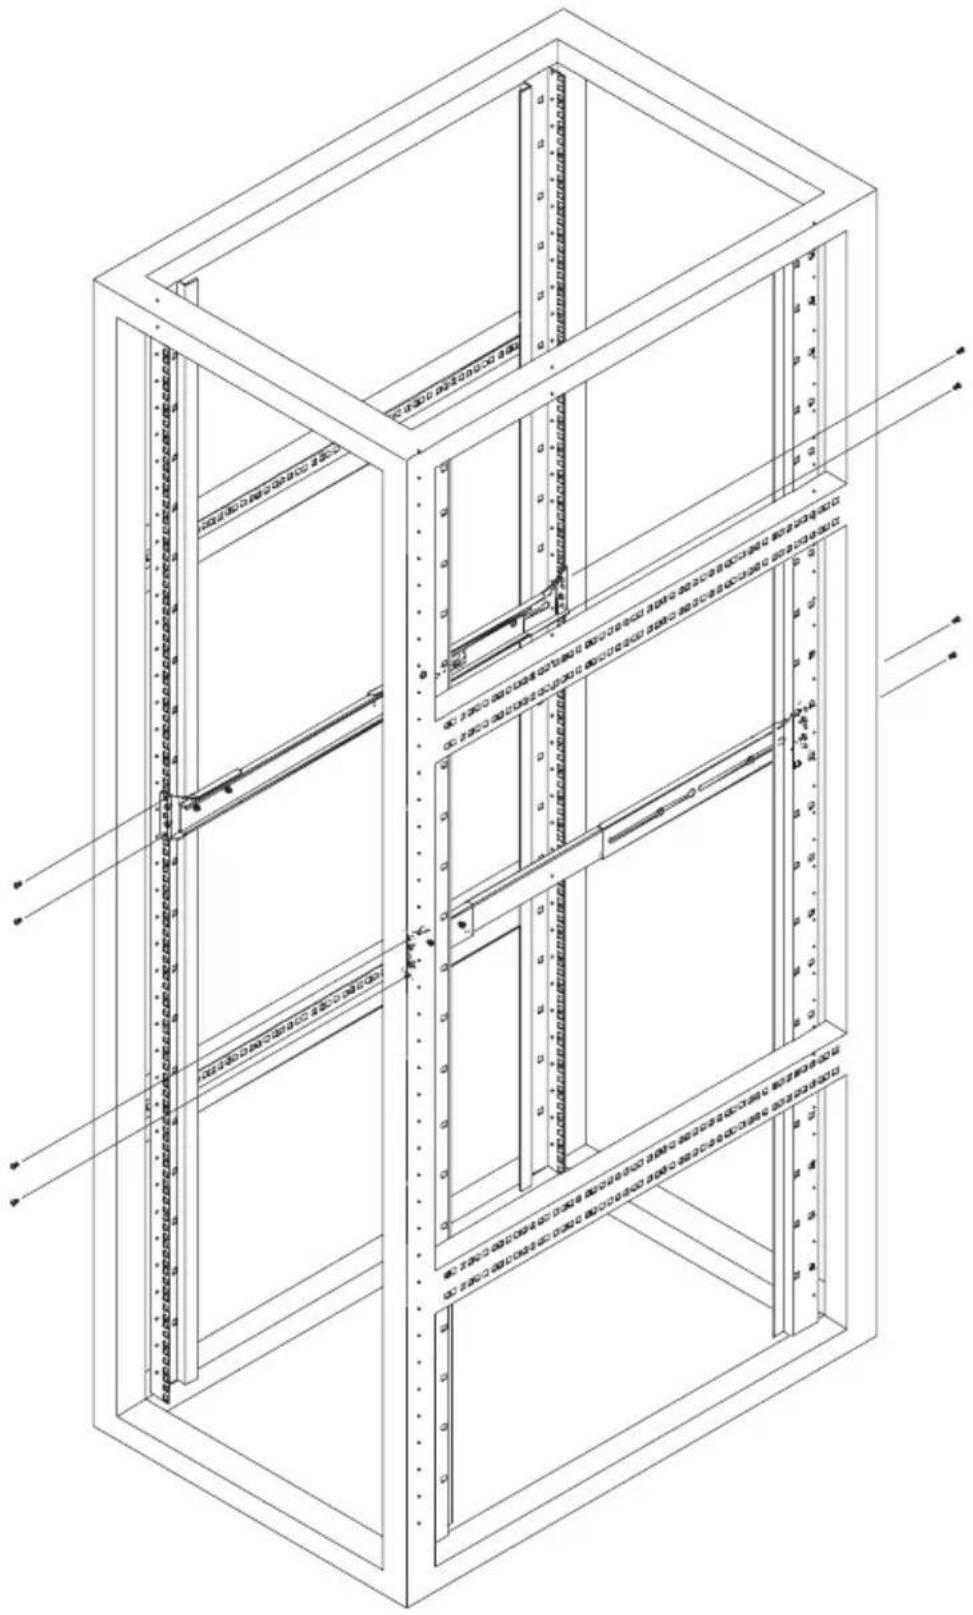
- Secure the long bracket to the front side of the outer rail with two M5 screws and the short bracket to the rear side of the outer rail with three M5 screws.
- Repeat steps 1-3 for the remaining outer rail.
natural_image
Technical line drawing of a multi-level server rack cabinet with visible internal components and mounting points (no text or labels)Figure 5-4: Installing the Outer Rails to the Server Rack
natural_image
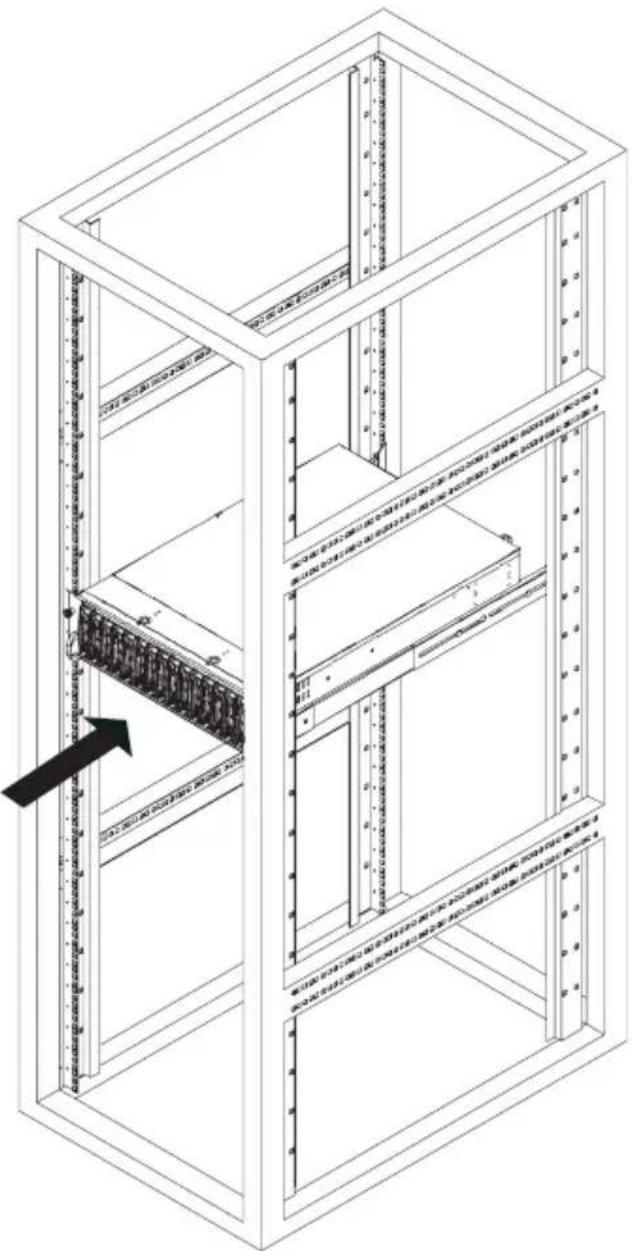
Isometric line drawing of a server rack cabinet with internal components and a black arrow indicating a component (no text or symbols present)Figure 5-5: Installing the Rack Rails
Installing the Chassis into a Rack
- Confirm that chassis inner rails and outer rails are installed on the rack.
- Line chassis rails with the front of the rack rails..
- Slide the chassis rails into the rack rails, keeping the pressure even on both sides (you may have to depress the locking tabs when inserting). When the server has been pushed completely into the rack, the locking tabs will click into the locked position.
- (Optional) Insert and tightening the thumbscrews that hold the front of the server to the rack.
Appendix A
Cables, Screws, and other Accessories
A-1 Overview
This appendix lists supported cables for your chassis system. It only includes the most commonly used components and configurations. For more compatible cables, refer to the manufacturer of the motherboard you are using and our Web site at: www.supermicro.com.
A-2 Cables Included with SC933T Chassis (SAS)
| SC933T-R760 | |||
| Part # Type | Length Description | ||
| CBL-0044L Cable | 2' SATA Cable | ||
| CBL-0209L Cable | 210 mm 4-pin to 3-pin Fan Power Cable | ||
| - Cable 6' | 2 - Regional power cords | ||
A-3 Cables Included with SC933S Chassis (SCSI)
| SC933S1-R760 | |||
| Part # Type | Length Description | ||
| CBL-063L | Cable | 30" | 2-Drop SCSI Cable |
| CBL-0209L Cable | 210 mm 4-pin to 3-pin Fan Power Cable | ||
| - Cable 6' | Regional power cord | ||
| SC933S2-R760 | |||
| Part # Type | Length Description | ||
| CBL-028 Cable | 30" | Ultra 320 S | CSI Cable |
| CBL-033L-U320 | Ribbon | 9" (23 cm) | ULTRA 320, PB FREE |
| CBL-0209L Cable | 210 mm 4-pin to 3-pin Fan Power Cable | ||
| - Cable 6' | Regional power cord | ||
A-4 Cables Included with SC933E Series Chassis
| SC933E1-R760 and SC933E2-R760 | |||
| Part # Type | Length Description | ||
| CBL-0180L-02 SAS | $ 39 cm iPass to iPass SAS | Cable | |
| CBL-0209L Cable | 210 mm 4-pin to 3-pin Fan Power Cable | ||
| - | Cable 6' | 2 - Regional power cords | |
A-5 Compatible Cables
These cables are compatible with the SC933 Chassis.
Alternate SAS Cables
Some compatible motherboards have different connectors. If your motherboard has only one SAS connector that the SAS cables must share, use one of the following cables. These cables must be purchased separately.
Cable Name: SAS Cable Quantity: 1
Part #: CBL-0175L
Alt. Name: "Big Four"
Description: This cable has one SFF-8484 (32 pin) connector on one end and 4 SAS connectors (7 pins each) at the other. This cable connects from the Host (motherboard or other controller) to the backplane SAS hard drive port.
Cable Name: SAS Cable Quantity: 1
Part #: CBL-0116
Alt. Name: iPass or "Small Four"
Description: This cable has one ipass (SFF-8087/mini-sas) connector (36 pins) at one end and 4 SAS connectors on one end. This cable connects from the Host (motherboard or other controller) to the backplane SAS hard drive port.
Extending Power Cables
Although Super Micro chassis are designed with to be efficient and cost-effective, some compatible motherboards have power connectors located in different areas.
To use these motherboards you may have to extend the power cables to the mother boards. To do this, use the following chart as a guide.
| Power Cable Extenders | ||
| Number of Pins Cable Part # Length | ||
| 24 pin CBL - 00 | 42 7.9”(20 CM) | |
| 20 pin CBL - 00 | 59 7.9”(20 CM) | |
| 8 pin CBL - 00 | 62 7.9”(20 CM) | |
| 4 pin CBL - 00 | 60 7.9”(20 CM) | |
Front Panel to the Motherboard
The SC933 chassis includes a cable to connect the chassis front panel to the motherboard. If your motherboard uses a different connector, use the following list to find a compatible cable.
| Front Panel to Motherboard Cable (Ribbon Cable) | ||
| Number of Pins(Front Panel) | Number of Pins(Motherboard | Cable Part # |
| 16 pin 16 pin CBL - 0049 | ||
| 16 pin 20 pin CBL - 0048 | ||
| 20 pin 20 pin CBL - 0047 | ||
| 16 pin various* CBL - 0068 | ||
| 20 pin various* CBL - 0067 | ||
* Split Cables: Use these cable if your motherboard requires several different connections from the front panel.
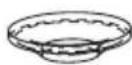
A-6 Chassis Screws
The accessory box includes all the screws needed to setup your chassis. This section lists and describes the most common screws used. Your chassis may not require all the parts listed.
M/B

Pan head 6-32 x 5 mm [0.197]
HARD DRIVE

Flat head 6-32 x 5 mm [0.197]
DVD-ROM, CD-ROM, and FLOPPY DRIVE

Pan head 6-32 x 5 mm [0.197]

Flat head 6-32 x 5 mm [0.197]

Round head M3 x 5 mm [0.197]

Round head M2.6 x 5 mm [0.197]
RAIL

Flat head M4 x 4 mm [0.157]

Round head M4 x 4 mm [0.157]
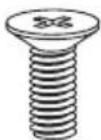
Flat head M5 x 12 mm[0.472] Washer for M5
M/B STANDOFFS
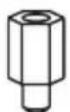
M/B standoff 6-32 to 6-32
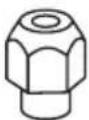
M/B (CPU) standoff M5 to 6-32
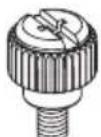
Thumb screw 6-32 x 5 mm [0.197]
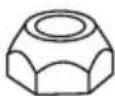
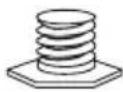
1/U M/B standoff 6-32 x 5 mm [0.197]
Appendix B
SC933 Power Supply Specifications
This appendix lists power supply specifications for your chassis system.
| 760W Power Supply | |
| MFR Part # PWS | -0065 |
| AC Voltage | 100 - 240V50 - 60Hz14 - 8 Amp |
| DC Output | 5V + 3.3V ≤ 200W |
| +5V standby | 36.0 Amp |
| 3.5 Amp | |
| +12V | 50.0 Amp (combined) |
| -12V | 1.0 AAmp |
| +3.3V | 36.0 Amp |
Notes
Appendix C
SAS-933EL Backplane Specifications
To avoid personal injury and property damage, carefully follow all the safety steps listed below when accessing your system or handling the components.
C-1 ESD Safety Guidelines
Electric Static Discharge (ESD) can damage electronic components. To prevent damage to your system, it is important to handle it very carefully. The following measures are generally sufficient to protect your equipment from ESD.
- Use a grounded wrist strap designed to prevent static discharge.
- Touch a grounded metal object before removing a component from the antistatic bag.
- Handle the RAID card by its edges only; do not touch its components, peripheral chips, memory modules or gold contacts.
- When handling chips or modules, avoid touching their pins.
- Put the card and peripherals back into their antistatic bags when not in use.
C-2 General Safety Guidelines
- Always disconnect power cables before installing or removing any components from the computer, including the backplane.
- Disconnect the power cable before installing or removing any cables from the backplane.
- Make sure that the backplane is securely and properly installed on the mother - board to prevent damage to the system due to power shortage.
C-3 An Important Note to Users
- All images and layouts shown in this user's guide are based upon the latest PCB Revision available at the time of publishing. The card you have received may or may not look exactly the same as the graphics shown in this manual.
Jumper Settings and Pin Definitions
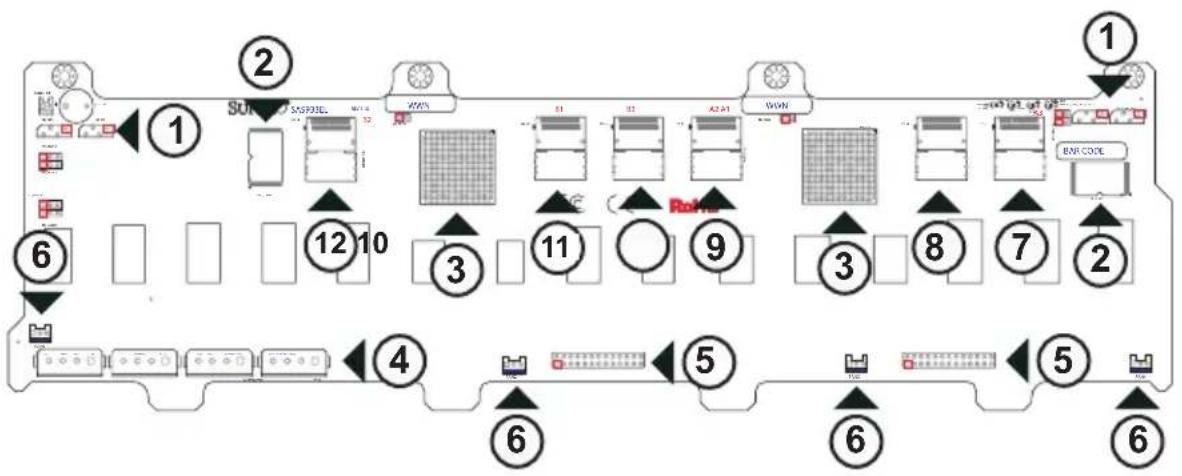
C-4 Front Connectors and Jumpers
flowchart
graph TD
    A["1"] --> B["2"]
    B --> C["3"]
    C --> D["4"]
    D --> E["5"]
    E --> F["6"]
    F --> G["7"]
    G --> H["8"]
    H --> I["9"]
    I --> J["10"]
    J --> K["11"]
    K --> L["12"]
    L --> M["1"]
    M --> N["BAR CODE"]
    style A fill:#f9f,stroke:#333
    style N fill:#ccf,stroke:#333
SC 933 EL2 Backplane
Front Connectors
- Primary and Secondary I²C connectors (optional)
- Primary and Secondary Flash Chip
- Primary and Secondary Expander Chip
- Power Connectors: PWR0, PWR1, PWR2, and PWR3
- EPP Connectors: J15 and J16
-
Fan Connectors: Fan1, Fan2, Fan3, and Fan4
-
SAS Connectors: PRI_A3
- SAS Connectors: PRI_A1
- SAS Connectors: PRI_A2
- SAS Connectors: SEC_B3 (not available in EL1 single port backplane)
- SAS Connectors: SEC_B1 (not available in EL1 single port backplane)
- SAS Connectors: SEC_B2 (not available in EL1 single port back-
flowchart
graph TD
    A["1"] --> B["2"]
    B --> C["3"]
    C --> D["4"]
    D --> E["5"]
    E --> F["6"]
    F --> G["7"]
    G --> H["8"]
    H --> I["9"]
    I --> J["10"]
    J --> K["SUPERC SUPERIOR WAIN 6.1"]
    style A fill:#f9f,stroke:#333
    style K fill:#f9f,stroke:#333
    style_L["REVER"] --> M["3"]
    style_N["SAR CODE"] --> O["7"]
    style_P["FC CE"] --> Q["3"]
    style_R["FC CE"] --> S["3"]
    style S --> T["3"]
    style_U["FC CE"] --> V["3"]
    style_W["FC CE"] --> X["3"]
    style_Y["FC CE"] --> Z["3"]
    style_AA["FC CE"] --> AB["3"]
    style_AC["FC CE"] --> AD["3"]
    style_AE["FC CE"] --> AF["3"]
    style_AG["FC CE"] --> AH["3"]
    style_AI["FC CE"] --> AJ["3"]
    style_AK["FC CE"] --> AL["3"]
    style_AM["FC CE"] --> AN["3"]
    style_AO["FC CE"] --> AP["3"]
C-5 Front Connector and Pin Definitions
1. Primary and Secondary I²C Connectors
The I²C Connectors are used to monitor hard drive activity and status through LED. See the table on the right for pin definitions. There are four total connectors--two primary and two secondary.
These connectors are optional and should only be used by qualified technicians.
| I2C ConnectorPin Definitions | |
| Pin# | Definition |
| 1 Data | |
| 2 Ground | |
| 3 Clock | |
| 4 No Connection | |
2. Primary and Secondary Flash Chips
The Primary and Secondary Flash Chips enhance the backplane memory.
3. Primary and Secondary Expander Chips
This Primary and Secondary Expander Chips allow the backplane to support dual ports, cascading, and failover.
4. Backplane Main Power Connectors
The 4-pin connectors, designated PWR0, PWR1, PWR2, and PWR3, provide power to the backplane. See the table on the right for pin definitions.
| BackplaneMain Power4-Pin Connector(PWR0, PWR1, PWR2,and PWR3) | |
| Pin# | Definition |
| 1 | +12V |
| 2 and 3 | Ground |
| 4 | +5V |
5. EPP Ports
The EPP ports are used for manufacturer diagnostic purposes only.
6. Fan Connectors
The 3-pin connectors, designated Fan1, Fan2, Fan3, and Fan4, provide power to the system fans.
See the table on the right for pin definitions.
| Fan Connectors(Fan1, Fan2, Fan3,and Fan4) | |
| Pin# | Definition |
| 1 Ground | |
| 2 +12V | |
| 3 Tachometer | |
7 - 11. SAS Ports
This backplane supports SAS drives only.
Note that the Primary and Secondary sets of SAS ports are in different order. From right to left the ports are Primary A3, A1, and A2 and Secondary B3, B1, and B2.
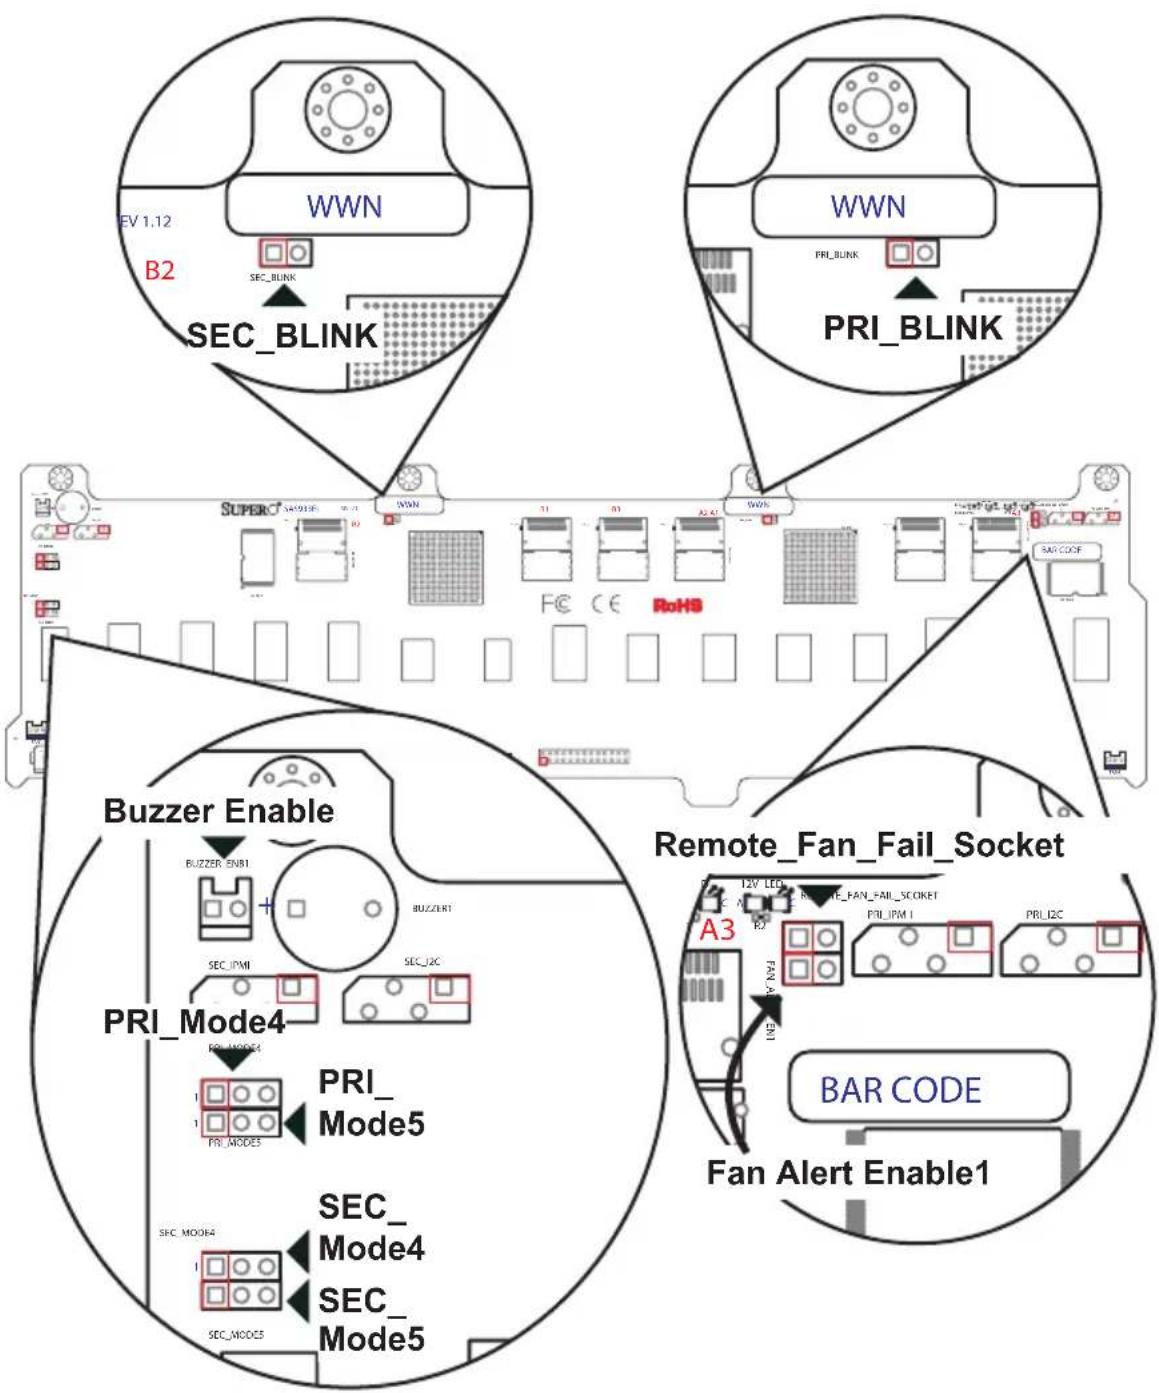
C-6 Front Jumper Locations and Pin Definitions
| Socket Settings | ||
| Socket Socket | Setting Note | |
| REMOTE_FAN_FAIL_SOCKET | Connected | Front Panel Fan Fail indicator(Optional) |
Explanation of Jumpers
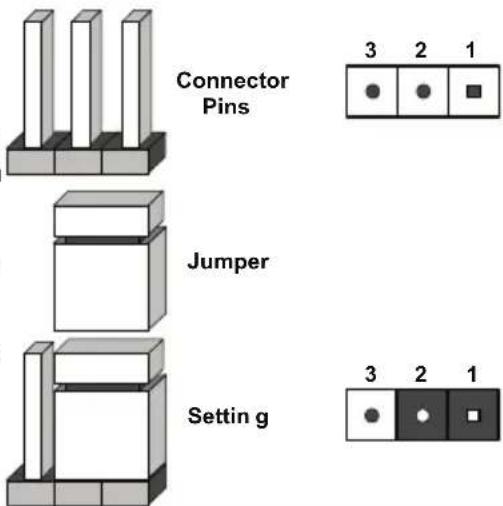
To modify the operation of the backplane, jumpers can be used to choose between optional settings. Jumpers create shorts between two pins to change the function of the connector. Pin 1 is identified with a square solder pad on the printed circuit board. Note: On two pin jumpers, "Closed" means the jumper is on and "Open" means the jumper is off the pins.
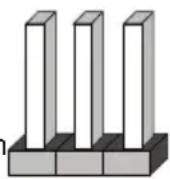
Connector
Pins
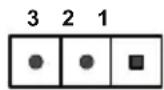
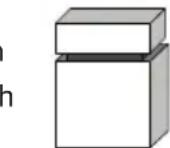
Jumper
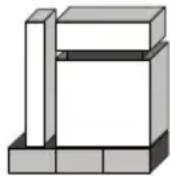
Setting
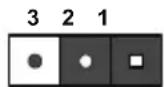
| General Jumper Settings | ||
| Jumper Jumper | Settings Note | |
| PRI_MODE4 1-2 | Factory SettingDo not change | |
| PRI_MODE5 2-3 | Factory SettingDo not change | |
| PRI_BLINK Open | Factory SettingDo not change | |
| SEC_MODE4 1-2 | Factory SettingDo not change | |
| SEC_MODE5 2-3 | Factory SettingDo not change | |
| SEC_BLINK Open | Factory SettingDo not change | |
| BUZZER_ENB | Open: DisableClosed: Enable | Buzzer Enable |
| FAN_ALERT_ENI | Open: DisableClosed: Enable | Fan Alert Enable |
Front LED Indicators
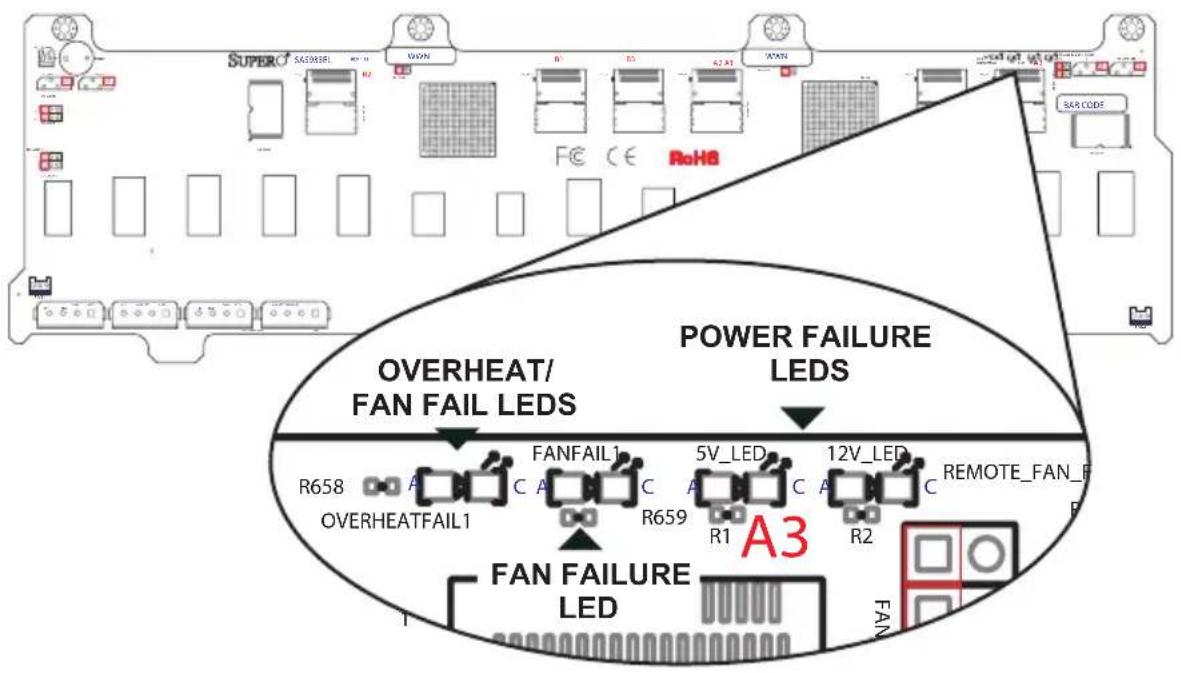
| Backplane LEDs | ||
| LED STATE | SPECIFICATION | |
| OVERHEATFAIL1 | ON Overheat | or Drive Failure |
| FANFAIL1 | ON Failure in | System Fans |
| 5V OFF | Backplane power failure. Light is on during normal operation. | |
| 12V | OFF | Backplane power failure. Light is on during normal operation. |
C-7 Rear Connectors and LED Indicators
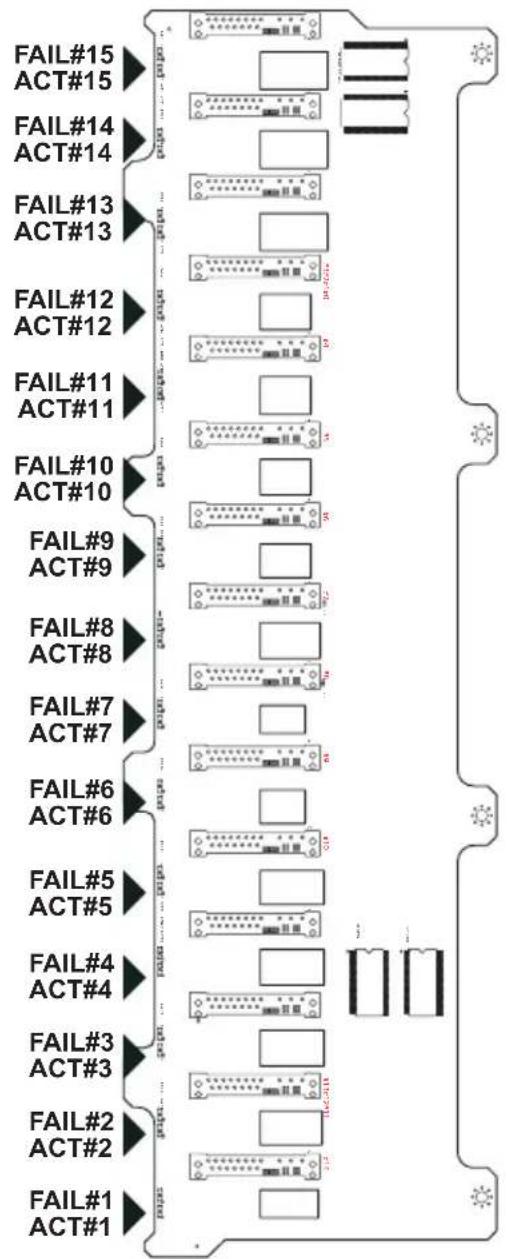
| Rear SAS Connectors | |||
| Rear Connector | SAS Drive Number | Rear Connector | SAS Drive Number |
| SAS #0 SAS HDD #0 SAS #8 SAS HDD #8 | |||
| SAS #1 SAS HDD #1 SAS #9 SAS HDD #9 | |||
| SAS #2 | SAS HDD #2 SAS #10 | SAS HDD #10 | |
| SAS #3 | SAS HDD #3 | SAS #11 | SAS HDD #11 |
| SAS #4 | SAS HDD #4 | SAS #12 | SAS HDD #12 |
| SAS #5 | SAS HDD #5 SAS #13 | SAS HDD #13 | |
| SAS #6 | SAS HDD #6 SAS #14 | SAS HDD #14 | |
| SAS #7 | SAS HDD #7 SAS #15 | SAS HDD #15 | |
| Rear LED Indicators | ||
| Rear LED Hard Drive Activity Failure LED | ||
| SAS #0 ACT #0 | FAIL #0 | |
| SAS #1 ACT #1 | FAIL #1 | |
| SAS #2 ACT #2 | FAIL #2 | |
| SAS #3 ACT #3 | FAIL #3 | |
| SAS #4 ACT #4 | FAIL #4 | |
| SAS #5 ACT #5 | FAIL #5 | |
| SAS #6 ACT #6 | FAIL #6 | |
| SAS #7 ACT #7 | FAIL #7 | |
| SAS #8 ACT #8 | FAIL #8 | |
| SAS #9 ACT #9 | FAIL #9 | |
| SAS #10 ACT #10 | FAIL #10 | |
| SAS #11 ACT #11 | FAIL #11 | |
| SAS #12 ACT #12 | FAIL #12 | |
| SAS #13 ACT #13 | FAIL #13 | |
| SAS #14 ACT #14 | FAIL #14 | |
| SAS #15 ACT #15 | FAIL #15 | |
Dual Port and Cascading Configurations
C-8 Single and Dual Port Expanders
Single Ports
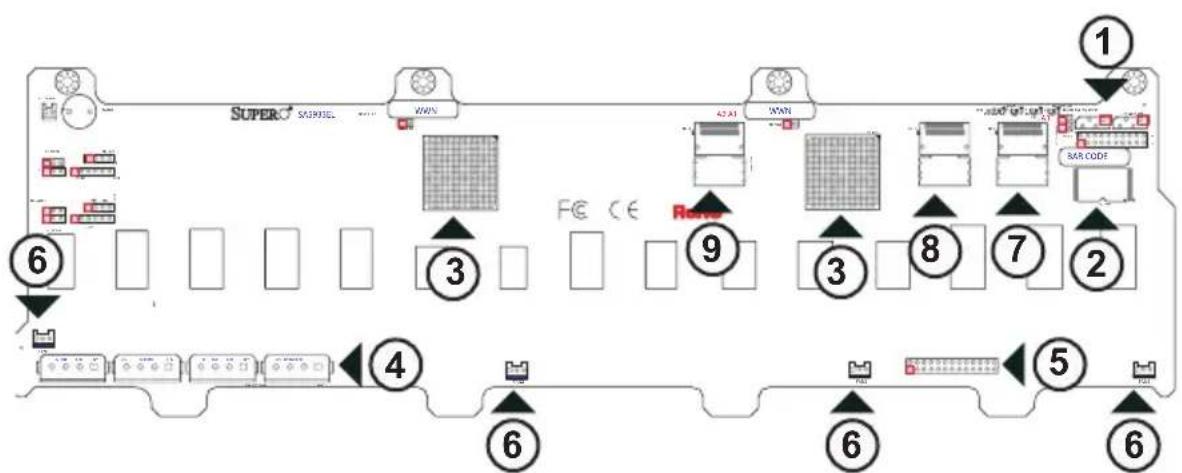
SC 933EL1 backplanes have a single-port expander that access all 16 drives and supports cascading.
Dual Ports
SC 933EL2 backplanes have dual-port expanders that access all 16 drives. These dual-port expanders support cascading, failover, and recovery.
SC 933EL2 Dual-Port Backplane
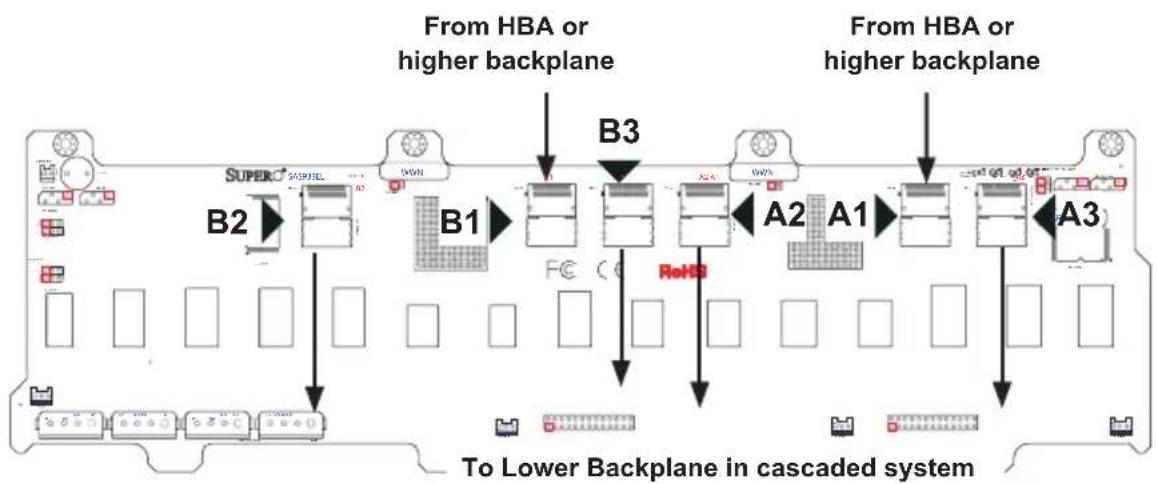
C-9 Failover
The SC933EL2 Backplane has two expanders which allow effective failover and recovery.
Single Host Bus Adapter
In a single host bus configuration, the backplane connects to one Host Bus Adapter (HBA).
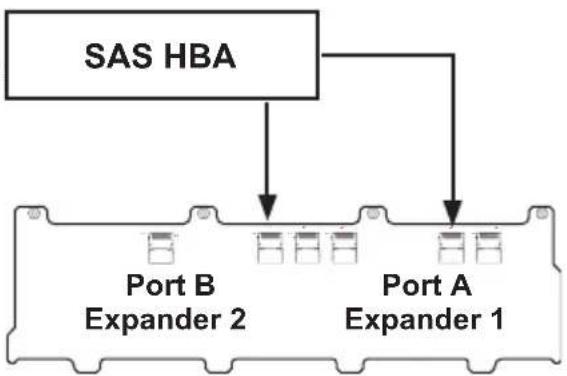
flowchart
graph TD
    A["SAS HBA"] --> B["Port B Expander 2"]
    A --> C["Port A Expander 1"]
Single Host Bus Adapter Failover
If the Expander or data path in Port A fails, the system will automatically fail over to Port B.
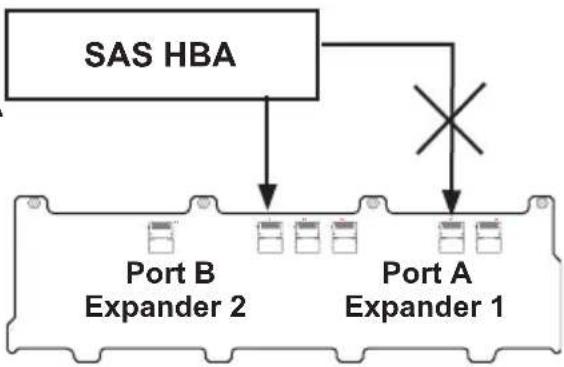
flowchart
graph TD
    A["SAS HBA"] --> B["Port B Expander 2"]
    A --> C["Port A Expander 1"]
    B --> D["Switch Symbol"]
    C --> D
Dual Host Bus Adapter
In a Dual Host Bus Configuration, the backplane connects to two Host Bus Adapters (HBA).
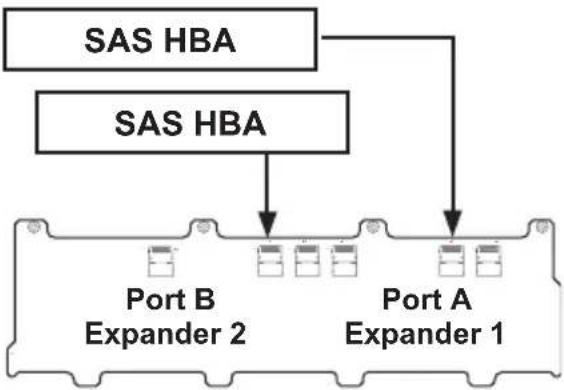
flowchart
graph TD
    A["SAS HBA"] --> B["Port B Expander 2"]
    C["SAS HBA"] --> D["Port A Expander 1"]
Dual Host Bus Adapter Failover
If the Expander or data path in Port A fails, the system will automatically fail over to Port B. This maintains a full connection to all drives.
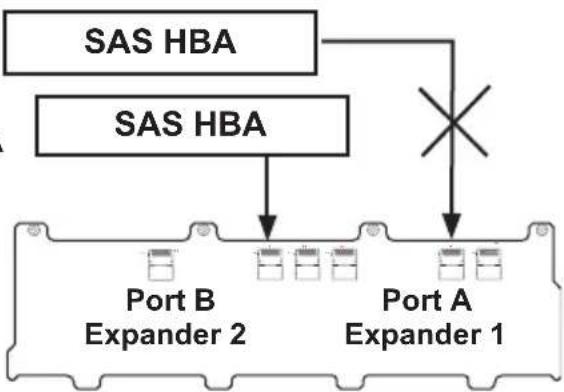
flowchart
graph TD
    A["SAS HBA"] --> C["Port B Expander 2"]
    B["SAS HBA"] --> C
    C --> D["Port A Expander 1"]
    D --> E["X Marker"]
C-10 Cables and Chassis Power Card
Chassis Power Card
In a cascaded configuration, the first chassis includes a motherboard and, at least one, Host Bus Adapter (HBA). Other servers in this enclosed system, include a power card. This section describes the supported power card for the 933 backplane system.
For more information, see the PCC-JBPWR2 power card manual. This manual can be found at the http://www.supermicro.com or as an appendix in the SC933 chassis manual.
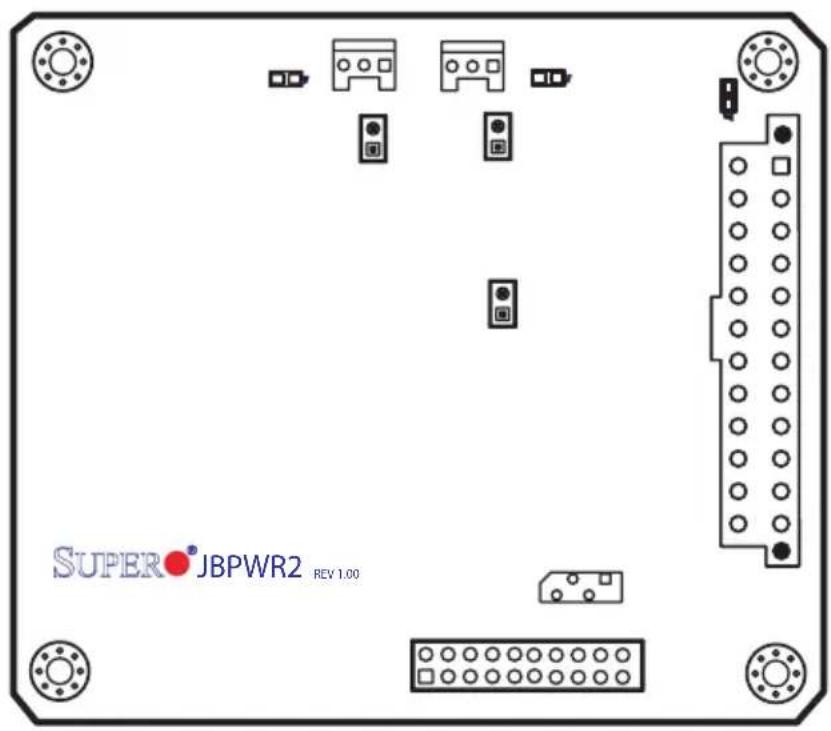
| Power Card | ||
| Part Number Part Type Where Used | ||
| CSE-PTJBOD-CB1 Power Card | Allows the chassis to be in a JBOD (Just a Bunch of Drives) system. | |
Connecting an Internal Host Bus Adapter to the Backplane
The following section lists the most common cables used to connect the HBA to the backplane.
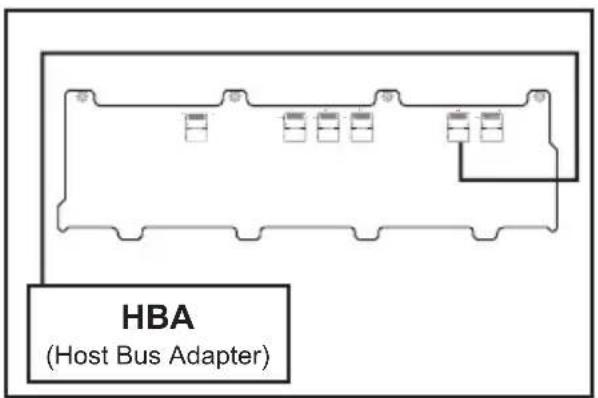
Single Internal Host Bus Adapter
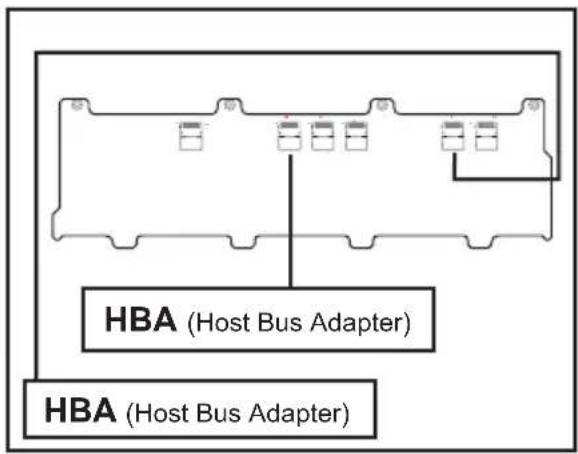
Dual Internal Host Bus Adapter
Supported Internal HBA to Backplane Cables
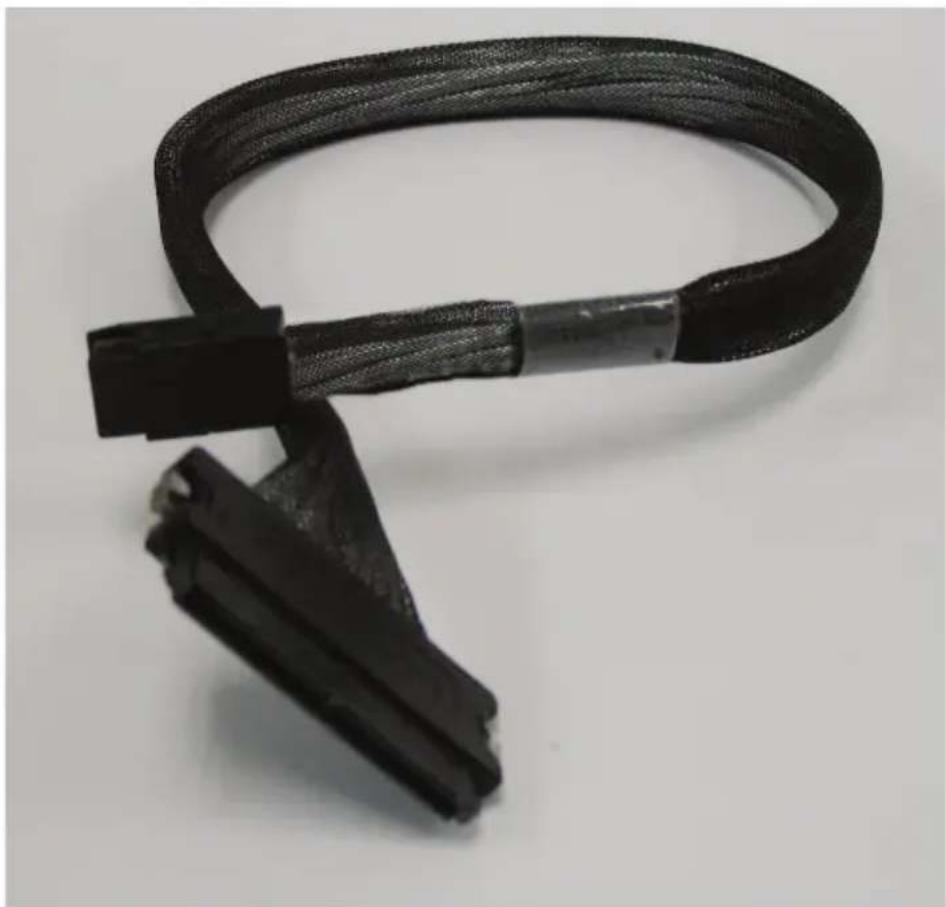
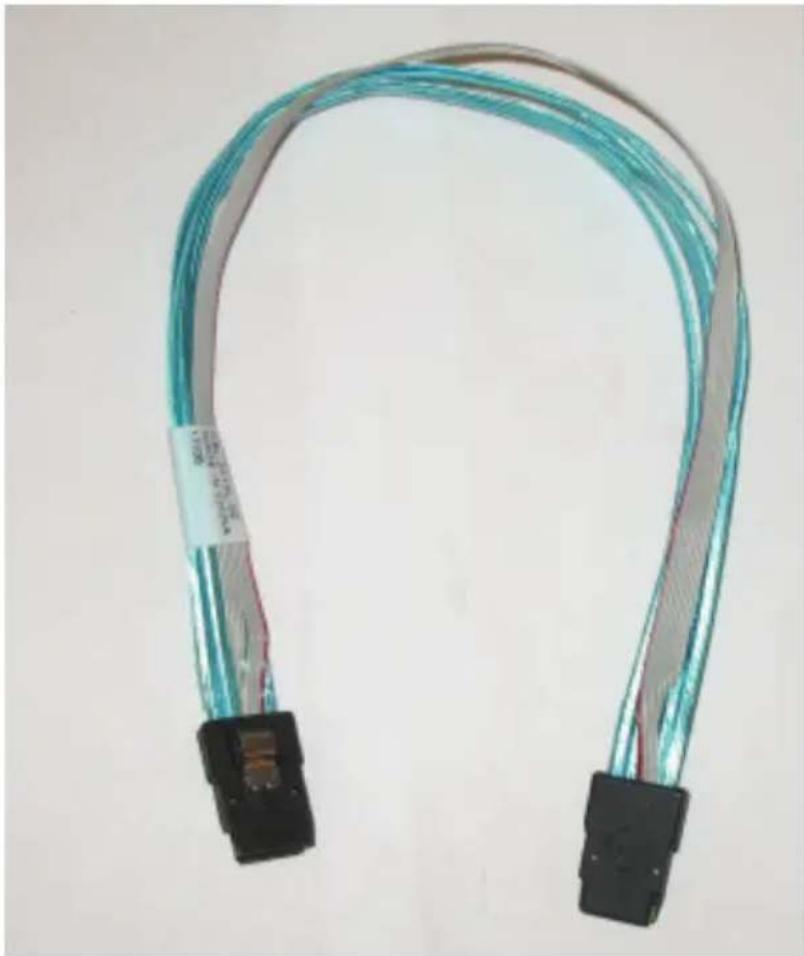
Use the following listed cables to create connections between the internal HBA and backplane. The cables required depend on the HBA connector.
natural_image
Close-up of a black flexible cable with attached metal connector, isolated on white background (no text or symbols)Ipass to 4-lane cable (CBL-0117)
Cable Name: IPASS TO 4-LANE
Part #: CBL-0117 Length: 46 cm (18 inches)
Description: This cable has one SFF-8484 (32 pin) connector on one end and ipass (SFF-8087/mini-sas) connector (36 pins) at the other. This cable connects from the HBA to the 933 EL backplane.
natural_image
Coiled cable with two black connectors and a gray wire, no visible text or symbolsIPASS (mini SAS) TO IPASS (mini SAS) (CBL-0110L-2)
Cable Name: IPASS (mini SAS) TO IPASS (mini SAS)
Part #: CBL-0108L-02 Length: 39 cm (15 inches)
Part #: CBL-0109L-02 Length: 22 cm (9 inches)
Part #: CBL-0110L-02 Length: 18 cm (7 inches)
Description: This cable has an ipass (SFF-8087/mini-sas) connector (36 pins) at each end. It connects from the HBA to the 933 EL backplane.
Connecting an External Host Bus Adapter to the Backplane
This backplane supports external Host Bus Adapters. In this configuration, the HBA and the backplane are in different physical chassis. This allows a JBOD (Just a Bunch Of Drives) configuration from an existing system.
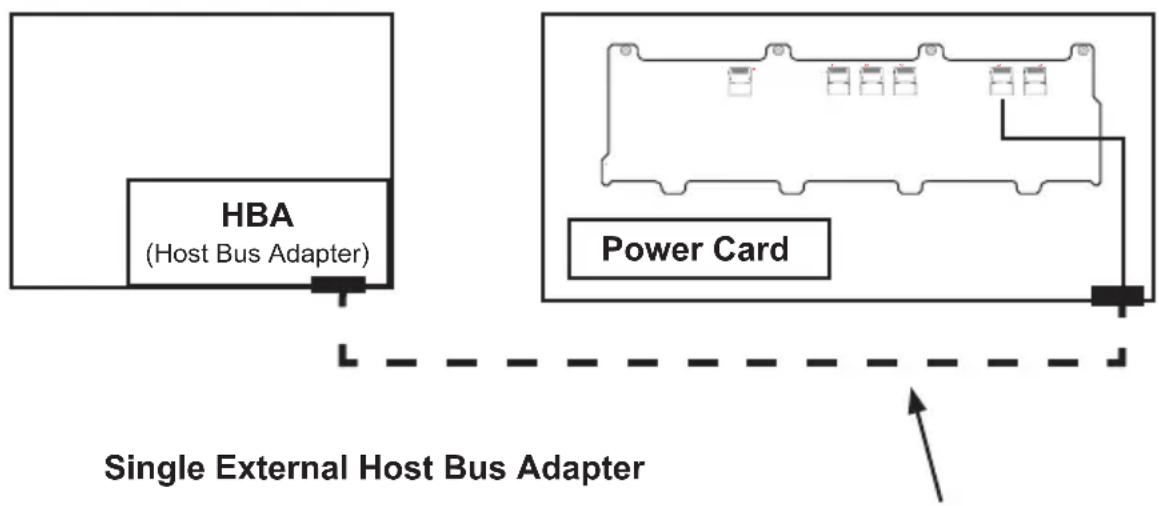
flowchart
graph TD
    A["HBA (Host Bus Adapter)"] --> B["Power Card"]
    B --> C["Single External Host Bus Adapter"]
    style A fill:#f9f,stroke:#333
    style B fill:#ccf,stroke:#333
    style C fill:#fff,stroke:#333
CBL-0200L External HBA Cable
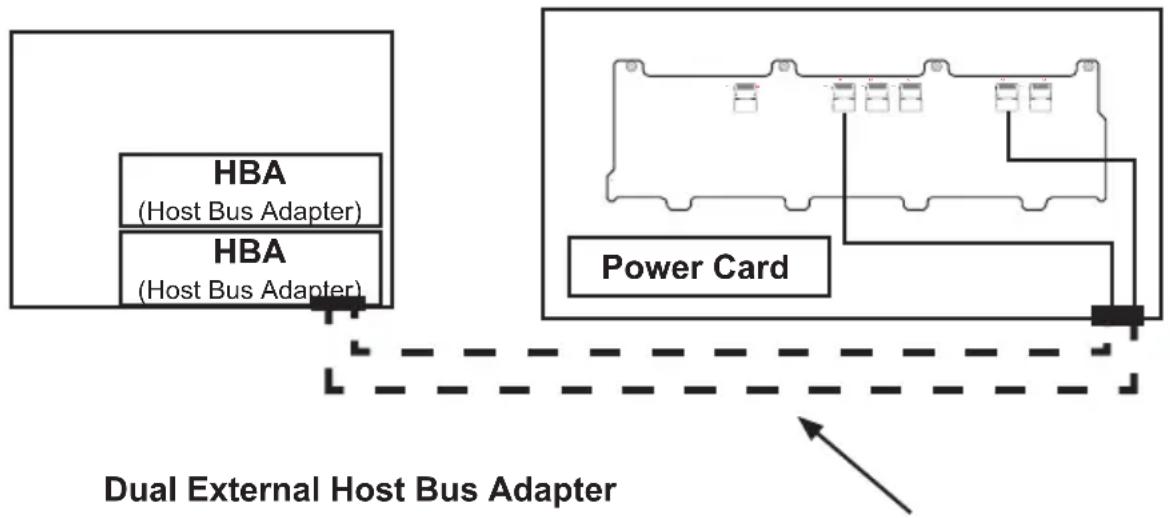
flowchart
graph TD
    A["Power Card"] --> B["HBA (Host Bus Adapter)"]
    B --> C["Dual External Host Bus Adapter"]
    style A fill:#f9f,stroke:#333
    style B fill:#ccf,stroke:#333
    style C fill:#cfc,stroke:#333
CBL-0200L External HBA Cables
Supported External HBA to Backplane Cable
Use the following cable if your external HBA has an Infiniband connector.
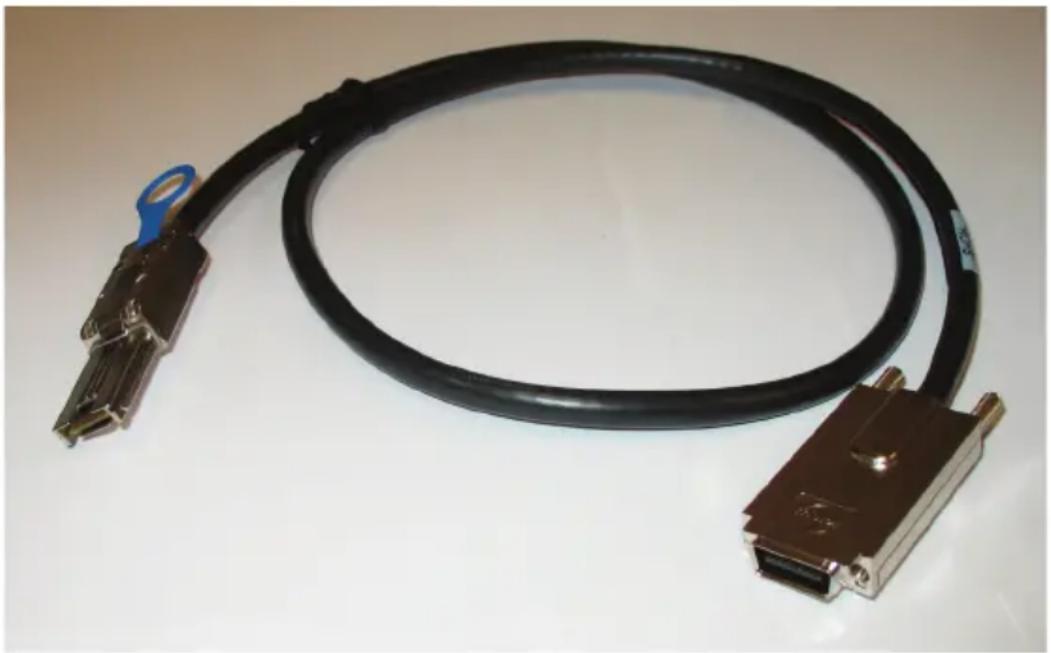
natural_image
Coiled black cable with metallic connectors and a blue clip, no visible text or symbolsSAS InfiniBand to Mini SAS (CBL-0200L)
Cable Name: SAS InfiniBand to Mini SAS X4 1M cable, PBF
Part #: CBL-0200L Length: 1 meter
Description: This cable has an Infiniband connector (SFF-8470) on one end and an SFF-8088-1X (26-pins) at the other end.
Connecting Multiple Backplanes in a Single Channel Environment
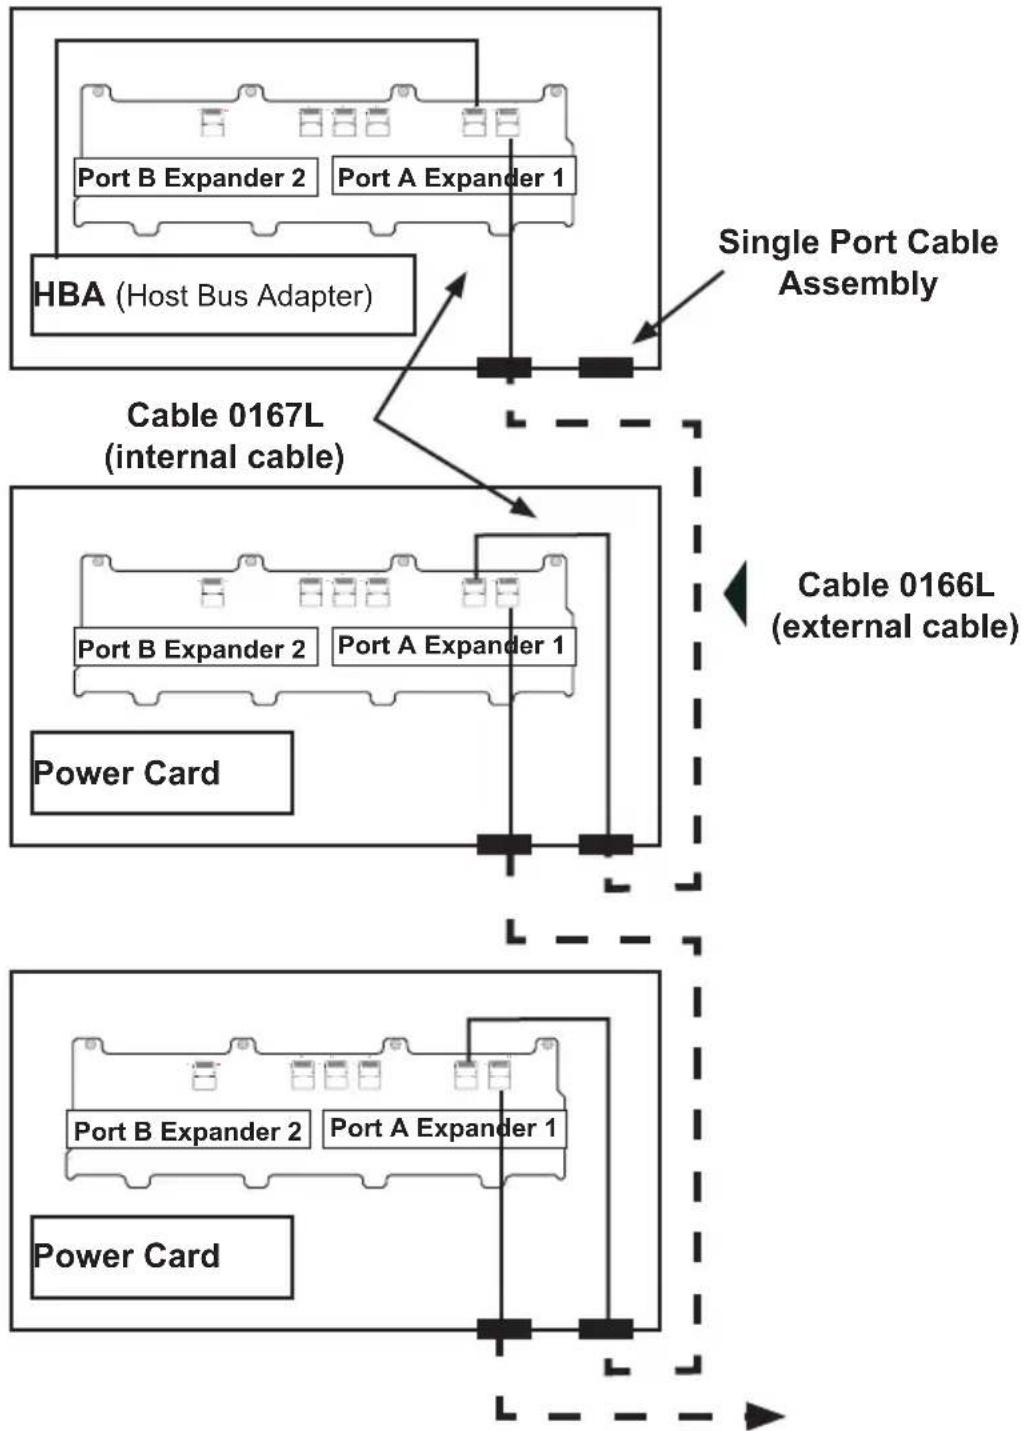
This section describes the cables used when cascading from a single HBA. These connections use CBL-0167L internal cables and CBL-0166L external cables.
Single HBA Conguration
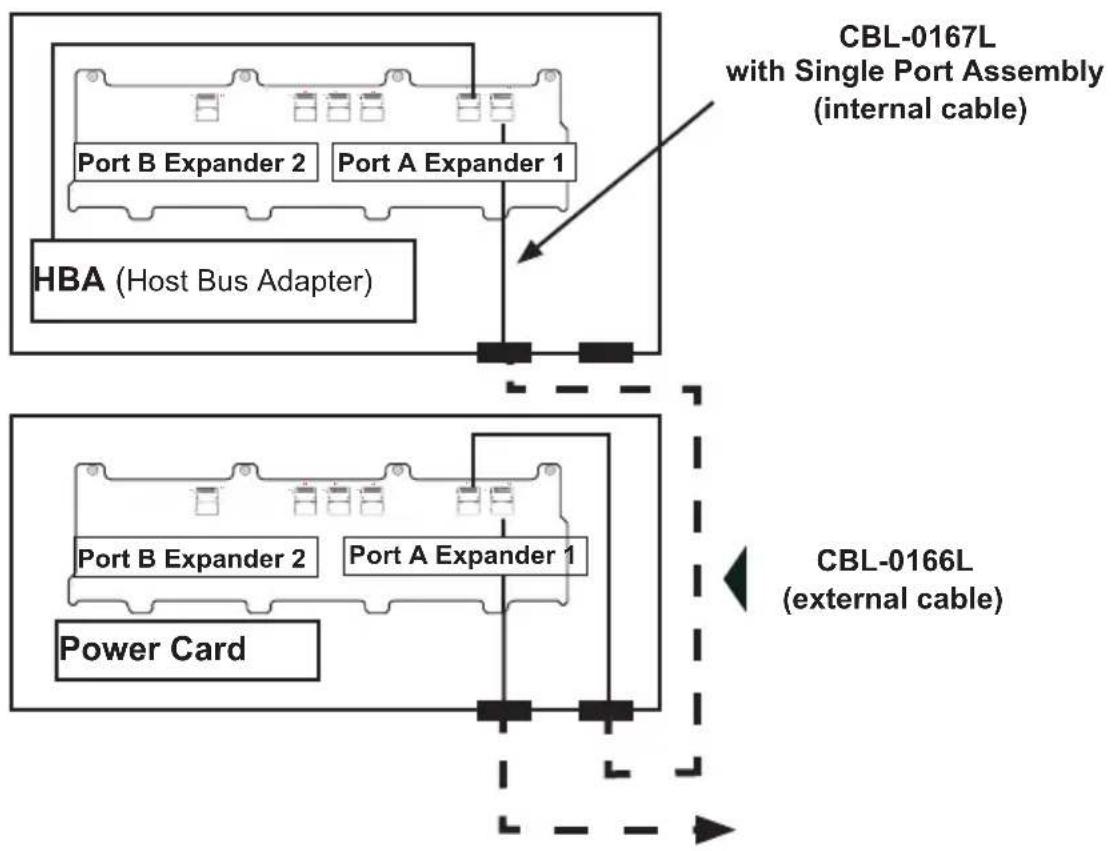
flowchart
graph TD
    A["HBA (Host Bus Adapter)"] --> B["Port B Expander 2"]
    A --> C["Port A Expander 1"]
    D["Power Card"] --> E["Port B Expander 2"]
    D --> F["Port A Expander 1"]
    G["CBL-0167L with Single Port Assembly (internal cable)"] --> H["External Cable"]
    I["CBL-0166L (external cable)"] --> J["External Cable"]
Single HBA Configuration Cables
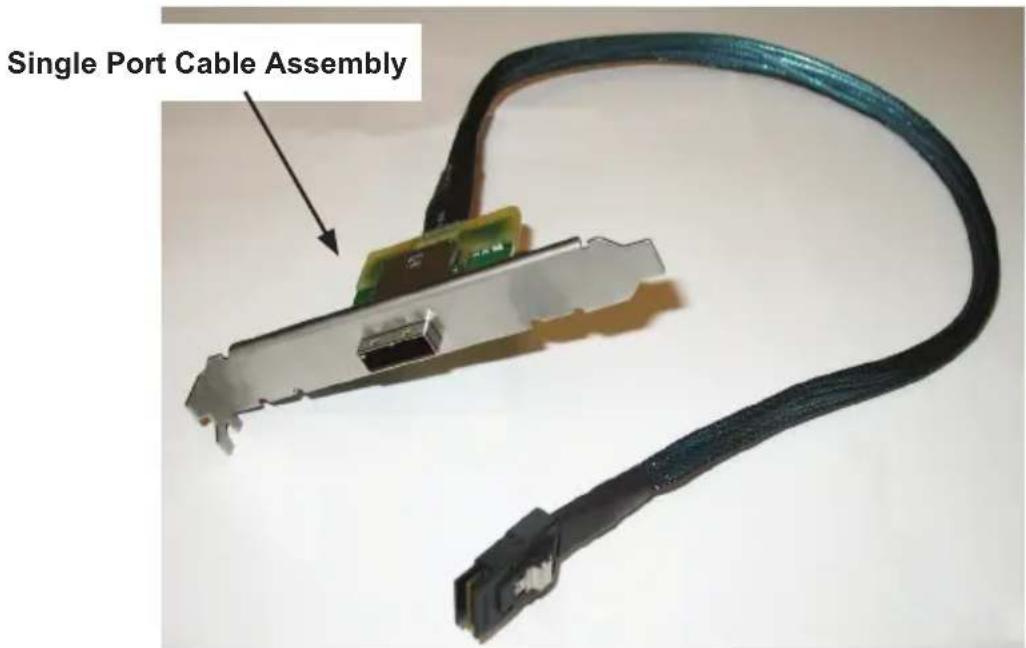
SAS Internal Backplane Cable (CBL-0167L)
Cable Name: SAS EL2/EL1 Backplane Cable (Internal) w/ 2-port Cascading Cable, 68 cm
Part #: CBL-0167L (SFF-8087 to SFF-8088 x1)
Ports: Single
Placement: Internal cable
Description: Internal cable. Connects the backplane to the Host Bus Adapter (HBA) or external port. Used in single port environments.
natural_image
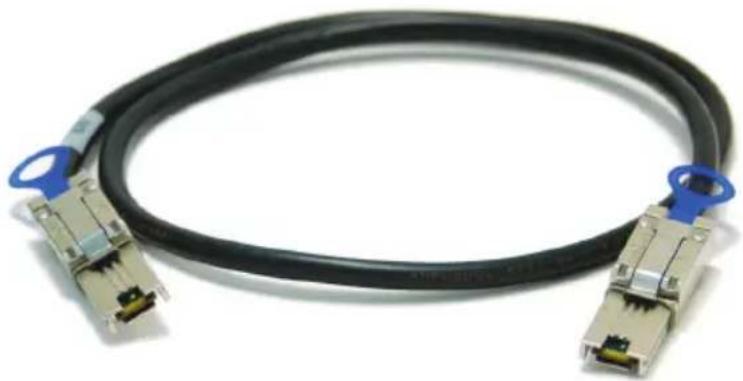
Coiled black network interface with two metallic connectors and a blue-labeled clip (no text or symbols visible)SAS Cascading Cable External (CBL-0166L)
Cable Name: SAS EL2/EL1 Cascading Cable (External), 68cm
Part #: CBL-0166L (SFF-8088 1x to SFF-8088 x1)
Ports: Single or Dual
Placement: External cable
Description: External cascading cable. Connects ports between servers. With most connectors, use one cable for single port connections and two cables for dual port connections.
Connecting Multiple Backplanes in a Dual Channel Environment
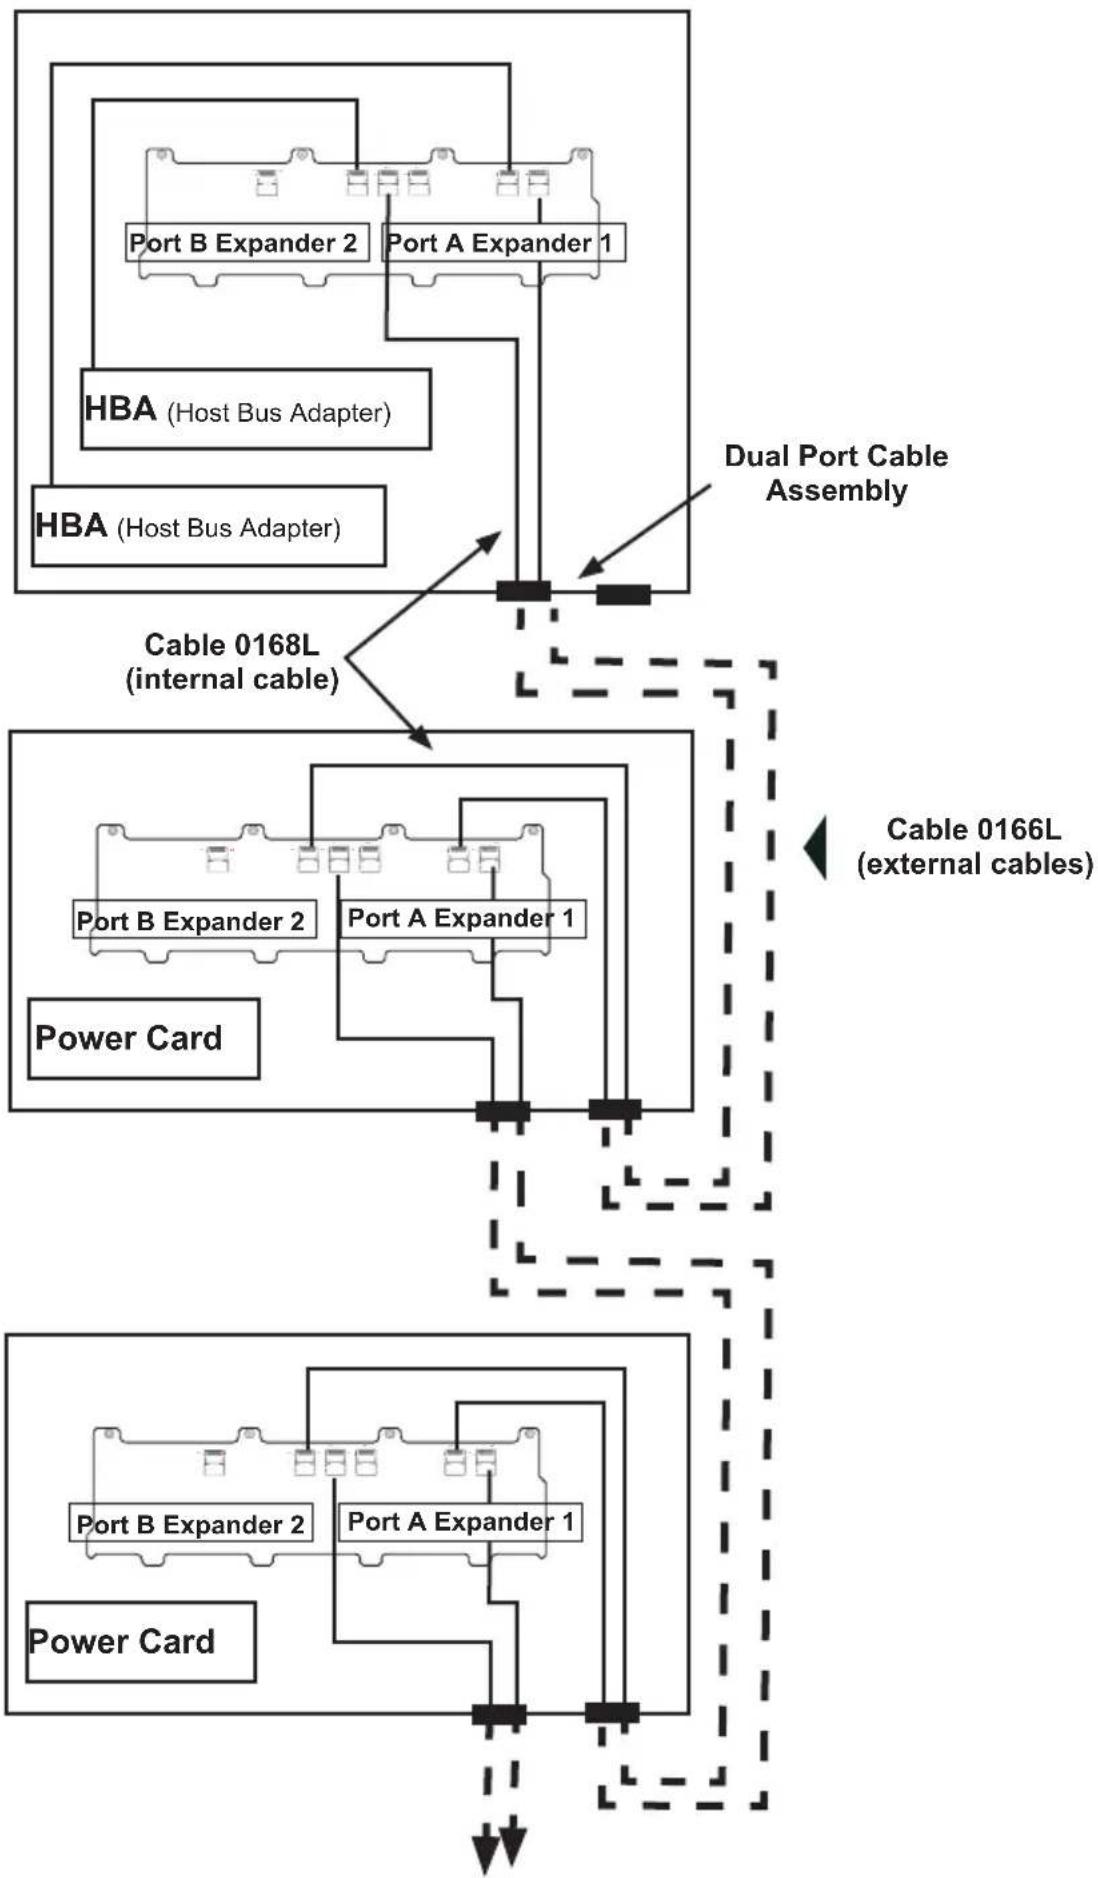
This section describes the cables used when cascading from a single HBA. These connections use CBL-0168L internal cables and CBL-0166L external cables.
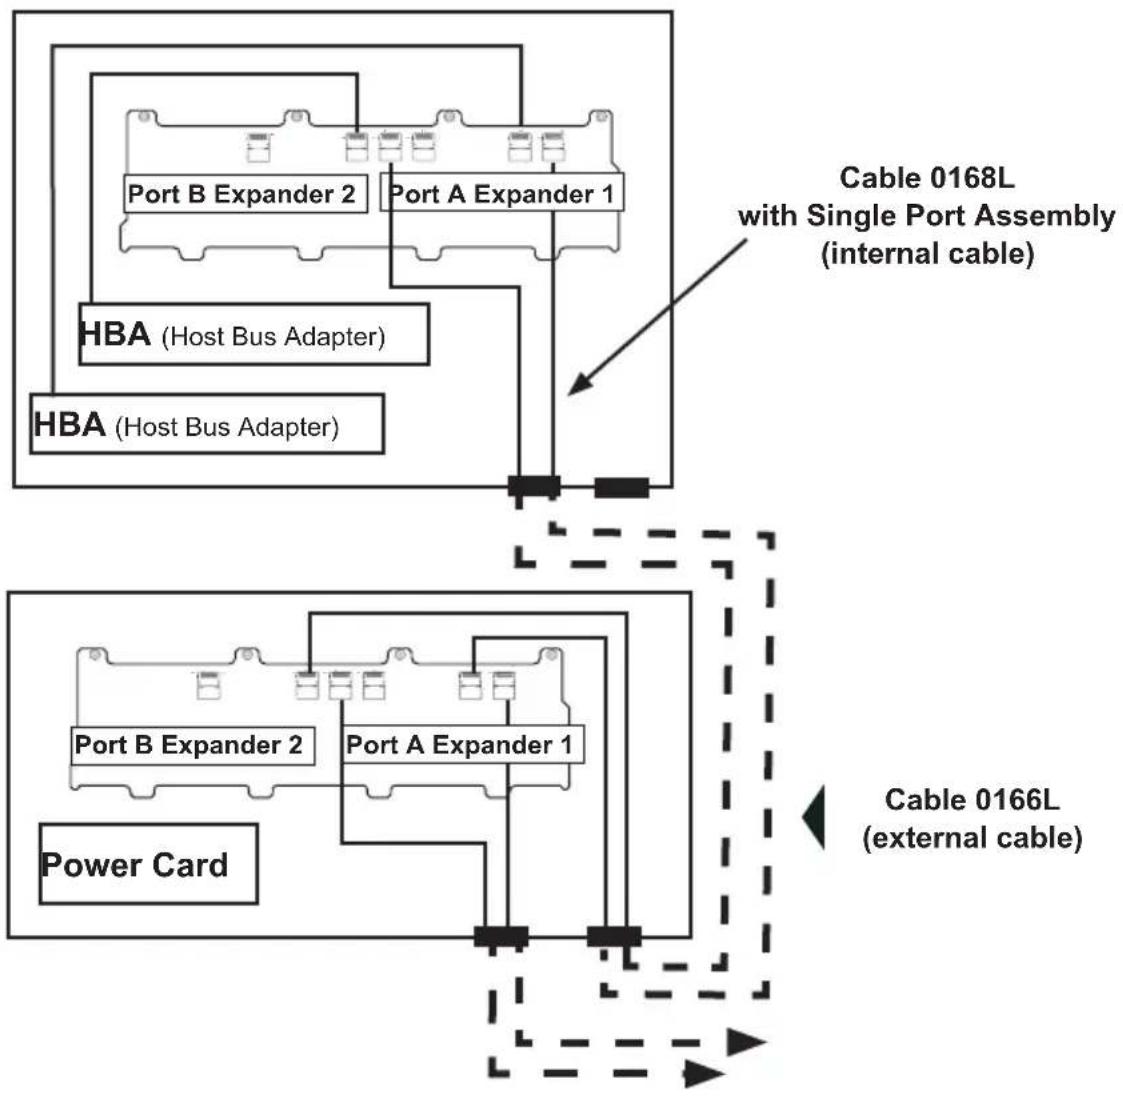
flowchart
graph TD
    A["Power Card"] --> B["HBA (Host Bus Adapter)"]
    B --> C["Port A Expander 1"]
    B --> D["Port B Expander 2"]
    C --> E["Cable 0168L with Single Port Assembly (internal cable)"]
    D --> F["Cable 0166L (external cable)"]
Dual HBA Conguration Cables
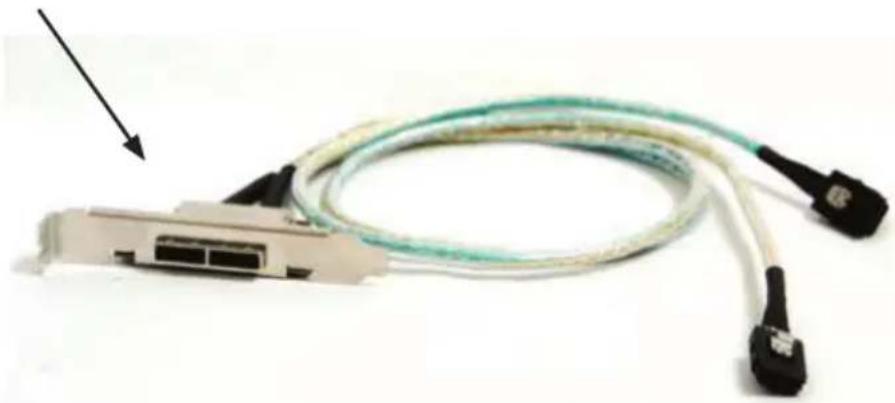
Dual Port Cable Assembly
natural_image
Coiled broadband cable with two connectors and an arrow pointing to a connector (no text or symbols visible)SAS Cascading Cable Internal (CBL-0168L)
Cable Name: SAS Dual-port Cable Assembly, 68/76cm
Part #: CBL-0168L
Placement: Internal cable
Ports: Dual
Description: Internal cascading cable. Connects the backplane to the Host Bus Adapter (HBA) or external port. Used in Dual port environments.
natural_image
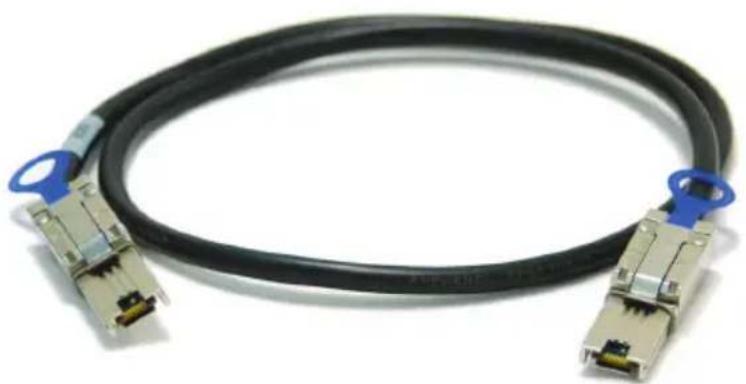
Coiled network device with two metallic connectors and a blue key clip (no text or symbols visible)SAS Cascading Cable External (CBL-0166L)
Cable Name: SAS EL2/EL1 Cascading Cable (External), 68cm
Part #: CBL-0166L
Placement: External cable
Ports: Single or Dual
Description: External cascading cable. Connects ports between servers. Use one cable for single port connections and two cables for dual port connections.
C-11 Supported Cascading Configurations
Cascading allows the system to access data at a faster rate by allowing several backplanes to share resources to reduce latency time.
The first backplane in a cascaded system requires a motherboard and HBA. Other servers require a power control card, not a motherboard and HBA. For more information, see the SC933 Chassis Manual.
flowchart
graph TD
    A["HBA (Host Bus Adapter)"] --> B["Cable 0167L (internal cable)"]
    A --> C["Cable 0166L (external cable)"]
    D["Power Card"] --> E["Single Port Cable Assembly"]
    F["Power Card"] --> G["Single Port Cable Assembly"]
    H["Port B Expander 2"] --> I["Single Port Cable Assembly"]
    J["Port A Expander 1"] --> K["Single Port Cable Assembly"]
    L["Port B Expander 2"] --> M["Single Port Cable Assembly"]
    N["Port A Expander 1"] --> O["Single Port Cable Assembly"]
Other Considerations:
● Cascading supports up to 122 hard drives
- Use the same cables for all single port configurations
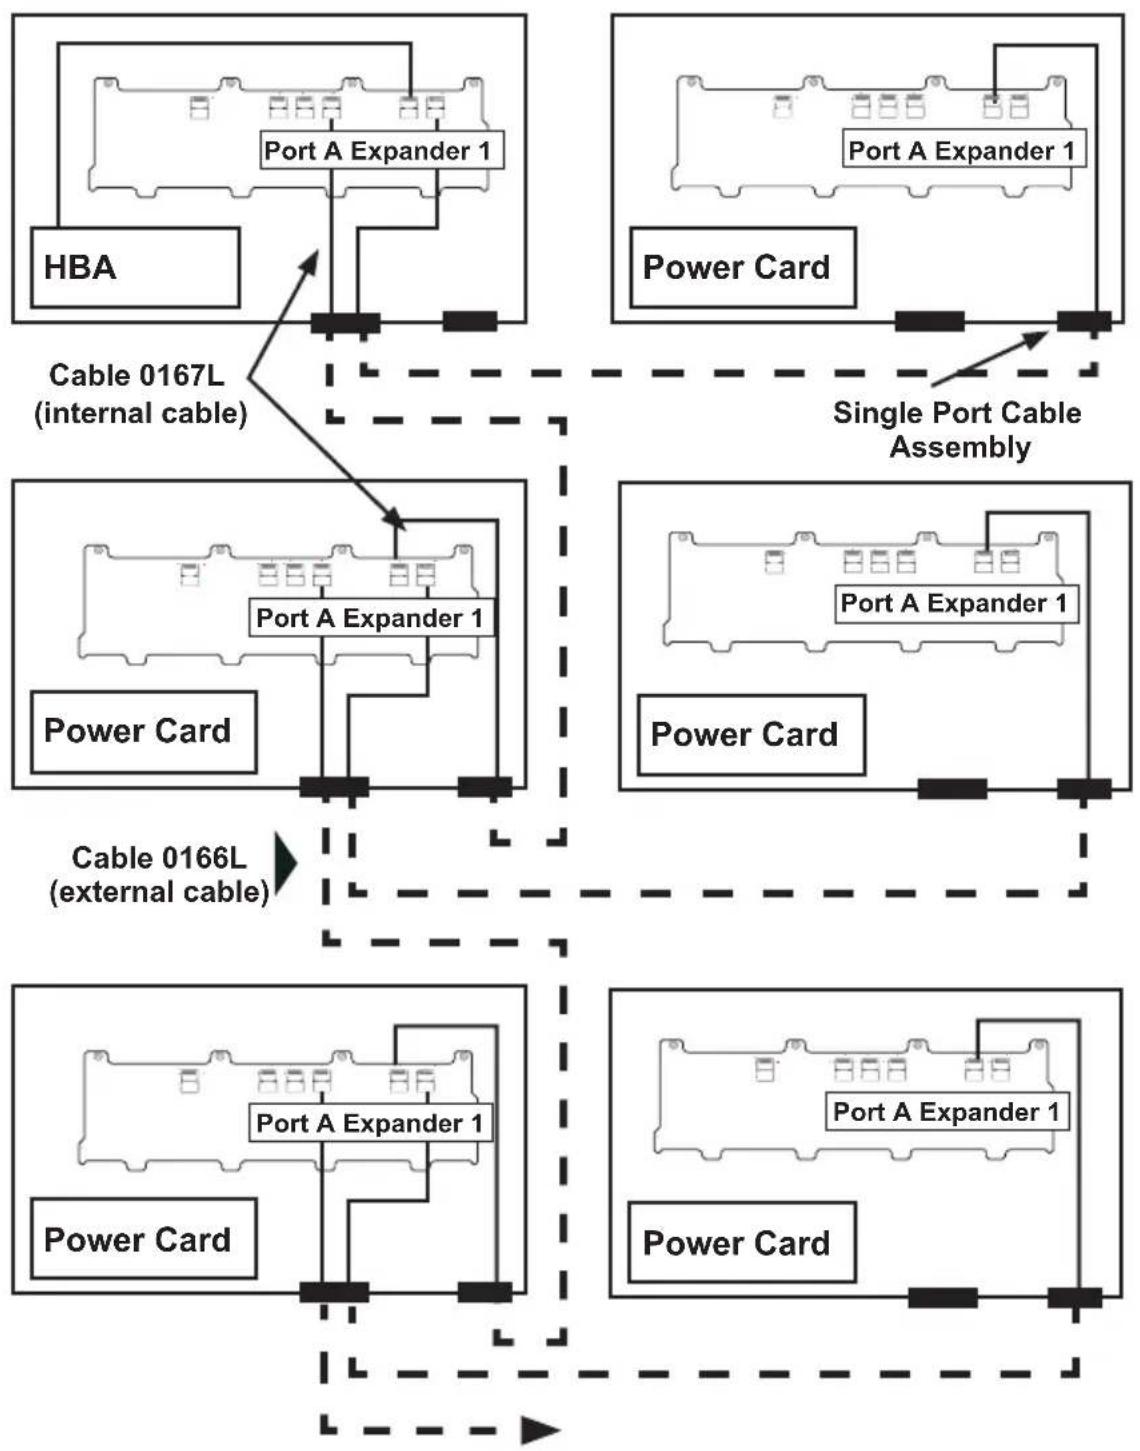
Server System with Single SAS HBA
The exanders allow horizontal branching. This configuration also applies to dual ports.
flowchart
graph TD
    subgraph HBA
        A["Port A Expander 1"] --> B["Cable 0167L (internal cable)"]
    end
    subgraph Power Card
        C["Port A Expander 1"] --> D["Cable 0166L (external cable)"]
    end
    subgraph Single Port Cable Assembly
        E["Power Card"] --> F["Port A Expander 1"]
        G["Power Card"] --> H["Port A Expander 1"]
    end
    A --> I["HBA"]
    C --> J["Power Card"]
    D --> K["Single Port Cable Assembly"]
    F --> L["Power Card"]
    G --> M["Power Card"]
    H --> N["Power Card"]
Server System with Dual SAS HBA and Cascading Configuration
flowchart
graph TD
    A["HBA (Host Bus Adapter)"] --> B["Port B Expander 2"]
    A --> C["Port A Expander 1"]
    D["Cable 0168L (internal cable)"] --> E["Power Card"]
    F["Dual Port Cable Assembly"] --> G["Port B Expander 2"]
    F --> H["Port A Expander 1"]
    I["Cable 0166L (external cables)"] --> J["Power Card"]
    K["Power Card"] --> L["Port B Expander 2"]
    K --> M["Port A Expander 1"]
    N["Power Card"] --> O["Power Card"]
Server System with Dual SAS HBA
Port B Ex. 2
Port A Ex. 1
Port B Ex. 2
Port A Ex. 1
HBA
Power
HBA
Card
Port B Ex. 2
Port A Ex. 1
Port B Ex. 2
Port A Ex. 1
Power
Card
Power
Card
Cable 0166L
(external cable)
Port B Ex. 2
Port A Ex. 1
Port B Ex. 2
Port A Ex. 1
Power
Card
Power
Card
Dual Cable Routing
External Cables
In the previous diagrams external cables are represented with two different lines. These cables are both CBL-0166L External Cables. Different lines help the user determine cable routing.
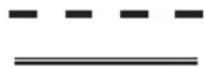
CBL-0166L (external cable)
Notes
Appendix D
SATA-933 Backplane Specifications
To avoid personal injury and property damage, carefully follow all the safety steps listed below when accessing your system or handling the components.
D-1 ESD Safety Guidelines
Electric Static Discharge (ESD) can damage electronic components. To prevent damage to your system, it is important to handle it very carefully. The following measures are generally sufficient to protect your equipment from ESD.
- Use a grounded wrist strap designed to prevent static discharge.
- Touch a grounded metal object before removing a component from the antistatic bag.
- Handle the RAID card by its edges only; do not touch its components, peripheral chips, memory modules or gold contacts.
- When handling chips or modules, avoid touching their pins.
- Put the card and peripherals back into their antistatic bags when not in use.
D-2 General Safety Guidelines
- Always disconnect power cables before installing or removing any components from the computer, including the backplane.
- Disconnect the power cable before installing or removing any cables from the backplane.
- Make sure that the backplane is securely and properly installed on the mother - board to prevent damage to the system due to power shortage.
D-3 An Important Note to Users
- All images and layouts shown in this user's guide are based upon the latest PCB Revision available at the time of publishing. The card you have received may or may not look exactly the same as the graphics shown in this manual.
Jumper Settings and Pin Definitions
D-4 Front Connectors and Jumpers
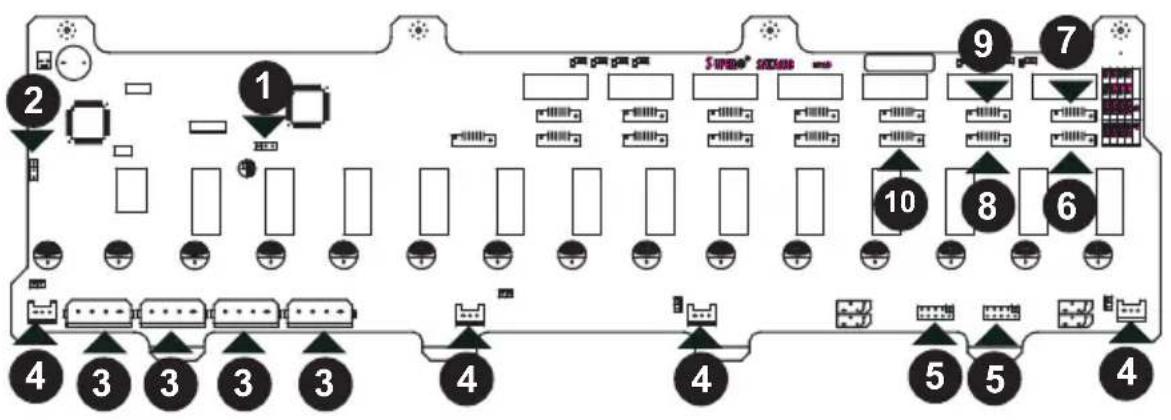
Front Connectors
- OH#1: JP25
- OH#2: JP45
- Power Connectors (4-pin): JP10, JP13, JP46 and JP48
- Fan Connectors: JP54, JP56, JP58 and JP60
- ACT_IN#0-7: JP26 and ACT_IN#8-14: JP47
- SATA Port #0: J5
- SATA Port #1: J6
- SATA Port #2: J7
- SATA Port #3: J8
- SATA Port #4: J10
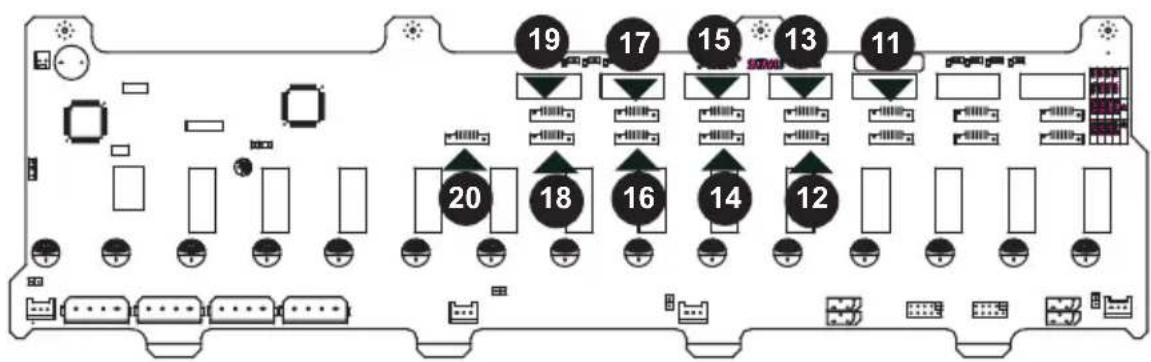
- SATA Port #5: J12
- SATA Port #6: J14
- SATA Port #7: J16
- SATA Port #8: J22
- SATA Port #9: J23
- SATA Port #10: J24
- SATA Port #11: J25
- SATA Port #12: J26
- SATA Port #13: J29
- SATA Port #14: J30
D-5 Front Connector and Pin Definitions
1. OH Temperature Connector
OH#1: JP25 and OH#2: JP45
Open: 45 degrees Celsius
1-2: 50 degrees Celsius
2-3: 55 degrees Celsius
2. Backplane Main Power Connectors
The 4-pin connectors designated JP10, JP13, JP46 and JP48 provide power to the backplane. See the table on the right for pin definitions.
| BackplaneMain Power4-Pin Connector(JP10, JP13,JP46 and JP48) | |
| Pin# Definition | |
| 1 | +12V |
| 2 and 3 | Ground |
| 4 | +5V |
5. Fan Connectors
The 3-pin connectors, designated JP61, JP62, JP63 and JP60, provide power to the fans. See the table on the right for pin definitions.
| Fan Connectors(JP54, JP56, and JP60) | |
| Pin# Definition | |
| 1 Ground | |
| 2 +12V | |
| 3 Tachometer |
6. Activity LED Connector
The activity LED connectors, designated JP26 and JP47 are used to indicate the activity status of each SAS drive. The Activity LED Connector is located on the front panel. For the Activity LED Header to work properly, connect using a 10-pin LED cable.
| SAS Activity LED HeaderPin Definitions (JP26) | |
| Pin # Definition Pin # Definition | |
| 1 ACT IN#0 6 ACT IN#4 | |
| 2 ACT IN#1 7 ACT IN#5 | |
| 3 ACT IN#2 8 ACT IN#6 | |
| 4 ACT IN#3 9 ACT IN#7 | |
| 5 Ground 10 Empty |
7. SATA Ports
The SAS ports are used to connect the SAS drive cables. The 8 ports are designated #0 - #14. Each port is also compatible with SATA drives.
D-6 Front Jumper Locations and Pin Definitions
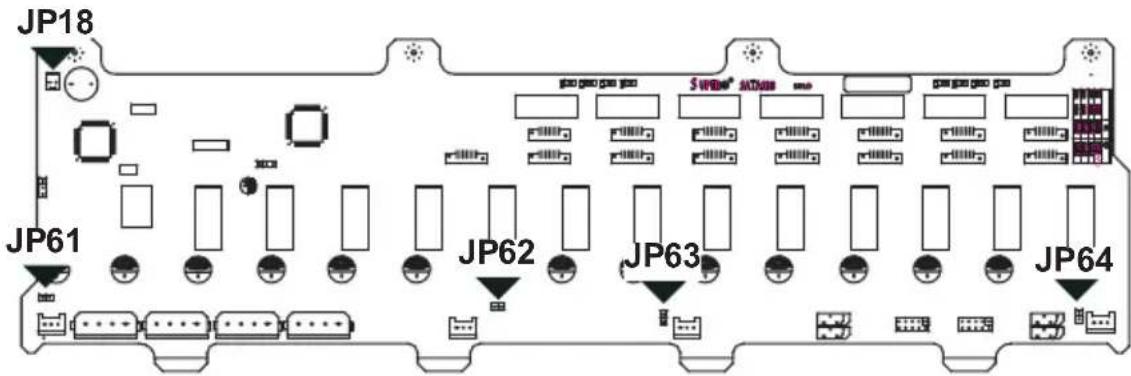
| Socket Settings | ||
| Socket | Socket Setting | Note |
| JP18 | Connected to front panel | Buzzer ResetPress once to disable buzzer;Press twice to enable buzzer |
Fan Jumper Settings
This backplane supports up to four fans. To utilize each fan, you must configure both jumpers as instructed below.
| Fan Jumper Settings | ||
| Jumper | Jumper Settings | Fan Number |
| JP61 | 1-2 On: Enable2-3 Off: Disable | FAN #1 |
| JP62 | 1-2 On: Enable2-3 Off: Disable | FAN #2 |
| JP63 | 1-2 On: Enable2-3 Off: Disable | FAN #3 |
| JP64 | 1-2 On: Enable2-3 Off: Disable | FAN #4 |
Explanation of Jumpers
To modify the operation of the backplane, jumpers can be used to choose between optional settings. Jumpers create shorts between two pins to change the function of the connector. Pin 1 is identified with a square solder pad on the printed circuit board. Note: On two pin jumpers, "Closed" means the jumper is on and "Open" means the jumper is off the pins.
Front LED Indicators
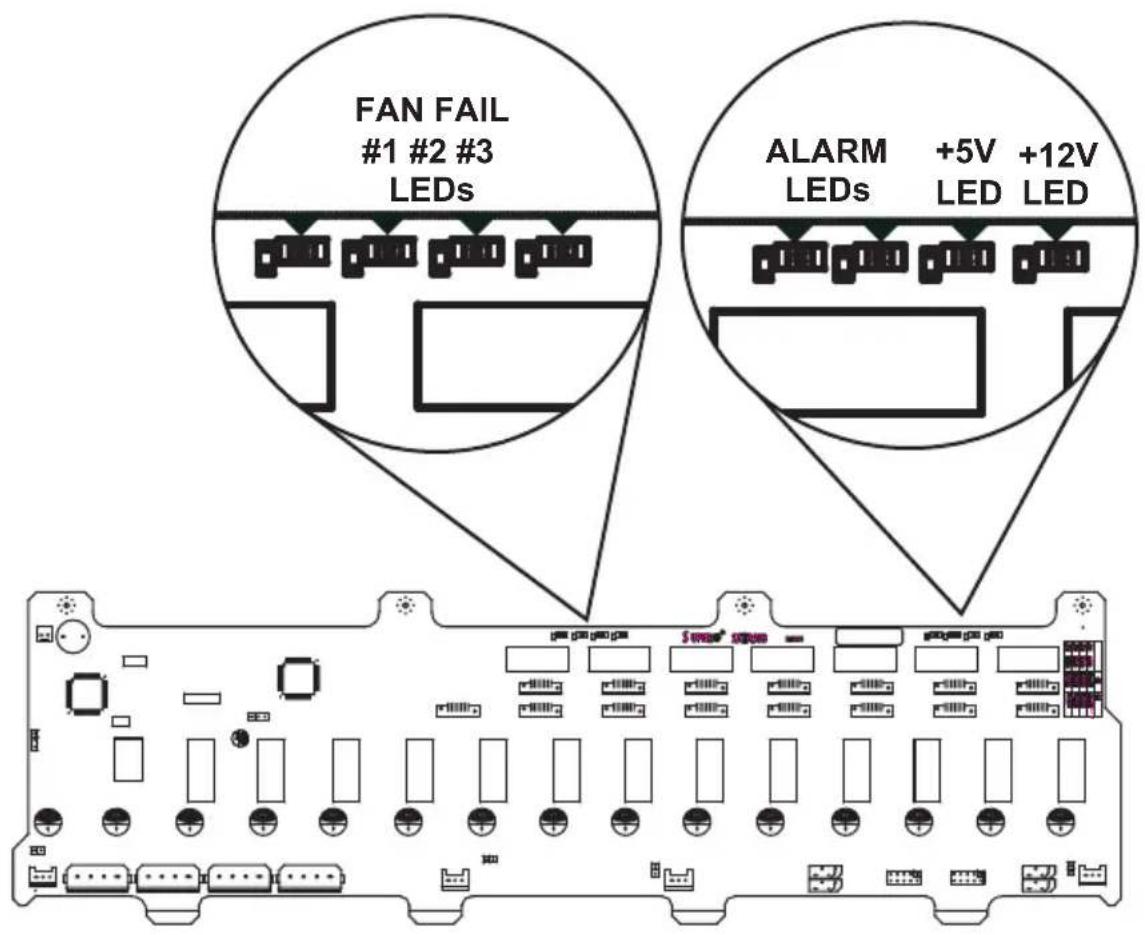
| Front Panel LEDs | ||
| LED Normal State Specification | ||
| Fan #1 Fail Off Failure in Fan #1 | ||
| Fan #2 Fail Off Failure in Fan #2 | ||
| Fan #3 Fail Off Failure in Fan #3 | ||
| Fan #4 Fail Off Failure in Fan #4 | ||
| Alarm #1 Off Overheat/Fan Failure | ||
| Alarm #2 Off Overheat/Fan Failure | ||
| +5V On | Backplane power failure. Light is on during normal operation. | |
| +12V On | Backplane power failure. Light is on during normal operation. | |
D-7 Rear Connectors and LED Indicators
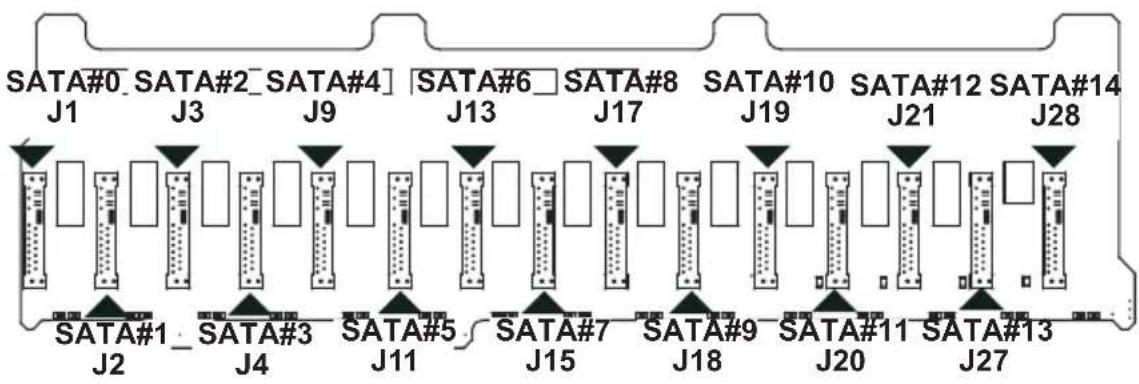
| Rear SATA Connectors | |
| Rear Connector | SATA Drive Number |
| SATA #0 SATA HDD #0 | |
| SATA #1 SATA HDD #1 | |
| SATA #2 SATA HDD #2 | |
| SATA #3 SATA HDD #3 | |
| SATA #4 | SATA HDD #4 |
| SATA #5 SATA HDD #5 | |
| SATA #6 SATA HDD #6 | |
| SATA #7 SATA HDD #7 | |
| SATA #8 SATA HDD #8 | |
| SATA #9 SATA HDD #9 | |
| SATA #10 SATA HDD #10 | |
| SATA #11 SATA HDD #11 | |
| SATA #12 SATA HDD #12 | |
| SATA #13 SATA HDD #13 | |
| SATA #14 SATA HDD #14 | |
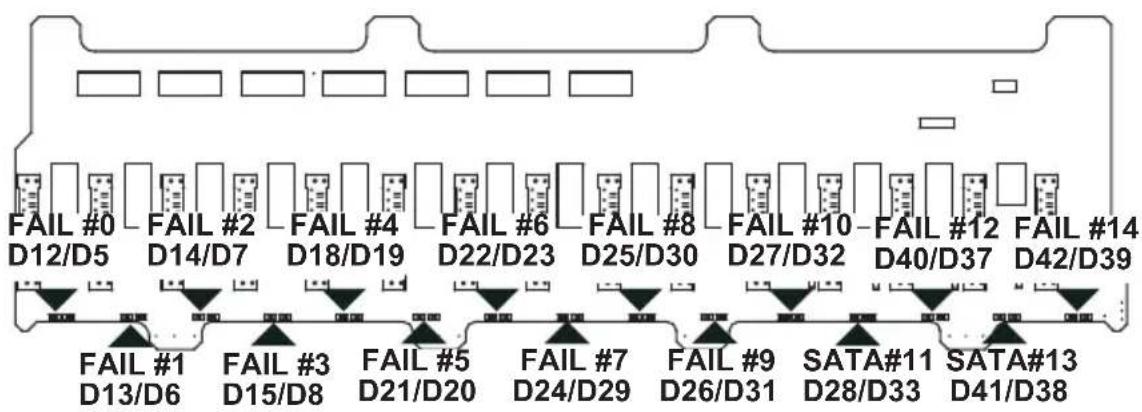
flowchart
graph TD
    A["FAIL #0\nD12/D5"] --> B["FAIL #1\nD13/D6"]
    C["FAIL #2\nD14/D7"] --> D["FAIL #3\nD15/D8"]
    E["FAIL #4\nD18/D19"] --> F["FAIL #5\nD21/D20"]
    G["FAIL #6\nD22/D23"] --> H["FAIL #7\nD24/D29"]
    I["FAIL #8\nD25/D30"] --> J["FAIL #9\nD26/D31"]
    K["FAIL #10\nD27/D32"] --> L["SATA#11\nD28/D33"]
    M["FAIL #12\nD40/D37"] --> N["SATA#13\nD41/D38"]
    O["FAIL #14\nD42/D39"] --> P["..."]
| Rear LED Indicators | ||
| Rear LED Hard Drive Activity Failure LED | ||
| FAIL #0 | D12 D5 | |
| FAIL #1 | D13 D6 | |
| FAIL #2 | D14 D7 | |
| FAIL #3 | D15 D8 | |
| FAIL #4 | D18 D19 | |
| FAIL #5 | D21 D20 | |
| FAIL #6 | D22 D23 | |
| FAIL #7 | D24 D29 | |
| FAIL #8 | D25 D30 | |
| FAIL #9 | D26 D31 | |
| FAIL #10 | D27 D32 | |
| FAIL #11 | D28 D33 | |
| FAIL #12 | D40 D37 | |
| FAIL #13 | D41 D38 | |
| FAIL #14 | D42 D39 | |
Notes
- Preface
- About This Manual
- Manual Organization
- Chapter 1 Introduction
- Chapter 2 System Safety
- Chapter 3 Chassis Components
- Chapter 4 Chassis Setup and Maintenance
- Chapter 5 Rack Installation
- Appendices
- Table of Contents
- Chapter 3 System Interface
- Chapter 1
- Introduction
- 1-1 Overview
- 1-2 Shipping List
- Part Numbers
- Legend:
- 1-3 Where to get Replacement Components
- 1-4 Contacting Supermicro
- Headquarters
- Europe
- Asia-Pacific
- 1-5 Returning Merchandise for Service
- Chapter 2
- System Safety
- 2-1 Overview
- 2-2 Warnings and Precautions
- 2-3 Preparing for Setup
- 2-4 Electrical Safety Precautions
- 2-5 General Safety Precautions
- 2-6 System Safety
- Chapter 3
- System Interface
- 3-1 Overview
- 3-2 Control Panel Buttons
- 3-3 Control Panel LEDs
- 3-4 Drive Carrier LEDs
- SAS Drives
- SCSI Drives
- Chapter 4
- Chassis Setup and Maintenance
- 4-1 Overview
- Installation Procedures
- 4-2 Removing the Chassis Cover
- Removing the Chassis Cover:
- 4-3 Installing Hard Drives
- Removing Hard Drive Trays from the Chassis
- Installing a Hard Drive to the Hard Drive Tray
- 4-4 Installing the Motherboard
- I/O shield
- Installing the I/O Shield
- Permanent and Optional Standoffs
- Installing the Motherboard:
- Add-on Card/Expansion Slot Setup
- Installing Add-on and Expansion Cards
- 4-5 Installing the Air Shroud
- Installing the Air Shroud
- Checking the Server's Air Flow
- 4-6 Installing System Fans
- Replacing a System Fan
- 4-7 Replacing Power Supply
- Changing the Power Supply
- Changing the Power Distributor
- Notes
- Chapter 5
- Rack Installation
- 5-1 Overview
- 5-2 Unpacking the System
- 5-3 Preparing for Setup
- Choosing a Setup Location
- Warnings and Precautions!
- Rack Precautions
- General Server Precautions
- Rack Mounting Considerations
- Ambient Operating Temperature
- Reduced Airflow
- Mechanical Loading
- Circuit Overloading
- Reliable Ground
- 5-4 Rack Mounting Instructions
- Identifying the Sections of the Rack Rails
- Inner Rail Extension
- Installing the Inner Rails
- Installing the Outer Rails to the Rack
- Installing the Chassis into a Rack
- Appendix A
- Cables, Screws, and other Accessories
- A-1 Overview
- A-4 Cables Included with SC933E Series Chassis
- A-5 Compatible Cables
- Alternate SAS Cables
- Extending Power Cables
- Front Panel to the Motherboard
- A-6 Chassis Screws
- Appendix B
- SC933 Power Supply Specifications
- Appendix C
- SAS-933EL Backplane Specifications
- C-1 ESD Safety Guidelines
- C-2 General Safety Guidelines
- C-3 An Important Note to Users
- Jumper Settings and Pin Definitions
- Front Connectors
- C-5 Front Connector and Pin Definitions
- Primary and Secondary I²C Connectors
- Primary and Secondary Flash Chips
- Primary and Secondary Expander Chips
- Backplane Main Power Connectors
- EPP Ports
- Fan Connectors
- - 11. SAS Ports
- Explanation of Jumpers
- Dual Port and Cascading Configurations
- C-8 Single and Dual Port Expanders
- Single Ports
- Dual Ports
- C-9 Failover
- Single Host Bus Adapter
- Single Host Bus Adapter Failover
- Dual Host Bus Adapter
- Dual Host Bus Adapter Failover
- C-10 Cables and Chassis Power Card
- Chassis Power Card
- Connecting an Internal Host Bus Adapter to the Backplane
- Supported Internal HBA to Backplane Cables
- Connecting an External Host Bus Adapter to the Backplane
- Supported External HBA to Backplane Cable
- Connecting Multiple Backplanes in a Single Channel Environment
- Single HBA Configuration Cables
- SAS Internal Backplane Cable (CBL-0167L)
- SAS Cascading Cable External (CBL-0166L)
- Connecting Multiple Backplanes in a Dual Channel Environment
- Dual HBA Conguration Cables
- SAS Cascading Cable Internal (CBL-0168L)
- C-11 Supported Cascading Configurations
- Server System with Single SAS HBA
- Server System with Dual SAS HBA
- Dual Cable Routing
- External Cables
- Appendix D
- SATA-933 Backplane Specifications
- D-1 ESD Safety Guidelines
- D-2 General Safety Guidelines
- D-3 An Important Note to Users
- D-4 Front Connectors and Jumpers
- D-5 Front Connector and Pin Definitions
- OH Temperature Connector
- Backplane Main Power Connectors
- Fan Connectors
- Activity LED Connector
- SATA Ports
- D-6 Front Jumper Locations and Pin Definitions
- Fan Jumper Settings
- D-7 Rear Connectors and LED Indicators
Brand : Supermicro
Model : SuperChassis 933E1-R760B
Category : Computer Case