
VDA1164-KITF - Digital decoder MATROX - Free user manual and instructions
Find the device manual for free VDA1164-KITF MATROX in PDF.

| Product Type | Digital Decoder |
| Brand | Matrox |
| Model | VDA1164-KITF |
| Dimensions (W x H x D) | 200 mm x 40 mm x 150 mm |
| Weight | 1.2 kg |
| Power Supply | 12V DC, 2A |
| Power Consumption | 15 W typical |
| Video Input | HDMI, DVI |
| Video Output | HDMI, VGA |
| Supported Resolutions | Up to 1920x1080@60Hz |
| Audio Support | Stereo analog, HDMI audio |
| Main Functions | Digital signal decoding, video scaling, multi-format support |
| Cleaning Instructions | Wipe with a dry, soft cloth. Do not use liquids or solvents. |
| Safety Precautions | Use only provided power adapter. Keep away from moisture. |
| Spare Parts Availability | Available from authorized distributors |
| Repairability | Repairs should be performed by qualified technicians. |
| Warranty | 2 years limited |
| Operating Temperature | 0°C to 45°C |
| Storage Temperature | -20°C to 70°C |
| Certifications | CE, FCC, RoHS |
Frequently Asked Questions - VDA1164-KITF MATROX
User questions about VDA1164-KITF MATROX
0 question about this device. Answer the ones you know or ask your own.
Ask a new question about this device
Download the instructions for your Digital decoder in PDF format for free! Find your manual VDA1164-KITF - MATROX and take your electronic device back in hand. On this page are published all the documents necessary for the use of your device. VDA1164-KITF by MATROX.
USER MANUAL VDA1164-KITF MATROX
Optional hardware (sold separately)....3
Software available (for Windows XP)....4
Installation overview....4
Hardware installation ....5
Connection setup....9
Step-by-step connection setup....9
Description of indicator lights on decoder card ....12
Software setup 13
Troubleshooting....14
Basic procedures 14
Graphics – Main troubleshooting....14
Graphics – Extra troubleshooting....18
Product Information 25
Digital monitor information....26
Where to get information....30
Warranty 31
Index 34
Overview
Thank you for purchasing a Matrox VDA (Video Decoder Accelerator) product. Your VDA product supports concurrent hardware decoding of multiple IP video streams (up to 16 D1 or 64 CIF) in a variety of resolutions and encoded formats that can be viewed on up to four HD monitors.
Hardware supplied
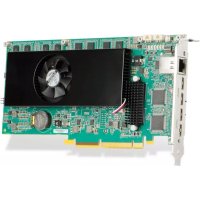
Matrox VDA
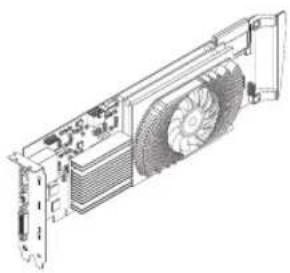
natural_image
Technical line drawing of a computer RAM unit with heatsink and fan (no text or symbols)Matrox decoder card
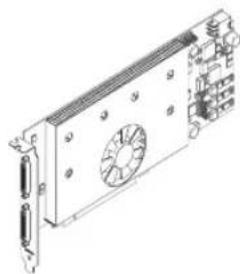
natural_image
Technical line drawing of a computer motherboard with fan and connectors (no text or symbols)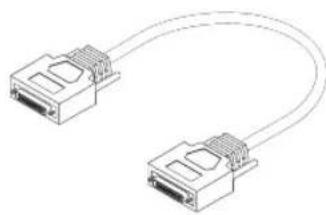
natural_image
Line drawing of two Ethernet cable connectors (no text or symbols)Matrox output card Matrox cable (KX20 to KX20)
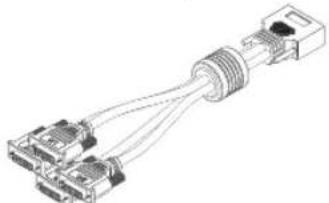
natural_image
Technical line drawing of a USB connector with multiple ports and wiring (no text or symbols)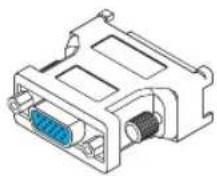
1 quad-monitor cable (KX20 to DVI) 4 DVI to HD-15 adapters
Optional hardware (sold separately)
PCI Express video card power adapter cable
Software available (for Windows XP)
- Matrox PowerDesk – to use your Matrox graphics hardware. Matrox makes new display drivers available on the Matrox Web site (www.matrox.com/graphics/support/drivers).
■ Other software – see the Matrox Web site (www.matrox.com/graphics/en/products/video_decoding/vda_series).
Installation overview

Note: If your Matrox product is already partially or fully installed on your computer, some or all the installation information in this guide may not apply to you. However, this information may be useful if you need to reinstall your Matrox product.
To install your Matrox product:
1 Install your Matrox cards – see “Hardware installation”, page 5.
2 Connect your devices – see "Connection setup", page 9.
3 Install the software – see "Software setup", page 13.
Hardware installation
This section describes how to install your Matrox cards. If your Matrox decoder and output cards are already installed in your computer, skip to "Connection setup", page 9. For information specific to your computer, like how to remove its cover, see your system manual.

WARNING: To avoid personal injury and to prevent damage to your computer or Matrox hardware, turn off your computer, unplug it, and then wait for it to cool before you install your Matrox product and touch any of the internal parts of your computer.
While your computer is turned off but still plugged in, some electrical current is supplied to the motherboard. This current may prevent newly installed hardware from working properly.
Also, static electricity can severely damage electronic parts. Before touching any electronic parts, drain static electricity from your body (for example, by touching the metal frame of your computer). When handling a card, carefully hold it by its edges and avoid touching its circuitry.

WARNING: To avoid damaging your card, carefully insert or remove your card as straight as possible.
1 Open your computer
Turn off your computer and all peripherals (such as your monitor or printer), then open your computer.
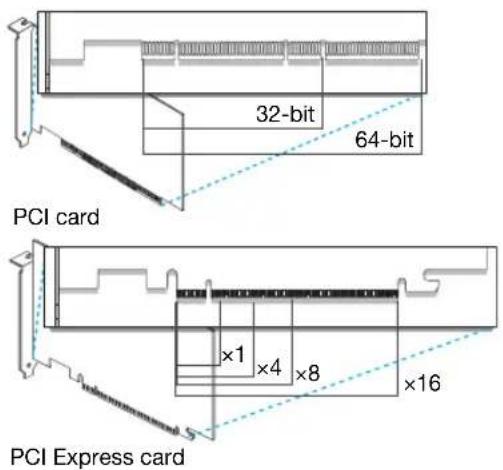
2 Choose an expansion slot
Most computers have different types of expansion slots.
Decoder card - Choose a PCI 64-bit (PCI-X) slot.
Output card – Choose a PCI Express ×16 (PCIe) slot.
Your system manual should identify the location of each type of expansion slot in your computer.


WARNING: Inserting your Matrox card into the wrong type of slot could damage your card, your computer, or both.
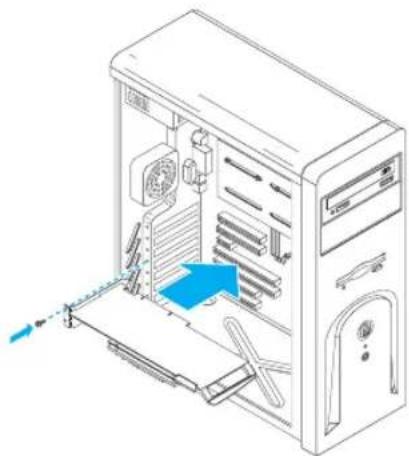
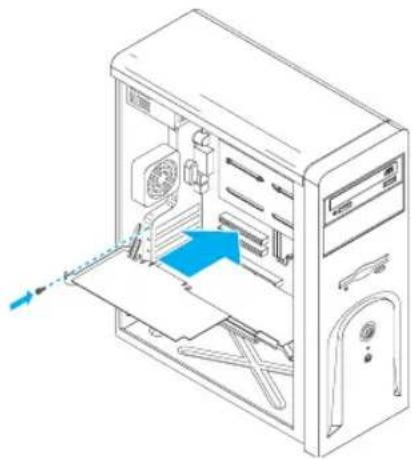
3 Insert your Matrox decoder card
a Position your Matrox decoder card over the expansion slot you've chosen.
b Push the card in firmly and evenly until it's fully seated in the slot.
c Secure the bracket of your Matrox card to the computer frame.
natural_image
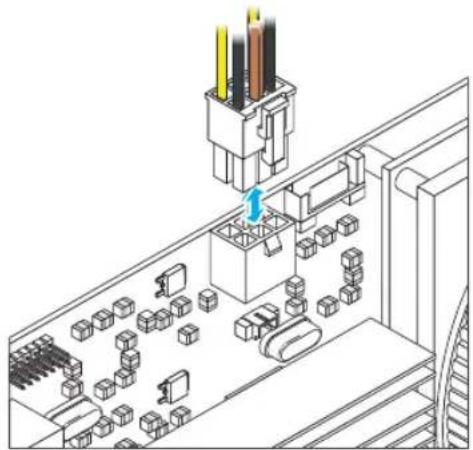
Isometric line drawing of a desktop computer tower with visible internal components and a blue arrow indicating a component (no text or symbols)4 Connect the power supply to the decoder card
Connect the 12V AUX connector from your computer's power supply to the connector on the decoder card.
If your computer's power supply doesn't have a 12V AUX connector, you'll need a PCI Express video card power adapter cable (sold separately).
natural_image
Isometric technical diagram of an electronic component assembly with no visible text or symbols
WARNING: To avoid personal injury and to prevent damage to your computer or Matrox hardware, turn off your computer and unplug it before you connect the power supply to your Matrox product.
5 Insert your Matrox output card
a Position your Matrox output card over the expansion slot you've chosen.
b Push the card in firmly and evenly until it's fully seated in the slot.
natural_image
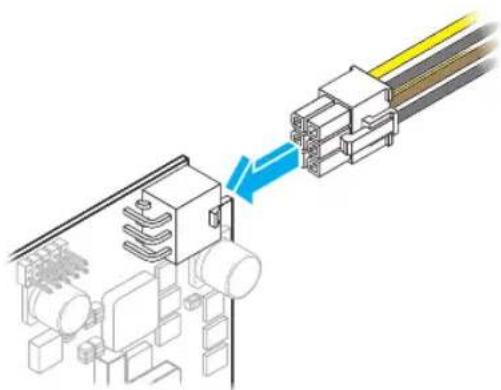
Isometric line drawing of a desktop computer tower with ventilation duct and drive mechanism (no text or symbols)6 Connect the power supply to the output card
Connect the 12V AUX connector from your computer's power supply to the connector on the output card.
If your computer's power supply doesn't have a 12V AUX connector you'll need a PCI Express video card power adapter cable (sold separately).
natural_image
Diagram showing a connector assembly with cable routing (no text or symbols)
WARNING: To avoid personal injury and to prevent damage to your computer or Matrox hardware, turn off your computer and unplug it before you connect the power supply to your Matrox product.
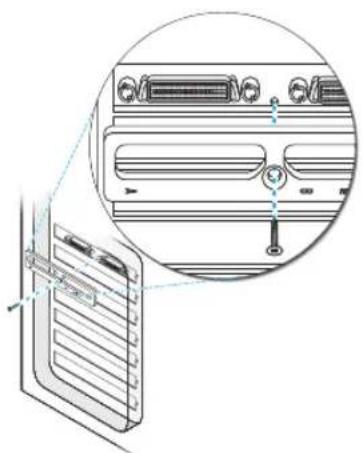
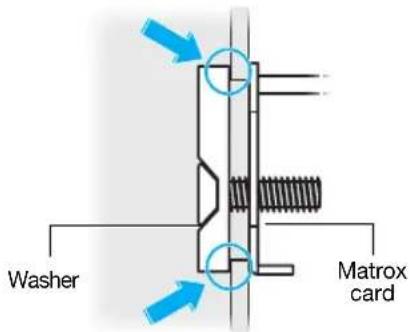
7 Secure the bracket of your Matrox card
To support the weight of your cable and to avoid damaging your Matrox card, you need to properly secure the bracket of your card to your computer.
To secure your bracket, slip the washer provided with your Matrox product over the monitor connectors, then screw the washer onto the bracket of your Matrox card.
natural_image
Technical diagram of a computer monitor with an inset close-up showing internal components (no text or labels)Make sure the washer lies flat against the frame of your computer.
Your Matrox cards are now installed. Before restarting your computer, connect your decoder and output cards and your camera inputs (see "Connection setup", page 9). After connecting, restart your computer and install your Matrox software (see "Software setup", page 13).
Connection setup
This section describes how to connect your Matrox decoder card, Matrox output card, and monitors.

WARNING: Don't change monitor connections while your computer is turned on. While your computer is turned on, it may be using monitor settings that are specific to the current monitor connections. Some devices may be permanently damaged if incorrect settings are used.

Note: Whenever you change your connection setup, make sure you're using the correct connectors and that all connectors are properly fastened.
Whenever you restart your computer, make sure your monitors are already turned on. Otherwise, the software may not be able to properly detect your monitors.

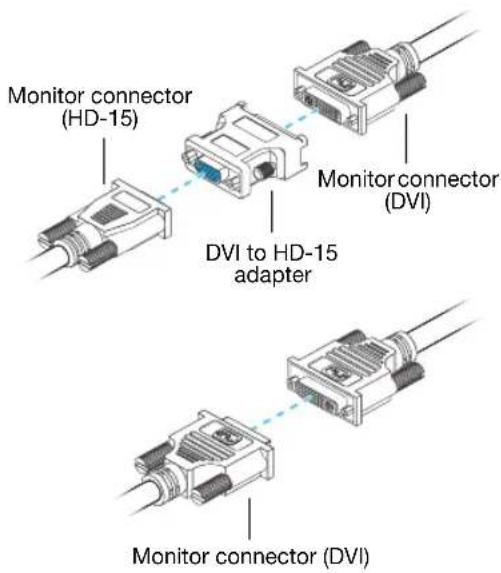
Note: To connect a digital monitor (a monitor that uses digital input, usually a flat panel monitor) to your Matrox product, your monitor must have a DVI connector.
Some monitors with DVI connectors support both digital and analog input. If you're using one of these monitors with your Matrox product, make sure it's configured to use the correct type of input. For more information, see your monitor documentation.
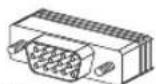
HD-15 connector (analog)
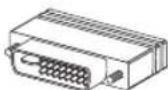
DVI connector (DVI-D: digital)
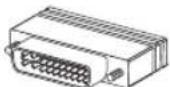
DVI connector (DVI-I: analog/digital)
Step-by-step connection setup
1 Connect the camera network
Connect the twisted pair (network) cable from the hub of your camera inputs to one of the network ports labeled Cam on your decoder card.
We recommend you connect a second twisted pair cable from the same hub to the second port. This is used as a back-up input.
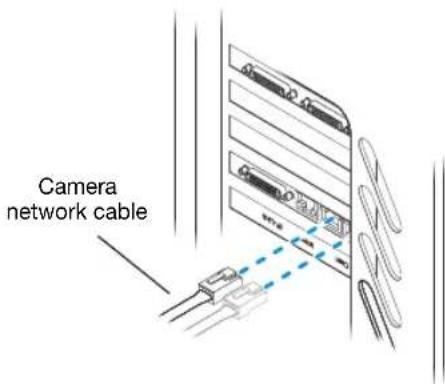
Matrox User Guide 9
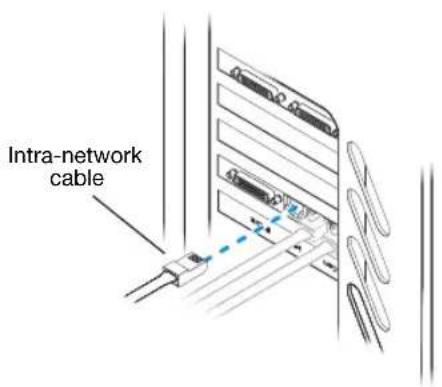
2 Connect the intra-network (twisted pair) cable
Connect a twisted pair (network) cable from your local area network to the network port labeled Intra on your decoder card.
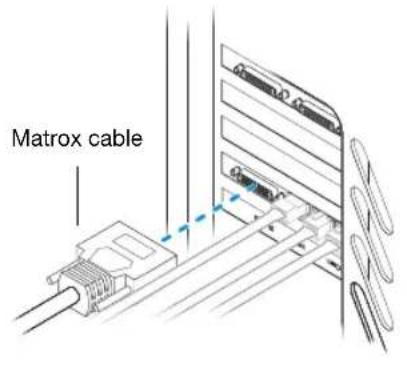
3 Connect your decoder card
Connect one end of your Matrox cable to the KX20 connector on your decoder card.
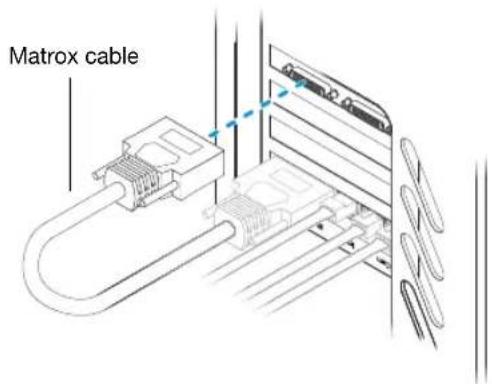
4 Connect your output card
Connect the other end of your Matrox cable to the KX20 connector labeled A on the bracket of your output card.
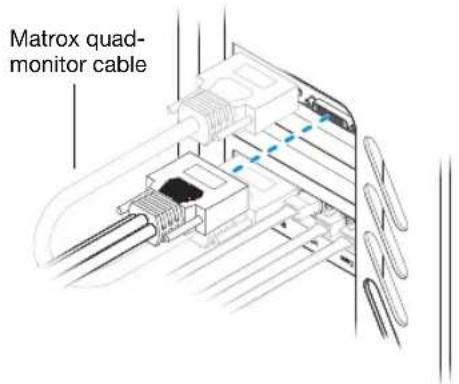
5 Connect your Matrox quad-monitor cable
Connect the KX20 connector of your Matrox quad-monitor cable to the KX20 connector labeled B on the bracket of your output card.
6 Connect your monitors
If your monitor has an HD-15 connector, use a DVI to HD-15 adapter included with your product to connect your monitor cable to your quad-monitor cable.
If your monitor has a DVI connector, connect your monitor cable directly to the quad-monitor cable without using a DVI to HD-15 adapter.
Note: Make sure all connectors are properly fastened.
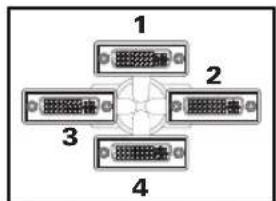
Note: Monitors are numbered consecutively based on which connector each monitor is attached to. Numbering starts with the primary display – the one that first displays information when you restart your computer. If another graphics card is installed in your computer, display numbering may be different.
Matrox quad-monitor cable
Description of indicator lights on decoder card
Your decoder card has four indicator lights (labeled 0, 1, 2, and 3) that show the configuration status of your setup. The following describes the behavior of these indicator lights.
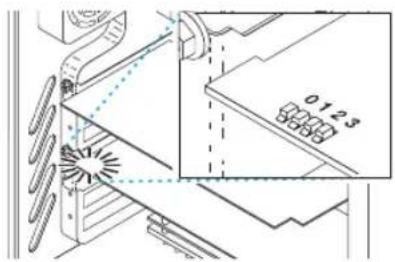
Indicator lights Behavior
All lights on Decoder card initializing
Light 3 flashing
Decoder card has established communications with the VDA host system
Lights 1, 2, and 3 flashing
Decoder card is working but hasn't established communications with the VDA host system
Lights 0 and 3 Enabling camera
Lights 2 and 3 Configuring NIC 1
Lights 0, 1, and 3 Configuring NIC 2
Lights 1 and 3 Configuring NIC 3
For more information on configuring your decoder card, see the Matrox Software Installation and Configuration Guide. This guide is available on the Matrox Web site (www.matrox.com/graphics/en/products/video_decoding/vda_series).
Software setup

Note: This guide has references that are specific to the Matrox installation CD-ROM. If your Matrox product wasn't packaged by Matrox (for example, if it was included with your computer), your product may not include this CD-ROM.
If you don't have this CD-ROM, certain references in this guide may not reflect the software you have. For more information, see other software documentation provided by your system vendor.
This section describes how to install Matrox software for Windows XP.
You may need administrator rights to install certain software. For more information, see Windows documentation or contact your system administrator.
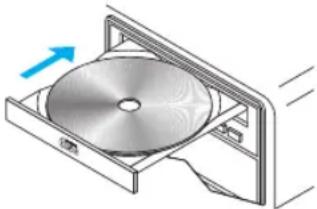
natural_image
Illustration of a CD inside a rectangular box with an arrow indicating direction (no text or symbols)1 Download the driver
Windows detects new hardware when you restart. If Matrox display drivers haven't been previously installed, Windows prompts you to install a driver. ClickCancel.
Matrox makes new drivers available on the Matrox Web site. To download the driver for your product, see the Matrox Web site (www.matrox.com/graphics/support/drivers).
2 Install the driver
Double-click the Setup.exe file and follow the on-screen instructions.
3 Configure the software
For more information on how to configure your software, see the Matrox Software Installation and Configuration Guide. This guide is available on the Matrox Web site.
4 Install optional software
After your computer restarts, there may be additional software you can install. For more information on additional software for your product, see the Matrox Web site.
Troubleshooting
Basic procedures
This section explains basic procedures that are referred to by some troubleshooting items in this guide.
Restarting in VGA mode
Windows XP - What follows is information on how to restart your computer in VGA mode.
1 Click Start → Shut Down* → Restart → OK* to restart your computer. (* Depending on your version and configuration of Windows, this part of the step may not be necessary.) If your primary monitor is unusable, see your system manual for information on how to restart your computer using a hardware control.
2 Before Windows starts, press [F8] for the Windows startup menu to appear. (If [F8] doesn't work, instead try pressing and holding [Ctrl] before Windows starts.)
3 Select "VGA mode" (or "Low resolution video"), then press [Enter].
i
Note: If your system stops responding while it's in VGA mode, select "Safe mode" instead.
Graphics - Main troubleshooting
This section addresses possible problems that could prevent you from using your computer.
Problem Computer doesn't display information or boot after Matrox card is installed
Cause Your Matrox card may not be properly installed.
Solution Make sure your Matrox card is properly installed. Specifically, make sure the card is firmly inserted in its expansion slot and that all connections to it are firmly in place. For more information, see “Hardware installation”, page 5.
Cause Your output card may have insufficient power. In this case, the indicator light labeled Fail on your output card is red.

Solution Make sure the power supply cable for your output card is firmly in place (see “Connect the power supply to the output card”, page 7).
Solution Try moving your output card to another PCIe slot in your computer. For instructions on how to safely install your Matrox card, see "Hardware installation", page 5.
Cause The power supply of your computer may not be powerful enough for all the devices on your computer.
Solution For advanced users – Remove unnecessary devices from your computer (for example, an unused network card or an extra CD-ROM drive). For more information, see your system manual or the documentation for each device.
Solution You may be able to upgrade the power supply of your computer.
Cause If you have more than one PCIe ×16 slot, your graphics card may be using a slot wired electronically to support PCIe×1,×4, or ×8 speeds.
Solution Try moving the PCIe card to another PCIe slot in your computer. For more information on the PCIe support of your system, see your system manual.
Cause There may be unsupported graphics hardware in your computer.
Solution If an unsupported graphics card is plugged into an expansion slot, remove it.
Solution If graphics hardware is built into your computer motherboard, your system may not have automatically disabled it when you inserted your Matrox card. Check your system manual for instructions on how to disable your computer's built-in graphics hardware.
Cause Your computer BIOS (Basic Input/Output System) settings may be incorrect.
Solution Change your BIOS settings. For more information on your computer BIOS, see your system manual.
Cause Your computer BIOS may not be up to date. For more information on your computer BIOS, see your system manual.
Solution Reinstall your previous graphics card and, if possible, update your computer BIOS. This can usually be done with software from the manufacturer of your computer. Contact your system vendor or manufacturer to get a BIOS update for your computer.
To get the correct BIOS update, you may need to know the serial number your computer displays when it restarts. (This number is usually in the lower-left corner of the display.)
Cause
The BIOS of your Matrox graphics card may need to be updated or restored.
Solution
For advanced users—If you have another VGA-compatible graphics card (PCI), you can try resetting the BIOS of your Matrox graphics card.
1 Turn off your computer and insert the other graphics card into an expansion slot. For more information on expansion slots, see “Choose an expansion slot”, page 5.
2 Plug your monitor into the other graphics card and restart your computer.
i
Note: Make sure your computer uses the other graphics card to control your primary display. The graphics card that controls your primary display is the one that first displays information when you restart your computer.
Your computer BIOS (Basic Input/Output System) and the slot type (PCI or PCIe—see “Choose an expansion slot”, page 5) of each graphics card help determine which graphics card controls your primary display.
To control which graphics card is used for your primary display, you may be able to change the configuration of your computer BIOS. For information on how to change your computer BIOS settings, see your system manual.
3 Insert your Matrox installation CD-ROM.
4 Click Start → Run, type D:\Sysutils. You will need to use the PBIOSWin program to update the BIOS of your Matrox graphics card. For more information on how to use this program, see the Readme file in the Sysutils folder.
5 Turn off your computer, remove the other graphics card, then plug your monitor into your Matrox graphics card.
6 Restart your computer.
Problem Wrong color balance, screen image off-center, or no picture at all
Cause
Your monitor video controls may be improperly set.
Solution
Adjust your monitor controls (brightness, contrast, and so on). For more information, see your monitor manual.
Cause
Your monitor may not be properly connected.
Solution
Make sure you're using the correct connectors (see "Connection setup", page 9) and that all connectors are properly fastened.
Solution Make sure the monitor power cable is firmly in place.
Solution Make sure the connection to the back of the monitor is firmly in place.
Cause If your monitor supports multiple input sources (analog/digital), it may be configured to use the wrong source.
Solution Make sure your monitor is using the correct input source. For more information on selecting the input source for your monitor, see your monitor documentation.
Solution Change your connection setup to use a different input source. For more information, see "Connection setup", page 9.
Problem After the startup screen, or after display settings are changed, the screen image is garbled or unusable (blank screen, rolling or overlapping screen images)
Cause Analog monitors only – The Matrox display driver may be trying to use settings your monitor doesn't support. This can happen if the display resolution was changed to one your monitor doesn't support or if the monitor connected to your computer was changed without changing the display or monitor settings in the software.

WARNING: If incorrect software monitor settings are applied, some monitors can be permanently damaged. For more information, see your monitor manual.
Solution Make sure your monitor supports the display mode currently in use. After installing your Matrox product, your system uses either the preferred display mode for your monitor or a display mode of 800 × 600 at 60 Hz.
Solution If none of your displays are available, reinstall your Matrox display drivers. For more information on reinstalling your display driver, see the following solution.
Cause Files on your system may have been deleted or corrupted.
Solution Uninstall, then reinstall Matrox software:

Note: Before removing software, make sure you have all the necessary files to reinstall software that may still be needed. Also, make sure the display driver you reinstall supports all Matrox products in your computer.
Windows XP -
1 If your primary display is unusable, restart your computer in VGA mode (see “Restarting in VGA mode”, page 14).
2 To uninstall Matrox software:
a Click Start → Settings* → Control Panel → Add/Remove Programs (double-click*) → Matrox PowerDesk-SE→ Change/Remove → Yes. (* Depending on your version and configuration of Windows, this part of the step may not be necessary.)
b Click Matrox Driver → Change/Remove → Yes.
3 Restart your computer for the changes to take effect.
4 After your computer has restarted, install the latest display driver for your Matrox card. You may also need to reinstall other Matrox software.

Note: Windows XP – You may need administrator rights to uninstall certain software. For more information, see Windows documentation.
Graphics – Extra troubleshooting
The following are extra troubleshooting items related to graphics hardware.
Problem Can't use Windows, Windows reports a configuration error, and/or can't install or uninstall Matrox display driver

Note: Windows XP – You may need administrator rights to uninstall certain software. For more information, see Windows documentation.
Cause The problem may be specific to the motherboard in your computer.
Solution There may be a software update available for your motherboard. To find out what motherboard model your computer is using, see your system manual. For more information, contact the maker of your motherboard or computer. Many motherboard or computer manufacturers have software updates available on their Web site.
Cause Files on your system may have been deleted or corrupted.
Solution Uninstall, then reinstall Matrox software. For more information, see page 17.
Problem Monitor settings aren't automatically detected

WARNING: If incorrect software monitor settings are used, your display may become unusable and some monitors can be permanently damaged. For more information, see your monitor manual.
Cause
If a monitor was changed or added while Windows was running, the new monitor may not be detected by the software.
Solution
Restart your computer. If your monitor is a Plug-and-Play (DDC) monitor, it should be automatically detected by the software.
Problem Built-in network hardware doesn't work after graphics card is installed
Cause
The installation of a graphics card may have caused your computer to reallocate system resources.
Solution
Try reinstalling your network drivers.
Solution
Try moving your Matrox graphics card to another PCI (or PCIe depending on your product) slot in your computer. For instructions on how to safely install your Matrox card, see "Hardware installation", page 5.
Cause
You may be using Windows XP Service Pack 2.
Solution
For more information, see the Microsoft Web site (www.microsoft.com).
Problem Can't see the camera network
Cause
Your camera network may not be properly connected to your decoder card.
Solution
Make sure the twisted pair (network) cable from your camera network is properly connected to your decoder card (see “Connect the camera network”, page 9). If the cable is disconnected, remove both your camera and intra-network cables, re-insert the intra-network cable, and then re-insert the camera cable.
Cause
The power supply cable for your decoder card may not be properly connected.
Solution
Make sure the power supply cable for your decoder card is firmly in place (see “Connect the power supply to the decoder card”, page 6).
Cause The firmware version for your output card may be out of date.

Solution Make sure the indicator light labeled CFG_Done on your output card is green. If the light is off, you may need to update the firmware on your output card. To find the latest firmware version for your Matrox product, see the Matrox Web site (www.matrox.com/graphics)
Problem Using multiple displays under Windows XP, program doesn't work with your Matrox product
Cause Your main graphics card may not be controlling your primary display. The graphics card that controls your primary display is the one that first displays information when you restart your computer.
A program that doesn't recognize multiple displays may not work with a graphics card unless it's controlling your primary display.
Your computer BIOS (Basic Input/Output System) and the slot type (PCI or PCIe – see "Choose an expansion slot", page 5) of each graphics card help determine which graphics card controls your primary display.
Solution If you're having problems with a program that can be moved on your Windows desktop, run this program on your primary display. Make sure the program window doesn't overlap any other display. If the program doesn't work with the graphics card controlling your primary display, or you want your main graphics card to control your primary display, see the other solutions.
Solution Windows XP – If you're having problems with a program that can't be moved on your Windows desktop, try changing your primary display.
1 Right-click your Windows desktop background, then click Properties → Settings.
2 Select the display you want as the primary display and enable Use this device as the primary monitor.
3 Click OK or Apply for your changes to take effect.
Solution Change the configuration of your computer BIOS so that the slot type of your main graphics card has priority for becoming the primary display. For information on how to change your computer BIOS settings, see your system manual.
If your computer BIOS doesn't let you select which slot type has priority for becoming the primary display, a BIOS update may be available to let you do this. (The BIOS of most computers can be updated with software.) For a possible BIOS update for your computer, contact your system vendor.
| Solution | If there’s a graphics controller built into the motherboard of your computer, by changing your computer BIOS settings, you may be able to change which device controls your primary display. For more information, see your system manual. |
| Solution | If you don’t need to use the graphics card that’s controlling your primary display, remove it from your computer. If your primary display is controlled by the motherboard of your computer, see your system manual for information on how to disable this graphics controller. |
| Cause | The program you’re using may not work properly with systems using more than one display at a time. |
| Solution | An update may be available for the program you’re using. This update may fix problems this program has with multi-display systems. For more information, contact the software distributor for the program you’re using. |
| Solution | If you’re using multiple displaysinindependentmode, try usingstretchedmode instead. Programs that don’t work in independent mode may work in stretched mode. For more information, see Matrox PowerDesk help. |
Problem Not all graphics cards in the computer are fully supported (Software doesn't work with a certain graphics card, or another graphics card doesn't work at all)
Cause If you have different models of graphics cards in your computer, your Matrox display driver may not support all the graphics cards in your computer.
Solution Under Windows XP, you can use different display drivers for different products. Software that depends on a specific display driver feature may not work if your graphics hardware is using different display drivers.
Note: If your Matrox product was provided by the manufacturer of your computer, check the Web site of that manufacturer for the latest display driver. A display driver provided by the manufacturer of your computer is more likely to be tested with your computer model.
Solution If a graphics card isn't supported, you may need to remove it. If there's graphics hardware built into the motherboard of your computer that's not supported by your software, see your system manual for information on how to disable this graphics hardware.
Cause Windows XP – If the Windows method for display driver installation was used (instead of running the setup program included with your Matrox display driver), the driver may not be installed for all the graphics cards it supports.
Solution Run the setup program included with the Matrox display driver. The setup program automatically installs the display driver for each Matrox graphics card it supports.
Problem In multi-display mode, displays aren't numbered consecutively
Cause
If you have more than one graphics card in your computer, the display numbering may not be consecutive for the displays of a multiple-display card (for example, a QuadHead supporting card). Display numbering depends on the types of expansion slots used in your computer (PCI and PCIe) and the BIOS settings of your computer.

Solution
Windows XP - Move the displays in Windows.
1 Right-click your Windows desktop background, then click Properties → Settings.
Windows Vista – Right-click your Windows desktop background, then click Personalize → Display Settings.
2 Select a display and move it according to the physical position of the monitor it's associated with.
3 Click OK.
i
Note: In multi-display mode, you may have limited control over the arrangement of your displays. For more information, see Matrox PowerDesk documentation.
Problem Screen image defects appear, program doesn't run properly, or Windows doesn't work properly
(example: mouse pointer not drawn properly)
Cause
Some programs may not work properly with some Matrox acceleration.
Solution
Windows XP - Disable Windows effects:
1 Right-click your Windows desktop background, then click Properties → Appearance → Effects.
2 Disable one or more features.
3 Click OK → OK.
Solution
If possible, update your Matrox display driver. Matrox makes new display drivers available on the Matrox Technical Support Web site (www.matrox.com/graphics/support/drivers).
i
Note: If your Matrox product was provided by the manufacturer of your computer, check the Web site of that manufacturer for the latest display driver. A display driver provided by the manufacturer of your computer is more likely to be tested with your computer model.

Note: If you identify a program that doesn't work well with Matrox acceleration, please contact Matrox technical support (see page 29) and describe the problem. This information may help us come up with a fix or work-around in a future driver release.
Problem Program window or dialog box doesn't appear on screen
Cause Another window or dialog box may be covering the window or dialog box you want to see.
Solution Move, close, or minimize any window or dialog box that may be covering the window or dialog box you want to see.
Cause If you're using multi-display mode, the program window or dialog box may be in a display or on a monitor that's unusable. (For example, your monitor may not be properly connected or configured.)
Solution Make sure all the displays and monitors you want to use are usable. For more information, see other troubleshooting items in this guide.
Cause The software may be using a display you didn't intend to use or the software may be configured to use more displays than the actual number of monitors you have. (For example, you may be in DualHead Multi-Display mode but you only have one monitor.)
Solution Disable the display:
Windows XP -
1 Right-click your Windows desktop background, then click Properties → Settings.
2 Select the display you want to disable, then clear the Extend my Windows desktop onto this monitor check box.
3 Click OK or Apply for your changes to take effect.
Cause The program window or dialog box may be somewhere off-screen.
Solution If the program window you want to see is named on the Windows taskbar, right-click on it and select Maximize. (If you click Restore the program window goes back to its previous position. To fix this problem, see the other solutions.)
Solution Manually move the program window or dialog box:
1 Press [Alt]+[Space].
2 If you see a pop-up menu, click Move. If you don't see a pop-up menu, press [M] (for Move).
3 Press on one of the arrow keys once and move your mouse pointer to where you want the window or dialog box to appear, then click. The program window or dialog box should appear where you clicked.
Problem Display on digital monitor appears blurry or uses only a portion of the screen
Cause You may be using a lower display resolution than what your digital monitor supports. If your monitor supports display scaling, the image on your screen may appear blurry. If display scaling isn't supported, the display may use only a portion of your screen.
Solution Select the highest display resolution available. This generally results in better image quality.
More Information
We provide additional information in help and Readme files. Be sure to check for any last-minute release notes included with your product. Also, check the Matrox Web site
(www.matrox.com/graphics) for the latest Matrox software, user guide, technical support, and product information.
Product Information
Specifications
| Matrox decoder card Matrox output card | ||
| Memory 128 MB 1 GB | ||
| Card type PCI 64-bit PCIe ×16 | ||
| Form factor ATXATX | ||
| # of displays supported — | 4 | |
| # of quad-monitor cables — | 1 | |
| # of DVI-to-HD15 adapters — | 4 | |
| Connectors 1 × KX20 | 2 × KX20 | |
| Monitor support | — | Digital or analog |
| Power supply | 12V AUX | 12V AUX |
| Twisted pair cable type supported | CAT5 or CAT6 | — |
| Certifications* | Class A: FCC, CE, ACMA, VCCI | Class A: FCC, CE, ACMA, VCCI |
* For more information, see page 35.
Notes
- Your Matrox graphics card is 100% VGA compatible and supports all VESA standards: VBE 3.0 (Super VGA modes), DPMS (energy saving), DDC-2B (Plug-and-Play monitor), and DDC-CI.
■ The display resolutions and refresh rates available depend on your monitor and software monitor settings. For more information on the capabilities of your monitor, see your monitor documentation.
If you're using multiple monitors, your Matrox hardware uses the same display resolution and monitor settings for all your monitors. The display resolution and monitor settings (such as refresh rate) will be the ones selected in Matrox PowerDesk multi-display settings.
■ Products with QuadHead support have a maximum display resolution of 1920 × 1200 at 60 Hz for both digital and analog monitors.
Digital monitor information
■ TMDS (Transition Minimized Differential Signaling) encoding based on the Silicon Image PanelLink standard
■ DDWG (Digital Display Working Group) compliant DVI connector
■ EDID (Extended Display Identification Data) 1.2, 1.3 (without the extended data block), and 2.0 support
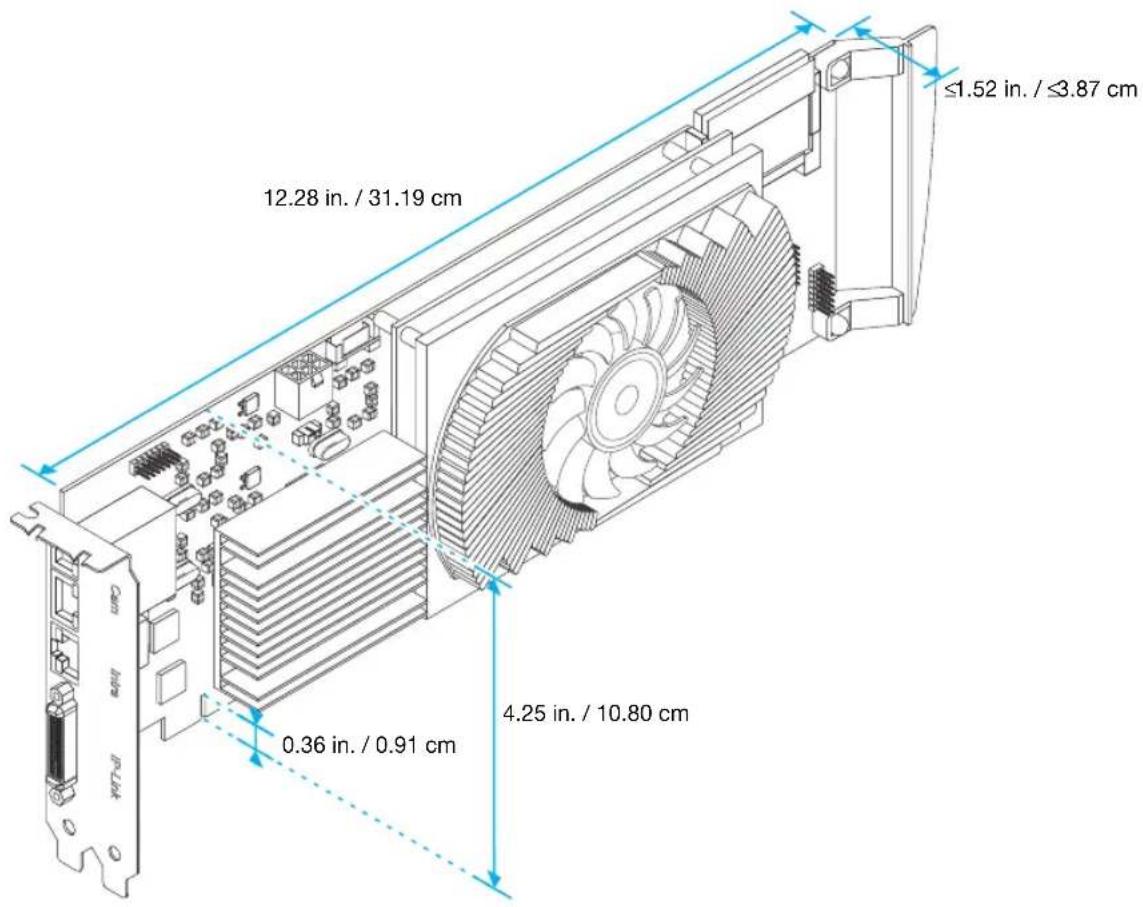
Maximum card dimensions – Matrox decoder card
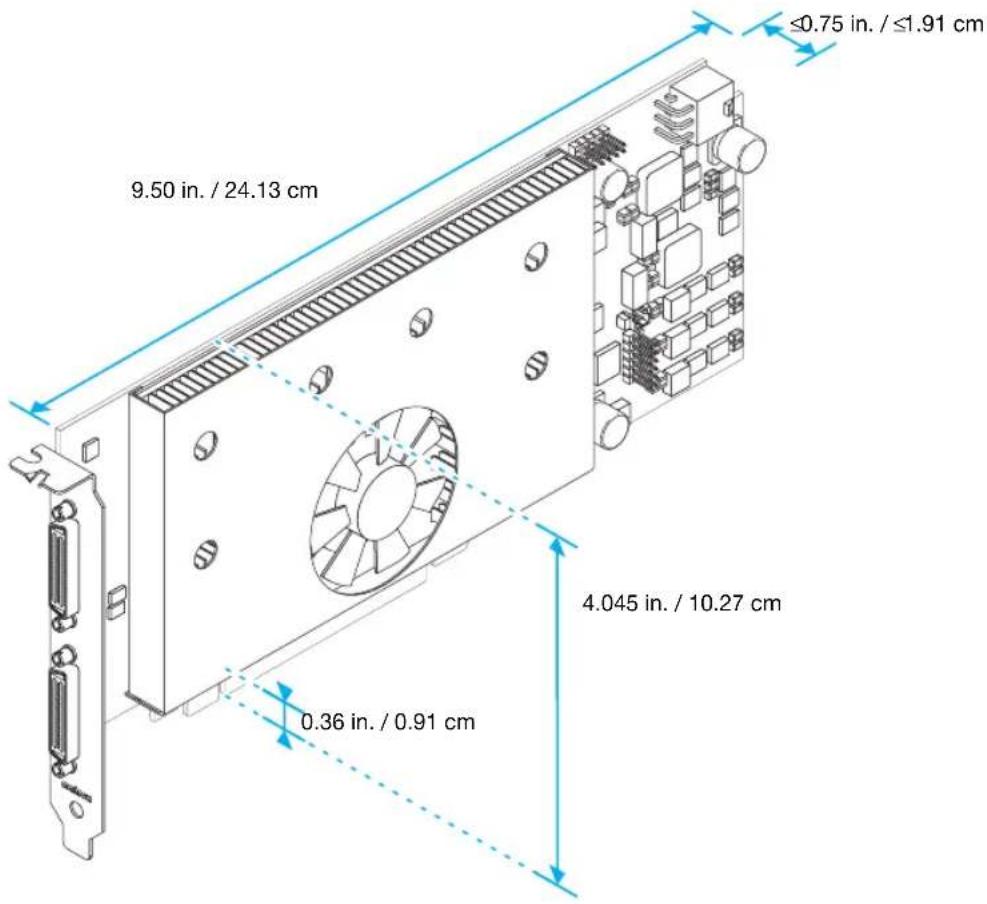
Maximum card dimensions - Matrox output card
Customer support
Matrox Web
Our Web site has product literature, press releases, technical material, a sales office list, trade show information, and other relevant material. Visit the Matrox Graphics Web site at www.matrox.com/graphics.
Technical support
Matrox values your business and offers professional support for your Matrox product. For product support, contact your Matrox representative or visit our technical support Web site at www.matrox.com/graphics/support/.
Information we need
Please give a complete description of the problem, and include:
■ Matrox card serial number, model number, revision number, BIOS number, driver type and version, and memory address at which the Matrox card is installed.
■ Computer brand and model name.
■ Monitor brand and model name.
■ Operating system, version, and service pack.
■ Brand and model of any other cards and devices installed on your system.
Program specific problems
If a problem appears with a specific program, please give us the following information:
■ Display settings (color palette, display resolution, and so on) applied when the problem occurs.
■ If possible, take note of the file and segment address that caused the problem.
■ Detailed steps known to cause the bug, so we can reproduce it.
Driver and software download
A more recent display driver may support more features and may offer increased capabilities (such as higher display resolutions). Matrox makes the latest display drivers, software, and system utilities available on the Matrox Technical Support Web site (www.matrox.com/graphics/en/support/drivers).
Register your Matrox product
Please register online (www.matrox.com/graphics/en/registration) to be eligible for customer support, new product announcements, and information on special offers and upcoming events.
Where to get information
For display information:
Windows XP -
1 Double-click the PowerDesk icon ( ) on your Windows taskbar to access the PowerDesk main interface. To see the PowerDesk icon in Windows XP, you may need to click the Show hidden icons button ( ) on your Windows taskbar.
2 Click Information.
For system information:
Windows XP -
- Click Start → Programs → Accessories → System Tools → System Information.
- Click Start → Settings* → Control Panel → Performance and Maintenance* → System (double-click*). (* Depending on your configuration of Windows, this part of the step may not be necessary.)
Warranty
A. Limited Warranty Statement
- Matrox Graphics Inc. ("Matrox") warrants to the end-user customer, who provides adequate proof of purchase and payment that Matrox Video Decoding Accelerator (VDA) (the "Products") purchased from Matrox or Matrox authorized dealers will be free from defects in materials and workmanship under normal use for a period of two (2) years from the date of purchase by the original end-user purchaser. This warranty applies only to the original end-user purchaser and is non-transferable. MATROX DOES NOT WARRANT THAT THE OPERATION OF THE PRODUCTS PURCHASED FROM MATROX WILL BE UNINTERRUPTED OR ERROR-FREE, THAT DEFECTS IN THE PRODUCTS WILL BE CORRECTED, OR THAT THE PRODUCTS WILL MEET THE CUSTOMER'S REQUIREMENTS OR PERFORM WITH ANY HARDWARE OR SOFTWARE PROVIDED BY THIRD PARTIES. Conditions and limitations of Matrox's warranty are stated below.
- Matrox's limited warranty applies only to Products manufactured by or for Matrox. The limited warranty does not apply to any non-Matrox hardware products or any software, even if packaged or sold with Matrox Products. Manufacturers, suppliers or publishers other than Matrox may provide their own warranties to the end-user purchaser, but Matrox, insofar as permitted by law, provides their products "as is". Software provided by Matrox is not covered under this limited warranty (please refer to the licensing agreement accompanying the software for details of your rights with respect to its use).
- Matrox's limited warranty covers only those defects which arise as a result of normal use of the hardware and does not apply to any damage which arises from:
a. improper or inadequate maintenance;
b. incompatibilities due to the user's hardware or software applications, including non-Matrox products, with or in which the Matrox Product interfaces;
c. Product of a special or custom-made nature;
d. unauthorized modification or misuse, including physical damage to the Product caused by the end-customer;
e. improper installation, abuse, misapplication or negligence;
f. failure to follow instructions relating to Product's use;
g. operation outside the product's environmental specifications;
h. improper site preparation or maintenance;
i. software;
j. service performed by anyone who is not a representative of Matrox;
k. other causes that do not relate to a Product defect;
I. defects or damage suffered as a result of force majeure (including theft);
m.defects or damage suffered as a result of normal wear and tear, and/or
n. stolen goods.
- If Matrox receives, during the applicable warranty period, notice of a defect in a Product and the defective Matrox Product in question, Matrox shall at its sole option, either i) repair the defect using new or refurbished parts and return the repaired Product within a reasonable delay; or ii) replace the Product with a Product that is new or which has been manufactured from new or serviceable used parts and is at least functionally equivalent to the original Product and send such replacement Product within a reasonable delay.
- A replacement Product or part assumes the remaining warranty of the original Product. When a Product or part is replaced, any replacement item becomes your property and the replaced item becomes Matrox's property.
- This warranty is valid in any country where Matrox Products are distributed by Matrox or its authorized dealers.
- This limited warranty gives the customer specific legal rights. The customer may also have other rights which vary from state to state in the United States, from province to province in Canada, and from country to country elsewhere in the world.
B. Limitations of Warranty
- TO THE EXTENT PERMITTED BY LAW, THIS WARRANTY AND THE REMEDIES SET FORTH ABOVE ARE EXCLUSIVE AND IN LIEU OF ALL OTHER WARRANTIES, REMEDIES AND CONDITIONS. NEITHER MATROX NOR ANY OF ITS THIRD PARTY SUPPLIERS MAKES ANY OTHER WARRANTY OF ANY KIND, WHETHER EXPRESSED OR IMPLIED, WITH RESPECT TO MATROX PRODUCTS. MATROX SPECIFICALLY DISCLAIMS (AND THE CUSTOMER, BY ACCEPTING THE MATROX PRODUCT, SPECIFICALLY ACCEPTS SUCH DISCLAIMER AND WAIVES) ALL OTHER WARRANTIES, EITHER EXPRESSED OR IMPLIED, ORAL OR WRITTEN, INCLUDING BUT NOT LIMITED TO THE IMPLIED WARRANTIES OF MERCHANTABILITY AND FITNESS FOR A PARTICULAR OR INTENDED PURPOSE OR USE AND THE WARRANTY AGAINST LATENT DEFECTS, WITH RESPECT TO THE HARDWARE AND/OR SOFTWARE. MATROX FURTHER DISCLAIMS ANY WARRANTY THAT MATROX PRODUCTS, IN WHOLE OR IN PART, WILL BE FREE FROM INFRINGEMENT OF ANY THIRD PARTY INTELLECTUAL PROPERTY, INCLUDING, WITHOUT LIMITATION, ANY PATENTS, OR PROPRIETARY RIGHTS.
- To the extent that this limited warranty is inconsistent with the law of the locality where the customer purchases the Matrox Product, this limited warranty shall be deemed modified to be consistent with such local law. Under such local law, certain limitations of this limited warranty may not apply to the consumer. If Matrox cannot lawfully disclaim statutory or implied warranties then to the extent permitted by law, all such warranties shall be limited in duration to the duration of this express warranty and to repair or replacement service as determined by Matrox at its sole discretion.
- Matrox disclaims any representation that it will be able to repair any Product under this warranty or make a Product exchange without risk to or loss of the programs or data.
- To the extent allowed by local law, the remedies provided in this limited warranty are the customer's sole and exclusive remedies.
C. Limitations of Liability
- EXCEPT FOR THE OBLIGATIONS SPECIFICALLY SET FORTH IN THE LIMITED WARRANTY, IN NO EVENT SHALL MATROX BE LIABLE FOR:
a. any direct, indirect, special, incidental, consequential, foreseeable or unforeseeable, or punitive damages, whether based on contract, tort, delict or any other legal theory and whether advised of the possibility of such damages; and/or
b. damages arising from the loss of use, data, production revenue, use of money, anticipated savings, business, opportunity, goodwill, reputation and/or profit in connection with the Matrox Product or any business interruption.
-
Without prejudice to the foregoing, any liability of Matrox for any breach of warranty shall be limited to the amount paid by the customer for the defective hardware in question.
-
To the extent allowed by local law, Matrox's entire liability and the customer's exclusive remedy shall be the repair or replacement of any defective Product during the warranty period. Matrox does not offer any other warranty with respect to Matrox hardware or software or any other hardware or software.
-
Customer shall be responsible for all applicable taxes, duties and customs fees on any replacement unit, as well as all transport, insurance, storage and other charges incurred on all returned Products.
D. Obtaining Service
- Verify that your Matrox Product was installed and configured according to the information in its accompanying documentation.
- Read the “Troubleshooting” information included with the Matrox Product to see if you can solve the problem yourself.
- If you are still experiencing difficulties, please contact your dealer where you purchased your Matrox Product.
- If you must return a Matrox Product, leave the configuration as it was when you were using it, and leave all identification stickers on the Product. Pack the Product in its original box and return to your Matrox dealer where the Product was purchased, together with your proof of purchase. Your Matrox dealer will return the Product for you. Alternatively, if this first option is unavailable to you, you may contact the Matrox Technical Support group who will issue a Return Merchandise Authorization (RMA) number, upon receipt of adequate proof of purchase, and inform
you of shipping instructions. DO NOT RETURN THE PRODUCT TO MATROX WITHOUT MATROX'S RMA NUMBER AND EXPRESS AUTHORIZATION.
E. General
- This limited warranty shall be governed by the laws of the Province of Quebec, Canada and the federal laws of Canada applicable therein and the courts of the Province of Quebec shall have exclusive jurisdiction to hear and decide any dispute instituted by the customer in connection with this limited warranty; the customer waives, by accepting the product, its rights to institute proceedings in connection with this warranty against Matrox in any jurisdiction other than Quebec.
- Except as may be expressly agreed to the contrary in a signed written agreement between you and Matrox, i) any written or oral information or advice given by Matrox's distributors, agents or employees will in no way increase the scope of the limited warranty contained in this limited warranty; and ii) this limited warranty states the only warranty made to you by Matrox with respect to the units of product that you have purchased, and the terms of this limited warranty shall override the terms of any purchase orders and any other terms and understandings you may seek to apply in respect thereof.
- This limited warranty is personal to you and cannot be assigned or transferred without Matrox's prior written agreement.
- The failure by Matrox to enforce any of the provisions of this limited warranty shall not constitute a waiver of Matrox's rights to enforce such provision or any other provision of this limited warranty in the future.
- If any clause in this limited warranty is held by a court of law to be illegal or unenforceable the remaining provisions of this limited warranty shall not be affected thereby.
Index
B
BIOS 15,16,20,21
C
CD-ROM, Matrox 24
Connection setup 9-11
Connector
DVI 11
HD-15 11
KX20 10
Customer support 29–30, 31–33
D
Decoder card 3
Display
Primary 20
E
Expansion slots 15
H
Hardware
Acceleration 22
Information 3
Installation 5-8
I
Installation
Hardware 5-8
Overview 4
M
Monitor
Settings 16–18
Multi-display
Mode 22
0
Output card 3
P
PCI Express 15
Power supply 25
Indicator light 12
PowerDesk 21,30
Product information 25–28
R
Registration 30
s
Software
Download 30
Setup 13
T
Technical support 29
Troubleshooting 14–24
V
VESA 25
VGA 25
W
Warning 5,6,7,9,17,19
Warranty 31-33
Web, Mat rox 29
USA
FCC Compliance Statement
Remark for the Matrox hardware products supported by this guide This equipment has been tested and found to comply with the limits for a Class A digital device, pursuant to Part 15 of the FCC Rules. These limits are designed to provide reasonable protection against harmful interference when the equipment is operated in a commercial environment. This equipment generates, uses, and can radiate radio frequency energy and, if not installed and used in accordance with the instructions manual, may cause harmful interference to radio communications. Operation of this equipment in a residential area is likely to cause harmful interference in which case the user will be required to correct the interference at his own expense.
WARNING Changes or modifications to this unit not expressly approved by the party responsible for the compliance could void the user's authority to operate this equipment. The use of shielded cables for connection of the monitor to the card is required to meet FCC requirements.
CANADA
(English) Industry Canada Compliance Statement
Remark for the Matrox hardware products supported by this guide These digital apparatus does not exceed the Class A limits for radio noise emission from digital devices set out in the Radio Interference Regulation of Industry Canada.
VCCI Compliance Statement
Remark for the Matrox hardware products supported by this guide This is a Class A product based on the standard of the Voluntary Control Council for Interference by Information Technology Equipment (VCCI). If this equipment is used in a domestic environment, radio disturbance may occur, in which case, the user may be required to take corrective actions.
(English) European user's information – Declaration of Conformity
Remark for the Matrox hardware products supported by this guide These devices comply with EC Directive 89/336/EEC for a Class A digital device. They have been tested and found to comply with EN55022/CISPR22 and EN55024/CISPR24. In a domestic environment these products may cause radio interference in which case the user may be required to take adequate measures. To meet EC requirements, shielded cables must be used to connect the monitor and other peripherals to the card. These products have been tested in a typical class A compliant host system. It is assumed that these products will also achieve compliance in any class A compliant system.
(English) European user's information - Directive on Waste Electrical and Electronic Equipment (WEEE)
Please refer to the Matrox Web site (www.matrox.com/environment/en/weee) for recycling information.

Microsoft Corporation.... Aero™, Direct3D®, DirectDraw®, DirectShow™, DirectX™, Microsoft®, MS-DOS®, PowerPoint®, Windows®, Windows NT®, Windows Server®, Windows Vista™
Silicon Graphics, Inc. ...... OpenGL®
Silicon Image, Inc. ...... PanelLink™
U.S. Environmental Protection Agency ...... Energy Star™
Video Electronics Standards Association ...... DisplayPort™
- (English) Registered trademarks are registered in the United States, Canada, and/or other countries. All other nationally and internationally recognized trademarks and tradenames are hereby acknowledged. • (Français) Les marques déposées sont déposées aux États-Unis, au Canada et/ou dans d'autres pays. Toutes les autres marques et tous les autres noms déposés reconnus nationalement ou internationalement sont également reconnus par les présentes. • (Deutsch) Die eingetragenen Warenzeichen sind in den USA, Kanada und/oder anderen Ländern registriert. Alle sonstigen national und international bekannten Warenzeichen und Produktnamen werden hiermit anerkannt. • (Italiano) I marchi registrati sono registrati negli Stati Uniti, in Canada e/o in altri paesi. Tutti gli altri marchi registrati e nomi commerciali riconosciuti a livello nazionale e internazionale sono ugualmente riconosciuti qui. • (Español) Las marcas registradas están registradas en los EE.UU., Canadá u otros países. Por medio del presente se reconocen todas las demás marcas y nombres comerciales reconocidos a nivel nacional e internacional.
(English) Disclaimer
THE INFORMATION IN THIS GUIDE IS SUBJECT TO CHANGE AT ANY TIME AND WITHOUT NOTICE.
Matrox Graphics Inc. reserves the right to make changes in specifications at any time and without notice. The information provided by this document is believed to be accurate and reliable. However, no responsibility is assumed by Matrox Graphics Inc. for its use; nor for any infringements of patents or other rights of third parties resulting from its use. No license is granted under any patents or patent rights of Matrox Graphics Inc.
Dorval, Quebec, Canada H9P 2T4
North America: 1-800-361-1408
International: (514) 822-6000
Email: graphics@matrox.com
Web site: www.matrox.com/graphics
Technical support:
www.matrox.com/graphics/support
To locate the sales office nearest you, visit
www.matrox.com/graphics/contact
- Hardware installation ....5
- Connection setup....9
- Software setup 13
- Troubleshooting....14
- Product Information 25
- Warranty 31
- Index 34
- Overview
- Hardware supplied
- Optional hardware (sold separately)
- Software available (for Windows XP)
- Installation overview
- Hardware installation
- Open your computer
- Choose an expansion slot
- Insert your Matrox decoder card
- Connect the power supply to the decoder card
- Insert your Matrox output card
- Connect the power supply to the output card
- Secure the bracket of your Matrox card
- Connection setup
- Step-by-step connection setup
- Connect the camera network
- Connect the intra-network (twisted pair) cable
- Connect your decoder card
- Connect your output card
- Connect your Matrox quad-monitor cable
- Connect your monitors
- Description of indicator lights on decoder card
- Indicator lights Behavior
- Software setup
- Download the driver
- Install the driver
- Configure the software
- Install optional software
- Troubleshooting
- Basic procedures
- Restarting in VGA mode
- Graphics - Main troubleshooting
- Problem Computer doesn't display information or boot after Matrox card is installed
- Cause
- Solution
- i
- Problem Wrong color balance, screen image off-center, or no picture at all
- Problem After the startup screen, or after display settings are changed, the screen image is garbled or unusable (blank screen, rolling or overlapping screen images)
- Windows XP -
- Graphics – Extra troubleshooting
- Problem Can't use Windows, Windows reports a configuration error, and/or can't install or uninstall Matrox display driver
- Problem Monitor settings aren't automatically detected
- Problem Built-in network hardware doesn't work after graphics card is installed
- Problem Can't see the camera network
- Problem Using multiple displays under Windows XP, program doesn't work with your Matrox product
- Problem Not all graphics cards in the computer are fully supported (Software doesn't work with a certain graphics card, or another graphics card doesn't work at all)
- Problem In multi-display mode, displays aren't numbered consecutively
- Problem Screen image defects appear, program doesn't run properly, or Windows doesn't work properly
- Problem Program window or dialog box doesn't appear on screen
- Problem Display on digital monitor appears blurry or uses only a portion of the screen
- More Information
- Product Information
- Notes
- Digital monitor information
- Customer support
- Matrox Web
- Technical support
- Information we need
- Program specific problems
- Driver and software download
- Register your Matrox product
- Where to get information
- Warranty
- Limited Warranty Statement
- Limitations of Warranty
- Limitations of Liability
- Obtaining Service
- General
- Index
- B
- C
- D
- E
- H
- M
- 0
- P
- R
- s
- T
- V
- W
- USA
- FCC Compliance Statement
- CANADA
- (English) Industry Canada Compliance Statement
- VCCI Compliance Statement
- (English) European user's information – Declaration of Conformity
- (English) European user's information - Directive on Waste Electrical and Electronic Equipment (WEEE)
- (English) Disclaimer
Brand : MATROX
Model : VDA1164-KITF
Category : Digital decoder