
Monarch LCS - Digital decoder MATROX - Free user manual and instructions
Find the device manual for free Monarch LCS MATROX in PDF.


| Product Type | Digital Decoder / H.264 Encoding Appliance |
| Brand | Matrox |
| Model | Monarch LCS |
| Dimensions (W x D x H) | 216 x 142 x 35.6 mm (8.5 x 5.59 x 1.4 in) |
| Weight | 0.6 kg |
| Power Supply | Input: 9-24 VDC; Consumption: 20-30 W (42 W max); External adapter 100-240 VAC, 50-60 Hz |
| Video Inputs | 2x HDMI (A & B), 1x SDI (A); supports up to 1080p60 |
| Audio Inputs | HDMI embedded (2-ch), SDI embedded (2-ch), Analog stereo (3.5 mm jack) |
| Video Outputs | 1x HDMI, 1x SDI (loop-through/preview) |
| Audio Output | Analog stereo (3.5 mm jack) |
| Recording Media | USB 2.0/3.0 (2 ports), SD/SDHC card, Network folder (NFS/SMB) |
| Streaming Protocols | RTSP, RTMP |
| Encoding | H.264 video, AAC audio; up to 1920x1080 |
| Operating Modes | Single Isolated, Dual Isolated, Switcher, Picture-in-Picture, Side-by-Side |
| Network | 10/100/1000 Base-T Ethernet (RJ-45), DHCP/Static IP |
| Control | Web interface (Command Center), front panel buttons, Matrox Utils/Radar |
| Environmental | Operating: 0 to 40°C; Humidity: 20-80% non-condensing |
| Regulatory | FCC Class A, CE Class A, RoHS compliant |
| Maintenance | No user-serviceable parts; clean with dry cloth; ensure adequate ventilation |
| Warranty | See http://www.matrox.com/video/en/support/warranty/ |
Frequently Asked Questions - Monarch LCS MATROX
User questions about Monarch LCS MATROX
0 question about this device. Answer the ones you know or ask your own.
Ask a new question about this device
Download the instructions for your Digital decoder in PDF format for free! Find your manual Monarch LCS - MATROX and take your electronic device back in hand. On this page are published all the documents necessary for the use of your device. Monarch LCS by MATROX.
USER MANUAL Monarch LCS MATROX
HDMI, the HDMI logo and High-Definition Multimedia Interface are trademarks or registered trademarks of HDMI Licensing LLC. All other nationally and internationally recognized trademarks and tradenames are hereby acknowledged.
The hardware warranty for this product can be found at: http://www.matrox.com/video/en/support/warranty/
Copyright © 2019 Matrox Electronic Systems Ltd. All rights reserved.
Disclaimer Matrox Electronic Systems Ltd. reserves the right to make changes in specifications at any time and without notice. The information provided by this document is believed to be accurate and reliable. However, no responsibility is assumed by Matrox Electronic Systems Ltd. for its use; nor for any infringements of patents or other rights of third parties resulting from its use. No license is granted under any patents or patent rights of Matrox Electronic Systems Ltd.
Unauthorized recording or use of broadcast television programming, video tape, or other copyrighted material may violate copyright laws. Matrox Electronic Systems Ltd. assumes no responsibility for the illegal duplication, use, or other acts that infringe on the rights of copyright owners.
Matrox Software License Agreement
(Hereafter referred to as License)
THIS IS A LEGAL AGREEMENT BETWEEN THE LICENSEE AND MATROX GRAPHICS INC. ("MATROX") CONCERNING THE USAGE OF THE MATROX SOFTWARE. BY DOWNLOADING, INSTALLING, COPYING, ACCESSING, CLICKING ON AN "ACCEPT" BUTTON, OR OTHERWISE USING THE SOFTWARE, THE LICENSEE AGREES TO THE TERMS OF THIS LICENSE. IF YOU ARE ACCEPTING THESE TERMS ON BEHALF OF YOUR COMPANY, ORGANIZATION, EDUCATIONAL INSTITUTION, OR AGENCY, INSTRUMENTALITY, OR DEPARTMENT OF THE FEDERAL GOVERNMENT AS ITS AUTHORIZED LEGAL REPRESENTATIVE, YOU REPRESENT AND WARRANTY THAT YOU HAVE FULL AUTHORITY TO BIND LICENSEE TO THESE TERMS. IF YOU DO NOT AGREE TO THE TERMS OF THIS LICENSE, PLEASE RETURN YOUR MATROX PRODUCT. IF THE SOFTWARE WAS DOWNLOADED, DESTROY ALL COPIES OF THE SOFTWARE.
In this License "Software" refers to: any firmware, software, associated software components, media, printed materials, and "online" or electronic documentation related to Matrox products, and any related updates or upgrades thereto.
The Software is not sold, and instead is only licensed for use, strictly in accordance with this document. This License does not cover the sale of hardware, since it may not necessarily be sold as a package with the Software. This License sets forth the terms and conditions of the Software license only.
Any Software provided to Licensee is the copyrighted work of Matrox and/or third party software suppliers (if any). The present License does not give Licensee any intellectual property rights to the Software or its derivatives. The downloading and/or the use of any Software are subject to the following restrictions and limitations:
LICENSES:
If you are an end user, the "End User License" shall apply to you.
If you are an original equipment manufacturer (OEM), the "OEM License" shall apply to you.
END USER LICENSE
1 Licensee may install the Software on an unlimited number of computers owned or leased by Licensee in any location. The Software is subject to a restricted license therefore Licensee must use the Software on a single computer owned or leased by Licensee at a time, in conjunction with and for the purpose of, operating the Matrox hardware product. Use of the Software in conjunction with non-Matrox products is prohibited and not licensed hereunder. Licensee shall also have the right to make one copy of the Software in any computer-readable or printed form for back-up or archival purposes;
2 No right to recopy, publish, display, network, rent, loan, lend, assign, sell, distribute, license, sublicense, alter, modify, disassemble, de-compile, create derivative works or reverse engineer any Software in any manner whatsoever is hereby given, except as provided in this License. Violation may result in severe civil and/or criminal penalties, as violators will be prosecuted to the maximum extent possible;
3 Licensee agrees to treat the Software as confidential information, and shall protect said information by using the same degree of care Licensee uses to protect Licensee's own confidential information, but no less than a reasonable degree of care, to prevent the unauthorized use, dissemination, disclosure or publication of such, or to use this Software to: (i) develop inventions directly derived from confidential information to seek patent protection; (ii) assist in the analysis of Licensee's patents and patent applications; or (iii) modify Licensee's existing patents or patent applications;
4 Licensee may only provide and disclose parts of the Software to third parties who have a need-to-know for the purpose of installation, service integration and/or support of said Software within Licensee's product. In such event, Licensee may only disclose the relevant and necessary parts of the Software to permit the third party to accomplish his work provided that all such disclosures shall be subject to the terms and conditions of this License;
5 Licensee may not grant any sublicense, lease or other right in the Software to others;
iv
6 Notwithstanding any other provision in this License, if Licensee provides any ideas, suggestions or recommendations to Matrox regarding the Licensed Software and/or Licensee's product ("Feedback"), Matrox is free to use and incorporate such Feedback in Matrox's products, without payment of royalties or other consideration to Licensee;
7 Licensee shall not have the right to alter or remove any Matrox or third party copyright, trademark or patent notices in the Software.
OEM LICENSE
Licensee may reproduce and distribute the Software only as an integral part of or incorporated in Licensee's product or as a standalone Software maintenance update for existing end users of Licensee's products, excluding any other standalone products, subject to these conditions:
1 This Software is subject to a restrictive license therefore it is licensed for use only in conjunction with the Matrox hardware product. Use of the Software in conjunction with non-Matrox products is prohibited and not licensed hereunder;
2 No right to recopy, publish, display, sell, network, rent, loan, lend, distribute, license, sublicense, alter, modify, disassemble, decompile, create derivative works or reverse engineer any Software in any manner whatsoever is hereby given, except as provided in this License. Violation may result in severe civil and/or criminal penalties, as violators will be prosecuted to the maximum extent possible;
3 Licensee agrees to treat the Software as confidential information, and shall protect said information by using the same degree of care Licensee uses to protect Licensee's own confidential information, but no less than a reasonable degree of care, to prevent the unauthorized use, dissemination, disclosure or publication of such, or to use this Software to: (i) develop inventions directly derived from confidential information to seek patent protection; (ii) assist in the analysis of Licensee's patents and patent applications; or (iii) modify Licensee's existing patents or patent applications;
4 Licensee may only distribute the Software to Licensee's customers pursuant to a written license agreement. At a minimum such license shall safeguard Matrox's ownership rights to the Software and such agreement shall contain similar terms and obligations;
5 Licensee may only provide and disclose parts of the Software to third parties who have a need-to-know for the purpose of installation, service integration and/or support of said Software within Licensee's product. In such event, Licensee may only disclose the relevant and necessary parts of the Software to permit the third party to accomplish his work provided that all such disclosures shall be subject to the terms and conditions of this License;
6 Notwithstanding any other provision in this License, if Licensee provides any ideas, suggestions or recommendations to Matrox regarding the Licensed Software and/or Licensee's product ("Feedback"), Matrox is free to use and incorporate such Feedback in Matrox's products, without payment of royalties or other consideration to Licensee;
7 Licensee shall not have the right to alter or remove any Matrox or third party copyright, trademark or patent notices in the Software.
GENERAL LICENSE TERMS: (APPLICABLE TO BOTH END-USERS & OEMs)
There are inherent dangers in the use of any software available for downloading on the Internet and Matrox cautions Licensee to ensure that Licensee completely understands the potential risks before downloading any of the Software. Licensee is solely responsible for adequate protection and backup of the data and equipment used in connection with any of the Software, and Matrox will not be liable for any damages that may be suffered in connection with use of the Software.
Licensee hereby acknowledges and agrees that this License, and all its terms and conditions, automatically applies, without other notice, to future updates of the Software, firmware, BIOS, drivers and associated utilities. In addition, certain third party intellectual property may be provided with or included in the Software. The third party license terms accompanying such Software, found at http://matrox.com/video/en/licenses/ and if
applicable, in the license.txt file located in the root installation directory, will govern your use of such Software. Matrox does not warrant and is not liable for such third party intellectual property, or anything related thereto. Licensee acknowledges and agrees to comply with the terms of all applicable third party software licenses if any. Please be advised that the terms and conditions of third party license agreements may be updated from time to time. It is the responsibility of the Licensee to verify that the agreement listed is current and applicable. Please note that this list of third party licenses is not exhaustive and was determined according to Matrox's understanding and to the best of its knowledge.
PRE-RELEASE LICENSE EXCLUSION: If you are using a version of the licensed Software that is designated, without limitation, as an alpha, beta, engineering sample, preliminary or early access version of the Software, then; (a) the Software is deemed to be pre-release code (e.g. alpha or beta, engineering sample, preliminary, early access, etc.), which may not be fully functional and which Matrox may substantially modify in development of a commercial version, and for which Matrox makes no assurances that it will ever develop or make generally available in a commercial version, and (b) Licensee shall have the right to use the Software only for the duration of the pre-release term or until the commercial release, if any, of the Software, whichever is shorter. For clarity, a remedy to any bug, defect, error or fault in any pre-release version of the Software will absolutely require upgrading to a new version of the Software. Matrox reserves the right to change any content of this new version of the Software at its sole discretion.
COPYRIGHT
All title, including but not limited to copyrights, in and to the Software and any copies thereof are owned by Matrox or its suppliers. All title and intellectual property rights in and to the content which may be accessed through use of the Software is the property of the respective content owner and may be protected by applicable copyright or other intellectual property laws and treaties. This License grants you no rights to use such content. All rights not expressly granted are reserved by Matrox.
DISCLAIMER OF WARRANTIES
LICENSEE EXPRESSLY ACKNOWLEDGES AND AGREES THAT USE OF THE SOFTWARE IS AT LICENSEE'S SOLE RISK. THE SOFTWARE IS PROVIDED "AS IS" AND WITHOUT WARRANTY OF ANY KIND AND MATROX EXPRESSLY DISCLAIMS ALL WARRANTIES, EXPRESS AND IMPLIED, INCLUDING, BUT NOT LIMITED TO, THE IMPLIED WARRANTIES OF MERCHANTABILITY, FITNESS FOR A PARTICULAR PURPOSE AND NON-INFRINGEMENT OF ITS SOFTWARE AND ANY THIRD PARTY INTELLECTUAL PROPERTY. MATROX DOES NOT WARRANT THAT THE CONTENTS OF THE SOFTWARE WILL MEET LICENSEE'S REQUIREMENTS, OR THAT THE OPERATION OF THE SOFTWARE WILL BE UNINTERRUPTED OR ERROR-FREE, OR THAT DEFECTS IN THE SOFTWARE WILL BE CORRECTED. THE ENTIRE RISK ASSOCIATED WITH THE USE OF THE SOFTWARE IS ASSUMED BY LICENSEE. FURTHERMORE, MATROX DOES NOT WARRANT OR MAKE ANY REPRESENTATIONS REGARDING THE USE OR THE RESULTS OF THE USE, OF THE SOFTWARE OR ANY THIRD PARTY INTELLECTUAL PROPERTY IN TERMS OF ITS CORRECTNESS, ACCURACY, RELIABILITY, CURRENTNESS, OR OTHERWISE. SHOULD THE CONTENTS OF THE SOFTWARE PROVE DEFECTIVE, LICENSEE ASSUMES THE ENTIRE COST OF ALL NECESSARY SERVICING, REPAIR OR CORRECTION. SOME JURISDICTIONS DO NOT ALLOW THE EXCLUSION OF IMPLIED WARRANTIES, SO THE ABOVE EXCLUSION MAY NOT APPLY TO LICENSEE.
LICENSEE ACKNOWLEDGES AND AGREES THAT LICENSEE IS SOLELY RESPONSIBLE FOR DETERMINING WHETHER ANY THIRD PARTY PATENT OR COPYRIGHT LICENSES, INCLUDING BUT NOT LIMITED TO VARIOUS AUDIO AND VISUAL STANDARDS, ARE NECESSARY TO USE, IMPLEMENT OR DISTRIBUTE THIS PRODUCT, WHICH INCLUDES ANY OR ALL SOFTWARE OR HARDWARE. LICENSEE IS RESPONSIBLE TO ADVISE LICENSEE'S CUSTOMERS OF THE LIMITATIONS PROVIDED HEREIN.
LIMITATION OF LIABILITY
UNDER NO CIRCUMSTANCES SHALL MATROX, ITS SISTER COMPANIES, ITS SUBSIDIARIES BE LIABLE FOR ANY DIRECT, INDIRECT, PUNITIVE, INCIDENTAL, SPECIAL, OR CONSEQUENTIAL DAMAGES THAT RESULT FROM THE USE OF, OR INABILITY TO USE, THE SOFTWARE. THIS LIMITATION APPLIES
SLA08282017 Matrox Software License Agreement
WHETHER THE ALLEGED LIABILITY IS BASED ON CONTRACT, TORT, NEGLIGENCE, STRICT LIABILITY, OR ANY OTHER BASIS, EVEN IF MATROX HAS BEEN ADVISED OF THE POSSIBILITY OF SUCH DAMAGE. BECAUSE SOME JURISDICTIONS DO NOT ALLOW THE EXCLUSION OR LIMITATION OF INCIDENTAL OR CONSEQUENTIAL DAMAGES, MATROX'S LIABILITY IN SUCH JURISDICTIONS SHALL BE LIMITED TO THE MINIMUM REQUIRED BY LAW.
UNAUTHORIZED USE. THIS SOFTWARE IS NOT DESIGNED, INTENDED, AUTHORIZED OR WARRANTED TO BE SUITABLE FOR USE OR RESALE IN ANY TYPE OF SYSTEM OR OTHER APPLICATIONS RELATED TO, HAZARDOUS OR POTENTIALLY HAZARDOUS ENVIRONMENTS OR APPLICATIONS REQUIRING HIGH-AVAILABILITY OR FAIL-SAFE PERFORMANCE, WHERE PERSONAL INJURY OR DEATH MAY OCCUR, SUCH AS MEDICAL SYSTEMS, LIFE SUSTAINING, LIFE SAVING SYSTEMS, OPERATION OF NUCLEAR FACILITIES, AIRCRAFT NAVIGATION OR COMMUNICATION SYSTEMS, AIR TRAFFIC CONTROL, PUBLIC WORKS, WEAPONS SYSTEMS, OR ANY OTHER APPLICATION IN WHICH THE FAILURE OF A PRODUCT COULD LEAD TO PROPERTY DAMAGE, ENVIRONMENTAL DAMAGE, OR PERSONAL INJURY. LICENSEE WILL NOT USE, OR PERMIT TO BE USED, THE PRODUCTS FOR SUCH HIGH-AVAILABILITY, FAIL-SAFE OR CRITICAL APPLICATIONS AND FURTHER, LICENSEE AGREES TO INDEMNIFY, DEFEND AND HOLD HARMLESS MATROX AND ITS MANAGERS, DIRECTORS, OFFICERS, EMPLOYEES, AGENTS, AFFILIATES, SUCCESSORS, ASSIGNS AND ITS THIRD PARTY SUPPLIERS FROM AND AGAINST ANY ACTION, SUIT, PROCEEDING, COST, EXPENSE, DAMAGES, AND LIABILITY (INCLUDING, BUT NOT LIMITED TO, REASONABLE ATTORNEYS' FEES) ARISING OUT OF, OR RELATED TO, THE BREACH OF LICENSEE'S OBLIGATIONS RELATED HERETO, EVEN IF SUCH CLAIM ALLEGES THAT MATROX WAS NEGLIGENT REGARDING THE DESIGN OR MANUFACTURE OF THE SOFTWARE.
DISCLAIMER OF WARRANTIES AND LIMITATION OF LIABILITIES FOR THIRD PARTY SOFTWARE INCLUDED WITH OR IN THE SOFTWARE. ALL THIRD PARTY SOFTWARE INCLUDED WITH THE SOFTWARE IS PROVIDED ON AN "AS IS" BASIS. MATROX AND ITS THIRD PARTY SUPPLIERS MAKE NO WARRANTY TO LICENSEE, WHETHER EXPRESS OR IMPLIED, INCLUDING WITHOUT LIMITATION THE IMPLIED WARRANTIES OF MERCHANTABILITY AND FITNESS FOR A PARTICULAR PURPOSE AND NON-INFRINGEMENT, REGARDING ANY THIRD PARTY SOFTWARE, OR ITS USE AND OPERATION ALONE OR IN COMBINATION WITH LICENSEE PRODUCTS. NEITHER LICENSEE, NOR ITS EMPLOYEES, AGENTS, OR DISTRIBUTORS HAVE ANY RIGHT TO MAKE ANY OTHER REPRESENTATION, WARRANTY OR PROMISE WITH RESPECT TO ALL THIRD PARTY SOFTWARE INCLUDED WITH THE SOFTWARE.
MATROX HAS NO OBLIGATION TO INDEMNIFY, DEFEND OR HOLD LICENSEE HARMLESS FROM AND AGAINST ANY CLAIM THAT ANY THIRD PARTY SOFTWARE INFRINGES ANY THIRD PARTY PATENT, COPYRIGHT, TRADEMARK OR OTHER INTELLECTUAL PROPERTY RIGHT. LICENSEE WILL PROMPTLY NOTIFY MATROX IN WRITING OF ANY SUCH CLAIM.
MATROX HAS NO OBLIGATION TO INDEMNIFY, DEFEND OR HOLD LICENSEE HARMLESS FROM AND AGAINST ANY CLAIMS OF INFRINGEMENT OF INTELLECTUAL PROPERTY THAT READS UPON OR IS INFRINGED BY A GENERALLY RECOGNIZED AUDIO, VIDEO, TECHNOLOGY OR PATENT STANDARD OR RECOMMENDATIONS, INCLUDING WITHOUT LIMITATION AVC/H.264, IEEE 1394, JPEG, JPEG2000 AND MPEG-4.
IN ANY EVENT, MATROX'S TOTAL CUMULATIVE LIABILITY TO LICENSEE FOR ANY AND ALL CAUSE OF ACTION SHALL BE LIMITED TO THE AGGREGATE OF ALL AMOUNTS PAID BY LICENSEE TO MATROX, DURING THE TWELVE (12) MONTH PERIOD PRIOR TO OBTAINING A FINAL, NONAPPEALABLE JUDGMENT OR \$50,000.00 USD, WHICHEVER IS LOWER. THE FOREGOING LIMITATIONS WILL APPLY EVEN IF THE ABOVE STATED REMEDY FAILS OF ITS ESSENTIAL PURPOSE.
TERMINATION
This License will automatically terminate if Licensee fails to comply with any of the terms and conditions hereof. In such event, Licensee must destroy all copies of the Software and all of its component parts. Matrox
reserves the right to terminate this License without prejudice to any additional recourses Matrox may have against Licensee if Licensee violates any of the terms and conditions of this License.
Matrox will not, by reason of the termination of this License, be liable for compensation, reimbursement or damages on account of the loss of prospective profits on anticipated sales, or on account of expenditures, investments, leases, or commitments in connection with the Licensee's business or goodwill or otherwise. If Licensee commences or participates in any legal proceeding against Matrox then Matrox may, in its sole discretion, suspend or terminate all license grants and any other rights provided under this License during the pendency of such legal proceedings.
MISCELLANEOUS
If any provision of this License is inconsistent with, or cannot be fully enforced under, the law, such provision will be construed as limited to the extent necessary to be consistent with and fully enforceable under the law. This License is the final, complete and exclusive agreement between the parties relating to the subject matter hereof, and supersedes all prior or contemporaneous understandings and agreements relating to such subject matter, whether oral or written. This License may only be modified in writing signed by an authorized officer of Matrox. Licensee agrees that it will not ship, transfer or export the Software into any country, or use the Software in any manner, prohibited by the United States Bureau of Industry and Security and shall fully comply with all United States and Canadian relevant export laws, restrictions or regulations and any other applicable export and import laws.
Controlling Law. The validity, performance and construction hereof shall be governed by and interpreted in accordance with the laws of the Province of Quebec. Both parties hereby irrevocably submit to the exclusive jurisdiction of the Courts of the district of Montreal, Province of Quebec, Canada with regard to any dispute arising out of or in connection with this License.
Additional information may be available on the Matrox website. If used, this site may contain other proprietary notices and copyright information, the terms of which must also be observed and followed.
The failure of Matrox to enforce at any time any of the provisions of this License, or the failure to require at any time performance by the Licensee of any of the provisions of this License, shall in no way be construed to be a present or future waiver of such provisions, nor in any way affect the right of Matrox to enforce each and every such provision thereafter.
Any and all articles and/or sections which by their nature are required to survive termination of this License shall survive.
ANY INTERPRETATION OF THE CONTENTS, RIGHTS AND OBLIGATIONS OF THE CONTENTS OF THIS NOTICE AND/OR MATROX WEB SITE SHALL BE INTERPRETED IN ACCORDANCE WITH THE LAWS OF QUEBEC.
Matrox reserves the right to change Software specification without notice. All intellectual property, including without limitation, trademarks and copyrights are the property of their respective owners and any unauthorized use thereof is strictly prohibited.
COPYRIGHT © 2017 Matrox. All rights reserved. Matrox is a trademark of Matrox Electronic Systems Ltd.
viii
Your notes
Contents
Chapter 1
Introduction
Welcome to Matrox Monarch LCS 2
Supported input formats.... 2
Supported operating systems 2
Supported Web browsers .... 3
Streaming 3
Recording 3
About this guide.... 3
Style conventions 3
Chapter 2
Matrox Monarch LCS Hardware and Connections
Matrox Monarch LCS hardware 6
Input select button 6
Encode button (ENCD)....7
USB ports 1 and 2....7
SD card....8
LAN 8
RS-232 9
Video/audio inputs and outputs....9
Powering Monarch LCS....11
Using the Reset button.... 12
Status LEDs 14
Chapter 3
Network Connection and Setup
Introduction...... 16
Monarch LCS Utils application....16
Monarch LCS Radar application 16
Network connection and IP address 17
Finding the Monarch LCS current IP address 17
Connecting to a network with a DHCP server (DHCP IP mode) 18
Connecting to a network without a DHCP server (Static IP mode).... 19
Accessing the Command Center 20
x
Updating the Monarch LCS firmware....20
Installing the Monarch SSL certificate.... 21
Chapter 4
Using the Command Center
Introduction 24
Using the Command Center side menu....24
Status page....26
Monarch LCS errors ....27
Settings page 28
Recording file size and duration
Recording file sizes and duration....74
Appendix B
Sharing a network folder
Introduction 76
Recording or transferring to folders on a USB or SD card 76
Recording or transferring to folders on a network drive 76
On a Windows system 76
On a Mac OS system 77
Appendix C
Integrating Monarch LCS with Kaltura
Introduction 80
Connecting Monarch to Kaltura 80
Contents
xi
Disconnecting Monarch from Kaltura.... 82
Creating Kaltura events for use in Monarch Scheduler 83
Exporting and importing Kaltura settings 84
Appendix D
Matrox Monarch LCS Specifications
General 88
Connections 88
Environmental specifications 89
Dimensions 90
Top 90
Front....90
Side 91
Appendix E
Matrox Customer Support
How to get Matrox customer support.... 94
Registration 94
Keep up to date with our website 94
Contacting us 94
xii
Your notes
1
Introduction
This chapter lists the Monarch LCS supported input formats, system requirements, and describes the Monarch LCS documentation.
Welcome to Matrox Monarch LCS
The Matrox Monarch LCS is a reliable, standalone network appliance that is simple to set up and integrate into any open Video Management System (VMS) or Lecture Management System (LMS). Monarch LCS lets you easily define profiles for live streamed and recorded lectures by mixing camera and presentation material from SDI and HDMI sources. Once configured, this versatile H.264 encoding appliance can be operated by anyone at the push of a button. For a full overview of the Monarch LCS, please refer to our website here: http://www.matrox.com/video/en/products/monarch_lcs/#close.
Supported input formats
Matrox Monarch LCS supports the following video input formats:
- 1920 × 1080p at 25/29.97/30/50/59.94/60 fps
- 1920 × 1080i at 25/29.97 fps
- 1280 × 720p at 50 / 59.94 / 60 fps
- 720 × 576i at 25 fps (SDI only)
- 720 × 486i at 29.97 fps (SDI only)
Supported operating systems
The Matrox Monarch LCS Utils application is used to perform firmware updates and acquire the device network IP address when connected to a network with a DHCP server. The application supports the following operating systems:
• Mac OS X El Capitan
- Microsoft Windows 10

Note You must have Microsoft .NET Framework installed. This release was tested with the latest version: http://www.microsoft.com/en-ca/download/
Other operating systems may work but have not been fully validated through internal testing. Before trying another operating system, please contact MonarchLCSSupport@matrox.com with any questions.
Supported Web browsers
Matrox Monarch LCS has been tested for use with the following Web browsers:
- Microsoft Internet Explorer
- Apple Safari
Other browsers may work but have not been fully validated through internal testing.

Note If you experience display issues in the Command Center when using Monarch LCS with Internet Explorer (11 or higher), disable Compatibility View and set the Document mode to Edge:
8 From Internet Explorer, go to Tools > Compatibility View Settings, clear Display intranet sites in Compatibility View, and then click Close.
9 Press F12 to open the developer tools interface, select Edge (default) from the document mode drop-down menu, and then press F12 to close the tools.
The Command Center should now display properly.
Streaming
Monarch LCS provides streaming settings for using RTSP and RTMP streaming protocols for use on media servers, video players and Content Delivery Networks (CDNs).
Recording
Monarch LCS provides settings for recording your input source for video on demand (VOD), high-quality editing, and archiving/previewing purposes.
About this guide
This guide provides you with information about connecting and using your Matrox Monarch LCS device.
Style conventions
The following style conventions are used in this guide:
- The names of files, folders, and documents appear in italics. For example:
- The data is stored in the Sample.mov file.
- The file is located in the Clips folder.
- Please refer to your Matrox Monarch LCS Release Notes.
- Menus and commands that you need to choose are displayed in the form Menu > Command. For example, File > Save means click File in the menu bar, and then click Save in the menu that appears.
Your notes
2
Matrox Monarch LCS Hardware and Connections
This chapter describes the Matrox Monarch LCS connections (video/audio, LAN, and recording), buttons, status LEDs, and shows how to power and reset Monarch LCS.
Matrox Monarch LCS hardware
This section explains the Matrox Monarch LCS hardware components. For hardware technical specifications, see Appendix D, “Matrox Monarch LCS Specifications.”
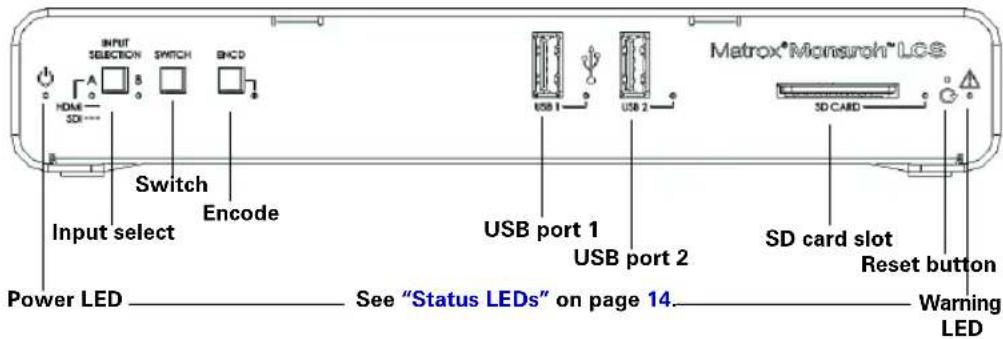
Input select button
With the Input select button, you can select from either an HDMI or SDI input source, and an LED illuminates indicating which source is in use. You can also select the input source in the Command Center.

ImportantWhile streaming or recording, any attempt to switch between inputs by pressing the Input select button will not have any effect, whether or not the front panel buttons have been disabled. This is the case only for the Input select button; however, clicking the Lock button in the Command Center disables all three buttons.
Encode button (ENCD)
The ENCD button functionality depends on the encoding mode you have selected for each channel in the Command Center. Press the ENCD button to start streaming or recording your selected input source(s) to the media or location specified in the Command Center.
Pressing the ENCD button starts the streaming or recording. When streaming or recording, the ENCD LED flashes. Press the ENCD button again to stop streaming/recording.
You can also use the control buttons in the Command Center to control the Monarch LCS device.

Note The ENCD button activates when you release the button. If you want to start/stop streaming and/or recording on both channels at the same time, press and hold the ENCD button. You can also start/stop both channels at once in the Command Center (see “Using the Command Center side menu” on page 24).
ENCD button use differs depending on whether you are recording, or the stream mode you selected in the Command Center:
- RTSP mode If Monarch LCS is set to stream in RTSP mode, the channel's LED will be on (solid). The unit delivers stream data once the ENCD button is pressed, and then the ENCD LED flashes, but the data will only start to stream when a client connects to Monarch LCS using the RTSP streaming protocol. Pressing the ENCD button enables a connection to the Monarch device, and pressing it again will sever the connection and the LED will return to the solid lit state.
- RTMP mode If Monarch LCS is set to stream in RTMP mode, press the ENCD button to begin streaming your input source to the stream destination specified in the stream settings.
- Record mode If the Monarch LCS is set to record, press the ENCD button to begin recording your input source(s) to either an SD card, a USB device, or a network folder, as specified in the record settings.
For information on specifying your settings, see “Encoder tab” on page 40.
USB ports 1 and 2
Use the USB ports to connect a USB 2.0 or 3.0 media device for recording the source connected to one of the Monarch LCS inputs. To select USB port 1 or 2 as the recording destination, see “Encoder tab” on page 40.
Please note the following about using USB devices:
- Monarch LCS writes to all USB devices (including USB 3.0 devices) at USB 2.0 speeds.
- The performance of USB keys or “thumb drives” varies. Many of these devices are optimized for “read” operations, while the Monarch LCS requires sustained “write” capabilities. For best results, especially at higher recording data rates, powered USB drives are recommended. In some cases, SD cards may be more suitable when small portable media is required.
- Monarch LCS supports USB devices with FAT32 or NTFS file systems. Media may need to be reformatted if not recognized by the Monarch.
- USB devices with password protection are not supported.
- It may take a few seconds for Monarch LCS to detect a newly connected USB device (verified on the Status page—see “Status page” on page 26).
- For USB 3.0 hard drives without a dedicated power supply, Monarch LCS may not be able to sufficiently power more than one USB 3.0 drive at a time.
- When a recording is stopped, it may take a few moments for Monarch LCS to finalize the file, during which the USB LED continues to flash. To avoid corrupted video files, do not remove the USB device when its LED is flashing.
- Connecting a USB device to USB port 2 and then performing a device reboot allows you to save the Monarch's current IP address and status as a text file (see “Device reboot” on page 12).
- Connecting a USB device to USB port 2 and then performing a factory reset allows you to load pre-configured Monarch settings.
SD card
Use the SD card slot for recording the source connected to one of the Monarch LCS inputs to an SD card. Monarch LCS supports SD and SDHC cards with FAT32 or NTFS file systems. To ensure that your SD card is fast enough to record at higher bit rates, we recommend using an SD card with a Class 10 speed rating. To select the SD card slot as the recording destination, see “Encoder tab” on page 40.
Remarks
- It may take a few seconds for Monarch LCS to detect a newly inserted SD card.
- When a recording is stopped, the SD card LED continues to flash while the Monarch LCS finalizes the file. It is recommended to not remove the SD card when its LED is flashing.
- SD cards with password protection are not supported.
LAN
The LAN port is an auto-sensing 10/100/1000 Base-T Ethernet port used to connect Monarch LCS to an Ethernet network via a standard RJ-45 Ethernet
cable. For information on how to connect to a network, see Chapter 3, “Network Connection and Setup.
RS-232
The RS-232 port is currently for internal use only.
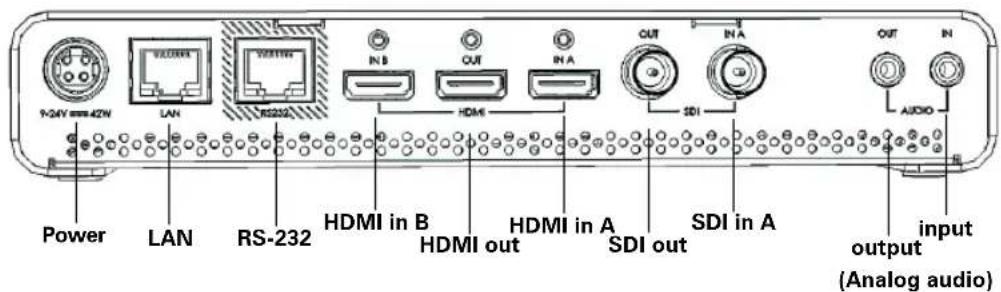
Video/audio inputs and outputs
Matrox Monarch LCS supports both SD (SDI only) and HD video signals, and auto-detects input source information; however, it does not support upscaling the input source for streaming or recording.

Note If you apply the channel settings before the input is connected, and the actual input resolution or frame rate is smaller than the resolution or frame rate you specified in the channel settings, the Monarch will stream/record at the input resolution/frame rate since upscaling is not supported. However, the Status page will display the previously selected encoding resolution/frame rate, and not the actual input resolution/frame rate.
HDMI out
Provides a preview of the selected SDI or HDMI input. For audio, you have the following options:
- Use the first pair of embedded HDMI audio channels.
- Use the first pair of embedded SDI audio channels.
- Use the analog pair.
For more information, see “Configuring video and audio settings” on page 29.
To display your input source, your monitor must support the input resolution. If your monitor does not, an error message will appear. For supported resolutions, see “HDMI in A and B and “SDI in.

N o t e While SD resolutions are not supported at the HDMI output, if the SDI input is SD, the HDMI output will display a “windowboxed” version of the picture in HD.
HDMI in A and B
Provides an input for HD HDMI video (YUV or RGB) from a digital HDMI device for streaming and recording. For information on supported HDMI input formats, see “Supported input formats” on page 2.

ImportantPlease note following:
- Before starting a session, it is recommended to unplug an input cable connected to an unused input. An invalid signal can affect production (the session).
- When using HDMI video, it is recommended to first use HDMI Input A.
Monarch LCS supports the first two channels of uncompressed embedded audio from the HDMI input source for streaming and recording. HDCP and SD sources are not supported on this input. You can monitor the HDMI input source by connecting an HDMI monitor to Monarch LCS' HDMI output. To select whether to stream and record the first two audio channels present in the HDMI input or the audio connected to the Monarch LCS analog audio input, see “Configuring video and audio settings” on page 29.
SDI out
Provides a preview of the selected SDI or HDMI input. For audio, you have the following options:
- Use the first pair of embedded HDMI audio channels.
- Use the 16 SDI audio channels.
- Use the analog pair.

Note For more information, see “Configuring video and audio settings” on page 29.
To monitor your input source, the SDI monitor must support the video input format.
SDI in
Provides an input for SDI video (YUV only) from an SDI device for streaming and recording. For information on supported SDI input formats, see “Supported input formats” on page 2.
Monarch LCS supports the first two channels of uncompressed embedded audio from the SDI input source for streaming and recording. You can monitor the SDI input source by connecting an SDI monitor to Monarch LCS' SDI output. To select whether to stream and record the first two audio channels present in the SDI input or the audio connected to the Monarch LCS analog audio input, see "Configuring video and audio settings" on page 29.
AUX
The AUX connector is currently for internal use only.
Analog audio output
Provides an unbalanced stereo analog audio output for monitoring the audio selected as the audio input source.

Note There may be a slight offset between the HDMI, SDI and analog outputs. Offsets can vary based on the source and operating mode.
Analog audio input
Allows you to input an unbalanced stereo analog audio source for streaming and recording. To select whether to stream and record the first two audio channels present in the selected video input or the audio connected to the Monarch LCS analog audio input, see “Configuring video and audio settings” on page 29.
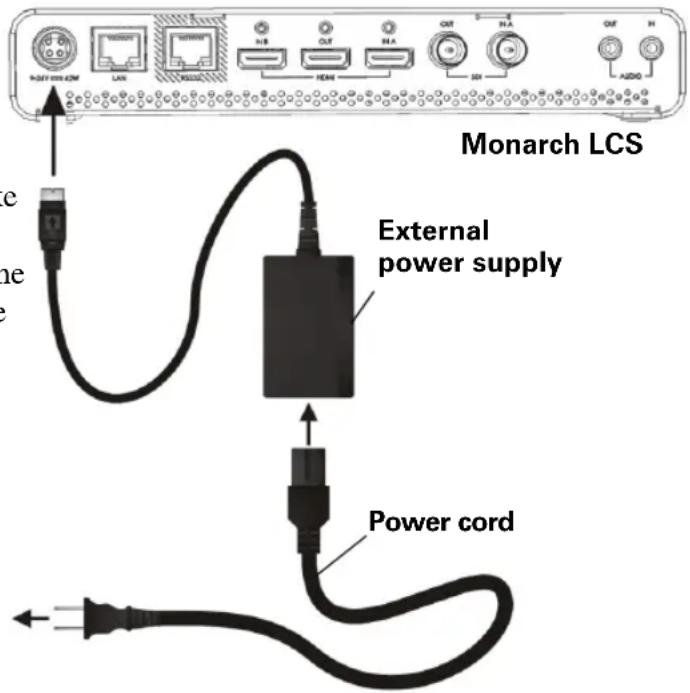
Powering Monarch LCS
Power the Monarch LCS device using an AC outlet via the external power supply and a power cord. When power is supplied to Monarch LCS, the Power ( ) LED goes on, and the device begins a power-up sequence during which various LEDs will flash on and off. The Warning LED ( ) will begin to flash early during the boot up sequence, and once it stops flashing, the Monarch LCS is ready for use.

Note The Warning LED (⚠️) may remain on if there is an error condition (see “Status page” on page 26 for more information).
To power off Monarch LCS, disconnect Monarch LCS from the power source. For power specifications, see Appendix D, “Matrox Monarch LCS Specifications”.

N o t e When the device is powered off, all current settings are maintained and any logged errors are cleared (see “Monarch LCS errors” on page 27).

CautionWhen disconnecting the power supply from Monarch LCS, make sure that you slide back the casing on the connector to release the locking mechanism.
Matrox Monarch LCS hardware
Using the Reset button
You can use the Monarch's Reset button to reboot the device (quick button press), or reset the device to factory defaults (long press of at least five seconds).
In addition to the typical reasons for rebooting the Monarch (fixing errors or other issues), a reboot (see “Device reboot” on page 12) also saves the Monarch’s IP address and status (see “Status page” on page 26) to a connected USB device (USB port 2) as a text file. This is a convenient way to find the Monarch’s IP address.
A reset allows you to switch to a Static IP (see “Switch to Static IP mode” on page 13), or load pre-configured Monarch settings from a configuration file on a USB device connected to USB port 2(see “Automatic Configuration” on page 48).
Remarks
- The Reset button is recessed in order to prevent unintended activation. Use a straightened paper clip, or similar device, to press the Reset button.
- A power cycle of the Monarch LCS performs a simple reboot, not a reset to factory defaults.
- When using the Reset button, any saved profiles for streaming and recording are maintained, and all logged errors are cleared (see “Monarch LCS errors” on page 27).
- Holding the Reset button pressed for more than five seconds will reset the device to factory defaults.
Device reboot
When performing a device reboot, all current settings are maintained, including the IP mode (DHCP or Static) that was set prior to the reboot.

Note To reboot the device and switch to Static IP mode, see “Switch to Static IP mode” on page 13”.
If you have a USB device connected to USB port 2 on the Monarch device, the Monarch's current IP address and status is saved to the USB device as a text file. This is a convenient way to find the Monarch's IP address.
To reboot the Monarch, do one of the following:
- Using a paper clip, press the recessed pinhole Reset button on the front of the device.
- Open the Matrox Monarch LCS Utils application, select the Monarch LCS device you wish to reboot, and then click Reboot Selected.
During a standard boot up sequence, various LEDs will flash on and off. The Warning ( )LED will begin to flash early during the boot up sequence, and once it stops flashing, the Monarch LCS is ready for use.
Switch to Static IP mode
You can switch your Monarch LCS device to Static IP mode by pressing the ENCD button while the Encoder LED flashes during the power-up sequence.
1 Press the Reset button on the device to initiate a device reboot. During the power-up sequence (see “Powering Monarch LCS” on page 11), the Encoder LED flashes for three seconds.
2 Press the ENCD button on the device while the Encoder LED is flashing. This sets the device to Static IP mode and the Static IP address to its default address (169.254.1.11).
The device is ready when the Warning ( LED stops flashing; however, the Warning LED ( may remain on if there is an error condition (see “Status page” on page 26 for more information).
Reset to factory defaults
When resetting Monarch LCS using this method, all Monarch LCS settings reset to factory defaults, the device password resets to admin, and the device powers up in DHCP IP mode for connecting to a network with a DHCP server, such as a router. To switch the device to Static IP mode after performing a factory reset, see “Switch to Static IP mode” on page 13.
You can also use a factory reset to load pre-configured Monarch LCS settings from a configuration file. For more information, see “Automatic Configuration” on page 48).
To reset Monarch LCS to factory defaults, press and hold the Reset button on the device for at least five seconds. The device begins a power-up sequence during which various LEDs will flash on and off. The Warning ( )LED will begin to flash early during the boot up sequence, and once it stops flashing, the Monarch LCS is ready for use.
The Warning LED (⚠️) may remain on if there is an error condition (see “Status page” on page 26 for more information.
Status LEDs
This section explains the Monarch LCS status LEDs.
 | ||
| Green Device is powered. | ||
| Yellow | Indicates that an error has occurred. This includes streaming, recording, fan or temperature-related errors, and/or a physical disconnection of the network cable. The LED turns off when the error is cleared in the Command Center (e.g. streaming error) and when the error has been resolved (e.g. temperature-related error). For information on how to view and clear errors, see “Monarch LCS errors” on page 27. | |
| INPUT SELECT | Green (2) | Two LEDs, indicating which input is in use (A or B): ON (solid) when HDMI is the selected input, and flashes when SDI is the selected input. |
| ENCD | OFF The | processes are idle. |
| Blue (solid) | The system is ready to record or stream. | |
| Blue (flash) | The LED switches from solid to flashing blue when you start a process, and will revert to solid blue when you stop it, regardless of the mode. | |
| Red (solid) | Indicates that both processes have failed. | |
| Red (flash) | Indicates that one of the two processes has stopped while the other is still running. | |
| USB ports1/2 and SD CARD | OFF Indicates that the port/slot is not selected. | |
| Red (solid) | Indicates that the port/slot has been selected for recording. | |
| Red (flash) | Monarch LCS is currently writing to the media device (USB device or SD card). Do not remove the media device when its LED is flashing—doing so may result in corrupted video files. | |
Chapter 2, Matrox Monarch LCS Hardware and Connections
Chapter 2, Matrox Monarch LCS Hardware and Connections
3
Network Connection and Setup
This chapter explains how to connect Monarch LCS to a network, and how to obtain the Monarch LCS IP address to access the Monarch LCS Command Center. It also explains how to update the Monarch LCS firmware.
Introduction
The network connection and setup instructions depend on whether you'll be connecting Monarch LCS on a network with a DHCP server, such as through a router, or a network without a DHCP server.
If connecting to a network with a DHCP server, Monarch LCS must be set to DHCP IP mode. If your network does not have a DHCP server, Monarch LCS must be set to Static IP mode. By default, Monarch LCS is set to DHCP IP mode. Once connected to a network, the stream and record settings are specified using the Monarch LCS Command Center.
To access the Command Center, enter the Monarch's IP address into your web browser and press ENTER, or use the Monarch LCS Utils or LCS Radar applications. On a DHCP-enabled network, the DHCP server assigns the IP address to the Monarch, so you must use the Monarch LCS Utils or LCS Radar applications to find the IP address. When connecting to a network without a DHCP server, you must assign a static IP address to Monarch. A default IP address is provided when in Static IP mode.
Monarch LCS Utils application
The Monarch LCS Utils application is available for both Mac OS and Windows systems, and you can use it to do the following:
- Identify Monarch devices on a network and list their IP addresses.
- Open the Monarch LCS web based UI (Command Center) by double-clicking an identified device on the displayed list.
- Update Monarch LCS firmware (see “Updating the Monarch LCS firmware” on page 20).
- Reboot Monarch devices (see "Device reboot" on page 12).
- Download the Monarch SSL security certificate (see “Installing the Monarch SSL certificate” on page 21).

Important It is not recommended to simultaneously update the same Monarch device using more than one instance of the Monarch LCS Utils. Do not sever the network connection during the update process.
Monarch LCS Radar application
Available for Windows systems only, Monarch LCS Radar is a server-based web application that you can use to monitor and control all the Monarch LCS devices on a network. You can monitor your Monarchs and perform functions such as rebooting or updating devices.
Download Monarch LCS Radar and its accompanying documentation here.
Chapter 3, Network Connection and Setup
Network connection and IP address
This section explains how to connect Monarch LCS to a network with or without a DHCP server, and describes how to acquire the Monarch LCS IP address.

Note If you switch the network connection while Monarch LCS is powered and the switch results in Monarch LCS getting a new network IP address, you must power cycle the device to apply the new IP address. To power cycle the device, use the Reset button on the Monarch LCS device (see “Using the Reset button” on page 12).
Finding the Monarch LCS current IP address
You must know your Monarch device's IP address to access the Command Center. There are three ways to find the Monarch LCS current IP address:
- You can see it displayed on an HDMI monitor at device boot up.
- You can have it automatically saved to a connected USB device when rebooting the Monarch LCS.
- Use the Monarch LCS Utils or LCS Radar applications to view all connected Monarch LCSs and their IP addresses.
Displaying the IP address on an HDMI monitor
The Monarch LCS IP address is displayed on a connected HDMI monitor at device boot up:
1 Connect the Monarch LCS to an HDMI monitor.
2 Power up the Monarch LCS.
When the Monarch LCS boots up, the IP address appears on the screen for approximately 30 seconds before being replaced by the signal from the HDMI output selection.
Saving the IP address and status to USB
You can save a file containing the Monarch LCS IP address and current status to a USB device, making this information easily accessible (see “Status page” on page 26).
1 Insert a formatted USB device into the USB port 2 (see “USB ports 1 and 2” on page 7).
2 Reboot your Monarch LCS. It is complete once the Warning ( ) AED stops flashing (see "Device reboot" on page 12).
The Monarch LCS IP address and status information are now saved to a text file on the USB device.
This file can be helpful if you do not have an HDMI monitor (see “Finding the Monarch LCS current IP address” on page 17), or if you need to share status information for your unit.
Finding the IP address with Monarch LCS Utils or LCS Radar
The Monarch LCS Utils and LCS Radar applications will indicate the IP addresses of the Monarch devices in your network. See “Connecting to a network with a DHCP server (DHCP IP mode) for details.
Connecting to a network with a DHCP server (DHCP IP mode)
When connecting to a network with a DHCP server, such as through a router, the Monarch LCS IP address is assigned by the DHCP server. Although other methods exist for obtaining the IP address of a device on a DHCP server, such as from a DHCP-server client list, these instructions detail how to use the Matrox Monarch LCS Utils to find the IP address of your Monarch LCS device.
1 Connect an Ethernet cable between Monarch LCS LAN port and a network port.
2 Make sure that power is supplied to Monarch LCS (see “Powering Monarch LCS” on page 11).
3 Monarch LCS must be set to DHCP IP mode (default). If you need to switch the device from Static IP mode to DHCP IP mode, you can either reset the device to factory defaults (see “Reset to factory defaults” on page 13), or set it to DHCP using the Command Center (see “IP Setup tab” on page 58).
4 From a computer that is on the same network subnet as your Monarch LCS device, download the Matrox Monarch LCS Utils or LCS Radar applications at www.matrox.com/video/support/.
Matrox Monarch LCS Utils is available for both Mac OS and Windows systems (see “Monarch LCS Utils application” on page 16).
The Matrox Monarch LCS Radar application is available for Windows systems only (see “Monarch LCS Radar application” on page 16). Details on how to use LCS Radar is covered in its accompanying documentation.
5 Double-click the downloaded file to open the Monarch LCS Utils. If Universal Plug and Play (UPnP) is enabled on your network, the utility will automatically scan for Monarch devices. To scan manually, click the Find All button.
All the Monarchs on the same network subnet as your computer will be displayed, along with their IP addresses and other information.
6 Open the Command Center (see “Accessing the Command Center” on page 20).

Tip If you have multiple Monarch LCS devices, you may want to change the name of each device for easier identification (see “Account tab” on page 55).
Connecting to a network without a DHCP server (Static IP mode)
When connecting to a network without a DHCP server, the network does not assign an IP address to your Monarch LCS device. In this case, you must assign a static IP address to Monarch LCS and you may be required to change your computer's network configuration to establish a connection between your computer and Monarch LCS.
1 Power Monarch LCS (see "Powering Monarch LCS" on page 11).
2 Monarch LCS must be set to Static IP mode. By default, Monarch LCS is set to DHCP IP mode. You can switch Monarch LCS to Static IP mode using the Reset button (see “Switch to Static IP mode” on page 13).
3 Establish a connection between Monarch LCS and your computer using one of the following methods:
- Connect an Ethernet cable from Monarch LCS LAN port directly to your computer's Ethernet port.
- Connect an Ethernet cable from Monarch LCS LAN port to the same network switch as your computer.
4 In order for your computer to communicate with Monarch LCS, your computer's IP address must be in the same network range as your Monarch LCS IP address. If it isn't, then you must change your computer's IP address accordingly. By default, the Monarch LCS static IP address is set to 169.254.1.11. If you're using the default static IP address, you must change your computer's IP address and subnet mask to the following:
-IP address 169.254.1.10
-Subnet mask 255.255.0.0

Note The default static IP address is designed primarily for the initial setup of Monarch LCS using a point-to-point connection (direct connection between your computer and Monarch LCS). The default IP address is not recommended for a traditional network setting. If you wish to use Monarch LCS in Static IP mode over a network, after the initial setup we recommend that you change the static IP address of the Monarch LCS device to an address that is more suitable to your network. You can change the static IP address in the Command Center as specified in “IP Setup tab” on page 58.
5 Open the Command Center (see “Accessing the Command Center” on page 20).

Note For more details on Monarch LCS IP modes, see “IP Setup tab” on page 58.
Accessing the Command Center
The Monarch LCS Command Center is where you specify the Monarch settings and control the streaming and recording for a Monarch device. The Command Center is accessible via Monarch LCS Utils (see “Monarch LCS Utils application” on page 16) and LCS Radar, or by typing your Monarch LCS network IP address in the address field of your web browser (see “Network connection and IP address” on page 17).
To access the Command Center, power the Monarch LCS and connect it to an Ethernet network, and then do one of the following:
- From your web browser, type the Monarch LCS IP address in the address field, and then press ENTER.
- With Matrox Monarch LCS Utils or LCS Radar open, double-click any of the listed devices to open the Command Center.
The Command Center opens to configure your Monarch LCS settings and control streaming and recording (see Chapter 4, “Using the Command Center).
The Command Center opens on the Status page, which you can access without logging in (see “Status page” on page 26). To access other pages, click the menu item for the page that you want, and then enter your username and password. By default, the username and password are set to admin. You cannot change the username but you can change the password (see “Device name and password” on page 55).
Updating the Monarch LCS firmware
The firmware on your Monarch LCS device is updated using the Matrox Monarch LCS Utils or LCS Radar applications. To view the current firmware version of your Monarch LCS, see “File Management tab” on page 63. The Matrox Monarch LCS Utils is available for both Mac OS and Windows systems, and LCS Radar is available for Windows only. For more information on the Utils application, see “Monarch LCS Utils application” on page 16. For more information on the LCS Radar application, see “Monarch LCS Radar application” on page 16.
A Monarch LCS device's network IP address is required to update its firmware (see “Network connection and IP address” on page 17).
1 Power Monarch LCS and connect it to an Ethernet network.
2 On a computer that is on the same network subnet as the Monarch LCS that you want to update, download the latest version of Matrox Monarch LCS Utils or LCS Radar at www.matrox.com/video/support/.

N o t e It is not recommended to update the Monarch LCS firmware over a wireless network. Matrox Monarch LCS Utils and LCS Radar should be on a
computer that is connected to the network/router using a wired Ethernet connection.
3 Double-click the MatroxMonarchLCSUtils.exe (Windows) or MatroxMonarchLCSUtils.app (Mac OS) file to open the Monarch LCS Utils.

N o t e For more information on using Monarch LCS Radar to update the firmware, see the Matrox Monarch LCS Radar Installation and User Guide available on the support page www.matrox.com/video/support/.
4 Open the Matrox Monarch LCS Utils, select the network IP Address of the Monarch LCS device that you want to update, and then click Update Selected. If you have multiple Monarch LCS devices on the network, select the IP address for every device in the Matrox Monarch LCS Utils by clicking Select All, and then all Monarch LCS devices will update in series.

ImportantDo not disconnect the Monarch from the network or power source during the firmware update.
During a firmware update, the USB 1, USB 2 and SD card LEDs will cycle on and off. Once complete, the device will automatically reboot, and the Warning (LED) will begin to flash. Once it stops flashing, the device is ready to use.

Note The Warning LED (⚠️) may remain on if there is an error condition (see “Status page” on page 26 for more information).
Installing the Monarch SSL certificate
You can connect to the Monarch Command Center using HTTPS encryption to prevent your username and password from being visible to someone on the network. To connect using the HTTPS protocol, you must first install the Monarch SSL certificate to authenticate the Command Center webpage.

Note Before you get the SSL certificate, make sure that your Monarch device is set to the correct time zone for its location, otherwise the certificate will not be valid. For more information, see “Date and Time tab” on page 61.
1 Run the Monarch LCS Utils application.
2 Click Get SSL certificate and download the certificate to your computer.
3 If you are using Mac OS, do the following (for Windows go to step 4):
a Open the certificate file MonarchSSLCertificate.crt.
The Keychain Access window opens.
b Click Always trust, enter your Mac OS password, then click Update Settings.
The Monarch certificate now appears in the Certificates list.
c Right-click the Monarch certificate and select Get Info.
d Click the Trust menu triangle to expand the menu.
e From the When using this certificate field, select Always Trust, enter your Mac OS password, then click Update Settings.
4 If you are using Windows, do the following:
a Double-click the certificate file MonarchSSLCertificate.crt.
The Certificate window opens.
b Click Install Certificate...
c In the Certificate Import Wizard, click Next.
d Select Place all certificates in the following store, then click Browse.
e From the list displayed, select Trusted Root Certification Authorities, then click OK.
f Click Next, then click Finish.
You will be asked to confirm the installation.
g Click Yes.
The Monarch certificate is authenticated, and HTTPS encryption is now available when connecting to the Monarch Command Center.
4
Using the Command Center
This chapter describes how to specify settings in the Monarch LCS Command Center, and view Monarch LCS information.
Introduction
The Monarch LCS Command Center is a web-based application that allows you to configure Monarch LCS settings, and control streaming and recording sessions. This chapter is an overview of the features and sections of the Command Center interface.
The Monarch LCS can be configured to capture and deliver content, such as presentations and seminars, in a variety of layouts and formats. Monarch LCS features one-click operation to start/stop streaming, recording, or both simultaneously, from anywhere within the Command Center. There are different operating modes to choose from, that allow you to deliver sources independently or as a composited image.

Note You can enter the network IP address of your Monarch LCS device in your browser, or use the Monarch LCS Utils to access the Command Center (see “Accessing the Command Center” on page 20).
Using the Command Center side menu
With the Monarch LCS, both channels are started or stopped at the same time. The appearance of the channel indicators change based on the selections you make in the settings.
You can also control the Monarch LCS by using the buttons on the Monarch LCS device. For more information, see Chapter 2, “Matrox Monarch LCS Hardware and Connections.
The following table details the different states of the control buttons/indicators.
| Indicator only or Indicator/Button | Function | |
| Operating mode | 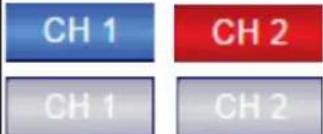 | The channel indicators are marked as CH1 and CH2. They work as follows:Solid red: Ready to record.Solid blue: Ready to stream.Pulsing red or blue: Channel is currently recording or streaming.Grey: Channel is set to “none” in the settings.The Start and Stop buttons start or stop one or both channels depending on how the Monarch is configured in the settings. |
 | ||
| Operating mode |  | The operating mode area is a visual representation of the operating mode the Monarch LCS is currently in. Depending on the operating mode, this area can be a static indicator only, or it can also be a button that performs certain actions:Single Isolated:Status indicator only.Dual Isolated:Status indicator only unless you select the option From Input A or B in the (HDMI Output) settings, in which case this also becomes a button that toggles between displaying Input A or B on the HDMI output.Switcher:Status indicator and button that you use to toggle between inputs.Picture-in-Picture:Status indicator and button that you use to display or remove the PiP window.Side-by-Side:Status indicator only. |
| Indicators |  | Indicates that the Monarch LCS is in Scheduler mode. |
 | This indicator appears when the Monarch LCS is transferring files. | |
| Warning |  | Indicates that an error has occurred. This includes streaming, recording, fan or temperature-related errors, and/or a physical disconnection of the network cable. Also, the Warning LED on the device's front panel illuminates when an error occurs. For more information, see “Monarch LCS errors” on page 27. |
| Muting |  | The Mute button lets you mute the audio at any time while streaming or recording, without interrupting your session. Clicking the Mute button disables all audio.You can also choose to not include the audio when streaming or recording from within the channel settings, before your session begins (see “Include audio” on page 46). |
| Lock/unlock |  | Click the Lock button in the Command Center to lock the Input Select, Switch and ENCD (encode) buttons on the Monarch LCS device. This can prevent someone from inadvertently switching inputs or stopping a streaming or recording session.By default, the front panel buttons are enabled (unlocked). When required, this button-disabling feature must be performed after a factory reset. |
Status page
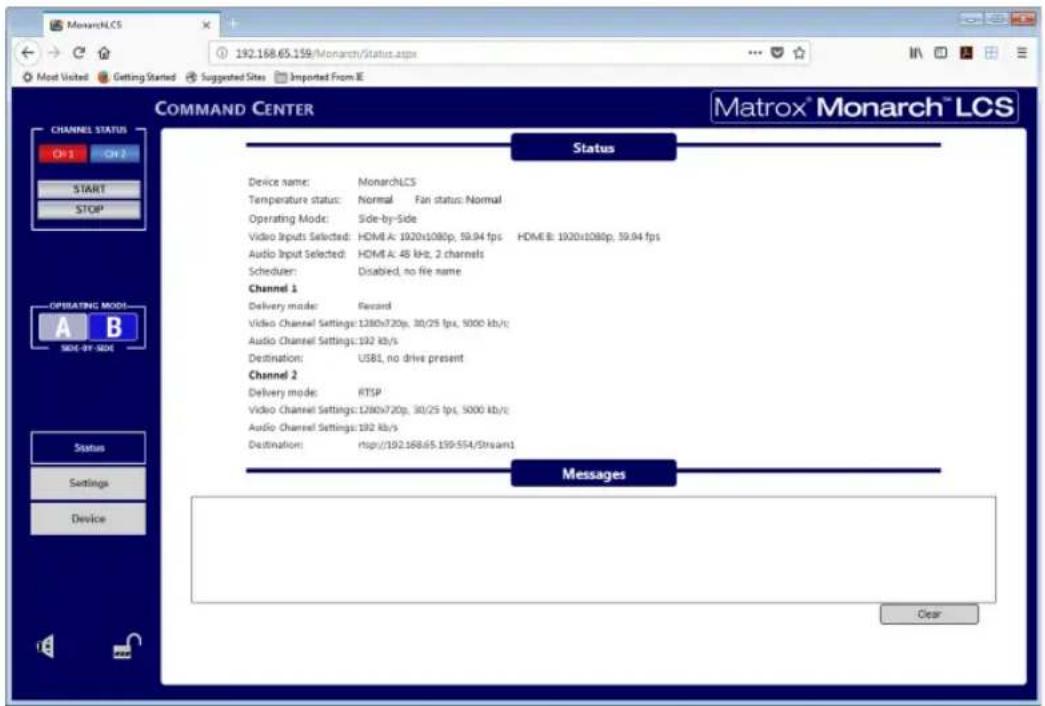
The Status page in the Command Center provides a summary of the Monarch LCS status and settings, as well as any logged errors. You can view this page without logging in; however, encoder information will display only when you have logged in.
To access the Status page, open the Monarch LCS Command Center (see "Accessing the Command Center" on page 20), and then click Status.
Monarch LCS errors
The Warning LED illuminates on the Monarch LCS device and the Warning icon ()appears in the Command Center when an error occurs.
Remarks
- The Status page displays the errors pertaining to that Monarch LCS device only.
- An error will not be reported if the audio connected to the Monarch analog audio input is lost or missing. If this occurs, the stream and/or recording continues, but will not contain audio.
- When you click the Clear messages button on the Status page, the logged errors are deleted from the list, the Warning LED will turn off, and the Warning icon will disappear if it is not a fan or temperature-related error (see “Fan and Temperature errors).
- If one of the channels unexpectedly fails and stops, for example, due to a full storage device, while the other channel is still running, you can restart the stopped channel from the Command Center once you have resolved the issue.

Important Do not use the ENCD button on the front panel to restart the process. Pressing the ENCD button while the other channel is running will stop it, requiring that you restart both channels.
Streaming and recording errors
Streaming and recording errors are instantly logged in the Messages section of the Status page. Clicking the Clear messages button on the Status page deletes the logged error from the list, the Warning LED turns off, and the Warning icon (⚠️) disappears (see “Status page” on page 26). The Warning LED will turn off, and the Warning icon (⚠️) disappear also if you successfully start a new stream and/or recording.

N o t e Powering off or resetting Monarch LCS will clear streaming and recording errors from the device.
Fan and Temperature errors
The fan is located under the device, and a constant readout of both the fan and the temperature statuses appear above the Messages section of the Status page. A fan or temperature error will be indicated in this area as well. No fan or temperature-related error message will be shown in the Messages section (see “Status page” on page 26).

Important This error won't stop the device; however, we recommend that you address the issue as soon as possible.
The display reads “Normal” for the fan and temperature when the fan is operating without a problem. If a fan and/or temperature error occurs, the status will change
to “Faulty” and/or “Critical”. The error status will remain as long as a problem is detected and has not been resolved. The Warning LED will turn off and the Warning icon ( ) will disappear when the condition is corrected, and the Status page will automatically update the fan/temperature status back to Normal.
The temperature may come down on its own over time, and so the Warning LED will turn off, the Warning icon disappear, and the fan and temperature statuses will return to Normal; however, the Warning LED will light up, the Warning icon reappear in the Command Center again and the error status will display (above the Messages section of the Status page) if/when the temperature rises once more.
The fan operates as an uptake under the device. For good fan operation, ensure that the device is not placed on top of paper, and that it is used in an area with adequate air circulation. If a fan or temperature error occurs:
- Check that the fan is spinning and is unobstructed.
- Verify that the area has suitable sufficient ventilation and that the ambient temperature has not risen.
Settings page
The Settings page lets you configure the Monarch operating modes, video/audio settings, encoder settings, and profiles.

ImportantPlease note the following:
- If you leave the Settings page before clicking Apply, all changes will be lost.
- Do not connect or disconnect any cables to the Monarch LCS while settings are being applied.
Production tab
The Production tab in the Command Center lets you select the Monarch Operating Mode, and configure the related video and audio settings.
To access the Production tab, open the Monarch LCS Command Center (see “Accessing the Command Center” on page 20), click Settings, and then click Production.
About the Operating Modes
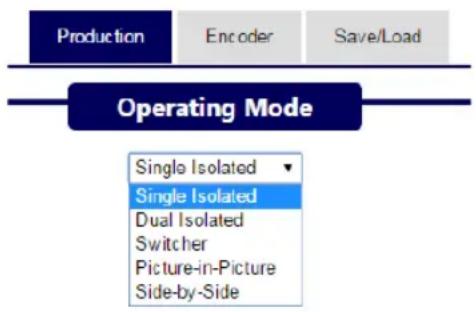
There are five different Monarch LCS operating modes: Single Isolated, Dual Isolated, Switcher, Picture-in-Picture, and Side-by-Side.
Depending on the Operating Mode you select, the settings under the Video and Audio sections will change, and certain modes (e.g. Picture-in-Picture) will add a Layout section.
The following are conditions where the final frame rate options are limited:
- In Dual Isolated mode, when your sources are at 50 or 60 fps, your (HDMI out) preview (of the sources) will display at 30 fps.
- In Dual Isolated, Switcher, Picture-in-Picture, and Side-by-Side operating modes, the encoding frame rate is dependent on the frame rate of the Input A source. For more information on frame rates, see “Frame rate” on page 44.
i ImportantPlease note the following:
- Before starting a session, it is recommended to unplug an input cable connected to an unused input. An invalid signal can affect production (the session).
- It is recommended that interlaced sources always be connected to Input A.
Configuring video and audio settings
The Video section includes the selectable video input and output settings. You can switch between inputs in the Command Center; however, only after a streaming or recording session has been stopped. If you attempt to switch the inputs while encoding, the stream/recording will have to be stopped, and the session will have to be restarted to encode from the new input.
The Audio section is where you set the source for your audio input (Analog or Digital), the sample rate, and the bit rate. Monarch LCS supports a stereo pair of audio for streaming and recording, and whether you are using an SDI or HDMI source, only the first two channels are selected by the device for encoding (see “Video/audio inputs and outputs” on page 9). However, all 16 audio channels from SDI sources are available when output through SDI out. Monarch LCS uses the AAC audio format for streaming and recording. To monitor the selected audio source, you can use any of the audio outputs (SDI, HDMI or analog).
Please note the following about the Audio settings:
- Sample Rate. You can select the desired sample rate for either your digital or analog audio input source.
-Both digital (HDMI or SDI) and analog audio can be sampled, or re-sampled at the embedded rates of 22.05, 24, 32, 44.1 and 48kHz .
- The analog audio is converted to the selected sample rate before encoding.
- Selecting the highest sample rate provides the best audio quality, but also increases the total bit rate required to maintain this quality for streaming and/or recording.
- Bit Rate. You can select the bit rate at which you want to stream or record the audio. Your bit rate selection can have an effect on the sample rate.
—The selectable audio bit rates are: 32, 96, 128, 192, and 256 kb/s.
Configuring Single Isolated mode
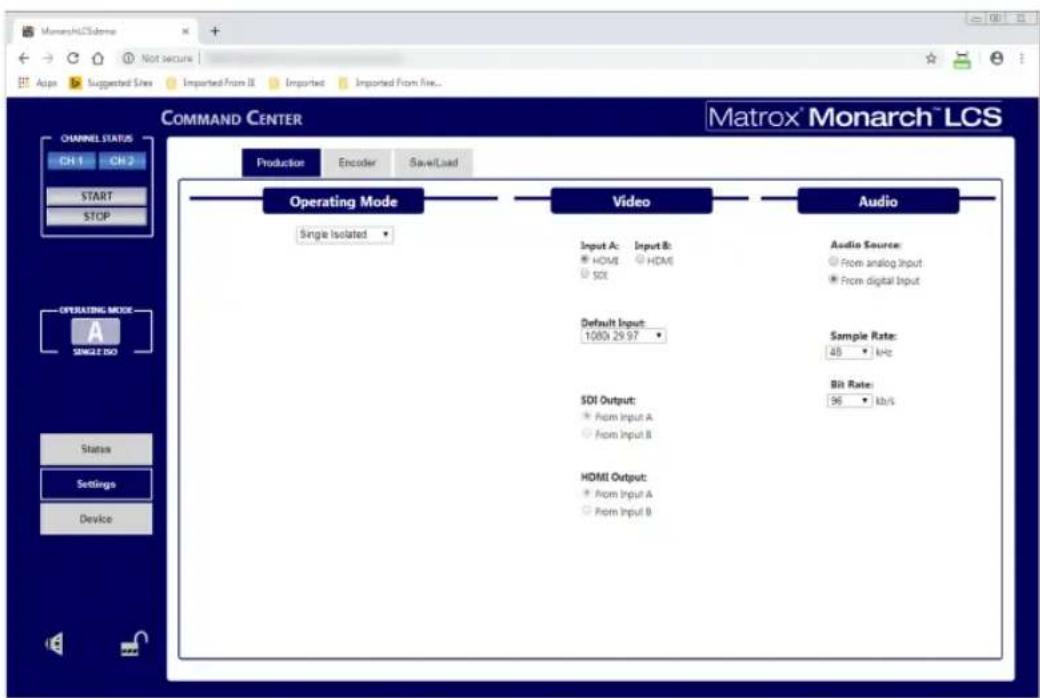
In Single Isolated mode, a single input source can be scaled and encoded by one or both encoders, before it is processed to one or two independent targets.
Although processed independently, two channels are always started and stopped synchronously. Your input selection cannot be changed while the unit is operating.
To configure Single Isolated mode:
1 Under Video, select either Input A (HDMI or SDI) or Input B.
2 Under Video, select the following:
- Your video input source. You can select either Input A (HDMI or SDI) or Input B.
- Your Default Input resolution. This is the resolution the Monarch will use if a scheduled stream/record session starts without a valid video input connected to the device.
For example, if you select 1080i 29.97 as your default, and a scheduled Monarch recording session begins without a laptop connected, the Monarch will start recording black video at 1080i @ 29.97 fps. When you then connect the laptop to the Monarch's input, two things can occur:
i If the laptop is at the same resolution as your selected default, the Monarch will continue streaming/recording the video without interruption.
ii If the laptop is at a different resolution than your selected default, the video will stop and then restart at the laptop's resolution. In this scenario, you may end up with split video files (if you are recording).
The SDI Output and HDMI Output settings are unavailable in this mode, but you will still see the settings change based your input source selection—all outputs (HDMI or SDI) display your incoming video signal.
3 Under Audio, select your audio input source (analog or digital) and configure the Sample Rate and Bit Rate.
4 Click Apply.
The Operating Mode is configured. In the Command Center's side menu, the Operating Mode indicator is static.
For more information, see the following sections:
- “Using the Command Center side menu” on page 24.
- “About the Operating Modes” on page 29.
- “Configuring video and audio settings” on page 29..
Configuring Dual Isolated mode
In Dual Isolated mode, two inputs can be scaled and encoded simultaneously. Although processed independently, the two processes are always started and stopped synchronously. The two processed inputs always include the HDMI B input and either the SDI A or HDMI A input.
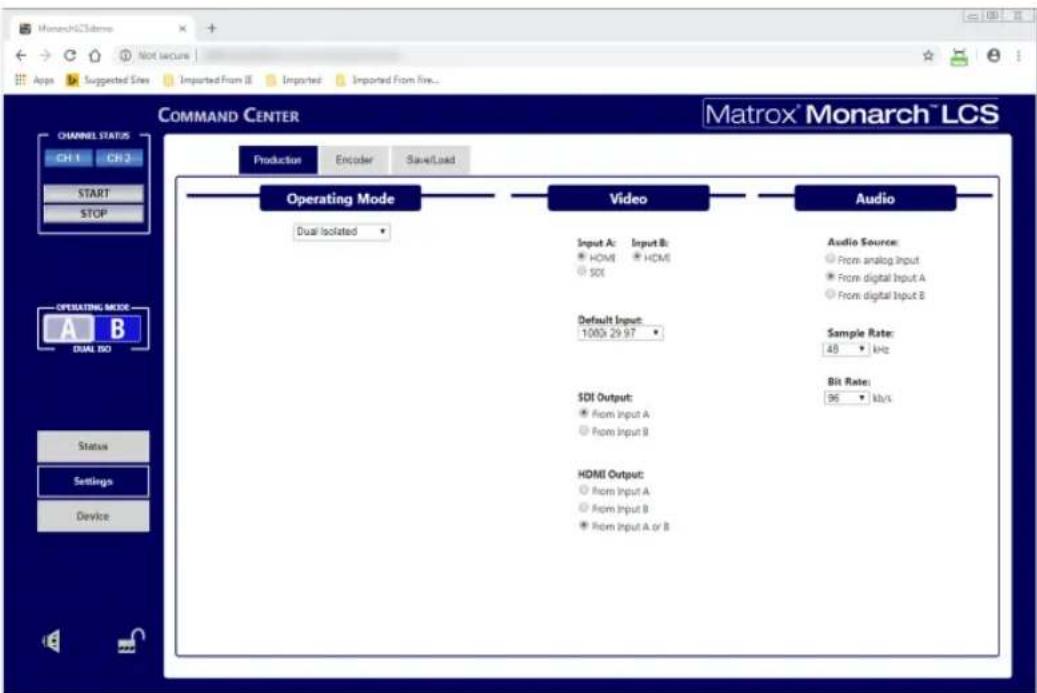

Note It is recommended to record to the same destination when recording in Dual Isolated mode.
To configure Dual Isolated mode:
1 Under Video, configure the following:
a Select your video input sources. For Input A you can select either HDMI or SDI.
b Your Default Input resolution. This is the resolution the Monarch will use if a scheduled stream/record session starts without a valid video input connected to the device.
For example, if you select 1080i 29.97 as your default, and a scheduled Monarch recording session begins without a laptop connected, the Monarch will start recording black video at 1080i @ 29.97 fps. When you then connect the laptop to the Monarch's input, two things can occur:
i If the laptop is at the same resolution as your selected default, the Monarch will continue streaming/recording the video without interruption.
Chapter 4, Using the Command Center
ii If the laptop is at a different resolution than your selected default, the video will stop and then restart at the laptop's resolution. In this scenario, you may end up with split video files (if you are recording).
c For SDI Output, specify whether your output is coming from Input A or Input B.
d For HDMI Output, specify whether your output is coming from Input A, Input B, or from both. If you select From input A or B, the Operating Mode indicator in the Command Center side menu becomes a button that can toggle between inputs dynamically.
2 Under Audio, select your audio input source (analog, digital input A or digital input B) and configure the Sample Rate and Bit Rate.
3 Click Apply.
The Operating Mode is configured. In the Command Center's side menu, the Operating Mode indicator shows the status, but can also be a button that affects the video output. The button can be used to preview either Input A or B.
For more information, see the following sections:
- “Using the Command Center side menu” on page 24.
- “About the Operating Modes” on page 29.
- “Configuring video and audio settings” on page 29.
- “Mode” on page 40.
Configuring Switcher mode
In Switcher mode, you can perform a full-frame dynamic switch from one video input to the other. Although processed independently, the two channels are always started and stopped synchronously.
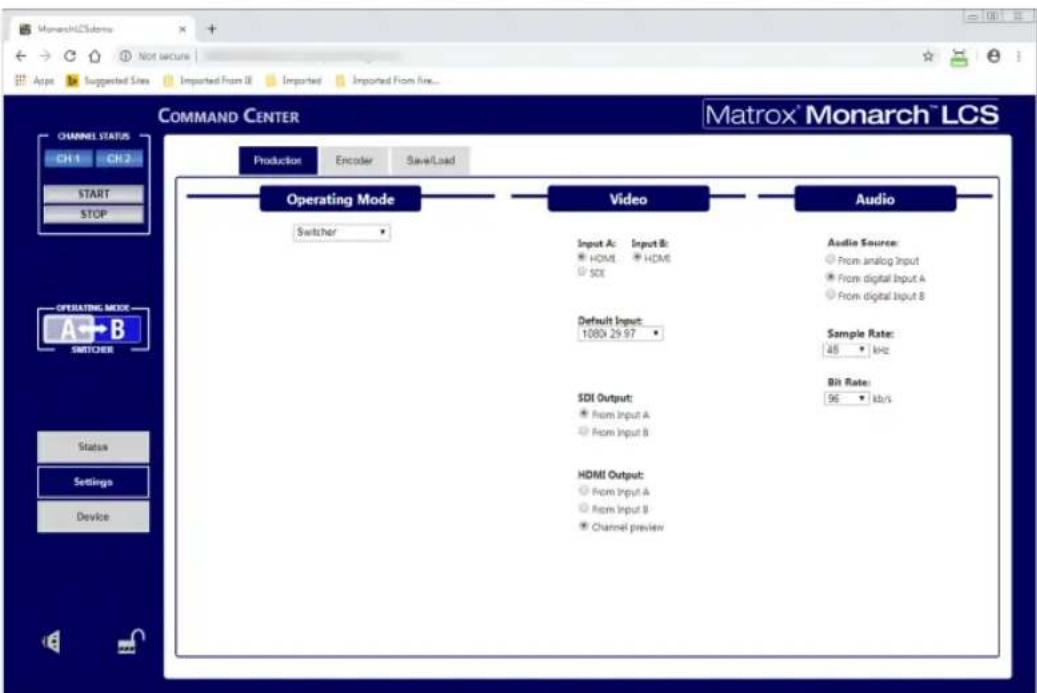
To configure Switcher mode:
1 Under Video, configure the following:
a Select your video input sources. For Input A you can select either HDMI or SDI.
b Your Default Input resolution. This is the resolution the Monarch will use if a scheduled stream/record session starts without a valid video input connected to the device.
For example, if you select 1080i 29.97 as your default, and a scheduled Monarch recording session begins without a laptop connected, the Monarch will start recording black video at 1080i @ 29.97 fps. When you then connect the laptop to the Monarch's input, two things can occur:
i If the laptop is at the same resolution as your selected default, the Monarch will continue streaming/recording the video without interruption.
ii If the laptop is at a different resolution than your selected default, the video will stop and then restart at the laptop's resolution. In this scenario, you may end up with split video files (if you are recording).
Chapter 4, Using the Command Center
c For SDI Output, specify whether your output is coming from Input A or Input B.
d For HDMI Output, specify whether your output is coming from Input A or Input B, or if you want a Channel preview. If you select Channel preview, the HDMI output will display the video at the resolution of the streaming/recording output, allowing you to view what the remote viewer will receive.
2 Under Audio, select your audio input source (analog, digital input A or digital input B) and configure the Sample Rate and Bit Rate.
3 Click Apply.
The Operating Mode is configured. In the Command Center's side menu, the Operating Mode indicator shows the status, but is also a button to dynamically switch between video inputs.
For more information, see the following sections:
- “Using the Command Center side menu” on page 24.
- “About the Operating Modes” on page 29.
- “Configuring video and audio settings” on page 29.
Configuring Picture-in-Picture mode
In Picture-in-Picture mode, Monarch LCS composites two video input sources, encodes them, and then streams/records them to one or two different destinations. Although processed independently, the two channels are always started and stopped synchronously. The two processed inputs always include the HDMI B input and either the SDI A or HDMI A input, where Input A is overlaid on top of Input B.
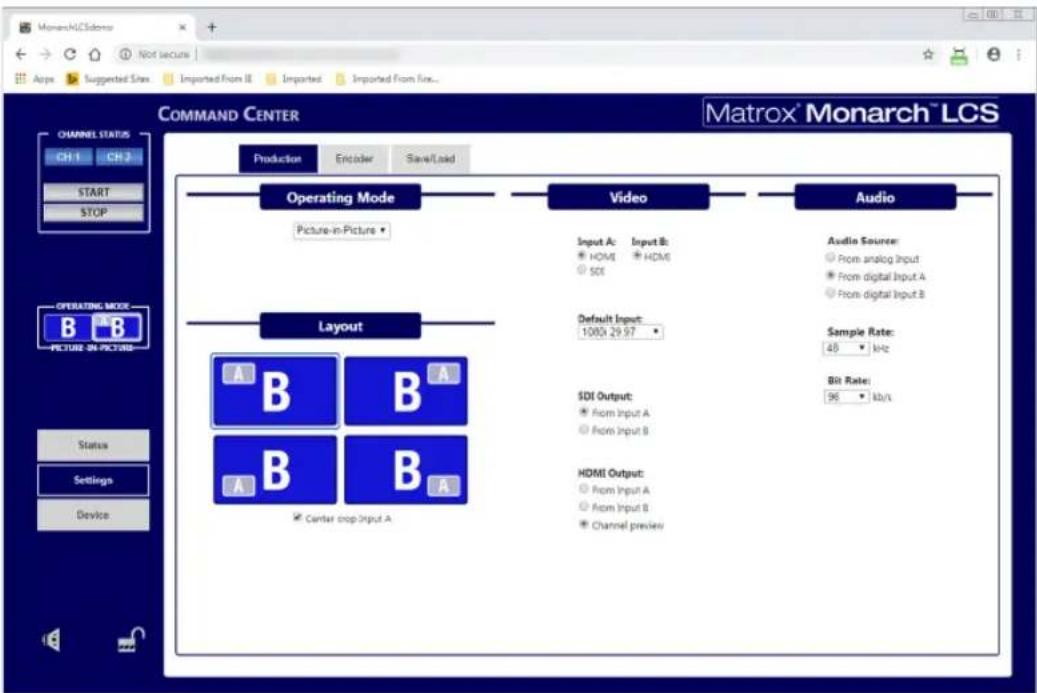
To configure Picture-in-Picture mode:
1 Under Layout, configure the following:
a Click on the type of picture-in-picture format you want to display.
b (Optional) Select Center crop Input A if you want to crop 25% of the left and right sides (giving you an 8:9 aspect ratio) of an HD Input A video signal.
2 Under Video, configure the following:
a Select your video input sources. For Input A you can select either HDMI or SDI.
b Your Default Input resolution. This is the resolution the Monarch will use if a scheduled stream/record session starts without a valid video input connected to the device.
For example, if you select 1080i 29.97 as your default, and a scheduled Monarch recording session begins without a laptop connected, the
Chapter 4, Using the Command Center
Monarch will start recording black video at 1080i @ 29.97 fps. When you then connect the laptop to the Monarch's input, two things can occur:
i If the laptop is at the same resolution as your selected default, the Monarch will continue streaming/recording the video without interruption.
ii If the laptop is at a different resolution than your selected default, the video will stop and then restart at the laptop's resolution. In this scenario, you may end up with split video files (if you are recording).
c For SDI Output, specify whether your output is coming from Input A or Input B.
d For HDMI Output, specify whether your output is coming from Input A or Input B, or if you want a Channel preview. If you select Channel preview, the HDMI output will display the video at the resolution of the streaming/recording output, allowing you to view what the remote viewer will receive.
3 Under Audio, select your audio input source (analog, digital input A or digital input B) and configure the Sample Rate and Bit Rate.
4 Click Apply.
The Operating Mode is configured. In the Command Center's side menu, the Operating Mode indicator shows the status, but is also a button to dynamically turn the Input A overlay on and off.
For more information, see the following sections:
- “Using the Command Center side menu” on page 24.
- “About the Operating Modes” on page 29.
- “Configuring video and audio settings” on page 29.
Configuring Side-by-Side mode
In Side-by-Side mode, Monarch LCS composites two video input sources, encodes them, and then streams/records them to one or two different destinations. The inputs are positioned side-by-side in one of four ways, two of which allow for a cropped Input A.
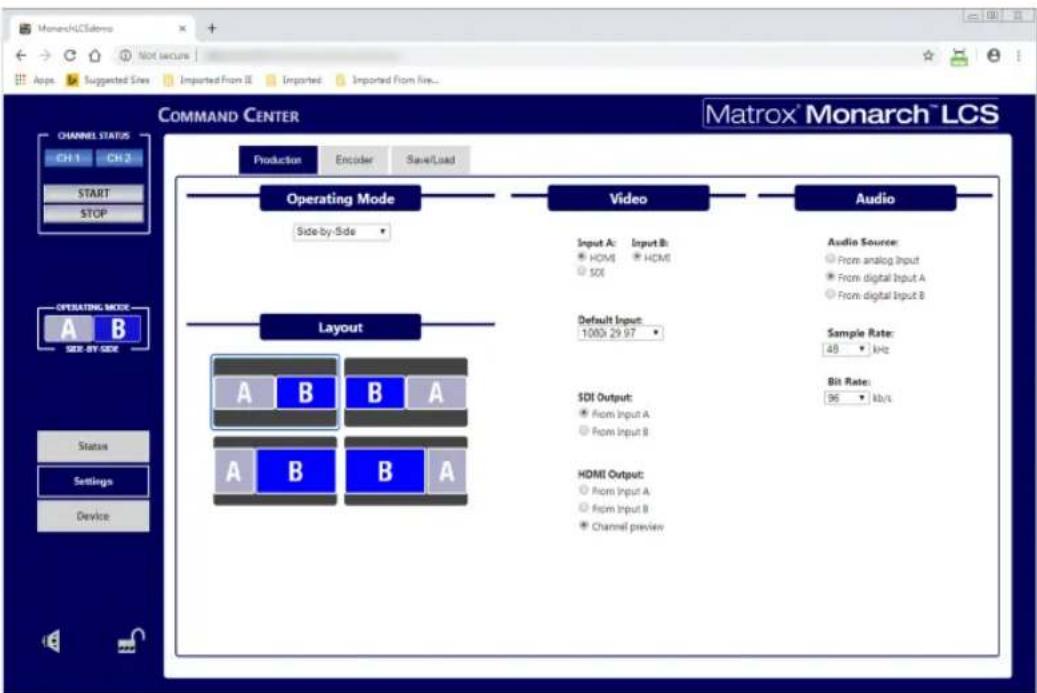
Although processed independently, the two channels are always started and stopped synchronously. The two processed inputs always include the HDMI B input and either the SDI A or HDMI A input.
To configure Side-by-Side mode:
1 Under Layout, click on the type of side-by-side format you want to display.
2 Under Video, configure the following:
a Select your video input sources. For Input A you can select either HDMI or SDI.
b Your Default Input resolution. This is the resolution the Monarch will use if a scheduled stream/record session starts without a valid video input connected to the device.
For example, if you select 1080i 29.97 as your default, and a scheduled Monarch recording session begins without a laptop connected, the Monarch will start recording black video at 1080i @ 29.97 fps. When you then connect the laptop to the Monarch's input, two things can occur:
i If the laptop is at the same resolution as your selected default, the Monarch will continue streaming/recording the video without interruption.
ii If the laptop is at a different resolution than your selected default, the video will stop and then restart at the laptop's resolution. In this scenario, you may end up with split video files (if you are recording).
c For SDI Output, specify whether your output is coming from Input A or Input B.
d For HDMI Output, specify whether your output is coming from Input A or Input B, or if you want a Channel preview. If you select Channel preview, the HDMI output will display the video at the resolution of the streaming/recording output, allowing you to view what the remote viewer will receive.
3 Under Audio, select your audio input source (analog, digital input A or digital input B) and configure the Sample Rate and Bit Rate.
4 Click Apply.
The Operating Mode is configured. In the Command Center's side menu, the Operating Mode indicator shows the status only, but that status reflects whichever format you chose to display.
For more information, see the following sections:
- “Using the Command Center side menu” on page 24.
- “About the Operating Modes” on page 29.
- “Configuring video and audio settings” on page 29.
Encoder tab
The Encoder tab on the Settings page in the Command Center lets you set stream and record settings for the Monarch LCS. Monarch LCS has several presets that can speed up the start of a project, meaning that you do not have to recall every parameter for repeated channel settings (see “Presets).

ImportantPlease note the following:
- If you leave the Encoder page before clicking Apply, all changes will be lost.
- Do not connect or disconnect any cables to the Monarch LCS while settings are being applied.
To access the Encoder tab, open the Monarch LCS Command Center (see "Accessing the Command Center" on page 20), click Settings, and then click Encoder.
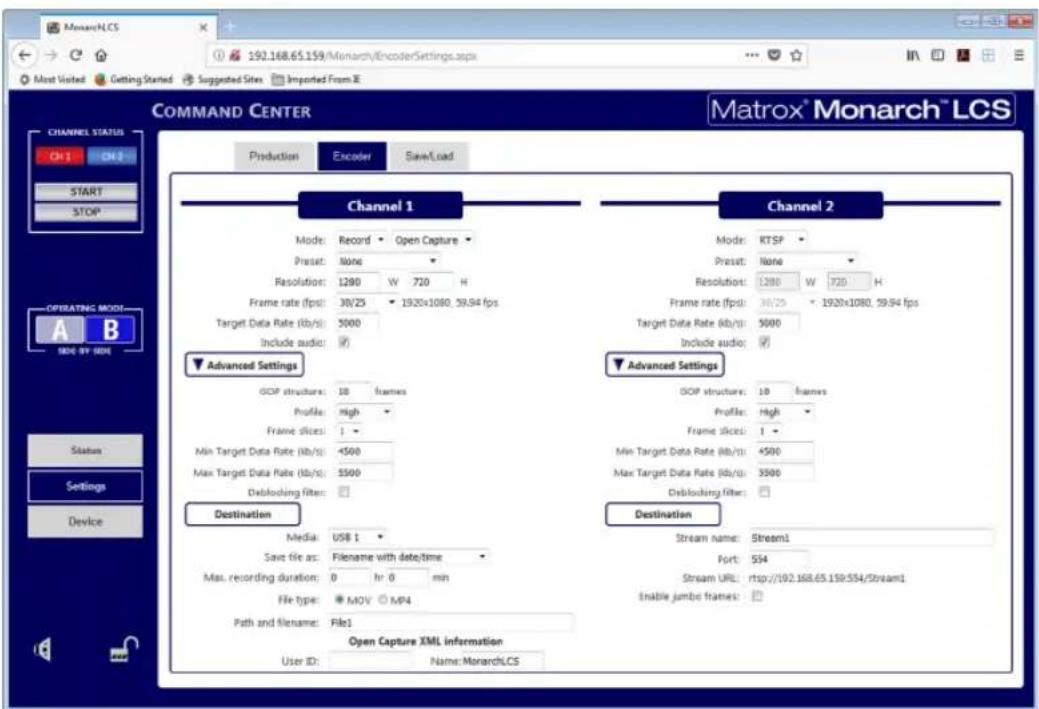
The Monarch LCS has three encoding modes with their own options and capabilities: Record, RTMP (streaming), and RTSP (streaming).
Mode
The Monarch LCS has three encoding modes:
- Record
• R T S P
• R T M P
Chapter 4, Using the Command Center
Record This mode saves the source to a USB device, an SD card, or to a network shared folder. Recordings can be done at different bit rates in case you need to deliver content to devices with varying decoding capabilities.
When a recording is stopped, it may take a few seconds for Monarch LCS to finalize the file. If you are recording to a USB device or SD card, the USB/SD card LED continues to flash during the finalization process. To avoid corrupted video files, do not remove the USB device or SD card when its LED is flashing.
Monarch LCS provides settings for recording your input source for video on demand (VOD), high-quality editing, and archiving/previewing purposes. Content can be recorded to MOV and MP4 file formats on a FAT32 or NTFS file system.
If you need to record files exceeding 4 GB, an NTFS drive should be used. For approximate recording file sizes based on the average video data rate and recording duration, and approximate maximum file durations given the average video data rate and available disk space, see Appendix A, “Recording file size and duration.
When you select Record, an additional drop-down menu appears with the following selections:
- Default The default recording behavior (no Open Capture XML files created).
- Open Capture Creates an XML file that is compatible with the Open Video Capture standard on the destination media.
If you select this option, the Destination section of the Encoder tab displays User ID and Name fields. Enter your Open Capture account (e.g. Kaltura) credentials in the User ID field. Open Capture software uses this ID to transfer the video to the correct location on their servers.
By default, the Name field is populated with the Monarch LCS device name. It is the Name, followed by the date and time of the recording that is found in the Open Capture XML file (created when Open Capture is selected), If you are using something other than the Monarch device's name in the Name field, note that a factory reset will set it back to the Monarch device's name.
The Open Capture option is set individually per encoder in all modes, with the exception of Dual Isolated mode. In Dual Isolated mode, note the following:
- When Open Capture is selected on both encoders, you only need to enter the User ID information under Encoder 1, as the field is grayed out for Encoder 2.
- If Open Capture is selected for only one of the two encoders, then the associated Open Capture XML file is saved on the destination media of
the encoder with the Open Capture option selected. Otherwise, if Open Capture is selected for both encoders, the Open Capture XML file is saved on the destination media for Encoder 1.
- It is recommended to record to the same destination when recording in Dual Isolated mode. For more information, see “Configuring Dual Isolated mode” on page 32.
Please note the following about Open Capture:
- File segmentation is not supported when recording with the Open Capture option. For more information, see File Segment Duration.
- Open Capture XML metadata files are also transferred when using the File Transfer feature; however, the Monarch will only transfer the files found on the selected media (even if a video referenced in the Open Capture XML file is located on another USB/SD card).
- When recording Open Capture files in Dual Isolated mode where video files are recorded to two different media (USB/SD card), it is recommended that both files be recorded on the same media so that, when needed, the transfer of all associated content be done in the same process.
- If it is not possible to record to the same drive, in order to minimize the chance of creating “orphan” Open Capture XML or video files in file transfer destination folder, it is recommend that you transfer each Open Capture XML file as soon as possible following the transfer of the parent video file(s).
For more information on transferring, see “File Management tab” on page 63.
RTSP Real-time Streaming Protocol: A network control protocol for media servers, controlling media sessions between end points.
RTMP Real-time Messaging Protocol: A popular protocol for transmitting audio, video, and data with Flash media. When RTMP mode is selected, another drop-down exposes three selections:
- Default Streams with an optimized methodology for communicating with RTMP servers (recommended for most RTMP streaming).
- Legacy This uses a RTMP streaming protocol identical to those used in older Monarch releases (use this option if you have difficulty using Default with another RTMP protocol).
- Wowza Cloud RTMP
protocol optimized for Wowza Cloud account users. The Wowza Cloud option uses the Wowza token mechanism to establish secure communications through the Wowza streaming cloud. The token is a code used to connect.
When you select Wowza Cloud, a Connection
Code (Wowza token) field appears under the
Destination section. You will have to enter all
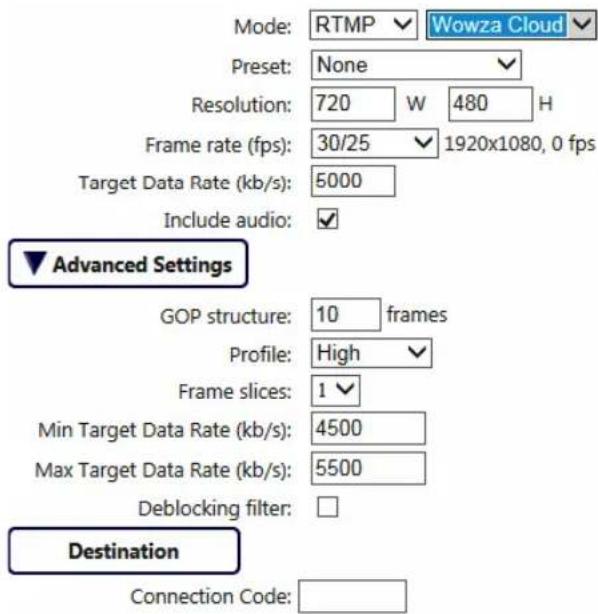
connection information (login, password, stream name, location, URL, etc) in your Wowza Cloud account.
Once you are provided a token, enter the code in the Connection Code field. Click Apply. Once the Monarch LCS confirms the code, the Connection Code field displays the code with "Authenticated" beside it and a Deactivate button appears.
Press the Deactivate button to clear the code currently being used. Wowza connection codes are valid for only 24 hours.


If the Monarch LCS is unable to make a connection (e.g. invalid code or lack of a network connection), an error message will display and "Failed" appears beside the Connection Code field. If the Wowza code is invalid, a message will also be a message on the Status page.


Performing a device reset will also clear the code.
Presets
Monarch LCS is preloaded with several encoding presets that define all the encoding parameters, including resolution and bit rate. A preset automatically sets all channel settings. Whether streaming or recording, you can also use a preset as a starting point when specifying your channel settings:
- Monarch LCS provides standard presets for streaming and recording operations; however, some presets may not be compatible for use with all CDNs. To avoid streaming issues, ensure that a preset's settings, such as video resolution and video data rate, are supported by your CDN.
-
Besides standard presets, Monarch LCS provides the following recording preset types:
-
HQ Used for creating recorded files that will be edited for high-quality production.
- Proxy Suitable for creating recorded files at smaller file sizes. This is especially useful when creating files for previewing or archiving, or when recording long-duration content.
Use a preset by selecting one from the Preset list.

Note It is recommended that you select one of the 4:3 presets when encoding standard definition sources.
Resolution
You can select the stream/record resolution you want by entering values for the width and height. The Monarch LCS does not support upscaling the resolution or frame rate of the input source (for streaming or recording).

Note If you apply the channel settings before the input is connected, and the actual input resolution is smaller than the resolution you specified in the channel settings, the Monarch will stream/record at the input resolution since upscaling is not supported. However, the Status page will display the previously selected encoding resolution, and not the actual input resolution.
Frame rate
Using the Frame rate drop-down list, you can choose to stream or record at your input source's frame rate, or at a lower frame rate. The Monarch LCS does not support upscaling the resolution or frame rate of the input source (for streaming or recording).

Note For the maximum frame rate for streaming or recording, see “Target video data rate” on page 45.
The following table lists the frame rates (in fps) and their associated Command Center selections:
| Source Frame rate | Command Center Selection | Encoded Frame rate |
| 59.94 or 60 | 60/50 | 59.94 or 60 |
| 30/25 | 29.97 or 30 | |
| 15/12.5 | 14.98 or 15 | |
| 50 | 60/50 | 50 |
| 30/25 | 25 | |
| 15/12.5 | 12.5 | |
| 29.97 or 30 | 30/25 | 29.97 or 30 |
| 15/12.5 | 14.98 or 15 | |
| 25 | 30/25 | 25 |
| 15/12.5 | 12.5 |
Remarks
- Prior to connecting your input source, if you select 60/50 as the frame rate, but your source is only 30, 29.97 or 25 fps, the Frame rate selection will switch to the source's frame rate (30/25 - see the table above) when the source is connected. The Status page will display the previously selected encoding frame rate, and not the actual input frame rate.
- The 60/50 option will only encode at 59.94 fps or 60/50 fps under the following conditions:
- When a single input is connected, and a single encoder is encoding at 1080p or 720p @ 60/50 fps. This works for RTMP, RTSP, or Record modes.
- When a single input is connected, and both encoders are encoding at 720p @ 60/50 fps. This works for RTSP and Record modes only.
In all other instances, Monarch will limit the encoding to the 30/25 option. Even if you select 60/50, Monarch will ignore the setting unless the stated conditions are met.
Target video data rate
Enter the target video data rate for your recording (average data rate). The default minimum and maximum values (see Min/Max Target Data Rate) are suitable in most instances, however, you can change the minimum and maximum values to suit your needs. When entering an average data rate, the Minimum and
Maximum target video data rates are automatically set to 90% and 110% of the target video data rate, respectively. The maximum average video data rate for
streaming or recording depends on the encoding mode (see “Mode” on page 40). Monarch LCS uses a variable data rate when encoding.
The maximum selectable video bit rates are as follows:
- 16 Mb/s (streaming or recording) when only one encoder is in used.
- 8 Mb/s (streaming) when two encoders are in used.
- 10 Mb/s (recording) when two encoders are in used.
For a more detailed breakdown, consult the following table:
| Encoder 1 | Encoder 2 | Maximum (Mb/s) |
| Streaming 16 Mb/s | None | 16 |
| Streaming 8 Mb/s | Streaming 8 Mb/s 16 | |
| Streaming 8 Mb/s | Recording 10 Mb/s 18 | |
| Recording16 Mb/s | None | 16 |
| Recording 10 Mb/s | Streaming 8 Mb/s 18 | |
| Recording 10 Mb/s | Recording 10 Mb/s 20 | |
| None | Streaming 16 Mb/s | 16 |
| None | Recording 16 Mb/s | 16 |
Include audio
You must select Include audio to stream/record the selected audio source (see “Configuring video and audio settings” on page 29) along with the video. If you want to change this setting, you must do so before starting a streaming/recording session; otherwise, you will need to stop the session, make the change, and then restart.

N o t e Monarch LCS uses the AAC audio format for streaming and recording.
Advanced settings
The following settings are considered advanced settings and may not need to be modified in most cases:
- GOP structure Enter the GOP structure (distance between I frames) to which you want to encode your input source for streaming or recording.
Monarch LCS uses the IP pattern when encoding. For example, a GOP structure of 10 creates a GOP of IPPPPPPPPPI.
Your CDN may use the term “keyframe interval” instead of GOP structure. Although related to the GOP size value, the keyframe interval is expressed in seconds and refers to the length of time between anchor frames. To set the
Monarch's GOP structure based on the keyframe interval required by your CDN, use the following formula:
- Monarch GOP Size = Encoding frame rate × Required keyframe interval.
For example, if your video input is 1920 × 1080 @ 30 fps, and your CDN requires a keyframe every 2 seconds, set your Monarch GOP structure to 60 (60 = 30 × 2) .
- Profile Set the H.264 encoder profile for your stream or recording to either Baseline, Main, or High. Typically, the High profile provides the best image quality and is suitable in most instances. However, depending on the decoder used when viewing the stream or the recorded file, such as with mobiles devices, a Main or Baseline profile may be required.
- Frame slices You can choose to slice each frame into 2, 4, or 8 sections when encoding, or you can select 1 to encode the frame as a whole. Slicing each frame when encoding the video for streaming or recording may be useful when a multi-slice decoder device is used to view the stream or recorded file.
- Min/Max Target Data Rate The Minimum and Maximum video data rates are automatically set to 90% and 110% of whatever you set as the target video data rate. For more information on minimum and maximum video data rates and how they are used with the Target video data rate, see “Target video data rate” on page 45.
- Deblocking filter Select this option to remove blockiness from the encoded video when streaming or recording. This option is especially useful when a low video data rate is required (see “Target video data rate” on page 45).
Destination settings (for streaming)
Monarch LCS provides options for using RTSP and RTMP streaming protocols for use on Adobe Media Servers, Wowza Media Servers and Streaming Cloud, software video players such as VLC, or any of the popular Content Delivery Networks (CDNs), such as YouTube Live and Ustream. In RTSP mode, Monarch LCS acts as a streaming server to which clients can connect via a media server, or software video player that supports the RTSP streaming protocol. If you want to stream to more than a handful of clients, we recommend using a dedicated media server to send streams to clients. In RTMP mode, Monarch LCS can send stream data to a media server that supports the RTMP streaming protocol.

Using the RTSP streaming protocol
1 Select RTSP mode.
2 Enter a Stream name.
3 Enter the network Port through which the clients will connect.
4 A Stream URL is automatically generated based on your settings. Provide this URL to a client to connect to your Monarch LCS network via a Wowza Media Server or software video player that supports the RTSP streaming protocol.
5 (Optional) Enable jumbo frames. Enabling jumbo frames changes the IP packet size of the stream from 1500 bytes to 9216 bytes. This option may improve performance on certain networks; however, not all networks support larger packet sizes. This option is disabled by default.
Remarks
- In RTSP mode, Monarch LCS will only start streaming data to clients once the ENCD button on the front panel or the Start button in the Command Center is pushed. The streaming will continue until it is stopped, by pressing the ENCD button or the Stop button in the Command Center, once more (see “Using the Command Center side menu” on page 24).
- If you get choppy video when streaming to VLC media player, you must enable the Real-time Transport Protocol (RTP) in VLC. Proceed by doing one of the following:
- Windows Open the VLC media player, open Tools > Preferences, and then choose the Input / Codecs tab. In the Network section, select RTP over RTSP (TCP).
- Mac Open the VLC media player, open VLC > Preferences, and then choose the Input / Codecs tab. In the Codecs / Muxers section, select Use RTP over RTSP (TCP).

Using the RTMP streaming protocol
1 Select RTMP mode.
2 Click Browse... to load the Server URL and Stream name from an XML file (Wowza Streaming Engine or Adobe Flash Media Live Encoder file only), or enter the Server URL and Stream name manually in the fields provided. You can only load destination information (server URL and stream name) from an XML file. Encoding information will not be loaded. Clear the Server URL field to remove the XML file. Clear the Stream name field to remove the loaded streaming XML file.

ImportantPlease note the following:
- If the stream name, username, or password is included in the stream URL, do not enter the information in the respective text boxes.
- Streaming XML files are not the same as Monarch HD configuration XML files.
3 If your Flash-based server or CDN uses the “ModuleRTMPAuthenticate” method for RTMP authentication, a username and password are used for authentication, however, username and password information is not included
Chapter 4, Using the Command Center
as part of the stream URL or streaming XML file. In this case, you must enter the stream Username and Password in the text boxes provided.
4 Start streaming the Monarch LCS input source to a CDN or media server.

Note For the maximum frame rate for streaming or recording, see “Target video data rate” on page 45.
Destination settings (for recording)
Specify the following settings for recording:
- Media Select the media to which you want to record your input source. You can choose either a USB or SD card slot on the Monarch LCS device, or a network location.
For more information on using USB devices or SD cards, including the known limitations of each, see the sections “USB ports 1 and 2” on page 7, and “SD card” on page 8.
- Save file as The Save file as option allows you to choose the filename format of your recorded files.

Note Blank spaces are not supported in the base name. Use underscores in place of blank spaces. For example, enter Recording1_Stage1 instead of Recording1 Stage1 as the base name for the file.
You can choose from three formats:
- Filename only Uses your specified filename to identify recorded files (e.g. Basename.mov/mp4). If a recording session results in a file being segmented into multiple files, a three-digit incrementing number (starting at 001) will also be added to the filename from the second file onwards (e.g. Basename001.mov/mp4, Basename002.mov/mp4, etc).
The three-digit value is needed to differentiate between the multiple files created by file segmentation. For more information on how file segmentation works, see File Segment Duration.
If you use this filename format, you must make sure to change the filename before manually starting a new recording, otherwise the old recorded file will be overwritten. A recording is manually started by pressing the ENCD button on the device or by clicking the Start button in the Command Center.
Do not use the Filename only option if you plan on consolidating your files with the Matrox File Consolidator. Because the filename differs from the second file onwards, the consolidator will not be able to recognize that the segmented files are part of the same recorded sequence.
- Filename with date/time Uses your specified filename, adds the start date/time of the recording session, and adds a three-digit number that increments when file segmentation occurs (e.g.
Basename-[YYYY-MM-DD_HH-MM-SS]-000.mov/mp4). For more information on how file segmentation works, see File Segment Duration.
If file segmentation occurs, each file will have the same date/time in the filename; that is, the start date/time of the first file in the sequence. The three-digit incrementing number is then used to differentiate the files.
For example, a recording that is segmented into three (3) files will result in the following:
- MyRecordedFile-[2015-12-01_13-30-45]-000.mov/mp4
- MyRecordedFile -[2015-12-01_13-30-45]-001.mov/mp4
- MyRecordedFile -[2015-12-01_13-30-45]-002.mov/mp4
The date/time in the filename only changes when you manually stop a recording and then start a new one, in which case it will be the start date/time of the first file in the new sequence.
- Filename with numeric counter Uses your specified filename, adds a two-digit number that increments when you manually stop/start the recording, and adds a three-digit number that increments when file segmentation occurs (e.g. Basename00000.mov/mp4). For more information on how file segmentation works, see File Segment Duration.
The two-digit number increments with each manual stop/start of the recording, up to 99 times, after which it resets to 00. As with date/time, this number does not increment with file segmentation. For example, if you have three (3) files that you created by manually starting and stopping the recording session, it will result in the following:
• MyRecordedFile00000.mov/mp4
• MyRecordedFile01000.mov/mp4
• MyRecordedFile02000.mov/mp4
The three-digit number increments when file segmentation occurs. For example, a recording that is segmented into three (3) files could look as follows:
• MyRecordedFile00000.mov/mp4
• MyRecordedFile00001.mov/mp4
• MyRecordedFile00002.mov/mp4
Another example would be if you have multiple files created by manual stop/start, and only the third file is segmented into two additional files.
That would look as follows:
• MyRecordedFile00000.mov/mp4
• MyRecordedFile01000.mov/mp4
• MyRecordedFile02000.mov/mp4
• MyRecordedFile02001.mov/mp4
• MyRecordedFile02002.mov/mp4
- Maximum recording duration Enter a duration to set an overall time limit for your recording session. The session will automatically end when this limit is reached, or when the selected storage media is full (whichever occurs first). If you enter a value of 0, the recording session will continue indefinitely until manually stopped; otherwise, it will stop only when your storage media is full. This setting represents your desired recording length. The actual length is determined by the size of your storage device.

Note The number of files created at the end of the session is dependent on the overall length of your recording session and whether or not you have entered a value in the File Segment Duration fields (see File Segment Duration).
Assuming the storage media has enough space, an entry in the Maximum file duration field will result in the Monarch LCS creating multiple recording files when:
- You have entered a maximum recording duration longer than 4 hours and 50 minutes.
- You have entered a file segment duration of 0, and your recording lasts longer than 4 hours and 50 minutes.
- You have entered a file segment duration longer than 1 minute.
- File Segment Duration If you enter a duration in the File Segment Duration fields (hr and/or min), at the specified interval, the Monarch LCS will create a new file, splitting your recording session over multiple files. For example, if you enter a duration of 30 minutes, Monarch LCS will close the current file and start recording to a new file every 30 minutes.
The maximum file segment duration you can set is 4 hours and 50 minutes. If you leave the setting at the default duration of 0, the Monarch LCS will automatically switch to a new file every 4 hours and 50 minutes.
The size of the created files (in approximated MBs) is displayed next to the duration. The file size adjusts depending on the video data rates you set in the encoding options (see “Target video data rate” on page 45).

ImportantPlease note the following:
- On FAT32 storage media, file segmenting will occur automatically after 4 GB.
- Because FAT32 limits the recording file size to 4 GB, you must use an NTFS drive if your recording file will be greater than 4 GB.
- File segmentation is not supported when recording with the Open Capture option. For more information, see Open Capture.
- File type Select the type of file that will be recorded. You can create either an MOV or MP4 file. - Path and filename Specify the destination and filename for your recording based on your recording destination. When specifying the path, all folders in the path must already exist. The Monarch will not create new folders. For more information on how to set up shared folders for Windows or Mac OS, see Appendix B, “Sharing a network folder,” on page 75.
i ImportantBlank spaces are not supported in the base name. Use underscores in place of blank spaces. For example, enter Recording1_Stage1 instead of Recording1 Stage1 as the base name for the file.
- Domain, Username, and Password When recording your source input to a network location (see Media) and Monarch LCS is not on the same domain as the network, enter the network domain. If required, also enter the Username and Password that is used to access the network.
Save/Load tab
The Monarch LCS lets you save up to eight profiles that you can load at any time. The profiles contain all the settings you selected in the Production and Encoder tabs. To access the Save/Load tab, open the Monarch LCS Command Center (see “Accessing the Command Center” on page 24), click Settings, and then click Save/Load.
![MonarchLCS 192.168.65.159/Monarch/Profile.aspx Most Visited Getting Started Suggested Sites Imported From IE COMMAND CENTER Matrox® Monarch™ LCS CHANNEL STATUS CHI OFF START STOP Production Encoder SaveLoad Profiles Profile: [empty] View Current Settings Profile Name: None Operating Mode: Side-by-Side Video Inputs Selected: HDMI A, HDMI B Audio Input Selected: Digital A, 48 kHz SDE Output Selected: Input A HDMI Output Selected: Channel preview Channel 1 Delivery mode: Record Video Encoder Settings: 1280x720p, 30/25 fps, 5000 kb/s; GOP Structure: 10 Profile: HIGH Min target Data Rate: 4500 Max Target Data Rate: 5500 Frame Slices: 1 Deblanking Filter: False Audio Encoder Settings: 192 kb/s Destination: USB1, no drive present Channel 2 Delivery mode: RISP Video Encoder Settings: 1280x720p, 30/25 fps, 5000 kb/s; GOP Structure: 10 Profile: HIGH Min target Data Rate: 4500 Max Target Data Rate: 5500 Frame Slices: 1 Deblanking Filter: False Audio Encoder Settings: 192 kb/s Destination: http://192.168.65.159-554/SWAEN1 Save](/content/2026/05/915548/images/89d79e93e392fa071a1034654d5ec89cdc258e632adb15f9c92b94107d924476.jpg)
Chapter 4, Using the Command Center
The Save/Load tab opens with the current settings (set in the Production and Encoder tabs) displayed. You can save the current settings to a new profile, or save over a previously saved profile. The following sections explain how.

ImportantPlease note the following:
- If you leave the Save/Load page before clicking Apply, all changes are lost.
- Do not connect or disconnect any cables to the Monarch LCS while settings are being applied.
Profiles
Monarch LCS lets you save up to eight profiles that you can load at any time.
Profiles are made up of the encoding parameters and production settings,
including operating mode and destination (see “Status page” on page 26).
Whether you use preset or custom parameters, you can enter them once and save them as a unique profile.

To save a profile:
1 Go to the Encoder and/or Production tab, enter your desired settings (for both channels), and then click Apply.
2 Go to the Save/Load tab and click Save. A window opens to save the settings as a new profile (select an empty profile) or to save over a previously saved profile (overwrite).
You can also rename a profile from the Profiles list using this method.

To load a profile
1 Go to the Save and Load tab of the Settings page and select a profile from the Profiles list and click View.
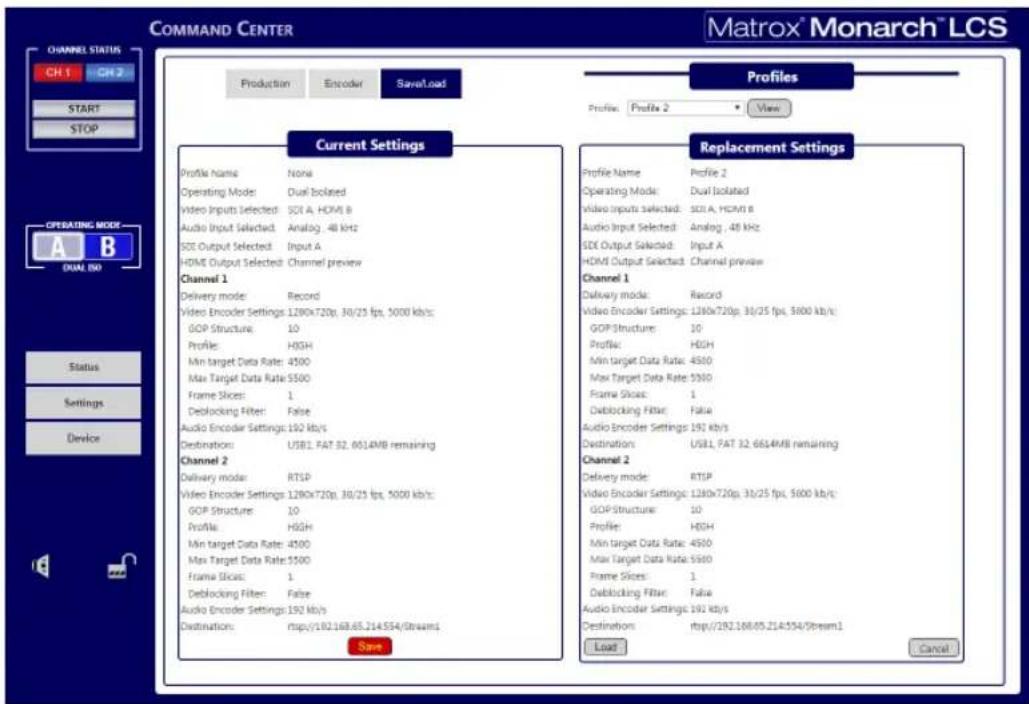
2 Click Load when the Replacement Settings window listing the profile settings opens to accept.
The Current Settings window will be updated with the profile settings while the Production and Encoder tabs are uploaded with the new settings. The profile configuration is now active. Apply is not required.
Device page
The Device page is where you access various settings related to all aspects of the Monarch LCS and its operation. You access these settings by clicking the tabs at the top of the Device page.

ImportantPlease note the following:
- If you leave a tab of the Device page before clicking Apply (when applicable), all changes will be lost.
- Do not connect or disconnect any cables to the Monarch LCS while settings are being applied.
Account tab
The Account tab in the Command Center is where you give a descriptive name to your Monarch LCS device and change your Monarch LCS password. To access the Account tab, open the Monarch LCS Command Center, and then choose
Device > Account.
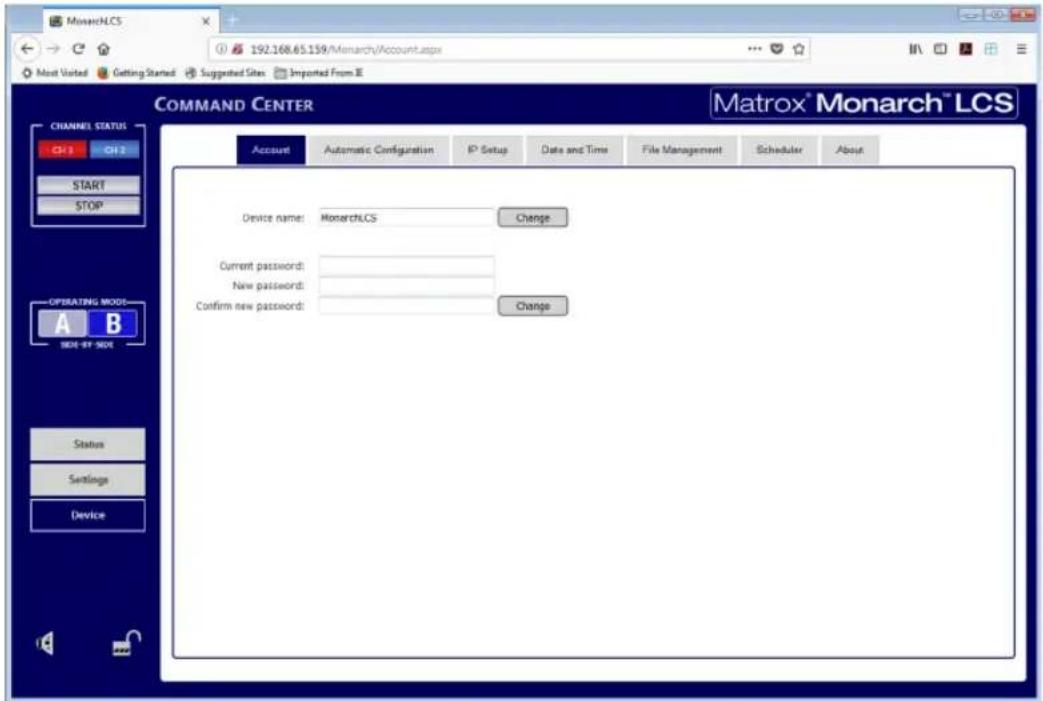
Device name and password
By default, the device name is set to Monarch LCS. You can give a unique name to each Monarch LCS device for easy identification within the Command Center and the Matrox Monarch LCS Utils (see “Monarch LCS Utils application” on page 16). This is especially useful when you have multiple Monarch LCS devices on the same network. To change the name of your Monarch LCS, type the desired name in the Device name box, and then click Change.
By default, the Monarch LCS username and password are set to admin. The device username cannot be changed, however, we do suggest that you change the device password. To change the Monarch LCS password, enter the current and new passwords, and then click Change. For information on resetting the password to factory default, see “Reset to factory defaults” on page 13.
Automatic Configuration tab
The Automatic Configuration tab in the Command Center is where you can export the current Monarch LCS settings to an XML file (called the Monarch LCS configuration file), import settings from a previously-created configuration file, or import settings from the same XML file hosted on a web page.
When you have a Monarch LCS configuration file, you can copy it to a USB device, connect the device to USB port 2, and then perform a factory reset to automatically load the settings. For more information on performing a factory reset, see “Network connection and IP address” on page 18.
The option to boot up Monarch LCS with all settings loading automatically from a USB device, or loading settings from a web page at device reboot, allows you to deploy other Monarch devices without logging in to the Command Center.
Accessing the Automatic Configuration tab
To access the Automatic Configuration tab, open the Monarch LCS Command Center (see “Accessing the Command Center” on page 22), and then choose Device > Automatic Configuration.
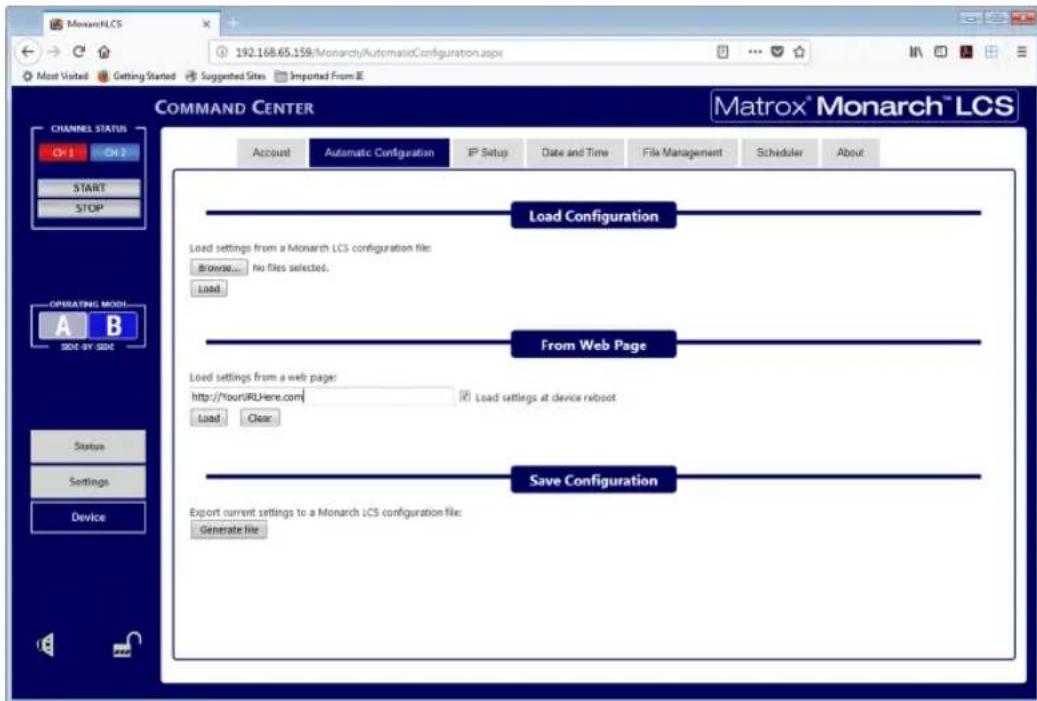
Chapter 4, Using the Command Center
Loading settings from a configuration file
You can import settings from a previously-generated Monarch LCS configuration file. The file must be located on your computer or somewhere that is accessible from your computer (see “Saving settings to a configuration file” on page 57).
1 Go to the Automatic Configuration tab of the Command Center.
2 Under Load settings from a Monarch LCS configuration file, click Browse or Choose Files depending on your web browser.
3 Select the file you want to load.
4 Click Load.
Your Monarch LCS settings will now match those of the chosen configuration file.
Loading settings from a web page
You can import Monarch settings from a specific web page that is hosting the configuration file generated in the Command Center (see “Saving settings to a configuration file” on page 57). This option is particularly useful when there is a need to oversee the Monarch LCS operation from a central control environment. You can set bit rates and destinations by managing a web page instead of logging into the Monarch LCS Command Center.
1 Go to the Automatic Configuration tab of the Command Center.
2 In the Load settings from a web page field, type the URL address of a page hosting the configuration parameters.
3 Click Load.
4 (Optional) Select Load settings at device reboot if you want to have your Monarch LCS automatically load the settings from the specified URL the next time it boots up.
Your settings will now match those of the chosen configuration file.

Note With Load settings at device reboot selected, you only need to reboot/reset your Monarch LCS and it checks the specified URL for updated settings.
Saving settings to a configuration file
You can save or export your current settings as a Monarch LCS configuration file, which you can then save to your computer, to a USB device connected to your computer, or to a network drive. You can then use the configuration file to configure other Monarch LCS devices.

Note You cannot save to a USB device connected to the Monarch LCS.
1 Go to the Automatic Configuration tab of the Command Center.
2 Under Export current settings to a Monarch LCS configuration file, click Generate file.
3 Select a save location. Do not change the filename (MonarchLCSSettings.xml) if you plan to automatically configure a Monarch from a USB device (see “Automatically importing Monarch settings on factory reset).
The Monarch LCS configuration file is created, and contains all the Monarch settings as XML parameters.
Automatically importing Monarch settings on factory reset
On factory reset, the Monarch LCS can automatically import configuration settings from a Monarch LCS configuration file that is on a USB device connected to the USB port 2.

1 Copy the Monarch LCS configuration file to a USB device (see "Saving settings to a configuration file).
Note The configuration file must have the original filename, given by the Monarch LCS when the file was generated (MonarchLCSSettings.xml).
2 Connect the USB device to the Monarch LCS' USB port 2 (see "USB ports 1 and 2" on page 7).
3 Perform a factory reset by pressing and holding the Reset button on the device for at least five seconds (see “Reset to factory defaults” on page 13).
The Monarch LCS boots up with your settings loaded.
For more information on Monarch configuration files, including generating or editing configuration files, consult the Matrox Monarch LCS Dev Tools Reference Guide, which is provided in PDF format in the Matrox Monarch LCS Support section of our website at www.matrox.com/video/support.
IP Setup tab
The IP Setup tab in the Command Center lets you switch the Monarch LCS IP mode between DHCP and Static. By default, Monarch LCS is set to DHCP mode.

ImportantChanging the IP mode will end the current Command Center session. To access the Monarch LCS Command Center again via IP address, you will need to enter a different Monarch LCS IP address in your browser's address field. If switching to Static mode, you may also be required to change your computer's network configuration. For information on obtaining the Monarch LCS IP address and accessing the Command Center in DHCP or Static mode, see Chapter 3, "Network Connection and Setup.
Chapter 4, Using the Command Center
To access the IP Setup tab, open the Monarch LCS Command Center, and then choose Device > IP Setup.
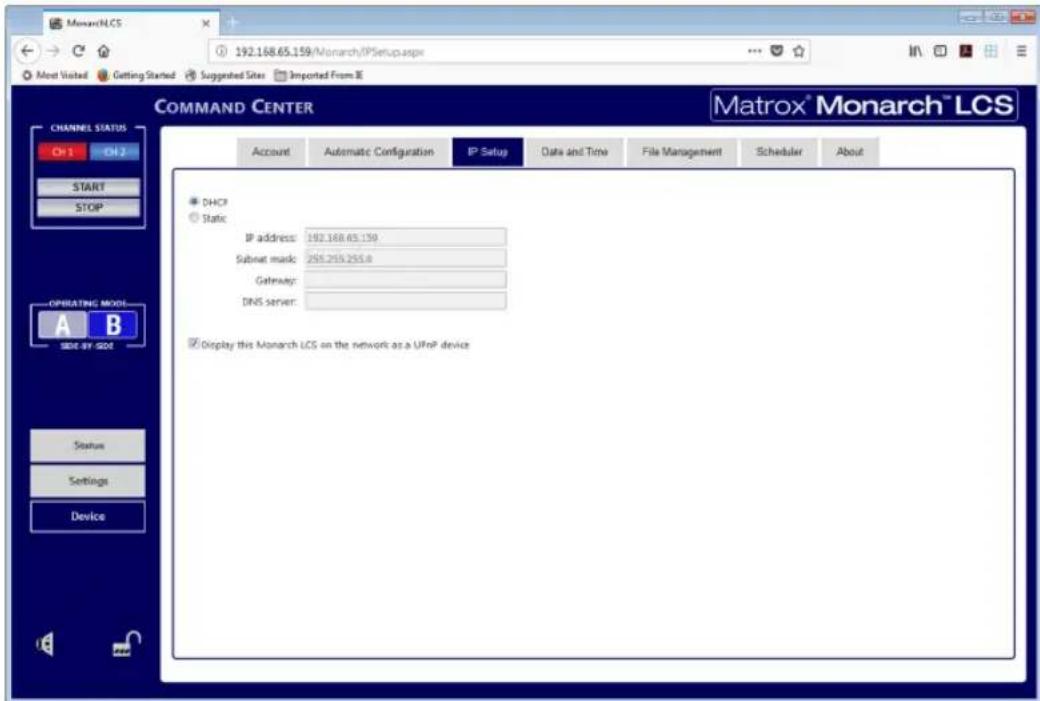
Setting the IP mode to DHCP
Set Monarch LCS to DHCP IP mode when connecting to a network with a DHCP server, such as through a router.
1 Select DHCP.
2 Click Apply.

Tip See “Network connection and IP address” on page 17 for instructions on how to connect Monarch LCS to a network with a DHCP server, and how to acquire the Monarch LCS network IP address to access the Command Center.
Setting the IP mode to Static
Set Monarch LCS to Static IP mode when connecting to a network without a DHCP server.
1 Select Static.
2 Enter a static IP address for your Monarch LCS. Unless you change this address, the default static IP address will be used (169.254.1.11). If you reset the device in Static IP mode (see “Switch to Static IP mode” on page 13), the static IP address reverts to default.

Note When connecting multiple Monarch LCS devices on the same network, each Monarch LCS device must have a unique network IP address.
3 Enter the Subnet mask on your network to which Monarch LCS is connected. By default, the subnet mask is set to 255.255.255.0.
4 Enter the Gateway IP address and DNS server.
5 Click Apply.

Tip See Chapter 3, “Network Connection and Setup for instructions on how to connect Monarch LCS to a network without a DHCP server, how to change your computer’s network configuration to establish a connection between your computer and the Monarch LCS device, and how to access the Command Center.
Preventing Monarch LCS from appearing as a UPnP device on the network
The Monarch LCS uses the Simple Service Discovery Protocol (SSDP) to broadcast itself as a Universal Plug and Play (UPnP) device. This means that it will appear in Windows Explorer (not visible in Mac OS) as if it were a printer, external hard drive, or similar UPnP device.
This feature is enabled by default, and makes it easier to find the Monarch LCS on a network if you do not know the device IP address. However, for security reasons you may not want the Monarch LCS to appear on your network for anyone to see. If so, you can disable SSDP to prevent the Monarch LCS from appearing as a UPnP device.

To prevent the Monarch LCS from appearing:
1 Access the Monarch LCS Command Center (see “Accessing the Command Center” on page 20).
2 Choose Device > IP Setup.
3 Clear Display this Monarch LCS on the network as a UPnP device.
4 Click Apply.
The Monarch LCS will no longer be visible in Windows Explorer as a UPnP device. You may need to restart Windows Explorer for Monarch LCS to no longer appear on the network.

Note By using this option, this Monarch device will not automatically appear on the Monarch LCS Utils list of connected devices. You must use the Find All button for the Monarch LCS to appear.
Date and Time tab
The Date and Time tab in the Command Center lets you set the date and time for your Monarch LCS device. The date and time are used in the naming of the recorded files (see Path and Filename).

Important To save changes made in the Date and Time tab, you must click the Apply button. A Monarch LCS hardware reboot is required to apply the changes. If you leave the Date and Time tab before clicking Apply, all changes will be lost.
To access the Date and Time tab, open the Monarch LCS Command Center, and then choose Device > Date and Time.
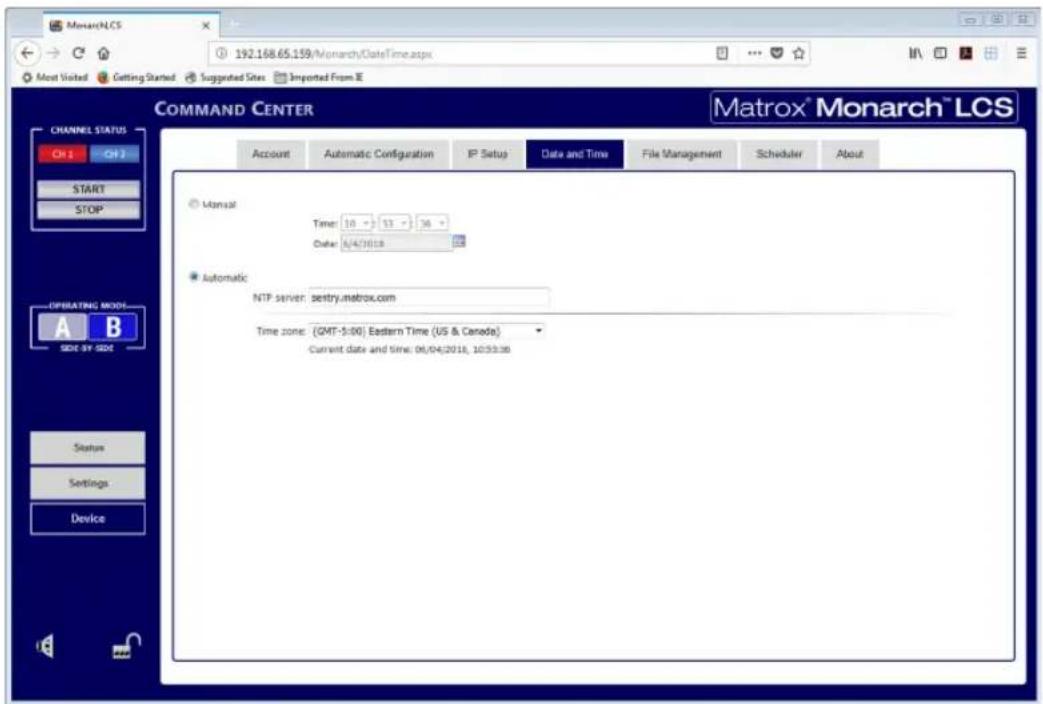
Setting the device date and time
You can set the date and time manually or automatically by using an NTP server..
| Manually Automatically* | |
| 1 Select Manual.2 Set the Time, and enter a Date in the format DD/MM/YYYY, or click to select a date from the calendar.3 Click Apply. You’ll be notified that Monarch LCS will be rebooted in order to apply the changes. | 1 Select Automatic.2 Enter a local or public NTP server address. The default NTP server address is time.nrc.ca.3 Select a Time zone from the list. The current date and time associated with the selected NTP server and time zone are displayed next to Current date and time.4 Click Apply. You’ll be notified that Monarch LCS will be rebooted in order to apply the changes. |
*Setting the date and time automatically requires a local or public NTP server address. An Internet connection is required to use a public NTP server. If you are using Monarch LCS in Static IP mode, do not forget to specify the “Gateway” and “DNS server” on the IP Setup tab (see “IP Setup tab” on page 58).
File Management tab
The File Management tab in the Command Center lets you transfer Monarch files from local storage (USB/SD card) to network or web-based folders, and then delete those files from the local storage device after they have been transferred. You can transfer/delete files manually, or set up an automatic transfer/delete schedule.
To access the File Management tab, open the Monarch LCS Command Center, and then choose Device > File Management.
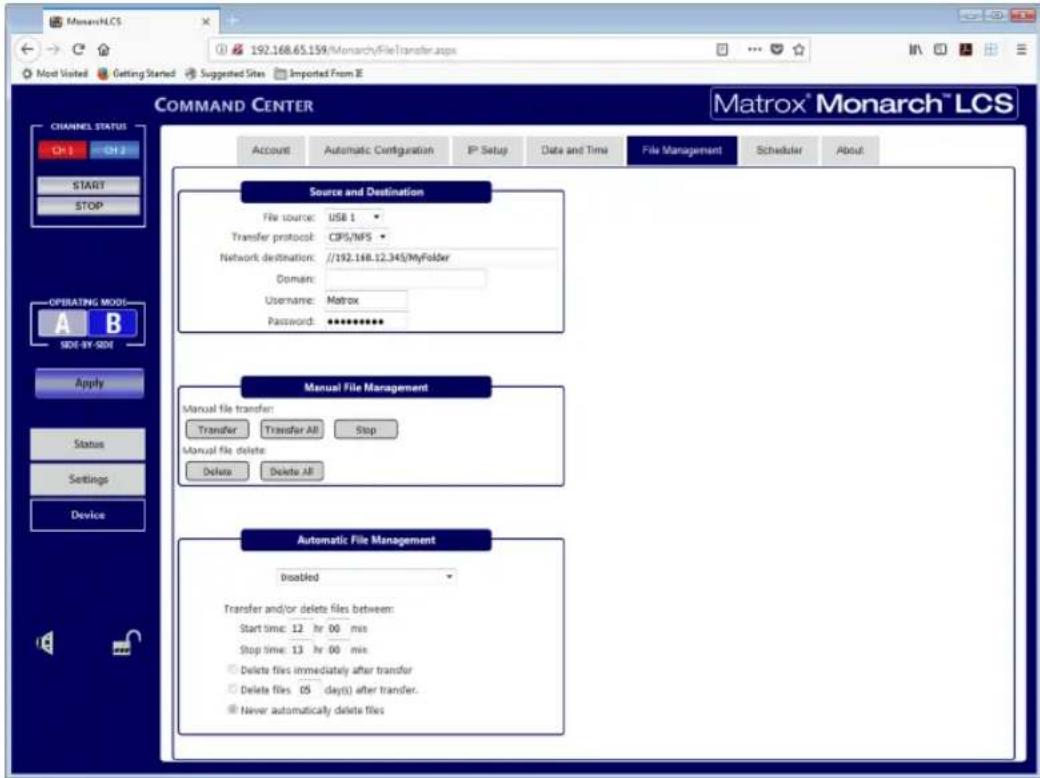
About File Management
When recording a file, the Monarch also creates a manifest (XML) file on the storage device (USB or SD Card) that identifies the recording. There is one XML file per recording. This XML file is only located on the storage device, and contains a tag identifying whether or not the file has previously been transferred to a specific network location.

Important Do not delete the manifest XML files created with the Monarch's recorded files. If you do, File Management will not work as intended.
Please note the following about File Management:
- The file destination has to be a valid network path (a defined network location), or a valid web-based drop folder (FTP or sFTP).
- File transfer cannot start while the Monarch is streaming or recording.
Device page
- Files cannot be deleted during a streaming/recording session.
- If a file transfer is in progress, starting a streaming/recording session will stop the file transfer.
- If the file already exists in the destination folder, it will not be overwritten or transferred again, even if you select Transfer all.
- It is recommended that you use a blank storage device (USB or SD card) when recording a file to be transferred.
- Files interrupted during a transfer will retain their untransferred status on the storage device, and then be transferred the next time a manual or automatic transfer occurs.
- Open Capture XML metadata files are also transferred when using the File Transfer feature; however, the Monarch will only transfer the files found on the selected media (even if a video referenced in the Open Capture XML file is located on another USB/SD card). For more information, see Open Capture.
- The Status page displays a message if a file did not successfully transfer.
Configuring your Source and Destination
Before you can transfer or delete Monarch files, you must specify the file source and file destination.

Note Before you begin, learn how File Management works including the conditions and limitations (see “About File Management” on page 63).
1 Select File source to specify the local storage media where your Monarch files are located. You can choose USB 1, USB 2, or SD Card.
2 Select your Transfer protocol. Depending on your selection, the additional options in the Source and Destination section will change.
- CIFS/NFS is for sending files to a network shared folder. If you select this protocol, proceed to step 3.
- FTP is for sending files to a web-based drop folder. If you select this protocol, proceed to step 4.
- sFTP is similar to FTP but uses the secure connection protocol SSH (Secure Shell). If you select this protocol, proceed to step 4.
3 If you selected CIFS/NFS in step 2, configure the following settings:
a Enter the Network destination.
If you are transferring files, Monarch will send the files to this location. Monarch does not delete files on a network location.
When specifying the path, all folders in the path must already exist. Monarch will not create new folders. For more information on how to set
up shared folders for Windows or Mac OS, see Appendix B, “Sharing a network folder,” on page 75.
b Enter the network Domain if the Monarch is not on the same domain.
c Enter the network Username (if applicable).
d Enter the network Password (if applicable).
4 If you selected FTP or sFTP in step 2, configure the following settings:
a Enter the Host.
b Enter the Username (if applicable).
c Enter the Password (if applicable).
d Enter the Port if you want to use a different port than the default 21 for FTP or 22 for sFTP (e.g. if the port is being used by another application).
5 Click Apply.
Your Source and Destination settings are configured.
Using Manual File Management
Use Manual File Management when you want direct control over how your Monarch files are transferred or deleted.

Note If you have not already configured your file source and file network destination, follow the steps described in “Configuring your Source and Destination” on page 64.
- Manual file transfer:
- Click Transfer to transfer only the Monarch files that have not yet been transferred to your specified network location.
- Click Transfer All to transfer all Monarch files from the local storage to your specified network location.
- Click Stop to stop a transfer in progress.
During the transfer, the “file transferring” indicator will display in the Command Center side menu and the encoder LED will blink, changing from red to blue (see “Using the Command Center side menu” on page 24).
- Manual file delete:
- Click Delete to delete only the Monarch files that have already been transferred to your specified network location.
- Click Delete All to delete all Monarch files on the local storage.
Using Automatic File Management
Use Automatic File Management when you want to schedule and automate File Transfer and/or File Delete operations.
1 If you have not already configured your Source and Destination settings, follow the steps described in “Configuring your Source and Destination” on page 64.
2 From the displayed drop-down list, select the type of automatic file transfer you want:
- Select Transfer files when Monarch is idle to transfer files when the file recording is complete and the Monarch is in an idle state.
Monarch enters an idle state approximately one (1) minute after a stream/record session has stopped. Monarch is not considered to be in an idle state after a reboot, even though it may not be streaming or recording after booting up.
During an idle state you can browse through the Command Center and even change settings. As long as you do not start a stream/record session, the Monarch is still considered to be idle.
If a file transfer is interrupted by a stream/record session, the transfer will continue when the Monarch is again idle (i.e. the session has stopped).
- Select Scheduled to specify the time of day you want the transfer operation to occur. Transfer will occur every day during this time. If you select this option, proceed to step 3.
- Select Disabled to disable automatic file management.
Depending on your selection, the additional options in the Automatic File Management section will change.
3 If you selected Scheduled in step 2, in the Transfer and/or delete files between section, specify the time of day you want the transfer/delete operation to occur (e.g. between 23:00 and 00:30).
Monarch will transfer files until all files have been sent or until the end of the allotted time, after which any remaining files will be transferred during the next window (or manually if you choose).
4 Specify how Monarch should manage deleting of files:
- Select Delete files immediately after transfer to delete the files on local storage immediately after a successful transfer operation.
- Select Delete files (x) days after transfer to specify how many days Monarch should keep files on local storage after a successful transfer operation. After the days specified are up, Monarch will delete all eligible files during the next available start/stop time you entered in step 3. If you
enter (0) for this option, Monarch will delete the files immediately after they have been transferred.
For example, let's say you want the Monarch to delete files after three (3) days, and your start/stop time is 12:30 to 14:30. Every day between 12:30 and 14:30, Monarch will look for files that have been on the local storage for 3 days past their transfer time and delete them.
- Select Never automatically delete files to disable automatic file delete.
5 Click Apply.
Automatic File Management is configured.
Scheduler tab
The Scheduler tab in the Command Center lets you schedule a streaming or recording session for a future date. The sessions are displayed as events on a calendar.
To access the Scheduler tab, open the Monarch LCS Command Center, and then choose Device > Scheduler.
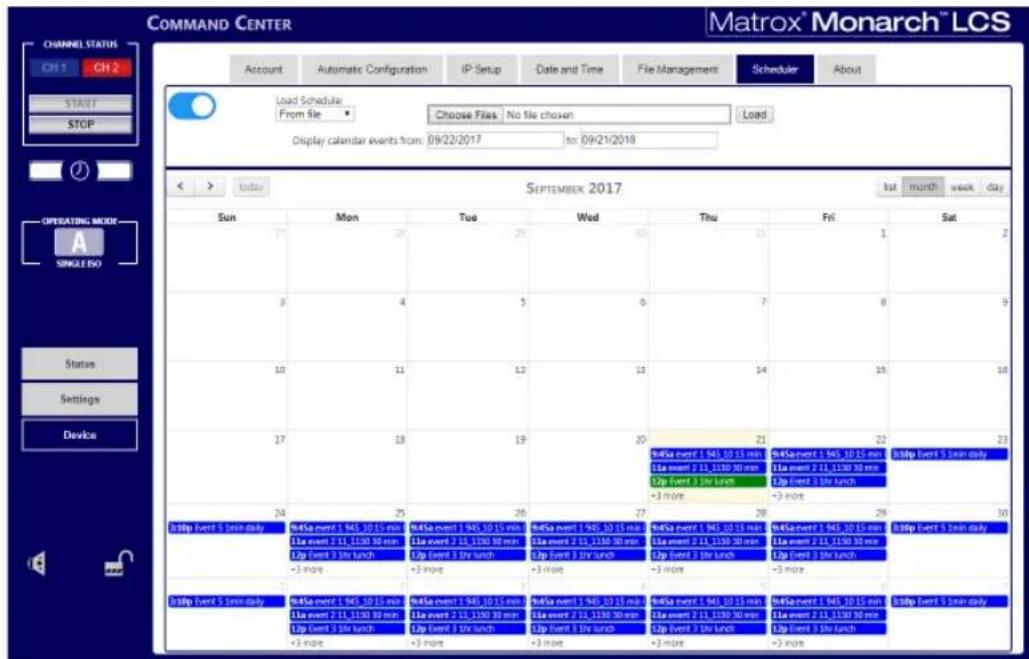
About Scheduler mode
Using the Monarch LCS in Scheduler mode allows you to automatically start and stop a streaming or recording session.
You can turn the Scheduler on and off using the toggle button at the top of the page.
When the Monarch LCS Scheduler mode is enabled, you will see the Scheduler icon displayed in the Command Center side menu.
Off/On button
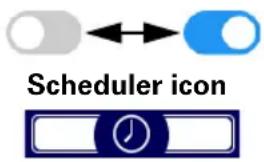
The Monarch LCS uses iCalendar (.ics) files to schedule events (streaming or recording sessions). iCalendar is a global format for (plain text) calendar files used by calendar and email programs like Google Calendar and Microsoft Outlook (recommended). These files enable the sharing and publishing of information from one calendar to another. The main information stored in .ics files is the title, start time, end time, and a brief summary of the calendar event(s).
Events
Events are upcoming streaming or recording sessions within the Scheduler calendar. An event represents the start and stop time of a session. Events must be created using a specific set of parameters. Using either Microsoft Outlook or Google Calendar, make sure that:
- The event summary/name begins with “LCS-”.
- The location is the name of the Monarch LCS unit to be used for that particular event.
- A valid start time and end time is entered for each event.

Note Please note the following:
- The minimum scheduled recording length is one (1) minute (there is no maximum length). You cannot set all-day events.
- Make sure to enter all the details correctly. If you need to make any changes to an event (e.g. Start time change, remove an event, etc.), you will have to do so in the original calendar, then load a new .ics file to replace the first one containing that event.
- You can schedule calendar events occurring within the coming twelve (12) months. Depending on the number of events you have in your calendar, you may experience a delay when switching from one month to the next.
- The Scheduler will not use a time zone that might have been set as part of an individual event.
- If the Monarch device is powered up during a scheduled event, the streaming/recording session associated to the event will start. This also applies to a device reboot.
Chapter 4, Using the Command Center
- Scheduled events will not start if the Monarch is already streaming or recording at the time. To ensure all scheduled events start when intended, make sure to stop any active streaming/recording sessions before the event.
Events on the Scheduler calendar are color-coded to inform you of their state:
| Event Color Event | Status |
| Blue Scheduled | |
| Green Successful | |
| Red Failed | |
| Yellow Stopped by the user | |
| Gray Discarded (overlap) |
For more information on events, see “About Scheduler mode” on page 68.
Custom event fields
If your recordings are using the Open Capture standard, you can add custom fields to your calendar events and the Monarch will include them in the Open Capture XML file included with your video files. For more information on how to create events, see “Events” on page 68.
To add custom fields to calendar events:
1 Open a Google Calendar or Microsoft Outlook event.
2 In the description or body of the event, add as many custom fields as you like using the following syntax:
STARTMONARCHCUSTOM:
Field1:value1 (e.g. PresenterName:John Smith)
Field2:value2 (e.g. PresenterID:123456789)
Field3:value3 (e.g. PresenterTitle:Calculus101)
ENDMONARCHCUSTOM:
3 Continue creating the event as described in “Events” on page 68 and “Creating and importing a calendar” on page 70.
4 Save the event as a .ics file.
When you import the iCalendar file into the Monarch, the custom fields will be added to the Open Capture XML file as follows:
<customDataItems>
    <customData>
    <xmlData>
    <metaData>
    <PresenterName>John Smith</PresenterName>
    <PresenterID>123456789</PresenterId>
    <PresenterTitle>Calculus101</PresenterTitle>
    </metaData>
    </xmlData>
</customData>
You can add any custom field you want to the XML. As long as you follow the proper syntax, Monarch will include it in the Open Capture XML file.
Creating and importing a calendar
To create a calendar for use with Monarch LCS:
1 Read more about how Scheduler mode and Events work in Monarch LCS.
2 Use either Google Calendar or Microsoft Outlook to create scheduled streaming or recording events.
For specific instructions on how to create iCalendar files in either Google Calendar or Microsoft Outlook, please refer to the help provided by Google and Microsoft in their respective applications.
3 Begin each event name with "LCS-".
4 Enter a start time and end time for each event.
5 Enter the device name of the Monarch LCS as the location for each event.
6 (Optional) Add custom fields to your event if needed (see “Custom event fields” on page 69).
7 Export the iCalendar file to a location that can be accessed by the Monarch LCS Command Center.
8 Go to the Scheduler tab in the Command Center. To load the calender from a file, go to step 9. To load the calender from a URL go to step 10.
9 To load the calendar from a file, do the following:
a Under Load Schedule, select From file.
b Click Browse or Choose Files depending on your web browser, find the .ics file you created, and then click Load.
c Enable the schedule by turning the toggle button on.
10 To load the calender from a URL, do the following:
a Under Load Schedule, select From URL.
b Type the URL in the field provided, then click Fetch to get the schedule from the specified URL.
c (Optional) To periodically fetch new schedules, specify how often in minutes the Monarch should check for schedule changes. If you leave this at zero (0), the Monarch will not check for new schedules.
11 In Display calendar events from, click inside the starting and ending date fields to specify the number of days you want the calendar to be able to display. The calendar can display a maximum of 364 days. For example, if you select 09/26/2017 as your start date, the latest end date you can select is 09/25/2018.
Your schedule is now loaded and Scheduler mode is enabled.
Chapter 4, Using the Command Center

Note The Status page will display the name of the loaded .ics file and whether the feature is on or off. For more information about events, see “Events” on page 68.
About tab
The About tab in the Command Center lets you see the serial number and current firmware version of your Monarch LCS device, provides links to the latest Monarch LCS documentation, warranty, and third-party licenses (an Internet connection is required), and displays the Matrox Software License Agreement.

Note To update the Monarch LCS firmware, see “Updating the Monarch LCS firmware” on page 20.
To access the About tab, open the Monarch LCS Command Center, and then choose Device > About.
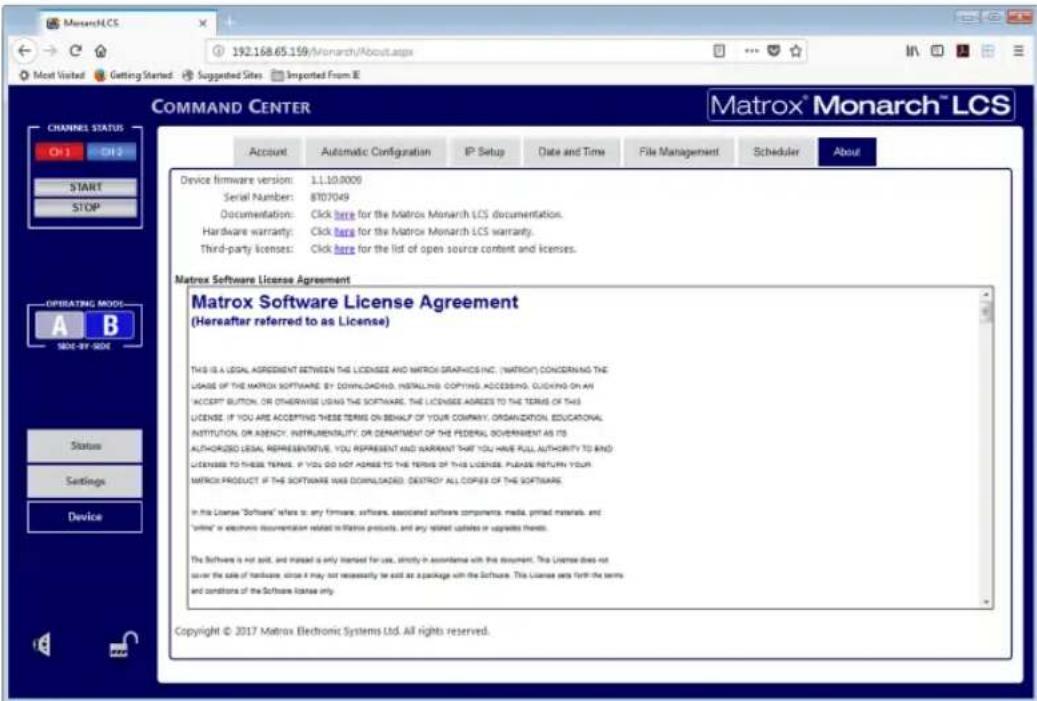
Your notes
A
Recording file size and duration
This appendix contains tables of approximated recording file sizes and recording lengths.
Recording file sizes and duration
The following tables list the approximate recording file size based on the average video data rate and recording duration, and the approximate maximum recording duration given the average video data rate and available disk space.

Note Unless a specific recording duration limit was set in the record settings, your Monarch device limits the duration of each recording to 4 hours and 50 minutes. The recording will automatically stop when the duration limit is reached.
Approximate file size
| Recording Duration | Average Video Data Rate (kb/s) | |||
| 500 200 | 0 5000 15 000 | |||
| 5 min 18.8 | MB 75 MB | 188 MB 563 | MB | |
| 30 min 112 | .5 MB 450 | MB 1.1 GB 3.4 | GB | |
| 60 min | 225 MB 900 | MB 2.3 GB | 6.8 GB | |
| 3 hrs 675 | MB 2.7 GB | 6.8 GB 20.3 | GB | |
| 4 hrs 50 min | 1.1 GB 4.5 GB | 11.3 GB | 33.8 GB | |
Approximate maximum recording duration
Sharing a network folder
This appendix provides instructions for sharing network folders with the Monarch.
Introduction
This appendix describes how to set up shared folders on a Windows or Mac system so they can be used as destination folders for Monarch recordings and file transfers.

Important Please note the following about creating shared folders:
- When specifying the path, all folders in the path must already exist. Monarch will not create new folders.
- When creating a shared folder for Monarch recordings (see “Destination settings (for recording)” on page 49), you must also specify the basename of the file since you are creating the file at that point. You do not specify the basename for file transfers (see “File Management tab” on page 63), only the destination folder, since those files have already been created and named.
Recording or transferring to folders on a USB or SD card
When recording or transferring to a USB device or SD card, enter the folder(s) on the recording device to which you want to record, if applicable, followed by the basename (if it is for a recording). Do not enter a basename for file transfers.
For example, if you want to name your file “Recording1”, and save the file in a folder named “Files” that is contained within another folder named “Project” on the root directory, enter Project/Files/Recording1. If you want to save the file in the media device's root directory, enter Recording1.
Recording or transferring to folders on a network drive
This option allows you to record or transfer files to a shared folder on the network. The method for entering the location depends on the operating system of the computer that contains the shared folder. For more information on supported operating systems, see “Supported operating systems” on page 2.
On a Windows system
When recording or transferring to a shared folder that is on a Windows system on the network, you must enter the IP address of the location on the network that will receive the file, followed by the shared folder name, and then the basename (if it is for a recording). Do not enter a basename for file transfers.
Use the following format:
//IP address/shared folder name/basename
For example, if you want to name your file “Recording1”, and send the file to a shared folder named “Files” that is located on a network computer with an IP address of “123.456.7.890”, enter //123.456.7.890/Files/Recording1.
i ImportantIf the network destination has a firewall, it must be disabled in order to send the file to the network location.
On a Mac OS system
When recording or transferring to a shared folder that is on a Mac OS system on the network, the folder to which you want to send the file must be shared using the Network File System (NFS) file-sharing protocol.
To share a folder using the NFS protocol, the full path to the folder that you want to share is required. You can obtain the full path to the folder by right-clicking the folder, and then clicking Get Info.
Important Shared folders that use a file-sharing protocol other than NFS are not supported.
1 On the computer that contains the folder that you want to share, make sure that you're logged in as an administrator and that your user account has a password. User accounts that do not have a password cannot be used to share a file using the NFS protocol.
2 In the Finder menu, choose File > New Finder Window.
3 In the Applications folder, click the Utilities folder, and then click Terminal
4 In the Terminal window, type the following command, where "Path" is the full path to the folder that you want to share:
echo /Path -mapall=\$(logname)| sudo tee -a /etc/exports
For example, to share a folder named Files that is located on the Desktop under Matrox in the Users root directory folder, type the following command:
echo /Users/Matrox/Desktop/Files -mapall=\$(logname)| sudo tee -a /etc/exports
For added security, you can restrict write access to the folder to one device by adding the IP address of the Monarch device that you want to use to write to the folder. For example, if the IP address of the Monarch device is 169.254.1.11, type the following command:
echo /Users/Matrox/Desktop/Files 169.254.1.11 -mapall=\$(logname)| sudo tee -a /etc/exports
5 Press ENTER.
6 Type your user account password, and then press ENTER.
7 Type the following command:
Recording or transferring to folders on a network drive
sudo nfsd restart
8 Press ENTER.
9 Close the Terminal window.
The folder is now a shared folder.
10 Now that you have created the shared folder, you must specify the folder path in the Monarch Command Center.
When entering the folder, you must enter the IP address of the location on the network to which you want to record or transfer, followed by the full path to the shared folder from the root directory, and then the basename (if it is for a recording). Do not enter a basename for file transfers.
Use the following format:
//IP address:/full path to shared folder/basename
For example, if you want to name your file “Recording1” and save the file to a shared folder named “Files” that is located on the Desktop under “Matrox” in the Users root directory folder on a network computer with an IP address of “123.456.7.890”, enter the following:
//123.456.7.890:/Users/Matrox/Desktop/Files/Recording1

Tip You can obtain the full path to the shared folder by right-clicking the folder, and then clicking Get Info.
The Monarch can now record or transfer files to the shared folder.
C
Integrating Monarch LCS with Kaltura
This appendix describes how to use Monarch LCS with the Kaltura service for creating custom scheduled events.
Introduction
Monarch LCS allows you to import and use Kaltura events in the Monarch Scheduler. From a custom page in the Monarch Command Center, you establish a connection with the Kaltura service, and then use the Monarch Scheduler to fetch and load events created in Kaltura MediaSpace.

Note Please note the following:
- This document does not describe how to use Kaltura beyond what is required for configuring the Monarch to accept Kaltura events. You are expected to be familiar with Kaltura functionality and/or terminology.
- References to Kaltura in this document (including user interface instructions) were up-to-date at the time of this document's publication.
Connecting Monarch to Kaltura
To connect your Monarch device to Kaltura, you will need the following Kaltura credentials:
- Partner ID and Administrator Secret
Found in the Kaltura Management Console under Settings > Integration Settings > Account Info. - Service URL
The URL for the Kaltura API. If the API is hosted by Kaltura the URL is the default https://www.kaltura.com. However, you may be hosting locally. - User ID
Your personal Kaltura User ID.

To connect Monarch to Kaltura:
1 Open a web browser and type the following into the address bar: http://
The following page appears:
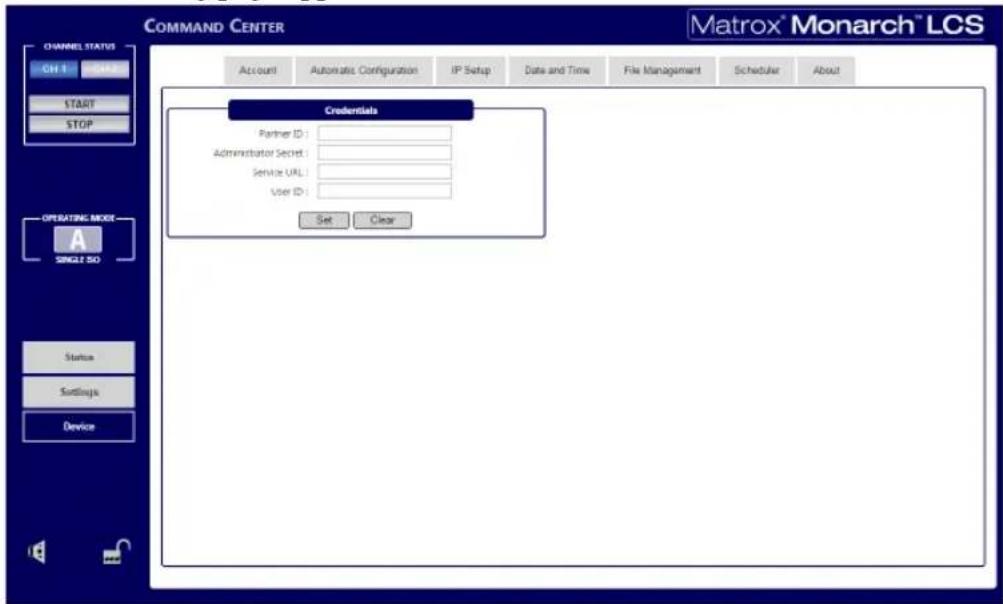
2 Enter your Kaltura credentials.
3 Click Set.
Your Monarch device is now connected to Kaltura. The Kaltura tab appears in the Command Center top menu, and the Register Device section appears.
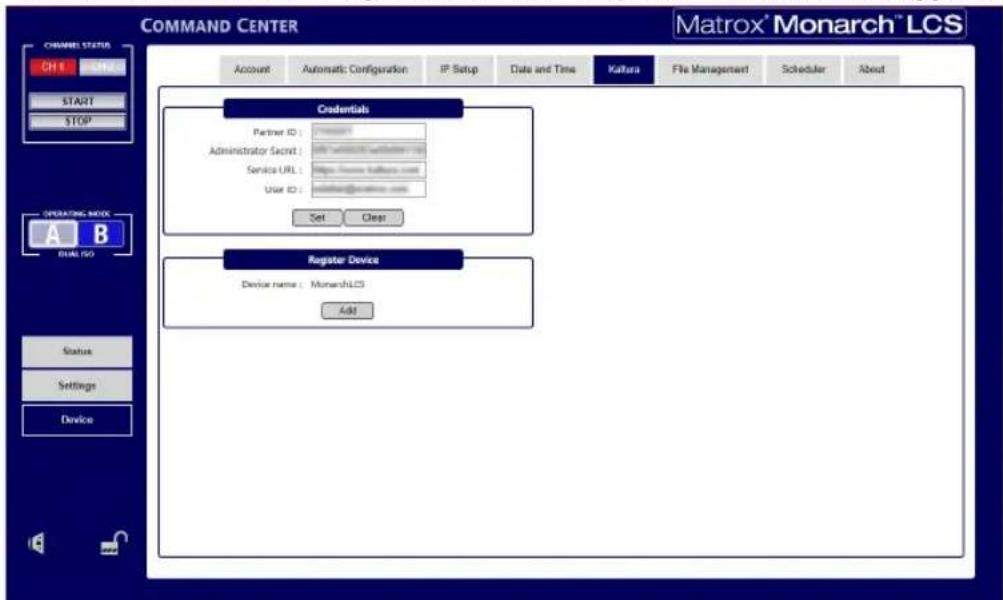
4 Under Register Device, your Monarch device name will be listed and can be added as a Kaltura resource.
If you want to change the Monarch device name before you add it as a resource, you must do so from the Account tab. (see “Account tab” on page 55).
5 Click Add.
Your Monarch has been added as a Kaltura resource, and will now be available for you to select when creating an event in Kaltura MediaSpace.
Please note the following:
- After you have successfully connected to Kaltura, it is recommended that you export your settings as a XML file using Monarch's Automatic Configuration feature. Kaltura settings are not preserved after a factory reset, and exporting your configured settings means that you can easily import them back if you ever need to factory reset your Monarch. For more information, see “Exporting and importing Kaltura settings” on page 84.
- If you add another Monarch device with the same name, the second Monarch will also be linked to the same Kaltura resource. Events created for that resource can then be applied to both Monarchs.
Disconnecting Monarch from Kaltura
To access the Kaltura tab, open the Monarch LCS Command Center (see "Accessing the Command Center" on page 22), and then choose Device > Kaltura.

Note The Kaltura tab is only visible if you have already connected your Monarch to the Kaltura service as described in “Connecting Monarch to Kaltura” on page 80.
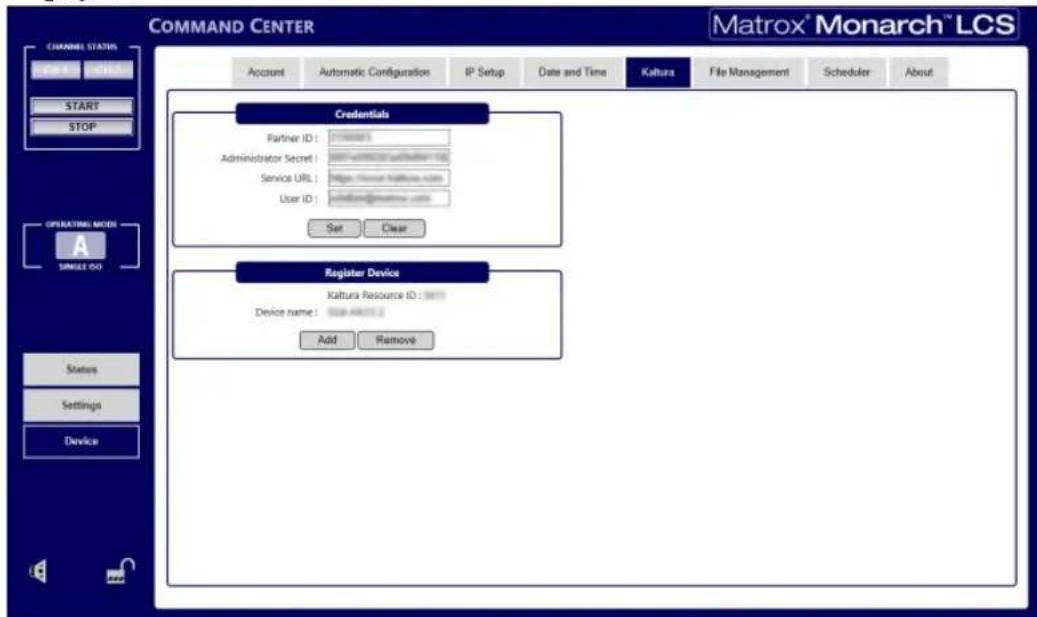
Appendix C, Integrating Monarch LCS with Kaltura
To disconnect Monarch from Kaltura:
1 Click Remove.
2 Enter the name of the Monarch and then confirm the delete operation. Removing the Monarch this way will delete the Kaltura resource. If you still want to unlink the Monarch but preserve the Kaltura resource, you can change the Monarch device name instead of removing it.
3 You can also remove the Kaltura tab from the Command center. Type the following into your web browser: http://
N o t e The “Reset” is case-sensitive. It must be a capital “R”.
4 Press ENTER.
The Monarch has been disconnected from the Kaltura resource, and the Kaltura tab no longer appears in the Command Center.
Please note the following:
- Any loaded Kaltura calendars are now disabled.
- If you were periodically pulling new calendar changes from Kaltura, that is now disabled.
- If you add the same Monarch device to Kaltura again (see “Connecting Monarch to Kaltura” on page 80) it is as if you are adding it for the first time. It will not relink to the same Kaltura resource as before, and you will have to re-create your events.
Creating Kaltura events for use in Monarch Scheduler
After you have established the link between your Monarch device and Kaltura, you can create events in Kaltura MediaSpace, and have the Monarch Scheduler import those events into the calendar.

Note The Kaltura MediaSpace instructions provided in the steps below were current at the time that this document was written. If you find any discrepancies between these instructions and the Kaltura user interface you are currently using, refer to Kaltura's documentation for more information.
To create a event in Kaltura MediaSpace:
1 Open Kaltura Media Space and log in with your Kaltura credentials.
2 Go to My Schedule.
3 Click Create Event.
The event name can be anything you want, but it will be truncated when viewed in the Monarch Scheduler.
4 Set the time for your event.
Creating Kaltura events for use in Monarch Scheduler
Remember to account for the time zone of your Monarch device when setting the event time. The time zone of the Kaltura event cannot be changed.
5 Select the resources (i.e. Monarchs) you want your event to apply to.
6 Clear the option Copy details from event to recording to display further options.
7 Click Save.
8 Again clear the option Copy details from event to recording.
9 From the Co-Editors and Co-Publishers section, select Published.
10 Select your desired option from the list.
11 Click Save and Exit.
Your event will be now be listed in My Schedule.
12 Open the Monarch Command Center, and go to Device > Scheduler.
13 From the Load Schedule drop-down list, select From Kaltura.
If the From Kaltura option is not shown, it means your Monarch is not linked to the Kaltura service. For more information, see “Connecting Monarch to Kaltura” on page 80.
14 Click Pull to get the events from Kaltura.
15 (Optional) If you want to periodically check for schedule updates, enter how often in minutes you want Monarch to fetch new calendar changes.
16 If it is not already enabled, enable Scheduler mode

Your Kaltura events are now enabled for the Monarch Scheduler.
Exporting and importing Kaltura settings
When you perform a factory reset of your Monarch device, the Kaltura configuration settings are not maintained. By exporting the settings to an XML file, you will then be able to import them by using the Automatic Configuration feature.

Note The Automatic Configuration feature is described in more detail in "Automatic Configuration tab" on page 56. This section describes how to use Automatic Configuration to preserve and update Kaltura settings.

To export your Kaltura settings:
1 Connect your Monarch to Kaltura with your Kaltura credentials as described in “Connecting Monarch to Kaltura” on page 80.
2 In the Monarch Command Center go to Device > Automatic Configuration.
3 Under Export current settings to a Monarch LCS configuration file click Generate.
4 Save the XML file that is generated.
5 Open the XML file using Notepad++ or a similar text editor.
6 Scroll down to the

Important For security reasons, the Administrator Secret tag
7 If you add the
Your Kaltura settings are now saved to the XML file.

To import your Kaltura settings:
1 Save the XML file you created in "To export your Kaltura settings:" on page 84 to a USB key or similar device.
2 After the Monarch's firmware update is complete, connect the USB device to the USB 2 connector on the Monarch.
3 Perform a factory reset of the Monarch (see "Using the Reset button" on page 12).
When the Monarch boots back up, the Kaltura configuration settings will have been updated.
Your notes
D
Matrox Monarch LCS Specifications
This appendix provides specifications for the Monarch LCS hardware.
General
• Regulatory compliance
-EMC: FCC Class A, CE Mark Class A, ACMA C-Tick Mark -RoHS Directive 2011/65/EU
- Weight
-0.6 kg
- Power
-Input: 9-24 VDC -Connector: DIN4 -Total power consumption: 20-30 Watts (42 max)
- Power Supply
- Line voltage: 100-240 VAC - Frequency: 50-60 Hz - Input connector: IEC320-C8 - Output connector: DIN4 Locking power - Output: 12VDC (42 W)
• International Adapter
-US/UK -European
Connections
- HDMI inputs (2)
- Supported video input formats (auto-detected): - 1920 × 1080p at 25/29.97/30/50/59.94/60 fps - 1920 × 1080i at 25/29.97 fps - 1280 × 720p at 50/59.94/60 fps - HDMI YCbCr 4:2:2 / RGB - HDMI embedded audio, 2-channel - HDCP not supported - Standard Type A HDMI connector (19 pins)
• H D M I o u t p u t
- HDMI YCbCr 4:2:2 / RGB - HDMI embedded audio, 2-channel - Standard Type A HDMI connector (19 pins)
- S D I i n p u t
–Supported video input formats (auto-detected):
- 1920 × 1080p at 25/29.97/30/50/59.94/60 fps
- 1920 × 1080i at 25/29.97 fps
- 1280 × 720p at 50 / 59.94 / 60 fps
- 720 × 576i at 25 fps
- 720 × 486i at 29.97 fps
-8-channel, 24-bit SDI embedded audio, 48 kHz sample rate, synchronous
-SDI compliant with SMPTE 259M/292M/424M(Level A)/425M
- BNC connector (75 Ω), terminated
–Full audio and VANC preservation
- SDI output
-SDI compliant with SMPTE 259M/292M/424M(Level A)/425M
-8-channel, 24-bit SDI embedded audio, 48kHz sample rate, synchronous
-BNC connector (75 Ω)
- Unbalanced analog audio input
-1x stereo 3.5 mm (1/8") stereo jack
-Input impedance: Hi-Z
-Nominal live level -10 dBv with 4 dB headroom
- Unbalanced analog audio output
-1x stereo 3.5 mm (1/8") stereo jack
-Output impedance: 25 ohm
—"Nominal live level -10 dBv with 4db headroom
- Data ports
-2 x 2.0 USB ports
-1 x auto-sensing 10/100/1000 Base-T Ethernet J-45 port
-1 x SD/SDHC card slot.
Environmental specifications
• Minimum/maximum room operating temperature: 0 to 40°C
- Minimum/maximum storage temperature: -20 to 60^ C
• Maximum altitude for operation: 3,000 meters
• Maximum altitude for transport: 12,000 meters
- Operating humidity: 20 to 80% relative humidity (non-condensing)
• Storage humidity: 5 to 95% relative humidity (non-condensing)
Dimensions
The dimensions for the Monarch LCS are as follows.
Top
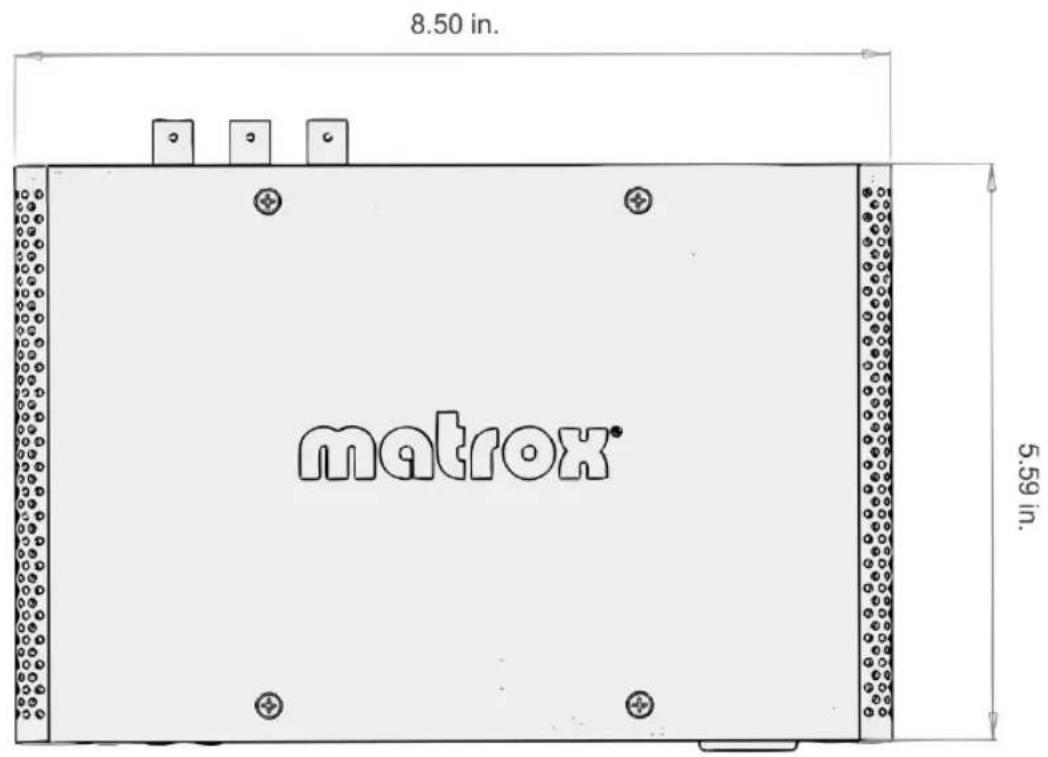
Front
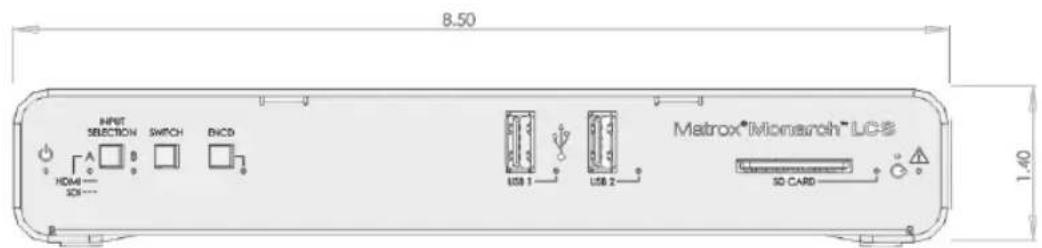
Side
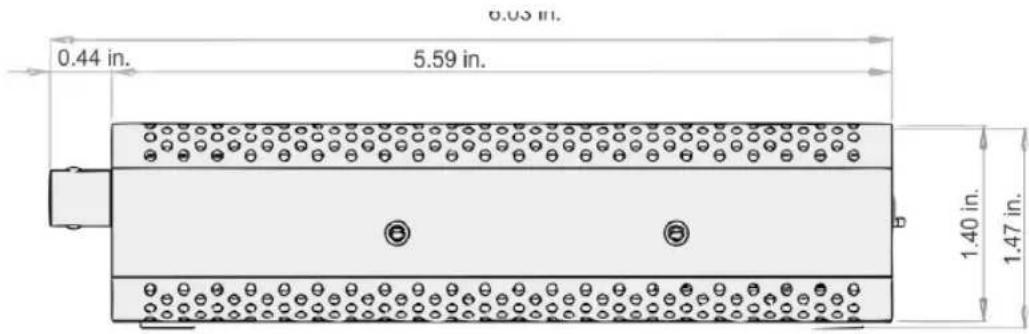
Your notes
E
Matrox Customer Support
This appendix explains how you can register your Matrox product and obtain customer support.
How to get Matrox customer support
If you have a problem that you're unable to solve by referring to the documentation for your Matrox product, please contact your Matrox representative. He or she should be able to help you quickly correct any installation or system configuration problem.
If your representative is unable to solve your problem, contact Matrox for further information and assistance.
Registration
You can register your Matrox product in the Matrox Support section of our website at www.matrox.com/video/support.
Only registered users are entitled to customer support, utilities, special promotional offers, and access to our user forum.
Keep up to date with our website
In addition to registering your Matrox product, our website offers you up-to-the-minute information about Matrox products and software updates. Be sure to place our site in your favorites or bookmarks:
www.matrox.com/video/support.
Contacting us
Matrox is proud to offer worldwide customer support. Please use the contact information for your Matrox product and area as provided on our website at www.matrox.com/video/support.
Index
A
About information (device) 71
AC power 11
Account settings 55
Advanced settings 46
Audio 29
hardware input 11
hardware output 10
source bit rate 30
source sample rate 29
Automatic configuration 56
C
Command Center
About tab 71
accessing 20
Account tab 55
Automatic Configuration tab 56, 82
Control buttons 24
Date and Time tab 61
device name 55
Encoder settings 40
File Transfer tab 63
IP Setup tab 59
log in 20
password 55
Production settings 28
Save/Load settings 52
Scheduler tab 67
Status page 26
Connection
analog audio input 11
analog audio output 10
LAN port 8
power 11
SD cards 8
USB ports 7
Customer support 94
D
Date and time 61
Device name 55
Dual Isolated mode 32
E
Encoder
buttons in Command Center 24
Ethernet port 8
F
File Transfer settings 63
Filename only 49
Filename with date/time 49
Filename with numeric counter 50
Firmware
update 20
Front panel buttons
Encoder button 7
Input select 6
H
Hardware
firmware update 20
overview 6
specifications 87
|
Input
analog audio 11
Input formats, supported 2
Internet site, Matrox 94
IP address
saving to USB 12
IP mode
changing in Command Center 58
setting to factory default using Reset button 13
L
LEDs, hardware 14
M
Matrox
contacting us 94
WWW site 94
Matrox Monarch LCS
analog audio input 11
analog audio output 10
date and time 61
device name and password 55
firmware update 20
hardware 6
hardware status LEDs 14
IP address 17
IP mode in Command Center 58
IP mode using Reset button 12
LAN port 8
Matrox Monarch Utils application 18
network connection 17
powering 11
SD card slot 8
USB ports 7
Matrox Monarch Utils application 18
Maximum recording duration 51
Media 49
Monarch LCS
See Matrox Monarch LCS
N
Name, device 55
Network
connection 17
Monarch LCS IP address 17
port 8
with DHCP server 18
without DHCP server 19
O
Open Capture 41
Operating Modes 29
Output
analog audio 10
P
Password, Command Center 55
Picture-in-picture mode 36
Power
connecting to Monarch LCS 11
R
Record mode 40
Open Capture option 41
Registering your Matrox product 94
Reset, Monarch LCS hardware 12
s
Save file as 49
Scheduler settings 67
SD card slot 8
Settings
account 55
audio source bit rate 30
audio source sample rate 29
date and time 61
device name 55
IP mode 58
password 55
Settings page
Encoder tab 40
Production tab 28
Save/Load tab 52
Side-by-side mode 38
Single Isolated mode 30
Specifications, hardware 87
Status
LEDs 14
saving to USB 12
Style conventions 3
Switcher mode 34
T
Technical support 94
U
USB ports 7
Username, Command Center 55
V
Video 29
W
WWW site, Matrox 94
Compliance Statements
USA
FCC Compliance Statement
Remark for the Matrox hardware products supported by this guide
This equipment has been tested and found to comply with the limits for a Class A digital device, pursuant to Part 15 of the FCC Rules. These limits are designed to provide reasonable protection against harmful interference when the equipment is operated in a commercial environment. This equipment generates, uses, and can radiate radio frequency energy and, if not installed and used in accordance with the instructions manual, may cause harmful interference to radio communications. Operation of this equipment in a residential area is likely to cause harmful interference in which case the user will be required to correct the interference at his own expense.
WARNING
Changes or modifications to this unit not expressly approved by the party responsible for the compliance could void the user's authority to operate this equipment. The use of shielded cables for connection of the equipment and other peripherals is required to meet FCC requirements.
Canada
(English) Industry Canada Compliance Statement
CAN ICES-3 (A)/NMB-3 (A)
Remark for the Matrox hardware products supported by this guide
These digital devices do not exceed the Class A limits for radio noise emission from digital devices set out in the Radio Interference Regulation of Industry Canada.
(English) European user's information – Declaration of Conformity
Remark for the Matrox hardware products supported by this guide

These devices comply with EC Directive 2014/30/EU for a Class A digital device. They have been tested and found to comply with EN55022/CISPR22 and EN55024/CISPR24. In a domestic environment these products may cause radio interference in which case the user may be required to take adequate measures. To meet EC requirements, shielded cables must be used to connect the equipment and other peripherals. These products have been tested in a typical Class A compliant host system. It is assumed that these products will also achieve compliance in any Class A compliant system.
www.matrox.com/video
- Copyright © 2019 Matrox Electronic Systems Ltd. All rights reserved.
- Matrox Software License Agreement
- (Hereafter referred to as License)
- LICENSES:
- END USER LICENSE
- OEM LICENSE
- GENERAL LICENSE TERMS: (APPLICABLE TO BOTH END-USERS & OEMs)
- COPYRIGHT
- DISCLAIMER OF WARRANTIES
- LIMITATION OF LIABILITY
- TERMINATION
- MISCELLANEOUS
- Your notes
- Contents
- Chapter 1
- Introduction
- Chapter 2
- Matrox Monarch LCS Hardware and Connections
- Chapter 3
- Network Connection and Setup
- Chapter 4
- Using the Command Center
- Recording file size and duration
- Appendix B
- Sharing a network folder
- Appendix C
- Integrating Monarch LCS with Kaltura
- Appendix D
- Matrox Monarch LCS Specifications
- Appendix E
- Matrox Customer Support
- 1
- Welcome to Matrox Monarch LCS
- Supported input formats
- Supported operating systems
- Supported Web browsers
- Streaming
- Recording
- About this guide
- Style conventions
- 2
- Matrox Monarch LCS hardware
- Input select button
- Encode button (ENCD)
- USB ports 1 and 2
- SD card
- Remarks
- LAN
- RS-232
- Video/audio inputs and outputs
- HDMI out
- HDMI in A and B
- SDI out
- SDI in
- AUX
- Analog audio output
- Analog audio input
- Powering Monarch LCS
- Using the Reset button
- Device reboot
- Switch to Static IP mode
- Reset to factory defaults
- Status LEDs
- 3
- Monarch LCS Utils application
- Monarch LCS Radar application
- Chapter 3, Network Connection and Setup
- Network connection and IP address
- Finding the Monarch LCS current IP address
- Displaying the IP address on an HDMI monitor
- Saving the IP address and status to USB
- Finding the IP address with Monarch LCS Utils or LCS Radar
- Connecting to a network with a DHCP server (DHCP IP mode)
- Connecting to a network without a DHCP server (Static IP mode)
- Accessing the Command Center
- Updating the Monarch LCS firmware
- Installing the Monarch SSL certificate
- 4
- Using the Command Center side menu
- Status page
- Monarch LCS errors
- Streaming and recording errors
- Fan and Temperature errors
- Settings page
- Production tab
- About the Operating Modes
- Configuring video and audio settings
- Configuring Single Isolated mode
- Configuring Dual Isolated mode
- Chapter 4, Using the Command Center
- Configuring Switcher mode
- Configuring Picture-in-Picture mode
- Configuring Side-by-Side mode
- Encoder tab
- Mode
- - Wowza Cloud RTMP
- When you select Wowza Cloud, a Connection
- Presets
- Resolution
- Frame rate
- Target video data rate
- Include audio
- Advanced settings
- Destination settings (for streaming)
- Using the RTSP streaming protocol
- Using the RTMP streaming protocol
- ImportantPlease note the following:
- Destination settings (for recording)
- Save/Load tab
- Profiles
- To save a profile:
- To load a profile
- Device page
- Account tab
- Device name and password
- Automatic Configuration tab
- Accessing the Automatic Configuration tab
- Loading settings from a configuration file
- Loading settings from a web page
- Saving settings to a configuration file
- Automatically importing Monarch settings on factory reset
- IP Setup tab
- Setting the IP mode to DHCP
- Setting the IP mode to Static
- Preventing Monarch LCS from appearing as a UPnP device on the network
- To prevent the Monarch LCS from appearing:
- Date and Time tab
- Setting the device date and time
- File Management tab
- About File Management
- Configuring your Source and Destination
- Using Manual File Management
- Using Automatic File Management
- Click Apply.
- Scheduler tab
- About Scheduler mode
- Events
- Note Please note the following:
- Custom event fields
- Creating and importing a calendar
- About tab
- A
- Recording file sizes and duration
- Recording or transferring to folders on a USB or SD card
- Recording or transferring to folders on a network drive
- On a Windows system
- On a Mac OS system
- C
- Connecting Monarch to Kaltura
- To connect Monarch to Kaltura:
- Click Add.
- Disconnecting Monarch from Kaltura
- To disconnect Monarch from Kaltura:
- Creating Kaltura events for use in Monarch Scheduler
- To create a event in Kaltura MediaSpace:
- Exporting and importing Kaltura settings
- To export your Kaltura settings:
- To import your Kaltura settings:
- D
- General
- • Regulatory compliance
- - Weight
- - Power
- - Power Supply
- • International Adapter
- Connections
- - HDMI inputs (2)
- • H D M I o u t p u t
- - S D I i n p u t
- Environmental specifications
- Dimensions
- Side
- E
- How to get Matrox customer support
- Registration
- Keep up to date with our website
- Contacting us
- Index
- F
- H
- |
- L
- M
- N
- O
- P
- R
- s
- T
- U
- V
- W
- Compliance Statements
- USA
- FCC Compliance Statement
- WARNING
- Canada
Brand : MATROX
Model : Monarch LCS
Category : Digital decoder