
ZSR0104FS - Router Zonet - Free user manual and instructions
Find the device manual for free ZSR0104FS Zonet in PDF.


| Product Type | 4-Port 10/100M Internet Broadband Router with USB Printer Server |
| Dimensions | 165 x 87 x 30 mm (6.5 x 3.4 x 1.2 in) |
| Power Supply | DC 7.5V, 1A |
| Power Consumption | 7.5W max |
| Network Standards | IEEE 802.3 10BASE-T, IEEE 802.3u 100BASE-TX, IEEE 802.3x, USB 1.1 |
| Ports | 1 x WAN 10/100M RJ-45, 4 x LAN 10/100M RJ-45, 1 x USB 1.1 Printer Port, 1 x Reset Button |
| NAT Accelerator | Yes, 64 entries |
| MAC Address Table | 1K entries |
| Auto MDI/MDIX | Yes on all RJ-45 ports |
| Switching Method | Store and forward |
| Supported Protocols | TCP/IP, PPPoE, PPTP Client, DHCP Client/Server, RIP I/II, Static Routing |
| Firewall Features | DoS attack prevention, URL blocking, IP port filtering, hide public IP |
| VPN Pass-through | PPTP, IPSec |
| Management | Web-based (HTTP), remote management via WAN |
| LED Indicators | Power, Diag, Link/Act (LAN/WAN), 100M, USB Printer Link/Act |
| Operating Temperature | 0°C to 50°C (32°F to 122°F) |
| Storage Temperature | -20°C to 70°C (-4°F to 158°F) |
| Humidity | 10% to 90% (non-condensing) |
| Regulatory Approvals | FCC Class B, CE Class B |
| Package Contents | Router, power adapter, CD-ROM (user manual & printer server driver), bracket set |
Frequently Asked Questions - ZSR0104FS Zonet
User questions about ZSR0104FS Zonet
0 question about this device. Answer the ones you know or ask your own.
Ask a new question about this device
Download the instructions for your Router in PDF format for free! Find your manual ZSR0104FS - Zonet and take your electronic device back in hand. On this page are published all the documents necessary for the use of your device. ZSR0104FS by Zonet.
USER MANUAL ZSR0104FS Zonet
4 Port 10/100M Internet Broadband Router with USB Printer server
User Guide
4824904AXZZ0
FCC Statement
This device complies with FCC Rules Part 15. Operation is subject to the following two conditions:
- This device may not cause harmful interference, and
- This device must accept any interference received, including interference that may cause undesired operation.
This equipment has been tested and found to comply with the limits for a Class B digital device, pursuant to Part 15 of the FCC Rules. These limits are designed to provide reasonable protection against harmful interference in a residential installation. This equipment generates, uses and can radiate radio frequency energy and, if not installed and used in accordance with manufacturer's instructions, may cause harmful interference to radio communications. However, there is no guarantee that interference will not occur in a particular installation. If this equipment does cause harmful interference to radio or television reception, which can be determined by turning the equipment off and on, the user is encouraged to try to correct the interference by one or more of the following measures:
- Re-orient or relocate the receiving antenna.
- Increase the separation between the equipment and receiver.
- Connect the equipment to an outlet on a circuit different from that to which the receiver is connected.
- Consult the dealer or an experienced radio/TV technician for help.
WARNING! Any changes or modifications to this product not expressly approved by the manufacturer could void any assurances of safety or performance and could result in violation of Part 15 of the FCC Rules.
CE Declaration of conformity
This equipment complies with the requirements relating to electromagnetic compatibility, EN 55022 class B for ITE and EN 50082-1. This meets the essential protection requirements of the European Council Directive 89/336/EEC on the approximation of the laws of the Member States relating to electromagnetic compatibility.
Trademarks
All company, brand, and product names are trademarks or registered trademarks of their respective companies.
Contents
1:Introduction 1
1.1 Feature & Benefit 1
1.2 Technical Specification 2
1.3 Package Contents 3
1.4 Glossary 3
2: Hardware Installation 6
2.1 Production Description 6
2.1.1 Front Panel 6
2.1.2 LEDs 6
2.1.3 Rear Panel 6
2.2 Getting Started 7
2.2.1 System Requirement 7
2.2.2 Before Installation 7
2.2.3 Setting Hardware Connection 7
2.2.4 Configure your computer 8
3: Using Configuration Menu 17
3.1 Basic Setup 18
3.2 DHCP Setting 24
3.3 URL Access 25
3.4 IP Access 26
3.5 Virtual Server 27
3.6 DMZ Host 28
3.7 Device Administration 29
3.8 Status Monitor 30
3.9 RIP 31
3.10 Static Routing 32
3.11 Dynamic DNS 33
3.12 Special Application 34
3.13 Statistics 35
3.14 Security Setting 36
3.15 UPnP 37
4: Install Printer Server 38
5: Trouble-Shooting 40
6: TCP/IP Port List for Internet Service 41
1. Introduction
This Broadband Router includes 4 10/100Mbps switch ports and a USB printer port. It provides a complete solution for Internet surfing and office resources sharing. This 4 Port Internet Broadband Router provides a simple, efficient, and cost-effective solution for LAN/Internet, especially for SOHO (Small Office/Home Office) users to share the Internet resources simultaneously using one ISP (Internet Service Provider) account. It also supports a wide range of LAN-WAN connectivity media. There are the DSL modem, cable modem, and Ethernet 10/100M connections. Another unsung feature is that the 4 Port Internet Broadband Router makes it easier and more economical to expand and segment your LAN. As a result, you would never have a nightmare with IP address depletion problem.
In addition, this broadband router built-in USB Printer Server, allowing users can share networked printer anytime. Besides, with firewall function, the 4 Port Internet Broadband Router can always protect your LAN from outsider's break-ins and yet expose your local servers such as Web Server, E-mail Server, FTP server, for remote access by Virtual Server Mapping or DMZ setting.
1.1 Feature & Benefit
- Conforms to IEEE 802.3, IEEE 802.3u and IEEE 802.3x standards
- Provides 1 10/100M WAN interface (RJ-45) to connect with DSL or cable modem
- Provides 4 ports 10/100M switch LAN interface to connect your local area network
- Provides 1 USB 1.1 Printer Server Port to connect USB Printer
- Embedded with DHCP Server & Printer Server
• Supports DDNS (Dynamic DNS) & Virtual Server
• Supports PPPoE, PPTP Client - Build-in Network Address Translation Accelerator (NATA) provides hardware NAT acceleration
- Firewall function, like DoS Attack prevented to protect your PCs from outside intruders
- Configurable through any networked PC's web browser and Remote Management
- Simultaneously acts as either a DHCP server on the LAN and a DHCP client on the WAN
- By using virtual server, outside users will be able to access the internal IP servers via Internet.
- Administrators can block specific interior users' Internet access
- URL Blocking: Prevent specific web sites form interior user's access
• Supports RIP I & II, Static Routing
• Supports PPTP, IPSec pass through
1.2 Technical Specification
| Standards IEEE 802.3 10BASE | E-T / IEEE 802.3u 100BASE-TXUSB 1.1 | |
| Protocol CSMA/CD, TCP/IP | PPPoE, PPP, PPTP Client, DHCP Client,DHCP Server, RIP I/RIP II | |
| Topology | Star | |
| Media 10BASE-T: UTP/STP | Cat. 3, 4 or 5100BASE-TX: UTP/STP Cat. 5 | |
| No. of Port WAN: 1x 10/100M | RJ-45 portLAN: 4 x 10/100M RJ-45 portsPrinter Port: 1 x USB 1.1 portReset: 1 x Reset Button | |
| NAT Accelerator Engine Yes | 64 Entries | |
| Flash/SDRAM 1MB/4MB | ||
| MAC Address 1K | ||
| Auto MDI/MDIX Yes | ||
| LAN Switching Method | Store and forward | |
| PPPoE/PPTP Client/Fixed IP | Yes | |
| DHCP Client | Yes | |
| Port Triggering | Yes | |
| DMZ Host | 2 way access for LAN PC | |
| Routing | RIP I & II, Static routing | |
| Firewall | DoS Attack preventedHide Public IP Address FunctionURL BlockingIP Port Filtering | |
| VPN | PPTP, IP Sec pass through | |
| Management | Local Web-based configuration, Remote Management | |
| LED Indicator | Power, Link/Act, 10/100M, Diag | |
| Environmental Temperature Humidity | Temperature 0°C~50°C Storage -20°C~70°C | Humidity 10%~90% 10%~90% |
| Dimension | 165 ×87 ×30mm | |
| Power Consumption | 7.5W Max. | |
| Power Supply | DC 7.5V, 1A | |
| Conformance | FCC class B, CE mark class B | |
1.3 Package Content
• One 4 Port Internet Broadband Router
- One Power adapter
- One CD-ROM
- One set of Bracket
1.4 Glossary
• LAN – Local Area Network
Local Area Networking (LAN) is the term used when connecting several computers together over a small area such as a building or group of buildings. LAN's can be connected over large areas. A collection of LAN's connected over a large area is called a Wide Area Network (WAN).
A LAN consists of multiple computers connected to each other. There are many types of media that can connect computers together. The most common media is CAT5 cable (UTP or STP twisted pair wire.) On the other hand, wireless networks do not use wires; instead they communicate over radio waves. Each computer must have a Network Interface Card (NIC), which communicates the data between computers. A NIC is usually a 10Mbps network card, or 10/100Mbps network card, or a wireless network card.
Most networks use hardware devices such as hubs or switches that each cable can be connected to in order to continue the connection between computers. A hub simply takes any data arriving through each port and forwards the data to all other ports. A switch is more sophisticated, in that a switch can determine the destination port for a specific piece of data. A switch minimizes network traffic overhead and speeds up the communication over a network.
- What is Router?
A router is a device that forwards data packets from a source to a destination. Routers forward data packets using IP addresses and not a MAC address. A router will forward data from the Internet to a particular computer on your LAN. A router also determines the best route that data packets should follow to ensure that the data packets are delivered properly.
- Firewall
A firewall is a device that sits between your computer and the Internet that prevents unauthorized access to or from your network. A firewall can be a computer using firewall software or a special piece of hardware built specifically to act as a firewall. In most circumstances, a firewall is used to prevent unauthorized Internet users from accessing private networks or corporate LAN's and Intranets.
A firewall watches all of the information moving to and from your network and analyzes each piece of data. Each piece of data is checked against a set of criteria that the administrator
configures. If any data does not meet the criteria, that data is blocked and discarded. If the data meets the criteria, the data is passed through. This method is called packet filtering.
A firewall can also run specific security functions based on the type of application or type of port that is being used. For example, a firewall can be configured to work with an FTP or Telnet server. Or a firewall can be configured to work with specific UDP or TCP ports to allow certain applications or games to work properly over the Internet.
- VPN – Virtual Private Network
Virtual Private Networking (VPN) uses a publicly wired network (the Internet) to securely connect two different networks as if they were the same network. For example, an employee can access the corporate network from home using VPN, allowing the employee to access files and printers. Here are several different implementations of VPN that can be used.
- PPTP – Point-to-Point Tunneling Protocol
PPTP uses proprietary means of connecting two private networks over the Internet. PPTP is a way of securing the information that is communicated between networks. PPTP secures information by encrypting the data inside of a packet.
- IPSec – IP Security
IPSec provides a more secure network-to-network connection across the Internet or a Wide Area Network (WAN). IPSec encrypts all communication between the client and server whereas PPTP only encrypts the data packets. Both of these VPN implementations are used because there is not a standard for VPN server software. Because of this, each ISP or business can implement its own VPN network making interoperability a challenge.
- DHCP – Dynamic Host Configuration Protocol
DHCP is a protocol for dynamically assigning IP addresses to networked computers. With DHCP, a computer can automatically be given a unique IP address each time it connects to a network--making IP address management an easier task for network administrators. When a computer logs on to the network, the DHCP server selects an IP address from a master list and assigns it to the system.
- NAT – Network Address Translation
For a computer to communicate with other computers on the Internet, it must have an IP address. An IP (Internet Protocol) address is a unique 32-bit number that identifies the location of your computer on a network. However, with the explosion of the Internet, the number of available IP addresses are simply not enough.
This is where NAT comes to the rescue. Network Address Translation allows a single device, such as a router, to act as an agent between the Internet (or "public network") and a local (or "private") network. This means that only a single, unique IP address is required to represent an entire group of computers.
- Printer Server
Printer Server allow networked PC sharing the same printer on the network, only the networked PC has printer driver without physical connection directly with printer.
- DDNS – Dynamic Domain Name System Server
Domain Name System Server is a server that matches URLs (such as www.router-net.com) to numeric IP addresses. DDNS
- TCP/IP
Transmission Control Protocol (TCP) with Internet Protocol (IP). The main internetworking protocol used in the Internet.
- PPPoE – PPP (Point-to-Point Protocol) over Ethernet
PPP is the standard Internet protocol for dial-up connections. PPPoE is for connecting remote hosts to the Internet over an always-on connection by simulating a dial-up connection.
- UDP – User Datagram Protocol
UDP provides a procedure for application programs to send messages to other programs with a minimum of protocol mechanism. The protocol is transaction oriented, and delivery and duplicate protection is not guaranteed. Applications requiring ordered reliable delivery of streams of data should use the TCP.
- DMZ Host– De-Militarized Zone Host
DMZ is the portion of a private network that is visible through the network's firewalls. DMZ Host allows a local computer exposed to the Internet. Therefore, an incoming packet will be checked by Firewall and NAT algorithms in the router, then pass to the DMZ host when packet is not sent by hacker and is not limited by Virtual Server list. Besides, there are some IP protocols that does not have port number information. There is no way to use Virtual Server setting to forward incoming packet. Thus, DMZ host is the way to forward such kind of packets. If you try to enable DMZ host and setup Virtual Server, the precedence is Virtual Server and then DMZ. For example, the incoming packet will be checked with Firewall rules, Virtual Server rules and then DMZ host.
2. Hardware Installation
2.1 Product Description
This Router with two type of housing, plastic and metal, is easy to install. With its Diagnostic LEDs, you could easily do trouble-shooting and get status information.
2.1.1 Front Panel

2.1.2 LEDs
The LEDs are explained in the following tables.
| LED | LED Activity |
| Power Lights to indicate the router has power. | |
| Diag. | 1. Lights to indicate loading fail.2. Blinks to indicate that safe mode is on. |
| Link/Act. for 1~4 LAN Port and WAN Port | 1. Lights to indicate a functional network link through the corresponding port (1 through 4 and WAN) with an attached device.2. Blinks to indicate that the router is actively sending or receiving data over that port. |
| 100 | 1. Lights for any port to indicate that the port is operating at 100 Mbps.2. Off to indicate that the port is operating at 10 Mbps while the network is still operating. |
| Link/Act. for USB Printer Port | 1. Lights to indicate a functional USB Printer Port link through the correspond2. Blinks to indicate that the printer is actively sending or receiving data over that port. |
2.1.3 Rear Panel
The following graphic shows the rear panel of 4504SX/AX.

- DC In: To connect the adapter to receive power.
- USB: This is USB Printer Port to connect your USB printer via USB cable.
• WAN: To connect the Cabel/DSL modem via Cat.5 RJ-45 cable.
• LAN 1\~4: To connect networked PC or uplink to Switch or Hub.
- Reset: Pressing the Reset button for more than 3 seconds, the router will restore to factory default setting. Please note that this should be done only when you had tried all the troubleshooting options. Pressing the Reset button during operation may bring you into the risk of creating IP address conflict between your PC and the router. In such a case, you may be compelled to reboot your entire system.
2.2 Getting Started
Please refer to the following sections of this manual for additional information about setting up a network.
2.2.1 System Requirement
Before you getting started, make sure that you meet the following requirements.
- An Internet connection through a cable or DSL modem
- A computer with an Ethernet network card installed
- Your Windows CD, if your computer is running Windows 95, 98, or ME
- UTP network cable with RJ-45 connector
- Either Microsoft Internet Explorer 4.0 (or above version) or Netscape Navigator 4.0 (or above version)
2.2.2 Before Installation
Before you start to connect your router to any network device, make sure you get the following values from your ISP. You will need those values to setup the Router and configure you networked PCs to accept the IP address the Router chooses to assign them.
- PPPoE User Name and Password or Fixed Internet IP Address assigned by your local ISP
- Your Subnet Mask
- Your Default Gateway
- Your Primary DNS IP address
You are supposed to have all those information mentioned above from your ISP. If not, contact your ISP and they will be able to supply all the information you need.
2.2.3 Setting Hardware Connection
Follow the steps listed below to install your Router when you have all the information mentioned above on hand.
Step 1. Power all devices down. This should include your PCs, Cable or DSL modem and the Router.
Step 2. Connect the Router to your PCs.
Connecting Computers: Connect computers directly to the Router on ports 1\~4 on the rear panel. If you have more than 4 computers need to be connected, connect a hub or a switch (using its uplink port) and connect additional computers to that device.
Step 3. Connecting a Cable Modem or DSL Modem: Connect your Cable or DSL modem to the WAN port on the rear panel.
Step 4. Connecting a Printer: If you have a printer that you want to share between computers, connect it to the Printer port using a standard USB Cable.
Step. 5 Power: Plug the power cord into the power jack. And power on computers.

flowchart
graph TD
    A["Notebook"] --> B["Router"]
    C["PC"] --> B
    D["PC"] --> B
    B --> E["Switch/Hub"]
    B --> F["Cable/DSL Modem"]
    B --> G["USB Printer"]
    H["Internet"] --> I["Router"]
2.2.4 Configure your computer
- Windows 95/98/ME
Step 1. TCP/IP Configuration
After you have completed the hardware setup by connecting your devices, you need to configure your computer to connect to your Router.
-
From the Windows desktop, click the "Start" button and choose "Settings", then click "Control Panel."
-
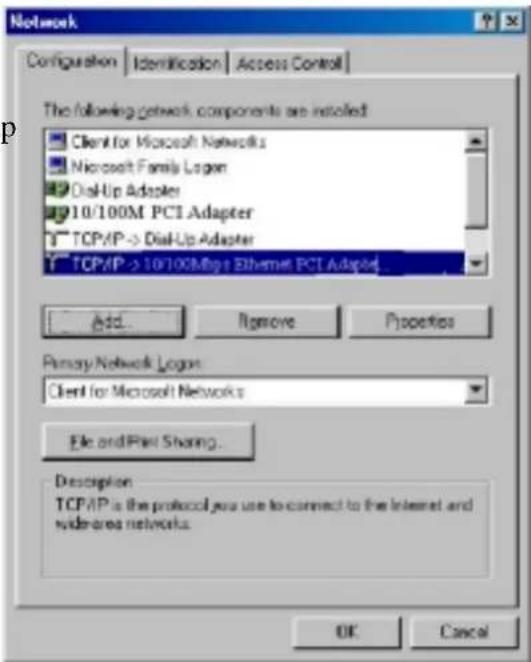
From "Control Panel", double-click the "Network" icon.
-
In the “Network” window, under the “Configuration” tab, double-click the “TCP/IP” entry that is listed with your network card.
-
On the “Internet Protocol (TCP/IP) Properties” dialog box, make sure “Obtain an IP address automatically” and “Obtain DNS server address automatically” are \ selected. If not, select them and click “OK” and close window.
-
Locate your IP address and Subnet Mask. Type them in the spaces provided below.
-
Click the "Gateway" tab and record the numbers listed under "Installed gateways."


- Click the “DNS Configuration” tab. Locate the DNS servers listed under “DNS Server Search Order”. And Click “OK”

- System may need your Windows 95/98/ME CD to copy some files. After it finishes copying, please restart your system.
Step. 2 Disable HTTP Proxy
- Internet Explorer
- Open Internet Explorer and click the stop button. Click "Tools" then "Internet Options"
- In the “Internet Options” window click the “Connections” tab. Then click the “LAN Settings”
- Clear all the checkboxes.


- Click "OK," and then click "OK" again to close the "Internet Options" window.
- Netscape
-
Open Netscape and click the stop button. Click "Edit," then click "Preferences..."
-
In the “Preferences” window, under “Category” double-click “Advanced,” then click “Proxies.” Select “Direct connection to the Internet.” Click “OK.”
Step. 3 Obtain IP Settings from Your Router
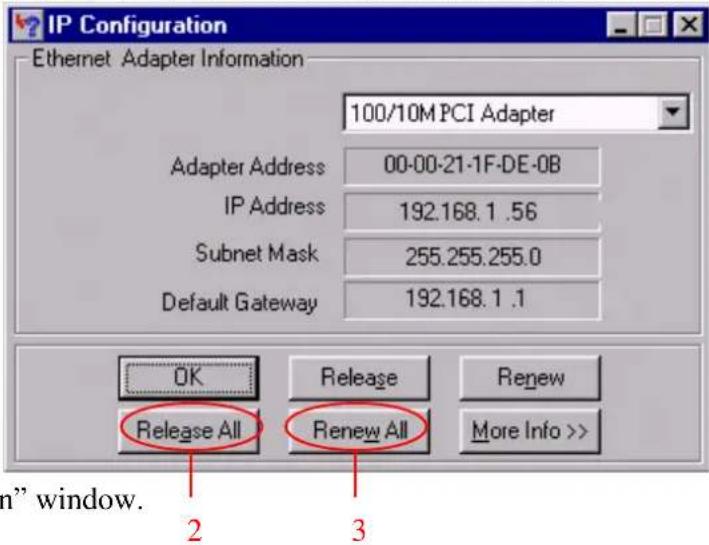
- Click "Start," then "Run..." Type "winipcfg" to open the IP Configuration utility.
- Click the "Release All" button.
- Click the "Renew All" button
- Verify that your IP address is now 192.168.1.xxx, your Subnet Mask is
255.255.255.0 and your Default Gateway is 192.168.1.1. Click
"OK" to close the "IP Configuration" window.
- Windows NT/2000/XP
Step 1. TCP/IP Configuration
After you have completed the hardware setup by connecting your devices, you need to configure your computer to connect to your Router.
- From the Windows desktop, click the "Start" button. Choose "Settings", then click "Control Panel."
- From "Control Panel", double-click the "Network & Dial-Up Connections" icon.
- Double-click the icon that corresponds to the connection to your router.
- Click "Properties" and double-click "Internet Protocol (TCP/IP)."
- On the "Internet Protocol (TCP/IP) Properties" dialog box, make sure "Obtain an IP
address automatically" and "Obtain DNS server address automatically" are selected. If not, select them and click "OK" and close window.
Step. 2 Disable HTTP Proxy
- Internet Explorer
-
Open Internet Explorer and click the stop button. Click "Tools" then "Internet Options"
-
In the “Internet Options” window click the “Connections” tab. Then click the “LAN Settings” button.

- Clear all the checkboxes.

- Click "OK," and then click "OK" again to close the "Internet Options" window.
- Netscape
-
Open Netscape and click the stop button. Click "Edit," then click "Preferences..."
-
In the “Preferences” window, under “Category” double-click “Advanced,” then click “Proxies.” Select “Direct connection to the Internet.” Click “OK.”
Step. 3 Obtain IP Settings from Your Router
-
From the Windows desktop, click the "Start" button, then "Programs", then "Accessories" and then click "Command Prompt."
-
Type "IPCONFIG /RELEASE" and press "Enter".
![Command Prompt Microsoft Windows 2000 [Version5.00.3135.]](/content/2026/06/1185577/images/ecfac7694e8ad15cb1853f9706f5d637c69610b41bfc3fc82f4cb195f7113cf3.jpg)
• MAC OS 7.X or above
Step 1. TCP/IP Configuration
1. Pull down the Apple Menu. Click "Control Panels" and select TCP/IP.  2. In the TCP/IP dialog box, make sure that “Ethernet” is selected in the “Connect Via:” field. Make sure “Using DHCP Server” is already selected in the “Configure” field and close window.  3. Another box will appear asking whether you want to save your TCP/IP settings. Click Save.Step. 2 Disable HTTP Proxy
- Internet Explorer
1. Open Internet Explorer and click the stop button. Click "Edit" then "Preferences"  2. Select "Proxies" and uncheck all checkboxes and click "OK". • Netscape
1. Open Netscape and click the stop button. Click "Edit," then click "Preferences..." 2. In the “Preferences” window, under “Category” double-click “Advanced,” then click “Proxies.” Select “Direct connection to the Internet.” Click “OK.”Step. 3 Obtain IP Settings from Your Router
1. Pull down the Apple Menu. Click "Control Panels" and select TCP/IP. 2. In the TCP/IP window, your new settings will be shown. Verify that your IP address is now 192.168.1.xxx, Subnet Mask is 255.255.255.0 and Default Gateway is 192.168.1.1. Close Window. 3. Using Configuration Menu
After configuration of your network, you can access the Router via Web browser and type the IP Address of Router. The default IP address of this Router is shown as following.  Please note that if you have changed the default IP Address assigned to the Router, make sure to enter the correct IP Address. Then the “Password” dialogue will be shown up. The default “User Name” is “admin”. The default “Password” is “admin”. Please refer to “Device Admin” page to check how to change your password. 3.1 Basic Setup
After enter user name and password, the configuration utility will show up. The first page is "Basic Setup". You can set up your connection type to your ISP. When finishing setting, click "Apply" button to save. If you skip pressing "Apply" button, the system will reset automatically. Note: After applying these settings, sometimes connection information is stored on the modem and needs to be updated. You may need to shut down and restart your modem. 1. Host Name & Domain Name
Some ISPs required these names as identification. You may check with your ISP to see if your Broadband Internet Service has been configured with a host and domain name (like CX-1234-56789). In most cases, leaving fields blank will work.2. Private IP Address
IP Address of this router used by the internal LAN. The default value is 192.168.1.1 for IP Address and 255.255.255.0 for Subnet Mask. In most applications, you should not change the “IP address” from the default (192.168.1.1). However, if you are implementing your router into an existing network, you may need to change it to match your current addressing scheme.3. Public IP Address
The Public IP Address and Subnet Mask of this router are used by external users of the Internet (including your ISP). Choose one of connection type, “DHCP” or “PPPoE” or “Static IP Address” or “PPTP”. Select “DHCP” or “PPPoE” if these values are to be automatically assigned to the router by your ISP. If a fixed Public IP Address is to be used, select “Static IP Address” and enter the IP Address and Public Subnet Mask provided by your ISP. “PPTP” mostly used in Europe. Choose this type of connection, if you connect to your ISP by PPTP. After choosing connection type, the corresponding option will show up for more detail setting.• DHCP
If your IP Address is provided by your ISP dynamically, choose this option. - PPPoE
User Name: Your User Name provided by your ISP. Password: Your password provided by your ISP. ISP Name: Your ISP name. Connect on Demand: When you enable this function, then the router will connect to your ISP under your command. Disconnect when network idle: You can set the network idle time to disconnect. If you set the time “0”, this function will be disabling. Connect State: This entry will show you the router connection status. You can connect to your ISP manually by click "Connect Manually" button. - Static IP Address
Static IP Address: Enter the IP Address provide by your ISP. Public Subnet Mask: Enter the Subnet Mask provide by your ISP. Default Gateway IP Address: Enter the Gateway IP Address provide by your ISP. Domain Name Server 1: Enter the Domain Name server Address provided by your ISP. • PPTP
IP Address: Enter the IP Address provide by your ISP. Subnet Mask: Enter the Subnet Mask provide by your ISP. Default Gateway: Enter the Gateway IP Address provide by your ISP. User ID: Enter the User ID provided by your ISP. Password: Enter the Password provide by your ISP. PPTP Server: Enter the PPTP Server Address provided by your ISP. Idle Time Out: Enter a maximum idle time during which Internet connection is maintained during inactivity. To disable this feature, enter "0". 3.2 DHCP
Unless you already have a DHCP server on your internal network, choose “Enable” from the DHCP. A DHCP Server can automatically assign IP Address to each computer in your network. It is highly recommended that you set your broad router to act as a DHCP server. Be sure to set your computers to be DHCP clients by setting their TCP/IP settings to “Obtain an IP Address Automatically.” When you turn your computers on, they will automatically load the proper TCP/IP settings provided by the router. The DHCP Server will automatically allocate an unused IP address from the IP address pool to the requesting computer. You must specify the starting and ending address of the IP address pool.  \- Dynamic IP Address: Select “Enable” to use the DHCP server option of the broadband router. If you already have a DHCP server in your network, set the router’s DHCP option to “Disable”. \- Starting IP Address: Enter the starting IP address for the DHCP server's IP assignment. Make sure the first three octets match the router's IP address, i.e., 192.168.1.xxx. The value must be located from 2 to 254. \- Number of Users: Enter the numbers of PCs connected to the router. The maximums value is 253. \- Assign Address Range: Enter the IP Address range for the DHCP server's IP assignment, i.e., 192.168.1.xxx\~192.168.1.yyy. Make sure the range of xxx\~yyy matches the number of users.3.2.1 DHCP Client Table
This table will show you how many network computers have been used on your DHCP server and the IP Address and MAC Address of networked computers connected to the Router. Click “Reload” to get updating information. 3.3 URL Access Setting
Use URL Access filters to allow or deny computers access to specific Internet domains whether it is through www, ftp, snmp, etc.  \- URL Access Limit: Choose Enable/Disable to use URL Access filters or not. \- Website Access: Select “Block” to deny users to access the specified Internet websites listed below. Users will be allowed access to all other Internet websites. In contrast, select “Allow” to allow users to access the specified Internet websites listed below. Users will be denied access to all other Internet websites. \- URL Address: Enter the URL Addresses you want to use, i.e., shopping.com. Remember clicking “ADD” when finishing typing the URL Address. Wait for a few second, router will save the URL Address to URL List and click “Back”.Upgrade Complete..
Back Close \- Current URL List: This table show you the URL Addresses you use. \- Remember clicking "Apply" after making any changes.3.4 IP Access
This function allows network administrators to restrict up to five groups of specified network users/computers from accessing the certain applications. Before using this function, the network PCs that you want to control the access limitation should be assigned fixed IP Address.  • LAN IP Range: Enter the range of IP address which you want them to be a controlled group to have the same access limitation. \- Protocol: Select the protocol type as “TCP” or “UDP” from the pull down menu. If you are not sure which one to choose, select “Both”. \- Blocked Port: Enter the range of port numbers which are used by the applications you wish to be blocked. I.e., Enter the range of 3\~7 in the LAN IP Range column and 1\~999 in the Blocked Port column and select the protocol type as TCP, then click “Apply” button. As the result, the user’s computers, which have IP Address in the range of 192.168.1.3 to 192.168.1.7, will not be able to use the applications that use port numbers from 1 to 999 and selected TCP protocol, such as web browsing. Please check the 6 ^th unit to see more TCP/IP Port list for Internet Service.3.5 Virtual Server
The router can be configured as a virtual server so that remote users accessing Web or FTP services via the public IP address can be automatically redirected to local servers in the LAN. The router firewall feature filters out unrecognized packets to protect your LAN network so all networked computers connected the router are invisible to the outside world. If you wish, you can make some of the networked computers accessible from the Internet by enabling Virtual Server. Depending on the requested service, the router will redirect the external service request to the appropriate server within the LAN network.  \- Select: Use the pull-down menu to select from a list of well-known Virtual Server services. such as Web, DNS, FTP, POP3 etc. The related Port Range will be automatically specified. For example, if you select the “FTP”, the port range will automatically be set to 21\~21. If you want to setting by yourself, you can select the “Manual Setting”.Please check the 6^th unit to see more TCP/IP Port list for Internet Service.
Note: If the browser is Netscape Navigator 4.7, the “Protocol” column will be not automatically selected. When you select a specify application, you have to select the protocol by yourself. \- Redirect IP Address: The IP address of the networked computer connected to the router that will be using the virtual Server service. \- Port Range: Enter the desired service port numbers. \- Protocol: Specify the protocol type as “TCP” or “UDP” from the pull-down menu. If you are not sure which one to select, choose “Both”.3.6 DMZ Host
If you have a computer that cannot run Internet applications properly from behind the router, then you can allow that computer to have unrestricted Internet access. Please note that adding a client to the DMZ may expose that computer to a variety of security risks, so only use this option as a last resort. Enter “0” in LAN IP Address field will disable DMZ Host. 3.6.1 PPPoE/DHCP/PPTP Mode
If your router is configured as PPPoE/DHCP/PPTP connection type to your ISP, enter the networked computer's IP Address to enable DMZ function.3.6.2 Static IP (Fixed IP) Mode
If your router is configured as static IP connection type to your ISP, \- MultiDMZ: Select "Enable" to activate this function or not. \- WAN IP→LAN IP: Enter the WAN IP address and corresponding LAN IP Address.3.7 Device Admin
You can update router's firmware, change password of this router and set up some management function of this router on this page.  \- Version: Here will show you the installed firmware version on this router. Make sure that the firmware you want to use is saved on the local hard drive of your computer. Click “Firmware Upgrade” button to update router’s firmware. Then direct the file path and click “Upload”. Upgrading the firmware will not change any of your system settings but it is recommended that you save your system settings before doing a firmware upgrade. Note: Do not power off the router when it is being upgraded. When the upgrade is complete, restarted the router via re-plug the power cord. - Old Password: Enter the password of this router. - New Password: Enter the new password of this router you want to change. Please keep the password safely. If you forgot your password, you have to reset your router by clicking the reset button in the rear panel of this router. - Confirm Password: Re-type the new password. - WAN MAC Change: If you want ot change the default MAC Address is set to the WAN's physical interface MAC address on the Router, enter the MAC Address you want to reset. - External Admin: This router allow outside user configure this router. This function also been called as Remote Management. It allows the device to be configured through the WAN (Wide Area Network) port from the Internet using a web browser. A username and password is still required to access the browser-based management interface. Enter the IP Address of outside user to allow access into this router to configure this router. To access the setting page from external side, enter “http://3.8 Status Monitor
This page displays the information of this router. Click “Reload” to re-fresh the current information. 3.9 RIP
RIP stands for Routing Information Protocol. RIP sends routing-update messages at regular intervals and when the network topology changes. It uses a single routing metric (hop count) to measure the distance between the source and a destination network. RIP maintain only the best route (the route with the lowest metric value) to a destination. After updating its routing table, the router immediately begins routing updates. This router provides two kinds of routing mode to choose, Dynamic Routing and Static Routing. Dynamic Routing means that it can be used to cache routes learned by RIP, thus allowing the automation of static routing maintenance. Static Routing only receives routing tables from other routers and does not send its own routing table to others. You can refer to the Static Routing page to set up static routing function.  \- TX: From the pull-down menu, select the routing type, "RIP-1", "RIP-1 Compatible", or "RIP-2", to enable the "TX(transmit)" function. “RIP-1” is the protocol used by order routers and newer routers should use “RIP-2”. “RIP-1 Compatible” serves to broadcast RIP-1 and multicast RIP-2. \- RX: Form the drop-down list, select one of the routing information types, "RIP-1" or "RIP-2", to enable the "RX(receive)" function. \- Routing Table: Click “Show Routing Table” to see update routing information. 3.10 Static Routing
 - Static Routing: Select the route entry number from 1 to 20 that you want to configure. - Destination LAN IP: You can create a static route by entering the IP address of the remote host or network. If you wish to build a route to the entire network, be sure to set the network portion of the IP address to zero (0). - Subnet Mask: The Subnet Mask determines which portion of an IP address is the network portion, and which portion is the host portion. - Default Gateway: Enter the address of the gateway device that allows for a contact between the Router and the remote network or host. - Hop Count: Enter the number of hops required between the LANs to be connected. The Hop Count represents the “cost” of the routing transmission. The default value is 1. - Interface: - Routing Table: Click “Show Routing Table” to see update routing information.3.11 Dynamic DNS
DDNS keeps dynamic IP addresses (i.e., IP addresses assigned by a DHCP capable router or server) linked to a domain name. Users who have a Dynamic DNS account may use this feature.  - Dynamic DNS: When an IP address is automatically assigned by a DHCP server, DDNS automatically updates the DNS server. Select Disable or Enable. - Service Provider: Before activate this function, please refer to www.dyndns.org to register your DNS service. - User Name: Enter your user name from your service provider. - password: Enter your password from your service provider. - Hostname: Enter the host name. - MX: Enter your Mail Server's domain name to enable. Or leave blank to disable. - Wildcard: Select “Enable” or “Disable” to use or not use the wildcard function. Wildcard function allows your domain name contains universal characters, i.e. \*, ?.3.12 Special Application
Some applications require multiple connections, such as Internet gaming, video conferencing, Internet telephony and others. These applications have difficulties working through NAT. Special Applications makes some of these applications work with the router.  There are nine special applications for selecting. If you want to enable other application not list on this table, you may go to the “Virtual Server” page to activate or using “DMZ Host” function. \- Enable: Check the box to enable the application you want to activate.3.13 Statistics
This page displays activities occurring on the router. Note: On Window XP or IE 6.0, you may need to install Java Virtual Machine program to see the windows. Please refer to the CD-ROM and select “Installing Java Virtual”. 3.14 Security Setting
By set up this security setting, keep your LAN away from hacker attack. DoS stands for Denial of Service. It's a method hackers use to prevent or deny legitimate users access to a computer. DoS attacks are typically executed using DoS tools that send many requests packets to a targeted Internet server (usually Web, FTP, or Mail server), which floods the server's resources, making the system unusable. Any system that is connected to the Internet and is equipped with TCP-based network services is subject to attack. To prevent DoS Attack, set up the below option.  \- DoS Attack Defense: Enter the time you want to make the DoS Attack Defense enabled. Enter “0” to disable. By enable this function, router will cut off the connection which sends a great quantity packet on irregular continuous condition over the time you set. \- Hide Public IP Address: Select "Yse" to activate this function or not. When enabling this function, outside users will not know your WAN IP Address.3.15 UPnP
UPnP stands for Universal Plug and Play. UPnP service allows computers to discover and use network-based devices. Windows ME and XP include native UPnP services; Windows 98 and 98SE do not include a native UPnP service, but you can install via the Internet Connection Sharing client that ships with Windows XP.  Select Enable/Disable to enable this function or disable. Then click “Apply” and the router will reboot automatically. After a few second, complete window will be showed up. 4. Install Printer Server
\- Insert the CD-ROM into the CD-ROM drive The following window will be shown automatically. If not, please find setup.exe on the CD-ROM\Printer Server. And click “Installing Printer Software”. The Printer Server Driver only supports Window 98/ME/2000/XP.  • System will auto run setup program The setup wizard will lead you to complete the installation. Click "Next" to proceed. - Finish the installation
Click "Finish" to complete the installation. Select the checkbox to open readme file or not.  Note: Please refer to Printer Server's User Guide to see more details.5. Trouble Shooting
No lights are lit on the router
The router has no power. - Make sure the power cord is properly connected to the router. - Make sure the power adapter is properly connected to a functioning power outlet. If it's in a power strip, make sure the power strip is turned on. - Make sure you are using the correct power adapter (DC 7.5V, 1Amp).There is no numbered light lit for a connected device
There's a hardware connection problem. - Make sure the cable connectors are securely plugged in at the router and the device. - Make sure the connected device is turned on. - Be sure the correct cable is used. For computers, use a Category 5 Ethernet patch cable. For other devices, you may need a cross-over cable or may need to use the uplink port.Why my browser can not open the router's on-line configuration program
You may need to download and install the Java Plug-in for your Operating System. Please refer to CD-ROM to install. Or upgrade your browser to Internet Explorer 5.5 and higher (with SP1), Netscape 6.0 and higher, Mozilla 5.0 and higher, Opera 6.0 and higherAfter setting up my router, I can not play on-line game
The Broadband Router uses Network Address Translation to issue several private (virtual) IPs using one public IP address. Internet games communicate with each other based on IP addresses and UDP port numbers. Unfortunately, some games will be affected when NAT is applied. Gamers would not communicate with each other due to the side effect created by NAT. Such games and applications are called NAT unfriendly applications. You can setup “Special Application” on this router. Consult with your game vender for correct port setting. If you want to host the Internet game for your parties to join it is better for you to set one computer host that you are playing on to be a DMZ host. You will need to tell your parties to join your game on the IP address of the WAN interface of the router device. Do not tell your parties of the virtually local IP address assigned from the DHCP function of the router device or you see in the game or the computer host. If your Internet connection service is an ADSL PPPoE or cable modem connection, please check the IP address of the WAN interface at every new Internet connections.6. TCP/IP Port List for Internet Service
The list of TCP/IP Port for Internet service is as following table. Please note that the list is just for your reference. You may check the service provider's manual to see more details.| Service Name TCP UDP Notes | |||
| AOL | 5190-5193 | 5190-5193 | American OnLine |
| AOL ICQ | 5190, dyn >=1024 | Message | |
| AOL Instant Messenger | 5190 | 5190 | American OnLine |
| Citrix ICA | 1494, dyn >=1023 1604, dyn >=1023 Remote application access | ||
| DirectX Gaming | 47624, 2300-2400 | 47624, 2300-2400 | many network games |
| Distributed.Net RC5/DES | 2064 | Distributed computation | |
| DNS | 53 Domain name Service | ||
| Doom | 666 | 666 | Network game |
| FTP | 21 | File Transfer Protocol | |
| Glimpseserver | 2001 | Search engine | |
| Gopher | 70 | ||
| H.323 Host Call | 1720 | 1720 | H.323 host call |
| HTTPS | 443 | Secure HTTP (SSL) | |
| ichat client, server | 4020 | 4020 | Chat rooms |
| ICU II | 2000-2003 | Videoconferencing | |
| iSpQ | 2000-2003 | Videoconference | |
| LDAP | 389 | 389 | Lightweight Directory Access Protocol |
| Mirabilis ICQ | dyn >=1024 | 4000 | Locator, chat |
| MS ICCP | 1731 | 1731 | Audio call control (Microsoft) |
| MS Netmeeting | dyn >=1024, | dyn >=1024 | Video conference |
| MS NetShow | 1755 | 1755 | Streaming video |
| MSN Gaming Zone | 28800-29000 | 28800-29000 | Network Game |
| MSN Messenger | 1863 | Instant messaging | |
| Netscape Conference | 6498, 6502 | 2327 | Audio conference |
| NNTPs | 563 | Secure NNTP news (SSL) | |
| Palm Computing Network Hotsync | 14237 | 14238 | Data synchronization |
| pcAnywhere | 5631 | 5632 | Remote control |
| POP3 | 110 | Post Office Protocol Version 3 | |
| QuickTime 4 | RTSP | RTP | Streaming audio, video |
| Real Audio & Video | RTSP, 7070 | 6970-7170 | Streaming audio and video |
| Remotely Possible (ControlIT) | 799 | Remote control software by CA | |
| RTSP | 554 | Real Time Streaming Protocol | |
| SMTP | 25 | Simple Mail Transfer Protocol | |
| SOCKS | 1080 | Internet proxy | |
| Squid | 3128 | 3130 Web proxy cache | |
| SSH | 22 | Secure Shell | |
| Telnet | 23 | ||
| Timbuktu | 1417-1420 | 407 | Remote control |
| ULP | 522 522 | User Location Protocol | |
| Virtual Places | 1533 | Conferencing | |
| VocalTec Internet Phone | 1490, 6670, 25793 | 22555 | Video conference |
| Win MX | 6399 6399 | Peer to Peer file exchange | |
| Xing StreamWorks | 1558 | Streaming video | |
| Yahoo Messenger - messages | 5050 | Message | |
| Yahoo Messenger - Webcam | 5100 | Video | |
| Yahoo Messenger -Voice Chat | 5000~5001 | 5000~5001 | Voice chat |

- Port 10/100M Internet Broadband Router with USB Printer server
- 4824904AXZZ0
- FCC Statement
- CE Declaration of conformity
- Trademarks
- Contents
- 1:Introduction 1
- 2: Hardware Installation 6
- Getting Started 7
- 3: Using Configuration Menu 17
- 4: Install Printer Server 38
- 5: Trouble-Shooting 40
- 6: TCP/IP Port List for Internet Service 41
- Introduction
- Feature & Benefit
- Package Content
- Glossary
- Hardware Installation
- Product Description
- Front Panel
- LEDs
- Rear Panel
- Getting Started
- System Requirement
- Before Installation
- Setting Hardware Connection
- Configure your computer
- - Windows 95/98/ME
- Step 1. TCP/IP Configuration
- Step. 2 Disable HTTP Proxy
- - Internet Explorer
- - Netscape
- Step. 3 Obtain IP Settings from Your Router
- - Windows NT/2000/XP
- • MAC OS 7.X or above
- • Netscape
- Using Configuration Menu
- Basic Setup
- Host Name & Domain Name
- Private IP Address
- Public IP Address
- • DHCP
- - PPPoE
- - Static IP Address
- • PPTP
- DHCP
- DHCP Client Table
- URL Access Setting
- Upgrade Complete..
- IP Access
- Virtual Server
- Please check the 6th unit to see more TCP/IP Port list for Internet Service.
- DMZ Host
- PPPoE/DHCP/PPTP Mode
- Static IP (Fixed IP) Mode
- Device Admin
- Status Monitor
- RIP
- Static Routing
- Dynamic DNS
- Special Application
- Statistics
- Security Setting
- UPnP
- Install Printer Server
- - Finish the installation
- Trouble Shooting
- No lights are lit on the router
- There is no numbered light lit for a connected device
- Why my browser can not open the router's on-line configuration program
- After setting up my router, I can not play on-line game
- TCP/IP Port List for Internet Service
Brand : Zonet
Model : ZSR0104FS
Category : Router