
CP-LX70TS - Home Theater Speakers PIONEER - Free user manual and instructions
Find the device manual for free CP-LX70TS PIONEER in PDF.

User questions about CP-LX70TS PIONEER
0 question about this device. Answer the ones you know or ask your own.
Ask a new question about this device
Download the instructions for your Home Theater Speakers in PDF format for free! Find your manual CP-LX70TS - PIONEER and take your electronic device back in hand. On this page are published all the documents necessary for the use of your device. CP-LX70TS by PIONEER.
USER MANUAL CP-LX70TS PIONEER
Thank you for buying this Pioneer product. The speaker stands CP-LX70 and CP-LX70TS should only be used with the S-LX70-LR Pioneer speaker system. Please read through these operating instructions for proper assembly and use. After you have finished reading the instructions, put them away in a safe place for future reference.
Caution
- Pioneer is not responsible for any accidents or damage that result from improper installation, misuse or modification of the product, or natural disasters.
- Only use the screws supplied when fixing the speaker to the speaker stand. Speakers may fall and incur damages if not fixed in place properly.
- Only use Pioneer S-LX70-LR Speakers with this stand. Other speakers may not balance properly, causing them to fall and potentially injure persons nearby.
- Be careful when assembling and moving the speaker stand, as it may cause damage or injury in the event of a fall.
- Do not place the stand on an unstable and/or sloping surface. The stand and speaker may fall and cause injury.
Care of the speaker stands
- With normal use, wiping with a soft cloth should be sufficient to keep the stand clean. If necessary, clean with a cloth dipped in a neutral cleanser diluted five or six times with water, and wrung out well. Do not use furniture wax or cleansers. Never use alcohol, thinners, benzine, insecticide sprays or other chemicals on or near this unit since these will corrode the surfaces. When using chemically-treated cloths, be sure to carefully read their accompanying instruction manual.
Cleaning the speaker stand bases
- When cleaning the surface of the speaker stand bases, gently wipe with the cleaning cloth supplied with the speaker system S-LX70-LR.
- Wiping with a dusty or hard cloth, or applying too much force when wiping may result in scratching of the surface of the speaker stand base.
CAUTION
These speaker terminals carry HAZARDOUS LIVE voltage. To prevent the risk of electric shock when connecting or disconnecting the speaker cables, disconnect the power cord before touching any uninsulated parts. D3-4-2-2-3_A_En
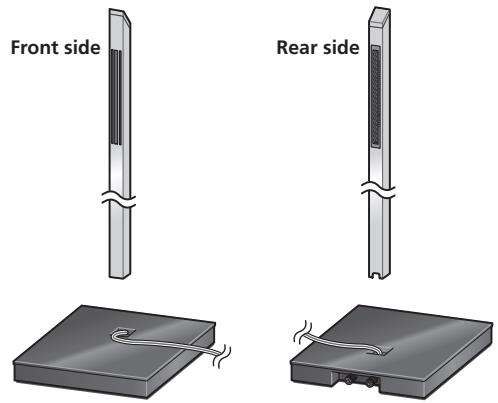
Confirm your Accessories
- Pillar x 2
- Stand base x 2
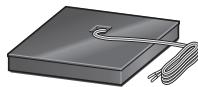
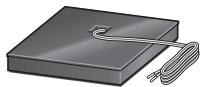
- Speaker security plate × 2
- Screw (Large) x 4

- Screw (Small) x 8

- Operating instructions
Illustrations of pillars and bases depict those for the CP-LX70. Those for the CP-LX70TS are similar, but of slightly different sizes.
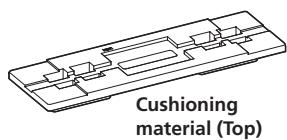
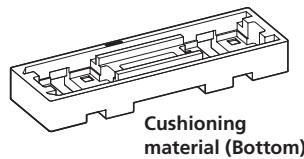
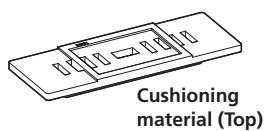
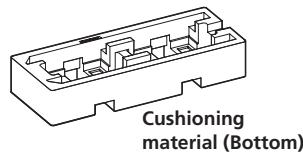
The Styrofoam cushioning material shown is used during assembly.
- CP-LX70
- CP-LX70TS
The pillars and speaker stand bases are designed with specific directional orientation for assembly. During assembly, make sure they are attached in the correct directions.
Installing the speaker stands
- Place the stand on a stable, level surface; placing the stand on an unstable surface can be dangerous.
When placing the speaker, keep in mind that the tone is affected by the position of the speaker.
If the bass is insufficient, move the speaker closer to the wall. The richest bass sound is obtained when the speaker is right against the wall. If the bass is too powerful, producing a muffled tone, move the speaker away from the wall. Placing the speaker against a thick curtain may also be effective.
Adjust the position as necessary to obtain optimal sound from your system.
Assembling the speaker stands
Make sure you assemble the stand on a flat surface that is relatively soft (such as a carpet).
A medium-sized Phillips screwdriver is required for assembly.
- The Styrofoam cushions are used during assembly.
CP-LX70 only: Confirm that the surfaces with printing are facing upwards and oriented as shown, then align the top cushion on the bottom cushion as illustrated.

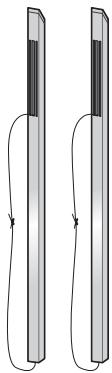
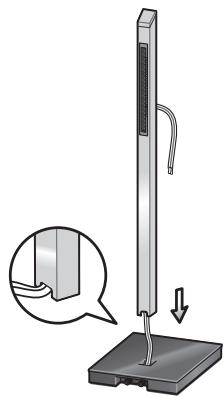
1 Run the speaker cable through the pillar and place the pillar onto the stand base.
Place the pillar on a flat surface and cut the string that is strung through the pillar. Tie the speaker cable coming out of the stand base to the end string at the bottom of the pillar. Pull the end of the string emerging from the top front side of the pillar to pull the speaker cable up through the pillar.
- Remove the string once the speaker cable is through the pillar.
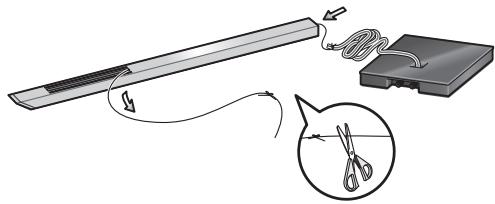
Next, stand the pillar upright and fit the bottom of the pillar into the stand base, making sure that the pillar is aligned with the hole in the stand base.
- When fitting the pillar into the stand base, make sure that the speaker cable comes through the groove on the bottom of the pillar and does not get pinched between the pillar and the stand base.
- Make sure not to scratch the surface of the stand base with the pillar, as the decorative laminate of the stand base may scar easily.
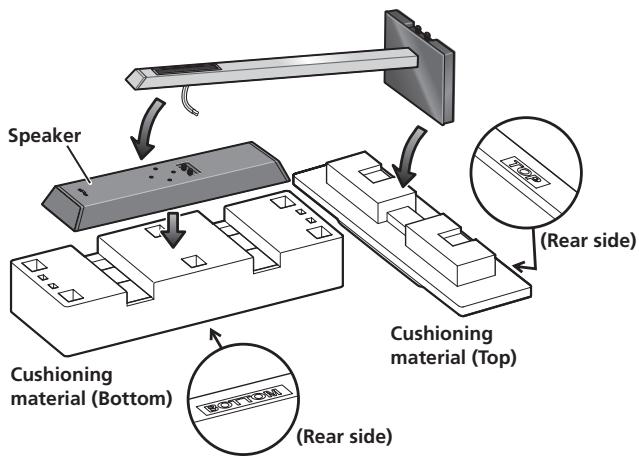
2 Securing the pillar onto the stand base.
While the pillar is fitted into the stand base, slowly place the stand onto the groove of the cushioning material (places indicated in the accompanying illustration) so that the rear side of the stand faces upwards (securely hold both the pillar and the stand base when doing this).
- Pillar and base for CP-LX70
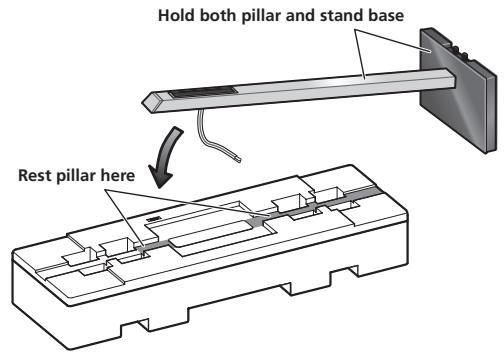
- Pillar and base for CP-LX70TS
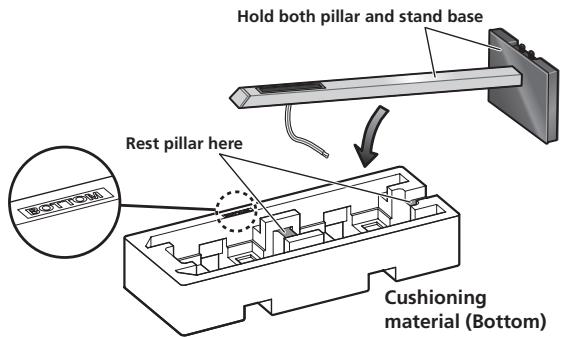
From the bottom side of the stand base, secure the pillar to the stand base by screwing in 4 supplied screws (small).

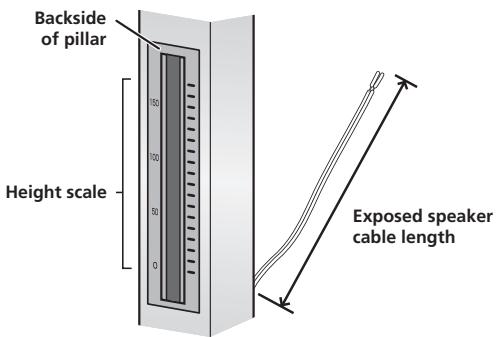
3 Adjust the length of the speaker cable.
Adjust the length of the speaker cable to suit the height at which the speaker is going to be installed. Viewing the height scale on the backside of the pillar, adjust the length of the exposed speaker cable using the following numbers as reference:
Scale: 0 Approx. 11 cm (4-1/2 in.)
Scale: 100 Approx. 15 cm (6 in.)
Scale: 170 Approx. 22cm (9 in.)
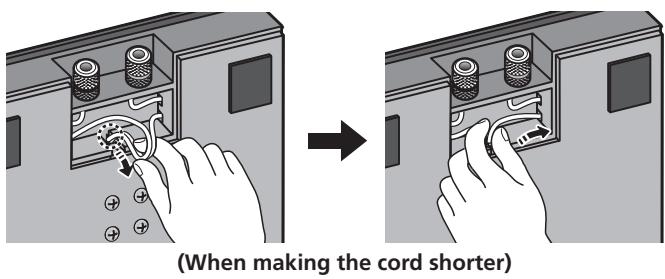
- To shorten the speaker cable, adjust the length by pulling the additional cable in the pillar from the hole in the bottom of the stand base, and then push that extra cable into the hole where the right or left cable passes, as shown in the illustration. If all of the extra cable cannot be pressed into the hole, store the remainder of the cable in the open space on the bottom of the stand base.
4 Preparing to attach the speaker.
CP-LX70: Temporarily place the speaker stand upright, and detach the bottom cushion material, leaving only the top cushion on the floor. Place the speaker on the top cushion and place the speaker stand on top of the speaker.
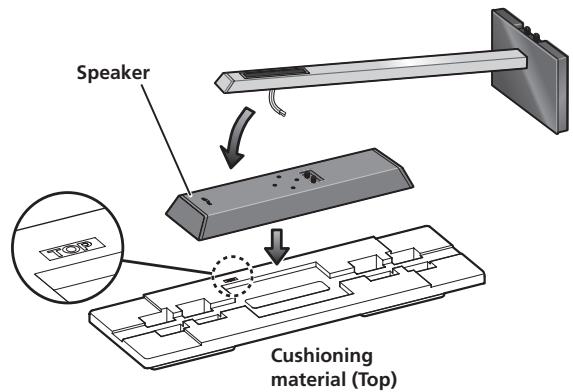
CP-LX70TS: Temporarily stand the speaker stand upright, then turn the bottom cushion material over and place the speaker on it. As shown in the illustration, turn the top cushion material sideways and orient it sideways to the stand, then rest the speaker stand assembled in step 2 on it.
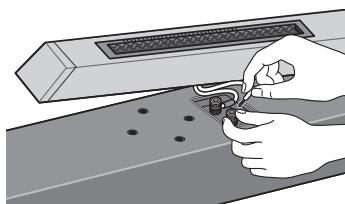
5 Connect the speaker cable to the speaker.
Pull the speaker cable through the front side of the pillar (the bottom side during assembly) and connect to the terminals located on the backside of the speaker.
- Connect the speaker cable with the marking to the (+) terminal, and the cable without the marking to the (-) terminal.
- If connecting the cords proves to be difficult, slightly move the position of the pillar and speaker.
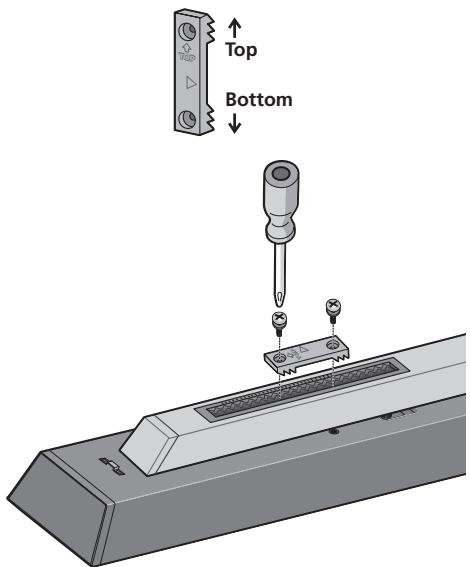
6 Secure the speaker.
Once the speaker is placed in the installation position, pull the slack of the speaker cord and store in the bottom side of the stand base as shown in step 3.
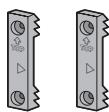
Next, place the speaker security plate on the pillar, and secure to the speaker using the supplied screws (large).
- The speaker security plates are designed with a directional orientation in which they are to be installed. Attach them so that the side printed with "TOP" is oriented toward the top of the speaker and pillar.
Caution
Confirm that the speaker cable does not become pinched between the pillar and the speaker.

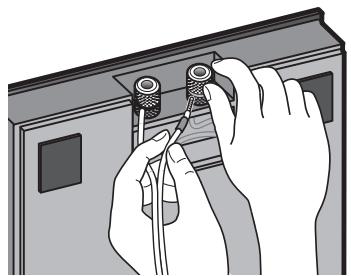
Connect the speaker cable to the amplifier
Connect the speaker cable to the terminals located on the rear side of the stand base.
1 Switch off the power to your amplifier.
2 Connect the speaker cables to the input terminals on the rear side of the stand base. For input terminal polarity, red is positive (+) and black is negative (-).
3 Connect the other ends of the cables to the amp's speaker output terminals (for more details, refer to your amp owner's manual).
- Grasp the cap knobs on the lower input terminals and rotate them to the left (counter-clockwise), insert the speaker cable wires into the holes in the terminal posts, then tighten the knobs to secure the wires.
- You can also connect the stand base's terminals with a banana plug. When using a banana plug, be sure to remove the cap at the tip of the input terminal.
- If the cables' wires happen to be pushed out of the terminals, allowing the wires to come into contact with each other, it places an excessive additional load on the amp. This may cause the amp to stop functioning, and may even damage the amp.
- After connecting the plugs, pull lightly on the cables to make sure that the ends of the cables are securely connected to the terminals. Poor connections can create noise and interruptions in the sound.
- When using a set of speakers connected to an amplifier, you won't be able to obtain the normal stereo effect if the polarity (+, -) of one of the speakers (left or right) is reversed.
Placement
Finish the installation of the speaker systems in your room by standing them and their attached stands upright. Refer to the section "When Installing the Speaker Stands" on page 3.
- The bottom and top cushioning materials should not be discarded after assembly, but stored in a safe place.
Changing the Speaker Height
When changing the height of the speakers, reassemble the stand while referring to step 3 through 6 of "Assembling the Speaker Stand."
- Do not attempt to adjust the speaker height while the stand is upright. This could cause the speaker to fall, resulting in damage or personal injury.
Specifications
- CP-LX70 (floor stand)
External dimensions.271 mm (W) x 1067 mm (H) x 271 mm (D)
10-11/16 in. (W) x 42-1/16 in. (H) x 10-11/16 in. (D)
Weight. 8.9 kg/19 lb 10 oz
Supplied accessories
Pillars 2
Stand bases 2
Speaker security plates [SNN1069] 2
Screws (Large) [BMH50P350FBN] 4
Screws (Small) [BMZ40P200FTB] 8
These operating instructions [SRD1353] 1
Replacement part numbers
Non-skid pads [SEB1324]
Input terminal (red) [SKX1105]
Inputter terminal (black) [SKX1106]
Top cushioning material [SHA2596]
Bottom cushioning material [SHA2597]
Rubber gasket material [SEC2155]
External packaging box [SHG2809]
Protective sheet (for stand base) [SHC1841]
Polyethylene bag (for screws and speaker security plates)
[SHL1460]
Polyethylene bag (for connection cables) [SHL1296]
Polyethylene bag (for Operating Instructions) [SHL1295]
Polyethylene bag (for pillars) [SHL1426]
The product numbers are listed above in square brackets.
- CP-LX70TS(tabletop stand)
External dimensions.225 mm (W) x 681 mm (H) x 225 mm (D)
8-7/8 in. (W) × 26-13/16 in. (H) × 8-7/8 in. (D)
Weight. 5.9 kg/13 lb 1 oz
Supplied accessories
Pillars 2
Stand bases. 2
Speaker security plates [SNN1069] 2
Screws (Large) [BMH50P350FBN] 4
Screws (Small) [BMZ40P200FTB] 8
These operating instructions [SRD1353] 1
Replacement part numbers
Non-skid pads [SEB1324]
Input terminal (red) [SKX1105]
Inputter terminal (black) [SKX1106]
Top cushioning material [SHA2599]
Bottom cushioning material [SHA2600]
Rubber gasket material [SEC2155]
External packaging box [SHG2810]
Protective sheet (for stand base) [SHC1841]
Polyethylene bag (for screws and speaker security plates)
[SHL1460]
Polyethylene bag (for connection cables) [SHL1349]
Polyethylene bag (for Operating Instructions) [SHL1295]
Polyethylene bag (for pillars) [SHL1347]
The product numbers are listed above in square brackets.
- Specifications and design subject to possible modification without notice, due to improvements.
WARNING: Handling the cord on this product or cords associated with accessories sold with the product will expose you to chemicals listed on proposition 65 known to the State of California and other governmental entities to cause cancer and birth defect or other reproductive harm.
Wash hands after handling
D36-P4_A_En
Publication de Pioneer Corporation.
© 2007 Pioneer Corporation.
Copyright © 2007 Pioneer Corporation.
Should this product require service in the U.S.A. and you wish to locate the nearest Pioneer Authorized Independent Service Company, or if you wish to purchase replacement parts, operating instructions, service manuals, or accessories, please call the number shown below.
1-800-421-1404
Please do not ship your product to Pioneer without first calling the Customer Support at the above listed number for assistance.
Pioneer Electronics Service, Inc.
P.O. BOX 1760, Long Beach, CA 90801-1760, U.S.A.
For warranty information please see the Limited Warranty sheet included with your product.
Should this product require service in Canada, please contact a Pioneer Canadian Authorized Dealer to locate the nearest Pioneer Authorized Service Company in Canada. Alternatively, please contact the Customer Satisfaction Department at the following address:
Pioneer Electronics of Canada, Inc.
Customer Satisfaction Department
300 Allstate Parkway, Markham, Ontario L3R 0P2
1-877-283-5901
905-479-4411
For warranty information please see the Limited Warranty sheet included with your product.
300, Allstate Parkway, Markham, Ontario L3R 0P2
1-877-283-5901
905-479-4411
Register Your Product at
http://www.pioneerelectronics.com (US)
http://www.pioneerelectronics.ca (Canada)
http://www.pioneerelectronics.com (US)
http://www.pioneerelectronics.ca (Canada)
PIONEER CORPORATION
4-1, Meguro 1-Chome, Meguro-ku, Tokyo 153-8654, Japan
PIONEER ELECTRONICS (USA) INC.
P.O. BOX 1540, Long Beach, California 90801-1540, U.S.A. TEL: (800) 421-1404
PIONEER ELECTRONICS OF CANADA, INC.
300 Allstate Parkway, Markham, Ontario L3R 0P2, Canada TEL: 1-877-283-5901, 905-479-4411
PIONEER EUROPE NV
Haven 1087, Keetberglaan 1, B-9120 Melsele, Belgium TEL: 03/570.05.11
PIONEER ELECTRONICS ASIACENTRE PTE. LTD.
253 Alexandra Road, #04-01, Singapore 159936 TEL: 65-6472-7555
PIONEER ELECTRONICS AUSTRALIA PTY. LTD.
178-184 Boundary Road, Braeside, Victoria 3195, Australia, TEL: (03) 9586-6300
PIONEER ELECTRONICS DE MEXICO S.A. DE C.V.
Blvd.Manuel Avila Camacho 138 10 piso Col.Lomas de Chapultepec, Mexico,D.F. 11000 TEL: 55-9178-4270
K002_B_En
Published by Pioneer Corporation.
Copyright © 2007 Pioneer Corporation.
All rights reserved.
Publication de Pioneer Corporation.
© 2007 Pioneer Corporation.