D200 Dialpad - Headset VXi - Free user manual and instructions
Find the device manual for free D200 Dialpad VXi in PDF.

| Product Type | Wired telephone headset with dialpad |
| Brand | VXi |
| Model | D200 Dialpad |
| Connectivity | RJ9/RJ11 connector for desk phones |
| Driver Size | 40 mm |
| Frequency Response | 100 Hz – 8 kHz |
| Impedance | 150 Ω |
| Microphone Type | Noise-canceling electret |
| Microphone Coverage | Unidirectional |
| Cord Length | Approx. 1.8 m (coiled) |
| Weight | 85 g |
| Dimensions (W x H x D) | 160 x 180 x 60 mm |
| Power Source | Powered via phone line (no batteries required) |
| Dialpad Features | Keypad with memory, mute, volume control |
| Headband | Adjustable, padded |
| Ear Cushions | Leatherette, replaceable |
| Compatibility | Most desk phones with RJ9/RJ11 ports |
| Operating Temperature | 0°C to 40°C |
| Cleaning Instructions | Wipe with dry cloth; do not use liquids |
| Safety Certifications | CE, FCC |
| Warranty | 1 year limited manufacturer warranty |
Frequently Asked Questions - D200 Dialpad VXi
User questions about D200 Dialpad VXi
0 question about this device. Answer the ones you know or ask your own.
Ask a new question about this device
Download the instructions for your Headset in PDF format for free! Find your manual D200 Dialpad - VXi and take your electronic device back in hand. On this page are published all the documents necessary for the use of your device. D200 Dialpad by VXi.
USER MANUAL D200 Dialpad VXi
-
VXi warrants that your D200 Dialpad will be free from defects in material and workmanship for one year from the date of purchase. If, during the first year from the date of purchase, your D200 Dialpad fails to work due to a defect in material or workmanship, VXi will repair or replace the product, at its election, free of charge. Without proof of purchase, the warranty period begins on the date of manufacture.
-
The foregoing limited warranty does not cover equipment failure attributable to accident, improper operation, misuse, abuse, or any cause other than defects in the materials or workmanship of VXi's products.
-
VXi's obligations under this warranty are limited to repair or replacement (at our option) of any defective part returned to VXi at the customer's expense. Returned products require a Return Authorization that may be obtained by calling 1-800-742-8588. Products returned to VXi for repair under this warranty will be return shipped to the customer at VXi's expense.
-
THIS LIMITED WARRANTY IS IN LIEU OF ALL OTHER WARRANTIES, EXPRESS OR IMPLIED, INCLUDING THE IMPLIED WARRANTIES OF MERCHANTABILITY AND FITNESS FOR A PARTICULAR PURPOSE. Some jurisdictions do not permit the exclusion of implied warranties and the foregoing exclusions may not apply to you.
-
In no event shall VXi be responsible for any other damages whatsoever, including direct, indirect, special, incidental, consequential, or other damages for breach of this or any other warranty, express or implied.

271 Locust Street • Dover, NH 03820 USA • 800-742-8588 • 603-742-2888 www.vxicorp.com ©VXi Corporation 2010 PN202933B Printed in China
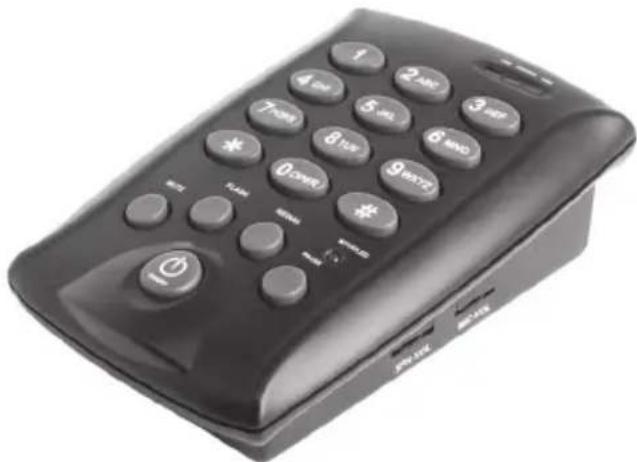
VXi D200 Dialpad
natural_image
Black rectangular electronic phone with keypad and control buttons (no visible text or symbols)Connecting you to the world.

5 Operation
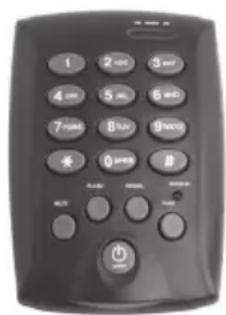
REDIAL
1) Press On/Off button
2) Press REDIAL button to automatically dial the last number dialed. If your phone requires you to dial 0 or 9 to get an outside line, you may not be able to use the redial feature.
MUTE / UNMUTE
To mute your voice while on a call, press the MUTE button once. The MUTE LED will light. To unmute, press the MUTE button again.
PAUSE
Use the PAUSE button to pause after dialing an access number (such as 9) and the telephone number, and for certain banking and long-distance services.
CALL WAITING
To answer a call through call waiting, press the FLASH button once. To return to the first call press FLASH again.
TRANSFER A CALL
To transfer a call, press FLASH then dial the phone number of the person to whom the call is being transferred. When the person answers, press ON/OFF to hang up. If the call is disconnected before it transfers, adjust the FLASH settings (see Section 6-Operation).
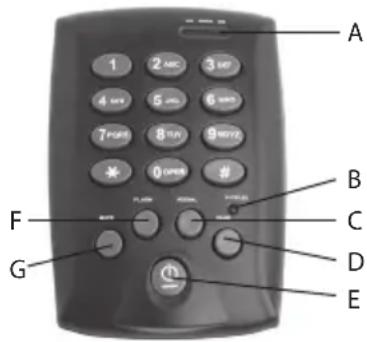
2 Features
A. In Use/Ringer LED
B. Mute LED
C. Redial
D. Pause
E. On/Off
F. Flash
G. Mute
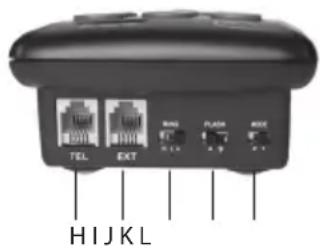
H. Telephone line jack
I. Extension jack
J. Ring setting
K. Flash Setting
L. Mode setting
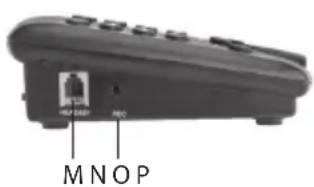
M. Headset jack
N. Recording jack
O. Speaker volume
P. Microphone volume
natural_image
Close-up of a black remote control device with buttons and ventilation slots (no visible text or symbols)1 Introduction
Thank you for choosing the VXi D200 Dialpad.
Included in the box:
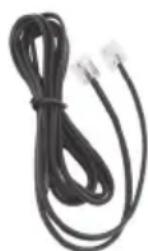
Line CordD200 Dialpad

Headset Hook (Attach to side of computer to hang the headset when not in use.)
6 Operation
RINGER SETTINGS
To adjust the volume of the ringer, set the RING switch to the HI (H) or LOW (L) position. To turn the ringer off, set the switch to the OFF (A) position.
FLASH SETTINGS
Set the switch to either A or B to enable the dialpad to transfer calls.
MODE SETTINGS
If you have a touch tone phone, set the switch to "T". If you have a rotary phone, set the switch to "P".
REC JACK (optional use)
This port can be used to connect a recording device for call monitoring purposes. It is also possible to connect a second headset with a 2.5mm plug, although it is recommended to use a single headset.
EXT JACK (optional use)
The D200 Dialpad is a fully functioning telephone; however, it is possible to connect the dialpad to a second phone with an RJ-11 cord, if desired (not included).
3 Installation 4 Operatio
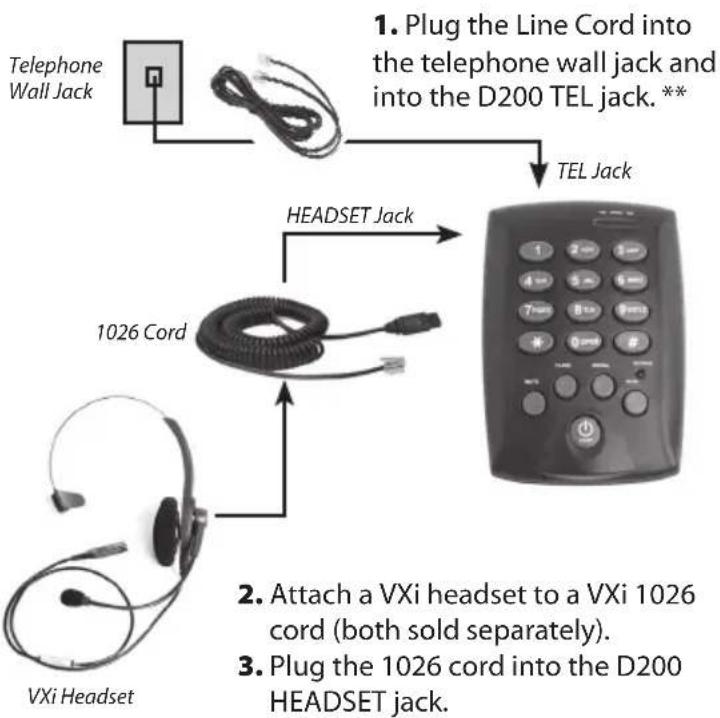
flowchart
graph TD
    A["Telephone Wall Jack"] --> B["Line Cord"]
    B --> C["TEL Jack"]
    B --> D["1026 Cord"]
    D --> E["VXi Headset"]
    D --> F["HEADSET Jack"]
    F --> G["1026 Cord (both sold separately)"]
    G --> H["2. Attach a VXi headset to a VXi 1026 cord"]
    G --> I["3. Plug the 1026 cord into the D200 HEADSET jack."]
** IMPORTANT: Wait 10 seconds after connecting the phone line before using (Whenever connecting the phone line, or if the phone line goes out of service, this 10 second wait time is required).
PLACE A CALL: Put the headset on and position the microphone near the corner of your mouth about a fingers-width away from your face. Press the ON/OFF button. The In Use LED will light.
On the microphone there is a painted dot or the word TALK embossed on the plastic. This mark MUST face your mouth. Proper microphone position is critical for good sound quality.

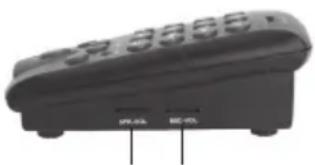
ADJUST SPEAKER VOLUME: Rotate the SPK-VOL wheel until the volume level in your earpiece is acceptable to you.
ADJUST MICROPHONE VOLUME: Rotate the MIC-VOL wheel until your voice is heard clearly and comfortably on the other end of the call. Note: If you are hearing an echo of your own voice in the earpiece, reduce the microphone volume.
ANSWER/END A CALL: When the phone rings, the RINGER LED will flash. Press the ON/OFF button once to answer and then again to end the call.
Brand : VXi
Model : D200 Dialpad
Category : Headset