VoxStar UC - Headphones VXi - Free user manual and instructions
Find the device manual for free VoxStar UC VXi in PDF.

User questions about VoxStar UC VXi
0 question about this device. Answer the ones you know or ask your own.
Ask a new question about this device
Download the instructions for your Headphones in PDF format for free! Find your manual VoxStar UC - VXi and take your electronic device back in hand. On this page are published all the documents necessary for the use of your device. VoxStar UC by VXi.
USER MANUAL VoxStar UC VXi
natural_image
Black handheld device with a USB port and a small USB flash drive (no text or symbols visible)Vxi VoxStar™ UC USER GUIDE
BC
Compatible with most Bluetooth ^® phones and Bluetooth-enabled computers (Windows ^® or Macintosh ^® )
SAFETY INSTRUCTIONS / GLOSSARY
SAFETY INSTRUCTIONS
- Avoid hearing damage. Set volume at lowest comfortable level. If you experience ringing in your ears or voices sound muffled, stop using the headset. Avoid turning up volume to block noisy surroundings (it's possible to adapt to volume that is too high).
- Check with local and state laws regarding cell phone/headset usage while operating a motor vehicle.
- Do not immerse any part of this product in water.
- Plastic bags and small parts may cause choking if ingested. Keep them away from small children and pets.
- Use only the power cords included with this product.
- Avoid temperatures exceeding 140^ (will cause equipment failure).
GLOSSARY OF TERMS
On: Headset is on, but there is no connection to the phone (blue light, double flash).
MFB: Abbreviation for "Multifunction Button."
Multipoint Mode: Multipoint Mode allows you to pair and switch between two Bluetooth devices.
Paired: Two Bluetooth devices agree to communicate with one another.
Standby Mode: Headset is on, Bluetooth link is active, and the user is not on a call (blue light flashes slowly).
Talk Mode: Headset is in use with the cell phone while the cell phone is on an active call (blue light flashes slowly).
TABLE OF CONTENTS
4 Package Contents
5 Proper Fit and Placement
6 Other Wearing Styles
8 Charging the Headset
9 Battery Power Indicators
10 Headset Controls
11 On/Standby/Off
12 Pairing with a Cell Phone
13 Pairing with BT2 USB Adapter
14 Multiple Device Pairing
15 Multipoint Mode
17 Proximity Pairing
18 Making a Call
19 Answering a Call
20 Operation While Using the Charger/Adapter
21 Additional Functions
Last Number Redial Rejecting a Call Voice Dial
Transfer Audio
Turn Indicator Lights
On/Off
Automatic Bluetooth Connection
23 Reset Paired Devices List
24 Call Waiting/Rejecting a Call
25 Specifications
26 Functions & Indicators
31 WARRANTY
32 FCC Notice to Users
33 IC Notice to Canadian Users
VXi VoxStar UC User Guide
PACKAGE CONTENTS
- BT2 Bluetooth® USB Adapter
- VoxStar™ Headset with Ear Hook
- Cheek Pad
- Foam Ear Cushions (1 small and 1 large)
- Rubber Ear Cushion
- Headband/Over-the-Head Wearing Style
- Neckband/Behind-the-Neck Wearing Style
- Contoured Ear Buds (1 small, 1 medium, and 1 large)
- Ear Bud Adapter Ring
- USB Charging Cable
- AC Adapter
- Quick-Start Guide (not shown)
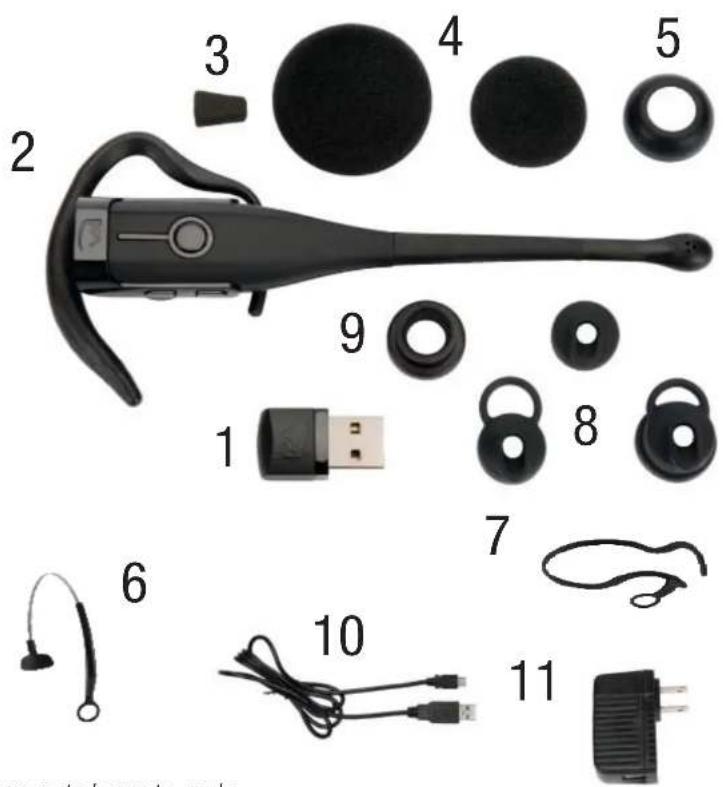
Images are not shown to scale
VXi VoxStar UC User Guide
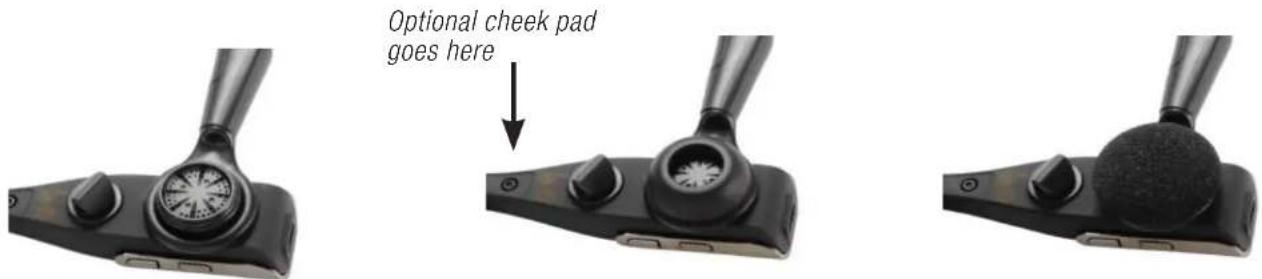
PROPER FIT AND PLACEMENT
To get the best performance from our noise-canceling technology, position the microphone near the corner of your mouth. Positioning is important; small adjustments in microphone placement can improve performance.
The VXi VoxStar UC offers three wearing styles to ensure optimal fit and comfort: earhook, headband and neck band. To attach the headset to the wearing style of your choice, please refer to the following photos.
Multiple sizes of ear tips are included. Choose the size that gives you the optimal fit.
Ear Bud Assembly

natural_image
Black plastic mechanical component with multiple cylindrical features and a handle, shown against white background (no text or symbols)VXi VoxStar UC User Guide
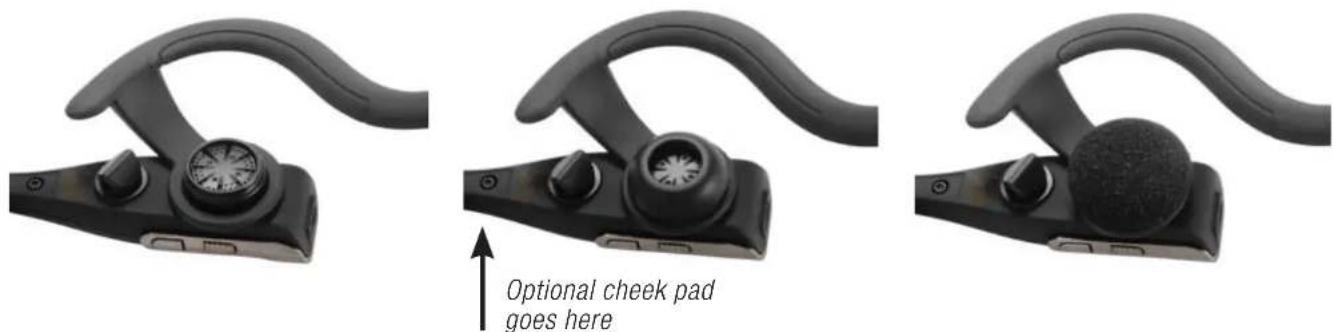
OTHER WEARING STYLES
Over-the-ear wearing style: Attach to ear hook as shown. Add foam or rubber ear cushion and optional foam cheek pad. Place the ear hook over your ear and mold it so it fits securely and comfortably.

Over-the-head wearing style: Attach to headband as shown. Add foam or rubber ear cushion. Place the ear hook over your ear and mold it so it fits securely and comfortably.
VXi VoxStar UC User Guide
OTHER WEARING STYLES
Behind-the-neck wearing style: Attach to headband as shown. Add foam or rubber ear cushion.
CHARGING THE HEADSET
Connect charger cord into the headset's charging port. The MFB's indicator light may turn blue for several seconds while the headset determines the level of charge the battery is holding. Do not remove the headset from the charger. If the headset is not fully charged, the indicator will turn RED within a short period (less than 3 minutes). When the indicator turns blue—and stays blue—the unit is fully charged. It could take approximately 2.5 hours to achieve a complete charge.
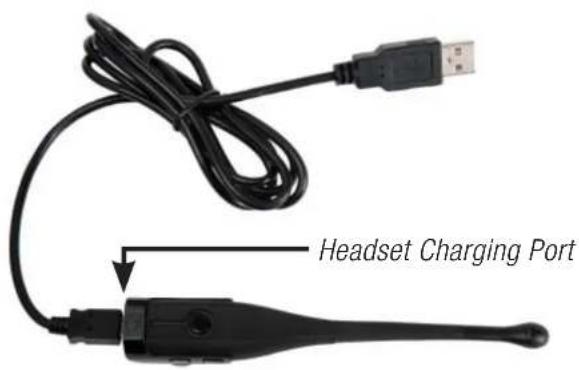
USB Charging Cable & AC Adapter
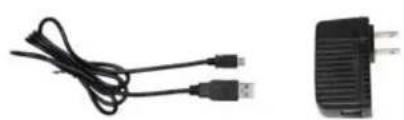
natural_image
Two electronic components: a black cable with USB connectors and a black plastic plug (no text or symbols visible)VXi VoxStar UC User Guide
BATTERY POWER INDICATORS
While charging, the MFB's indicator light shows the level of battery power on your VXi VoxStar as follows:
Blue light: Fully charged. Over 7 hours' talk time.
Red light: Less than a full charge.
For best performance, keep charging headset when not in use.
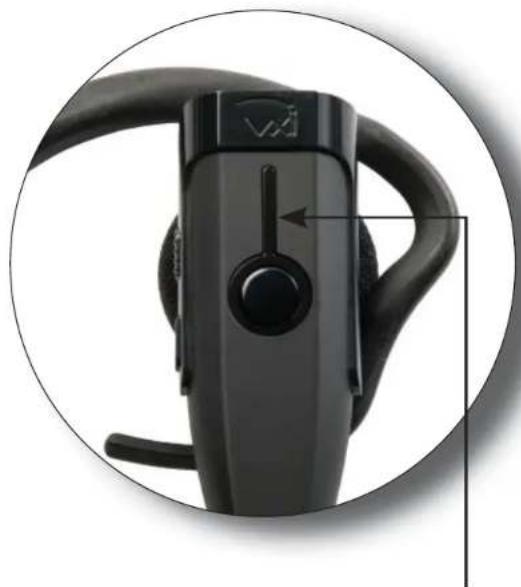
natural_image
Close-up of a black Bluetooth device head with a circular outline highlighting the component (no text or symbols visible)Indicator Light
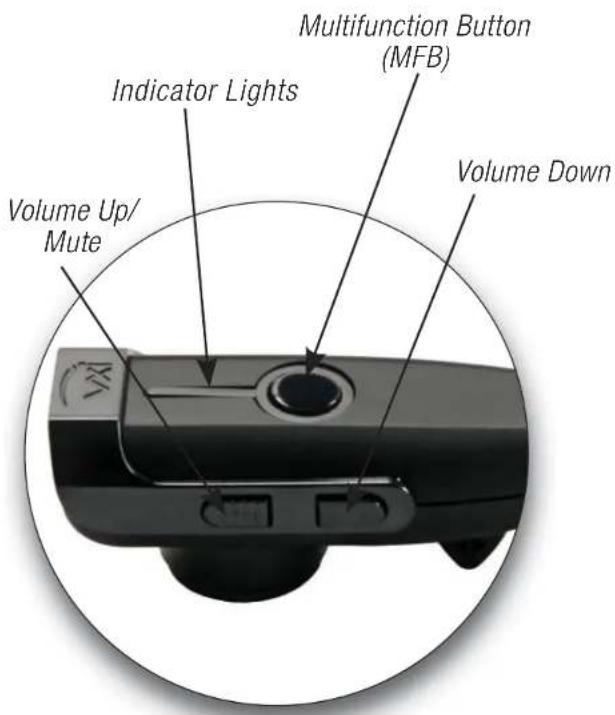
HEADSET CONTROLS
Volume Increase: Quickly press and release the Volume Up/Mute button. Repeat until desired volume is attained.
Volume Decrease: Quickly press and release the Volume Down button. Repeat until desired volume is attained.
Microphone Mute/Un-Mute While on a call, hold down the Volume Up/Mute button for 2 seconds until you hear a beep. A mute reminder beep will be heard every 10 seconds. Repeat to un-mute.
VXi VoxStar UC User Guide
ON / STANDBY / OFF
Turn Headset On: Hold down the MFB for approximately 2-3 seconds until you hear a voice prompt, "Power on." The blue light will flash twice every second.
Standby Mode: Once the headset is turned on (after the initial pairing), it will attempt to connect to the last device that it was paired with, putting itself into Standby Mode. (The headset can also be put into Standby Mode with a quick press and release of the MFB). The blue light will flash indicating an active Bluetooth link. The headset will give a voice prompt (in English), "Your headset is connected."
Turn Headset Off (conserves battery power): Hold down the MFB for approximately 3-4 seconds until you hear a voice prompt (in English), "Power off." A red light will flash 4 times and the headset will turn off.
PAIRING WITH A CELL PHONE
Keep headset and phone no less than 3 inches and no more than 3 feet apart while pairing. Keep other Bluetooth devices at least 50 feet away, or turn them off. NOTE: The headset can be paired with up to 8 different devices but can only be connected to one at a time. It can only switch back and forth between 2 devices in Multipoint Mode.
- Turn headset off.
- Press the MFB until the light rapidly flashes blue and you hear the audio prompt "Power On" (in English) and keep holding until you hear "Discovering" (in English). IMPORTANT: Wait for all audio prompts and the blue, rapidly flashing light. This may take up to 8–10 seconds. Release the MFB.
- Put your cell phone into Bluetooth Search/Scan Mode per the manufacturer's instructions.
- Wait while the devices discover each other: This could take up to 2 minutes. Once the phone discovers the headset, select "pair" and enter a passcode of "0000" if instructed. Once pairing is complete, the headset's rapid blue light will stop flashing and the phone may prompt you to 'connect' to the headset. Enter "Yes" on the phone if prompted to connect to the headset. When connected, you'll hear the voice prompt (in English), "Your headset is connected," and the blue light will flash slowly (once every 3–4 seconds), indicating that the headset is in Standby Mode and ready to make or receive calls.
PAIRING WITH BT2 USB ADAPTER
Your VoxStar UC headset is pre-paired with the BT2 USB Adapter. If you need to re-pair your headset, or pair the BT2 with a different headset, follow these steps:
- Place the headset into pairing mode.
- Insert the BT2 into a USB port on the computer.
- The adapter will initialize and enter pairing mode while the computer installs any necessary driver files. The BT2 LED will flash quickly. The headset should connect with the adapter either during initialization or shortly after. Note: If the adapter and headset do not pair the first time, unplug the adapter and repeat this procedure.
Make sure your PC's sound settings have the VXi BT2 USB Adapter as the default microphone and/or speaker. Go to www.vxicorp.com/usb for more information on configuring your specific operating system.
MULTIPLE DEVICE PAIRING
The VXi VoxStar UC can pair with up to 8 devices at the same time; however, only one device may be connected to the headset at a time, unless the headset is in Multipoint Mode.
Once all devices are paired, the headset will connect to the devices in reverse order of pairing. For instance, if device A, B and C were paired in that order, connection will be established to C first. If C is not available (turned off, out of range), the headset will connect to B, etc.
MULTIPOINT MODE
Multipoint Mode allows you to pair and switch between two Bluetooth devices.
The headset can be paired with devices before or after enabling Multipoint Mode.
ENABLING MULTIPOINT MODE
- Make sure any other Bluetooth devices are powered off or out of range.
- Power on the headset, but release the MFB as soon as you hear the voice prompt (in English) "Power On." The headset should not be connected to any other devices and should display a double-blinking blue light.
- Press and hold the MFB, Volume Up and Volume Down buttons, and then release all three at the same time.
- If successful, you should hear a 4 rising tone "fanfare."
- Power off the headset. It is now in Multipoint Mode.
- If you have not already done so, pair the headset with the devices you want to use.
- Once all this is completed, when you next power on the headset, you should hear the voice prompt (in English) "Your headset is connected" as it connects to each device.
MULTIPOINT MODE
DISABLING MULTIPOINT MODE
Disabling Multipoint Mode does not affect device pairings.
- Repeat steps 1–3 for enabling Multipoint Mode.
- If successful, you should hear a 4 descending tone "fanfare."
- Power off the headset. Multipoint Mode is now disabled.
PROXIMITY PAIRING
Proximity Pairing enables the headset to find the closest "discoverable" phone.
- Make sure the headset is powered on.
- Hold the MFB down and quickly press the Volume Down button.
- You should hear the voice prompt "discovering" (in English) in the headset.
- The headset lights will rapidly flash blue.
- The headset initiates pairing activity, and the user has to accept the incoming pairing invitation on the phone. NOTE: This may include entering the pin number "0000" (four zeros).
MAKING A CALL
If you have not paired the headset and phone together yet, you must do so.
- Turn on your cell phone. Be sure the Bluetooth option is enabled on your phone (refer to your phone's user guide for instruction).
- Put headset on and properly position the microphone. Turn the headset on, and wait for it to connect to your phone.
- Dial the phone and make a call as usual. Or use the headset's Voice Dial function (if your phone supports it) to make a call.
- To end call, quickly press the MFB on the headset and release. You will hear falling tones. The call will end and the headset will enter Standby Mode.
ANSWERING A CALL
In order to answer a call, the headset must be in Standby Mode.
- When your cell phone rings, you will hear ring tones in the headset. Answer the call by quickly pressing the headset's MFB and release. You will hear 2 rising tones (and the MFB button will blink blue every second).
- To end the call, quickly press the MFB on the headset and release. You will hear falling tones and the headset will enter Standby Mode.
The VoxStar UC headset will operate from battery power or from the AC/DC charger/adapter.
NOTE: Do not attach the charger mid-call. This will cause the headset to reset, and the call will be sent back to the phone.
When the headset is operating from the battery, all indicator lights and sounds will function as described in this guide.
When the headset is operating from the charger/adapter, the headset—including the audio indicators—will function as described in this user guide. However, the MFB lights will indicate the battery charge status.
While the headset is on the charger, press and hold the MFB long enough to power the unit on. The headset should reconnect automatically unless your phone is set to “always ask” for connection requests.
After the battery is fully charged, the MFB charge light will turn and stay blue. As long as the charger/adapter is connected to the headset, the indicator light will remain blue.
ADDITIONAL FUNCTIONS
LAST NUMBER REDIAL
To re-dial the last number that was dialed from the cell phone, press and hold the Volume Down button for approximately 1 second. A beep will be heard and the phone will redial the last number.
REJECT A CALL
To reject an incoming call, press and hold the MFB for 2 seconds. You will hear 2 falling tones and the incoming call will be transferred to your voicemail (if available).
VOICE DIAL
To use the Voice Dial feature of the cell phone, quickly press the MFB on the headset. A tone will be heard and the phone's voice dialer should open. Clearly speak the command. Repeat quick press of the MFB to end Voice Dial. The headset must be in Standby Mode to use this feature.
More functions on page 22
VXi VoxStar UC User Guide
ADDITIONAL FUNCTIONS
TRANSFER AUDIO
To transfer audio from the headset to the cell phone while on a call, press and hold the Volume Down button for 1-2 seconds. The audio will transfer to the phone; repeat to transfer audio back to the headset. When audio is transferred to the phone, the light on the headset will be off until the audio is transferred back to the headset.
TURN HEADSET INDICATOR LIGHTS ON/OFF
A quick press of both the Volume Up and Volume Down buttons at the same time will turn the headset indicator lights off. Repeat to turn the indicator lights on. When powering on the headset, the indicator lights will be in the same state as they were when last powered off.
AUTOMATIC BLUETOOTH CONNECTION
When the headset is powered on, it will automatically attempt to connect to the last device it was paired with. If the headset was paired with multiple devices and the last connected device is not available (turned off, out of range, etc.), the headset will attempt to connect to the second to the last device it was connected to, etc. It is also possible to reconnect to the device with a quick press of the headset's MFB. A tone and the voice prompt (in English), "Your headset is connected," will be heard and the two devices should connect.
RESET PAIRED DEVICES LIST
The headset must be on to perform this function.
To reset the headset's internal paired devices list, hold the headset near your ear. Press and hold the Volume Up and the Volume Down buttons simultaneously for approximately 6-10 seconds until two low tones are heard.
This procedure may be necessary if the headset will not pair or connect to a device.
NOTE: Pairing information for devices previously paired with the headset will be lost. Headset will need to be paired to the device after reset has occurred. If Multipoint Mode was enabled at the time of reset, the headset will remain in Multipoint Mode.
CALL WAITING / REJECTING A CALL
This function is dependent on the features supported by your cell phone.
- To accept an incoming call while talking on an active call, press the MFB button twice to put the active call on hold.
- To switch to the original call, quickly press the MFB button once. NOTE: Depending on your phone's programming, you may be able to switch between calls from the phone's call handling menu.
- To reject an incoming call while on an active call, press and hold the MFB button for 2 seconds. The incoming call will go to voicemail, if available and supported by your cell phone.
SPECIFICATIONS
VoxStar UC Headset
Range: Up to 66 feet. Best range is achieved with line-of-sight positioning of headset and cell phone. Certain conditions and obstructions, such as wireless devices, placing your phone on a metal surface (such as your vehicle's hood), walls, etc., can inhibit radio wave transmission and reduce range.
Talk Time: 7+ hours on a 2.5-hour charge.
Standby Time: Up to 195 hours on a 2.5 -hour charge.
BT2 USB Adapter
Range: Up to 66 feet
Interface: USB and Bluetooth
OS Support: Windows XP SP3 or higher, Mac OSX 10.4 or higher
VXi VoxStar UC User Guide
FUNCTIONS & INDICATORS
VoxStar UC Headset
| Function Button/Duration of Press LED Indicator Audio Indicator | Voice Indicator (in English) | |||
| Power On MFB (2-3 seconds) | Blue, double flash (1 second) | Short tone “Power on” | ||
| Power Off MFB (3-4 seconds) All LEDs turn off NONE “Power off” | ||||
| Enable Pairing Mode | MFB (5-15 seconds) Blue, rapid flash NONE “Discovering” | |||
| Headset connects to device | n/a Blue, slow flash | NONE | “Your headset is connected” | |
| Connect to A2DP | n/a | Blue, quick double flash | NONE | “Your headset is connected” |
| Volume Up | Volume Up (quick press) | NONE | Single tone | NONE |
| Volume Down | Volume Down (quick press) | NONE | Single tone | NONE |
FUNCTIONS & INDICATORS
Function Button/Duration of Press LED Indicator Audio Indicator
Voice Indicator (in English)
| Mute reminder n/a n/a | Single tone at 10-second intervals | n/a | ||
| Voice Dial (Start/End) | MFB (quick press) | NONE Single tone NONE | ||
| Last Number Redial | Volume Down (1 second) | NONE Single tone NONE | ||
| Answer a Call/ Active Call | MFB (quick press) | Blue flash, once per second | Two rising tones | NONE |
| End a Call | MFB (quick press) | Blue flash, every 4 seconds | Two falling tones | NONE |
| Reject a Call | MFB (2 seconds) | NONE | Two falling tones | NONE |
FUNCTIONS & INDICATORS
Function Button/Duration of Press LED Indicator Audio Indicator
Voice Indicator (in English)
| Transfer Audio Volume Down (1-2 seconds) NONE NONE NONE | ||||
| Disable LEDs | Volume Up/Volume Down(quick press) | All LEDs turn off Short tone NONE | ||
| Enable LEDs | Volume Up/Volume Down(quick press) | LEDs turn on Short tone NONE | ||
| ResetPaired Devices | Volume Up/Volume Down(6-10 seconds) | NONE 2 low tones NONE | ||
| Disconnectfrom Device | n/a Blue, double flash | NONE | “Your headset isdisconnected.” | |
| Link Loss | NONE | Red, slow flash | Two tones, andthen one tone every10 seconds. | NONE |
| Low Battery | NONE | Red, fast flash | Long, high tone@ 20 seconds | “Battery low” |
FUNCTIONS & INDICATORS
Function Button/Duration of Press LED Indicator Audio Indicator
Voice Indicator (in English)
| Accept Held Incoming Call | MFB (quick press) NONE NONE NONE | |||
| Reject Held Incoming Call | MFB (1-2 seconds) NONE NONE NONE | |||
| Enable Multipoint Mode | MFB / Volume Up & Volume Down (quick press) | NONE 4 rising tones NONE | ||
| Disable Multipoint Mode | MFB / Volume Up & Volume Down (5-6 seconds) | NONE 4 falling tones NONE | ||
| Start Proximity (RSSI) Pairing | MFB (2–3 seconds), then Volume Down (quick press) | Blue, rapid flash | 2 half-second low tones | “Discovering” |
FUNCTIONS & INDICATORS
BT2 USB Adapter LED Indicators
Function LED Indicator
Adapter not connected to headset Steady on/off flash
Adapter connected to headset Long on/short off flash
Adapter in pairing mode Fast flash
VXi WARRANTY
(1) VXi warrants that your VXi VoxStar UC headset system will be free from defects in material and workmanship for one year from the date of purchase. If, during the first year from the date of purchase, your VXi VoxStar UC headset system fails to work due to a defect in material or workmanship, VXi will repair or replace product, at its election, free of charge. Without proof of purchase, the warranty period begins on the date of manufacture. Consumable components (for example, cushions, battery and fuse) are not included in this one-year warranty. (2) The foregoing limited warranty does not cover equipment failure attributable to accident, improper operation, misuse, abuse, or any cause other than defects in the materials or workmanship of VXi's products. (3) VXi's obligations under this warranty are limited to repair or replacement (at our option) of any defective part returned to VXi at the customer's expense. Returned products require a Return Authorization that may be obtained by calling 800-742-8588 or visiting www.vxicorp.com. Products returned to VXi for repair under this warranty will be return shipped to the customer at VXi's expense. (4) THIS LIMITED WARRANTY IS IN LIEU OF ALL OTHER WARRANTIES, EXPRESS OR IMPLIED, INCLUDING THE IMPLIED WARRANTIES OF MERCHANTABILITY AND FITNESS FOR A PARTICULAR PURPOSE. Some jurisdictions do not permit the exclusion of implied warranties and the foregoing exclusions may not apply to you. (5) In no event shall VXi be responsible for any other damages whatsoever, including direct, indirect, special, incidental, consequential, or other damages for breach of this or any other warranty, express or implied.
VXi VoxStar UC User Guide
FCC NOTICE TO USERS
This device complies with part 15 of the FCC rules. Operation is subject to the following two conditions: (1) This device may not cause harmful interference, and (2) This device must accept any interference received, including interference that may cause undesired operation. Users are not permitted to make changes or modify the device in any way. Changes or modifications not approved by VXi Corporation will void the user's authority to operate the equipment. NOTE: This equipment has been tested and found to comply with the limits for a Class B digital device pursuant to part 15 of the FCC rules. These limits are designed to provide reasonable protection against harmful interference in a residential installation. This equipment generates, uses and can radiate radio frequency energy and, if not installed and used in accordance with the instructions, may cause harmful interference to radio communications. However, there is no guarantee that interference will not occur in a particular installation. If this equipment does cause harmful interference to radio or television reception, which can be determined by turning the equipment on and off, the user is encouraged to try to correct the interference by one or more of the following measures:
- Reorient or relocate the receiving antennae.
- Increase the separation between the equipment and the receiver.
- Connect the equipment into an outlet on a circuit different from that to which the receiver is connected.
- Consult the dealer or an experienced radio/TV technician for help.
IC NOTICE TO CANADIAN USERS
This device complies with Industry Canada license-exempt RSS standard(s). Operation is subject to the following two conditions: (1) This device may not cause interference, and (2) This device must accept any interference, including interference that may cause undesired operation of the device. This device complies with RSS-310 of Industry Canada. Operation is subject to the condition that this device does not cause harmful interference. This Class B digital apparatus complies with Canadian ICES-003 (Cet appareil numérique de la classe B conforme à la norme NMB-003 du Canada).

natural_image
Abstract logo design featuring stylized 'vxi' letters with a curved arc above (no text or symbols)VXi Corporation | 271 Locust Street, Dover, NH 03820 USA Toll Free | Llamada sin cargo | Sans frais | Gebührenfrei in den USA: (800) 742-8588 Phone | Teléfono | Téléphone | Tel.: 1 603 742-2888 www.vxicorp.com APN 203433X1 © 2014 VXi Corporation