
DW6PS - Dishwasher Avanti - Free user manual and instructions
Find the device manual for free DW6PS Avanti in PDF.


| Brand | Avanti |
| Model | DW6PS |
| Product Type | Dishwasher |
| Dimensions (H x W x D) | Approx. 17.5 x 19.7 x 17.5 in (44.5 x 50.0 x 44.5 cm) |
| Weight | Approx. 35 lbs (16 kg) |
| Power Supply | 115/120 V AC, 60 Hz, 10 A |
| Power Cord Length | 6.3 ft (195 cm) |
| Inlet/Drain Hose Length | 22.8 in (58 cm) |
| Water Pressure | 15-20 psi |
| Water Temperature Range | 120°F - 149°F (49°C - 65°C) |
| Wash Cycles | Heavy, Normal, Light, Glass, Rapid, Pre-Wash (6 cycles) |
| Water Consumption | 0.7 - 4.2 gallons per cycle |
| Cycle Time | 10 - 115 minutes |
| Detergent Dispenser | Yes, with two main cups and open cup on lid |
| Rinse-Aid Dispenser | Yes, capacity 3.5 oz, adjustable setting |
| Filter System | Three-stage: coarse, fine (micro), main (flat) filters |
| Cutlery Basket | Yes, removable |
| Rack | One rack with cup shelf and foldable tines |
| Control Panel | Rotary selector, Start/Reset button, ON/OFF button, indicator lights |
| Safety Features | Grounded plug, water heater hydrogen gas warning, child supervision recommended |
| Warranty | 1 year limited parts and labor |
| Installation Type | Countertop/portable with quick-connect faucet adapter |
| Included Accessories | Rack, cutlery basket, measuring spoon, measuring cup, faucet adapter, instruction manual |
Frequently Asked Questions - DW6PS Avanti
User questions about DW6PS Avanti
0 question about this device. Answer the ones you know or ask your own.
Ask a new question about this device
Download the instructions for your Dishwasher in PDF format for free! Find your manual DW6PS - Avanti and take your electronic device back in hand. On this page are published all the documents necessary for the use of your device. DW6PS by Avanti.
USER MANUAL DW6PS Avanti
natural_image
Technical line drawing of an open kitchen appliance with internal components (no text or symbols)BEFORE USE, PLEASE READ AND FOLLOW ALL SAFETY RULES AND OPERATING INSTRUCTIONS.
Avanti has a policy of continuous improvement on its products and reserves the right to change materials and specifications without notice.
Avanti Products, A Division of The Mackle Co., Inc.
P.O. Box 520604 - Miami, Florida 33152
www.avantiproducts.com
TABLE OF CONTENTS
| Help Us Help You | 3 |
| Parts and Features / Control Panel | 4 |
| Important Safety Features | 5 |
| Water Heater Safety | 5 |
| Electrical Connection | 6 |
| Installation Instructions | 7 – 9 |
| Connecting the Drain Hose | 9 |
| Before Using Your Dishwasher | 10 |
| Operating Instructions | 10 – 11 |
| Cycle Sequence | 12 |
| Detergent Dispenser | 13 |
| Rinse-Aid Dispenser | 14 |
| Loading the Dishwasher | 15 – 16 |
| Care and Maintenance | 17 – 18 |
| Troubleshooting Guide | 19 – 20 |
| Error Codes | 21 |
| Service for Your Dishwasher | 21 |
| Your Avanti Products Warranty | 22 |
| Instrucciones en Español | 23 – 34 |
| Registration Information and Registration Card | 35 |
HELP US HELP YOU...
Read this guide carefully.
It is intended to help you operate and maintain your new dishwasher properly.
Keep it handy to answer your questions. If you don't understand something or you need more assistance, please call:
Avanti Customer Service 800-220-5570
Keep proof of original purchase date (such as your sales slip) with this guide to establish the warranty period.
Write down the model and serial numbers.
You'll find them on a plate located on the rear wall of the dishwasher.
Please write these numbers here:
Date of Purchase
Model Number
Serial Number
Use these numbers in any correspondence or service calls concerning your dishwasher.
If you received a damaged dishwasher, immediately contact the dealer (or builder) that sold you the dishwasher.
Save time and money. Before you call for service, check the Troubleshooting Guide. It lists causes of minor operating problems that you can correct yourself.
IF YOU NEED SERVICE
We're proud of our service and want you to be pleased. If for some reason you are not happy with the service you receive, here are some steps to follow for further help.
FIRST, contact the people who serviced your dishwasher. Explain why you are not pleased. In most cases, this will solve the problem.
NEXT, if you are still not pleased, write all the details, including your telephone number, and send it to:
Customer Service
Avanti Products
10880 NW 30 ^th Street
Miami, FL 33172
PARTS AND FEATURES
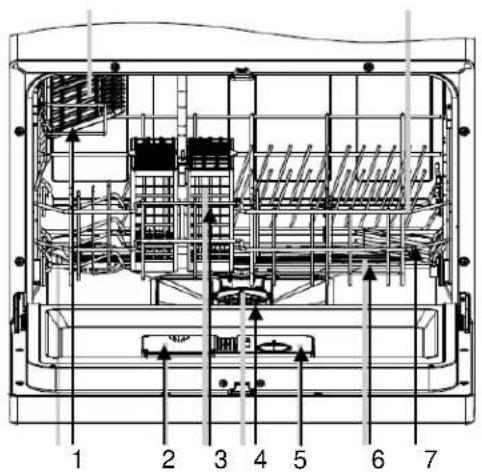
| Front View (Open) | |
| 1 | Cup Shelf |
| 2 | Detergent Dispenser |
| 3 | Cutlery / Silverware Basket |
| 4 | Filter Assembly |
| 5 | Rinse-Aid Dispenser |
| 6 | Water Spray Arm |
| 7 | Rack |
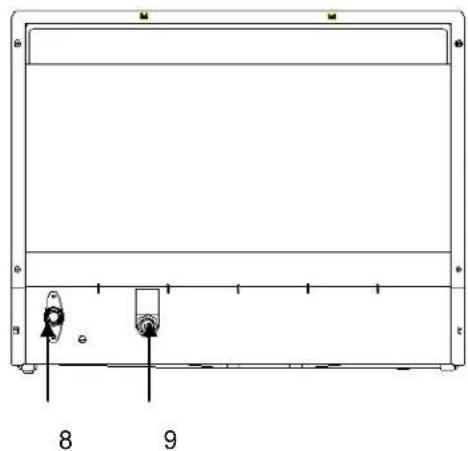
| Rear View | |
| 8 | Drain Pipe Connector |
| 9 | Water Inlet Pipe Connector |
Control Panel

| 1 | Rinse-Aid Warning Indicator | 4 | Wash Program / Cycle Selector Knob |
| 2 | Start / Reset Light | 5 | ON / OFF Power Button |
| 3 | Start / Reset Button | 6 | Power Indicator Light |
WARNING!
For your safety, the information in this manual must be followed to minimize the risk of fire or explosion, electric shock, or to prevent property damage, personal injury, or death.
WATER HEATER SAFETY
Under certain conditions hydrogen gas may be produced in a water heater that has not been used for two weeks or more. HYDROGEN GAS IS EXPLOSIVE. If the hot water has not been used for two weeks or more, prevent the possibility of damage or injury by turning on all hot water faucets and allow them to run for several minutes. Do this before using any electrical appliance which is connected to the hot water system. This simple procedure will allow any built-up hydrogen gas to escape. Since the gas is flammable, do not smoke or use an open flame or appliance during this process. Use this appliance only for its intended purpose as described in this Owner's Manual.
PROPER INSTALLATION AND MAINTENANCE
This dishwasher must be properly installed and located in accordance with the Installation Instructions before it is used.
Connect to a grounded metal, permanent wiring system; or run an equipment grounding conductor with the circuit conductors and connect to the equipment grounding terminal or lead of the appliance. Improper connection of the equipment grounding conductor can result in a risk of electric shock. Check with a qualified electrician or service representative if you are in doubt whether the appliance is properly grounded.
Dispose of discarded appliances and shipping or packing material properly
Do not attempt to repair or replace any part of your dishwasher unless it is specifically recommended in this manual. All other servicing should be referred to a qualified technician.
To minimize the possibility of electric shock, disconnect this appliance from the power supply before attempting any maintenance.
NOTE: Turning the dishwasher off does not disconnect the appliance from the power supply. We recommend having a qualified technician service your appliance.
CAUTION: To prevent minor injury or property damage
Contents washed in anti-bacterial mode, if available, may be hot to the touch. Use care before handling. Using a detergent that is not specifically designed for dishwasher will cause the dishwasher to fill with suds.
If your dishwasher is connected to a wall switch, ensure that the switch is prior to use.
Non-dishware items: Do not wash items such as electrical cleaner filter, furnace filters and paint brushes in your dishwasher and discoloration or staining of dishwasher may result.
Close supervision is necessary if this appliance is used by or near children.
On dishwashers with electronic controls, if you chose turn the switch off between wash cycles, allow 5-10 seconds after turning the switch on before touching the switch START/RESET to allow the control to reboot.
ELECTRICAL CONNECTION
Warning
Improper use of the grounded plug can result in the risk of electrical shock. If the power cord is damaged, have it replaced by an authorized Avanti Products service center.
This appliance should be properly grounded for your safety. The power cord of this appliance is equipped with a three-prong plug which mates with standard three prong wall outlets to minimize the possibility of electrical shock.
Do not under any circumstances cut or remove the third ground prong from the power cord supplied. For personal safety, this appliance must be properly grounded.
This appliance requires a standard 115/120 Volt AC \~/60Hz electrical ground outlet with three-prong. Have the wall outlet and circuit checked by a qualified electrician to make sure the outlet is properly grounded. When a standard 2-prong wall outlet is encountered, it is your responsibility and obligation to have it replaced with a properly grounded 3-prong wall outlet.
The cord should be secured behind the appliance and not left exposed or dangling to prevent accidental injury.
The appliance should always be plugged into its own individual electrical outlet which has a voltage rating that matches the rating label on the appliance. This provides the best performance and also prevent overloading house wiring circuits that could cause a fire hazard from overheated. Never unplug the appliance by pulling the power cord. Always grip the plug firmly and pull straight out from the receptacle. Repair or replace immediately all power cords that have become frayed or otherwise damaged. Do not use a cord that shows cracks or abrasion damage along its length or at either end. When moving the appliance, be careful not to damage the power cord.
EXTENSION CORD
Because of potential safety hazards under certain conditions, it is strongly recommended that you do not use an extension cord with this appliance. However, if you must use an extension cord it is absolutely necessary that it be a UL/CUL-Listed, 3-wire grounding type appliance extension cord having a grounding type plug and outlet and that the electrical rating of the cord be 115 volts and at least 10 amperes.
SURGE PROTECTOR
Most electrical appliances use a series of electric control boards to operate. These boards are very susceptible to power surges and could be damaged or destroyed.
If the appliance is going to be used in an area or if your city / country is prone to power surges / outages; it is suggested that you use a power surge protector for all electrical devices / appliances you use. The surge protector that you select must have a surge block high enough to protect the appliance it is connected to. If you have any questions regarding the type and size of surge protector needed contact a licensed electrician in your area.
Damages due to power surges are not considered a manufacturer covered defect and will void your product warranty.
WARNING:
When using your dishwasher, follow basic precaution, including the following:
Use this appliance only for its intended purpose as described in this owner's manual.
Use only powder, tabs, liquid detergents or rinse agents recommended for use in a dishwasher and keep them out of the reach of children.
Locate the sharp items so that they are not likely to damage the door seal.
Load the sharp knives with the handles up to reduce the risk of cut-type injuries.
Do not wash plastic unless marked dishwasher safe or the equivalent. For plastic items not so marked check the manufacturer's recommendations.
Do not operate your dishwasher unless all enclosure are properly in place.
Do not tamper with controls.
Do not abuse, sit on or stand on the door or dish rack of the dishwasher.
Do not allow children to play around the dishwasher when opening or closing door due the possibility of small fingers being pinched in door.
Do not discard the dishwasher without removing the door of the washing compartment.
Do not store or use combustible materials, gasoline or other flammable vapors and liquids in the vicinity of this or any other appliance.
Do not allow children to play with, on or inside this appliance or any discarded appliance.
REDA AND FOLLOW THIS SAFETY INFORMATION CAREFULLY.
SAVE THESE INSTRUCTIONS
Installation instructions
WARNING
A hose that attaches to a sink spray can burst if it is installed on the same water line as the dishwasher. If your sink has one, it is recommended that the hose be disconnected and the hole plugged. Remove All Packaging Materials Carefully.
If your existing faucet adapter is not compatible with the "quick connect" hose assembly supplied;
- Connect the faucet adapter (included with dishwasher) to your faucet.
- If your faucet is inclusive of a 'male' type (threaded) connection, use only the standard rubber washer (0.2"/5mm thick) supplied inside the adapter. Remove the second rubber washer.
- If your faucet is inclusive of a ‘female’ type (threaded) connection, both rubber washers must be installed inside the faucet adapter.
- The minimum height clearance required to install your dishwasher on a counter top surface with overhead cupboards is 45cm (17.7").
- Make sure there is an electrical supply (outlet) within reach of the electrical power supply cord (195 cm / 6.3 ft).
- Make sure the water supply/faucet connection is within reach of the inlet & drain hose assembly (i.e., 58 cm / 22.8").
- The dishwasher must be installed on a solid, level surface.
Water Pressure
For best operating results, incoming water pressure should be between 15 and 20 pounds per square inch (psi).
For the Best Results:
Your dishwasher cleans by spraying a mixture of hot clean water and detergent (under pressure) against the soiled surfaces of dishes. The water is pumped through a rotating spray arm, drained through a filter (removing food and soiled particles) and pumped back through the spray arm. Soiled water is pumped out and replaced with clean water at the end of each cycle, (the number of times depends on the wash program being used). For best cleaning results, the water temperature must be at least 55^ C ( 130^ F). To prevent damage to the dishwasher, the temperature of the incoming water supply should not exceed 65^ C ( 149^ F).
Connecting your dishwasher
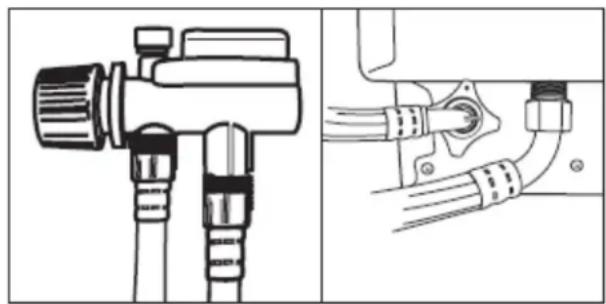
Your dishwasher comes equipped with a 'quick connect' assembly (includes inlet and drain hose). The faucet adapter must be installed on the faucet before you can connect the dishwasher. This adapter is included inside your dishwasher. The faucet adapter is compatible with faucets inclusive of either male (outside) or female (inside) threaded faucet connections.
natural_image
Technical line drawing of a mechanical device with two views: top shows a valve assembly, bottom shows wiring connections (no text or symbols)- Screw the faucet adapter onto (or into) the faucet tap. Check for leaks (use Teflon tape to eliminate if necessary).
- Connect the six-sided connection of the drain hose to the drain port connection on the back of the dishwasher cabinet. Do not over-tighten (to avoid damage to threads).
- Connect the star-shaped connection of the inlet hose to the inlet port on the back of the dishwasher cabinet. Do not over-tighten (to avoid damage to threads).
- Connect the circular connection of the drain hose onto the longer (bottom) male connection on the quick connect.
- Connect the circular connection of the inlet hose onto the shorter (top) male connection on the quick connect.
- Attach the quick connect onto the faucet adapter, by pulling down the outer locking collar on the quick connect, while pushing the quick connect upward onto the faucet adapter.
- When the quick connect snaps onto the faucet adapter, release the locking collar. Verify the connection is secure.
- Slowly open the hot water line and check for any sign of water leaks at all hose connections. If leaks are located, immediately close the water supply and repair the hose connections.
IMPORTANT
- Once you open the water supply line, (even if it is closed immediately thereafter), the inlet hose will be pressurized.
- To relieve water pressure from inside the inlet hose, (make sure the water line (faucet) is closed): press and hold the red pressure relief button on the quick connect until the flow of water stops.
WARNING
FAILURE TO RELIEVE WATER PRESSURE, BEFORE DISCONNECTING THE QUICK-CONNECT FROM THE FAUCET, WILL RESULT IN BACK-PRESSURE OVER-SPRAY. THE TEMPERATURE OF INCOMINGWATER CAN BE VERY HOT, AND BACK-PRESSURE OVER-SPRAY COULD CAUSE SEVERE BURNS AND/OR SCALDING.
DANGER
DO NOT LET CHILDREN DISCONNECT THE DISHWASHER; CLOSE SUPERVISION OF CHILDREN IS ALWAYS IMPORTANT AROUND APPLIANCES.
NOTE:
Hard water conditions will adversely affect the washing performance of your dishwasher. Hard water conditions will also contribute to 'lime' (white film substance) deposits and/or 'scaling' on the stainless steel surface of the dishwasher tub and heater element, located in the sump underneath the removable filter screen. To assist in minimizing these conditions, it is recommended to periodically operate/rinse the inside of the dishwasher (empty) using 1 cup of white vinegar at least once a week.
Disconnecting your Dishwasher
- Shut off the hot water supply at the faucet.
- Disconnect the power supply cord.
- Remember to release the water pressure inside the inlet hose. Press and hold the red pressure relief button on the quick-connect until the flow of water stops.
- Disconnect the quick-connect hose assembly by pulling down on the outer locking collar, (thus releasing the quick-connect from the faucet adapter).
Before Using Your Dishwasher
- Remove the exterior and interior packing.
- Check to be sure you have all of the following parts:
1 Rack
1 Cutlery / Silverware Basket
1 Measuring Spoon
1 Measuring Cup
1 Instruction Manual
Clean the interior surface with lukewarm water using a soft cloth.
Operating Instructions
To get the best performance from your dishwasher, read all operating instructions before using it for the first time.
You can locate your model number on the tub wall just inside the door. Throughout this manual, features and appearance may vary from your model.
Control Panel

| 1 | Rinse-Aid Warning Indicator | 4 | Wash Program / Cycle Selector Knob |
| 2 | Start / Reset Light | 5 | ON / OFF Power Button |
| 3 | Start / Reset Button | 6 | Power Indicator Light |
| Status Indicator Light – Description | |
| Light – OFF | Dishwasher is in Stand-by mode. |
| Light - ON | Dishwasher is in PAUSE mode. |
| Light – Flashing | Dishwasher is in RUN mode. |
Operating Your Dishwasher
a) Ensure that all Electrical, Water, and Drain connections have been installed correctly before proceeding.
b) Load the dishwasher accordingly (See the "Loading the Dishwasher Rack" section on pages 15–16).
c) Add the appropriate amount of dishwasher detergent to the dispenser (See the section "Proper Use of Detergent" on page 13).
d) Close the door and ensure that the door latch has engaged.
e) Turn the dishwasher ON by pressing the ON / OFF button.
f) Select the appropriate wash cycle / program (See the Cycle Sequence / Program Description section on page 12).
g) Make sure that the water supply is turned on to full pressure.
h) Press the Start/Reset button, the dishwasher will begin to start. The START / RESET indicator light will begin to flash intermittently to indicate the dishwasher is in "RUN" mode.
NOTE:
When you press the Start/Reset button to pause during washing, the program light will stop blinking and the dishwasher will beep once every minute unless you press the Start/Reset button to start (See Pausing the Wash Program / Cycle).
Pausing the Wash Cycle / Program:
In order to make any changes to the selected wash program / cycle, load additional items, or remove previously loaded items the dishwasher must be put in a "PAUSED" status. The dishwasher can be put into PAUSE mode at any time during the wash cycle.
To temporarily pause the washing process follow these steps:
a) Press and hold the START / RESET button for approximately 3 seconds.
(The START / RESET indicator light with be ON indicating that the unit is in PAUSE mode. While in the PAUSE mode you will hear a beep once every minute until the dishwasher is put back into normal operation or "RUN" mode.)
b) Make the necessary changes to the wash program / cycle selection, add/remove the items from the dishwasher.
c) Ensure that the door is closed and the latch is fully engaged.
d) Press the START / REST button once
e) The dishwasher will immediately resume operation using the selected wash program / cycle.
NOTE:
If the door is opened at any time during the washing process, the dishwasher will automatically go to the PAUSE mode. Once the door is closed and the latch is fully engaged the dishwasher will immediately resume operation as normal. Although the dishwasher will be put in the PAUSE mode by opening the door, it is recommended that you follow the steps above to PAUSE the washing process.
Changing the Wash Program / Cycle:
If at any time during the washing process you would like to change the selected wash program / cycle; follow the steps below:
a) Press and hold the START / RESET button for approximately 3 seconds.
(The START / RESET indicator light will be ON indicating that the unit is in PAUSE mode.)
b) Select the new wash program / cycle by turning the selector knob to the appropriate program / cycle.
c) Press the START / RESET button again, the dishwasher will resume operation using the newly selected wash program / cycle.
NOTE:
If you change the wash program / cycle after the detergent has been dispensed or the dishwasher has already drained the wash water, you will need to refill the detergent dispenser for the newly selected program / cycle accordingly. (See the section "Proper Use of Detergent on page 13)
At the End of the Wash Cycle
Once the dishwasher has completed the selected wash cycle / program, there will be a buzzer sound for 8 seconds indicating the end of the cycle and then stop.
a) Shut off the water supply.
b) Turn the dishwasher OFF by pressing the ON/OFF button.
c) Slightly open the door with caution to allow any residual steam to escape.
d) Wait a few minutes (approximately 15 minutes) before unloading the dishwasher as the dishes and cutlery will be hot. This also allows the dishes not only time to cool down but also aids in drying.
e) Unload the dishwasher and store your dishes and cutlery as normal.
f) The interior of the dishwasher will be wet, this is normal and will dry naturally.
WARNING:
It is dangerous to open the door when washing, because the hot water may scald you.
Check the Water Temperature
For the most effective cleaning and to prevent damage to the dishes being cleaned, the water supplied to the dishwasher should be at a temperature of at least 120^ F ( 49^ C) and no more than 150^ F ( 66^ C).
Using a candor or meat thermometer, place the thermometer in a glass under the faucet that will be used for the dishwasher and allow the HOT water to continuously run and fill the glass. Once the temperature stops rising this is the highest temperature of the water from that faucet.
Cycle Sequence
| Cycle | Water (Approx) | Time (Approx) | Sequence |
| Heavy | 4.2 Gallons | 115 Minutes | Pre-wash |
| Pre-wash (122°F/50°C) | |||
| Pre-wash (122°F/50°C) | |||
| Wash (140°F/60°C) | |||
| Wash (122°F/50°C) | |||
| Rinse | |||
| Rinse (149°F/65°C) | |||
| Dry | |||
| Normal | 3.6 Gallons | 80 Minutes | Pre-wash |
| Pre-wash | |||
| Pre-wash | |||
| Wash (131°F/55°C) | |||
| Rinse | |||
| Rinse (149°F/65°C) | |||
| Dry | |||
| Light | 3.0 Gallons | 80 Minutes | Pre-wash |
| Pre-wash (122°F/50°C) | |||
| Wash (122°F/50°C) | |||
| Rinse | |||
| Rinse (140°F/60°C) | |||
| Dry | |||
| Glass | 2.4 Gallons | 65 Minutes | Pre-Wash |
| Wash (122°F/50°C) | |||
| Rinse | |||
| Rinse (140°F/60°C) | |||
| Dry | |||
| Rapid | 3.0 Gallons | 50 Minutes | Pre-wash |
| Pre-wash (122°F/50°C) | |||
| Wash (122°F/50°C) | |||
| Rinse | |||
| Rinse (131°F/55°C) | |||
| Pre-Wash | 0.7 Gallons | 10 Minutes | Pre-wash |
Proper Use of Detergent
Use only detergent specifically made for use in dishwashers. Keep your detergent fresh and dry. Do not put powder detergent into the dispenser until you're ready to wash dishes.
The amount of detergent to use depends on whether your water is hard or soft. With hard water, you need extra detergent. With soft water, you need less detergent.
Protect your dishes and dishwasher by contacting your water department and asking how hard your water is. Twelve or more grains is extremely hard water. A water softener is recommended. Without it, lime can build up in the water valve, which could stick while open and cause flooding. Too much detergent with soft water can cause a permanent cloudiness of glassware, called etching.
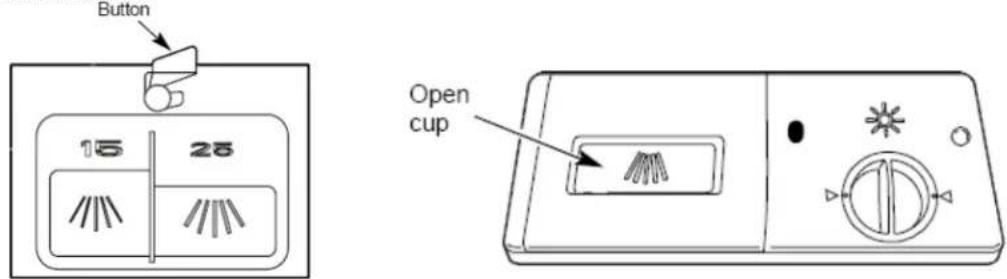
For heavily soiled loads, use the HEAVY, NORMAL WASH Cycle, fill one or both of the interior cups, depending on the hardness of your water, and also fill the open cup on the dispenser lid.
Use the information in the table below as a guideline to determine the amount of automatic dishwasher detergent to place in the dispenser:
| Number of Grains | Detergent Cups to Fill |
| Less than 4 | 15 cup |
| 4 to 8 | 25 cup |
| 8 to 12 | 15 and 25 cups |
| Greater than 12 | 15, 25 cups and the open cup |
To open the wash cover, press the button and the cover will flip back. After you finish, please close the cover. See below:
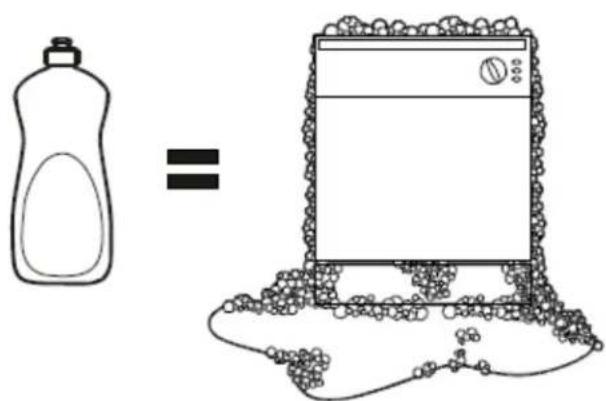
NOTE: DO NOT USE HAND DISH DETERGENT
Using a detergent that is not specifically designed for dishwashers will cause the dishwasher to fill with suds. During operation, these suds will spill out of the dishwasher vents, covering the kitchen floor and making the floor wet.
Because so many detergent containers look alike, store the dishwasher detergent in a separate space from all other cleaners. Show anyone who may use the dishwasher the correct detergent and where it is stored.
While there will be no lasting damage to the dishwasher, your dishes will not get clean using a dishwashing detergent that is not formulated to work with dishwashers.
Use Jet-Dry Rinse Agent
Jet-Dry rinse agent removes spots and prevents new film buildup on your dishes, glasses, flatware, cookware and plastic.
Filling the Dispenser
The rinse agent dispenser holds 3.5 oz. of rinse agent. Under normal conditions, this will last approximately one month. Try to keep it full, but do not overfill.
1) Make sure the dishwasher door is fully open.
2) Turn the dispenser knob to the left and lift it out.
3) Add rinse agent until the indicator window looks full.
4) Clean up any spilled rinse agent with a damp cloth.
5) Replace the dispenser knob.
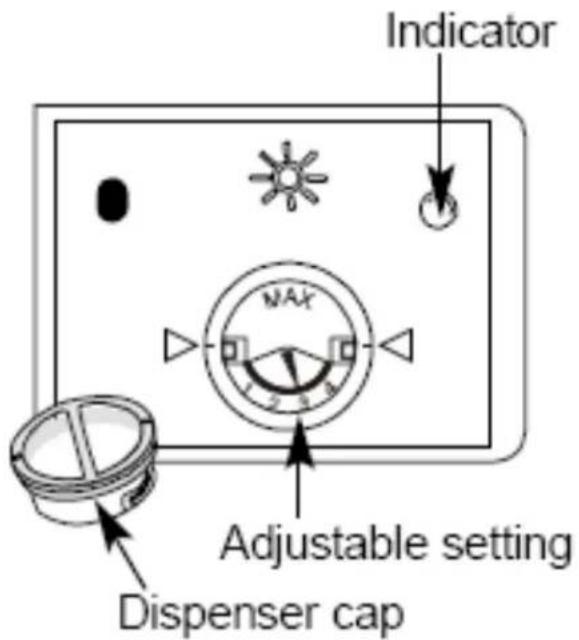
Rinse Aid Setting
The amount of rinse agent released into the final wash can be adjusted.
The factory setting is at the midpoint. If there are rings of calcium (hard water) spots on dishes, try a higher setting.
To adjust the setting
Remove the dispenser knob; then turn the adjuster counterclockwise to increase the amount of rinse agent.
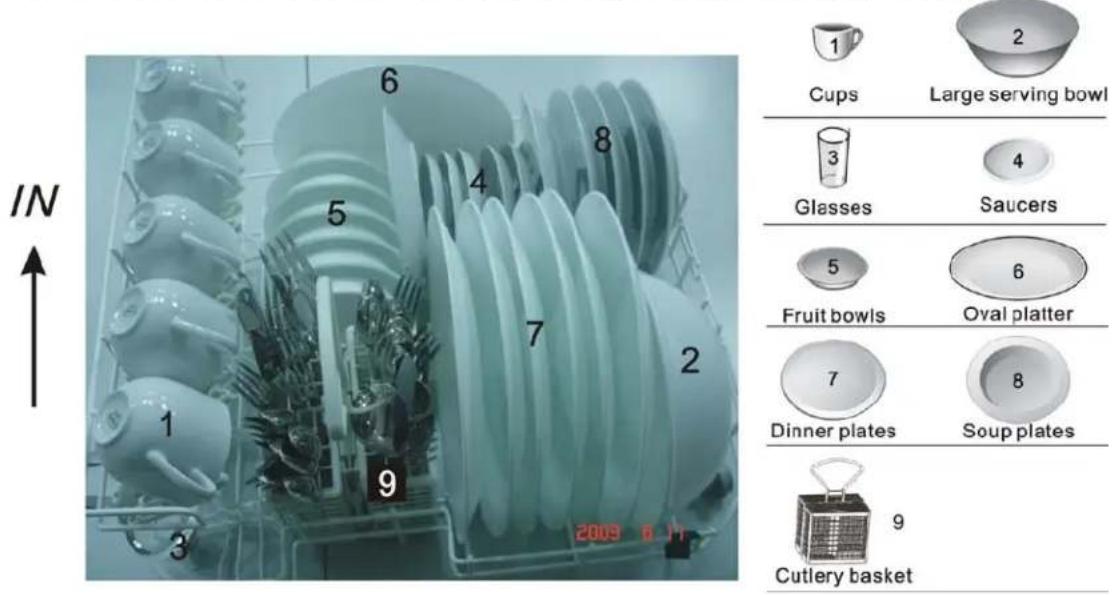
Loading the Dishwasher Rack
Position the dishes and cookware so that they will not get moved by the spray of water.
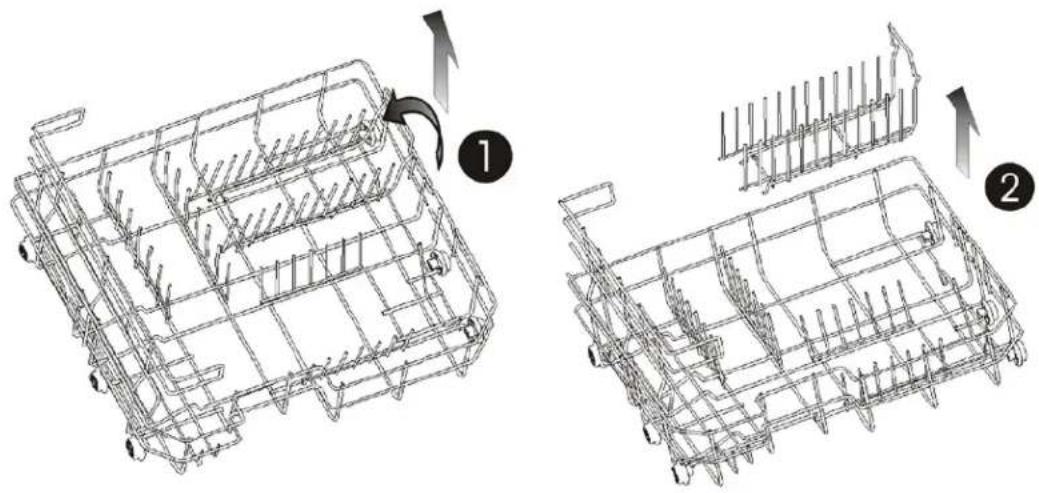
To remove the plate bracket from the rack:
natural_image
Technical line drawings of a mechanical component with two views (1 and 2), showing internal structure and assembly (no text or symbols)Silverware Basket
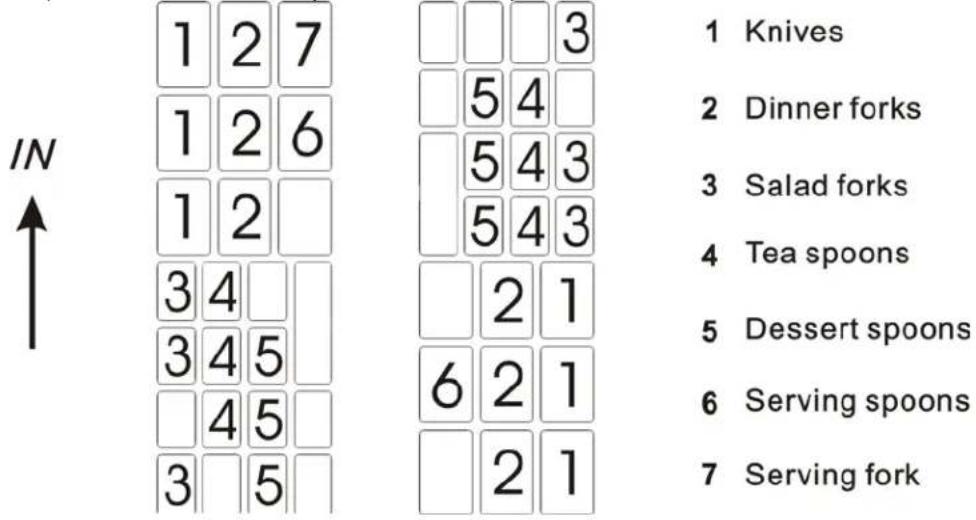
Silverware should be placed in the Silverware basket with handles at the bottom. If the rack has side baskets, the spoon should be loaded individually into the appropriate slots, especially long utensils should be placed in the horizontal position on the cup shelf.

natural_image
Circular diagram with grid lines and a cross symbol, no readable text or labelsWARNING:
Do not let any item extend through the bottom of the rack or cutlery basket.
WARNING:
Always load sharp utensils with the sharp point down!
For personal safety and a top quality cleaning, place the silverware in the basket ensure the following:
• They do not nest together.
- Place silverware with handles-down.
- But place knives and other potentially dangerous utensils handles-up.
Forget to Add a Dish?
You can load additional dishes / cutlery at any time before the detergent dispenser cup opens.
1 Press and hold the START / RESET button for approximately 3 seconds.
(The START / RESET indicator light will be on indicating that the dishwasher is in PAUSE mode).
2 Slowly open the door to both stop the water spray arm and to release any steam if applicable.
3 Once the water spray arm has stopped, you can open the door completely.
4 Add the additional items to the wash rack.
5 Close the door
6 Press the START / Reset button again, the dishwasher will resume operation after 10 seconds.
Care and Maintenance Instructions
Filter system
The filter system consists of a coarse filter, a flat (Main filter) And a micro filter (Fine filter).
1. Main filter:
Food and soil particles trapped by this filter are pulverized by a special jet on the spray arm and washed down to drain.
2. Fine filter:
This filter holds soil and food residue in the sump area and prevents it from being redeposit on the dishes during wash cycle.
3. coarse filter
Larger items, such as pieces of bone or glass, that could block the drain are trapped in the coarse filter. To remove the items caught by the filter, gently squeeze the tap on the top of this filter and lift out.
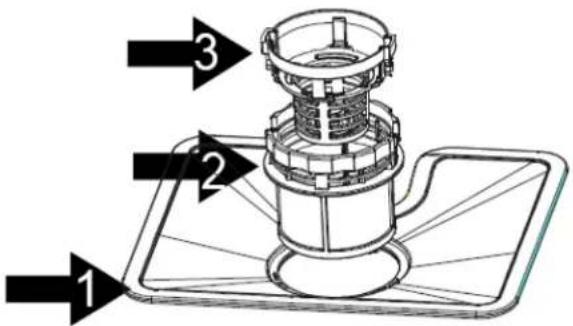
The filter efficiently removes food particles from the wash water, allowing it to be re-cycled during the cycle.
For best performance and results, the filter assembly must be regularly. For this reason, it is a good idea to remove the larger food particles trapping in the filter after each wash cycle by rinsing the filter assembly under running water. To clean the coarse filter and the fine filter, use a soft cleaning brush. Reassemble the filter parts as shown in following and reinsert the entire assembly in the dishwasher, positioning in its seat and pressing downward.
To remove the filter assembly, grab the handle of the fine filter, rotate it anti-clockwise then pull upward direction.
Step1: rotate the fine filter anti-clockwise;
Step2: lift it up;
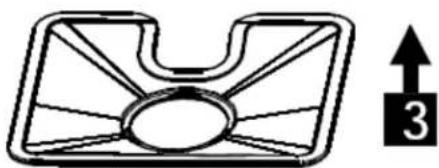
Step3: lift the Main filter up
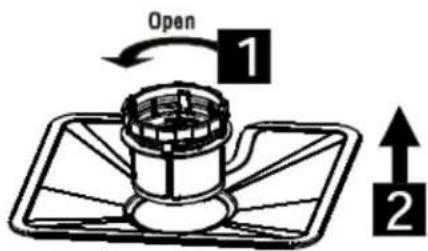
NOTE:
If do it from step1 to step 3, the filter system will be removed; while if do it from Step 3 to Step 1, the filter system will be installed.
natural_image
Pure diagram of a mechanical component with no text or symbolsRemarks:
- Inspect the filters for blocking every time the dishwasher has been used.
- By unscrewing the coarse filter, you can remove the filter system. Remove any food remnants and clean the filters under running water.
WARNING:
- Never run the dishwasher without the filters in place.
- The dishwasher must never be used without the filters.
- Improper replacement of the filter may reduce the performance level of the appliance and damage dishes and utensils.
·The entire filter system should be cleaned once a week - When cleaning the filters, don't knock on them. Otherwise, the filters could be contorted and the performance of dishwasher could be debased.
Cleaning The Spray Arm
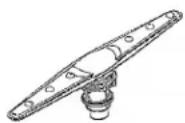
It is necessary to clean the spray arm regularly for hard water chemicals will clog the spray arm jets and bearings. To remove the spray arm, screw off the nut to take out the washer on top of the spray arm and remove the arm. Wash the arm in soapy and warm water and use a soft brush to clean the jets. Replace it after rinsing thoroughly.
Cleaning The Control Panel.
- To clean the control panel use a lightly dampened cloth then dry thoroughly. To clean the exterior use a good appliance polish wax.
- Never use sharp objects, scouring pads or harsh cleaners on any part of the dishwasher.
Cleaning The Door
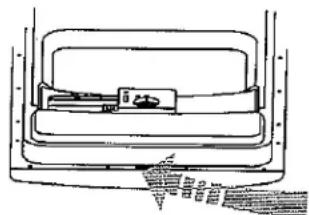
To clean the edge around the door, you should use only a soft warm, damp rag. To prevent penetration of water into the door lock and electrical components, do not use a spray cleaner of any kind.
Also, never use abrasive cleaners or scouring pads on the outer surfaces because they will scratch the finish. Some papers towels can also scratch or leave marks on the surface.
natural_image
Line drawing of a mechanical device with a handle and internal components (no text or symbols)WARNING - Never use a spray cleaner to clean the door panel for it could damage the door lock and electrical components. It is not
allowed to use the abrasive agent or some paper towel because of the risk of scratching or leaving spots on the stainless steel surface.
How To Keep You Dishwasher In Shape
After every wash
After every wash, turn off the water supply to the appliance and leave the door slightly ajar so that moisture and odors are not trapped inside.
No solvents or abrasive cleaning products
To clean the exterior and rubber parts of the dishwasher, do not use solvents or abrasive cleaning products. Rather, use only a cloth and warm soapy water. To remove spots or stains from the surface of the interior, use a cloth dampened with water and a little white vinegar, or a cleaning product made specifically for dishwashers.
Seals
One of the factors that cause odors to form in the dishwasher is food that remains trapped in the seals. Periodic cleaning with a damp sponge will prevent this from occurring.
Troubleshooting tips
Save time and money! Review the charts on the following pages. You may not need to call for service.
| Problem | Possible Causes | What To Do: |
| Dishwasher does not start | Fuse is blown or the circuit breaker has tripped. | Replace the fuse or reset the circuit breaker. Remove any other appliances sharing the same circuit with the dishwasher. |
| Power supply is not turned on. | Make sure the dishwasher is turned on and the door is closed securely.Make sure the power cord is properly plugged into the wall socket. | |
| Dishwasher door is not closed properly. | Close the door making sure the door latch is engaged. | |
| Water is not pumped from the dishwasher | Drain hose is kinked | Check the drain hose and ensure there are no kinks. |
| Filter is clogged | Check the filter assembly and remove any debris if any that may be blocking the filter. | |
| Kitchen sink is clogged | Check the kitchen sink for adequate drainage. If the kitchen sink is not draining you may need to contact a local plumber to inspect your drainage pipe. | |
| Suds in tub | Improper detergent | Use only detergent specifically designed and marked for use with dishwashers. If this occurs, open the dishwasher and let the suds evaporate.Add approximately 1 gallon of cold water to the tub, close the door ensuring the latch is engaged.Select the “PRE-WASH” program. Press the Start / Rest button to drain out the water. Repeat if necessary. |
| Spilled rinse-aid | Always wipe up rinse-aid spills immediately. | |
| Stained tub interior | Detergent with colorant was used. | Make sure you use detergents without colorants. |
| White film on the inside surface | Hard water minerals | Wearing rubber gloves, clean the interior using a damp sponge with a small amount of dishwasher detergent.Never use any cleaners other than dishwasher detergent to avoid the risk of over-sudsing. |
| There are rust stains on silverware / cutlery | The affected items are not corrosion resistant | These items are not suitable for dishwasher use. |
| Knocking noise in the washing cabinet | The spray arm is knocking against an item loaded in the rack. | Pause the wash cycle and rearrange the items accordingly to remove any item blocking the spray arm rotation. |
| Rattling noise in the washing cabinet | Items are not loaded securely and are vibrating against each other | Pause the wash cycle and rearrange the items accordingly. |
| Knocking noise in the water pipes | This may be caused by shaking plumbing or loose connections at cross-sections in the piping. | This has no influence on the dishwasher operation. If in doubt contact a qualified plumber. |
| The dishes are not clean. | The dishes were not loaded correctly | See the notes in Loading the Dishwasher section of this manual. |
| The program selected was not the appropriate cycle for the condition of the dishes. | Select a more intense program. | |
| Not enough detergent was dispensed. | Use more detergent, or change the type of detergent being used. | |
| Items were blocking the rotation path of the water spray arm. | Rearrange the items accordingly so that the spray arm can rotate freely. | |
| The filter assembly in the base of the unit is not clean, is clogged, or is not installed correctly.(This may cause the spray arm jets to become clogged). | Clean and / or fit the filter assembly correctly.Clean the spray arm jets. See the Cleaning the Spray Arm section of this manual. | |
| Cloudiness on the glassware. | This is a combination of soft water and too much detergent. | Use less detergent if you have soft water and select a shorter cycle to wash the glassware to get them clean. |
| Black or gray marks on dishes. | Aluminum utensils have rubbed against the dishes. | Use a mild abrasive cleaner to remove the marks |
| Detergent left in the dispenser cups. | Dishes blocked the detergent cups not allowing them to open completely during the wash cycle. | Re-load the dishes accordingly and re-run the wash cycle. |
| The dishes are not dry | Improper loading | Load the dishwasher as suggested in the Loading your dishwasher section of this manual. |
| Too little rinse-aid | Increase the amount of rinse-aid dispensed or refill the rinse-aid dispenser if empty. | |
| Dishes were removed from the washer too soon. | Do not empty your dishwasher immediately after the cycle ends. Open the door slightly so that the steam can escape. Begin unloading the dishwasher once the dishes are barely warm to the touch. | |
| Wrong program / cycle selected. | When using the shorter cycles/programs the washing temperatures are lower.This also lowers the cleaning performance.Choose a cycle / program with a longer wash time. | |
| Using cutlery with a low quality coating. | Water drainage is more difficult with these items. Cutlery or dishes of this type are not suitable for dishwasher use. | |
Error codes
When some malfunctions occur, the appliance will display error codes to warn you:
| Codes | Meanings | Possible causes |
| The Start/Reset light blinks intermittently. | Longer inlet time. | Faucets is not opened, or water intake is restricted, or water pressure is too low. |
| Overflow | Some element of dishwasher leaks |
WARNING:
-If overflow occurs, turn off the main water supply before calling a service.
- If there is water in the base pan because of an overfill or small leak, the water should be removed before restarting the dishwasher.
SERVICE FOR YOUR DISHWASHER
We are proud of our customer service organization and the network of professional service technicians that provide service on your Avanti dishwashers. With the purchase of your Avanti dishwasher, you can have the confidence that if you ever need additional information or assistance, the Avanti Products Customer Service team will be here for you. Just call us toll-free.
AVANTI PRODUCTS CUSTOMER SERVICES
| Product Information800-323-5029 | Whatever your questions are about our products, help is available. |
| Part Orders800-220-5570 | You may order parts and accessories that will be delivered directly to your home, by personal check, money order, Master Card, or Visa. |
| In-Home Repair Service800-220-5570 | An Avanti Products authorized service center will provide expert repair service, scheduled at a time that is convenient for you. Our trained servicers know your dishwasher inside and out. |
| YOUR AVANTI PRODUCTS WARRANTY | Staple your sales receipt here. Proof of original purchase date is needed to obtain service under warranty. |
WHAT IS COVERED LIMITED ONE-YEAR WARRANTY
For one year from the date of purchase by the original owner, Avanti Products will, at its option, repair or replace any part of the dishwasher which proves to be defective in material or workmanship under normal use. During this period Avanti Products will provide all parts and labor necessary to correct such defects free of charge, so long as the dishwasher has been installed and operated in accordance with the written instructions in this manual. Avanti Products will provide you with a reasonably similar replacement product that is either new or factory refurbished. In rental or commercial use, the warranty period is 90 days. All Avanti Appliances of 3.5 cubic feet capacity or less must be brought/sent to the appliance service shop for repair.
WHAT IS NOT COVERED
- Incidental or consequential damages.
- Parts and labor costs for the following will not be considered as warranty:
- Doors, door springs, and/or frames.
- Inner door panels, door shelves, door rails, and/or door supports.
• Light bulbs and/or plastic housing. - Plastic cabinet liners.
- Shipping and Handling costs associated with the replacement of the unit.
• Repairs performed by unauthorized servicers. - Service calls that do not involve defects in material or workmanship such as customer education, door reversal, or proper installation.
• Service calls that are related to external problems, such as abuse, misuse, inadequate electrical power, accidents, fire, floods, or acts of God. - Surcharges including, but not limited to, any after hour, weekend, or holiday service calls, tolls, ferry trip charges, or mileage expense for service calls to remote areas, including the state of Alaska.
- Replacement of house fuses or resetting circuit breakers.
• Failure of the product if it is used for other than its intended purpose. - This warranty does not apply outside the Continental U.S.A..
natural_image
Technical line drawing of a mechanical device with two views: top shows a cylindrical component, bottom shows a coiled pipe fitting (no text or symbols)COMO CARGAR LOS PLATOS
Como utilizar la canasta.
natural_image
Illustration of a building with spiral structures and a magnified inset showing a grid pattern (no text or symbols)natural_image
Technical line drawing of a mechanical device with no visible text or symbolsADVERTENCIA
Thank you for purchasing this fine Avanti product. Please fill out this form and return it to the following address within 100 days from the date of purchase and receive these important benefits:
Avanti Products, A Division of The Mackle Co., Inc.
P.O.Box 520604 – Miami, Florida 33152
Protect your product:
We will keep the model number and date of purchase of your new Avanti product on file to help you refer to this information in the event of an insurance claim such as fire or theft.
➢ Promote better products:
We value your input. Your responses will help us develop products designed to best meet your future needs.
(detach here)
Avanti Registration Card
| Name | Model # Serial # | ||
| Address | Date Purchased Store / Dealer Name | ||
| City State Zip | OccupationAs your Primary Residence, Do You: | ||
| Area Code Phone Number | □ Own □ Rent | ||
| Did You Purchase An Additional Warranty | Your Age: | ||
| □ Extended□ None | □ under 18 □ 18-25 □ 26-30□ 31-35 □ 36-50 □ over 50 | ||
| Reason for Choosing This Avanti Product:Please indicate the most important factorsThat influenced your decision to purchase this product: | Marital Status:□ Married□ SingleIs This Product Used In The:□ Home□ Business | ||
| □ Price□ Product Features□ Avanti Reputation□ Product Quality□ Salesperson Recommendation□ Other:____□ Friend / Relative Recommendation□ Warranty□ Other:____ | |||
| How Did You Learn About This Product:□ Advertising□ In-Store Demo□ Personal Demo | |||
Comments:
PRINTED IN CHINA
- HELP US HELP YOU...
- Read this guide carefully.
- Avanti Customer Service 800-220-5570
- Write down the model and serial numbers.
- IF YOU NEED SERVICE
- PARTS AND FEATURES
- Control Panel
- WARNING!
- WATER HEATER SAFETY
- PROPER INSTALLATION AND MAINTENANCE
- CAUTION: To prevent minor injury or property damage
- ELECTRICAL CONNECTION
- Warning
- EXTENSION CORD
- SURGE PROTECTOR
- WARNING:
- Installation instructions
- Water Pressure
- For the Best Results:
- Connecting your dishwasher
- IMPORTANT
- DANGER
- NOTE:
- Disconnecting your Dishwasher
- Before Using Your Dishwasher
- Operating Instructions
- Operating Your Dishwasher
- Pausing the Wash Cycle / Program:
- Changing the Wash Program / Cycle:
- At the End of the Wash Cycle
- Check the Water Temperature
- Proper Use of Detergent
- NOTE: DO NOT USE HAND DISH DETERGENT
- Use Jet-Dry Rinse Agent
- Filling the Dispenser
- Rinse Aid Setting
- To adjust the setting
- Loading the Dishwasher Rack
- Silverware Basket
- Forget to Add a Dish?
- Care and Maintenance Instructions
- Filter system
- Main filter:
- Fine filter:
- coarse filter
- Remarks:
- Cleaning The Spray Arm
- Cleaning The Control Panel.
- Cleaning The Door
- How To Keep You Dishwasher In Shape
- After every wash
- No solvents or abrasive cleaning products
- Seals
- Troubleshooting tips
- Error codes
- SERVICE FOR YOUR DISHWASHER
- WHAT IS COVERED LIMITED ONE-YEAR WARRANTY
- WHAT IS NOT COVERED
- COMO CARGAR LOS PLATOS
- Como utilizar la canasta.
- ADVERTENCIA
- Protect your product:
- ➢ Promote better products:
- Avanti Registration Card
Brand : Avanti
Model : DW6PS
Category : Dishwasher