
P-997 - Blender KING - Free user manual and instructions
Find the device manual for free P-997 KING in PDF.

| Brand | KING |
| Model | P-997 |
| Product Type | Hand Blender with Whisk, Slicing/Shredding, Chopping/Mixing Functions |
| Power Supply | 230-240V, 50/60Hz |
| Power Cord Length | Approx. 1.2 m (estimated) |
| Weight | Approx. 1.5 kg (estimated) |
| Dimensions (L x W x H) | Approx. 40 x 10 x 12 cm (estimated) |
| Material | Plastic motor part, stainless steel blades, glass/plastic bowl |
| Functions | Blending, whisking, slicing, shredding, chopping, mixing |
| Speed Settings | 2 speeds (Speed 1 and Speed 2) |
| Maximum Continuous Operating Time | 1 minute per cycle |
| Rest Period Between Cycles | 30 minutes |
| Maximum Ingredient Temperature | 80°C |
| Bowl Capacity | Approx. 500 ml (estimated) |
| Max Food Weight for Chopping | 400 g (varies by food type) |
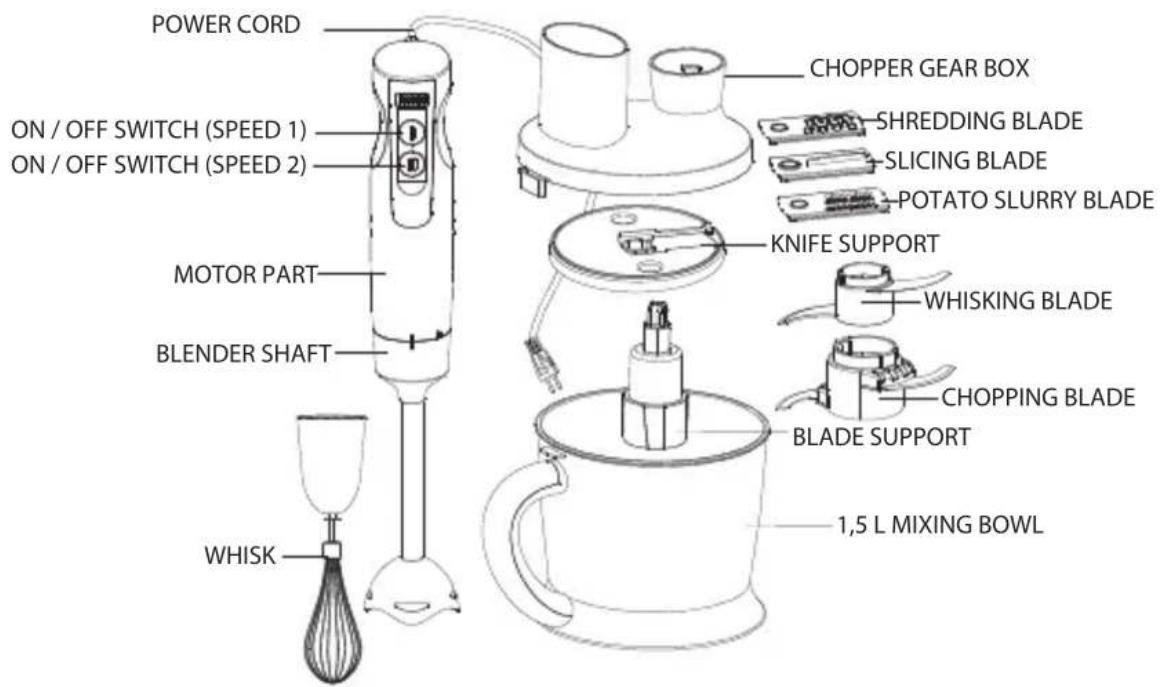
| Removable Parts | Blender shaft, whisk shaft, slicing/shredding blade, chopping blade, mixing blade, bowl, cover |
| Dishwasher Safe Parts | Blender shaft, mix cup, lip (except motor part) |
| Cleaning | Motor part with damp cloth; other parts in warm soapy water or dishwasher |
| Safety Features | Overload protection (slow speed triggers shut-off), child supervision required |
| Warranty | Standard manufacturer warranty (details not provided) |
| Accessories Included | Motor part, blender shaft, whisk, slicing/shredding blade set, chopper gear box, bowl, cover, measuring cup |
| Repairability | Repairs by authorized service center only; do not attempt self-repair |
| Disposal | Do not dispose with household waste; recycle in accordance with EU regulations |
Frequently Asked Questions - P-997 KING
User questions about P-997 KING
0 question about this device. Answer the ones you know or ask your own.
Ask a new question about this device
Download the instructions for your Blender in PDF format for free! Find your manual P-997 - KING and take your electronic device back in hand. On this page are published all the documents necessary for the use of your device. P-997 by KING.
USER MANUAL P-997 KING
natural_image
Red background with a white crown and ring design (no text or symbols)king
P 997
PROMIX
Mutfak Robotu

natural_image
Product photo of a kitchen blender with whisk, stand, and micelle (no visible text or symbols)
GARANTI

natural_image
Red background with a white crown and ring design (no text or symbols)king
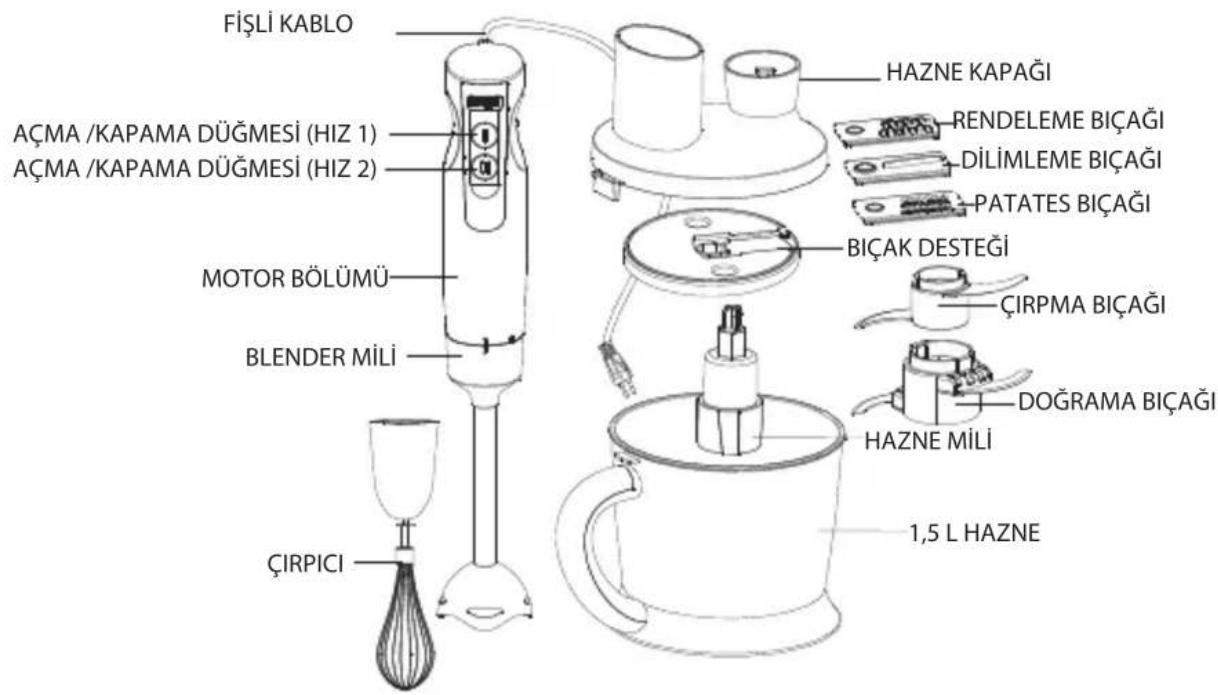
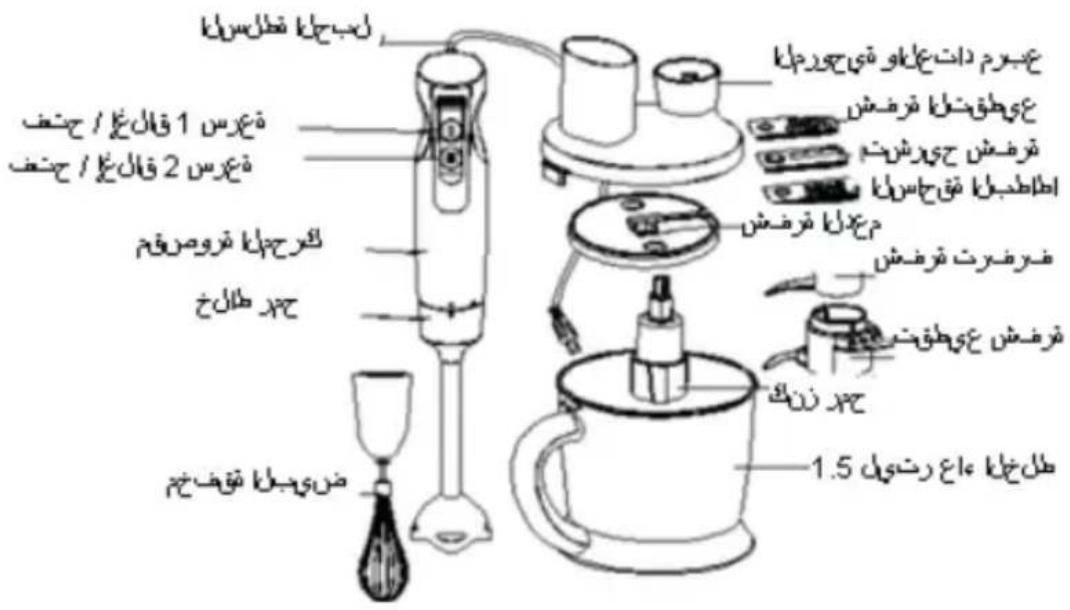
MAIN PARTS
king
INSTRUCTION GUIDE
Blender Function
The hand blender is perfectly suited for preparing dips, sauces, soups, mayonnaise and baby food as well as for mixing drinks and milk shakes. Please read all the instructions carefully before operation;
- Please clean all the removable parts firstly (Please refer to "Cleaning and Maintenance").
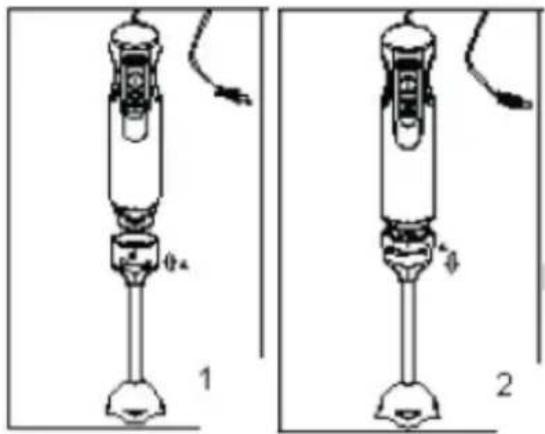
- Insert the motor part into the blender shaft and turn the motor part in counterclockwise direction until it locks into place, as shown in Diagram 1.
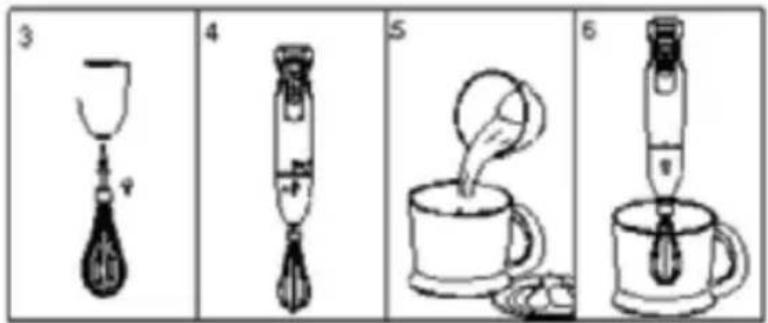
- Put the food (e.g. strawberry) into the Mix cup, as shown in Diagram 2. Big piece food needs to be cut into small pieces. (1.5 CM x 1.5CM x 1.5 CM).
- Connect the power plug of the hand blender and position the hand blender deep in the Mix cup, immerse the blender shaft into the food. Then press switch (Speed 1-- speed 2 The power increases by degree).
- Gently move the blender up and down to process food evenly. If the blender sucks itself to the bottom of the container, briefly release the on/off switch..
■ You can operate the hand blender in any container.
■ The temperature of the ingredients is prohibited to more than 80 C when the machine is working.
6. After use, release the switch to turn the blender off and unplug the blender from the power socket. Turn the motor part to remove it from the blender shaft, as shown in Diagram 2.
7. Pour the whisked food out, as shown in Diagram 5. Then immediately clean the blender after use to prevent food from drying on (Please refer to "Cleaning and Maintenance")
king
Whisking function
Whisking function has almost the same operating steps as blender shaft function. Only change the blender shaft to whisking shaft. It is used for mixing and whisking of food, e.g. egg、liquid.As shown in Diagram 3-6.
Slicing & Shredding Function
-
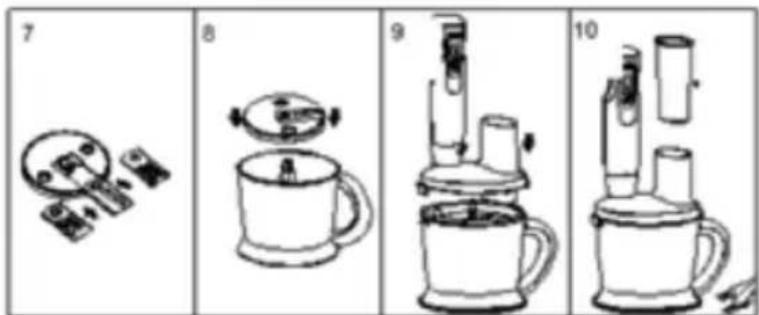
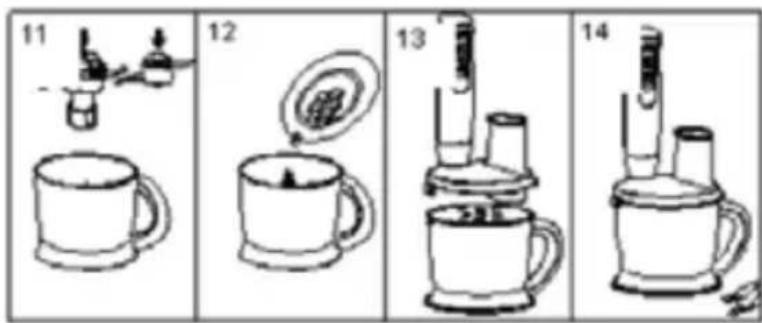
Fix the slicing/shredding/potato slurry blade to the knife support, as shown in Diagram 7. Slicing knife makes the food into slices. Shredding knife make the food into shreds.
-
Put the blade support on the axis in the middle of the bowl, and press it to the bottom. Then fix the knife support to the blade support, as shown in Diagram 8.
-
Put the cover on the bowl and turn it in clockwise direction, until hearing the chattering sound, as shown in Diagram 9.
-
Insert the motor part into the chopper gear box and turn it in counterclockwise direction until it locks into place, as shown in Diagram 10.
-
Fix the plug to the electric socket, press the switch (speed 1-speed 2 the power increases by degree). Put into the clean food in strip from the entrance of the cover, and push the food down slowly. When the food strip is short, push them down with the measuring cup, as shown in Diagram 11.
When the operation is finished, after the blade stops completely, pour out the food.
king
Chopping & Mixing function
- Lay the bowl horizontally on the crash roll, then put the blade support on the axis in the middle of the bowl, and press it to the bottom. Then fix the chopping blade or mixing blade to the blade support, as shown in Diagram 11.
- Put the food (e.g. strawberry) into the mix bowl, as shown in Diagram 13. Big piece food needs to be cut into small pieces. (1.5 CM x 1.5CM x 1.5 CM).
- Put the cover on the bowl and turn it in clockwise direction, until hearing the chattering sound, as shown in Diagram 14.
- Fix the plug to the electric socket, press the switch (speed 1-speed 2 The power increases by degree). When the operation is finished, after the chopping blade stops completely, pour out the food.
IMPORTANT SAFEGUARDS
- Do not operate the machine more than 1 minute.
- Cut the solid stuff into small pieces and start to whisk. It's better than put many stuff into the Mix cup each time.
3.Shut off the machine if the speed is obviously slow when it's working, and then: A: Please reduce the material if there are too much; B: Please make the solid material loose if there is any solid material blocked inside. - This appliance is not intended for use by persons (including children) with reduced physical, sensory or mental capabilities, or lack of experience and knowledge, unless they have been given supervision or instruction concerning use of the appliance by a person responsible for their safety.
- Children being supervised not to play with the appliance
WARNING
■ Check power supply before use. The voltage is 230-240V standard;

natural_image
Red background with a white crown and circular swirl design (no text or symbols)king
- Check power supply before use. The voltage is 230-240V standard;
■ Do not plug the blender in until it is assembled;
■ Please use this item under PARENTAL SUPERVISION, Not Suitable for Children;
■ Family use only.
■ Do not operate any appliance with a damaged cord or plug or after the appliance malfunctions, or has been damaged in any manner. Return appliance to the nearest Repair Shop for examination, repair or adjustment.
■ Do not put Motor part into water or any other liquid.
■ Please make sure that you allow the machine to rest for a long time (about 30 minutes) after 1 cycle.
■ The hand blender is not suitable for chopping very hard food items, such as nutmeg, cereals, coffee beans or spices. Let peas and beans soak in a sufficient quantity of liquid before processing them.
The blade in the blender shaft continues to turn for a few seconds after switching the blender off. Wait for the blade to stop turning before removing the blender from food and before further handling.
■ Do not use aggressive or abrasive cleaning products.
■ Make sure that the power cord cannot be damaged by sharp edges or hot surfaces. Do not wind the power cord around the blender.
■ Do not make any modifications to the hand blander. Do not attempt to change the power cord by yourself either. Repairs to the hand blender or power cord must only be carried out by a specialist workshop or at the Service Centre. Improper repair may result in considerable risk of injury to the user.
a- If the supply cord is damaged, it must be replaced by the manufacturer, its service agent or similarly qualified persons in order to avoid a hazard.
b- Switch off the appliance and disconnect from supply before changing accessories or approaching parts that move in use.
c- Care is needed when handling cutting blades, especially when removing the blade from the bowl, emptying the bowl and during cleaning.
d- Always disconnect the blender from the supply if it is left unattended and before assembling, disassembling or cleaning.
CLEANING AND MAINTENANCE
■ Please clean the Motor part with a soft, damp cloth.

natural_image
Red background with a white crown and circular swirl design (no text or symbols)king
■ Blender shaft, Mix cup and lip can put in the dishwasher for cleaning. And also can be cleaned in warm water and a few drops of washing-up liquid;
■ Please put some warm water into the Mix bowl to clean if there is some residue ON the blade. Put the blender shaft into the Mix bowl and switch on the machine. Pour the water out of the Mix bowl and shut off the machine after a working period.
■ Let all parts dry thoroughly after cleaning them.
INGREDIENTS LIST
| FUNCTION INGREDIENT MAX QUANTITIES | MAX TIMES(s) | |||
| SLICING | SHREDDING | |||
| SLICING & SHREDDING | MURPHY 400g | 50s 30s | ||
| MELON 400g | 50s 30s | |||
| CARROT | 400g | 50s | 30s | |
| CHOPPING/MIXING & BLENDER | MEAT 300g (about 10g/piece) | 30s | ||
| HAM 300g (about 15g/piece) 30s | ||||
| ONIONS | 400g (about 20g/piece) | 30s | ||
| STRAWBERRY | 200g | 25s | ||
| CHEESE 100g | 20s | |||
| ALMONDS 100g | 20s | |||
| HAZELNUTS | 100g | 20s | ||
| WALNUTS | 100g | 20s | ||
| WHISKING EGS six yolks 25s | ||||

natural_image
Simple line drawing of a trash bin with no text or symbolsThis marking indicates that this product should not be disposed with other household wastes throughout the EU. To prevent possible harm to the environment or human health from uncontrolled waste disposal, recycle it responsibly to promote the sustainable reuse of material resources. To return your used device, please use the return and collection systems or contact the retailer where the product was purchased. They can take this product for environmental safe recycling.

natural_image
Red background with a white crown and ring design (no text or symbols)king
PARÇALARI

natural_image
Red background with a white crown and ring design (no text or symbols)king

natural_image
Red background with a white crown and circular swirl design (no text or symbols)king
natural_image
Red background with a white crown and circular ring design (no text or symbols)king
natural_image
Red background with a white crown and ring design (no text or symbols)king
MALZEME LISTESI:
| FONKSIYON MALZEMELER MAX MKTAR | MAX ZAMAN(s) | |||
| DLMLEME | PARÇALAMA | |||
| DLMLEME&PARÇALAMA | PATATES 400g 50s 30s | |||
| KAVUN | 400g | 50s | 30s | |
| HAVUÇ | 400g | 50s | 30s | |
| DORAMA/KARI TIRMA&BLENDER | ET 300g(10g/parça) 30s | |||
| JAMBON | 300g(15g/parça) | 30s | ||
| SOAN | 400g(20g/parça) | 30s | ||
| ÇLEK 200g | 25s | |||
| PEYNJR | 100g | 20s | ||
| BADEM | 100g | 20s | ||
| FINDIK | 100g | 20s | ||
| CEVIZ | 100g | 20s | ||
| ÇIRPMA YUMURTA | ALTI YUMURTASARISI | 25s | ||

natural_image
White crown icon on red background, no text or symbols presentking
natural_image
Red background with a white crown and circular ring design (no text or symbols)king
تعليمات دليل
خلاط وظيفة
natural_image
Technical line drawing of a mechanical device with no visible text or symbols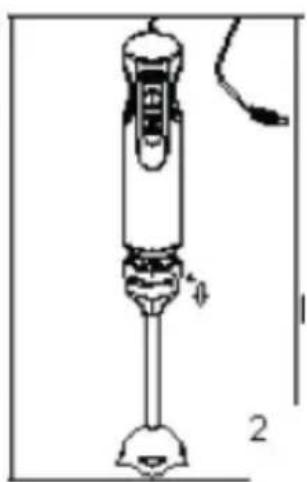
natural_image
Technical line drawing of a mechanical tool or device with labeled parts (no readable text or symbols)
natural_image
Red background with a white crown and circular ring (no text or symbols)king
وظانف خفعت
natural_image
Simple line drawing of a mechanical device with no text or symbols
natural_image
Simple line drawing of a cup pouring liquid into a container (no text or symbols)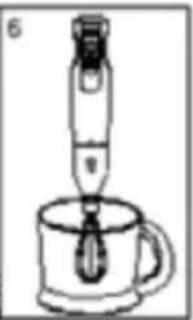
natural_image
Simple line drawing of a pipette dispensing liquid into a cup (no text or symbols)natural_image
Line drawing of a mug with lid and lid, no text or symbols present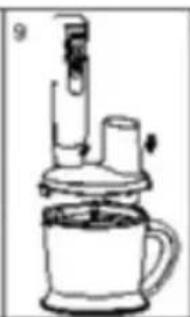
natural_image
Line drawing of a coffee maker with a stand mixer and cup (no text or symbols)
natural_image
Hand-drawn sketch of a laboratory glassware setup with a beaker and two tubes (no text or symbols)
Brand : KING
Model : P-997
Category : Blender