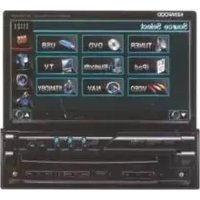
KVT-54DVDR - Car Radio KENWOOD - Free user manual and instructions
Find the device manual for free KVT-54DVDR KENWOOD in PDF.


| Product Type | Car Radio with DVD Receiver |
| Brand | Kenwood |
| Model | KVT-54DVDR |
| Dimensions (W × H × D) | 182 × 53 × 160 mm |
| Weight | 2.3 kg |
| Operating Voltage | 14.4 V (11 – 16 V allowable) |
| Maximum Current Consumption | 15 A |
| Display | 6.96 inch wide TFT LCD, 480 × 234 pixels |
| Disc Playback | DVD-Video, VCD, CD-DA, CD-R/RW, DVD±R/RW, MP3, WMA, AAC, JPEG, DivX, MPEG |
| USB Playback | USB mass storage class (FAT16/32), up to 500 mA |
| iPod/iPhone Compatibility | Via optional KCA-iP301V cable (multiple generations) |
| Bluetooth | Via optional KCA-BT200 unit for hands-free and audio streaming |
| Radio Tuner | FM (87.5 – 108 MHz), AM (531 – 1611 kHz), LW (153 – 281 kHz) |
| TV Tuner | Optional (KTC-D500E, KTC-V300E, KTC-V301E) |
| Maximum Power Output | 50 W × 4 (Front & Rear) |
| Preout Level | 2 V / 10 kΩ |
| Speaker Impedance | 4 – 8 Ω |
| Audio Formats | MP3, WMA, AAC, Linear PCM, Dolby Digital, DTS |
| Video Formats | MPEG1, MPEG2, DivX |
| Picture Formats | JPEG |
| Cleaning | Dry soft cloth; neutral cleaner for stains; avoid volatile liquids |
| Safety Precautions | Do not watch while driving; keep metallic objects away; reset button for malfunctions |
| Optional Accessories | Navigation units (KNA-G520 etc.), Bluetooth unit, TV tuner, iPod cable |
| Operating Temperature Range | -10°C to +60°C |
Frequently Asked Questions - KVT-54DVDR KENWOOD
User questions about KVT-54DVDR KENWOOD
0 question about this device. Answer the ones you know or ask your own.
Ask a new question about this device
Download the instructions for your Car Radio in PDF format for free! Find your manual KVT-54DVDR - KENWOOD and take your electronic device back in hand. On this page are published all the documents necessary for the use of your device. KVT-54DVDR by KENWOOD.
USER MANUAL KVT-54DVDR KENWOOD
Declaration of Conformity with regard to the EMC Directive 2004/108/EC
Manufacturer:
Kenwood Corporation
2967-3 Ishikawa-machi, Hachioji-shi, Tokyo, 192-8525 Japan
EU Representative's:
Kenwood Electronics Europe BV
Amsterdamseweg 37, 1422 AC UITHOORN, The Netherlands



How to read this manual 4
Before Use 6
Notes 7
Basic Operations 10
Navigation Control 16
Using the Navigation System 16
Control of Other Sources While Displaying the Navigation Screen 16
iPod Control 33
Connecting an iPod 33
Functions When Displaying the Easy Control Panel 33
Functions While Displaying the Control Screen 34
Watching DVD/VCD 18
Functions During the Playback Screen 18
Functions When Displaying the Easy Control Panel 19
Functions While Displaying the Control Screen 19
DVD Disc Menu 20
VCD Zoom Control 22
USB Device Control 36
Functions When Displaying the Easy Control Panel 36
Functions While displaying the Control Screen 36
Folder Select 38
Music Disc & Audio File Listening 23
Functions While Displaying the Control Screen 23
TV Watching 39
Function During TV Screen 39
Functions When Displaying the Easy Control Panel 39
Functions While Displaying the Control Screen 40
TV Menu (with KTC-D500E (optional accessory) connected only) 41
Seek Mode 41
Auto Memory 41
Manual Memory 42
Set Station Name 42
Video File/Picture Watching 25
Function During Playback Screen 25
Functions When Displaying the Easy Control Panel 26
Functions While Displaying the Control Screen 26
Picture Control 27
Bluetooth Audio Control 43
Functions While Displaying the Control Screen 43
Radio Listening 28
Functions While Displaying the Control Screen 28
Seek Mode 29
Auto Memory 30
Manual Memory 30
Radio Text 31
Traffic Information 31
Search for Program Type 32
Muting Audio Volume upon Reception of Phone call 44
Muting Audio Volume upon Reception of Phone Call 44
Character Entry 45
How To Use the Character Entry Screen 45
Screen Control 46
Screen Control 46
Hands Free Unit Control 47
Control Screen Function 47
When Received a Call 48
Calling by Entering a Phone Number 48
Quick Dialing 49
Controlling Tone-based Services 49
Calling by Phonebook 50
Making a Call Using Outgoing/Incoming Call Records 51
Calling by Voice Recognition 52
Setting Up the Hands-Free Phone 53
Voice Registration 54
Key Word Voice Registration 54
Phone Number Preset 55
SMS (Short Message Service) 56
Setup Menu 58
Setup Menu 58
Audio Setup 58
Crossover Network Setup 59
DVD Setup 59
Language Setup 60
Parental Level Setup 61
DivX Setup 62
System Setup 62
Panel Color Coordinate 63
AV Interface Setup 64
User Interface 66
Direct Source Button Setup 67
Entering Background 68
Background Delete 68
Background Select 69
Touch Panel Adjustment 69
Clock Setup 70
Monitor Setup 70
Security Code Setup 72
Deactivating Security Code 73
iPod Setup 73
TV Setup 74
RDS Setup 74
Bluetooth Setup 75
Registering Bluetooth Unit 75
Registering Bluetooth Unit PIN Code 76
Registering Special Bluetooth Unit 77
Bluetooth Unit Connection 77
Deleting Bluetooth Unit 78
Software Information 78
Setup Memory 79
Audio Control 80
Audio Control Menu 80
Audio Control 80
Equalizer Control 81
Tone Setup 82
Zone Control 82
Remote Controller 84
Battery installation 84
Remote Controller mode switch 84
Common operations (AUD mode) 85
DVD/VCD/CD/Audio files (DVD mode) 86
TV (TV mode) 87
Radio (AUD mode) 88
DVD Language Codes 89
Help? Troubleshooting 90
Help? Error 91
Specifications 92
How to read this manual
This manual uses illustrations to explain its operations.
The displays and panels shown in this manual are examples used to provide clear explanations of the operations.
For this reason, they may be different from the actual displays or panels used, or some display patterns may be different.
▼: Continues to the next line.
● : Ends here.
Seek Mode
Sets a station selection.
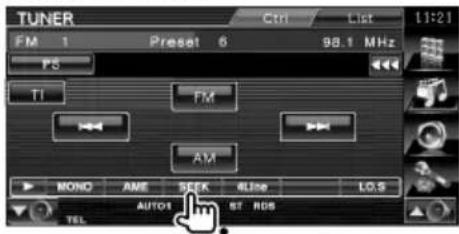
The mode is switched in following order each time you touch the button.
Display Setting
"AUTO1" Tunes in a station with good reception automatically.
"AUTO2" Tunes in stations in memory one after another.
"MANU" Switches to the next frequency manually.
Manual Memory
Stores the current receiving station in memory.
1 Select a station you wish to store in memory

2 Store in memory

Continue to the next page
The instruction continues to the next page. Make sure to flip the page for the rest of the instruction.
The above operation example with the mark differs from the actual operation.

Short Press
Press the button, denoted by 📄.

Change in the screen
With each operation, the screen changes in the order shown here.

Selecting a screen item
Select and choose an item on the screen. Select the item by touching the button on the screen.

Press 1 second or more
Press the button, denoted by ⏻, for 1 second or more (2-3 seconds).
Indicates to press and hold down the button until operation starts or the screen changes. The left example indicates to press the button for 1 second.
Press it approximately for the seconds shown in the clock.
The Ground Truth image displays a single, solid horizontal line. According to Rule 2 (UNDERSCORE & LINE RULES), this is a stylistic or background line, not a placeholder underscore. Therefore, the OCR result must ignore it and output nothing or only meaningful text. The provided OCR content is "____", which consists of four underscores. This is an incorrect interpretation of the line as a placeholder, violating the rule that stylistic lines must be ignored. The OCR has hallucinated underscores where none should exist based on the GT's visual context. Hence, the OCR result is inconsistent with the Ground Truth.
Other marks

Important precautions are described to prevent injuries etc.

Special instructions, supplementary explanations, limitations, and reference pages are described.

General precautions and reference pages are shown on the item.

The initial value of each setup is shown.
▲WARNING
To prevent injury or fire, take the following precautions:
- To prevent a short circuit, never put or leave any metallic objects (such as coins or metal tools) inside the unit.
- Do not watch or fix your eyes on the unit's display when you are driving for any extended period.
How to reset your unit
- If the unit or the connected unit fails to operate properly, press the Reset button. The unit returns to factory settings when the Reset button is pressed.
- Remove the USB device before pressing the Reset button. Pressing the Reset button with the USB device installed can damage the data contained in the USB device. For how to remove the USB device, see
(page 12).

Reset button
Cleaning the Unit
If the faceplate of this unit is stained, wipe it with a dry soft cloth such as a silicon cloth.
If the faceplate is stained badly, wipe the stain off with a cloth moistened with neutral cleaner, then wipe it again with a clean soft dry cloth.

- Applying spray cleaner directly to the unit may affect its mechanical parts. Wiping the faceplate with a hard cloth or using a volatile liquid such as thinner or alcohol may scratch the surface or erases characters.
Lens Fogging
When you turn on the car heater in cold weather, dew or condensation may form on the lens in the disc player of the unit. Called lens fogging, this condensation on the lens may not allow discs to play. In such a situation, remove the disc and wait for the condensation to evaporate. If the unit still does not operate normally after a while, consult your Kenwood dealer.
Handling discs
- Do not touch the recording surface of the disc.
- Do not stick tape etc. on the disc, or use a disc with tape stuck on it.
- Do not use disc type accessories.
- Clean from the center of the disc and move outward.
- When removing discs from this unit, pull them out horizontally.
- If the disc center hole or outside rim has burrs, use the disc only after removing the burrs with a ballpoint pen etc.
Discs that cannot be used
• Discs that are not round cannot be used.

• Discs with coloring on the recording surface or discs that are dirty cannot be used.
• This unit can only play the CDs with
This unit may not correctly play discs which do not have the mark.
- You cannot play a CD-R or CD-RW that has not been finalized. (For the finalization process refer to your CD-R/CD-RW writing software, and your CD-R/CD-RW recorder instruction manual.)
- If you try to load a 3-inch-disc with its adapter into the unit, the adapter might separate from the disc and damage the unit.

Other notes
- If you experience problems during installation, consult your Kenwood dealer.
- When you purchase optional accessories, check with your Kenwood dealer to make sure that they work with your model and in your area.
- The characters conforming to ISO 8859-1 character set can be displayed.
- The RDS or RBDS feature won't work where the service is not supported by any broadcasting station.
Navigation units that can be connected to this unit
- KNA-G520*
- KNA-G420*
- KNA-G421*
- KNA-G421V*
- KNA-DV3200
- KNA-DV2200
* Update the navigation software to the latest version. For how to update the software, refer to the instruction manual of the navigation unit.
iPod/iPhone models that can be connected to this unit
Made for
- iPod nano (1st generation)
- iPod nano (2nd generation)
- iPod nano (3rd generation)
- iPod nano (4th generation)
- iPod with video
- iPod classic
- iPod touch (1st generation)
- iPod touch (2nd generation)
Works with
- iPhone
- iPhone 3G
- Update iPod/iPhone software to the latest version.
- You can control an iPod/iPhone from this unit by connecting an iPod/iPhone (commercial product) with Dock connector using an optional accessory iPod connection cable (KCA-iP301V). The word "iPod" appearing in this manual indicates the iPod/ iPhone connected with the KCA-iP301V (optional accessory).
- By connecting your iPod/iPhone to this unit with an optional accessory iPod connection cable (KCA-iP301V), you can supply power to your iPod/iPhone as well as charge it while playing music. However, the power of this unit must be on.
Bluetooth unit that can be connected to this unit
- KCA-BT200
TV tuner that can be connected to this unit
- KTC-D500E
- KTC-V300E
- KTC-V301E
List of playable discs
| Disc types | Standard Support Remark | |
| DVD DVD Video | ○ | |
| DVD Audio × | ||
| DVD-R | ○ | MP3/WMA/AAC/JPEG/MPEG/DivX PlaybackMulti-border/Multisession/(Playback depends on authoring conditions) |
| DVD-RW | ○ | |
| DVD+R | ○ | |
| DVD+RW | ○ | Compatible with 8-cm (3 inch) discs |
| DVD-R DL (Dual layer) | ○ | |
| DVD+R DL (Double layer) | ○ | Only video format |
| DVD-RAM × | ||
| CD Music CD | ○ | CD-TEXT/8-cm (3 inch) discs supported. |
| CD-ROM | ○ | MP3/WMA/AAC/JPEG/DivX playback |
| CD-R | ○ | |
| CD-RW | ○ | Multisession supportedPacket write not supported. |
| DTS-CD | ○ | |
| Video CD (VCD) | ○ | |
| Super video CD × | ||
| Photo CD × | ||
| CD-EXTRA | △ | Only music CD session can be played. |
| HDCD | △ | Sound quality of normal CD music |
| CCCD × | ||
| Others Dualdisc × | ||
| Super audio CD | △ | Only CD layer can be played. |
O: Playback is possible.
△ : Playback is partly possible.
× : Playback is impossible.

- When buying DRM enabled contents, check the Registration Code in the
Use of "DualDisc"
When playing a "DualDisc" on this unit, the surface of the disc that is not played may be scratched while the disc is inserted or ejected. Since the music CD surface does not conform to the CD standard, playback may be impossible.
(A "DualDisc" is a disc with one surface containing DVD standard signals and the other surface containing music CD signals.)
About Audio files
- Playable Audio file
AAC-LC (.m4a), MP3 (.mp3), WMA (.wma)

- If music of normal CD and other playback systems are recorded in the same disc, only the playback system recorded at the first setout is played.
- Playable disc media
CD-R/RW/ROM, DVD±R/RW
- Playable disc file format
ISO 9660 Level 1/2, Joliet, Romeo, Long file name.
- Playable USB device
USB mass storage class, iPod with KCA-iP301V
- Playable USB device file system
FAT16, FAT32
Although the audio files are complied with the standards listed above, the play maybe impossible depending on the types or conditions of media or device.
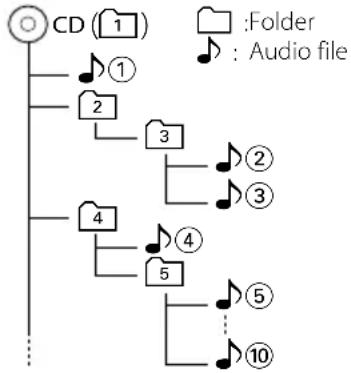
- Playing order of the Audio file
In the example of folder/file tree shown below, the files are played in the order from ① to ⑩.
flowchart
graph TD
    A["CD (1)"] --> B["1"]
    A --> C["2"]
    A --> D["3"]
    A --> E["4"]
    A --> F["5"]
    B --> G["Folder"]
    C --> H["Audio file"]
    D --> I["2"]
    D --> J["3"]
    E --> K["4"]
    F --> L["5"]
    F --> M["..."]
    F --> N["10"]
An online manual about audio files is put on the site, www.kenwood.com/audiofile/. On this online manual, detailed information and notes which are not written in this manual are provided. Make sure to read through the online manual as well.
About Video files
- Acceptable video files
MPEG1, MPEG2, DivX
- Extensions
mpg, mpeg, divx, div, avi
- Acceptable media
CD-R/RW/ROM, DVD±R/RW, VCD, mass-storage-class USB device, iPod with KCA-iP301V
Acceptable discs, disc formats, USB device file system, file and folder names and playing order are the same as those for audio files. See
About Picture files
- Acceptable picture files
JPEG
- Extensions
jpg, jpeg
- Acceptable media
CD-R/RW/ROM, DVD±R/RW, mass-storage-class USB device
Acceptable discs, disc formats, USB device file system, file and folder names and playing order are the same as those for audio files. See
About USB device
- In this manual, the word "USB device" is used for flash memories and digital audio players which have USB terminals.
- When the USB device is connected to this unit, it can be charged up provided that this unit is powered.
• Install the USB device in the place where it will not prevent you from driving your vehicle properly. - You cannot connect a USB device via a USB hub and Multi Card Reader.
- Take backups of the audio files used with this unit. The files can be erased depending on the operating conditions of the USB device. We shall have no compensation for any damage arising out of erasure of the stored data.
- No USB device comes with this unit. You need to purchase a commercially available USB device.
- When connecting the USB device, usage of the CA-U1EX (option) is recommended.
Normal playback is not guaranteed when a cable other than the USB compatible cable is used.
Connecting a cable whose total length is longer than 5 m can result in abnormal playback.
Region codes in the world
The DVD players are given a region code according to the country or area it is marketed, as shown in the following map.
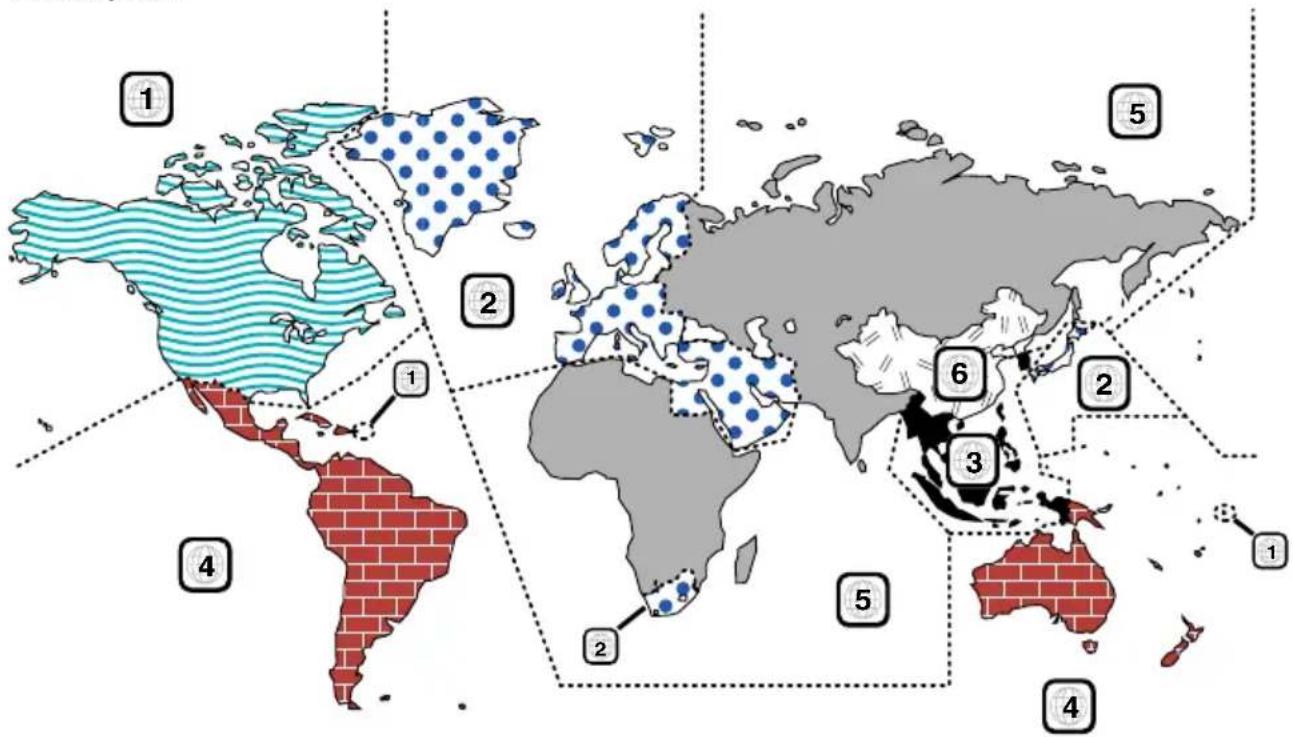
DVD disc marks
| Symbol Description | |
 | Indicates a region number. The discs with this mark can be played with any DVD player. |
 | Indicates the number of audio languages recorded. Up to 8 languages can be recorded in a movie. You can select a favorite language. |
 | Indicates the number of subtitled languages recorded. Up to 32 languages can be recorded. |
 | If a DVD disc has scenes shot from multiple angles, you can select a favorite angle. |
 | Indicates the type of screen for the image. The left mark indicates that a wide image picture (16:9) is displayed on a standard TV set screen (4:3) with a black band at both the top and bottom of the screen (letter box). |
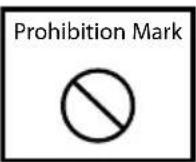
Operation regulatory marks
With this DVD, some functions of this unit such as the play function may be restricted depending on the location where the DVD is playing. In this case, the following marks will appear on the screen. For more information, refer to the disc manual.
Discs with limited period of use
Do not leave discs with a limited period of use in this unit. If you load an already expired disc, you may not be able to remove it from this unit.
Basic Operations
When the monitor is open
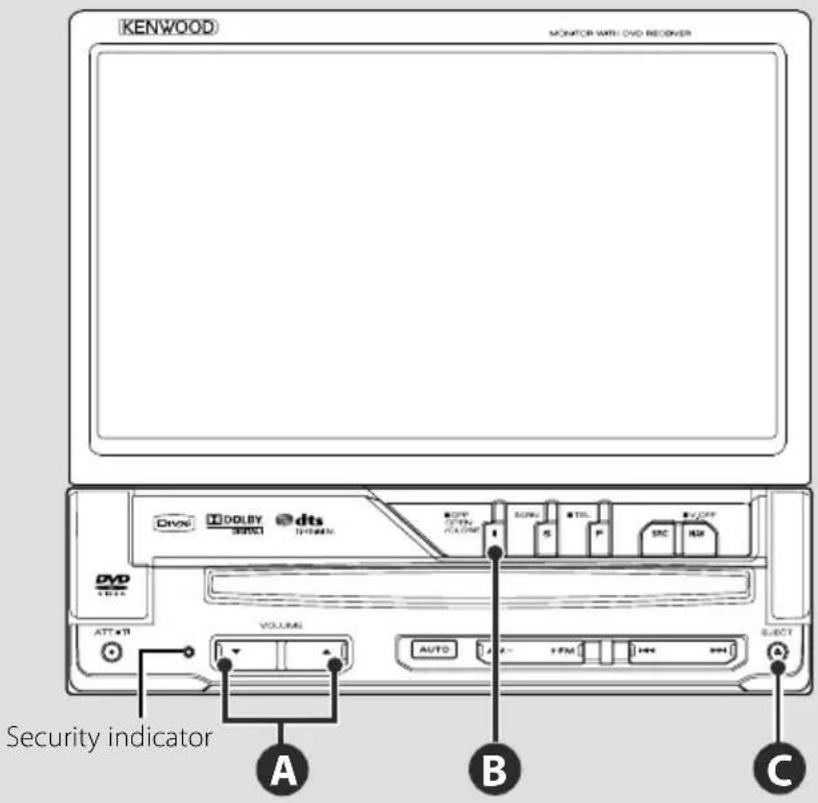
When the monitor is closed

B
Open/Close the monitor
Press to open or close the monitor panel

- Do not touch the moving components when you are opening or closing the monitor. If you touch the moving components, you may be hurt or the equipment may be damaged.
- Do not try to open or close the monitor by hand.

- You can automatically open or close the monitor when you turn on or off the ignition key (page 70).
- If the monitor movement is stopped by the shift lever or another obstacle when the monitor is opened, this movement is canceled by the safety function. If an obstacle is pinched by the monitor when closed, the monitor movement is also canceled by the safety function. If it has occurred, remove the obstacle and press the [OPEN/CLOSE] button again.
B
Turns power ON/OFF
Press the button to turn on the power.
When the button is pressed and held down for
1 second or more, the power is turned off.
F
Listening Traffic Infomation
Press it for more than 1 second to turn the
Traffic Infomation function on or off. (page 31)
A
Adjusts the volume
F
Attenuates the volume
Press it to attenuate the volume.
Press it again to cancel muting.
C
Playing a disc

natural_image
Diagram of a computer monitor with an open rear panel and a black arrow pointing to the front panel (no text or symbols present)When you load a disc into disc loading slot, the disc starts playing. If a menu appears, when playing a video disc, select the desired item

- See (page 7) for a list of supported discs and formats.
Removing a disc
Press[▲] (Eject) button.
D
Play/ Pause
Press [▶II] button once to pause.
Press again to resume playing.
D E
Stop/ play
Press [■] button Ⓔ to stop playing.
Press [▶II] button Ⓓ to resume playing from the previous interrupted position.
G
Switches Seek Mode
Press the butotn to selects the Seek mode. (see page 29, 41 for the
H
Select a band/folder
Press [FM] button to change to the radio bands to FM1/2/3 or next folder/disc.
Press [AM] button to change the radio band to AM or previous folder/disc.
I
Select a chapter/scene/track/frequency
Press [I◄◄] or [►►I] button.
Selects a music or chapter, track, or frequency.
Basic Operations

Playing a USB device
When connecting a USB device, playback starts automatically.

natural_image
Diagram of a connector with a USB cable and connector pin (no text or symbols)
- If the USB source is selected when a USB device is not connected, "No Device" is displayed.
- When the playback is stopped and then restarted, the playback will start from the point where it was stopped at the last time. Even if the USB is removed and connected again, the playback will start from the last stopped point unless the contents in the USB device is changed.
• Make sure that the USB device is connected firmly.
Removing the USB device
Press on the USB control screen to enter the USB suspend mode, and then remove the USB device. Refer to

- Removing the USB device before entering the USB suspend mode may result in damaging the data in the USB device.
A
Selecting a source
Press it to display the source select screen. Touch the source button to select the source.
Full Source Select screen
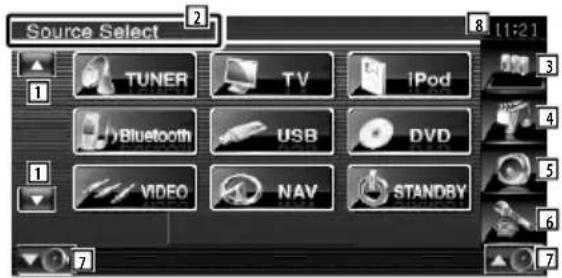

Favorite Source Select screen
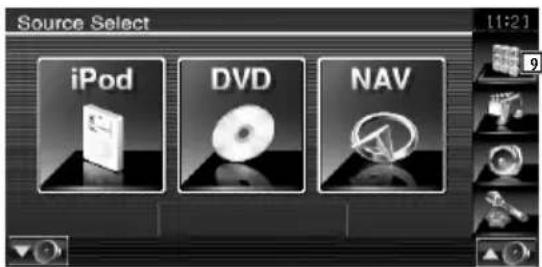
1 Scrolls the source display.

- The displayed source depends on the type of device connected. In addition, you cannot press the button of currently unavailable source.
The following buttons are always displayed on the source select screen and source control screen.
2 Press for at least 2 seconds to erase the buttons. Touch the screen to redisplay the buttons.
3 Displays the Source Select screen.
The display switches between Favorite Source Select screen and Full Source Select screen by touching the button.
4 Displays Source Control screen.
5 Displays the Audio Control Menu screen. (page 80)
6 Displays the Setup Menu screen. (page 58)
7 Adjusts the volume.
8 Clock display
9 Displays the Full Source Select screen.

- For how to register the frequently used source buttons to Favorite Source Select screen, see
Basic Operations

A
Screen Setup
Press the button.
Displays the Screen Control Screen (page 46).
C
Switches to the Navigation system
Press the button to switch the display to the navigation system screen.
B
Switches to the Hands Free control
Press it for more than 1 second to the Hands Free control screen.
Press it again for more than 1 second to resume the normal display.
C
Turns the display OFF
Press it for more than 1 second to turn the display off.
Press [NAV], [SRC] or [FNC] button, or touch the screen to resume the normal display.

- Functions of the [NAV] button can be changed to rear view function. See
B
Switching the function screen
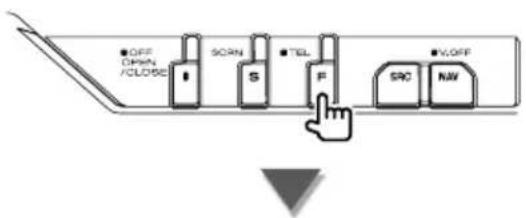
The function control screen switches in the following order each time you press the button.
Navigation screen

[FNC] button

Easy Control buttons appear.
Picture or Video playback screen

[FNC] button

Easy Control buttons appear.
Navigation screen Picture or Video playback screen

Easy Control button

Easy Control button

- For the functions of Easy Control buttons, see
Sets and controls the navigation system function.
Using the Navigation System
Displays the navigation system screen and makes the navigation function available.
1 Displaying the navigation screen


2 Setting the navigation system function
Touch the navigation system button displayed on the screen. See the included NAVIGATION SYSTEM's INSTRUCTION MANUAL for information on using the navigation system.

- You can set the navigation system function when nothing else is displayed on the screen. If anything else, such as Easy control panel is displayed, erase it first.
- An optional navigation system needs to be connected. See
(page 7) for connectable navigation units.
Control of Other Sources While Displaying the Navigation Screen
Selected source can be controlled while displaying navigation screen.
1 Display the easy control buttons
When "DVD" is selected:

1 Displays the Screen Control screen. See
2 Adjusts the volume.
3 During DVD play : Selects a chapter. During VCD play : Selects a scene (when PBC is On) or a track (when PBC is Off). During CD play : Selects music. During Audio file, Video file, or Picture file play : Selects a file.
4 Stops playing. When pressed twice, the disc is played from its beginning when you play it in the next time. (DVD play only) 5 Plays or pauses. 6 When touched this area, the source control screen appears.
When "USB" or "iPod" is selected:

7 During iPod play : Searches Music or Video. During USB play : Selects a file.
8 Plays or pauses. 9 When touched this area, the source control screen appears.
When "TUNER" is selected:

10 Tunes in a station. 11 Switches the band (to AM or FM 1/2/3). 12 When touched this area, the source control screen appears.
When "TV" is selected:

13 Selects a channel.
Use the
When "Bluetooth" is selected:

17 Selects a file. 18 Plays. 19 Pauses. 20 When touched this area, the source control screen appears.

- The Easy Control buttons are hidden when you touch the central part of the screen. - *Not available for the optional digital TV tuner KTC-D500E.
You can play DVD/VCD using various functions.

- For the basic method of how to watch DVD/VCD, see
(page 10). - Set the remote controller mode switch to "DVD" mode before starting operation, see
(page 84).
Functions During the Playback Screen
Basic functions are available even when the playback screen is displayed.
1 Display the playback screen

natural_image
Diagram of a computer monitor with an open rear panel and a circular button, showing no text or symbols.
[DVD] button on the "Source Select" screen

DVD playback screen
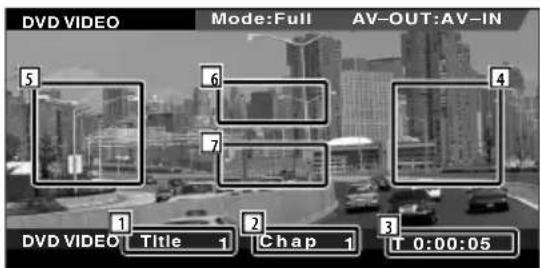
1 Title Number Display
2 Chapter Number Display
3 Play Time Display
4 Forward Chapter Search Area
Selects the next chapter.
5 Backward Chapter Search Area Selects the previous chapter.
6 DVD Disc Menu Control Buttons Area Displays the Disc Menu Control buttons (page 20).
7 Information Display Button Area
VCD playback screen
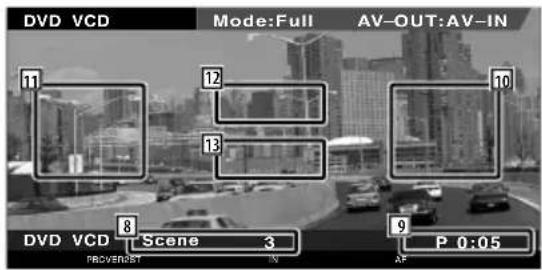
8 Scene/Track Number Display
9 Play time Display
[10] Forward Scene/Track Search Area Selects the next scene (when PBC is On) or track (when PBC is Off).
11 Backward Scene/Track Search Area Selects the previous scene (when PBC is On) or track (when PBC is Off).
12 Zoom Control Button Area
Displays the Zoom Control buttons (page 21).
13 Information Display Button Area

- The information display is cleared automatically after approximately 5 seconds. Also, the information can be displayed automatically when it is updated.
Functions When Displaying the Easy Control Panel
Displays the basic operation buttons on the screen.
1 While the source is playing, press the [FNC] button
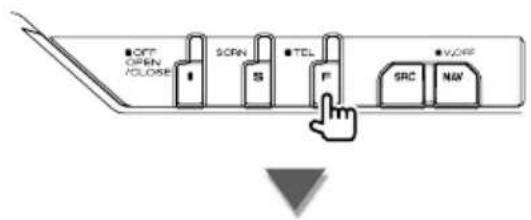
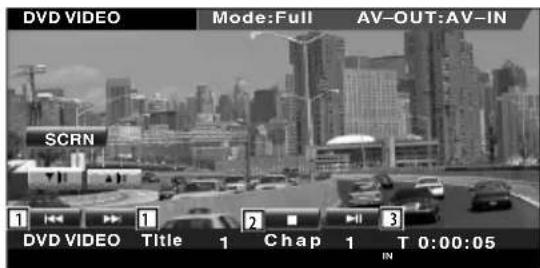
1 Chapter Search (during DVD play) Searches for a chapter. Scene/Track Search (during VCD play) Selects a scene (when PBC is On) or a track (when PBC is Off).
2 Stops playing. When pressed twice, the disc is played from its beginning when you play it in the next time.
3 Plays or pauses.
![KENWOOD KVT-54DVDR - While the source is playing, press the [FNC] button - 3](/content/2026/06/1183724/images/1e2c480534af8d84a5907a4a095b61d4323127b7574957002b8140315aa9de6a.jpg)
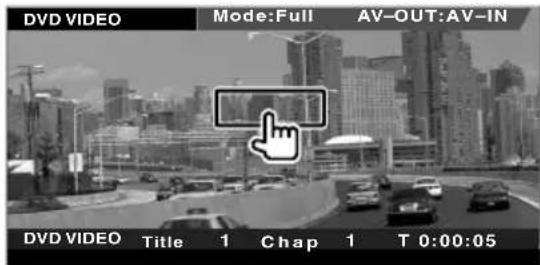
- When the navigation screen is displayed, press the [NAV] button to switch to the source playback screen.
- The Easy Control Panel is hidden when you touch a central part of the monitor.
Functions While Displaying the Control Screen
Switches to the source control screen to use various playback functions.
1 While the source is playing, press the [FNC] button
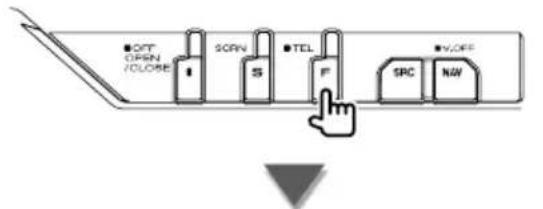

![KENWOOD KVT-54DVDR - While the source is playing, press the [FNC] button - 3](/content/2026/06/1183724/images/fab5cc96ff18fb584302c3d166d1510c7c6d1955fa7052f254949422e3b87ccf.jpg)
When playing a DVD

When playing a VCD

1 Switches to the playback screen.
② Title Number Display (during DVD play)
3 Chapter/Scene/Track Number Display
4 Play Mode Display
5 Play Time Display
6 Volume Label Display
When << is appeared, the text display is scrolled by pressing it.
7 Ejects the disc.
8 Fast Forwards or Fast Backwards.
9 Stops playing.
When pressed twice, the disc is played from its beginning when you play it in the next time.
10 Selects a chapter, a scene or a track.
When the VCD is paused, touch this button to start single-frame stepping.
11 Plays or pauses.
[12] Slow Forwards or Backwards. (during DVD play)
13 Switches the Repeat Play operations in the following sequence.
DVD: Title Repeat, Chapter Repeat, Repeat Off
VCD: Track Repeat, Repeat Off (Available when the PBC is off)
14 Switches the play time display in the following sequence.
DVD: Chapter, Title, remaining titles
VCD: Track, disc, remaining discs (Effective only when the PBC function is off)
15 Function Indicator
16 Appears when a disc is inserted.
[17] Turns the PBC function of VCD On or Off. (only when VCD Ver 2.0 is in use)
18 Appears when PBC is On.
19 VCD version indicator
DVD Disc Menu
Selects an option from the DVD Disc Menu.
1 Display the Disc Menu Control screen

![MenuCtrl TopTop MenuMenReturn EnterEnte Highlight [Cancel] ExitEx](/content/2026/06/1183724/images/3306d3632d9cb81ed23906798318a907312c11f844601afdd42cfa1be7b94aba.jpg)
① Calls the Menu.
2 Returns to the Disc Menu screen.
3 Selects a menu option.
4 Enters your menu selection.
5 Returns to the previous menu screen.
6 Displays the Top Menu.
7 Highlight Control.
8 Clears the Disc Menu Control.
Highlight Control
You can select a chapter and title for the DVD Menu screen. When you touch the screen, you can select the DVD menu.


• To cancel Highlight Control, press [FNC] button.
2 Select Disc Menu options
Disc Menu


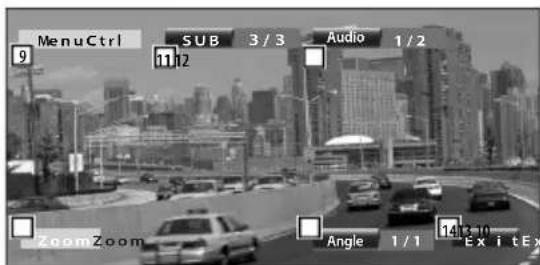
9 Calls the Menu Control.
10 Switches the picture angle. (during program playback only)
11 Switches the subtitle language. (during program playback only)
12 Switches the voice language. (during program playback only)
13 Displays the Zoom Control screen.
14 Clears the Disc Menu Control.
Zoom Control
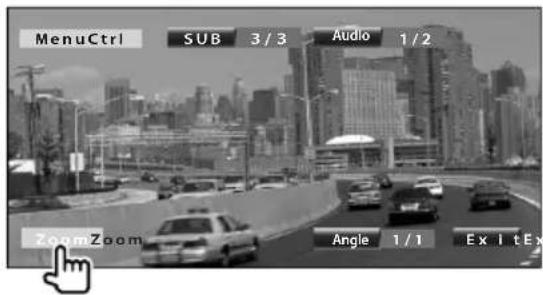


15 Changes the zoom ratio at 4 levels (2 times, 3 times, 4 times, or off) each time you touch.
16 Scrolls the screen in the direction you touch.
17 Returns to the Disc Menu Control screen.
18 Clears the Disc Menu Control.
VCD Zoom Control
Displays an enlarged VCD screen.
1 Display the Zoom Control screen


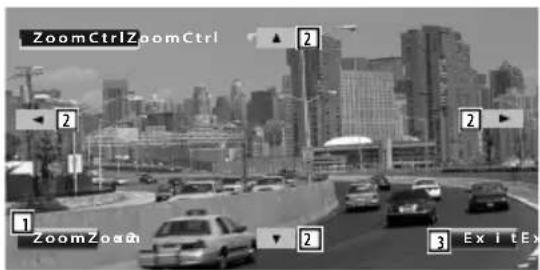
1 Changes the zoom ratio at 2 levels (2 times or off) each time you touch.
2 Scrolls the screen in the direction you touch.
3 Clears the Zoom Control button.
Music Disc & Audio File Listening
You can recall various control screens during CD/Audio file playback.

- For the basic method of how to play a music disc/audio file, see
(page 10).
• See- (page 7) for playable discs.
• See(page 8) for playable files.
Functions While Displaying the Control Screen
Switches to the source control screen to use various playback functions.

natural_image
Diagram of a computer monitor with an open rear panel and a scroll wheel, showing internal components (no text or symbols)
[DVD] button on the "Source Select" screen


During CD playback

1 Switches to the wallpaper.
2 Track (Music) Number Display
3 Play Mode Display
4 Play Time Display
5 Music information display Selects the Disc Text or Track Text. When 🐘 is appeared, the text display is scrolled by pressing it.
6 Ejects the disc.
7 Fast Forwards or Fast Backwards.
8 Stops playing the built-in disc player. When pressed twice, the disc is played from its beginning when you play it in the next time.
9 Selects a track.
10 Plays or pauses.
11 Starts or stops Scan Play (that plays the beginning of each music one after the other).
12 Repeats to play (the present track).
13 Starts or stops Random Play (to play music in random order).
14 Switches the number of lines displayed in the Information Display.
15 Switches the play time display between Track, Disc, and Disc Remaining Time.
16 Function Indicator
17 Appears when a disc is inserted.
During Audio file playback
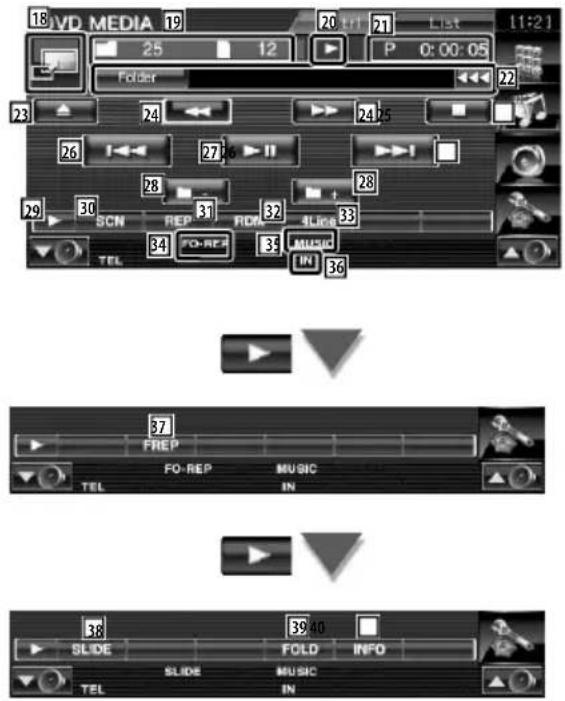
18 Switches to the playback screen. If there is no playback screen, wallpaper is displayed.
19 Folder and File Number Display
20 Play Mode Display
21 Play Time Display
[22] Music information display
Selects Folder Name, File Name, Title, Artist Name, or Album Name.
When 🎯 is appeared, the text display is scrolled by pressing it.
23 Ejects the disc.
24 Fast Forwards or Fast Backwards.
(Disabled when a JPEG is being played.)
25 Stops playing.
When pressed twice, the disc is played back from its beginning in the next time.
26 Selects a file.
27 Plays or pauses.
28 Selects a folder.
29 Switches the button display.
30 Starts or stops Scan Play (that plays the beginning of each music or data one after the other).
31 Repeats to play (the preset files or data).
32 Starts or stops Random Play (to play files of the present folder in random order).
33 Switches the number of lines displayed in the Information Display.
34 Function Indicator
35 MUSIC, MOVIE or PICTURE indicator
36 Appears when a disc is inserted.
37 Repeats to play the music or data of the present folder.
38 Displays images in the folder currently being played one after another. If there is no image in the folder currently being played, initial background is displayed. For information on setting the image display time, see
39 You can search for folders and Audio files through a hierarchy.
40 Displays music information (such as Tag and content property) of Audio file being played.

![DVD MEDIA Ctrl List [1:2] 42 41 Folder/File List Folder/File List Folder/File List Folder/File List Folder/File List ROOT 43 UP 44 42 CUR 45](/content/2026/06/1183724/images/42098c1fafc8a3668988295fa60bb31a252ceb2cb8bfacc53253ca8aea425cb6.jpg)
41 Lists folders and Audio files
Folder opens when touched, and the Audio file is played.
When ↔ appeared, the text display is scrolled by pressing it.
42 Scrolls the list.
43 Moves to the top hierarchy level.
44 Moves up a hierarchy level.
45 Displays the currently playing file.
Video File/Picture Watching
You can recall various control screens during playback of video file (MPEG 1, MPEG 2 and DivX file) and picture file (JPEG file).
Function During Playback Screen
Basic functions are available even when the playback screen is displayed.
1 Display the playback screen

natural_image
Diagram of a computer monitor with an open rear panel and a circular button, showing no text or symbols.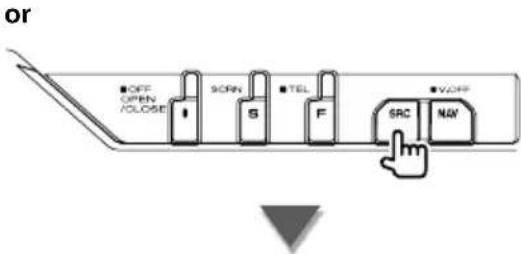
[DVD] button on the "Source Select" screen


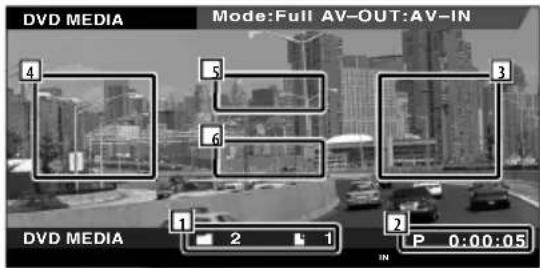
① Folder/File Number Display
2 Play Time Display
3 Forward File Search Area Selects the next file.
4 Backward File Search Area Selects the previous file.
5 JPEG: Picture Control Button Area (page 27)
DivX: Sub=Off, Audio 1/1
MPEG: Switches to the screen with subtitle language selection option and voice language selection option.
6 Information Display Button Area

- The information display is cleared automatically after approximately 5 seconds. Also, the information can be displayed automatically when it is updated.
Functions When Displaying the Easy Control Panel
Displays the basic operation buttons on the screen.
1 While the source is playing, press the [FNC] button


1 Selects a file.
2 Stops playing.
3 Plays or pauses.
![KENWOOD KVT-54DVDR - While the source is playing, press the [FNC] button - 3](/content/2026/06/1183724/images/337855c536b8591684a38cc799c515da6d1eb1cd41e945afa0094c7210bf2247.jpg)
- When the navigation screen is displayed, press the [NAV] button to switch to the source playback screen.
- The Easy Control Panel is hidden when you touch a central part of the monitor.
Functions While Displaying the Control Screen
Switches to the source control screen to use various playback functions.
1 While the source is playing, press the [FNC] button


![KENWOOD KVT-54DVDR - While the source is playing, press the [FNC] button - 4](/content/2026/06/1183724/images/6926b3fdd1cb840372944c3a989ee5b94e3f2cf0a5c8c32feb7a464cd2f4587a.jpg)

![KENWOOD KVT-54DVDR - While the source is playing, press the [FNC] button - 6](/content/2026/06/1183724/images/aed879ca322a7677c0b667526ae0f2afa6877bc2a269b957a1ccc77b6f4373c4.jpg)

1 Switches to the playback screen.
2 Folder and File Number Display
3 Play Mode Display
4 Play Time Display
⑤ Video/Picture information display
Selects Folder Name, File Name, Title, Artist Name, or Album Name.
When 🎯 is appeared, the text display is scrolled by pressing it.
6 Ejects a disc.
7 Fast Forwards or Fast Backwards.
(Disabled when a JPEG is being played.)
8 Stops playing.
When pressed twice, the disc is played back from its beginning in the next time.
9 Selects a file.
10 Plays or pauses.
11 Selects a folder.
12 Switches the button display.
13 Starts or stops Scan Play (that plays the beginning of each song or data one after the other).
14 Repeats to play (the preset files or data).
15 Starts or stops Random Play (to play files of the present folder in random order).
16 Switches the number of lines displayed in the Information Display.
[17] Function Indicator
[18] PICTURE, MOVIE or MUSIC indicator
[19] Appears when a disc is inserted.
[20] Repeats to play the file of the present folder.
[21] Displays images in the folder currently being played one after another.
If there is no image in the folder currently being played, initial background is displayed.
For information on setting the image display time, see
22 You can search for folders and files through a hierarchy.
23 Displays information of file being played.
![List Ctrl DVD MEDIA Ctrl List [1:2] 25 24 Folder/File List 25 Folder/File List 25 Folder/File List 25 Folder/File List 25 Folder/File List ROOT 26 UP 27 CUR 28](/content/2026/06/1183724/images/7f4946ac650af3386a7bb5d50af00efdb751fa64bf4fbf5603a8b866a4c8bc5b.jpg)
24 Lists folders and Video files/Picture files. Folder opens when touched, and the Video/Picture file is played.
25 Scrolls the list.
26 Moves to the top hierarchy level.
27 Moves up a hierarchy level.
28 Displays the currently playing file.
Picture Control
Adjusting the video display.
1 Start Picture Control

2 Adjust the video display

1 Reverses the picture horizontally.
2 Rotates counter clockwise.
3 Rotates clockwise.
4 Ends Picture Control.
Radio Listening
Various control screens appear in the Tuner Source mode.

- For the basic method of receiver button operations, see
(page 10). - Set the remote controller mode switch to "AUD" mode before starting operation, see
(page 84).
Functions While Displaying the Control Screen
Switches to the source control screen to use various functions.

[TUNER] button on the "Source Select" screen





① Band display
2 Preset number
3 Frequency display
4 Radio station information display. Selects the Program Service Name, Title & Artist name, Station Name, Category Name 1/2, or Radio Text.
5 Switches to the FM1/2/3 band.
6 Switches to the AM band.
7 Tunes in a station.
Use the
8 Switches the button display.
9 Selects the Monaural reception mode. (Only when receiving the FM broadcast)
10 Selects the Auto Memory mode.
(See page 30 for the
11 Switches the Seek mode.
(See page 29 for the
12 Switches the number of lines displayed in the Information Display.
13 Turns the Local Seek function On or Off.
[14] Turns the Traffic Information function On or Off.
See
15 When no buttons appear, you can recall the stations on memory. For memory of broadcasting stations, see
16 Searches station by program type. See
17 Lists and selects memorized station.
18 Displays Radio Text screen. See


19 Memorized stations are displayed. Touch to tune in.
20 Scrolls the list.
Seek Mode
Sets a station selection.

The mode is switched in following order each time you touch the button.
Display Setting
"AUTO1" Tunes in a station with good reception automatically.
"AUTO2" Tunes in stations in memory one after another.
"MANU" Switches to the next frequency manually.
Auto Memory
Stores stations with good reception in memory automatically.
1 Select a band you wish to store in memory
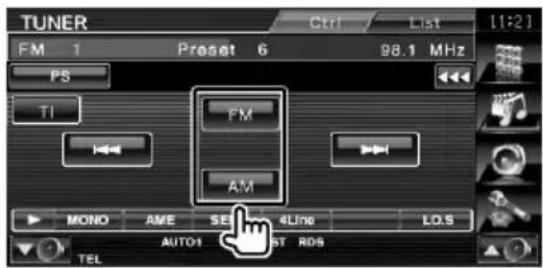
2 Select the Auto Memory mode
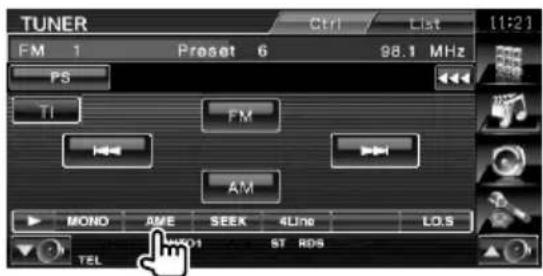
3 Start Auto Memory

Touch or
[Non-Text]
Auto Memory terminates when 6 stations are stored or when all stations are tuned in.

- The operation ends automatically if you do not operate within 10 seconds.
Manual Memory
Stores the current receiving station in memory.
1 Select a station you wish to store in memory

2 Store in memory
![TUNER CFI List [1:2] FM 1 Preset 6 98.1 MHz PS TI FM AM P1 P2 P3 P4 P5 P6 TEL NETOUT ST MND](/content/2026/06/1183724/images/db1f1232b87edb3a80cb97acb87a1cdc3300f38666bc1b6ebae06b2381fc191f.jpg)
Continue to touch until the memory number appears.
Radio Text
You can display the radio text. (Only when receiving the FM broadcast)
1 Select a station
2 Display the radio text
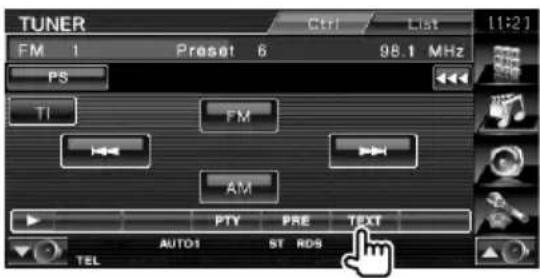


1 Selects the Program Service Name, Title & Artist name, Station Name, Radio Text Plus, or Radio Text for text display.
When 🎨 is appeared, the text display is scrolled by pressing it.
2 Scrolls the text display.
3 Returns to the previous screen.
Traffic Information
When a traffic bulletin starts, any source is switched to the traffic information and it is displayed automatically.
1 Set the Traffic information mode
![TUNER Ctrl List [1:2] FM 1 Preset 6 98.1 MHz PS TI FM AM MONO AME SEEK 4Line LO.S AUTO1 ST RDS TEL](/content/2026/06/1183724/images/23a918927dbf1c980fb9d43df88f5587a51fa50a55640d3c2e27a797f101602f.jpg)
When the traffic bulletin starts...
The Traffic Information screen appears automatically.
Traffic Information screen


- It is necessary to have Traffic Information function set to On in order to have the Traffic Information screen appear automatically.
- During reception of traffic information the adjusted volume is automatically remembered, and the next time it switches to traffic information it's automatically the remembered volume.
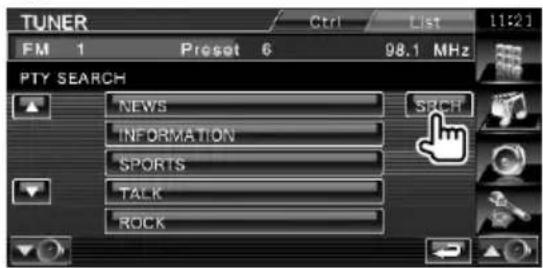
Search for Program Type
A program is tuned when you set its program type. (Only when receiving the FM broadcast)
1 Enter Program Type mode

2 Select a Program Type
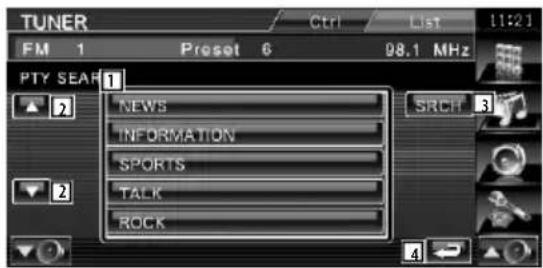
1 Program Type is displayed. Touch to select a Program Type.
2 Scrolls the Program Type list.
3 Searches for the program type. It is displayed when the Program type is selected.
4 Returns to the previous screen.
3 Search a station of the selected Program Type
You can control and listen to songs in your iPod by connecting an iPod to this unit with KCA-iP301V (optional accessory). You can also display video contents on this unit when connecting an iPod with video.
Connecting an iPod
Connect an iPod to this unit.

natural_image
Line drawing of a device with an open lid and connected to a plug (no text or symbols)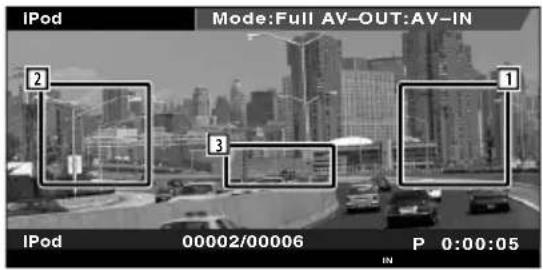
① Forward music/video search area Selects the next music/video.
2 Backward music/video search area Selects the previous music/video.
③ Information display button area
The information is displayed for 5 seconds.

- Remove all accessories such as headphone before connecting an iPod. You may not be able to control the iPod if you connect it with accessories attached.
- When you connect an iPod to this unit, playback starts from the song you were playing on the iPod itself (Resume Function).
- If you start playback after connecting the iPod, the music that has been played by the iPod is played first. In this case, "RESUMING" is displayed without displaying a folder name, etc. Changing the browse item will display a correct title, etc.
- When the iPod is connected to this unit, "KENWOOD" or "✓" is displayed on the iPod to indicate that you cannot operate the iPod.
- If the played song is not a video content, "No iPod Video Signal" is displayed on the video screen.
Functions When Displaying the Easy Control Panel
Displays the basic operation buttons on the screen.
1 While the source is playing, press the [FNC] button
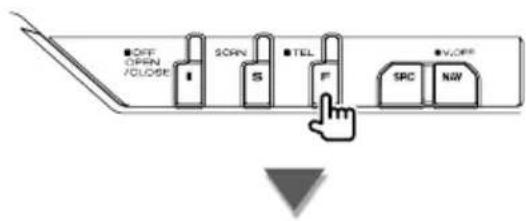
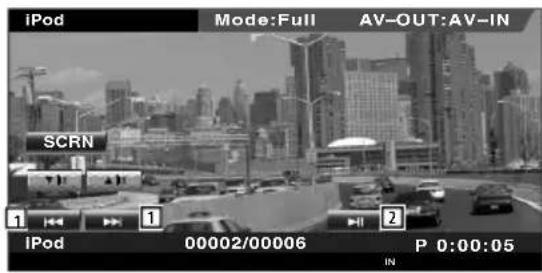
1 Music/Video Search.
2 Plays or pauses.
![KENWOOD KVT-54DVDR - While the source is playing, press the [FNC] button - 3](/content/2026/06/1183724/images/bbc0270960ed71e4f9e5cfc070f3ac9c30f24b817f977977a21dd68758a29da0.jpg)
- When the navigation screen is displayed, press the [NAV] button to switch to the source playback screen.
- The Easy Control Panel is hidden when you touch a central part of the monitor.
Functions While Displaying the Control Screen
Switches to the source control screen to use various playback functions.
When Video or picture is playing, press the [FNC] button.


[iPod] button on the "Source Select" screen


1 Image picture
Switches to the playback screen. If there is no playback screen, wallpaper is displayed.
2 Total number of music in the iPod and the music number display
3 Play Mode Display
4 Play Time Display
5 Music/Video Information Display Selects the Title, Artist Name, Album Name or iPod Name.
When 📄 is appeared, the text display is scrolled by pressing it.
6 Fast Forwards or Fast Backwards.
7 Selects Music/Video.
8 Plays or pauses.
9 Switches the button display.
10 Starts or stops Scan Play (that plays the beginning of each music or video one after the other).
11 Repeats to play (the preset files or data).
12 Starts or stops Random play.*
13 MUSIC or VIDEO indicator
14 Starts or stops Album Random Play (plays randomly from current album).*
15 Displays the list of music category.
16 Displays the list of video category.
17 Displays the previous music/video list screen.
18 Displays information screen of music/video being played.

* Disabled when VIDEO is being played.

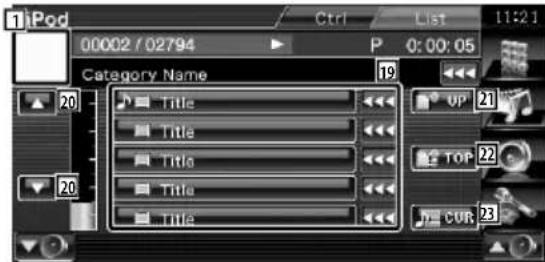
19 Categories and music are listed.
Touch a category name to move its lower level. If music title is displayed, the music is played by touching it.
When is appeared, the text display is scrolled by pressing it.
When it appeared, all the music in its category is played by touching the button.
20 Switches list page.
21 Returns to previous category.
22 Moves to the top category.
23 Displays the currently playing category.
USB Device Control
You can control and listen to songs in your USB device by simply connecting it to the USB connector of this unit.

- For the connection of a USB device, see
Functions When Displaying the Easy Control Panel
Displays the basic operation buttons on the screen.
1 While the source is playing, press the [FNC] button


1 Selects a file.
2 Plays or pauses.

- The Easy Control Panel is hidden when you touch a central part of the monitor.
Functions While displaying the Control Screen
Switches to the source control screen to use various playback functions.
When Video or picture is playing, press the [FNC] button.


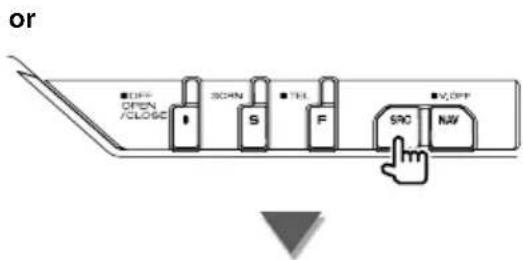
[USB] button on the "Source Select" screen






1 Image picture
Switches to the playback screen. If there is no playback screen, wallpaper is displayed.
2 Track Number Display
3 Play Mode Display
4 Play Time Display
5 Music information display
Selects the Folder Name, File Name, Title,
Artist Name, or Album Name.
When 🐘 is appeared, the text display is
scrolled by pressing it.
6 Removes the USB device.
When "No Device" is shown, the USB device can be removed safely.
If you wish to play it again while the USB device is connected, press it again.
7 Selects a folder. (Only in Folder Select Mode)*
8 Selects a file.
9 Plays or pauses.
10 Switches the button display.
11 Starts or stops Scan Play (that plays the beginning of each music one after the other).
12 Repeats to play (the present music).
13 Starts or stops Random Play (to play music in random order).
14 Switches the number of lines displayed in the Information Display.
15 MUSIC, VIDEO or PICTURE indicator
16 Repeats to play the music or data of the present folder.* (Only in Folder Select Mode)
17 Displays images in the folder currently being played one after another.*
If there is no image in the folder currently being played, initial background is displayed.
For information on setting the image display time, see
18 Displays the folder list. See
19 Displays the list of category.
20 Displays information screen of music being played.

* Disabled during play list mode.


The display above can also be the folder list display. See
21 Switches to the lower level of the category. If the file is displayed, the music is played by touching it.
22 Scrolls the list.
23 Lists all the music in the selected category.
24 Moves to the upper level of the category.
25 Moves to the top category.
26 Displays the currently playing category. (Only in Category Mode)
Folder Select
Searches folders and Audio files stored in the USB device according to hierarchy.
1 Start Folder Select
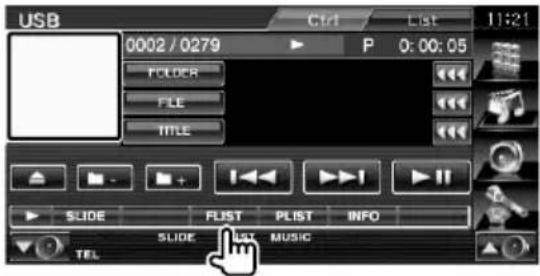
2 Select music

1 Lists folders and Audio files
Folder opens when touched, and the Audio file is played.
2 Scrolls the list.
3 Moves to the top hierarchy level.
4 Moves up a hierarchy level.
5 Moves to the top page of the list.
6 Displays the currently playing file.
Various control screens appear in the TV source mode. You can only operate TV with the optional accessory TV Tuner connected.
Function During TV Screen
Basic functions are available even when the TV screen is displayed.
1 Display the TV screen
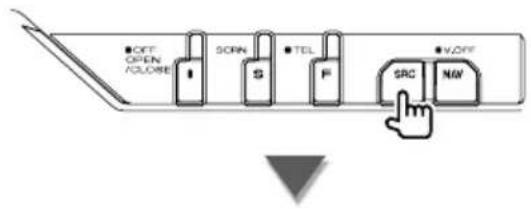
[TV] button on the "Source Select" screen


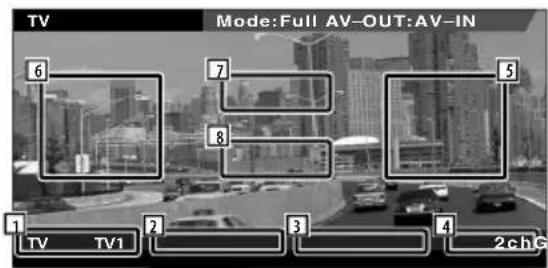
1 TV Band Number Display
2 TV Area Group Display. See
3 Memory Number Display
4 Channel Number Display
5 Channel Up Area Increases the channel.
6 Channel Down Area Decreases the channel
⑦ Band Switch Area
Switches to TV1 or TV2.
8 Information Display Button Area

- The information display is cleared automatically after approximately 5 seconds. Also, the information can be displayed automatically when it is updated.
Functions When Displaying the Easy Control Panel
Displays the basic operation buttons on the screen.
1 While the source is playing, press the [FNC] button


1 Selects a channel.
Use the
2 Switches to TV1 or TV2.*
3 Switches the Seek mode.*1
![KENWOOD KVT-54DVDR - While the source is playing, press the [FNC] button - 3](/content/2026/06/1183724/images/5c47615886c89f509f07e2261bdcf3bae8d8ea09c454454c3b486eef85cad39c.jpg)
- When the navigation screen is displayed, press the [NAV] button to switch to the source playback screen.
- The Easy Control Panel is hidden when you touch a central part of the monitor.
- *1 Not available for the optional digital TV Tuner KTC-D500E.
Functions While Displaying the Control Screen
Switches to source control screen to use various functions.
1 While the source is playing, press the [FNC] button


![KENWOOD KVT-54DVDR - While the source is playing, press the [FNC] button - 4](/content/2026/06/1183724/images/654a3ec9616f3cc6d745de1e1efbdc6ae307ac74cfbe01b1c2eee5ba870e104c.jpg)

![KENWOOD KVT-54DVDR - While the source is playing, press the [FNC] button - 6](/content/2026/06/1183724/images/69c0a6b77cf1d953bf652f4db3ff07381a120678af063e3129878769640fe576.jpg)

1 Switches to the TV screen.
2 Band display
3 TV Area Group Display See
4 Memory Number Display
5 Channel display
6 Channel information display
7 Select a channel.
Use the
8 Switches to TV1 or TV2.
9 Switches the button display.
10 Selects the Auto Memory mode. See
11 Switches the Seek mode. See
12 Indicates current Seek mode.
13 When P1 to buttons, you can recall channels on memory.
For memory of broadcasting stations, see
14 Sets a name to the tuned station. (page 42)
15 Lists and selects memorized station.*
![KENWOOD KVT-54DVDR - While the source is playing, press the [FNC] button - 8](/content/2026/06/1183724/images/ff591ed1d9ff9b427b2700797400550d2e320842128c97551d6fbffbd693e8ac.jpg)

16 Memorized stations are displayed. Touch to tune in.*1
![KENWOOD KVT-54DVDR - While the source is playing, press the [FNC] button - 10](/content/2026/06/1183724/images/408060c818d217e5b4f9a8690a77bd43e30fd34ecb77118cdc5cba3c044207cd.jpg)
*1 Not available for the optional digital TV Tuner KTC-D500E.
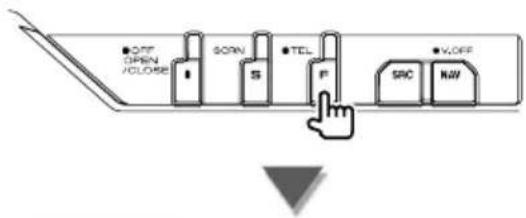
TV Menu (with KTC-D500E (optional accessory) connected only)
Menu Control screen appears by touching the area shown below.


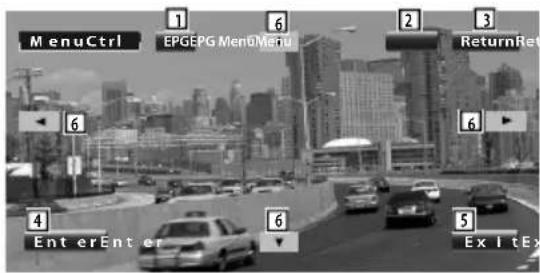
1 Shows EPG (Electric Program Guide) screen.
2 Shows Digital TV Broadcasting menu screen.
3 Returns to the previous screen.
4 Executes selected menu item.
5 Returns to Digital TV screen.
6 Moves highlight in Digital TV Broadcasting menu.
Seek Mode
Sets a station selection.

The mode is switched in following order each time you touch the button.
| Display | Setting |
| "AUTO1" | Tunes in a station with good reception automatically. |
| "AUTO2" | Tunes in stations in memory one after another. |
| "MANU" | Switches to the next frequency manually. |
Auto Memory
Stores stations with good reception in memory automatically.
1 Select a band you wish to store in memory
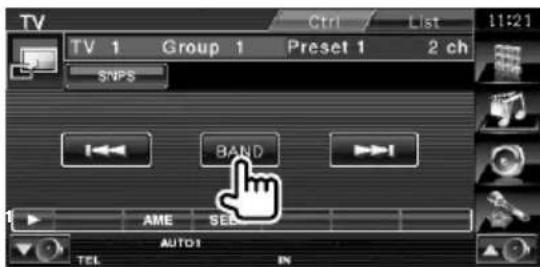
2 Select the Auto Memory mode

3 Start Auto Memory

Auto Memory terminates when 6 stations are stored or when all stations are tuned in.

- The operation ends automatically if you do not operate within 10 seconds.
Manual Memory
Stores the current receiving channel in memory.
1 Select a station you wish to store in memory

2 Store in memory

Continue to touch until the memory number appears.
Set Station Name
Assigns a name to a station.
1 Select a station you wish to name
2 Start Name set
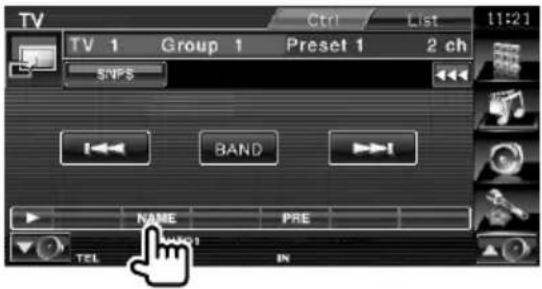
3 Enter the name
See
4 End Name set

Bluetooth Audio Control
When KCA-BT200 (optional accessory) is connected, you can listen to audio files stored in Bluetooth audio player and cell-phone.

- You need to register your audio player and cell-phone to your Bluetooth Unit beforehand. Make sure to read the instruction manual of the Bluetooth Unit as well.
Functions While Displaying the Control Screen
Switches to control screen to use various functions.
[Bluetooth] button on the "Source Select" screen


1 Plays.
2 Pauses.
3 Stops playing.
4 Selects a file.

- If the Bluetooth Audio player does not support AVRCP profile, buttons 1 to 4 are not displayed. Operate from the Audio player.
Muting Audio Volume upon Reception of Phone call
When the telephone is called, the system is paused automatically.
Muting Audio Volume upon Reception of Phone Call
When the telephone is called...
The Phone Call ("CALL") screen appears, and system is paused.
Phone Call ("CALL") screen

When the call ends...
Hang up the phone.
The system resumes playing automatically.

- To use the TEL Mute feature, you need to hook up the MUTE wire to your telephone using a commercial telephone accessory. Refer to
Character Entry
When you select the Set Station Name mode or others, the following screen appears for character entry.
How To Use the Character Entry Screen
Character Entry screen

1 Shifts the cursor.
2 Enters characters.
③ Scrolls up or down the character button display.
4 Sets the key layout of the character buttons.
abc : Alphabetical key layout.
qwe : Qwerty key layout.
5 Enters a space. If you erase a character, locate the cursor on it and touch this button.
6 Clears the character. 7 Exits the Character Entry mode and returns to the previous screen.

- You can enter characters only after you have applied the parking brake.
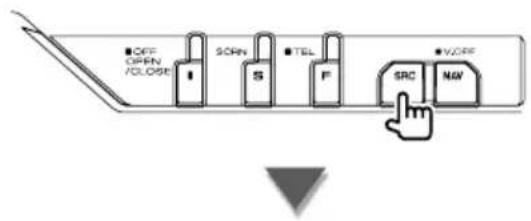
Setting the monitor screen.
Screen Control
1 Display Easy Control panel
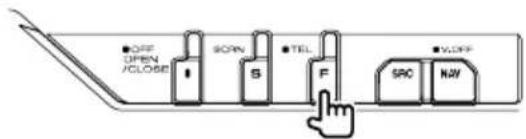
2 Display the Screen Control screen

3 Adjust the picture quality
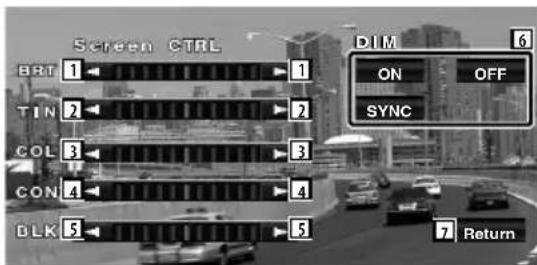
1 Brightness Control
2 Tint Control
Displayed for an NTSC system image on TV, Video, iPod or Rear View Camera.
3 Color Control
Displayed on the TV, Video, iPod or Rear View Camera screen only.
4 Contrast Control
5 Black Level Adjustment
6 Dimmer Mode Setup
"ON": The display dims.
"OFF": The display doesn't dim.
"SYNC": Turning the Dimmer function
On or Off when the vehicle light
control switch is turned On or Off.
7 Returns to the previous screen.

- The Screen Control screen is displayed only when you have applied the parking brake.
• The picture quality can be set for each source. - You can set image quality of screens such as menu from
(page 70) of the .
Various functions can be used in the Hands Free control mode. (with the optional accessory Bluetooth unit connected only)

- You need to register your cell-phone to your Bluetooth Unit beforehand. Make sure to read the instruction manual of the Bluetooth Unit as well
- To use the Phonebook, it must have been downloaded from the cell-phone. For more details, see the instruction manual of your Bluetooth Unit and your cell-phone.
Control Screen Function
Displaying the control screen and using various functions.
1 Display the Hands-Free Control screen

Press the [FNC] button for more than 1 second.

1 Displays the various conditions.
SMS : Displays short message status. If a cell-phone which supports SMS function is not connected, this mark does not appear.
: There is unread short message.
SHS : There is no unread short message.
: Downloading Phonebook.
HOLD : Indicates there is a call on hold.
: Displays the signal strength.*
The more the number of bar segments, the stronger the signal.
: Displays the present Auto Answering status
Guro: When Auto Answering is on
: When Auto Answering is off
: Displays the battery drain of the cell-phone.*
The more the number of bar segments, the higher the battery level.
2 Displays the called phone numbers. If you have registered a phone number in the Phonebook, the destination person name is displayed.
3 Calls the displayed preset phone number.
4 Displays the SMS Select screen.
See
⑤ Displays the Search for Phonebook screen. See
6 Displays the Outgoing Calls screen. See
7 Displays the Incoming Calls screen. See
8 Calls the preset phone number.
For information on how to preset a phone number, see
9 Displays the Hands-Free Set Up screen. See
10 Displays the Dialing Display screen. See
11 Starts voice recognition.
See
12 Returns to the previous screen.

- While your car is moving, some functions are disabled for safety's sake. The buttons associated with the disabled functions become ineffective if pressed.
- When the Hands-Free Control screen appears, the name of the connected cell-phone is displayed for 5 seconds.
- * Since the number of steps of the control unit is different from that of the cell-phone, the statuses displayed on the control unit may discord from those displayed on the cell-phone. No status is displayed if information about it cannot be obtained.
- Setting the cell-phone in the private mode can disable the hands-free function.
When Received a Call
When you receive a call, you can use the hands-free phone.
1 Respond to a call

When a call arrives, the Talking screen appears automatically.
1 Starts conversation with a person called. Switches the call destination if you hear a tone of call-waiting.
Resumes conversation with the person on hold after completed conversation with the other party.
2 Disconnects the phone.
3 Switches the voice output between phone and speaker.
4 Outputs dial tone.
See
Calling by Entering a Phone Number
Makes a call by entering a phone number.
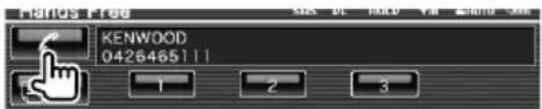
1 Display the number input screen

2 Enter a phone number

1 Calls the entered phone number.
② Creates an SMS for the entered phone number.
See
3 Clears the number.
4 Returns to the previous screen.
3 Make a call
You can start talking when the destination responds.
4 End the call
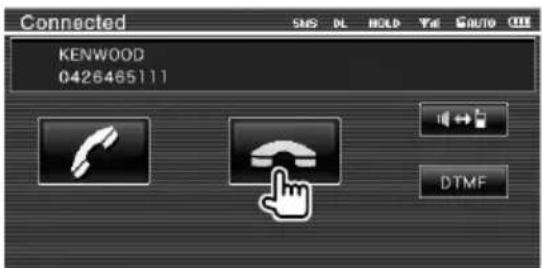
The Hand Free screen reappears.

- You can input max 32 digits.
Quick Dialing
You can register up to 6 phone numbers for quick dialing.

- Phone numbers must be registered in advance. See
1 Recall the phone number

2 Make a call

Controlling Tone-based Services
Uses tone base service using DTMF (Dual Tone Multi Frequency).
1 Display the DTMF input screen
Display the Talking screen. See

2 You can send tones during a call
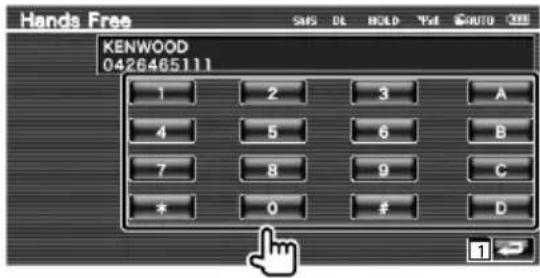
1 Returns to the previous screen.
Calling by Phonebook
You can call a person using his/her phone number that you have registered in the Phonebook.
1 Display the Phonebook screen
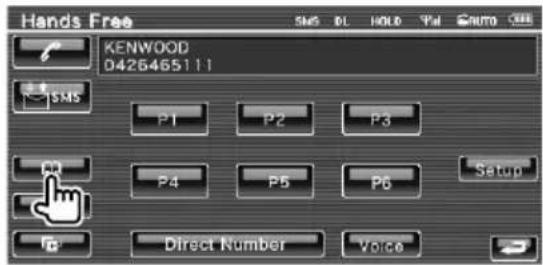
The Initial Input screen appears.
2 Select the Phonebook search method
You can search by the initial of the Phonebook data.
Initial alphabet screen
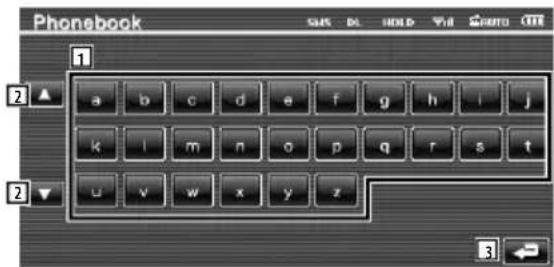
1 Displays the Phonebook beginning with the name whose first character you have touched.
2 Scrolls the character array display.
3 Returns to the Hands-Free Control screen.

Initial number screen

4 Displays a list of numbers in the Phonebook starting with the selected number.

Cyrillic alphabet search screen

5 Displays the Phonebook beginning with the name whose first character you have touched.
3 Select the name to call

6 Phonebook data list.
"REC" turns on for data with voice for voice recognition already registered.
7 Scrolls the Phonebook data list.
8 Scrolls the name.
9 Registers the voice for voice recognition to the selected Phonebook.
If there are already 35 voice tag registered in the same cell-phone, [Record] button is deactivated.
See
10 Plays the voice registered in the selected Phonebook data.
11 Deletes the voice registered in the selected Phonebook data.
Touch to display the confirmation screen.
Touch [YES] to delete or [NO] to cancel.
12 Displays the detail of the selected Phonebook data.
13 Returns to the Hands-Free Control screen.
4 Select the phone number to call

14 Calls the selected phone number.
15 Creates an SMS for the displayed phone number.
See
16 Scrolls the phone number.
17 Displays the Phonebook data list.
18 Returns to the Hands-Free Control screen.
5 Make a call


• To use the Phonebook, it must have been downloaded from the cell-phone. For more details, see the instruction manual of your Bluetooth Unit and your cell-phone.
- Initials including no corresponding name will not be displayed.
- During search, a non-accent character such as "u" is searched for instead of an accent character such as "ü".
Making a Call Using Outgoing/Incoming Call Records
Calls by selecting a phone number from the outgoing or incoming calls list.
1 Display the Outgoing Calls or Incoming Calls screen

:Outgoing Calls
: Incoming Calls
The Outgoing Calls or Incoming Calls list screen appears.
2 Select from calls list
Example : Outgoing Calls screen
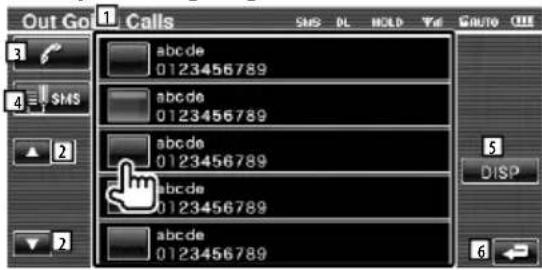
1 Outgoing Calls list.
2 Scrolls the list.
3 Makes a call to the selected number.
4 Creates an SMS for the selected phone number. See
5 Displays the detail of the selected phone number.
6 Returns to the Hands-Free Control screen.
3 Make a call


- The Outgoing Calls list screen or Incoming Calls list screen shows the list of the calls originated from or received at this unit. They are not the ones stored in the cell-phone memory.
Calling by Voice Recognition
Calls by recognizing the registered voice.

- In order to perform voice recognition, voice must be registered in the Phonebook data. See
1 Display the Voice Recognition screen
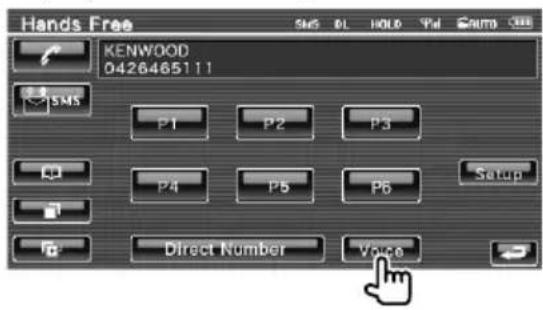
2 Utter the voice registered in the PhoneBook
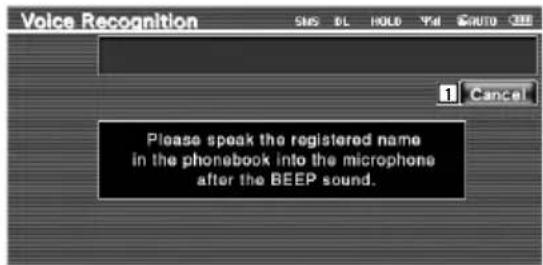
Utter within 2 seconds after the Beep.
1 Cancels voice recognition.

If the voice recognition is succeeded and there is only one phone number found:

Make a call.
2 Displays the phonebook list.
If you hear another Beep sound:
Speak the key word within 2 seconds after the Beep, or touch the [Phonebook List] button to select the phone number.

Make a call.

- If there are more than one phone numbers registered under the same name, and the key word voice is registered for each phone number, you will hear another beep. For how to register key word, see
If there are more than one phone numbers registered under the same name, go to step 3.
3 Select a Phone number category

3 Calls the displayed phone number.
4 Creates an SMS to the displayed address. See
5 Selects the Phone number category.
6 Scrolls the phone number.
7 Displays the Phonebook data list.
8 Returns to the Hands-Free Control screen.
4 Make a call


- A message is displayed if the voice is not recognized. Read the message for the further operation.
Setting Up the Hands-Free Phone
The Hands-Free system can be set as follows.
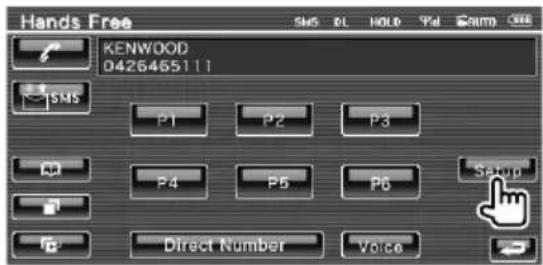
1 Display the Hands Free Setup screen
2 Setup each item
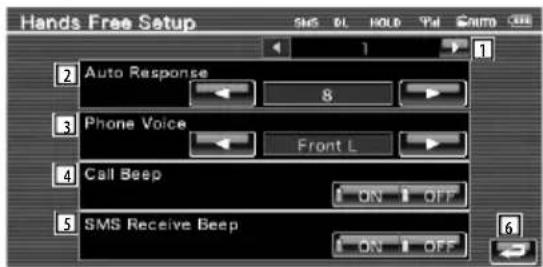


① Moves to the "Hands Free Setup 2" screen.
2 Sets an automatic response time after call termination. (8")
"Off": This function can not use.
"0-99": Sets to calling ring time (second).
3 Sets a ringing tone output position.
(“Front All”)
"Front L": Outputs the tone from the front left-hand side speaker.
"Front R": Outputs the tone from the front right-hand side speaker.
"Front All": Outputs the tone from the both front speakers.
4 Sets the beep of the incoming call.
(ON")
"ON": Beep is heard.
"OFF": Beep is canceled.
5 Sets the beep of the incoming SMS.
(ON)
"ON": Beep is heard.
"OFF": Beep is canceled.
6 Returns to the Hands-Free Control screen.
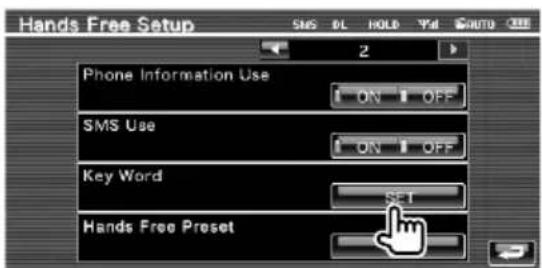
⑦ Returns to the "Hands Free Setup 1" screen.
8 Sets whether to use cell-phone phonebook, outgoing calls list and incoming calls list.
("ON")
"ON": Yes.
"OFF": No.
9 Sets the SMS function. (☐ "ON")
"ON": Use SMS function.
"OFF": SMS not available.
[10] Registers the voice to select phone number category with voice recognition. See
11 Registers the phone number to Hands Free Control screen preset button.
See
12 Returns to the Hands-Free Control screen.

- Either the time interval for automatic answer set on this unit or the time interval set on the cell-phone, whichever is shorter, takes effect.
- Select the speaker which is further from the microphone in order to prevent howling or echoes.
Voice Registration
Registers voice for voice recognition in Phonebook. Up to 35 voices can be recorded in one cell-phone.
1 Select the name to register
Go through the procedure of
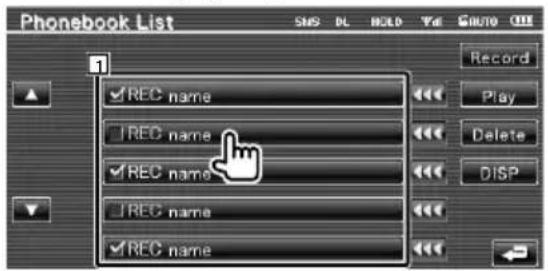
1 Selects a name.
"REC" turns on for data with voice for voice recognition already registered.
2 Display the voice registration screen

3 Utter the voice to register (1st try)

2 Registers the voice.
3 Cancels voice registration.
Utter within 2 seconds after the Beep.
4 Utter the voice to register (2nd try)

5 End voice registration


- A message is displayed if the voice is not recognized. Read the message for the further operation.
- Repeat from 1st try if the voice is different from the 1st try.
Key Word Voice Registration
Registers the voice to select the Phone number category by Voice Recognition.
1 Display the Key Word List screen
Display the "Hands Free" screen and touch [Setup]. See
2 Select the Phone number category to register

1 Selects the Phone number category. "REC" turns on for data with voice for voice recognition already registered.
2 Registers voice for the selected Phone number category.
3 Plays voice registered for the selected Phone number category.
4 Deletes voice registered for the selected Phone number category. Touch to display the confirmation screen. Touch [YES] to delete or [NO] to cancel.
5 Returns to the Hands-Free Set Up screen.
3 Display voice registration screen

4 Utter the voice to register (1st try)

6 Registers the voice.
7 Cancels voice registration.

Utter within 2 seconds after the Beep.
5 Utter the voice to register (2nd try)

6 End voice registration
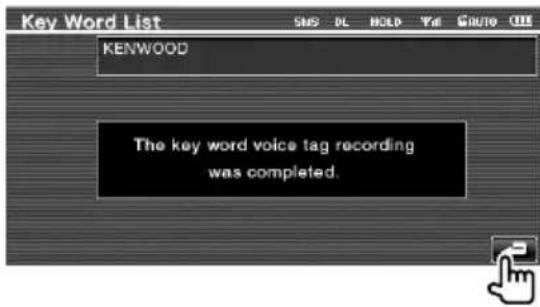

- A message is displayed if the voice is not recognized. Read tha message for the further operation.
- Repeat from 1st try if the voice is different from the 1st try.
Phone Number Preset
Registers frequently used phone number to Hands Free control screen preset button.
1 Display the Hands Free Preset List screen
Display the "Hands Free" screen and touch [Setup]. See

2 Select the Preset number to register
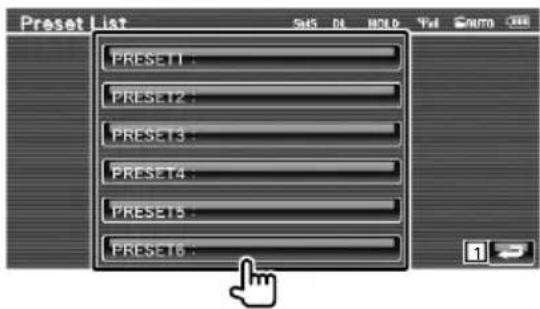
1 Returns to the Hands-Free Set Up screen.
3 Select the search destination of the number to register

2 Registers from SMS incoming calls list.
3 Registers from SMS outgoing calls list.
4 Registers from Phonebook.
5 Registers from outgoing calls list.
6 Registers from incoming calls list.
7 Registers by entering phone numbers.
8 Registers voice for voice recognition to preset number.
9 Registers the currently displayed phone number.
10 Deletes the currently displayed phone number.
11 Returns to the previous screen.
4 Search phone number to register with each function
5 Register phone number
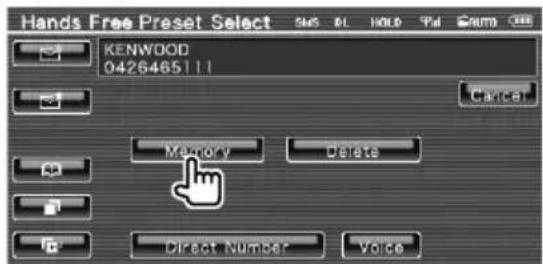

- Press [Delete] to delete the registered phone number.
SMS (Short Message Service)
Uses SMS function.
1 Display the SMS Select screen

2 Select a function

1 Displays received message list.
2 Displays sent message list.
3 Displays the Message screen. If there is an unfinished message, the button will be active.
4 Retrieves SMS messages from the cell-phone.
5 Returns to the Hands-Free Control screen.
3 Select message to display

6 Calls the number in the selected message.
7 Creates a new message for the selected message.
8 Scrolls the list.
9 Displays the selected message.
SMS Message screen

10 Calls the number in the selected message.
[11] Creates a new message for the selected message.
12 Scrolls the message.
13 Returns to the previous screen.
4 Create a message

14 Moves the cursor.
15 Displays remaining number of characters allowed.
16 Enters character.
17 Changes keyboard character type.
18 Sends the message.
19 Sets the key layout of the character buttons.
abc : Alphabetical key layout.
qwe : Qwerty key layout.
20 Enters space.
21 Erases the entered character. If pressed more than 1 second, all the input characters are erased.
22 Returns to the previous screen.
You can set up various receiver parameters.
Setup Menu
Displays the Setup menu to set various functions.
1 Display the control screen of any source

Touch any source button on the "Source Select" screen.
2 Display the Setup Menu

3 Select the setup item

① The selected setup screen appears.
2 Scrolls the setup menu.

- [Audio Setup] and [AV Interface] options can be locked. The key mark (i) is displayed in reverse video for the locked option. See
Audio Setup
You can setup a speaker network, etc.
1 Display the Audio SETUP screen
Touch Audio SETUP in the "Setup Menu" screen (page 58).

- [Audio Setup] cannot be selected under the following conditions:
- When no source is selected.
- When dual zone function is set to on. See
(page 82)
2 Setup each item
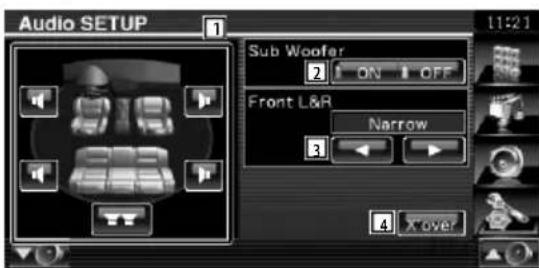
1 Selects the speaker to set the crossover. See
② Sets the availability of subwoofers. This can be selected only when Preout is set to "Sub". See
3 Selects the type of front speakers.
"Standard": Setup for general diameter speakers
"Narrow": Setup for small diameter speakers
"Middle": Setup for middle diameter speakers
"Wide": Setup for large diameter speakers
4 Switches to the crossover setup screen. See
Crossover Network Setup
You can set a crossover frequency of speakers.
1 Select the speaker to set the crossover

1 Sets the High Pass Filter of the front speaker.
② Sets the High Pass Filter of the rear speaker.
3 Sets the Low Pass Filter of the sub woofer.
4 Switches to the crossover setup screen.
2 Display the Crossover setup screen

3 Set the crossover

5 Sets the cross over frequency.
When front speaker or rear speaker is selected in step 1:
High Pass Filter adjustment
When Subwoofer is selected in step 1: Low Pass Filter adjustment
6 Sets the sub woofer phase. (Only when "Subwoofer" is set to "ON" in Audio Setup and "LPF SUB FREQ" is set to other than "Through")
7 Returns to the "Audio Setup" screen.
DVD Setup
You can set up the DVD play.
1 Display the DVD Setup screen
Touch DVD SETUP in the "Setup Menu" screen (page 58).
2 Setup each item
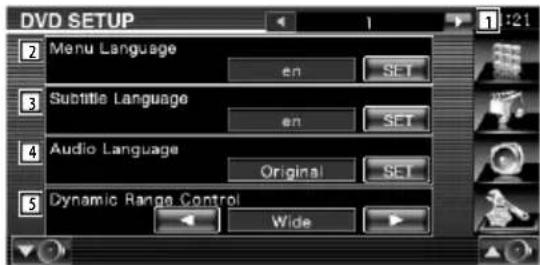
① Moves to the "DVD Setup 2" screen.
2 Selects a disc menu language.*1 (See
3 Selects a subtitle language.*1
(See
4 Selects an audio language.*1
(See
5 Sets the dynamic range.*1 (Wide") The dynamic range is reduced by changing from "Wide" to "Normal" and from "Normal" to "Dialog". "Dialog" makes the total sound volume becomes larger as compared with "Wide" and "Normal", allowing you to listen to the movie's dialog more clearly.
This is effective only when you are using a Dolby Digital software.
The operation is available during the play stop mode.

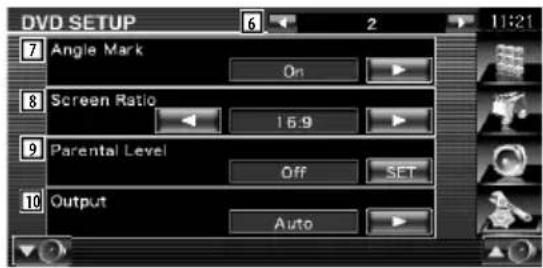
6 Returns to the "DVD Setup 1" screen.
7 Sets an angle mark display. *1 (On")
8 Selects the screen display mode.*
(6:9")
"16:9": Displays wide pictures.
"4:3 LB": Displays wide pictures in the Letter Box format (having black stripes at the top and bottom of screen).
"4:3 PS": Displays wide pictures in the Pan & Scan format (showing pictures cut at the right and left ends).
9 Displays the Parental Lock screen.*

(See
10 Keep "Auto" to use.*

- *1 Disabled when a DVD is being played.
Language Setup
Selects a language you use for the speech and menus.
1 Select the language item to set
See

2 Display the Language Setup screen

1 Enters a language code.
② Cancels the language setup and returns to the "DVD Setup 1" screen.
3 Sets the original audio language.
(It appears during Audio Language setup.)
4 Sets the language and returns to the "DVD Setup 1" screen.
(It appears after you have entered a language code.)
5 Clears the language code.
3 Enter a language code
See
4 Set the language you use

Parental Level Setup
Sets a parental level.
1 Display the Parental Level code number screen
See

2 Enter the code number
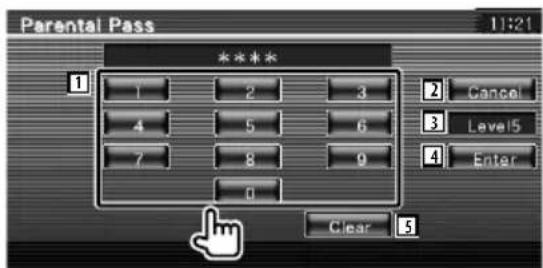
1 Enters a code number.
② Cancels the current setup and returns to the "DVD Setup 2" screen.
3 Indicates the present parental lock level.
4 Determines the code number and displays the Parental Level setup screen.
5 Clears the code number.

• The number you enter first is set as your code number.
- You can clear the code number by pressing the Reset button.
3 Display the Parental Level Setup screen
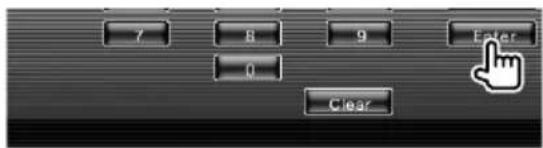
4 Select a parental level and complete the setup
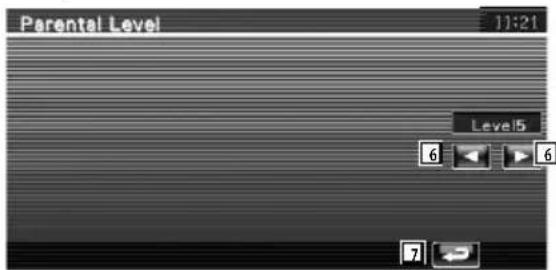
6 Selects a parental level.
7 Complete the parental level setup and returns to the "DVD Setup 2" screen.

- If a disc has higher parental lock level, you need to enter the code number.
- The parental lock level varies depending on a loaded disc.
- If a disc has no parental lock, anybody can play it back even when you have set the parental lock.
DivX Setup
Checks the registration code. This code is needed when making a disc which has DRM (Digital Rights Management).
1 Display the DivX Setup screen
Touch DIVX(R) SETUP in the "Setup Menu" screen (page 58).
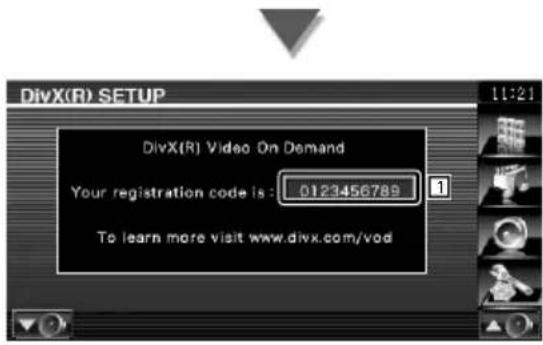
1 Displays the registration code.

- When downloading a DivX VOD file controlled by DRM, register the code appeared on the screen such as the one above. Otherwise the file may not be able to play with this unit. Remaining number of viewing is displayed when playing a DivX VOD file with the viewing restriction. When the remaining number of viewing reached 0, a warning message appears and the file cannot be played.
System Setup
You can set up the system parameters.
1 Display the System Setup screen
Touch "System SETUP" in the "Setup Menu" screen (page 58).
2 Setup each item
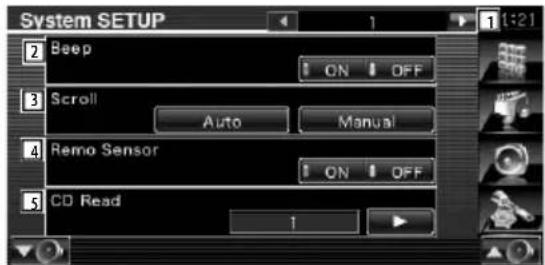
1 Moves to the "System Setup 2" screen.
2 Turns the key touch tone On or Off.
("ON")
3 Allows scrolling of text display on the Source Control screen. (Auto)
"Auto": Scrolls the screen automatically.
"Manual": Allows you to scroll the screen manually.
4 Selects a remote control signal. (ON) When turned "OFF", the remote control of TV reception is rejected.
5 Sets a music CD playback. (☐ "1")
"1": Automatically recognizes and plays back an Audio file disc, a DVD or a music CD.
"2": Forcibly plays back a disc as a music CD. Select "2" if you wish to play a music CD having a special format or if you cannot play a disc in the "1" position.

- You cannot play an Audio file/VCD disc in the "2" position. Also, you may not play some music CDs in the "2" position.
- Your setup is disabled when the disc is being played.

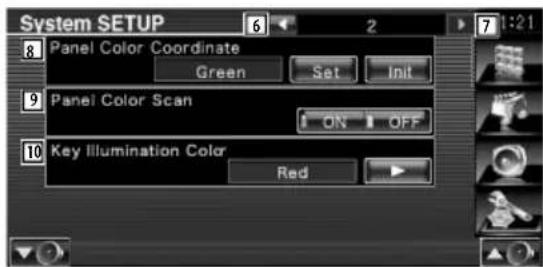
6 Returns to the "System Setup 1" screen.
7 Moves to the "System Setup 3" screen.
8 Sets the button illumination color.
See
9 When set to "ON", the illumination color of the screen and buttons changes one after another.
10 Select an illumination color of receiver buttons. (Red)
"Green": Green
"Red": Red

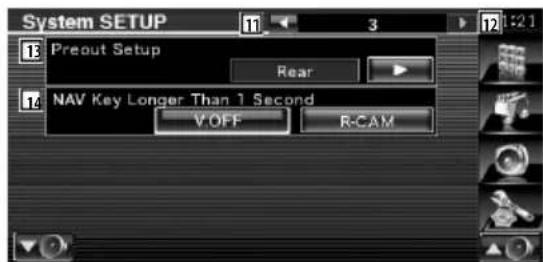
11 Returns to the "System Setup 2" screen.
12 Moves to the "System Setup 4" screen.
13 Sets the Preout output. (Settable only when in Standby mode)
"Rear": Rear sound is output.
"Sub": Subwoofer sound is output.
14 Sets the function of the [NAV] button.
"V. OFF": Press the [NAV] button for more than 1 second to turn the display off.
"R-CAM": Press the [NAV] button for more than 1 second to switch to rear view.


15 Returns to the "System Setup 3" screen.
16 Selects a picture display time. (➤ "Long") The Display of a JPEG picture is changed. ("Short", "Middle", "Long")
Panel Color Coordinate
Sets the screen and button illumination color.
1 Display the Panel Color Coordinate screen

See
2 Select a color

1 Sets to the touched color.
2 Sets and registers favorite color.
3 Returns to the "System Setup 2" screen.
To register your original color
1 Start the RGB coordinate
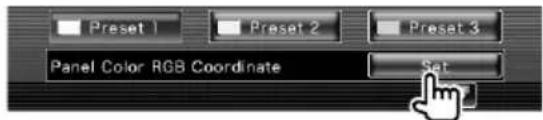
2 Adjust the each color value

1 Selects a preset number to register.
2 Adjusts the Red value.
3 Adjusts the Green value.
4 Adjusts the Blue value.
5 Returns to the "Panel Color Coordinate" screen.
3 Select a Preset number to register
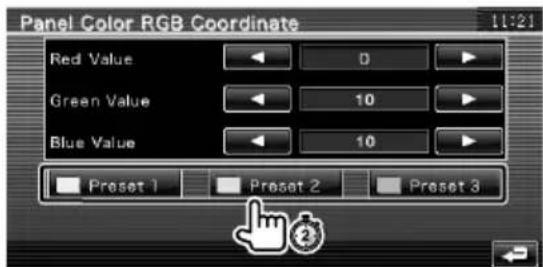
Adjusted color is registered to the selected Preset button.
4 Complete the color coordination
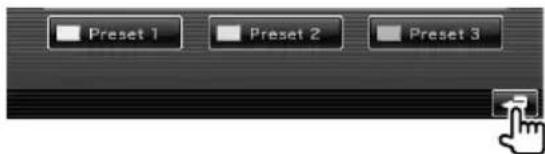
AV Interface Setup
You can set audio and visual (AV) interface parameters.
1 Display the AV Interface screen
Touch "AV Interface" in the "Setup Menu" screen (page 58).
2 Setup each item

① Moves to the "AV Interface 2" screen.
2 Sets a name to be displayed when you select a system that is connected via the AV INPUT port. (VIDEO")
When using the rear view camera, set it to "R-CAM".
3 Sets an image display of the system that is connected via the AV INPUT port. (OFF")
"OFF": When the image source is switched, an image entered via the AV INPUT port is displayed.
"ON": When an image signal is entered via the AV INPUT port, this image is displayed.
4 Selects a navigation system connection. (RGB")
"RGB": Allows the Kenwood's Navigation System to connect via the AV INPUT port.
"AV-IN": Allows a third-party navigation system to connect via the AV INPUT port.
"Off": Must be used if no navigation system is connected. (The navigation display is cancelled when the AV source is switched.)


5 Returns to the "AV Interface 1" screen.
6 Moves to the "AV Interface 3" screen.
7 Selects an AV source to be output at the AV OUTPUT port. (AV-IN")

- When in DVD source, "AV-OUT" cannot be set to USB. Or, when in USB source, "AV-OUT" cannot be set to DVD.
- If "AV-OUT" is set to DVD or USB, the same source video or control screen as the front monitor is displayed in the rear monitor.
- If the front source is switched from DVD (or USB) to another source, the rear source is also switched to the same source as front. In this case, displaying the navigation screen in front monitor allows the rear source to return to the DVD (or USB). Use the easy control buttons to operate the front source.
8 Sets output of operation screen such as control screen to AV-OUT. Operation screen is not output when set to "Black".
(Through")
9 Sets a method to switch to the rear view camera video display. (OFF)
"ON": Switches to the rear view camera video display when engaging the shift knob of car to "Reverse".
"OFF": Switches to the rear view camera video display when engaging the shift knob of car to "Reverse" and then pressing the [NAV] button for more than 1 second.
Make sure to set the AV-IN Name 2 to "R-CAM" to activate R-CAM Interruption function.
10 You can flip the left and right of the rear view camera video display. Set to "ON" and the rear view will be displayed left and right in mirror image on the screen.
(OFF)

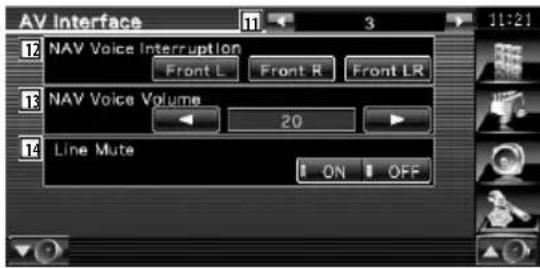
11 Returns to the "AV Interface 2" screen.
12 Selects speakers used for voice guidance of the navigation system. (Front LR")
"Front L": Uses the front left side speaker for voice guidance.
"Front R": Uses the front right side speaker for voice guidance.
"Front LR": Uses both front speakers for voice guidance.
13 Adjusts the volume for voice guidance of the navigation system. (23")
14 Mutes the volume during voice guidance of the navigation system. (ON")
When turned "ON", the volume level drops for voice guidance.
User Interface
You can set up user interface parameters.
1 Display the User Interface screen
Touch "User Interface" in the "Setup Menu" screen (page 58).
2 Setup each item
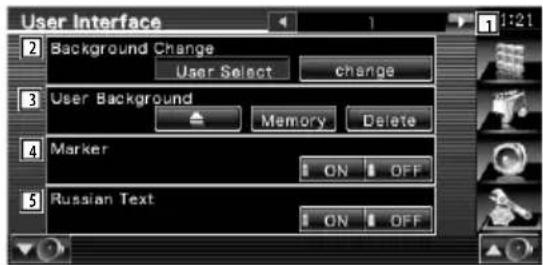
1 Moves to the "User Interface 2" screen.
2 Selects the background to display.
"Change": Displays images entered into this unit. See
3 Enables entering or deleting of background images into or from this unit.
Press to enter the USB suspend mode, and then remove the USB device.
"Memory": Enables entering of background images. See
"Delete": Enables deleting of background image entered into this unit. See
4 Sets whether to display the target when touching the panel.
5 Sets the display method of the unrecognized characters.
"ON": Displays in the Russian character.
"OFF": Displays in the European character.

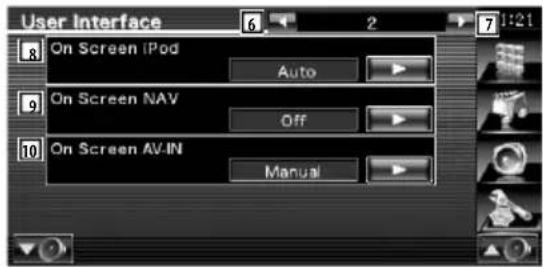
6 Returns to the "User Interface 1" screen.
7 Moves to the "User Interface 3" screen.
8 Sets an on-screen display of the iPod Playback screen. (☐ "Auto")
"Auto": Information is displayed for 5 seconds when updated.
"Manual": Information is displayed when you touch on the screen.
9 Sets an on-screen display of the navigation screen. (☐ "Off")
"Auto": Information is displayed for 5 seconds when updated.
"Off": Information is not displayed.
10 Sets an on-screen display of the AV-IN playback screen. (Auto")
"Auto": Information is displayed for 5 seconds when updated.
"Manual": Information is displayed when you touch on the screen.

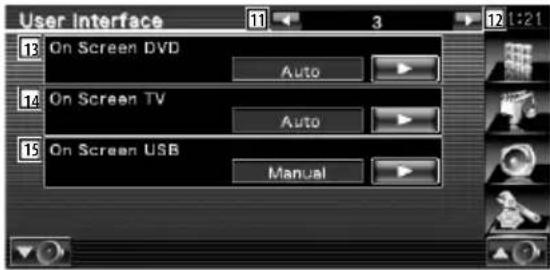
11 Returns to the "User Interface 2" screen.
12 Moves to the "User Interface 4" screen.
13 Sets an on-screen display of the DVD Playback screen. (Auto")
"Auto": Information is displayed for 5 seconds when updated.
"Manual": Information is displayed when you touch on the screen.
14 Sets an on-screen display of the TV screen. (Auto") (with the optional accessory TV tuner connected only)
"Auto": Information is displayed for 5 seconds when updated.
"Manual": Information is displayed when you touch on the screen.
15 Sets an on-screen display of the USB screen. (Manual")
"Auto": Information is displayed for 5 seconds when updated.
"Manual": Information is displayed when you touch on the screen.

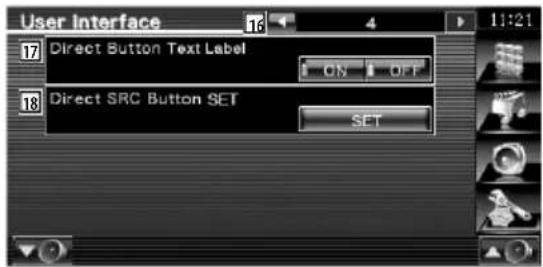
16 Returns to the "User Interface 3" screen.
17 Sets whether to display the name of the


right side of the menu screen.
18 Registers the source displayed in the favorite source screen.
See
Direct Source Button Setup
Registers the source displayed in the favorite source screen.
1 Displays the Direct SRC button Setup screen

See
2 Select a preset button
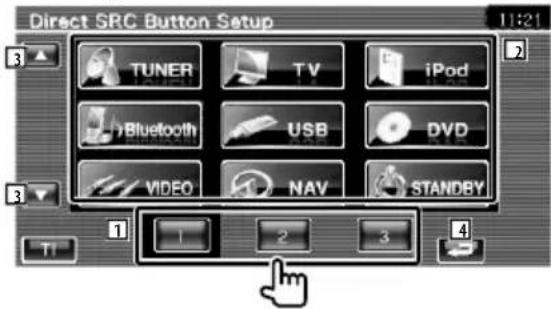
1 Selects the preset button to register.
2 Selects the source to register.
3 Scrolls the source button list.
4 Returns to the "User Interface 4" screen.
3 Select a source to register
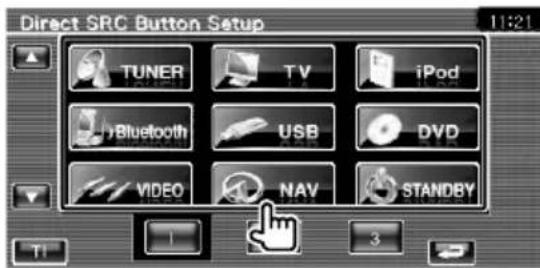
4 Complete the registration
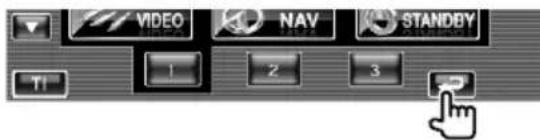
The selected source is registered to the preset button.
Entering Background
Loads a image for background.
1 Connect the device which has the image to load
2 Display the User Interface screen
Touch "User Interface" in the "Setup Menu" screen (page 58).
3 Display the Background Memory screen
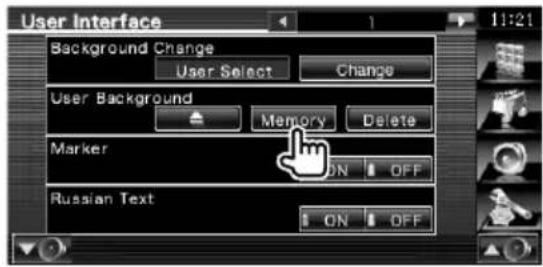
4 Select the image to load

1 Lists the files.
2 Scroll the list.
3 Returns to Media Select screen.
4 Returns to the previous folder.
5 Returns to the "User Interface" screen.
5 Load the image
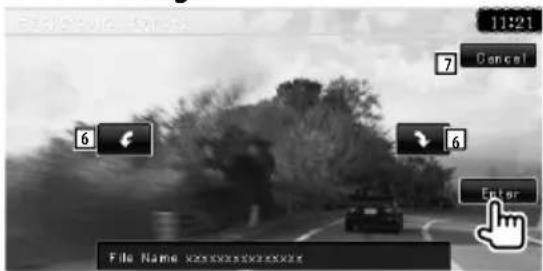
6 Rotates the image.
7 Returns to the Picture Select screen.

• See
- This operation is not possible when USB /DVD is selected as the source.
Background Delete
Deletes the background image.
1 Delete the image you have loaded

2 Confirm

1 Returns to the "User Interface" screen.

- This operation is not possible when USB/DVD is selected as the source.
Background Select
Selects a image for background.
1 Select Background Change screen
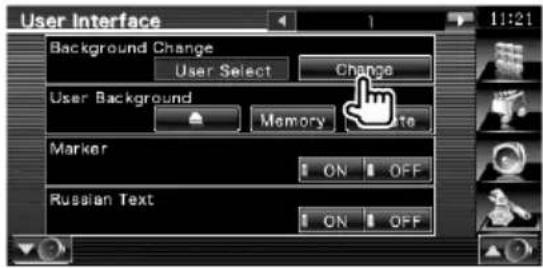
2 Select a image for background

1 Returns to the initial background.
2 Returns to the original screen.
3 Set the image as the background


- This operation is not possible when USB/DVD is selected as the source.
Touch Panel Adjustment
You can adjust the touch panel operations.
1 Display the Touch panel Adjustment screen
Touch Touch in the "Setup Menu" screen (page 58).
2 Start Touch panel setup

3 Adjust the Touch panel
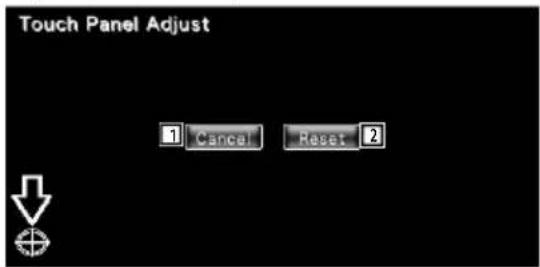
Follow the instruction on the screen and touch the center of
① Cancels the adjustment and returns to the Touch Panel Adjust screen.
2 Resets to the initial status.
Clock Setup
You can adjust the clock time.
1 Display the Clock Setup screen
Touch "Clock" in the "Setup Menu" screen (page 58).
2 Setup the Clock

1 Clock time display
2 Adjusts hours.
3 Adjusts minutes.
4 Sets "00" minute.
Setup examples: 3:00 - 3:29 → 3:00
3:30 - 3:59 → 4:00
5 Sets the clock time in synchronization with the time data sent from the navigation system or the RDS station. (KVT-524DVD/KVT-554DVD/KVT-54DVDR with KNA-G520, KNA-G420, KNA-G421 or KNA-G421V) Sets the clock time in synchronization with the time data sent from the RDS station. (KVT-524DVD/KVT-554DVD/KVT-54DVDR with KNA-DV3200 or KNA-DV2200) When the synchronized mode is set, the clock cannot be adjusted manually.
3 Adjust the clock time
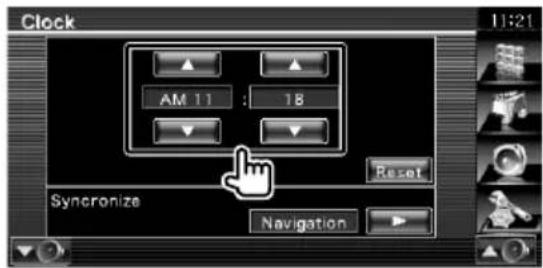
Monitor Setup
You can adjust the position, picture quality and the screen mode of the monitor.
1 Displaying the Monitor SETUP screen
Touch Monitor SETUP in the "Setup Menu" screen (page 58).
2 Setup each item

① Moves to "Angle Control" screen.
2 Brightness control
3 Contrast Control
4 Black Level Adjustment
5 Dimmer Mode Setup
"ON": The display dims.
"OFF": The display doesn't dim.
"SYNC": Turning the Dimmer function On or Off when the vehicle light control switch is turned On or Off.

- In this Screen Control screen, you can perform setups for the menu screen. Setups for videos such as DVD can be performed on the

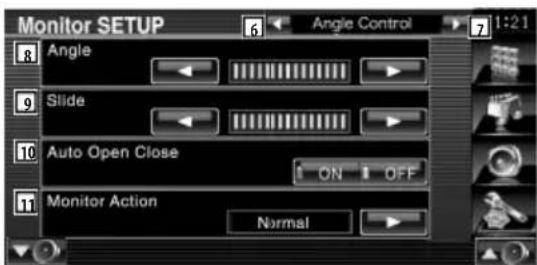
6 Returns to the "Screen Adjust" screen.
7 Moves to "Mode Select 1" screen.
8 Monitor Angle Adjustment
9 Forward/Backward Monitor Position Adjustment
10 Monitor Open/Close Setup
When turned "ON", the monitor is opened or closed automatically when you turn on or off the ignition key.
11 Monitor Action Setup
When set to "Quick", the monitor is opened quickly.

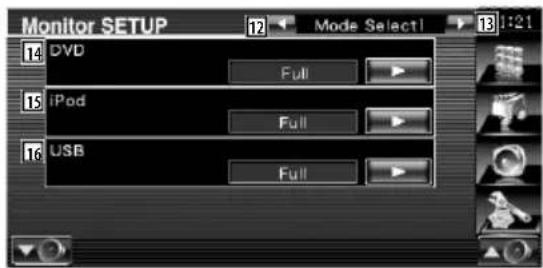
12 Returns to the "Angle Control" screen.
13 Moves to the "Mode Select 2" screen.
14 Selects a screen mode of the DVD playback screen.
You can select any of the following screen mode.
"Full", "Just", "Zoom", "Normal"
15 Selects a screen mode of the iPod VIDEO playback screen.
You can select any of the following screen mode.
"Full", "Just", "Zoom", "Normal"
16 Selects a screen mode of the USB playback screen.
You can select any of the following screen mode.
"Full", "Just", "Zoom", "Normal"

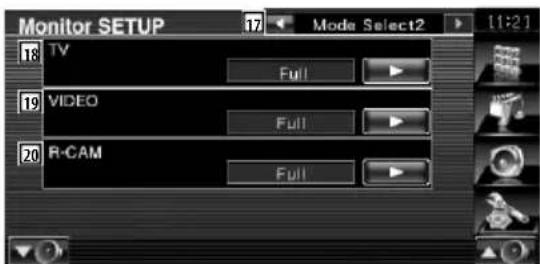
17 Returns to the "Mode Select 1" screen.
18 Selects a screen mode of the TV screen. You can select any of the following screen mode.
"Full", "Just", "Zoom", "Normal"
19 Selects a screen mode of the VIDEO playback screen.
You can select any of the following screen mode.
"Full", "Just", "Zoom", "Normal"
20 Selects a screen mode of the rear view camera (R-CAM) screen.
You can select any of the following screen mode.
"Full", "Just", "Zoom", "Normal"

- When you select the Menu or Navigation, the display is shown in the full-size display mode automatically. The screen mode of these displays cannot be changed.
- The picture quality can be set for each source.
Full picture mode ("Full")

natural_image
Diagram showing a central sphere surrounded by four smaller spheres with dashed lines indicating field lines (no text or symbols)Zoom picture mode ("Zoom")
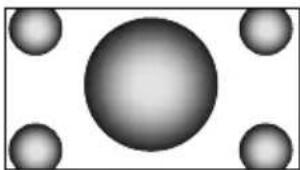
natural_image
Abstract grayscale image of a central sphere surrounded by four smaller spheres in a 2x2 grid (no text or symbols)Justify picture mode ("Just")
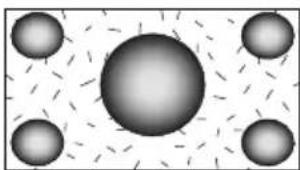
natural_image
Diagram showing a central sphere surrounded by four smaller spheres with dashed lines indicating field lines (no text or symbols)Normal picture mode ("Normal")

natural_image
Diagram showing a central sphere surrounded by four smaller spheres with dashed lines indicating interactions or particles (no text or symbols)Security Code Setup
You can set a security code to protect your receiver system against theft.

- When the Security Code function is activated, the code cannot be changed and the function cannot be released. Note the Security Code can be set as the 4 digit number of your choice.
1 Display the Security Code Setup screen
Touch Security SETUP in the "Setup Menu" screen (page 58).
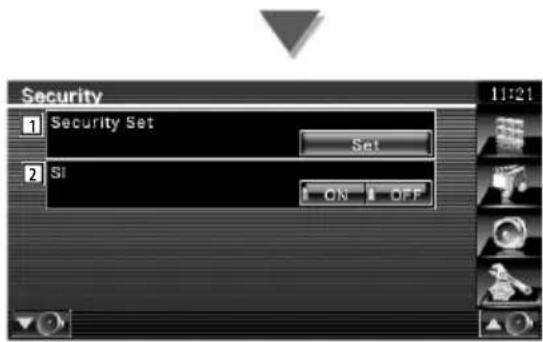
1 Displays the Security code input screen.
2 Turns the SI function on or off.
If turned "ON", the burglar alarm lamp flashes when the vehicle ignition is off.
(ON")
2 Start Security Code setup


- If you have already completed the code registration, Clear is displayed.
3 Enter a security Code

Input four-digit number.
4 Register your security code

5 Reenter the security code
Reenter the same security code as that you have entered in Step 3 for confirmation.

- If you enter a different security code, the screen returns to Step 3 (for the first code entry).
6 Register the security code again

Now, your security code is registered. If you press the Reset button or if you disconnect your receiver from the battery after the code registration, you need to enter the registered security code.
If you have pressed the Reset button or if you have disconnected the Receiver from battery...
1 Enter the correct security code

You must enter the same security code as that you have entered in Step 3.
2 Enter the security code
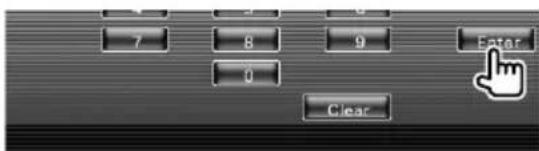
Now, you can use your Receiver.
Deactivating Security Code
To deactivate the Security Code function.
1 Display Security Code Setup screen
Touch Security SETUP in the "Setup Menu" screen (page 58).
2 Start to cancel a registration of the Security Code

3 Enter a security Code

Input by four-digit number.
4 Register your security code

Now, your security code is cleared.
iPod Setup
Performs setup when using iPod.
1 Display the iPod Setup screen
Touch "Pod SETUP" in the "Setup Menu" screen (page 58).
2 Setup each item

1 Sets the Audio book playback speed.
2 Sets Wide Screen on or off.

- "Wide Screen" cannot be set while the iPod is connected.
TV Setup
The TV signal receiving areas can be set. (with the optional accessory TV Tuner connected only)
1 Displaying TV Setup screen
Touch TV SETUP in the "Setup Menu" screen (page 58).
2 Setting up TV
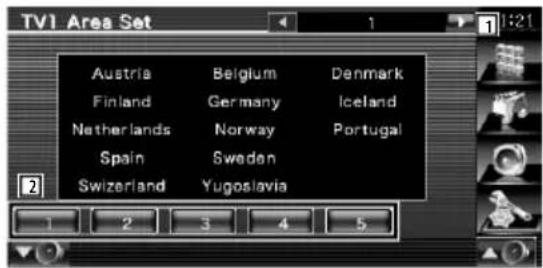
1 Moves to "TV2 Area Set" screen.
2 Sets the present TV1 receiving area.

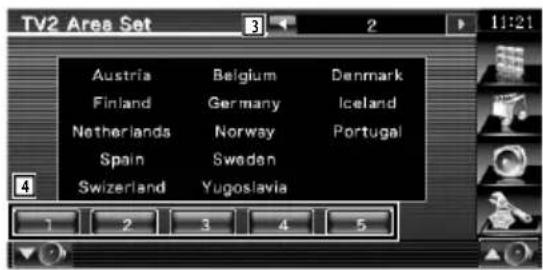
3 Returns to the "TV1 Area Set" screen.
4 Sets the present TV2 receiving area.
RDS Setup
You can set RDS related parameters.
1 Display the RDS Setup screen
Touch "ADS SETUP" in the "Setup Menu" screen (page 58).
2 Setup each item

1 Moves to "RDS Setup 2" screen.
2 Sets a news bulletin interrupt time.
3 Turns the Alternative Frequency function On or Off. (ON")
4 Turns the Region Restriction function On or Off. (ON")
5 Turns the Auto TP Seek function On or Off. (ON")

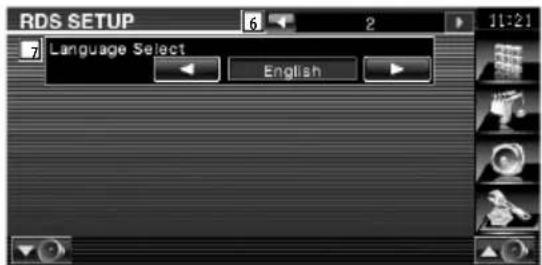
6 Returns to the "RDS Setup 1" screen.
7 Selects a display language for the PTY function.
Bluetooth Setup
Registers and selects Bluetooth unit.
1 Display the Bluetooth Setup screen
Touch Bluetooth SETUP in the "Setup Menu" screen (page 58).
2 Setup each item

1 Sets cell-phone for Hands Free and Audio player for Bluetooth Audio.
② Sets the PIN code of Bluetooth unit to enter when registering (pairing) from the cell-phone or audio player side.
Registering Bluetooth Unit
Registers the Bluetooth unit to be connected.
1 Display the Connect Device List screen

2 Search for a Bluetooth unit

1 Displays the registered Bluetooth unit. Displays the busy service in red. Displays the available service in gray.
2 Scrolls the name of the Bluetooth unit.
3 Searches for Bluetooth unit.
4 Registers Bluetooth unit that cannot be registered by normal register (paring) operation.
5 Returns to the previous screen.

- A new device cannot be registered if there are 5 registered Bluetooth units. Delete unnecessary registration. See
3 Select the Bluetooth unit to register
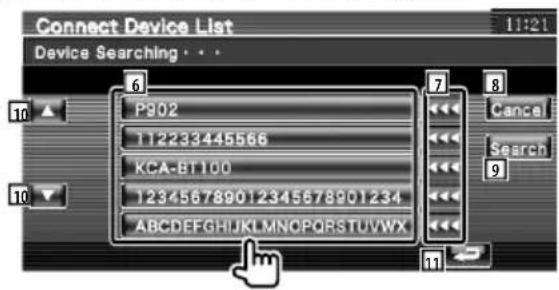
6 Displays the searched Bluetooth unit.
7 Scrolls the name of the Bluetooth unit.
8 Cancels searching of Bluetooth unit.
9 Starts search.
10 Scrolls.
11 Returns to the previous screen.
4 Enter PIN code
Enter the PIN code specified for the Bluetooth unit to register.

12 Enters a code number.
13 Cancels registration of PIN code.
14 Enters PIN code.
15 Clears the code number.

- You can also register from the Bluetooth unit side. For the PIN code necessary for registration, see
(page 76). - If the error message appears even though the PIN code is correct, try
(page 77).
Registering Bluetooth Unit PIN Code
Sets the PIN code of the Bluetooth unit to enter when registering (pairing) from the cell-phone or audio player side.
1 Display the Receiver PIN Code screen

2 Enter PIN code

1 Enters a code number.
2 Cancels registration of PIN code.
3 Enters PIN code.
4 Clears the code number.
Registering Special Bluetooth Unit
Registers Special Bluetooth unit that results in error by normal operation by selecting from model name.
1 Display the Special Device List screen

2 Select a model name

1 Displays the Bluetooth unit name that can be registered.
2 Scrolls the name of the Bluetooth unit.
3 Scrolls.
4 Returns to the previous screen.
3 Confirm whether to register

5 Cancels registration.

- Only models in Bluetooth unit name list can be registered.
4 Go through the procedure of
Bluetooth Unit Connection
Selects the Bluetooth unit to connect.
1 Display the Connect Device List screen

2 Select a registered Bluetooth unit
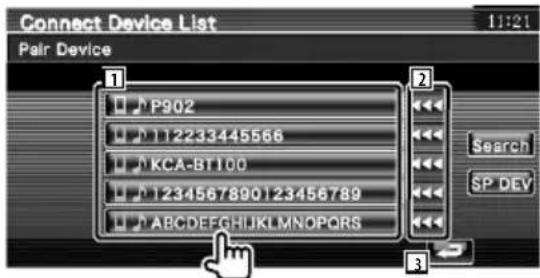
1 Displays the registered Bluetooth unit.
2 Scrolls the name of the Bluetooth unit.
3 Returns to the previous screen.
3 Select the service to use
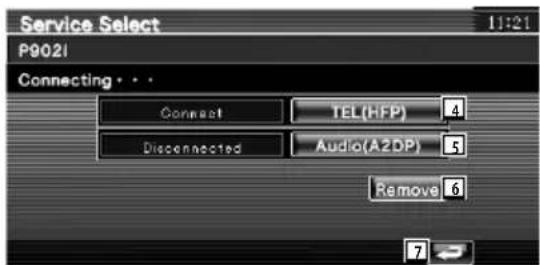
4 Connects/disconnects cell-phone to use for Hands Free.
5 Connects/disconnects Audio player to use for Bluetooth Audio.
6 Deletes registration (pairing).
7 Returns to the previous screen.
Deleting Bluetooth Unit
Deletes the registered Bluetooth unit.
1 Display the Connect Device List screen

2 Select a Bluetooth unit to delete
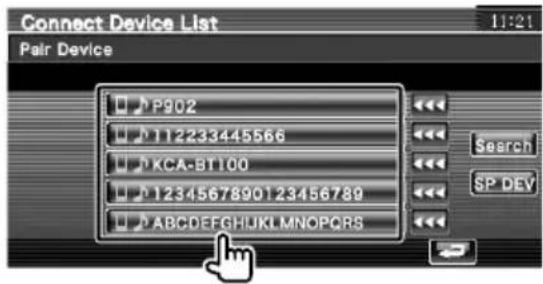
3 Delete the Bluetooth unit
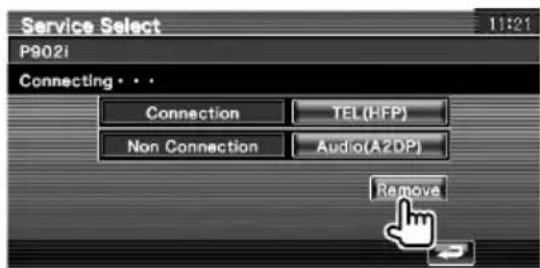
4 Confirm deleting of Bluetooth unit

Software Information
Checks the software version of this unit.
1 Display the Software Information screen
Touch "Software Information" in the "Setup Menu" screen (page 58).

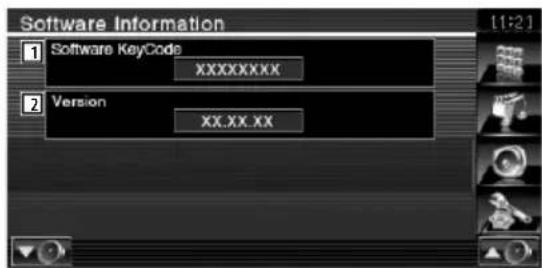
① Displays the software keycode.
2 Displays the software version.
Setup Memory
Audio Setup and AV Interface settings can be memorized. The memorized settings can be recalled at any time. For example, even when the settings are cleared due to replacement of the battery, the settings can be restored.
1 Display the Setup Memory screen
Touch SETUP Memory in the "Setup Menu" screen (page 58).


1 Locks the Audio Setup and AV Interface settings. When [coselected, you cannot set the Audio Setup and AV Interface settings.
② Memorizes or recalls the settings. To cancel the function, touch □ No cancel memorization, touch □ No The "Setup Menu" screen appears again.
2 Start Setup Memory


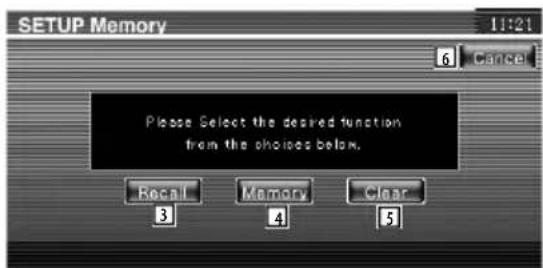
3 Recalls the memorized settings.
4 Memorizes the current Audio Set Up and AV Interface settings.
5 Clears the currently memorized settings.
6 Returns to "Setup Memory" screen.
3 Memorize or recall the settings
When memorizing the Audio Setup and AV Interface settings:
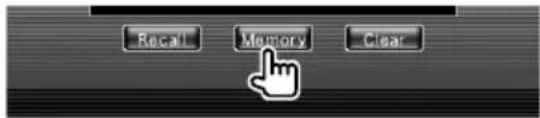
If settings have already been memorized, a confirmation message appears. Touch Yes To cancel memorization, touch No
When recalling the memorized settings:
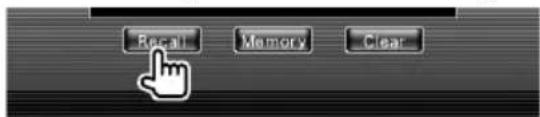
Touching the screen displays a confirmation message. Touch No cancel recalling, touch No
When clearing the currently memorized settings:
Touching the screen displays a confirmation message. Touch No cancel clearing, touch No
4 Quit memorization/recalling of settings

Audio Control Menu
Displays the Audio Control menu to set the sound effect function of this unit.
1 Display the control screen of any source

Touch any source button on the "Source Select" screen.
2 Display the Audio Control menu
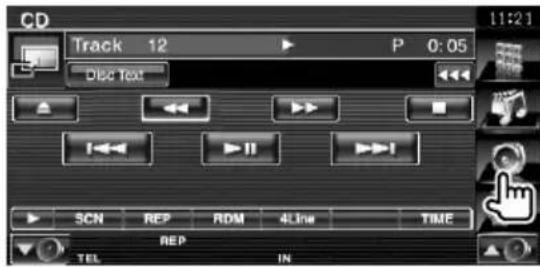
3 Select the Audio Control item

1 Switches to the selected Audio Control screen.
Audio Control
You can adjust the front/rear and right/left audio balance.
1 Display Audio Control screen
Touch "Audio Control" in the "Audio Control Menu" screen (page 80).
2 Set the each item
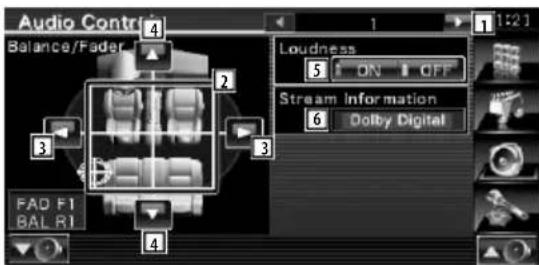
1 Moves to the "Audio Control 2" screen.
2 Adjust the front/back and left/right volume around the touched area.
3 Adjusts the right and left volume balance.
4 Adjusts the front and rear volume balance.*
5 Turns the Loudness control function On or Off.*
If turned "ON", high and low tones are automatically enhanced during low volume.
6 Displays the present source information. The stream (Dolby Digital, dts, Linear PCM, MPEG, MP3, WMA or AAC) is displayed.

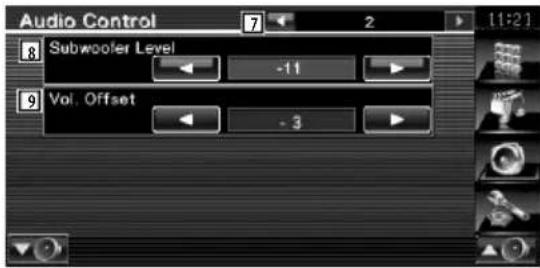
7 Returns to the "Audio Control 1" screen.
8 Adjusts the subwoofer volume.*
9 Adjusts the volume of the present source based on the difference level of original volume.

- * Settable Only when zone function is set to Off. See
(page 82). - If you have increased the volume first, then reduced the volume using the "Vol. Offset", the sound generated if you suddenly switch to another source may be extremely loud.
Equalizer Control
You can set up the equalizer.
1 Display Equalizer Control
Touch Equalizer in the "Audio Control Menu" screen (page 80).
2 Display the Equalizer screen
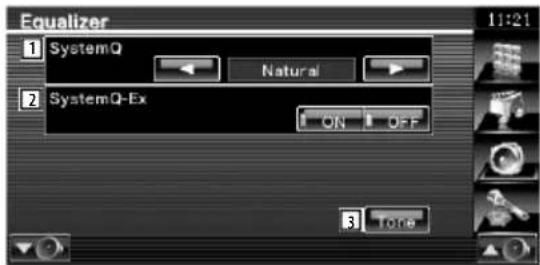
1 Selects an equalizer curve type. You can select any of the following equalizer curves.
• "Natural"
- "Rock"
• "Pops"
- "Easy"
• "Top40"
• "Jazz"
- "User"

- "User" can be selected after tone adjustment is carried out. See
② Selects items to be adjusted for tone curve setup.
If turned "OFF", only Level can be setup for tone curves.
3 Displays the Tone curve setup screen. (page 82)
Tone Setup
You can set a Tone curve.
1 Display the Tone screen

See
2 Set the Tone

1 Tone curve becomes flat.
2 Bass adjustment items are displayed.
3 Middle adjustment items are displayed.
4 Treble adjustment items are displayed.
5 Sets the Center frequency.
6 Sets the level.
7 Sets the Q factor. (Only Bass and Middle can be set)
8 Bass DC Extend settings (Only when Bass is selected)
If turned "ON", it extends the bass center frequency to the low register by approximately 20%.
9 Returns to the "Equalizer" screen.
Zone Control
You can set the front and rear audio source.
1 Display Zone Control
Touch Zone Control in the "Audio Control Menu" screen (page 80).


① Displays the current source.
2 Set the Zone Control
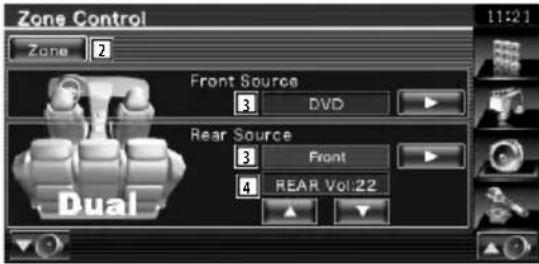
2 Turns the Zone Function (that sets different source sounds for front and rear speakers) On or Off.
3 Sets the front and rear audio source separately.
(This button appears when the Zone function is On.)

- When the rear speaker sound is switched, the audio source that is output at the AV OUTPUT terminal is also switched to the same source.
4 Adjusts the volume of the rear channel. (This button appears when the Zone function is On.)

- There are following limitations when zone function is set to "On".
- There is no output from the subwoofer.
- When "DVD" or "USB" is selected as the front source, the rear source can be selected from "Front" (same source as front), "iPod" or "VIDEO", etc. When the rear source is set to "Front", "DVD" or "USB", the same source screen or control screen is displayed in the rear monitor. See
(page 64).
Remote Controller
For KVT-554DVD/KVT-54DVDR : This unit can be operated using the Remote Controller supplied with this unit.
For KVT-524DVD : Optional Remote Controller KNA-RCDV330 is designed for controlling this unit.

- Put the Remote Controller in a place where it will not move during braking or other operations. A dangerous situation could result, if the Remote Controller falls down and gets wedged under the pedals while driving.
- Do not place the battery near an open flame or heat source. This may cause the battery to explode.
- Do not recharge, short, break up or heat the battery or place it in an open fire. Such actions may cause the battery to leak fluid. If spilled fluid comes in contact with your eyes or on clothing, immediately rinse with water and consult a physician.
- Place the battery out of reach of children. In the unlikely event that a child swallows the battery, immediately consult a physician.
▲CAUTION
- Do not leave the battery near fire or under direct sunlight. A fire, explosion or excessive heat generation may result.
Battery installation
Use two "AAA"/"R03"-size batteries.
Insert the batteries with the + and - poles aligned properly, following the illustration inside the case.
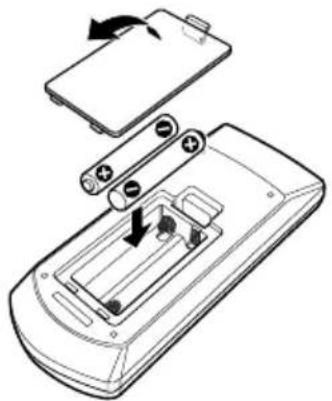
natural_image
Diagram of a battery pack and internal circuit components (no text or symbols)
- If the Remote Controller operates only over shorter distances or does not operate at all, it is possible that the batteries are depleted. In such instances, replace the both batteries with new ones.
Remote Controller mode switch
The functions operated from the remote controller differ depending on the position of the mode switch.
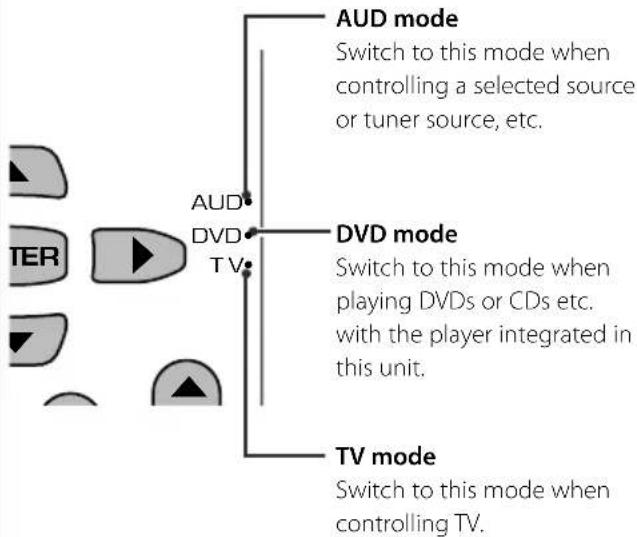
flowchart
graph TD
    A["TER"] --> B["AUD"]
    B --> C["DVD"]
    C --> D["TV"]
    D --> E["TV mode"]
    E --> F["Switch to this mode when controlling TV."]
    G["AUD mode"] --> H["Switch to this mode when controlling a selected source or tuner source, etc."]
    I["DVD mode"] --> J["Switch to this mode when playing DVDs or CDs etc. with the player integrated in this unit."]

- The position of the remote control mode switch is indicated in the title of each mode, e.g., "(AUD mode)".
- When controlling a player that is not integrated in the unit, select "AUD" mode.
Common operations (AUD mode)
Source switching
Switches to the source to be played.

Volume control
Adjusts the volume.

Volume attenuator
Press the key once to lower the volume. Press again to restore the previous volume.

Dual Zone
Switches the Dual Zone function ON and OFF.

Rear volume control
Adjusts volume at rear when the Dual Zone function is ON.

V.SEL
Switches to the navigation screen.
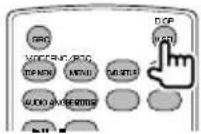
OPEN
Opens or closes the monitor each time you press the key.

Cursor key
Moves the cursor when displaying menu.

ENTER
Enters options.
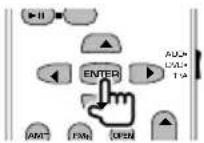
Hands-free communication
When a call comes in, it answers the call.

Function
Switches the function screen.

MODE
Switches the screen mode.
Screen mode changes each time you press this key.
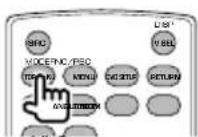
DVD/VCD/CD/Audio files (DVD mode)
Folder search
Selects the folder to be played.

Track search and file search
Selects the track or file to be played.
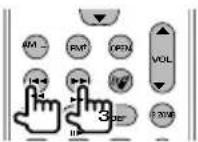
Play/Pause
Pauses the track.
Press again to resume playing.

Stop
Memorizes the last point where the disc stopped. When pressed again, the last point is deleted.

Direct search
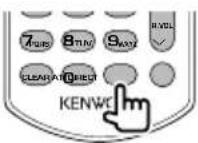
Pressing this button switches the features that can be searched directly.
DVD
Title number
Chapter number
Play time
Item number*
Cancel
* You may not be able to use this function with some discs or scenes.
CD
Track number
Play time
Cancel
Audio files
Folder number
File number
Cancel
VCD 1.X, VCD 2.X (PBC OFF)
Track number
Cancel
VCD 2.X (PBC ON)
Scene number
Number
Cancel
Once you have switched to the direct search feature, specify the search number from the numeric keypad, and then press [ENTER] key.
Numeric keypad

- Specify the number to search in direct search.
- Press 1 2 ABC to fast forward/backward. Switches the fast forward/backward speed each time you press this key.
- Press 4CHI 5JKL to slow forward/backward. Switches the slow playback speed each time you press this key.
DVD Top Menu
Returns to the DVD top menu.

DVD Menu
Displays the DVD menu.
Turns the playback control on or off while playing VCD.

SUBTITLE
Switches the subtitle language.
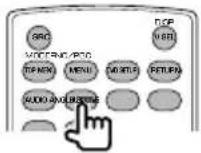
ZOOM
Switches the zoom ratio each time you press this key.

Picture Angle
Switches the picture angle each time you press this key.
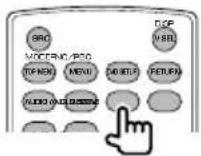
AUDIO
Switch Voice Language
Switches the voice language each time you press this key.

TV (TV mode)
Switching Band/Video
It switches between the station of the TV band to receive and video input.
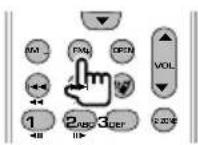
Channel Selection
The TV channel to receive is selected.

Direct tuning
(NTSC TV type only)
Press this key first, and then specify the station to receive with the numeric keypad.
Example: In case of Channel 6 (2-digit)

Numeric keypad

- The number of the memorized station is selected. (1 - 6 MND )
- Press the direct tuning key first, then specify the channel of the station to receive.
Radio (AUD mode)
Band switching
Switches to bands received by the unit.
Station selection
Switches to broadcast stations received by the unit.
Direct tuning
After pressing this key, use the keypad to specify the broadcast station you wish to receive.
Example: 92.1MHz (FM)

Example: 810kHz (AM)

Numeric keypad

- To use preset tuning, press the number of a programmed broadcast station. (1 - 6MNO)
- Press the direct tuning key first, then specify the frequency of the station to receive.
DVD Language Codes
Code Language
| aa Afar | |
| ab Abkhazian | |
| af Afrikaans | |
| am Amharic | |
| ar Arabic | |
| as Assamese | |
| ay Aymara | |
| az Azerbaijani | |
| ba Bashkir | |
| be Byelorussian | |
| bg Bulgarian | |
| bh Bihari | |
| bi Bislama | |
| bn Bengali, Bangla | |
| bo Tibetan | |
| br Breton | |
| ca Catalan | |
| co Corsican | |
| cs Czech | |
| cy Welsh | |
| da Danish | |
| de German | |
| dz Bhutani | |
| el Greek | |
| en English | |
| eo Esperanto | |
| es Spanish | |
| et Estonian | |
| eu Basque | |
| fa Persian | |
| fi Finnish | |
| fj Fiji | |
| fo Faroese | |
| fr French | |
| fy Frisian | |
| ga Irish | |
| gd Scots Gaelic | |
| gli Galician | |
| gn Guarani | |
| gu Gujarati | |
| ha Hausa | |
| he Hebrew | |
| hi Hindi | |
| hr Croatian | |
| hu Hungarian | |
| hy Armenian | |
| ia Interlingua | |
| ie Interlingue | |
| ik Inupiak | |
| id Indonesian |
Code Language
| is Icelandic | |
| it Italian | |
| ja Japanese | |
| jv Javanese | |
| ka Georgian | |
| kk Kazakh | |
| kl Greenlandic | |
| km Cambodian | |
| kn Kannada | |
| ko Korean | |
| ks Kashmiri | |
| ku Kurdish | |
| ky Kirghiz | |
| la Latin | |
| lb Luxembourgish | |
| In Lingala | |
| lo Laotian | |
| It Lithuanian | |
| lv Latvian, Lettish | |
| mg Malagasy | |
| mi Maori | |
| mk Macedonian | |
| ml Malayalam | |
| mn Mongolian | |
| mo Moldavian | |
| mr Marathi | |
| ms Malay | |
| mt Maltese | |
| my Burmese | |
| na Nauru | |
| ne Nepali | |
| nl Dutch | |
| no Norwegian | |
| oc Occitan | |
| om (Afan) Oromo | |
| or Oriya | |
| pa Punjabi | |
| pl Polish | |
| ps Pashto, Pushto | |
| pt Portuguese | |
| qu Quechua | |
| rm Rhaeto-Romance | |
| rn Kirundi | |
| ro Romanian | |
| ru Russian | |
| rw Kinyarwanda | |
| sa Sanskrit | |
| sd Sindhi | |
| sg Sangho | |
| sh Serbo-Croatian |
Code Language
| si Singhalese | |
| sk Slovak | |
| sl Slovenian | |
| sm Samoan | |
| sn Shona | |
| so Somali | |
| sq Albanian | |
| sr Serbian | |
| ss Siswati | |
| st Sesotho | |
| su Sundanese | |
| sv Swedish | |
| sw Swahili | |
| ta Tamil | |
| te Telugu | |
| tg Tajik | |
| th Thai | |
| ti Tigrinya | |
| tk Turkmen | |
| tl Tagalog | |
| tn Setswana | |
| to Tongan | |
| tr Turkish | |
| ts Tsonga | |
| tt Tatar | |
| tw Twi | |
| uk Ukrainian | |
| ur Urdu | |
| uz Uzbek | |
| vi Vietnamese | |
| vo Volapuk | |
| wo Wolof | |
| xh Xhosa | |
| yo Yoruba | |
| zh Chinese | |
| zu Zulu |
Some functions of this unit may be disabled by some settings made on this unit.
! • Cannot set up the subwoofer.
- Cannot set up subwoofer phase.
- No output from the subwoofer.
- Cannot set up the low pass filter.
- Cannot set up the high pass filter.
Subwoofer is not set to On.
! Cannot set up the subwoofer phase.
Subwoofer is not set to On.
- Cannot select the output destination of the subsource in the Dual zone.
- Cannot adjust the volume of the rear speakers.
The Dual zone function is disabled.
! Cannot play audio files.
▶ "CD Read" of
! Cannot Folder select.
▶ The Scan play or Random play function is enabled.
! Cannot perform Repeat play.
▶ The PBC function is enabled.
! • Cannot set up the equalizer.
- Cannot set up the crossover network.
The Dual zone function is enabled.
! Cannot watch the source selected as AV-OUT in the rear monitor.
▶ A source control screen is displayed in front.
▶ "AV-OUT Graphic Output" of
What might seem to be a malfunction in your unit may just be the result of slight misoperation or miswiring. Before calling service, first check the following table for possible problems.
General
? The Touch Sensor Tone doesn't sound.
√ The preout jack is being used.
The Touch Sensor Tone can't be output from the preout jack.
Tuner source
? Radio reception is poor.
√ The car antenna is not extended.
Pull the antenna out all the way.
√ The antenna control wire is not connected.
Connect the wire correctly, referring to the section on
Disc source
? The specified disc does not play, but another one plays instead.
√ The specified disc is quite dirty.
Clean the disc.
√ The disc is severely scratched.
Try another disc instead.
Audio file source
? The sound skips when an Audio file is being played.
√ The media is scratched or dirty.
Clean the media, referring to the CD cleaning of the section on
√ The recording condition is bad.
Record the media again or use another media.
Navigation
? The touch panel control of the navigation system does not work.
√ Navigation software is not the latest version.
Update the navigation software. For how to update the software, refer to the instruction manual of the navigation unit.
When the unit fails to operate correctly, the cause of the failure appears on the display.
Protect :
Protective circuit has been activated because a speaker cord has shorted or it has come in contact with the car chassis.
→ Wire or insulate the speaker cord as appropriate and then push the Reset button (page 6).
Hot Error :
When the internal temperature of this unit rises to 60irc C or more, the protection circuit is activated and you may not be able to operate the unit. At such times this message will appear.
- Use the unit again after reducing the temperature inside the vehicle.
Hold Error :
Activation of the protective circuit when the temperature inside the disc changer is higher than 60 degrees Celsius stops the disc changer from operating. At such times this message will appear.
→ Use when the temperature at the site where the disc changer has been fitted has dropped.
Mecha Error :
The disc player is malfunctioning.
→ Eject the disc and try inserting it again. Contact the Kenwood dealer if this indicator continues blinking or the disc cannot be ejected.
Disc Error :
An unplayable disc is inserted.
Read Error :
Disc is quite dirty.
→ Clean the disc, referring tot he section on
Disc is upside down.
→ Load the disc with the labeled side up.
Region code Error :
The disc you wanted to play has a region code that cannot be played with this unit.
Parental level Error:
The disc you wanted to play has a higher level than the parental level you set.
Error 07-67:
The unit is not operating correctly due to some reason or other.
→ Push the unit's Reset button. If the "Error 07–67" message does not disappear, see your nearest Kenwood dealer.
No Device (USB device)/Disconnected (iPod):
The USB device/iPod is selected as a source although no USB device/iPod is connected.
→ Change the source to any source other than USB/iPod. Connect an USB device/iPod, and change the source to USB/iPod again.
No Music:
The connected USB device contains no playable audio file.
Media was played that doesn't have data recorded that the unit can play.
USB Device Error!!:
The connected USB device is rated a current capacity higher than the allowable limit.
→ Check the USB device.
Some trouble may have occurred to the connected USB device.
→ Change the source to any source other than USB. Remove the USB device.
Authorization Error:
Connection to the iPod has failed.
→ Remove the iPod and then reconnect it.
The unit does not support the iPod.
→ See
Update your iPod:
The iPod's software is an older version which the unit can not support.
→ Confirm that the software for the iPod is the latest version. See
Monitor section
Picture Size
: 6.96 inches (diagonal) wide 154.08 mm (W) x 86.58 mm (H)
Display Sytem
: Transparent TN LCD panel
Drive System
: TFT active matrix system
Number of Pixels
: 336,960 (480H x 234V x RGB)
Effective Pixels
: 99.99 %
Pixel Arrangement
: RGB striped arrangement
Back Lighting
: Cold Cathode Fluorescent Tube
DVD player section
D/A Converter
: 24 bit
Audio Decoder
: Linear PCM/ Dolby Digital/ dts/ MP3/ WMA/ WAV/ AAC
Video Decoder
: Below Measurable Limit
Frequency Response
Sampling frequency; 96 kHz : 20 – 44,000 Hz Sampling frequency; 48 kHz : 20 – 22,000 Hz Sampling frequency; 44.1 kHz : 20 – 20,000 Hz
Total Harmonic Distortion
: 0.010 % (1 kHz)
S/N Ratio (dB)
: 98 dB (DVD-Video 96 kHz)
Dynamic Range
: 98 dB (DVD-Video 96 kHz)
Disc Format
: DVD-Video/VIDEO-CD/CD-DA
Sampling Frequency
: 44.1/ 48/ 96 kHz
Quantifying Bit Number
: 16/20/24 bit
USB interface section
USB Standard
: USB 1.1/2.0 (High speed)
File Sytem
: FAT 16/32
Maximum Power Supply Current
:500 mA
D/A Converter
: 24 Bit
Audio Decoder
Frequency Range (50 kHz)
: 87.5 MHz - 108.0 MHz
Usable Sensitivity (S/N : 26 dB)
: 0.7 μV/ 75 Ω
Quieting Sensitivity (S/N : 46 dB)
: 1.6 μV/75 Ω
Frequency Response (± 3.0 dB)
: 30 Hz - 15 kHz
S/N Ratio (dB)
: 65 dB (MONO)
Selectivity (± 400 kHz)
:≤80dB
Stereo Separation
: 35 dB (1 kHz)
LW tuner section
Frequency Range (9 kHz)
: 153 kHz - 281 kHz
Usable Sensitivity
:45 μV
MW tuner section
Frequency Range (9 kHz)
: 531 kHz - 1611 kHz
Usable Sensitivity
:25 μV
Video section
Color System of External Video Input : NTSC/PAL
External Video Input Level (RCA jacks)
: 1 Vp-p/75 Ω
External Audio Max Input Level (RCA jacks) : 2 V/ 25 kΩ
Video Output Level (RCA jacks)
: 1 Vp-p/75 Ω
Audio Output Level (RCA jacks) : 1.2 V/ 10 kΩ
Analog RGB input
: 0.7 Vp-p/ 75 Ω
General
Operating voltage
: 14.4 V (11 - 16 V allowable)
Maximum Current Consumption
:15A
Dimensions (W × H × D)
: 182 × 53 × 160 mm
Operational Temperature Range
:-10°C-+60°C
Storage Temperature Range
: -20ircC - +85ircC
Weight
: 2.3 kg
Audio section
Maximum Power (Front & Rear)
:50 W×4
Full Bandwidth Power (Front & Rear)
(PWR DIN 45324, +B=14.4V)
: 30 W × 4
Preout Level (V)
: 2 V/10 kΩ
Preout Impedance
:≤600Ω
Speaker Impedance
:4-8Ω
Tone action
Bass : 100 Hz ± 8 dB
Middle : 1 kHz ± 8 dB
Treble : 10 kHz ± 8 dB
Specifications subject to change without notice.
Although the effective pixels for the liquid crystal panel is given as 99.99% or more, 0.01% of pixels may not light or may light incorrectly.
This Product is not installed by the manufacturer of a vehicle on the production line, nor by the professional importer of a vehicle into an EU Member State.
Information on Disposal of Old Electrical and Electronic Equipment and Batteries (applicable for EU countries that have adopted separate waste collection systems)

Products and batteries with the symbol (crossed-out wheeled bin) cannot be disposed as household waste.
Old electrical and electronic equipment and batteries should be recycled at a facility capable of handling these items and their waste byproducts.
Contact your local authority for details in locating a recycle facility nearest to you. Proper recycling and waste disposal will help conserve resources whilst preventing detrimental effects on our health and the environment.
Notice: The sign "Pb" below the symbol for batteries indicates that this battery contains lead.
The marking of products using lasers (Except for some areas)
CLASS 1 LASER PRODUCT
The label is attached to the chassis/case and says that the component uses laser beams that have been classified as Class 1. It means that the unit is utilizing laser beams that are of a weaker class. There is no danger of hazardous radiation outside the unit.
About DivX
DivX is a popular media technology created by DivX, Inc. DivX media Files contain highly compressed video with high visual quality that maintains a relatively small file size. DivX files can also include advanced media features like menus, subtitles, and alternate audio tracks. Many DivX media files are available for download online, and you can create your own using your personal content and easy-to-use tools from DivX.com.
About DivX Certified
DivX Certified products are officially tested by the creators of DivX and guaranteed to play all versions of DivX video, including DivX 6. Certified products qualify for one of several DivX Profiles that designate the type of video the product supports, from compact portable video to high-definition video.
The "AAC" logo is a trademark of Dolby Laboratories.
iPod is a trademark of Apple Inc., registered in the U.S. and other countries.
iPhone is a trademark of Apple Inc.
"Made for iPod" means that an electronic accessory has been designed to connect specifically to iPod and has been certified by the developer to meet Apple performance standards.
"Works with iPhone" means that an electronic accessory has been designed to connect specifically to iPhone and has been certified by the developer to meet Apple performance standards.
Apple is not responsible for the operation of this device or its compliance with safety and regulatory standards.
DivX, DivX Certified, and associated logos are trademarks of DivX, Inc. and are used under license.

is a trademark of DVD Format/Logo Licensing Corporation registered in the U.S., Japan and other countries.
This product incorporates copyright protection technology that is protected by U.S. patents and other intellectual property rights. Use of this copyright protection technology must be authorized by Macrovision, and is intended for home and other limited viewing uses only unless otherwise authorized by Macrovision. Reverse engineering or disassembly is prohibited.
Manufactured under license from Dolby Laboratories.
"Dolby" and the double-D symbol are trademarks of Dolby Laboratories.
Manufactured under license under U.S. Patent #'s: 5,451,942; 5,956,674; 5,974,380; 5,978,762; 6,487,535 & other U.S. and worldwide patents issued & pending. DTS and DTS 2.0 + Digital Out are registered trademarks and the DTS logos and Symbol are trademarks of DTS, Inc. ©1996-2007 DTS, Inc. All Rights Reserved.
KENWOOD

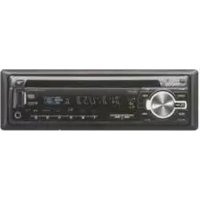
- Declaration of Conformity with regard to the EMC Directive 2004/108/EC
- Muting Audio Volume upon Reception of Phone call 44
- Character Entry 45
- Screen Control 46
- Hands Free Unit Control 47
- Setup Menu 58
- Audio Control 80
- Remote Controller 84
- DVD Language Codes 89
- Help? Troubleshooting 90
- Help? Error 91
- Specifications 92
- How to read this manual
- Seek Mode
- Display Setting
- Manual Memory
- Continue to the next page
- Short Press
- Change in the screen
- Selecting a screen item
- Press 1 second or more
- Other marks
- ▲WARNING
- To prevent injury or fire, take the following precautions:
- How to reset your unit
- Cleaning the Unit
- Lens Fogging
- Handling discs
- Discs that cannot be used
- Other notes
- Navigation units that can be connected to this unit
- iPod/iPhone models that can be connected to this unit
- Bluetooth unit that can be connected to this unit
- TV tuner that can be connected to this unit
- Use of "DualDisc"
- About Audio files
- - Playable Audio file
- - Playable disc media
- - Playable disc file format
- - Playable USB device
- - Playable USB device file system
- - Playing order of the Audio file
- About Video files
- - Acceptable video files
- - Extensions
- - Acceptable media
- About Picture files
- - Acceptable picture files
- About USB device
- Region codes in the world
- Operation regulatory marks
- Discs with limited period of use
- Basic Operations
- B
- Open/Close the monitor
- Turns power ON/OFF
- F
- Listening Traffic Infomation
- A
- Adjusts the volume
- Attenuates the volume
- C
- Playing a disc
- Removing a disc
- D
- Play/ Pause
- D E
- Stop/ play
- G
- Switches Seek Mode
- H
- Select a band/folder
- I
- Select a chapter/scene/track/frequency
- Playing a USB device
- Removing the USB device
- Selecting a source
- The following buttons are always displayed on the source select screen and source control screen.
- Screen Setup
- Switches to the Navigation system
- Switches to the Hands Free control
- Turns the display OFF
- Switching the function screen
- Using the Navigation System
- Setting the navigation system function
- Control of Other Sources While Displaying the Navigation Screen
- When "USB" or "iPod" is selected:
- When "TUNER" is selected:
- When "TV" is selected:
- When "Bluetooth" is selected:
- Functions During the Playback Screen
- Display the playback screen
- Functions When Displaying the Easy Control Panel
- While the source is playing, press the [FNC] button
- Functions While Displaying the Control Screen
- DVD Disc Menu
- Highlight Control
- Select Disc Menu options
- VCD Zoom Control
- Music Disc & Audio File Listening
- Video File/Picture Watching
- Function During Playback Screen
- Picture Control
- Radio Listening
- Auto Memory
- Radio Text
- Select a station
- Display the radio text
- Traffic Information
- Set the Traffic information mode
- When the traffic bulletin starts...
- Search for Program Type
- Enter Program Type mode
- Select a Program Type
- Search a station of the selected Program Type
- Connecting an iPod
- USB Device Control
- Folder Select
- Start Folder Select
- Select music
- Function During TV Screen
- Display the TV screen
- TV Menu (with KTC-D500E (optional accessory) connected only)
- Set Station Name
- Bluetooth Audio Control
- Muting Audio Volume upon Reception of Phone call
- When the telephone is called...
- When the call ends...
- Hang up the phone.
- Character Entry
- How To Use the Character Entry Screen
- Screen Control
- Display Easy Control panel
- Display the Screen Control screen
- Adjust the picture quality
- Control Screen Function
- Display the Hands-Free Control screen
- When Received a Call
- Calling by Entering a Phone Number
- Quick Dialing
- Controlling Tone-based Services
- Display the DTMF input screen
- Calling by Phonebook
- Select the Phonebook search method
- Select the phone number to call
- Make a call
- Making a Call Using Outgoing/Incoming Call Records
- Display the Outgoing Calls or Incoming Calls screen
- Select from calls list
- Make a call
- Calling by Voice Recognition
- Display the Voice Recognition screen
- Utter the voice registered in the PhoneBook
- If you hear another Beep sound:
- Select a Phone number category
- Make a call
- Setting Up the Hands-Free Phone
- Voice Registration
- Select the name to register
- Display the voice registration screen
- Utter the voice to register (1st try)
- Utter the voice to register (2nd try)
- End voice registration
- Key Word Voice Registration
- Display the Key Word List screen
- Select the Phone number category to register
- Display voice registration screen
- Utter the voice to register (1st try)
- Utter the voice to register (2nd try)
- End voice registration
- Phone Number Preset
- Display the Hands Free Preset List screen
- Select the Preset number to register
- Select the search destination of the number to register
- Search phone number to register with each function
- Register phone number
- SMS (Short Message Service)
- Display the SMS Select screen
- Select a function
- Select message to display
- SMS Message screen
- Create a message
- Setup Menu
- Display the control screen of any source
- Display the Setup Menu
- Select the setup item
- Audio Setup
- Display the Audio SETUP screen
- Setup each item
- Crossover Network Setup
- Select the speaker to set the crossover
- Display the Crossover setup screen
- Set the crossover
- DVD Setup
- Display the DVD Setup screen
- Language Setup
- Select the language item to set
- Display the Language Setup screen
- Enter a language code
- Set the language you use
- Parental Level Setup
- Display the Parental Level code number screen
- Enter the code number
- Display the Parental Level Setup screen
- Select a parental level and complete the setup
- DivX Setup
- Display the DivX Setup screen
- System Setup
- Display the System Setup screen
- Panel Color Coordinate
- Display the Panel Color Coordinate screen
- Select a color
- To register your original color
- Start the RGB coordinate
- Adjust the each color value
- Select a Preset number to register
- Complete the color coordination
- AV Interface Setup
- Display the AV Interface screen
- User Interface
- Display the User Interface screen
- Direct Source Button Setup
- Displays the Direct SRC button Setup screen
- Select a preset button
- Select a source to register
- Complete the registration
- Entering Background
- Background Delete
- Background Select
- Touch Panel Adjustment
- Clock Setup
- Display the Clock Setup screen
- Setup the Clock
- Adjust the clock time
- Monitor Setup
- Displaying the Monitor SETUP screen
- Security Code Setup
- Display the Security Code Setup screen
- Start Security Code setup
- Enter a security Code
- Register your security code
- Reenter the security code
- Register the security code again
- Enter the correct security code
- Enter the security code
- Deactivating Security Code
- Display Security Code Setup screen
- Start to cancel a registration of the Security Code
- iPod Setup
- Display the iPod Setup screen
- TV Setup
- Displaying TV Setup screen
- Setting up TV
- RDS Setup
- Display the RDS Setup screen
- Bluetooth Setup
- Display the Bluetooth Setup screen
- Registering Bluetooth Unit
- Display the Connect Device List screen
- Search for a Bluetooth unit
- Select the Bluetooth unit to register
- Enter PIN code
- Registering Bluetooth Unit PIN Code
- Display the Receiver PIN Code screen
- Enter PIN code
- Registering Special Bluetooth Unit
- Bluetooth Unit Connection
- Deleting Bluetooth Unit
- Software Information
- Setup Memory
- Display the Setup Memory screen
- Start Setup Memory
- Memorize or recall the settings
- Quit memorization/recalling of settings
- Audio Control Menu
- Display the Audio Control menu
- Select the Audio Control item
- Audio Control
- Display Audio Control screen
- Set the each item
- Equalizer Control
- Display Equalizer Control
- Display the Equalizer screen
- Tone Setup
- Zone Control
- Remote Controller
- ▲CAUTION
- Battery installation
- Remote Controller mode switch
- Common operations (AUD mode)
- Source switching
- Volume control
- Volume attenuator
- Dual Zone
- Rear volume control
- V.SEL
- OPEN
- Cursor key
- ENTER
- Hands-free communication
- Function
- MODE
- DVD/VCD/CD/Audio files (DVD mode)
- Folder search
- Track search and file search
- Play/Pause
- Stop
- Direct search
- DVD
- CD
- Audio files
- VCD 1.X, VCD 2.X (PBC OFF)
- VCD 2.X (PBC ON)
- Numeric keypad
- DVD Top Menu
- DVD Menu
- SUBTITLE
- ZOOM
- Picture Angle
- AUDIO
- TV (TV mode)
- Switching Band/Video
- Channel Selection
- Direct tuning
- Radio (AUD mode)
- Band switching
- Station selection
- DVD Language Codes
- General
- Tuner source
- Disc source
- Audio file source
- Navigation
- When the unit fails to operate correctly, the cause of the failure appears on the display.
- Protect :
- Hot Error :
- Hold Error :
- Mecha Error :
- Disc Error :
- Read Error :
- Region code Error :
- Parental level Error:
- Error 07-67:
- No Device (USB device)/Disconnected (iPod):
- No Music:
- USB Device Error!!:
- Authorization Error:
- Update your iPod:
- Monitor section
- Picture Size
- Display Sytem
- Drive System
- Number of Pixels
- Effective Pixels
- Pixel Arrangement
- Back Lighting
- DVD player section
- D/A Converter
- Audio Decoder
- Video Decoder
- Frequency Response
- Total Harmonic Distortion
- S/N Ratio (dB)
- Dynamic Range
- Disc Format
- Sampling Frequency
- Quantifying Bit Number
- USB interface section
- USB Standard
- File Sytem
- Maximum Power Supply Current
- Frequency Range (50 kHz)
- Usable Sensitivity (S/N : 26 dB)
- Quieting Sensitivity (S/N : 46 dB)
- Frequency Response (± 3.0 dB)
- Selectivity (± 400 kHz)
- Stereo Separation
- LW tuner section
- Frequency Range (9 kHz)
- Usable Sensitivity
- MW tuner section
- Video section
- Audio section
- Information on Disposal of Old Electrical and Electronic Equipment and Batteries (applicable for EU countries that have adopted separate waste collection systems)
- The marking of products using lasers (Except for some areas)
- CLASS 1 LASER PRODUCT
- About DivX
- About DivX Certified
- KENWOOD
Brand : KENWOOD
Model : KVT-54DVDR
Category : Car Radio