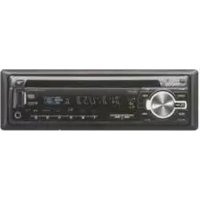
KDV-5544U - Car Radio KENWOOD - Free user manual and instructions
Find the device manual for free KDV-5544U KENWOOD in PDF.


| Product Type | Car Radio with DVD/USB/iPod playback |
| Brand & Model | Kenwood KDV-5544U |
| Dimensions (Installation) | 182 × 53 × 159 mm (W×H×D) |
| Weight | 1.4 kg |
| Operating Voltage | 14.4 V (10.5 – 16 V allowable) |
| Maximum Current Consumption | 10 A |
| Maximum Output Power | 50 W × 4 |
| Speaker Impedance | 4 – 8 Ω |
| Playable Discs | DVD-Video, DVD-R/RW, DVD+R/RW, DVD-R DL, DVD+R DL, Video CD, CD, CD-R/RW, CD-ROM |
| Playable USB Media | Mass storage class USB device (FAT16/32), up to 500 mA |
| Playable File Formats | MP3, WMA, WAV (Linear PCM), MPEG1/2, DivX, JPEG |
| iPod/iPhone Compatibility | iPod nano (1st-4th gen), iPod classic, iPod touch (1st/2nd gen), iPhone, iPhone 3G |
| Tuner Sections | FM (87.5–108 MHz), MW (531–1611 kHz), LW (153–281 kHz) |
| Preout Output (Switchable) | Rear, Subwoofer, or AV output (audio) |
| Audio Features | Preset EQ (Rock, Pops, Jazz, etc.), 5-band manual equalizer, Digital Time Alignment, Crossover, Subwoofer control |
| Security Features | Detachable faceplate, Security code (4-digit) |
| Other Functions | RDS, PTY, Traffic Information, Clock adjustment, Demo mode, Russian character display |
| Maintenance | Clean faceplate with dry soft cloth; clean terminals with dry cloth; avoid volatile liquids |
| Safety Notices | Do not insert metallic objects; fuse rating 10A; disconnect battery during installation |
Frequently Asked Questions - KDV-5544U KENWOOD
User questions about KDV-5544U KENWOOD
0 question about this device. Answer the ones you know or ask your own.
Ask a new question about this device
Download the instructions for your Car Radio in PDF format for free! Find your manual KDV-5544U - KENWOOD and take your electronic device back in hand. On this page are published all the documents necessary for the use of your device. KDV-5544U by KENWOOD.
USER MANUAL KDV-5544U KENWOOD
KDV-5244U KDV-5544U KDV-4244 KDV-4544
INSTRUCTION MANUAL
Kenwood Corporation





Contents
Before use 3
For first use 7
Before using this unit for the first time
Language Setup
DSP Setup
Basic Operation of control panel 8
General functions
Tuner functions
DVD/ USB/ iPod play functions
Function Control/ Setup Menu 10
Clock/ Display Settings 14
Manual Clock Adjustment
Text Display Selection
AV Input Display Setting
Theft Deterrent Faceplate
Disc/ USB Operations of Remote Control 16
Before Use
Playing a Disc
Playing a USB device
Basic Operation
Displaying Status and Control on-screen
DVD-VIDEO Disc Menu
DVD-VR Menu
Video CD PBC Menu
Zoom
Time Search
Direct Search
File Select
iPod Operations of Remote Control 20
Before Use
Playing the iPod
Search Mode
Music disc/Audio file/iPod Operation of Control Panel 21
Music/Video Search
Music/Video Search for iPod
iPod Control by Hand Mode
Basic Operation of Disc Changer (Optional)
Tuner Operation 24
Auto memory entry
PTY (Program Type)
Program Type preset
Changing Language for PTY Function
Other Functions 26
Activating Security Code
Deactivating Security Code
Audio Adjustments 27
Audio Control
Audio Setup
Preset Equalizer Select
Manual Equalizer Control
Position Control
Cabin Selection
Speaker Setting
X'Over Setting
DTA (Digital Time Alignment) Setting
Audio Preset Memory
Audio Preset Recall
Basic Operations of Remote Control 32
Appendix 33
Accessories/ Installation Procedure 36
Connecting Wires to Terminals 37
Installation/Removing the Unit 39
Troubleshooting Guide 40
Specifications 42
About the functions by playback source
In this manual, functions that can be used with various playback sources are indicated as follows:
DVD-V D E O D V E V I D E O i on of DVD-VIDEO playback.
DVD-VR Function of DVD-VR playback.
Video CD Function of Video CD playback.
CD Function of CD (CD-DA) playback.
Audio File Function of Audio file playback.
MPEG/DivX® Function of Video file playback.
JPEG Function of JPEG file playback.
iPod Function of iPod playback.
Before use
▲WARNING
To prevent injury or fire, take the following precautions:
- To prevent a short circuit, never put or leave any metallic objects (such as coins or metal tools) inside the unit.
How to reset your unit
- If this unit or the connected unit (disc auto changer, etc.) fails to operate properly, press the Reset button. The unit returns to factory settings when the Reset button is pressed.

Reset button
Cleaning the Unit
If the faceplate of this unit is stained, wipe it with a dry soft cloth such as a silicon cloth.
If the faceplate is stained badly, wipe the stain off with a cloth moistened with neutral cleaner, then wipe it again with a clean soft dry cloth.

- Applying spray cleaner directly to the unit may affect its mechanical parts. Wiping the faceplate with a hard cloth or using a volatile liquid such as thinner or alcohol may scratch the surface or erases characters.
Cleaning the Faceplate Terminals
If the terminals on the unit or faceplate get dirty, wipe them with a clean soft dry cloth.
Lens Fogging
When you turn on the car heater in cold weather, dew or condensation may form on the lens in the DVD player of the unit. Called lens fogging, this condensation on the lens may not allow discs to play. In such a situation, remove the disc and wait for the condensation to evaporate. If the unit still does not operate normally after a while, consult your Kenwood dealer.
- If you experience problems during installation, consult your Kenwood dealer.
- When you purchase optional accessories, check with your Kenwood dealer to make sure that they work with your model and in your area.
- The characters which can be displayed by this unit are A-Z 0-9 @"^ % & * + - = , . / \ < > [ ] ( ) : ; ^ - { } | \~.
- The RDS feature won't work where the service is not supported by any broadcasting station.
- The illustrations of the display and the panel appearing in this manual are examples used to explain more clearly how the controls are used. Therefore, what appears on the display in the illustrations may differ from what appears on the display on the actual equipment, and some of the illustrations on the display may be inapplicable.
Handlingdiscs
- Do not touch the recording surface of the disc.
- Do not stick tape etc. on the disc, or use a disc with tape stuck on it.
- Do not use disc type accessories.
- Clean from the center of the disc and move outward.
- When removing discs from this unit, pull them out horizontally.
- If the disc center hole or outside rim has burrs, use the disc only after removing the burrs with a ballpoint pen etc.
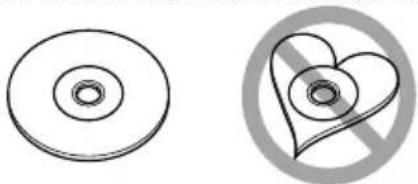
Discs that cannot be used
• Discs that are not round cannot be used.
natural_image
Two abstract circular diagrams with concentric rings and a crossed-out heart symbol (no text or labels)• Discs with coloring on the recording surface or discs that are dirty cannot be used.
- This unit can only play the CDs with disc disc disc disc disc disc disc disc disc disc disc disc disc disc disc disc disc disc disc disc disc disc disc disc disc disc disc disc disc disc disc disc disc disc disc disc disc disc disc disc disc disc disc disc disc disc disc disc disc disc disc disc disc disc disc disc disc disc disc disc disc disc disc disc disc disc disc disc disc disc disc disc disc disc disc disc disc disc disc disc disc disc disc disc disc disc disc disc disc disc disc disc disc disc disc disc disc disc disc disc disk. This unit may not correctly play discs which do not have the mark.
- You cannot play a disc that has not been finalized. (For the finalization process refer to your writing software, and your recorder instruction manual.)
Before use
List of playable discs
| Disc types | Standard Support Remark | ||
| DVD DVD Video | ○ | DTS not supported. | |
| DVD Audio × | |||
| DVD-R | ○ | MP3/WMA/WAV/JPEG/MPEG/DivX Playback | |
| DVD-RW | ○ | Multi-border/Multisession/(Playback depends on authoring conditions) | |
| DVD+R | ○ | Video mode supported | |
| DVD+RW | ○ | VR mode supported (Only DVD-R/RW) | |
| DVD-R DL (Dual layer) | ○ | Only video format | |
| DVD+R DL (Double layer) | ○ | ||
| DVD-RAM × | |||
| CD Music CD | ○ | CD-TEXT | |
| CD-ROM | ○ | MP3/WMA/WAV/JPEG/ | |
| CD-R | ○ | DivX playback | |
| CD-RW | ○ | Multisession supported | |
| DTS-CD × | Packet write not supported. | ||
| Video CD (VCD) | ○ | ||
| Super video CD × | |||
| Photo CD × | |||
| CD-EXTRA | △ | Only music CD session can be played. | |
| HDCD | △ | Sound quality of normal CD music | |
| CCCD × | |||
| Others DualDisc × | |||
| Super audio CD | △ | Only CD layer can be played. | |
O: Playback is possible.
△ : Playback is partly possible.
× : Playback is impossible.

- When buying DRM enabled contents, check the Registration Code in the
Use of "DualDisc"
When playing a "DualDisc" on this unit, the surface of the disc that is not played may be scratched while the disc is inserted or ejected. Since the music CD surface does not conform to the CD standard, playback may be impossible.
(A "DualDisc" is a disc with one surface containing DVD standard signals and the other surface containing music CD signals.)
About Audio files
- Playable Audio file
MP3 (.mp3), WMA (.wma), Linear PCM (WAV) (.wav)

- If music of normal CD and other playback systems are recorded in the same disc, only the playback system recorded at the first setout is played.
- Acceptable media
CD-R/RW/ROM, DVD±R/RW, mass-storage-class USB device, iPod with KCA-iP240V/ KCA-iP101
- Playable disc file format
ISO 9660 Level 1/2, Joliet, Romeo.
• USB device Playable Model
KDV-5244U/ KDV-5544U
- Playable USB device file system
FAT32, FAT16
- iPod Playable Model
KDV-5244U/ KDV-5544U
Although the audio files are complied with the standards listed above, the play maybe impossible depending on the types or conditions of media or device.
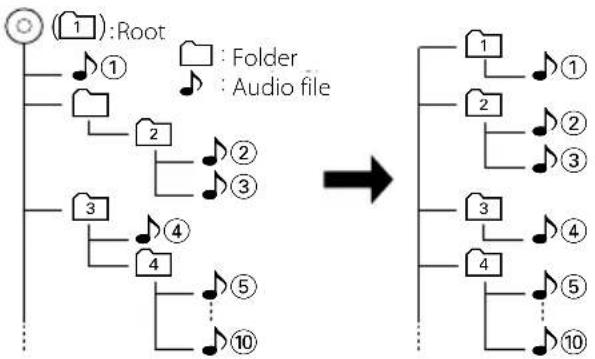
- Playing order of the Audio file
In the example of folder/file tree shown below, the files are played in the order from ① to ⑩.
flowchart
graph TD
    A["Root"] --> B["1"]
    A --> C["2"]
    A --> D["3"]
    A --> E["4"]
    B --> F["Folder"]
    B --> G["Audio file"]
    C --> H["10"]
    D --> I["2"]
    D --> J["3"]
    E --> K["4"]
    E --> L["5"]
    E --> M["10"]
An online manual about audio files is put on the site, www.kenwood.com/audiofile/. On this online manual, detailed information and notes which are not written in this manual are provided. Make sure to read through the online manual as well.
About Video files
- Acceptable video files
MPEG1, MPEG2, DivX
- Extensions
mpg, mpeg, divx, div, avi
- Acceptable media
CD-R/RW/ROM, DVD±R/RW, mass-storage-class USB device, iPod with KCA-iP240V
Acceptable discs, disc formats, USB device file system, file and folder names and playing order are the same as those for audio files. See
About Picture files
- Acceptable picture files
JPEG
- Extensions
jpg, jpeg
- Acceptable media
CD-R/RW/ROM, DVD±R/RW, mass-storage-class USB device
Acceptable discs, disc formats, USB device file system, file and folder names and playing order are the same as those for audio files. See
iPod/iPhone that can be connected to this unit
Made for
- iPod nano (1st generation) • iPod nano (2nd generation)
- iPod nano (3rd generation) • iPod nano (4th generation)
- iPod with video • iPod classic
- iPod touch (1st generation) • iPod touch (2nd generation)
Works with
- iPhone • iPhone 3G

iPhone
4GB 8GB 16GB

iPhone 3G
8GB 16GB
- Update iPod/iPhone software to the latest version.
- You can control an iPod/iPhone from this unit by connecting an iPod/iPhone (commercial product) with Dock connector using an optional accessory iPod connection cable (KCA-iP240V/ KCA-iP101). The word "iPod" appearing in this manual indicates the iPod/iPhone connected with the KCA-iP240V/ KCA-iP101 (optional accessory).
- By connecting your iPod/iPhone to this unit with an optional accessory iPod connection cable (KCA-iP240V/ KCA-iP101), you can supply power to your iPod/iPhone as well as charge it while playing music. However, the power of this unit must be on.

- If you start playback after connecting the iPod, the music that has been played by the iPod is played first.
- You cannot operate iPod if "KENWOOD" or "✓" is displayed on the iPod.
- A video file stops playing if you switch to another source while playing it. You cannot play from the last playback position if you switch back to iPod.
About USB device
- In this manual, the word "USB device" is used for flash memories and digital audio players which have USB terminals.
- When the USB device is connected to this unit, it can be charged up provided that this unit is powered.
• Install the USB device in the place where it will not prevent you from driving your vehicle properly. - You cannot connect a USB device via a USB hub and Multi Card Reader.
- Take backups of the audio files used with this unit. The files can be erased depending on the operating conditions of the USB device. We shall have no compensation for any damage arising out of erasure of the stored data.
- No USB device comes with this unit. You need to purchase a commercially available USB device.
- When connecting the USB device, usage of the CA-U1EX (option) is recommended. Normal playback is not guaranteed when a cable other than the USB compatible cable is used. Connecting a cable whose total length is longer than 5 m can result in abnormal playback.
About DivX
DivX is a popular media technology created by DivX, Inc. DivX media Files contain highly compressed video with high visual quality that maintains a relatively small file size. DivX files can also include advanced media features like menus, subtitles, and alternate audio tracks. Many DivX media files are available for download online, and you can create your own using your personal content and easy-to-use tools from DivX.com.
About DivX Certified
DivX Certified products are officially tested by the creators of DivX and guaranteed to play of DivX video, without DivX 6.
Certified products qualify for one of several DivX Profiles that designate the type of video the product supports, from compact portable video to high-definition video.
Before use
Region codes in the world
The DVD players are given a region code according to the country or area it is marketed, as shown in the following map.
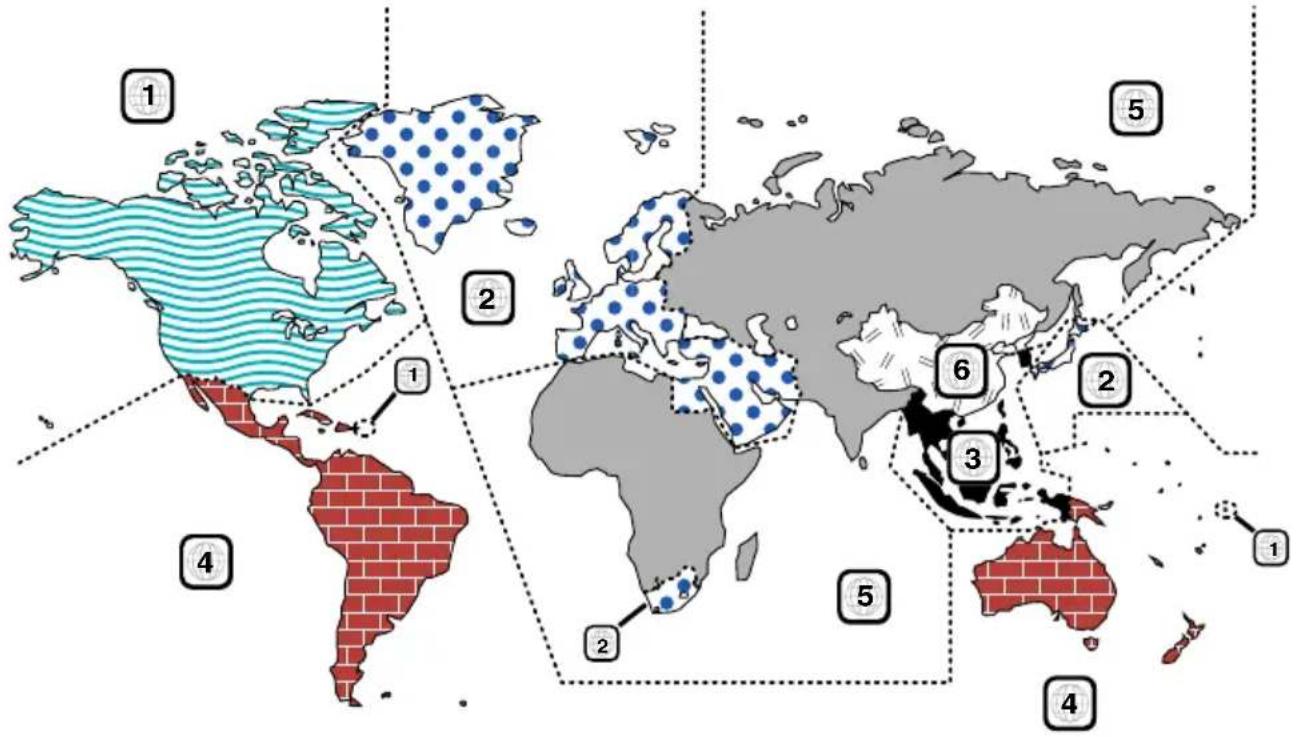
DVD disc marks
| Symbol Description | |
 | Indicates a region number. The discs with this mark can be played with any DVD player. |
 | Indicates the number of audio languages recorded. Up to 8 languages can be recorded in a movie. You can select a favorite language. |
 | Indicates the number of subtitled languages recorded. Up to 32 languages can be recorded. |
 | If a DVD disc has scenes shot from multiple angles, you can select a favorite angle. |
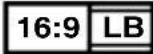 | Indicates the type of screen for the image. The left mark indicates that a wide image picture (16:9) is displayed on a standard TV set screen (4:3) with a black band at both the top and bottom of the screen (letter box). |
Operation regulatory marks
With this DVD, some functions of this unit such as the play function may be restricted depending on the location where the DVD is playing. In this case, the following marks will appear on the screen. For more information, refer to the disc manual.

Discs with limited period of use
Do not leave discs with a limited period of use in this unit. If you load an already expired disc, you may not be able to remove it from this unit.
Before using this unit for the first time
Demonstration mode setting
This unit is initially set on the Demonstration mode. When using this unit for the first time, cancel the Demonstration mode setting.
Display Setting
"DEMO ON" The Demonstration mode function is ON.
"DEMO OFF" Cancel Demonstration mode (Normal mode).
Selecting Russian Characters ^*1
If necessary, select Russian as a text display language.
Display Setting
“RUS ON” Displays texts using Russian characters.
"RUS OFF" Displays texts using European characters.
1 Select Standby
Press the [SRC] button.
Select the "STANDBY" display.
2 Enter Function Control mode
Press the [button for at least 1 second.
"FUNCTION" is displayed.
3 Enter Menu mode
Turn the [AUD] knob to select "MENU".
Press the [AUD] knob.
4 Set the Demonstration mode
Turn the [AUD] knob to select "DEMO".
Press the [AUD] knob for at least 2 seconds.
Select the "DEMO OFF" display.
5 Set the Russian Character\*1
Turn the [AUD] knob to select "RUS".
Press the [I◄◄] or [►►I] button.
6 Exit Function Control mode
Press the [button for at least 1 second.
7 Turning OFF the Power
Press the [SRC] button for at least 1 second.

• *1 Function of KDV-5544U/ KDV-4544
• These settings can be changed later.
Language Setup
Set a language used for screen display, DVD subtitles, etc.
- "Language" item of the Setup menu (page 13)
DSP Setup
To get clear sound, set the sound environment according to the location and size of physically installed speakers with reference to the followings:
- "MENU" > "SWPRE" of
(page 11) - Cabin selection (page 29)
- Speaker Setting (page 29)
• DTA (Digital Time Alignment) setting (page 30)
• X'Over setting (page 30)

- Setting "DSP SET" to "BYPASS" disables the settings related to the DSP function. Refer to "DSP" > "DSP SET" of
Basic Operation of control panel
![[SRC] Release [FM+] [AM-] Disc slot [▲] USB Terminal KENWOOD USB Terminal [DISP] [AUD][ ] [1][2][3][4][5] [6] AV input](/content/2026/06/1183723/images/6fb9d5f1610a014a7b7db64039b0eb91b3d526f5f0e527e524a296f63b46272d.jpg)
General functions
Power/Source Select button: [SRC]
Turns on the power.
When the power is on, the source switches between Tuner ("TUNER"), USB*1 or iPod*1 ("USB" or "iPod"), DVD ("DVD"), AV input ("AVIN"), and Standby ("STANDBY") each time this button is pressed.
Press at least 1 second to turn off the power.
![KENWOOD KDV-5544U - Power/Source Select button: [SRC] - 1](/content/2026/06/1183723/images/fa5a260da0e38a5f7a038f0cfb39686fc14d5ce6f89ff3f46cdc2299a7302f9c.jpg)
- When an optional accessory is connected, the source name for each device appears.
Volume control: [AUD] knob
Turn the knob to adjust the volume.
Subwoofer output: [AM-]
Switches between ON ("SW ON") and OFF ("SW OFF") each time this button is pressed for at least 2 seconds.
![KENWOOD KDV-5544U - Subwoofer output: [AM-] - 1](/content/2026/06/1183723/images/e3d3315b8c1ba4bcacf7ace2f2d0b2ce17514db1b36de3a80c4cbda5758a5b0b.jpg)
- You can do this function when "SWPRE" in
AV input
Connect an external player such as a digital audio player to AV IN jack. Use of the optional cable CA-C3AV is recommended for connecting an external player.

- The AV input requires the setting made in "MENU" > "AVIN" of
Switching display: [DISP]
Changes the information displayed. Refer to page 14 for the details of the display setting.
Text/Title scroll: [DISP]
Scrolls the text display of a CD, audio files or Radio text when pressed for at least 1 second.
Muting volume upon reception of phone call
When there is a call, "CALL" is displayed and the audio system is paused.
When the call ends, "CALL" disappears and the audio system comes back on.
The audio system also comes back on when [SRC] is pressed during a call.

- To use the TEL Mute feature, you need to hook up the MUTE wire to your telephone using a commercial telephone accessory. Refer to
Tuner functions
FM band: [FM+]
Switches between FM1, FM2, and FM3 each time the [FM+] button is pressed.
AM band: [AM-]
Switches to AM.
Tuning: [I◄◄] / [►►I]
Changes the frequency.
![KENWOOD KDV-5544U - Tuning: [I◄◄] / [►►I] - 1](/content/2026/06/1183723/images/38ac5d7ada3ff770b0d7a2c4a6c8826062d94f0569dad18f8ac69eb0aa23eb13.jpg)
- Use the "MENU"> "AUTO1"/"AUTO2"/"MANUAL" in
(page 10) to change the frequency switching. - During reception of stereo stations the "ST" indicator is ON.
Preset memory: [1] - [6]
Memorizes the station selected when pressing for at least 2 seconds.
Preset tuning: [1] - [6]
Recalls the memorized station.
Traffic information: [FM+]
Turns ON or OFF the Traffic Information function when pressing for at least 2 seconds. When the function is turned ON, "TI" indicator is ON.
If traffic bulletin starts when the function is ON, "TRAFFIC" is displayed and traffic information is received.
![KENWOOD KDV-5544U - Traffic information: [FM+] - 1](/content/2026/06/1183723/images/dc1f6331e35d8b59c69ec5a9308ca1582732bc563a9b1ef04da8adc3ef67cdf6.jpg)
- If the volume is adjusted during reception of traffic information, the adjusted volume is memorized automatically. The memorized volume will be applied next time the Traffic Information function is turned ON.
DVD/USB/iPod play functions
Disc play: Disc slot
Starts playing when a disc is inserted.
When a disc is inserted, the "IN" indicator is ON.

- Do not attempt to insert a disc into the slot if another one is already there.
- The unit can only play 12 cm (5 inch) discs. If you insert an 8 cm (3 inch) disc, it will get stuck inside and can cause the unit to malfunction.
Disc ejection: [▲]
![KENWOOD KDV-5544U - Disc ejection: [▲] - 1](/content/2026/06/1183723/images/718b5da9cada5dc39ae867583b83de81c0781a392a825d26f4c7c00ac9edee22.jpg)
- You can eject the disc for 10 minutes after switching off the engine.
USB device/iPod play\* 1: USB Terminal
Connecting a USB device starts playback.

- For the playable audio file, video file, media, and devices, refer to
USB device/ iPod removing\* 1
To disconnect the USB device/ iPod, stop the playback by pressing the [1] button, and then disconnect the USB device/ iPod.
Pause and play: [6]
Switches between pause and play each time this button is pressed.
Stops playing: [1]
Track/File search: [◀◀] / [▶▶]
Changes the chapter/ track/ file when this button is pressed.
Fast reverses or forwards the music while pressing. Pressing these buttons for 5 seconds or longer accelerates the speed of fast-forward or fast-reverse.
![KENWOOD KDV-5544U - Track/File search: [◀◀] / [▶▶] - 1](/content/2026/06/1183723/images/ead3c34dbe707c2889ef06eae936cc8d8fd9314aca0180bb5a43d2533b3f5c49.jpg)
- For the iPod, the fast-forward or reverse speed does not change.
*1 Function of KDV-5244U/KDV-5544U.
Title/ Folder search DVD-VIDEO DVD-VR Audio File MPEG/DivX® JP:GJPEG[FM+]/[AM-]
Changes the title/ folder.
Search mode AudioFileAudioFile MPEG/DivX® JPEGJPEG PodiPod : [9]
After pressing this button, you can quickly search songs with the [AUD] knob. See
Changing the audio channel Video CD : [2]
Changes the audio channel when this button is pressed.
Repeat play: [4]
Each time you press the button, the Repeat Play alternates between the modes.
| DVD-VD | Chapter Repeat ("CHAP REP"), Title Repeat ("TITL REP") and OFF ("REP OFF") |
| DVD-VR | Chapter Repeat ("CHAP REP"), Program Repeat ("PRG REP") and OFF ("REP OFF") |
| Video CD | Track Repeat ("TRAC REP") and OFF ("REP OFF") (Video CD: PBC Off) |
| CD | |
| Audio File | File Repeat ("FILE REP"), Folder Repeat ("FOLD REP"), and OFF ("REP OFF") |
| MPEG/DivX® | |
| JPEG | Folder Repeat ("FOLD REP") and OFF ("REP OFF") |
| PodiPod | File Repeat ("REP ONE"), All Repeat ("REP ALL"), and OFF ("REP OFF") |
Random play Video CD Audio File CD MPEG/DivX® PodiPod : [3]
Randomly plays the track/ file in the disc or folder. When Random Play is turned on, "DISC RDM"/ "FOLD RDM" is displayed.
![KENWOOD KDV-5544U - Random play Video CD Audio File CD MPEG/DivX® PodiPod : [3] - 1](/content/2026/06/1183723/images/fe30486bd5986ba5c522a6b418a8d5a0a5a43ff8b6b3830d94faee34dbb43729.jpg)
• PodiPodDisabled when VIDEO is being played.
All Random play AudioFileAMMEGFDivX® PodiPod[3]
If you press this button for at least 3 seconds while playing a file, all files in the media play at random ("ALL RDM").
Pressing the button again turns the random play off ("RDM OFF").
![KENWOOD KDV-5544U - All Random play AudioFileAMMEGFDivX® PodiPod[3] - 1](/content/2026/06/1183723/images/74a3c858b636734d0ae3733186c9c2cbce40edc65eb1173e4c17b20a6cc2763d.jpg)
- The time required to turn on the all random function may become longer depending on the number of songs in iPod or the folder structure.
- iPodiPod Turning on the all random function changes the iPod browse item to "songs". This browse item will not change even if the all random function is turned off.
- PodiPod If the brows item is changed to search for music while the all random function is on, the all random function is turned off and the songs in the browse item are played at random.
Function Control/ Setup Menu
FunctionControl
Functions in the table below can be set up by using Function Control.
1 Enter Function Control mode
Press the [Q] button for at least 1 second.
"FUNCTION" is displayed.
2 Select your desired setup item
Operation type Operation
| Movement between items | Turn the [AUD] knob. |
| Selection of item Press the [AUD] knob. | |
| Return to previous item | Press the [ 🔒 ] button. |
Repeat selection and determination until your desired setup item is selected.
In this manual, the above selection is indicated as
Press [Q] 1sec., and select "MENU" > "ICON".
Category Function of setup item Condition
| “iPodCTRL”* Allows you to set up iPod Control by Hand Mode. | iPod |
| “DSP” Allows you to set up the sound environment. | SB |
| “MENU” Allows you to set up the environment. — | |
| “RETURN” Exit Function Control mode. | — |
3 Make a setting
Press the [AUD] knob or turn the [AUD] knob to select a setting value, and then press the [AUD] knob.
- The value of items with [AUD] mark can be set by pressing the [AUD] knob.
- The value of items with [I◄◄/►►] mark can be set by pressing the [I◄◄] or [►►] button.
- Some items require you to keep pressing the [AUD] knob for 1 or 2 seconds to set. For these items, the time during which you need to keep pressing the [AUD] knob is displayed in the Entry column in seconds.
4 Exit Function Control mode
Press the [Q] button for at least 1 second.
Displayed item is depending on currently selected source or mode. The mark in Condition column shows the condition to which the item is displayed.
SB: Can be set in other than standby state.
SB : Can be set in standby state.
iPod : Can be set only during playback of the iPod source. (USB source used when the iPod is connected)
DVD : Can be set during DVD source.
Tuner : Can be set during Tuner source.
FM : Can be set during FM reception.
AV IN : Can be set while accessing AV IN or AUX source.
2ZONE : Can be set for sources other than the standby source by setting "2ZON" of
— : Can be set during all sources.

- Refer to the respective page for information on how to set the items with reference page number.
- Only the items available to the current source are displayed.
*Factory setting
*1 Function of KDV-5244U/ KDV-5544U
*2 Function of KDV-5544U/ KDV-4544
"MENU"
| Item | Setting | Entry | Setting overview | Condition | Page |
| "CODE SET"/"CODE CLR" | 1 sec. | Sets/Resets security code. | SB | 26 | |
| "SYNC" | "OFF"/"ON"* | ◀◀/▶▶ | Synchronizes the RDS station time data and this unit's clock. | SB | — |
| "DIM" | "OFF"*/ "ON" | ◀◀/▶▶ | Adjusts the brightness of the display according to the surrounding illumination. | — | — |
| Item Setting Entry Setting overview Condition Page | ||||
| "ICON""OFF"/"ON1"/"ON2"* | ◀/▶ | Sets the Graphics mode of the display. | SB | 34 |
| "SWPRE""R"*/"SW"/"AV" | ◀/▶ | Sets the preout output. | SB | 34 |
| "ZONE2""F"/"R"* | ◀/▶ | Specifies the destination of sub source sound when the Dual Zone function is turned on. | ZONE | 34 |
| "NEWS""OFF"*/"00M"—"90M" | ◀/▶ | Turns ON/OFF the News Bulletin Automatic Reception function and sets the news bulletin interrupt disabled time. | SB | 34 |
| "LO.S""OFF"*/"ON" | ◀/▶ | Searches stations with good reception in auto seek tuning. | FM | — |
| "AUTO1"/"AUTO2"/"MANUAL" | "AUTO1"*/"AUTO2"/"MANUAL" | Selects the tuning mode of the radio. | Tuner | 33 |
| "A-MEMORY" | 2 sec. | Memorizes six stations with good reception automatically. | Tuner | 24 |
| "AF""OFF"/"ON"* | ◀/▶ | When station reception is poor, automatically switches to the station that is broadcasting the same program over the same RDS network. | SB | 33 |
| "REG""OFF"/"ON"* | ◀/▶ | Sets whether to switch to the station only in the specific region using the "AF" control. | SB | — |
| "ATPS""OFF"/"ON"* | ◀/▶ | When traffic information station reception is poor, automatically searches for a station that can be received better. | SB | — |
| "MONO""OFF"*/"ON" | ◀/▶ | Reduces the noise when stereo broadcasts are received as monaural. | FM | — |
| "NAME SET" | 1 sec. | Sets the display when switched to AV IN or AUX source. | AV IN | 15 |
| "RUS"*2 | "OFF"/"ON"* | Selects Russian as the display language. You have to turn the power off after the setting is changed. | SB | 34 |
| "M/V" | Displays the firmware version of Microvision. | DVD | — | |
| "ABOOK"*1 | "SL"/"NM"/"FA" | Sets the audio book playback speed. | iPod | — |
| "SKIP"*1 | "0.5%"*/ "1%"/"5%"/"10%" | Sets the ratio of skip performed with. | iPod | 21 |
| 'iART"* | "OFF"/"ON"* | Specifies whether or not the artworks of the music files are displayed. | iPod | — |
| "FILENAME">"DISC">"USB"*1 | "A/V"/"PIC" | Selects playback file type when a disc or USB contains different types of files.You can make advanced settings in the "FILE TYPE" of the Setup menu. "A" or "V" may appear on the display after setting. | SB | 13 |
| "SCL" | "AUTO"/"MANU"* | When set to "AUTO", scrolls the screen once with the change of the displayed text. | — | — |
| "AVIN""OFF"/"ON1"*/"ON2" | ◀/▶ | Sets whether to display AV IN during source selection. | SB | 33 |
| "OFF" | "-"/"20M"*/"40M"/"60M" | Turns off the power when the preset time has lapsed in the Standby mode. | SB | 34 |
| "DEMO""OFF"/"ON"* | Specifies whether to enable demonstration. | — | 7 | |
" iPodCTRL "
| Item Setting Entry Setting overview Condition Page | |||||
| “iPodCTRL”* | “HANDS ON”/ “MODE OFF”* | AUD | When set to "HANDS ON", allows you to operate iPod with the control on the iPod. | iPod | 22 |
Next page ▶
Function Control/ Setup Menu
"DSP"
| Item Setting Entry Setting overview Condition Page | ||||||
| "CONTROL" "EQ" [AUD] | Sets the sound quality. | SB | 27 | |||
 | Sets the Bass Boost level in two steps. | SB | ||||
| [287H] | Compensates the low volume or bass sound being lost by road noises to make vocal sound clearer. | SB | ||||
| "SETUP" | "CABIN" | [AUD] | Selects the car type to compensate the distance difference between each speaker. | SB | 29 | |
| "SPEAKER" | [AUD] | Sets the connected speaker, speaker size, and installation position. | SB | 29 | ||
| "DTA" | [AUD] | Makes fine adjustment of the compensation value specified at Cabin. | SB | 30 | ||
| "X'OVER" | [AUD] | Makes fine adjustment of the X'Over value specified at Speaker. | SB | 30 | ||
| "PRESET" "RECALL" | [AUD] | Registering the value setup by Sound Control. Recalling the sound setup registered by. | SB | 31 | ||
Setup menu of remote control
By using the Setup menu, you can make various adjustments to items such as picture and sound. You can also set a language for the subtitles and the Setup menu, among other things.
1 Select DVD or USB source Press the [SRC] button.
Select the "DVD" or "USB"* display.
2 Press the [■] button.
3 Enter Setup menu mode Press the [SETUP] button.
![LANGUAGE MENU LANGUAGE ENGLISH AUDIO LANGUAGE ENGLISH SUBTITLE ENGLISH ON SCREEN LANGUAGE ENGLISH SELECT TO SELECT, USE ENTER TO CONFIRM. TO EXIT, PRESS [SET UP]. ENTER](/content/2026/06/1183723/images/51e58d6006d7a3b954edecf87b3108e2345256c3effcd9adfe0b7fedfaecdf6f.jpg)
4 Press the [◀]/[▶] button to select the menu.
LANGUAGE/ PICTURE/ AUDIO/ OTHER
5 Press the [▲]/[▼] button to select the desired item, and then press the [ENTER] button.
To cancel pop-up menu, press the [RETURN] ↕ button.
6 Press the [▲]/[▼] button to select the desired setting, and then press the [ENTER] button to confirm your selection.
7 Exit Setup menu mode
Press the [SETUP] button.
The Setup menu ends.

- The memory cannot be erased by the Reset button.
*1 Function of KDV-5244U/ KDV-5544U
LANGUAGE A
| Item Setting | |
| MENU LANGUAGE/AUDIO LANGUAGE | Selects the initial disc menu language and audio language.Refer to the language code list (page 35). |
| SUBTITLE | Selects the initial subtitle language or remove the subtitle (OFF). Refer to the language code list (page 35). |
| ON SCREENLANGUAGE | Selects a language for the setup menu and on screen display. |
PICTURE
| Item Setting | |
| MONITOR TYPE | 16:9: Select when a 16:9 wide TV is connected.4:3 LETTERBOX: Select when a standard 4:3 TV is connected. Displays a wide picture with bands on the upper and lower portions of the screen.4:3 PAN SCAN: Select when a standard 4:3 TV is connected. Automatically displays the wide picture on the entire screen and cuts off the portions that do not fit. |
| OSD POSITION | Selects the on-screen bar position on the monitor.1: Higher position.2: Lower position (Guidance below the disc setup menu will disappear.) |
| iPod ARTWORK*1 | ON: Displays the artwork of your iPod.OFF: Does not display the artwork of your iPod. |
AUDIO
| Item Setting | |
| DOWN MIX | SURROUND COMPATIBLE: Uses multi-channel surround audio by connecting an amplifier compatible with Dolby Surround.STEREO: Normally select this. |
| D.RANGE COMPRESSION | You can enjoy a powerful sound at low or middle volume levels while playing a Dolby Digital software.AUTO: Applies the effect to multi-channel encoded software (excluding 1-channel and 2-channel software).ON: Uses this function always. |
OTHER
| Item Setting | |
| DivXREGISTRATION | This unit has its own Registration Code. Once you have played back a disc in which the Registration Code recorded, this unit's Registration Code is overwritten for copyright protection.1. Press the [ENTER] button to show Code.2. Press the [ENTER] button to exit.When downloading a DivX VOD file controlled by DRM, register the code appeared on the screen such as the one above. Otherwise the file may not be able to play with this unit. Remaining number of viewing is displayed when playing a DivX VOD file with the viewing restriction. When the remaining number of viewing reached 0, a warning message appears and the file cannot be played. |
| FILETYPE(DISC)/FILE TYPE (USB)*1 | Selects playback file type when a disc or USB contains different types of files.AUDIO: Play Audio file (MP3, WMA, WAV).STILL PICTURE: Play JPEG file.VIDEO: Play Video file (MPEG, DivX).AUDIO+VIDEO: Play Audio or Video file. |
Clock/ Display Settings
Manual Clock Adjustment
1 Select the Clock display
Press the [DISP] button.
2 Enter Clock adjustment mode
Press the [DISP] button for at least 1 second.
The clock display blinks.
3 Adjusting Clock
| Operation type | Operation |
| Adjust the hours | Press the [FM+] or [AM-] button. |
| Adjust the minutes | Press the [|◀◀| or [▶▶] button. |
4 Exit Clock adjustment mode Press the [DISP] button.

- You can do this adjustment when "SYNC" in
Text Display Selection
Changing displayed information on each source following;
In Tuner source
| Information Display | |
| Program Service name (FM) "FREQ/PS" | |
| Radio text (FM) | “R-TEXT” |
| Frequency (MW, LW) | “FREQ” |
| Clock "CLOCK" | |
In DVD/ Video CD source
| Information Display | |
| Title number & Chapter number/Program number & Chapter number | “TNO : CNO”*1“PNO : CNO”*1 |
| Track number & Play time*2 | “P-TIME” |
| Clock “CLOCK” | |
*1 DVD-VIDEO or DVD-VR only
*2 Track number and play time are not displayed with Video CD PBC On.
In CD & External disc source
| Information Display | |
| Disc title | “D-TITLE” |
| Track title | “T-TITLE” |
| Play time & Track number | “P-TIME” |
| Clock “CLOCK” |
In Audio file/ Video file/ JPEG file source
| Information Display | |
| Title & Artist name "TITLE"* | 1 |
| Album name & Artist name "ALBUM"* | 1 |
| Folder name "FOLDER" | |
| File name "FILE" | |
| Play time & File number*1 | "P-TIME" |
| Clock "CLOCK" |
*1 "JPEG" is displayed when a file is JPEG.
In iPod source
| Information Display | |
| Music title & Artist name "TITLE" | |
| Album name & Artist name "ALBUM" | |
| Play time & Music number "P-TIME" | |
| Clock "CLOCK" |
In Standby/ AV input source
| Information Display | |
| Source name "SRC NAME" | |
| Clock "CLOCK" |
Select the text
Press the [DISP] button.

- When you select the clock display, the display setting of each source will be changed to the clock display.
- If the selected display item does not have any information, alternative information is displayed.
- If the iPod Control by Hand Mode is set to on while playing the iPod, "iPodMODE" is displayed.
AV Input Display Setting
Selecting the display when changing to AV IN or AUX source.
1 Select AV IN source Press the [SRC] button. Select the "AVIN" display.
2 Enter AV input display setting mode Press [Q] 1 sec, and select "MENU" > "NAME SET".
Press the [AUD] knob for at least 1 second.
The presently selected AV input display is displayed.
• For how to select Function Control items, refer to
3 Select the AV input display Turn the [AUD] knob.
"AVIN"/ "DVD"/ "PORTABLE"/ "GAME"/ "VIDEO"/ "TV"
4 Exit AV input display setting mode Press the [Qbutton.

- When operation stops for 10 seconds, the name at that time is registered, and the AV input display setting mode closes.
- The AV input display can be set only when the built-in AV input or the auxiliary input of optional KCA-S220A is used. On the KCA-S220A, "AUX EXT" is displayed by default.
Theft Deterrent Faceplate
The faceplate of the unit can be detached and taken with you, helping to deter theft.
Removing the Faceplate Press the Release button.
The faceplate unlocks, allowing you to detach it.

- The faceplate is a precision piece of equipment and can be damaged by shocks or jolts.
- Keep the faceplate in its faceplate case while detached.
- Do not expose the faceplate (and the faceplate case) to direct sunlight or excessive heat or humidity. Also avoid places with too much dust or the possibility of water splashing.
- To prevent deterioration, do not touch the terminals of the unit or faceplate with your fingers.
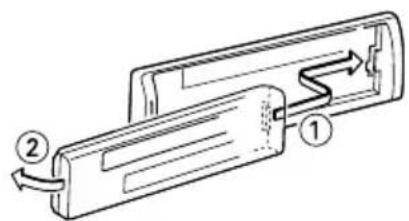
Reattaching the Faceplate Refer to the following diagram when reattaching the faceplate.
Disc/ USB Operations of Remote Control
Before Use
- Turn on the monitor to watch the playback picture. If you turn on the monitor, you can also control playback of other discs by referring to the monitor screen.
- Set the remote controller mode switch to "DVD" mode before starting operation, refer to
(page 32).
Playing a Disc
Inserting a disc in the unit
"READING" appears on the display, and playback starts automatically.
If playback does not start, press [▶II].
In some cases, the disc menu might appear instead.

- The menu screen may be displayed first after loading a DVD or Video CD 2.0 which offers a menu.
- DVDs may have a region code. Your player does not play discs that have a region code different from your player. About the region code, refer to Region code (page 6).
- The playback file may be different depending on the file type set for Audio, Video and JEPG files. (page 13)
Playing a USB device (KDV-5244U/ KDV-5544U)
Connecting the USB device
For a USB device that includes audio files, video files, or photo files, "READING" appears in the display, and playback starts automatically.

- The playback file may be different depending on the file type set for Audio, Video and JEPG files. (page 13)
Basic Operation
Playing or pausing Press the [▶II] button.
Stopping the play Press the [■] button.
Searching for a chapter/ scene/ track/ file Press the [l◄◄] or [►►l] button.
Selecting a title/ folder DVD-V DE-ODVD-VIDEO DIVE-RDVD-VR JPEG Audio FileAudio File Press the [FM+] or [AM-] button.
Fast Forwarding or Fast Backwarding
Press the [◀◀] or [▶▶] button repeatedly to select the required speed.
x2, x5, x10, x20, x60 DVD-VIDEO DVD-VR Video CD CD
Audio FileAudio File
1, 2, 3 MPEG/DivX®
Slow Forwarding or Backwarding DVD-V D: ODVD-VIDEO DVD-VRDVD-VI Video CDVideo CD
1 Press the [▶II] button to pause.
2 Press the [◀◀] or [▶▶] button repeatedly to select the required speed.
1/32, 1/16, 1/8, 1/4, 1/2

- Slow motion playback in reverse is not possible with DVD-VR or Video CDs.
Forward frame-by-frame playback DVD-V DI-ODVD-VIDEO DVD-VRDVD-VI Video CDVideo CD
1 Press the [▶II] button to pause.
2 Press the [▶▶] button.
5 minutes skip MPEG/DivX®
Press the [◀] or [▶] button.
Skips from the head of a file at five-minute intervals. Example: 1:23 → 5:00 → 10:00

- The operation is enabled when the Status and Control bars are not displayed.
Camera angle DVD-V D ODVD-VIDEO
If the disc contains scenes recorded at different camera angles, you can change to a different camera angle during playback.
Press the [ANGLE] button repeatedly during playback to select a desired angle.
The number of the current angle appears on the display.
Subtitles DVD-VIDDVD-VIDEO DMPBRODMEVR
Press the [SUBTITLE] button repeatedly during playback to see the different subtitle languages.
Changing the audio stream DVD-V D: ODVD-VIDEO DVD-VRDVD-VR MPEG/DivX®
Press the [AUDIO] button repeatedly during playback to hear a different audio stream.
Changing the audio channel Video CDVideo CD
Press the [AUDIO] button repeatedly during playback to hear a different audio channel (STEREO, Left or Right).
Displaying Status and Control
on-screen DVD-VIDEO DVD-VR Video CD MPEG/DivX® JPEGJPEG
You can display various information about the disc loaded on-screen.
Example: DVD-VIDEO

Status bar
① Disc type
2 DVD: Audio signal format type and channel
Video CD: PBC
3 Playback mode
"T.RPT" (Title/ Track repeat), "C.RPT" (Chapter repeat), "PG.RPT" (Program repeat), "F.RPT" (Folder repeat)
"F.RND" (Folder random), "A.RND" (All random)
4 Playback information "T" (Title/ Track), "C" (Chapter), "PG" (Program), "PL" (Play list), "F" (Folder/ File)
5 Time indication
6 Playback status "▶" (Play), "■" (Pause), "■" (Stop), "▶▶"/"◀◀" (Forward/reverse search), "▶"/"◀Forward/ reverse slow-motion)
Control bar
| Format | Icon | Operation |
| DVD-V D ODVD-VMEO | Switches the Chapter time ("TIME"), remaining chapter ("REM"), Title time ("TOTAL"), and remaining title ("T.REM"). | |
| Refer to(page 18). | ||
| Direct Title Search. | ||
| Direct Chapter Search. | ||
| Switches the Chapter repeat ("CHAPTER"), Title repeat ("TITLE"), and repeat off ("OFF"). | ||
| Changes the audio stream. | ||
| Changes the subtitle language. | ||
| Changes the camera angle. | ||
| DVD-VRDVD-VMEME | Switches the Program/ Play list time ("TOTAL"), remaining program/ play list ("T.REM"). | |
| Refer to(page 18). | ||
| Direct Chapter Search. | ||
| Switches the Chapter repeat ("CHAPTER"), Program repeat ("PROGRAM"), and repeat off ("OFF"). | ||
| ○ | Changes the audio stream. | |
| ☐ | Changes the subtitle language. | |
| Video CD video | TIME | Switches the Track time ("TIME"), remaining track ("REM"), Disc time ("TOTAL"), and remaining disc ("T.REM"). |
| → | Refer to(page 18).* | |
| TRACK→ | Direct Track Search.*1 | |
| RPT | Switches the Track repeat ("TRACK"), and repeat off ("OFF).* | |
| RND | Switches the Disc random ("ALL"), and random off ("OFF).* | |
| ○ | Changes the audio channel. | |
| MPEG/DivX® | RPT | Switches the File repeat ("TRACK"), Folder repeat ("FOLDER"), and repeat off ("OFF"). |
| RND | Switches the Folder random ("FOLDER"), All random ("ALL"), and random off ("OFF"). | |
| ○ | Changes the audio language. | |
| ☐ | Changes the subtitle language. | |
| JPE GJPEG | RPT | Switches the Folder repeat ("FOLDER"), and repeat off ("OFF"). |
*1 While PBC is not in use.
1 Press the [OSD] button during playback.
Pressing the button repeatedly selects Status bar, Status & Control bar, and Status bar off sequentially.
2 Press the [◀] or [▶] button during control bar on-screen to select an item. Press the [ENTER] button.
To cancel pop-up menu, press the [RETURN] button.
3 Press the [▲] or [▼] button to change or select the setting. Press the [ENTER] button.
![KENWOOD KDV-5544U - Press the [▲] or [▼] button to change or select the setting. Press the [ENTER] button. - 1](/content/2026/06/1183723/images/02e2a1f2fedfd5135a968d44d05d5e3275c6b26f0a78a8943d889a0507de32f9.jpg)
- If any button is not pressed for a few seconds, the on-screen display disappears.
DVD-VIDEO Disc Menu
DVDs may offer menus that allow you to access special features.
1 Press the [MENU] button
The disc menu is displayed.
2 Use the [▲]/[▼]/[◀]/[▶] button to highlight your selection, then press the [ENTER] button.
3 To return to the first menu feature, press the [TOP MENU] button again.
4 To remove the disc menu, press the [MENU] button again.
DVD-VR Menu
Selects an option from the DVD-VR Disc menu.
1 Press the necessary operation button In case of Program list : [TOP MENU] In case of Play list : [MENU]
| ORIGINAL PROGRAM | ||||
| No | Date | Ch | Time | Title |
| 1 | 25/04/07 | 4ch | 19:00 | Kenwood |
| 2 | 17/05/07 | 8ch | 10:30 | |
| 3 | 22/05/07 | 8ch | 17:00 | Musical Festival |
| PLAY LIST | ||||
| No | Date | Chap | Length | Title |
| 1 | 25/05/07 | 001 | 1:03:16 | Kenwood |
| 2 | 17/06/07 | 005 | 1:35:25 | |
| 3 | 20/06/07 | 003 | 0:10:23 | Favorite music |
2 Use the [▲] or [▼] button to highlight your selection, then press the [ENTER] button
To remove the disc menu, press the [MENU] ☑ button or the [TOP MENU] button again
Video CD PBC Menu
Press [RETURN] to return to the menu screen.
Menu settings and operating procedures may differ. Follow the instructions on the each menu screen.
Canceling the PBC playback
1 Press the [■] button to stop
2 Press the [DIRECT] button
3 Press the number buttons
4 Press the [ENTER] button
To resume PBC, press [TOP MENU] or [MENU].
Zoom
The zoom function allows you to enlarge the video image.
DVD-VIDEO DVD-VR Video CD MPT GMPEG
Press the [ZOOM] button repeatedly during playback or in the pause mode to enlarge the image.
OFF, 1 - 6
You can move through the zoomed picture ☑ using [▲]/[▼]/[◀]/[▶].
JPGJPEG
1 Press the [▶II] button to pause
2 Press the [ZOOM] button repeatedly to enlarge the image
OFF, 1, 2
You can move through the zoomed picture ↗ using [▲]/[▼]/[◀]/[▶].
Time Search DVD-VIDEO DVD-VR Video CD
The Time Search function allows you to start playing at any chosen time on the disc.
1 Press the [OSD] button twice briefly during playback
2 Press the [◀] or [▶] button to select the Time Search icon in the on-screen display. Press the [ENTER] button.
The “_:___:__” appears in the Time Search box.
3 Press the [▲] or [▼] button to change the number, then press the [◀] or [▶] button to move to the next entry
4 Press the [ENTER] button to confirm the start time
Playback starts from the selected time on the disc. If you enter an invalid time, playback will continue from the current point.
Direct Search
Searching the chapter by entering the number.
1 Select the search mode Press the [DIRECT] button.
Each time you press the button, the search mode alternates between the modes.
DVD-V D: ODVD-WDED Chapter search ("CHAP"), Title search ("TITL"), and Search mode off.
DVD-VRDVD-VR Chapter search ("CHAP"), Program/Play list search ("PRGM"/ "PLST"), and Search mode off.
Video CD Video CD Track search ("TRAC"/"NMBR") and Search mode off.
MPEG/DivX® Track search ("TRAC" or "Track Search"), Folder search ("FOLD" or "Folder Search"), and Search mode off.
JPE GJPEG File search ("FILE", "TRAC" or "Track Search"), Folder search ("FOLD" or "Folder Search"), and Search mode off when pressed while playing a JPEG.
2 Press the number buttons
3 Press the [ENTER] button
![KENWOOD KDV-5544U - Press the [ENTER] button - 1](/content/2026/06/1183723/images/ffc6798c5e6020611e07b1e28173d91c199ab400d2b94ed8cc7b94c9963ed9cb.jpg)
- Direct Search cannot be performed during Random play.
- The Search mode is cleared automatically after approximately 5 seconds.
- "0" is not displayed in the first digit by pressing the [0] button.
Example: “--” → Press [0], [2] → “-2”.
File Select MPEG/DivX® JP-GJPEGAudioFileAudioFile
You can select a file from the list display.

1 Folder list
2 Track information
3 Track list
1 Show the control screen
MPEG/DivX® JPGJPE Press the [■] button to stop. AudioFileAudioFile Automatically appear during play.
2 Press [◀] or [▶] to select "Folder" column or "Track" column MPEG/Div® JPE-GJPEGAudioFileAudioFile
3 Press the [▲] or [▼] button to select a folder or track
4 Start playback
MPEG/DivX® JP-GJPEG Press the [ENTER] button.
AudioFileAudioFile Playback starts automatically.

- An image is displayed at the folder list position when an album art is attached to the tag of a playing audio file.
To select a playback mode
1 Show the Playback mode selection screen Press the [OSD] button.
![KENWOOD KDV-5544U - Show the Playback mode selection screen Press the [OSD] button. - 1](/content/2026/06/1183723/images/3c49036314592eee8302675d4a81b1d9a6e25aa9f02e7ac783fe99f6be83b5ca.jpg)
2 Press the [◀] or [▶] button to select a playback mode MPEG/DivX® Audio leAudioFile
"REPEAT"/ "RANDOM"
3 Press the [▲] or [▼] button to select an item
"REPEAT": Track/File repeat ^4 ("TRACK"), Folder repeat ^*2 ("FOLDER"), and repeat off ("OFF").
"RANDOM"*1: Folder random ("FOLDER"), All random ("ALL"), and random off ("OFF").
*1 Not selectable for JPEG
*2 Not selectable for CD
4 Press the [ENTER] button
List screen
1 Press the [■] button to stop
2 Show the list screen
Press the [MENU] or [TOP MENU] button.
3 Select an item from the folder list
Use [▲]/[▼]/[◀]/[▶] to highlight your selection, and then press the [ENTER] button.
4 Select a track to start playing
Use [▲]/[▼]/[◀]/[▶] to highlight your selection, and then press the [ENTER] or [▶] button.
To go back to the folder list, press the [RETURN] button.
5 To remove the List screen, press the [MENU] button again.
Before Use
• Video output setting of iPod needs to be set on your iPod.
- Turn on the monitor to watch the playback picture. If you turn on the monitor, you can also control playback of other discs by referring to the monitor screen.
- Set the remote controller mode switch to "DVD" mode before starting operation, refer to
Playing the iPod
Connecting the iPod
"READING" appears in the display, and playback starts automatically.
Playing or pausing
Press the [▶II] button.
Stopping the play
Press the [■] button.
Searching for a chapter/ scene/ track/ file
Press the [◀◀] or [▶▶] button.
Fast Forwarding or Fast Backwarding
Press the [◀◀] or [▶▶] button.
Search Mode
You can select a file from the list display.

1 Category list
② Track information
3 Track list
1 Enter Search mode Press the [TOP MENU] or [MENU] button.
2 Select an menu item Press the [▲] or [▼] button to select an menu Music/ Videos/ Shuffle Songs
3 Search for music/video
Operation type Operation
| Movement between items Press the [ ▲] or [▼] button. | |
| Selection of item Press the [ENTER] or [ ▶] button. | |
| Return to previous item Press the [ ◀] or [MENU] button. | |
| Return to Top menu Press the [TOP MENU] button. | |
| Cancelling the Search mode Press the [RETURN] button. |

- An image is displayed in the category list when a playing song has artwork with "MENU" > "iART" (page 11) of the
set to ON. - It takes some seconds to read artwork. You cannot operate during the read operation.
To select a playback mode
1 Show the Playback mode selection screen Press the [OSD] button.
![KENWOOD KDV-5544U - Show the Playback mode selection screen Press the [OSD] button. - 1](/content/2026/06/1183723/images/603e9d900b426afebfc88c430b4ccf70344ccfaceed76564e81cdb917732b642.jpg)
2 Select a playback mode Press the [◀] or [▶] button.
"REPEAT"/ "RANDOM"/ "AUDIO BOOK"
3 Select an item
Press the [▲] or [▼] button.
"REPEAT": File repeat ("ONE"), All repeat ("ALL"), and repeat off ("OFF").
"RANDOM": Song random ("SONGS"), Album random* ("ALBUMS"), and random off ("OFF").
"AUDIO BOOK": Normal speed ("NORMAL"), Faster speed ("FASTER"), and Slower speed ("SLOWER").
4 Press the [ENTER] button
![KENWOOD KDV-5544U - Press the [ENTER] button - 1](/content/2026/06/1183723/images/2b2bcc168e878d6a357daa77f2b4c5669942e7793c832a94ccf2f0dc851e610a.jpg)
- * Functions only if you select "All Albums" or "All" in "Albums" of the main "MENU".
Music disc/Audio file/iPod Operation of Control Panel
Music/VideoSearch Audio FileAudioFile MPEG/DivX®
JPEGJPEG
Selecting the track/ file you want to listen to from the device or media being played now.
1 Enter Music/Video Search mode
Press the [Qbutton.
"SEARCH" is displayed.
Displays the current Audio file name.
2 Search for track/ file
Audio TheAUMREGBivX® JPEGJPEG
| Operation type Operation | |
| Movement between folders/files | Turn the [AUD] knob, or press the [FM+]/[AM-] button. |
| Selection of folder/flie Press | the [AUD] knob or [ ▶▶] button. |
| Return to previous folder Press the [ ◀◀◀] button. | |
| Return to root folder Press the [ ◀◀◀] button for at least 1 second. | |
: Indicates that your selection is a folder.
: Indicates that your selection is a file.
The folder tree is not displayed and only folders ↗ with files are displayed in order. Refer to
CD
Operation type Operation
| Movement between track | Turn the [AUD] knob, or press the [FM+]/[AM-] button. |
| Selection of track | Press the [AUD] knob. |
| Return to first track | Press the [I◄◄] button for at least 1 second. |
Cancelling the Music/Video Search mode
Press the [button.

- Music/Video Search cannot be performed during Random play.
Function of KDV-5244U/ KDV-5544U
Music/Video Search for iPod
Search for the song/ video (in iPod) you want to play.
1 Enter Music/Video Search mode Press the [Qbutton.
"SEARCH" is displayed.
2 Search for song/video
| Operation type Operation | |
| Movement between items | Turn the [AUD] knob. |
| Skip Search *1 | Press the [◀◀] or [▶▶] button. |
| Selection of item | Press the [AUD] knob. |
| Return to previous item | Press the [FM+] button. |
| Return to Top menu | Press the [FM+] button for at least 1 second. |
| Search by initial | Press the [ 🔒 ] button for at least 1 second. |
The position of the currently displayed item is indicated by the icon bar in eight steps.

Cancelling the Music/Video Search mode
Press the [button.
Searching for Music by Initial
You can select an alphabetic character from the list in the browse item (artist, album, etc.) selected now.
1 Enter alphabet search mode
Press the [button for at least 1 second.
"A B C ..." is displayed.
- If you can not search for a song by an alphabetic character in the browse item selected now, the data on the screen does not change.
2 Select the initial to be searched for
| Operation type | Operation |
| Move to the next character. | Turn the [AUD] knob, or press the [◀◀]/ [▶▶] button. |
| Move to the next row. | Press the [FM+] or [AM−] button. |
| Cancelling the alphabet search mode | Press the [○] button. |
3 Determine the selected initial
Press the [AUD] knob.
Start search. When search is completed, the Music/Video Search mode is selected again at the selected character position.
Music disc/Audio file/iPod Operation of Control Panel

- *1 Skip Search: The number of songs to be skipped is determined by the ratio of the total number of songs in the list which is selected now. Set the ratio with "SKIP" in
(page 11). Keep pressing this button for 3 seconds or longer skips songs at 10% irrespective of the setting. - The time of search by alphabet may become long depending on the number of songs in iPod or the folder structure.
- When selecting an initial in the alphabet search mode, entering “*” searches symbols and entering “1” searches digits.
- If the first character string begins with an article "a", "an", or "the" in the alphabet search mode, it is searched for in defiance of the article.
Function of KDV-5244U/ KDV-5544U
iPod Control by Hand Mode
Allows you to operate iPod with the control on the iPod.
Display Setting
"HANDS ON" iPod control by hand mode is ON.
"MODE OFF" iPod control by hand mode is OFF.
1 Enter iPod Control by Hand Mode Press [Q, ec., and select "iPodCTRL". Press the [AUD] knob.
- For how to select Function Control items, refer to
2 Set the iPod Control by Hand Mode Turn the [AUD] knob.
3 Exit iPod Control by Hand Mode Press the [button.

- In the iPod Control by hand mode, iPod cannot be operated using this unit.
- This mode is not compatible with music information display. The display will show "iPodMODE".
- The following iPods cannot be controlled using this unit. iPod nano (1st generation), and iPod with video. (KCA-iP101 (optional accessory) connected only.)
- In the iPod Control by hand mode, video is output to the AV input of this unit. Nothing is displayed without video output from the iPod.
- When you cancel the hand mode while playing a video file, the video file stops and a music file starts.
Basic Operation of Disc Changer (Optional)
Selecting CD changer source
Press the [SRC] button.
Select the "CD CH" display.
Playing or pausing
Press the [6] button.
Music search
Press the [◀◀] or [▶▶] button.
Changes the music when this button is pressed.
Fast reverses or forwards the music while pressing.
Disc Search
Press the [FM+] or [AM-] button.
Playing the Current Song or Disc Repeatedly (Repeat play)
Press the [4] button.
Pressing the button repeatedly selects Track Repeat play on ("TRAC REP"), Disc Repeat play on ("DISC REP"), and Repeat play off ("REP OFF") sequentially.
Playing the first part of each music on the disc (Scan play)
Press the [2] button.
Successively plays the intro of the music in the disc. When Scan Play is turned on, "TRAK SCN" is displayed.

- To use the functions written as the [SCN] button in the option manual, press the [2] button.
Playing all the music on the disc in random order (Random play)
Press the [3] button.
Randomly plays the music in the disc.
When Random Play is turned on, "DISC RDM" is displayed.
Playing the music in the disc changer randomly (Magazine random play)
Press the [5] button.
Pressing the button toggles the setting between
Magazine random play on ("MGZN RDM") and off ("RDM OFF").
Searching the music by entering the track number (Direct Music Search)
1 Set the remote controller mode switch to "AUD" mode
2. Press the number buttons on the remote control.
3. Press the [I◄◄] or [►►I] button.
Press the [▶■] button to cancelling Direct Music Search.

- Direct Music Search cannot be performed during playing of Random play, or scan play.
Searching the disc by entering the disc number (Direct Disc Search)
1 Set the remote controller mode switch to "AUD" mode
2. Press the number buttons on the remote control.
3. Press the [FM+] or [AM-] button.
Press the [▶■] button to cancelling Direct Disc Search.

- Direct Disc Search cannot be performed during playing of Random play, or scan play.
- Input "0" to select disc 10.

- Set the remote controller mode switch to "AUD" mode before starting operation, refer to
Auto memory entry
Putting stations with good reception in the memory automatically.
1 Enter Menu mode
Press [Q] 1 sec, and select "MENU".
Press the [AUD] knob.
- For how to select Function Control items, refer to
2 Select the Auto memory mode
Turn the [AUD] knob, or press the [FM+]/[AM-] button.
Select the "A-MEMORY" display.
3 Open Auto Memory Entry
Press the [AUD] knob for at least 2 seconds.
When 6 stations that can be received are put in the memory, auto memory entry closes.

- When "AF" in
(page 11) is ON, only RDS stations are put in the memory. - When Auto Memory Entry is done in the FM2 band, the RDS stations preset in the FM1 band are not put in the memory.
Likewise, when Auto Memory Entry is done in the FM3 band, RDS stations preset in FM1 or FM2 are not put in the memory.
PTY(ProgramType)
Selecting the Program Type below and searching for a station;
| Program Type Display | |
| Speech "SPEECH" | |
| Music "MUSIC" | |
| News "NEWS" | |
| Current Affairs "AFFAIRS" | |
| Information "INFO" | |
| Sport "SPORT" | |
| Education "EDUCATE" | |
| Drama "DRAMA" | |
| Culture "CULTURE" | |
| Science "SCIENCE" | |
| Varied "VARIED" | |
| Pop Music | "POP M" |
| Rock Music | "ROCK M" |
| Easy Listening Music | "EASY M" |
| Light Classical "LIGHT M" | |
| Program Type Display | |
| Serious Classical “CLASSICS” | |
| Other Music | “OTHER M” |
| Weather | “WEATHER” |
| Finance | “FINANCE” |
| Children’s programs | “CHILDREN” |
| Social Affairs | “SOCIAL” |
| Religion | “RELIGION” |
| Phone In | “PHONE IN” |
| Travel | “TRAVEL” |
| Leisure | “LEISURE” |
| Jazz Music | “JAZZ” |
| Country Music | “COUNTRY” |
| National Music | “NATION M” |
| Oldies Music | “OLDIES” |
| Folk Music | “FOLK M” |
| Documentary | “DOCUMENT” |
- Speech and Music include the Program type shown below.
Music: Black character item.
Speech: White character item.
1 Enter PTY mode
Press the [Q] button.
During PTY mode the "PTY" indicator is ON.
2 Select the Program Type
Turn the [AUD] knob, or press the [FM+]/[AM-] button.
3 Search for the selected Program Type station
Press the [◀◀] or [▶▶] button.
4 Exit PTY mode
Press the [Q] button.

- This function cannot be used during a traffic bulletin or AM reception.
- When the selected Program Type is not found, "NO PTY" is displayed. Select another Program Type.
Program Type preset
Putting the Program Type in the Preset button memory and quick recall.
Presetting the Program Type
1 Select the Program Type to preset
Refer to
2 Preset the Program Type
Press the desired [1] — [6] button for at least 2 seconds.
Recalling the preset Program Type
1 Enter PTY mode
Refer to
2 Recall the Program Type
Press the desired [1] — [6] button.
Changing Language for PTY Function
Selecting the Program Type display language as follows;
| Language Display | |
| English “ENGLISH” | |
| French “FRENCH” | |
| German “GERMAN” |
1 Enter PTY mode
Refer to
2 Enter Changing Language mode Press the [DISP] button.
3 Select the language Turn the [AUD] knob, or press the [FM+]/[AM-] button.
4 Exit Changing Language mode Press the [DISP] button.
Other Functions
Activating Security Code
When Security Code is set, possibility of theft is reduced because input of Security Code is prompted to turn on the unit once it is turned off.

- You can set the Security Code with a 4 digit number of your choice.
- The Security Code cannot be displayed or referenced. Make a note of the Security Code and treasure it up.
1 Select Standby
Press the [SRC] button.
Select the "STANDBY" display.
2 Enter Security Code mode
Press [Q] 1 sec, and select "MENU" > "CODE SET". Press the [AUD] knob for at least 1 second.
When "ENTER" is displayed, "CODE" is also displayed.
- For how to select Function Control items, refer to
3 Enter Security Code
| Operation type Operation | |
| Select the digits to enter Press the | [ ◀◀◀] or [▶▶-] button. |
| Select the Security Code numbers | Turn the [AUD] knob, or press the [FM+]/ [AM−] button. |
4 Confirm the Security Code
Press the [AUD] knob for at least 3 seconds.
When "RE-ENTER" is displayed, "CODE" is also displayed.
5 Do the step 3 through 4 operation, and reenter the Security Code.
"APPROVED" is displayed.
The Security Code function activates.

- If you enter the wrong Code in steps 3 through 4, repeat from step 3.
- When the Security Code function is activated, "CODE SET" changes to "CODE CLR".
- To deactivate the Security Code function, see the next section
.
6 Exit Security Code mode
Press the [button.
Entering Security Code
The Security Code is required to use the audio unit when the unit is first used after removed from the battery power source or the Reset button is pressed.
1 Turn the power ON.
2 Do the step 4 through 5 operation, and enter the Security Code.
"APPROVED" is displayed.
Now, you can use the unit.
Deactivating Security Code
Deactivating the Security Code function.
1 Select Standby
Press the [SRC] button.
Select the "STANDBY" display.
2 Enter Security Code mode
Press [Q] 1 sec, and select "MENU" > "CODE CLR". Press the [AUD] knob for at least 1 second.
When "ENTER" is displayed, "CODE CLR" is also displayed.
- For how to select Function Control items, refer to
3 Enter Security Code
| Operation type Operation | |
| Select the digits to enter Press the [ | |◀◀| or [▶▶] button. |
| Select the Security Code numbers | Turn the [AUD] knob, or press the [FM+]/[AM−] button. |
4 Press the [AUD] knob for at least 3 seconds.
"CLEAR" is displayed.
The Security Code function deactivates.
5 Exit Security Code mode
Press the [button.

- If a wrong security code is entered, "ERROR" is displayed. Enter a correct security code.
Audio Adjustments
AudioControl
You can adjust following Audio Control items;
| Adjustment Item Display Range | |
| Rear volume "R-VOL" 0 — 35 | |
| AV output volume "AVVOL" 0 — 35 | |
| Subwoofer level "SW L" -15 — +15 | |
| Balance "BAL" Left 15 — Right 15 | |
| Fader "FAD" Rear 15 — Front 15 | |
| Exit Audio Control mode (Volume control mode) | |
1 Select the source to adjust Press the [SRC] button.
2 Enter Audio Control mode Press the [AUD] knob.
3 Select the Audio item to adjust Press the [AUD] knob.
4 Adjust the Audio item Turn the [AUD] knob.
5 Exit Audio Control mode
Press any button.
Press a button other than the [AUD] knob or [▲] button.
AudioSetup
You can set Sound system, such as follows;
| Adjustment Item Display | Range | |
| Volume offset | “V-OFF” | -8 — ±0 (AV IN: -8 — +8) |
| Dual Zone System | “2ZON” | OFF/ DVD/ USB/ AV IN |
| AV output source | “AV/O” | OFF/ DVD/ USB/ AV IN |

- Volume offset: Sets each source's volume as a difference from the basic volume.
- Dual Zone System Main source and sub source (DVD, USB, AV IN) output Front channel and Rear channel separately.
-
Set the preout to "R" or "SW" in "MENU" > "SWPRE" (page 11) of
. -
Set up the channel of sub source by "ZONE2" of
(page 11). - Select Main source by [SRC] button.
- Adjust the volume of Front channel by [AUD] knob.
- Adjust the volume of Rear channel by
- The Audio Control has no effect on sub source.
-
"USB" and "DVD" cannot be set at the same time for the main and sub sources.
-
AV output source The sub source (DVD, USB, and AV IN) can be output to the AV output separately from the main source.
- Set the preout to "AV" in "MENU" > "SWPRE" (page 11) of
. - Adjust the volume of AV output source by
- "USB" and "DVD" cannot be set at the same time for the main and AV output sources.
- Dual Zone System and the AV output source cannot be used at the same time. Turn off the setting currently used and then set the next function.
1 Select the source to adjust Press the [SRC] button.
2 Enter Audio Setup mode
Press the [AUD] knob for at least 1 second.
3 Select the Audio Setup item to adjust Press the [AUD] knob.
4 Adjust the Audio setup item Turn the [AUD] knob.
5 Exit Audio Setup mode
Press the [AUD] knob for at least 1 second.
Preset Equalizer Select
You can select following Equalizer curve;
| Preset Equalizer | Display | Preset Equalizer | Display |
| User* "USER" | Jazz "JAZZ" | ||
| Rock | "ROCK" | Game | "GAME" |
| Pops | "POPS" | iPod (During iPod source only) | "iPod" |
| Easy "EASY" | |||
| Top 40 "TOP40" | Natural | "NATURAL" |
* The Equalizer curve set in the section
1 Enter Preset Equalizer mode Press [Q] 1 sec, and select "DSP" > "CONTROL" > "EQ" > "PRESET".
Press the [AUD] knob.
- For how to select Function Control items, refer to
2 Select the Equalizer curve Turn the [AUD] knob and push the center when the desired item is displayed.
You can select from 22 Equalizer curve types for iPod when "iPod" is selected.
Audio Adjustments
Select the iPod Equalizer curve
- Enter iPod Equalizer mode
Press the [AUD] knob.
- Select the iPod Equalizer curve
Turn the [AUD] knob and push the center when the desired item is displayed.
3 Exit Preset Equalizer mode.
Press the [button.

- You can select for each source.
Manual Equalizer Control
You can adjust following Equalizer Control items;
| Adjustment Item | Range |
| Band level “BAND#”>“GAIN” | -9 - 0 - +9 |
| Bass Effect* “BAND1”>“EFFECT” | “OFF”/“ON” |
- *Can be only set for "BAND1".
1 Enter Manual Equalizer Control mode Press [Q] 1 sec, and select "DSP" > "CONTROL" > "EQ" > "MANUAL". Press the [AUD] knob.
- For how to select Function Control items, refer to
(page 10).
2 Select the band you want to set Turn the [AUD] knob and push the center. "BAND1" – "BAND5"
3 Select the item you want to set Turn the [AUD] knob and push the center.
4 Set the value Turn the [AUD] knob and push the center when the desired item is displayed.
5 Exit Manual Equalizer Control mode Press the [button twice.

- When "iPod" is selected in the section
(page 27), Manual Equalizer Control is disabled. - You can select for each source.
PositionControl
According to the listening position, select the position from the following settings so that the normal position of the sound environment can be compensated in accordance with the selected position;
Preset position "PRESET"
| Adjustment Item Display | Adjustment Item Display |
| Not compensating. “ALL” | Front-Right seat “F-RIGHT” |
| Front-Left seat “F-LEFT” | Front seat “F-ALL” |
Manual position "MANUAL"
| Adjustment Item Display | Adjustment Item Display |
| Front Left speaker “F-LEFT” | Subwoofer Left “SW-LEFT” |
| Front Right speaker “F-RIGHT” | Subwoofer Right “SW-RIGHT” |
| Rear Left speaker “R-LEFT” | Initialize the setting “INITIAL” values. |
| Rear Right speaker “R-RIGHT” |
1 Enter Preset position setting mode Press [Q] 1 sec, and select "DSP" > "CONTROL" > "POSITION" > "PRESET".
Press the [AUD] knob.
- For how to select Function Control items, refer to
(page 10).
2 Select the seat you want to compensate Turn the [AUD] knob and push the center when the desired item is displayed.
3 Exit Preset position setting mode Press the [button.
You can fine-adjust your listening position.
1 Enter Manual position adjust mode
Press [Q] 1 sec, and select "DSP" > "CONTROL" > "POSITION" > "MANUAL".
Press the [AUD] knob.
2 Select the speaker you want to set
Turn the [AUD] knob and push the center.
Selecting "INITIAL" initializes the Manual position adjustment.
3 Set the value
Turn the [AUD] knob and push the center when the desired value is displayed.
Adjust between 0 and 170 cm.
4 Exit Manual position adjust mode Press the [☐button twice.

- About the position setting
First, set the using environment with
(page 30). - When using the Subwoofer Left and Subwoofer Right as a single sub woofer, set the left side and right side to the same value.
CabinSelection
You can compensate the delay of the sound arrival time by selecting your environment from the following car types;
| Car type Display | Car type Display |
| Not compensating. "OFF" | Minivan "MINIVAN" |
| Compact car "COMPACT" | Sport-utility vehicle "SUV" |
| Sedan "SEDAN" | Passenger van "PAS-VAN" |
| Station wagon "WAGON" |
1 Enter Cabin select mode Press [Q] 1 sec, and select "DSP" > "SETUP" > "CABIN".
Press the [AUD] knob.
- For how to select Function Control items, refer to
2 Select the car type Turn the [AUD] knob and push the center when the desired item is displayed.
3 Exit Cabin select mode Press the [button.

- You can compensate the distances in more details by using
SpeakerSetting
Setting the speaker to be connected, speaker size, and installation position;
| Setting item Range | |
| Front Speaker Location “FRONT”>“LOCATION” | “DOOR”/“ON DASH”/“UND DASH”(Under dash) |
| Front Speaker Size “FRONT”>“SIZE” | O.E.M./10 cm/13 cm/16 cm/17 cm/18 cm/4×6/5×7/6×8/6×9/7×10 |
| Front Tweeter “FRONT”>“TWEETER” | “NONE”/“USE” |
| Rear Speaker Location “REAR”>“LOCATION” | “DOOR”/“R-DECK”“2ND ROW”/“3RD ROW”(Minivan/ Passenger van) |
| Front Speaker Size “REAR”>“SIZE” | None/ O.E.M./10 cm/13 cm/16 cm/17 cm/18 cm/4×6/5×7/6×8/6×9/7×10 |
| Subwoofer Size “SUB-W”>“SIZE” | None/16 cm/20 cm/25 cm/30 cm/38 cm over |
1 Enter Speaker Setting mode Press [Q] 1 sec, and select "DSP" > "SETUP" > "SPEAKER".
Press the [AUD] knob.
- For how to select Function Control items, refer to
(page 10).
2 Select the speaker you want to set Turn the [AUD] knob and push the center. "FRONT" / "REAR" / "SUB-W"
3 Select the item you want to set Turn the [AUD] knob and push the center.
4 Set the value Turn the [AUD] knob and push the center when the desired item is displayed.
5 Exit Speaker Setting mode Press the [button twice.
X'OverSetting
You can set a X'Over value for the speakers;
| Setting item Range | |
| Front High Pass Filter“FRONT”>“FC” | “THRU” (Through)/ 30/ 40 / 50/60/ 70/ 80/ 90/ 100/ 120/ 150/180/ 220/ 250 Hz |
| Rear High Pass Filter“REAR”>“FC” | |
| Front High Pass Slope“FRONT”>“SLOPE” | -6/ -12/ -18/ -24 dB/Oct. |
| Rear High Pass Slope“REAR”>“SLOPE” | |
| Subwoofer Low Pass Filter“SUB-W”>“FC” | 30/ 40/ 50/ 60/ 70/ 80/ 90/ 100/120/ 150/ 180/ 220/ 250 Hz/“THRU” (Through) |
| Subwoofer Low Pass Slope“SUB-W”>“SLOPE” | -6/ -12/ -18/ -24 dB/Oct. |
| Subwoofer Phase“SUB-W”>“PHASE” | REVERSE (180°)/ NORMAL (0°) |
1 Enter X'Over setting mode Press [Q] 1 sec, and select "DSP" > "SETUP" > "X'OVER".
Press the [AUD] knob.
- For how to select Function Control items, refer to
(page 10).
2 Select the speaker you want to set Turn the [AUD] knob and push the center. "FRONT"/"REAR"/"SUB-W"
3 Select the item you want to set Turn the [AUD] knob and push the center.
4 Set the X'Over value Turn the [AUD] knob and push the center when the desired value is displayed.
5 Exit X'Over setting mode Press the [button twice.
DTA (Digital Time Alignment) Setting
Adjusting fine tuning of the speaker position compensation value specified at
1 Enter DTA setting mode
Press [Q] 1 sec, and select "DSP" > "SETUP" > "DTA".
Press the [AUD] knob.
- For how to select Function Control items, refer to
2 Select the speaker you want to set
Turn the [AUD] knob and push the center.
"FRONT" (Front speaker)/ "REAR" (Rear speaker)/ "SUB-W" (Subwoofer)
3 Set the compensation value of the speaker position
Turn the [AUD] knob and push the center when the desired value is displayed.
Adjust between 0 and 440 cm.
Refer to
4 Exit DTA setting mode
Press the [button.
Audio Preset Memory
Registering the value setup by Sound Control.
1 Setup Sound Control
Refer to the following operations to setup the Sound Control.
- Cabin selection (page 29)
- Speaker Setting (page 29)
- DTA (Digital Time Alignment) setting (page 30)
- X'Over setting (page 30)
- Preset Equalizer Select (page 27)
- Manual Equalizer Control (page 28)
- Position Control (page 28)
2 Enter Audio Preset Memory mode (Other than Standby mode)
Press [Q] 1 sec, and select "DSP" > "PRESET" > "MEMORY".
Press the [AUD] knob for at least 1 second.
- For how to select Function Control items, refer to
3 Select the number to put in the memory Turn the [AUD] knob to select number, and then press the [AUD] knob.
"USER1" – "USER6"
4 Put the Audio Preset in the memory Turn the [AUD] knob to select "YES", and then press the [AUD] knob.
"COMPLETE" is displayed.
5 Exit Function Control mode Press the [Q] button for at least 1 second.
![KENWOOD KDV-5544U - Exit Function Control mode Press the [Q] button for at least 1 second. - 1](/content/2026/06/1183723/images/0187b8b7a68c8b6c81f0c347d3c8d4dcf766578bcc90bae280e36ea7f0d63e2b.jpg)
- Register 6 pairs of Audio Preset Memory.
- "USER1": When you press the Reset, all the sources will be the setting value which is registered.
- "USER1", "USER2":
The memory cannot be erased by the Reset button. - This function cannot be registered when the iPod Equalizer set in
(page 27).
Audio Preset Recall
Recalling the sound setup registered by
1 Select the source
Press the [SRC] button.
2 Enter Audio Preset Recall mode
Press [Q] 1 sec., and select "DSP" > "PRESET"> "RECALL".
Press the [AUD] knob for at least 1 second.
- For how to select Function Control items, refer to
3 Select the number to recall in the memory
Turn the [AUD] knob to select number, and then press the [AUD] knob.
"USER1" - "USER6"
4 Recall the Audio Preset
Turn the [AUD] knob to select "YES", and then press the [AUD] knob.
"COMPLETE" is displayed.
5 Exit Function Control mode
Press the [button for at least 1 second.

- The User memory of
- The source tone memory item of
Basic Operations of Remote Control
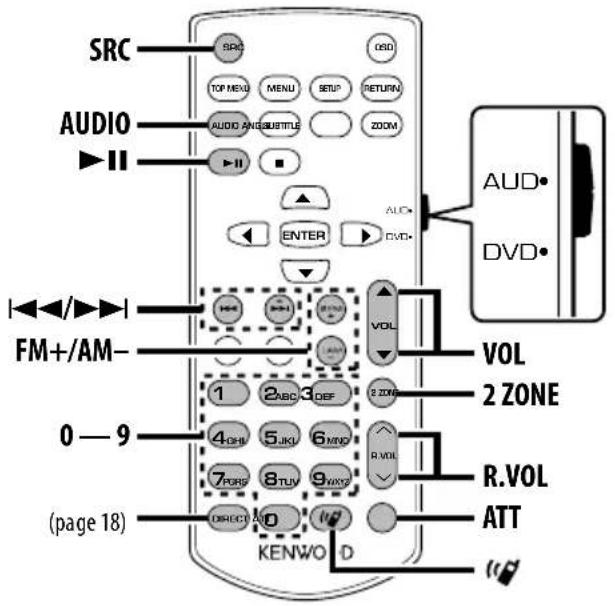
Remote Controller Mode Switch
The functions operated from the remote controller differ depending on the position of the mode switch.
AUD mode: [AUD]
Switch to this mode when controlling a selected source or tuner source, etc.
DVD mode: [DVD]
Switch to this mode when playing DVDs or USB etc. with the player integrated in this unit.
![KENWOOD KDV-5544U - DVD mode: [DVD] - 1](/content/2026/06/1183723/images/6fe8d6d59bbad98b0c6bfda5743f7ea80f8c3e88e1771e572873712cb525a100.jpg)
- Switch the mode switch to AUD or DVD position. With the mode switch in the middle, the remote controller cannot operate.
General Control
Volume control: [VOL]
Source select: [SRC]
Volume reduce: [ATT]
When the button is pressed again, the volume returns to the previous level.
In Audio Control (AUD mode)
Audio item select: [AUDIO]
Adjust the Audio item: [VOL]
![KENWOOD KDV-5544U - Adjust the Audio item: [VOL] - 1](/content/2026/06/1183723/images/2ac72b86429a1bc9a6b9f765cfb732307f727834f10b6f0fd6ac03ea481831a6.jpg)
- Refer to
Dual Zone Control
Select sub source of Dual zone system: [2 ZONE]
Rear channel volume control: [R.VOL]
In Tuner Source (AUD mode)
Band select: [FM+]/[AM-]
Station select: [◀◀]/[▶▶]
Recall preset stations: [1] — [6]
In DVD/USB/iPod Source (DVD mode)
Refer to
Refer to

About []
This button is used when Bluetooth HANDS FREE BOX is connected. For more information, refer to the instruction manual of Bluetooth HANDS FREE BOX.
Loading and Replacing battery
Use two "AAA"/"R03"-size batteries.
Insert the batteries with the + and - poles aligned properly, following the illustration inside the case.
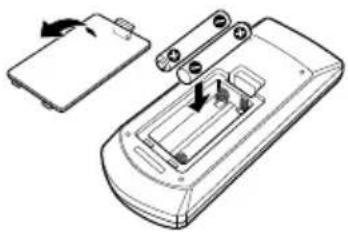
natural_image
Diagram of a remote control device with battery and switch components (no text or symbols)CAUTION
- Do not leave the battery near fire or under direct sunlight. A fire, explosion or excessive heat generation may result.
- Do not set the remote control in hot places such as on the dashboard.
Appendix
For operating KCA-BT200 (Optional)
For operation refer to Model-A-1 in the Instruction Manual of KCA-BT200, and the table below. The [AUTO]/[TI] button should be replaced with [SRC] button for
Set the remote controller mode switch to "AUD" mode before starting operation.
| Notation used in the KCA-BT200 Instruction Manual | Operation |
| [▶■] button [AUD] knob* | 1 |
| Control knob [AUD] knob | |
| [AUTO]/[TI] button [DISP] button | |
| Control knob towards up or down [FM+] or [AM-] button | |
| Control knob towards left or right | [1◀◀] or [▶▶] button |
*1 Use the [▶II] button for the operation of
For operating KCA-BT100 (Optional)
To control KCA-BT100, operate as follows;
To make setting for
To make
Set the remote controller mode switch to "AUD" mode before starting operation.
Moreover, some displays are different from the description of KCA-BT100 Instruction Manual.
| Displays of KCA-BT100 Instruction Manual | Actual displays on this unit | |
| “DISCONCT” | “HF | D-CON” |
| “CONNECT” | “HF | CON” |
| “PHN-DEL” | “DVC-DEL” | |
| “P-STATUS” | “D-STATUS” | |
| “BT-CON Y” “HF-CON Y” | ||
| “BT-CON N” “HF-CON N” | ||
Function Glossary
• "AF"(AlternativeFrequency)
When the reception is poor, automatically alternate to another frequency broadcasting the same program in the same RDS network with better reception.
- "AUTO1", "AUTO2", "MANUAL" (Tuning mode select)
Select a tuning mode of the radio.
| Tuning mode | Display | Operation |
| Auto seek | "AUTO1" | Automatic search for a station. |
| Preset station seek | "AUTO2" | Search in order of the stations in the Preset memory. |
| Manual | "MANUAL" | Normal manual tuning control. |
• "AVIN" (Audio/ visual input)
When this is set to ON, AV input source can be selected.
ON1: Allows AV input source to be selected. Use this setting when the built-in AV IN terminal is connected to the external equipment all the time.
ON2: Activates the attenuator function when turning on the power with AV input source selected. Cancel the attenuator function by turning the volume knob clockwise when listening to the audio of the external equipment.
OFF: Disable AV input source selection. Use this setting when the built-in AV IN terminal is not used.
• DTA (Digital Time Alignment)
Make fine adjustment of the delay time of the speaker output specified at
The settings of the delay time are automatically identified and compensated by specifying the distances of each speaker from the center of the vehicle interior.
1 Set the front and rear positions and the height of the reference point to the position of the ears of the person sitting in the front seat, and set the right and left positions to the center of the vehicle interior.
2 Measure the distances from the reference point to the speakers.
3 Calculate the distance difference in accordance with the farthest speaker.
Appendix
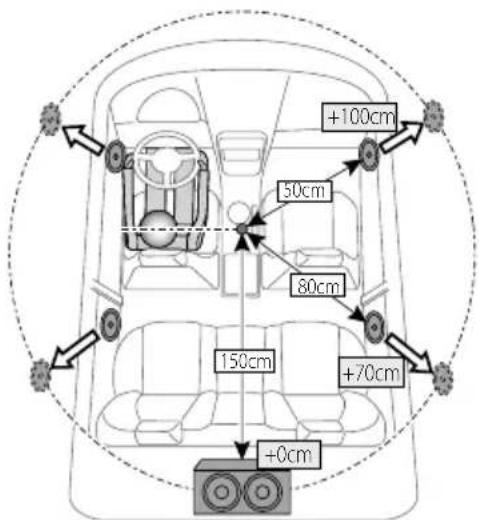
• "HIGHWAY" (Highway sound)
Increases the volume of faintest sound being lost by road noises to make the sound more audible. Additionally, it accentuates bass sound being lost by road noises to make the bass sound more dynamic.
- "ICON"
Sets the Graphics mode of the display during normal playback condition.
ON1: Turns on.
ON2: Displays an animation.
OFF: Turns off.
- "NEWS" (News Bulletin with Timeout Setting)
Automatically receives news bulletin when it starts. Set the time during which interrupt is to be disabled after start of another news bulletin. Changing "NEWS 00M" to "NEWS 90M" turns this function ON. If news bulletin starts when this function is ON, "TRAFFIC" is displayed and news is received. If "20M" is has been set, reception of another news bulletin will not start for 20 minutes. The news bulletin volume is the same level that was set for Traffic Information.
• "OFF"(PowerOFFTimer)
Setting the timer to turn this unit's power OFF automatically when Standby mode continues. Using this setting can save the vehicle's battery power.
---: Power OFF Timer function is OFF.
20M: Turns the power OFF after 20 minutes. (Factory setting)
40M: Turns the power OFF after 40 minutes.
60M: Turns the power OFF after 60 minutes.
• "RUS" (Russian language setting)
When this is set to ON, the following character strings are displayed in Russian: Folder name/ File name/ Song title/ Artist name/ Album name/ KCA-BT200/BT100 (optional accessory)

• "SWPRE" (Switching Preout)
Switches the preout between rear output ("R"), subwoofer output ("SW"), and DVD/USB/AV input source output ("AV").
• "ZONE2" (Dual Zone)
Set the destination (front speaker "F" or rear speaker "R") of the sub source (DVD/USB/AV input) when the Dual Zone function is turned on.
Language code list
| Code Language | Code Language | Code Language | |||
| ENGLISH English | HE Hebrew | RO Romanian | |||
| SPANISH Spanish | HI | Hindi | RW Kinyarwanda | ||
| FRENCH French | HR Croatian | SA Sanskrit | |||
| GERMAN German | HU Hungarian | SD Sindhi | |||
| ITALIAN Italian | HY Armenian | SG Sangho | |||
| DUTCH Dutch | IA | Interlingua | SH Serbo-Croatian | ||
| SWEDISH Swedish | IE | Interlingue | SI | Singhalese | |
| DANISH Danish | IK | Inupiak | SK Slovak | ||
| RUSSIAN Russian | ID | Indonesian | SL | Slovenian | |
| CHINESE Chinese | IS | Icelandic | SM | Samoan | |
| PORTUGUESE Portuguese | JV | Javanese | SN Shona | ||
| JAPANESE Japanese | KA Georgian | SO Somali | |||
| AA Afar | KK Kazakh | SQ Albanian | |||
| AB Abkhazian | KL Greenlandic | SR Serbian | |||
| AF Afrikaans | KM | Cambodian | SS Siswati | ||
| AM Amharic | KN Kannada | ST | Sesotho | ||
| AR Arabic | KO Korean | SU Sundanese | |||
| AS Assamese | KS Kashmiri | SW Swahili | |||
| AY Aymara | KU Kurdish | TA Tamil | |||
| AZ Azerbaijani | KY Kirghiz | TE | Telugu | ||
| BA Bashkir | LA Latin | TG Tajik | |||
| BE Byelorussian | LB Luxembourgish | TH Thai | |||
| BG Bulgarian | LN Lingala | TI | Tigrinya | ||
| BH Bihari | LO Laotian | TK Turkmen | |||
| BI | Bislama | LT | Lithuanian | TL | Tagalog |
| BN Bengali, Bangla | LV | Latvian, Lettish | TN Setswana | ||
| BO Tibetan | MG Malagasy | TO Tongan | |||
| BR Breton | MI Maori | TR Turkish | |||
| CA Catalan | MK | Macedonian | TS Tsonga | ||
| CO Corsican | ML | Malayalam | TT | Tatar | |
| CS Czech | MN Mongolian | TW | Twi | ||
| CY Welsh | MO Moldavian | UK Ukrainian | |||
| DZ Bhutani | MR | Marathi | UR Urdu | ||
| EL | Greek | MS | Malay | UZ Uzbek | |
| EO Esperanto | MT | Maltese | VI | Vietnamese | |
| ET | Estonian | MY Burmese | VO Volapuk | ||
| EU Basque | NA Nauru | WO | Wolof | ||
| FA Persian | NE Nepali | XH Xhosa | |||
| FI | Finnish | NO Norwegian | YO Yoruba | ||
| FJ | Fiji | OC Occitan | ZU Zulu | ||
| FO Faroese | OM (Afan) Oromo | ||||
| FY Frisian | OR Oriya | ||||
| GA Irish | PA Punjabi | ||||
| GD Scots Gaelic | PL Polish | ||||
| GLI | Galician | PS Pashto, Pushto | |||
| GN Guarani | QU Quechua | ||||
| GU Gujarati | RM | Rhaeto-Romance | |||
| HA Hausa | RN Kirundi |
Accessories/ Installation Procedure
Accessories

natural_image
Isometric diagram of a mechanical assembly with labeled parts (no text or symbols present)
natural_image
Close-up of a coiled wire or rope with no visible text or symbols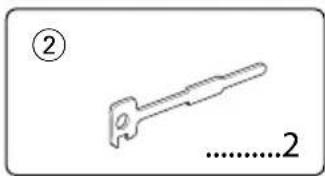
natural_image
Simple line drawing of a key with no text or symbolsInstallation Procedure
- To prevent short circuits, remove the key from the ignition and disconnect the terminal of the battery.
- Make the proper input and output wire connections for each unit.
- Connect the wire on the wiring harness.
- Take Connector B on the wiring harness and connect it to the speaker connector in your vehicle.
- Take Connector A on the wiring harness and connect it to the external power connector on your vehicle.
- Connect the wiring harness connector to the unit.
- Install the unit in your car.
- Reconnect the ⊖ terminal of the battery.
- Press the reset button.

- Mounting and wiring this product requires skills and experience. For safety's sake, leave the mounting and wiring work to professionals.
• Install this unit in the console of your vehicle. Do not touch the metal part of this unit during and shortly after the use of the unit. Metal part such as the heat sink and enclosure become hot. - Make sure to ground the unit to a negative 12V DC power supply.
- Do not install the unit in a spot exposed to direct sunlight or excessive heat or humidity. Also avoid places with too much dust or the possibility of water splashing.
- Do not use your own screws. Use only the screws provided. If you use the wrong screws, you could damage the unit.
- If the power is not turned ON ("PROTECT" is displayed), the speaker wire may have a short-circuit or touched the chassis of the vehicle and the protection function may have been activated. Therefore, the speaker wire should be checked.
- Make sure that all wire connections are securely made by inserting jacks until they lock completely.
- If your vehicle's ignition does not have an ACC position, or if the ignition wire is connected to a power source with
constant voltage such as a battery wire, the power will not be linked with the ignition (i.e., it will not turn on and off along with the ignition). If you want to link the unit's power with the ignition, connect the ignition wire to a power source that can be turned on and off with the ignition key.
- Use a commercially available conversion connector if the connector does not fit in the vehicle connector.
- Insulate unconnected wires with vinyl tape or other similar material. To prevent a short circuit, do not remove the caps on the ends of the unconnected wires or the terminals.
- If the console has a lid, make sure to install the unit so that the faceplate will not hit the lid when closing and opening.
- If the fuse blows, first make sure the wires aren't touching to cause a short circuit, then replace the old fuse with one with the same rating.
- Connect the speaker wires correctly to the terminals to which they correspond. The unit may be damaged or fail to work if you share the ⊖ wires or ground them to any metal part in the car.
• After the unit is installed, check whether the brake lamps, blinkers, wipers, etc. on the car are working properly. - Mount the unit so that the mounting angle is 30^ or less.
About CD players/disc changers connected to this unit
If the CD player/ disc changer has the "O-N" switch, set it to the "N" position.
The functions you can use and the information that can be displayed may differ depending on the models being connected.
Connecting Wires to Terminals

flowchart
graph TD
    A["AV input\nUse of the optional cable CA-C3AV\nis recommended for connecting an external player."] --> B["USB connector\n(KDV-5244U/ KDV-5544U\nonly)"]
    B --> C["Front side"]
    C --> D["Fuse (10A)"]
    D --> E["Wiring harness\n(Accessory①)"]
    E --> F["TEL mute wire (Brown)"]
    F --> G["MUTE"]
    G --> H["If no connections are made, do not let the wire come out from the tab."]
    H --> I["Power control/ Motor antenna\ncontrol wire (Blue/White)"]
    I --> J["P.CONT"]
    J --> K["ANT.CONT"]
    K --> L["Battery wire (Yellow)"]
    L --> M["Ignition wire (Red)"]
    M --> N["A-7 Pin (Red)"]
    N --> O["A-4 Pin (Yellow)"]
    O --> P["Connector A"]
    O --> Q["Connector B"]
    P --> R["For the sake of safety, be sure to connect the parking sensor."]
    Q --> S["Connect to the vehicle's parking brake detection switch harness."]
    R --> T["VR/TV/Video/Visual output (Yellow)"]
    S --> U["FM/AM antenna input (JASO)"]
    T --> V["Front output (KDV-5244U/ KDV-5544U only)"]
    V --> W["Rear output/ Sub Woofer output/ AV output (audio)"]
    W --> X["Do not connect."]
    X --> Y["To Kenwood disc changer/ External optional accessory\nTo connect these leads, refer to the relevant instruction manuals."]
Connecting Wires to Terminals
Connector Function Guide
| Pin Numbers for ISO Connectors | Cable Colour Functions |
| External Power ConnectorA-4 Yellow BatteryA-5 Blue/White Power ControlA-7 Red Ignition (ACC)A-8 Black Earth (Ground) | Connection |
| Speaker ConnectorB-1 Purple Rear Right (+)B-2 Purple/Black Rear Right (-)B-3 Gray Front Right (+)B-4 Gray/Black Front Right (-)B-5 White Front Left (+)B-6 White/Black Front Left (-)B-7 Green Rear Left (+)B-8 Green/Black Rear Left (-) |
▲WARNING
Connecting the ISO Connector
The pin arrangement for the ISO connectors depends on the type of vehicle you drive. Make sure to make the proper connections to prevent damage to the unit.
The default connection for the wiring harness is described in ① below. If the ISO connector pins are set as described in ②, make the connection as illustrated. Please be sure to reconnect the cable as shown ② below to install this unit to the Volkswagen vehicles etc.
①(Default setting) The A-7 pin (red) of the vehicle's ISO connector is linked with the ignition, and the A-4 pin (yellow) is connected to the constant power supply.
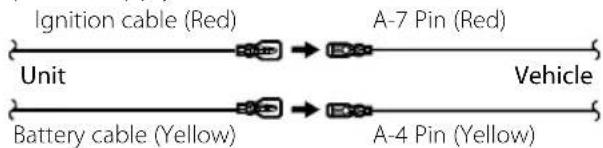
flowchart
graph LR
    A["Ignition cable (Red)"] --> B["A-7 Pin (Red)"]
    C["Battery cable (Yellow)"] --> D["A-4 Pin (Yellow)"]
    style A fill:#f9f,stroke:#333
    style C fill:#f9f,stroke:#333
    style B fill:#ccf,stroke:#333
    style D fill:#ccf,stroke:#333
②The A-7 pin (red) of the vehicle's ISO connector is connected to the constant power supply, and the A-4 pin (yellow) is linked to the ignition.
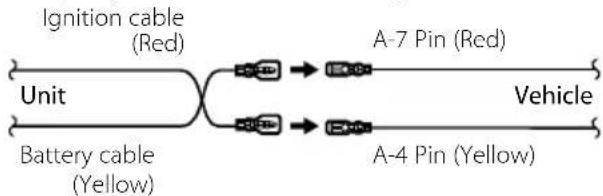
flowchart
graph LR
    A["Unit"] -->|Ignition cable (Red)| B["A-7 Pin (Red)"]
    A -->|Battery cable (Yellow)| C["A-4 Pin (Yellow)"]
    B --> D["Vehicle"]
    C --> D
Installation/Removing the Unit
Installation

Bend the tabs of the mounting sleeve with a screwdriver or similar utensil and attach it in place.

- Make sure that the unit is installed securely in place. If the unit is unstable, it may malfunction (for example, the sound may skip).
Removing the hard rubber frame
1 Engage the catch pins on the removal tool and remove the two locks on the upper level. Upper the frame and pull it forward as shown in the figure.
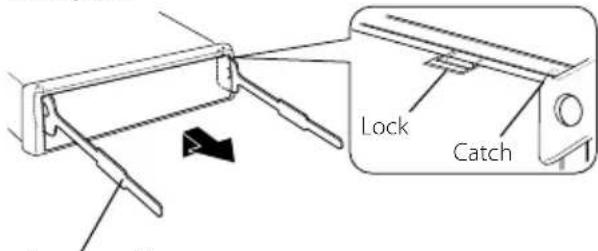
Accessory② Removal tool
2 When the upper level is removed, remove the lower two locations.

- The frame can be removed from the bottom side in the same manner.
Removing the Unit
1 Refer to the section
2 Insert the two removal tools deeply into the slots on each side, as shown.
3 Lower the removal tool toward the bottom, and pull out the unit halfway while pressing towards the inside.
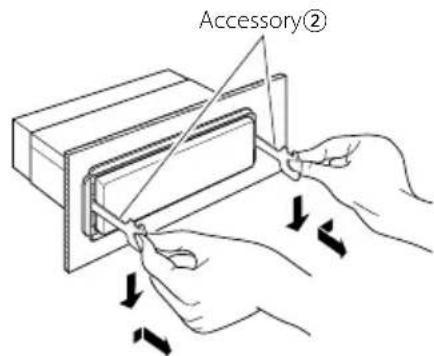

- Be careful to avoid injury from the catch pins on the removal tool.
4 Pull the unit all the way out with your hands, being careful not to drop it.
Troubleshooting Guide
Some functions of this unit may be disabled by some settings made on this unit.
! • Cannot set up the subwoofer.
- Cannot set up the low pass filter.
- Cannot set up subwoofer phase.
- No output from the subwoofer.
-
- Preout is not set to subwoofer. “MENU” > “SWPRE” of
- The Dual zone function is enabled.
! • Cannot set up the equalizer.
- Cannot set up the crossover network.
- Cannot set up Digital Time Alignment.
- Cannot select the "CONTROL" in "DSP".
- Cannot select the "SETUP" in "DSP".
- The Dual zone function is enabled.
- The DSP function is disabled. “DSP” > “DSP SET” of
- In the speaker select option, None is selected for the rear speakers. 📋
! Cannot set up the Dual zone.
The AV output function is enabled.
! • Cannot set up the AV output.
- Cannot select the "SWPRE" in "MENU".
The Dual zone function is enabled.
! • Cannot register a security code.
- Cannot set up Display.
• Power OFF Timer does not function.
▶
! • Cannot switch to DVD or USB source.
- The Dual zone function is set to DVD or USB.
What might seem to be a malfunction in your unit may just be the result of slight misoperation or miswiring. Before calling service, first check the following table for possible problems.
Tuner source
? Radio reception is poor.
√ The car antenna is not extended. ☒ Pull the antenna out all the way.
Disc source
The specified disc does not play, but another one plays instead.
√ The specified disc is quite dirty.
Clean the disc, referring to the disc cleaning of the section on
√ The disc is loaded in a different slot from that specified.
Eject the disc magazine and check the number for the specified disc.
√ The disc is severely scratched. ■ Try another disc instead.
Audio file source
The sound skips when an Audio file is being played.
√ The media is scratched or dirty.
■ Clean the media, referring to the disc cleaning of the section on
√ The recording condition is bad. Record the media again or use another media.
The messages shown below display your systems condition.
TOC ERR: • The disc is quite dirty. The disc is upside-down. The disc is scratched a lot.
• No disc has been loaded in the disc magazine.
E-05: The disc is unreadable.
E-77: The unit is malfunctioning for some reason.
Press the reset button on the unit. If the "E-77" code does not disappear, consult your nearest service center.
E-99: Something is wrong with the disc magazine.
Or the unit is malfunctioning for some reason.
Check the disc magazine. And then press the reset button on the unit. If the "E-99" code does not disappear, consult your nearest service center.
MEC ERR: The unit is malfunctioning for some reason.
Press the [▲] button on the unit. If the error message does not disappear when you eject the disc and insert it again, consult your nearest service center.
IN (Blink): The DVD player section is not operating properly.
Reinsert the disc. If the disc cannot be ejected or the display continues to flash even when the disc has been properly reinserted, please switch off the power and consult your nearest service center.
PROTECT (Blink):
The speaker wire has a short-circuit or touches the chassis of the vehicle, and then the protection function is activated.
Wire or insulate the speaker cable properly and press the reset button. If the "PROTECT" code does not disappear, consult your nearest service center.
NA FILE: An Audio file is played with a format that this unit can't support.
COPY PRO: A copy-protected file is played.
READ ERR: The file system of the connected USB device is broken.
Copy the files and folders for the USB device again. If the error message is still displayed, initialize the USB device or use other USB devices.
NO DVICE: The USB device is selected as a source
although no USB device is connected.
→ Change the source to any source other than USB. Connect an USB device, and change the source to USB again.
NA DVICE: • An unsupported USB device is connected.
- Connection to the iPod has failed.
Check that the connected iPod is an iPod that is supported. See
NO MUSIC/E-15:
- The connected USB device contains no playable audio file.
• Media was played that does not have data recorded that the unit can play.
USB ERR: Some trouble may have occurred to the connected USB device.
Remove the USB device, turn off the unit, wait for about 10 seconds, and then turn on the unit again. If the same display is repeated, use another USB device.
iPod ERR: Connection to the iPod has failed.
Remove the USB device and then reconnect it.
Confirm that the software for the iPod is the latest version.
REG ERR: The disc you wanted to play has a region code that cannot be played with this unit.
PARK OFF: Source for displaying video is selected while car is traveling.
Video will be displayed when the car is stopped and the parking brake has been engaged.
Press the [DISP] button for at least 1 second. The display of this unit can be temporarily hidden.
READING: The unit is reading the data on the media.
Specifications
FM tuner section
Frequency range (50 kHz space) : 87.5 MHz – 108.0 MHz
Usable sensitivity (S/N = 26dB) : 0.7 μV/75 Ω
Quieting Sensitivity (S/N = 46dB) : 1.6 μV/75 Ω
Frequency response ( ± 3.0 dB) : 30 Hz – 15 kHz
Signal to Noise ratio (MONO) : 65 dB
Selectivity (DIN) ( ± 400 kHz) : ≥ 80 dB
Stereo separation (1 kHz) : 35 dB
MW tuner section
Frequency range (9 kHz space) : 531 kHz - 1611 kHz
Usable sensitivity (S/N = 20dB) : 25 μV
LW tuner section
Frequency range
: 153 kHz - 281 kHz
Usable sensitivity (S/N = 20dB) : 45 μV
DVD player section
Signal Detection System
: Non-contact optical pickup (semiconductor laser)
Wow & Flutter
Below Measurable Limit
Frequency response
Sampling frequency; 96 kHz : 16 – 22,000 Hz
Sampling frequency; 48 kHz : 16 – 22,000 Hz
Sampling frequency; 44.1 kHz : 16 - 20,000 Hz
Signal to Noise ratio (1 kHz) : 95 dB
Dynamic range
Sampling frequency; 96 kHz : 100 dB
Sampling frequency; 48/ 44.1 kHz : 90 dB
DivX
Max. Resolution : 720 x 480 pixels (30fps)/720 x 576 pixels (25fps)
Audio Bit Rate : 32kbps - 320kbps
Audio Sampling Frequency : 32k/44.1k/48kHz
MPEG video
Max. Resolution : 720 x 480 pixels (30fps)/720 x 576 pixels (25fps)
Audio Bit Rate : 32kbps - 320kbps
Audio Sampling Frequency : MPEG-1:32k/44.1k/48kHz MPEG-2:16k/22.05/24kHz
MP3
Bit Rate : 32kbps - 320kbps
Sampling Frequency : MPEG-1:32k/44.1k/48kHz MPEG-2:16k/22.05/24kHz
WMA
Bit Rate : 32kbps - 320kbps
Sampling Frequency : 22.05k/32k/44.1k/48kHz
WAV (Linear PCM)
Quantization Bit Rate: 16 bit
Sampling Frequency : 44.1kHz
USB Interface (KDV-5244U/KDV-5544U)
USB Standard
: USB1.1/2.0
Data Transfer Rate
: Maximum 12 Mbps
Compatible Device
: Mass storage class
Maximum Supply current
: 500 mA
File System
: FAT16/ 32
playable Video/Audio Format
: MPEG1/ MPEG2/ DivX (Maximum 2 Mbps)/
MP3/ WMA/ WAV (Linear PCM)
Audio section
Maximum output power
: 50 W × 4
Output power (DIN 45324, +B=14.4V)
: 30 W × 4
Speaker Impedance
: 4 - 8
Tone action
Frequency (BAND1 - 5): 60/ 250/ 1k/ 4k/ 16k Hz
Gain : ±9 dB
Video terminal
Output/ Input level : 1 Vp-p (75 Ω)
Color System : PAL
Audio terminal
Output level / Load (DVD) : 2500 mV/10 kΩ
Output impedance : ≤ 600 Ω
Input Maximum Voltage : 1200 mV
Input Impedance : 10 kΩ
General
Operating voltage (10.5 – 16V allowable) : 14.4 V
Maximum Current consumption
: 10 A
Installation Size (W x H x D)
: 182 × 53 × 159 mm
Weight
: 1.4 kg
This Product is not installed by the manufacturer of a vehicle on the production line, nor by the professional importer of a vehicle into an EU Member State.
Information on Disposal of Old Electrical and Electronic Equipment and Batteries (applicable for EU countries that have adopted separate waste collection systems)

Products and batteries with the symbol (crossed-out wheeled bin) cannot be disposed as household waste.
Old electrical and electronic equipment and batteries should be recycled at a facility capable of handling these items and their waste byproducts.
Contact your local authority for details in locating a recycle facility nearest to you.
Proper recycling and waste disposal will help conserve resources whilst preventing detrimental effects on our health and the environment.
Notice: The sign "Pb" below the symbol for batteries indicates that this battery contains lead.
The marking of products using lasers (Except for some areas)
CLASS 1 LASER PRODUCT
The label is attached to the chassis/case and says that the component uses laser beams that have been classified as Class 1. It means that the unit is utilizing laser beams that are of a weaker class. There is no danger of hazardous radiation outside the unit.
CE
Declaration of Conformity with regard to the EMC Directive 2004/108/EC
Manufacturer:
Kenwood Corporation
2967-3 Ishikawa-machi, Hachioji-shi, Tokyo, 192-8525 Japan
EU Representative's:
Kenwood Electronics Europe BV
Amsterdamseweg 37, 1422 AC UITHOORN, The Netherlands
For Turkey
This product complies with Directive, Number 26891 regarding "REGULATION ON THE RESTRICTION OF THE USE OF CERTAIN HAZARDOUS SUBSTANCES IN ELECTRICAL AND ELECTRONIC EQUIPMENT".
iPod is a trademark of Apple Inc., registered in the U.S. and other countries.
iPhone is a trademark of Apple Inc.
"Made for iPod" means that an electronic accessory has been designed to connect specifically to iPod and has been certified by the developer to meet Apple performance standards.
"Works with iPhone" means that an electronic accessory has been designed to connect specifically to iPhone and has been certified by the developer to meet Apple performance standards.
Apple is not responsible for the operation of this device or its compliance with safety and regulatory standards.
DivX® is a registered trademarks of DivX, Inc., and is used under license.
DVD
is a trademark of DVD Format/Logo Licensing Corporation registered in the U.S., Japan and other countries.
This product incorporates copyright protection technology that is protected by U.S. patents and other intellectual property rights. Use of this copyright protection technology must be authorized by Macrovision, and is intended for home and other limited viewing uses only unless otherwise authorized by Macrovision. Reverse engineering or disassembly is prohibited.
Manufactured under license from Dolby Laboratories. Dolby and the double-D symbol are trademarks of Dolby Laboratories.
KENWOOD

- KDV-5244U KDV-5544U KDV-4244 KDV-4544
- INSTRUCTION MANUAL
- Contents
- Before use 3
- For first use 7
- Basic Operation of control panel 8
- Function Control/ Setup Menu 10
- Clock/ Display Settings 14
- Disc/ USB Operations of Remote Control 16
- iPod Operations of Remote Control 20
- Music disc/Audio file/iPod Operation of Control Panel 21
- Tuner Operation 24
- Other Functions 26
- Audio Adjustments 27
- Basic Operations of Remote Control 32
- Appendix 33
- Accessories/ Installation Procedure 36
- Connecting Wires to Terminals 37
- Installation/Removing the Unit 39
- Troubleshooting Guide 40
- Specifications 42
- About the functions by playback source
- Before use
- ▲WARNING
- To prevent injury or fire, take the following precautions:
- How to reset your unit
- Cleaning the Unit
- Cleaning the Faceplate Terminals
- Lens Fogging
- Handlingdiscs
- Discs that cannot be used
- Use of "DualDisc"
- About Audio files
- - Playable Audio file
- - Acceptable media
- - Playable disc file format
- • USB device Playable Model
- - Playable USB device file system
- - iPod Playable Model
- - Playing order of the Audio file
- About Video files
- - Acceptable video files
- - Extensions
- About Picture files
- iPod/iPhone that can be connected to this unit
- About USB device
- About DivX
- About DivX Certified
- Region codes in the world
- Operation regulatory marks
- Discs with limited period of use
- Before using this unit for the first time
- Demonstration mode setting
- Display Setting
- Selecting Russian Characters *1
- Select Standby
- Enter Function Control mode
- Enter Menu mode
- Set the Demonstration mode
- Set the Russian Character\*1
- Exit Function Control mode
- Turning OFF the Power
- Language Setup
- DSP Setup
- Basic Operation of control panel
- General functions
- Power/Source Select button: [SRC]
- Volume control: [AUD] knob
- Subwoofer output: [AM-]
- AV input
- Switching display: [DISP]
- Text/Title scroll: [DISP]
- Muting volume upon reception of phone call
- Tuner functions
- FM band: [FM+]
- AM band: [AM-]
- Tuning: [I◄◄] / [►►I]
- Preset memory: [1] - [6]
- Preset tuning: [1] - [6]
- Traffic information: [FM+]
- DVD/USB/iPod play functions
- Disc play: Disc slot
- Disc ejection: [▲]
- USB device/iPod play\* 1: USB Terminal
- USB device/ iPod removing\* 1
- Pause and play: [6]
- Stops playing: [1]
- Track/File search: [◀◀] / [▶▶]
- Title/ Folder search DVD-VIDEO DVD-VR Audio File MPEG/DivX® JP:GJPEG[FM+]/[AM-]
- Search mode AudioFileAudioFile MPEG/DivX® JPEGJPEG PodiPod : [9]
- Changing the audio channel Video CD : [2]
- Repeat play: [4]
- Random play Video CD Audio File CD MPEG/DivX® PodiPod : [3]
- All Random play AudioFileAMMEGFDivX® PodiPod[3]
- Function Control/ Setup Menu
- FunctionControl
- Enter Function Control mode
- Select your desired setup item
- Make a setting
- Exit Function Control mode
- Setup menu of remote control
- Clock/ Display Settings
- Manual Clock Adjustment
- Text Display Selection
- Select the text
- AV Input Display Setting
- Theft Deterrent Faceplate
- Removing the Faceplate Press the Release button.
- Reattaching the Faceplate Refer to the following diagram when reattaching the faceplate.
- Disc/ USB Operations of Remote Control
- Playing a Disc
- Inserting a disc in the unit
- Playing a USB device (KDV-5244U/ KDV-5544U)
- Connecting the USB device
- Basic Operation
- Fast Forwarding or Fast Backwarding
- Slow Forwarding or Backwarding DVD-V D: ODVD-VIDEO DVD-VRDVD-VI Video CDVideo CD
- Forward frame-by-frame playback DVD-V DI-ODVD-VIDEO DVD-VRDVD-VI Video CDVideo CD
- minutes skip MPEG/DivX®
- Camera angle DVD-V D ODVD-VIDEO
- Subtitles DVD-VIDDVD-VIDEO DMPBRODMEVR
- Changing the audio stream DVD-V D: ODVD-VIDEO DVD-VRDVD-VR MPEG/DivX®
- Changing the audio channel Video CDVideo CD
- Displaying Status and Control
- on-screen DVD-VIDEO DVD-VR Video CD MPEG/DivX® JPEGJPEG
- Status bar
- Press the [OSD] button during playback.
- Press the [◀] or [▶] button during control bar on-screen to select an item. Press the [ENTER] button.
- Press the [▲] or [▼] button to change or select the setting. Press the [ENTER] button.
- DVD-VIDEO Disc Menu
- DVD-VR Menu
- Video CD PBC Menu
- Canceling the PBC playback
- Zoom
- Time Search DVD-VIDEO DVD-VR Video CD
- Direct Search
- Press the number buttons
- Press the [ENTER] button
- File Select MPEG/DivX® JP-GJPEGAudioFileAudioFile
- Show the control screen
- To select a playback mode
- Show the Playback mode selection screen Press the [OSD] button.
- Press the [◀] or [▶] button to select a playback mode MPEG/DivX® Audio leAudioFile
- Press the [▲] or [▼] button to select an item
- Press the [ENTER] button
- Press the [■] button to stop
- Show the list screen
- Select an item from the folder list
- Select a track to start playing
- To remove the List screen, press the [MENU] button again.
- Playing the iPod
- Connecting the iPod
- Playing or pausing
- Stopping the play
- Searching for a chapter/ scene/ track/ file
- Search Mode
- Search for music/video
- Select a playback mode Press the [◀] or [▶] button.
- Select an item
- Music disc/Audio file/iPod Operation of Control Panel
- Music/VideoSearch Audio FileAudioFile MPEG/DivX®
- JPEGJPEG
- Enter Music/Video Search mode
- Press the [Qbutton.
- Search for track/ file
- CD
- Cancelling the Music/Video Search mode
- Press the [button.
- Music/Video Search for iPod
- Enter Music/Video Search mode Press the [Qbutton.
- Search for song/video
- Searching for Music by Initial
- Enter alphabet search mode
- Press the [button for at least 1 second.
- Select the initial to be searched for
- Determine the selected initial
- Press the [AUD] knob.
- iPod Control by Hand Mode
- Enter iPod Control by Hand Mode Press [Q, ec., and select "iPodCTRL". Press the [AUD] knob.
- Set the iPod Control by Hand Mode Turn the [AUD] knob.
- Exit iPod Control by Hand Mode Press the [button.
- Basic Operation of Disc Changer (Optional)
- Selecting CD changer source
- Music search
- Disc Search
- Playing the Current Song or Disc Repeatedly (Repeat play)
- Playing the first part of each music on the disc (Scan play)
- Playing all the music on the disc in random order (Random play)
- Playing the music in the disc changer randomly (Magazine random play)
- Searching the music by entering the track number (Direct Music Search)
- Searching the disc by entering the disc number (Direct Disc Search)
- Auto memory entry
- Enter Menu mode
- Select the Auto memory mode
- Open Auto Memory Entry
- PTY(ProgramType)
- Enter PTY mode
- Select the Program Type
- Search for the selected Program Type station
- Exit PTY mode
- Program Type preset
- Presetting the Program Type
- Recalling the preset Program Type
- Changing Language for PTY Function
- Other Functions
- Activating Security Code
- Enter Security Code mode
- Enter Security Code
- Confirm the Security Code
- Do the step 3 through 4 operation, and reenter the Security Code.
- Exit Security Code mode
- Entering Security Code
- Do the step 4 through 5 operation, and enter the Security Code.
- Deactivating Security Code
- Press the [AUD] knob for at least 3 seconds.
- Exit Security Code mode
- Audio Adjustments
- AudioControl
- AudioSetup
- Preset Equalizer Select
- Select the iPod Equalizer curve
- Exit Preset Equalizer mode.
- Manual Equalizer Control
- PositionControl
- CabinSelection
- SpeakerSetting
- X'OverSetting
- DTA (Digital Time Alignment) Setting
- Audio Preset Memory
- Setup Sound Control
- Enter Audio Preset Memory mode (Other than Standby mode)
- Select the number to put in the memory Turn the [AUD] knob to select number, and then press the [AUD] knob.
- Put the Audio Preset in the memory Turn the [AUD] knob to select "YES", and then press the [AUD] knob.
- Exit Function Control mode Press the [Q] button for at least 1 second.
- Audio Preset Recall
- Select the source
- Enter Audio Preset Recall mode
- Select the number to recall in the memory
- Recall the Audio Preset
- Exit Function Control mode
- Basic Operations of Remote Control
- Remote Controller Mode Switch
- AUD mode: [AUD]
- DVD mode: [DVD]
- General Control
- Volume reduce: [ATT]
- In Audio Control (AUD mode)
- Audio item select: [AUDIO]
- Adjust the Audio item: [VOL]
- Dual Zone Control
- In Tuner Source (AUD mode)
- In DVD/USB/iPod Source (DVD mode)
- About []
- Loading and Replacing battery
- CAUTION
- Appendix
- For operating KCA-BT200 (Optional)
- For operating KCA-BT100 (Optional)
- Function Glossary
- • "AF"(AlternativeFrequency)
- - "AUTO1", "AUTO2", "MANUAL" (Tuning mode select)
- • "AVIN" (Audio/ visual input)
- • DTA (Digital Time Alignment)
- • "HIGHWAY" (Highway sound)
- - "ICON"
- - "NEWS" (News Bulletin with Timeout Setting)
- • "OFF"(PowerOFFTimer)
- • "RUS" (Russian language setting)
- • "SWPRE" (Switching Preout)
- • "ZONE2" (Dual Zone)
- Accessories/ Installation Procedure
- Accessories
- Installation Procedure
- About CD players/disc changers connected to this unit
- Connecting Wires to Terminals
- Connecting the ISO Connector
- Installation/Removing the Unit
- Installation
- Removing the hard rubber frame
- Removing the Unit
- Troubleshooting Guide
- Tuner source
- Disc source
- Audio file source
- The messages shown below display your systems condition.
- Specifications
- FM tuner section
- MW tuner section
- LW tuner section
- DVD player section
- USB Interface (KDV-5244U/KDV-5544U)
- Audio section
- General
- Information on Disposal of Old Electrical and Electronic Equipment and Batteries (applicable for EU countries that have adopted separate waste collection systems)
- The marking of products using lasers (Except for some areas)
- CLASS 1 LASER PRODUCT
- CE
- Declaration of Conformity with regard to the EMC Directive 2004/108/EC
- Manufacturer:
- EU Representative's:
- For Turkey
- DVD
- KENWOOD
Brand : KENWOOD
Model : KDV-5544U
Category : Car Radio