GR0080S - Grill Applica - Free user manual and instructions
Find the device manual for free GR0080S Applica in PDF.

| Product Type | Electric Grill |
| Model Number | GR0080S |
| Brand | Applica |
| Dimensions (W x D x H) | Approx. 30 x 20 x 15 cm |
| Weight | Approx. 2.0 kg |
| Power Supply | 120 V, 60 Hz, 1500 W |
| Cooking Surface | Non-stick coated |
| Temperature Control | Adjustable thermostat with indicator light |
| Indicator Light | Power on / heating indicator |
| Handles | Cool-touch, stay-cool handles |
| Drip Tray | Removable, dishwasher safe |
| Cooking Plate | Removable for cleaning |
| Dishwasher Safe Parts | Drip tray and cooking plate |
| Safety Features | Auto shut-off, overheat protection |
| Wattage | 1500 W |
| Voltage | 120 V |
| Frequency | 60 Hz |
| Certifications | UL listed |
| Included Accessories | Drip tray, spatula (may vary) |
| Repairability Index | Standard consumer electronics |
| Warranty | 1 year limited warranty |
| Country of Origin | China |
| Care Instructions | Wipe with damp cloth, do not immerse in water |
Frequently Asked Questions - GR0080S Applica
User questions about GR0080S Applica
0 question about this device. Answer the ones you know or ask your own.
Ask a new question about this device
Download the instructions for your Grill in PDF format for free! Find your manual GR0080S - Applica and take your electronic device back in hand. On this page are published all the documents necessary for the use of your device. GR0080S by Applica.
USER MANUAL GR0080S Applica
natural_image
Man in apron holding a GEORGE FOREMAN® food processor with open lid (no visible text or symbols on device)Customer Care Line:
USA/Canada
1-800-231-9786
Accessories/Parts (USA / Canada)
For online customer service
and to register your product, go to
www.prodprotect.com/applica

text_image
3 YEAR UNITED WARRANTYVari-Temp
GRILL
Model
Modelo

GR0080S
Please Read and Save this Use and Care Book.
IMPORTANT SAFEGUARDS
When using electrical appliances, basic safety precautions should always be followed, including the following:
Read all instructions.
☐ Do not touch hot surfaces. Use handles or knobs.
☐ To protect against electrical shock do not immerse cord, plugs or appliance in water or other liquids.
☐ Close supervision is necessary when any appliance is used by or near children.
☐ Unplug from outlet when not in use and before cleaning. Allow to cool before putting on or taking off parts.
☐ Do not operate any appliance with a damaged cord or plug, or after the appliance malfunctions or has been damaged in any manner. Return appliance to the nearest authorized service facility for examination, repair or adjustment. Or, call the appropriate toll-free number on the cover of this manual.
☐ The use of accessory attachments not recommended by the appliance manufacturer may cause injuries.
Do not use outdoors.
☐ Do not let cord hang over edge of table or counter, or touch hot surfaces.
☐ Do not place on or near a hot gas or electric burner, or in a heated oven.
☐ Extreme caution must be used when moving an appliance containing hot oil or other hot liquids.
☐ To disconnect, turn any control to OFF (0), then remove plug from wall outlet.
☐ Do not use this appliance for other than intended use.
☐ The appliance is only to be operated in the closed position.
SAVE THESE INSTRUCTIONS.
This product is for household use only.
POLARIZED PLUG (120V Models Only)
This appliance has a polarized plug (one blade is wider than the other). To reduce the risk of electric shock, this plug is intended to fit into a polarized outlet only one way. If the plug does not fit fully into the outlet, reverse the plug. If it still does not fit, contact a qualified electrician. Do not attempt to modify the plug in any way.
TAMPER-RESISTANT SCREW
Warning: This appliance is equipped with a tamper-resistant screw to prevent removal of the outer cover. To reduce the risk of fire or electric shock, do not attempt to remove the outer cover. There are no user-serviceable parts inside. Repair should be done only by authorized service personnel.
ELECTRICAL CORD
a) A short power-supply cord (or detachable power-supply cord) is to be provided to reduce the risk resulting from becoming entangled in or tripping over a longer cord.
b) Longer detachable power-supply cords or extension cords are available and may be used if care is exercised in their use.
c) If a long detachable power-supply cord or extension cord is used,
1) The marked electrical rating of the detachable power-supply cord or extension cord should be at least as great as the electrical rating of the appliance,
2) If the appliance is of the grounded type, the extension cord should be a grounding-type 3-wire cord, and
3) The longer cord should be arranged so that it will not drape over the countertop or tabletop where it can be pulled on by children or tripped over.
Note: If the power supply cord is damaged, it should be replaced by qualified personnel, in Latin America, by an authorized service center.
Product may vary slightly from what is illustrated.

text_image
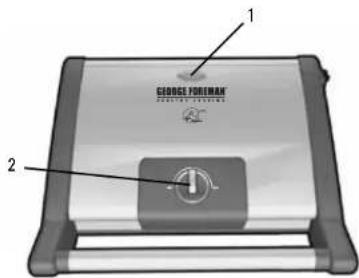
Labeled diagram of a portable electric grill with numbered parts for identification-
Lid handle
-
Grill lid
-
Grill plate (upper)
-
Grill plate (lower)
-
On/Off switch
† 6. Drip tray (Part # GR0080S-01)
† 7. Spatula (Part # GR0080S-02)
Note: † indicates consumer replaceable/removable parts
-
Preheat indicator light
-
Variable temperature control knob
text_image
1 GEORGE POWERMAN 2How to Use
This product is for household use only.
GETTING STARTED
- Remove all packing material and, if applicable, any stickers from the product; remove and save literature.
- Please go to www.prodprotect.com/applica to register your warranty; for additional information go to www.georgeforemancooking.com.
- Wash all removable parts and/or accessories as instructed in CARE AND CLEANING.
- Wash grill plates with hot, soapy water and wipe with a moist paper towel to remove any dust. Wipe dry with a soft cloth or paper towel.
- Select a dry, level location where your grill will be used, leaving enough space between the back of grill and wall to allow heat to flow without damage to cabinets and walls.
DRIP TRAY
Place drip tray under front sloped section of grill.
PREHEATING THE GRILL
-
Close cover on grill.
-
Unwind cord and plug into an outlet.
- Press the On/Off (I/O) switch on the back right side of the grill to the ON (I) position. The preheat indicator light turns on to show the grill is heating.
- Set the variable temperature control knob on the top of the grill to the desired setting (see GRILLING CHART for suggested temperatures).
- Allow the grill to preheat (approximately 5 minutes) before grilling. When the selected temperature is reached, the preheat indicator light will go out.
Note: The preheat indicator light will turn on and off during cooking to indicate your desired temperature is being maintained.
GRILLING
- Using a pot holder, carefully open the preheated grill.
- Before first use, lightly oil grill plates, if desired.
Note: Aerosol cooking spray should not be used on nonstick surface. Chemicals that allow spray to come out of can build up on surface of grill plates and reduce their efficiency. - Carefully place foods to be cooked on lower grill plate. This grill accommodates up to 4 servings.
Note: Do not overload grill.
- Close the cover and allow food to cook for the selected time. If desired, use a kitchen timer.
Note: Use suggested cooking times found in the GRILLING CHART on pages 6 and 7. Important: Do not leave the appliance unattended during use.
-
Light pressure can be used on the handle to press and heat food to your liking. Important: Do not use heavy pressure on the lid of the grill at any time.
-
After selected time, the food should be done. If you would prefer longer cooking, simply follow the steps beginning at step 4.
- Once cooking is complete, carefully open the grill cover using a pot holder.
- Remove cooked food using plastic spatula provided.
Note: Always use silicone, heatproof plastic or wood utensils to avoid scratching nonstick surface of grill plates. Never use metal spatulas, skewers, tongs, forks or knives.
- When finished cooking, turn the temperature control knob to the MIN setting, turn the On/Off (I/O) switch OFF (O) and unplug the appliance.
Important: Heat will continue to be ON until the On/Off (I/O) switch is pressed or the appliance is unplugged.
- Allow liquid in drip tray to cool before removing it from under grill. Wash and dry drip tray after each use.
SUGGESTED GRILL SETTINGS
MIN: Use to reheat fully cooked foods
MIN – Mid: Sandwiches and wraps
Mid: Fish
Mid – MAX: Fish, poultry, fruits and vegetables
MAX: Meat
SUGGESTED GRILLING CHART
The following are meant to be used as a guideline only. The times reflect a full grill of food. Cooking times will depend upon thickness and cut being used. Use a cooking thermometer as a test for doneness. If the food needs longer cooking, check periodically to avoid overcooking the food.
| FOOD COOKING | TIME | SETTING COMMENTS | |
| MEAT | |||
| Hamburger (5 oz.) 6 | -8 minutes MAX | 34 -inch thick | Cooked to medium ( 160^ / 71^ ) |
| Frozen hamburgers (5 oz.) | 7 - 9 minutes MAX | 34 -inch thick | Cooked to medium ( 160^ / 71^ ) |
| Flank steak ( 34 lb.) 7 | -9 minutes MAX | 34 -inch thick | Cooked to medium rare( 145^ / 63^ ) |
| Skirt steak ( 12 lb.) 6 | -8 minutes MAX | 34 -inch thick | Cooked to medium ( 160^ / 71^ ) |
| NY strip steak / shell steak (6 oz.) | 6 - 8 minutes MAX | 34 -inch thick | Cooked to medium rare( 145^ / 63^ ) |
| Beef tenderloin (5 oz.) | 5 - 7 minutes MAX | 34 -inch thick | Cooked to medium rare( 145^ / 63^ ) |
| FOOD COOKING | TIME | SETTING COMMENTS | |
| MEAT | |||
| Beef kabobs 6 – 8 minutes MAX Cooked to medium (160°F / 71°C) | |||
| Pork loin chops, boneless | 4 – 6 minutes Mid-MAX 3⁄4-inch thickCooked to 160°F (71°C) | ||
| Pork loin chops, bone in | 10 – 12 minutes Mid-MAX 1⁄2 -inch thickCooked to 160°F (71°C) | ||
| Sausage, link or patty | 5 - 7 minutes Mid-MAX Cooked to 160°F (71°C) | ||
| Hot dogs | 5 – 7 minutes Mid-MAX Cooked to 168°F (76°C) | ||
| Bacon | 6 – 8 minutes Mid-MAX Cooked until just crisp | ||
| Smoked pork loin chops, boneless | 6 – 8 minutes Mid-MAX Cooked to 160°F (71°C) | ||
| Lamb chops, loin | 7 – 9 minutes MAX 3⁄4-inch thickCooked to medium (160°F / 71°C) | ||
| POULTRY | |||
| Chicken breast, boneless and skinless (8 oz.) | 11 – 13 minutes Mid-MAX Cooked to 170°F (77°C) | ||
| Chicken tenderloins (4 to 6 pieces) | 4 – 6 minutes Mid-MAX Cooked to 170°F (77°C) | ||
| Turkey tenderloin (3⁄4 lb.) | 9 – 11 minutes Mid-MAX Cooked to 170°F (77°C) | ||
| Turkey burgers (5 oz.) | 6 – 8 minutes Mid-MAX Cooked to 170°F (77°C) | ||
| FISH | |||
| Tilapia fillets (6 oz., ea.) | 3 – 6 minutes Mid Cooked to 145°F (63°C) | ||
| Trout fillet (6 oz.) 3 – 6 minutes Mid-MAX Cooked to 145°F (63°C) | |||
| Salmon fillet (8 oz. piece) | 5 – 7 minutes Mid-MAX Cooked to 145°F (63°C) | ||
| Salmon steak (6 – 8 oz.) | 7 – 9 minutes MAX Cooked to 145°F (63°C) | ||
| Tuna steak (6 oz.) | 7 – 9 minutes Mid-MAX Cooked to 145°F (63°C) | ||
| Shrimp | 4 – 6 minutes Mid-MAX Cooked to 145°F (63°C) | ||
Please note: To be sure your food is fully cooked the USDA recommends the following guidelines. Use a kitchen timer. Using a meat thermometer, test for doneness by inserting the meat thermometer into the center of the food being cooked and make sure the thermometer is not touching the bone or grill plates.
| FOOD TO BE COOKED MEDIUM WELL DONE OR | FULLY COOKED | |||
| Chicken breast 170°F | 77°C | |||
| Chicken thigh 180°F | 82°C | |||
| Beef / Lamb / Veal 160°F | 71°C | 170°F | 77°C | |
| Pork 160°F | 71°C | |||
| Reheated cooked meats and poultry 165°F | 74°C | |||
GRILLING FRUITS AND VEGETABLES
The following are meant to be used as a guideline only. The times reflect a full grill of food. Cooking time will depend upon thickness of food. Use a fork inserted into the center of the food to test for doneness. (Be careful not to touch the grill plate.) If the food needs longer cooking, check periodically to avoid overcooking the food.
| FOOD SETTING GRILLING TIME | ||
| Asparagus spears Mid-MAX 4 – 6 minutes | ||
| Bell peppers, assorted colors cut into 12 -inch rings | Mid-MAX 5 – 7 minutes | |
| Mushrooms, thickly sliced Mid-MAX 4 – 5 minutes | ||
| Onion slices, 12 -inch Mid-MAX 5 – 7 minutes | ||
| Potato slices, 12 -inch | Mid-MAX | 15 – 18 minutes |
| Portabella mushrooms, 3-inch diameter | Mid-MAX | 4 – 6 minutes |
| Zucchini slices, 12 -inch | Mid-MAX 3 – 4 minutes | |
| Fresh pineapple slices, 12 -inch | Mid-MAX 2 – 4 minutes | |
GRILLING TIPS
- To prevent heat loss and for even cooking, do not open the lid frequently.
- For best results, do not overload the grill
- When first cooking a particular food, check for doneness several minutes before suggested time; if necessary adjust the time.
- When cooking several pieces of food, try to have them similar in size and thickness.
- Remember that since grill is cooking from both sides, cooking time will typically be shorter than expected. Watch carefully to avoid overcooking.
- For added flavor, add dry seasonings or marinate foods before grilling.
Important: Use only silicone, heatproof plastic and wooden utensils when cooking on the grill. Silicone utensils are especially good because they do not discolor or melt with the high temperature.
Care and Cleaning
This appliance contains no user-serviceable parts. Refer service to qualified service personnel.
CLEANING
Caution: To avoid accidental burns, allow grill to cool thoroughly before cleaning.
- Before cleaning, unplug grill from wall outlet and allow to cool.
Important: Heat will continue to be ON until the On/Off (I/O) switch is pressed or the appliance is unplugged. - Place drip tray under front of grill. Use plastic spatula to scrape off any excess fat and food particles left on the grill plates; runoff will drip into the drip tray.
- Use a warm, soapy sponge to wipe plates clean, then rinse sponge and wipe again to remove any soapy residue. Dry thoroughly with an absorbent paper towel.
- To remove stubborn buildup, use a nylon or nonmetallic scrubbing pad to clean the grill plates.
Important: Do not use metallic scrubbing pads, steel wool or any abrasive cleaners to clean any part of your grill; use only nylon or nonmetallic scrubbing pads.
- Empty drip tray and wash in warm, soapy water; dry thoroughly with a paper towel or cloth.
- To clean the grill cover, wipe with a warm, damp sponge and dry with a soft, dry cloth.
Important: Do not immerse body of grill in water or any other liquid.
- Any servicing requiring disassembly other than the above cleaning must be preformed by a qualified electrician.
Caution: Make sure to hold grill cover while cleaning to prevent accidental closing and injury.
STORAGE
Always make sure grill is clean and dry before storing.
TROUBLESHOOTING
| PROBLEM POSSIBLE CAUSE SOLUTION | ||
| Finish on grill plates is scratched or has cut marks. | Metal utensils have been used. | Always use silicone,heatproof plastic, nylonor wood utensils to avoidscratching nonstick surfaceof grill plates. Never usemetal spatulas, skewers,tongs, forks or knives. |
| The indicator light turns on and off. | The heating elements are cycling. | This is normal. The lightcomes on when the grill isplugged in and off once theset temperature is reached.However, it will cycle onand off to indicate thecorrect temperature is beingmaintained. |
| Grill marks on food are very light. The food looks steamed. | Grill was not fully preheated before use. | Always preheat grill at least5 minutes before cookingany foods. |
| There is food buildup on grill plates. | Grill not properly cleaned after use. | Use nylon scrubbing pad andhot, soapy water to cleangrill plates. Do not use steelwool scrubbing pads orabrasive cleaners to cleangrill. |
| Food is dry and burnt. Food is overcooked. Since grill is cooking fromboth sides, food is cookedmuch faster than in a skilletor under a broiler. Usecooking chart as a guide andcheck food at lowest timestated on chart. | ||
| Grill does not turn on. Grill is not plugged in. Check to be sure applianceis plugged into workingoutlet and On/Off (I/O) switchis in the ON (I) position. | ||
text_image
Labeled diagram of a portable TV or gaming device with numbered parts for identificationFor service, repair or any questions regarding your appliance, call the appropriate 800 number on cover of this book. Please DO NOT return the product to the place of purchase. Also, please DO NOT mail product back to manufacturer, nor bring it to a service center. You may also want to consult the website listed on the cover of this manual.
Three-Year Limited Warranty
(Applies only in the United States and Canada)
What does it cover?
- Any defect in material or workmanship provided; however, Applica's liability will not exceed the purchase price of product.
For how long?
• Three years from the date of original purchase with proof of such purchase.
What will we do to help you?
- Provide you with a reasonably similar replacement product that is either new or factory refurbished.
How do you get service?
• Save your receipt as proof of date of sale.
- Check our on-line service site at www.prodprotect.com/applica, or call our toll-free number, 1-800-231-9786, for general warranty service.
• If you need parts or accessories, please call 1-800-738-0245.
What does your warranty not cover?
• Damage from commercial use
• Damage from misuse, abuse or neglect
• Products that have been modified in any way
• Products used or serviced outside the country of purchase
• Glass parts and other accessory items that are packed with the unit
• Shipping and handling costs associated with the replacement of the unit
- Consequential or incidental damages (Please note, however, that some states do not allow the exclusion or limitation of consequential or incidental damages, so this limitation may not apply to you.)
How does state law relate to this warranty?
- This warranty gives you specific legal rights, and you may also have other rights that vary from state to state or province to province.
Made in People's Republic of China
Printed in People's Republic of China