
EGG9363 - Cooktop AEG-ELECTROLUX - Free user manual and instructions
Find the device manual for free EGG9363 AEG-ELECTROLUX in PDF.


| Product type | Gas hob |
| Brand | AEG-ELECTROLUX |
| Model | EGG9363 |
| Hob dimensions (W x D) | 894 x 510 mm |
| Recess dimensions (W x D) | 830 x 480 mm |
| Number of burners | 4 |
| Burner types | Auxiliary (1.0 kW), Semi-rapid (2.0 kW), Rapid (2.8 kW), Triple ring (4.0 kW) |
| Total gas power (G20) | 12.8 kW |
| Electrical supply | 230 V ~ 50 Hz, 3 A |
| Compatible gas type | Natural gas G20 (20 mbar) and LPG G30/G31 (28-30/37 mbar) |
| Gas connection | G 1/2" |
| Category | II2H3+ |
| Appliance class | 3 |
| Surface material | Stainless steel and enamel |
| Safety device | Thermocouple: automatic gas shut-off if the flame goes out |
| Ignition | Integrated electronic ignition |
| Flame adjustment | Variable from minimum to maximum power |
| Maintenance | Clean with a damp cloth and mild detergent. Pan supports are hand washable (not dishwasher safe). |
| Included accessories | Replacement nozzles for LPG, adhesive labels, sealing gasket |
| Repairability | Original spare parts available: nozzles, power cord, spark plug, thermocouple |
Frequently Asked Questions - EGG9363 AEG-ELECTROLUX
User questions about EGG9363 AEG-ELECTROLUX
0 question about this device. Answer the ones you know or ask your own.
Ask a new question about this device
Download the instructions for your Cooktop in PDF format for free! Find your manual EGG9363 - AEG-ELECTROLUX and take your electronic device back in hand. On this page are published all the documents necessary for the use of your device. EGG9363 by AEG-ELECTROLUX.
USER MANUAL EGG9363 AEG-ELECTROLUX
natural_image
Abstract geometric composition with three overlapping white circles on a gray background (no text or symbols)CONTENTS
- SAFETY INFORMATION 3
- PRODUCT DESCRIPTION 5
- DAILY USE 5
- HELPFUL HINTS AND TIPS 6
- CARE AND CLEANING 7
- TROUBLESHOOTING 8
- INSTALLATION 9
- TECHNICAL INFORMATION 13
- ENVIRONMENT CONCERNS 14
WE'RE THINKING OF YOU
Thank you for purchasing an Electrolux appliance. You've chosen a product that brings with it decades of professional experience and innovation. Ingenious and stylish, it has been designed with you in mind. So whenever you use it, you can be safe in the knowledge that you'll get great results every time.
Welcome to Electrolux.
Visit our website for:

Get usage advice, brochures, trouble shooter, service information: www.electrolux.com

Register your product for better service: www.electrolux.com/productregistration

Buy Accessories, Consumables and Original spare parts for your appliance: www.electrolux.com/shop
CUSTOMER CARE AND SERVICE
We recommend the use of original spare parts.
When contacting Service, ensure that you have the following data available. The information can be found on the rating plate. Model, PNC, Serial Number.

Warning / Caution-Safety information
General information and tips
Environmental information
Subject to change without notice.
1. ⚠ SAFETY INFORMATION
This appliance is suitable for the following markets: GB
Before the installation and use of the appliance, carefully read the supplied instructions. The manufacturer is not responsible if an incorrect installation and use causes injuries and damages. Always keep the instructions with the appliance for future reference.
1.1 Children and vulnerable people safety

WARNING!
Risk of suffocation, injury or permanent disability.
- This appliance can be used by children aged from 8 years and above and persons with reduced physical, sensory or mental capabilities or lack of experience and knowledge if they have been given supervision or instruction for the operation of the appliance by a person who is responsible for their safety.
- Do not let children play with the appliance.
- Keep all packaging away from children.
- Keep children and pets away from the appliance when it operates or when it cools down. Accessible parts are hot.
- If the appliance has a child safety device, we recommend that you activate it.
- Cleaning and user maintenance shall not be made by children without supervision.
1.2 Installation

WARNING!
Only a qualified person must install this appliance.
- Remove all the packaging.
- Do not install or use a damaged appliance.
- Obey the installation instruction supplied with the appliance.
-
Keep the minimum distance from the other appliances and units.
-
Always be careful when you move the appliance because it is heavy. Always wear safety gloves.
- Seal the cut surfaces with a sealant to prevent moisture to cause swelling.
- Protect the bottom of the appliance from steam and moisture.
- Do not install the appliance adjacent to a door or under a window. This prevents hot cookware to fall from the appliance when the door or the window is opened.
- If the appliance is installed above drawers make sure that the space, between the bottom of the appliance and the upper drawer, is sufficient for air circulation.
- The bottom of the appliance can get hot. We recommend to install a non-combustile separation panel under the appliance to prevent access to the bottom.
Electrical connection

WARNING!
Risk of fire and electrical shock.
- All electrical connections must be made by a qualified electrician.
- Before every wiring make sure the main terminal of the appliance is not live.
- Make sure the appliance is installed correctly. Loose and incorrect plug and socket can make the terminal become too hot.
- Make sure that a shock protection is installed.
- Do not let the electricity bonds touch the appliance or hot cookware, when you connect the appliance to the near sockets.
- Do not let the electricity bonds tangle.
- Use a strain relief clamp on cable.
- Use the correct mains cable.
- Make sure not to cause damage to the mains plug and to the mains cable. Contact the Service or an electrician to change a damaged mains cable.
- The electrical installation must have an isolation device which lets you discon-
nect the appliance from the mains at all poles. The isolation device must have a contact opening width of minimum 3 mm.
- Use only correct isolation devices: line protecting cut-outs, fuses (screw type fuses removed from the holder), earth leakage trips and contractors.
Gas connection
- All gas connections should be made by a qualified person.
- Make sure that there is air circulation around the appliance.
- The information about the gas supply is on the rating plate.
- This appliance is not connected to a device, which evacuates the products of combustion. Make sure to connect the appliance according to current installation regulations. Pay attention to requirements regarding adequate ventilation.
1.3 Use

WARNING!
Risk of injury, burns or electric shock.
- Use this appliance in a household environment.
- Do not change the specification of this appliance.
- Do not use an external timer or a separate remote-control system to operate the appliance.
- Do not let the appliance stay unattended during operation.
- Do not operate the appliance with wet hands or when it has contact with water.
- Do not put cutlery or saucepan lids on the cooking zones. They become hot.
- Set the cooking zone to "off" after use.
- Do not use the appliance as a work surface or as a storage surface.
- If the surface of the appliance is cracked, disconnect immediately the appliance from the power supply. This to prevent an electrical shock.

WARNING!
Risk of fire or explosion.
- Fats and oil when heated can release flammable vapours. Keep flames or heated objects away from fats and oils when you cook with them.
- The vapours that very hot oil releases can cause spontaneous combustion.
- Used oil, that can contain food remnants, can cause fire at a lower temperature than oil used for the first time.
- Do not put flammable products or items that are wet with flammable products in, near or on the appliance.
- Do not try to extinguish a fire with water. Disconnect the appliance and cover the flame with a lid or a fire blanket.

WARNING!
Risk of damage to the appliance.
- Do not keep hot cookware on the control panel.
- Do not let cookware to boil dry.
- Be careful not to let objects or cookware fall on the appliance. The surface can be damaged.
- Do not activate the cooking zones with empty cookware or without cookware.
- Do not put aluminium foil on the appliance.
- Cookware made of cast iron, aluminium or with a damaged bottom can cause scratches on the glass ceramic. Always lift these objects up when you have to move them on the cooking surface.
- Provide good ventilation in the room where the appliance is installed.
- Make sure that the ventilation openings are not blocked.
- Use only stable cookware with the correct shape and diameter larger than the dimensions of the burners. There is a risk of overheating and rupture of the glass plate (if applicable).
- Make sure the flame does not go out when you quickly turn the knob from the maximum to the minimum position.
- Make sure pots are centrally positioned on the rings and do not stick out over edges of the cooking surface.
- Use only the accessories supplied with the appliance.
- Do not install a flame diffuser on the burner.
1.4 Care and Cleaning

WARNING!
Risk of damage to the appliance.
- Clean regularly the appliance to prevent the deterioration of the surface material.
- Do not use water spray and steam to clean the appliance.
- Clean the appliance with a moist soft cloth. Only use neutral detergents. Do not use abrasive products, abrasive cleaning pads, solvents or metal objects.
1.5 Disposal

WARNING!
Risk of injury or suffocation.
- Contact your municipal authority for information on how to discard the appliance correctly.
- Disconnect the appliance from the mains supply.
- Cut off the mains cable and discard it.
- Flat the external gas pipes.
2. PRODUCT DESCRIPTION
2.1 Cooking surface layout
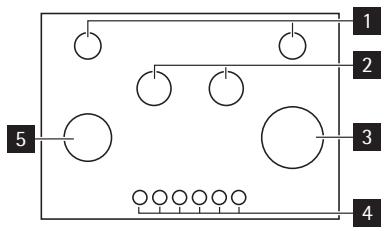
flowchart
graph TD
    A["1"] --> B["2"]
    B --> C["3"]
    C --> D["4"]
    C --> E["5"]
    E --> F["6"]
    style A fill:#fff,stroke:#000
    style B fill:#fff,stroke:#000
    style C fill:#fff,stroke:#000
    style D fill:#fff,stroke:#000
    style E fill:#fff,stroke:#000
    style F fill:#fff,stroke:#000
1 Auxiliary burner
2 Semi-rapid burner
3 Triple Crown burner
4 Control knobs
5 Rapid burner
2.2 Control knobs
| Symbol | Description |
| no gas supply / off position | |
| ignition position / maximum gas supply |
| Symbol | Description |
| minimum gas supply |
3. DAILY USE

WARNING!
Refer to "Safety information" chapter.
3.1 Ignition of the burner

WARNING!
Be very careful when you use open fire in kitchen environment. Manufacturer decline any responsibility in case misuse of the flame
i Always light the burner before you put cookware.
To light the burner:
-
Turn the control knob counterclockwise to the maximum position ( ☆ ) and push it down.
-
Keep the control knob pushed for approximately 5 seconds; this will let thermocouple to warm up. If not, the gas supply will be interrupted.
-
Adjust the flame after it is regular.
If after some tries the burner does not light, check if the crown and its cap are in correct positions.


Refer to "Safety information" chapter.

WARNING!
Do not keep the control knob pushed for more than 15 seconds.
If the burner does not light after 15 seconds, release the control knob, turn it into off position and try to light the burner again after minimum 1 minute.

In the absence of electricity you can ignite the burner without electrical device; in this case approach the burner with a flame, push the relevant knob down and turn it counter-clockwise to maximum gas release position.

If the burner accidentally goes out, turn the control knob to the off position and try to light the burner again after minimum 1 minute.

The spark generator can start automatically when you switch on the mains, after installation or a power cut. It is normal.
3.2 Turning the burner off
To put the flame out, turn the knob to the symbol ●.

WARNING!
Always turn the flame down or switch it off before you remove the pans from the burner.
4.1 Energy savings
- If possible, always put the lids on the pans.
- When the liquid starts to boil, turn down the flame to barely simmer the liquid. Use cookware with diameters applicable to the size of burners.
| Burner | Diameters of cook-ware |
| Triple Crown | 180 - 260 mm |
| Rapid | 160 - 260 mm |
| Semi-rapid | 120 - 220 mm |
| Auxiliary | 80 - 180 mm |

WARNING!
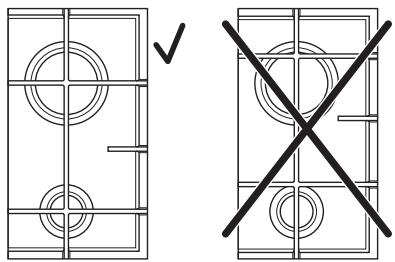
Do not put the same pan on two burners.

natural_image
Two identical cooking pots on stovels with a crossed-out X mark, no text or symbols present.
WARNING!
Make sure pot handles do not protrude over the front edge of the cooktop and that pots are centrally positioned on the rings in order to achieve maximum stability and to obtain lower gas consumption.
Do not place unstable or deformed pots on the rings to prevent from spill and injury.
Information on acrylamides
Important! According to the newest scientific knowledge, if you brown food (specially the one which contains starch), acrylamides can pose a health risk. Thus, we recommend that you cook at the lowest temperatures and do not brown food too much.
5. CARE AND CLEANING

WARNING!
Refer to "Safety information" chapter.

WARNING!
Deactivate the appliance and let it cool down before you clean it. Disconnect the appliance from the electrical supply before you do cleaning or maintenance work.

Scratches or dark stains on the surface have no effect on how the appliance operates.
- You can remove the pan supports to easily clean the hob.
- To clean the enamelled parts, cap and crown, wash them with warm soapy water and dry them carefully before you put them back.
- Wash stainless steel parts with water, and then dry them with a soft cloth.
- The pan supports are not dishwasher proof. They must be washed by hand.
- When you wash the pan supports by hand, take care when you dry them as
the enamelling process occasionally leaves rough edges. If necessary, remove stubborn stains using a paste cleaner.
- Make sure you position the pan supports correctly after cleaning.
- To make the burners work correctly, make sure that the arms of the pan supports are in the centre of the burner.
natural_image
Pure electrical circuit lines without any symbols- Be very careful when you replace the pan supports to prevent the hob top from damage.
After cleaning, dry the appliance with a soft cloth.
The stainless steel can become tarnished if it is too much heated. Refer to this you must not cook with potstones, earthenware pans or cast iron plates. Do not use aluminium foil to prevent damage the top during operation.
Removing the dirt:
- – Remove immediately: melting plastic, plastic foil, and food containing sugar.
- Stop the appliance and let it cool down before you clean: lime-scale rings, water rings, fat stains, shiny metallic discolorations. Use a special cleaner applicable for surface of hob.
-
Clean the appliance with a damp cloth and some detergent.
-
At the end rub the appliance dry with a clean cloth.
5.1 Cleaning of the spark plug
This feature is obtained through a ceramic ignition candle with a metal electrode. Keep these components well clean to prevent difficult lighting and check that the burner crown holes are not obstructed.
5.2 Periodic maintenance
Periodically speak your local Service Force Centre to check the conditions of the gas supply pipe and the pressure adjuster, if fitted.
6. TROUBLESHOOTING
| Problem | Possible cause | Remedy |
| There is no spark when lighting the gas | There is no electrical supply | Make sure that the unit is connected and the electrical supply is switched on.Control the fuse. If the fuse is released more than one time, refer to a qualified electrician. |
| Burner cap and crown are placed uneven | Make sure that the burner cap and crown are in correct positions. | |
| The flame is blow out immediately after ignition | Thermocouple is not heated sufficient | After lightning the flame, keep the knob pushed for approximately 5 seconds. |
| The gas ring burns unevenly | Burner crown is blocked with food residues | Make sure that the injector is not blocked and the burner crown is clear of food particles. |
If there is a fault, first try to find a solution to the problem yourself. If you cannot find a solution to the problem yourself, speak your dealer or the local Service Force Centre.

If you operated the appliance incorrectly, or the installation was not carried out by a registered engineer, the visit from the customer service technician or dealer may not take place free of charge, even during the warranty period.
These data are necessary to help you quickly and correctly. These data are available on the supplied rating plate.
- Model description ......
- Product number (PNC) ....
- Serial Number (S.N.) ......
Use the original spare parts only. They are available at Service Force Centre and approved spare parts shops.
6.1 Labels supplied with the accessories bag
Stick the adhesive labels as indicated below:
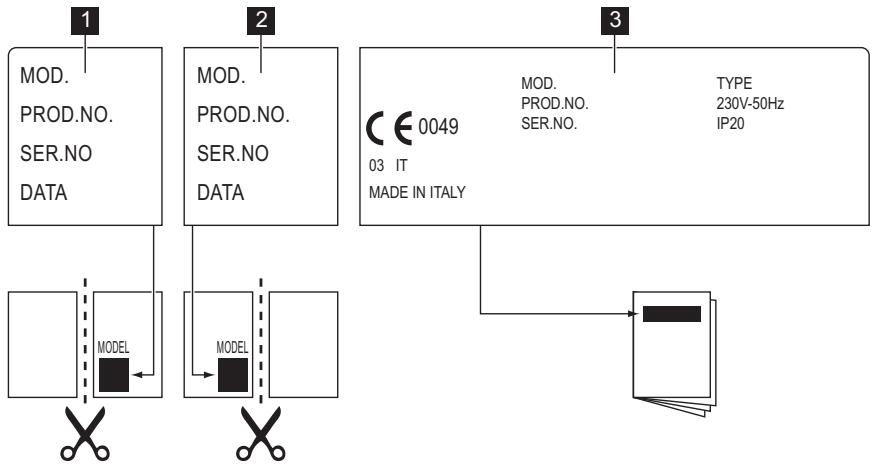
flowchart
graph TD
    A["1: MOD. PROD.NO. SER.NO DATA"] --> B["2: MOD. PROD.NO. SER.NO DATA"]
    B --> C["3: MOD. PROD.NO. SER.NO. TYPE 230V-50Hz IP20"]
    C --> D["Output"]
    subgraph Model_Block1
        E["MODEL"] --> F["Model"]
        G["MODEL"] --> H["Model"]
    end
    subgraph Model_Block2
        I["MODEL"] --> J["Model"]
    end
1 Stick it on Guarantee Card and send this part
2 Stick it on Guarantee Card and keep this part
3 Stick it on instruction booklet
7. INSTALLATION

WARNING!
Refer to "Safety information" chapter.

WARNING!
The following instructions about installation, connection and maintenance must be carried out by qualified personnel in compliance with standards and local regulations in force.
7.1 Important safety requirements
This hob must be installed in accordance with the Gas Safety (Installation and Use)
Regulations (Current Edition) and the IEE Wiring Regulations (Current Edition). For appliances installed in the Republic of Ireland please refer to NSAI- Domestic Gas Installation I.S. 813 Current Editions and the ETCI Rules for Electrical Installations.
Provision for ventilation
Detailed recommendations are contained in the following British Standards Codes Of Practice: B.S. 6172/ B.S. 5440, Par. 2 and B.S. 6891 Current Editions. The hob should not be installed in a bed sitting room with a volume of less than 20 m³. If it is installed in a room of volume less than 5 m³ an air vent of effective area
of 100 cm^2 is required. If it is installed in a room of volume between 5 m^3 and 10 m^3 an air vent of effective area of 50 cm^2 is required, while if the volume exceeds 11 m^3 no air vent is required.
However, if the room has a door which opens directly to the outside no air vent is required even if the volume is between 5 m ^3 and 11 m ^3 .
If there are other fuel burning appliances in the same room, B.S. 5440 Part 2 Current Edition, should be consulted to determine the requisite air vent requirements. For appliances installed in the Republic of Ireland please refer to the NSAI- Domestic Gas Installation I.S. 813 Current Editions Table Four.
Location
The hob may be located in a kitchen, a kitchen/diner or bed sitting room (with a volume greater than 20 m ^3 ), but not in a bathroom or shower room.
The minimum distance combustible material can be fitted above the hob in line with the edges of the hob is 400 mm. If it is fitted below 400 mm a space of 50 mm must be allowed from the edges of the hob.
For appliances installed in the Republic of Ireland please refer to NSAI- Domestic Gas Installation I.S 813 Current Edition Section 7- Permitted Locations of Appliance.
7.2 Gas Connection

WARNING!
Any gas installation must be carried out by a GAS SAFE REGISTER installer.
Make sure that, once the hob is installed, it is easily accessible for the engineer in the event of a breakdown.
The manufacturer will not accept liability, should the above instructions or any of the other safety instructions incorporated in this instruction booklet be ignored. On the end of the shaft, which includes the G 1/2" threaded elbow, adjustment is fixed so that the washer is fitted between the components as shown in the diagram. Screw the parts together without using excessive force.

A) End of shaft with nut
B) Washer
C) Elbow
Connection to the gas supply should be with either rigid or semi-rigid pipe, i.e. steel or copper.
The connection should be suitable for connecting to R 1/2 (1/2 BSP male thread).
When the final connection has been made, it is essential that a thorough leak test is carried out on the hob and installation.
Make sure that the main connection pipe does not exert any strain on the hob.
If you use flexible metal pipes make sure that they agree to ISO 10380 and ISO 10807 standards. Be careful they do not come in touch with mobile parts or they are not squeezed. Also be careful when the hob is put together with an oven.

It is important to install the elbow correctly, with the shoulder on the end of the thread, fitted to the hob connecting pipe.

Failure to ensure the correct assembly will cause leakage of gas.

Make sure that the gas supply pressure of the appliance obeys the recommended values.
Rigid connection:
Carry out connection by using metal rigid pipes (copper with mechanical end).
7.3 Injectors replacement
- Remove the pan supports.
- Remove the caps and crowns of the burner.
- With a socket spanner 7 remove the injectors and replace them with the ones which are necessary for the type
of gas you use (see table in "Technical Information" chapter).
- Assemble the parts, follow the same procedure backwards.
- Replace the rating plate (it is near the gas supply pipe) with the one for the new type of gas supply. You can find this plate in the package supplied with the appliance.
If the supply gas pressure is changeable or different from the necessary pressure, you must fit an applicable pressure adjuster on the gas supply pipe.
7.4 Adjustment of minimum level
To adjust the minimum level of the burners:
- Light the burner.
- Turn the knob on the minimum position.
- Remove the knob.
- With a thin screwdriver, adjust the bypass screw position.

natural_image
Technical line drawing of a mechanical component with a circular base and radial shaft (no text or symbols)A) The by-pass screw
- If you change from natural gas G20 20 mbar to liquid gas, fully tighten the bypass screw in.
- If you change from liquid gas to natural gas G20 20 mbar, undo the by-pass screw approximately 1/4 of a turn (1/2 of a turn for Triple Crown burner).

WARNING!
Make sure the flame does not go out when you quickly turn the knob from the maximum position to the minimum position.
7.5 Electrical connection
- Make sure that there is access to the mains plug after the installation.
- Do not pull the mains cable to disconnect the appliance. Always pull the mains plug.
- Do not connect the appliance with an extension cable, an adapter or a multiple socket. There is a risk of fire. Make sure that the ground connection complies with the standards and regulations force.
- Do not let the connection cable parts to heat to a temperature above 90^ C.
Electrical Requirements
Permanent electrical installation must comply with the latest I.E.E. Regulations and local Electricity Board regulations. For your own safety the installation must be done by a qualified electrician (e.g. your local Electricity Board, or a contractor who is on the roll of the National Inspection Council for Electrical Installation Contracting [NICEIC]).

The manufacturer declines any liability if these safety measures are not observed.
The appliance must be connected to a 230 V 50 Hz AC electrical supply. Before activating the appliance, make sure the electrical supply voltage is the same as that indicated on the rating plate. The rating plate is located on the bottom of the appliance.
The appliance is supplied with a 3 core flexible supply cord with a 3 amp plug. If it is necessary to change the fuse, use a 3 amp ASTA-approved (BS 1362) fuse.

Should you need to replace the plug for any reason, the wires in the mains lead are coloured in accordance with the following code:
| Green and yellow | - Earth |
| Blue | - Neutral |
| Brown | - Live |
- Connect the green and yellow (earth) wire to the terminal in the plug which is marked with the letter 'E' or the earth symbol ⏻, or coloured green and yellow.
- Connect the blue (neutral) wire to the terminal in the plug which is marked with the letter 'N' or coloured black.
- Connect the brown (live) wire to the terminal in the plug which is marked with the letter 'L' or coloured red.
There must be no cut or stray strands of wire present. The cord clamp must be correctly attached on the outer sheath.

WARNING!
Make sure that the cut off plug is disposed of safely. A cut off plug put into a 13 amp socket is a safety hazard. There is a risk of electrical shock.

The current regulations let only a qualified electrician or a competent person to replace the mains cable. Do not try to replace it if you are not qualified to do that.
7.6 Replacement of the connection cable
To replace the connection cable use only H05V2V2-F T90 or equivalent type. Make sure that the cable section is applicable to the voltage and the working temperature. The yellow/green earth wire must be approximately 2 cm longer than the brown (or black) phase wire.
7.7 Building In

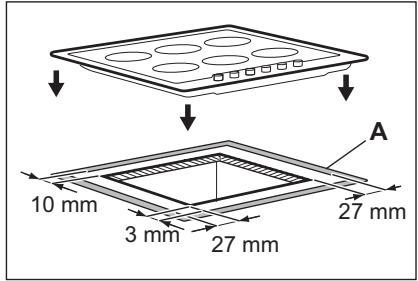

A) supplied seal
B) supplied brackets
7.8 Possibilities for insertion
Kitchen unit with door
The panel installed below the hob must be easy to remove and let an easy access in case a technical assistance intervention is necessary.
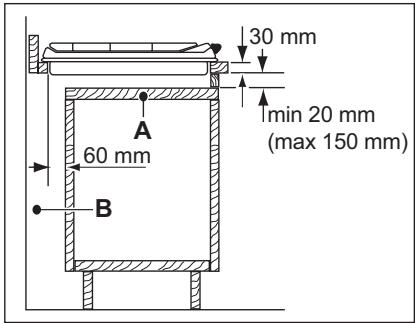
A) Removable panel
B) Space for connections
Kitchen unit with oven
The hob recess dimensions must obey the indication and the kitchen unit must be equipped with vents to let a continuous supply of air. The electrical connection of the hob and the oven must be installed separately for safety reasons and to let easy remove oven from the unit.

8. TECHNICAL INFORMATION
Hob dimensions
| Width: | 894 mm |
| Length: | 510 mm |
Hob recess dimensions
| Width: | 830 mm |
| Length: | 480 mm |
Heat input
| Triple Crown burner: | 4.0 kW |
| Rapid burner: | 2.8 kW |
| Semi-rapid burn-er: | 2.0 kW |
| Auxiliary burner: | 1.0 kW |
| TOTAL POWER: | G20 (2H) 20 mbar = 12.8 kWG30 (3+) 28-30 mbar = 931 g/hG31 (3+) 37 mbar = 914 g/h |
| Electric supply: | 230 V ~ 50 Hz supply, 3 core flexible cable with non rewireable plug fitted with a 3 amp cartridge fuse |
| Category: | II2H3+ |
| Gas connection: | G 1/2" |
| Gas supply: | G20 (2H) 20 mbar |
| Appliance class: | 3 |
By-pass diameters
| Burner | By-pass in 1/100 mm |
| Auxiliary | 28 |
| Semi-rapid | 32 |
| Burner | ∅ By-pass in 1/100 mm |
| Rapid | 42 |
| Triple Crown | 56 |
Gas burners
| BURN-ER | NOR-MAL POWER | REDUCED POW-ER | NORMAL POWER | ||||
| NATURAL GAS G20 (2H) 20 mbar | LPG (Butane/Propane) G30/G31 (3+) 28-30/37 mbar | ||||||
| kW | kW | inj. 1/100 mm | m^3/h | inj. 1/100 mm | G30 28-30 mbar | G31 37 mbar | |
| g/h | g/h | ||||||
| Auxiliary | 1.0 | 0.33 | 70 | 0.095 | 50 | 73 | 71 |
| Semi-rapid | 2.0 | 0.45 | 96 | 0.190 | 71 | 145 | 143 |
| Rapid | 2.8 | 0.75 | 115 | 0.267 | 86 | 204 | 200 |
| Triple Crown | 4.0 | 1.4 | 146 | 0.381 | 98 | 291 | 286 |
9. ENVIRONMENT CONCERNS
Recycle the materials with the symbol

. Put the packaging in applicable containers to recycle it.
Help protect the environment and human health and to recycle waste of electrical
and electronic appliances. Do not dispose appliances marked with the symbol 📋
with the household waste. Return the product to your local recycling facility or contact your municipal office.

natural_image
Abstract geometric composition with overlapping white circles on a gray background (no text or symbols)- CONTENTS
- WE'RE THINKING OF YOU
- Visit our website for:
- CUSTOMER CARE AND SERVICE
- ⚠ SAFETY INFORMATION
- Children and vulnerable people safety
- WARNING!
- Installation
- Electrical connection
- Gas connection
- Use
- Care and Cleaning
- Disposal
- PRODUCT DESCRIPTION
- Cooking surface layout
- Control knobs
- DAILY USE
- Ignition of the burner
- Turning the burner off
- Energy savings
- Information on acrylamides
- CARE AND CLEANING
- Removing the dirt:
- Cleaning of the spark plug
- Periodic maintenance
- TROUBLESHOOTING
- These data are necessary to help you quickly and correctly. These data are available on the supplied rating plate.
- Labels supplied with the accessories bag
- INSTALLATION
- Important safety requirements
- Provision for ventilation
- Location
- Gas Connection
- Rigid connection:
- Injectors replacement
- Adjustment of minimum level
- Electrical connection
- Electrical Requirements
- Replacement of the connection cable
- Building In
- Possibilities for insertion
- Kitchen unit with door
- Kitchen unit with oven
- TECHNICAL INFORMATION
- ENVIRONMENT CONCERNS
Brand : AEG-ELECTROLUX
Model : EGG9363
Category : Cooktop