WSR-1712 - Washing machine German Pool - Free user manual and instructions
Find the device manual for free WSR-1712 German Pool in PDF.


| Product Type | Front-loading washing machine |
| Model Number | WSR-1712 |
| Brand | German Pool |
| Dimensions (H x W x D) | 850 mm x 600 mm x 400 mm |
| Net Weight | 66 kg |
| Rated Voltage | 220 V ~ 50 Hz |
| Rated Power | 1,800 W |
| Max. Dry Laundry Capacity | 7 kg |
| Water Pressure Range | 0.05 MPa – 0.8 MPa |
| Programmes | Cotton, Synthetics, Delicates, Wool, Hand Wash, Rinse, Spin, Drain, 30 min Rapid |
| Temperature Selection | Adjustable from 20°C to 90°C (via Temperature button) |
| Spin Speed Adjustment | Variable up to max speed (model-dependent), min 400 rpm, spin cancel option |
| Delay Start | Up to 24 hours |
| Extra Rinse Function | Additional rinse cycle for sensitive skin |
| Strong Wash (Cotton only) | Intensive cleaning with sensor-controlled temperature and drum action |
| Easy Iron (Anti-crease) | Minimizes creases for synthetic, delicate and wool programmes |
| Wash Time Adjustment | 3 levels of wash intensity (Cotton and Mixed Fabrics) |
| Display | Digital display showing temperature, spin speed, time remaining, delay start |
| Door Security Indicator | Lights when door is locked; goes off 2 min after cycle end |
| Auto Half Load | Self-adjusting water level based on load size |
| Detergent Drawer | 3 compartments: prewash, main wash, fabric softener/additives |
| Filter Cleaning | Monthly cleaning recommended; easy access at front |
| Safety Features | Earthing, child supervision warning, door lock delay, non-slip feet leveling |
| Warranty | 1 year full warranty (requires online registration within 10 days) |
Frequently Asked Questions - WSR-1712 German Pool
User questions about WSR-1712 German Pool
0 question about this device. Answer the ones you know or ask your own.
Ask a new question about this device
Download the instructions for your Washing machine in PDF format for free! Find your manual WSR-1712 - German Pool and take your electronic device back in hand. On this page are published all the documents necessary for the use of your device. WSR-1712 by German Pool.
USER MANUAL WSR-1712 German Pool
natural_image
Line drawing of a German washing machine with control panel and buttons (no text or symbols on the device itself)Please read these instructions and warranty information carefully before use and keep them handy for future reference.
即時網上登記保用
Online Warranty Registration

請即進行保用登記!
Please register your warranty information now!
For Warranty Terms & Conditions,
please refer to the last page of this user manual.
目錄
简介 04
產品運輸須知 04
安全注意事項 05
快速啟動 06
操作說明 07
功能表 13
程式選擇 15
洗滌劑容器 17
洗滌劑的選擇及用量 18
使用指引 19
主洗 20
清潔與保養 22
故障處理 24
技術規格 25
安装指引 26
電源及安全說明 28
保用條款 55
機門把手 A
鎖門指示燈 B
啟動/暫停鍵 C
防皺浸泡鍵 D
溫度鍵 E
延時啟動鍵 F
額外過水鍵 G
強力洗滌鍵 H
脱水速度鍵 I
顯示屏
洗衣時間鍵 K
程式旋鈕(備有關機“關閉”位置) L
按鈕指示燈 M
洗滌劑分配盒 N
操作說明 操作說明
A 機門把手
按住洗衣機門把手內側並打開洗衣機門。
B 鎖門指示燈
natural_image
Simple diagram showing a circular object with an arrow pointing upward, no text or symbols present注意:
請閱讀以下注意事項
洗衣剂格分为三部份:
natural_image
Illustration of a washing machine connected to a basket and a box (no text or symbols)估計衣物重量
B) 打開洗衣機門
natural_image
Illustration of a hand using a tool to lift or lift a tray into a drawer (no text or symbols)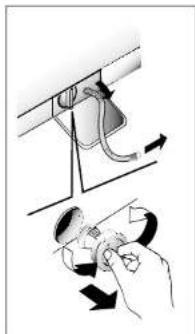
natural_image
Illustration of a hand holding a small object with arrows indicating motion or force (no text or symbols)注意:
natural_image
Illustration of a hand holding a wall-mounted switch with an outlet, next to a medical catheter (no text or symbols present)故障處理 故障處理
述下述故障,使用者可参考本表进行操作。
Description of Controls 33
Table of Programmes 39
Programme Selector 41
Detergent Drawer 43
Detergents, Washing Aids & Amounts to Use 44
Useful Advice for User 45
Main Wash 46
Cleaning and Routine Maintenance 48
Investigating Malfunctions 50
Technical Specifications 51
Setting Up & Installation 52
Electricity Supply & Safety Advice 54
Warranty Terms & Conditions 55
BEFORE SWITCHING ON THE APPLIANCE MAKE SURE IT IS CORRECTLY INSTALLED AND THAT THE FIXING SCREWS ARE REMOVED AS SHOWN IN "SETTING UP & INSTALLATION" PART.
Introduction
- Please read these instructions for use carefully and all other information enclosed with the washing machine.
- Keep all documentation in a safe place for future reference or for any future owners.
Notes:
This machine is solely for domestic use.
Notes on disposal
All packaging material used is environmentally-friendly and recyclable. Please help dispose of the packaging via environmentally-friendly means.
Your supplier or local council will be able to give you details of current means of disposal.
Valuable materials can be salvaged from an old appliance via scrap reprocessing.
Notes:
pull out the mains plug from any old appliance. Cut the power cable and dispose of it, together with the plug.
When disposing of an old washing machine, please ensure that the door lock is rendered inoperable to prevent children shutting themselves in the appliance.
General delivery notes
Please check that the following items are delivered with the appliance:
- Instruction manual
- Certificate of guarantee
- Inlet hose
Check that no damage has occurred during transit, and if so, call your nearest Authorised Technical Support Service agent.
Safety Notes
Notes:
For cleaning or maintenance of the washing machine.
A) Pull out the plug
B) Turn off the tap
C) The equips all its appliances with earthing. Ensure that the mains supply is earthed, and if it is not, seek assistance from a qualified person.
D) Do not touch the appliance when hands or feet are wet or damp. Do not use the appliance with bare feet.
E) The use of adapters, multiple connectors and/or extensions is not recommended.
Notes::
Water temperature can reach 90°C during the wash cycle.
F) Check there is no water left in the drum before opening the door.
G) This appliance is not intended for use by persons (including children) with reduced physical, sensory or mental capabilities, or lack of experience and knowledge, unless they have been given supervision or instruction concerning use of the appliance by a person responsible for their safety.
Children should be supervised to ensure that they do not play with the appliance.
H) Do not pull the power cable or the appliance itself to remove the plug from the socket. I) The appliance must not be exposed to weather conditions (rain, direct sun, etc...)
J) When moving the appliance never lift it by the controls or by the detergent drawer. When in transit never rest the door against the trolley or transport the appliance without the polystyrene base.
K) If the appliance is installed on a carpeted floor ensure that the ventilation holes on the base of the appliance are not obstructed.
L) If the appliance is not running properly or breaks down, switch it off, turn off the tap and do not tamper with the appliance. Consult only the Authorised Technical Support Service for possible repair and ask them to use original spare parts. Failure to comply with the above can compromise the safety of the appliance.
M) If the appliance's power cable should ever need replacing, consult the Authorised Technical Support Service
Quick Start
Washing
- Open the door by using the handle "A" (Fig. 1)
- Select laundry and put it in the machine
- Close the door
- Put detergent in the compartments as indicated in the programme guide in this instruction manual
- Select programme
- The display will show the settings for the programme selected.
- Adjust the wash temperature if necessary.
Press additional function buttons (if required)
- Press the "Start/Pause" button
- The programme starts.
After washing
- The word "End" will appear on the display.
- Wait for the door lock to be released
(About 2 minutes after the programme has finished). The "Door Security" indicator light will go out. - Switch off the washing machine by turning the selector to "OFF" position.
- Open the door and remove the laundry.
Ensure that the machine is correctly installed in line with the instructions found on "Setting Up & Installation".
Description of Controls
Fig. 1
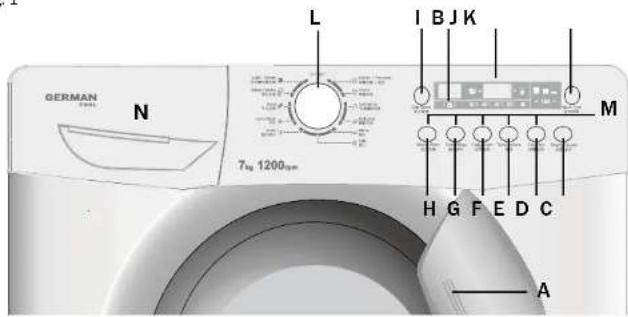
Door handle A
"Door Security" indicator light B
"Start/Pause" button C
"Easy Iron" button D
"Temperature" button E
"Delay Start" button F
"Strong wash" button H
"Spin Speed" button I
Digital display J
"Wash Time" button K
Programme selector with "OFF" position L
Buttons indicator light M
Detergent drawer N
Description of Controls
A Door handle
Press the finger-bar inside the door handle to open the door.
B DOOR SECURITY indicator light
The "Door Security" indicator light is illuminated when the door is fully closed and the machine is ON. When "Start/Pause" is pressed on the machine with the door closed the indicator will flash momentarily and then illuminate.
NOTE: If the door is not closed the indicator will continue to flash.
A special safety device prevents the door from being opened immediately after the end of the cycle. Wait for 2 minutes after the wash cycle has finished and the "Door Security" light has gone out before opening the door. At the end of the cycle turn the programme selector to "OFF".
C START/Pause button
Press to start the selected cycle.
NOTE: When the "Start/Pause" button has been pressed, the appliance can take few seconds before it starts working.
Changing the settings after the programmes has started (PAUSE)
Press and hold the "START/PAUSE" button for about 2 seconds, the flashing lights on the options buttons and time remaining indicator will show that the machine has been paused, adjust as required and press the "START/PAUSE" button again to cancel the flashing lights. If you wish to add or remove items during washing, wait 2 minutes until the safety device unlocks the door.
When you have carried out the manoeuvre, close the door, press "Start/Pause" button and the appliance will continue working where it left off.
CANCELLING THE PROGRAMME
To cancel the programme, set the selector to the OFF position. Select a different programme. Re-set the programme selector to the OFF position.
NOTE: The option buttons should be selected before pressing the "Start/Pause" button.
D EASY IRON button
The Easy Iron function (Not available on COTTON programmes) minimizes creases as much as possible with a uniquely designed anti-crease system that is tailored to specific fabrics.
MIXED FABRICS - the water is gradually cooled throughout the final two rinses with no spinning and then a delicate spin assures the maximum relaxation of the fabrics.
P.34
Description of Controls
DELICATE FABRICS - after the final two rinses with no spinning the machine stops in the final rinse stage and the option indicators blink.
The load is held in the water in the drum, thus reducing creasing and enabling easier ironing.
WOLLENS/HAND WASH – after the final rinse the load is held in the water in the drum, thus reducing creasing and enabling easier ironing and the option indicators blink.
To complete the cycle press the Easy Iron button and the machine will pump out the water and complete the cycle.
If you do not want to spin the clothes and activate drain only:
- Turn the programme selector to the "OFF" position;
- Select programme drain only ;
- Switch on the appliance again by pressing the "Start/Pause" button.
E TEMPERATURE button
The Wash Temperature button allows a reduction in the wash temperature in each
programme.
Each time the button is pressed the temperature decreases until a minimum of 15° C (cold wash20°C)
F DELAY START button
This button allows you to pre-programme the wash cycle to delay the start of the cycle for up to 24 hours. To delay the start, please do the following procedure: Set the required programme.
Press the button once to activate it (h00 appears on the display) and then press it again to set a 1 hour delay (h01 appears on the display); the pre-set delay increases by 1 hour each time the button is pressed, until h24 appears on the display, at which point pressing the button again will reset the delay start to zero.
Confirm by pressing the "START/PAUSE" button (the light on the display starts to flash). The countdown will begin and when it has finished the programme will start automatically.
It is possible to CANCEL the delay start by taking the following action:
Press and hold the button for 5 seconds until the display will show the settings for the programme selected. At this stage it is possible to start the programme previously selected by pressing the "START/PAUSE" button or to cancel the process by setting the selector to the OFF position and then selecting another programme.

If there is any break in the power supply while the machine is operating, a special memory stores the selected programme and, when the power is restored, it continues where it left off.
P.35
Description of Controls
G EXTRA RINSE button
Press the button to select or deselect this function.
Thanks to the new electronic system, it is possible to effect a new special rinse cycle by using this button. The addition of a lot more water and the new action combining of cycles of rotation of the drum with loading and unloading of water, allow the laundry to be perfectly rinsed.
This function has been designed for the people with delicate and sensitive skin, for which the smallest residue of detergent can cause irritations or allergies.
It advisable to also use this function for the children's items and in case of washings of very dirty items, for which it is due to use a lot of detergent, or in the washing of towelling items whose fibers mostly have the tendency to hold the detergent.
This option is not available on WOOL programmes.
H STRONG WASH Button
By pressing this button, which can only be activated in the Cotton cycles, the sensors in the new system come into operation. They affect both the selected temperature, keeping it at a constant level throughout the wash cycle, and the mechanical function of the drum.
The drum is made to turn at two different speeds at crucial moments. When the detergent enters the garments, the drum rotates in such a way that the detergent is distributed in a uniform manner; during the wash and rinse procedures, however, the speed increases in order to maximise the cleaning action. Thanks to this special system, the efficiency of the wash procedure is improved WITHOUT ANY INCREASE IN THE LENGTH OF THE PROGRAM.
I SPIN SPEED button
The spin cycle is very important to remove as much water as possible from the laundry without damaging the fabrics. You can adjust the spin speed of the machine to suit your needs.
By pressing this button, it is possible to reduce the maximum speed, and if you wish, the spin cycle can be cancelled.
To reactivate the spin cycle press the button until you reach the spin speed you would like to set. To prevent damage to the fabrics, it is not possible to increase the speed over that which is automatically suitable during the selection of the program.
It is possible to modify the spin speed without pausing the machine.
NOTE:
The machine is fitted with a special electronic device, which prevents the spin cycle should the load be unbalanced.
This reduces the noise and vibration in the machine and so prolongs the life of your machine.
Description of Controls
J DIGITAL Displa

The display's indicator system allows you to be constantly informed about the status of the machine:
1) WASH TEMPERATURE
When a programme is selected the relevant indicator will light up to show the maximum possible wash temperature.
Selecting a lower temperature using the special button will cause the corresponding indicator to light up.
2) DOOR LIGHT
Once the START/PAUSE button has been pressed the light first flashes then stops flashing and remains on until the end of the wash.
2 minutes after the end of the wash the light goes off to show that the door can now be opened.
3) SPIN SPEED
Once the programme has been selected, the maximum spin speed allowed for that programme appears on the display. Pressing the spin button will reduce the speed by 100rpm each time the button is pressed. The minimum speed allowed is 400 rpm, or it is possible to omit the spin by pressing the spin button repeatedly.
This flashes when delay start has been set.
5) CYCLE DURATION
When a programme is selected the display automatically shows the cycle duration, which can vary, depending on the options selected.
Once the programme has started you will be kept informed constantly of the time remaining to the end of the wash.
6) PROGRAMME START LIGHT
This lights up when the START button has been pressed.
7) WASH TIME
When a programme is selected the relevant indicator will light up to show the minimum possible wash time.
Selecting a greater time using the special button will cause the corresponding indicator to light up.
Description of Controls
K WASH TIME button
By selecting this button (active only on COTTON and MIXED FABRIC programmes) there is a choice of 3 levels of wash intensity, depending on how much the fabrics are soiled.
Once the programme have been selected the wash time indicator is automatically set to the minimum allowed; pressing the button increases the level and the settings for the cycle duration are also adjusted accordingly.
L PROGRAMME selector with "OFF" position
NOTE:
When the programme selector is turned the display lights up to show the settings for the programme selected.
Note: To switch the machine off, turn the programme selector to the "OFF" position.
Press the "Start/Pause" button to start the selected cycle.
Once a programme is selected the programme selector remains stationary on the selected programme till cycle ends.
Switch off the washing machine by turning the selector to 'OFF'.

natural_image
Simple diagram showing a circular object with an arrow pointing upward, no text or symbols presentNOTE:
The programme selector must be returned to the "OFF" position at the end of each cycle or when starting a subsequent wash cycle prior to the next programme being selected and started.
M Buttons indicator light
These lights up when the relevant buttons are pressed.
If an option is selected that is not compatible with the selected programme then the light on the button first flashes and then goes off.
Table of Programmes
| PROGRAM FOR P | PROGRAMME SELECTOR ON: | WEIGHT MAX kg* | TEMP. °C | CHARGE DETERGENT | ||
| 2 | 1 | |||||
| Resistant fabrics Cotton, linen | 7 | Up to: 90°C | ● | ● | ● | |
| Cotton, mixed resistant, Coloureds | 7 | Up to: 60°C | ● | ● | ||
| Mixed fabrics and synthetics Cotton, mixed fabrics, synthetics | 3.5 | Up to: 60°C | ● | ● | ||
| Very delicate fabrics | 3.5 | Up to: 40°C | ● | ● | ||
| Rinse | - | - | ● | |||
| Fast spin | - | - | ||||
| Drain only | - | - | ||||
| Hand wash | 1.5 | Up to: 30°C | ● | ● | ||
| "MACHINE WASHABLE" woollens | 2 | Up to: 40°C | ● | ● | ||
| Resistant fabrics Mixed fabrics and synthetics | 3 | Up to: 20°C | ● | ● | ||
| Resistant fabrics Mixed fabrics and synthetics | 2.5 | Up to: 40°C | ● | ● | ||
Table of Programmes

Please read these notes
* Maximum load capacity of dry clothes, according to the model used (see rating label). When washing heavily soiled laundry it is recommended the load is reduced to 3/4 kg maximum.
** STANDARD COTTON PROGRAMMES ACCORDING TO (EU) No 1015/2010 and No 1061/2010
COTTON PROGRAMME with a temperature of 60°C COTTON PROGRAMME with a temperature of 40°C
These programmes are suitable to clean normally soiled cotton laundry and they are the most efficient programmes in terms of combined energy and water consumptions for washing cotton laundry. These programmes have been developed to be compliant with the temperature on the wash label on the garments and the actual water temperature may slightly differ from the declared temperature of the cycle.
The spin speed may also be reduced, to match any guidelines suggested on the fabric label, or for very delicate fabrics cancel the spin completely this option is available with a spin speed button.
■ Pressing the wash temperature button makes it possible to wash at any temperature below the maximum allowed.
1) For the programmes shown you can adjust the duration and intensity of the wash using the Wash Time button.

For the various types of fabrics and various degrees of dirt the washing machine has different programme bands according to: wash cycle, temperature and length of cycle (see table of washing cycle programmes).
RESISTANTS FABRICS (Cotton)
The programmes have been designed for a maximum wash and the rinses, with spin intervals, ensure perfect rinsing.
The final spin gives more efficient removal of water.
MIXED AND SYNTHETIC FABRICS (Synthetics)
The main wash and the rinse give best results thanks to the rotation rhythms of the drum and to the water levels.
A gentle spin will mean that the fabrics become less creased.
SPECIAL DELICATE FABRIC (Delicates)
This is a new wash cycle which alternates washing and soaking and is particularly recommended for very delicate fabrics.
The wash cycle and rinses are carried out with high water levels to ensure best results.
SPECIAL "RINSE" PROGRAMME (Rinse)
This programme carries out three rinses with a intermediate spin (which can be reduced or excluded by using the correct button). It can be used for rinsing any type of fabric, eg. use after hand-washing.
SPECIAL "SPIN" PROGRAMME © (Spin)
Programme *SPIN* carries out a maximum spin (which can be reduced by using the correct button).
DRAIN ONLY (Drain)
This programme drains out the water.
SPECIAL "HAND WASH" (Hand wash)
This washing machine also has a gentle Hand Wash programme cycle.
This programme allows a complete washing cycle for garments specified
as "Hand Wash only" on the fabric care label. The programme has a
temperature of 30° C and concludes with 3 rinses and a slow spin.
WOOL PROGRAMME (Wool)
The special cycle enables to thoroughly wash garments without damaging them. The cycle comprises of alternate periods of activity and pauses. The programme has a maximum temperature of 40° and concludes with 3 rinses and a short spin.
Programme selector
MIXED FABRICS PROGRAMME (Mixed Fabrics)
The main wash and the rinse gives best results thanks to the rotation rhythms of the drum and to the water levels. A gentle spin will mean that the fabrics become less creased.
Important:
- The first washing of new coloured fabrics must be done separately;
- In every case, never mix NON-FAST COLOUREDS fabrics.
30 MINUTE RAPID PROGRAMME

The 30 minute rapid programme allows a complete washing cycle to be carried out in approximately 30 minutes, with up to a maximum load of
2-2.5 kg and a temperature of 40°C.
When selecting the "30 minute rapid" programme, please note that we recommend you use only 20% of the recommended quantities shown on the detergent pack.
Auto Half Load
The washing machine is fitted with a self-adjusting water level system.
This system enables the machine to use the amount of water needed to wash and rinse the laundry in relation to the particular load.
This results in a reduction of the water and electricity used, without in any way compromising the washing and rinsing performance.
In fact the amount of water and electricity used will always be appropriate for the clothes load. The washing machine automatically ensures excellent washing results at minimum cost whilst respecting the environment.
Detergent Drawer
N Detergent Drawer

The detergent drawer is split into 3 compartments:
- The compartment labelled *1* is for prewash detergent;
- The compartment labelled * is for special additives, fabric softeners, fragrances, starch, brighteners etc;
- The compartment labelled *2* is for main wash detergent. Only use front loader washing detergent either liquid or powder.
NOTE:
Some Detergents are Difficult to utilise. Ensure to use an in drum dispenser if recommended by the detergent Manufacturer.

NOTE:
Only put liquid products in the compartment labelled "✗". The machine is programmed to automatically take up additives during the final rinse stage for all wash cycles.
Detergents, Washing Aids & Amounts to Use
Choice of detergent
General purpose detergents
- Powder detergents, for a thorough wash, with bleaching agent, particularly suitable for use in hot wash programmes (60°C and over), for heavily soiled and stained laundry.
- Liquid detergents, particularly suitable for grease stains, such as greasy skin marks, cosmetics and oil. These detergents are not suitable for washing stained laundry, as they do not contain bleach.
- Biological detergents, not all the products available give a really thorough wash.
Additional laundry aids
- Water softener, means less detergent can be used where water hardness is classed as hard to very hard.
- Prewash substances, for the programmed treatment of stains prior to the main wash.
Using those means the subsequent wash can be at a low temperature or with bleach-free detergents.
- Fabric softener prevents static build-up in synthetic fabrics and softens fabrics.
If you own a tumble dryer, clothes are softened even without the use of a fabric softener.
Note: Do not put solvents in the washing machine!
Keep detergents and other laundry products out of children's reach.
Before pouring in the detergent, please check that there are no foreign bodies in the detergent drawer.
Dosage details are usually shown on the detergent packaging. Follow those instructions.
Front Loader Washing Machine Dosages
Only use detergents which are suitable for use in a washing machine.
You will obtain the best results from your wash with the minimum use of chemical products and the best care for your laundry if you take into consideration the degree of soiling as well as the type of detergent to choose.
The amount of detergent to use depends on:
- Water hardness: depending on the hardness of the water and the type of detergent used, it is possible to reduce the amount of detergent.
- The degree of soiling; it is possible to reduce the amount of detergent used depending on the degree of soiling.
- Amount of laundry: It is possible to reduce the amount of detergent when washing only a small amount of laundry.
Front Loader Washing Machine Dosage for Powder Detergent
For normal and low concentration detergents: for normally soiled laundry choose a programme without prewash.
Put the detergent in compartment "2" of the drawer.
For heavily soiled laundry, choose a programme with prewash.
Put 1/4 of the detergent in compartment "1", 3/4 in compartment "2" of the drawer.
When using water softeners, first put in the detergent, and then add the softener to compartment "2". For highly concentrated detergents not in single dose format, follow what is shown on pack exactly as regards type and amount of dosage.
To avoid the difficulty of checking if the detergent has been taken up, use the dosage aids provided in the detergent packaging.
Front Loader Washing Machine Liquid detergent dosage
Liquid detergents may be used in accordance with the instructions on the relevant packaging, for all programmes without prewash, by using the special container which is placed in the drum or, for those models that have it, in the special insert for liquid detergents.
Useful Advice for Users
Tips on using your domestic appliance in the most environmentally-friendly and economical way
Do a full load in your washing machine
To prevent any possible waste of energy, water or detergent we recommend that you put a full load in your washing machine, not exceed the recommended maximum load size.
Up to 50% energy saving can be made with one full load compared to two half load washes.
When is prewashing really needed?
Only with particularly dirty loads!
Energy savings of 5 to 15% are made by not selecting the prewash option for normal soiled laundry.
Which wash temperature should you choose?
Using stain removers before machine washing reduces the need to wash at temperatures over 60°C.
Energy savings of up to 50% can be made by using a 60°C wash temperature rather than
90°C.
Main Wash
Sorting the laundry
It is recommended you wash only items which are machine washable with water and detergent and not dry-clean items.
- If you need to wash rugs, bedspreads or other heavy items, it is best not to spin them.
Washing these items may damage your washing machine which may void your manufacturer warranty.
- Sort the laundry according to fabric type, degree of soiling and wash temperature: Always follow the wash care advice on the garment label for the most suitable care and treatment of the laundry
Laundry for hot wash 95°

Coloured, easy-care materials


Delicates and wool


Wash by hand

Items labelled with the following symbol are not suitable for machine washing:
Dry clean
For very delicate items, such as net curtains, underwear, tights etc., you are advised to use a laundry net or wash bag.
- Woollen items must be labelled with the "Pure New Wool" symbol to be washed in the machine, and must also be labelled "non-matting" or "machine washable".
- Colour often leaks from new coloured items.
This can then colour other lighter items being washed.
We therefore recommend that coloured items should be washed for the first time separately.
For future washes, colourfast items can only be washed with whites up to 40°C.
Note: when sorting laundry
- check there are no metal objects in the laundry
(Such as paper clips, safety pins, pins, coins etc...):
- button up pillowcases, fasten zips, hook & eye fasteners, belts and long dressing gown cords;
- remove curtain hooks;
- pay close attention to the labels on items
- If you notice stubborn stains whilst sorting the laundry, remove them using a special detergent or a special stain remover.
- We recommend that you do not do a full load of toweling items only as these become too heavy since they absorb a lot of water.

Main Wash
The correct way to wash
Preparing the laundry
A) Select the laundry.
Loading the laundry
B) Open the porthole.
C) Put the laundry in the washing machine.
Close the porthole again, ensuring that no items of laundry are obstructing the lock.
Putting detergent in machine
D) Open the drawer, choose the detergent and put in the correct amount, according to the manufacturer's instructions and the advice on page 44. Add any other laundry aids (see page 44). Close the drawer again.


Selecting the wash programme
Refer to the programme guide or the programme descriptions on the machine to select the most suitable programme.
Turning the selector knob, the required programme is activated. Adjust the wash temperature if necessary.
Press additional function buttons (if required).
Check that the tap is turned on and that the discharge hose is positioned correctly. Press the "Start/Pause" button.
When the "Start/Pause" button is pressed the machine sets the working sequence in motion.
The programme carries out with the programme selector stationary on the selected programme till cycle ends.

Warning: If there is any break in the power supply while the machine is operating, a special memory is the selected programme and, when the power is restored, it continues where it left off.
When the programme is finished
The word "End" will appear on the display.
Wait for the door lock to be released (about 2 minutes after the programme has finished). The "Door Security" Indicator light will go out.
Switch off the machine by turning the programme selector on the "OFF" position. Open the door and remove the laundry. Turn off the tap.
Cleaning and routine maintenance
Do not use alcohol-based scourers and / or thinners on the outside of your washing machine, just a wipe with a damp cloth will suffice. The washing machine needs very little maintenance:
- Cleaning the drawer compartments.
- Cleaning the filter.
Cleaning the door glass.
Cleaning the drawer compartments
Even if it is not strictly necessary, it is good to clean the compartments for bleaching detergents and additives occasionally.
A) To do this you just need to pull them out firmly, but without forcing them.
B) Clean everything in the compartment under running water.
C) Put everything back in its proper place.
Cleaning the filter
The washing machine is fitted with a special filter for handling large deposits which could block the discharge hose (coins, buttons etc.) and which can, therefore, be easily retrieved.
We recommend that the filter be cleaned at least once a month.
The cleaning operation is as follows:
1) Open the flap
2) Only available on certain models:
Pull out the corrugated hose, remove the stopper and drain the water into a container.
3) Before removing the filter, place an absorbent towel below the filter cap to collect the small amount of water likely to be inside the pump
4) Turn the filter anti-clockwise until it stops in the vertical position. Remove and clean.
5) After cleaning, replace by turning the notch on the end of the filter clock wise. Then follow all procedures described above in reverse order.

natural_image
Illustration of a hand using a tool to lift or lift a tray into a drawer (no text or symbols)
natural_image
Diagram showing a hand holding a device with arrows indicating motion or force (no text or symbols present)Attention: if the filter needs cleaning while there is washing still in the drum, follow the above instructions to empty the water. This will prevent excessive loss of water via the filter.
Cleaning and routine maintenance
Cleaning the door glass
Regularly clean the door glass and silicone ring with a damp cloth. A buildup of soiling and residues from the water may result in water leaking from the door.
Do not use abrasive cleaners as they can scratch the surface.
Transporting the appliance or long periods when appliance is not in use
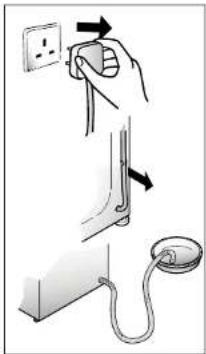
If the appliance is being transported or is out of use for long periods in unheated places, all remaining water must be completely removed from the hoses.
Ensure mains power is off, then unclip the hose and point it downwards into a basin until all the water has emptied out.
When finished, please clip the hose properly.
Investigating Malfunctions
What might be the cause of... Defects you can remedy yourself
| MALFUNCTION CAUSE REMEDY | ||
| Does not work on any programme | Plug not in socket. Not switched on. Power failure.Fuse blown. Door open. | Plug it in.Switch on.Check.Check.Close door. |
| Does not fill with water | See cause 1. Tap turned off.Programme selector not correctly positioned.Fill hoses are kinked | Check.Turn on tap.Position programme selector correctly.Straighten fill hoses |
| Water does not drain away | Kink in discharge hose. Foreign bodies in filter House drain is blocked | Straighten discharge hose. Examine filter (see pages 48-49) Clean drain |
| Water on floor around the washing machine | Leaking gasket between tap and water inlet hose.House drain is blockedSoap drawer blocked with soap residues | Replace gasket and tighten hose and tap well.Clean drainClean soap drawer |
| Does not spin | Water has not yet drained away. "No spin" selected (certain models only). | Wait a few minutes for machine to empty. Reset button or turn "no spin" knob. |
| Machine vibrates a lot during spin | Washing machine not completely level. Transit brackets not removed yet.Load not distributed evenly. | Adjust the special adjustable feet.Remove transit brackets. Rearrange the laundry evenly. |
| Door will not open | Two minutes have not elapsed since the programme finished. | Wait two minutes. |
| Display reads error 0, 1, 5, 7, 8, 9 | - Call service. | |
| Display reads error 2 No water fill. Check water supplies are on. | ||
| Display reads error 3 No pump out. | Check drain is clear.Check drain hose is not kinked. | |
| Display reads error 4 Machine overfilled with water. | Turn off water supply to machine. Call service. | |
The machine makes a different noise when spinning! This is because it has a brush motor for better performance.
Only a small level of water can be seen in the drum! This is because new machines do not use much water, yet achieve the same standard of washing and rinsing.
Investigating Malfunctions
Note:
The use of environmentally-friendly, phosphate-free detergents can have the following effects:
- Waste water from rinsing may be cloudier because of the presence of zeolites held in suspension, with out the rinse performance being adversely affected;
- Presence of white powder (zeolites) on laundry after washing, which is not absorbed by the fabric and does not alter the colour of the fabric.
- The presence of foam in the final rinsing water is not necessarily an indication of poor rinsing.
- Anionic surfactants used in washing detergent formulae often prove to be difficult to remove from the laundry itself and, even in small quantities, can still cause considerable foam production.
- Carrying out more rinse cycles does not serve any purpose in such cases.
Technical data
| Model No. | WSR 1712 | |
| Max. load of dry laundry 7 kg | ||
| Water pressure Min. 0.05 MPa, Max.0.8 MPa | ||
| Rated voltage | 220V | |
| Rated frequency | 50Hz | |
| Rated power | 1,800W | |
| Product Dimensions | H x W x D | 850×600×400mm |
| Net weight | 66kg | |
Specifications are subject to change without prior notice.
If there is any inconsistency or ambiguity between the English version and the
Chinese version, the English version english prevail.
Refer to www.genhankool.com for the most up to date version of the Operating Instructions.
Note:
For specifications regarding electrical data, see the data panel on the front of the washing machine (porthole area).
Setting up & Installation

1 Remove the polystyrene base and place the machine near its permanent position (diagram 1).
2 Carefully cut through the hose retaining clip at the rear of the appliance (diagram 2).
3 Remove the 4 fixing screws marked (A) and remove the 4 spacers marked (B) (diagram 3).
4 Cover the 4 holes using the caps provided in the Instruction booklet pack (diagram 4).

WARNING:
DO NOT LEAVE THE PACKAGING WITHIN REACH OF CHILDREN AS IT IS A POTENTIAL SOURCE OF DANGER.
Apply the insulation sheet of corrugated material to the base as shown.

Use the 4 feet to level the machine with the floor;
a) Turn the nut clockwise to release the screw adjuster on the foot. b) Rotate the foot to raise or lower it until it stands firmly on the A ground. c) Lock the foot in position by turning the nut anti-clockwise until it comes up against the bottom of the machine.

Setting up & Installation
Note:
we recommend you keep the screws to immobilise the machine for future transit. The Manufacturers will not be responsible for any possible damage to the machine caused by not following the rules relating to releasing the mechanism. The user is responsible for all costs of installation.
Water connection
The appliance must be connected to the water mains using new hose-sets. The old hose-sets should not be re-used. The machine has an inlet hose with 3/4" B.S.P threaded end connection to attach between the threaded connector on the appliance and the cold water supply.
Note:
This machine only uses cold water; therefore only one hose is needed to connect to the cold water supply. Do not connect to the hot supply. Cold fill is an energy efficient system. Only the water required for the washing is heated. There is no loss of heat in the pipeline from a hot water tank or boiler to the machine.
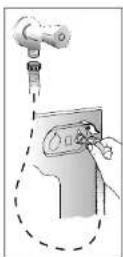

It is advisable to turn off the tap after each wash to isolate the washing machine from the water supply.
For the washing machine to function properly the terminal end of the discharge hose (mouth) must be at a minimum of 50 cm and a maximum of 85 cm from the ground.
Electricity Supply & Safety Advice
Washing machines are supplied to operate at a voltage of 220V, 50 Hz single-phase. Check that the conductor is powerful enough to supply at least 3.0 kW, and then connect the plug to a 10A earthed socket. After installation, the appliance must be positioned so that the plug is accessible. Check that the electricity supply to your home has an earthing system.
The socket in your home and the plug on the appliance must be of the same type. WARNING: Do not use this appliance with a cord extension set, multiple connector or electrical portable outlet device due to risk of overload, splashing or ingress of moisture.
All washing machines comply with the safety requirements laid down by the Quality Trademark Institute.

ATTENTION:
If the power supply cord or plug of this appliance is damaged, it must be replaced by an authorised service centre or qualified electrician.
This appliance is marked according to the European directive 2012/19/EU on Waste Electrical and Electronic Equipment (WEEE). WEEE contains both polluting substances (which can cause negative consequences for the environment) and basic components (which can be re-used). It is important to have WEEE subjected to specific treatments, order to remove and dispose properly all pollutants, and recover and recycle all materials. Individuals can play an important role in ensuring that WEEE does not become an environmental issue; it is essential to follow some basic rules:
- WEEE should not be treated as household waste;
- WEEE should be handed over to the relevant collection points managed by the municipality or by registered companies. In many countries, for large WEEE, home collection could be present.
In many countries, when you buy a new appliance, the old one may be returned to the retailer who has to collect it free of charge on a one-to-one basis, as long as the equipment is of equivalent type and has the same functions as the supplied equipment.

保用條款
Warranty Terms & Conditions
Under normal operations, the product will receive a 1-year full warranty provided by German Pool (effective starting from the date of purchase).
* This warranty is not valid until Customer registration information is received by our Service Centre within 10 days of purchase via one of the following methods:
1) Visit our website and register online: www.gormanpool.com/ warranty
2) Complete all fields on the attached Warranty Card and mail it back to our Customer Service Centre.

另请填妥以下表格并填正本发之一份保存,以便严格时核对资料。用户提供之所有资料必须正确纸质,否则免费保管符合无效。Please fill out the form below. This information and the original purchase invoice will be required for any repairs. Warranty will be invalid if information provided is found to be inaccurate.
-
综代上有權選擇維修或更換配件或其摘要部份。
-
產山一經被轉讓,其保用非被視作無效。
-
Customer who fails to present original purchase invoice will be disqualified for free warranty.
-
Customer should always follow the operating instructions. This warranty does not apply to labour costs for on-site installation, check up, repair, replacement of parts and other transportation costs;
- damages caused by accidents of any kind (including transport and others);
- operating failures resulted from incorrect voltage, improper operations and unauthorized installations or repairs.
- This warranty is invalid if:
purchase invoice is modified by unauthorized party; - product is used for any commercial or industrial applications; - product is repaired or modified by unauthorized personnel, or unauthorized parts are installed; - serial number is modified, damaged or removed from the product.
-
German Pool will, in its discretion, repair or replace any defective part.
-
This warranty will be void if there is any transfer of ownership from the original purchaser.
客戶服務及維修中心
香港 澳門
Customer Service & Repair Centre
Hong Kong Macau
Syt, China Travel (Cargo) Logistics Centre Alameda Dr. Carlos D/Assumpcoo
1 Cheong Tung Road No. 263, Edi. China Civil Plaza,
Hung Hom, Kowloon, Hong Kong
German Pool (Hong Kong) Limited
香港 | 香港
Hong Kong
香港九龍土瓜灣馬頭角道116號
新寶工商中心2期113號室
香港九龙土瓜湾马头角道116号
新宝工商中心2期113号室
Room 113. Newport Centre Phase II. 116 Ma Tau
Kok Road. Tokwawan. Kowloon. Hong Kong.
3/F, Takshun Plaza, Nanguo East Road,
Shunde, Foshan, Guangdong
Alameda Dr. Carlos D'Assumpcao No. 263,
Edif. China Civil Plaza, 15 Andar, I. Macau
© 版權所有。未獲德國寶授權,不得翻印、複製或使用本說明書作任何商業用途,違者必究。 | © 版权所有。未获德国宝授權,不得翻印、复制或使用本说明书作任何商业用途,違者必究。 © All rights reserved. Copying, reproducing or using the contents of this manual is not allowed without prior authorization from German Pool, violators will be prosecuted.
www.germanpool.com
- 目錄
- 操作說明 操作說明
- A 機門把手
- B 鎖門指示燈
- 請閱讀以下注意事項
- 估計衣物重量
- 故障處理 故障處理
- Introduction
- Notes:
- Notes on disposal
- General delivery notes
- Safety Notes
- Notes::
- Quick Start
- Washing
- Press additional function buttons (if required)
- After washing
- Description of Controls
- A Door handle
- B DOOR SECURITY indicator light
- C START/Pause button
- D EASY IRON button
- E TEMPERATURE button
- F DELAY START button
- G EXTRA RINSE button
- H STRONG WASH Button
- I SPIN SPEED button
- NOTE:
- 1) WASH TEMPERATURE
- 2) DOOR LIGHT
- 3) SPIN SPEED
- 5) CYCLE DURATION
- 6) PROGRAMME START LIGHT
- 7) WASH TIME
- K WASH TIME button
- L PROGRAMME selector with "OFF" position
- M Buttons indicator light
- Table of Programmes
- Please read these notes
- Programme selector
- MIXED FABRICS PROGRAMME (Mixed Fabrics)
- Important:
- MINUTE RAPID PROGRAMME
- Auto Half Load
- Detergent Drawer
- N Detergent Drawer
- Detergents, Washing Aids & Amounts to Use
- Choice of detergent
- General purpose detergents
- Additional laundry aids
- Front Loader Washing Machine Dosages
- Front Loader Washing Machine Dosage for Powder Detergent
- Front Loader Washing Machine Liquid detergent dosage
- Useful Advice for Users
- Do a full load in your washing machine
- When is prewashing really needed?
- Which wash temperature should you choose?
- Main Wash
- Sorting the laundry
- Dry clean
- Note: when sorting laundry
- The correct way to wash
- Loading the laundry
- Putting detergent in machine
- Selecting the wash programme
- When the programme is finished
- Cleaning and routine maintenance
- Cleaning the drawer compartments
- Cleaning the filter
- Cleaning the door glass
- Transporting the appliance or long periods when appliance is not in use
- Investigating Malfunctions
- Setting up & Installation
- WARNING:
- Water connection
- Electricity Supply & Safety Advice
- ATTENTION:
- 保用條款
- Warranty Terms & Conditions
- 客戶服務及維修中心
- Customer Service & Repair Centre
- German Pool (Hong Kong) Limited
Brand : German Pool
Model : WSR-1712
Category : Washing machine