
MX723 - Video projector BENQ - Free user manual and instructions
Find the device manual for free MX723 BENQ in PDF.


| Product Type | Video Projector |
| Brand | BenQ |
| Model | MX723 |
| Display Technology | DLP |
| Resolution | XGA (1024 x 768) |
| Brightness | 3500 ANSI Lumens |
| Contrast Ratio | 15000:1 |
| Lamp Life | 4500 hours (Normal mode), 6000 hours (Eco mode) |
| Projection Lens | F/2.42 - 2.98, f=20.77 - 31.13 mm |
| Zoom Ratio | 1.5:1 |
| Keystone Correction | Vertical: ±40°, Horizontal: ±40° |
| Inputs | HDMI (x2), VGA (x2), Composite, S-Video, USB (x2), RS-232 |
| Outputs | VGA, Audio out 3.5mm |
| Built-in Speaker | Yes, 10W |
| Dimensions (W x D x H) | 331 x 246 x 117 mm |
| Weight | 3.2 kg |
| Power Consumption | 295W (Normal mode), <0.5W (Standby) |
| Noise Level | 33 dB (Normal mode), 30 dB (Eco mode) |
| Maintenance | Clean air filter every 1000 hours; replace lamp when indicator shows |
| Included Accessories | Power cord, VGA cable, remote control, user manual |
Frequently Asked Questions - MX723 BENQ
User questions about MX723 BENQ
0 question about this device. Answer the ones you know or ask your own.
Ask a new question about this device
Download the instructions for your Video projector in PDF format for free! Find your manual MX723 - BENQ and take your electronic device back in hand. On this page are published all the documents necessary for the use of your device. MX723 by BENQ.
USER MANUAL MX723 BENQ
For Projector Management
V 1.02
Copyright
Copyright 2019 BenQ Corporation. All rights reserved. No part of this publication may be reproduced, transmitted, transcribed, stored in a retrieval system or translated into any language or computer language, in any form or by any means, electronic, mechanical, magnetic, optical, chemical, manual or otherwise, without the prior written permission of BenQ Corporation.
All other logos, products, or company names mentioned in this manual may be the registered trademarks or copyrights of their respective companies, and are used for informational purposes only.
Disclaimer
BenQ Corporation makes no representations or warranties, either expressed or implied, with respect to the contents hereof and specifically disclaims any warranties, merchantability or fitness for any particular purpose. Further, BenQ Corporation reserves the right to revise this publication and to make changes from time to time in the contents hereof without obligation of BenQ Corporation to notify any person of such revision or changes.
This user manual aims to provide the most updated and accurate information to customers, and thus all contents may be modified from time to time without prior notice. Please visit http://www.benq.com for the latest version of this manual.
The illustrations and the screens shown in this guide are for your reference. The actual content and available functions may vary by the connected projectors and the product supplied for your region.
Table of Contents
Copyright......2
Introduction 5
System requirements ....5
Initial Setup 6
Connecting the projector(s) and computer to a network......6
Installing DMS Local 7
Configuring Projector Settings....7
Using DMS Local 8
Launching DMS Local for the First Time....8
Closing DMS Local....10
The DMS Local Main Page....II
Adding Projectors to DMS Local....12
Managing Your Projectors 15
Creating Groups....16
Renaming a Projector....17
Deleting a Projector ....17
Device Tree Icons ....18
Status Icons....18
Monitoring Your Projectors....19
The Projector Panel....19
The Information Tab....22
Controlling Your Projectors....24
The Control Tab (Single BenQ Projector)......25
The Control Tab (Single Non-BenQ Projector)......26
The Control Tab (Multiple Projectors)......27
Virtual Keypad....28
Quick Settings 29
Direct Command Controls....30
Scheduling a Task for Your Projectors 34
Creating/Editing a Scheduled Task....35
Error Notifications via E-mail....36
Table of Contents4
Creating a E-mail Alert 37
Setting a Login Password for DMS Local 39
Other Functions 40
Generating an Error Report...... 40
Firmware Update....41
Backup Projector Listings.... 41
About DMS Local 43
Troubleshooting 44
Introduction
DMS Local is a software tool for computers that enables remote and centralized management of multiple digital projectors by IT administrators/technicians via a local network. DMS Local's management capabilities include the ability to remotely monitor, control, and configure projectors individually or as groups.
DMS Local is designed for use in settings where multiple projectors are spread out across various spaces and for convenience sake requires a central portal to manage and monitor each projector remotely, for example a multi-floored office building or a school with multiple classrooms.
System requirements
To install and run DMS Local, a computer must meet the following minimum hardware and software requirements.
| CPU Intel i7 2.6GHz | |
| Free memory 8 GB | |
| Hard disk space 2GB | |
| Connectivity • Wi-Fi capability• RJ-45 Ethernet port | |
| Display Resolution | 1054x640 or higher It is suggested that the resolution for your computer's is set to 1054x640 or higher with a standard size/ratio to ensure the best visualization of the DMS Local interface. It is suggested that the resolution for your computer's is set to 1054x640 or higher with a standard size/ratio to ensure the best visualization of the DMS Local interface. |
| Operating system | • Windows 7 (32/64-bit)• Windows 10 |
Other For certain functions within DMS Local the following requirements may need to be met:• Internet access• A Gmail, Yahoo Mail, or Outlook Mail Service account —Mail accounts must be configured to allow less secure sign-ins for full functionality in DMS Local. For Gmail accounts you can configure this setting in the Google Account > Apps with account access > Allow less secure apps menu. For other mail services this setting should be located in the security settings menu for the service. —Mail accounts must be configured to allow less secure sign-ins for full functionality in DMS Local. For Gmail accounts you can configure this setting in the Google Account > Apps with account access > Allow less secure apps menu. For other mail services this setting should be located in the security settings menu for the service. | |
For a projector to support management via DMS Local the projector must feature the following items:
- An RJ-45 Ethernet port with LAN control functionality

DMS Local also supports non-BenQ projectors that utilize the PJLink protocol.
Initial Setup
Before you can properly use DMS Local to manage your projector(s) the following setup procedures must be completed:
- Connect the projectors and computer to the same network
• Install DMS Local on your computer - Configure projector settings
Connecting the projector(s) and computer to a network
To connect the projectors and computer to the same network, follow the steps below:
I. Connect the projectors to an Ethernet LAN or WAN network via a hub, switch or router using RJ-45 cables.
- Connect the computer to the same network using either an RJ-45 cable or via a wireless connection.
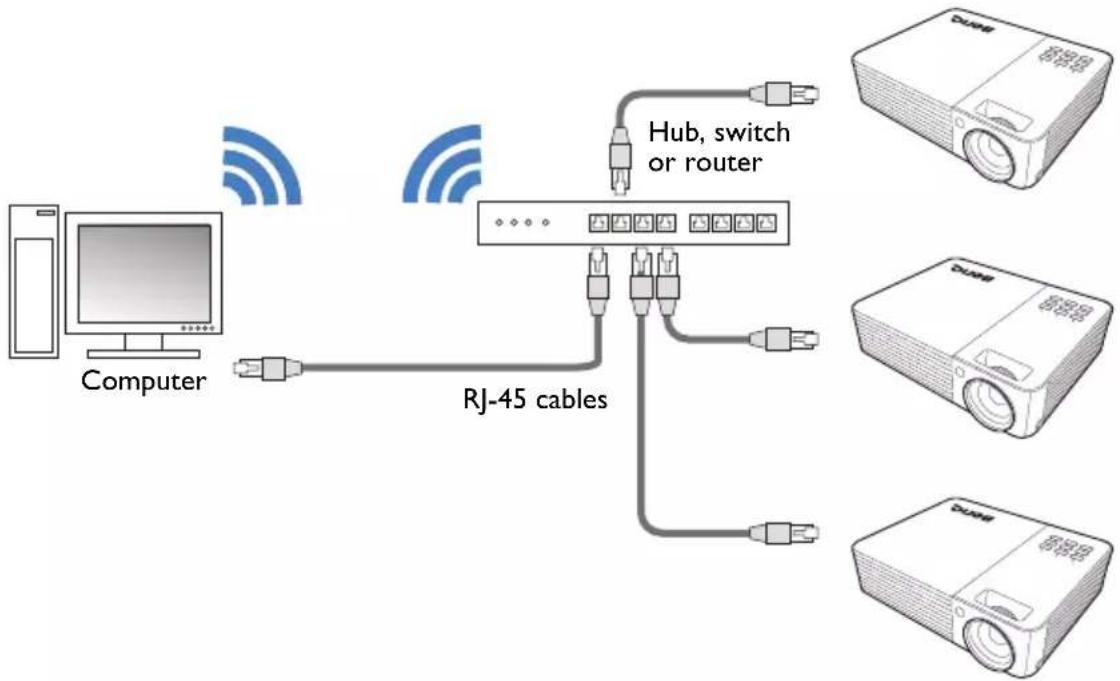
flowchart
graph TD
    A["Computer"] -->|Wireless Signal| B["RJ-45 cables"]
    B --> C["Hub, switch or router"]
    C --> D["Produce"]
    B --> E["Produce"]
    B --> F["Produce"]

- For details on the location of ports and connectors, please refer to the documentations for the computer and projectors.
-
It is suggested that you connect your computer to the network using a RJ-45 cable to ensure a stable connection.
-
Ensure that the IP address for each projector is properly set and that the IP address is shown on the OSD menu of the projector. You may need to contact your network administrator for assistance in setting the projectors' IP addresses.
Installing DMS Local
To install DMS Local on your computer, first ensure that the computer meets the minimum system requirements described on System requirements, then follow the steps below:

To avoid improper functioning for DMS Local, it is suggested that only one computer in the shared network install and run DMS Local. Multiple computers simultaneously running DMS Local will prevent DMS Local from functioning properly.
I. Download the DMS Local software from the following URL:
https://business-display.benq.com/en/findproduct/projector/software/dms-local.html.
2. Launch the installation file and follow the on-screen instructions to complete the installation.
Configuring Projector Settings
For DMS Local to be able to access a projector while it is in standby mode, the settings on the projector must be pre-configured by your IT administrator to ensure that the Enable Network Standby Mode setting in the projector's setting menu is set to On.

- For BenQ projectors this setting can be found in either the System > Standby Settings > Network or Advanced > Standby Settings > Network menu.
- For non-BenQ projectors refer to the documentation for the device.
- For certain projectors “Monitor Out” should be enabled in the standby settings menu to ensure that the projector is accessible while in standby mode. Please refer to your projector’s user manual for details.
- For BenQ projectors this setting can be found in either the System > Standby Settings > Network or Advanced > Standby Settings > Network menu. - For non-BenQ projectors refer to the documentation for the device. - For certain projectors “Monitor Out” should be enabled in the standby settings menu to ensure that the projector is accessible while in standby mode. Please refer to your projector's user manual for details.
Using DMS Local
Launching DMS Local for the First Time
Once you have completed the steps described in Initial Setup, you can launch DMS Local in one of the following ways:
- Click the Windows Start button and then select Programs > DMSLocal > DMSLocal.
- Double-click the DMSLocal icon on the Windows desktop.
When launching DMS Local for the first time, it is suggested that you connect your computer to the Internet and then update DMS Local's database of projectors to ensure that DMS Local features the most up-to-date information available on BenQ's cloud service site. For more information on updating DMS Local's database of projectors refer to the instructions on page 12.

Some functions such as Error icon projector panel, Error Notifications via E-mail, and Generating an Error Report are not available for current projector models.
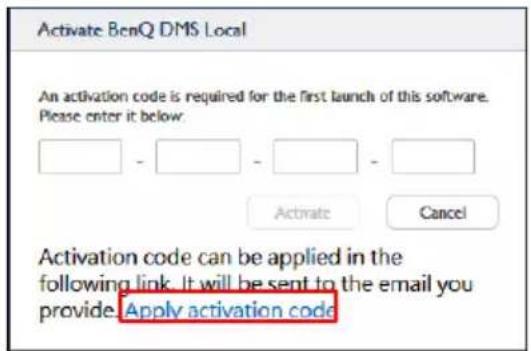
After launching DMS Local for the first time you will be prompted to enter an activation code before you can begin using the software. To obtain the activation code follow the steps below:
I. Apply for a license using one of the following methods:
- Click the Apply activation code link at the bottom of the Activate BenQ DMS Local prompt. Your computer will open the Get the license here webpage that will allow you to apply for a license and obtain the activation code.
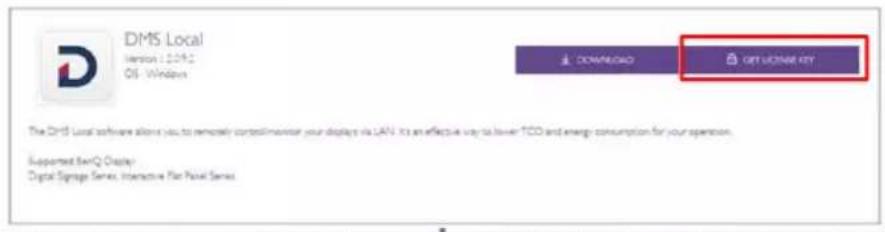
- Open the BenQ Display Solutions website (https://business-display.benq.com/en/index.html), click the Find Product > Projector > Software & App > DMS Local link at the top of the page, then click the DOWNLOAD link, and then click the GET LICENSE KEY link in the DMSLocal box.
- In the Get the license here webpage enter the following information in their respective fields and then click Send.
a. Serial Number - Enter the 13-character serial number located on the chassis of the display you want to control using DMS Local.
b. e-Mail - Enter your company or organization's e-mail address where you want the registration code to be sent.
c. Industrial Classification - Select the industry for your company/organization.
d. Company Name - Enter your company or organization's name.
e. Verification Code - Enter the 4-digit code shown in the window colored box.
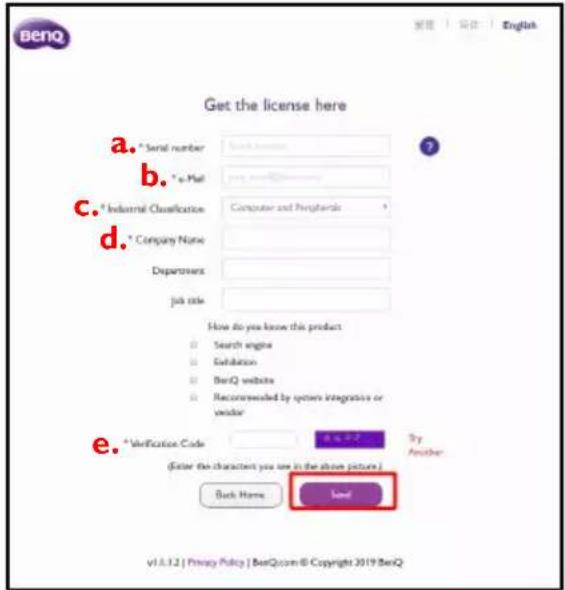
- When all the required information for the Get the license here webpage is entered and submitted, a verification e-mail will be sent to the e-mail address entered in the e-Mail field. Open your e-mail inbox and click the Confirm link in the verification e-mail to verify your e-mail address.
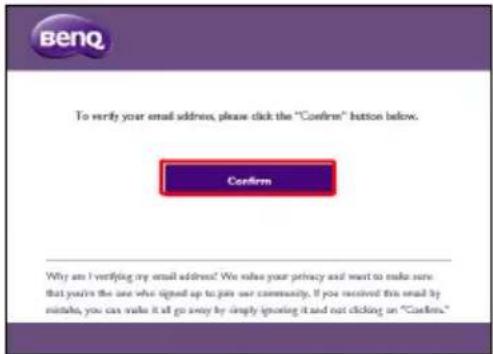

- If the serial number entered in the Get the license here page has been previously used to obtain an activation code via an e-mail address different from the one entered, a prompt will appear notifying you of this. You can then choose to change the e-mail address for the specified serial number and re-obtain the activation code using the new e-mail address.
- If you have previously verified the e-mail address entered in the Get the license here page, the activation code will be directly sent to the e-mail address.
-
If you have not received a verification e-mail shortly after submitting the information in the Get the license here page click the Resend me a verification email again button in the license application submission page.
-
Once your e-mail address has been verified, the activation code will be sent to your e-mail address listed in the Key field.
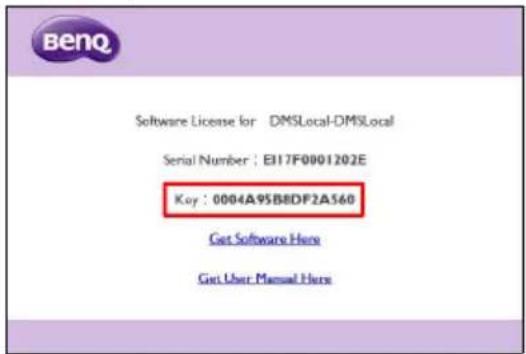
- Return to the Activate BenQ DMS Local window and enter the activation code shown in the Key field, and then click the Activate button.
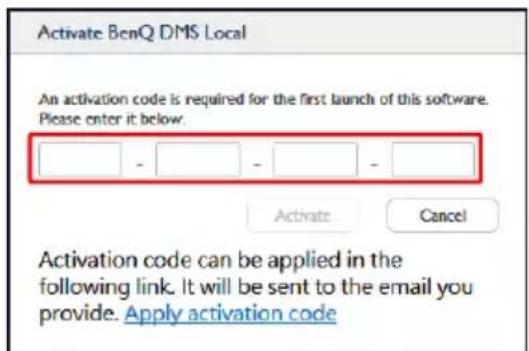
Once you have activated DMS Local and begin using DMS Local for the first time, it is suggested that you update DMS Local's database of projectors to ensure that DMS Local features the most up-to-date information available on BenQ's cloud service site. For more information on updating DMS Local's database of projectors refer to the instructions on page 12.
Closing DMS Local
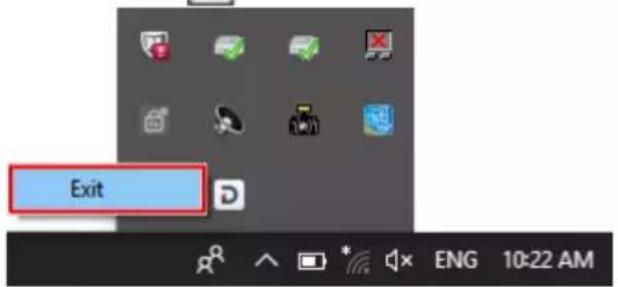
When you are finished using DMS Local, closing the program window alone does not properly close DMS Local, you must fully exit the program to ensure that DMS Local is properly closed. To exit DMS Local follow the instructions below:
I. Click in the Windows system tray.
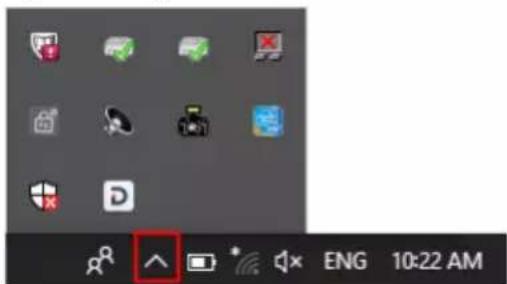
- Right-click the DMS Local icon and select Exit.
The DMS Local Main Page
The main page for DMS Local will be shown. The following items are featured on the DMS Local main page.
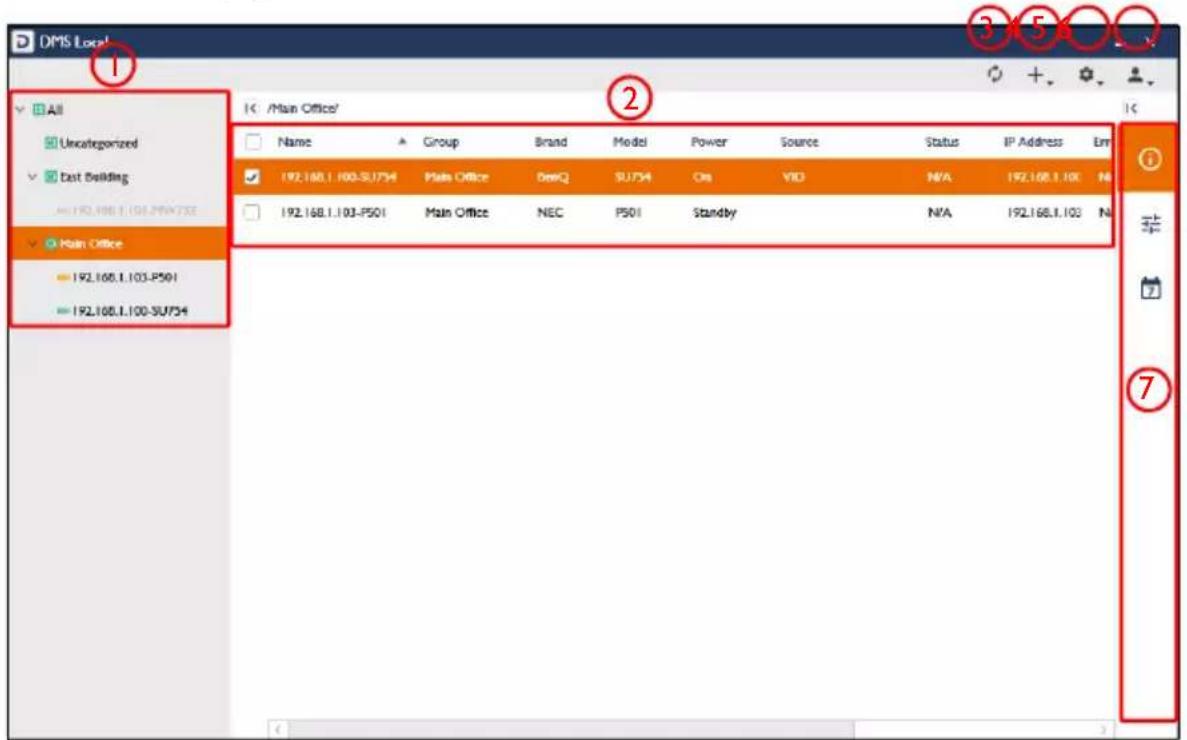
| No. | Item Description | |
| 1 | Device Tree | Shows all the projectors and projector groups managed by DMS Local in a tree-view structure.See Adding Projectors to DMS Local for more information on the adding projectors to the device tree.See Device Tree Icons for more information on the status icons shown in the device tree. |
| 2 | Projector Panel | Shows status information for the projector(s) or projector groups selected in the device tree.See The Projector Panel for more information on the various fields featured in the projector panel. |
| 3 | Refresh  | Click to refresh the status of the projectors shown on the main page. DMS Local will automatically refresh the projector status after a given interval of time. The refresh button is to allow users to get the most up-to-date information at any given time. DMS Local will automatically refresh the projector status after a given interval of time. The refresh button is to allow users to get the most up-to-date information at any given time. |
| 4 | Add  | Click to search for and add projectors to the DMS Local management system, or to create groups for better organization in the device tree.See Adding Projectors to DMS Local for more information on adding projectors and projector groups. |
| 5 | Settings  | Click to access various system management functions for administrators, such as error reports, e-mail alerts, database backups, and more.See Other Functions for more information on the system management functions available for the Settings button. |
| 6 | User  | Click to setup a login password for DMS Local.See Setting a Login Password for DMS Local for more information on setting up a login password. |
| 7 | Action Panel | Provides various tools that allow you to further manage/monitor projectors and projector groups, including the information tab ( ); control tab ( ), and the schedule tab ( 7).See The Information Tab, Controlling Your Projectors, or Scheduling a Task for Your Projectors for more information on each tab in the Action Panel.The action panel only appears when a projector or projector group is selected in the projector panel. The information tab only appears when a single projector is selected in the projector panel. |
Adding Projectors to DMS Local
In order to manage a projector via the DMS Local software the projector must first be added into the DMS Local device tree.
Before adding any projectors, it is suggested that you first update DMS Local's database of projectors to ensure that DMS Local features the most up-to-date information regarding newly added projectors, including their product names and available configurations. To update DMS Local's projector database, follow the steps below:
I. Ensure that the computer running DMS Local is connected to the Internet.
- Click the Settings button and then select Update device definitions (JSON).

- Once the prompt notifying you that the device definitions have been updated appears, restart DMS Local and begin adding projectors.
To add projector(s) to DMS Local follow the steps below:

Before following the steps below, ensure that your computer and projectors are connected to the same network, as described in Connecting the projector(s) and computer to a network.
I. Click the add button (+) and then select Add new device.

- In Add new device pop-up window choose one of the following options:
- In the Network Interface field select the interface your computer is using to connect to the network, and then click Scan.
![Add new device Please select the network interface connected to the target device network for scanning. Network Interface Realtek PCIe FE Family Controller - [192.168.1.103] Search specific IP range Scan Cancel](/content/2026/06/1176614/images/0bd404bf1d653a3aeb3ebec4d7100e84ad6d509ace72a3cef49affa9c02a12be.jpg)

The network interface can be either your computer's network card (for wired connections) or its wireless card (for wireless connections).
- Check the Search specific IP range box, enter the IP range set for the projectors in the network by the IT administrator; and then click Scan.
![Add new device Please select the network interface connected to the target device network for scanning. Network Interface Realtek PCIe FE Family Controller - [192.168.1.103] ✓ Search specific IP range Scan Cancel](/content/2026/06/1176614/images/e5e6c7a7eafb88702c43944fcb73d8c67f4a0e310d6a86340dc8a7e96751d15e.jpg)

To obtain the IP range for the projectors on your network, consult your IT administrator.
- After DMS Local is finished scanning, a list of projectors that are connected to your network will appear. In the projectors list you can choose from the following options:
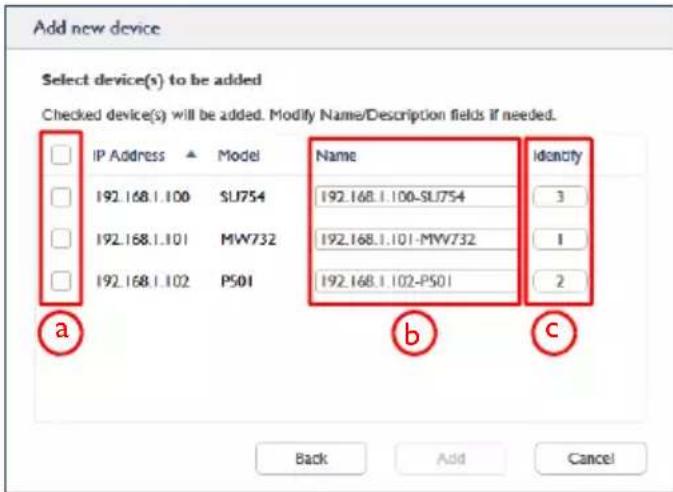
a. Check the box next to the projector(s) you want to add or check the select all box to select all the projectors on the list.
b. Enter a name for the projector in the Name field. If you do not enter a name in the field the default name for the projector (the IP address for the projector followed by the projector's model name) will be used.
c. [For BenQ projectors only] Click the numbered button in the Identify field to help you identify which projector corresponds to the projector name shown. Once you click the numbered button, the corresponding projector will flash a screen to help you identify the respective projector.
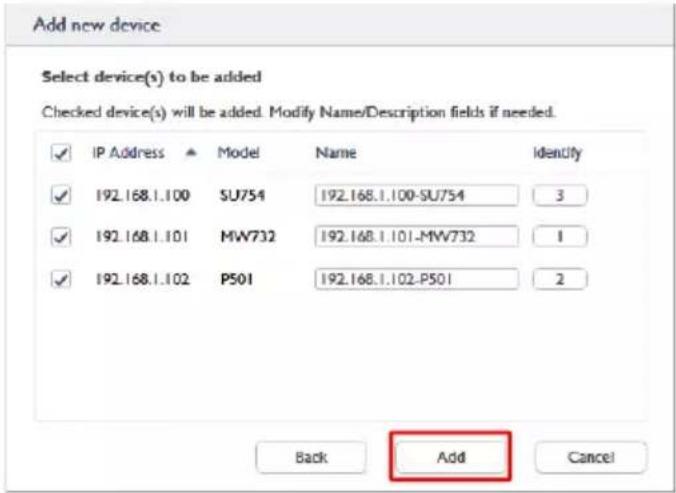
- Once you have finished with the options described above, click Add to add the selected projectors.
Managing Your Projectors
Once you have added the projector(s) into the DMS Local system, the projectors will appear in the device tree on the main page. Initially all newly added projector will be listed in the Uncategorized group of projectors.
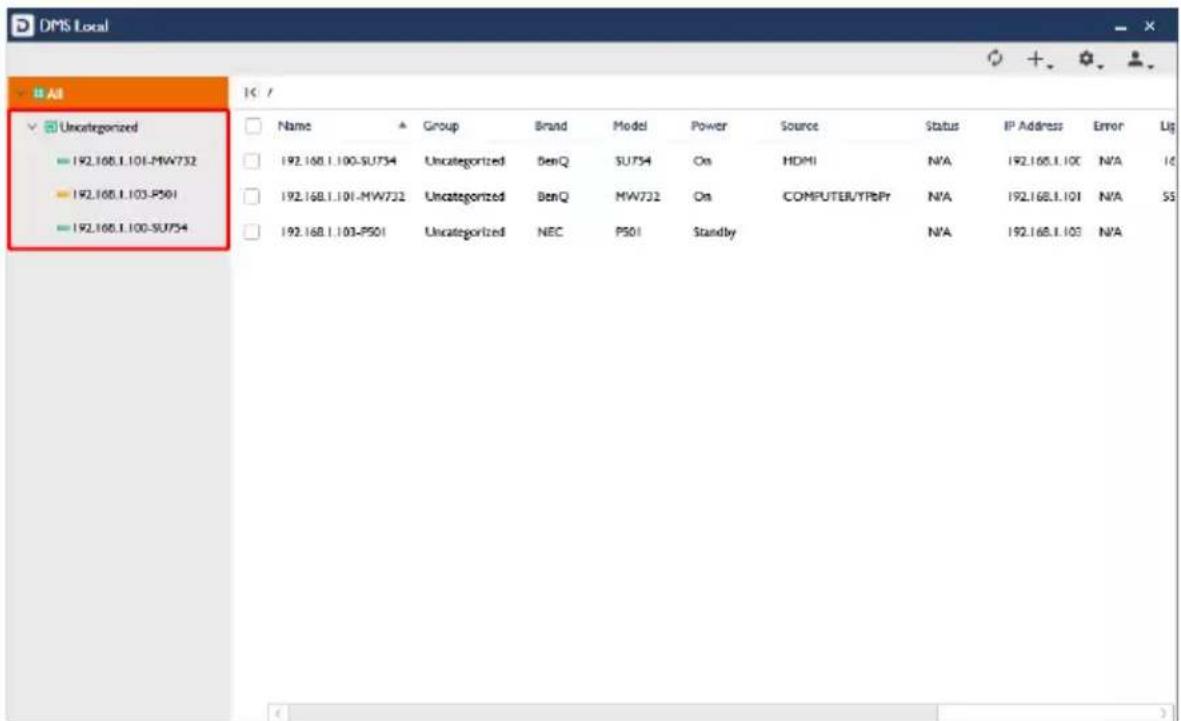
To help you better organize and identify your projectors DMS Local features the following options:
- Create Projector Groups
- Rename Projectors
- Delete Projectors
Creating Groups
In instances where DMS Local is used to manage a large number of projectors spread out over various spaces, organizing projectors into groups may be useful to manage your projectors. To create a projector group follow the steps below:
- Select the All category in the device tree, then click the add button (+) and select Add new group.
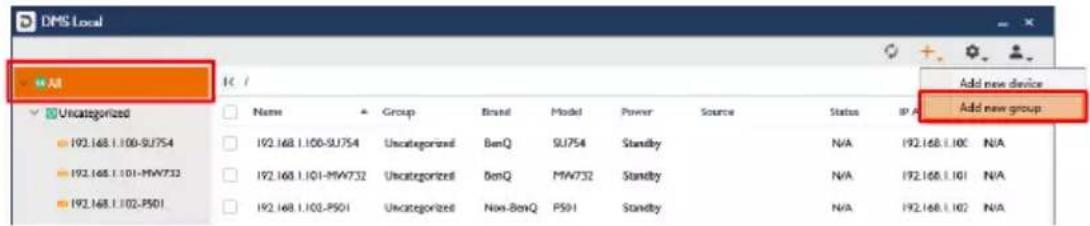

- A sub-group can be created within a group by selecting the group in the device tree that you want to create the sub-group in and then following the steps described in this section.
-
A group cannot be created within the Uncategorized group in the device tree.
-
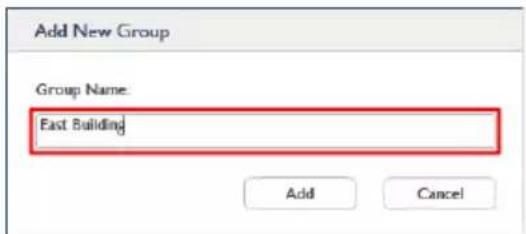
In the Add new group pop-up window enter a name for the group and then click Add.
- Once the new group has been created it will appear in the device tree. You can begin adding projectors to the group by selecting the respective projector in the device tree, dragging it into the group, and then confirming the addition.
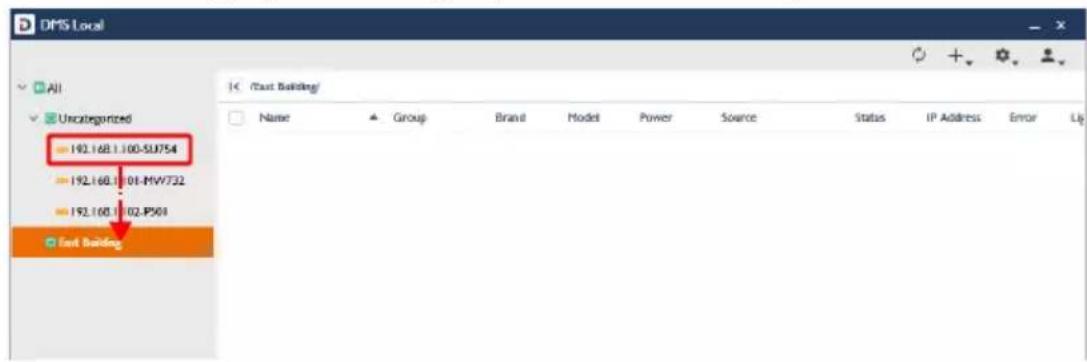

A projector can only be part of one group at a time.
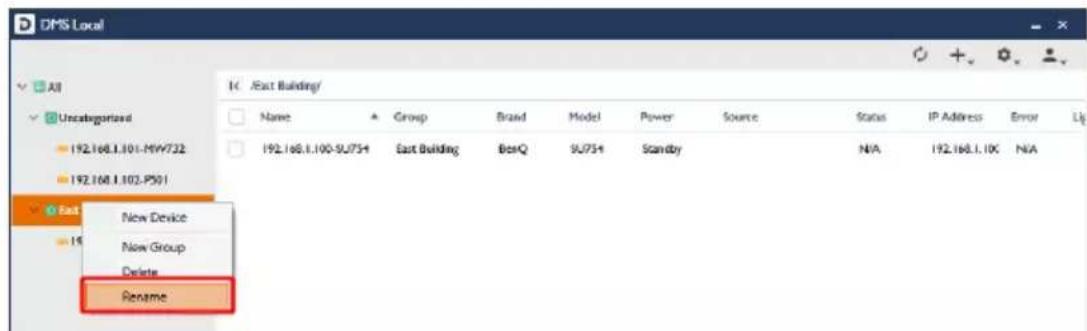
- To rename a group right-click the group you want to rename and select Rename.
Renaming a Projector
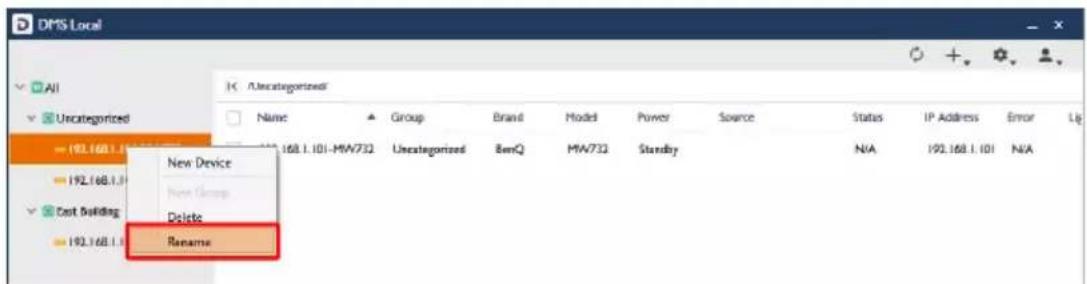
As described in Adding Projectors to DMS Local, the Add new device menu allows you to rename a projector while adding it to DMS Local. In instances where a projector is not renamed while it is being added to DMS Local, the projector will be added using its default name (the IP address for the projector followed by the projector's model number), you can then rename a projector to a more easily identifiable name in at any time by following the steps below:
I. Right-click on the projector you want to rename in the device tree, and then select Rename.
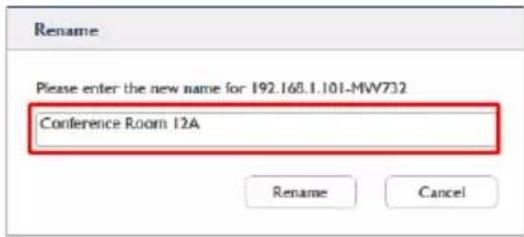
- In the Rename menu enter the new name and then click Rename.
Deleting a Projector
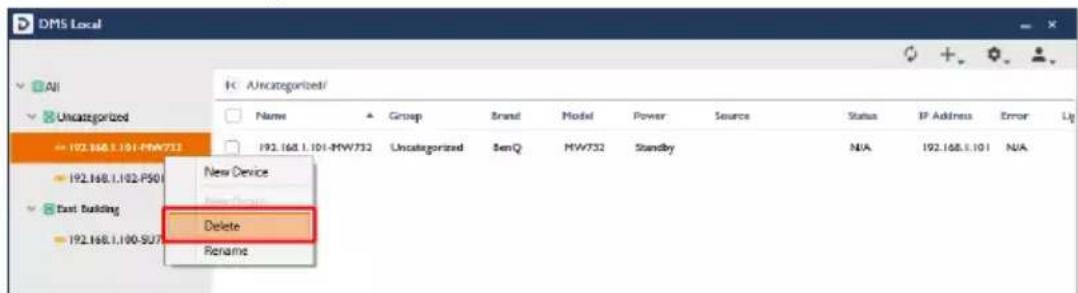
To delete a projector from the device tree, right-click on the projector you want to delete in the device tree, and then select Delete.
Device Tree Icons
As described earlier, the device tree lists all projectors managed by DMS Local in a hierarchical, tree-view structure. The device tree also shows various icons that allow you to quickly view the current status of all projectors and whether or not there are any errors causing the projector to malfunction.
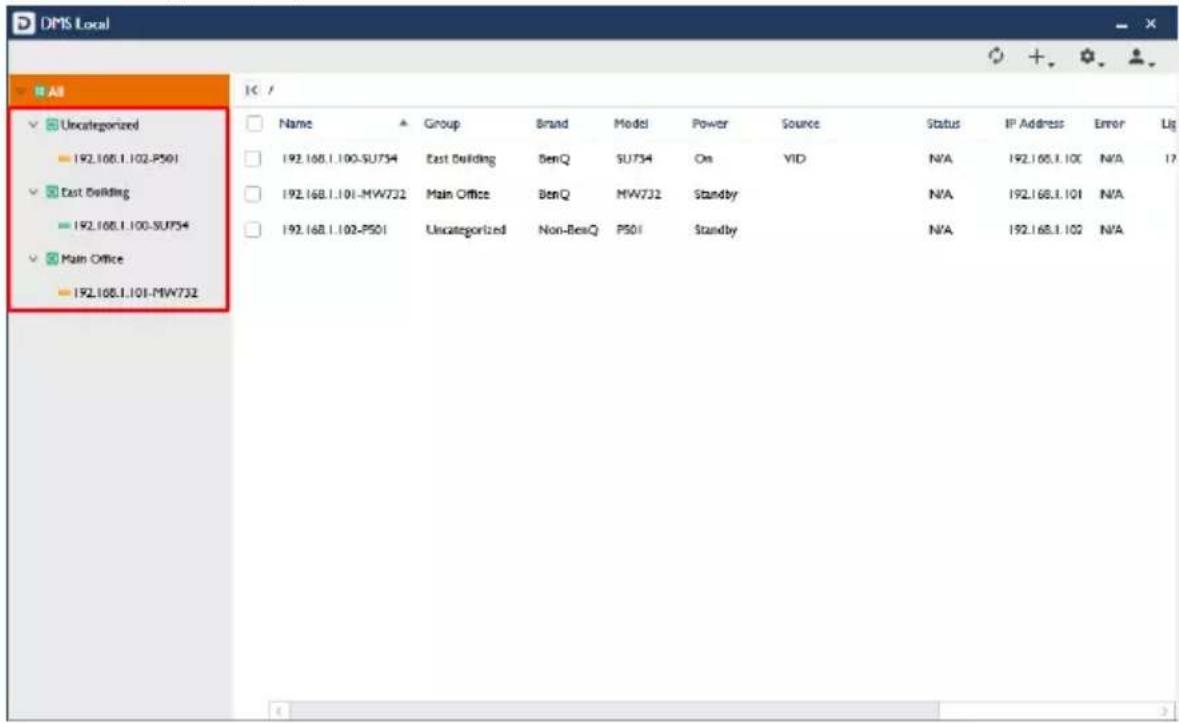
Status Icons
Icons that indicate the current status of each projector appears to the left of the projector's name in the device tree. Icons that indicate errors for a projector appears to the right of the projector's name in the device tree. The table below provides descriptions of each icon.
| Icon Status Description | ||
 | Online The | projector is powered on. |
 | Standby The | projector is in standby mode. |
 | Offline | The projector is undetected by DMS Local.This status usually indicates a problem with the projector's connection to the network or with the network itself, in such instances it is suggested that you check the projector's connection. |
 | Error | There is an error detected with the projector. For a more detailed description of the error, check the projector's Error column in the Projector Panel. |
Monitoring Your Projectors
Beyond the status icons shown in the device tree, DMS Local features the projector panel to monitor the status of your projector and the information tab to view detailed information for each projector, both of which are described in the sections below.
The Projector Panel
When either an individual projector or a projector group is selected in the device tree, the projector panel of the DMS Local main page will show in-depth status information for the selected projector or the projectors in the selected group.
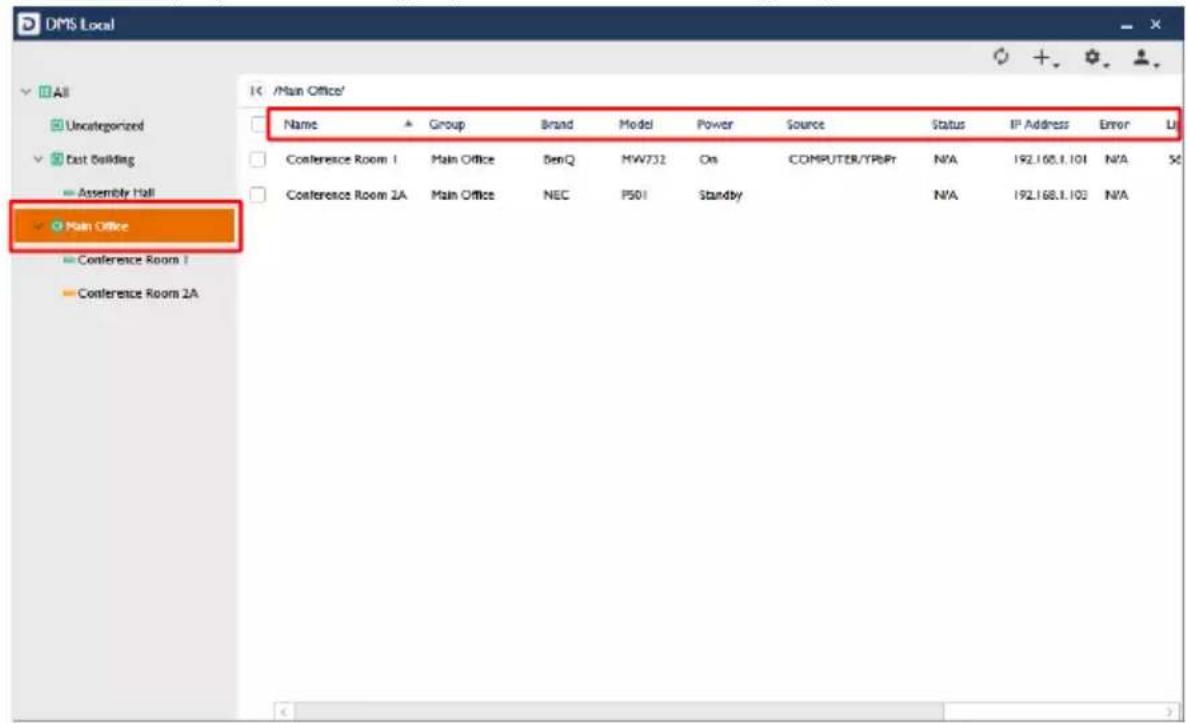
The table below describes the information featured in the projector panel.
| Item Description | |
| Name Name of the projector. | |
| Group Group that the projector belongs to. | |
| Brand Brand of the projector. | |
| Model Model name for projector. | |
| Power | Current power status of the projector.See Power for definitions of the various power statuses. |
| Status | Current operating status of the projector.See Status for definitions of the various statuses. |
| Source Current signal source for the projector. | |
| IP Address IP address for the projector. | |
| Error | Error or warning messages for the projector.See Error for definitions of the various error messages. |
| Light Used The | cumulative hours the lamp has been used. |
| Light 2 Used The | cumulative hours the 2nd lamp has been used. |
Power
The Power column in the projector panel shows the current power status of the projector(s). The following table defines the various power statuses available in the projector panel.
| Power Status Description | |
| On The projector is powered on. | |
| Standby The projector is in standby mode. | |
| N/A | The projector is undetected by DMS Local.This status usually indicates a problem with the projector's connection to the network or with the network itself, in such instances it is suggested that you check the projector's connection. |
Status
The Status column in the projector panel shows the current operating status of the projector(s). The following table defines the various statuses available in the projector panel.
| Status Description | |
| Normal The projector is operating normally. | |
| Error | The projector has encountered an operating error. When this status is shown, check the Error column in the projector panel to view detailed information regarding the operating error. |
| N/A | • The projector does not support the transmission of error messages over the network.• The projector is in standby mode. |
| Offline | The projector is undetected by DMS Local.This status usually indicates a problem with the projector's connection to the network or with the network itself, in such instances it is suggested that you check the projector's connection. |
Error
Depending on the operating status indicated in the Status column of the projector panel, the Error column may show a more detailed message regarding the type of operating error the projector may have encountered. The following table defines the various operating errors featured in the projector panel.
| Error Icon/Message | Description |
 | Indicates a system error based on one of the following scenarios:The color wheel has failed to start.The scaler has shutdown abnormally.The filter life has changed.The scaler has failed to reset. |
 | Indicates a lamp error based on one of the following scenarios:The life of the lamp/light source has been exhausted.The lamp door is not closed.Lamp 1 / Light source error.Lamp 2 / Light source error.Both lamps have failed.Lamp 1 / light source is not lit up. |
 | Indicates that at least one of the fans in the projector has encountered an error. |
 | Indicates a temperature error based on one of the following scenarios:Temperature 1 or 2 error.Thermal sensor 1 or 2 open error.Thermal sensor 1 or 2 short error.Thermal IC #1 or 2 I2C connection error.Thermal break error |
| (No message) | There is currently no operating issues (theStatusfield will show Normal). |
| N/A | DMS Local is not able to read the status information of the projector.This can indicate the following scenarios:The projector does not support the transmission of error messages over the network.The projector is in standby mode (theStatusfield will show N/A).The projector is undetected by DMS Local (theStatusfield will show Offline). |

For more information on error descriptions, projector indicator definitions, and troubleshooting please refer to the projector's user manual.
The Information Tab
The information tab of DMS Local shows detailed information for a projector and is only accessible when a single projector is selected in the projector panel and the information button in the action panel is clicked.
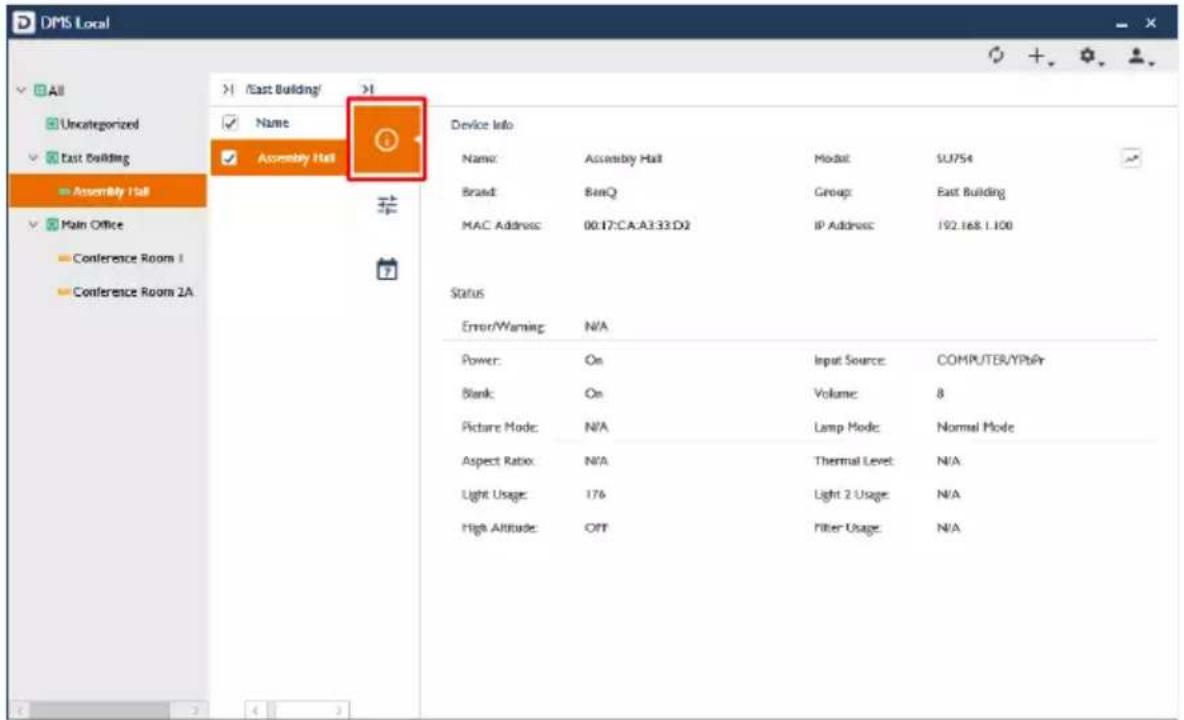
The table below describes the detailed information featured in the information tab.
| Item Description | |
| Name Name of the projector. | |
| Model Model name for projector. | |
| Brand Brand of the projector. | |
| Group Group that the projector belongs to. | |
| MAC Address MAC address for the projector. | |
| IP Address IP address for the projector. | |
| Error/Warning | Error or warning messages for the projector.See Error for definitions of the various error messages. |
| Power | Current power status of the projector.See Power for definitions of the various power statuses. |
| Input Source Current signal source for the projector. | |
| Blank | Indicates whether the blank screen function for the projector is on or off. |
| Volume Current volume level for the projector. | |
| Picture Mode Current picture mode setting for the projector. | |
| Lamp Mode | Current lamp mode setting for the projector. |
| Aspect Ratio Current aspect ratio for the projector. | |
| Thermal Level | Current thermal level for the projector. |
| Light Used The cumulative hours the lamp has been used. | |
| Light 2 Used The cumulative hours the 2nd lamp has been used. | |
| High Altitude Indicates whether the high altitude configuration is on or off. | |
| Filter Usage Current filter used for the projector. | |

- If the projector does not support the transmission of a certain field's information over the network, the field will show "N/A".
- For non-BenQ projectors only the following fields will display information: Name, Group, Brand, Model, Power, and IP Address. All other fields will show "N/A"
Controlling Your Projectors
The control tab of DMS Local features a panel of functions that allows you to control an individual projector or an entire projector group when they are selected in the projector panel and the control button in the action panel is clicked. The control tab also allows users to enter and save control command codes using the BenQ protocol (for BenQ projectors), the PJLink protocol or self-input via the protocol port (for non-BenQ projectors) to create custom controls for the projector.
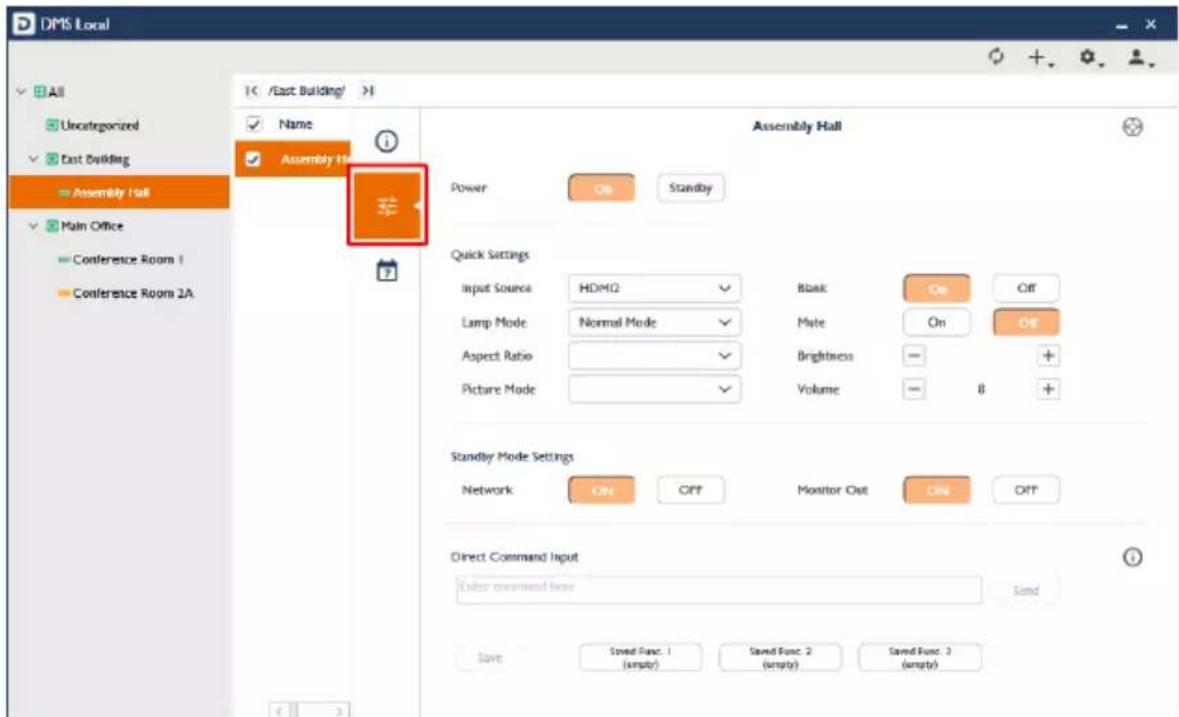

When DMS Local detects a problem with the projector's connection to the network all the buttons and fields in the control tab will be greyed out.
The control tab will show different control items depending on what type of selection is made in the projector panel, the possible selections include the following:
• A single BenQ projector
• A single non-BenQ projector
• Multiple projectors in a projector group
The sections below describe the control panel for each of the items above.
The Control Tab (Single BenQ Projector)
When a single BenQ projector is selected in the projector panel, the control tab features the following items:
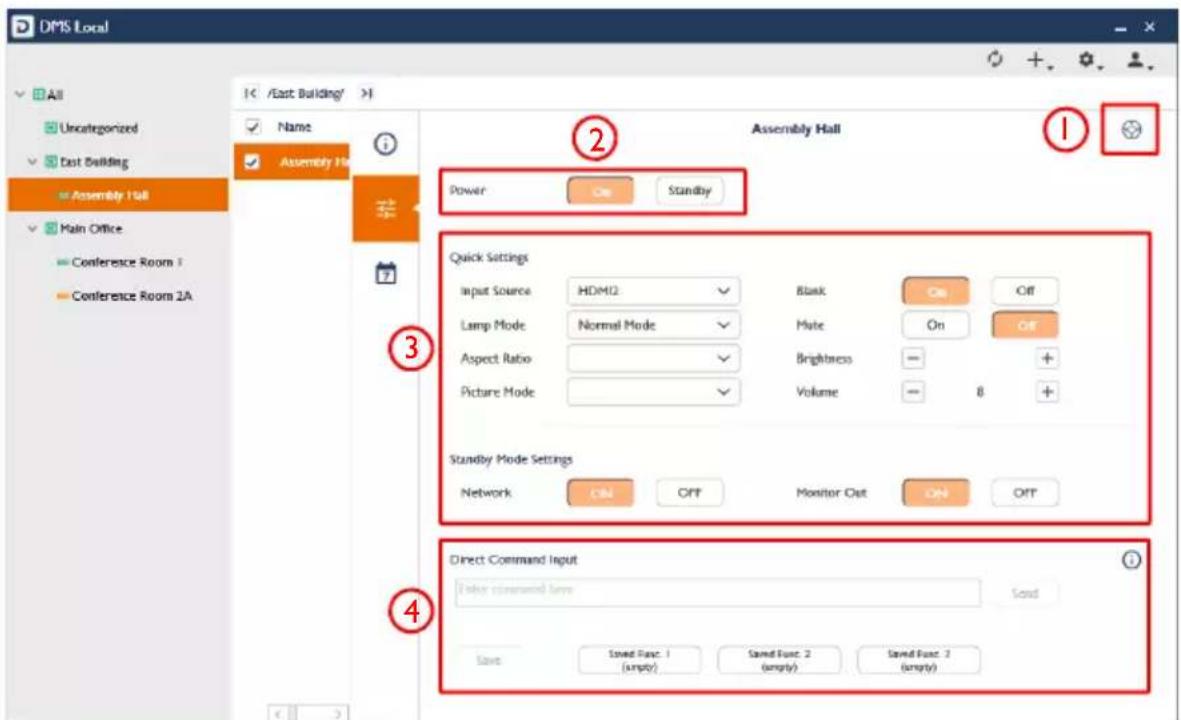
| No. | Item Description | |
| 1 | Virtu | Click to view a virtual keypad for the projector.See Virtual Keypad for more information on the virtual keypad. |
| 2 | Power Powers on the | projector or puts it in standby mode. |
| 3 | Quick Settings | Features buttons and menus to control your projector.See Quick Settings for more information on the quick settings controls. |
| 4 | Direct Control Commands | Send or save custom control command codes for the projector using the BenQ protocol for projector control.See Direct Command Controls for more information on the basic controls. |
The Control Tab (Single Non-BenQ Projector)
When a single non-BenQ projector is selected in the projector panel, the control tab features the following items:
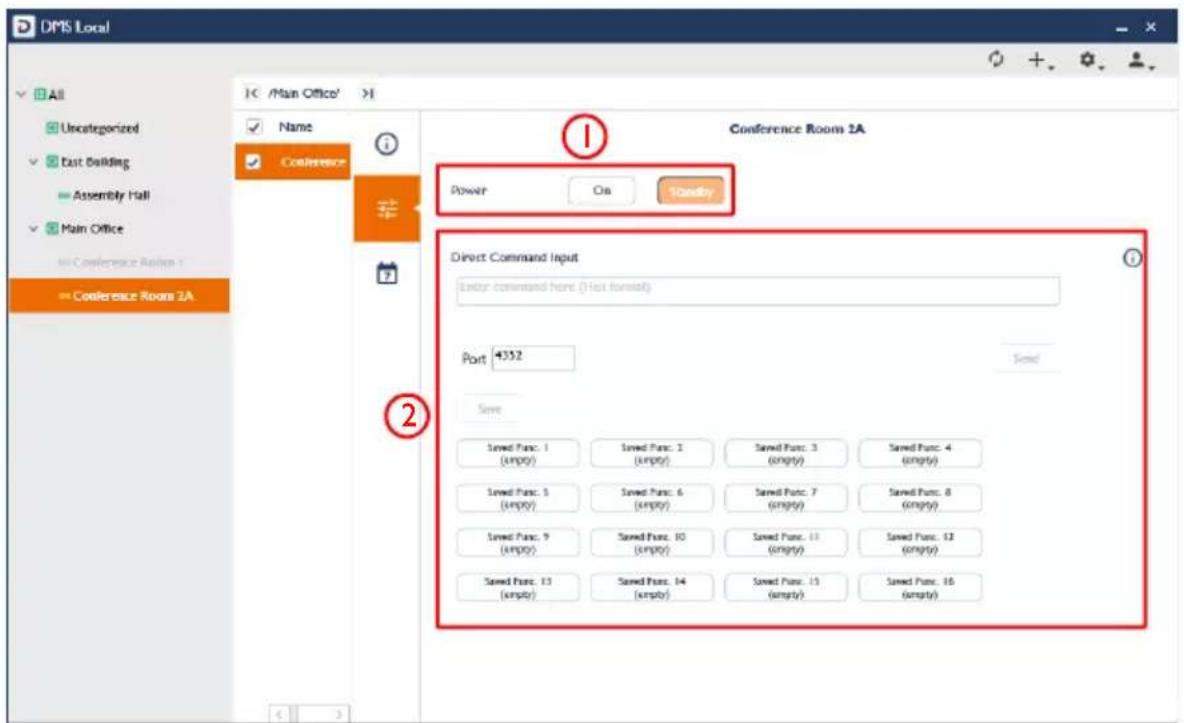
| No. | Item Description | |
| 1 | Power | Powers on the projector or puts it in standby mode via the PJ Link protocol. |
| 2 | Direct Command Controls | Send or save custom command control codes for the projector using either the (default) PJLink protocol or direct input via the protocol port.See Direct Command Controls for more information on the basic controls. |
The Control Tab (Multiple Projectors)
When multiple projectors in a projector group are selected in the projector panel, the control tab features the following items:
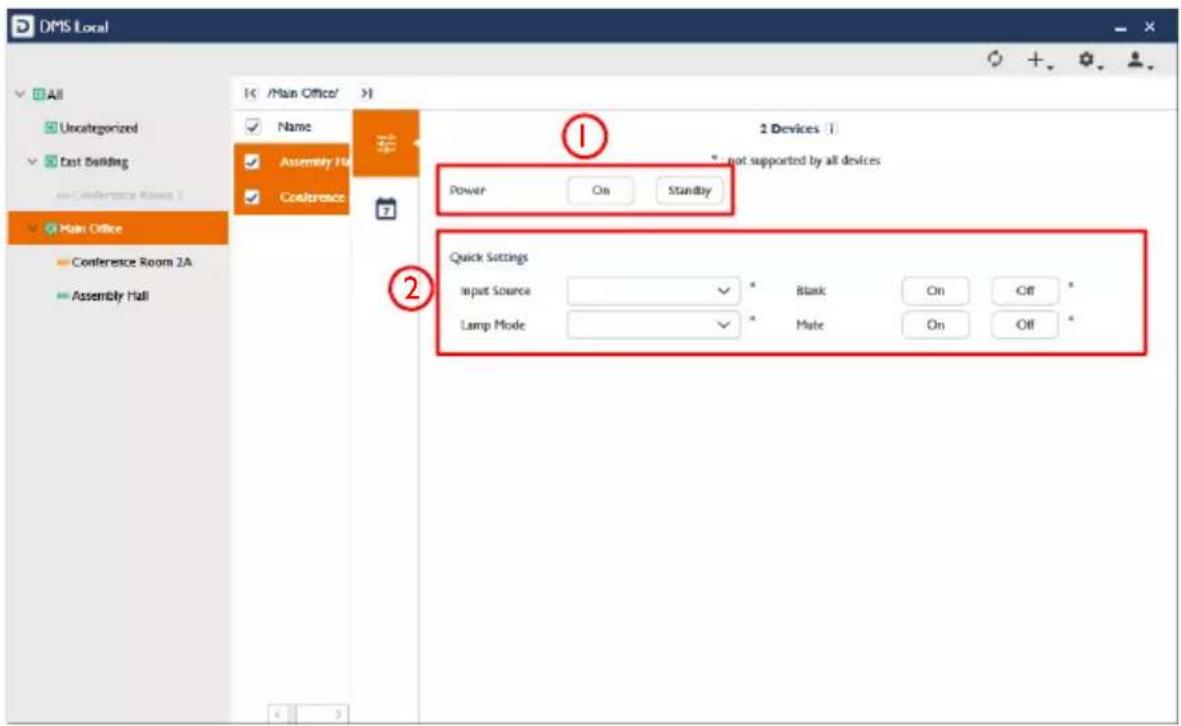
| No. | Item Description | |
| 1 | Power Powers on the projector or puts it in standby mode. | |
| 2 | Quick Settings | Features buttons and menus to control your projector.See Quick Settings for more information on the quick settings controls.Only functions supported by all projectors in the group will be supported in the Quick Settings section. Functions that are not supported by all projectors will show an Unsupport message. |
 If a non-BenQ projector is part of the group of projectors selected only the Power function will be available in the control tab. If a non-BenQ projector is part of the group of projectors selected only the Power function will be available in the control tab. | ||
Virtual Keypad
When the virtual keypad button is clicked in the control tab of a BenQ projector, the following digitized version of the hardware keys common to most BenQ projectors will appear.
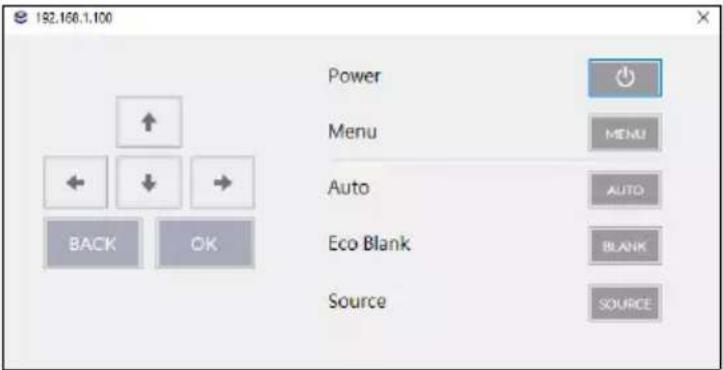
| Button Description | |
| Arrow buttons Selects or toggles OSD menu items. | |
| Back Goes to the previous OSD menu. | |
| OK Confirms the selected OSD menu item. | |
| Power Powers on the projector or puts it in standby mode. | |
| Menu Turns on/off the On-Screen Display (OSD) menu. | |
| Auto | Automatically determines the best picture timings for the image shown. |
| Eco Blank Makes the projector show a blank screen. | |
| Source Shows the source selection bar. | |
Quick Settings
The quick settings section of the control tab features the following buttons and menus which help you control your projector.
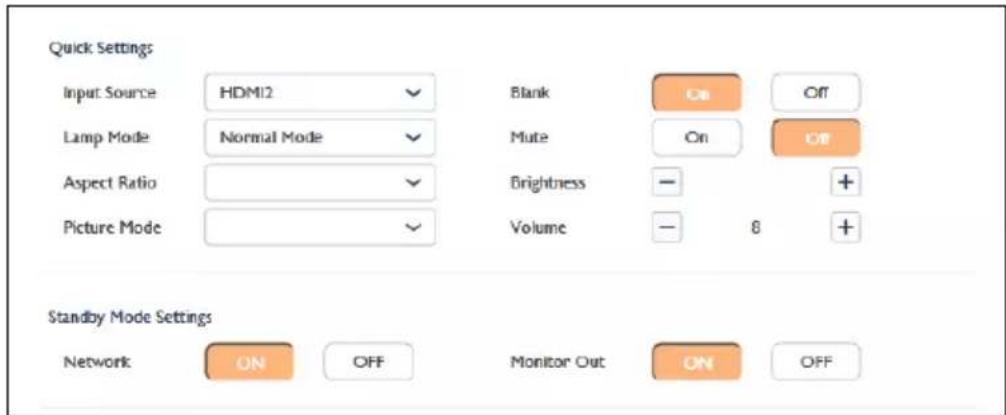
| Button Description | |
| Input Source Sets the input source for the projector. | |
| Blank Toggles a blank screen for the projector on or off. | |
| Lamp Mode Select the lamp mode settings for the projector. | |
| Mute Mutes or unmutes the audio output. | |
| Aspect Ratio* Sets the image aspect ratio for the projector. | |
| Brightness* Sets the brightness level for the projector. | |
| Picture Mode* Sets the picture mode for the projector. | |
| Volume* Adjusts the audio volume. | |
| Network* Enables/Disables the network function in standby mode. | |
| Monitor Out* Enables/Disables outputting the signal via the Monitor Out port. | |
| *Not available for multiple projectors. | |

- When the projector is in standby mode all fields in the quick settings section will be empty.
- When the projector is powered on the fields in the quick settings section will be set to the current configurations of the projector.
- When DMS Local detects a problem with the projector's connection to the network the fields in the quick settings section will be greyed out.
- When the quick settings section is opened for multiple projectors, both control fields and available options that are not supported by all projectors will feature an asterisk (*).
Direct Command Controls
The direct command control section of the control tab allows you to create custom controls for your projector using direct commands, for instance you can create a command to have your projector rotate its screen clockwise 90-degrees.

- Non-BenQ projectors support direct command controls as long as the protocol port is entered.
- Functions available to projectors that support direct command controls and their corresponding commands vary by model, check the specifications and user manual for your projector for available functions and commands.
- Direct command controls can only be used on one projector at a time.
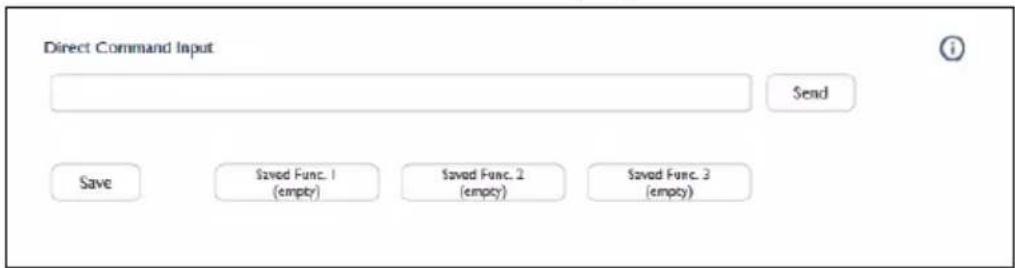
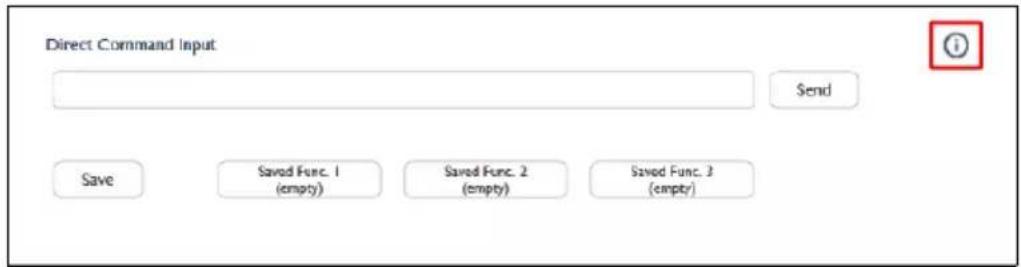
The direct command control section for a BenQ projector is shown below:
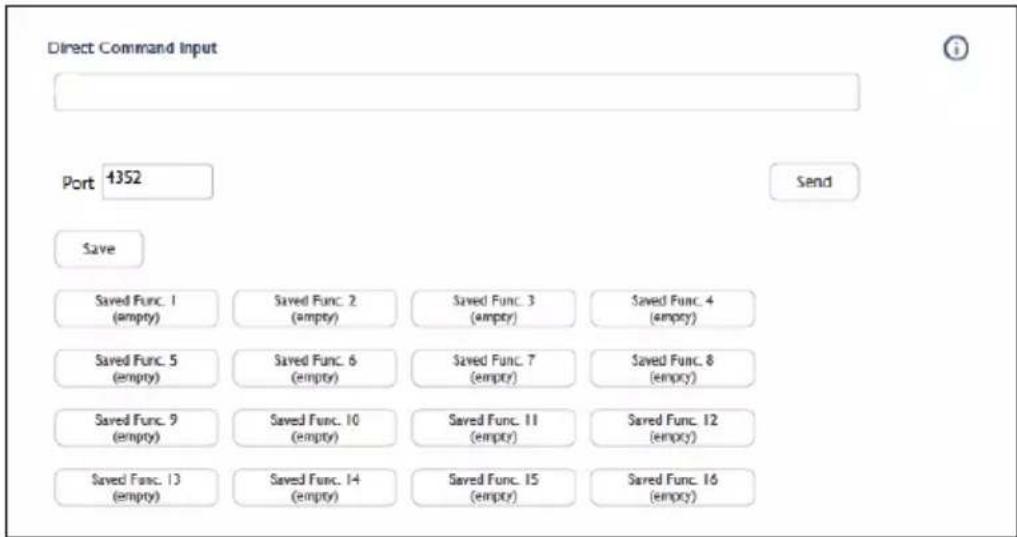
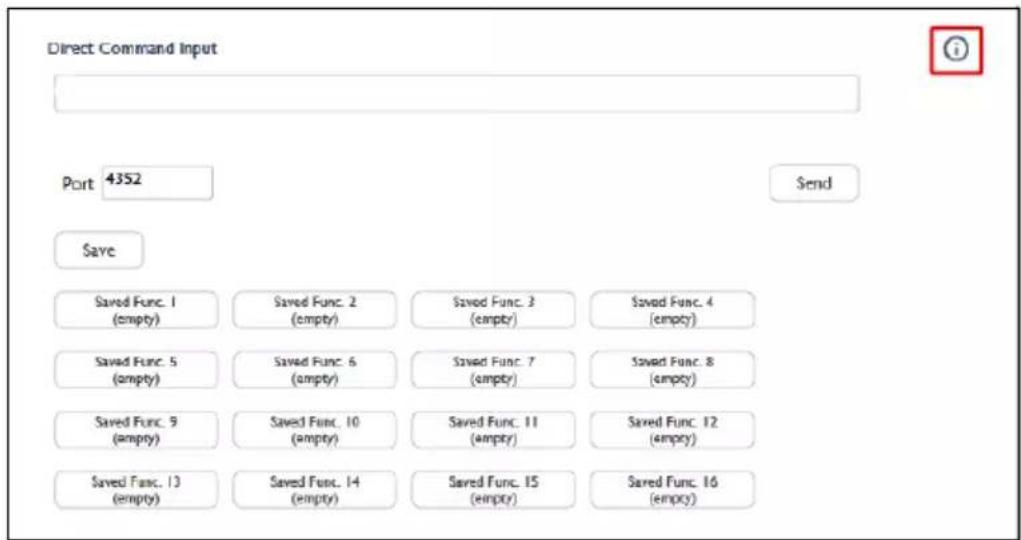
The direct command control section for a non-BenQ projector is shown below:
Creating a One-Time-Only Direct Command
To create a one-time-only direct command, follow the steps below:
I. For BenQ projectors - Enter the direct command code in the Direct Command Input field.
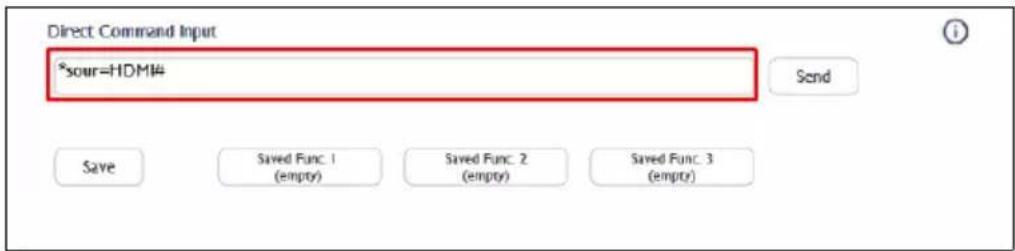
For non-BenQ projectors - Enter the direct command code in the Direct Command Input field and the TCP port for the projector in the Port field.
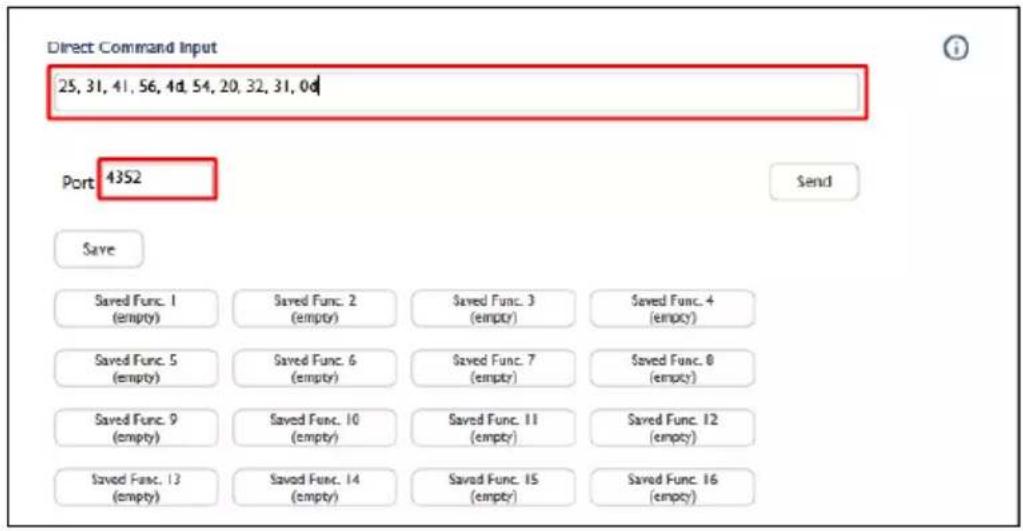

Commands for BenQ projectors must be in ASCII format, while commands for non-BenQ projectors must be in hexadecimal format. See for more information on creating direct commands see Direct Command Help.
- Click Send and wait for a confirmation that the command has been executed successfully.

To prevent quick changes to the projector's state the Direct Command Input will be grayed out while DMS Local is confirming whether the direct command is successful. Once the direct command has been confirmed or the confirmation process has timed out the field will return to its normal state.
Saving a Custom Direct Command Button
To save a direct command as a custom button, follow the steps below:
I. Click the button you want to customize in the direct command control section.
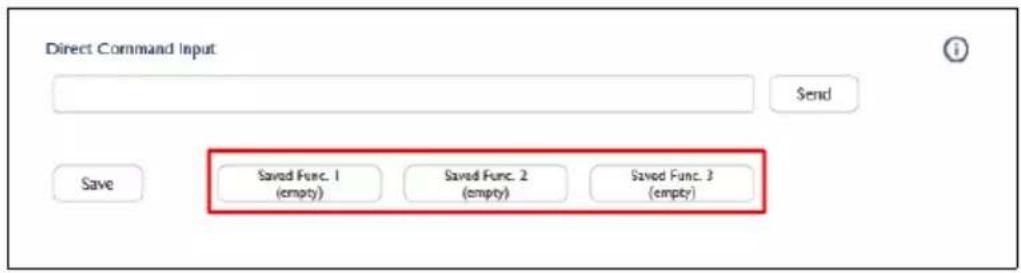

The direct command control section for BenQ projectors features 3 direct command buttons available for customization, while the direct command control section for non-BenQ projectors features 16 direct command buttons available for customization.
- In the Saved Func. window that appears click the options button ( : ) and select Edit.
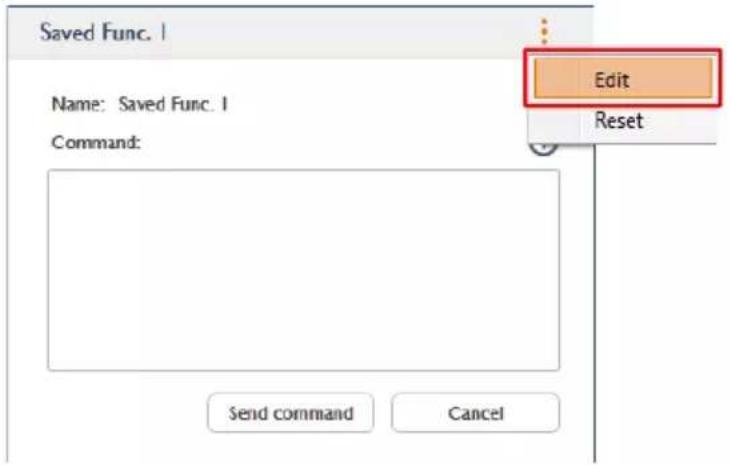
- For BenQ projectors - In the Edit Saved Function window enter a name for the button in the Name field and the direct command code in the Command field.
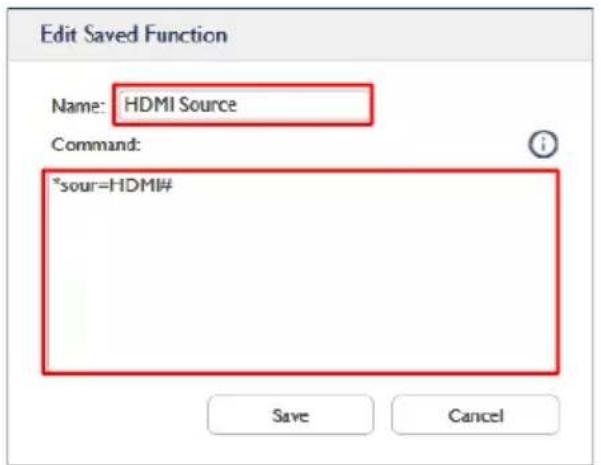
For non-BenQ projectors - In the Edit Saved Function window enter a name for the button in the Name field, the direct command code in the Command field, and the TCP port for the projector in the Port field.
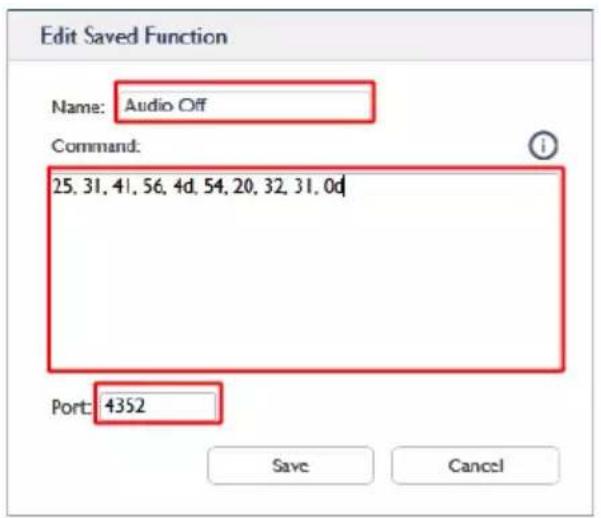

Commands for BenQ projectors must be in ASCII format, while commands for non-BenQ projectors must be in hexadecimal format. See for more information on creating direct commands see Direct Command Help.
- Click Save in the Edit Saved Function, your custom direct command button will appear in the direct command control section of the control panel, which you can click to send the command.
Direct Command Help
If you need help with creating direct commands in DMS Local, you can click the help button located in the direct command control section for guidelines on creating direct commands.
Scheduling a Task for Your Projectors
The schedule tab of DMS Local allows you to create scheduled tasks for an individual projector or an entire projector group when they are selected in the projector panel, where the projector(s) will automatically perform a certain function at a given day/time.
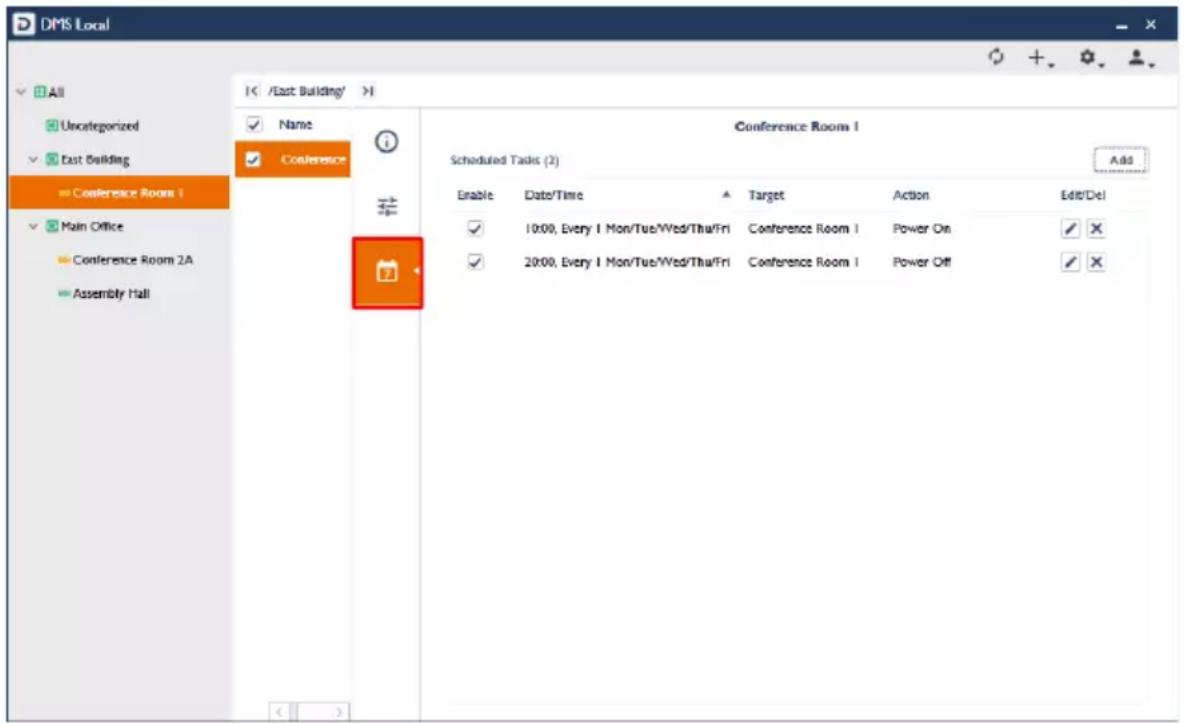
The table below describes the items featured in the schedule tab:
| Item Description | |
| Add | Click to add a new scheduled task.SeeCreating/Editing aScheduled Taskfor more information on adding a scheduled task. Scheduled tasks can be added for a single BenQ/non-BenQ projector or a group of BenQ and/or non-BenQ projectors. Scheduled tasks can be added for a single BenQ/non-BenQ projector or a group of BenQ and/or non-BenQ projectors. |
| Enable | Check the box for a scheduled task in this column to enable that task. Scheduled tasks which have an unchecked box are disabled and will be grayed out. Scheduled tasks which have an unchecked box are disabled and will be grayed out. |
| Date/Time* | Shows the day, time, and frequency for a given scheduled task. The format for theDate/Timeentry is: [Time], [Frequency (in Weeks)], [Days/ Date]. For example “16:30, Every 3 Mon/Tue” means that the task is scheduled every three weeks on Mondays and Tuesdays at 4:30pm. The format for theDate/Timeentry is: [Time], [Frequency (in Weeks)], [Days/ Date]. For example “16:30, Every 3 Mon/Tue” means that the task is scheduled every three weeks on Mondays and Tuesdays at 4:30pm. |
| Target* | Shows the projector(s) that the scheduled task apply to. |
| Action* | Shows the scheduled task.Scheduled tasks that are disabled will be grayed out. Scheduled tasks that have already been completed and have no remaining instances scheduled will be grayed and crossed out. |
| Edit/Del | Click the edit button ( ) to edit the scheduled task, click the delete button ( ) to delete the scheduled task. |
| *Click the header for this field to sort the list of scheduled tasks based on the field. | |
Creating/Editing a Scheduled Task
To create a scheduled task, follow the steps below:
I. Select the projector(s) you want the scheduled task to apply to in the projector panel and then click the schedule tab.
2. Click the Add button in the schedule tab for the projector.
3. Configure the following items in the Add schedule task menu:
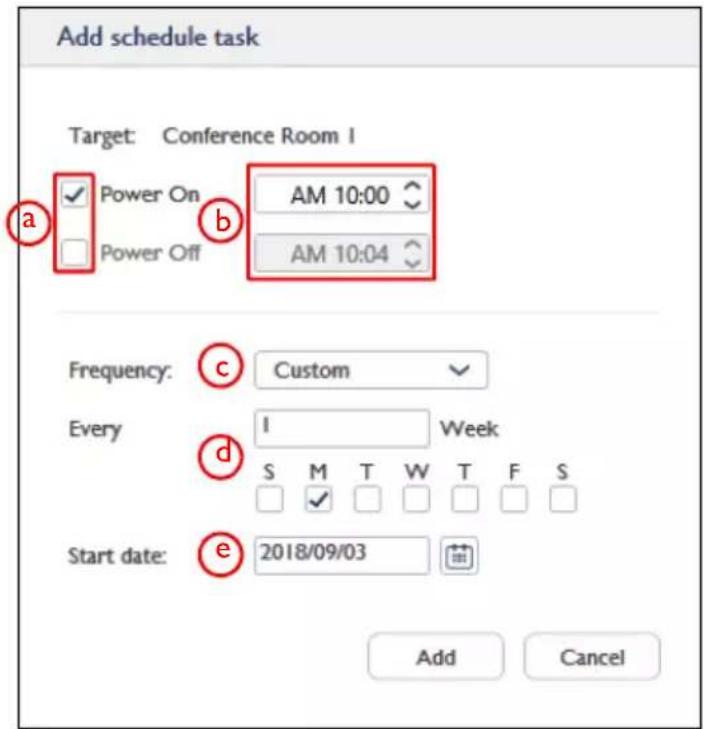
a. Check the box next to task you want the projector to perform based on the set schedule.
b. Set the time when you want the task to be performed.
c. Set the frequency for the task. The available options are Once (Default), Daily, Weekly, Monthly, and Custom.
d. If Custom is selected in the Frequency field enter how frequently (in weeks) the task will occur and the days in which it will occur.
e. Enter the date when the scheduled task will begin.
- Click the Add button in the Add schedule task menu to finish creating the scheduled task. By default the created task will automatically be enabled.
To edit a scheduled task, follow the steps below:
I. Select the projector(s) you want to edit the scheduled task for in the projector panel and then click the schedule tab.
2. Click the edit button () for the scheduled task you want to edit in the schedule tab for the projector.
3. Edit the items in the Edit schedule task menu based on the descriptions in step 3 above.
4. Click the Save button in the Edit schedule task menu to finish editing the scheduled task. The edited task will retain the enabled/disabled setting from before it was edited.
Because most projectors do not have built-in date/time record-keeping capabilities, DMS Local must remain open once a scheduled task is created to ensure that the task is executed.
Error Notifications via E-mail
The settings button ☐ on the DMS Local main page features a function that allows DMS Local to automatically send e-mail alerts to designated e-mail addresses anytime a specified error has occurred on any of your projectors. The e-mail alert will include the projector's name (the name for the projector in the device tree), model, IP address, input source along with the type of error that occurred, and a timestamp for the error.
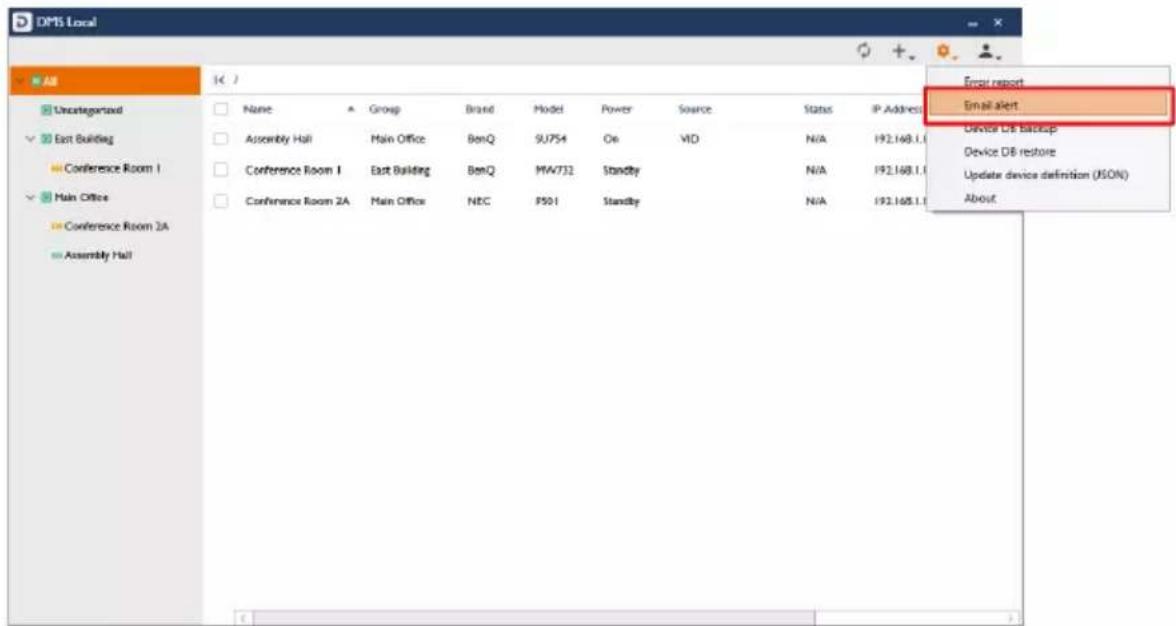

Projectors that do not support sending error messages via the network do not support error notifications via e-mail.
Creating a E-mail Alert
To create an E-mail alert, follow the steps below:
I. Click the settings button (✗) in the DMS Local main page and select Email alert.
- Configure the following items in the Event receiver tab of the Email alert settings menu:
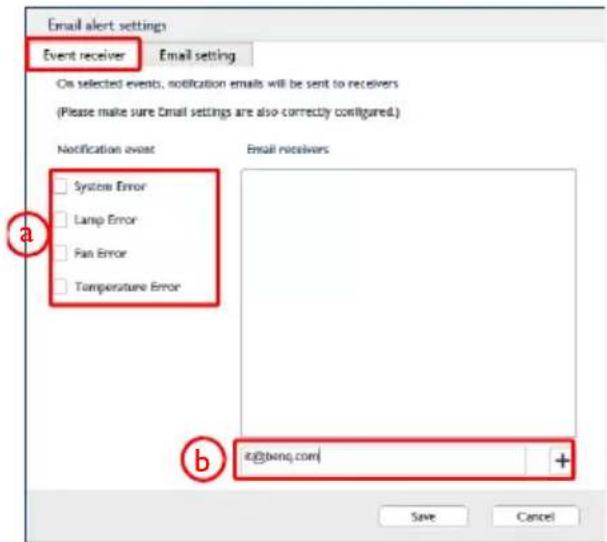
a. Check the box next to the type of error you want an e-mail alert sent out for (multiple error types can be checked).
b. Enter the e-mail address you want the alert to be sent to and then click the + button (multiple addresses can be entered).
- Click the Email setting tab and then configure the following items:
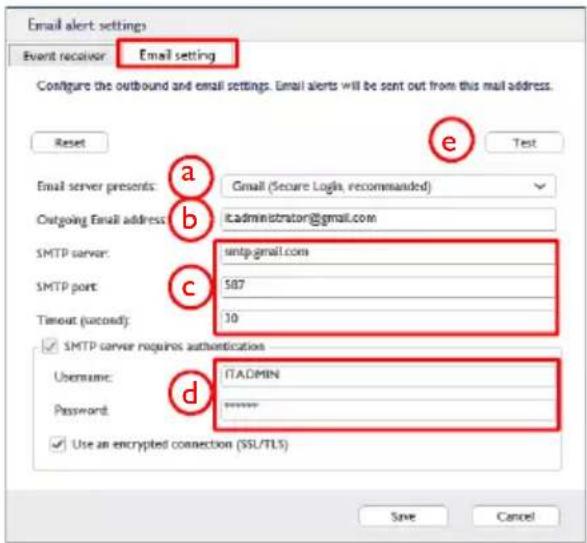
a. Select the type of e-mail service that the e-mail alert will be using to send the alert. The available options are Gmail, Yahoo, Outlook, QQ, and Custom.
b. Enter the e-mail address that the e-mail alert will be sent from.
c. If Custom is selected in the Email server presents field enter the server, port, and time-out settings. Consult your IT administrator if you are unsure of these settings.
d. Enter the Username and Password for the e-mail account used in the Outgoing Email address field.
e. Click the Test button if you want to send out a test e-mail alert to ensure that all the configurations are correct. The test e-mail alert will be sent to the e-mail address entered in the Event receiver tab.
- Click Save to finish creating the e-mail alert.

Individual e-mail alerts will be sent out for each projector that an error occurs on. For example, if a fan error occurs on 2 separate projectors, 2 separate e-mail alerts will be sent out.
An example of an e-mail alert for a thermal sensor error is shown below:
From: DMS Local send a mail to you! ooo@ooo.com
To: xxx@xxx.com
Subject: [BenQ DMS Local] From "192.168.1.4-MH733": "Thermal Sensor I open error" ERROR
Content:
This message is generated automatically by “192.168.1.4-MH733”, see below information:
Name: 192.168.1.4-projector
Model: MH733
IP: 192.168.1.4
Input: HDMI-I
Error: Thermal Sensor I open error
Time: 2018/08/28 14:49:23
Setting a Login Password for DMS Local
To ensure that access to DMS Local is secure and only for designated personnel, you can set a login password for DMS Local that needs to be entered every time DMS Local is launched. To set a login password for DMS Local, follow the steps below:
I. Click the user button () in the DMS Local main page and select Change password.
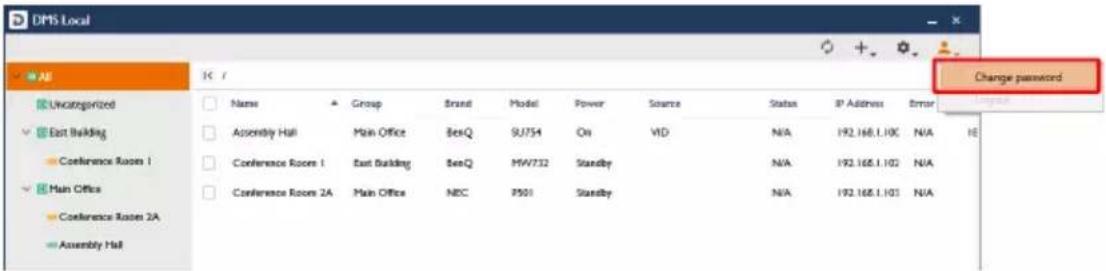
- In the Change password menu enter the password you want to set as the login password in both the New password and Confirm password fields. If DMS Local already features a login password enter the current password in the Current password field.
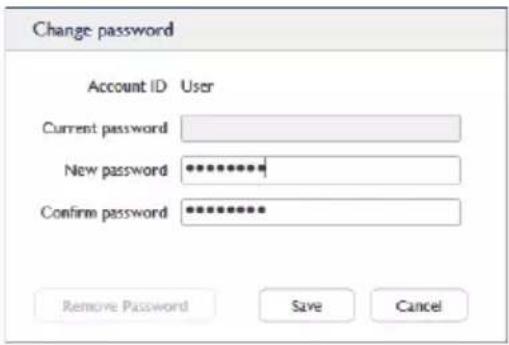

If you want to remove the existing password, click the Remove Password button in the Change password menu.
- Click Save to finish setting a login password for DMS Local.

If you forget your login password for DMS Local, click the Forget password? link at the bottom of the login window and contact your local BenQ service team to provide them with the password retrieval code shown in the Forget password? prompt.
Other Functions
DMS Local also features the following functions to further help you manage your projectors:
- Generate error report
- Update your projector's firmware over the network
- Backup DMS Local's projector listings
Generating an Error Report
To generate an error report in DMS Local which lists past errors along with information for the projectors that the error(s) occurred on, follow the steps below:

Projectors that do not support sending error messages via the network do not support generating error reports.
- Click the settings button () in the DMS Local main page and select Error Report.
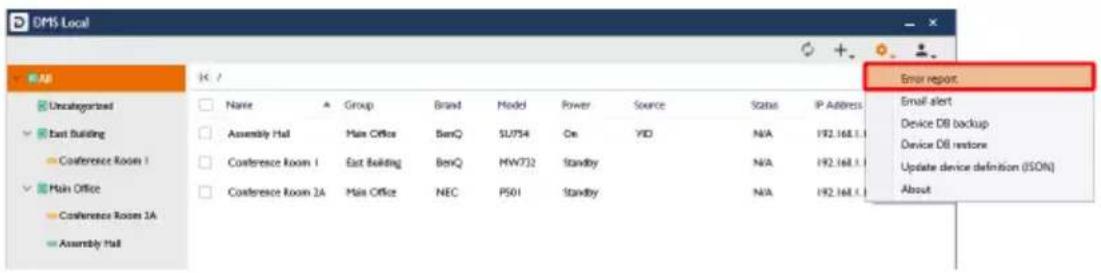
- If you want to export the error report to a saveable file format, click the Export in the Error Report pop-up window.
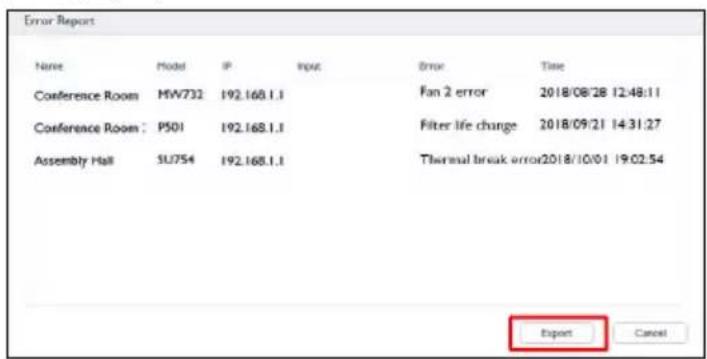

- Error reports will only feature projectors whose error status in the projector panel feature error icons. Projectors whose error status in the projector panel feature no message or an "N/A" message will not be included in error reports.
- The error report will only list the errors that have occurred since the previous error report was generated.
Firmware Update
To update the firmware on a projector in DMS Local, follow the steps below:

- This function is only available to BenQ projectors that support firmware update over the network.
- This function requires that the network that your projector is connected to has access to the Internet.
I. Select the projector in the projector panel whose firmware you want to update, and then click the information tab.
- In the information tab for the projector, click the firmware upgrade button ( ). The BenQ Easy Firmware Updater window will appear.
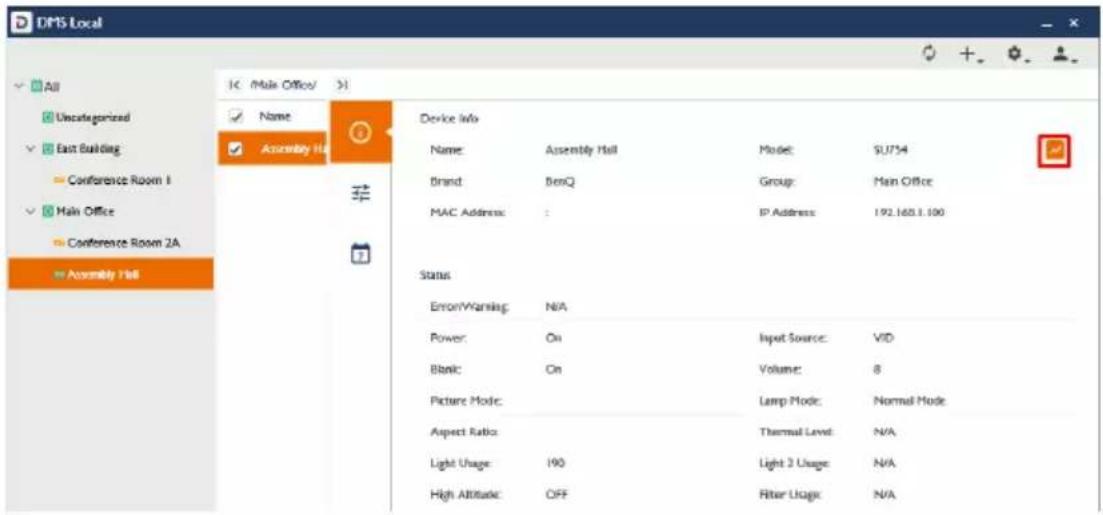

From the BenQ Easy Firmware Updater window you will be able to update any projector connected to network DMS Local is connected to.
- Refer to the BenQ Easy Firmware Updater user manual to proceed with the firmware update.

Contact your BenQ Local Service Center for information on where to download the BenQ Easy Firmware Updater user manual.
Backup Projector Listings
To backup the list of projectors and groups from the DMS Local device tree and their relevant data for data backup purposes or to transfer the list to another computer, follow the steps below:
- Click the settings button () in the DMS Local main page and select Device DB backup.
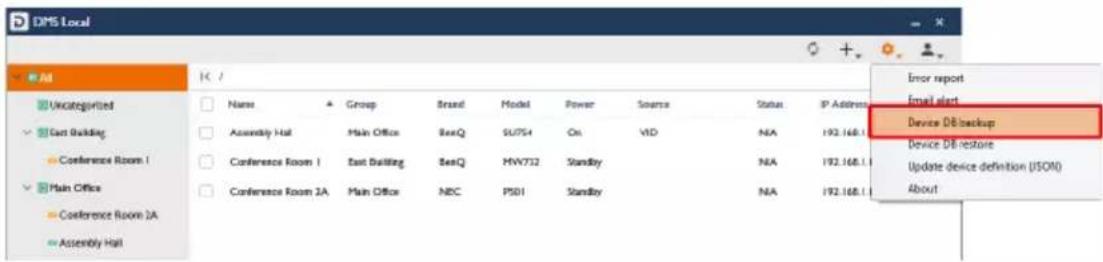
- Navigate to the folder you want to save the backup to in the pop-up window.

The backup file only saves the device tree and group settings for the projectors, it will not save any command controls or scheduled tasks.
To restore the backup file or load the backup file on a new computer follow the steps below:
- Click the settings button () in the DMS Local main page and select Device DB restore.
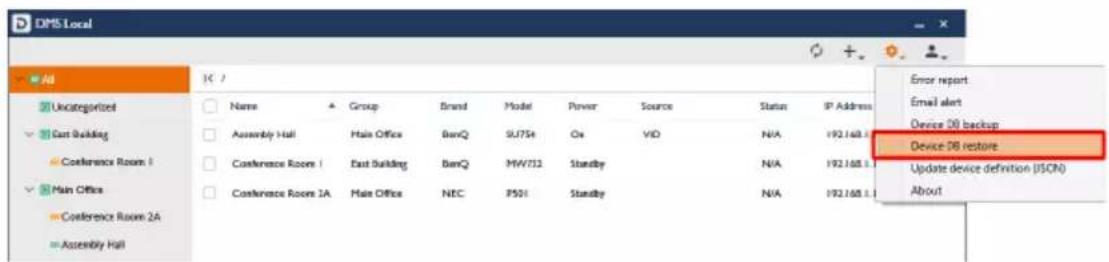
- Navigate the location where the backup file is located to in the pop-up window.
About DMS Local
For more information regarding DMS Local including software version, click the settings button ( ) in the DMS Local main page and select About.
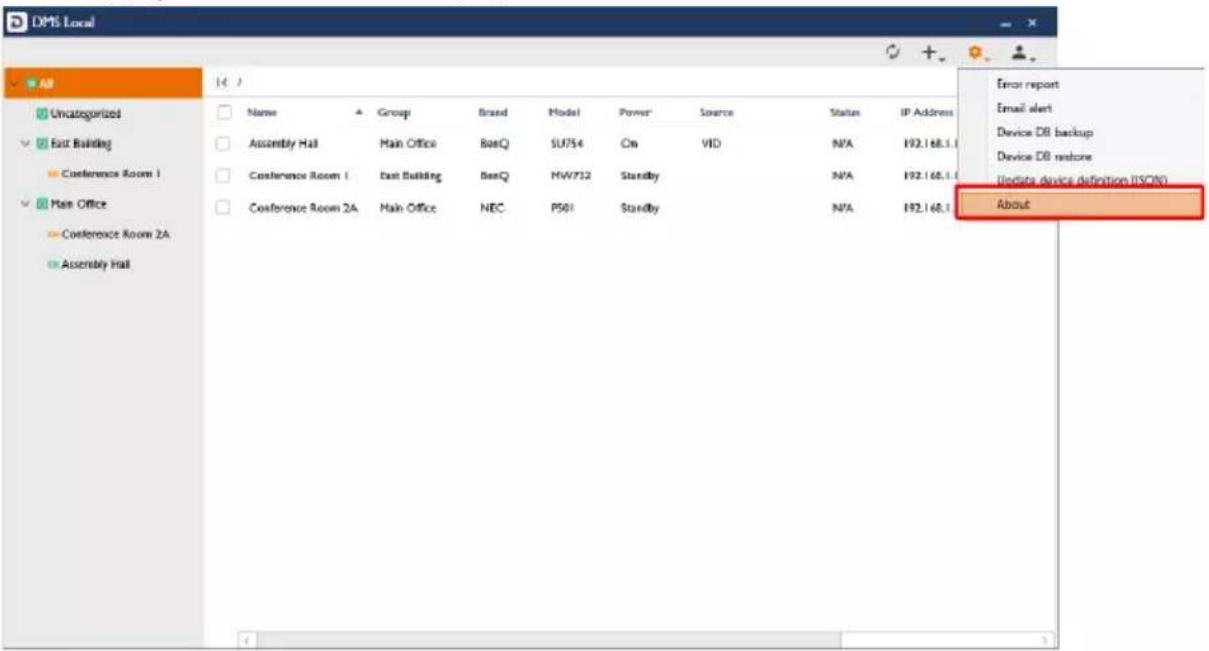
Troubleshooting
If you encounter problems while using the DMS Local, please refer to the following troubleshooting tips to try to solve the problems by yourself. If the problem persists, please contact BenQ Customer Support for help.
| Problem Solution | |
| Cannot connect to the projector(s) | Check the following:Check the cable connection. Is the projector correctly connected to the computer?Is the projector turned on?Is the projector's network setting correct? |
| Cannot add a projector into DMS Local | Check if the projector supports LAN control.Update the database of projectors (JSON) in DMS Local. |
8/23/19
- Copyright
- Disclaimer
- Table of Contents
- Copyright......2
- Introduction 5
- Initial Setup 6
- Using DMS Local 8
- Table of Contents4
- About DMS Local 43
- Troubleshooting 44
- Introduction
- System requirements
- Initial Setup
- Connecting the projector(s) and computer to a network
- Installing DMS Local
- Configuring Projector Settings
- Using DMS Local
- Launching DMS Local for the First Time
- Closing DMS Local
- The DMS Local Main Page
- Adding Projectors to DMS Local
- Managing Your Projectors
- Creating Groups
- Renaming a Projector
- Deleting a Projector
- Device Tree Icons
- Status Icons
- Monitoring Your Projectors
- The Projector Panel
- Power
- Status
- Error
- The Information Tab
- Controlling Your Projectors
- The Control Tab (Single BenQ Projector)
- The Control Tab (Single Non-BenQ Projector)
- The Control Tab (Multiple Projectors)
- Virtual Keypad
- Quick Settings
- Direct Command Controls
- Creating a One-Time-Only Direct Command
- Saving a Custom Direct Command Button
- Direct Command Help
- Scheduling a Task for Your Projectors
- Creating/Editing a Scheduled Task
- Error Notifications via E-mail
- Creating a E-mail Alert
- Content:
- Setting a Login Password for DMS Local
- Other Functions
- Generating an Error Report
- Firmware Update
- Backup Projector Listings
- About DMS Local
- Troubleshooting
Brand : BENQ
Model : MX723
Category : Video projector