
WTA3500FG - Tumble dryer BOSCH - Free user manual and instructions
Find the device manual for free WTA3500FG BOSCH in PDF.


| Product type | Vented dryer |
| Brand | Bosch |
| Model | WTA3500FG |
| Maximum capacity | 5 kg (cotton), 2.5 kg (synthetics) |
| Electronic programs | Whites/Colors, Synthetics |
| Timed programs | 20, 30, 40 minutes, Air refresh |
| Additional functions | Delicate (reduced temperature), Acoustic signal, Delayed start (up to 19 h) |
| Electrical supply | 230 V, 50 Hz, switching 10 A / 16 A |
| Dimensions (H x W x D) | Approx. 85 x 60 x 60 cm |
| Net weight | Approx. 35 kg |
| Filter maintenance | Clean after each drying cycle (by hand or with hot water) |
| Humidity sensor maintenance | Clean with a cloth soaked in vinegar if scaled |
| Appliance cleaning | Soapy water or non-abrasive cleaner, solvent-free |
| Safety | Do not dry textiles with solvents, elastane; door lock; automatic stop in case of malfunction |
| Drum light | Bulb to be replaced only by customer service |
| Indicative energy consumption | Whites 4-5 kg: 3.3 kWh (1400 rpm, 10 A); Synthetics 2 kg: 0.9 kWh (1000 rpm, 10 A) |
| Indicative drying time | Whites 4-5 kg: 105 min (1400 rpm, 10 A); Synthetics 2 kg: 31 min (1000 rpm, 10 A) |
| Disposal | Packaging recyclable; old appliance: cut the cable, destroy the lock |
Frequently Asked Questions - WTA3500FG BOSCH
User questions about WTA3500FG BOSCH
0 question about this device. Answer the ones you know or ask your own.
Ask a new question about this device
Download the instructions for your Tumble dryer in PDF format for free! Find your manual WTA3500FG - BOSCH and take your electronic device back in hand. On this page are published all the documents necessary for the use of your device. WTA3500FG by BOSCH.
USER MANUAL WTA3500FG BOSCH
natural_image
Line drawing of a front-loading washing machine with top handle, front panel, and side button (no text or symbols)WTA 35..
BOSCH
NL
Inhoudsopgave
Bladzijde
Witte / bonte was en kreukherstellend 9
natural_image
Line drawing of a washing machine with a side panel open, showing internal components and no text or symbols.
pie
| Category | Value | |---|---| | Drogen | 2 | | Strijkdroog | 3 | | Kastdroog | 4 | | Extra droog | 5 | | Einde | 6 | | Klaar in min. | 7 | | Start over h | 8 | | Voor-zichtig drogen | 9 | | Signaal | 10 | Tijdprogramma min. | 11 | | warm | 12 | | luchten | 13 | | Kleukherstellend | 14 | | witte/bonte w. extra droog | 15 | | zeer droog | 16 | | kastdroog | 17 | | licht droog | 18 | | strijkdroog | 19 | | mangeldroog | 20 |natural_image
Technical line drawing of a mechanical device with a perforated grille and mounting bracket (no text or symbols)
natural_image
Line drawing of a mechanical device with a handle and ventilation grille (no text or symbols)natural_image
Line drawing of a kitchen appliance with a lid open, showing internal components and ventilation slots (no text or symbols)
natural_image
Technical line drawing of a mechanical device with a perforated grille and mounting bracket (no text or symbols)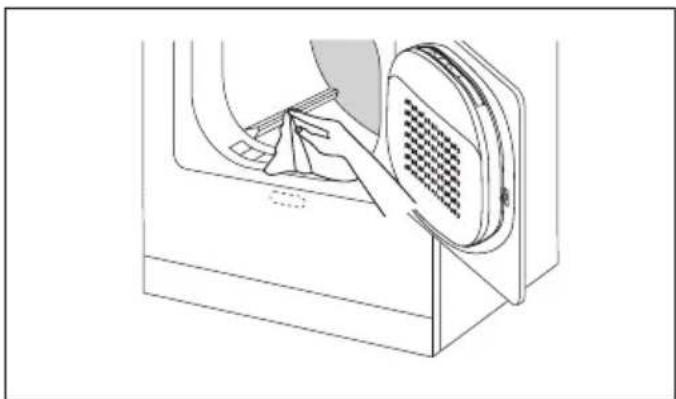
natural_image
Line drawing of a mechanical device with a handle and ventilation grille (no text or symbols)Packaging of the new tumble dryer 31
Old machine 31
We recommend environmentally friendly and economical use of the dryer
Energy consumption 32
Notes on safety 33
Brief instructions
Before drying 33
After drying 33
Getting to know your tumble dryer 34
Drying instructions
Drying tips 35
First operation
Switching between 10 A and 16 A 35
Switch the machine on. 35
Loading the tumble dryer 35
Programme table 36
Electronic programmes
Cottons and Easy-care 37
Setting a programme 37
Starting the programme 37
Programme run 37
Time programmes
Starting the programme 38
Changing a programme 38
Adding more washing 38
Programme end
Taking out washing 39
Switching the unit off 39
Additional functions
"Low heat" button 40
"Buzzer" button 40
"Time delay" button 40
Maintenance / Care / Cleaning
Cleaning the filter 41
Cleaning moisture sensor 41
Cleaning the tumble dryer 41
Rectifying minor malfunctions yourself 42
Customer service 43
Notes on disposal
Packaging of the new tumble dryer
All packaging material used is environmentally friendly and re-usable.
The cardboard boxes consist of 80% to 100% recycled paper.
Wooden pallets have not been treated chemically.
The plastic wrappings are of polythene (PE), the tapes are of polypropylene (PP) and the CFC-free packing is of foamed polystyrene (PS). These materials are all hydrocarbon compounds and can be recycled.
Reprocessing and re-using materials saves raw materials and reduces waste.
Old machine
! Make the old machine unusable:
Cut off both the plug and the cable.
Destroy the door lock, so that children cannot lock themselves in.
The old machine contains valuable materials which should be recycled. Please assist with environmentally friendly disposal or recycling.
You can obtain addresses for disposal of old machines from your local council.
GB
We recommend environmentally friendly and economical use of the dryer
How to save energy, time and money:
- The laundry should be well spun in a washing machine or spin dryer. The higher the spin speed the shorter the drying time, requiring less electricity.
- Delicate washing should be spun before being tumble dried.
- Put in the recommended quantity of washing. Do not exceed the maximum load (see programme table, page 36).
- When using the tumble dryer make sure that the room is well ventilated (open a window or a door).
- Always clean the filter after using the dryer.
- We recommend directing the evacuated air into the open air (see installation instructions).
Energy consumption
| Spin speedin rpmwashing machineor spin-dryer(approx. values) | Drying timein minutes(incl. 4 min cooling down)(approx. values) | Energyconsumptionin kWh(approx. values) | |||
| 10 A 16 | A 10 A 16 A | ||||
| Cottons/coloureds4 - 5 kgcupboard dryiron dry 1400 55 | 1400800 105 80 3,40 1,7 1,8800 77 58 2,4 | 753 3,3 | 55 | 2,4 | 2,4 |
| Easy-care 2 kgcupboard dry 10 | 00 31 27 0,9 1,0 | ||||
The consumption values given are average values which were determined under test conditions. Fluctuations of up to 10% are possible.
The drying time will be longer if the tumble dryer is located in a room with low ambient temperatures.
Notes on safety
Before using your tumble dryer for the first time:
! Read the enclosed documents carefully. They contain important information regarding installation, use and safety.
! Keep the documents in a safe place so that later users can refer to them.
! Install the appliance as described in the installation instructions.
! Do not connect an appliance if it is visibly damaged. If in doubt consult your dealer or customer service.
When drying please note:
! Use the machine only in a domestic situation and for fabrics suitable for tumble drying.
! Empty pockets of any objects that may have been forgotten, especially cigarette lighters (Explosion hazard!).
! Do not leave children unsupervised with the machine.
! Keep pets away from the machine.
! The machine should only be used to dry fabrics which have been washed in water. Do not use the machine to dry or air laundry which has been treated with solvents, e.g. stain removers (risk of severe damage!).
Do not use the machine to dry fabrics which are foam backed or are stained with hair-styling agent, nail varnish remover or similar substances (risk of severe damage!).
After programme end please note:
! After programme end switch the machine off.
To protect the machine please note:
! Do not stand on the machine.
Do not lean or sit against the door.
! Do not use washing performance enhancer sprays containing solvents or dirt and stain removers near the machine. The spray could damage the machine.
During transport please note:
! Caution when transporting the machine!
Risk of injury!
Do not use protruding components to lift the machine!
! Do not connect the exhaust hose into a chimney which also serves as chimney for a gas fire, coal fire or gas central heating as poisonous fumes may be drawn back into the room.
Brief instructions
Before drying
- Press the "On/off" button.
- Press the "Door" button.
- Put the washing in.
- Close the door. The door catch must lock securely into position.
- Set drying level with the programme selector or time selector (page 37).
- Select additional functions as required page 40).
- Press the "Start" button.
After drying
- Press the "Door" button.
- Remove the laundry from the machine.
- Clean the filter (page 41).
- Press the "On/off" button.
GB
Getting to know your tumble dryer
1 Door with filter

natural_image
Line drawing of a washing machine with a side panel open, showing internal components and no text or symbols.
2 "On/off" button to switch the machine on and off
3 "Door" button to open the door
4 "Start" button to start programme
5 "Low heat" button for drying at a reduced temperature (additional functions see page 40)
6 Buzzer button to turn signal on and off at the end off the programme (additional functions, see page 40)
7 "Time delay" button for delayed start time (additional functions see page 40)
8 Time selector for time programmes and anti-crease
9 Programme selector for drying levels
10 Indicator lights (LED) for type of laundry.
11 Indicator light (LED) for time programmes and anti-crease.
12 Indicator lights (LED) for the buttons pressed.
13 Indicator for delayed start time
14 Indicator lights (LED) for programme run.
Drying instructions
! Follow the drying symbols on the textiles.
= Dry at normal temperature
Dry at low temperature (Press "Low heat" button)
☒ = Do not tumble dry
! Do not dry the following fabrics in the tumble dryer:
- Wool or fabrics with a wool content: Risk of shrinkage!
- Fabrics that do not allow the free passage of air (e.g. Goretex or similar material)
- Delicate fabrics (silk, synthetic net curtains): Liable to crease!
- Very wet laundry: Waste of energy!
Drying tips
- For best results, sort the washing according to fibre type and desired level of dryness.
- Close all zips, hooks and eyelets. Tie loose belts, apron strings etc.
- For delicate laundry select "lightly dry" level and if possible, take it out of the machine whilst it is still slightly damp. Let it briefly dry out in the air as overdrying in the tumble dryer may cause creasing.
- It is not necessary to iron the laundry immediately after drying. We recommend that before ironing items are folded or rolled up so that residual moisture can spread evenly through the laundry.
- Items containing substantially different fibres which are still damp after drying can be further dried with the time programme.
- Knitted fabrics, e.g. jersey type material, may stretch if tumble dried. Only use the "lightly dry" programme for these fabrics. Always check labels in garments whether they are suitable for tumble drying.
First operation
! Install the machine according to the installation instructions.
Before the machine is operated for the first time, wipe out the drum with a damp cloth.
Switching between 10 A and 16 A
This tumble dryer can be operated on either a 10 A or 16 A circuit depending on the fuse in your household wiring. Please refer to the installation instructions for details of how to switch over from one to the other.
Switch the machine on.
- Press the “On/off” button. The indicator lights up.
Loading the tumble dryer
- Press the "Door" button.
The door opens.
When the door opens, the drum light (not available on all models) will come on.
! Before loading the machine make sure that no foreign bodies or pets are inside the drum. - Place items of laundry loosely into the drum.
- Do not trap any laundry items when closing the door and ensure that the door catch has locked securely into position.
- If the door is not shut properly a safety device prevents the machine from operating.
GB
Programme table
| Whites and colours made of cotton, or linen items up to max. 5 kgFor heat-sensitive fabrics, press the “Low heat” button. | Electronic programmeCottons.Drying level | |
| Bed and table linen, towels for laundry which will be ironed with a hot rotary iron. | rotary iron dry | |
| Bed and table linen, towelsT-shirts, polo shirts, work clothes | for laundry which will be ironed with a steam iron. | iron dry |
| T-shirts, polo shirts, trousers, work clothes, underwear | for laundry which will be ironed either lightly or not at all. | lightly dry |
| Bath towels, tea towels and hand towels, bed linen, underwear, cotton socks | for laundry which will not be ironed | cupboard dry * |
| Bath towels, tea towels and hand towels, bed linen, underwear, cotton socks | for laundry which will not be ironed, with thick, multi-layered parts. | very dry |
| Flannelled dessing gowns and bed linen no underwear or socks | particularly thick or multi-layered materials | extra dry |
| Delicate (non-iron) items made of synthetic and mixed fibres as well as non-iron cottonse.g. viscose polyesters up to max. 2,5 kg.For highly temperature-sensitive fabrics e.g. polacrylics, polyamides, elasthan, acetates press the “Low heat” button! | ProgrammeEasy-careDrying level | |
| Trousers, skirts, dresses, shirts for laundry | which will be ironed with a steam iron. | iron dry |
| Synthetic trousers, skirts, dresses, shirts, blouses, girdles, leggings and sports clothes | for laundry which will be ironed either lightly or not at all. | lightly dry |
| Shirts, blouses, sports clothes for laundry | which will not be ironed | cupboard dry * |
| Bed and table linen, tracksuits | for laundry which will not be ironed, with thick, multi-layered parts. | very dry |
| Anoraks, bed covers particularly thick or | multi-laye-red materials | extra dry |
| predried fabrics with low moisture content, and separate, small items up to 1 kg. for temperature-sensitive fabrics press “Low heat” button! | Time programmes20, 30, 40 min |
| all fabricsfreshening up seldom-worn clothes.Removal of creases from damp fabrics which should not be dried in the dryer. | Anti-crease cold |
* according to the test programmes to IEC 1121 / EN 61121
Electronic programmes
Please choose a drying programme from the programme table (36)
Cottons and Easy-care
Setting a programme
- Turn the programme selector: to the righ, the cottons, indicator will light up; to the left for easy-care, the "Easy-care" indicator will light up, and then further to the desired level of dryness e.g. cupboard dry.
Indicators light up
The "Start" indicator flashes.
- Select additional functions as required page 40).
Starting the programme
- Press the "Start" button.
The "Start" indicator lights up.
or
if Start time delay has been selected e.g.
after 6 hours
Press the "Time delay" button (see chapter on additional functions 40).
Programme run
An electronic scanning system continually monitors the level of dampness of the washing.
- The programme stage is indicated by a light.


GB
Time programmes
Time programmes for delicate acrylic fabrics, extra drying or anti-crease.
The drying time should be set according to the type, quantity and dampness of the laundry.
- Set the programme selector so that the marker points upwards (O-Setting).
- Turn the start time selector to desired time or to anti-crease.
Indicators light up e.g. for 30 min. time programme.
The "Start" indicator flashes. - For acrylics press the "Low heat" button (see page 40).
Starting the programme
- Press the "Start" button. The "Start" indicator lights up.


Changing a programme
This may be done at any time. Then press "Start" button again.
Adding more washing
This may be done at any time.
- Press the "Door" button.
The drum stops revolving. - Add any additional clothes.
- Close the door.
- Press the "Start" button.
Programme end
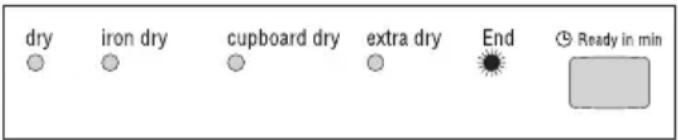
- "end" indicator lights up.
- Signal sounds (only when "signal" button is pressed).
If the washing is not removed, the drum will continue to turn in brief intervals so that the washing does not crease (for 35 minutes, with preselection at start time 8 hours).
The washing should be removed at this point at the latest.
Taking out washing
If installation conditions are incorrect, condensation water may occasionally form around the porthole.
Washing which is being taken out of the machine may therefore come into contact with water droplets, but will dry again within a few minutes.
◆ Press the "Door" button.
The drum is lit up.
Switching the unit off
- Clean the filter (page 41).
- Press the "On/off" button.
Indicators go out.
Drum lighting goes out.
Additional functions
"Low heat" button
Should be pressed when drying heat-sensitive fabrics such as acrylics. The drying temperature is reduced and the drying period extended slightly. Make sure you comply with fabric-care instructions on garment labels.
"Buzzer" button
When you have pressed this button, you will hear a signal at regular intervals at the programme end.
Changing the volume of the signal:
Hold down the button.
Volume changes.
Release button when desired volume is reached. This volume is stored.
Switching off the signal:
◆ Press the button again.
"Buzzer" indicator light goes out.
"Time delay" button
The programme start can be delayed for up to 19 hours.
- Press the "Time delay" button, Indicator "Time delay" lights up.
— The time [1] hour appears in the display - Each time the button is pressed the start time delay is increased by 1 hour.
- The running time is indicated by a flashing light.
- The programme starts automatically after the delayed time has expired.
Changes to the time delay may be made at any time:
Carry on pressing the button until the desired start delay appears in the display.
The "Time delay" indicator lights up.
Opening the door during the time delay period:
- Press the "Door" button. "Time delay" indicator flashes.
- Close the door.
- Press the "Time delay" button again, the "Time delay" indicator is continually lit.
For immediate start after delayed start has been selected:
◆ Press the "Start" button.

Maintenance / Care / Cleaning
Cleaning the filter
Normal wear and tear of laundry leads to the formation of fluff, which becomes loose in the dryer and is deposited on the filter on the inside of the door.
For this reason the filter must be cleaned after each use.
The machine does not have to be switched off whilst the filter is being cleaned.
- Press the "Door" button.
- Pull the filter out.
- Wipe the filter with your hand to remove fluff.
- Replace the filter.
- Close the door.
Blocked or very dirty filters can be cleaned under flowing water.
! Before inserting the filter, dry thoroughly.
Cleaning moisture sensor
After a longer period of operation a fine layer of limescale may build up on the moisture sensors on the edges of the drum. This build-up prolongs the drying time. Limescale can be wiped off using a cloth soaked in vinegar and squeezed out.
Cleaning the tumble dryer
! Do not use solvents as they may damage components, produce poisonous vapours, may cause an explosion!
! Do not spray the unit with water!
Use a soft cloth rinsed in soapy water or a standard solvent-free, non-scouring cleaning agent to clean housing and fascia.

natural_image
Technical line drawing of a mechanical component with a perforated grille and directional arrow (no text or symbols)
natural_image
Technical line drawing of a mechanical device with a circular component and a handle (no text or symbols)Rectifying minor malfunctions yourself
This tumble dryer meets the safety requirements for electrical appliances. Repairs or alterations to electrical appliances may only be carried out by qualified persons. Repairs carried out by unqualified personal may result in considerable damage to the appliances. If the following remedies do not work, call customer service!
Malfunctions Possible causes / Remedy:
"On/off" indicator light does not come on.
- plug is not, or not properly inserted into the socket.
- "On/off" button not pressed.
- blown fuse.
Machine does not start - "Start" button not pressed.
- door not properly closed
- no programme selected.
- "Time delay" button pressed, start only after preselected time delay has passed.
- Room temperature is below 0 °C.
Tumble drying is discontinued Buzzer sounds, "Extra dry" LED is flashing
- Clean filter.
Check hose length and make sure it is within the admissible length (see installation instructions). Switch off appliance and let it cool down for 3 minutes. Switch on appliance again and restart.
Tumble drying is discontinued Buzzer sounds, One or several programme indicators flash
- this indicates a faulty programme run.
Clean the filter. Check the duct length. Check that site conditions are suitable. Switch the dryer off. Wait for it to cool down and then switch it on again. Start the programme again (press the "Start" button).
Drying level was not reached or drying time was too long.
- clean the moisture sensors in the drum (see page 41).
- If there is a power failure of two or more hours the programme has be re-started.
The laundry is not dry although the highs possible drying level was set
- Drum too full
- laundry was too wet when it was put into the dryer.
- room is not sufficiently ventilated.
Ensure adequate room ventilation.
- filter in the door blocked (cleaning the filter).
- ventilation hose blocked.
Drum light does not work - "On/off" button not pressed.
- bulb defect. For safety reasons only customer service or a qualified person may change the bulb.
The door has opened automatically
- The door catch must lock securely into position.
Customer service
Before calling customer service, please check whether you can rectify the malfunction yourself (see section “Rectifying minor malfunctions yourself”).
If an engineer is called and no fault is found you may be charged for the visit, even if the machine is still under guarantee.
! If you cannot rectify a malfunction yourself, switch the machine off, take the plug out of the socket and call customer service.
You can find the nearest customer service in the directory supplied.
When calling customer service please give the product number (P No) and the production number (PD) of the machine. These numbers can be found on the inside of the door and on the rating plate on the back of the machine.
Note the numbers of your tumble dryer here
E Nr. FD
Product number Production number
Please help to avoid unnecessary journeys by giving the product number and the production number. This will help to keep costs down.
- NL
- Inhoudsopgave
- Bladzijde
- We recommend environmentally friendly and economical use of the dryer
- Notes on safety 33
- Brief instructions
- Getting to know your tumble dryer 34
- Drying instructions
- First operation
- Programme table 36
- Electronic programmes
- Time programmes
- Programme end
- Additional functions
- Maintenance / Care / Cleaning
- Rectifying minor malfunctions yourself 42
- Customer service 43
- Notes on disposal
- Packaging of the new tumble dryer
- Old machine
- GB
- How to save energy, time and money:
- Notes on safety
- Before using your tumble dryer for the first time:
- When drying please note:
- After programme end please note:
- To protect the machine please note:
- During transport please note:
- Before drying
- After drying
- Getting to know your tumble dryer
- Drying tips
- Switching between 10 A and 16 A
- Switch the machine on.
- Loading the tumble dryer
- Please choose a drying programme from the programme table (36)
- Cottons and Easy-care
- Setting a programme
- Starting the programme
- Programme run
- Time programmes for delicate acrylic fabrics, extra drying or anti-crease.
- Changing a programme
- Adding more washing
- Taking out washing
- Switching the unit off
- "Low heat" button
- "Buzzer" button
- Changing the volume of the signal:
- Switching off the signal:
- "Time delay" button
- Opening the door during the time delay period:
- For immediate start after delayed start has been selected:
- Cleaning the filter
- Cleaning moisture sensor
- Cleaning the tumble dryer
- Rectifying minor malfunctions yourself
- Malfunctions Possible causes / Remedy:
- Customer service
- Product number Production number
Brand : BOSCH
Model : WTA3500FG
Category : Tumble dryer