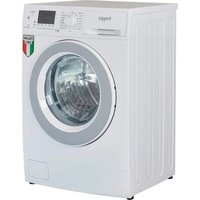
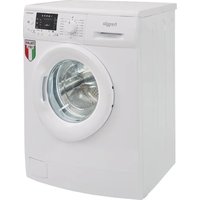
WID1290 - Washing machine Freggia - Free user manual and instructions
Find the device manual for free WID1290 Freggia in PDF.


| Product Type | Freestanding Washing Machine |
| Brand | Freggia |
| Model | WID1290 |
| Capacity | 9 kg |
| Energy Class | A+++ |
| Annual Energy Consumption | 209 kWh |
| Annual Water Consumption | 9680 L |
| Maximum Spin Speed | 1200 rpm |
| Dimensions (H x W x D) | 84 cm x 59.5 cm x 58 cm |
| Weight | 75 kg |
| Power Supply | 220-230 V ~ 50 Hz, 10 A, 2200 W |
| Water Pressure | 0.05 - 1 MPa |
| Programmes | Cotton, Intensive, Synthetic, Rapid 30', Memory, Eco 20°, Jeans/Coloured, Duvet, Delicate, Sport, Curtain, Wool, Allergy |
| Special Functions | Prewash, Extra Rinse, Rinse Hold, Delay Start (up to 24h), Stain Level, Eco, Child Lock |
| Temperature Range | Cold to 90°C (depending on programme) |
| Noise Level (Wash/Spin) | 55 dB(A) / 77 dB(A) |
| Door Type | Front-loading with porthole |
| Child Lock | Yes |
| Water Inlet | Cold water only, 3/4" threaded |
| Drain Hose | Height 60-90 cm, diameter larger than hose |
| Filter Cleaning | Monthly - drain pump filter accessible |
| Detergent Drawer | Removable for cleaning; liquid/powder partition plate |
| Self-Diagnosis | Error codes on display (F1-F6) |
| Manufacturer Warranty | According to national legislation; contact authorized service |
Frequently Asked Questions - WID1290 Freggia
User questions about WID1290 Freggia
0 question about this device. Answer the ones you know or ask your own.
Ask a new question about this device
Download the instructions for your Washing machine in PDF format for free! Find your manual WID1290 - Freggia and take your electronic device back in hand. On this page are published all the documents necessary for the use of your device. WID1290 by Freggia.
USER MANUAL WID1290 Freggia
Thank you for purchasing Freggia household appliance. Please carefully read the user manual, as it contains the instructions for the safe installation, operation and maintenance of the household appliance.
Save it for future use.
RU
ATTANTION! Important safety information.
IMPORTANT: Edditional recommendations regarding usage.
NOTE: Care and maintenance.
The packaging has the purpose to protect appliance from damage that might occur during the transportation. The materials used for packaging are recyclable, so selected on the basis of respect for the environment and ease of disposal with aim of material reintegration to the production cycles. This mechanism allows on one hand to reduce the volume of waste, while the other it makes possible for a more rational usage of nonrenewable resources.
• DISPOSAL OF WASTE ELECTRICAL AND ELECTRONIC EQUIPMENT (WEEE)
In pursuant to the EU directive 2012/19/EU on the disposal of electrical and electronic waste: the crossed waste bin symbol indicates that the at end of the product life span, it must be disposed separately from other waste.

Users must dispose of the appliance in question at suitable recycling centres for electronic and electrical waste or take it to the dealer when buying a new equivalent appliance, on a one to one bases.
The adequate differential collection for the subsequent forwarding for recycling, treatment and environmentally compatible disposal helps to prevent negative impact on the environment and health. It promotes the recycling of materials from the appliance. The manufacturer has always been careful to develop technologies and products which are environmentally friendly. It is also constantly engaged in investments in the field of ecology.
Improper disposal of the product by the user involves the application of administrative penalties provided by law.
Illegal dumping of the appliance by user will call for the application of administrative sanctions in accordance with the law.
INDEX
SAFETY INSTRUCTIONS AND WARNINGS......4
DESCRIPTION OF MACHINE....5
INSTALLATION....5
GENERAL INFORMATION....5
REMOVAL OF TRANSPORTATION LOCKING SCREWS......5
POSITIONING OF WASHING....5
INSTALLATION UNDER A WORK PLAIN....6
WATER SUPPLY CONNECTION....6
WATER DRAINAGE....6
FIRST USE....6
POWER SUPPLY CONNECTION....6
CONTROL PANEL....7
DESCRIPTION OF COMMANDS....7
PROGRAMME SELECTION KNOB....7
TEMPERATURE....7
SPIN REGULATION....7
DELAY START....7
STAIN LEVEL REGULATION....7
WISD1460, WID1480, WID1290 MODELS OPTIONS......7
WISL1050, WIL1070 MODELS OPTIONS....7
WASHING PROGRAMMES DURATION AND OPTIONS.....8
FABRIC CARE SYMBOLS....9
PRODUCT DATA SHEETS IN ACCORDANCE WITH EU 1061/2010 DIRECTIVE ON ENERGY LABELLING.....10
PRECAUTIONS AND ADVICE....10
WASHING RECOMMENDATIONS....10
SELECTION OF LAUNDRY....10
DOOR GASKET....10
DOOR CLOSURE....10
DETERGENT AND SOFTENER DOSAGE....10
LIQUID OR POWDERED DETERGENT PARTITION PLATE....10
DETERGENT POWDER....11
LIQUID DETERGENT....11
SOFTENER....11
DETERGENT DOSES....12
STARTING WASHING....12
PAUSING WASHING....12
LOADING LAUNDRY INTO THE DRUM....12
MAINTENANCE....12
CABINET....12
DETERGENT DRAWER....12
CLEANING DRAIN PUMP FILTER....12
EMPTYING PROCEDURE....12
DETERGENT CLEANING PROCEDURE....12
POSSIBLE REMEDIES....13
SPARE PARTS AND SERVICE....14
SAFETY INSTRUCTIONS AND WARNINGS
This washing machine complies with current safety standards. However, improper use can cause damage to persons and/or property. Before using the machine for the first time, carefully read this manual.
It contains important instructions for safety, usage and maintenance of the washing machine. In this way self injury and damage to the machine is avoided. Keep the instruction manual and also pass it onto any other users.
INTENDED USE
Use the washing machine only for domestic purpose and only for washing clothes which the producer declared on the label suitable for washing in water. Any other usage may be dangerous.
The manufacturer is not liable for damage caused by misuse and/or incorrect setting of the appliance.
USE BY CHILDREN OR PEOPLE HIGHLY VULNERABLE
The washing machine can be used by children aged 8 years and persons with reduced physical, sensory or mental capabilities or lack of experience or knowledge required, provided they are under supervision or after they have received the same instructions for the safe use of the washing machine and the understanding of the dangers inherent to it.
Children should not play with the washing machine. The cleaning and maintenance intended to be performed by the user, must not be carried out by children without supervision of able adult.
Children of less than 3 years should be kept away unless continuously supervised.
! ATTENTION! If washing is done at higher temperatures, it must be kept in mind that the glass door could be become very hot up to around 90°C, thus avoid children touching it.
DEFINITIONS
Children: refers to young people, including very small, small and big children.
Very young children: young kids aged between 0 and 36 months
Small children: young kids over the age 36 months, but less than 8 years.
Big children: young kids aged between 8 and 14 years.
Vulnerable people
People with reduced physical, sensory or mental capacity (e.g. partially disabled, adults with reduced physical and mental capacity), or lack of experience and knowledge on the appliance (e.g. big children).
TECHNICAL SAFETY
Before connecting the washing machine to the electric supply compare the technical data given on the rating label (voltage, frequency) with those of the mains. If in doubt, consult a qualified electrician.
The electrical safety of this washing machine is guaranteed only if it is connected to a protective connection spot in accordance with wiring standard (earthing). It is a fundamental requirement for safety.
Check for this condition and in case of doubt, have the electrical system checked by a qualified technician.
N.B. manufacturer can not be held responsible for damages caused by the failure or inappropriate protective connection spot.
Any repairs of the appliance must be carried out by the manufacturer authorized technical service centre, otherwise the manufacturer is not liable for any damage that may ensue.
Repairs carried out in a workmanlike manner may also expose user to serious danger, for which manufacturer is not responsible. If the power cord is damaged, it must be wholly replaced by an manufacturer authorized technician to avoid any danger to user.
In the event of a fault or cleaning of the washing machine, it must be kept in mind that the machine must be disconnected from the mains; only:
- if the power cord plug is unplugged or
- if the main power switch of the electrical supply of the house is off or
- if the power supply fuse completely unscrewed (the wiring fully disconnected).
To connect the washing machine to the main water, use always new hose only. Do not use old hose.
Modifi cation or changes to the washing machine cannot be made if it has not been specifi cally authorized by Manufacturer.
PROPER USE
Do not install the washing machine in areas subject to frost. If the hoses freeze it may rupture or burst. In addition, at temperatures below zero, the electronics might not function properly.
Before starting the machine for the first time, remove the safety transportation screws from the back (see Installation chapter). If they are not removed when the washer spins it might cause damage to furniture and to adjacent appliances, as well as to the machine itself.
In case of prolonged absence (e.g. on holidays), turn off the water from tap, pull out the power plug from the electric socket.
FLOOD HAZARD
Before hanging the drain hose onto a sink, make sure the water can drain away quickly.
Secure the drain hose so that it can not fall off as the drain water to push it out the sink. Be careful not to wash, along with the laundry foreign bodies (e.g. nails, needles, coins, paper clips). These foreign bodies may damage the washing machine (e.g. drum or tub) and in turn, the damaged parts may be detriment to laundry.
Laundries that have been previously treated with solvents or products containing them must be well rinsed in clean water before being loaded into the washing machine.
Never use in the washing detergents containing solvents (e.g., gasoline, trichlorethylene).
These products may damage components of the machine and generate toxic fumes.
DANGER OF EXPLOSION AND FIRE
Never use in the washing machine cleaners or detergents that contain solvents (e.g. trichlorethylene, gasoline). They can damage the plastic surfaces.
N.B. Manufacturer srl cannot be held liable for damages due to failure to comply with these instructions.
DESCRIPTION OF MACHINE INSTALLATION
This appliance meets all modern requirements for effective treatment of laundry with reduced consumption of water, electricity and detergent. Its innovative system permits full use of detergent and reduces water consumption, resulting in energy savings.
This machine complies with EU directives:
• 2009/125/EC (ErP) Relating to product energy efficiency;
• 2014/35/EC (low tension) (ex 2006/95/EC and subsequent modifications;
• 2004/30/EU (electromagnetic compatibility ex 2004/108/EC) and subsequent modifications;
• 2011/65/EU & 2015/865 (Disposal of electronic and electrical waste ex 2002/95/EC), RoHS II.
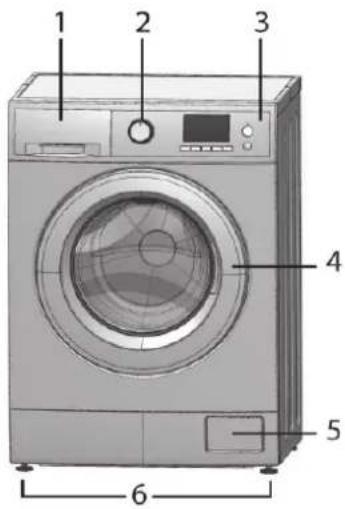
• DETERGENT DRAWER
1 - DETERGENT DRAWER
2 - PROGRAMME SELECTION KNOB
3 - CONTROL PANEL
4 - DOOR HANDLE
5 - PUMP FILTER
6 - ADJUSTABLE FEET

natural_image
Cross-sectional diagram of a device showing internal components labeled I, II, and III (no text or symbols beyond labels)I Detergent compartment used with pre-washing or soaking function. The detergent to be used for the prewash and the soak is loaded at the beginning of the washing program.
Il Compartment for powder or liquid detergent used for main wash. If use liquid detergent is used, pour just before starting the programme.
III Compartment for liquid additives (fabric softener, starching). Follow the manufacturer's recommendations regarding the amount of use and do not exceed the "MAX" mark on the detergent drawer. The softeners, starch or additives must be poured into the compartment before the start of the wash programme.
The washing machine can be installed in any place on condition that:
- it is protected from the bad weather;
- the ambient temperature is not lower than 3^ C ;
• the cables and hoses at the back of the machine are not crushed; - the power cord is accessible in case of any maintenance.
N.B. Should it prove necessary for electrical and/or hydraulic maintenance contact only a qualified technician.
REMOVAL OF TRANSPORTATION LOCKING SCREWS
N.B. Failure to remove the fixing screws will generate strong vibrations and abnormal movement of the machine during the washing with consequent damages.

natural_image
Cross-sectional diagram of a mechanical device showing internal components and wiring (no text or symbols)The washing unit is locked in place by four fi xing screws (which protect it during transport) as show in fi gure 1. Before operating the machine the screws must be removed. To unscrew them use a spanner.
Once unscrewed the screws pull out the locking screws including a bushing and spacer as shown in Figure 2.


N.B. In case the spacers fall into the machine it will be necessary to open the rear panel, retrieve them and reposition the panel.
Close up the holes with the supplied caps as shown in Figure 2b.
POSITIONING OF WASHING

natural_image
Mechanical assembly diagram showing a bolt and nut assembly with directional arrows (no text or symbols)Adjustable foot
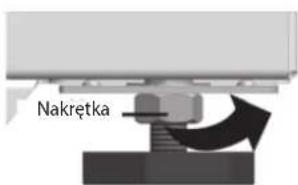
To ensure stability to washing machine and avoid strong vibrations during washing and spinning, it is necessary that the appliance be placed on a smooth, hard, dry surface and not raised above floor level. To compensate for any unevenness in the floor it is possible to act on the height of the feet, by screwing or unscrewing them according to requirements.
As shown in the next figure.
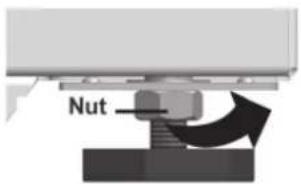
After adjustment, to avoid their modification by vibrations, they should tighten by the nut on the foot until it locks as shown in the figure below.
It is good to avoid, in any case, placing under or around to the machine cardboard, wood or similar materials, so as not to obstruct the passage of air.
INSTALLATION UNDER A WORK PLAIN

The positioning of the machine under a work plan, can only happen if the housing compartment has the following dimensions of width of 76 cm and of height of 85 cm. It should also be considered that the machine needs a approximately 5 cm behind from the wall. An example of a typical installation is shown in the illustration below. The superior cover (TOP) of the machine must not be removed for reasons of electrical and mechanical safety.
WATER SUPPLY CONNECTION

natural_image
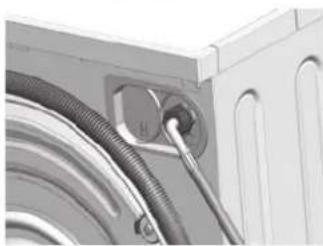
Illustration of a faucet with a flanged handle and internal fittings (no text or symbols)The water inlet hose must be connected to a tap of cold water with a 3/4" threaded mouth.
Use only the supplied water inlet hose. Avoid the use of old hoses or hoses used previously.
natural_image
Close-up of a wall-mounted electrical outlet with coiled tubing and a plug (no visible text or symbols)N.B. The hose is already complete with rubber gasket, if this is missing, the tube must not be used.
If the water supply system is new or has been inactive for too long, it will be necessary to allow the water run until the it appears clear.
WATER DRAINAGE
Drain hose can be installed in two different ways:
- On the edge of sink using the plastic hose hanger commercially available.
In this case make sure that the tube is secured to the sink.
- In a drain pipe at a height of not less than 60 cm and not more than 90cm.
The tube end must always be ventilated, i.e. the inside diameter of the drain pipe must be larger than the outer diameter of the drain hose of the washing machine. The drain hose must not be obstructed.
Example of installation
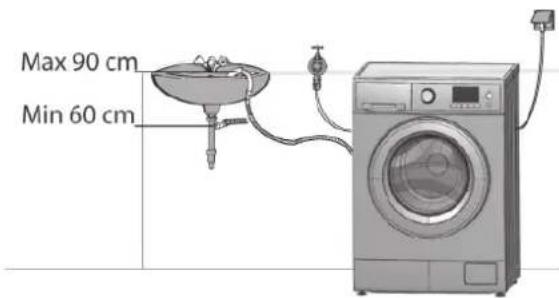
N.B. It is not recommend using extension on the drain hose.
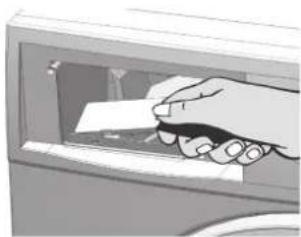
LIQUID DETERGENT BULKHEAD PAN
natural_image
Interior view of a washing machine with visible door and handle (no text or symbols)
natural_image
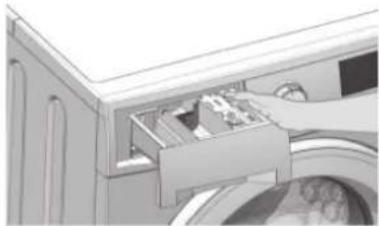
3D interior view of a mechanical housing or enclosure with numbered components (no visible text or symbols)Inside the kit supplied, there is a bulkhead pan of blue colour which grants the use of liquid detergents in the washing machine.
To install a bulkhead it is necessary to:
- remove the detergent drawer from the washing machine
• apply the bulkhead as shown in photo (see figure 7)
After installation, replace the drawer into the washing machine. There is no need to remove the bulkhead (see p. 22).
FIRST USE
Before the normal washing operation a wash cycle of with the cotton programme at 80°C must be run with detergent and without laundry.
POWER SUPPLY CONNECTION
The machine is equipped with a connecting cable and earthed schuko plug for connection to AC 230 V \~ 50 Hz.
Make sure the schuko plug is always accessible to unplug the machine from the mains. The electrical power system must be designed according to VDE 0100. It is recommend not to connect, in any case, the machine with extension cords, multiple power sockets, etc to avoid overheating which are sources of potential fi re hazard. The manufacturer declines any responsibility for damages due to failure or inappropriate protective connecting point.
To enhance safety, VDE in the directive DIN VDE 0100 in section 739, has recommended to install a circuit breaker (RCD) with a tripping current of 30 mA (DIN VDE 0664).
If using a differential circuit breaker, make sure it is type A, according to DIN VDE 0664 and current sensitive buttons.
The rating plate provides information on rated current absorption and relating protection. Compare these data with the power supply.
ELECTRICAL SHOCK HAZARD NOT KEEPING TO THIS INSTRUCTION COULD ENDANGER THE USER. THIS WASHING MACHINE REQUIRES EARTH WIRING.
For personal safety, this washing machine must be grounded.
This washing machine is equipped with a power cord (A) and with a plug (B).
To minimize the risk of electric shock, the cable must be plugged into socket (C) that fi ts the plug (B).
If the socket is not available, it will be sole responsibility and duty of the user to have it installed by a qualified electrician.
Do not change/modify the power cord and do not use adapters or extension cables (D).

FIRST USE
After having installed the appliance, the power cord must be accessible.
If the power cord is damaged, it must be substituted by the manufacture, its qualified technician with aim of avoiding dangers.
Warning!
Do not disassemble and reassemble the machine without authorization.
Do not insert hand and take out laundry inside the drum or barrel before it is fully stopped.
Do not install the machine in damp and under rainy environment, to avoid electric shock, fi re outbreak from short circuit, faults and other accidents.
! Warning!
Do not directly rinse the machine with water when cleaning.
CONTROL PANEL WISD1460, WID1480, WID1290

CONTROL PANEL WISL1050, WIL1070

DESCRIPTION OF COMMANDS
1. PROGRAMME SELECTION KNOB
The knob is used to select a desired programme and to turn the machine OFF. It can be rotated in clockwise and counterclockwise for a fast and easy selection of programme.
2. TEMPERATUR E REGULATING KNOB
This button allows for the adjustment of the temperature. To change setting push the temperature button (at impulse) until the desired temperature is obtained.
3. SPIN REGULATION
This button is used for spin regulation. To vary the setting, press repeatedly the corresponding button until the desired value is reached on the digit display.
4. DELAY START
This button permits the programming of the end of a wash cycle activating delay start. The lagging time to the end of the cycle is expressed in hours (h) and displayed on the interface.
On Display model: from 0 to 24h
On LED model: from 0 to 9h
5.ADJUSTMENT OF THE WASHING PROGRAM DEPENDING ON THE LEVEL OF POLLUTION
Only for WISD1460, WID1480 models.
With this button you can get maximum washing efficiency depending on the soiling of the laundry.

6. OPTIONS
This button consents navigating through the washing options. Press repeatedly the button to visualised the desired option. The selected option will start to blink and can be confirmed by pressing the "Option confirm" button 7. Its activation is marked by a steady lit icon.
7. OPTION CONFIRMATION
This key is used for confirmation of selected options.
8. START/PAUSE
Press the Start/Pause button to start washing (with LED on) or in pause status (with blinking LED).
MODELS WISD1460, WID1480, WID1290

PREWASH
The prewash function is used for washing at low temperature, before the main wash cycle, to eliminate stains.

EXTRA-RINSE
The extra-rinse function adds one rinses to the standard number of rinse(s) per cycle. It scope is to eliminate as much as possible detergent residue from laundry.

With this button, the laundry can be soaked for 30-60 minutes before the main wash cycle. It serves to remove very stubborn stains.

SE HOLD
The function permits holding stand still the drum with washing solution without draining and spinning. To drain and spin it is necessary to press button 8 START / PAUSE.

Eco function allows you to reduce energy consumption without compromising the quality of washing.

BY LOCK
To activate the control lock function, after turning on the machine, simultaneously press and hold buttons 6 and 7 until the corresponding icon flashes on the display. To disable this feature, press and hold buttons 6 and 7 until the icon disappears.

OR LOCK
A steady lit icon indicates the locking of the door which can only be opened when the icon is off.
MODELS WISL1050, WIL1070

- PREWASH
The prewash function is used for washing at low temperature, before the main wash cycle, to eliminate stains.
DESCRIPTION OF COMMANDS

- EXTRA-RINSE
The extra-rinse function adds one rinses to the standard number of rinse(s) per cycle. It scope is to eliminate as much as possible detergent residue from laundry.

- RINSE HOLD
The function permits holding stand still the drum with washing solution without draining and spinning. To drain and spin it is necessary to press button 8 START / PAUSE.

- DOOR LOCK AND BABY LOCK
A steady lit icon indicates the locking of the door which can only be opened when the icon is off. The baby lock can be activated once the washing cycle starts by pressing and holding down 6 and 7 simultaneously till the icon blinks.
WASHING PROGRAMMES DURATION AND OPTIONS
To deactivate this function, hold pressed buttons 6 and 7 till the icon is turned off. The programme intensive 60 °C and 40 °C are the program
(*) Options are valid only for WISD1460, WID1480 models.
(**) The memory programme, memorises the options selected by user in last used programmed.
| ProgrammeTemperature obtainableSpin speedLaundry | Machine nominal capacity (kg) | MAXIMUM laundry load (kg) | MINIMUM laundry load (kg) | Programme duration (*) | Laundry options | |
| 30 °C Max °C | ||||||
| 1 - CottonFrom cold to 90 °C0 - Max r.p.m.Bed sheets. pillow cases.tablecloths in cotton | 5 5 2,5 | 2 hours 2 hours | 25 min. | Prewash or Soak(*).Extra-rinse Eco(*).Rinse hold.Stain level(*). | ||
| 6 | 6 | 3 | ||||
| 7 7 3,5 | ||||||
| 8 | 8 | 4 | 2 hours 15 min. 2 | hours 40 min.9 9 4,5 | ||
| 10/10,5 10/10,5 4,5 | ||||||
| 2 - IntensiveFrom cold to 90 °C.0 - Max r.p.m.Bed sheets. pillowcases. tablecloths incotton | 5 5 2,5 | 2 hours 27 min. 2 | hours 52 min. | Prewash or Soak(*).Extra-rinseEco(*).Rinse hold.Stain level(*). | ||
| 6 | 6 | 3 | ||||
| 7 7 3,5 | ||||||
| 8 | 8 | 4 | 2 hours 42 min. 3 | hours 7 min.9 9 4,5 | ||
| 10/10,5 10/10,5 4,5 | ||||||
| 3 - SyntheticFrom cold to 60 °C.0 - 800 r.p.m.Synthetic fabrics (e.g. acrylic.polyester. micro-fi ber). | 5 2,5 1.5 | 1 hours 39 min. 1 | hours 59 min. | Prewash or Soak(*).Extra-rinseEco(*).Rinse hold.Stain level(*). | ||
| 6 3 1.5 | ||||||
| 7 3,5 2 | ||||||
| 8 | 4 | 2 | 1 hours 54 min. 2 | hours 14 min.9 4,5 2,5 | ||
| 10/10,5 4,5 2,5 | ||||||
| 4 - Rapid 30'From cold to 40 °C.0 - Max r.p.m.Cotton and synthetic fabrics | 5 2,5 1.5 | 35 min. | 40 min. | Extra-rinse.Eco (*). | ||
| 6 3 1.5 | ||||||
| 7 3,5 2 | ||||||
| 8 | 4 | 2 | 40 min. | 45 min. | ||
| 9 4,5 2,5 | ||||||
| 10/10,5 4,5 2,5 | ||||||
| 5 - Memory (** )From cold to 90 °C.0 - Max r.p.m.Suitable for all types of fabrics. | 5 2 1.5 | 1 hours 27 min. 1 | hours 33 min. | Prewash or Soak(*).Extra-rinseEco(*).Rinse hold.Stain level(*). | ||
| 6 2,5 1.5 | ||||||
| 7 | 3 | 2 | ||||
| 8 3,5 2 | 1 hours 35 min. 2 | hours 41 min.9 4 2,5 | ||||
| 10/10,5 | 4 2,5 | |||||
| 6 - Eco 20°From cold to 60 °C.0 - Max r.p.m.Suitable for all types offabrics. | 5 2,5 1.5 | 1 hours 8 min. | Soak(*).Extra-rinseEco(*).Rinse hold.Stain level(*). | |||
| 6 3 1.5 | ||||||
| 7 3,5 2 | ||||||
| 8 | 4 | 2 | 1 hours 13 min. | |||
| 9 4,5 2,5 | ||||||
| 10/10,5 4,5 2,5 | ||||||
| 7 - Jeans/ColouredFrom cold a 60 °C.0 - max r.p.m.Coloured cotton e Jeans. | 5 2 1.5 | 1 hours 40 min. 1 | hours 46 min. | Prewash or Soak(*).Extra-rinseEco(*).Rinse hold.Stain level(*). | ||
| 6 2,5 1.5 | ||||||
| 7 | 3 | 2 | ||||
| 8 3,5 2 | 1 hours 48 min. 1 | hours 54 min.9 4 2,5 | ||||
| 10/10,5 | 4 2,5 | |||||
| 8 - DuvetFrom cold a 60 °C.0 - 800 r.p.m.Duvets, pillows, padded garmentsand feather | 5 1,5 | - | 1 hours 30 min. 1 | hours 40 min. | Soak(*).Extra-rinseEco(*).Rinse hold.Stain level(*). | |
| 6 | 2 | - | ||||
| 7 2,5 | - | |||||
| 8 | 3 | - | 1 hours 35 min. 1 | hours 45 min.9 3,5 | ||
| 10/10,5 3,5 | - | |||||
| 9 - DelicateFrom cold to 40 °C.0 - 600 r.p.m.Suitable for all fabrics. | 5 0.5 - | 1 hour 1 hour | 6 min. | Prewash or Soak(*).Extra-rinseEco(*).Rinse hold.Stain level(*).- | ||
| 6 0.5 - | ||||||
| 7 | 1 | - | ||||
| 8 1,5 - | 1 hour 5 min. 1 hour 11 min.9 | |||||
| 10/10,5 2 - | ||||||
| 10 - SportFrom cold to 40 °C.0 - 600 r.p.m.Cotton sport wears.Lycra or chenille etc. | 5 | 1 | - | 1 hour 10 min. 1 hour 16 min. | Prewash or Soak(*).Extra-rinseEco(*).Rinse hold.Stain level(*).- | |
| 6 1,5 - | ||||||
| 7 | 2 | - | ||||
| 8 2,5 - | 1 hour 18 min. 1 hour 24 min.9 | |||||
| 10/10,5 3 - | ||||||
| 11 - CurtainFrom cold to 40 °C.0 - 600 r.p.m.Polyester and cotton curtains. | 5 | 1 | - | 1 hour 18 min. 1 hour 30 min. | Extra-rinseEco(*).Rinse hold.Stain level(*).- | |
| 6 1,5 - | ||||||
| 7 | 2 | - | ||||
| 8 2,5 - | 1 hour 26 min. 1 hour 38 min.9 | |||||
| 10/10,5 3 - | ||||||
| 12 - WoolFrom cold to 40 °C.0 - 1000 r.p.m.Washable wool or blended wool. | 5 | 1 | - | 56 min. | Extra-rinseEco(*).Rinse hold.3 Stain level(*).- | |
| 6 1,5 - | ||||||
| 7 | 2 | - | ||||
| 8 2,5 - | 1 hour 1 min.9 | |||||
| 10/10,5 3 - | ||||||
| 13 - AllergyFrom cold to 40°C0 - 1000 r.p.m.Suitable for all fabrics. | 5 5 1,5 | 1 hour 25 min. | Prewash or Soak(*).Extra-rinseEco(*).Rinse hold.Stain level(*). | |||
| 6 6 1,5 | ||||||
| 7 | 7 | 2 | ||||
| 8 8 2,5 | 1 hour 25 min.993 | |||||
| 10/10,5 | 10/10,5 | 3,5 | ||||
USE AS A REFERENCE FOR THE LAUNDRY, THE FOLLOWING WEIGHTS
| Bathrobe | 1200 g |
| Bedspread | 700 g |
| Work apron | 600 g |
| Pyjama | 500 g |
| Tablecloth | 250 g |
| Pillowcase and towel | 200 g |
| Table mats (serviette) and underwear | 100 g |
FABRIC CARE SYMBOLS
| WASHING | LAUNDRY | IRONING | BLEACHING | DRYING | |||||
| The value inside the basin indicates the maximum temperature at which laundries are washed | The letter inside the tank indicates the maximum temperature at which laundry can be washed. | The dots represent the optimal temperature of the iron. | Type of bleaching for laundries | The square and cycle is the symbol of drying and the first line pressing and the second rotation of drum | |||||
 | Normal treatment |  | Dry cleaning with petrol |  | About 200°C |  | Bleaching is possible with any bleach |  | Tumble dry with gentle cycle and no heating |
 | Delicate treatment |  | Dry cleaning perchloride |  | About 150°C |  | Use only oxygen bleaches |  | Tumble dry with gentle cycle and low heating |
 | Very delicate treatment | [S456] | Washing in water |  | About 110°C |  | Do not bleach | [SATT] | Tumble dry with gentle cycle and medium heating |
 | Hand wash |  | Do not dry clean |  | No ironing |  | Tumble dry with low heat | ||
 | Not washable in water | [S463] | Do not iron with steam |  | Do not tumble dry | ||||
 | Do not spin | ||||||||
PRODUCT DATA SHEETS IN ACCORDANCE WITH EU 1061/2010 DIRECTIVE ON ENERGY LABELLING
| Type | Capacity kg | Energy Class (1) | Consumption data - Standard Programma (5) | |||||||
| Annual energy consumption (2) kWh | Cotton 60°C full load kWh | Cotton 60°C Half load kWh | Cotton 40°C half load kWh | Stand by OFF W | Stand by ON W | Annual water consumption (3) L | Water consumption/ cycle 40°C half load L | |||
| WISL1050 5 | A++ 142 0,7 | 0,7 0,4 0,08 | 0,35 6380 24,4 | |||||||
| WISD1460 6 | A+++ 150 | 0,8 0,8 0,4 0,08 | 0,35 7700 28,7 | |||||||
| WIL1070 7 | A+++ 169 0,8 | 0,8 0,5 0,08 | 0,35 8140 32,4 | |||||||
| WID1480 | 8 A+++ | 193 0,9 0,9 | 0,5 0,08 0,35 8800 | 33,9 | ||||||
| WID1290 | 9 A+++ | 209 1,1 1,0 | 0,6 0,08 0,35 9680 | 37,1 | ||||||
* It indicates only the type of user interface L stands for LED and the D stands for DIGIT. The mechanical and electrical characteristics are identical S for special model
The following data are to be considered common to all the washing machines
Type of washing machine: Stand alone
Electrical connection: Power 2200 Watt - Voltage 220/230 Volts - Maximum current 10 Ampere
Water intake pressure: Min. 0.05 Mpa - Max: 1 Mpa
(1) A + + + higher energy efficiency and D lower energy efficiency
(2) Annual energy consumption in kWh per year based on 220 standard washing programme cotton 60 °C and 40 °C at full and half load. The actual consumption will depend on how the washing machine is used.
PRECAUTIONS AND ADVICE
WASHING RECOMMENDATIONS
- Do not allow children or disabled to use the washing machine without supervision.
- Do not allow children to play with the washing machine.
- Load the drum within the limits indicated in pages 16 and 17.
- For each fabric it is important to follow the washing instructions on the label.
• Make sure that there are no coins, pins, etc in the pockets of clothes for washing. - Refrain from the use of petrol, alcohol, trichlorethylene, etc on fabrics intended for machine washing.
- It is advisable to collect the laundry of small dimensions, such as socks, belts, etc in a canvas bag, so as to avoid them been stuck to the drum.
- Use fabric softener within the maximum allowable limit as an excessive amount could damage the laundry.
- When machine is turned off, leave the door ajar for the better preservation of the seal and preventing musty odours.
• Before opening the door always check that the water has been drained.
• Always close the water tap when the machine is turned off. - Remove the power plug when the machine is not used for long periods.
SELECTION OF LAUNDRY
For proper washing, laundry has to belong to only one of the following types:
- White
- Coloured
- Synthetics
- Delicate
- Wool
In particular, it must be considered that:
• the white laundries lose their whiteness if they are washed with coloured fabrics;
- the new coloured clothes usually fade with the first washing. So they must not washed with other laundries.
It is also important to follow the suggestions for washing indicated on the labels of every individual fabric. Make sure in the laundries there are no metallic objects (such as clasps, pins, screws, coins, curtain hooks etc) left.
Before washing, it may be appropriate to treat very dirty spots with a special detergent or detergent paste.
Carpets, ruined clothes, hair, lint, fluff and dirt in general can clog the drainage. It is, however, recommend to avoid washing of these types of laundries.
DOOR GASKET

natural_image
Illustration of a hand adjusting a pressure gauge with a valve (no text or symbols visible)When washing some objects from over-folded clothes, or not removed from the laundry (paper clips, buttons, nails, pins) can break off and settle in the folds of the door gasket. It is a good habit to check the folds of the door gasket and remove any foreign objects which with time could cause serious problems to the washing machine.
DOOR CLOSURE

natural_image
Illustration of a hand holding a device with a circular screen showing a stylized animal face (no text or symbols)Before closing the door make sure that there is no piece of laundry on of the door gasket. This could damage it. Close the porthole with a slight thrust.
DETERGENT AND SOFTENER DOSAGE
For each wash cycle the optimal amount of detergent must be determined by the degree of dirt, number of laundry and water hardness. In any type of washing, the detergent must be placed in the central compartment (marked II).
Where there will be prewash, detergent must be deposited in the compartment on the left side (marked I).
The basin on the right is used for fabric softener. The dose of the latter should not exceed the "MAX" mark (see page 9).
LIQUID OR POWDERED DETERGENT PARTITION PLATE
To swap between liquid and powdered detergent, it is necessary to insert the appropriate bulkhead plate supplied in the kit:

natural_image
3D cutaway view of a mechanical device showing internal components and housing (no text or symbols visible)| Consumption data - Standard Programma (5) | Spinning effi ciency (4) | Maximum spin (rpm) | Standard programme time (5) | Noise level washing dB(A) | Noise level spinning dB(A) | Dimensions and weight | ||||||
| Water consumption/ cycle 60°C half load L | Water consumption/ cycle 60°C full load L | Full load cotton 60°C (min.) | Half load cotton 60°C (min.) | Half load cotton 40°C min.) | H cm | W cm | L cm | Weight Kg | ||||
| 25,9 33,1 C | 952 153,7 173,0 13 | 8,5 57 79 84 5 | 9,5 45,5 59 | |||||||||
| 31,0 41,5 B | 1233 169,7 175,5 1 | 55,5 52 75 84 | 59,5 45,5 65 | |||||||||
| 34,7 42,4 C | 1004 160,3 168,5 1 | 42,0 55 76 84 | 59,5 55 63 | |||||||||
| 35,4 47,3 B | 1350 176,0 177,5 1 | 54,5 54 79 84 | 59,5 55 71 | |||||||||
| 39,4 51,8 B | 1200 184,3 175,5 1 | 59,0 55 77 84 | 59,5 58 75 | |||||||||
(3) Annual water consumption in litres per year based on 220 standard washing programme cotton 60 °C and 40 °C at full and half load. The actual consumption will depend on how the washing machine used.
(4) G low efficiency and A higher efficiency
(5) The intensive 60°C and intensive 40°C washing programmes are the standard test programmes. These programmes are used to clean normally soiled cotton fabrics
and are the most efficient programmes in terms of combined energy and water consumption.
The appliance complies with the European standards and directives last issued:
Low Voltage Directive (LVD) 2014/35/EU
Electromagnetic Compatibility (EMC) Directive 2014/30/EU and Legislation
Eco-design compatible for elettrodomestics directive 1015/2010/EU
Then place the plate in position:
UP - The position of the plate for the use of detergent powder
Pour the detergent powder in the main wash compartment II.
For the amount of detergent powder, always check the details on the product packaging and make sure the detergent can be contained in the dispenser drawer.
DOWN - position of the plate for the use with liquid detergent
Pour liquid detergent into the main wash compartment marked II

natural_image
Interior view of a computer drawer showing internal components (no text or symbols visible)
natural_image
Hand inserting a device into a drawer with visible internal components (no text or symbols)
natural_image
Interior view of a computer drive bay showing internal components (no text or symbols visible)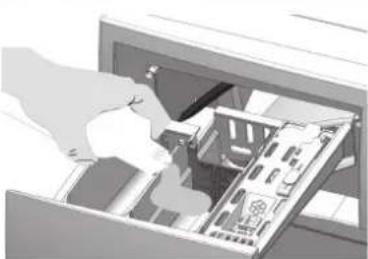
natural_image
Illustration of a person interacting with a computer monitor displaying a virtual keyboard (no text or symbols visible)WARNING!
Do not use the plate in the "DOWN" position (see figure 15):
• With with gelatinous or dense detergent
• With powdered detergent
- Withe prewash programme
- Do not use liquid detergent if the wash cycle does not start immediately. In such cases use the plate in the "UP" position (see figure 13).
DETERGENT POWDER
Detergent powder is more aggressive than the liquid and undoubtedly less advantageous in in some aspects. It is prepared, usually with rather, strong substances which also react through particular substances (enzymes) which destroy dirt by detaching it from the laundry, but does exert any abrasion on the fabric. The laundry washed with detergent powder, when dried, is rather rough and dry because of these aggressive substances that are absorbed by the fabrics. This requires generally rinsing with fabric softener. Furthermore, the enzymes may cause allergies in some people particularly sensitive. Not to mention that it is less soluble, powder of this type of detergent can be deposited in the dispenser and in the drainage system, causing the incrustation of the tubes. On the other hand, it is the only detergent that ensures a pure white washing due to sodium perborate (a strong and aggressive whitening agent) effective even at low temperatures (refer to the labelling and the degree of dirt).
Recommended temperature 30°C - 90°C
LIQUID DETERGENTS
The liquid detergent is undoubtedly the most modern. It possesses superior cleaning features. Being less alkaline, it preserves the quality of the fabrics. Although it does not contain abrasive substances however it cleans nested dirt. Thus, in contrast to the detergent powder, it cleans without hardening the laundry fibres, thanks to the absence of an insoluble residue that upon drying becomes hard. The laundry is more soft and therefore require less fabric softener. Furthermore, the liquid detergent does not leave any type of solid residues inside the washing machine and in the drainage system. Thus eliminating the long standing problem of incrustation and ruining of the tubes. It washes well also in cold water and is ideal for coloured clothes because it does not interact with the fabric colours, rather the colour is preserved and protected with time.
It should be used within temperature range of 0^ C and 90^ C. The temperature depends on the fabric (refer to the labelling and by grade of dirt). The whiteness efficiency is obtained instead only at temperatures above 50^ C. In the liquid detergent there is no sodium perborate, but the optical bleaching agent that works well only beyond a certain temperature.
Recommended temperature cold - 90°C
SOFTENER
The softener is very high concentrate, which is deposited on the laundry fibres and makes them soft. It should be used sparingly or diluted with water, 50% and more. It facilitates ironing of clothes washed.
The fragrances are due to different essences added to the additive and it does not in any way impair the ability of cleaning product.
PRECAUTIONS AND ADVICE
DETERGENT DOSES
The doses vary depending on the type of water: with hard or averagely hard water it takes a greater amount of product compared to that soft water, as it is typically printed on the label of the various products. In general, using quality products, very little quantity of detergent would be enough. It is always recommended to use 20% less than usual!
STARTING WASHING PROGRAMME
- To start the washing program turn the programme selection knob onto the desired programme.
- Evaluate the opportunity to customise the washing programme by adjusting the temperature with the button No. 2, the spin (button 3) or selecting one or more of the special functions provided (see wash options on page 15).
STARTING WASHING
After the steps above washing can be started by pressing the Start/Pause button.
PAUSING WASHING
It is possible to stop the wash cycle by pressing the Start/Pause button. The machine will go to standby mode. If there is a need to change the programme, the knob No. 1 must be turned to OFF position before selecting new programme.
At the end of the wash cycle, the red LED turns off and the door can be opened only if the drum is not empty of water.
LOADING LAUNDRY INTO THE DRUM
For proper washing, it is necessary to load the drum possibly with loose laundry one at a time.
This is to prevent nodding. The washing efficiency is strongly influenced by the way and the amount laundry. In general, an excessive or less than half the rated capacity (see technical data table page 16 - 17), puts strain on the 'reliability of the washing machine and generates more noise in the machine.
In the case of excessive loads or below the nominal capacity and uneven, it is appropriate to minimize the spin speed to avoid strong vibrations during spinning.
MAINTENANCE
CABINET
To maintain the shininess washing machine cabinet unchanged over time it must be cleaned with warm water. Cleaning is recommended with soft cloth without using any detergent.
DETERGENT DRAWER

natural_image
Interior view of a mechanical device with a handle and control panel (no visible text or symbols)To avoid deposits formation by detergent, it is necessary to rinsed well often the drawer with the water. It can be extracted from the housing by pressing on the area encircled in Figure 17.
CLEANING DRAIN PUMP FILTER
natural_image
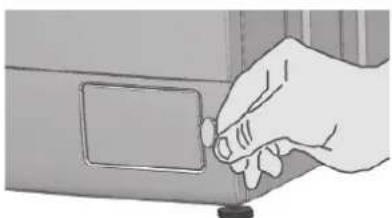
Hand inserting a button into a device panel (no text or symbols visible)To minimize the risk of clogging of the drainage system, it is advisable to do a monthly periodic cleaning of the drain pump filter. To clean the filter, proceed as follows:
- open the drain pump door in the event of a blocked drain and / or power outage.
- turn off the washing machine obtain a coin.
Insert a coin or others into the open slot fl ip side.
N.B If the drain pump is clogged, substantial quantity of water could be in the machine (max. 25l).
Attention!
Burn hazard if washing at high temperature was made.
• EMPTYING PROCEDURE
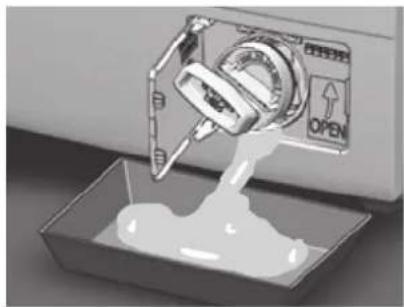
1) Position a basin or other recipient between the cabinet and filter spill lip.

natural_image
Interior view of a microwave oven with open lid and control panel (no visible text or symbols)2) Loose the fi Iter only just enough to drain the water. Do not loose completely the drain fi Iter.
To stop the flow: Tighten the drain filter.
When no more water comes out: Unscrew and pull out the entire filter.
Clean the filter.
natural_image
Illustration of a mechanical device pouring liquid into a container with an open lid (no text or symbols)Verify that the drain pump propeller rotates easily. Remove any debris and clean the inside if there should be any.
Replace the drain pump fi Iter and screw it fi rmly.

natural_image
Close-up of a mechanical device showing a circular component with an 'OPEN' button and directional arrow (no text or symbols beyond the label)Warning! If the filter is not reinserted or screwed tightly, water could spill from the machine.
DETERGENT DRAWER CLEANING
Having removed the detergent drawer, take away the steam vent plate as shown in photo below.

natural_image
Interior view of a washing machine with a door handle and fan (no visible text or symbols)
natural_image
Hand inserting a card into a banknote (no text or symbols visible)
natural_image
Illustration of a device with a brush touching its screen, showing mechanical components inside (no text or symbols visible)If it is clogged by foreign bodies or detergent, it is advisable to break it small fragments taking care not to push the lumps to the bottom to prevent clogging of the internal circuit. Note that the detergent is removed easily if treated with hot water.
The vast majority of failures and faults that occur in daily use of the machine can be eliminated personally. In many cases time and costs could be saved without necessarily having to contact the manufacturer's authorized technical service centre.
The following table will aid to identify and possibly eliminate the causes of failure/malfunction.
However, keep in mind that:
! Repairs to electrical equipment can be carried out only by qualified and authorized. Repairs executed incorrectly can seriously threaten the safety of user.
WHAT TO DO IF....
• THE MACHINE MAKES NOISE
All washing machines on the market produce very little noise, perceptible in washing and spinning step. They measured between 55 and 80 dB (A). These noises are considered audible according to the European standard EN ISO 3741-2010.
• THE MACHINE DOES NOT SPINNING/VIBRATES
This model is equipped with a special electronic device that prevents the start of spinning if laundry load is particularly unbalanced, irregular discharge, excessive or noncompliant detergent. This serves to reduce vibration, increase the silence and life span of the washing machine.
IMPORTANT WARNINGS
For the smooth operation of the washing machine and to prevent an increase in noise and vibration or spin blockage, make sure to respect the following:
Make sure that the transportation screws have been removed during installation.
Ensure that the drain pump filter is clean and make sure the exhaust pipe is not choked and that the machine drains all the water well (as previously reported).
Make sure the detergent used is for washing machine and use the right amount.
WARNING! Make sure the laundry load is not amassed or knotted.
Make sure the machine is well levelled on the floor (see chapter Installation).
| Problem | Diagnosis | Possible Solution | |
| LED | LCD | ||
| The machine does not turn on or start. | Make sure that the power plug is inserted.Make sure there is power in the socket.Make sure that the selector switch, programme selector knob 1, is not in the OFF position. | ||
| The machine is on but does not start and LEDs 1 and 2 are blinking (on LED model) or F1 appears (on display model). | ○○●● | F1· | Make sure the door is well closed. |
| The machine does not take water and LEDs 1 and 3 are blinking (on LED model) or F2 appears (on display model). | ○○●○● | F2 | Make sure there is water supply.Make sure the water tap is opened.Make sure the water inlet hose is not squashed.Make the water electro-valve fi liter is not clogged. |
| LEDs 2 and 3 are blinking (on Led model) or F3 appears on monitor (of display model). | ○○●○○ | F3 | Switch off and then switch on the washing machine. In the fault persist contact an authorised service centre. |
| The machine does not drain/empty or does not spin and leds 1 and 4 are blinking (on led model) or F4 appears on display (of display model). | ●○○● | F4 | Make sure the drain pump fi liter is not clogged. See page 25.Make sure the rinse hold special function is enabled.Make sure that the drain hose is not squashed and the internal diameter of the drainage is larger the that of the drain hose. |
| LEDs 2 and 4 are blinking (on Led model) or F5 is displayed (on display model). | ●○○●○ | F5 | Switch off and then switch on the washing machine. In the fault persist contact an authorised service centre. |
| LEDs 1, 2 and 6 are blinking (on led model) or F6 is displayed (on display model). | ●○○●● | F6 | Switch off and then switch on the washing machine. If the fault persist contact an authorised service centre. |
| The door does not open. | Make sure that the red LED is turned off.Make sure the machine is not the soak status or in special anti-crease functionPress the door from the locking the side or give a light heat and simultaneously pull to open. | ||
| There is water on the floor. | Make sure that the inlet and drain hoses are intact and that they do not lose water.The detergent may not be appropriate or excessive (Overflows the drawer).Reduce the amount of detergent. | ||
| The machine take in water continuously while it is turned off. | Reduce the water pressure or of pumping device.Close the tap at the end of wash. | ||
SPARE PARTS AND SERVICE
REPAIR
For any repairs, contact authorised The manufacturer Ltd technical support service centre. Always communicate model and serial number of the appliance printed on the rating label. The data plate is also visible on the door opening, in the upper part.

• IMPORTANT WARRANTY INFORMATION.
Each appliance is cover within the warranty terms. The warranty is valid for the period indicated according to national legislation on consumer rights.
natural_image
Top-down view of a mechanical housing or enclosure with concentric rings and mounting points (no visible text or symbols)natural_image
Mechanical assembly diagram showing a bolt and nut assembly with directional arrows (no text or symbols)Регулируемая ножка

natural_image
Illustration of a washing machine with labeled dimensions (85 cm and 76 cm), no text or symbols on the device itself.natural_image
Illustration of a faucet with a valve and fittings, showing fluid flow direction (no text or symbols)natural_image
Close-up of a wall-mounted electrical outlet with coiled tubing and a bulb (no visible text or symbols)natural_image
Interior view of a washing machine with internal components and a close-up view of the interior (no text or symbols visible)1. РУЧКА ВЫБОРА ПРОГРАММ
natural_image
Illustration of a hand adjusting a circular device with a dial (no text or symbols visible)natural_image
Illustration of a hand holding a circular device with a stylized animal face and X symbol (no text or labels)natural_image
3D diagram of a computer drawer with internal compartments and ventilation slots (no text or symbols)
natural_image
Illustration of a hand inserting into a drawer with plastic items (no text or symbols visible)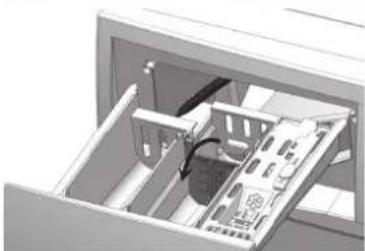
natural_image
Interior view of a computer case showing internal components (no text or symbols visible)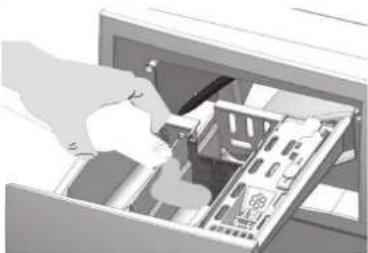
natural_image
Illustration of a person opening a computer case with visible circuitry and components (no text or symbols)natural_image
Close-up of a mechanical device interior showing internal components and a circular annotation (no visible text or symbols)natural_image
Hand inserting a small component into a device panel (no text or symbols visible)natural_image
Diagram of a device with labeled ports (OPEN, RIGHT, LEFT) and a circular dial, showing internal components without any readable text or symbols.
natural_image
Illustration of a mechanical device pouring liquid into a container with an open lid (no text or symbols)
natural_image
Close-up of a mechanical device showing a circular component with an 'OPEN' button and directional arrow (no text or symbols beyond the label)natural_image
Interior view of a kitchen appliance with a drawer and door (no visible text or symbols)B
natural_image
Hand inserting a card into a computer monitor (no text or symbols visible)
natural_image
Diagram of a device with a brush applying material to a window, showing no text or symbols.natural_image
3D diagram of a device with three labeled sections (I, II, III) showing internal components and casing structure (no text or symbols beyond labels)natural_image
Top-down view of a mechanical housing or enclosure with concentric rings and mounting points (no visible text or symbols)natural_image
Illustration of a faucet with a flanged handle and fittings, showing a curved arrow indicating rotation (no text or symbols)natural_image
Close-up of a wall-mounted electrical outlet with coiled tubing and a bulb (no visible text or symbols)natural_image
Interior view of a washing machine showing internal components and casing (no text or symbols visible)1. РУЧКА ВИБОРУ ПРОГРАМ.
natural_image
Illustration of a hand adjusting a circular dial with a valve (no text or symbols visible)natural_image
Illustration of a mechanical device with a circular component and a cross symbol, no visible text or labelsnatural_image
Interior view of a 3D printer or scanner module showing internal components and labeled parts (no readable text or symbols)natural_image
Diagram of a computer drawer showing internal compartments and a device (no text or symbols visible)
natural_image
Hand inserting a plastic bag into a drawer with shelves of contents (no visible text or symbols)
natural_image
3D cutaway view of an internal device showing internal components and casing (no text or symbols visible)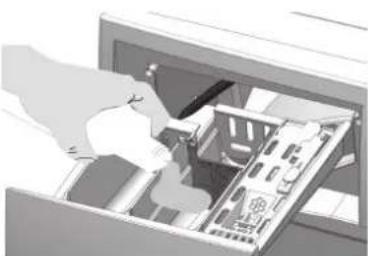
natural_image
Illustration of a person inside a computer room with visible circuit boards and components (no text or symbols)natural_image
Close-up of a mechanical device with internal compartments and a circular annotation (no visible text or symbols)natural_image
Hand inserting a small component into a device panel (no text or symbols visible)natural_image
Diagram of a washing machine with open door and internal mechanism (no text or symbols)natural_image
Illustration of a mechanical device pouring liquid into a container (no text or symbols)natural_image
Interior view of a device showing a camera aperture with an 'OPEN' button and directional arrow (no text or symbols beyond the label)natural_image
3D technical illustration of a cabinet or enclosure with internal components, no visible text or symbolsB

natural_image
Illustration of a hand inserting a card into a machine (no text or symbols visible)
natural_image
Close-up of a computer monitor with a cable inserted, showing a close-up of the screen (no visible text or symbols)НЕСПРАВНОСТЕЙ
MODEL WISL1050, WIL1070....43
CZAS I FUNKCJE PROGRAMÓW PRANIA....44
OZNACZENIA SPOSOBÓW PIELEGNACJI TKANIN.....45
PORADY I ŚRODKI OSTROŻNOŚCI....46
PORADY DOTYCZĄCE PRANIA....46
DOBÓR PRANIA....46
USZCZELKA DRZWICZEK PRALKI....46
ZAMYKANIE DRZWICZEK....46
DAWKOWANIE ŚRODKÓW PIORĄCYCH I ZMIĘKCZACZY...46
ZASTAWKA DO PŁYNÓW DO PRANIA....46
PROSZKI DO PRANIA....47
PŁYNY DO PRANIA....47
PŁYNY DO ZMIĘKCZANIA TKANIN....47
DAWKOWANIE ŚRODKÓW PIORĄCYCH....48
WŁĄCZANIE PRANIA....48
PAUZOWANIE PRANIA....48
WKŁADANIE PRANIA DO BĘBNA....48
KONSERWACJA I PIELEGNACJA....48
OBUDOWA....48
SZUFLADA DOZOWNIKÓW NA ŚRODKI PIORĄCE......48
CZYSZCZENIE FILTRA POMPY ODPROWADZANIA WODY..48
CZYSZCZENIE FILTRA....48
CZYSZCZENIE SZUFLADY DOZOWNIKÓW NA ŚRODKI PIORĄCE......48
ROZWIAZYWANIE PROBLEMÓW....49
CZEŚCI ZAMIENNE I SERWIS....50
natural_image
Top-down view of a mechanical device showing internal components and mounting points (no text or symbols visible)natural_image
Mechanical assembly diagram showing a bolt and nut assembly with bidirectional arrows indicating motion (no text or symbols)Nóżka regulowana
natural_image
Illustration of a faucet with a handle and valve, showing internal components (no text or symbols)natural_image
Close-up of a mechanical component with coiled tubing and a metallic housing (no visible text or symbols)natural_image
Interior view of a washing machine with hand inserting a component (no visible text or symbols)natural_image
3D mechanical assembly diagram showing internal components (no text or symbols visible)PRZED PIERWSZYM PRANIEM
OPIS PRZYCISKÓW I POKRĘTEŁ
1. POKRETŁO PROGRAMATORA
MODELS WISL1050, WIL1070
PRANIE WSTĘPNE
natural_image
Illustration of a hand adjusting a circular dial with a valve, no text or symbols presentnatural_image
Illustration of a stylized animal face inside a circular frame with a cross symbol, no text or symbols present.natural_image
3D interior view of a mechanical housing or enclosure with numbered components (no visible text or symbols)natural_image
3D diagram of an open computer drive bay showing internal components (no text or symbols)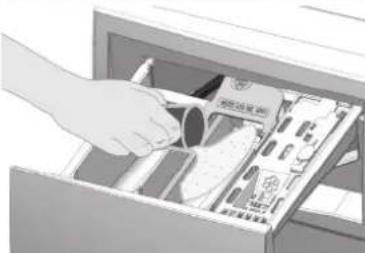
natural_image
Hand inserting a plastic into a drawer with shelves of contents (no visible text or symbols)
natural_image
3D cutaway view of an internal computer drive showing internal components (no text or symbols)
natural_image
Illustration of a computer monitor with an open screen showing internal components (no text or symbols visible)! OSTRZEŻENIE!
natural_image
Interior view of a mechanical device with a handle and control panel (no visible text or symbols)natural_image
Hand inserting a button into a device panel (no text or symbols visible)natural_image
Interior view of a microwave oven with open lid and control panel (no visible text or symbols)natural_image
Illustration of a mechanical device pouring liquid into a container with an open lid (no text or symbols)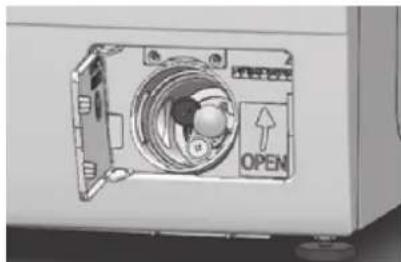
natural_image
Diagram of a refrigerator interior showing the open door and circular vent (no text or symbols)natural_image
Interior view of a double-door refrigerator with open drawer and door (no visible text or symbols)B

natural_image
Illustration of a hand inserting a card into a machine (no text or symbols visible)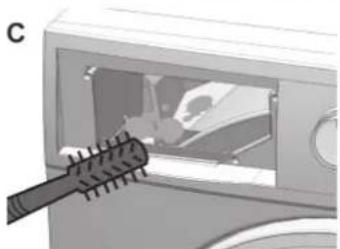
natural_image
Close-up of a device with a brush applying material to a window (no visible text or symbols)• INFORMACJE O GWARANCJI
This manual can be downloaded at
www.freggia.com
- RU
- • DISPOSAL OF WASTE ELECTRICAL AND ELECTRONIC EQUIPMENT (WEEE)
- INDEX
- SAFETY INSTRUCTIONS AND WARNINGS
- INTENDED USE
- USE BY CHILDREN OR PEOPLE HIGHLY VULNERABLE
- DEFINITIONS
- Vulnerable people
- TECHNICAL SAFETY
- PROPER USE
- FLOOD HAZARD
- DANGER OF EXPLOSION AND FIRE
- DESCRIPTION OF MACHINE INSTALLATION
- REMOVAL OF TRANSPORTATION LOCKING SCREWS
- POSITIONING OF WASHING
- INSTALLATION UNDER A WORK PLAIN
- WATER SUPPLY CONNECTION
- WATER DRAINAGE
- LIQUID DETERGENT BULKHEAD PAN
- FIRST USE
- POWER SUPPLY CONNECTION
- ELECTRICAL SHOCK HAZARD NOT KEEPING TO THIS INSTRUCTION COULD ENDANGER THE USER. THIS WASHING MACHINE REQUIRES EARTH WIRING.
- CONTROL PANEL WISD1460, WID1480, WID1290
- CONTROL PANEL WISL1050, WIL1070
- DESCRIPTION OF COMMANDS
- PROGRAMME SELECTION KNOB
- TEMPERATUR E REGULATING KNOB
- SPIN REGULATION
- DELAY START
- 5.ADJUSTMENT OF THE WASHING PROGRAM DEPENDING ON THE LEVEL OF POLLUTION
- OPTIONS
- OPTION CONFIRMATION
- START/PAUSE
- MODELS WISD1460, WID1480, WID1290
- PREWASH
- EXTRA-RINSE
- SE HOLD
- BY LOCK
- OR LOCK
- MODELS WISL1050, WIL1070
- - PREWASH
- - EXTRA-RINSE
- - RINSE HOLD
- - DOOR LOCK AND BABY LOCK
- WASHING PROGRAMMES DURATION AND OPTIONS
- PRODUCT DATA SHEETS IN ACCORDANCE WITH EU 1061/2010 DIRECTIVE ON ENERGY LABELLING
- PRECAUTIONS AND ADVICE
- WASHING RECOMMENDATIONS
- SELECTION OF LAUNDRY
- DOOR GASKET
- DOOR CLOSURE
- DETERGENT AND SOFTENER DOSAGE
- LIQUID OR POWDERED DETERGENT PARTITION PLATE
- Then place the plate in position:
- WARNING!
- DETERGENT POWDER
- LIQUID DETERGENTS
- SOFTENER
- DETERGENT DOSES
- STARTING WASHING PROGRAMME
- STARTING WASHING
- PAUSING WASHING
- LOADING LAUNDRY INTO THE DRUM
- MAINTENANCE
- CABINET
- DETERGENT DRAWER CLEANING
- • THE MACHINE MAKES NOISE
- • THE MACHINE DOES NOT SPINNING/VIBRATES
- IMPORTANT WARNINGS
- SPARE PARTS AND SERVICE
- REPAIR
- • IMPORTANT WARRANTY INFORMATION.
- РУЧКА ВЫБОРА ПРОГРАММ
- РУЧКА ВИБОРУ ПРОГРАМ.
- НЕСПРАВНОСТЕЙ
- PRZED PIERWSZYM PRANIEM
- OPIS PRZYCISKÓW I POKRĘTEŁ
- POKRETŁO PROGRAMATORA
- PRANIE WSTĘPNE
- ! OSTRZEŻENIE!
- • INFORMACJE O GWARANCJI
Brand : Freggia
Model : WID1290
Category : Washing machine