
LED1503 - Television Manta - Free user manual and instructions
Find the device manual for free LED1503 Manta in PDF.

| Product Type | LED TV |
| Brand | Manta |
| Model | LED1503 |
| Screen Size | 15 inches (38 cm) |
| Resolution | 1366 x 768 pixels |
| Aspect Ratio | 16:9 |
| Dimensions (W x H x D) | 36.0 x 25.0 x 8.0 cm |
| Weight | Approx. 2.5 kg |
| Power Supply | AC 100-240V, 50/60Hz |
| Power Consumption | 30 W (typical) |
| Inputs | HDMI, USB, VGA, AV, RF |
| Outputs | Headphone jack |
| Audio | Built-in speakers, 2 x 3W |
| Remote Control | Included |
| Wall Mount | VESA 75 x 75 mm |
| Safety | Do not expose to moisture; keep ventilation slots clear. |
| Cleaning | Wipe with a soft dry cloth; do not use chemicals. |
| Repairability | Spare parts available through authorized service centers. |
| General Information | LED TV suitable for small rooms or kitchens. Manual available online. |
Frequently Asked Questions - LED1503 Manta
User questions about LED1503 Manta
0 question about this device. Answer the ones you know or ask your own.
Ask a new question about this device
Download the instructions for your Television in PDF format for free! Find your manual LED1503 - Manta and take your electronic device back in hand. On this page are published all the documents necessary for the use of your device. LED1503 by Manta.
USER MANUAL LED1503 Manta
natural_image
Abstract black-and-white circular logo design with interlocking curved shapes (no text or symbols)MANTA
LED TV 15"
LED1503
natural_image
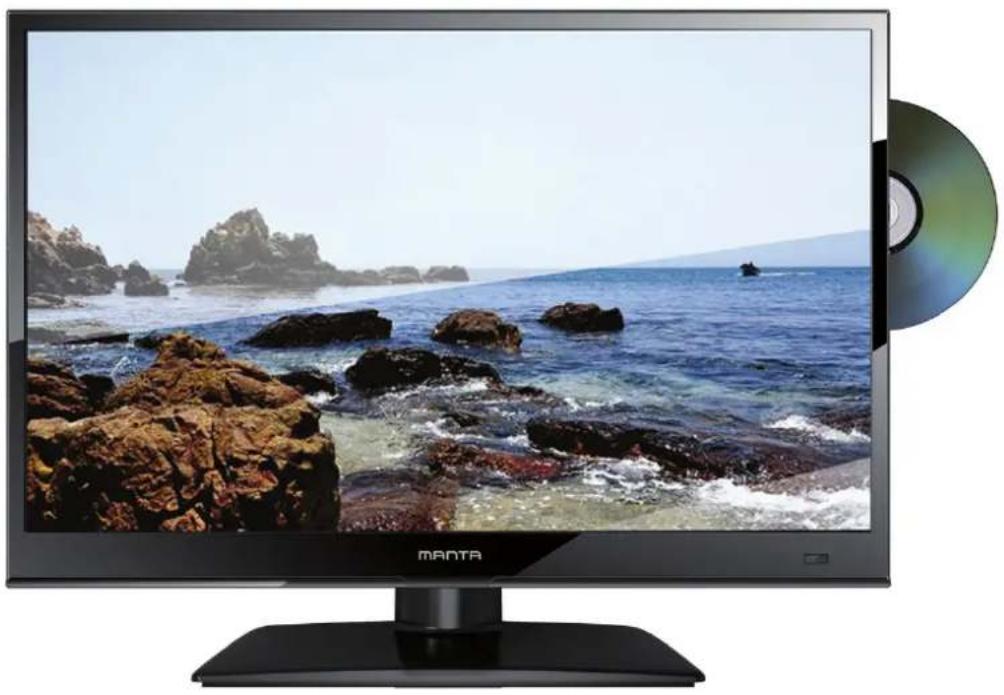
Modern flat-screen TV displaying a coastal scene with rocky seas and ocean waves, next to a CD (CD) disc (no text or symbols visible on screen)natural_image
Technical line drawing of a mechanical component with radial slots and mounting holes (no text or symbols)BM3*6

INSTRUKCJA OBSŁUGI
PL
INSTRUKCJA OBSŁUGI
PL
natural_image
Row of six small icons on a textured background, no text or symbols visibleOdtwarzanie
Time to start recorder
20 s
TimeShift
3. Ustawienia wideo
4. Preferencje
Thank you for buying this TV! Please read this manual thoroughly before operating the TV. Make sure the TV was not damaged in transit. Should the TV is damaged, do no install it and contact your dealer. Check that you have all the accessories according to the mode.
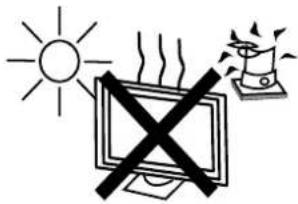
Keep the TV away from heat sources.
2.SAFETY PRECAUTIONS

Put the TV on the stable surface

natural_image
Illustration of a computer monitor with arrows indicating sound waves or vibration, and a hand holding a device crossed out (no text or symbols)Unplug the TV before cleaning it. Do not use solvent or liquid to clean the TV. Only clean the TV with a soft and dry cloth.

natural_image
Simple line drawing of a computer monitor with a cross symbol above it (no text or labels)Do not place any material on the TV.
Equipment cannot place such as the vase kind of filled with liquid items.

In case of troublesome -oting, do not use spare parts other than those suggested by the manufacturer. Using inadequate spare parts can led to electric shocks, short-circuits fire or other incidents.
Do not use the TV with fixtures other than those provided or suggested by the manufacturer.

Unplug the TV during lightening storms or when unused for long periods of time.

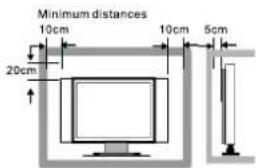
Do not block or cover the ventilation openings on the TV. If you have a wall mount, check that it is steady.

Power cord and cables must be properly routed and protected to prevent people from stepping on them and causing the TV to fall.
- where the MAINS plug or appliance coupler is used as the disconnect device, the disconnect device shall remain readily operable.
2.A warning that batteries (battery pack or batteries installed) shall not be exposed to excessive heat such as sunshine, fire or the like.
- A warning that an apparatus with CLASS I construction shall be connected to a MAINS socket outlet with a protective earthing connection.

natural_image
Cartoon illustration of a computer monitor with broken-out fragments and lightning bolts (no text or symbols)Keep the TV dry and away from humidity.
3.How to install the stand
Fig 1
Plug the panel into the stand, as shown in Figure
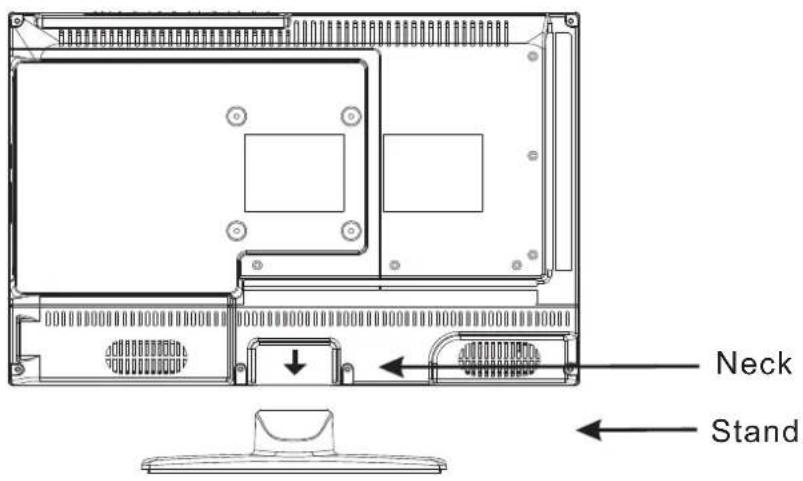
Fig2
Assembly 3 screws, as shown in Figure
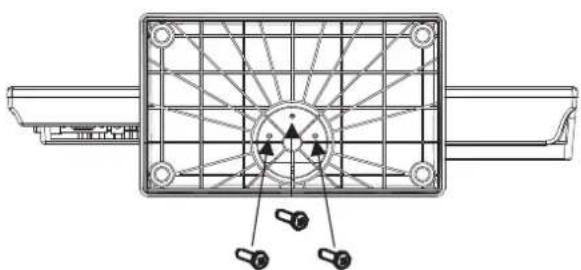
natural_image
Technical line drawing of a mechanical component with radial slots and mounting holes (no text or symbols)BM3*6
4. FRONT, BACK, CONNECTIONS OF LED
Front View
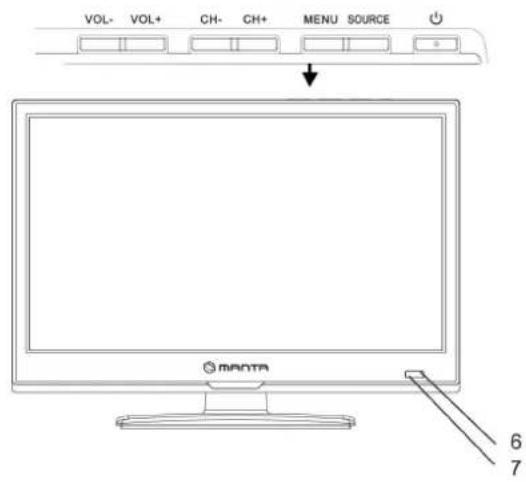
- Press "SOURCE" to select the input source.
- Press "MENU" to bring up the main menu on the screen.
- Press "CH+" or "CH-" to scan through channels.
- Press "VOL+" or "VOL-" to increase or decrease the sound level.
- Press "POWER" button to turn the TV on or off.
- POWER INDICATOR: When the TV will display in standby or turn Green or blue.
- REMOTE SENSOR: infrared sensor for the remote control.
- Press to play pause the playback. Press again to resume normal playback.
- Press to eject the disc out.
Back View and Control Connections

- COAXIAL
- antenna socket
- USB port
- Mini-Y/Pb/Pr jack input
- Cl port
- Mini-AV jack input

- Power socket
- earphone input
- SCART socket
- PC AUDIO input
- VGA (WEPC) input
- HDMI slot
5. REMOTE CONTROL
Remote Control Instructions in DTV mode
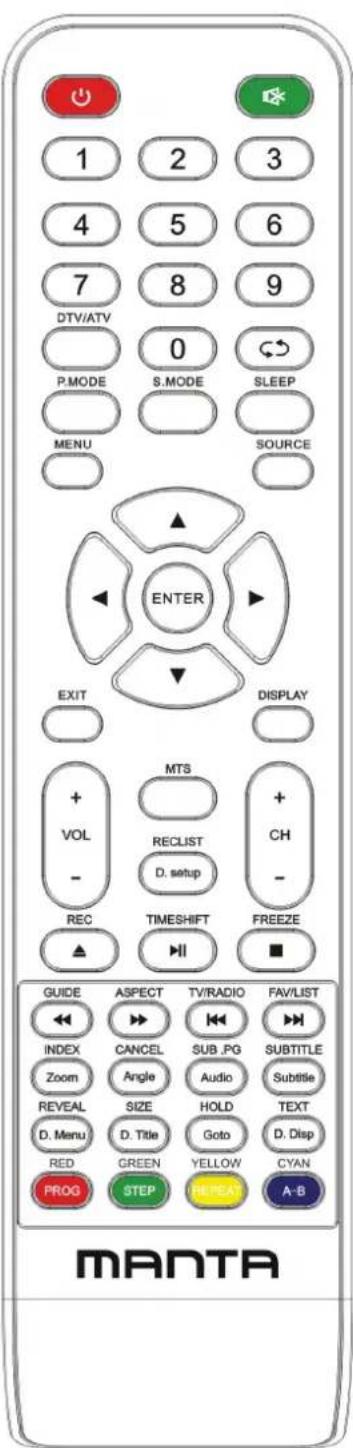
POWER
Turn the LED TV ON or OFF.
MUTE
Press to mute the sound. Press again or press VOL+ to un-mute the TV.
SLEEP
Lets you select amount of time before your TV turn itself off automatically.
P.MODE
Press to select the picture modes.
S.MODE
Press this button to change the audio mode.
DISPLAY
Press to display the source and channel's information.
NICAM
Press to select the NICAM modes.
AUDIO
Audio select button.
NUMBER BUTTONS
The numerical keys are used for editing the name of the channel.
O
Return to the previous channel viewed.
TV MENU
Press to enter or exit the setup menu.
EXIT
Press to exit all the OSD on the screen.
GUIDE
Press to display the channel guide menu.
SOURCE
Press SOURCE to display the OSD input source, Press ▲▼
to select an input source, and then press ENTER to confirm.
THUMBSTICK( ▲/ ▼/◀/ ▶/ ENTER)
Allows you to navigate the on-screen menus and adjust the system settings to your preference.
CH+/CH-
Press to scan through channels.
VOL+/VOL-
Press to increase/decrease the sound level.
Remote Control Instructions in DTV mode


Playing backward fast in timeshift mode.

Playing forward fast in timeshift mode.
▶ (Timeshift)
Press to perform the Timeshift function.
NOTE: Select Time Shifting Mode "off" in the menu, then the "teletext" can be available.

Press to stop recording.
ZOOM
Zoom can change display size.
Color button
Color buttons (respectively red, green, yellow and blue) used in a few sub-menus.
TV/RADIO
When watching a channel, allows you switch between TV and Radio modes.
FAV
Displays the selected favorite programmers.
FAV-
Displays the selected favorite down programmers.
FAV+
Displays the selected favorite up programmers.
SUBTITLE
In DTV mode, Press to select alternate subtitle languages during view/playback of a DTV program.

Record button.
Remote Control Instructions in Teletext/Media mode
NUMBER BUTTONS
Press 0-9 to select a teletext page.

Page up and page down.
CH+/CH-
Page up and page down.
SUBTITLE
In Teletext mode, press to display P.100.
TEXT
Switch on or off the teletext mode.
Select Time Shifting Mode "off" in the menu, then the
"teletext" can be available.
HOLD
Hold on or off for current page display.
SUBPAGE
Sub coded page access.
REVEAL
Reveal or hidden the hidden words.

Playing backward fast.

Playing forward fast.
INDEX
Request the index page.
SIZE
Change display size in teletext mode.

Skip backward button.

Skip forward button.

Press to pause the playback.

Press to stop playing.
ZOOM
Zoom can change display size.
MEDIA
Press to display the MEDIA menu.
Color button
Color buttons (respectively red, green, yellow and blue) used in a few sub-menus.
REPEAT
Repeatedly play the title or chapter continuous.
Remote Control Instructions in DVD mode
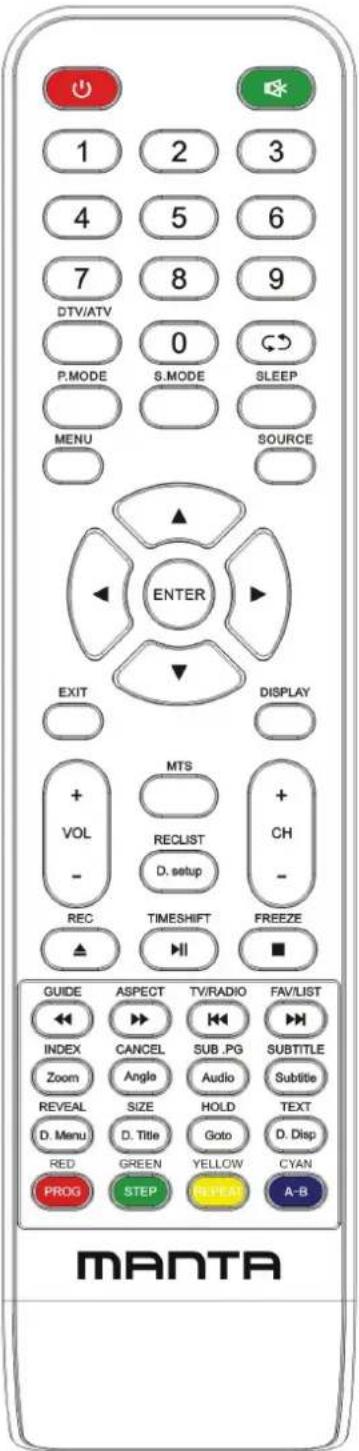
THUMBSTICK( ▲/ ▼/◀/ ▶/ ENTER)
Allows you to navigate the on-screen menus and adjust the system settings to your preference.
REVEAL
Reveal or hidden the hidden words.

Playing backward fast.

Playing forward fast.
SIZE
Change display size in teletext mode.

Skip backward button.

Skip forward button.

Press to pause the playback.

Press to stop playing.
ZOOM
Zoom can change display size.
REPEAT
Repeatedly play the title or chapter continuous.

Press to eject the DVD in DVD mode.
D.MENU
Press to display DVD-disc menu on the screen.
D.SETUP
To display the setup menu of DVD on the screen.
TITLE
Press to display the DVD title menu.
GOTO
Press to go to DVD.
A-B
Press to AB playback.
D.DISPLAY
Press to display the source and channel's information.
Press ▼ / ▲ button to select the input source you want to watch;
Press ENTER button or ▶ button to enter the input source;
- Press MENU button to display the MAIN OSD MENU;
- Press ▼ / ▲ button to select the MENU you want;
- Press ENTER button or ▶ button to enter the sub menu, and press ◀ button to return back to the previous menu.
- Press ▼/▲ button to select the option and then press ENTER button or ▶ button to enter the submenu, press ◀/▶ button to adjust the value or press ▼/▲ button to select in the sub menu;
- You can press MENU button to save and return back to the previous menu, and press EXIT button to exit the entire menu.
Press INFO button on the remote control to display program Information.
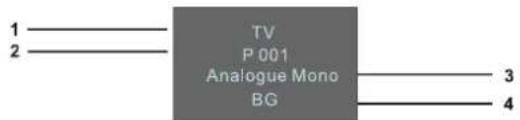
- Current Source
- Current program Number.
- The NICAM mode of current program.
- The sound system of current channel, could be changed on Analog Manual Search menu.
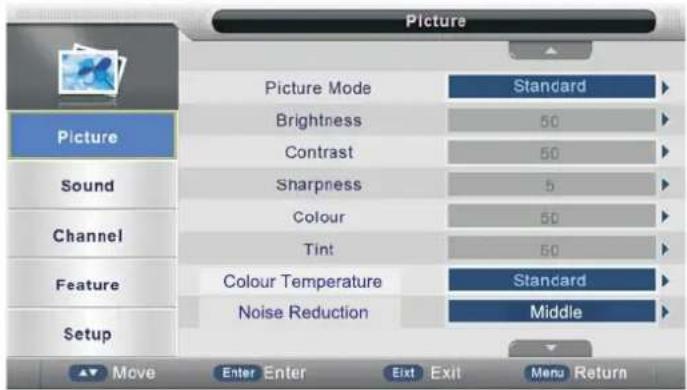
Picture Menu
Press MENU button to display the main menu.
Press ▼/▲ button to select Picture in the main menu, then press ENTER button or ▶ button to enter.
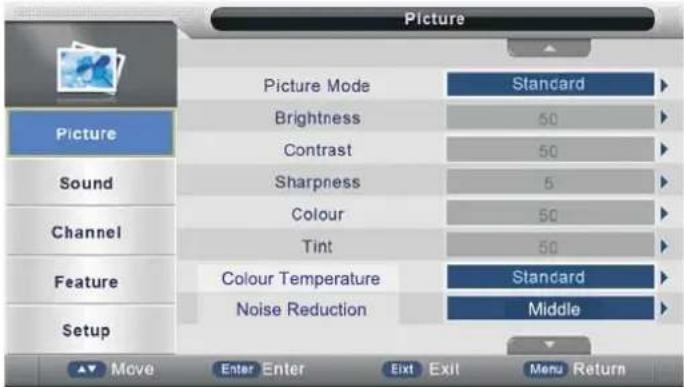
- Press ▼/▲ button to select the option that you want to adjust in the Picture menu, then press ENTER button or ▶ button to enter.
- Press ◀/▶ button to adjust or press ▼/▲ button to select. and press ENTER button or ▶ button to select the sub menu.
- After finishing your adjustment, Press MENU button to save and return back to the previous menu, and press EXIT button to exit the entire menu.
Picture Mode
Press ▼ / ▲ button to select Picture Mode, then press ENTER button or ▶ button to enter and press ▼/▲ button to select. (Available Picture Mode: User, Standard, Vivid,Soft).
You only can change the value of brightness, contrast, sharpness, colour, when the picture is in User mode.
TIPS: You can press P-MODE button on the remote control again and again to change the Picture Mode directly.

Brightness
Press ▼ / ▲ button to select Brightness, then press ENTER button or ▶ button to enter and press◀/▶ button to adjust. then press MENU button to return back the previous menu directly.
Contrast
Press ▼ / ▲button to select Contrast, then press ENTER button or ▶ button to enter and press◀/▶ button to adjust. then press MENU button to return back the previous menu directly.

Sharpness
Press ▼/▲ button to select Sharpness, then press ENTER button or ▶ button to enter and press ◀/▶ button to adjust. then press MENU button to return back the previous menu directly.
Colour
Press ▼/▲ button to select Colour, then press ENTER button or ▶ button to enter and press ◀/▶ button to adjust. then press MENU button to return back the previous menu directly.
Noise Reduction
Press ▼/▲ button to select Noise Reduction, then press ENTER button or ▶ button to enter and ▼/▲ button to enter and press ▼/▲ button to select Off, Low, Middle, High.
Reset
Press ▼/▲ button to select Reset then press ENTER button or ▶ button to enter the confirm menu, then choose OK to reset the value.
SOUND MENU
Press MENU button to display the main menu.
Press ▼/▲ button to select Sound in the main menu, then press ENTER button or ▶ button to enter.
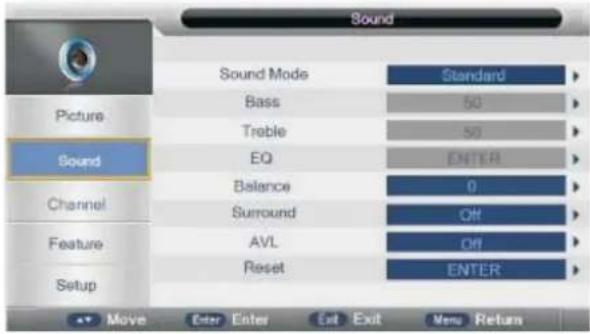
- Press ▼/▲ button to select the option that you want to adjust in the Sound menu, then press ENTER button or▶ button to enter.
- Press ◀/▶ button to adjust or press ▼/▲ button to select, and press ENTER or ▶button to select the submenu.
- After finishing your adjustment, Press MENU button to save and return back to the previous menu, or press EXIT button to exit the entire menu.
Sound Mode
Press ▼ / ▲ button to select Sound Mode, then press ENTER button or ▶ button to enter. and then press ▼ / ▲ button to select. (Available Sound mode: User, Standard, Movie, Music, Speech). You can change the value of bass and treble, Balance and EQ, when the sound is in User mode. TIPS: You can press SMODE button on the remote control to change the Sound Mode directly.
Sound: Music
Bass
Press ▼ / ▲ button to select Bass, then press ENTER button or ▶ button to enter and press ◀/▶ button to adjust. then press MENU button to return back the previous menu directly.
Balance
Press ▼ / ▲ button to select Balance, then press ENTER button or ▶ button to enter and press ◀/▶ button to adjust, then press MENU button to return back the previous menu directly.
Treble
Press ▼ / ▲button to select Treble, then press ENTER button or ▶button to enter and press ◀/▶ button to adjust. adjust, then press MENU button to return back the previous menu directly.
EQ
Press ▼ / ▲ button to select EQ, then press ENTER button or ▶ button to enter and press ▼ / ▲ button to select. (Available EQ mode: EQ100HZ, EQ300HZ, EQ1KHZ, EQ3KHZ, EQ8KHZ)
Then press ENTER button or ▶button to enter and press ◀/▶ button to adjust. then press MENU button to return back the previous menu directly.
Surround
Press ▼ / ▲ button to select Surround, then press ENTER button or ▶ button to enter and press ▼ / ▲ button to select On or Off.
AVL
Press ▼ / ▲button to select AVL, then press ENTER button or ▶ button to enter and press ▼ / ▲button to select On or Off.
Reset
Press ▼ / ▲ button to set Rese,t then press ENTER button or ▶ button to enter the confirm ment, then choose OK to reset the Value.
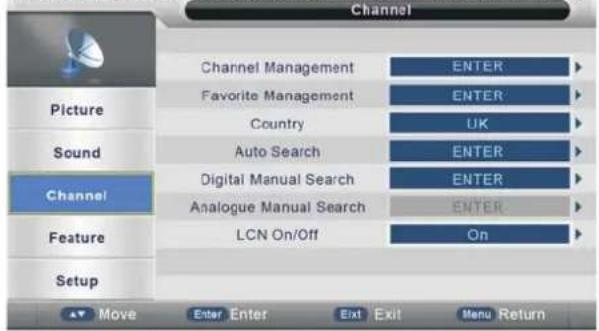
CHANNEL MENU
Press MENU button to display the main menu.
Press ▼/▲ button to select Channel in the main menu, then press ENTER button or ▶ button to enter.
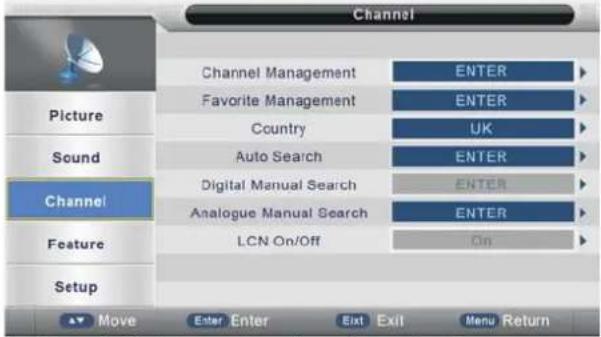
- Press ▼ / ▲ button to select the option that you want to adjust in the Channel menu, then press ENTER button or ▶ button to enter.
- Press ▼ / ▲ button to select and press ENTER button or ▶ button to select the sub menu.
- After finishing your adjustment, Press MENU button to save and return back to the previous menu, or press EXIT button to exit the entire menu.
Channel Management
Press▼ / ▲button to select Channel Management, then press ENTER button or ▶ button to enter.
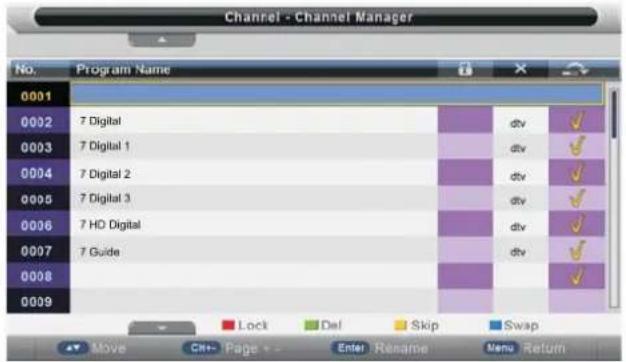
Press RED button to set the current channel to lock, if the current channel already lock, press RED button again cancel lock.
Press GREEN button to set the current channel to delete, if the current channel already delete, Press GREEN button again will cancel delete.
Press YELLOW button to skip the current channel. If the current channel already skip, press YELLOW button again will cancel skip.
Press BLUE button to swap the channel position.
If one of the channel has been incorrectly placed in the station listing, you may move it to the correct position you want Using the ▼ / ▲select the channel to be moved, press BLUE button, move the channel to the new location and press ENTER button or BLUE button, this will move the station to the new location.
If there is delete channel logo, press MENU button or ENTER button, the menu will appear as follows:

Press ◀ button to choose OK, press ▶ button choose cancel, press ENTER button to confirm.

Press ▼/▲ button to select channel then press ENTER button to enter the rename channel menu.
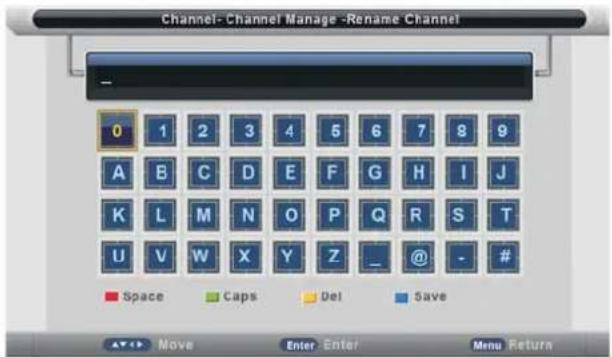
Press RED button to enter a space,
Press GREEN button to change case,
Press ▼/▲ or ◀/▶ button to select the character, and press ENTER to confirm.
Press YELLOW button to delete the previous character.
Press BLUE button to save the change and return to the previous page.
Press EXIT button, the menu will appear as follows:

Exit the entire menu if select "CANCEL" and there will nothing be change,
Save successful if select "OK" the menu will appear as follows: and it d means the changes has been saved.

Favorite Manager
Press ▼/▲ button to select Favorite Manager, then press ENTER button or ▶ button to enter.
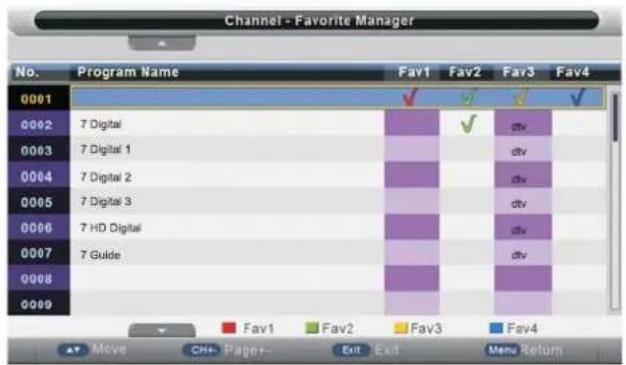
Press ▼ / ▲button to select Channel, press RED button to set to Fav1.
Press ▼ / ▲ button to select Channel, press GREEN button to set to Fav2.
Press ▼ / ▲button to select Channel, press YELLOW button to set to Fav3.
Press ▼ / ▲ button to select Channel, press BLUE button to set Fav4.
if the current channel already be one of your favorite channel, press the RED/GREEN/YELLOW/BLUE button again will set it to a normal channel.
Press MENU button or EXIT button, the successfully updated menu will appear.
Country
Press ENTER button or ▶ button to enter, then press▼ / ▲ button to select appropriate country, and press
ENTER or ▶ button to confirm.
Auto Search
Press ▼ / ▲ button to select Auto Search, then press ENTER button or ▶ button to enter (When the System Lock is on, please input the default password "0000").
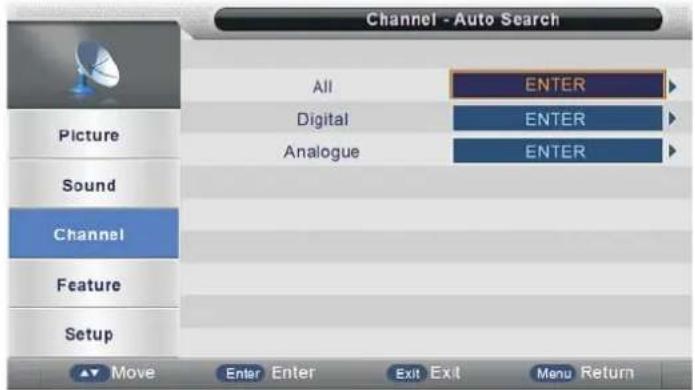
Press ▼ / ▲ button to select All, Digital, Analogue, then press ENTER button or ▶ button to enter

Auto Search selected items if select "OK" and press ENTER button, otherwise select CANCEL to return back to previous page. After a few second, the menu will appear as follows:
When auto search finish, the save successful menu will appear a few second.
Analog Manual Search
Press ▼/ ▲button to select Analog Manual Search, then press ENTER button or ▶ button to enter (When the System Lock is on, please input the default password "0000").
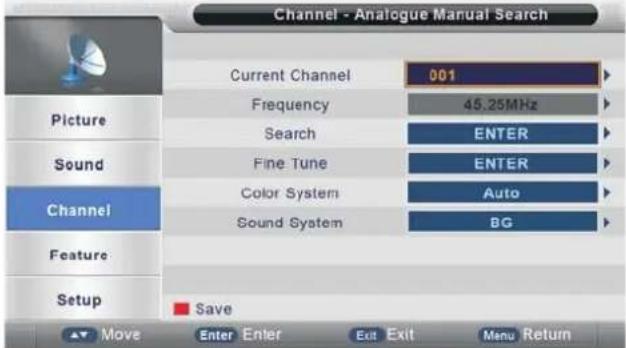
Current Channel
Press ENTER or ▶ to enter. then ress ▼ / ▲ button to select Current Channel.
Press ▼ / ▲button to select Current Channel then press ENTER button or ▶button to select.
Search
Press ▼ / ▲ button to select Search, then press ENTER button or ▶ button to enter, the menu will appear as follows. and then press ◀/▶ to scan the channel.
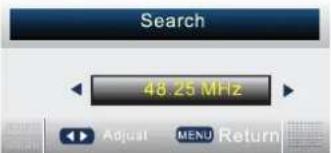
Fine Tune
Press ▼ / ▲ button to select Fine Tune, then press ENTER button or ▶ button to enter, the menu will appear as follows:

Press ◀/▶ button shortly to adjust program1 frequency, press MENU button to return back to the previous menu. Note: press RED button to save the result of the adjustment.
Color System
Press ▼/ ▲ button to select Color System, press ENTER button or ▶ button to enter the sub menu,
Press▼/ ▲button to select Auto/PAL/SECAM, then press ENTER button or ▶ button to confirm.
Sound System
Press▼/ ▲button to select Sound System, and press ENTER button or ▶ button to enter the sub menu,
press▼ / ▲button to select BG, DK, I, L, L'. the press ENTER or ▶ button to confirm.
Feature Menu
Press MENU button to display the main menu.
Press ▼ / ▲ button to select Feature in the main menu, then press ENTER button or ▶ button to enter.
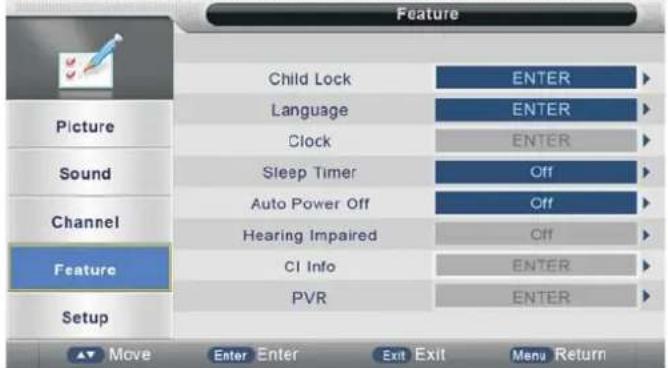
- Press ▼ / ▲ button to select the option that you want to adjust in the Feature menu, then press ENTER button or ▶ button to enter.
- Press ◀/▶ button to adjust or press ▼ / ▲ button to select.
- After finishing your adjustment, Press MENU button to save and return back to the previous menu and press EXIT button to exit the entire menu.
Child Lock
Press ▼ /▲button to select Child Lock, then press ENTER button or ▶button to enter.
(Please input the default password "0000")

Child Lock
Press ▼ / ▲ button to select Child Lock, Press ENTER button or ▶ button to enter the sub menu. then press ▼ / ▲ button to select On or Off(please input the default password "0000"). then press ENTER button or ▶ button to confirm.
Parental Lock
Press ▼ / ▲ button to select Parental Rating, Press ENTER button or ▶ button to enter the sub menu. then press
▼ / ▲ button to select Rate (From4-18, or OFF). then press ENTER button or ▶ button to confirm.
Change Pin Code
Press ▼ / ▲ button to select Change Pin Code. then press ENTER button or ▶ button to enter, and Change Pin Code menu will appear as follows:
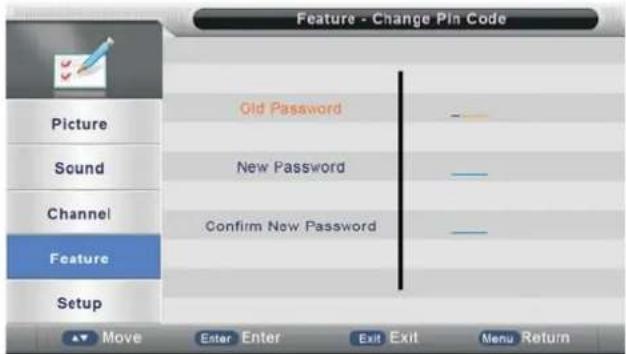
Input old password at "Old Password", (if the old password is incorrect, the password will not be allowed to modify.) Input new password at "New Password".
Input new password again at "Confirm New Password", if new password and confirm new password consistent, The successfully updated menu will appear a few second, otherwise, the menu will display the password mismatch.
Language
Press ▼ / ▲button to select Language, then press ENTER button or ▶button to enter the sub menu.

OSD Language
Press ▼ / ▲ button to select OSD Language, Press ENTER button or ▶ button to enter the sub menu. then press ▼ / ▲ button to select, then press ENTER button or ▶ button to confirm.
Preferred Subtitle
Press ▼ / ▲ button to select Preferred Subtitle, Press ENTER button or ▶ button to enter the sub menu. then press ▼ / ▲ button to select, then press ENTER button or ▶ button to confirm.
Preferred Audio
Press ▼ / ▲ button to select Preferred Audio, Press ENTER button or ▶ button to enter the sub menu. then press ▼ / ▲ button to select, then press ENTER button or ▶ button to confirm.
Digital Teletext Language
Press ▼ / ▲ button to select Digital Teletext language, Press ENTER button or ▶ button to enter the sub menu. then press ▼ / ▲ button to select, then press ENTER button or ▶ button to confirm.
Analog Teletext Language
Press ▼ / ▲ button to select Analog Teletext language, Press ENTER button or ▶ button to enter the sub menu. then press ▼ / ▲ button to select, then press ENTER button or ▶ button to confirm.
Sleep Timer
Press ▼ / ▲ button to select Sleep Time, then press ENTER button or ▶ button to enter the sub menu, then press ▼ / ▲ button to select the time or Off, then press ENTER button or ▶ button to confirm.
Auto Power Off
Press ▼ / ▲ button to select Auto Power Off, then press ENTER button or ▶ button to enter the sub menu, then press ▼ / ▲ button to select the time or Off, then press ENTER button or ▶ button to confirm.
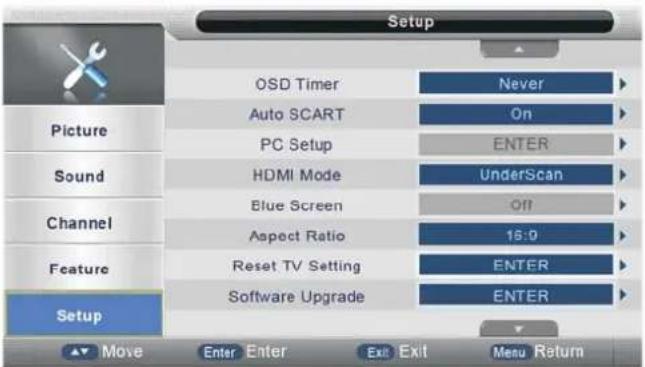
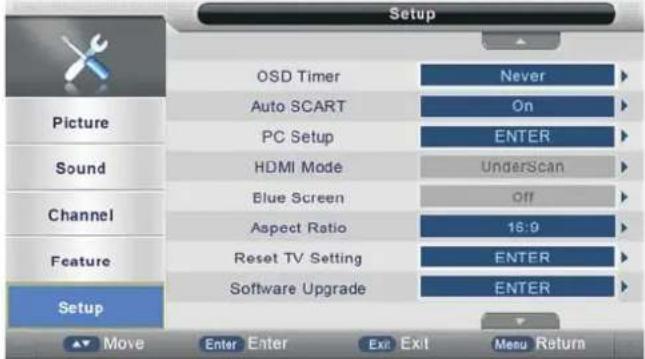
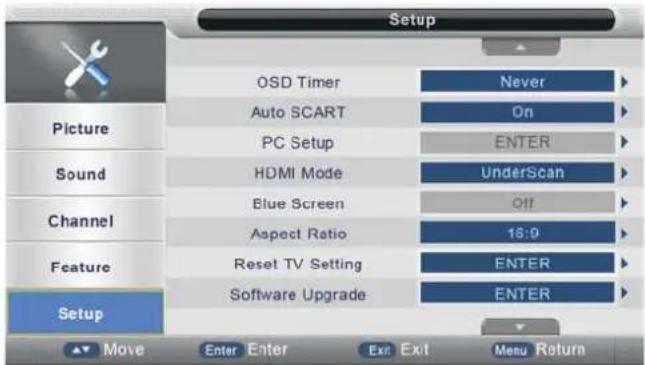
Setup Menu
Press MENU button to display the main menu.
Press ▼ / ▲ button to select Setup in the main menu, then press ENTER button or ▶ button to enter.
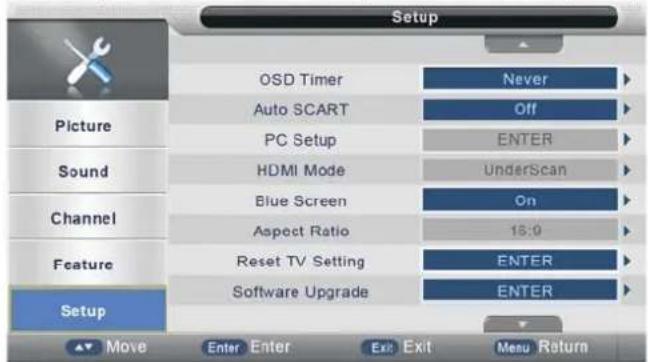
- Press ▼ / ▲button to select the option that you want to adjust in the Setup menu, then press ENTER button or ▶button to enter.
- Press ◀/▶ button to adjust or press ▼ / ▲ button to select.
- After finishing your adjustment, Press MENU button to save and return back to the previous menu, and press EXIT button to exit the entire menu.
OSD Timer
Press ▼ / ▲ button to select OSD Timer, Press ENTER button or ▶ button to enter the sub menu. then press
▼ / ▲button to select.(Available OSD Timer:5 Seconds 10 Seconds,15 Seconds,20 Seconds,25 Seconds,30 Seconds, never), then press ENTER button or ▶ button to confirm.
Auto SCART
Press ▼ / ▲ button to select Auto SCART, Press ENTER button or ▶ button to enter the sub menu.then press ▶ button to select ON or Off, then press ENTER button or ▶ button to confirm.
PC Setup
Press ▼ / ▲ button to select PC Setup, Press ENTER button or ▶ button to enter the sub menu. then press ▶ button to enter, then press ENTER button or ▶ button to confirm (when the PC Signal is connected).
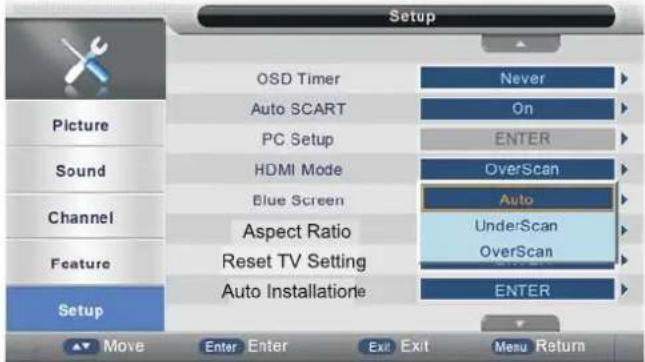
HDMI Mode
Press ▼ / ▲ button to select HDMI Mode, Press ENTER button or ▶ button to enter the sub menu. then press ▶ button to select.(Available:Auto,PC,Video)then press ENTER button or ▶ button to confirm. (when the HDMI Signal is connected)
Blue Screon
Press ▼ / ▲button to select Blue Screon, Press ENTER button or ▶ button to enter the sub menu. then press ▼ / ▲ button to select On or Off. then press ENTER button or ▶ button to confirm.
Reset TV Setting
Press ▼ / ▲button to select Reset TV Setting, then press ENTER button or ▶ button to enter. the password menu will Appear (when the Child Lock is on).
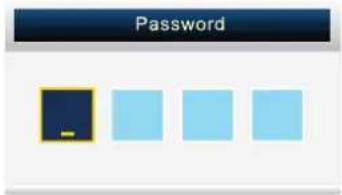
At the cursor input password to enter default password is "0000" the menu will appear as follows:

Return back to the previous menu if select "CANCEL" and press ENTER button. If select "OK" and press ENTER button, the resetting menu will appear a few second. then the first time installation menu will appear as follows:
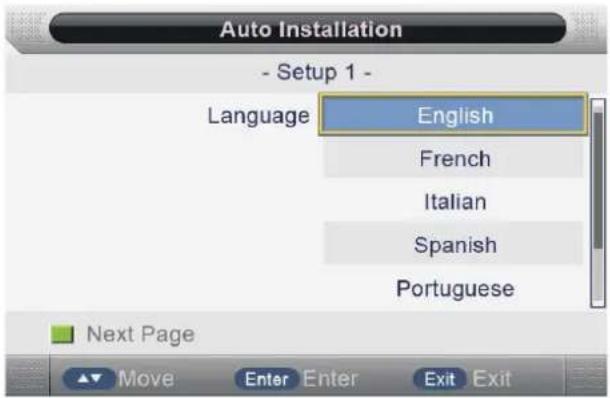
Press EXIT button to exit entire menu and ignore following set.
Setup 1
Press ▼ / ▲button to select language. Press ENTER button or GREEN button to enter setup 2 menu.
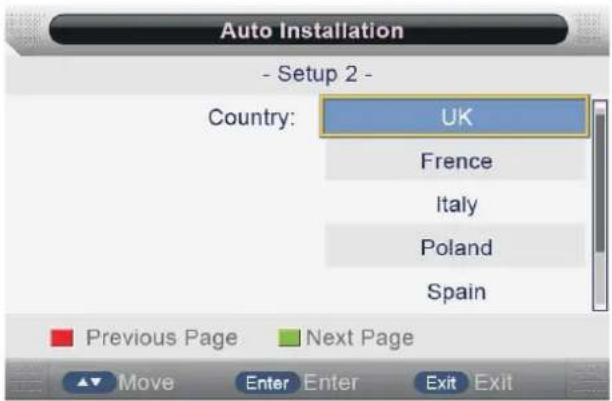
Setup 2
Press ▼ / ▲button to select country.
Press RED button to enter setup 1 menu.
Press ENTER button or GREEN button to enter setup 3 menu.
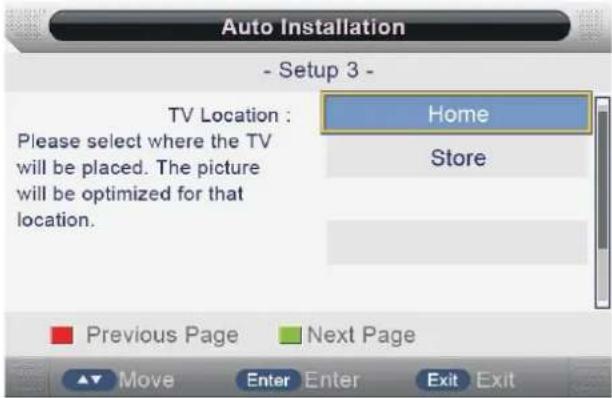
Setup 3
Press ▼ / ▲button to select TV Location.
Press RED button to enter setup 2 menu.
Press ENTER button or GREEN button to enter setup 4 menu.
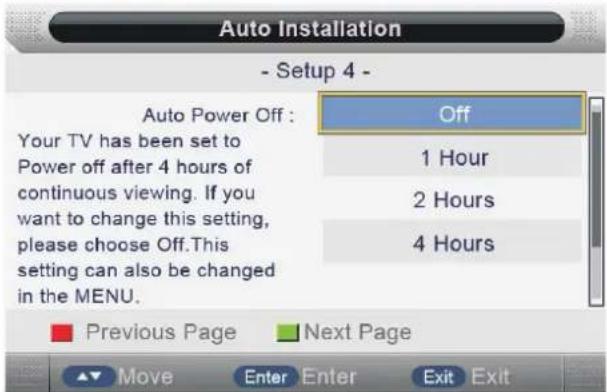
Setup 4
Press ▼ / ▲button to select Auto Power Off.
Press RED button to enter setup 3 menu.
Press ENTER button or GREEN button to enter setup 5 menu.
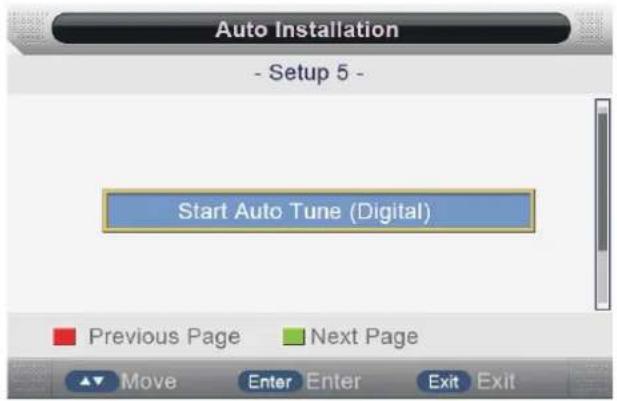
Setup 5
Press RED button to enter setup 4 menu.
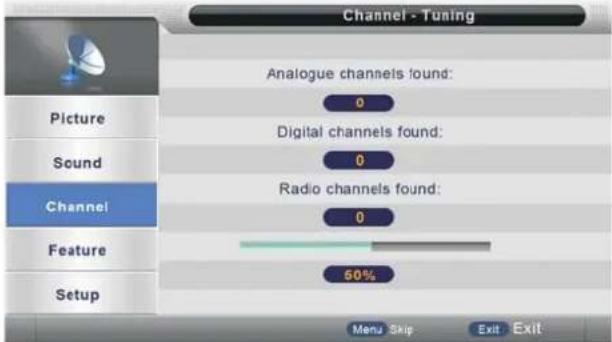
Press ENTER button to enter Auto Tune(Digital), the menu will appear as follow:

bar
Auto Installation | Channel Type | Percentage (%) | | :--- | :--- | | Analogue channels found: | 0 | | Digital channel founds: | 0 | | Radio channels found: | 0 | | Exit | ExitDTV
Press INFO button on the remote control to display program information.
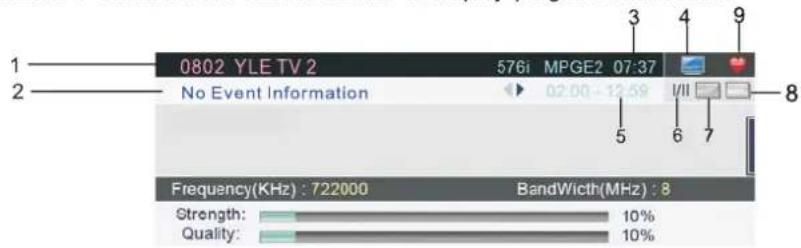
- The current channel No. and channel name.
- The current program event info.
- The current time.
-
TV channel icon, if the current channel is RADIO channel, it will be a RADIO icon.
-
The current program's start-stop time.
- Language icon.
- Text icon.
- Subtitle icon.
- Favorite program icon.
Notes: 1. Picture menu and description are the same as that for TV source.
- Sound menu and description are the same as that for TV source.
- Setup menu and description are the same as that for TV source.
CHANNEL MENU
Press MENU button to display the main menu.
Press ▼ / ▲button to select Channel in the main menu, then press ENTER button or ▶ button to enter.
- Press ▼ / ▲button to select the option that you want to adjust in the Channel menu, then press Enter button or ▶ button to enter.
- Press ◀/▶ button to adjust or press ▼ / ▲button to select.
- After finishing your adjustment, Press MENU button to save and return back to the previous menu, and press EXIT button to exit the entire menu.
Channel Management
Press ▼ / ▲button to select Channel Management, then press ENTER button or ▶button to enter.

Digital Manual Search
Press ▼ / ▲button to select Digital Manual Search, then press ENTER button or ▶ button to enter (when the System Lock is On, please input the default password "0000").
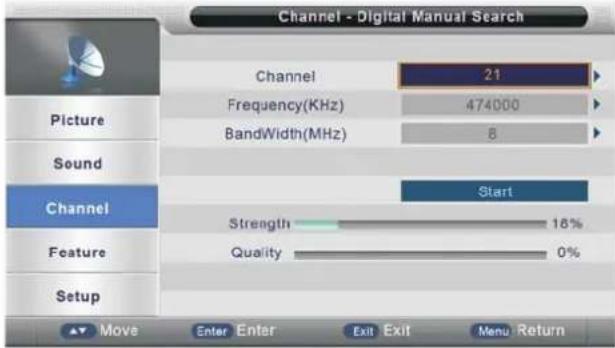
Channel
Press ▼ / ▲ button to select Channel, then press ENTER button or ▶ button to enter and press ▼ / ▲ to select channel, then press ENTER button or ▶ button to confirm.
Start
Press ▼ / ▲ button to select start, then press ENTER button or ▶ button to start scan, the channel tuning menu will appear a few second.
Feature Menu
Press MENU button to display the main menu.
Press ▼ / ▲ button to select Feature in the main menu, then press ENTER button or ▶ button to enter.
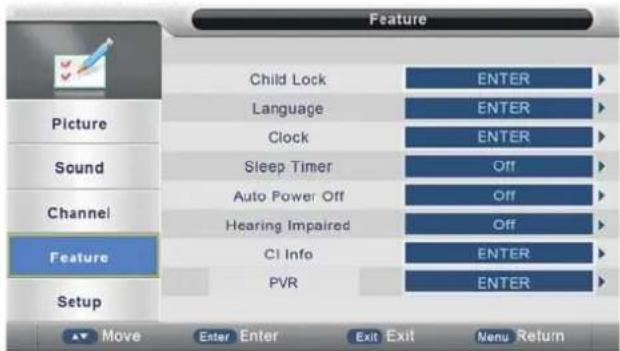
- Press ▼ / ▲ button to select the option that you want to adjust in the Feature menu, then press ENTER button or ▶ button to enter.
- Press ◀/▶ button to adjust or press ▼ / ▲ button to select.
- After finishing your adjustment, Press MENU button to save and return back to the previous menu, and press EXIT button to exit the entire menu.
PVR/Timeshift
Press ▼ / ▲ button to select PVR/Timeshit, then press ENTER button or ▶ button to enter.

Record File Format
Press ▼ / ▲ button to select Record File Format, Press ENTER button or ▶ button to enter the sub menu. then press ▼ / ▲ button to select the 'TS' or 'PS', then press ENTER button or ▶ button to confirm.
Auto Timeshift
Press ▼ / ▲ button to select Auto Timeshift, Press ENTER button or ▶ button to enter the sub menu. then press ▼ / ▲ button to select the 'Off' or 'Auto', then press ENTER button or ▶ button to confirm.
Hearing Impaired
Press ▼ / ▲ button to select Hearing Impaired, Press ENTER button or ▶ button to enter the sub menu.
then press ENTER button or ▼ / ▲button to select On or Off. then press ENTER button or ▶ button to confirm.
CI Info
Press ▼ / ▲ button to select CI Info, then press ENTER button or ▶ button to enter, CI Info menu will appear as follows:
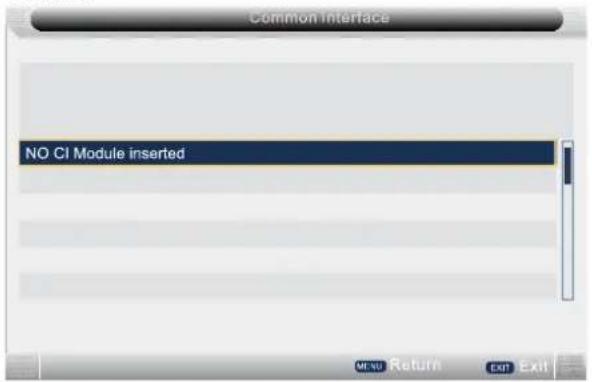
Notes: 1. This is just an example for reference, different CI module will have different CI menu. 2. Other menu and description are the same as that for TV source.
Channel List
Press LIST button on the remote control to display the channel list menu.
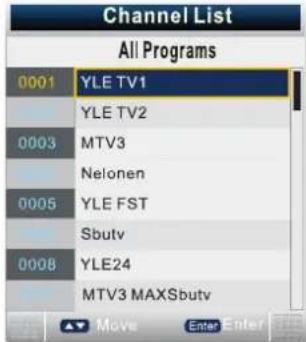
Press ▼ / ▲ button to select channel that you want to view, then press ENTER button to view.
FAV List
Press FAV button on the remote control to display the FAV list menu.
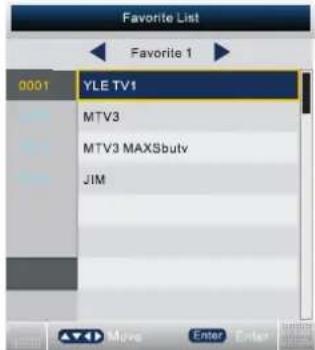
Press ▼ / ▲button to select channel that you want to view, then press ENTER button to view.
Press ◀/▶ button to switch favorite 1, favorite 2, favorite 3 and favorite 4.
Subtitle
Press Subtitle button on the remote control, the subtitle menu will appear as follows:
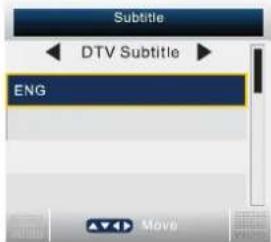
Press ◀/▶ button to OFF, then press ENTER button, will not display subtitle.
Press ▼ / ▲button to ENG, then press ENTER button, show the subtitle in English.
Press EXIT to exit.
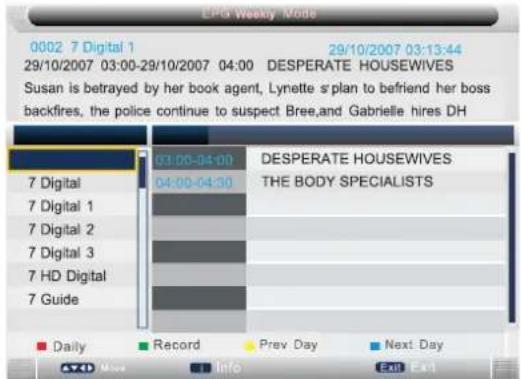
EPG (ELECTRONIC PROGRAM GUIDE)
Press EPG button on the remote control to display the EPG daily mode menu.
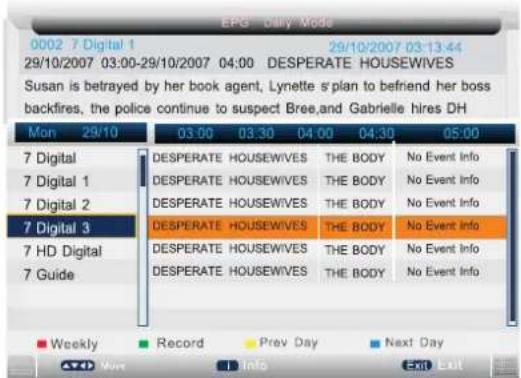
1: The current channel No. and channel name.
2: The current program's start-stop time and program name.
3: The current date and time.
Press ▼ / ▲ button to select the channel or program.
Press ◀/▶ button to choose between the channel and program.
Press RED button to switch between EPG weekly mode and EPG daily mode.
To see programmes for the yesterday or further.press the YELLOW button to decrease the date.
To see programmes for the next day or further. press the BLUE button to increment the date.
For more information about a programme. press INFO.
Press GREEN button once to add channel to the recorder list.
Press GREEN button twice to Reminder the program .there will be a small logo or beside the program.
Press EPG once more or EXIT once to cancel the operation.
- means the channel is encoded channel.
TEXT
Press TT/CC button on the remote control to display the text;.
Press TT/CC button on the remote control again to stop playing the text.
Multi-Audio
Press AUDIO button on the remote control to display the multi-audio menu.
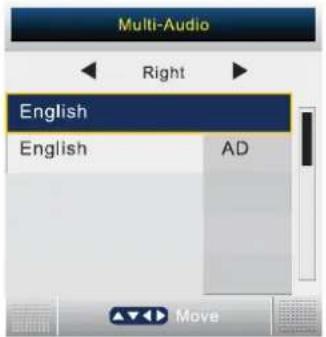
Press ◀/▶ button to select the audio format of the language, (available audio format: right.stereo, left).
Press ▼ / ▲ button to select the different language
You can press 🟢 on the remote control under the DTV Source.
If your device speed is not enough, there will be a dialog as follows:
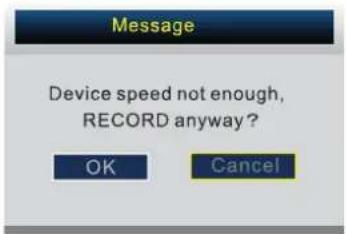
You'd better change a high speed device or select "OK" to continue.
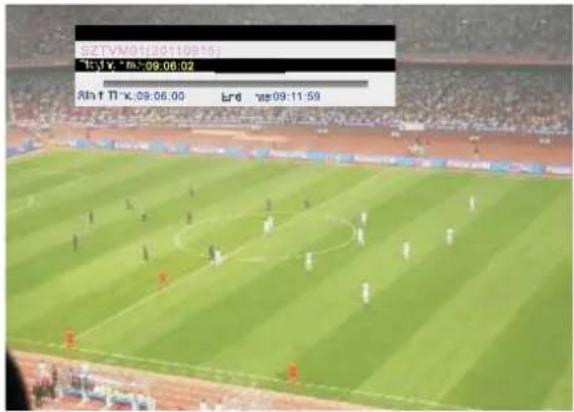
Press ☐ on the remote control again to start record, there will be a dialog as follow:
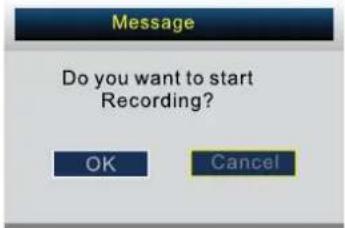
Select "Yes" to start recording. You'll see the dialog:

During Recording, There will be a small dialog on the left:
REC
Press ● on the remote control again to set the Recorder duration time.
Rec Duration Time: 00:00
Press □ on the remote control to stop recording.
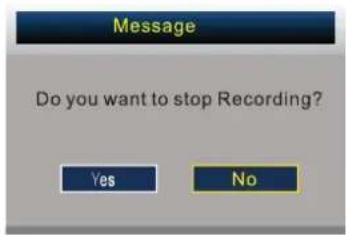
To stop recording by choose "Yes", to continue recording by choose "No".
SCART
Notes:
- SCART source's channel menu is not available, and it will be shown in gray.
- Picture menu and description are the same as that for TV source.
- Sound menu and description are the same as that for TV source.
- Feature menu and description are the same as that for TV source.
- Setup menu and description are the same as that for TV source.
PC Setup Menu
Press MENU button to display the main menu.
Press ▼ / ▲ button to select Setup in the main menu, then press ENTER button or ▶ button to enter.
(when the PC signal is connected)
- Press ▼ / ▲button to select the option that you want to adjust in the Setup menu, then press ENTER button or ▶ button to enter.
- Press ▶ button to adjust or press ▼ / ▲ button to select.
- After finishing your adjustment, Press MENU button to save and return back to the previous menu, and press EXIT button to exit the entire menu.
PC Setup
Press ▼ / ▲ button to select PC Setup, then press ENTER button or ▶ button to enter.
Auto Adjust
Press ▼ / ▲ button to select Auto Adjust, then press ENTER or ▶ button, the menu will appear a few second.

H Positon
Press ▼ / ▲ button to select H Position, then press ENTER or ▶ button to enter, press ◀/▶ button to adjust. Adjusts the picture horizontally.
V Positon
Press ▼ / ▲ button to select V Position, then press ENTER or ▶ button to enter and press ◀/▶ button to adjust. Adjusts the picture vertically.
Phase
Press ▼ / ▲ button to select Phase, then press ENTER or ▶ button to enter and press ◀/▶ button to adjust. Adjusts the picture vertically.
Clock
Press ▼ / ▲ button to select Clock, then press ENTER or ▶ button to enter and press ◀/▶ button to adjust the picture vertically.
HDMI
Setup Menu
Press MENU button to display the main menu.
Press ▼ / ▲ button to select Setup in the main menu, then press ENTER button or ▶ button to enter.
- Press ▼ / ▲ button to select the option that you want to adjust in the Setup menu, then press ENTER button or ▶ button to enter.
- Press ◀/▶ button to adjust or press ▼ / ▲ button to select.
- After finishing your adjustment, Press Menu button to save and return back to the previous menu, and press EXIT button to exit the entire menu.
HDMI Setup
Press ▼ / ▲button to select HDMI Setup, then press ENTER button or ▶button to enter.
H Positon
Press ▼ / ▲ button to select H Position, then press ENTER button or ▶ button to enter and press ◀/▶ button to adjust the picture horizontally.
V Positon
Press ▼ / ▲ button to select V Position, then press ENTER button or ▶ button to enter and press ◀/▶ button to adjust the picture vertically.
Position Reset
Press ▼ / ▲ button to select Position Reset, then press ENTER button or ▶ button to reset H position and V position.
HDMI Setup
Press ▼ / ▲ button to select HDMI Setup, then press ENTER button or ▶ button to enter and press ◀/▶ button to select Overscan or Underscan Auto.
Notes: 1. Other menu and description are the same as that for TV source.
2.HDMI source's channel menu is not available, and it will be shown in gray.
3.Picture menu and description are the same as that for TV source.
4. Sound menu and description are the same as that for TV source.
5.Feature menu and description are the same as that for TV source.
MEDIA OPERATION
Note: Before operating MEDIA menu, Plug in USB device or memory card,
then press SOURCE button to set the Input Source to Media.
Press ▼ / ▲ button to select MEDIA in the Source Menu, then press ENTER button or ▶ button to enter.
You can also enter the Media by pressing MEDIA button on the remote control.
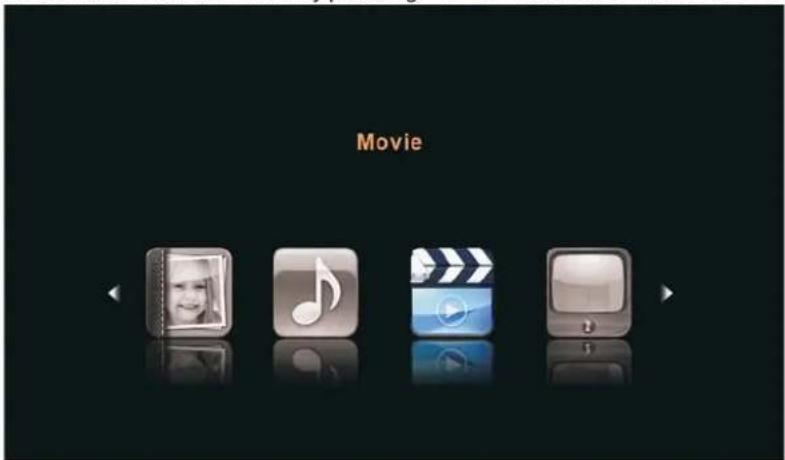
- Press ◀/▶ button to select the option that you want to select in the media menu, then press ENTER button or ▶ button to enter.
- Press ▼ / ▲ button to select or press ENTER button to confirm or play.
3 Press EXIT button to save and return back to the main media menu.
Movie Menu
Press ◀/▶ button to select Movie in the main menu,
then press ▼ button to enter,
Press EXIT button to return back to the previous menu.

Press ▼ / ▲ button to select the folder that you want to view,
Press ENTER button or ▶ button to select the sub folder,
Press RED button to open setup menu. you can set the play mode as follows:

press ENTER button or ▶ button to play,
press ■ button or EXIT button to stop playing.
press the ◀ button to return back to previous page.
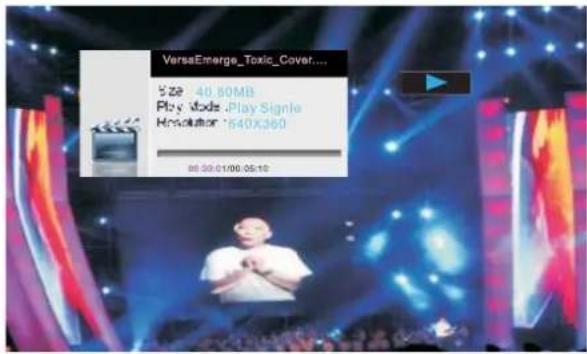
You can see the information of the current playing media at the first flew seconds or after press INFO button.
Press GREEN button to select the speech play menu in the bottom you want to run,
Music Menu
Press ◀/▶ button to select Music in the main menu, then press ▼ button to enter,

nu.
on or
Press ▼/▲button to select the Song you want to listen, then press ENTER button or ▶ butt
▶ button to play.
Press ◀ button to return back to the previous menu.
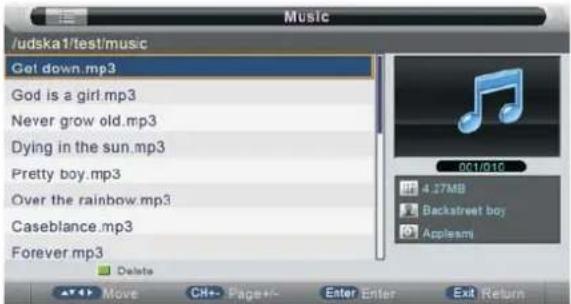
You can see the information of the current playing song at the left of the menu.
Press BLUE button it appears as follow: BG Music Folder is set.

Setup
- press GREEN button to delete the selected file.
- press YELLOW button to repeat play mode when the selected file is playing.
- press BLUE button to set BG Music.
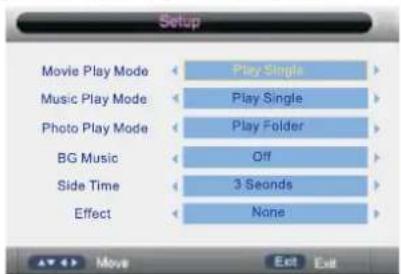
Return
Press ◀ button to return previous menu..
Photo Manager
Press ◀/▶ button to select Photo Manager in the main menu, then press ▼ button to enter, Press EXIT button to return back to the previous menu.
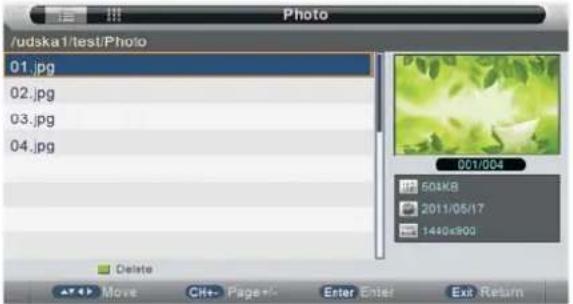
Press YELLOW button how the picture in thumbnails sketch.
Press ▼ / ▲ to select the photos, press ENTER or ▶|| button or ▶ button to view.
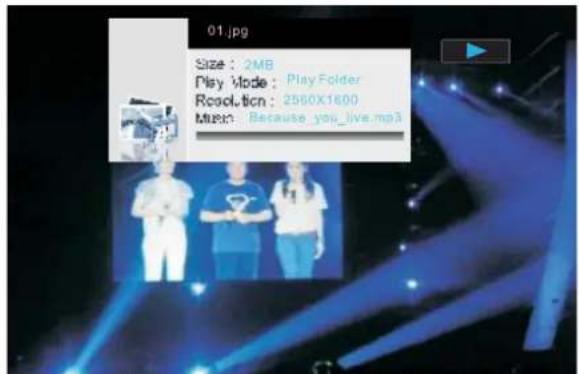
You can see the information of the current playing photo after press INFO button then press ▶I button to play or pause, you can see the playing state in the right. then press ▼/▲ or ◀/▶ button to ratate the picture. then press RED button to zoom the picture.
Notes: 1. Other menu and description are the same as that for Movie menu.
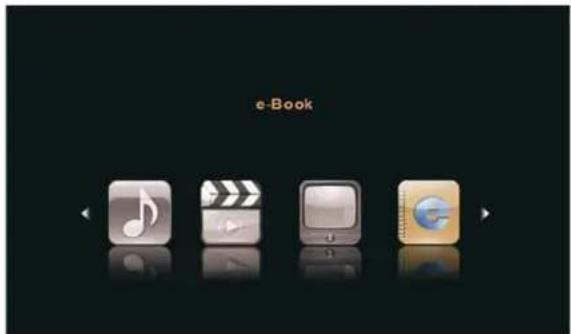
Ebook
Press ◀/▶ button to select Ebook Manager in the main menu, then press ▼ button to enter, Press EXIT button to return back to the previous menu.
Press ▼ / ▲ to select the file, press ENTER or ▶ button or ▶ button to read.
Record Manager
Press ◀/▶ button to select Record Manger in the main menu, then press ▼ button to enter, Press EXIT button to return back to the previous menu.
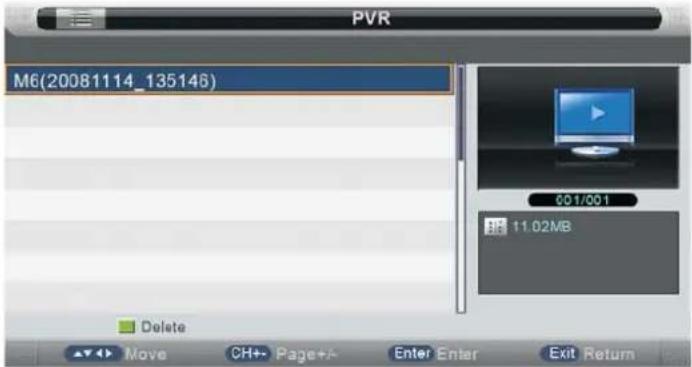
Press ▼ / ▲ to select the Video, press ENTER or ▶ button or ▶ button to play.
You can see the information of the current video Playing at the first few seconds or after press INFO button.
then press ▶ button to play, you can see the playing state in the right.
Notes: 1. Other menu and description are the same as that for Movie menu.
7. DVD Operation
Note: please ensure that the TV you have bought is with DVD loader, otherwise all this part does not apply.
Basic Operation
-
Press Source button on the remote controller to select DVD input source.
-
Press OPEN/CLOSE button to load from into disc tray.
Hold the disc without touching either or its surfaces, insert the DVD with the label toward the device's back panel into the DVD slot on the right side of you TV set.
Only push the DVD slightly until the unit feeds it automatically.
DVD SETUP
Press the "D.Setup" button to enter the DVD settings menu, use the◄/► " buttons to select the desired menu page (General / Audio / Dolby / Video / Preferences), and use◄/▲ " buttons to select the items in each menu, then use ► " button to enter the selected item. If you then change any setting, press "ENTER" button to confirm the value you changed. Press the "◄" button to return to the left submenu; to go back up to one of the main DVD menu pages, press "EXIT" button.
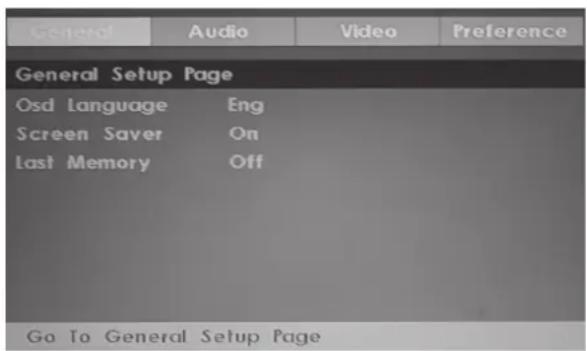
1. General Setup Page
Osd Language: Set the language of the setup menu and screen display.
Screen saver: Set the screen protection.
Last Memory: Remember and resume from the position of the previous playback.
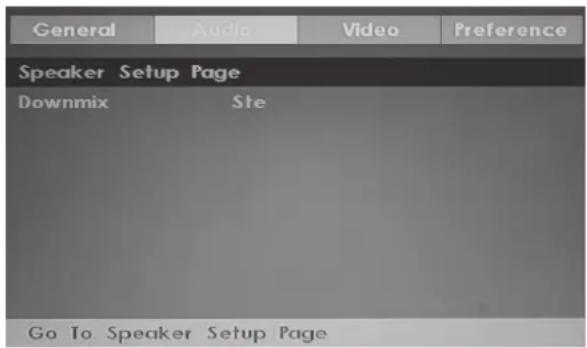
2.Speaker Setup Page
Downmix: This is DVD L/R and stereo output, default as stereo output.
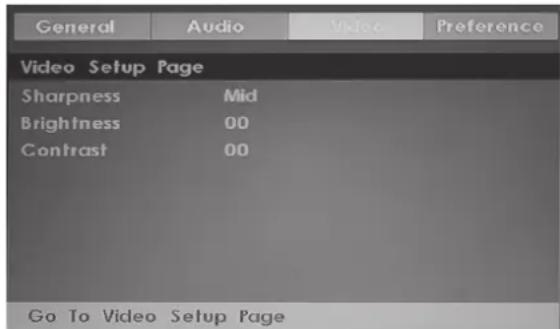
3. Video Setup Page
Sharpness: adjust the sharpness of the image.
Brightness: adjust the brightness of the image.
contrast:adjust the contrast of the image.
4. Preference Page (Note: This menu page will pop up before put the disc into DVD.)
TV Type: Select the local TV system (PAL/NTSC/Auto; Australia uses PAL)
Audio: Disc audio language selection (disc dependent)
Subtitle: Disc subtitle language selection (disc dependent)
Disc Menu: Disc Menu language selection (disc dependent)
Parental: Set the maximum disc rating (G / PG / M etc.) that can be viewed without a password (default password is 0000)
Password: Change the password
Default: Choose this to restore the original default Preference settings
| General | Audio | Video | Preference |
| Preference Page | |||
| TV Type | NTSC | ||
| Audio | Eng | ||
| Subtitle | Off | ||
| Disc Menu | Eng | ||
| Parental | |||
| Password | |||
| Default | |||
| Go To Preference Page | |||
8.TROUBLESHOOTING AND ADVICE
Please check if you can solve the troubleshooting by yourself.
| Troubleshooting | Control |
| No signal | Please check that all cables and cords are correctly plugged in. |
| No color shades | Adjust the contrast, the color and the brightness. |
| Stain showing on the screen | Maybe result from a lighting signal from car, motor, neon light and other electrical devices or appliances. |
| Double or multiple display image | Maybe the result of an electrical wave disturbance from other TV, Computer and Game machine or Radio. |
| Snow on the screen | The cables of the antenna are not correctly plugged in. |
| The remote control does not work | Please check the batteries order and alignment. Check that the IR of the remote control is not hidden by something. |
| No sound | Make sure that you have not pressed the MUTE button on the panel or the remote control. |
| No DVD | Make sure if the TV Set have been switched to DVD mode |
| DVD player not working properly | Ensure disc is correctly inserted into the player. Ensure the disc does not damaged and with correct format. Please wait patiently as some discs need longer time to play. |

natural_image
Abstract black-and-white circular logo design with interlocking curves (no text or symbols)MANTA
CUSTOMER SERVICE
The manufacturer reserves the right to make changes to product specifications without notice.
Main page: www.manta.com.pl
Technical suport page: www.manta.info.pl


Assembled in Poland

- MANTA
- INSTRUKCJA OBSŁUGI
- Odtwarzanie
- TimeShift
- Ustawienia wideo
- Preferencje
- 2.SAFETY PRECAUTIONS
- 3.How to install the stand
- FRONT, BACK, CONNECTIONS OF LED
- REMOTE CONTROL
- Remote Control Instructions in DTV mode
- POWER
- MUTE
- SLEEP
- P.MODE
- S.MODE
- DISPLAY
- NICAM
- AUDIO
- NUMBER BUTTONS
- O
- TV MENU
- EXIT
- GUIDE
- SOURCE
- CH+/CH-
- VOL+/VOL-
- Remote Control Instructions in Teletext/Media mode
- Remote Control Instructions in DVD mode
- THUMBSTICK( ▲/ ▼/◀/ ▶/ ENTER)
- Picture Menu
- Picture Mode
- Brightness
- Contrast
- Sharpness
- Colour
- Noise Reduction
- Reset
- SOUND MENU
- Sound Mode
- Sound: Music
- Bass
- Balance
- Treble
- EQ
- Surround
- AVL
- CHANNEL MENU
- Channel Management
- Favorite Manager
- Country
- Auto Search
- Analog Manual Search
- Current Channel
- Search
- Fine Tune
- Color System
- Sound System
- Feature Menu
- Child Lock
- Parental Lock
- Change Pin Code
- Language
- OSD Language
- Preferred Subtitle
- Preferred Audio
- Digital Teletext Language
- Analog Teletext Language
- Sleep Timer
- Auto Power Off
- Setup Menu
- OSD Timer
- Auto SCART
- PC Setup
- HDMI Mode
- Blue Screon
- Reset TV Setting
- Setup 1
- Setup 2
- Setup 3
- Setup 4
- Setup 5
- DTV
- Digital Manual Search
- Channel
- Start
- PVR/Timeshift
- Record File Format
- Auto Timeshift
- Hearing Impaired
- CI Info
- Channel List
- FAV List
- Subtitle
- EPG (ELECTRONIC PROGRAM GUIDE)
- TEXT
- Multi-Audio
- REC
- SCART
- Notes:
- PC Setup Menu
- Auto Adjust
- H Positon
- V Positon
- Phase
- Clock
- HDMI
- HDMI Setup
- Position Reset
- MEDIA OPERATION
- Movie Menu
- Music Menu
- Setup
- Return
- Photo Manager
- Ebook
- Record Manager
- DVD Operation
- Basic Operation
- DVD SETUP
- General Setup Page
- 2.Speaker Setup Page
- Video Setup Page
- Preference Page (Note: This menu page will pop up before put the disc into DVD.)
- 8.TROUBLESHOOTING AND ADVICE
- CUSTOMER SERVICE
Brand : Manta
Model : LED1503
Category : Television