Cerberus P6331-62 - Router Pentagram - Free user manual and instructions
Find the device manual for free Cerberus P6331-62 Pentagram in PDF.


| Product Type | ADSL2+ Modem/Router with 4-Port Switch and Wireless Access Point |
| Model | Pentagram Cerberus P6331-62 |
| WAN Interface | ADSL2+ (RJ-11), supports Annex A, L, M, J; downstream up to 24 Mbps, upstream up to 1 Mbps |
| LAN Interfaces | 4x 10/100 Mbps Fast Ethernet ports with auto MDI/MDI-X |
| Wireless Standard | IEEE 802.11b/g (up to 54 Mbps) |
| Wireless Security | WEP 64/128-bit, WPA-PSK, WPA2-PSK, WPA/WPA2 mixed |
| WAN Protocols | PPPoE, PPPoA, MPoA (RFC1483/2684), Pure Bridge, PPPoE with Pass-through |
| NAT | Network Address Translation with ALGs for FTP, Telnet, ICQ, etc. |
| Firewall | SPI firewall, packet filter, MAC filter, URL filter, intrusion detection, block WAN ping |
| QoS | Quality of Service with bandwidth management by IP, protocol, port |
| DHCP | DHCP server, client, relay; IP pool: 192.168.1.101-200 (default), lease time 12 hours |
| Virtual Server / DMZ | Port forwarding, DMZ host |
| Dynamic DNS | Supported (e.g., Dyndns.org) |
| VLAN | Up to 8 VLAN groups with tagging |
| Management | Web GUI (HTTP, port 80), SNMP v1/v2c/v3, remote access, firmware upgrade via browser |
| Default Settings | IP: 192.168.1.100, user: admin, password: pentagram |
| Power Supply | 12V DC, 1A (included adapter) |
| Package Contents | Router, power adapter, Ethernet cable, telephone cable, CD, Quick Installation Guide |
| Standards Compliance | ANSI T1.413, ITU-T G.992.1/2/3/5, G.994.1, RE ADSL |
| Warranty & Support | Refer to www.pentagram.eu for latest drivers and firmware |
Frequently Asked Questions - Cerberus P6331-62 Pentagram
User questions about Cerberus P6331-62 Pentagram
0 question about this device. Answer the ones you know or ask your own.
Ask a new question about this device
Download the instructions for your Router in PDF format for free! Find your manual Cerberus P6331-62 - Pentagram and take your electronic device back in hand. On this page are published all the documents necessary for the use of your device. Cerberus P6331-62 by Pentagram.
USER MANUAL Cerberus P6331-62 Pentagram
The latest versions of manual, drivers and applications are available on www.pentagram.eu
NOTE! Any information and technical data are subject to change without prior notification and/or indication in this manual.
INDEX
INTRODUCTION 5
FEATURES 5
PACKAGE CONTENTS....7
PRODUCT OVERVIEW....7
IMPORTANT NOTES....7
FRONT PANEL....7
BACK PANEL 9
DEFAULT SETTINGS....9
RESETTING ROUTER 10
CONNECTING CERBERUS TO COMPUTER....10
Connecting via Ethernet Port (Ethernet Card)....10
Connecting via WLAN Interface (Wireless Card) 10
CONFIGURE TCP/IP 10
Windows Vista....11
Windows 2000/XP 13
Windows 95/98/Me 14
CONFIGURE ROUTER VIA WEB BROWSER....15
LOGIN....15
NAVIGATION....15
Configuration Modes 15
Buttons 15
Save Config to FLASH 15
BASIC....16
MENU 16
STATUS....17
QUICK START 18
WAN....18
Select WAN Port....18
Select Protocol 18
Please wait....21
Wireless....22
Set Wireless configuration....22
WAN....23
WLAN....26
ADVANCED 29
MENU 29
STATUS....30
Status / ADSL Status....31
Status / ARP Table 31
Status / DHCP Table 32
Status / System Log 32
Status / Firewall Log 33
Status / UPnP Portmap 33
QUICK START 34
WAN 34
Select WAN Port....34
Select Protocol 34
Please wait....37
Wireless....38
Set Wireless configuration....38
CONFIGURATION 39
LAN 39
LAN / Ethernet 39
LAN / IP Alias 39
LAN / Wireless....40
LAN / Wireless Security....41
LAN / DHCP Server 44
WAN 46
WAN / WAN Profile....46
WAN / ADSL Mode 50
System....51
System / Time Zone 51
System / Firmware Upgrade....51
System / Backup/Restore 52
System / Restart Router 52
System / User Management 53
System / Mail Alert 53
Firewall 54
Firewall / Packet Filter 54
Firewall / MAC Filter 55
Firewall / Intrusion Detection 56
Firewall / Block WAN PING 56
Firewall / URL Filter 57
QoS 59
Virtual Server 62
Virtual Server / Port Mapping 63
Virtual Server / DMZ 64
Wake on LAN 64
Time Schedule 65
Advanced 66
Advanced / Static Route 66
Advanced / Static ARP 66
Advanced / Dynamic DNS 67
Advanced / VLAN 68
Advanced / Device Management 69
Advanced / IGMP 70
Advanced / SNMP Access Control 70
Advanced / Remote Access 72
TROUBLESHOOTING....73
USING LEDS TO DIAGNOSE PROBLEMS....73
Power LED 73
LAN LED....73
ADSL LED 73
PROBLEMS WITH THE WEB INTERFACE 73
PROBLEMS WITH THE LOGIN USERNAME AND PASSWORD 74
PROBLEMS WITH LAN INTERFACE....74
PROBLEMS WITH WAN INTERFACE 74
PROBLEMS WITH THE INTERNET ACCESS 75
Introduction
Thank you for purchasing the Cerberus ADSL2 Wi-Fi Plus (P 6331-62) ADSL2+ Modem/Router by PENTAGRAM. Your new router is an all-in-one unit that combines an ADSL modem, ADSL router, Ethernet network switch and wireless Access Point to provide everything you need to get the machines on your network connected to the Internet over an ADSL broadband connection.
The Cerberus ADSL2 Wi-Fi Plus (P 6331-62) router complies with ADSL2+ standards for deployment worldwide and supports downstream rates of up to 24 Mbps and upstream rates of up to 1 Mbps. Designed for small office, home office and residential users, the router enables even faster Internet connections. You can enjoy ADSL services and broadband multimedia applications such as interactive gaming, video streaming and real-time audio much easier and faster than ever before.
Features
- A 4-port 10/100Mbps fast Ethernet switch is built-in with automatic switching between MDI and MDI-X for 10Base-T and 100Base-TX ports, with auto detection allowing you to use either straight or cross-over Ethernet cables.
- With built-in 802.11g access point for extending the communication media to WLAN while providing the WEP, WPA/WPA2 and WDS for securing your wireless networks.
- Network Address Translation (NAT) allows multiple users to access outside resources such as the Internet simultaneously with one IP address/one Internet access account. Many application layer gateways (ALG) are supported such as web browser, ICQ, FTP, Telnet, E-mail, News, Net2phone, Ping, NetMeeting, IP phone and others.
- This protocol is used to enable simple and robust connectivity among stand-alone devices and PCs from many different vendors, and it makes setting up a network simple and affordable. UPnP architecture leverages TCP/IP and the Web to enable proximity networking in addition to control and data transfer among networked devices. With this feature enabled, you can seamlessly connect to Net Meeting or MSN Messenger.
- The Dynamic DNS service allows you to alias a dynamic IP address to a static hostname. This dynamic IP address is the WAN IP address. To use the service, you must first apply for an account from a DDNS service such as http://www.dyndns.org/.
- The Cerberus ADSL2 Wi-Fi Plus (P6311-62) provides an embedded PPPoE client function to establish a connection. You get greater access speed without changing the operation concept, while sharing the same ISP account and paying for one access account. No PPPoE client software is required for the local computer. Automatic Reconnect and Disconnect Timeout (Idle Timer) functions are also provided.
- Virtual Server: You can specify which services are visible to outside users. The router detects an incoming service request and forwards it to the specific local computer for handling. For example, you can assign a PC in a LAN to act as a Web server inside and expose it to the outside network. Outside users can browse inside the web server directly while it is protected by NAT. A DMZ host setting is also provided for local computers exposed to the outside Internet network.
- Dynamic Host Configuration Protocol (DHCP) Client and Server: On a WAN site, the DHCP client obtains an IP address from the Internet Service Provider (ISP) automatically. On a LAN site, the DHCP server allocates a range of client IP addresses, including subnet masks and DNS IP addresses and distributes them to local computers. This provides an easy way to manage the local IP network.
- Static and RIP1/2 Routing: An easy static routing table or RIP1/2 routing protocol supports routing capability.
- SNMP (Simple Network Management Protocol): SNMP allows convenient remote management of the router.
- Web-based GUI: A web-based GUI offers easy configuration and management. User-friendly and with on-line help, it also supports remote management capability for remote users to configure and manage this product.
- Firmware Upgradeable: You can upgrade the router with the latest firmware through its web-based GUI.
- Quality of Service (QoS) gives you full control over which types of outgoing data traffic should be given priority by the router, ensuring important data like gaming packets, customer information, or management information move through the router ay lightning speed, even under heavy load. The QoS features are configurable by source IP address, destination IP address, protocol, and port. You can throttle the speed at which different types of outgoing data pass through the router, to ensure P2P users don't saturate upload bandwidth, or office browsing doesn't bring client web serving to a halt. In addition, or alternatively, you can simply change the priority of different types of upload data and let the router sort out the actual speeds.
- High Speed Internet Access: downstream rates of up to 24Mbps and upstream rates of up to 1Mbps. Cerberus ADSL2 Wi-Fi Plus (P6311-62) is compliant with the following standards:
ANSI T1.413 issue 2,
ITU-T G.992.1 (G.dmt),
ITU-T G.992.2 (G.lite),
ITU-T G.992.3 (ADSL2 G.dmt.bis),
ITU-T G.992.5 (ADSL2+),
ITU-T G.994.1 (G.hs),
Reach Extended ADSL (RE ADSL).
- Multi-Protocol to Establish a Connection: The router supports following protocols to establish a connection with an ISP:
PPPoA (PPP over ATM Adaptation Layer 5 – RFC 2364),
PPPoE (PPP over Ethernet – RFC 2516)
RFC 1483/2684 encapsulation over ATM (bridged or routed),
The router also supports VC-based and LLC-based multiplexing.
Package Contents
- PENTAGRAM Cerberus ADSL2 Wi-Fi Plus (P6331-62)
- Power adapter 12 V, 1 A
- Ethernet cable (RJ-45)
- Telephone cable (RJ-11)
- CD
- Quick Installation Guide
Product Overview
Important Notes

- Do not use the router in high humidity or high temperatures.
- Do not use the same power source for the router as other equipment.
- Do not open or repair the case yourself. If the router is too hot, turn off the power immediately and have it repaired at a qualified service center.
- Phone landlines are susceptible to the electrical discharges during the storms. It is recommended to disconnect the phone line from the router during storm, vacation or other longer absence.
- Avoid using this product and all accessories outdoors.
- Place the router on a stable surface.
- Only use the power adapter that comes with the package. Using a different voltage rating power adaptor may damage the router.

Front Panel
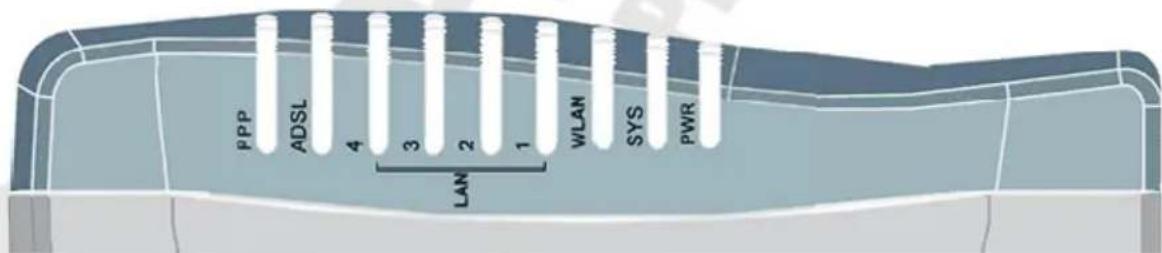
| LED Action Description | ||
| PWR Off No power is supplied to the device | ||
| Steady light Connected to an AC power supply | ||
| SYS Steady light System is ready | ||
| WLAN Off Access point is disabled | ||
| Steady light Access point is enabled | ||
| Blinking light Transmitting/Receiving data | ||
| LAN (1-4) Off No Ethernet connection | ||
| Steady light Connected to an Ethernet port | ||
| Blinking light Transmitting/Receiving data | ||
| ADSL Off No ADSL signal | ||
| Steady light ADSL signal is established | ||
PENTAGRAM Cerberus P 6331-62
| Blinking Light Establishing ADSL signal | |
| PPP Steady light PPPoA / PPPoE connection established | |
Back Panel
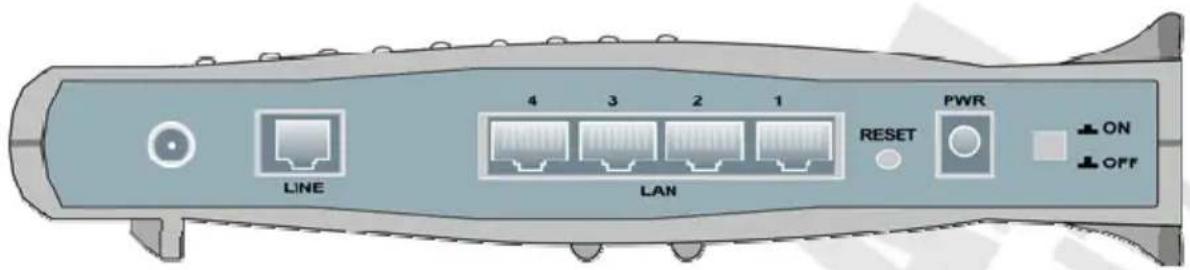
| Label Used for... | |
| RP-SMA Connector Connecting the external antenna | |
| LINE (RJ-11) Connecting the telephone cable | |
| LAN 1-4 (RJ-45) | Connecting with computers/devices through Ethernet cable |
| RESET Resetting the device. | |
| PWR Connecting with supplied power adapter | |
| ON/OFF Switching the device on/off | |
Default Settings
Before changing configuration familiarize yourself with these default settings.
| IP Address 192.168.1.100 | |
| Subnet Mask 255.255.255.0 | |
| SSID Pentagram P 6331-62 | |
| DHCP Server Enabled | |
| DHCP Server IP Address Pool | 100 IP addresses from 192.168.1.101 |
| IP Address Lease Time 43200 seconds (12 hours) | |
| User Name admin | |
| Password pentagram | |
It is recommended to set username and password as soon as possible.
If you ever forget the password to log in, you may need to reset router to restore the factory default settings. This procedure is described in the next section.
Resetting router
- Turn router on and wait about 2 minutes for router initialization.
- Hold the RESET button until the LEDs all turn Off, turn On and then turn Off. The router performs configuration factory reset and the router reboots. You can then access the router from the web GUI.
Connecting Cerberus to Computer.
Cerberus can be connected to computer via Ethernet or WLAN:
Connecting via Ethernet Port (Ethernet Card)
All Ethernet ports of router are made in the technology, which automatically activates Crossover if necessary. Thanks to autonegotiation of connection speed the router will automatically select the maximum available speed rate. Transfer at 10/100 Mbit/s rate requires the category 5 cable wired with RJ-45 connectors. In case of "straight" cable both connectors must be crimped in standard EIA/TIA 568B. In case of Crossover cable one connector must be in standard EIA/TIA 56A, and the second in EIA/TIA 568B. After connecting the device to one of the ports, corresponding LED will begin to blink. That signals the process of the auto-checking of port and the negotiation of connection speed rate.
Connecting via WLAN Interface (Wireless Card)
To connect PC to Cerberus via WLAN, Wireless Adapter must be properly installed and configured and both router and PC must be in the same subnet.
Configure TCP/IP
After connecting the computer to the router (by LAN adapter or WLAN interface) the TCP/IP protocol should be configured. The protocol should be automatically installed together with Network card drivers. It is advised that TCP/IP should be configured to receive IP address and all the necessary network parameters from DHCP server automatically. You can find step-by-step configuration for different Windows systems below.
Note: In some cases computer with Windows Vista or Windows XP SP3 cannot obtain an IP address from router's DHCP server. If you encounter this, follow this steps to resolve this problem (Microsoft Support page) http://support.microsoft.com/kb/928233/en-us (this article may be not available in user language).
Windows Vista
Note: Network configuration require administrator privileges. When User Account Control window pops up, either click Continue (Administrator user) or select Administrator user and enter valid password (Standard user).
- Click Start → Control Panel.
- Click View network status and tasks.
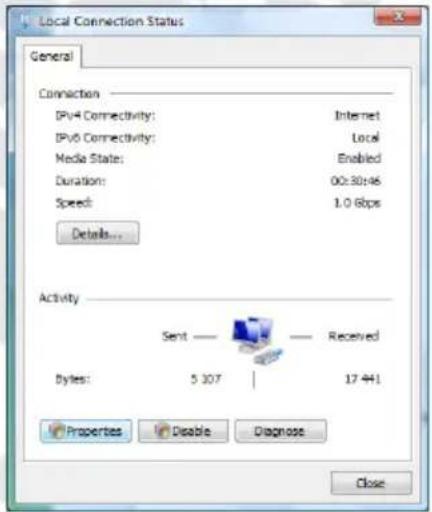
- Click View status for appropriate connection.
-
On General tab, Click the Properties button.
-
On General tab, select Internet Protocol Version 4 (TCP/IPv4) and click Properties.

Network and Internet View network status and tasks Set up file sharing

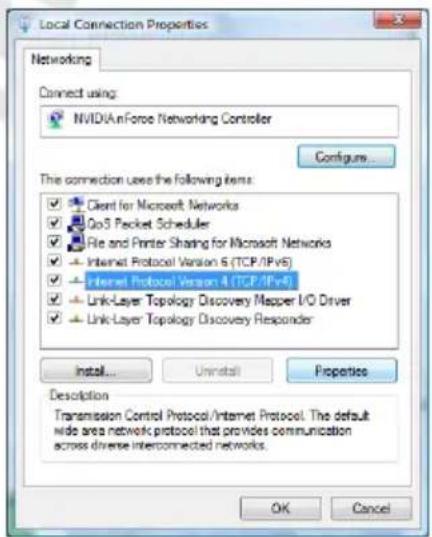
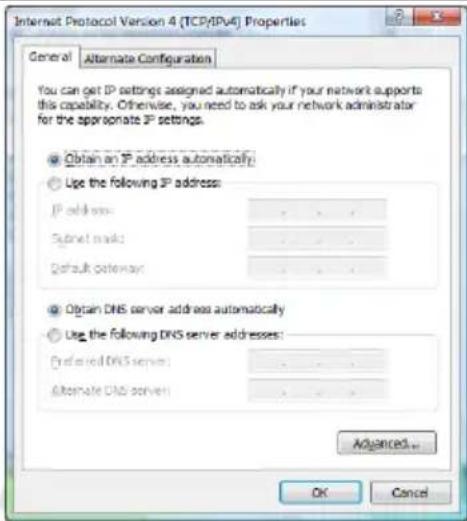
- On General tab, select Obtain an IP address automatically and Obtain DNS server address automatically.
- Click OK to save settings and close Internet Protocol Version 4 (TCP/IPv4) Properties window.
Windows 2000/XP
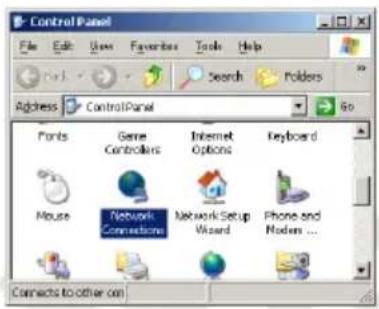
- Click Start → Settings → Control Panel. Double-click the Network Connections icon (2000/XP Classic view) or click Network and Internet Connections icon and then Network Connections icon (XP Default view).
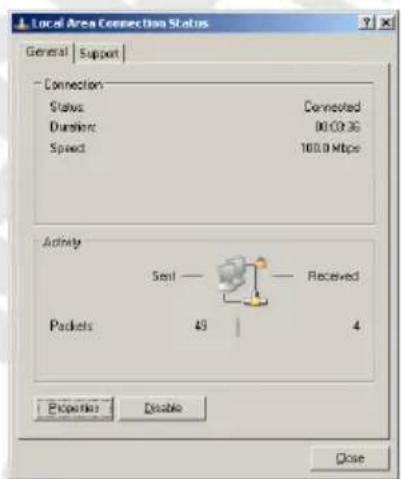
- Double-click the Local Area Connection icon.
-
On General tab, Click the Properties button.
-
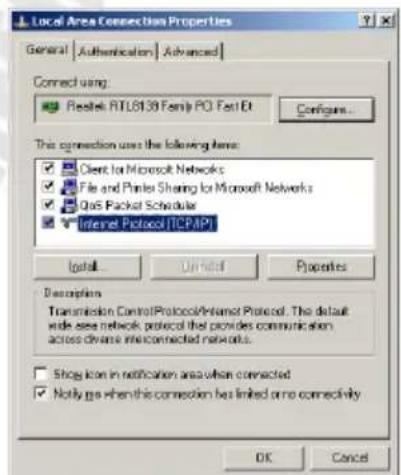
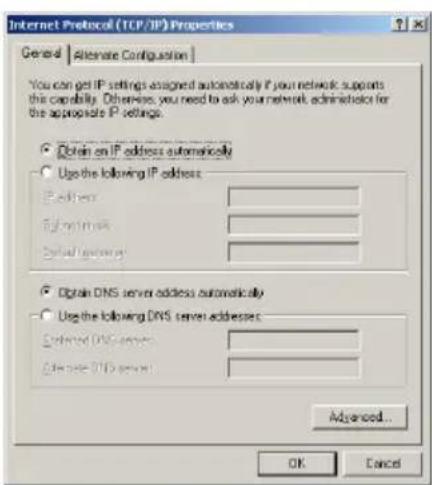
On General tab, select Internet Protocol (TCP/IP) and click Properties.
-
On General tab, select Obtain an IP address automatically and DNS server address automatically.
- Click OK to save settings and close Internet Protocol (TCP/IP) Properties window.
Windows 95/98/Me
-
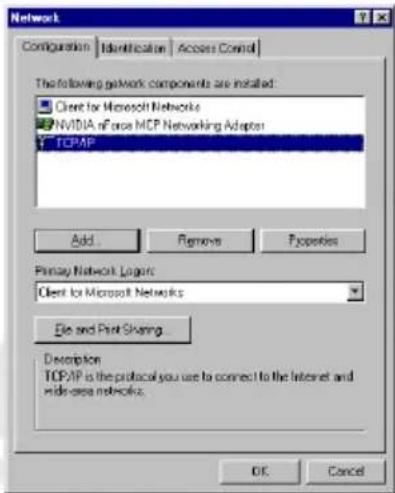
Click Start → Settings → Control Panel. Double-click the Network icon.
-
On Configuration tab, select TCP/IP for appropriate network adapter and click Properties.
-
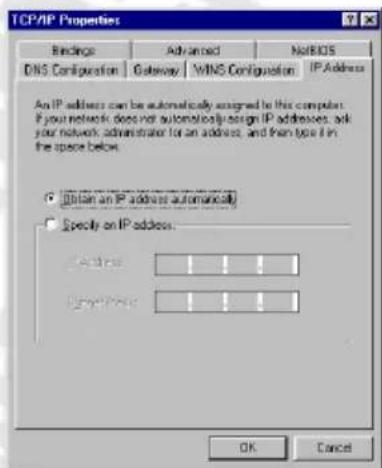
On IP Address tab, select Obtain an IP address automatically.
-
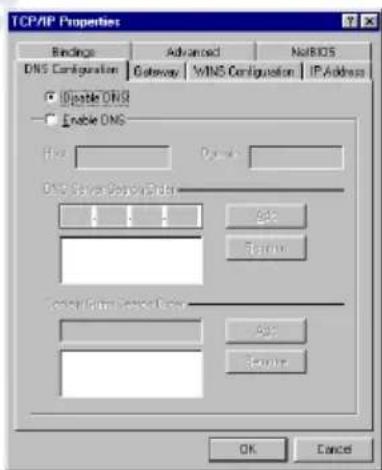
On DNS Configuration tab, select Disable DNS
-
Click OK to save settings and close TCP/IP Properties window.
To make sure that network adapter properly obtained an IP address from router's DHCP server:
- click Start > Run
- type cmd (Win 2000/XP) or command (Win 95/98/ME) and press Enter
- in command line type ipconfig /all and press Enter
- check if the IP Address is 192.168.1.x
Configure router via web browser
Cerberus ADSL2 Wi-Fi Plus (P6331-62) router can be configured via web browser, which is usually integrated with operating system. Router offers clear and simple interface.
Login
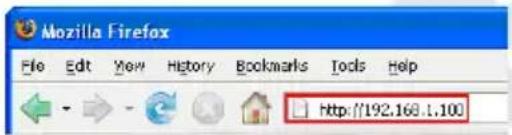
- Launch the Web browser
- In address bar enter the default IP address: http://192.168.1.100
- Enter username and password – default admin / pentagram
Navigation
Configuration Modes
Router supports two configuration modes: Basic and Advanced. Each mode can be assigned to certain users (based on login name), ie. Basic mode for Local Administrator with restricted access to router functions (only basic configuration of WAN and WLAN connection) and Advanced for Network Administrator with full access to all router functions (see System / User Management section for details).
Buttons
This three buttons are available in both configuration modes at the bottom of the screen:
- Save Settings – Opens Save Config to FLASH page.
- Restart Router – Opens System / Restart Router page.
- Logout – Logs out currently logged user.
Save Config to FLASH
After changing the router's configuration settings, you must save all of the configuration parameters to FLASH to avoid losing them after turning off or resetting your router. Click Apply to write your new configuration to FLASH.

Basic
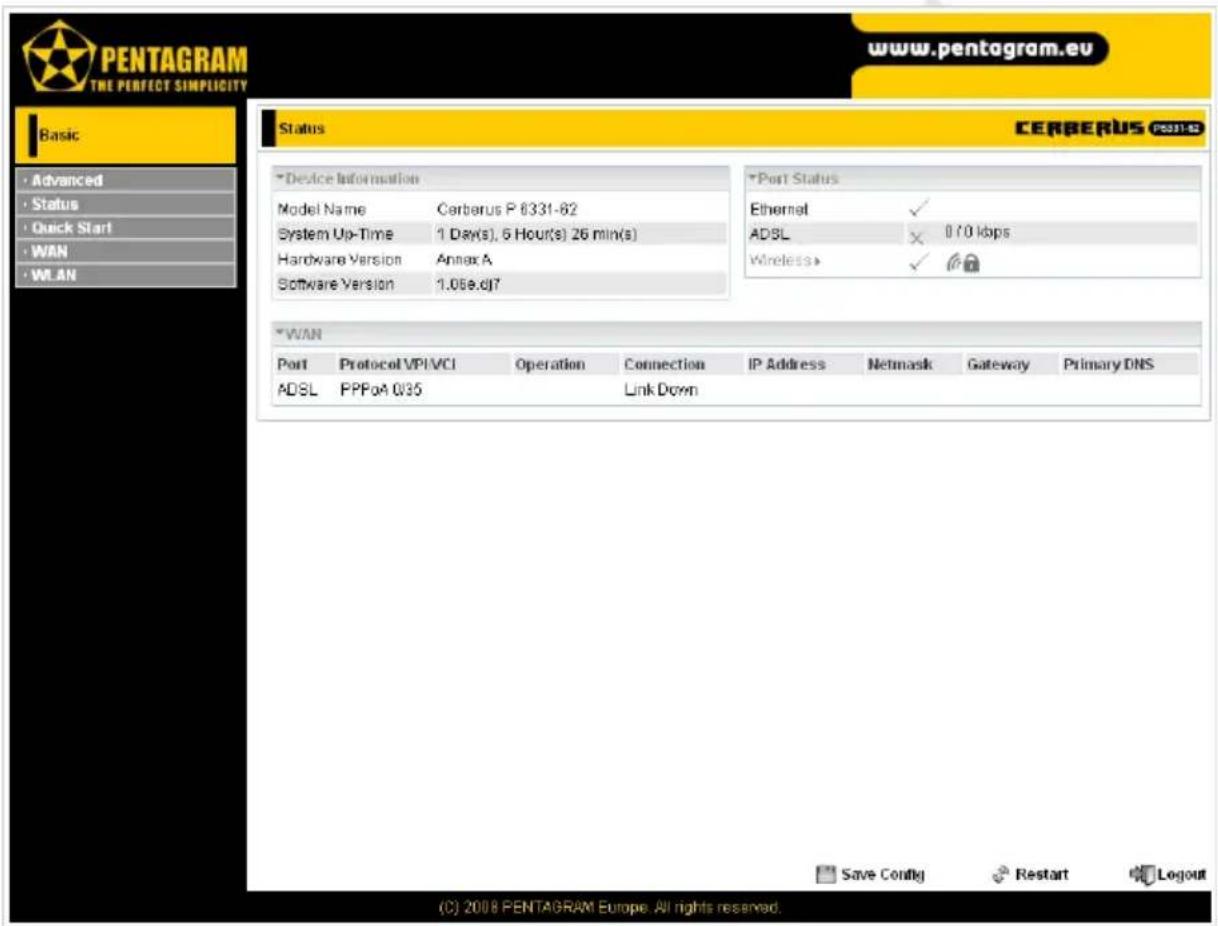
Menu
In Basic configuration mode following menu items are available:
- Advanced – Change Configuration mode to Advanced.
• Status – Status page. - Quick Start – Quick WAN and WLAN (wireless) connections configuration.
- WAN – WAN connection configuration.
- WLAN – WLAN (wireless) connection configuration.
Status
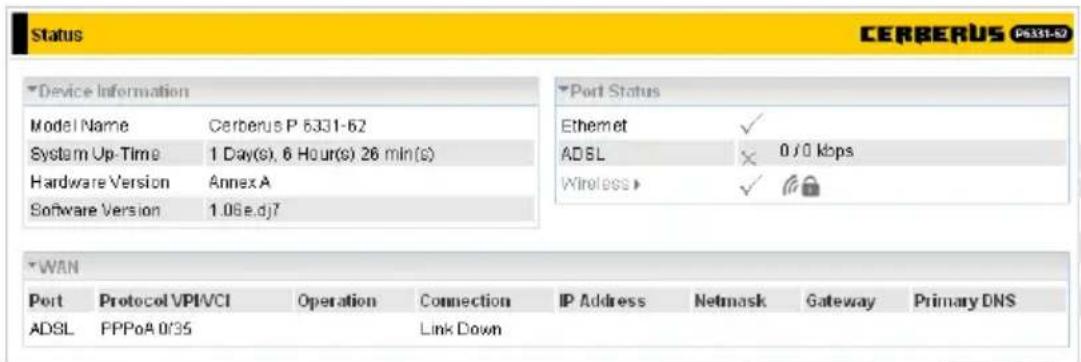
Device Information
Model Name – Router's model name.
System Up-Time – Router's up-time (time passed since router was powered on).
Hardware Version – Chipset version.
Software Version – Firmware version.
Port Status
Status of Ethernet, ADSL, and Wireless connections:

Connection established.
Connection not established.
Wi-Fi network is protected.
Click on Wireless to go to WLAN configuration page.
WAN
Port – Name of the WAN connection.
Protocol VPI/VCI – Protocol, Virtual Path Identifier and Virtual Channel Identifier.
Operation – Current available operation.
Connection – The current connection status.
IP Address – WAN port IP address.
Netmask – WAN port IP subnet mask.
Gateway – The IP address of the default gateway.
Primary DNS – The IP address of the primary DNS server.
Quick Start
Quick Start allows to fast and easy configuration of WAN and WLAN connections. For WAN configuration you will need parameters such as username, password, protocol, VPI / VCI, encapsulation method, and so on. You can obtain all required parameters from your ISP.
WAN
Select WAN Port
This is the first screen you will see after clicking on Quick Start in menu.
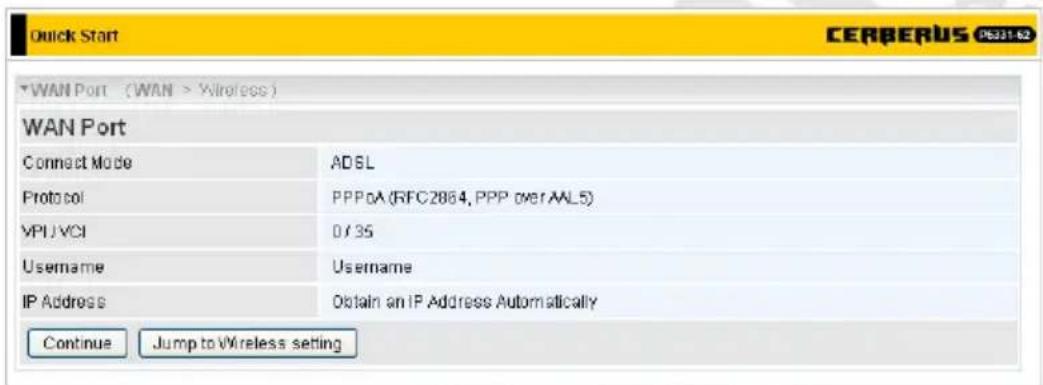
Continue – Continue to ADSL configuration. ADSL line must be connected to router before you can proceed.
Jump to Wireless setting – Skip ADSL configuration and go directly to WLAN configuration.
Select Protocol
You will see this screen if you clicked Continue on previous screen (Select WAN Port). This screen appearance changes with selected Protocol:
- PPPoE (RFC2516, PPP over Ethernet)
PPPoE (PPP over Ethernet) provides access control in a manner similar to dial-up services using PPP.
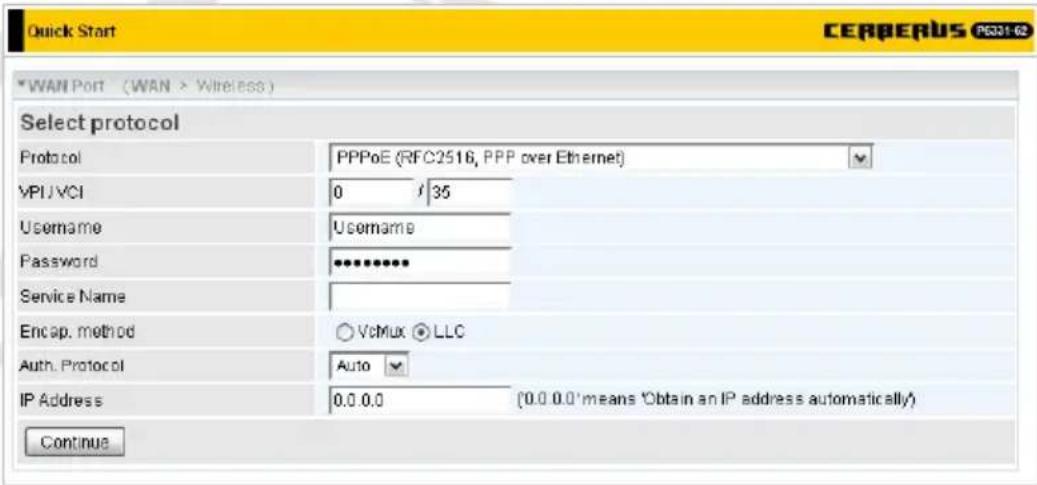
Protocol – Change used protocol.
VPI / VCI – Enter the information provided by your ISP.
Username – Enter the username provided by your ISP. You can input up to 128 alphanumeric characters (case sensitive). This is in the format of username@ispname instead of simply username.
Password – Enter the password provided by your ISP. You can input up to 128 alphanumeric characters (case sensitive).
Service Name – This item is for identification purposes. If it is required, your ISP provides you the information. Maximum input is 20 alphanumeric characters.
Encap. method – Select the encapsulation method provided by your ISP (VcMux or LLC).
Auth. Protocol – Default is Auto. Your ISP advises on using Chap or Pap.
IP Address – Your WAN IP address. Leave this at 0.0.0.0 to automatically obtain an IP address from your ISP.
Continue – Click this button to configure and establish connection.
- PPPoA (RFC2684, PPP over AAL5)
PPPoA stands for Point to Point Protocol over ATM Adaptation Layer 5 (AAL5). It provides access control and billing functionality in a manner similar to dial-up services using PPP.
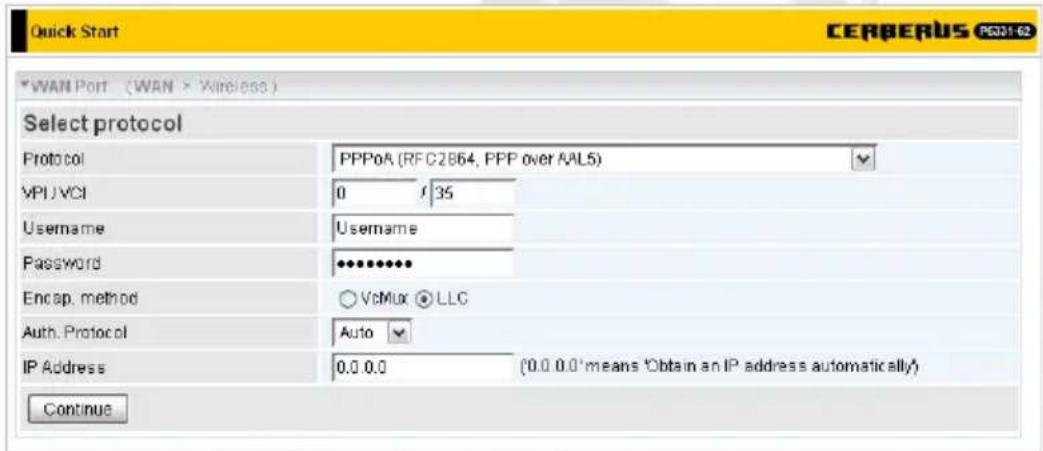
Protocol – Change used protocol.
VPI / VCI – Enter the information provided by your ISP.
Username – Enter the username provided by your ISP. You can input up to 128 alphanumeric characters (case sensitive). This is in the format of username@ispname instead of simply username.
Password – Enter the password provided by your ISP. You can input up to 128 alphanumeric characters (case sensitive).
Encap. method – Select the encapsulation method provided by your ISP (VcMux or LLC).
Auth. Protocol – Default is Auto. Your ISP advises on using Chap or Pap.
IP Address – Your WAN IP address. Leave this at 0.0.0.0 to automatically obtain an IP address from your ISP.
Continue – Click this button to configure and establish connection.
• MPoA (RFC 1483/RFC2684, Multiprotocol Encapsulation over AAL5)
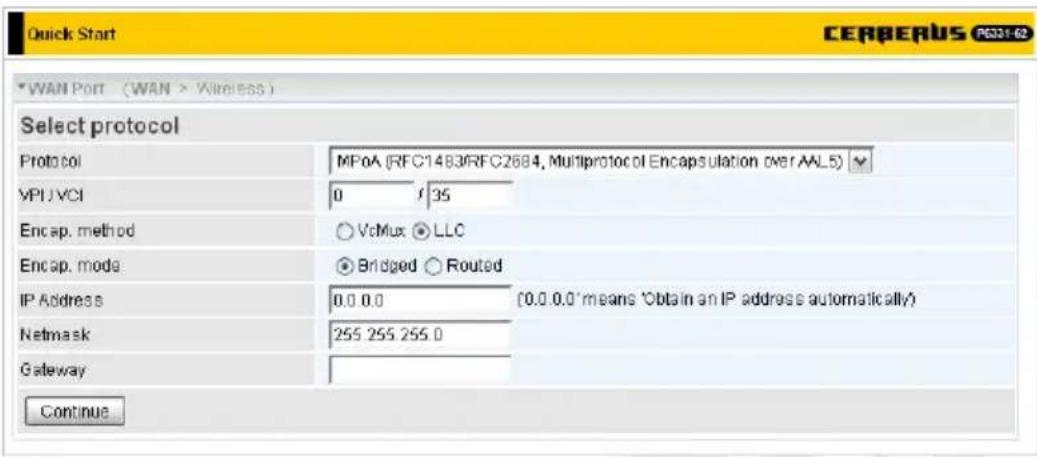
Protocol – Change used protocol.
VPI / VCI – Enter the information provided by your ISP.
NAT – The NAT (Network Address Translation) feature allows multiple users to access the Internet through a single IP account, sharing the single IP address. If users on your LAN have public IP addresses and can access the Internet directly, the NAT function can be disabled.
Encap. method – Select the encapsulation method provided by your ISP (VcMux or LLC).
Encap. mode – Choose whether you want the device to function as bridge mode or routing mode.
IP Address – Your WAN IP address. Leave this at 0.0.0.0 to automatically obtain an IP address from your ISP.
Netmask – The default netmask is 255.255.255.0. User can change it to other such as 255.255.255.128. Type the netmask assigned to you by your ISP (if given)
Gateway – Enter the IP address of the default gateway.
Continue – Click this button to configure and establish connection.
- Pure Bridge
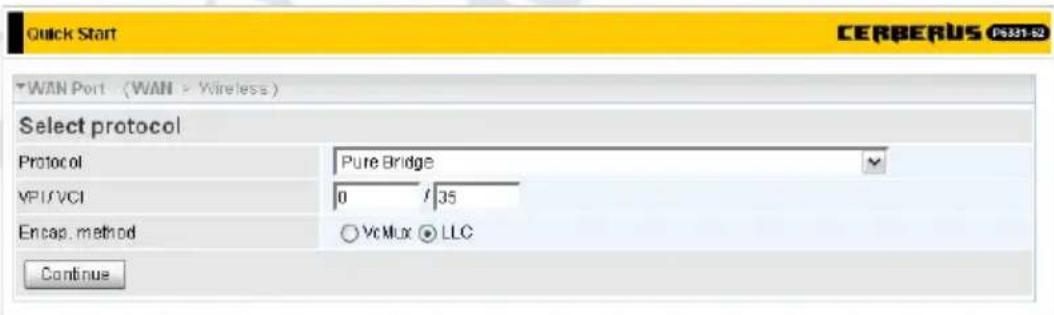
Protocol – Change used protocol.
VPI / VCI – Enter the information provided by your ISP.
Encap. method – Select the encapsulation method provided by your ISP (VcMux or LLC).
Continue – Click this button to configure and establish connection.
- PPPoE with Pass-through
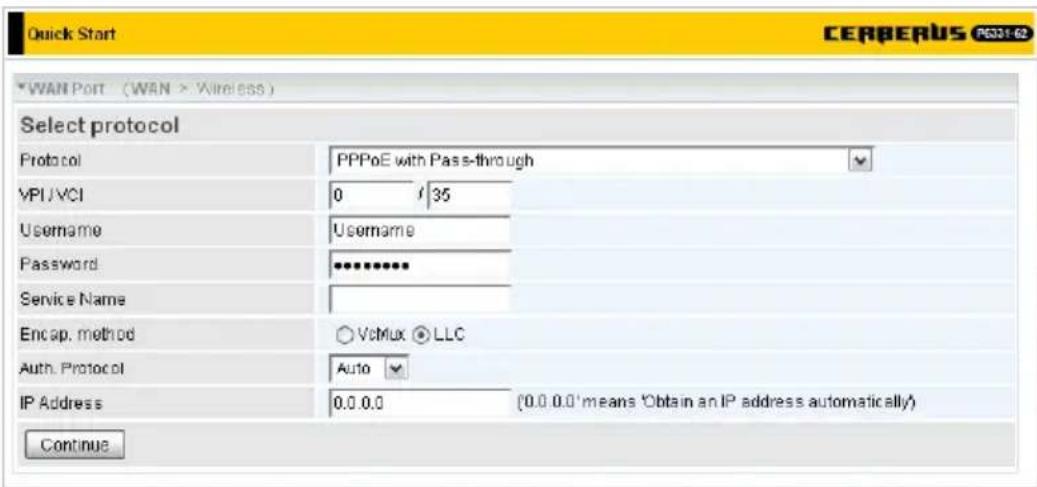
Protocol – Change used protocol.
VPI / VCI – Enter the information provided by your ISP.
Username – Enter the username provided by your ISP. You can input up to 128 alphanumeric characters (case sensitive). This is in the format of username@ispname instead of simply username.
Password – Enter the password provided by your ISP. You can input up to 128 alphanumeric characters (case sensitive).
Service Name – This item is for identification purposes. If it is required, your ISP provides you the information. Maximum input is 20 alphanumeric characters.
Encap. method – Select the encapsulation method provided by your ISP (VcMux or LLC).
Auth. Protocol – Default is Auto. Your ISP advises on using Chap or Pap.
IP Address – Your WAN IP address. Leave this at 0.0.0.0 to automatically obtain an IP address from your ISP.
Continue – Click this button to configure and establish connection.
Please wait...
After entering correct information and clicking Continue button on Select Protocol screen, router will be configured and connection established.

If entered values was correct, following screen will appear:
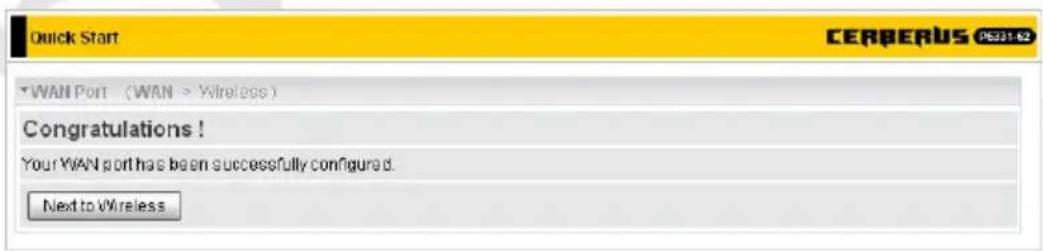
Next to Wireless – Continue to WLAN configuration.
Wireless
Set Wireless configuration
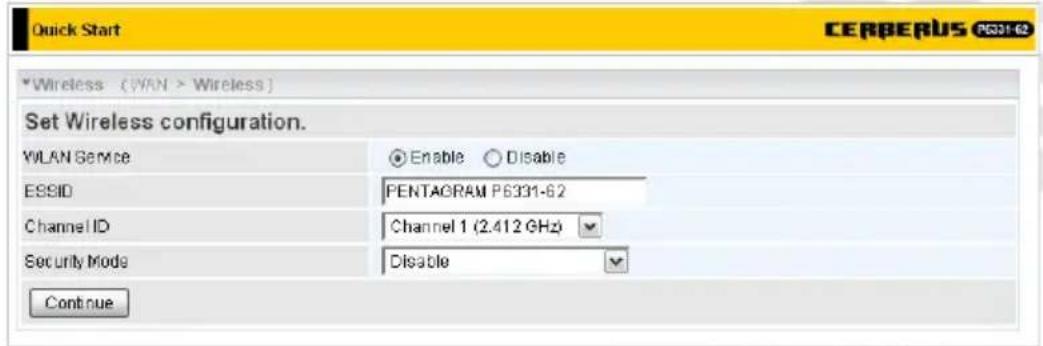
WLAN Service – Enable or Disable built-in Access Point.
ESSID – The ESSID is the unique name of a wireless access point (AP) to be distinguished from another. For security propose, change to a unique ID name to the AP which is already built-in to the router's wireless interface. It is case sensitive and must not excess 32 characters. Make sure your wireless clients have exactly the same ESSID as the device, in order to get connected to your network.
Channel ID – Select the ID channel that you would like to use.
Security Mode – You can disable or enable with WPA or WEP for protecting wireless network. It is recommended to enable wireless network protection (see WLAN section for details).
Continue – Save all settings and return to Status page.
WAN
A WAN (Wide Area Network) is an outside connection to another network or the Internet. This screen appearance changes with selected Protocol:
Protocol – Protocol used by ISP.
- PPPoE (RFC2516, PPP over Ethernet)
PPPoE (PPP over Ethernet) provides access control in a manner similar to dial-up services using PPP.
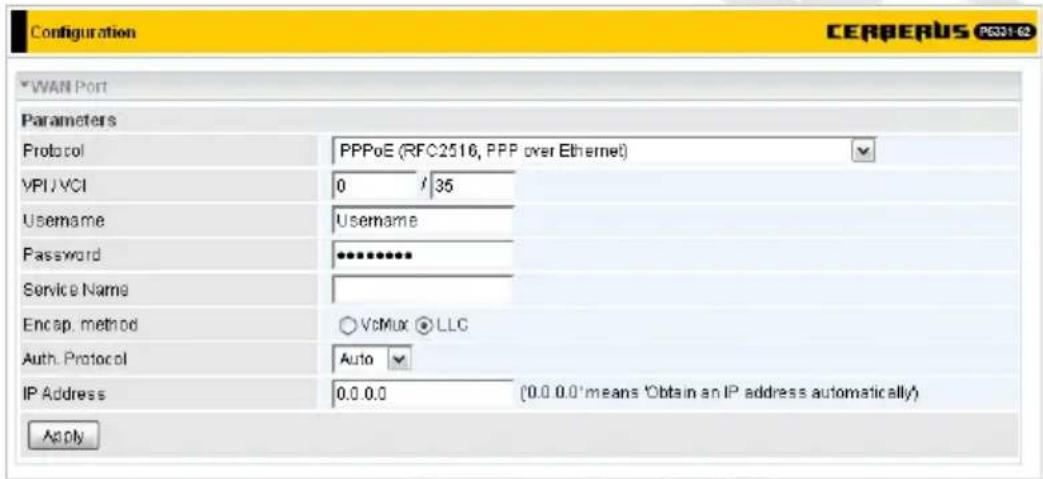
Protocol – Change used protocol.
VPI / VCI – Enter the information provided by your ISP.
Username – Enter the username provided by your ISP. You can input up to 128 alphanumeric characters (case sensitive). This is in the format of username@ispname instead of simply username.
Password – Enter the password provided by your ISP. You can input up to 128 alphanumeric characters (case sensitive).
Service Name – This item is for identification purposes. If it is required, your ISP provides you the information. Maximum input is 20 alphanumeric characters.
Encap. method – Select the encapsulation method provided by your ISP (VcMux or LLC).
Auth. Protocol – Default is Auto. Your ISP advises on using Chap or Pap.
IP Address – Your WAN IP address. Leave this at 0.0.0.0 to automatically obtain an IP address from your ISP.
Apply – Click this button to apply changes made on this screen.
Cancel – Click this button to discard changes made on this screen.
• PPPoA (RFC2684, PPP over AAL5)
PPPoA stands for Point to Point Protocol over ATM Adaptation Layer 5 (AAL5). It provides access control and billing functionality in a manner similar to dial-up services using PPP.
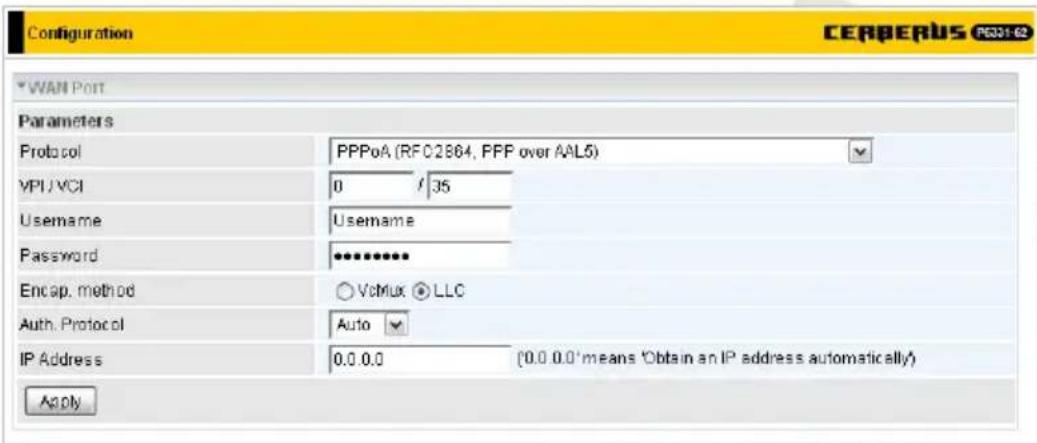
Protocol – Change used protocol.
VPI / VCI – Enter the information provided by your ISP.
Username – Enter the username provided by your ISP. You can input up to 128 alphanumeric characters (case sensitive). This is in the format of username@ispname instead of simply username.
Password – Enter the password provided by your ISP. You can input up to 128 alphanumeric characters (case sensitive).
Encap. method – Select the encapsulation method provided by your ISP (VcMux or LLC).
Auth. Protocol – Default is Chap. Your ISP advises on using Chap or Pap.
IP Address – Your WAN IP address. Leave this at 0.0.0.0 to automatically obtain an IP address from your ISP.
Apply – Click this button to apply changes made on this screen.
Cancel – Click this button to discard changes made on this screen.
• MPoA (RFC 1483/RFC2684, Multiprotocol Encapsulation over AAL5)
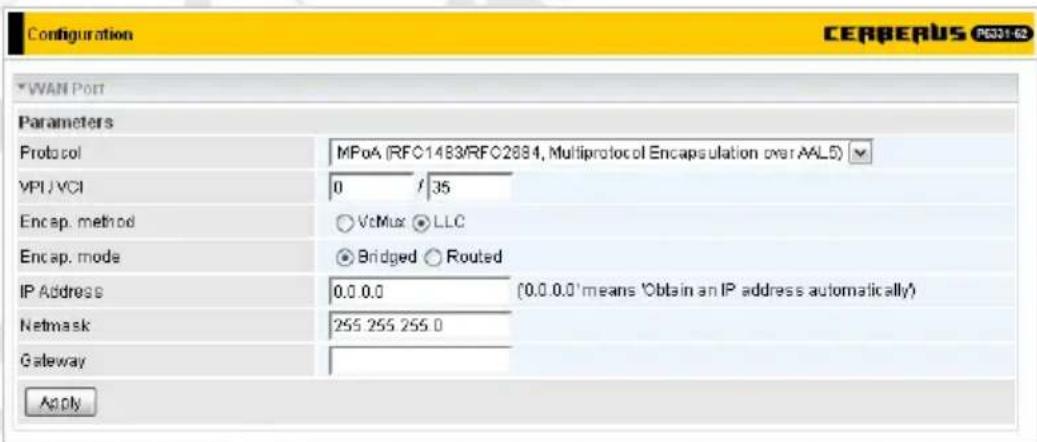
Protocol – Change used protocol.
VPI / VCI – Enter the information provided by your ISP.
NAT – The NAT (Network Address Translation) feature allows multiple users to access the Internet through a single IP account, sharing the single IP address. If users on your
LAN have public IP addresses and can access the Internet directly, the NAT function can be disabled.
Encap. method – Select the encapsulation method provided by your ISP (VcMux or LLC).
Encap. mode – Choose whether you want the device to function as bridge mode or routing mode.
IP Address – Your WAN IP address. Leave this at 0.0.0.0 to automatically obtain an IP address from your ISP.
Netmask – The default netmask is 255.255.255.0. User can change it to other such as 255.255.255.128. Type the netmask assigned to you by your ISP (if given)
Gateway – Enter the IP address of the default gateway.
Apply – Click this button to apply changes made on this screen.
Cancel – Click this button to discard changes made on this screen.
- Pure Bridge
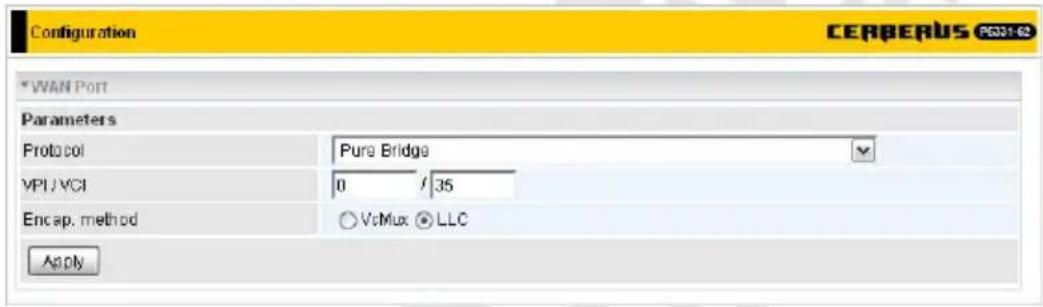
Protocol – Change used protocol.
VPI / VCI – Enter the information provided by your ISP.
Encap. method – Select the encapsulation method provided by your ISP (VcMux or LLC).
Apply – Click this button to apply changes made on this screen.
Cancel – Click this button to discard changes made on this screen.
- PPPoE with Pass-through
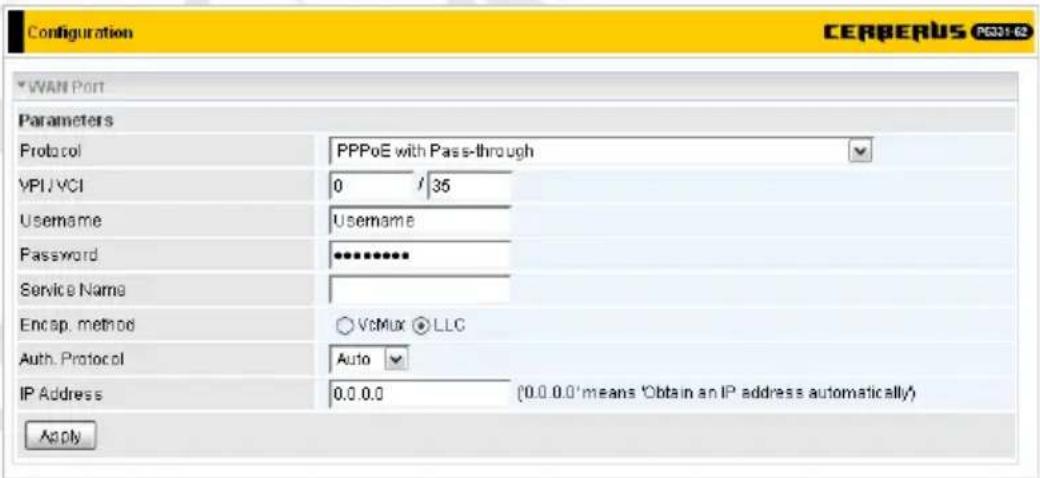
Protocol – Change used protocol.
VPI / VCI – Enter the information provided by your ISP.
Username – Enter the username provided by your ISP. You can input up to 128 alphanumeric characters (case sensitive). This is in the format of username@ispname instead of simply username.
Password – Enter the password provided by your ISP. You can input up to 128 alphanumeric characters (case sensitive).
Service Name – This item is for identification purposes. If it is required, your ISP provides you the information. Maximum input is 20 alphanumeric characters.
Encap. method – Select the encapsulation method provided by your ISP (VcMux or LLC).
Auth. Protocol – Default is Auto. Your ISP advises on using Chap or Pap.
IP Address – Your WAN IP address. Leave this at 0.0.0.0 to automatically obtain an IP address from your ISP.
Apply – Click this button to apply changes made on this screen.
Cancel – Click this button to discard changes made on this screen.
WLAN
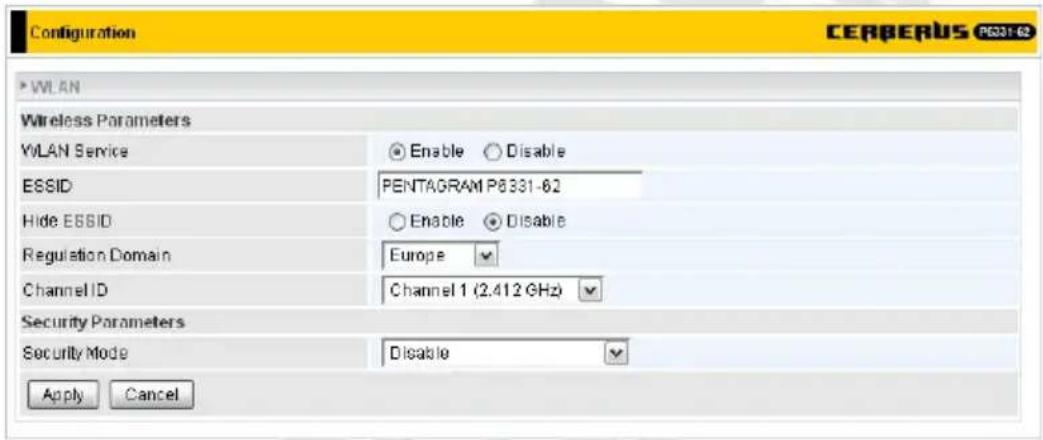
Wireless Parameters
WLAN Service – Enable or Disable built-in Access Point.
ESSID – The ESSID is the unique name of a wireless access point (AP) to be distinguished from another. For security propose, change to a unique ID name to the AP which is already built-in to the router's wireless interface. It is case sensitive and must not excess 32 characters. Make sure your wireless clients have exactly the ESSID as the device, in order to get connected to your network. Note: ESSID is case sensitive and must not excess 32 characters.
Hide ESSID – It is function in which transmits its ESSID to the air so that when wireless client searches for a network, router can then be discovered and recognized. Select Enable if you do not want broadcast your ESSID. When Enable is selected, no one will be able to locate the Access Point (AP) of your router. When Disable is selected, you can allow anybody with a wireless client to be able to locate the Access Point (AP) of your router.
Regulation Domain – There are seven Regulation Domains for you to choose from, including North America (N.America), Europe, France, etc. The Channel ID will be different based on this setting. Select region in which router will be used – broadcasting on channel unavailable for your region may be against the law.
Channel ID – Select the ID channel that you would like to use.
Apply – Click this button to apply changes made on this screen.
Cancel – Click this button to discard changes made on this screen.
Security Parameters
Appearance of this section depends on option selected on Security Mode list:
- Disable
Wireless network in this mode is not protected and anyone who knows ESSID can connect to this wireless network.

• WPA Pre-Shared Key
Only wireless stations with security set to WPA-PSK will be able to connect to this network.
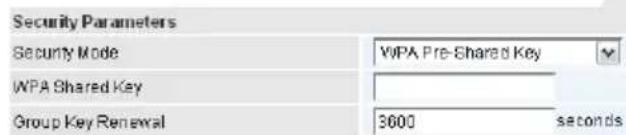
Security Mode – Change security mode.
WPA Shared Key – The key for network authentication. The input format is in character style and the key size should be in the range between 8 and 63 characters.
Group Key Renewal – The period of renewal time for changing the security key between wireless client and Access Point (AP). This process is done automatically.
• WPA2 Pre-Shared Key
Only wireless stations with security set to WPA2-PSK will be able to connect to this network.
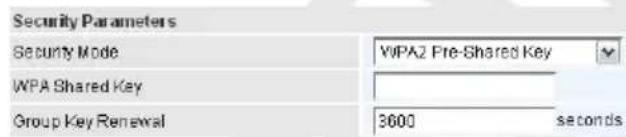
Security Mode – Change security mode.
WPA Shared Key – The key for network authentication. The input format is in character style and the key size should be in the range between 8 and 63 characters.
Group Key Renewal – The period of renewal time for changing the security key between wireless client and Access Point (AP). This process is done automatically.
• WPA/WPA2 Pre-Shared Key
Wireless stations with security set to both WPA-PSK or WPA2-PSK will be able to connect to this network.
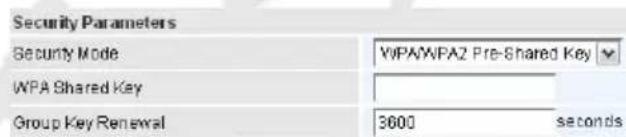
Security Mode – Change security mode.
WPA Shared Key – The key for network authentication. The input format is in character style and the key size should be in the range between 8 and 63 characters.
Group Key Renewal – The period of renewal time for changing the security key between wireless client and Access Point (AP). This process is done automatically.
• WEP
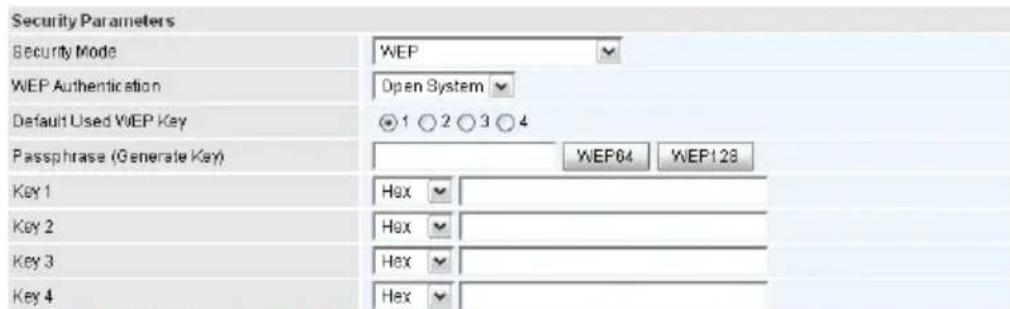
WEP 64-Hex:10 Hex codes, (1\~9, a\~f, A\~F). EX 11aa22cc33.
WEP 64 - ASCII 5 ASCII characters are required. Insert your WEP key manually. EX: 1a3eb
WEP 128 - Heic 26 Horcodes, (1-9, a-f, A-f). EX. 11aa22cc33dd44ee55e00a36f
WEP 12B-ASCII: 13ASCII characters are required. Insert your WEP key manually. EX 1a3e?ldbd3erl
Security Mode – Change security mode.
WEP Authentication – To prevent unauthorized wireless stations from accessing data transmitted over the network, the router offers secure data encryption, known as WEP. If you require high security for transmissions, there are three options to select from:
- Open System – No authentication is required to connect to this network.
- Share key – Authentication is required and is based on Share keys.
- Both – Used authentication method depends on wireless station security settings.
Default Used WEP Key – Select the encryption key ID; please refer to Key (1\~4) below.
Passphrase – This is used to generate WEP keys automatically based upon the input string and a pre-defined algorithm in WEP64 or WEP128. You can input the same string in both the AP and Client card settings to generate the same WEP keys. Please note that you do not have to enter Key (1-4) as below when the Passphrase is enabled.
Key (1-4) – Enter the key to encrypt wireless data. To allow encrypted data transmission, the WEP Encryption Key values on all wireless stations must be the same as the router. There are four keys for your selection. The input format is in HEX or ASCII style, 5 and 13 ASCII characters or 10 and 26 HEX characters are required for WEP64 and WEP128 respectively no any separator is included.
Advanced
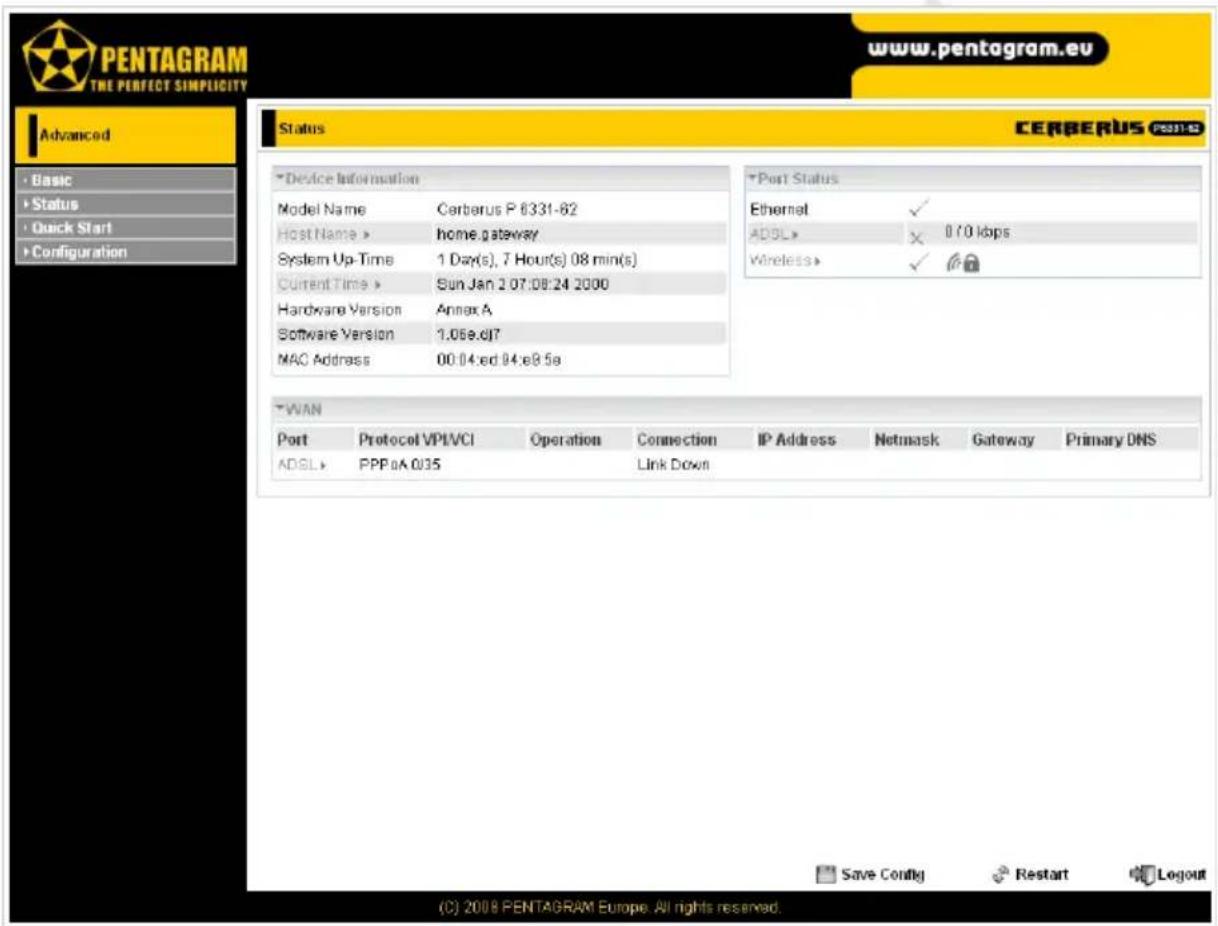
Menu
In Advanced configuration mode following menu items are available:
- Basic – Change Configuration mode to Basic.
- Status – Main status page. More detailed status pages and logs are available: Status / ADSL Status, Status / ARP Table, Status / DHCP Table, Status / System Log, Status / Firewall Log and Status / UPnP Portmap.
- Quick Start – Quick WAN and WLAN (wireless) connections configuration.
- Configuration – Router settings grouped by categories: LAN, WAN, System, Firewall, QoS, Virtual Server, Wake on LAN, Time Schedule and Advanced.
Status
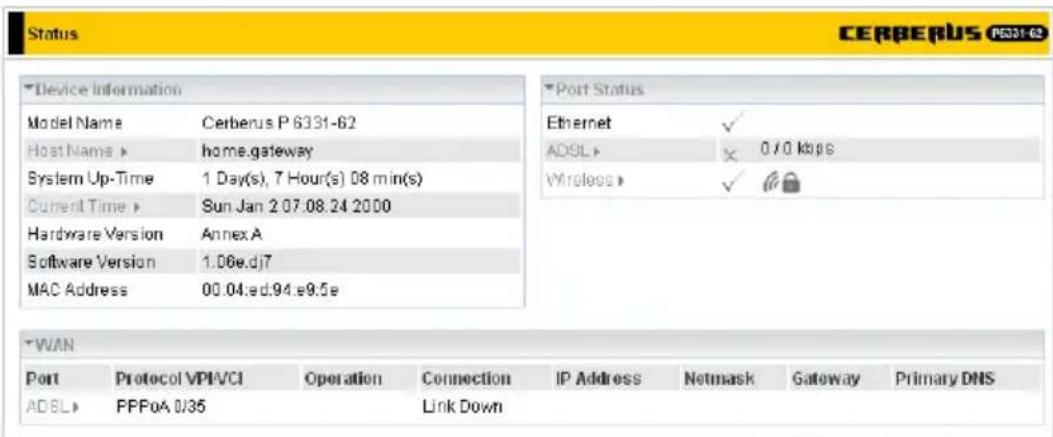
Device Information
Model Name – Router's model name.
Host Name – Router's name for identification purposes. Click on Host Name to go to Advanced / Device Management page.
System Up-Time – Router's up-time (time passed since router was powered on).
Current Time – Current date and time. Click on Current Time to go to System / Time Zone page.
Hardware Version – Chipset version.
Software Version – Firmware version.
MAC Address – Router's MAC Address.
Port Status
Status of Ethernet, ADSL and Wireless connections:

Connection established.
Connection not established.
Wi-Fi network is protected.
Click on ADSL to go to Status / ADSL Status page or click on Wireless to go to LAN / Wireless page.
WAN
Port – Name of the WAN connection. Click on Port or connection name to go to WAN / WAN Profile page.
Protocol VPI/VCI – Protocol, Virtual Path Identifier and Virtual Channel Identifier.
Operation – Current available operation.
Connection – The current connection status.
IP Address – WAN port IP address.
Netmask – WAN port IP subnet mask.
Gateway – The IP address of the default gateway.
Primary DNS – The IP address of the primary DNS server.
Status / ADSL Status
On this page you can find all information about ADSL connection.
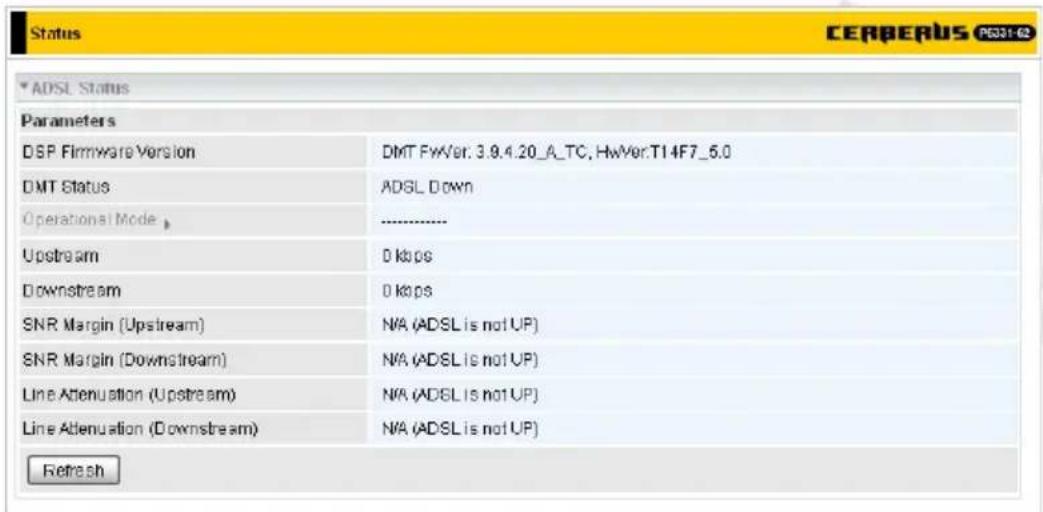
DSP Firmware Version – DSP code version.
DMT Status – Current DMT Status.
Operational Mode – Used ADSL standard. Click on Operational Mode to go to WAN / ADSL Mode page.
Upstream – Upstream rate.
Downstream – Downstream rate.
SNR Margin (Upstream) – This is noise margin in upstream.
SNR Margin (Downstream) – This is noise margin in downstream.
Line Attenuation (Upstream) – This is attenuation of signal in upstream.
Line Attenuation (Downstream) – This is attenuation of signal in downstream.
Status / ARP Table
The router's ARP (Address Resolution Protocol) Table shows the mapping of Internet (IP) addresses to Ethernet (MAC) addresses. This is a quick way to determine the MAC address of the network interface of your PCs to use with the router's Firewall / MAC Filter function. ARP Table is divided to Wireless and Wired clients.
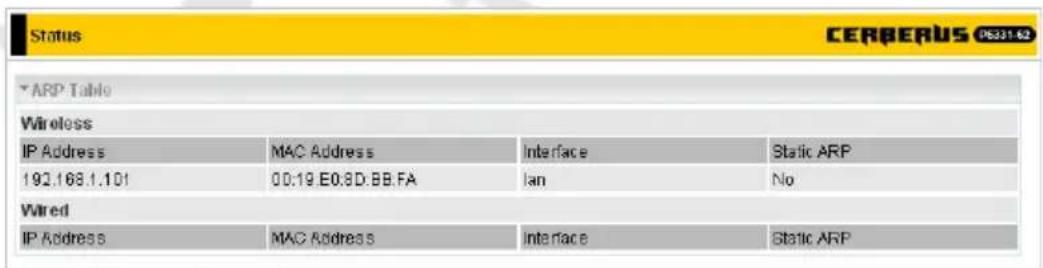
IP Address – A list of IP addresses of devices on your LAN (Local Area Network).
MAC Address – MAC (Media Access Control) address for each device on your LAN.
Interface – The interface name (on the router) that this IP Address connects to.
Static – Static status of the ARP table entry:
• No for dynamically-generated ARP table entries.
• Yes for static ARP table entries added by the user.
Status / DHCP Table
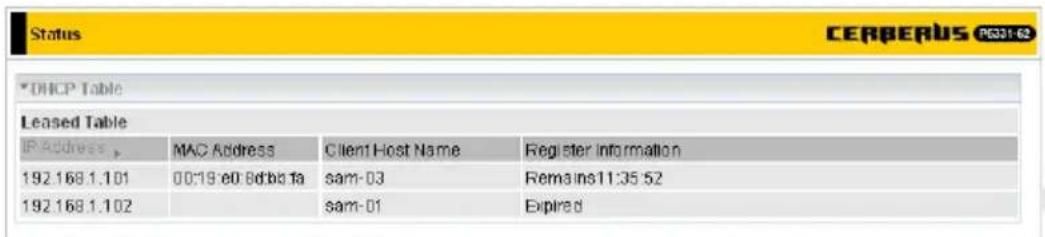
IP Address – IP addresses of devices on your LAN. Click on IP Address to go to LAN / DHCP Server page.
MAC Address – The MAC Address to which IP address is assigned.
Client Host Name – Expired IP addresses information.
Register Information – Remained DHCP lease time.
Status / System Log
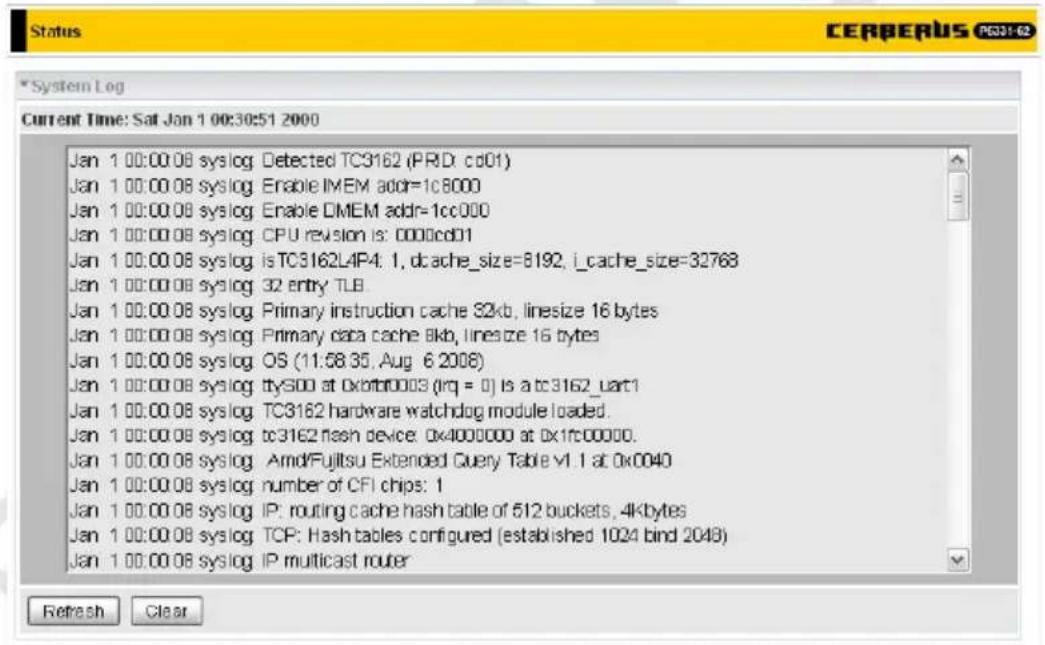
Display system logs accumulated up to the present time. You can trace historical information with this function.
Status / Firewall Log
Firewall Log displays log information of any unexpected action with your firewall settings. This page displays the router's Firewall Log entries. The log shows log entries when you have enabled Intrusion Detection or Block WAN PING in the Firewall section of the interface.
Status / UPnP Portmap
The section lists all port-mapping established using UPnP (Universal Plug and Play). Please see the Universal Plug and Play (UPnP) section of this manual for more details on UPnP and the router's UPnP configuration options.

Quick Start
Quick Start allows to fast and easy configuration of WAN and WLAN connections. For WAN configuration you will need parameters such as username, password, protocol, VPI / VCI, encapsulation method, and so on. You can obtain all required parameters from your ISP.
WAN
Select WAN Port
This is the first screen you will see after clicking on Quick Start in menu.
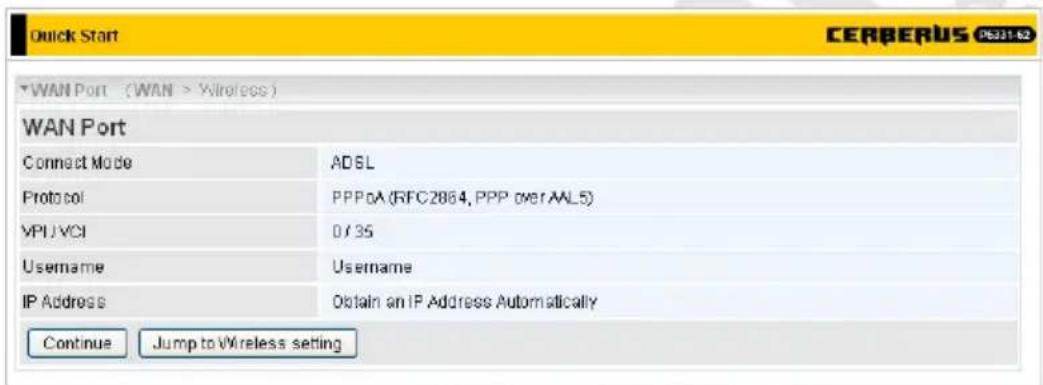
Continue – Continue to ADSL configuration. ADSL line must be connected to router before you can proceed.
Jump to Wireless setting – Skip ADSL configuration and go directly to WLAN configuration.
Select Protocol
You will see this screen if you clicked Continue on previous screen (Select WAN Port). This screen appearance changes with selected Protocol:
- PPPoE (RFC2516, PPP over Ethernet)
PPPoE (PPP over Ethernet) provides access control in a manner similar to dial-up services using PPP.
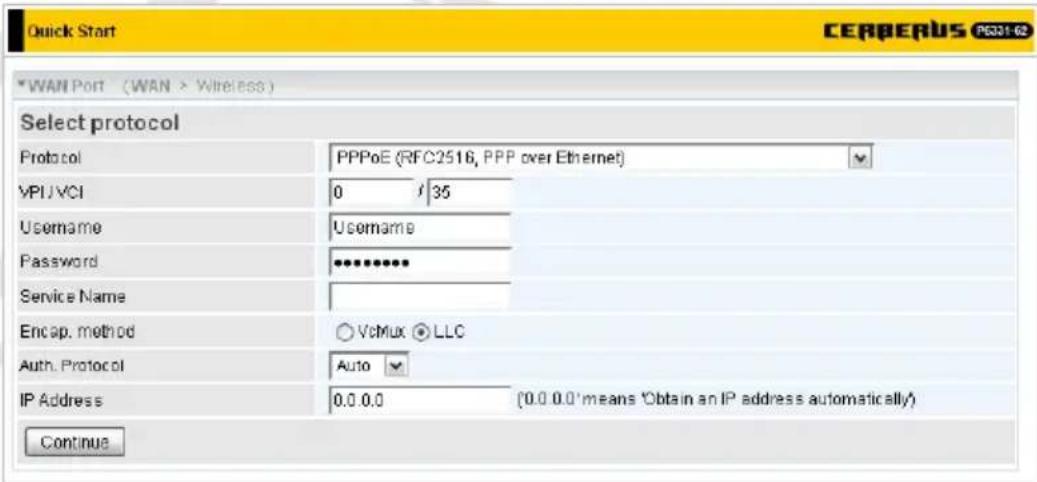
Protocol – Change used protocol.
VPI / VCI – Enter the information provided by your ISP.
Username – Enter the username provided by your ISP. You can input up to 128 alphanumeric characters (case sensitive). This is in the format of username@ispname instead of simply username.
Password – Enter the password provided by your ISP. You can input up to 128 alphanumeric characters (case sensitive).
Service Name – This item is for identification purposes. If it is required, your ISP provides you the information. Maximum input is 20 alphanumeric characters.
Encap. method – Select the encapsulation method provided by your ISP (VcMux or LLC).
Auth. Protocol – Default is Auto. Your ISP advises on using Chap or Pap.
IP Address – Your WAN IP address. Leave this at 0.0.0.0 to automatically obtain an IP address from your ISP.
Continue – Click this button to configure and establish connection.
• PPPoA (RFC2684, PPP over AAL5)
PPPoA stands for Point to Point Protocol over ATM Adaptation Layer 5 (AAL5). It provides access control and billing functionality in a manner similar to dial-up services using PPP.
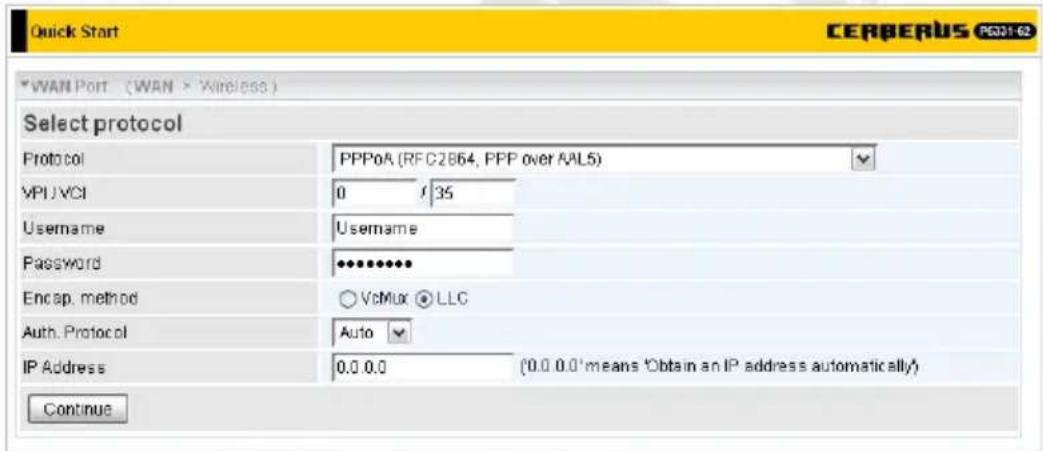
Protocol – Change used protocol.
VPI / VCI – Enter the information provided by your ISP.
Username – Enter the username provided by your ISP. You can input up to 128 alphanumeric characters (case sensitive). This is in the format of username@ispname instead of simply username.
Password – Enter the password provided by your ISP. You can input up to 128 alphanumeric characters (case sensitive).
Encap. method – Select the encapsulation method provided by your ISP (VcMux or LLC).
Auth. Protocol – Default is Chap. Your ISP advises on using Chap or Pap.
IP Address – Your WAN IP address. Leave this at 0.0.0.0 to automatically obtain an IP address from your ISP.
Continue – Click this button to configure and establish connection.
• MPoA (RFC 1483/RFC2684, Multiprotocol Encapsulation over AAL5)
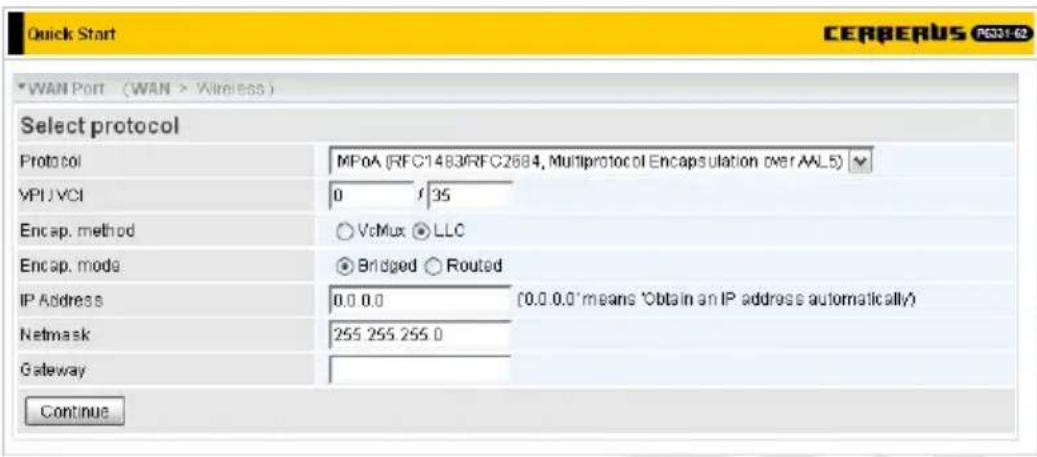
Protocol – Change used protocol.
VPI / VCI – Enter the information provided by your ISP.
NAT – The NAT (Network Address Translation) feature allows multiple users to access the Internet through a single IP account, sharing the single IP address. If users on your LAN have public IP addresses and can access the Internet directly, the NAT function can be disabled.
Encap. method – Select the encapsulation method provided by your ISP (VcMux or LLC).
Encap. mode – Choose whether you want the device to function as bridge mode or routing mode.
IP Address – Your WAN IP address. Leave this at 0.0.0.0 to automatically obtain an IP address from your ISP.
Netmask – The default netmask is 255.255.255.0. User can change it to other such as 255.255.255.128. Type the netmask assigned to you by your ISP (if given)
Gateway – Enter the IP address of the default gateway.
Continue – Click this button to configure and establish connection.
- Pure Bridge
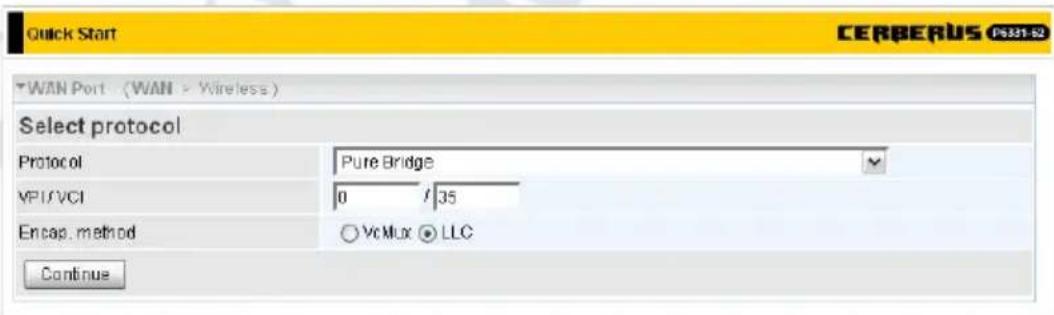
Protocol – Change used protocol.
VPI / VCI – Enter the information provided by your ISP.
Encap. method – Select the encapsulation method provided by your ISP (VcMux or LLC).
Continue – Click this button to configure and establish connection.
- PPPoE with Pass-through
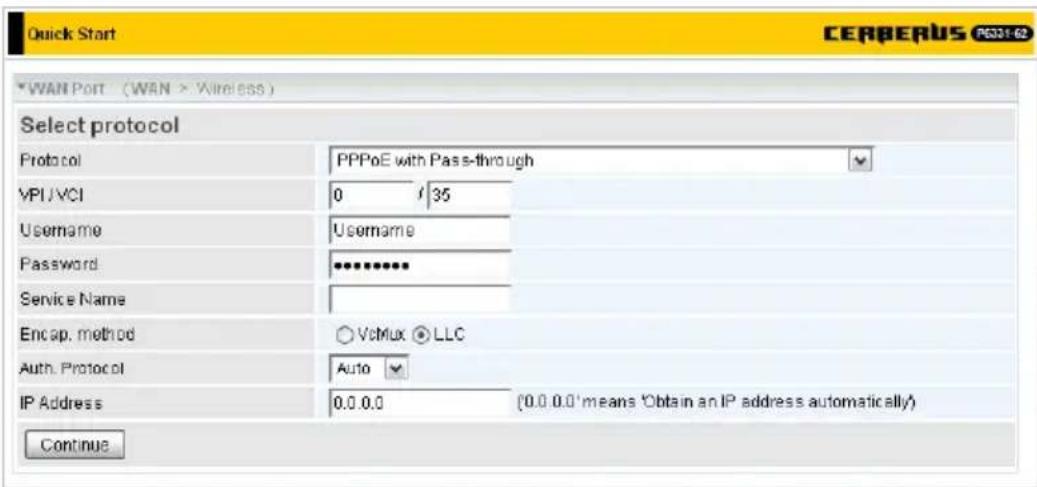
Protocol – Change used protocol.
VPI / VCI – Enter the information provided by your ISP.
Username – Enter the username provided by your ISP. You can input up to 128 alphanumeric characters (case sensitive). This is in the format of username@ispname instead of simply username.
Password – Enter the password provided by your ISP. You can input up to 128 alphanumeric characters (case sensitive).
Service Name – This item is for identification purposes. If it is required, your ISP provides you the information. Maximum input is 20 alphanumeric characters.
Encap. method – Select the encapsulation method provided by your ISP (VcMux or LLC).
Auth. Protocol – Default is Auto. Your ISP advises on using Chap or Pap.
IP Address – Your WAN IP address. Leave this at 0.0.0.0 to automatically obtain an IP address from your ISP.
Continue – Click this button to configure and establish connection.
Please wait...
After entering correct information and clicking Continue button on Select Protocol screen, router will be configured and connection established.

If entered values was correct, following screen will appear:
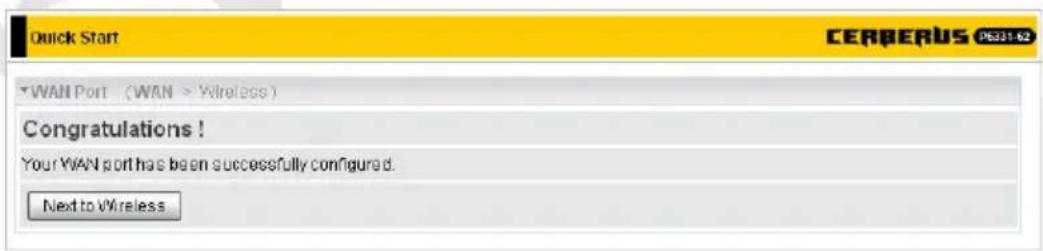
Next to Wireless – Continue to WLAN configuration.
Wireless
Set Wireless configuration
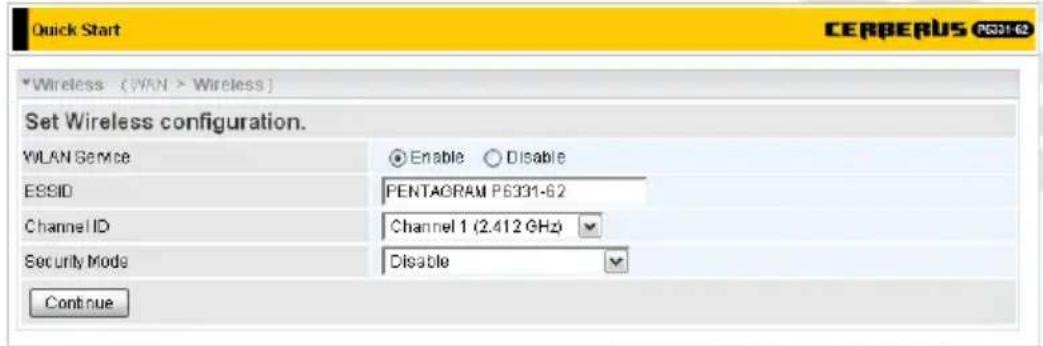
WLAN Service – Enable or Disable built-in Access Point.
ESSID – The ESSID is the unique name of a wireless access point (AP) to be distinguished from another. For security propose, change to a unique ID name to the AP which is already built-in to the router's wireless interface. It is case sensitive and must not excess 32 characters. Make sure your wireless clients have exactly the same ESSID as the device, in order to get connected to your network.
Channel ID – Select the ID channel that you would like to use.
Security Mode – You can disable or enable with WPA or WEP for protecting wireless network. It is recommended to enable wireless network protection (see LAN / Wireless section for details).
Continue – Save all settings and return to Status page.
Configuration
LAN
In this group you can find all settings for LAN network, both wired and wireless.
LAN / Ethernet
The router supports more than one Ethernet IP addresses in the LAN, and with distinct LAN subnets through which you can access the Internet at the same time. Users usually only have one subnet in their LAN. The default IP address for the router is 192.168.1.100.
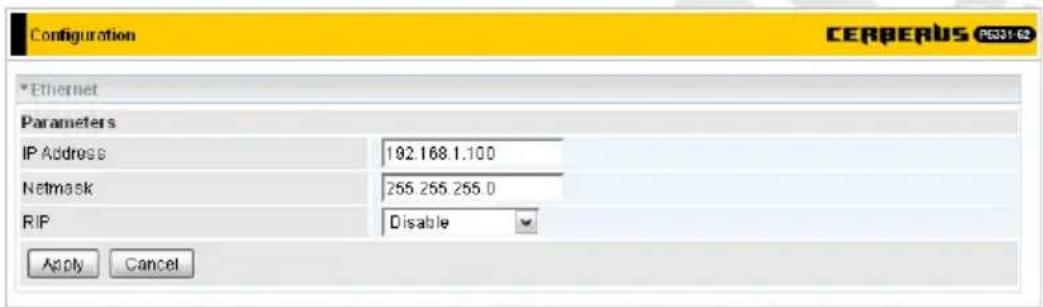
IP Address – The default IP on this router.
Netmask – The default subnet mask on this router.
RIP – RIP v1, RIP v2, RIP v1+v2 and RIP v2 Multicast.
Apply – Click this button to apply changes made on this screen.
Cancel – Click this button to discard changes made on this screen.
LAN / IP Alias
This function allows the creation of multiple virtual IP interfaces on this router. It helps to connect two or more local networks to the ISP or remote node. In this case, an internal router is not required.
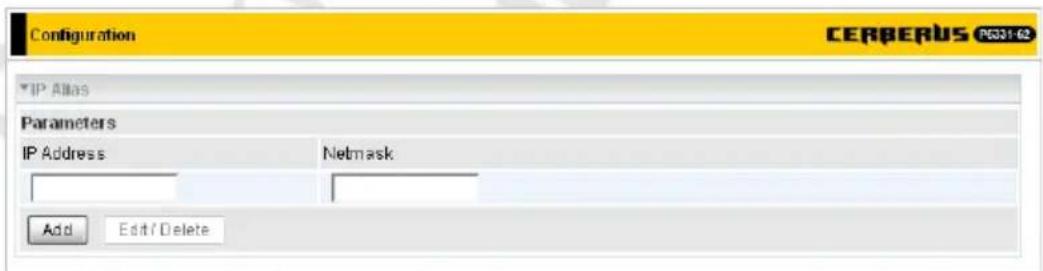
IP Address – Specify an IP address on this virtual interface.
Netmask – Specify a subnet mask on this virtual interface.
Add – Click this button to add new item to the list.
Edit / Delete – Click this button to save new values to list item with selected Edit field or to delete list items with selected Delete field.
LAN / Wireless
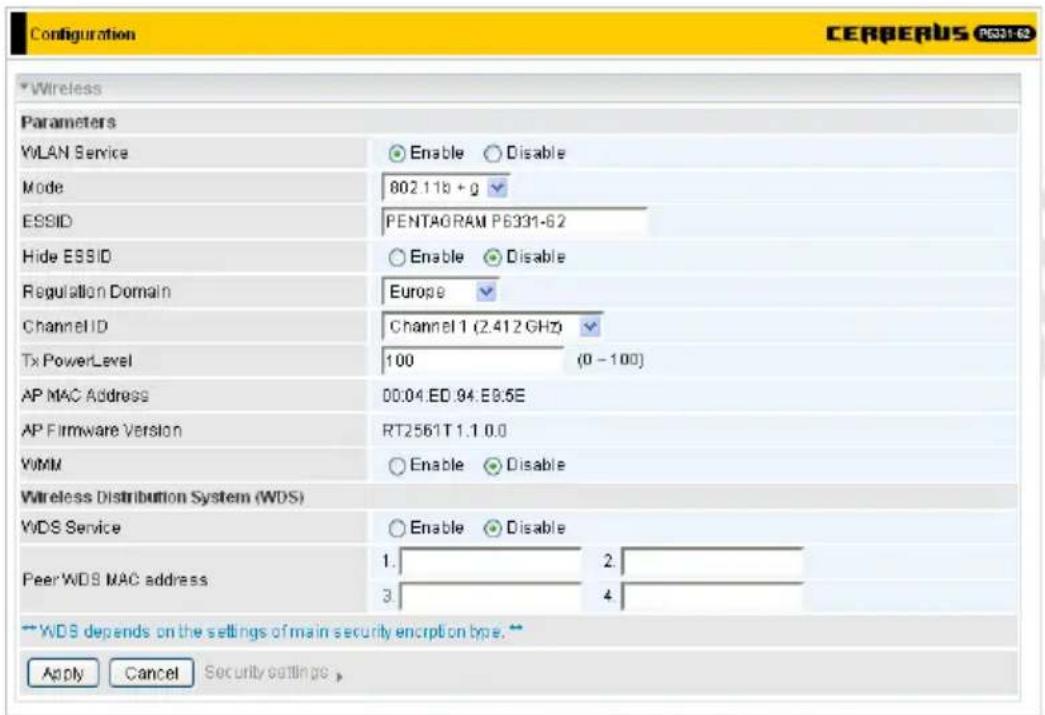
Parameters
WLAN Service – Enable or Disable built-in Access Point.
Mode – The default setting is 802.11b + g (Mixed mode). If you do not know or have both 11b and 11g devices in your network, then keep the default in mixed mode. From the drop-down list, you can select 802.11g if you have only 11g card. If you have only 11b card, then select 802.11b.
ESSID – The ESSID is the unique name of a wireless access point (AP) to be distinguished from another. For security propose, change to a unique ID name to the AP which is already built-in to the router's wireless interface. It is case sensitive and must not excess 32 characters. Make sure your wireless clients have exactly the same ESSID as the device, in order to get connected to your network.
Hide ESSID – It is function in which transmits its ESSID to the air so that when wireless client searches for a network, router can then be discovered and recognized. Select Enable if you do not want broadcast your ESSID. When Enable is selected, no one will be able to locate the Access Point (AP) of your router. When Disable is selected, you can allow anybody with a wireless client to be able to locate the Access Point (AP) of your router.
Regulation Domain – There are seven Regulation Domains for you to choose from, including North America (N.America), Europe, France, etc. The Channel ID will be different based on this setting. Select region in which router will be used – broadcasting on channel unavailable for your region may be against the law.
Channel ID – Select the ID channel that you would like to use.
Tx Power Level – It is function that enhances the wireless transmitting signal strength. User may adjust this power level from minimum 0 up to maximum 100. Note: The Power Level maybe different in each access network user premises environment and choose the most suitable level for your network.
AP MAC Address – It is a unique hardware address of the Access Point.
AP Firmware Version – The Access Point firmware version.
WMM – Enable or Disable WMM (Wi-Fi Multimedia) also known as WME (Wireless Multimedia Extensions).
Wireless Distribution System (WDS)
It is a wireless access point mode that enables wireless link and communication with other access point. It is easy to be installed, simply define the peer's MAC address of the connected AP. WDS takes advantages of cost saving and flexibility which no extra wireless client device is required to bridge between two access points and extending an existing wired or wireless infrastructure network to create a larger network.
WDS Service – The default setting is Disable. Check Enable radio button to activate this function.
Peer WDS MAC Address – It is the associated AP's MAC Address. It is important that your peer's AP must include your MAC address in order to acknowledge and communicate with each other. Note: For MAC Address, Semicolon “:” or Dash “-” must be included.
Apply – Click this button to apply changes made on this screen.
Cancel – Click this button to discard changes made on this screen.
Security Settings – Click on Security Settings to go to LAN / Wireless Security.
LAN / Wireless Security
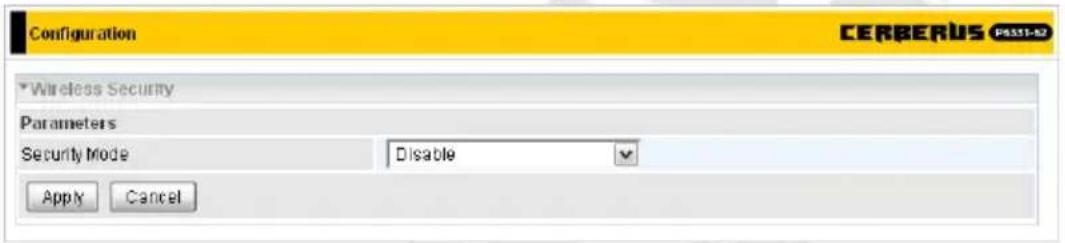
Appearance of this page depends on option selected on Security Mode list:
- Disable
Wireless network in this mode is not protected and anyone who knows ESSID can connect to this wireless network.

• WPA Pre-Shared Key
Only wireless stations with security set to WPA-PSK will be able to connect to this network.
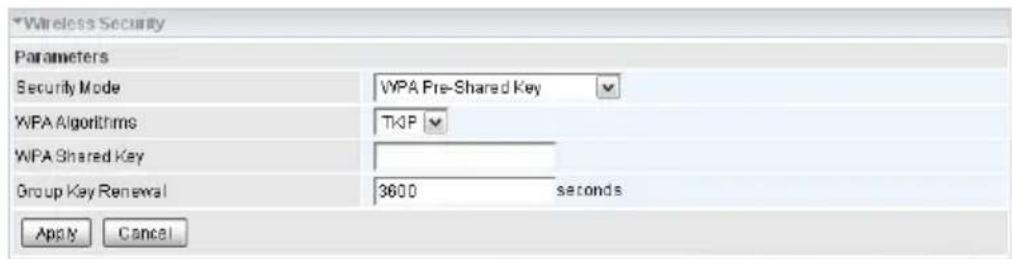
Security Mode – Change security mode.
WPA Algorithms – Select encryption algorithm: TKIP (Temporal Key Integrity Protocol) or AES (Advanced Encryption Standard). AES utilizes a stronger encryption method and incorporates Message Integrity Code (MIC) to provide protection against hackers.
WPA Shared Key – The key for network authentication. The input format is in character style and the key size should be in the range between 8 and 63 characters.
Group Key Renewal – The period of renewal time for changing the security key between wireless client and Access Point (AP). This process is done automatically.
Apply – Click this button to apply changes made on this screen.
Cancel – Click this button to discard changes made on this screen.
• WPA2 Pre-Shared Key
Only wireless stations with security set to WPA2-PSK will be able to connect to this network.
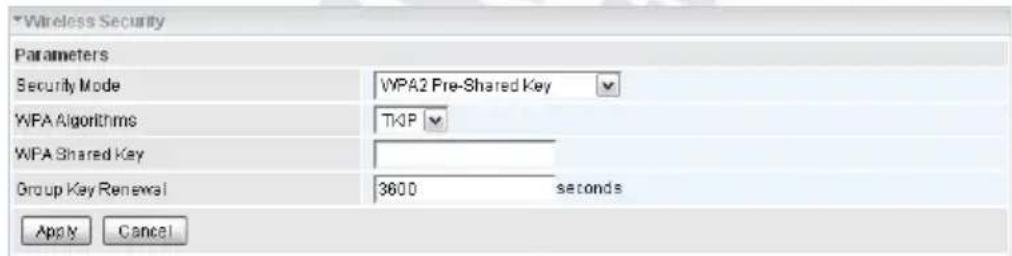
Security Mode – Change security mode.
WPA Algorithms – Select encryption algorithm: TKIP (Temporal Key Integrity Protocol) or AES (Advanced Encryption Standard). AES utilizes a stronger encryption method and incorporates Message Integrity Code (MIC) to provide protection against hackers.
WPA Shared Key – The key for network authentication. The input format is in character style and the key size should be in the range between 8 and 63 characters.
Group Key Renewal – The period of renewal time for changing the security key between wireless client and Access Point (AP). This process is done automatically.
Apply – Click this button to apply changes made on this screen.
Cancel – Click this button to discard changes made on this screen.
• WPA/WPA2 Pre-Shared Key
Wireless stations with security set to both WPA-PSK or WPA2-PSK will be able to connect to this network.
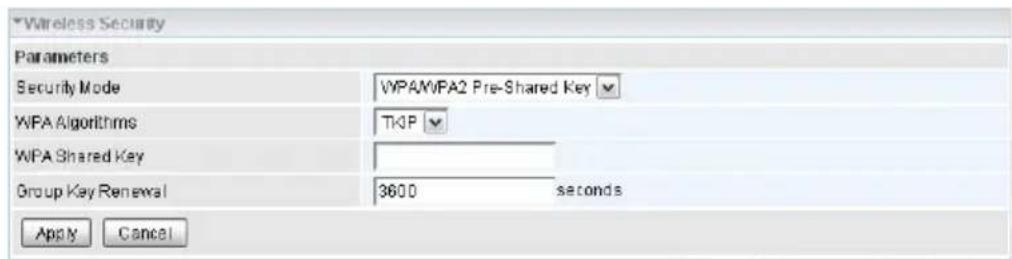
Security Mode – Change security mode.
WPA Algorithms – Select encryption algorithm: TKIP (Temporal Key Integrity Protocol) or AES (Advanced Encryption Standard). AES utilizes a stronger encryption method and incorporates Message Integrity Code (MIC) to provide protection against hackers.
WPA Shared Key – The key for network authentication. The input format is in character style and the key size should be in the range between 8 and 63 characters.
Group Key Renewal – The period of renewal time for changing the security key between wireless client and Access Point (AP). This process is done automatically.
Apply – Click this button to apply changes made on this screen.
Cancel – Click this button to discard changes made on this screen.
- WEP
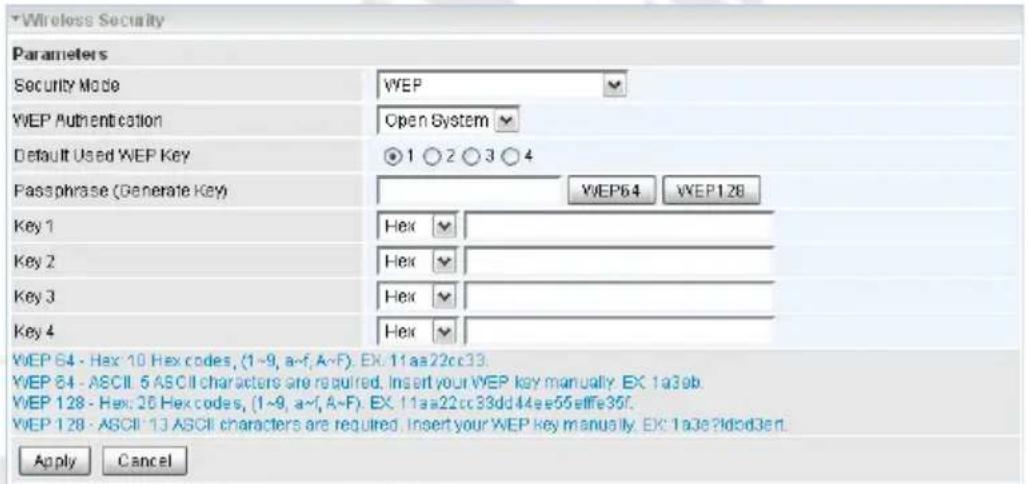
WEP Authentication – To prevent unauthorized wireless stations from accessing data transmitted over the network, the router offers secure data encryption, known as WEP. If you require high security for transmissions, there are three options to select from:
- Open System – No authentication is required to connect to this network.
- Share key – Authentication is required and is based on Share keys.
- Both – Used authentication method depends on wireless station security settings.
Default Used WEP Key – Select the encryption key ID; please refer to Key (1\~4) below.
Passphrase – This is used to generate WEP keys automatically based upon the input string and a pre-defined algorithm in WEP64 or WEP128. You can input the same string in both the AP and Client card settings to generate the same WEP keys. Please note that you do not have to enter Key (1-4) as below when the Passphrase is enabled.
Key (1-4) – Enter the key to encrypt wireless data. To allow encrypted data transmission, the WEP Encryption Key values on all wireless stations must be the same as the router.
There are four keys for your selection. The input format is in HEX or ASCII style, 5 and 13 ASCII codes or 10 and 26 HEX codes are required for WEP64 and WEP128 respectively no any separator is included.
Apply – Click this button to apply changes made on this screen.
Cancel – Click this button to discard changes made on this screen.
LAN / DHCP Server
You can disable or enable the DHCP (Dynamic Host Configuration Protocol) server or enable the router's DHCP relay functions. The DHCP protocol allows your router to dynamically assign IP addresses to PCs on your network if they are configured to obtain IP addresses automatically. Appearance of this page depends on option selected on DHCP Server Mode list.
- Disable
When the DHCP Server is disabled, you will need to manually assign a fixed IP address to each PC on your network, and set the default gateway for each PC to the IP address of the router (the default is 192.168.1.100).
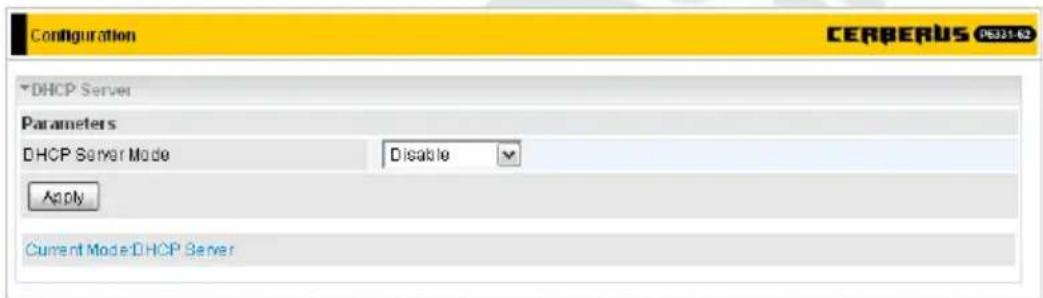
Apply – Click this button to apply changes made on this screen.
- DHCP Server
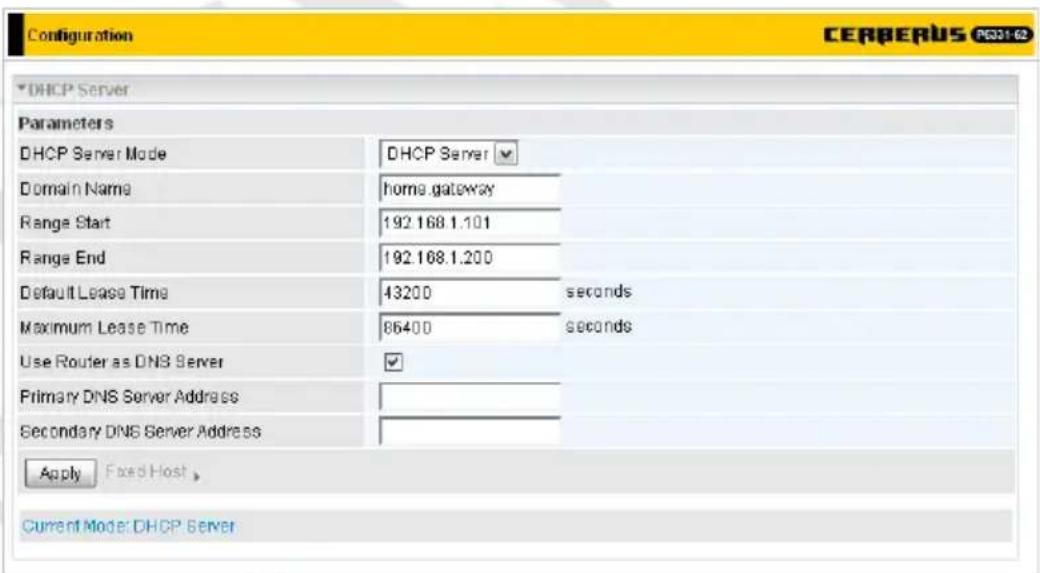
Domain Name – Domain in which router's DHCP server operates.
Range Start – First IP address in DHCP server's IP pool.
Range End – Last IP address in DHCP server's IP pool.
Default Lease Time – Default time for which DHCP client will lease IP address.
Maximum Lease Time – Maximum time for which DHCP client will lease IP address.
Use Router as DNS Server – Check this box if router will act also as DNS server.
Primary / Secondary DNS Server – IP addresses of primary and secondary DNS servers. This fields are unavailable when Use Router as DNS Server is enabled.
Apply – Click this button to apply changes made on this screen.
Fixed Host – Click on Fixed Host to open Fixed Host list.
Fixed Host list
This list allows you to assign IP address to certain MAC address. This will allow your network printers or internal servers to receive always the same IP address while using DHCP server.
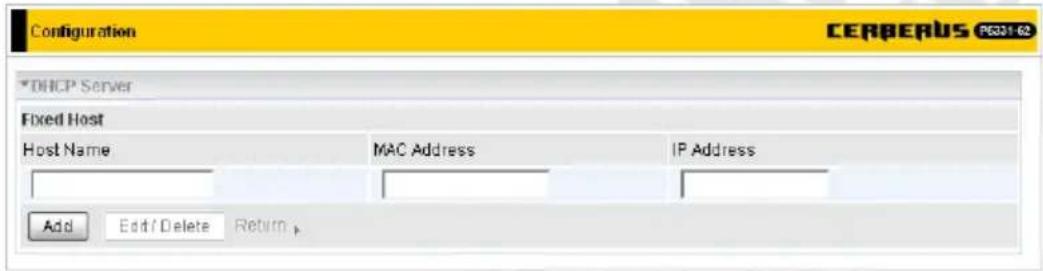
Host Name – Name of DHCP client.
MAC Address – MAC address to which IP address will be assigned.
IP Address – IP address which will be assigned to MAC address.
Add – Click this button to add new item to the list.
Edit / Delete – Click this button to save new values to list item with selected Edit field or to delete list items with selected Delete field.
Return – Click on Return to go back to main DHCP Server page.
- DHCP Relay
In DHCP Relay mode router's DHCP server relays all DHCP requests to external DHCP server. Use this function only if advised to do so by your network administrator or ISP.
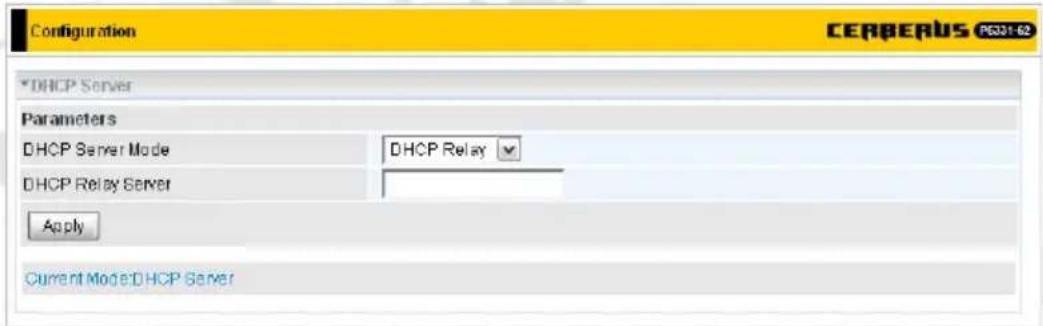
DHCP Relay Server – IP address of external DHCP server.
Apply – Click this button to apply changes made on this screen.
WAN
A WAN (Wide Area Network) is an outside connection to another network or the Internet.
WAN / WAN Profile
This screen appearance changes with selected Main Port and Protocol:
Protocol – Protocol used by ISP.
- PPPoE (RFC2516, PPP over Ethernet)
PPPoE (PPP over Ethernet) provides access control in a manner similar to dial-up services using PPP.
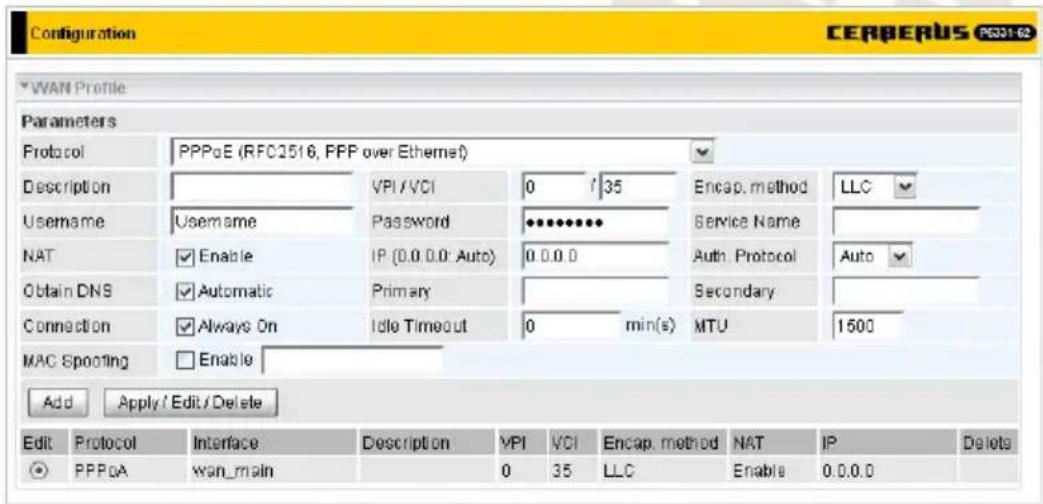
Protocol – Change used protocol.
Description – A user-definable name for this connection.
VPI/VCI – Enter the VPI and VCI information provided by your ISP.
Encap. method – Select the encapsulation format, the default is LLC. Select the one provided by your ISP.
Username – Enter the username provided by your ISP. You can input up to 128 alphanumeric characters (case sensitive). This is in the format of username@ispname instead of simply username.
Password – Enter the password provided by your ISP. You can input up to 128 alphanumeric characters (case sensitive)
Service Name – This item is for identification purposes. If it is required, your ISP provides you the information. Maximum input is 15 alphanumeric characters.
NAT – The NAT (Network Address Translation) feature allows multiple users to access the Internet through a single ISP account, sharing a single IP address. If users on your LAN have public IP addresses and can access the Internet directly, the NAT function can be disabled.
IP Address – Your WAN IP address. Leave this at 0.0.0.0 to automatically obtain an IP address from your ISP.
Auth. Protocol – Default is Auto. Your ISP advises on using Chap or Pap.
Obtain DNS – Select Automatic check box to receive DNS via DHCP.
Primary / Secondary – Enter the IP addresses of the DNS servers. The DNS servers are passed to the DHCP clients along with the IP address and the Netmask.
Connection – Check Always On box if you want the router to establish a PPPoE session when starting up and to automatically re-establish the PPPoE session when disconnected by the ISP. Uncheck Always On if you want to establish a PPPoE session
only when there is a packet requesting access to the Internet (i.e. when a program on your computer attempts to access the Internet). In this mode, you must set Idle Timeout value at same time.
Idle Timeout – Auto-disconnect the broadband firewall gateway when there is no activity on the line for a predetermined period of time. The minimum value is 10 minutes.
MTU – Maximum Transmission Unit. The size of the largest datagram (excluding media-specific headers) an IP attempts to send through the interface.
MAC Spoofing – Select Enable and enter a MAC address that will temporarily change your router's MAC address to the one you have specified in this field. Leave it as Disabled if you do not wish to change the MAC address of your router.
Apply / Edit / Delete – Click this button to apply and save new values to list.
- PPPoA (RFC2684, PPP over AAL5)
PPPoA stands for Point to Point Protocol over ATM Adaptation Layer 5 (AAL5). It provides access control and billing functionality in a manner similar to dial-up services using PPP.
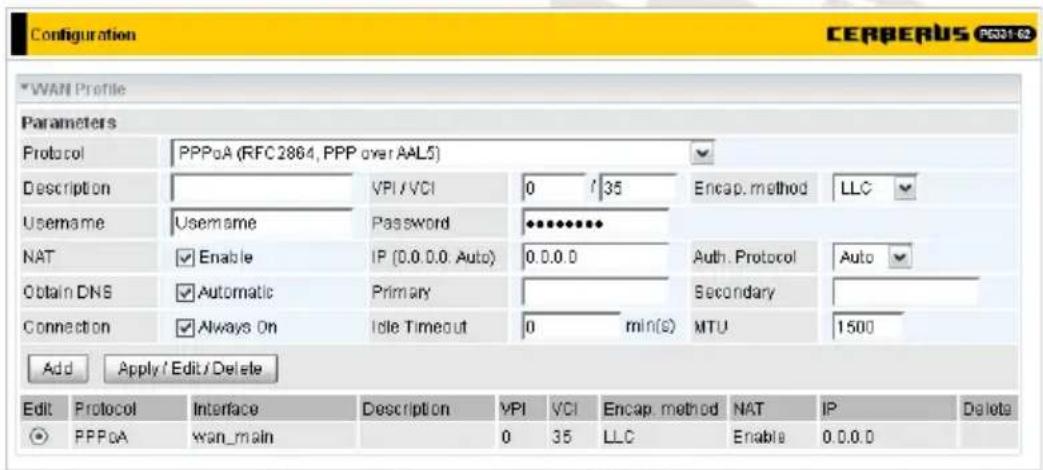
Protocol – Change used protocol.
Description – User-definable name for the connection.
VPI/VCI – Enter the VPI and VCI information provided by your ISP.
Encap. method – Select the encapsulation format, the default is LLC. Select the one provided by your ISP
Username – Enter the username provided by your ISP. You can input up to 128 alphanumeric characters (case sensitive). This is in the format of username@ispname instead of simply username.
Password – Enter the password provided by your ISP. You can input up to 128 alphanumeric characters (case sensitive).
NAT – The NAT (Network Address Translation) feature allows multiple users to access the Internet through a single IP account, sharing a single IP address. If users on your LAN have public IP addresses and can access the Internet directly, the NAT function can be disabled.
IP Address – Your WAN IP address. Leave this at 0.0.0.0 to automatically obtain an IP address from your ISP.
Auth. Protocol – Default is Auto. Your ISP should advise you on whether to use Chap or Pap.
Obtain DNS – Select Automatic check box to receive DNS via DHCP.
Primary / Secondary – Enter the IP addresses of the DNS servers. The DNS servers are passed to the DHCP clients along with the IP address and the Netmask.
Connection – Check Always On box if you want the router to establish a PPPoA session when starting up and to automatically re-establish the PPPoA session when disconnected by the ISP. Uncheck Always On if you want to establish a PPPoA session only when there is a packet requesting access to the Internet (i.e. when a program on your computer attempts to access the Internet). In this mode, you must set Idle Timeout value at same time.
Idle Timeout – Auto-disconnect the broadband firewall gateway when there is no activity on the line for a predetermined period of time. The minimum value is 10 minutes.
MTU – Maximum Transmission Unit. The size of the largest datagram (excluding media-specific headers) an IP attempts to send through the interface.
Apply / Edit / Delete – Click this button to apply and save new values to list.
- MPoA (RFC 1483/RFC2684, Multiprotocol Encapsulation over AAL5)
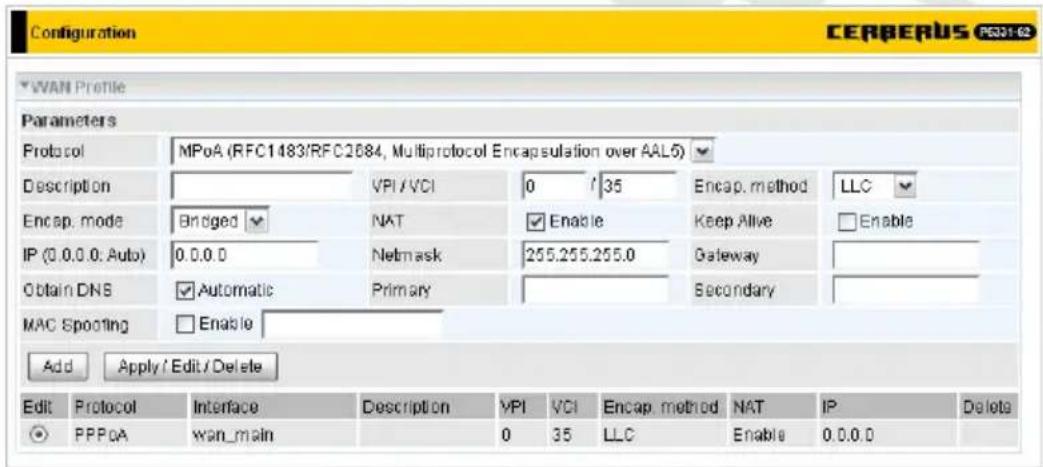
Protocol – Change used protocol.
Description – Your description of this connection.
VPI/VCI – Enter the VPI and VCI information provided by your ISP.
Encap. method – Select the encapsulation format, the default is LLC. Select the one provided by your ISP.
Encap. mode – Choose whether you want the device to function as bridge mode or routing mode.
NAT – The NAT (Network Address Translation) feature allows multiple users to access the Internet through a single IP account, sharing the single IP address. If users on your LAN have public IP addresses and can access the Internet directly, the NAT function can be disabled.
IP Address – Your WAN IP address. Leave this at 0.0.0.0 to automatically obtain an IP address from your ISP.
Netmask – The default is 255.255.255.0. User can change it to other such as 255.255.255.128. Type the netmask assigned to you by your ISP (if given).
Gateway – Enter the IP address of the default gateway.
Obtain DNS – Select Automatic check box to receive DNS via DHCP.
Primary / Secondary – Enter the IP addresses of the DNS servers. The DNS servers are passed to the DHCP clients along with the IP address and the Netmask.
MAC Spoofing – Select Enable and enter a MAC address that will temporarily change your router's MAC address to the one you have specified in this field. Leave it as Disabled if you do not wish to change the MAC address of your router.
Apply / Edit / Delete – Click this button to apply and save new values to list.
- Pure Bridge
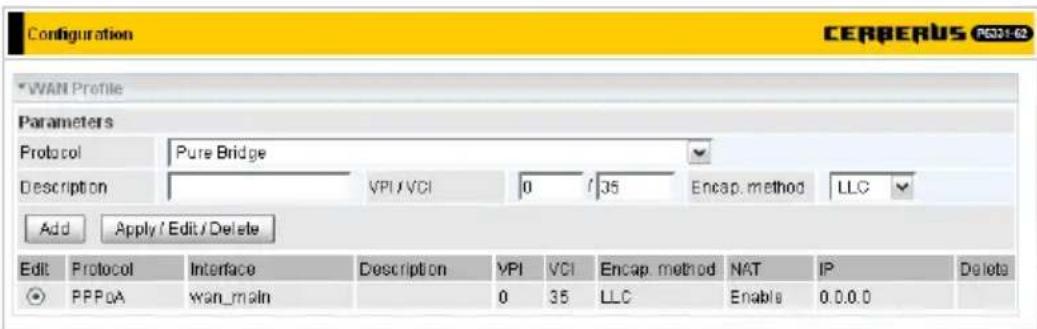
Protocol – Change used protocol.
Description – A user-definable name for this connection.
VPI/VCI – Enter the VPI and VCI information provided by your ISP.
Encap. method – Select the encapsulation format, this is provided by your ISP.
Add – Click this button to add new item to the list.
Apply / Edit / Delete – Click this button to apply and save new values to list item with selected Edit field or to delete list items with selected Delete field.
- PPPoE with Pass-through
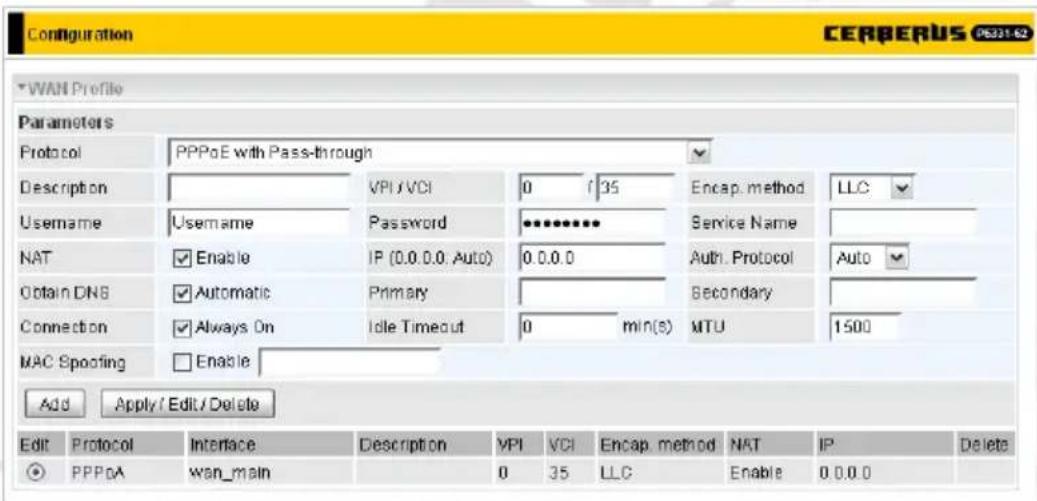
Protocol – Change used protocol.
Description – A user-definable name for this connection.
VPI/VCI – Enter the VPI and VCI information provided by your ISP.
Encap. method – Select the encapsulation format, the default is LLC. Select the one provided by your ISP.
Username – Enter the username provided by your ISP. You can input up to 128 alphanumeric characters (case sensitive). This is in the format of username@ispname instead of simply username.
Password – Enter the password provided by your ISP. You can input up to 128 alphanumeric characters (case sensitive)
Service Name – This item is for identification purposes. If it is required, your ISP provides you the information. Maximum input is 15 alphanumeric characters.
NAT – The NAT (Network Address Translation) feature allows multiple users to access the Internet through a single ISP account, sharing a single IP address. If users on your LAN have public IP addresses and can access the Internet directly, the NAT function can be disabled.
IP Address – Your WAN IP address. Leave this at 0.0.0.0 to automatically obtain an IP address from your ISP.
Auth. Protocol – Default is Auto. Your ISP advises on using Chap or Pap.
Obtain DNS – Select Automatic check box to receive DNS via DHCP.
Primary / Secondary – Enter the IP addresses of the DNS servers. The DNS servers are passed to the DHCP clients along with the IP address and the Netmask.
Connection – Check Always On box if you want the router to establish a PPPoE session when starting up and to automatically re-establish the PPPoE session when disconnected by the ISP. Uncheck Always On if you want to establish a PPPoE session only when there is a packet requesting access to the Internet (i.e. when a program on your computer attempts to access the Internet). In this mode, you must set Idle Timeout value at same time.
Idle Timeout – Auto-disconnect the broadband firewall gateway when there is no activity on the line for a predetermined period of time. The minimum value is 10 minutes.
MTU – Maximum Transmission Unit. The size of the largest datagram (excluding media-specific headers) an IP attempts to send through the interface.
MAC Spoofing – Select Enable and enter a MAC address that will temporarily change your router's MAC address to the one you have specified in this field. Leave it as Disabled if you do not wish to change the MAC address of your router.
Apply / Edit / Delete – Click this button to apply and save new values to list.
WAN / ADSL Mode
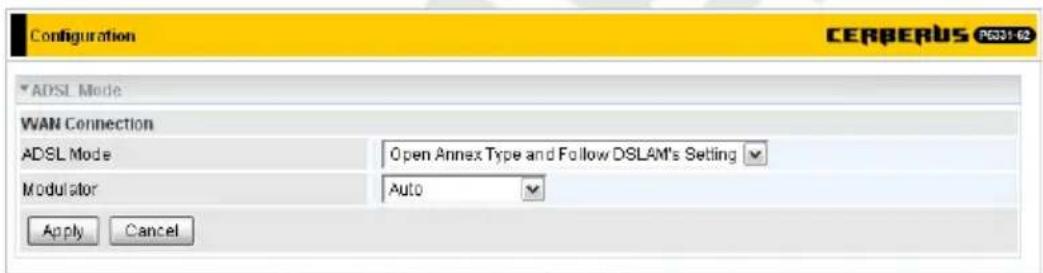
ADSL Mode – There are five modes Open Annex Type and Follow DSLAM's Setting, Annex A, Annex L, Annex M and Annex J that user can select for this connection.
Modulator – There are seven modes AUTO, ADSL multimode, ADSL2, ADSL2+, G.Lite, T1.413 and G.DMT that user can select for this connection.
Apply – Click this button to apply changes made on this screen.
Cancel – Click this button to discard changes made on this screen.
System
System / Time Zone
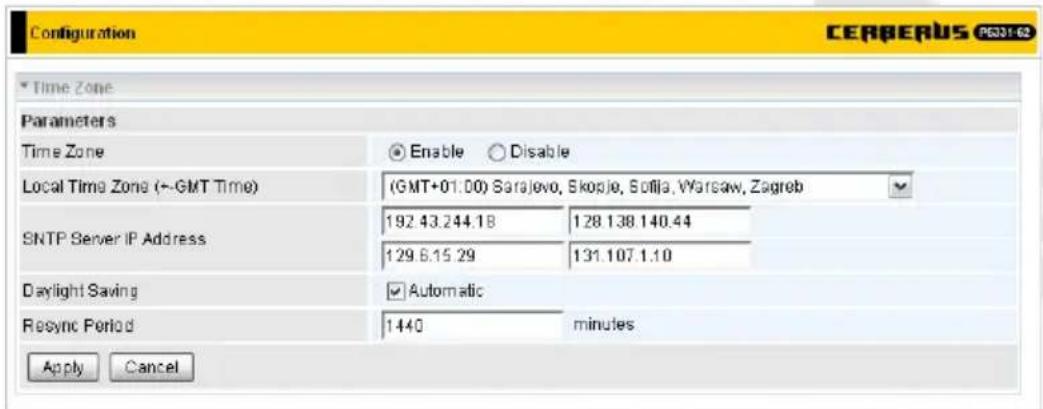
The router does not have a real time clock on board; instead, it uses the Simple Network Time Protocol (SNTP) to get the current time from an SNTP server outside your network. Choose your local time zone, click Enable and click the Apply button. After a successful connection to the Internet, the router retrieves the correct local time from the SNTP server you have specified. If you prefer to specify an SNTP server other than those in the drop-down list, simply enter its IP address as shown above. Your ISP may provide an SNTP server for you to use.
Resync Period (in minutes) is the periodic interval the router waits before it resynchronizes the router's time with that of the specified SNTP server. To avoid unnecessarily increasing the load on your specified SNTP server you should keep the poll interval as high as possible – at the absolute minimum every few hours or even days.
System / Firmware Upgrade
Your router's firmware is the software that allows it to operate and provides all its functionality. Think of your router as a dedicated computer, and the firmware as the software it runs. Over time this software may be improved and modified. Your router allows you to upgrade the software it runs to take advantage of these changes.
Clicking on Browse allows you to select the new firmware image file you have downloaded to your PC. Once the correct file is selected, click Upgrade to update the firmware in your router.
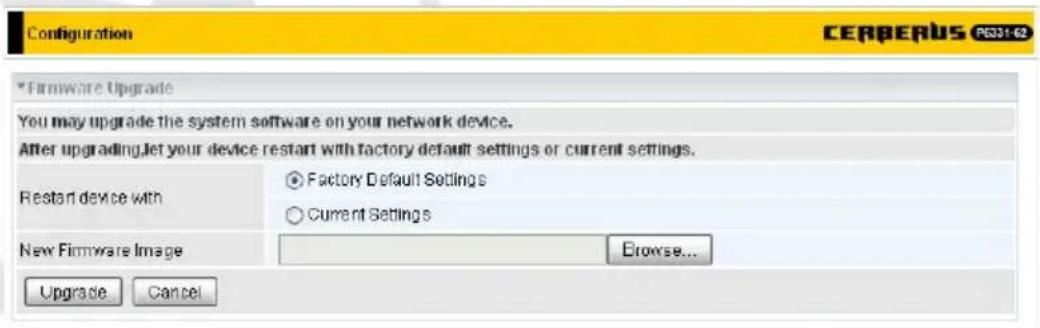
Restart Router with – To choose Factory Default Setting or Current Settings that user want.
New Firmware Image – Type in the location of the file you wish to upload in this field or click Browse... to find it.
Browse... – Click Browse... to find the .afw file you wish to upload. Remember that you must decompress compressed (.zip) files before you can upload them.
Upgrade – Click upgrade to begin the upload process. This process may take up to two minutes.
Warning: DO NOT power down the router or interrupt the firmware upgrade while it is still in process. Improper operation may damage the router.
System / Backup/Restore
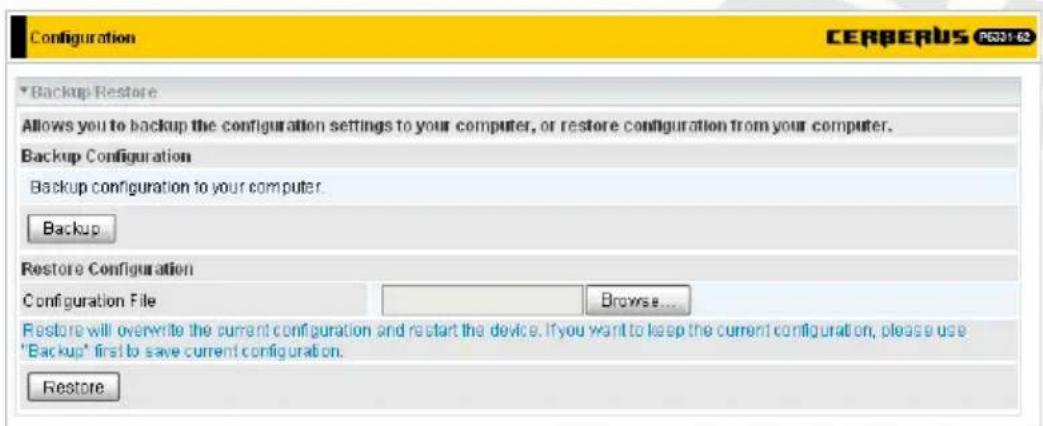
These functions allow you to save and backup your router's current settings to a file on your PC, or to restore a previously saved backup. This is useful if you wish to experiment with different settings, knowing that you have a backup handy in the case of any mistakes. It is advisable to backup your router's settings before making any significant changes to your router's configuration.
Press Backup to select where on your local PC to save the settings file. You may also change the name of the file when saving if you wish to keep multiple backups.
Press Browse to select a file from your PC to restore. You should only restore settings files that have been generated by the Backup function, and that were created when using the current version of the router's firmware. Settings files saved to your PC should not be manually edited in any way.
Select the settings files you wish to use, and press Restore to load those settings into the router.
System / Restart Router
Click Restart with option Current Settings to reboot your router and restore your last saved configuration.
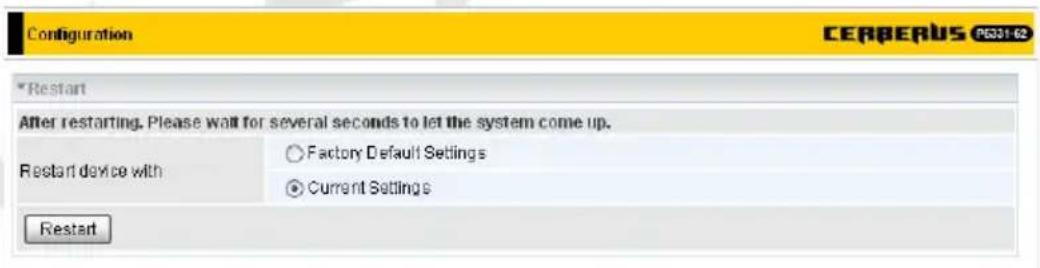
If you wish to restart the router using the factory default settings (for example, after a firmware upgrade or if you have saved an incorrect configuration), select Factory Default Settings to reset to factory default settings.
You may also reset your router to factory settings by pressing in the small Reset pinhole button on the back of your router for about 6 seconds while the router is turned on.
System / User Management
In order to prevent unauthorized access to your router's configuration interface, it requires all users to login with a password. You can set up multiple user accounts, each with their own password. Once you have clicked Edit on the account you want to edit, the information of the account will be displayed above.
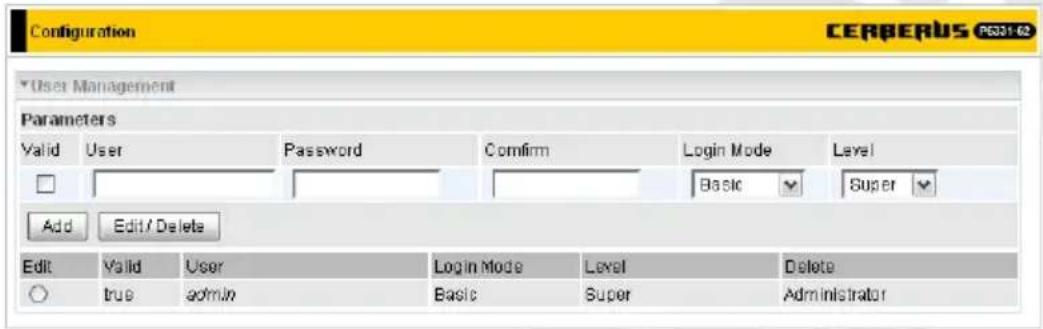
Valid – Select this box to enable or deselect to disable user account..
User – Enter user name.
Password / Confirm – In both fields enter password for this user.
Login Mode – Configuration mode after user logon. Advanced mode is available only for users with Super privileges.
Level – Privileges level for this user.
Add – Click this button to add new item to the list.
Edit / Delete – Click this button to save new values to list item with selected Edit field or to delete list items with selected Delete field.
System / Mail Alert
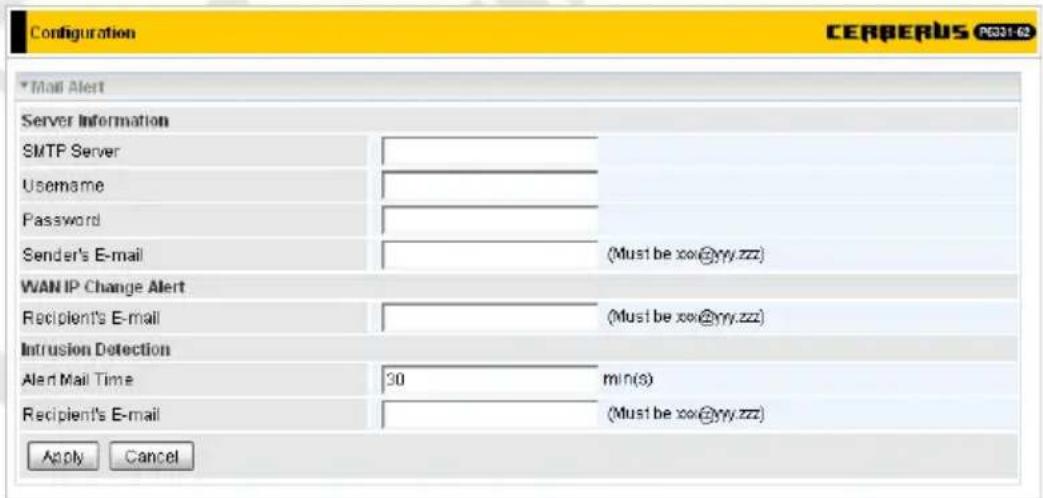
Send a log via email, if WAN IP is changed or if intruders accessing your computer without permission
Firewall
Firewall / Packet Filter
Packet filtering enables you to configure your router to block specified internal/external users (IP address) from Internet access, or you can disable specific service requests (Port number) to /from Internet. This configuration program allows you to set up to 6 different filter rules for different users based on their IP addresses or their network Port number. The relationship among all filters is "or" operation, which means that the router checks these different filter rules one by one, starting from the first rule. As long as one of the rules is satisfied, the specified action is taken.
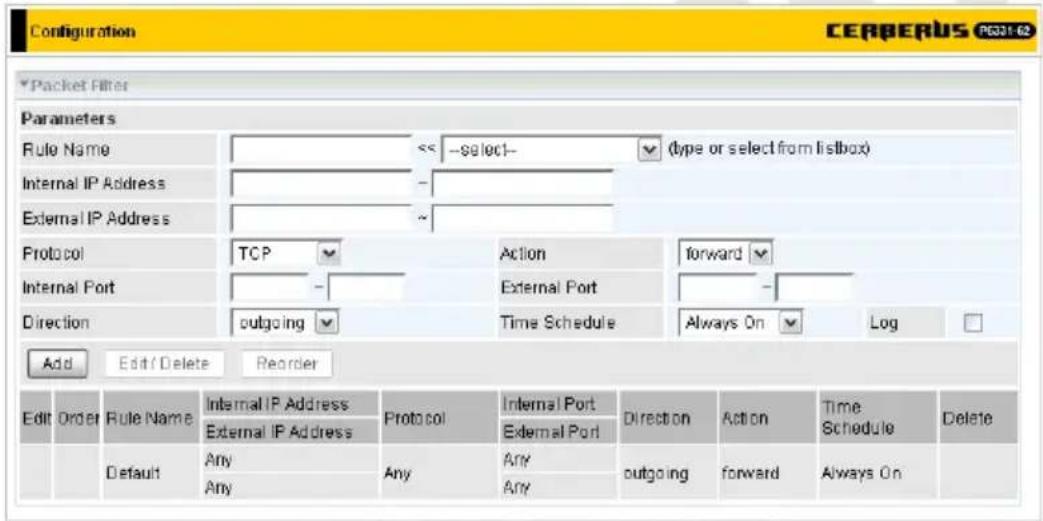
Rule Name – Users-define description to identify this entry. The maximum name length is 32 characters, and then can choose application that they want from listbox.
Internal IP Address / External IP Address – This is the Address-Filter used to allow or block traffic to/from particular IP address(es). Input the range you want to filter out. If you leave empty or 0.0.0.0, it means any IP address.
Protocol – Specify the packet type (TCP, UDP, ICMP, etc.) that the rule applies to. Select TCP if you wish to search for the connection-based application service on the remote server using the port number. Or select UDP if you want to search for the connectionless application service on the remote server using the port number.
Action – If a packet matches this filter rule, Forward (allows the packets to pass) or Drop (disallow the packets to pass) this packet.
Internal Port – This Port or Port Range defines the ports allowed to be used by the Remote/WAN to connect to the application. Default is set from range 0 \~ 65535. It is recommended that this option be configured by an advanced user.
External Port – This is the Port or Port Range that defines the application.
Direction – Determine whether the rule is for outgoing packets or for incoming packets.
Time Schedule – It is self-defined time period. You may specify a time schedule for your prioritization policy. For setup and detail, refer to Time Schedule section.
Log - Check this box if you wish to generate logs when the filer rule is applied to a packet.
Add – Click this button to add new item to the list.
Edit / Delete – Click this button to save new values to list item with selected Edit field or to delete list items with selected Delete field.
Reorder – Use arrows in Order column to change order of rules and then click Reorder button to apply new order.
Attention: If the DHCP server option is enabled, you must be very careful in assigning IP addresses of a filtered private IP range to avoid conflicts because you do not know which PC in the LAN is assigned which IP address. The easiest and safest way is that the filtered IP address is assigned to a specific PC that is not allowed to access an outside resource such as the Internet. You configure the filtered IP address manually for this PC, but it stays in the same subnet with the router.
Firewall / MAC Filter
A MAC (Media Access Control) address is the unique network hardware identifier for each PC on your network's interface (i.e. its Network Interface Card or Ethernet card). Using your router's MAC Address Filter function, you can configure to block specific machines from accessing your LAN.
There are no pre-defined MAC address filter rules; you can add the filter rules to meet your requirements.
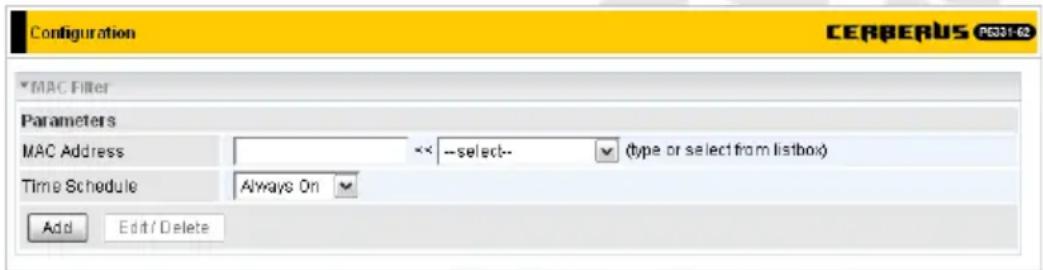
MAC Address – Enter the MAC address you wish to manage.
Time Schedule – It is self-defined time period. You may specify a time schedule for your prioritization policy. For setup and detail, refer to Time Schedule section.
Add – Click this button to add new item to the list.
Edit / Delete – Click this button to save new values to list item with selected Edit field or to delete list items with selected Delete field.
Firewall / Intrusion Detection
Check Enable if you wish to detect intruders accessing your computer without permission. The router automatically detects and blocks a DoS (Denial of Service) attack if a user enables this function. This kind of attack is not to access confidential data on the network; instead, it aims to disrupt specific equipment or the entire network. If this happens, users are not able to access network resources.
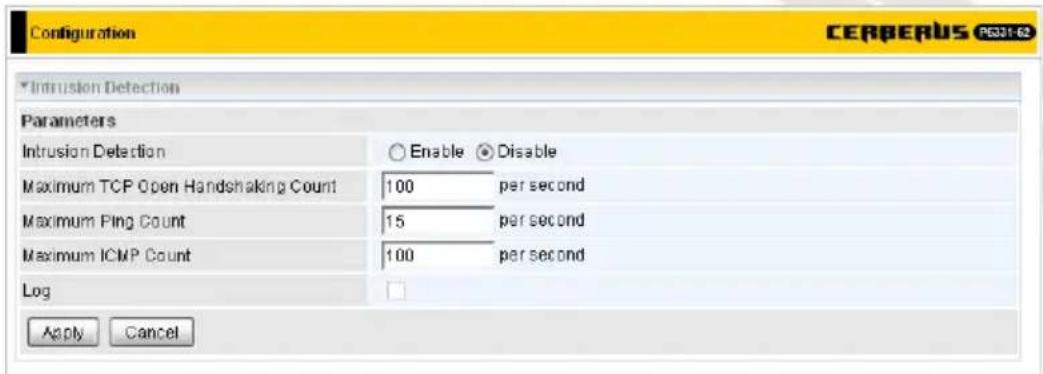
Intrusion Detection – Check Enable if you wish to detect intruders accessing your computer without permission.
Maximum TCP Open Handshaking Count – This is a threshold value to decide whether a SYN Flood attempt is occurring or not. Default value is 100 TCP SYN per seconds.
Maximum Ping Count – This is a threshold value to decide whether an ICMP Echo Storm is occurring or not. Default value is 15 ICMP Echo Requests (PING) per second.
Maximum ICMP Count – This is a threshold to decide whether an ICMP flood is occurring or not. Default value is 100 ICMP packets per seconds except ICMP Echo Requests (PING).
Log – Check Log if you wish to generate logs when the filer rule is applied to the Intrusion Detection.
Apply – Click this button to apply changes made on this screen.
Cancel – Click this button to discard changes made on this screen.
Firewall / Block WAN PING
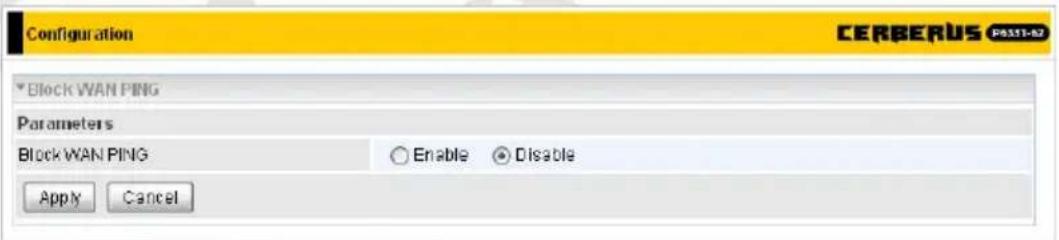
Block WAN PING – Check Enable if you wish to exclude outside PING requests from reaching this router.
Apply – Click this button to apply changes made on this screen.
Cancel – Click this button to discard changes made on this screen.
Firewall / URL Filter
URL (Uniform Resource Locator – e.g. an address in the form of http://www.pentagram.eu or http://www.example.com) filter rules allow you to prevent users on your network from accessing particular websites from their URL. There are no pre-defined URL filter rules; you can add filter rules to meet your requirements.
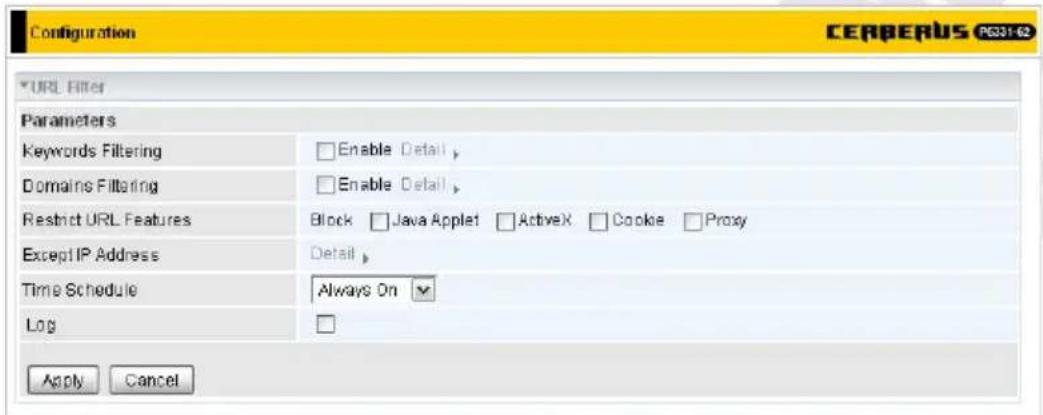
Keywords Filtering – Allows blocking by specific keywords within a particular URL rather than having to specify a complete URL (e.g. to block any image called “advertisement.gif”). When enabled, your specified keywords list is checked to see if any keywords are present in URLs accessed to determine if the connection attempt should be blocked. Note that the URL filter blocks web browser (HTTP) connection attempts using port 80 only. Click on Detail to open Keywords Filtering list.
Domains Filtering – Checks the domain name in URLs accessed against your list of domains to block or allow. If it matches, the URL request is sent (Trusted) or dropped (Forbidden). Please be note that the completed URL www.[domain name] shall be specified. Click on Detail to open Domain Filtering list.
Restrict URL Features – This function enhances the restriction to your URL rules. You can select to Block Java Applet (Blocks Web content which includes the Java Applet to prevent someone who wants to damage your system via the standard HTTP protocol), Block ActiveX, Block Cookies or Block Proxy.
Except IP Address – Click on Detail to open Except IP Address list.
Time Schedule – It is self-defined time period. You may specify a time schedule for your prioritization policy. For setup and detail, refer to Time Schedule section.
Log – Click Log if you wish to generate logs when the filer rule is applied to the URL Filter.
Apply – Click this button to apply changes made on this screen.
Cancel – Click this button to discard changes made on this screen.
- Keywords Filtering
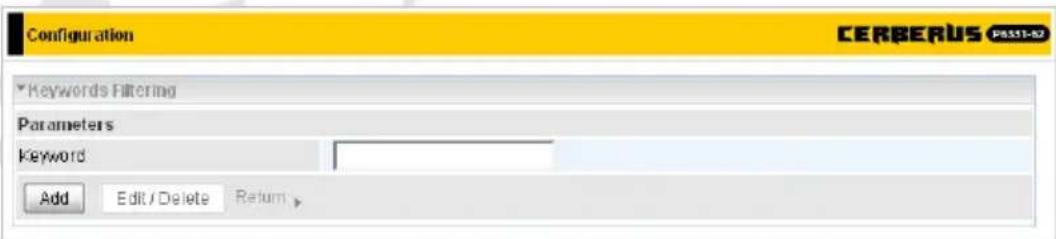
Keyword – Enter keyword which will be blocked.
Add – Click this button to add new item to the list.
Edit / Delete – Click this button to save new values to list item with selected Edit field or to delete list items with selected Delete field.
Return – Click on Return to go back to Firewall / URL Filter page.
- Domain Filtering
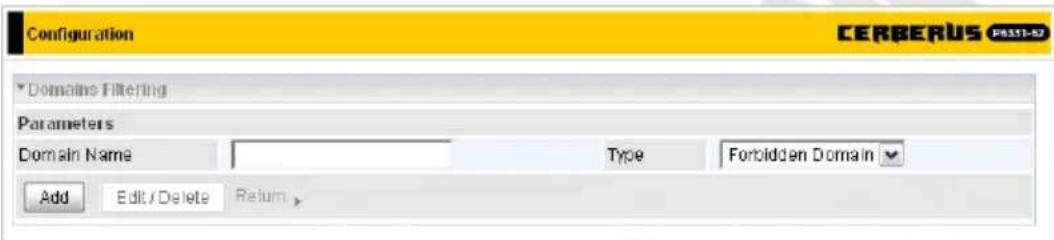
Domain – Enter domain for which filter will be created.
Type – Select whether entered domain is Trusted Domain or Forbidden Domain.
Add – Click this button to add new item to the list.
Edit / Delete – Click this button to save new values to list item with selected Edit field or to delete list items with selected Delete field.
Return – Click on Return to go back to Firewall / URL Filter page.
- Except IP Address
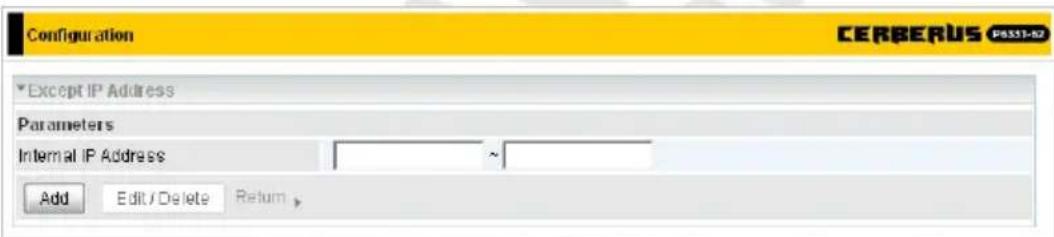
Internal IP Address – Type IP address of range of IP addresses for which URL filtering won't be applied.
Add – Click this button to add new item to the list.
Edit / Delete – Click this button to save new values to list item with selected Edit field or to delete list items with selected Delete field.
Return – Click on Return to go back to Firewall / URL Filter page.
QoS
Quality of Service Introduction
If you've ever found your ‘net’ speed has slowed to a crawl because another family member is using a P2P file sharing program, you'll understand why the Quality of Service features in the routers is such a breakthrough for home users and office users.
QOS: Keeping Your Net Connection Fast and Responsive
Configurable by internal IP address, external IP address, protocol, and port, the Quality of Service (QoS) gives you full control over which types of outgoing data traffic should be given priority by the router, ensuring bandwidth-consumption data like gaming packets, latency-sensitive application like voice, or even mission critical files, move through the router at lightning speed, even under heavy load. You can throttle the speed at which different types of outgoing data pass through the router. In addition, you can simply change the priority of different types of upload data and let the router sort out the actual speeds.
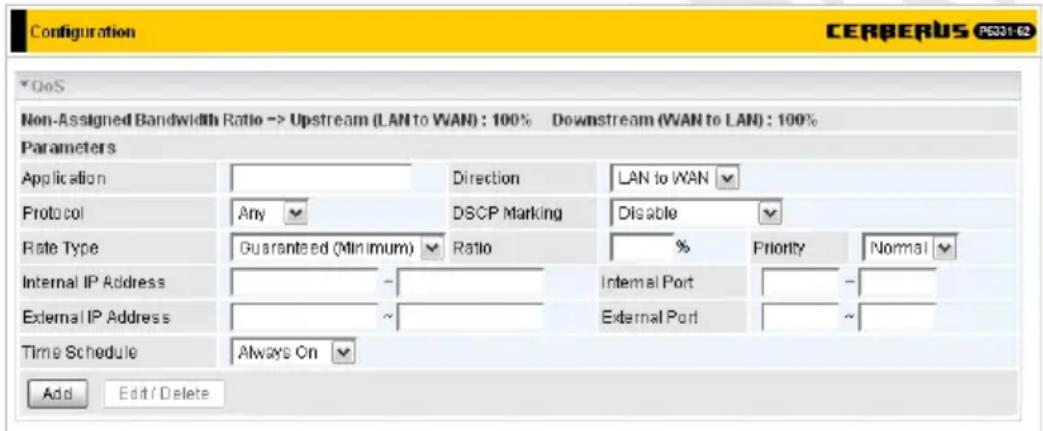
Non-Assigned Bandwidth Ratio – Total available (Non-assigned) bandwidth, in percentage, that can be assigned for QoS purposes.
Application - A name that identifies an existing policy.
Direction – The traffic flow direction to be controlled by the QoS policy. There are two settings to be provided in the Router:
- LAN to WAN – You want to control the traffic flow from the local network to the outside world. e.g., you have a FTP server inside the local network and you want to have a limited traffic rate controlled by the QoS policy. So, you need to add a policy with LAN to WAN direction setting.
- WAN to LAN – Control Traffic flow from the WAN to LAN. The connection may be either issued from LAN to WAN or WAN to LAN.
Protocol – The Protocol will be controlled. For GRE protocol, there is no need to specify the IP addresses or Application ports in this page. For other protocols, at least one value shall be given.
• ANY – No protocol type is specified.
- TCP
• UDP
- ICMP
- GRE – For PPTP VPN Connections.
DSCP Marking – Differentiated Services Code Point (DSCP), it is the first 6 bits in the ToS byte. DSCP Marking allows users to classify traffic based on DSCP value and send packets to next Router.
Note: Make sure that the router(s) in the backbones network have the capability in executing and checking the DSCP through-out the QoS network.
PENTAGRAM Cerberus P 6331-62
| DSCP Mapping Table | |
| Disabled | None |
| Best Effort Best Effort (000000) | |
| Premium Express Forwarding (101110) | |
| Gold service (L) Class 1, | Gold (001010) |
| Gold service (M) Class 1, | Silver (001100) |
| Gold service (H) Class 1, | Bronze (001110) |
| Silver service (L) Class 2, | Gold (010010) |
| Silver service (M) Class 2, | Silver (010100) |
| Silver service (H) Class 2, | Bronze (010110) |
| Bronze service (L) Class 3, | Gold (011010) |
| Bronze service (M) Class 3, | Silver (011100) |
| Bronze service (H) Class 3, | Bronze (011110) |
Rate Type - 2 types are provided:
- Limited (Maximum) – Specify a limited data rate for this policy. It also is the maximal rate for this policy. For example, you may want to “throttle” the outgoing FTP speed to 20% of 256K and limit to it, you may use this type.
- Guaranteed (Minimum) – Specify a minimal data rate for this policy. For example, you want to provide a guaranteed data rate for your outside customers to access your internal FTP server with, say at least, 20% of your total bandwidth. You can use this type. Then, if there is available bandwidth that is not used, it will be given to this policy by following priority assignment.
Ratio – Assign the data ratio for this policy to be controlled. For example, we want to only allow 20% of the total data transfer rate for the LAN-to-WAN direction to be used for FTP server. Then we can specify here with data ratio = 20. If you have ADSL LINE with 256K/bps.rate, the estimated data rate, in kbps, for this rule is 20%*256*0.9 = 46kbps. (For 0.9 is an estimated factor for the effective data transfer rate for a ADSL LINE from LAN to WAN. For WAN-to-LAN, it is 0.85 to 0.8).
Priority – Specify the priority for the bandwidth that is not used. For example, you may specify two different QoS policies for different applications. Both applications need a minimal bandwidth and need more bandwidth, beside the assigned one, if there is any available/non-used one available. So, you may specify which application can have higher priority to acquire the non-used bandwidth. For the sample priority assignment for different policies, it is served in a First-In-First-Out way.
Internal IP Address – The IP address values for Local LAN machines you want to control. (For IP packets from LAN to WAN, it is the source IP address. For IP packages from WAN to LAN, it is the destination IP address.)
Internal Port – The Application port values for local LAN machines you want to control. (For TCP/UDP packets from LAN to WAN, it is the source port value. For TCP/UDP packets from WAN to LAN, it is the destination port value.)
External IP Address – The IP address values for Remote WAN machines you want to control. (For IP packets from LAN to WAN, it is the destination IP address. For IP packages from WAN to LAN, it is the source IP address.)
External Ports – The Application port values for remote machines you want to control. (For TCP/UDP packets from LAN to WAN, it is the destination port value. For TCP/UDP packets from WAN to LAN, it is the source port value.)
Time Schedule – Scheduling your prioritization policy.
Add – Click this button to add new item to the list.
Edit / Delete – Click this button to save new values to list item with selected Edit field or to delete list items with selected Delete field.
Example QOS Plan
| Application | IP or Ports | Control Flow | Data Rate | Time Schedule | |
| VoIP User | 192.168.1.1 | Outgoing | Minimal 20% with high priority for non-used bandwidth with SDCP marking Class 1 Gold Service | Always | |
| FTP Sever | 192.168.1.100 | Incoming and Outgoing | Outgoing: minimal 30%. Data rate. Incoming: minimal 30%. Data rate. Both with low priority for non-used bandwidth. | Only Working Hours 9:00 to 17:00 Monday to Friday. | |
| HTTP web browsing users | 80 | Incoming Outgoing | Outgoingd limited 20%. Data rate. Incoming: limited 30%. Data rate. | Always | |
ADSL Subscription Rate
Upstream: 256 kbps
Downstream: 2048 Mbps
Example QOS Setup
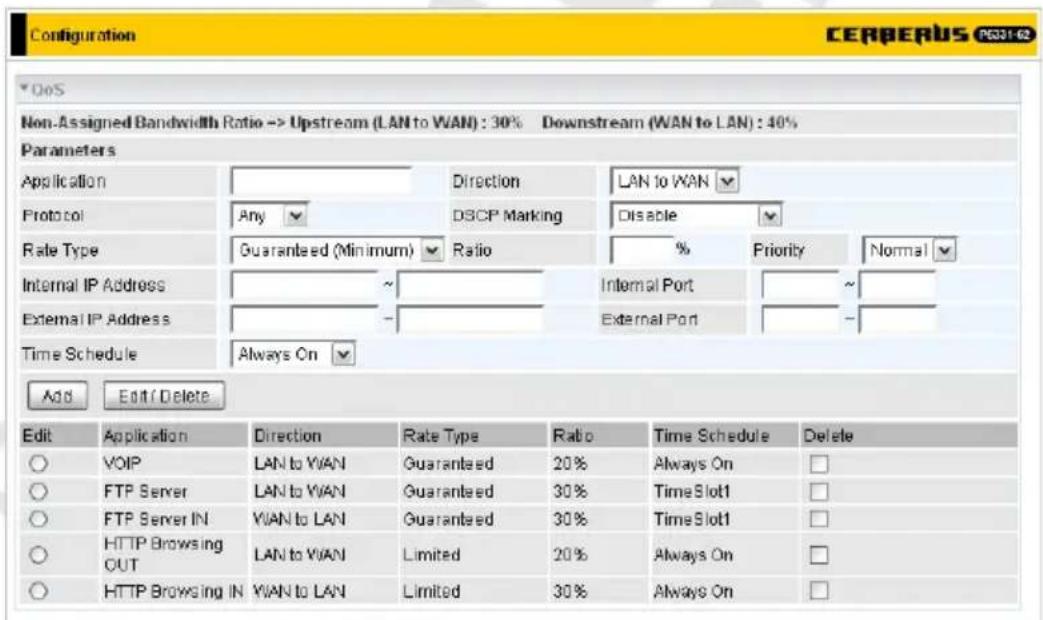
VoIP application
Voice is latency-sensitive application. Most VoIP devices are used SIP protocol and the port number will be assigned by SIP module automatically. Better to use fixed IP address for catching VoIP packets as high priority.
Virtual Server
In TCP/IP and UDP networks a port is a 16-bit number used to identify which application program (usually a server) incoming connections should be delivered to. Some ports have numbers that are pre-assigned to them by the IANA (the Internet Assigned Numbers Authority), and these are referred to as “well-known ports”. Servers follow the well-known port assignments so clients can locate them.
If you wish to run a server on your network that can be accessed from the WAN (i.e. from other machines on the Internet that are outside your local network), or any application that can accept incoming connections (e.g. Peer-to-peer/P2P software such as instant messaging applications and P2P file-sharing applications) and are using NAT (Network Address Translation), then you need to configure your router to forward these incoming connection attempts using specific ports to the PC on your network running the application. You also need to use port forwarding if you wish to host an online game server.
The reason is that when using NAT, your publicly accessible IP address is used by and points to your router, which needs to deliver all traffic to the private IP addresses used by your PCs. Please see the WAN configuration section of this manual for information on NAT.
The Internet Assigned Numbers Authority (IANA) is the central coordinator for the assignment of unique parameter values for Internet protocols. Port numbers range from 0 to 65535, but only port numbers 0 to 1023 are reserved for privileged services and are designated as “well-known ports”. The registered ports are numbered from 1024 through 49151. The remaining ports, referred to as dynamic ports, or private ports, are numbered from 49152 through 65535.
Examples of well-known and registered port numbers are shown below, for further information, please see IANA's website at: http://www.iana.org/assignments/port-numbers
Note: Using port forwarding does have security implications, since outside users are able to connect to PCs on your network. For this reason you are advised to use specific Virtual Server entries just for the ports your application requires instead of simply using DMZ or creating a Virtual Server entry for “All” protocols, as doing so results in all connection attempts to your public IP address accessing the specified PC.
Attention: If you disable the NAT option in the WAN / WAN Profile section, the Virtual Server function becomes invalid.
Attention: If the DHCP server option is enabled, you have to be very careful in assigning the IP addresses of the virtual servers in order to avoid conflicts. The easiest way of configuring Virtual Servers is to manually assign a static IP address to each virtual server PC, with an address that does not fall into the range of IP addresses that are issued by the DHCP server. You can configure the virtual server IP address manually, but it must still be in the same subnet as the router.
Well-known and Registered Ports
| Port Number | Protocol | Description | |
| 20 | TCP | FTP | Data |
| 21 | TCP | FTP | Control |
| 22 TCP & | UDP SSH Remote Login Protocol | ||
| 23 | TCP | Telnet | |
| 25 TCP | SMTP (Simple Mail Transfer Protocol) | ||
| 53 TCP & | UDP DNS (Domain Name Server) | ||
| 69 UDP | TFTP (Trivial File Transfer Protocol) | ||
| 80 TCP | World Wide Web HTTP | ||
| 110 TCP | POP3 (Post Office Protocol Version 3) | ||
| 119 TCP | NEWS (Network News Transfer Protocol) | ||
| 123 UDP | NTP (Network Time Protocol) | ||
| 161 | TCP | SNMP | |
| 443 TCP & | UDP HTTPS | ||
| 1503 | TCP | T.120 | |
| 1720 | TCP | H.323 | |
| 4000 | TCP | ICQ | |
| 7070 | UDP | RealAudio | |
Application – Select the service you wish to configure
Protocol – Automatic when you choose Application from listbox or select a protocol type which you want.
External Port / Internal Port – Enter the public port number & range you wish to configure.
Internal IP Address – Enter the IP address of a specific internal server to which requests from the specified port is forwarded.
Add – Click this button to add new item to the list.
Edit / Delete – Click this button to save new values to list item with selected Edit field or to delete list items with selected Delete field.
Since NAT acts as a “natural” Internet firewall, your router protects your network from access by outside users, as all incoming connection attempts point to your router unless you specifically create Virtual Server entries to forward those ports to a PC on your network. When your router needs to allow outside users to access internal servers, e.g. a web server, FTP server, Email server or game server, the router can act as a “virtual server”. You can set up a local server with a specific port number for the service to use, e.g. web/HTTP (port 80), FTP
(port 21), Telnet (port 23), SMTP (port 25), or POP3 (port 110). When an incoming access request to the router for a specified port is received, it is forwarded to the corresponding internal server.
In addition to specifying the port number used, you also need to specify the protocol used. The protocol is determined by the particular application. Most applications use TCP or UDP, however you can specify other protocols using the drop-down Protocol menu. Setting the protocol to "all" causes all incoming connection attempts using all protocols on all port numbers to be forwarded to the specified IP address.
Virtual Server / DMZ
The DMZ Host is a local computer exposed to the Internet. When setting a particular internal IP address as the DMZ Host, all incoming packets are checked by the Firewall and NAT algorithms, then passed to the DMZ host when a packet received does not use a port number in use by any other Virtual Server entries.
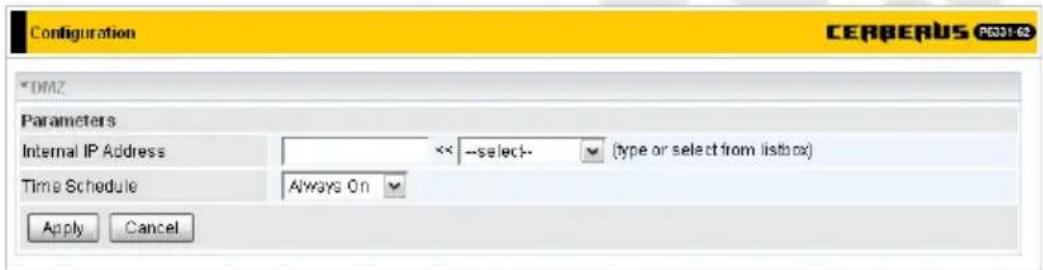
Internal IP Address – Enter the IP address of a specific internal host to which all external requests is forwarded.
Apply – Click this button to apply changes made on this screen.
Cancel – Click this button to discard changes made on this screen.
Wake on LAN
This page allows you to control to which hosts Magic Packet will be forwarded.
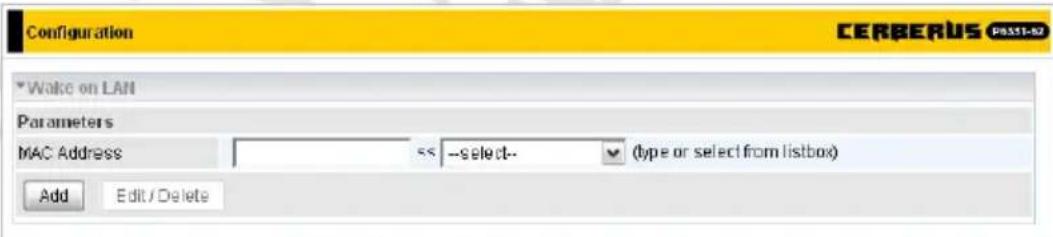
MAC Address – Enter the MAC address you wish to manage.
Add – Click this button to add new item to the list.
Edit / Delete – Click this button to save new values to list item with selected Edit field or to delete list items with selected Delete field.
Time Schedule
The Time Schedule supports up to 16 time slots which helps you to manage your Internet connection. In each time profile, you may schedule specific day(s) i.e. Monday through Sunday to restrict or allowing the usage of the Internet by users or applications.
This Time Schedule correlates closely with router's time, since router does not have a real time clock on board; it uses the Simple Network Time Protocol (SNTP) to get the current time from an SNTP server from the Internet. Refer to System / Time Zone for details. You router time should correspond with your local time. If the time is not set correctly, your Time Schedule will not function properly.
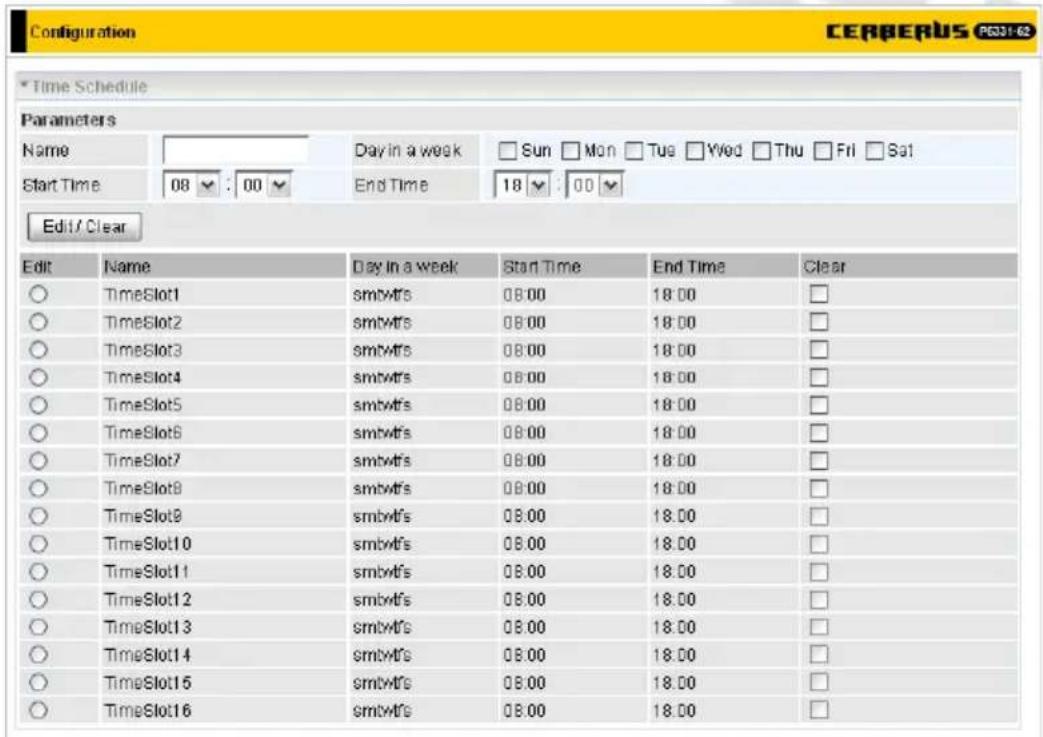
Name – A user-define description to identify this time portfolio.
Day in a week – The default is set from Sunday through Saturday. You may specify the days for the schedule to be applied. Selected days on list are displayed in capital letters.
Start Time – The default is set at 8:00 (AM). You may specify the start time of the schedule.
End Time – The default is set at 18:00 (6:00PM). You may specify the end time of the schedule.
Edit / Clear – Click this button to save new values to list item with selected Edit field or to clear list items with selected Clear field.
Advanced
Advanced / Static Route
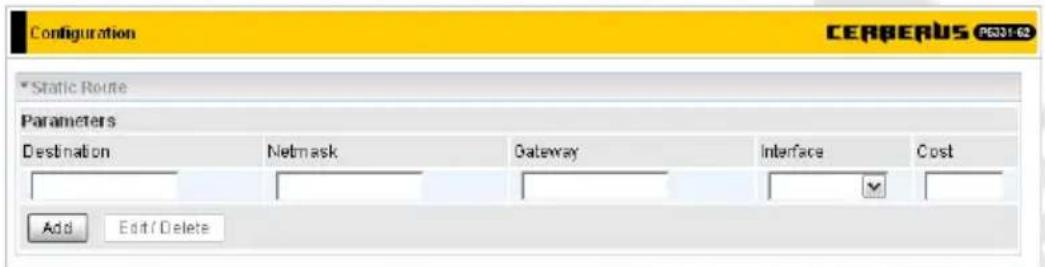
Destination – The destination subnet IP address.
Netmask – Subnet mask of the destination IP addresses based on above destination.
Gateway – The gateway IP address to which packets are forwarded.
Interface – Select the interface through which packets are forwarded.
Cost - Represents the cost of transmission for routing purposes. The number need not be precise, but it must be between 0 and 65535.
Add – Click this button to add new item to the list.
Edit / Delete – Click this button to save new values to list item with selected Edit field or to delete list items with selected Delete field.
Advanced / Static ARP
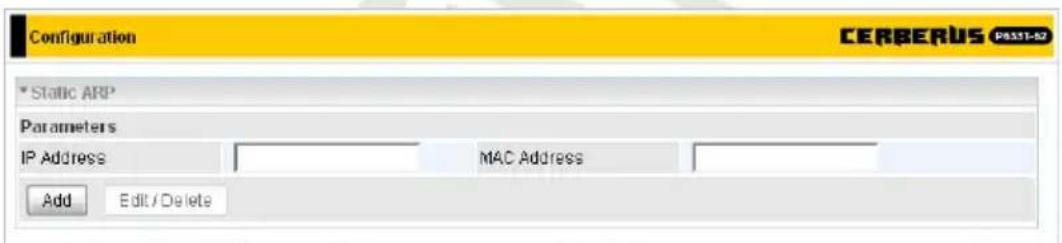
Enter IP Address and MAC_Address of host which will be added to static ARP table.
Add – Click this button to add new item to the list.
Edit / Delete – Click this button to save new values to list item with selected Edit field or to delete list items with selected Delete field.
Advanced / Dynamic DNS
The Dynamic DNS function lets you alias a dynamic IP address to a static hostname, so if your ISP does not assign you a static IP address you can still use a domain name. This is especially useful for hosting servers via your ADSL connection, so that anyone wishing to connect to you may use your domain name, rather than having to use your dynamic IP address, which changes from time to time. This dynamic IP address is the WAN IP address of the router, which is assigned to you by your ISP.
You first need to register and establish an account with the Dynamic DNS provider using their website, for example http://www.dyndns.org/
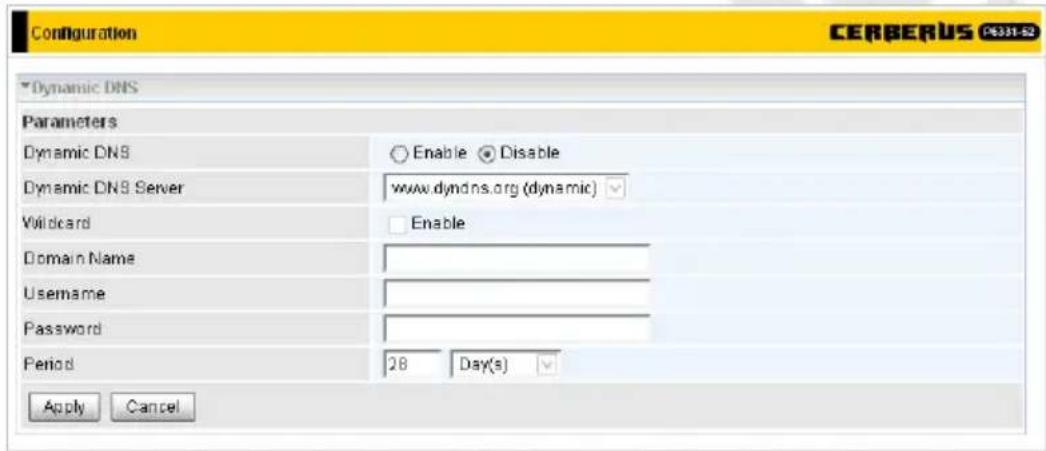
Dynamic DNS – Check Disable to disable or Enable to enable the Dynamic DNS function.
Dynamic DNS Server – Select the DDNS service you have established an account with.
Wildcard – Select this check box to enable the DYNDNS Wildcard.
Host – Enter one domain name you have registered.
Domain Name, Username and Password – Enter your registered domain name and your username and password for this service.
Period – Set the time period between updates, for the router to exchange information with the DDNS server. In addition to updating periodically as per your settings, the router performs an update when your dynamic IP address changes.
Apply – Click this button to apply changes made on this screen.
Cancel – Click this button to discard changes made on this screen.
Advanced / VLAN
VLAN (Virtual Local Area Network) is a group of devices on different physical LAN segments that can communicate with each other as if they were all on the same physical LAN segment. While clients and servers may be located anywhere on a network, they are grouped together by VLAN technology, and broadcasts are sent to devices within the VLAN.
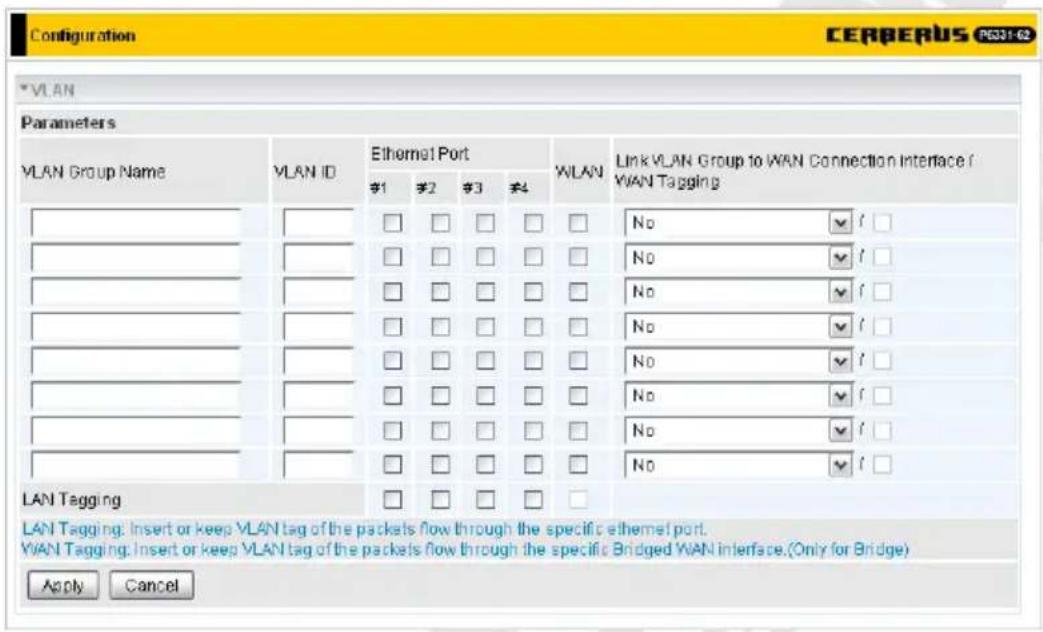
VLAN Group Name – There are eight groups that user can setup by themselves.
VLAN ID – Group name ID
LAN Tagging – Tagging VLAN ID to the specific VLAN group for Ethernet interface.
Ethernet port – Port name of Router
Link VLAN Group to WAN connection Interface / WAN Tagging – Select the WAN connection interface that VLAN group link. Select check box to enable WAN Tagging (only for Bridge connections).
Apply – Click this button to apply changes made on this screen.
Cancel – Click this button to discard changes made on this screen.
Advanced / Device Management
The Device Management advanced configuration settings allow you to control your router's security options and device monitoring features.
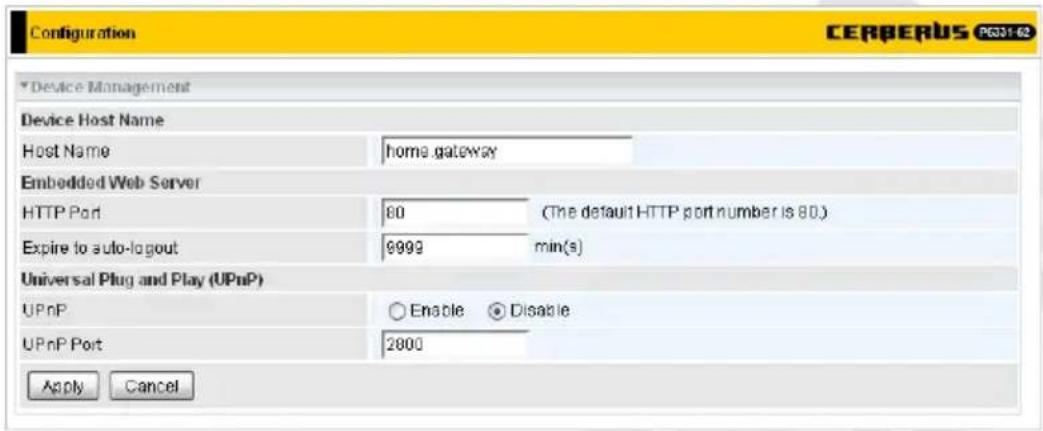
Device Host Name
Host Name – Router's name for identification purposes.
Embedded Web Server
HTTP Port – The port number of the router's embedded web server (for web-based configuration uses. The default value is the standard HTTP port, 80. You may specify an alternative if, for example, you are running a web server on a PC within your LAN.
Expire to auto-logout – Time after which user will be automatically logged out.
For Example: User A changes HTTP port number to 100, specifies their own IP address of 192.168.1.55, and sets the logout time to be 10 minutes. The router only allows User A access from the IP address 192.168.1.55 to logon to the Web GUI by typing: http://192.168.1.100:100 in their web browser. After 10 minutes, the device automatically logs out User A.
Universal Plug and Play (UPnP)
UPnP offers peer-to-peer network connectivity for PCs and other network devices, along with control and data transfer between devices. UPnP offers many advantages for users running NAT routers through UPnP NAT Traversal, and on supported systems makes tasks such as port forwarding much easier by letting the application control the required settings, removing the need for the user to control advanced configuration of their device.
Both the user's Operating System and the relevant application must support UPnP in addition to the router. Windows XP and Windows Me natively support UPnP (when the component is installed), and Windows 98 users may install the Internet Connection Sharing client from Windows XP in order to support UPnP. Windows 2000 does not support UPnP.
Note: For security reasons (Flash UPnP attack) UPnP is disabled by default.
Disable – Check to disable the router's UPnP functionality.
Enable – Check to enable the router's UPnP functionality.
UPnP Port – The default setting is 2800. It is highly recommended that you use this port value. If the value conflicts with other ports already in use you may wish to change the port.
Apply – Click this button to apply changes made on this screen.
Cancel – Click this button to discard changes made on this screen.
Advanced / IGMP
IGMP, known as Internet Group Management Protocol, is used to management hosts from multicast group.
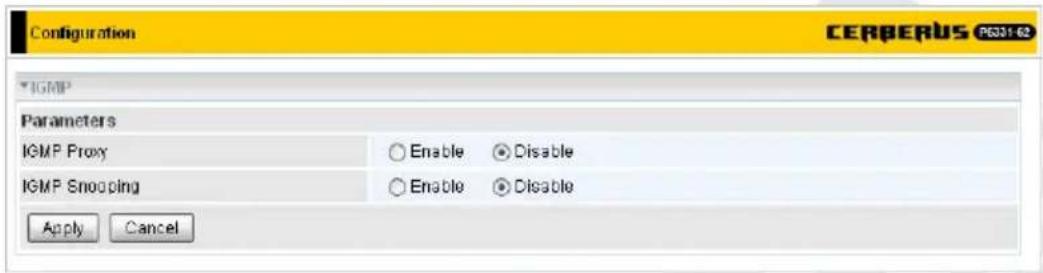
IGMP Proxy – Accepting multicast packet. Default is set to Disable.
IGMP Snooping – Allowing switched Ethernet to check and make correct forwarding decisions. Default is set to Enable
Apply – Click this button to apply changes made on this screen.
Cancel – Click this button to discard changes made on this screen.
Advanced / SNMP Access Control
Simple Network Management Protocol software on a PC within the LAN is required to use this function.
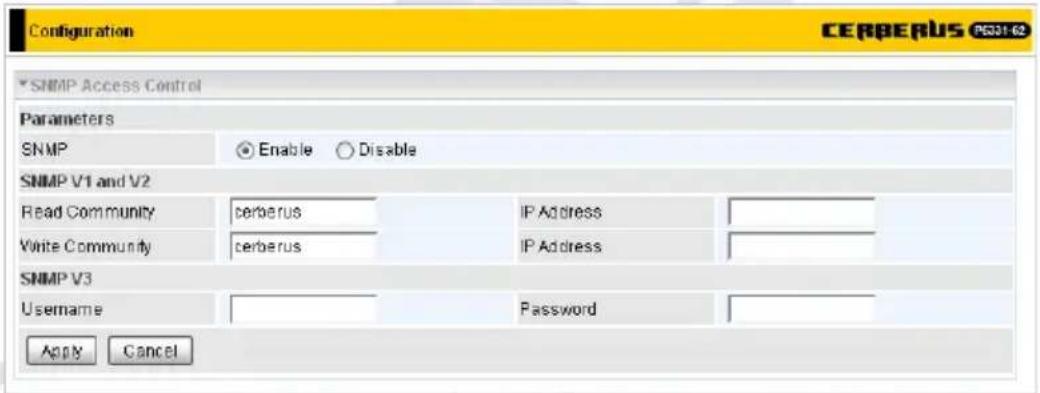
Parameters
SNMP – Enable or Disable SNMP.
SNMP V1 and V2
Read Community – Specify a name to be identified as the Read Community, and an IP address. This community string is checked against the string entered in the configuration file. Once the string name is matched, you can obtain this IP address and are able to view the data.
Write Community – Specify a name to be identified as the Write Community, and an IP address. This community string is checked against the string entered in the configuration file. Once a string name is matched, users from this IP address are able to view and modify data.
SNMP V3
Specify a name and password for authentication, and define access rights from the identified IP address. Once authentication has succeeded, users from this IP address are able to view and modify data.
Apply – Click this button to apply changes made on this screen.
Cancel – Click this button to discard changes made on this screen.
SNMP Version: SNMPv2c and SNMPv3
SNMPv2c is the combination of the enhanced protocol features of SNMPv2 without the SNMPv2 security. The "c" comes from the fact that SNMPv2c uses the SNMPv1 community string paradigm for "security" but is widely accepted as the SNMPv2 standard.
SNMPv3 is a strong authentication mechanism with fine granularity for remote monitoring.
Traps supported: Cold Start, Authentication Failure.
The following MIBs are supported:
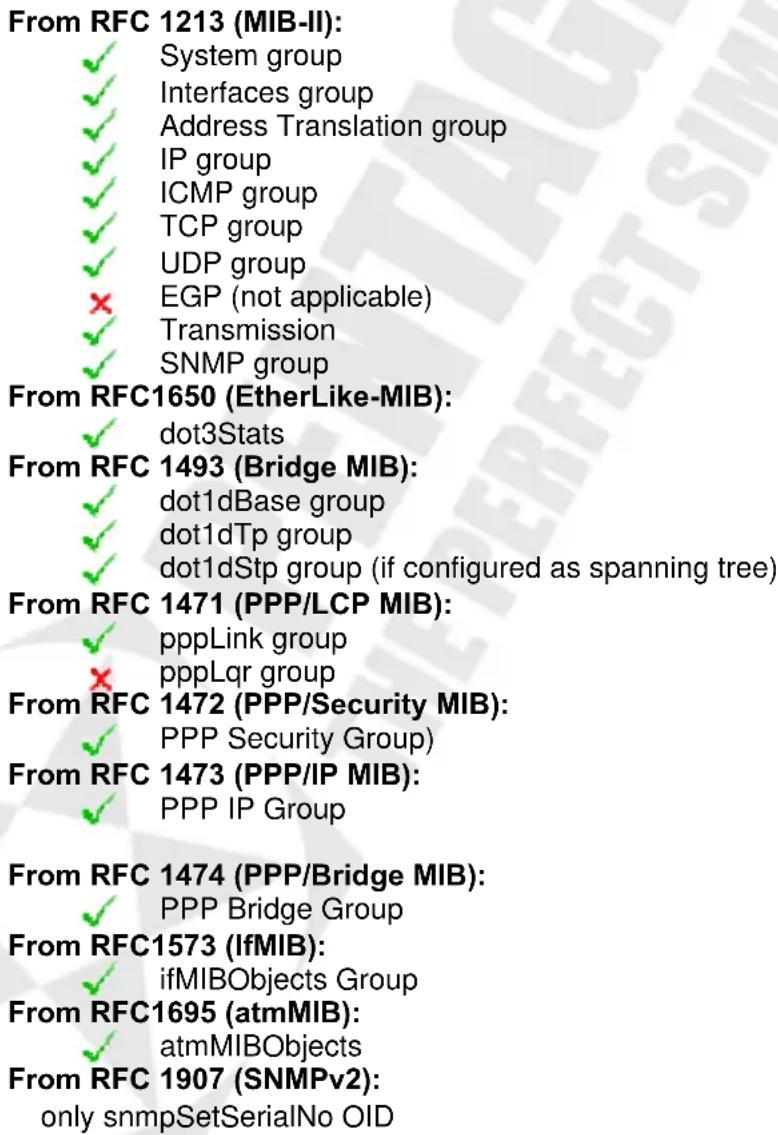
Advanced / Remote Access
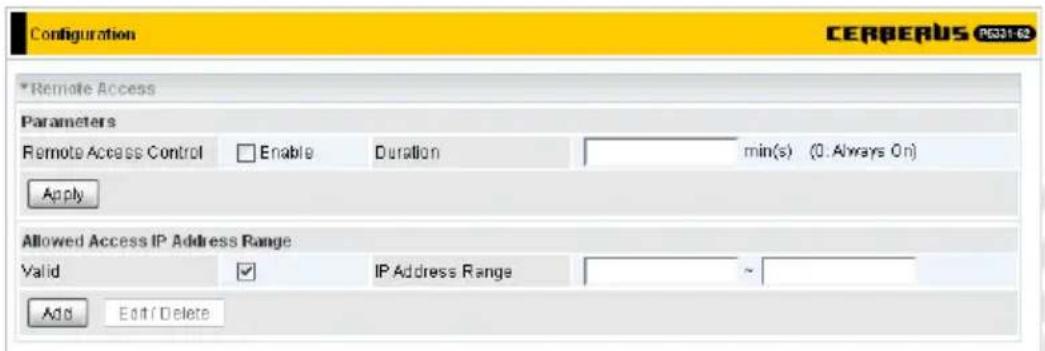
Remote Access Control
Enable – Select Enable to allow management access from remote side (mostly from internet). Duration – Set how many minutes to allow management access from remote side. Zero means always on.
Apply – Click this button to apply changes made on this screen.
Allowed Access IP Address Range
Valid – Select Valid to allow remote management from these IP ranges.
IP Address Range – Specify what IP address to be allowed to access device from remote side.
Add – Click this button to add new item to the list.
Edit / Delete – Click this button to save new values to list item with selected Edit field or to delete list items with selected Delete field.
Troubleshooting
If the router is not function properly, first check this session for simple troubleshooting before contacting your Internet service provider (ISP) for support.
Using LEDs to Diagnose Problems
The LEDs are useful aides for finding possible problem causes.
Power LED
The POWER LED on the front panel does not light up.:
- Make sure that the power adaptor is connected to the router and plugged in to an appropriate power source. Use only the supplied power adaptor;
- Check that the router and the power source are both turned on and the router is receiving sufficient power;
- Turn the router off and on;
- If the error persists, you may have a hardware problem. In this case, you should contact your vendor.
LAN LED
The LAN LED on the front panel does not light up.:
- Check the Ethernet cable connections between your router and the computer or hub;
- Check for faulty Ethernet cables;
- Make sure your computer's Ethernet card is working properly;
- If these steps fail to correct the problem, contact your local distributor for assistance.
ADSL LED
The ADSL LED on the front panel does not light up:
- Check the telephone wire and connections between the router ADSL port and the wall jack;
- Make sure that the telephone company has checked your phone line and set it up for ADSL service;
- Reset your ADSL line to reinitialize your link to the DSLAM;
- If these steps fail to correct the problem, contact your local distributor for assistance.
Problems with the Web Interface
I cannot access the web Interface:
- Make sure you are using the correct IP address of the router. Check the IP address of the router;
- Your computer's and the router's IP addresses must be on the same subnet for LAN access;
- If you changed the router's LAN IP address, then enter the new one as the URL;
- Remove any filters in LAN or WAN that block web service.
Problems with the Login Username and Password
I forgot my login username and/or password:
- The default username is "admin". The default password is "pentagram". The Password and Username fields are case-sensitive. Make sure that you enter the correct password and username using the proper casing;
- Press the RESET button for 10-12 seconds, and then release it - the defaults have been restored and the router restarts;
Problems with LAN Interface
I cannot access the router from the LAN or ping any computer on the LAN:
- Check the Ethernet LEDs on the front panel. A LAN LED should be on for a port that has a PC connected. If it is off, check the cables between your router and the PC. Make sure you have uninstalled any software firewall for troubleshooting;
- Make sure that the IP address and the subnet mask is consistent between the router and the workstation.
- In some cases computer with Windows Vista or Windows XP SP3 cannot obtain an IP address from router's DHCP server. If you encounter this, follow this steps to resolve this problem (Microsoft Support page) http://support.microsoft.com/kb/928233/en-us (this article may be not available in user language).
Problems with WAN Interface
Initialization of the ADSL connection failed:
- Check the cable connections between the ADSL port and the wall jack. The ADSL LED on the front panel of the router should be on;
- Check that your VPI, VCI and type of encapsulation settings are the same as what you collected from your telephone company and ISP;
- Restart the router. If you still have problems, you may need to verify your VPI, VCI and type of encapsulation settings with the telephone company and ISP.
I cannot get a WAN IP address from the ISP:
-
Ensure that all other devices connected to the same telephone line as your router (e.g. telephones, fax machines, analogue modems) have a line filter connected between them and the wall socket (unless your are using a Central Splitter or Central Filter installed by the qualified and licensed electrician), and ensure that all line filters are correctly installed and right way around;
-
Missing line filters or line filters installed the wrong way around can cause problems with your ADSL connection, including causing frequent disconnects.
Frequent loss of ADSL line sync (disconnections):
-
The ISP provides the WAN IP address after authenticating you. Authentication may be through the user name and password, the MAC address or the host name;
-
The username and password apply to PPPoE and PPPoA connections only. Make sure that you have entered the correct Service Name, Username and Password (be sure to use the correct casing).
Problems with the Internet Access
I cannot access the Internet:
- Make sure the router is turned on and connected to the network;
- If the ADSL LED is off, refer to Section ADSL LED of this troubleshooting;
- Verify your WAN settings;
- Make sure you entered the correct user name and password;
- For wireless stations, check that both the router and wireless station(s) are using the same ESSID, channel and encryption keys (if encryption is activated).
Internet connection disconnects:
- If you use PPPoA or PPPoE encapsulation, check the idle time-out setting;
- Contact your ISP.
If you have any troubles to configure or setup this ADSL Ethernet Router, please feel free to contact us.
NOTES
NOTES
- INDEX
- Introduction
- Features
- Package Contents
- Product Overview
- Important Notes
- Front Panel
- Back Panel
- Default Settings
- Resetting router
- Connecting Cerberus to Computer.
- Connecting via Ethernet Port (Ethernet Card)
- Connecting via WLAN Interface (Wireless Card)
- Configure TCP/IP
- Windows Vista
- Windows 2000/XP
- Windows 95/98/Me
- Configure router via web browser
- Login
- Navigation
- Configuration Modes
- Buttons
- Save Config to FLASH
- Basic
- Menu
- Status
- Device Information
- Port Status
- WAN
- Quick Start
- Select WAN Port
- Select Protocol
- - PPPoE (RFC2516, PPP over Ethernet)
- - PPPoA (RFC2684, PPP over AAL5)
- • MPoA (RFC 1483/RFC2684, Multiprotocol Encapsulation over AAL5)
- - Pure Bridge
- - PPPoE with Pass-through
- Please wait...
- Wireless
- Set Wireless configuration
- • PPPoA (RFC2684, PPP over AAL5)
- WLAN
- Wireless Parameters
- Security Parameters
- - Disable
- • WPA Pre-Shared Key
- • WPA2 Pre-Shared Key
- • WPA/WPA2 Pre-Shared Key
- • WEP
- Advanced
- Status / ADSL Status
- Status / ARP Table
- Status / DHCP Table
- Status / System Log
- Status / Firewall Log
- Status / UPnP Portmap
- Configuration
- LAN
- LAN / Ethernet
- LAN / IP Alias
- LAN / Wireless
- Parameters
- Wireless Distribution System (WDS)
- LAN / Wireless Security
- - WEP
- LAN / DHCP Server
- - DHCP Server
- Fixed Host list
- - DHCP Relay
- WAN / WAN Profile
- - MPoA (RFC 1483/RFC2684, Multiprotocol Encapsulation over AAL5)
- WAN / ADSL Mode
- System
- System / Time Zone
- System / Firmware Upgrade
- System / Backup/Restore
- System / Restart Router
- System / User Management
- System / Mail Alert
- Firewall
- Firewall / Packet Filter
- Firewall / MAC Filter
- Firewall / Intrusion Detection
- Firewall / Block WAN PING
- Firewall / URL Filter
- - Keywords Filtering
- - Domain Filtering
- - Except IP Address
- QoS
- Quality of Service Introduction
- QOS: Keeping Your Net Connection Fast and Responsive
- Example QOS Plan
- ADSL Subscription Rate
- Example QOS Setup
- VoIP application
- Virtual Server
- Well-known and Registered Ports
- Virtual Server / DMZ
- Wake on LAN
- Time Schedule
- Advanced / Static Route
- Advanced / Static ARP
- Advanced / Dynamic DNS
- Advanced / VLAN
- Advanced / Device Management
- Device Host Name
- Embedded Web Server
- Universal Plug and Play (UPnP)
- Advanced / IGMP
- Advanced / SNMP Access Control
- SNMP V1 and V2
- SNMP V3
- SNMP Version: SNMPv2c and SNMPv3
- The following MIBs are supported:
- Advanced / Remote Access
- Remote Access Control
- Allowed Access IP Address Range
- Troubleshooting
- Using LEDs to Diagnose Problems
- Power LED
- LAN LED
- ADSL LED
- Problems with the Web Interface
- Problems with the Login Username and Password
- Problems with LAN Interface
- Problems with WAN Interface
- Problems with the Internet Access
- NOTES
Brand : Pentagram
Model : Cerberus P6331-62
Category : Router