M2NS - Hard Drive Xcellon - Free user manual and instructions
Find the device manual for free M2NS Xcellon in PDF.

User questions about M2NS Xcellon
0 question about this device. Answer the ones you know or ask your own.
Ask a new question about this device
Download the instructions for your Hard Drive in PDF format for free! Find your manual M2NS - Xcellon and take your electronic device back in hand. On this page are published all the documents necessary for the use of your device. M2NS by Xcellon.
USER MANUAL M2NS Xcellon
USB Type-C Enclosure for M.2 NVMe and SATA SSDs
User Manual

XCELLON

text_image
CLOSURE NVMe and SATA SSDs XCELLONThank you for choosing Xcellon.
The M2NS SSD Enclosure connects an M.2 NVMe or SATA SSD to a host device. Its light and compact form factor make it an invaluable addition to your computer setup when you're performing data-heavy tasks on the go, like editing 4K video and photos. The superior storage capacity and read/write speeds of SSDs make it possible to use the enclosure to record directly from a USB Type-C™ equipped camera. The enclosure's USB Type-C connector delivers USB 3.2 Gen 2 data transfer rates of up to 10 Gbps. Its tool-free design allows quick and easy SSD installation and swapping, and plug-and-play functionality requires no additional drivers or installation.
Precautions
» Speeds may vary based on system configuration and drive speed.
» This product, SSDs, and computers are precision devices. Handle with care.
»Do not attempt to disassemble or repair this product.
»Keep this product away from strong magnetic devices.
»Clean this product with only a soft, dry cloth.
» Keep this unit away from water, and avoid use in humid environments.
»All images are for illustrative purposes only.
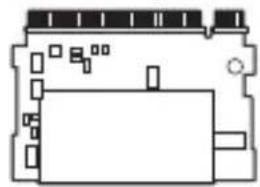
Overview
External
1 Indicator LED
2 USB Type-C port
3 Enclosure cover with heat sinks
4 Enclosure lock
Internal
5 M.2 socket
6 SSD card compartment
7 Form-factor plug holes

Contents Include
»SSD Enclosure
»USB Type-C cable
»Thermal pad and aluminum strip
»Silicone plug (×4)
Compatibility

text_image
Diagram of a mobile phone rear panel with numbered compartments and ventilation slots, showing internal structure and spacing.M Key2230 2242 2260 2280 B&M Key
natural_image
Pure electrical circuit lines without any symbols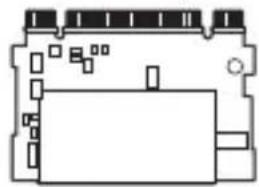
natural_image
Pure electrical circuit lines without any symbols


Windows macOS OS

Android

iPadOS
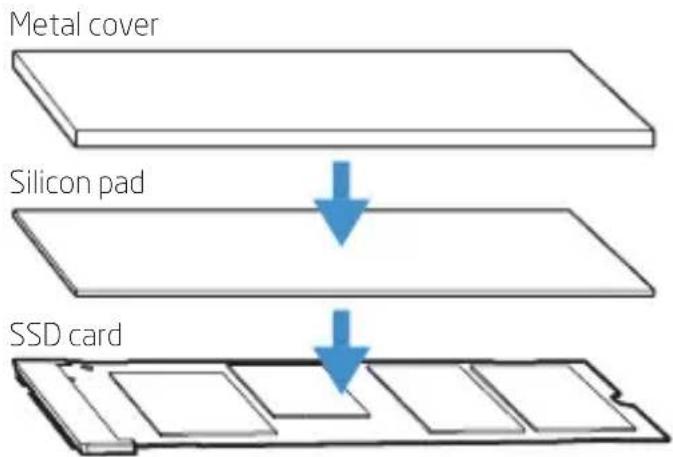
Attaching the Thermal Pad
The optional thermal pad is designed for 2280 form-factor cards that generate a lot of heat. It will prevent overheating within the enclosure compartment by transferring heat to the enclosure's shell, where it will dissipate. To attach the thermal pad to an SSD card, follow these steps:
1 Remove the protective strip from the silicon pad to expose the tacky surface, and press the pad onto the top of the SSD card.
2 Remove the protective strip from the top of the silicon pad. Then remove the protective strip from the metal cover, and press the cover onto the pad.
text_image
Metal cover Silicon pad SSD cardInstalling the SSD Card
1 Press the SSD card compartment lock and slide the compartment out of the enclosure.
2 Push a silicon plug into the hole that corresponds to the SSD card's form factor (see Compatibility above). Make sure the silicon plug's lip is positioned as pictured.

natural_image
Technical line drawing of a device with internal components and airflow direction indicators (no text or symbols)3 Hold the SSD card at approximately 45^ , and gently insert it into the M.2 socket.

Important! Hold the card at an angle as illustrated when inserting it into the socket. Inserting the SSD flat can damage the connector's and socket's pins.
4 Press the SSD card down so it lies flat in the compartment. Turn the silicon plug so the lip holds the card in place.
natural_image
Line drawing of a remote control panel with a blue arrow indicating the internal mechanism (no text or symbols present)
natural_image
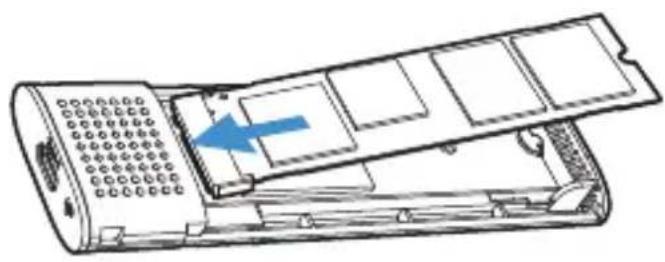
Technical line drawing of a mechanical component with a blue arrow indicating rotation or movement (no text or symbols)5 Slide the SSD card compartment back into the enclosure until the lock clicks shut.
6 Connect the enclosure to a computer or device with the USB cable.

natural_image
Technical illustration showing two views of a heat exchanger with cooling fins and wiring (no text or symbols)Specifications
| External Interface | Gen 2 |
| Internal Interface | t |
| Compatibility | d SATAKeying: M key and B&M key drivesForm factors: 2230, 2242, 2260, 2280 |
| Max Supported Drive Capacity | TB |
| Operating System Support | ws, macOS, iPadOS, Linux, ChromeOS, Android |
| Cable Connections | B in. / 25 cm) |
| Dimensions | 10 × 38.1 × 13.5 mm) |
| Weight |
One-Year Limited Warranty
This Xcellon product is warranted to the original purchaser to be free from defects in materials and workmanship under normal consumer use for a period of one (1) year from the original purchase date or thirty (30) days after replacement, whichever occurs later. The warranty provider's responsibility with respect to this limited warranty shall be limited solely to repair or replacement, at the provider's discretion, of any product that fails during normal use of this product in its intended manner and in its intended environment. Inoperability of the product or part(s) shall be determined by the warranty provider. If the product has been discontinued, the warranty provider reserves the right to replace it with a model of equivalent quality and function.
This warranty does not cover damage or defect caused by misuse, neglect, accident, alteration, abuse, improper installation or maintenance. EXCEPT AS PROVIDED HEREIN, THE WARRANTY PROVIDER MAKES NEITHER ANY EXPRESS WARRANTIES NOR ANY IMPLIED WARRANTIES, INCLUDING BUT NOT LIMITED TO ANY IMPLIED WARRANTY OF MERCHANTABILITY OR FITNESS FOR A PARTICULAR PURPOSE. This warranty provides you with specific legal rights, and you may also have additional rights that vary from state to state.
To obtain warranty coverage, contact the Xcellon Customer Service Department to obtain a return merchandise authorization ("RMA") number, and return the defective product to Xcellon along with the RMA number and proof of purchase. Shipment of the defective product is at the purchaser's own risk and expense.
For more information or to arrange service, visit www.xcellongear.com or call Customer Service at 212-594-2353.
Product warranty provided by the Gradus Group.
www.gradusgroup.com
Xcellon is a registered trademark of the Gradus Group.
© 2022 Gradus Group LLC. All Rights Reserved.

XCELLON ^* A Gradus Group Brand