HDD-1312 - Hard Drive Xcellon - Free user manual and instructions
Find the device manual for free HDD-1312 Xcellon in PDF.

| Product Type | External Hard Drive |
| Brand | Xcellon |
| Model | HDD-1312 |
| Capacity | 1 TB |
| Interface | USB 3.0 |
| Form Factor | 2.5-inch |
| Dimensions (W x D x H) | 120 x 80 x 20 mm |
| Weight | 200 g |
| Power Supply | USB bus-powered |
| Operating Systems Supported | Windows, macOS |
| Data Transfer Rate | Up to 5 Gbps |
| Rotational Speed | 5400 RPM |
| Cache | 8 MB |
| Main Functions | Portable data storage, backup, file transfer |
| Maintenance & Cleaning | Wipe exterior with dry cloth; avoid liquids |
| Safety Precautions | Do not disassemble; avoid drops and shocks |
| Spare Parts & Repairability | Non-user-serviceable; contact support for issues |
| General Information | Compatible with USB 2.0 and 3.0 ports; plug and play |
Frequently Asked Questions - HDD-1312 Xcellon
User questions about HDD-1312 Xcellon
0 question about this device. Answer the ones you know or ask your own.
Ask a new question about this device
Download the instructions for your Hard Drive in PDF format for free! Find your manual HDD-1312 - Xcellon and take your electronic device back in hand. On this page are published all the documents necessary for the use of your device. HDD-1312 by Xcellon.
USER MANUAL HDD-1312 Xcellon
USB 3.1 Gen 2 Dock for SATA Drives
User Manual

XCELLON*
natural_image
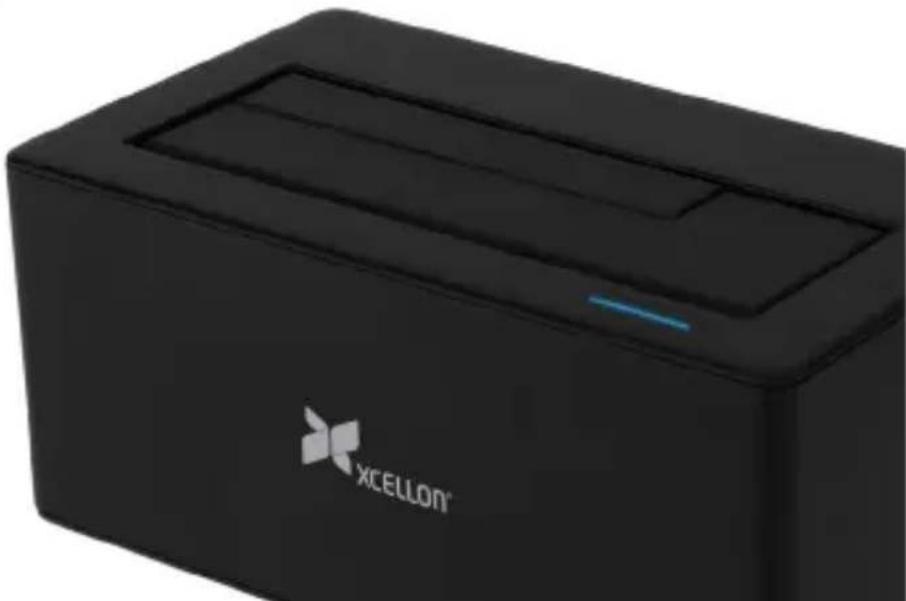
Black XCELLON® electronic device with a blue indicator light on the side (no readable text or symbols beyond branding)Thank you for choosing Xcellon.
The Xcellon HDD-1312 Hard Drive Dock is the most convenient way to access data on an internal SATA-type drive. Inserting your drive into the dock allows you to work with your drives and eliminates having to open your computer and install them internally.
The HDD-1312 is designed for compatibility with hard disk drives and solid state drives. It accepts 2.5- or 3.5-inch SATA I/II/III drives with capacities up to 10 TB (HDD) and 8 TB (SSD). The dock is equipped with a USB Type-C™ port, and cables with USB Type-C and Standard-A connectors are included for compatibility with a wide variety of older and newer computers. The dock supports plug-and-play and hot-swapping, and it will even run off of bus power when using most 2.5-inch drives.
Precautions
» Please read and follow these instructions, and keep this manual in a safe place.
» Back up your data before using this product in order to prevent loss of important data. Xcellon will not be responsible for any data loss.
» Keep this product away from water and any flammable gases or liquids.
»Use only the correct, recommended voltage.
»Handle this product with care.
»Clean this product with only a soft, dry cloth.
»Keep this product away from children.
» Do not store this product in direct sunlight or in extreme high or low temperatures.
»All images are for illustrative purposes only.
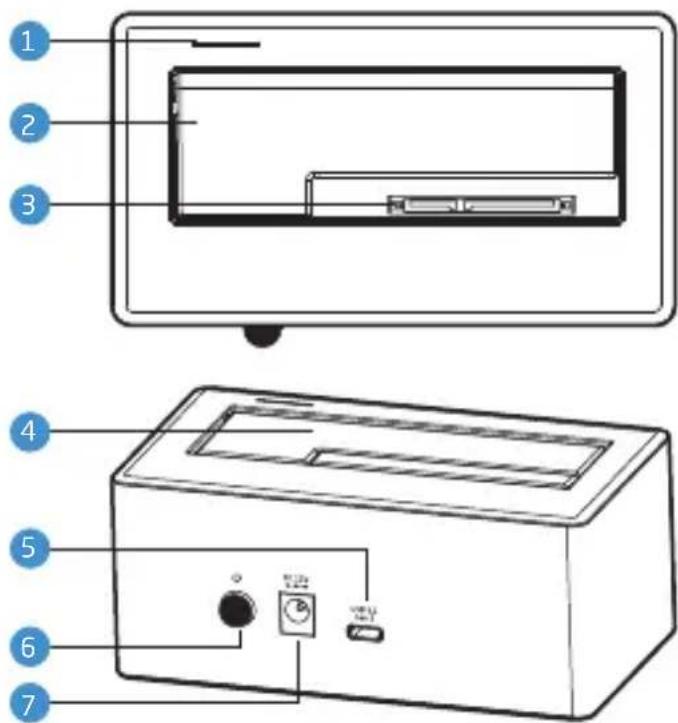
Overview
1 Power LED
2 Protective door
3 SATA contacts
4 3.5 and 2.5 in. drive slot
5 USB Type-C port
6 Power button
7 DC power input
Also Includes
»USB Type-C to Standard-A cable
»USB Type-C to Type-C cable
»DC power adapter
»User manual
Plugging In and Setting Up
1 Use the included power adapter to connect the dock to an AC power source. Make sure the dock is turned off by verifying that the power LED is not glowing.
2 Use one of the included USB cables to connect the dock to the corresponding port on your computer.
3 Align the SATA contacts on your disk drive and the dock, and fully insert the drive into the dock.
4 Press the power button to turn on the dock. The power LED will glow blue during normal operation, purple when a drive is active, and red if a drive is damaged.
If your disk drive has been formatted, your computer will notify you that new hardware has been detected, and the drive will appear on the Desktop, in My Computer, or in the Finder.
If the drive has not been formatted, or if your computer cannot read or recognize it, you may need to format the drive. See Formatting Your Disk below.
Important! To prevent data loss, do not unplug the HDD-1312, turn it off, or remove your disk drive from the enclosure until the drive has been safely ejected from the computer.
Formatting Your Disk
If your disk drive has not been formatted, or if your computer cannot read or recognize it, then you may need to format the drive. Formatting a drive will erase all of its data. If you have data on your drive, make sure to back it up before formatting.
Windows 7/8/8.1/10
These instructions will help create a formatted, whole-drive partition.
1 Windows 7: Right-click on My Computer, and select Manage.
Windows 8, 8.1, and 10: Press Windows key+X to open the Quick Links menu. Select Disk Management, and skip to step 3.
2 In the middle column of the Computer Management window, double-click on Storage and then Disk Management.
3 In the bottom half of the middle column, you will see a list of all the connected disk drives and their partitions. Formatted drives have a blue bar, and unformatted drives have a black bar and are labeled Unallocated.
4 Right-click on the partition labeled Unallocated, and click on New Simple Volume. This will open the New Simple Volume Wizard.
5 When the New Simple Volume Wizard opens, click on Next to continue.
6 In the Specify Volume Size window, make sure the maximum disk space in MB is the same as the simple volume size in MB, in order to make a whole-drive partition. Click on Next to continue.
7 In the Assign Drive Letter or Path window, select a letter from the drop-down menu to assign to the disk drive. Click on Next to continue.
8 In the Format Partition window, select Format this volume with the following settings.
a. From the File system drop-down menu, select the file system you want to use for the disk.
b. Set Allocation unit size to Default.
c. Type in a name for the disk in the Volume label text entry box. The default disk name is "New Volume".
d. You can opt to Perform a quick format or a full format. Perform a quick format is the default option.
e. Make sure Enable file and folder compression is unselected.
f. Click on Next to continue.
9 Review your settings, and click on Finish. Windows will format the partition, which will appear as formatted in the middle column of the Disk Management window, and the disk will appear as a usable drive in My Computer.
macOS
1 If your disk drive is unformatted, a dialog box will appear, stating that the computer cannot read the disk. Click on Initialize to open the Disk Utility application. Alternatively, you can go to Applications/Utilities/Disk Utility.
2 In the left column of the Disk Utility window, you will see a list of connected disk drives. Select the disk you want to erase, and click on the Erase tab in the right-hand column.
3 Choose the disk name, format, and scheme in the pop-up window.
4 Click on the Erase button, and confirm your selection in the dialog box that follows. MacOS will format the disk, and it will appear in the Finder under the Devices category.
Specifications
| Drive Types Supported | 3.5 in. SATA I/II/III type HDD and SSD |
| Max Hard-Disk Capacity | 0 TBSSD: 8 TB |
| Internal Interface | |
| External Interface | |
| Data Transfer Rate (Max) | 3.1 Gen 2 at 10 Gbps |
| Chipset | |
| Protocols | |
| System Requirements | 7 or latermacOS 10.6.x or laterLinux |
| Power Requirements | Most 2.5 in. drives can operate off of bus powerExternal power supply for 3.5 in. drivesAC Input: 100-240 V, 50/60 Hz, 0.6 A maximumDC Output: 12 V, 2 A |
| Construction | |
| Operating Environment | Operation Temperature: 41°F to 95°F (5°C to 35°C)Storage Temperature: -4°F to 122°F (-20°C to 50°C) |
| Dimensions | 3 × 5.5 × 7.2 cm) |
| Weight | |
| Cables | x1 Type-C to Standard-AX1 Type-C to Type-C |
Troubleshooting
| The dock will not turn on. | Make sure the DC power adapter is fully plugged into the dock's DC power port and an AC power source.Check your power source to make sure it's reliable. Try switching AC power sources. |
| The dock is turned on, but the disk does not appear on my computer. | Make sure the USB cable is fully plugged into your computer and the dock. Try another USB port on your computer.Make sure the drives are properly inserted into the dock.If you're using a PC, you may need to format the disk. For more information, refer to Formatting Your Disk above.Reboot the dock.Reboot your computer. |
One-Year Limited Warranty
This Xcellon product is warranted to the original purchaser to be free from defects in materials and workmanship under normal consumer use for a period of one (1) year from the original purchase date or thirty (30) days after replacement, whichever occurs later. The warranty provider's responsibility with respect to this limited warranty shall be limited solely to repair or replacement, at the provider's discretion, of any product that fails during normal use of this product in its intended manner and in its intended environment. Inoperability of the product or part(s) shall be determined by the warranty provider. If the product has been discontinued, the warranty provider reserves the right to replace it with a model of equivalent quality and function.
This warranty does not cover damage or defect caused by misuse, neglect, accident, alteration, abuse, improper installation or maintenance. EXCEPT AS PROVIDED HEREIN, THE WARRANTY PROVIDER MAKES NEITHER ANY EXPRESS WARRANTIES NOR ANY IMPLIED WARRANTIES, INCLUDING BUT NOT LIMITED TO ANY IMPLIED WARRANTY OF MERCHANTABILITY OR FITNESS FOR A PARTICULAR PURPOSE. This warranty provides you with specific legal rights, and you may also have additional rights that vary from state to state.
To obtain warranty coverage, contact the Xcellon Customer Service Department to obtain a return merchandise authorization ("RMA") number, and return the defective product to Xcellon along with the RMA number and proof of purchase. Shipment of the defective product is at the purchaser's own risk and expense.
For more information or to arrange service, visit www.xcellongear.com or call Customer Service at 212-594-2353.
Product warranty provided by the Gradus Group.
www.gradusgroup.com
Xcellon is a registered trademark of the Gradus Group.
© 2018 Gradus Group LLC. All Rights Reserved.

XCELLON ^* A Gradus Group Brand