
NVR-470 - CD Player NEVIR - Free user manual and instructions
Find the device manual for free NVR-470 NEVIR in PDF.


| Product Type | CD Player |
| Brand | Nevir |
| Model | NVR-470 |
| Disc Support | CD, CD-R, CD-RW |
| Audio Formats | CD-DA, MP3 (via CD-R) |
| Playback Functions | Play/Pause, Stop, Next/Previous Track, Repeat, Shuffle |
| Outputs | Audio Line Out (RCA), Headphone Jack |
| Dimensions (W x H x D) | Approx. 430 x 100 x 250 mm |
| Weight | Approx. 3.0 kg |
| Power Supply | AC 220-240V, 50/60Hz |
| Power Consumption | 15 W (typical) |
| Standby Power Consumption | < 1 W |
| Display | LED Display, Track Number and Time |
| Remote Control | Included (IR) |
| Programming | Up to 20 Tracks Programmable |
| Maintenance | Clean lens with soft cloth; do not use liquids |
| Safety | Class II, double insulation; do not expose to moisture |
| Spare Parts | Remote control, power cord (available from service center) |
| Repairability | Designed for professional repair; no user-serviceable parts inside |
| General Information | User manual available for free download in PDF format |
Frequently Asked Questions - NVR-470 NEVIR
User questions about NVR-470 NEVIR
0 question about this device. Answer the ones you know or ask your own.
Ask a new question about this device
Download the instructions for your CD Player in PDF format for free! Find your manual NVR-470 - NEVIR and take your electronic device back in hand. On this page are published all the documents necessary for the use of your device. NVR-470 by NEVIR.
USER MANUAL NVR-470 NEVIR
natural_image
Line drawing of a microwave oven with control panel and side-mounted screen (no text or symbols)Panel posterior
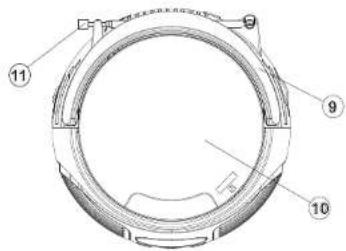
Panel lateral
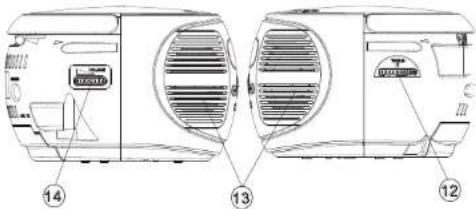
Panel posterior
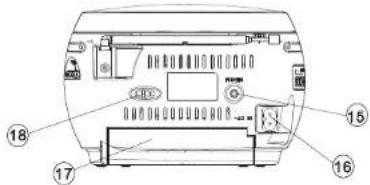
SPA-4
SPA-9
CC 9V=6 pilas UM-2/R-14 (no includes)
Consumo:
12 vatios
Tamaño del aparato:
185(Longitud) x 186(Anchure) x 123, 7(Altura) mm
Peso:
1.14 kg
Read this instruction and safety manual carefully before use. Keep this manual in a safe place for further reference.
WARNINGS
To reduce the risk of fire or electric shock, do not expose this product to rain or moisture.
EXPLANATION OF GRAPHIC SYMBOLS.

HARZARD WARNING
RISK OF ELECTRIC SHOCK DO NOT OPEN


The lightning symbol inside an equilateral triangle warns the user of the presence inside the product of uninsulated hazardous electric voltage powerful enough to represent an electrocution risk.
CAUTION: TO MINIMISE THE RISK OF ELECTRIC SHOCK, NEVER REMOVE THE COVER. THIS PRODUCT CONTAINS NO USER-SERVICEABLE PARTS. ONLY QUALIFIED REPAIR TECHNICIANS SHOULD WORK ON THIS EQUIPMENTS.

The exclamation mark symbol inside an equilateral triangle wams the user that important operating and servicing (troubleshooting) instructions are contained in the documentation accompanying the product.
HAZARD WARNING: TO REDUCE THE RISK OF FIRE OR ELECTRIC SHOCK, DO NOT EXPOSE THIS PRODUCT TO RAIN OR MOISTURE. CLASS 1 LASER PRODUCT
CLASS 1 LASER PRODUCT APPAREIL À LASER DE CLASSE1 PRODUIT LASER DE CLASSE1
CAUTIONS INVISIBLE LASER RADIATION WHEN OPEN AND INTERLOCKS DE FEATED. AVO ID EX POS URE TO BEAM.

This product contains a low-power emitter.
PRECAUTIONS FOR USE
To ensure safe use of this product, please follow the advice below:
- Do not use the product in extremely hot, cold, dusty or damp condition.
- Place the product on a smooth, flat surface.
- Do not obstruct the flow of air through the product. Place it on a well-ventilated position; do not cover with fabric or stand on a rug or carpet.
Power supply
● Before using this product, check that its rated voltage matches your mains power supply voltage.
Safety instructions
- Never pull on the power cord when plugging in or unplugging the product always use the plug pulling the cord could damage it and create a risk of electric shock.
● Unplug the product from the mains socket if you do not intend to use it for an extended pencil.
- The On/Off button does not isolate the product from the power supply. To disconnect the product from the mains power supply, you must unplug the power cord.
- This product should only be used in a horizontal position.
owner's record
For your convenience, record the model number and serial number for future reference. Model : Serial number :
Condensation
● Water droplets or condensation may from inside it is moved into a very warm, humid atmosphere.
● Condensation can cause the product to malfunction.
- Leave the set in a warm room for 1 to 2 hours to allow the condensation to evaporate.
In the event of a problem, unplug the power cord and contact a qualified repair technician.
Ventilation precautions
● Never obstruct the product's ventilation holes.
Warning concerning liquids
- Do not allow liquids to splash or spill onto the product, and never stand a liquid-filled container (vase, jar, etc.) on the top of it.
Warning concerning excessive sound levels
- Owing to this product's extremely low noise output and extended dynamic range, the user may be lompled to turn up the volume louder than necessary.
- The sound output may be excessively high, to the point of damaging the product's headphones or loud spoke r. All way s keep the volume with in reasonable limits.
SAFETY PRECAUTIONS
IMPORTANT INFORMATION
- This product is designed for use in moderate climate. Do not use or install this unit where it would be exposed to direct sunlight or in extremely hot temperatures, or near a radiator, stove or appliance that produces heat.
- Do not take this unit into the bathroom, or near a swimming pool. Do not use it where it would be exposed to water, moisture, dripping or splashing.
- No objects filled with liquids, such as vases, placed on the product
• No naked flame sources, such as lighted candies on the product. - If water gets inside the unit, Unplug the power cord from the supply socket and consult your dealer.
- Do not handle the power cord with wet hands. To avoid electric shock, NEVER touch any internal parts. Repairs/servicing should be left to qualified service personnel.
- When connecting or disconnecting from the mains supply, hold the plug but not the cord. Pulling the cord may damage it and is dangerous.
- Do not drop the unit, spill liquid into it or allow objects to fall in it.
- When plugged in, a very small current will flow. To save electricity and for safe, it is recommended that the product is completely disconnected with the AC mains socket after the unit not used for a long time.
- Consult your nearest dealer when damage, disconnection or contact failure is found with the cord.
• Do not bend the cord sharply, pull or twist it.
• Do not modify the power cord in any manner.
• Do not insert any metallic object in the unit.
• Unplug the power cord when there is the possibility of lighting. - Mains plug is used as the disconnecting device. It shall remain readily operable and should not be obstructed during intended used.
- To be completely disconnected the apparatus from supply mains, the mains plug of the apparatus shall be disconnected from the mains socket outlet completely.
- In case of malfunction due to electrostatic discharge, just reset the product reconnect of power source may be required to resume normal operation.
POSITIONING THE UNIT
• A minimum distance of 6 INCHES must be kept to provide sufficient ventilation.
- Do not place the product in closed bookcases or racks without proper ventilation.
- Allow adequate ventilation for the unit ventilation. It should not be impeded by covering the ventilation openings with items such as newspapers, table cloths, curtains etc.
- Do not stand it on a thick pile carpet, install it in a thick pile carpet, or install it in a place with inadequate air flow. Place the unit on a flat even surface.
- Do not use the unit in excessively hot, cold, dusty, damp or humid place.
- Condensation may form inside the CD player if the unit is left anywhere warm and damp, or if you move the unit from somewhere cold to a warm room. In this case, let the unit stand for 1-2 hours or gradually increase the room temperature that the unit will be dry before use.
SAFETY PRECAUTIONS
• Do not place it where it could be subject to vibration.
- Do not place it where it could be magnetised by a magnet or speaker. Since there are magnets, do not place tapes as recorded data could be erased.
- When this unit is used near a TV, the TV picture could be distorted. If this happens, move the unit away from the TV. If the situation could not be solved, avoid using the unit when the TV is turned on.
- Keep the CD door closed so the lens is not contaminated by dust. Do not touch the lens.
- Batteries shall not be exposed to excessive heat such as sunshine, fire or the like.
- Warning: excessive sound pressure from earphones and headphones can cause hearing loss.
• Attention should be drawn to the environmental aspects of battery disposal.
SAFETY MECHANISM
This unit incorporates a safety interlock mechanism that switches the laser beam on and off, when the disc holder is open, the laser baser beam stops automatically.
CAUTION
- Danger of explosion if battery is incorrectly replaced. Replace only with the same or equivalent type.
FUNCTIONS AND CONTROLS
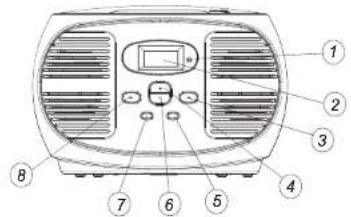
Front panel
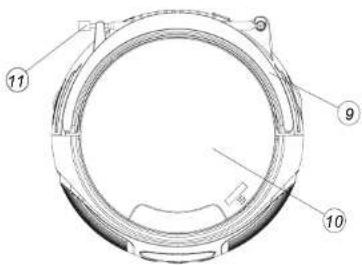
Top panel
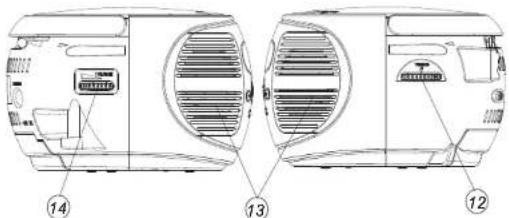
Side panel
Rear panel
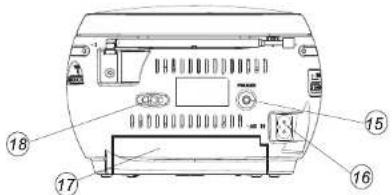
ENG-4
FUNCTIONS AND CONTROLS
FRONT, TOP AND SIDE PANEL
- FM STEREO INDICATOR
-
display of FM stereo indications.
-
DISPLAY
-
display of CD functions.
-
NEXT CD: next tracks.
-
PLAY/PAUSE CD: start or pauses CD playback.
-
REPEAT CD: repeat a track/CD/program.
-
STOP CD: stops CD playback or delete a program.
-
PROGRAM CD: programming and control of programmed track number.
-
BACK CD: return to the previous track.
-
HANDLE
-
CD DOOR
-
CD compartment door open/close mark (OPEN/CLOSE).
-
TELESCOPIC ANTENNA - improvement of FM reception.
-
TUNING KNOB
-
AM/FM ST. stationa selector.
-
SPEAKER
-
VOLUME CONTROL - sound level control.
REAR PANEL
- STEREO HEADPHONE JACK
-
connect for the 3.5mm stereo headphone.
-
AC POWER SUPPLY
-
power supply cord connection.
-
BATTERY COMPARTMENT - opening of the battery compartment
-
FUNCTION SELECTOR
- source selection AM, FM ST., OFF and CD/MP3
POWER SUPPLY
If you would like, the electrical power supply can be used to save the batteries. Make sure that the unit is unplugged from the wall outlet before inserting the batteries.
USING THE DC POWER SUPPLY Batteries (not included)
Open the battery compartment and insert 6 R14 batteries with respect to the "+" and "-" polarity indications in the compartment.
Warnings relating to the use of batteries
Batteries must be inserted taking care to match the polarities shown. Make sure that the (+) and (-) terminals are placed in the right direction.
Never use batteries that show signs of electrolyte leaks or cracking.
Never dispose of used batteries in an open fire.
Keep batteries out of reach of children.
Never recharge disposable batteries. Never short circuit battery terminals.
Always remove used batteries from the appliance case.
Do not try to open the batteries,
Do not mix up different kind of batteries or new and already. Only use batteries of the recommended or equivalent type.
Only use batteries of the recommended or equivalent type. Remove batteries from the appliance before disposing of it at the end of its service life.
Important:
When replacing the batteries, make sure you dispose of the old batteries in accordance with applicable regulations. They should be disposed of in a location specifically designated for that purpose so they can be recycled safely and without posing any risk for the environment. Do not bum or bury them.
- Warnings: excessive sound pressure from earphones and headphones can caused hearing loss.
USING THE AC POWER SUPPLY
-
Make sure that the voltage indicated on the manufacturer's nameplate in the battery compartment corresponds to the voltage supplied by your electrical installation. If this is not the case, consult your dealer or service center.
-
Connect the electrical power cable the unit then plug it into the wall outlet. The wall outlet must be located near the product and be easily accessible.
-
To turn power to the apparatus off, unplug the power supply cable from the wall outlet.
-
To protect the unit during violent thunderstorms, unplug the power supply cable from the wall outlet.
GENERAL OPERATION
GENERAL OPERATION
- Select the source by setting the FUNCTION SELECTOR to AM, FM ST., OFF or CD/MP3.
- Set the desired volume level using the VOLUME CONTROL.
- To turn off the unit, set the FUNCTION SELECTOR to OFF.
RADIO RECEPTION
- Adjust FUNCTION SELECTOR to AM or FM ST..
- Turn the TUNING KNOB to search for the desired station.
NOTE: The FM stereo indicator comes on if the BAND SELECTOR is set on FM stereo and you have tuned the radio to an FM stereo station. - Adjust VOLUME CONTROL for the desired volume level
- When you have finished listening to the radio, position the FUNCTION SELECTOR to OFF to turn the unit off.
Helpful hints:
To improve radio reception
To listen to the FM radio, extend the telescopic antenna and orient it for optimum reception. Reduce the length of the antenna if the signal is too strong (if you are very near the transmitter, for example).
As the unit is equipped with a built-in antenna, the telescopic antenna does not have to be used to
- listen to AM stations. Move the entire unit to orient the built-in antenna.
STEREO HEADPHONE JACK
Plug stereo headphones (not included), equipped with a 3.5mm mini-plug, into the PHONES jack for private listening, without disturbing those around you.
Reduce the VOLUME to a low level before putting on the headphones. You can then adjust the VOLUME progressively to a comfortable level.
Noted: The speakers will be muted when headphones are connected to the set.
This CD player plays Audio Discs including CD-R, CD-RW and MP3 files. CD ROMs, CDi, CDV, VCD, DVD or computer CDs are not possible for playback on this set.
Note: Even if this portable radio-CD player is able to read CD-R and CD-RW discs, in addition to conventional compact discs, it is not possible to offer a 100% guarantee that all CD-R/RW discs can be read; playback depends on the quality and condition of the blank discs that you use, among other things. A playback failure does not necessarily indicate that the unit is malfunctioning.
IMPORTANT: CDs encoded with copyright protection technologies by some record companies may be unplayable by this product.
-
Adjust FUNCTION SELECTOR to CD/MP3.
-
To open the CD door, raise it by the corner marked OPEN/CLOSE.
-
Insert a CD with the printed side facing up and press the CD door gently to close.
(Display shows -- and later the total number of tracks)
-
Start playback by pressing PLAY/PAUSE.
-
Press PLAY/PAUSE to interrupt or resume playback.
-
To stop CD playback, press STOP.
NOTE: CD playback stops automatically when:
• the CD compartment is opened
• the RADIO function is selected:
• the CD is finished.
SELECTING A DIFFERENT TRACK
- Press NEXT or BACK once or repeatedly until the desired track number appears in the display.
- In the stop/pause position, press PLAY/PAUSE to start playback.
SEARCHING FOR A PASSAGE ON A TRACK
-
During playback, press and hold down BACK or NEXT. (The CD is played at high speed and low volume.)
-
When you recognize the passage you want release BACK or NEXT. (Normal playback resumes.)
NOTE: When your searching reaches the end of the last track, the CD goes to stop mode.
REPEAT
Repeat: playback of the current track continuously.
Repeat All: playback of the entire CD continuously.
PROGRAMMING OF TRACK NUMBERS You may store up to 20 tracks (in CD mode) or 99 tracks (in MP3/USB mode) the desired sequence. If you like, store any track more than once. 4. In STOP mode, trace PROC to activate programming / iPiluxi PROG and iP017 flash!
-
In STOP mode, press PROG to activate programming. [Display: PROG and POT hash.]
-
Press BACK or NEXT to select your desired track. (Display: PROG and your desired track number flash.)
-
Press PROG to store the desired track number. (Display: PROG and "P01" flash for you to program the next track.)
-
Repeat stop 2 to 3 to select and store all desired tracks in this way.
-
To play your program, press PLAY/PAUSE. (Display: PROG flash during program playback.)
NOTE: If you try to store more than 20 tracks, no track can be selected and the display will show flashing CD
FUL or MP3/USB FUL.
PROGRAM CHECK
In STOP mode, press the PROG repeatedly to see your stored track numbers.
DELETING A PROGRAM
Perform the following operations to delete the memory:
• open the CD door;
• select the RADIO source:
- press STOP once.
ENG-8
- Place the unit on a hard, flat and stable surface so that the system does not till.
- Do not expose the unit, batteries, CDs to humidity, rain, sand or excessive heat caused by heating equipment or direct sunlight.
• Do not expose the apparatus to dripping or splashing.
- Adequate ventilation with a minimum gap of 15cm between the ventilation holes and surrounding surfaces is necessary to prevent heat build-up.
- The ventilation should be impeded by covering the ventilation openings with items, such as newspapers, table-cloths, curtains, etc...
• No objects filled with liquids, such as vases, shall be placed on the apparatus.
• No naked flame sources, such as lighted candles, should be placed on the apparatus.
• The mechanical parts of the set contain self-lubricating bearings and must not be oiled or lubricated.
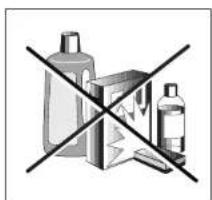
- To clean the set, use a dry cloth. Do not use any cleaning agents containing alcohol, ammonia, benzene or abrasives as these may harm the housing.
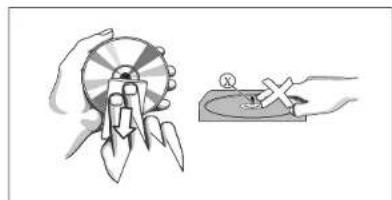
CLEANING CDs
• Use a soft and clean cloth to wipe away fingerprints or dust from the surface of the disc.
- Wipe in a straight motion from the center to the edge. Very small dust particles and slight smudges have absolutely no effect on the sound quality.
- Never use chemical products such as sprays for conventional (vinyl) records, anti-static aerosols, benzene or thinners to clean your CDs.
• To reduce the risk of scratches, always store CDs in their case when not used.
• Do not expose CDs to direct sunlight, high humidity or excessively high temperatures for long periods
• Never write or affix labels to the CD's surfaces.
CLEANING THE LENS
If the lens is dirty, the sound may skip and the CD may not be read correctly. Open the CD door and clean the lens as follows:
- Unplug the power cord
- Duct or dry particles
Blow on the lens several times using a camera lens brush, then wipe it gently with the brush to remove the dust. Then blow again on the lens.
• Fingerprints:
If you are unable to clean the lens with the camera lens brush, use a dry cotton swab to clean the surface, from the center to the outside.
natural_image
Illustration of a hand holding a fan with a magnifying glass, next to a hand holding a small cross (no text or symbols present)ENG-9
TROUBLESHOOTING
If a fault occurs, first check the points listed below before taking the set for repair.
If you are unable to remedy a problem by following hints, consult your dealer or service center.
WARNING: Do not open the unit as there is a risk of electric shock. Under no circumstances should you try to repair the set yourself; as this will invalidate the guarantee.
Problem
- Possible cause
■ Remedy
Notes:
Make sure the CD is not encoded with Copyright protection technologies, as some do not conform to the Compact Disc standard.
No sound/power
• Volume not adjusted
■ Adjust the volume.
• Power cord not securely connected.
■ Check the AC power cord properly.
• Batteries dead/incorrectly inserted.
■ Insert (fresh) batteries correctly.
• CD contains non-audio files.
■ Press BACK or NEXT once or more to skip to a CD audio track, instead of the data file.
--indication
• No CD inserted.
■ Insert a CD.
• CD badly scratched or dirty.
■ Replace/clean CD. see Maintenance.
• Laser lens steamed up.
■ Wait until lens has cleared.
• CD-R(W) is blank or not finalized
■ Use a finalized CD-R(W) or suitable CD Audio disc only.
Display does not function properly/No reaction
to operation of any of the controls
• Electrostatic discharge.
■ Switch off and unplug the set. Reconnect after a few seconds.
The CD skips tracks
• CD damaged or dirty.
■ Replace or clean CD.
• Program is active.
■ Quit program mode.
Environmental information
All unnecessary packaging materials has been omitted. The packaging can be easily separated into three materials: cardboard, polystyrene and plastic.
Your set consists of materials which can be recycled if disassembled by a specialized company. Please observe the local regulations regarding the disposal of packaging, dead batteries and old equipment.
SPECIFICATIONS
Power supply
AC 230V-50Hz
DC 9V = 6 x UM-2/R14 batteries (not included)
Power consumption
12 Watts
Dimensions of unit
185(L) × 186(W) × 123.7(H) mm
Weight
1.14kgs
Frequency range
AM 540-1600kHz
FM 87-108MHz
Output power (RMS)
1.2W x 2 RMS
Speaker
8ohm
Headphone
∅ 3.5mm
(The technical characteristics are liable to change without notice)
In order to fulfill ruling UNE EN-60065, we indicate that if the flexible wire is damaged, it can only be substituted by a technical service recognized by NEVIR, S.A., as per special tooling is required
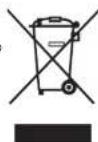
Recycling
This symbol bears the selective sorting symbol for waste electrical and electronic equipment (WEEE). This means that this product must be handled pursuant to European Directive 2002/96/EC in order to be recycled or dismantled to minimize its impact on the environment.
For further information, please contact your local or regional authorities.
Electronic products not included in the selective sorting process are potentially dangerous for the environment and human health due to the presence of hazardous substances.

- WARNINGS
- HARZARD WARNING
- PRECAUTIONS FOR USE
- Power supply
- owner's record
- Condensation
- SAFETY PRECAUTIONS
- IMPORTANT INFORMATION
- POSITIONING THE UNIT
- SAFETY MECHANISM
- CAUTION
- FUNCTIONS AND CONTROLS
- FRONT, TOP AND SIDE PANEL
- REAR PANEL
- USING THE DC POWER SUPPLY Batteries (not included)
- Warnings relating to the use of batteries
- Important:
- USING THE AC POWER SUPPLY
- GENERAL OPERATION
- RADIO RECEPTION
- Helpful hints:
- STEREO HEADPHONE JACK
- TROUBLESHOOTING
- Problem
- Notes:
- No sound/power
- --indication
- The CD skips tracks
- Environmental information
- SPECIFICATIONS
- Recycling
Brand : NEVIR
Model : NVR-470
Category : CD Player