
AF-I NIKKOR ED 600MM F/4D IF - Camera lens NIKON - Free user manual and instructions
Find the device manual for free AF-I NIKKOR ED 600MM F/4D IF NIKON in PDF.
Download the instructions for your Camera lens in PDF format for free! Find your manual AF-I NIKKOR ED 600MM F/4D IF - NIKON and take your electronic device back in hand. On this page are published all the documents necessary for the use of your device. AF-I NIKKOR ED 600MM F/4D IF by NIKON.
USER MANUAL AF-I NIKKOR ED 600MM F/4D IF NIKON
® 7 * - a * * - KW& *.«&*'*> ®oi]M ®!gSSffi @ 7*-a*fMRBtf]«a.x-f 7 51 (giotj^s © » ¥ # & * as ® 7 * - * * * - KJSfflt ® «*a*S7-fJV5-*A?-Oj* @ BtHI+aiW-f K @»UU>7" S<7*'x< F4V-U-X F90X->U-X F90v'J-X F70D AF ( * •hX? t-yt-tlT.) (F3AFKSO M/A
(7 * - A X I -f K5I)
AF ( * - l-7*-*^) 7-i7'^7*-*^tiS5 A/L B F4 ( D P - 2 0 W * ) F4 ( D A - 2 0 t t § ) © 0 © o (+1/2 F3-
G2 G3 G4 HI H2 H3 H4 H i
- * • a it 600mm f > 1 :4
l> V X « 18 }g S? S§ SI 'IS tR * ^ v * x - r ^ < 7 ) } i f J S I »
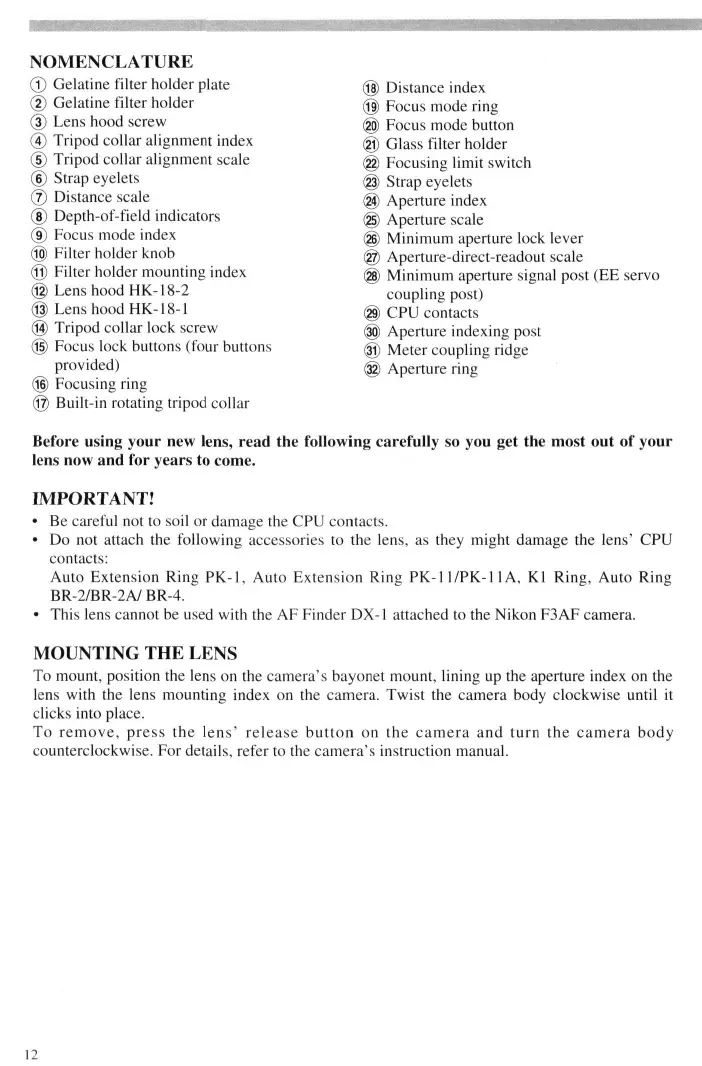
-3>^*^lt»ffl ft 166mm (JRTCS) X 417mm flfIB H'NRMny? nvnvmwnmmimmmmmmmmmmmMmmmmmammmmmmmammmmmmmmm NOMENCLATURE (T) Gelatine filter holder plate (f) Gelatine filter holder (3) Lens hood screw (4) Tripod collar alignment index (D Tripod collar alignment scale (6) Strap eyelets (J) Distance scale (D Depth-of-field indicators (f) Focus mode index @ Filter holder knob @ Filter holder mounting index ® Lens hood HK-18-2 @ Lens hood HK-18-1 ® Tripod collar lock screw ® Focus lock buttons (four buttons provided) ® Focusing ring @ Built-in rotating tripod collar
Distance index Focus mode ring Focus mode button Glass filter holder Focusing limit switch Strap eyelets Aperture index Aperture scale Minimum aperture lock lever Aperture-direct-readout scale Minimum aperture signal post (EE servo coupling post) CPU contacts Aperture indexing post Meter coupling ridge Aperture ring Before using your new lens, read the following carefully so you get the most out of your lens now and for years to come. IMPORTANT!
- Be careful not to soil or damage the CPU contacts.
- Do not attach the following accessories to the lens, as they might damage the lens' CPU contacts: Auto Extension Ring PK-1, Auto Extension Ring PK-11/PK-l 1A, Kl Ring, Auto Ring BR-2/BR-2A/ BR-4.
- This lens cannot be used with the AF Finder DX-1 attached to the Nikon F3AF camera.
MOUNTING THE LENS
To mount, position the lens on the camera's bayonet mount, lining up the aperture index on the lens with the lens mounting index on the camera. Twist the camera body clockwise until it clicks into place. To remove, press the lens' release button on the camera and turn the camera body counterclockwise. For details, refer to the camera's instruction manual. FOCUSING When used with a Nikon F4-Series, F90X/N90s, F90-Series/N90 or F70-Series/N70 camera, this lens not only lets you choose between autofocus or manual focusing, but also enables quick switching between autofocus and manual (autofocus with manual priority) by presetting the focus mode ring to the M/A position. With other cameras, only manual focusing is available. See chart below to determine appropriate focus mode. Camera's focus m ode Cameras F4-Series N90X/N90s F90-Series/N90 F70-Series/N70 Nikon AF (autofocus) cameras (except for F3AF) Other Nikon cameras
Manual focus (Focus assist is available) Lens' focus mode M/A
Autofocus with manual priority Autofocus Manual focus (Focus assist is available)
Manual focus (Focus assist is available) Manual focus For use with a Nikon F4-Series, F90X/N90s, F90-Series/N90 or F70-Series/N70 Camera To select autofocus mode, push the focus mode button and rotate focus mode ring until it clicks into position at A. When ring locks, lens is set for autofocus operation. Be sure camera's focusing mode is set at C or S. In autofocus mode, you can use either "Focus lock" or "Preset focusing" (with focusing limit switch). For details, see the following page. To select autofocus mode with manual priority, push the focus mode button and rotate focus mode ring until it clicks into position at M/A. When the ring locks, lens is set for autofocus with manual-priority operation. To focus manually, while lightly pressing the shutter release button rotate the focusing ring until the viewfinder image appears sharp and crisp. Removing your finger from the shutter release button cancels manual focus mode to resume autofocus. Be sure the camera's focusing mode is set at C or S to activate autofocus operation. To select manual mode, push the focus mode button and rotate the focus mode ring until it clicks into position at M. When the ring locks, lens is set for manual focus. Rotate focusing ring until the viewfinder image appears sharp and crisp. The electronic rangeftnder can be used as a focusing assist. For manual focus with lens' focusing mode set at M/A, first set the camera's focusing mode to M. Next, push the lens' focus mode button and rotate focus mode ring until it clicks into position at M/A. To focus manually, while lightly pressing the shutter release button rotate the focusing ring until the viewfinder image appears sharp and crisp. Removing your finger from the shutter release button cancels manual focus mode to resume autofocus mode. It does not, however, activate autofocus operation, because the camera's focusing mode is set at M. The electronic rangefinder can be used as a focusing assist. For a Nikon Autofocus Camera (except the F3AF) Only manual focusing operation is available. Push the focus mode button and rotate the focus mode ring until it clicks into position at M. When the ring locks, lens is set for manual focus. Rotate the focusing ring until the viewfinder image appears sharp and crisp. The electronic rangefinder can be used as a focusing assist. To focus manually with the focus mode ring set at M/A, the M/A mode must be set for manual before lens is attached to the camera. For a Nikon Non-Autofocus Camera Only manual focusing operation is available. Push the focus mode button and rotate focus mode ring until it clicks into position at M. When the ring locks, lens is set for manual focus. Rotate focusing ring until the viewfinder image appears sharp and crisp.
FOCUS LOCK (WITH AN F4-SERIES, F90X/N90s, F90-SERIES/N90 OR F70-SERIES/N70 CAMERA) When shooting a subject that is off-center or moving in Continuous Servo Autofocus mode, press this button to lock focus. To cancel focus lock and reactivate autofocus, remove your finger from the focus lock button. Although AF-Lock function can be set on both camera and lens, priority is given to whichever is set first. FOCUSING LIMIT SWITCH (WITH AN F4-SERIES, F90X/N90s, F90SERIES/N90 OR F70-SERIES/N70 CAMERA) With autofocus operation, you can reduce focusing time by setting the focusing limit switch according to the pre-determined distance range for the subject(s). There are three focusing limit zones provided: Close distance — infinity H Set switch to front setting (FULL) Close distance — 12m Set switch to middle setting (12 — 6m) 12m — infinity (°°) Set switch to rear setting (°° — 12m)
RECOMMENDED FOCUSING SCREEN
Various interchangeable focusing screens are available for Nikon cameras to suit any type of lens or picture-taking situation. Those which are recommended for use with your lens are listed. ""***• _ Screen Camera ^~__ A/L
G2 G3 G4 III
®=Excellent focusing 0=Acceptable focusing Slight vignetting or moire phenomenon affects screen image, but film image shows no traces of this.
- = Exposure measurement is not possible; lens/screen combination permits focusing operation only. ( )= Indicates degree of exposure compensation needed for F4-series cameras (CenterWeighted metering only). For F4-series cameras, compensate using the Exposure Compensation Dial for the focusing screen. (See the F4/F4s instruction manual, page 78.) *For F3-Series cameras, exposure compensation is not necessary. Blank box means not applicable. Since type M screen can be used for both macrophotography at a 1:1 magnification ratio and for photomicrography, it has different applications than other screens. For the K2, B2 and E2 focusing screens, refer to the columns on the K, B and E screens, respectively. For details, also refer to the specific camera's instruction manual.
MINIMUM APERTURE LOCK
Illust. A For programmed auto or shutter-priority auto shooting, use the minimum aperture lock lever to lock the lens aperture at f/22.
1. Set the lens to its minimum aperture (f/22).
2. Slide lock lever in the direction of the aperture ring and so the white dot on the lever aligns
with the orange dot. (See illust.) To release the lock, slide the lever in reverse direction.
Depth of field can be checked with the white indicator engraved on the lens barrel. If your camera has a depth-of-field preview function, it is possible to check the depth of field in the viewfinder. (For details, see camera instruction manual.) Depth of field can also be checked by referring to the table on page 39. USING FILTERS Always use a filter with the lens. The slip-in glass filter holder comes mounted with a Nikon L37C filter. A slip-in gelatine filter holder is also supplied with the lens. Replacing glass filters Must. B, C, D
1. Press down on the glass filter holder knob, and turn counterclockwise until the white line on
the knob is at a right angle to the axis of the lens.
2. Pull the holder out.
3. Unscrew the mounted filter and replace with the filter you want to use.
4. Put the holder back, push down on the knob, and turn clockwise to lock.
Using gelatine filter Illust. E
1. Cut the gelatine filter into a circle of approx. 40mm (1.6 in.) in diameter.
2. Open the gelatine filter holder plate by pushing on the latch and lifting up.
3. Insert the gelatine filter into the holder and close the plate. Make sure the filter is
unscratched and free of dust and take care that it stays flat.
4. Remove the glass filter holder from the lens and insert the gelatine filter holder.
USING LENS HOODS HK-18-1 AND 2
When shooting in bright sunlight, use the lens hood(s) to prevent stray light from entering lens. To Use Lens Hood HK-18-1
1. Loosen lock screw on the HK-18-1.
2. Slip HK-18-1 onto the front of the lens.
3. Tighten the locking screw.
Illust. F To Attach Lens Hood HK-18-2
1. Loosen lock screw on the HK-18-2.
2. Slip HK-18-2 onto the front of the HK-18-1.
3. Tighten the locking screw.
Illust. G To Store the Lens Hoods
1. Loosen lock screw on the HK-18-2, then remove from the HK-18-1.
2. Reverse the HK-18-2, then slide back onto the HK-18-1 and tighten the lock screw.
3. Loosen the lock screw on the HK-18-1, then remove the HK-18-1 (and attached HK-18-2).
4. Reverse the HK-18-1 and attached HK-18-2, then slide back onto the lens and tighten the
HK-18-1 lock screw. warn Standard Accessories Slip-on leatherette front lens cap Rear lens cap LF-1 39mm screw-in filter L37C Holder for gelatine filters Optional Accessories Other 39mm screw-in filters Teleconverter TC-14B Teleconverter TC-301 Teleconverter TC- 14E Teleconverter TC-20E*
- Autofocus cannot be used with the AF-1 Nikkor ED 600mm 174 D IF lens when it is used with the TC-20E teleconverter. Use of an AF-1 teleconverter is recommended although other models can be used. SPECIFICATIONS Focal length: 600mm Maximum aperture: f/4 Lens construction: 9 elements in 7 groups (plus dustproof glass plate built into front) Picture angle: 4° 10' Distance scale: Graduated in meters and feet from 6m (20 ft.) to infinity («>) Distance information: Output into camera body Aperture scale: f/4—f/22 on both standard and aperture-direct-readout scales Minimum aperture lock: Provided Diaphragm: Fully automatic Exposure measurement: Via full-aperture method with AI cameras or cameras with CPU interface system; via stop-down method for other cameras Focusing: Nikon Internal Focusing (IF) system Tripod mounting: Built-in tripod mounting collar rotatable through 360° Lens hood: Provided Filters: Slip-in glass filter holder accepts 39mm screw-in filters; gelatin filter holder accepts gelatin filters Mount: Nikon bayonet mount Dimensions: Approx. 166mm (6.5 in.) dia. x 417mm (16.4 in.) extension from flange; approx. 425mm (16.7 in.) long (overall) Weight: Approx. 6,050g (213.4 oz.) LENS CARE
- Clean lens surface with a blower brush. To remove dirt and smudges, use a soft, clean cotton cloth or lens tissue moistened with ethanol (alcohol) or lens cleaner. Wipe in a circular motion from center to outer edge, taking care not to leave traces and not to touch the other lens parts. If you use ether in cleaning the lens, a smudge sometimes appears on the surface of a multicoated lens. If this happens, wipe it again with a cotton cloth moistened with alcohol.
- Take care in cleaning the rear part of the lens with a spraygun-type blower because its strong stream of air may damage the lens diaphragm blades. To avoid damage, set the lens at full aperture and use the blower far enough away.
- Always protect the lens surface from dirt or damage. The lens hood also helps to protect the lens.
- Keep the lens cap in place whenever the lens is not in use.
- If you will not use the lens for a long time, protect it from rust and mold by storing it in a cool, dry place. Also, do not store in direct sunlight, and keep it away from naphthalene or camphor.
- Be careful not to get the lens wet or drop it in water. Water on the lens may cause malfunction.
Camaras Nikon AF (autofocus) (Excepto F3AF)
Teleconverter TC-14E Teleconverter TC-20E* ftaxftsisesi^Sf,# 1 n. Si~~~~^5? A/L B C D © O
F4 + DP-20 F 4 + DA-20 i+i/'i
G2 G3 CM HI H2 H3 114 © O
mmm JisI^HK-18-1, 2 #>IMJI&CT-604 © =%m<$mtmm © nmi @ i$«ae?F£ @ t^?L $> T W I ^ ' J ^ ©JHStS T2ft««*X*«*^Sii8ft* mvmw^ F90X F90*?8 F70JRPJ
JE*AF(@SJH^)M
G2 G3 G4 HI H2 H3 114
^^HK-18-1,2 JP@^*^CT-604 39mm«S£j»ft4iL37C 8JiftW# S2Efg*^TC-14B aS1ff*itTC-301 ^AFJNikkor ED 600mm DEPTH-OF-FIELD TABLE Focused distance
Ml.) Depth of field f/4 ii'ir — 20' 24' II" — 25' 29*10"— 30' 1" 39'9" — 40' 2" By using Internal Focusing {IF), the closest focusing distance of this lens is shorter than previous models at the same focal length, which utilized traditional helicoid focusing.
- * * mmm/DEvm-OF FIELD TABLE/SCHARFENTIEFE-TABELLE No reproduction in any form of this manual, in whole or in part (except for brief quotation in critical articles or reviews), may be made without written authorization from NIKON CORPORATION. Nikon NIKON CORPORATION FUJI BLDG., 2-3, MARUNOUCHI 3-CHOME, CHIYODA-KU, TOKYO 100, JAPAN PHONE: 81 -3-3214-5311 TELEX: NIKON J22601
FAX: 81-3-3201-5856
Printed in Japan 9&015-e10 (K500) <