LC-157070 - Television AudioSonic - Free user manual and instructions
Find the device manual for free LC-157070 AudioSonic in PDF.


| Type | LED-LCD Television |
| Screen Size | 15.7 inches (40 cm) |
| Resolution | 1366 x 768 pixels |
| Dimensions (with stand) | 40 x 30 x 10 cm |
| Weight (with stand) | 3.0 kg |
| Power Consumption | 30 W (typical) |
| Standby Power | < 0.5 W |
| Input Voltage | AC 100-240 V, 50/60 Hz |
| Connectivity | 1 x HDMI, 1 x USB, 1 x AV (Composite), 1 x VGA, 1 x Headphone Out |
| Remote Control | Infrared remote included (batteries not included) |
| VESA Wall Mount | 100 x 100 mm |
| Audio | 2 x 3 W speakers |
| Cleaning | Use a soft dry cloth. Avoid liquid cleaners. |
| Safety | Place on stable surface; do not expose to water; unplug during storms. |
| Repairability | Score 6/10; user replaceable fuse, remote, stand |
| Spare Parts | Available via official service centers: remote, stand, power cord |
| Energy Class | A+ (EU energy label) |
| Frequency Band | PAL/SECAM, DVB-T/T2 |
| Warranty | 2 years |
Frequently Asked Questions - LC-157070 AudioSonic
User questions about LC-157070 AudioSonic
0 question about this device. Answer the ones you know or ask your own.
Ask a new question about this device
Download the instructions for your Television in PDF format for free! Find your manual LC-157070 - AudioSonic and take your electronic device back in hand. On this page are published all the documents necessary for the use of your device. LC-157070 by AudioSonic.
USER MANUAL LC-157070 AudioSonic
1- Important Safety Precaution
Incorrect usage will cause fire or electric shock. To prevent this, please do as required when you are installing, using and cleaning this machine. To insure your safety and extend the life span of LCD-TV, please read the following items carefully before using:
The On/Off key on this product does not fully disconnect the TV from the main power supply. Unplug the power cord from the AC outlet before connecting any Audio / Video cables to the LCD TV.
Do not place the LCD TV on any unstable surface or furniture. Which may cause the product to fall, resulting in serious personal injuries and damage the product. Only place on stable furniture, recommended for LCD TV by its manufacturer.
The LCD panel used in this product is made of glass. Do not drop or impact the product with other objects, it may cause the panel broken. Be careful with the broken glasses in case the panel broken.
The vents and openings at the back of the products are designed for ventilation. Do not cover or block these vents and openings. Insufficient ventilation may cause overheating and / or shorten the life of the product. Do not insert any foreign objects (metals or flammable objects) into the TV, which may cause electric shock or fire.
Do not place the LCD TV closed to other furniture, furnishing or electronic products. This product is not designed for built-in installation; do not place in an enclosed place without proper ventilation.
Keep this product away from direct sunlight or any heat sources such as radiator, heaters, stoves, and other heat generating products (including adaptors and amplifiers).
Do not use this product in wet and moisture area or near water, such as kitchen sink, bathtub, washbasin, laundry tub, swimming pool or a wet basement.
Do not place any water container on top of this product. The water may spill onto the product causing electric shock or fire.
Do not place any type of candle or naked flames on the top or near the LCD TV, which may cause fire.
To clean the cabinet and LCD panel, unplug the Power cord, use only a clean soft moistened cloth and gently wipe the display panel. Hard cloth may scratch the panel surface. Never use dirty cloth, liquid cleaners or chemical cloth to clean it; such materials may damage the LCD panel.
Do not remove cover; there are no serviceable parts inside. Refer servicing to qualified services personnel only.
2- Main functions
1- Can be connected with analog RGB input
2- Can be connected with CVBS and S-VIDEO input
3- Can be connected with HDMI input.
4- Can receive SCART signal
5- Can receive TV signal
6- Support DVD / Card / USB Playback
7- Built-in 2 x 3W speakers, 2 sets audio input
8- Full function Infra-red remote control
9- Coaxial Audio output
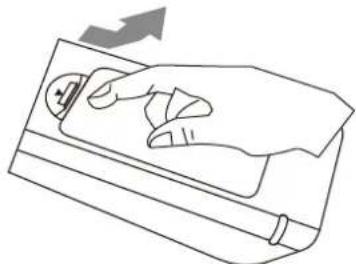
3- Fitting the Remote Control Batteries
The remote unit is operated with 2 x AAA size batteries.
- Push and hold the hook, the battery cover is opened.
- Insert batteries according to the polarity marks.
- Replace the cover.
natural_image
Line drawing of a hand pressing down on a device with an arrow indicating motion (no text or symbols)
natural_image
Technical line drawing of a battery pack with internal components and mounting holes (no text or symbols)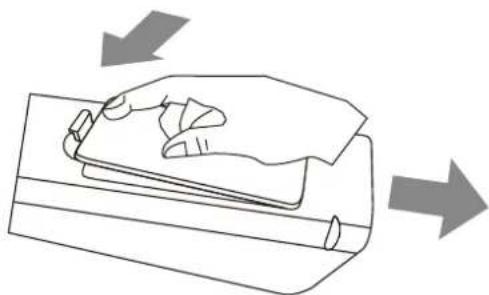
natural_image
Illustration of a hand pressing down on a rolled document or paper sheet, with arrows indicating direction (no text or symbols)Remarks:
Battery replacement is necessary when the remote control fail to operate the TV set.
Battery Cautions
Incorrect use of batteries can cause chemical leakage, which will corrode the Remote Control Unit or cause the batteries to burst.
-
Batteries shall always replace as a pair. Always use new batteries when replacing the old set.
-
Do not combine a used battery with a new one or mix battery type (Zinc Carbon with Alkaline).
- Do not attempt to charge, short-circuit, disassemble, heat or burn used batteries.
- Dispose the used batteries according to your local authorities guidelines. Do not put it into your household waste.
4- Product Overview

natural_image
Illustration of a AudioSonic computer monitor with a circular disc on the left (no text or symbols on the screen)5- Control Panel Overview
1. Control Panel Functions:
1- EJECT - DVD eject button
2- PLAY/PAUSE - DVD play/pause button
3- INPUT - Select the input signals: ATV /HDMI / SCART / AV /S-VIDEO / VGA /DVD
4- MENU - Enter into MENU
5- ◀ VOL – Volume down / Left orientation
6- VOL ▶ – Volume up / Right orientation
7- ◀ CH. - TV channel down
8- CH.▶ - TV channel up
9- STANDBY – Switches the TV to standby and on again

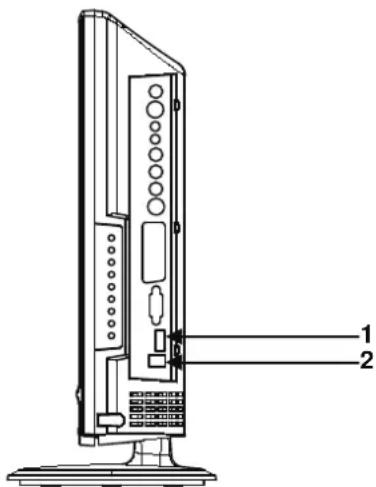
(2) Card, USB Panel Illustration:
A. SD/MMC/MS Card Slot
B. USB

Indicator Light Status
When the unit is on, the indicator light turns green. The indicator light is red when the TV is in standby mode.
(3) Illustration of Connectors

Connector's descriptions
-
DC 12V power input for the LCD TV, connect power supply adaptor here.
-
High Quality Audio/Video input socket for connecting an external device fitted with an HDMI output.
-
DB15 VGA interface.
-
Scart input interface; connect your AV system with Scart output.
-
S-VIDEO input, connect video input from external device here.
-
CVBS / Composite video inputs, connect your AV system.
-
Right Audio Channel input for Composite video & S-video mode.
-
Left Audio Channel input for Composite video & S-video mode.
-
Audio input for VGA mode, connect to your PC audio output.
-
Headphone output
-
75 Ω aerial input, connect antenna connector or aerial interface here to receive cable / aerial signal.
-
DVD Coaxial Output, connecting to Coaxial input of your Amplifier.
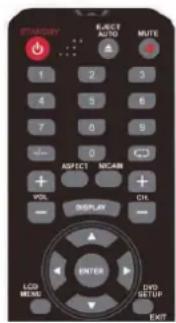
6- Remote Control Overview
Remote control Illustration
Keys description on the remote control

| 1. STANDBY | Switch the TV to standby and on again |
| 2. AUTO/EJECT | AUTO Adjust(PC MODE)/Eject the DVD |
| 3. MUTE | Mute button |
| 4. 0 - 9 | TV channel number or teletext page number select |
| 5. -/-- | One / two digit TV channel selection |
| 6. Return | View last TV Channel |
| 7. ASPECT | Change display size |
| 8. NICAM | NICAM |
| 9. VOL+ / VOL- | Volume up / Volume down |
| 10. CH+ / CH- | TV channel up / TV channel down |
| 11. DISPLAY | Display current TV channel information |
| 12. ▲▼◄► / ENTER | Navigation & Enter buttons |
| 13. LCD MENU | OSD menu |
| 14. DVD SETUP/EXIT | DVD- OSD menu /Menu exit |
| 15. INPUT | Input mode selection |
| 16. SLEEP | Sleep time |
| 17. PMODE | Picture mode selection |
| 18. SMODE | Sound mode selection |
| 19. TEXT/ ►I | Switch to the Teletext with text mode DVD- PLAY & PAUSE button |
| 20. STEP/PGDW | DVD - STEP/Text page down |
| 21. ■/ HOLD | DVD - STOP/Hold on or off for current page display |
| 22. SLOW/PGUP | DVD - SLOW/Text page up |
| 23. ◀/ INDEX | DVD - Previous Chapter /Request index page |
| 24. ZOOM | DVD - Zoom in and out |
| 25. ►/SIZE | DVD - Next chapter/Change display size |
| 26. AUDIO / REVEAL | DVD - Audio channel selection Reveal or hidden the hidden words |
| 27. ← | DVD - Fast Reverse button |
| 28. D.SUB | DVD - sub-title |
| 29. ➡ | DVD - Fast forward button |
| 30. ANGLE | DVD - Display current playback angle |
| 31. TITLE | DVD-Title Menu |
| 32. D.DISP | Display current DVD information |
| 33. D.MENU | DVD-Disc menu |
| 34. GOTO | DVD-GOTO |
| 35. RED/PROGRAM | Correspond to the differently colored subjects DVD-Program Playback button |
| 36. AB | Correspond to the differently colored subjects /AB / DVD - AB Selection Playback |
| 37. INTRO | Correspond to the differently colored subjects /INTRO / CD/VCD - Intro / Scan / 9 picture display |
| 38. REPEAT | Correspond to the differently colored subjects / REPEAT / DVD Repeat playback |
7- Connection between different input signals
A) Connect with PC signal
You can use your LCD-TV as a monitor for your personal computer using a VGA cable(not supplied).
- VGA input (Remember to tighten the screws.)
- PC Audio Input
- DC12V power input

Connection steps:
* Read the user guide supplied with your computer and ensure that it has a VGA connector;
* Make sure that the power of the LCD-TV and the PC are off;
* Connect a D type 15-pin VGA interface cable (not supplied) to the VGA video interface connector on the PC. Then connect the other end to the VGA video interface connector on the back of the LCD-TV. Tighten the screws on the VGA connectors once they are firmly connected;
* Connect the DC 12V power input with the adaptor come with your LCD TV.
* Turn on the power of the LCD-TV first, and then turn on the power of the PC;
* Press the INPUT button to set the video input mode of the LCD-TV to "VGA";
* Use the VOL- / VOL+ on the control panel or remote controller to adjust the volume.
B) Connect to external AV devices using Composite and S-Video inputs
- Left & Right Audio input.
- CVBS / composite video input.
- S-video Input.
- DC12V power input

Connection steps:
* Read the user guide supplied with your AV devices and ensure that it has Composite or S-Video connectors;
* Make sure that the power of the LCD-TV and the AV device are off;
* Connect a Composite video cable (not supplied) to the yellow composite video connector input on the back of the LCD-TV. Now insert the other end of the composite cable into the yellow composite connector output on the AV device;
* Alternatively connect a S-Video Cable (not supplied, provide better image quality) to the S-Video connector on the back of the LCD-TV. Now insert the other end of the S-Video cable into the S-Video connector on the AV device;
* Connect the RCA audio cables (not supplied, white and red connectors) from the AV devices' RCA audio output connectors to the RCA audio input connectors on the back of the LCD-TV;
* Turn on the power of the LCD-TV first, and then turn on the power of the AV device;
* Press the INPUT button to set the video input mode of the LCD-TV to "S-VIDEO" mode or "AV" mode;
(C) Connect with TV signal
- Antenna / 75Ω aerial input.
- DC 12V power input.

Connection steps:
* Make sure that the power of the LCD-TV is off;
* Connect an antenna cable (CATV) to the corresponding interface connector (75 Ω ANT) on the back of the LCD-TV. Connect the other end of the antenna cable to the antenna connector on the wall or on your digital cable / satellite receiver.
Now you are able to view regular cable TV;
* Turn on the power of the LCD-TV;
* Press the INPUT button to set the video input mode of the LCD-TV to "TV" mode. The channel number appears in the top right side of the screen;
* When channels are not programmed a blue screen will appear with go around white screen with the text "ATV NO SIGNAL".
On the LCD MENU you can read how the channels can be programmed (auto search or manual search).
It is recommended first to let the channels automatically to be searched.
* You can use key CH + / CH- button or the number keys on the remote control to select the channel you want to watch;
(D) Connect with SCART signal
-
Scart input.
-
DC 12V power input.

Connection steps:
* Read the user guide supplied with your AV devices and ensure that it has a scart connector;
* Make sure that the power of the LCD-TV is off;
* Connect a SCART cable to the corresponding interface connector on the back of the LCD-TV;
* Turn on the power of the LCD-TV;
* Press the INPUT button to set the video input mode of the LCD-TV to "SCART" mode;
E) Connect with HDMI signal
- HDMI input
- DC 12V power input.
Connection steps:
* Read the user guide supplied with your AV devices and ensure that it has a HDMI connector;
* Make sure that the power of the LCD-TV is off;
* Connect a HDMI cable to the corresponding interface connector on the back of the LCD-TV;
* Turn on the power of the LCD-TV;
* Press the INPUT button to set the video input mode of the LCD-TV to "HDMI" mode;
8- Basic operating instructions
Turn on the LCD-TV
When the STANDBY button is pressed and the LCD-TV is turned on, the indicator light on the front of the LCD-TV changes from red to green. When the LCD-TV is turned on, the input mode is displayed on the screen.
When the LCD-TV is turned off using the STANDBY button, the LCD-TV will go into standby mode and the indicator light turns red.
Switch Among Different Inputs :
ATV /HDMI / SCART / AV /S-VIDEO / VGA /DVD
Press the Input button to display the inputs mode menu, then press ▼/▲ key to select a input source and press Enter key to confirm.
SOURCE
ATV
HDMI
SCART
AV
S-VIDEO
VGA
DVD
Audio control
- Press the VOL+ button to increase the volume.
A number will appear on screen indicating the volume level. - Press the VOL - button to decrease the volume.
A number will appear on screen indicating the volume level.
Volume 50

Mute
- Press the MUTE button to mute the sound temporarily. A Mute icon appears on the screen.
- Press the MUTE button again to restore the sound. The Mute icon disappears.

Note
When you turn the LCD-TV off, the mute function is canceled automatically.
Select the TV channel you want
You can use the number keys on the remote control to directly select TV channels. The LCD-TV can store up to 99 channels (1 to 99), and you can press the keys on the remote control or on the panel to make a selection.

1- Press the relevant key on the remote control if you want to choose any channel from 1 to 9. (For example: if you want to choose channel 8, just press the key number 8).
2- If you want to choose a channel bigger than 9, please press the “-/-” button until “- -” is indicated on the screen. Enter the two digits of the channel number you want to watch. (For example: select channel 16).
ASPECT
Press to display proportion.(AUTO; FULL; ZOOM; 4:3; 16:9)
NICAM
Usually set to stereo to provide the best reproduction, but if reception deteriorates or if the service is not available the switch to Mono. Mono(M1) and (M2) can also be selected if a mono signal is being transmitted.
9- TELETEXT
Teletext features may vary depending on the Broadcasting Companies and is only available if the channel selected is transmitting Teletext. Pressing the TEXT button whilst in Teletext operation will switch the current status to TV. When in Teletext mode, the volume may still be altered to the desired listening level.
Page Selection
Pages can be selected by entering the page number, using the number keys on the remote control.
Size Button
Press Size to change display size: normal => large top => large bottom => normal.
Reveal Button
Press Reveal to reveal hidden words e.g. quiz page answers. Press again to hide.
Red/Green/Yellow/Cyan Buttons
These four buttons correspond to the differently coloured subjects.
Hold Button
Press Hold to remain the Teletext page when viewing multi-page information Press again to return to automatic page update.
Index Button
Press Index to return to the main index page.
Depending on the way information is transmitted, this may have to be pressed more than once to return to the main index page.
Sub page Button
When Teletext information exceeds more than one page, it may take some time for the automatic changing of the sub pages to reach the sub page you require.
It is possible to enter your required sub page and continue watching the normal programme until the correct sub page is found.
Select the required page number using buttons 0-9.
If the top of the page indicates that sub pages are being transmitted yet the page does not change, then the number at the top of the page is there to indicated that the broadcaster has updated the page's contents, there are no sub pages
Press Subpage, page number -/– will be displayed at the Bottom right of the screen. Enter desired subpage number before the page number -/– disappears.
To select page 6 enter 0,0,0 and 6.
Text Button
Press TEXT to enter or turn off Teletext mode
10- Menu operations
You can modify certain parameters of the LCD-TV in the menu system. Please read the following descriptions to get an understanding of each adjustable parameter.
Input mode: PC (VGA)
- Press the LCD MENU key to display the main menu.
- Use the RIGHT ARROW key to select the PICTURE, the SOUND, the SETTING, the FUNCTION, the PC SETUP.
- Press the EXIT key to exit the menu.
| NAME OF MENU | PICTURE OF MENU | INSTRUCTIONS |
| PICTURE |  | 1. Picture ModeUse the Up / Down arrow keys to set the PICTURE MODEindication to yellow.Use the Left / Right arrow keys to select one of PMODE. (STANDARD; MOVIE;VIVID;PERSONAL).2. ContrastUse the Up / Down arrow keys to set the CONTRAST indication to yellow. Use the Left / Right arrow keys to adjust the contrast. The contrast increases as the number increases.3. BrightnessUse the Up / Down arrow keys to set the BRIGHTNESS indication to yellow. Use the Left / Right arrow keys to adjust the brightness. The brightness increases as the number increases.4. Color temperatureUse the Up/Down arrow keys to set the COLOR TEMPERATURE indication to yellowUse the Left / Right arrow keys to select an optimumCOLOR TEMPERATUREmode which suit your eyes for viewing among Normal, Warm and Cold. |
| NAME OF MENU | SOUND OF MENU | INSTRUCTIONS |
| SOUND | 1. Sound ModeUse the Up / Down arrow keys to set the SOUND MODE indication to yellow.Use the Left / Right arrow buttons to select one of SOUND MODE.(STANDARD;MOVIE MUSIC PERSONAL) | |
| NAME OF MENU SOUND OF MENU INSTRUCTIONS | ||
| SOUND | 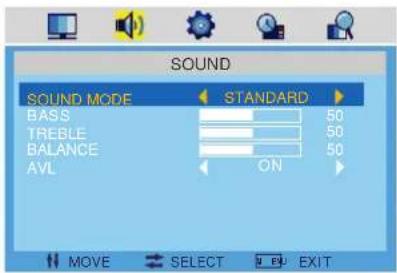 | 2. BassUse the Up / Down arrow keys to set theBASS indication to yellow. Use the Left /Right arrow keys to adjust the bass.This can only be adjusted in thePERSONAL mode.3. TrebleUse the Up / Down arrow keys to set theTREBLE indication to yellow. Use theLeft / Right arrow keys to adjustthe treble. This can only beadjusted in the PERSONAL mode.4. BalanceUse the Up / Down arrow keys to set theBALANCE indication to yellow. Use theLeft / Right arrow keys to adjust thebalance.5. AVL (Auto volume control)Use the Up/Down arrow keys to set theAVL indication to yellow. Use theLeft/Right arrow keys to select itON or OFF. |
| NAME OF MENU SETTING OF MENU INSTRUCTIONS | ||
| SETTING |  | 1. LanguageUse the Up / Down arrow keys to set theLANGUAGE indication to yellow.Use the Left / Right arrow keys tochange the menu to one of the followingLanguages: DUTCH, ENGLISH,FRENCH, GERMAN, PORTUGUESE,SPANISH, POLISH.2. OSD TimerUse the Up/Down arrow keys to set the OSD Timer indication to yellow.Use the Left/Right arrow keys toselect the OSD Timer screen.3. TransparenceUse the Up/Down arrow keys to set the TRANSPARENCE indication toyellow. Use the Left/Right arrowkeys to adjust OSD menutransparence. |
| NAME OF MENU SETTING OF MENU INSTRUCTIONS | ||
| SETTING | 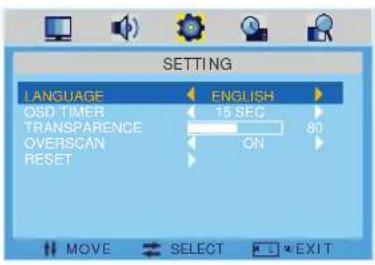 | 4. OverscanUse theUp/Downarrow keys to set the OVERSCANindication to yellow. Use theLeft/Rightarrow keys to select itONorOFFwhen your input source is HDMI.5. ResetUse theUp/Downarrow keys to set theRESETindication to yellow. Use theRightarrow keys to reset picture setting to the factory default. |
| NAME OF MENU | FUNCTION OF MENU | INSTRUCTIONS |
| FUNCTION | 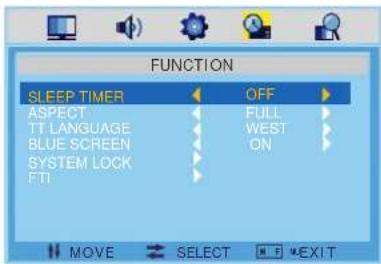 | 1. Sleep timerUse theUp/Downarrow keys to set theSLEEP TIMERindication to yellow. Use theLeft/Rightarrow keys to select the sleep timer.2. AspectUse theUp/Downarrow keys to set theASPECTindication to yellow. Use theRightarrow key to select the screen display mode. Which best corresponds to your viewing requirements.3. TT languageUse theUp/Downarrow keys to set theTT language indication to yellow. Use theLeft/Rightarrow keys to selectTT language(Teletext language).(WEST;EAST;EAST;RUSSIAN;ARABIC;FARSI)4. Blue screenUse theUp/Downarrow keys to set theBLUE SCREENindication to yellow.When there is no signal, the screen will be blue. You can switch this functionON/OFFby means of theLeft/Rightarrow keys.5. System lockUse theUp/Downarrow keys to set theSYSTEM LOCKindication to yellow.Use theRightarrow key to enter sub-menu. |
| NAME OF MENU | FUNCTION OF MENU | INSTRUCTIONS |
| FUNCTION |  | - System lockUse theUp/Downarrow keys to set theSYSTEM LOCKindication to yellow. Use theLeft/Rightarrow keys to select this optionONorOFF. When set the system lockOFF, the locks below will be unavailable.- Child lockUse theUp/Downarrow keys to set theCHILD LOCKindication to yellow. Use theLeft/Rightarrow keys to select this optionONorOFF. When the child lock ON, the program locked in thePROGRAM EDITcan not be displayed.-KEY LOCKUse theUp/Downarrow keys to set theKEY LOCKindication to yellow. Use theLeft/Rightarrow keys to select this optionONorOFF. When set the key lockON. the key can not work.- Change codeUse theUp/Downarrow keys to set theCHILD LOCKindication to yellow. Use theRightarrow key to change the password of the system lock. A dialog as above will appear, the enter the new password can change the password successfully.Password default is 0000.6. FTI (First time installation)Use theUp/Downarrow keys to set theFTI indicationto yellow. Press theRightarrow key. A new screen appears on and you can initial Channel Search will scan for sort and save any available channels.-LanguageUse theUp/Downarrow keys to set theLANGUAGEindication to yellow and use theLeft/Rightarrow keys to choose the language as you want.- CountryUse theUp/Downarrow keys to set theCOUNTRYindication to yellow and use theLeft/Rightarrow keys to select for tuning.-Start searchUse theUp/Downarrow keys to set theSTART SEARCHindication to yellow. Press theRightarrow key. A new screen will appear and begin to auto search. |
 | ||
 | ||
| NAME OF MENU | PC SETUP OF MENU | INSTRUCTIONS |
| PC SETUP | [KT AH] | 1. H PositionUse theUp / Downarrow keys to set theH POSITIONindication to yellow. With this function the image width can be adjusted by means of theLeft / Rightarrow keys.2. V PositionUse theUp / Downarrow keys to set theV POSITIONindication to yellow. With this function the image height can be adjusted by means of theLeft / Rightarrow keys.3. ClockUse theUp / Downarrow keys to set theCLOCKindication to yellow. With this function the clock can be adjusted by means of theLeft / Rightarrow keys.4. PhaseUse theUp / Downarrow keys to set thePHASEindication to yellow. With this function any horizontal interference can be corrected and the contours of characters sharpened by means of theLeft / Rightarrow keys.5. Auto AdjustUse theUp / Downarrow keys to set theAuto SyncIndication to yellow. Use theRight arrow key to adjust the setting automatically. |
Input mode: HDMI/SCART/AV/YPBPR
- Press the LCD MENU key to display the main menu.
- Use the Right arrow key to select the PICTURE, the SOUND, the SETTING or the FUNCTION.
- Press the EXIT key to exit the menu.
| NAME OF MENU PICTURE OF MENU INSTRUCTIONS | ||
| PICTURE |  | 1. Picture ModeUse the Up / Down arrow keys to set the PICTURE MODE indication to yellow.Use the Left / Right arrow keys to select one of PMODE. (STANDARD;MOVIE;VIVID;PERSONAL).2. ContrastUse the Up / Down arrow keys to set the CONTRAST indication to yellow. Use the Left / Right arrow keys to adjust the contrast. The contrast increases as the number increases.3. BrightnessUse the Up / Down arrow keys to set the BRIGHTNESS indication to yellow. Use the Left / Right arrow keys to adjust the brightness. The brightness increases as the number increases.4. ColourUse the Up / Down arrow keys to set the COLOUR SETTING indication to yellow.Use the Left/Right arrow keys to adjust the color. The color increases as the number increases.5. TintUse theUp/Down arrow keys to set the TINT indication to yellow. Use the Left/Right arrow keys to adjust the tone of color when your system is in NTSC.6. SharpnessUse the Up / Down arrow keys to set the SHARPNESS indication to yellow.Use the Left / Right arrow keys to adjust the sharpness.(Normal,Sharp,Sharpest,Soft)7. Color temperatureUse the Up/Down arrow keys to set the COLOR TEMPERATURE indication to yellow Use the LEFT/RIGHT ARROW keys to select an optimum COLOR TEMPERATURE mode which suit your eyes for viewing among Normal, Warm and Cold.8. Noise ReductionUse the LEFT/RIGHT ARROW keys to reduce the video noise level when the broadcast signal received is weak |
| NAME OF MENU | SOUND OF MENU INSTRUCTIONS | |
| SOUND |  | 1. Sound ModeUse the Up / Down arrow keys to set the SOUND MODE indication to yellow.Use the Left / Right arrow buttons to select one of SOUND MODE.(STANDARD;MOVIE;MUSIC;PERSONAL)2. BassUse the Up / Down arrow keys to set the BASS indication to yellow. Use the Left / Right arrow keys to adjust the bass.This can only be adjusted in the PERSONAL mode.3. TrebleUse the Up / Down arrow keys to set the TREBLE indication to yellow. Use the Left / Right arrow keys to adjust the treble. This can only be adjusted in the PERSONAL mode.4. BalanceUse the Up / Down arrow keys to set the BALANCE indication to yellow. Use the Left / Right arrow keys to adjust the balance.5. AVL (Auto volume control)Use the Up/Down arrow keys to set the AVL indication to yellow. Use the Left/Right arrow keys to select it ON or OFF. |
| NAME OF MENU SETTING OF MENU INSTRUCTIONS | ||
| SETTING |  | 1. LanguageUse the Up / Down arrow keys to set the LANGUAGE indication to yellow.Use the Left / Right arrow keys to change the menu to one of the following Languages: DUTCH, ENGLISH,FRENCH, GERMAN, PORTUGUESE,SPANISH, POLISH.2. OSD TimerUse the Up/Down arrow keys to set the OSD Timer indication to yellow.Use the Left/Right arrow keys to select the OSD Timer screen. |
| NAME OF MENU SETTING OF MENU | INSTRUCTIONS | |
| SETTING | 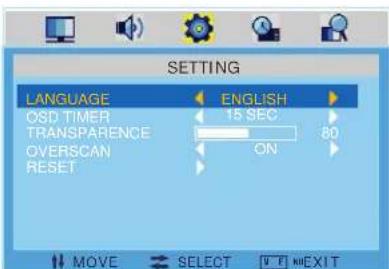 | 3. TransparenceUse theUp/Downarrow keys to set theTRANSPARENCEindication to yellow.Use theLeft/Rightarrow keys to adjust OSD menu transparence.4. OverscanUse theUp/Downarrow keys to set theOVERSCANindication to yellow. Use theLeft/Rightarrow keys to select itON or OFFwhen your input source is HDMI.5. ResetUse theUp/Downarrow keys to set theRESETindication to yellow. Use theRightarrow keys to reset picture setting to the factory default. |
| NAME OF MENU FUNCTION OF MENU INSTRUCTIONS | ||
| FUNCTION |  | 1. Sleep timerUse theUp/Downarrow keys to set theSLEEP TIMERindication to yellow. Use theLeft/Rightarrow keys to select the sleep timer.2. AspectUse theUp/Downarrow keys to set theASPECTindication to yellow. Use theRightarrow key to select the screen display mode. Which best corresponds to your viewing requirements.3. TT languageUse theUp/Downarrow keys to set theTT language indication to yellow. Use theLeft/Rightarrow keys to selectTT language(Teletext language).(WEST;EAST;EAST;RUSSIAN;ARABIC; FARSI)4. Blue screenUse theUp/Downarrow keys to set theBLUE SCREENindication to yellow.When there is no signal, the screen will be blue. You can switch this functionON/OFFby means of theLeft/Rightarrow keys.5. System lockUse theUp/Downarrow keys to set theSYSTEM LOCKindication to yellow.Use theRightarrow key to enter sub-menu. |
| NAME OF MENU FUNCTION OF MENU INSTRUCTIONS | ||
| FUNCTION |  | - System lockUse the Up/Down arrow keys to set the SYSTEM LOCK indication to yellow. Use the Left/Right arrow keys to select this option ON or OFF. When set the system lock OFF, the locks below will be unavailable.- Child lockUse the Up/Down arrow keys to set the CHILD LOCK indication to yellow. Use the Left/Right arrow keys to select this option ON or OFF. When the child lock ON, the program locked in the PROGRAM EDIT can not be displayed.-KEY LOCKUse the Up/Down arrow keys to set the KEY LOCK indication to yellow. Use the Left/Right arrow keys to select this option ON or OFF. When set the key lock ON. the key can not work.- Change codeUse the Up/Down arrow keys to set the CHILD LOCK indication to yellow. Use the Right arrow key to change the password of the system lock. A dialog as above will appear, the enter the new password can change the password successfully. Password default is 0000.6. FTI (First time installation)Use the Up/Down arrow keys to set the FTI indication to yellow. Press the Right arrow key. A new screen appears on and you can initial Channel Search will scan for sort and save any available channels.-LanguageUse the Up/Down arrow keys to set the LANGUAGE indication to yellow and use the Left/Right arrow keys to choose the language as you want.- CountryUse the Up/Down arrow keys to set the COUNTRY indication to yellow and use the Left/Right arrow keys to select for tuning.-Start searchUse the Up/Down arrow keys to set the START SEARCH indication to yellow. Press the Right arrow key. A new screen will appear and begin to auto search. |
 | ||
 | ||
Input mode: TV
- Press the LCD MENU key to display the main menu.
- Use the RIGHT ARROW key to select the PICTURE, the SOUND, the SETTING the FUNCTION or the CHANNEL.
- Press the EXIT key to exit the menu.
| NAME OF MENU PICTURE OF MENU INSTRUCTIONS | 1. Picture ModeUse the Up / Down arrow keys to set the PICTURE MODE indication to yellow.Use the Left / Right arrow keys to select one of PMODE. (STANDARD; MOVIE; VIVID; PERSONAL).2. ContrastUse the Up / Down arrow keys to set the CONTRAST indication to yellow. Use the Left / Right arrow keys to adjust the contrast. The contrast increases as the number increases.3. BrightnessUse the Up / Down arrow keys to set the BRIGHTNESS indication to yellow. Use the Left / Right arrow keys to adjust the brightness. The brightness increases as the number increases.4. ColourUse the Up / Down arrow keys to set the COLOUR SETTING indication to yellow.Use the Left/Right arrow keys to adjust the color. The color increases as the number increases.5. TintUse theUp/Downarrow keys to set theTINTindication to yellow.Use the Left/Right arrow keys to adjust the tone of color when your system is in NTSC.6. SharpnessUse the Up / Down arrow keys to set the SHARPNESS indication to yellow.Use the Left / Right arrow keys to adjust the sharpness.(Normal,Sharp,Sharpest,Soft)7. Color temperatureUse the Up/Down arrow keys to set the COLOR TEMPERATURE indication to yellow Use the LEFT/RIGHT ARROW keys to select an optimum COLOR TEMPERATURE mode which suit your eyes for viewing among Normal, Warm and Cold. | |
| PICTURE | 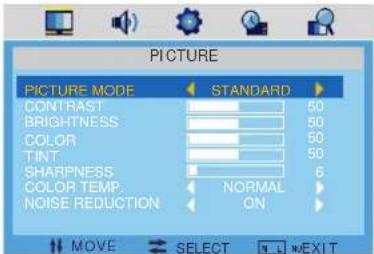 | |
| 8. Noise ReductionUse the LEFT/RIGHT ARROW keys . to reduce the video noise level when the broadcast signal received is weak | ||
| NAME OF MENU SOUND OF MENU INSTRUCTIONS | ||
| SOUND | 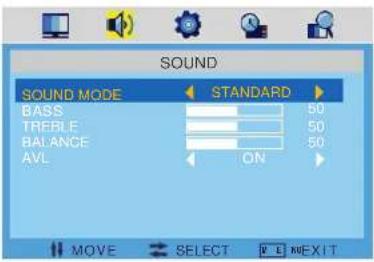 | 1. Sound ModeUse the Up / Down arrow keys to set the SOUND MODE indication to yellow.Use the Left / Right arrow buttons to select one of SOUND MODE.(STANDARD;MOVIE;MUSIC;PERSONAL)2. BassUse the Up / Down arrow keys to set the BASS indication to yellow. Use the Left / Right arrow keys to adjust the bass.This can only be adjusted in the PERSONAL mode.3. TrebleUse the Up / Down arrow keys to set the TREBLE indication to yellow. Use the Left / Right arrow keys to adjust the treble. This can only be adjusted in the PERSONAL mode.4. BalanceUse the Up / Down arrow keys to set the BALANCE indication to yellow. Use the Left / Right arrow keys to adjust the balance.5. AVL (Auto volume control)Use the Up/Down arrow keys to set the AVL indication to yellow. Use the Left/Right arrow keys to select it ON or OFF. |
| NAME OF MENU SETTING OF MENU INSTRUCTIONS | ||
| SETTING | 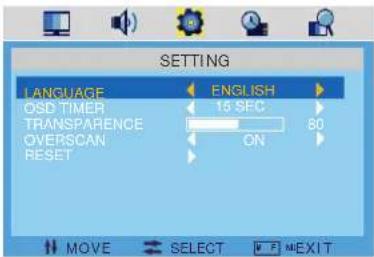 | 1. LanguageUse the Up / Down arrow keys to set the LANGUAGE indication to yellow.Use the Left / Right arrow keys to change the menu to one of the following Languages: DUTCH, ENGLISH, FRENCH, GERMAN, PORTUGUESE, SPANISH, POLISH.2. OSD TimerUse the Up/Down arrow keys to set the OSD Timer indication to yellow.Use the Left/Right arrow keys to select the OSD Timer screen. |
| NAME OF MENU | SETTING OF MENU | INSTRUCTIONS |
| SETTING |  | 3. TransparenceUse theUp/Downarrow keys to set theTRANSPARENCEindication to yellow.Use theLeft/Rightarrow keys to adjust OSD menu transparence.4. OverscanUse theUp/Downarrow keys to set theOVERSCANindication to yellow. Use theLeft/Rightarrow keys to select itON or OFFwhen your input source is HDMI.5. ResetUse theUp/Downarrow keys to set theRESETindication to yellow. Use theRightarrow keys to reset picture setting to the factory default. |
| NAME OF MENU FUNCTION OF MENU INSTRUCTIONS | ||
| FUNCTION | 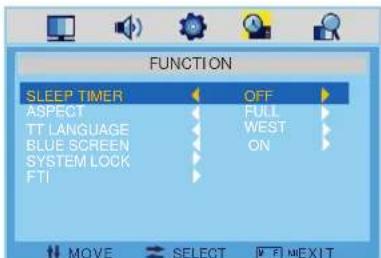 | 1. Sleep timerUse theUp/Downarrow keys to set theSLEEP TIMERindication to yellow. Use theLeft/Rightarrow keys to select thesleep timer.2. AspectUse theUp/Downarrow keys to set theASPECTindication to yellow. Use theRightarrow key to select the screen display mode. Which best corresponds to your viewing requirements.3. TT languageUse theUp/Downarrow keys to set theTT language indication to yellow. Use theLeft/Rightarrow keys to selectTT language(Teletext language).(WEST;EAST;EAST;RUSSIAN;ARABIC;FARSI)4. Blue screenUse theUp/Downarrow keys to set theBLUE SCREENindication to yellow.When there is no signal, the screen will be blue. You can switch this functionON/OFFby means of theLeft/Rightarrow keys.5. System lockUse theUp/Downarrow keys to set theSYSTEM LOCKindication to yellow.Use theRightarrow key to enter sub-menu. |
| NAME OF MENU FUNCTION OF MENU INSTRUCTIONS | ||
| FUNCTION | 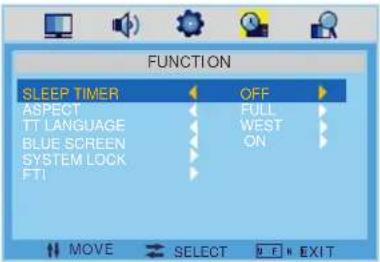 | - System lockUse theUp/Downarrow keys to set theSYSTEM LOCKindication to yellow. Use theLeft/Rightarrow keys to select this optionONorOFF. When set the system lockOFF, the locks below will be unavailable.- Child lockUse theUp/Downarrow keys to set theCHILD LOCKindication to yellow. Use theLeft/Rightarrow keys to select this optionONorOFF. When the child lockON, the program locked in thePROGRAM EDITcan not be displayed.-KEY LOCKUse theUp/Downarrow keys to set theKEY LOCKindication to yellow. Use theLeft/Rightarrow keys to select this optionONorOFF. When set the key lockON. the key can not work.- Change codeUse theUp/Downarrow keys to set theCHILD LOCKindication to yellow. Use theRightarrow key to change the password of the system lock. A dialog as above will appear, the enter the new password can change the password successfully.Password default is 0000.-FTI (First time installation)Use theUp/Downarrow keys to set theFTI indicationto yellow. Press theRightarrow key. A new screen appears on and you can initial Channel Search will scan for sort and save any available channels.-LanguageUse theUp/Downarrow keys to set theLANGUAGEindication to yellow and use theLeft/Rightarrow keys to choose the language as you want.- CountryUse theUp/Downarrow keys to set theCOUNTRYindication to yellow and use theLeft/Rightarrow keys to select for tuning.-Start searchUse theUp/Downarrow keys to set theSTART SEARCHindication to yellow. Press the Right arrow key. A new screen will appear and begin to auto search. |
 | ||
 | ||
| NAME OF MENU CHANNEL OF MENU INSTRUCTIONS | ||
| CHANNEL | 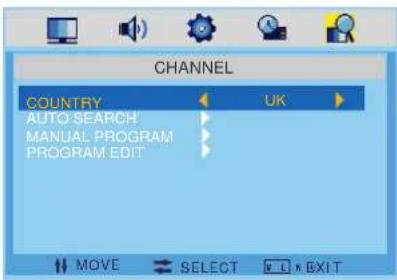 | 1. CountryUse theUp/Downarrow keys to set theCOUNTRYindication to yellow and use theLeft/Rightarrow keys to select fortuning.(OTHER,GERMANY,UK,PORTUGAL,SPAIN,FRANCE,HOLLAND,POLAND).2.Auto searchUse theUp/Downarrow keys to set theAUTO SEARCHindication to yellow.Press theRightarrow key.A new screenwill appear and begin to auto search.3. Manual programUse the Up/Downarrow keys to set theMANUAL PROGRAMIndication to yellow.Press theRightarrow key.A new screen will appear.ProgramUse theUp/Downarrow keys to highlight Program.Use theLeft/Rightarrow keys to change the channel number.Colour SystemUse theUp/Downarrow keys to highlight Colour System.Use theLeft/Rightarrow keys to change the colour system.In theNederlands,the PAL system is used.Ensure that the system is set to PAL before you select a channel.Sound SystemUse theUp/Downarrow keys to highlight Sound System.Use theLeft/Rightarrow keys to change the sound system.In theNederlands,theBGsystem is used.Ensure that the system is set toBGbefore you select a channel.Manual SearchUse theDownarrow key to highlight Manual Search.Press either theRightarrow key to search upwards or theLeftarrow key to search downwards.Each press of thekeywill increment the frequency 0.6 MHz.When the new program has been located and is of good sound and picture quality,press theEXITkey to store and exit the feature.AFT(Auto Fine Tune)This option due to weak signals or a wrong antenna configuration,some of the channels may not be turned to the best reception condition.AFTfunction allows you to fine tune channel selected.Use theUp/Downarrow keys to highlightAFT.Use theLeft/Rightarrow keys to selectONorOFF. |
 | ||
| CHANNEL |  | FineUse theUp/Downarrow keys to set theFINE indication to yellow. To improvethe image quality, you can change thechannel frequency by means of theLeft/Rightarrow keys.SkipUse theUp/Downarrow keys to set theSKIP indication to yellow. Then youcan change SKIP into ON/OFF bymeans of theLeft/Rightarrow keys. Ifthis function is set to ON, the respectivechannel will be skipped.4. Program editUse theUp/Downarrow keys to set thePROGRAM EDIT indication to yellow.Press theRightarrow key. A newscreen will appear. After tuning thereceives, this function allows you to sortthe TV Programs according to yourpreferences. Use theUp/Downarrowkeys to select the channel to bePreference.This option has three functions:-UseGreenbutton and use theUp/Downarrow keys to name thecurrent channel.-UseYellowbutton again insert thecurrent channel.-UseRedbutton to set the currentchannel to lock.Note:The Lock will effective unless theCHILD LOCKsetted "ON" under theSYSTEM LOCKmenu. |
 | ||
11- Product specifications
| Items | Relevant illustrations | |
| LCD | 40 cm LCD TV Widescreen 16:9 | |
| Resolution | 1366* 768(best resolution 1366 * 768) | |
| Features | Compatible areas | Multinorm |
| TV standard | PAL B / G - AUTO - SECAM L | |
| Channel amount | 99 | |
| Input interface | PC | DB15 VGA input interface |
| AV video, S-video | Composite video input interface, S-video input interface | |
| TV | 75Ω ANT. | |
| SCART | 21 Pin socket (Audio/Video in, Audio/Video out, RGB in) | |
| Audio | Audio(1) Left,right audio input interfaceAudio(2) Left,right audio input interface | |
| HDMI | High Quality Audio/Video input socket for connecting an external device fitted with an HDMI output | |
| Headphone Output | headphone output interface | |
| Speaker Output | 3W x 2 | |
| OSD language | English, German, Spanish, French,Dutch, Portuguese, Polish | |
| Power supply | DC 12 V / Adaptor for 230 Volt | |
| Power consumption | < 40 W | |
| Accessories | Remote control, AC adapter, AC cable, 2xAAA Battery, IB,Warranty card | |
Part 2 : DVD OPERATION
This Product can play the following format of DVD Disc.
| Disc type | Disc Size | Recorded Time | Recorded Content | Remarks |
| DVD | 12cm | Single side: 120mins. Approx. | DVD format: Compressed digital Audio and Video | |
| Double side: 240mins. Approx | ||||
| Super VCD | 12cm | 45mins. Approx. | MPEG 2 Compressed Digital Audio and Video | Included: SVCD, CVD |
| VCD | 12cm | 74mins. Approx. | MPEG 1 Compressed Digital Audio and Video | Included: VCD2.0, VCD1.1, VCD1.0, DVCD |
| CD | 12cm | 74mins. Approx. | CD-DA: Digital Audio | |
| HD-CD | 12cm | 74mins. Approx. | HD-CD: Digital Audio | |
| MP3 / JPEG | 12cm | 600mins. Approx. | Compressed digital Audio |
Notice: Also support DVD-R, CD-R, and CD-RW playback.
Card reader module support SD, MS and MMC Card and has a USB connection.
1- Basic operating instructions
1. DVD on
Turn on the LCD TV, switch to the DVD mode for the DVD operation.
2. Insert Disc
Insert the Disc to the Disc slot (Printed side facing towards the front of the TV); the player will load the disc automatically. There will have an on screen indication "CLOSE" then "READ". After loading the disc content, it will switch to play mode automatically. If the disc is already placed inside, the disc will be read automatically.
Note 1: For some discs, after loading the content of the disc, need to press PLAY or select from the disc menu to start.
Note 2: Please make sure when inserting the Disc, the printed side of the disc should be facing the front of the TV. When inserting the Disc incorrectly, you may damage the DVD mechanism.
3. Play
According to the disc content, the disc menu will display for your selection. When playing the disc, you may use PAUSE button to toggle between Play and Pause mode. This product also supports Menu, Title, and Sequential and Program playback.
1. Menu Playback (For DVD, Super VCD and VCD2.0 discs)
<1> Press MENU button
• For DVD discs, the screen will display the DVD Disc Menu (Root Menu)
- For Super VCD & VCD2.0 discs, the screen will display the Super VCD, VCD2.0 Disc Menu (PBC: [OFF]) (Press the MENU button to display the PBC status.)
- Playback the Super VCD & VCD2.0 discs, the default PBC status is ON.
<2> For DVD discs, use the navigation buttons to select and Play the highlighted contents; For Super VCD & VCD2.0 discs, use the numeric buttons to play your favorite content directly. (Note: PBC should be OFF.)
<3> Press ENTER or PLAY button to start from the highlighted content.
<4> Returns to the Root Menu when playing the disc
• For DVD discs, press MENU to display the Disc Menu.
- For Super VCD & VCD2.0 discs, when PBC is ON, press MENU to display the Disc Menu.
<5> STOP
- Press STOP button once to stop. Press PLAY button to resume from where you stopped.
- Press STOP button Twice to stop. Press PLAY button to start from beginning.
In order to protect the disc, press STOP button then press EJECT button to take the disc out. When the disc is ejected, hold the disc edge slightly and take it from the eject direction to prevent scratches.
When not using the DVD function (in stand-by mode or using others modes for a long time), please take out the disc to protect the DVD loader and the disc.
2. Title Playback (For DVD Disc only)
- Press TITLE button, there will have an on screen indication "TITLE".
- Press the direction or numeric buttons to select your favorite title.
• Then will play from the first chapter of the selected title.
3. Sequential Playback (For DVD, Super VCD, VCD, CD, CD-G, HD-CD, MP3/JPEG discs, Memory Card and USB)
For Super VCD & VCD discs, if PBC is "ON" status, press PLAY button will enter the disc menu. Press MENU button to turn PBC OFF. Press PLAY button to start in sequent.
For others, while it stopped, press PLAY button to start in sequent.
4. Program Playback (For DVD, Super VCD, VCD, CD, CD-G, HD-CD, MP3/JPEG discs, Memory Card and USB)
Using Program playback, you can select max. 16 tracks from the disc to playback in programmed order.
OSD for Program playback
If it is in PBC ON status, using program playback will turn to PBC OFF automatically.
According to the highlight area input the title and chapter number by numeric buttons, press PLAY button to start; or move to the
While playing the program, you may press PROGRAM button to display the program menu for edit.
To clear the program by moving to
While playing the program, there will have an on screen indication "PRG PLAY" and the current title and chapter number.
2- Functions operating instructions
-
Play (For DVD, Super VCD, VCD, CD, CD-G, HD-CD, MP3/JPEG discs, Memory Card and USB)
-
For DVD disc, press PLAY button from root or title menu; while playing the DVD, you may play your favorite title directly with title selection by pressing the TITLE button.
- For Super VCD & VCD discs, while playing the disc, you may play your favorite tracks by numeric buttons. (Note: When using the Program playback or when it is PCB ON status, you can only use PREV or NEXT buttons to change the track)
- For CD, CD-G & HD-CD discs, while playing the disc, you may play your favorite tracks by numeric buttons.
- For MP3 / JPEG disc, you may play your favorite tracks by numeric buttons from the content menu.
Note: From track 1-10, use numeric buttons directly; For tracks over 10, press - / -- button first. (e.g. Track 15, press - / -- then 5)
If input track number is not valid, it will not function.
- Previous / Next (For DVD, Super VCD, VCD, CD, CD-G, HD-CD, MP3/JPEG discs, Memory Card and USB)
While playing the disc;
- Press PREVIOUS button to play to the last Title / Chapter / track.
- Press NEXT button to play to the next Title / Chapter / track.
For super VCD & VCD discs, in PBC OFF status;
• If the current track is the first one, press PREVIOUS button will stop the playback.
• If the current track is the last one, press NEXT button will stop the playback.
For DVD discs, the above functions may vary due to different DVD disc's structure.
- Forward / Backward (For DVD, Super VCD, VCD, CD, CD-G, HD-CD, MP3/JPEG discs, Memory Card and USB)
While playing the disc, you may use forward or backward function.
- There are 4 speeds for forward. Press forward button to toggle between different speeds in sequent. (FORWARDx2 - FORWARDx4 - FORWARDx8 - FORWARDx20 - Play)
○ While in forward, you may press PLAY to resume normal speed.
- For CD, HD-CD, MP3, forward also have audio output.
For DVD discs, if forward to last title / chapter, it will start from the beginning.
For Super VCD & VCD discs, in PBC ON status, if forward to the last track, it will start from the beginning.
- There are 4 speeds for backward. Press backward button to toggle between different speeds in sequent. (BACKWARDx2 - BACKWARDx4 - BACKWARDx8 - BACKWARDx20 - Play)
○ While in backward, you may press PLAY to resume normal speed.
- For CD, HD-CD, MP3, backward also have audio output.
For DVD discs, if backward to first title / chapter, it will start from the beginning.
For Super VCD & VCD discs, in PBC ON status, if backward to the first track, it will start from the beginning.
Note: During Forward or Backward, the sound will be off.
- Slow motion (For DVD, Super VCD & VCD discs)
While playing the disc, you may use slow motion function.
- There are 6 speeds for slow motion. Press SLOW button to toggle between different speeds in sequent. (SF1/2 - SF1/3 - SF1/4 - SF1/5 - SF1/6 - SF1/7 - Play)
• While in slow motion, you may press PLAY to resume normal speed.
Note: During Slow motion, the sound will be off.
- Pause (For DVD, Super VCD, VCD, CD, CD-G, HD-CD, MP3/JPEG discs, Memory Card and USB)
FOR CD, CD-G, HD-CD & MP3/JPEG discs, press PAUSE button to pause; press PLAY button to resume.
FOR DVD, Super VCD, VCD discs, press PAUSE button to pause; press STEP button to
playback frame by frame; press PLAY button to resume.
- Repeat (For DVD, Super VCD, VCD, CD, CD-G, HD-CD, MP3/JPEG discs, Memory Card and USB)
Press REPEAT button once to display the current repeat mode.
- For Super VCD, VCD, CD, CD-G, HD-CD, discs, while playing in sequent, you may use the repeat playback.
There are 2 repeat modes, press REPEAT to toggle between different modes in sequent. (REPEAT (OFF) – REPEAT (1) – REPEAT (ALL)).
• For DVD discs, you may setup the repeat playback mode.
There are 2 repeat modes, press REPEAT to toggle between different modes in sequent. (REP: (OFF) – REP: (CHAPTER) – REP: (TITLE) – REP: (ALL)).
- For MP3 / JPEG discs, while playing the disc, you may use the repeat playback.
There are 3 repeat modes, press REPEAT to toggle between different modes in sequent. (REPEAT (OFF) – REPEAT (1) – REPEAT (DIR) – REPEAT (ALL)).
- D.DISP (For DVD, Super VCD, VCD, CD, CD-G, HD-CD, MP3/JPEG discs, Memory Card and USB)
Press D.DISP button to activate the on screen roll-down menu for the current Title, Chapter, time and other information.
• For DVD discs, (2 pages)
Press D.DISP button once to display first page:
Disc type, Title -/- (Current / Full), Chapter-/-(Current/Full), Full disc time.
Press D.DISP button again to display second page:
Audio-/--(Current/Full) or OFF, Language, Audio type, Subtitle-/--(Current/Full) or OFF.
Press D.DISP button again to turn off the on screen display.
• For Super VCD discs, (2 pages)
Press D.DISP button once to display first page:
Disc type, Track -/- (Current / Full), Mute status, PBC status, Repeat mode status, Current track time.
Press D.DISP button again to display second page:
Audio-/--(Current/Full) or OFF, Audio type, Language, Subtitle-/--(Current/Full) or OFF.
Press D.DISP button again to turn off the on screen display.
• For CD, CD-G, HD-CD, MP3 / JPEG discs,
Press D.DISP button once to display first page:
Disc type, Track -/- (Current / Full), Mute status, Repeat mode status, Current track
time.
Press D.DISP button again to turn off the on screen display.
- Goto (For DVD, Super VCD, VCD, CD, CD-G, HD-CD, MP3/JPEG discs, Memory Card and USB)
This function allows you to play your favorite Title / Chapter / track. Press GOTO button to activate the on screen scroll-down menu for edit. According to the highlighted area, input your favorite Title / chapter / Track number by numeric buttons or input the playback time. After editing, press ENTER to start. If the input is invalid, it will not function.
Note: While editing, the GOTO button is not function.
If it is in PBC ON status, this function will switch the it to OFF.
- Intro (For Super VCD, VCD, CD, CD-G, HD-CD, MP3/JPEG discs, Memory Card and USB)
- For Super VCD & VCD discs, while the disc had stopped, press INTRO button.
The screen will split to 9 small display to play each track by 3 sec. according to the tracks order.
- If it is in PCB ON status, this function will switch it to OFF. (Note: If started the disc menu, preview will not function)
- Press PREV / NEXT button to navigate the 9 small screens.
- Press PLAY buttons to playback the current selection.
- Press 1 – 9 button to activate corresponding small screen directly.
- For CD, CD-G, DTC-CD, HD-CD discs, while the disc had stopped, press INTRO button. It will start to play each track by 15 sec. according to the tracks order.
- Press numeric buttons directly to select the tracks for preview
-
Press PLAY button to playback the current track
While playing the discs, you may also press INTRO button to activate this function.
(Note: if the current track started over 15 sec. this function will start from next track.) -
Audio (For Super VCD, VCD, CD, CD-G, HD-CD, MP3/JPEG discs, Memory Card and USB)
-
Press AUDIO button once to display current audio mode.
- Press again to toggle between different audio modes in sequent.
- For Super VCD & VCD discs: (Stereo - L - R - Auto L - Auto R)
○ For CD, CD-G, HD-CD, MP3 discs: (Stereo - L - R)
Note: Switching to Auto L / R audio channel may be vary due to different discs contents.
Bilingual VCD discs can use AUDIO button to switch between different languages.
-
Language (For DVD, Super VCD discs)
-
Press AUDIO button once to display current language.
- Press again to toggle between different languages mode in sequent.
Note: For Multi-languages DVD & Super VCD discs, press AUDIO button to select your favorite language.
-
Subtitle (For DVD, Super VCD discs)
-
Press SUBTITLE button once to display current sub-title.
- Press again to toggle between different subtitle modes in sequent.
Note: For Multi-languages subtitle DVD & Super VCD discs, press SUBTITLE button to select your favorite subtitle language.
-
Angle (For DVD discs, Memory Card and USB)
-
Press ANGLE button once to display current playback angle.
- Press again to toggle between different playback angle code in sequent.
(e.g. Angle -/- (Current/Full) or OFF)
Note: Only for DVD with multi-angle, press SUBTITLE button to select your favorite playback angle. Selectable playback angle depends on the availability of the DVD contents.
-
Mute (For DVD, Super VCD, VCD, CD, CD-G, HD-CD, MP3/JPEG discs, Memory Card and USB)
-
Press MUTE button to mute the audio output. There will have an on screen symbol indicate, "MUTE".
-
Press again to cancel, or Press VOL + / VOL – to cancel and adjust the volume.
• In case there is no audio output, try to press MUTE button to cancel mute. -
Zoom (For DVD, Super VCD, VCD, MP3/JPEG discs, Memory Card and USB)
• Press ZOOM button to zoom in the picture.
- There are 6 zoom modes, press ZOOM button to toggle between different zoom modes in sequent. (Zoom2 - Zoom3 - Zoom4 - Zoom1/2 - Zoom1/3 - Zoom1/4 - Zoom OFF)
- In Zoom2-4, You may use the navigation buttons to pan the picture for your favorite portion.
- Repeat A – B (For DVD, Super VCD, VCD, CD, CD-G, HD-CD, MP3/JPEG discs, Memory Card and USB)
- In normal Playback, fast forward or fast reverse, press A-B button at where you want to start the repeat portion. There will have an on screen indication "REPEAT A –".
- In normal Playback, fast forward or fast reverse, press A-B button again at where you want to stop the repeat portion. There will have an on screen indication "REPEAT A-B".
• The repeat function started to playback the portion from A to B automatically.
- Press A-B button again to cancel. There will have an on screen indication "A – B CANCEL".
- For Super VCD, VCD & CD discs, repeat A-B is only function within the same track. When playing the others, repeat A-B will cancel automatically.
- For Super DVD discs, repeat A-B is only function within the same Title /Chapter. When playing the others, repeat A-B will cancel automatically.
- Volume (For DVD, Super VCD, VCD, CD, CD-G, HD-CD, MP3/JPEG discs, Memory Card and USB)
Press VOL - / VOL + buttons to adjust the output volume.
Note: Playback DVD discs in original code, is not adjustable.
3-MP3 / JPEG Playback
After loading the MP3 / JPEG disc, it will start to scan for the stored MP3 /JPEG folders. Then will firstly display the MP3 contents automatically and start to play the first file (highlighted file). Screen as follow.
![[MP3] _.MP3 01.MP3 Highlight file for current playback. Buttons for switching between MP3 & JPEG playback function. Display current MP3 playback function Display current JPEG playback [PICTURE] _.JPG 01.PICTURE Scroll bar to view next page.](/content/2026/06/1158765/images/c3e10d9ad18bdb8a51cf8da480a09e762f7316b1a7bf452d26a49e79232d0f09.jpg)
Using the navigation buttons to check you favorite folder and playback the first file or move to the your favorite file.
Note:
- Press ◀▶ buttons to move the highlight to folders, documents or mode selection.
- Press numeric buttons to select the contents directly. For number over 10, press -/-- button first. (e.g. File number 15, press -/-- then 5.)
- When playback MP3 files, there is no picture display, only audio output.
- Playing the JPEG discs, press PROGRAM button to select slide effects. There are
17 slide modes, press PROGRAM button to toggle between different modes in sequent. (Start from top – Start from bottom – Start from left – Start from right – Start from upper left corner – Start from upper right corner – Merge from left / right – Horizontal blades – Vertical blades – Merge form 4 corners – Random Playback – Slide effect OFF)
- When play or pause with picture playback, you may use navigation butoons to flip / rotate the picture.
- ▲ button to flip horizontally
○ ▼ button to flip vertically
○ ◀ button to rotate left 90°
○ ▶ button to rotate right 90°
- When play or pause with picture playback, you may use MENU button to enter preview mode to display 12 pictures. Press NEXT / PREV button to select next / previous page or press numeric buttons to view the corresponding pictures.
Note 1: The above functions may vary according to DMP & USB contents.
Note 2: The maximum JPEG image size that can be displayed is 1280 x 1024
4- Card Reader and USB Playback
The card reader can read SD / MS / MMC 3 kinds of cards and also USB storage.
Switch the unit in ON position.
Push the INPUT button until the DVD function appears.
Remove the DVD disc when available in the drawer. Plug in the USB player or Memory card.
Plug in the USB player or Memory card.
The unit will now automatically detect the USB player or Memory card.
Playback document formats included:
- DVD-audio and DVD-video data format : compressed digital audio and compressed digital video.
- Super VCD data format : MPEG 2 compressed digital audio and compressed digital video, for SVCD and CVD.
- MPEG 1 data format : MPEG 1 compressed digital audio and compressed digital video, for VCD2.0, VCD1.1, VCD1.0 and DVCD.
- Audio data format : for CD-DA, HDCD
- MP3 / JPEG format : MP3 compressed digital audio and JPEG still pictures.
Note: The maximum JPEG image size that can be displayed is 1280 x 1024
Important
The USB port of this product is fully compatible with the USB 1.1 and 2.0. standard. If MP3 players connected to this port are not written in compliance with the official USB 1.1 or 2.0. standard it may occur that those MP3 players do not work on this port.
This is not a defective of this product.
The MP3 player does not comply with the official USB 1.1 or 2.0 standard.
5-Function Settings
1. DVD Function General Setup
- Press DVD –SETUP button to activate the DVD player OSD menu;

- Press ◀ / ▶ button to move and highlight between different sub-menu. Press ▲ / ▼ ENTER button to enter the highlighted sub-menu.
- Press DVD-SETUP button to exit the OSD menu, or move the highlight to EXIT SETUP then press ENTER button to exit.
Note: In Setup mode, the following functions will be cancel or pause :
TITLE, SUB-TITLE, D.DISP, PLAY, SETUP, STOP, SLOW / STEP, NICAM / AUDIO, FF, FR, PREV, NEXT, GOTO, ZOOM, ANGLE, PROGRAM, PREVIEW, REPEAT, REPEAT A-B.
2. Others Functions Setup
System Setup
- Source

Select according to what type of media you want to playback:
(Disc, USB, MEMORY CARD)
Default setting is DISC.
- TV color system

Select according to your TV color system:
(NTSC, PAL, Auto for Multi-system)
Default setting is PAL.
- TV Type

4:3PS: suitable for normal TV, when playback wide screen movie, the left and right of the screen will be cropped.
4:3LB: suitable for normal TV, when playback wide screen movie, the top and bottom will have a black border.
16:9 : suitable for connecting a wide screen TV / Display.
Note:
○ Playback screen size may vary according to the discs contents.
- For discs with 4:3 contents, using any mode would only display a 4:3 screen.
- Screen ratio selection should be according to the connected TV / Display aspect ratio.
- Password
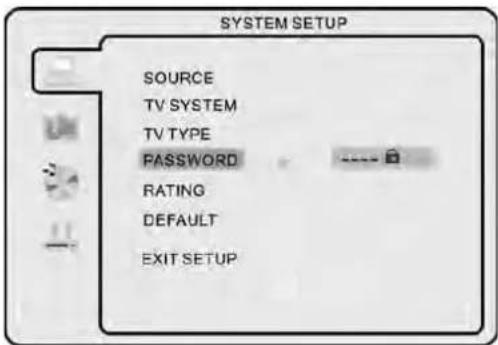
- The default setting is locked. No Rating selection or change password could be done. To edit the Rating setting, please enter default password "0000" by numeric buttons, then press ENTER button to confirm.
To change password, input any 4-digit number when the lock is unlocked. Once the 4-digit number in entered, that will be your new password.
- Rating
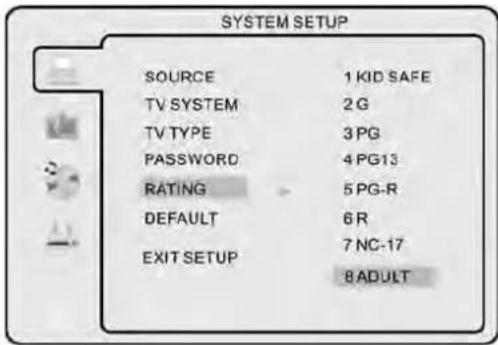
Playback for some discs with rating, you can select the rating setting according to your preference.
Rating restriction divided in eight different categories from KID SAFE to ADULT.
Note: Only editable when password is unlocked. And only can function when password is locked.
- Default Setting
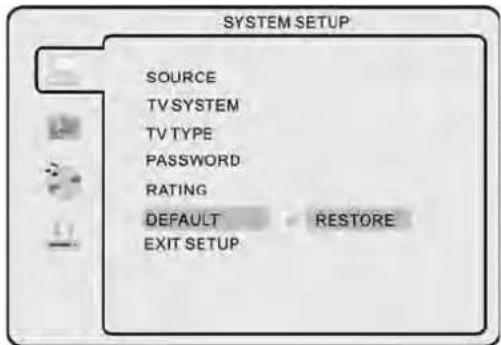
Press ENTER button to restore factory default.
7. Language Setup
Press DVD-setup button to enter the DVD OSD menu.
- OSD Language

Use navigation buttons to select the OSD LANGAUGE setup icon, press ENTER button to confirm. There are 6 languages for your selection, press ▲ & ▼ buttons to toggle between different languages. (ENGLISH - GERMAN - SPANISH - FRENCH - PORTUGUESE - DUTCH - POLISH) Press ENTER button to confirm.
Note: If the selected language is not included in you DVD disc content, it will select the default language of the disc automatically.
The default language setting is ENGLISH.
- Audio Language

Use navigation buttons to select the AUDIO LANG setup icon, press ENTER button to confirm. There are 6 languages for you selection, press ▲ & ▼ buttons to toggle between different languages. (ENGLISH – GERMAN – SPANISH – FRENCH – PORTUGUESE – DUTCH – POLISH) Press ENTER button to confirm.
Note: If the selected language is not included in you DVD disc content, it will select the default language of the disc automatically.
The default language setting is ENGLISH.
- Subtitle Language

Use navigation buttons to select the SUBTITLE LANG setup icon, press ENTER button to confirm. There are 6 languages for you selection, press ▲ & ▼ buttons to toggle between different languages. (ENGLISH – GERMAN – SPANISH – FRENCH – PORTUGUESE – DUTCH – POLISH – OFF) Press ENTER button to confirm.
Note: If the selected language is not included in you DVD disc content, it will select the default language of the disc automatically.
The default language setting is ENGLISH.
- Menu Language

Use navigation buttons to select the MENU LANG setup icon, press ENTER button to confirm. There are 6 languages for you selection, press ▲ & ▼ buttons to toggle between different languages. (ENGLISH - GERMAN - SPANISH - FRENCH - PORTUGUESE - DUTCH - POLISH) Press ENTER button to confirm.
Note: If the selected language is not included in you DVD disc content, it will select the default language of the disc automatically.
The default language setting is ENGLISH.
8. Audio Setup
Audio Output, Use navigation buttons to select the AUDIO OUT setup icon, press ENTER button to confirm.

There are 3 modes for your selection; use navigation buttons to select different modes, press ENTER button to confirm. (SPDIF / OFF - SPDIF / original code - SPDIF / PCM) SPDIF / OFF: Coaxial output off.
SPDIF / Original code : When connected the coaxial output to your audio amplifier, playing back the disc with Dobly / MPEG contents, the coaxial output will transmit the original signal to your amplifier. However, your audio amplifier must have the corresponding decoding function.
SPDIF / PCM: When connected with 2 channels digital stereo amplifier, playing back the discs with Dolby, MPEG contents, the coaxial output with 2 channel to your amplifier.
Tone

Use ▲ & ▼ buttons to adjust the Tone setting.
9. Dolby Digital Setup
Dynamic Range
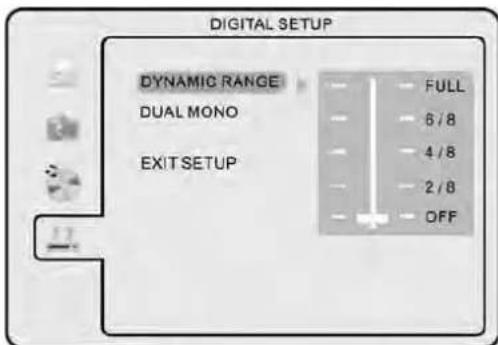
When switch the compress mode to "Audio output", adjust the compress ratio for different effect. When selected FULL, the peak signal value is smallest. When selected OFF, the peak signal value is biggest.
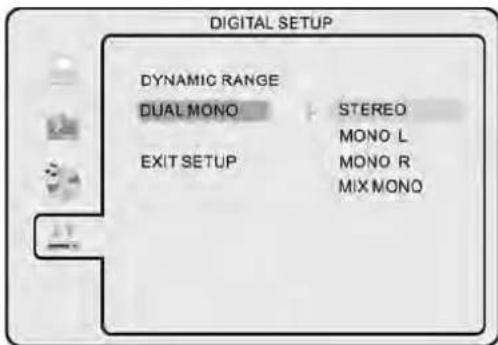
You can select four different audio output, STEREO, MONO L, MONO R, MIX MONO.
Wall Mount
Screw taps x 4 for wall mounting

natural_image
Technical line drawing of a computer monitor rear panel with ventilation ducts and indicator lights (no text or symbols)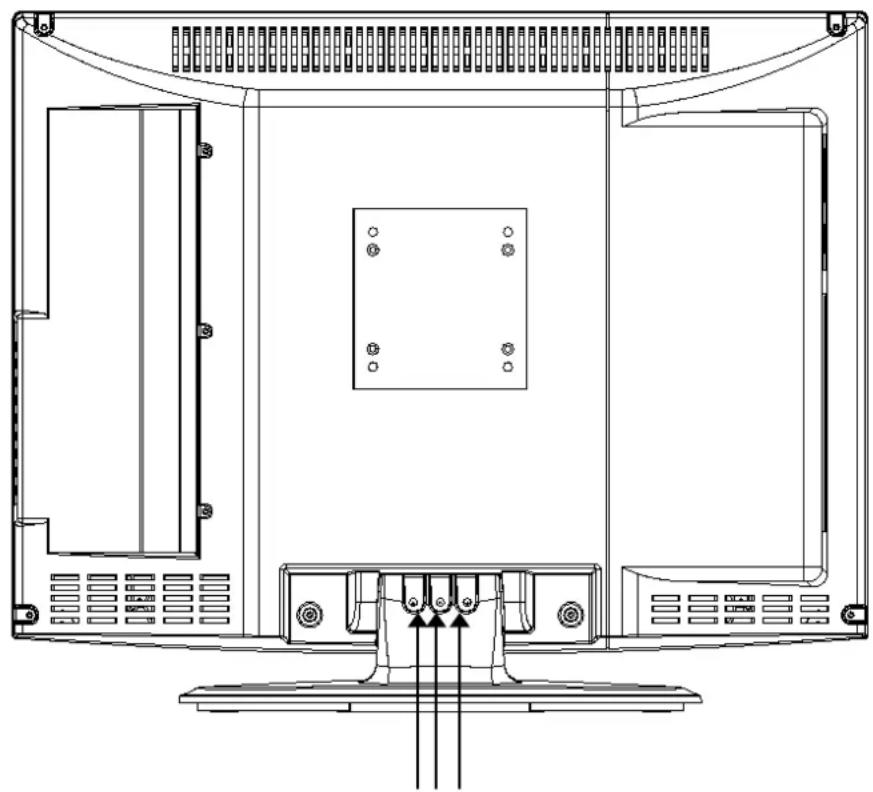
natural_image
Technical line drawing of a computer monitor rear panel with ventilation grilles and control panel (no text or symbols)Remove the stand by taking out the 3 screws
Instructions on environment protection

natural_image
Simple line drawing of a trash bin with no text or symbolsDo not dispose of this product in the usual household garbage at the end of its life cycle; hand it over at a collection point for the recycling of electrical and electronic appliances. The symbol on the product, the instructions for use or the packing will inform about methods for disposal.
The materials are recyclable as mentioned in its marking. By recycling, material recycling or other forms of re-utilization of old appliances, you are making an important contribution to protect our environment.
Please inquire at the community administration for the authorized disposal location.
Deel 1: BEDIENING VAN DE LCD TV
natural_image
Technical line drawing of a mechanical component with mounting holes and housing (no text or symbols)
natural_image
Illustration of a hand pressing down on a rolled document or paper sheet, with arrows indicating direction (no text or symbols)Opmerking:
natural_image
Illustration of a AudioSonic computer monitor with a circular disc on the left (no text or symbols on the screen)Status indicatorlampje
Red/Green/Yellow/Cyaan-toetsen
natural_image
Technical line drawing of a computer monitor front panel with ventilation ducts and indicator lights (no text or symbols)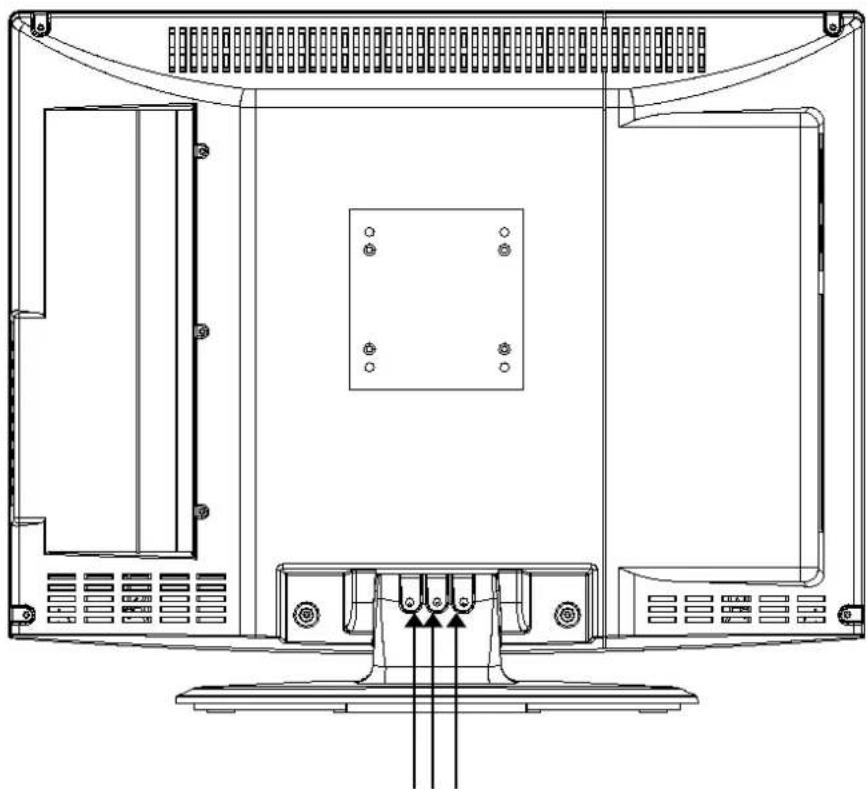
natural_image
Technical line drawing of a computer monitor rear panel with ventilation grilles and mounting base (no text or symbols)natural_image
Simple line drawing of a battery with circuit lines and a battery symbol (no text or labels)natural_image
Line drawing of a hand pressing down on a device with an arrow indicating motion (no text or symbols)
natural_image
Technical line drawing of a battery pack with mounting holes and internal components (no text or symbols)
natural_image
Simple line drawing of a hand pressing down on a sheet of paper with arrows indicating motion (no text or symbols)Remarque :
natural_image
Illustration of a vintage audio monitor with a CD/DVD disc on the left (no text or symbols on the screen)4- Lecture Card Reader
natural_image
Technical line drawing of a computer monitor rear panel with ventilation ducts and indicator lights (no text or symbols)
natural_image
Technical line drawing of a computer monitor rear panel with ventilation grilles and control buttons (no text or labels)natural_image
Simple line drawing of a mechanical device with no text or symbolsnatural_image
Three-step diagram showing a hand pressing down on a battery, then moving and finally adding a component (no text or symbols)Bemerkungen:
natural_image
Illustration of a AudioSonic computer monitor with a circular disc on the left (no text or symbols on the screen)natural_image
Technical line drawing of a computer monitor front panel with ventilation ducts and indicator lights (no text or symbols)
natural_image
Technical line drawing of a computer monitor rear panel with ventilation grilles and control buttons (no text or symbols)natural_image
Simple line drawing of a battery with circuit lines and a battery symbol (no text or labels)natural_image
Line drawing of a hand pressing down on a device with an arrow indicating motion (no text or symbols)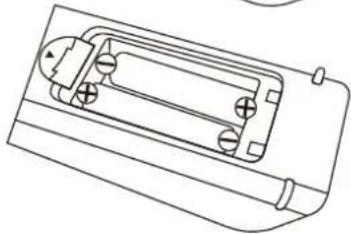
natural_image
Technical line drawing of a battery pack with mounting holes and internal circuit (no text or symbols)
natural_image
Illustration of a hand cleaning a sheet of paper with directional arrows indicating motion (no text or symbols)Observaciones:
natural_image
Illustration of a AudioSonic TV monitor with a circular disc on the left (no text or symbols on the screen)natural_image
Technical line drawing of a computer monitor front panel with internal components and ventilation ducts (no text or labels)
natural_image
Technical line drawing of a computer monitor rear panel with ventilation grilles and mounting feet (no text or symbols)natural_image
Line drawing of a hand pressing down on a device with an arrow indicating motion (no text or symbols)
natural_image
Technical line drawing of a battery pack with mounting holes and internal components (no text or symbols)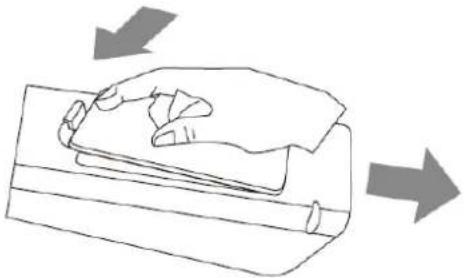
natural_image
Line drawing of a hand pressing down on a sheet of paper with two arrows indicating direction (no text or symbols)Observações:
natural_image
Illustration of a flat-screen audio monitor with 'AudioSonic' branding, no visible text or symbols on the screen or background.Passos de ligação:
Passos de ligação:
Passos de ligação:
Passos de ligação:
Seleccione de acordo com o sistema de cores do seu televisor:
(NTSC, PAL, Automático para Multi-sistema)
natural_image
Technical line drawing of a computer monitor rear panel with ventilation ducts and control buttons (no text or symbols)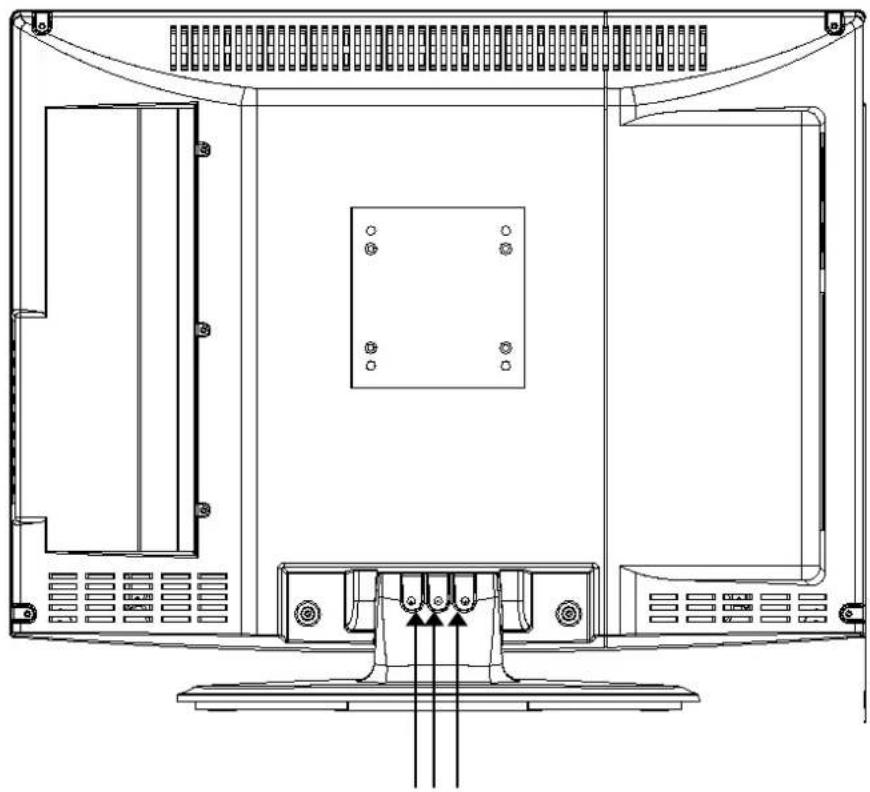
natural_image
Technical line drawing of a computer monitor rear panel with ventilation grilles and control buttons (no text or labels)natural_image
Line drawing of a hand pressing down on a device with an arrow indicating motion (no text or symbols)
natural_image
Technical line drawing of a battery pack with two terminals and a central housing (no text or symbols)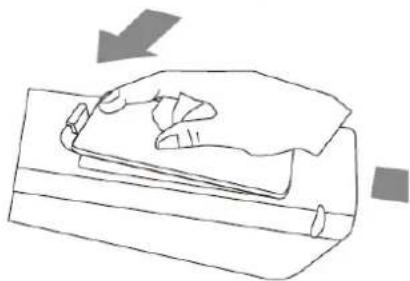
natural_image
Line drawing of a hand pressing down on a piece of paper with a downward arrow indicating compression (no text or symbols)Uwagi:
natural_image
Illustration of a AudioSonic TV monitor with a CD/DVD graphic on the left (no text or symbols on the screen)natural_image
Technical line drawing of a computer monitor front panel with internal components and ventilation ducts (no text or symbols)
natural_image
Technical line drawing of a computer monitor rear panel with ventilation grilles and mounting base (no text or symbols)


- 1- Important Safety Precaution
- 2- Main functions
- 3- Fitting the Remote Control Batteries
- Battery Cautions
- 4- Product Overview
- 5- Control Panel Overview
- Control Panel Functions:
- Indicator Light Status
- Illustration of Connectors
- Connector's descriptions
- 6- Remote Control Overview
- 7- Connection between different input signals
- A) Connect with PC signal
- Connection steps:
- B) Connect to external AV devices using Composite and S-Video inputs
- Connect with TV signal
- Connect with SCART signal
- E) Connect with HDMI signal
- 8- Basic operating instructions
- Turn on the LCD-TV
- Switch Among Different Inputs :
- ATV /HDMI / SCART / AV /S-VIDEO / VGA /DVD
- SOURCE
- Audio control
- Mute
- Note
- Select the TV channel you want
- ASPECT
- NICAM
- 9- TELETEXT
- Page Selection
- Size Button
- Reveal Button
- Red/Green/Yellow/Cyan Buttons
- Hold Button
- Index Button
- Sub page Button
- Text Button
- 10- Menu operations
- Input mode: PC (VGA)
- Input mode: HDMI/SCART/AV/YPBPR
- Input mode: TV
- Part 2 : DVD OPERATION
- 1- Basic operating instructions
- DVD on
- Insert Disc
- Play
- Menu Playback (For DVD, Super VCD and VCD2.0 discs)
- Title Playback (For DVD Disc only)
- Sequential Playback (For DVD, Super VCD, VCD, CD, CD-G, HD-CD, MP3/JPEG discs, Memory Card and USB)
- Program Playback (For DVD, Super VCD, VCD, CD, CD-G, HD-CD, MP3/JPEG discs, Memory Card and USB)
- OSD for Program playback
- 2- Functions operating instructions
- 3-MP3 / JPEG Playback
- Note:
- 4- Card Reader and USB Playback
- Important
- 5-Function Settings
- DVD Function General Setup
- Others Functions Setup
- System Setup
- - Password
- - Rating
- Language Setup
- Audio Setup
- Dolby Digital Setup
- Wall Mount
- Instructions on environment protection
- Deel 1: BEDIENING VAN DE LCD TV
- Status indicatorlampje
- Red/Green/Yellow/Cyaan-toetsen
- 4- Lecture Card Reader
- Passos de ligação:
Brand : AudioSonic
Model : LC-157070
Category : Television