
AWT7120W - Washing machine ARTHUR MARTIN - Free user manual and instructions
Find the device manual for free AWT7120W ARTHUR MARTIN in PDF.


User questions about AWT7120W ARTHUR MARTIN
0 question about this device. Answer the ones you know or ask your own.
Ask a new question about this device
Download the instructions for your Washing machine in PDF format for free! Find your manual AWT7120W - ARTHUR MARTIN and take your electronic device back in hand. On this page are published all the documents necessary for the use of your device. AWT7120W by ARTHUR MARTIN.
USER MANUAL AWT7120W ARTHUR MARTIN
We were thinking of you
when we made this product **
Welcome to the world of Electrolux
Thank you for choosing a first class product from Electrolux, which hopefully will provide you with lots of pleasure in the future. The Electrolux ambition is to offer a wide variety of quality products that make your life more comfortable. You find some examples on the cover in this manual. Please take a few minutes to study this manual so that you can take advantage of the benefits of your new machine. We promise that it will provide a superior User Experience delivering Ease-of-Mind. Good luck!
4 sommaire
Sommaire
Avertissements 5
text_image
Image of a white disposable water dispenser with numbered labels pointing to its front panel.La boîte à produits
Pli Prélavage
Lavage
natural_image
White plastic electronic component with labeled parts (II, III, and a small symbol on the side), no readable text or symbols present.5 Touche «Rinçage plus»
6 Voyants de déroulement de cycle
7 Touche «Départ/Pause»
8 Touche «Départ différé»
text_image
Electrolux ARTHUR MARTIN INTUITION 1 2 3 4 5 6 7 8 90° 60° 40° 30° * Prewash Super Quick Eco Options 5.5Kg Soft Opening AWT 9:20 Wnatural_image
Diagram of a computer keyboard layout with no text or symbols
natural_image
Close-up of a hand holding a white appliance with a handle, next to a perforated surface (no text or symbols visible)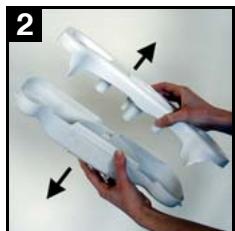
natural_image
Hands holding white plastic controllers with arrows indicating motion direction (no text or symbols)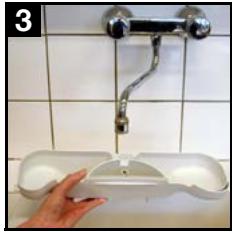
natural_image
Hand placing a small bowl into a sink on a tiled wall (no text or symbols visible)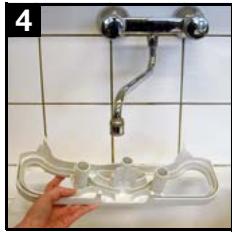
natural_image
Hand placing a plastic tank into a tiled wall (no text or symbols visible)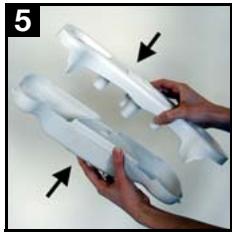
natural_image
Close-up of hands holding white plastic gaming equipment with arrows indicating motion (no text or symbols visible)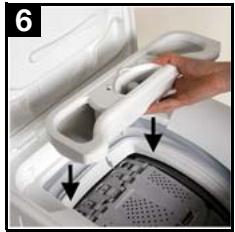
natural_image
Close-up of a hand holding a white appliance with a handle, next to a textured surface (no visible text or symbols)Le piège à objets
natural_image
Illustration of a hand holding a small object with arrows indicating motion or force (no text or symbols)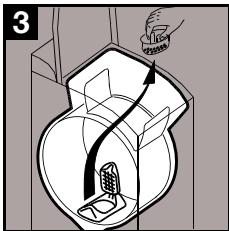
natural_image
Diagram of a mechanical device with internal components and directional arrows (no text or symbols)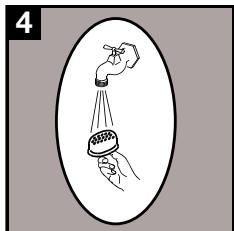
natural_image
Illustration of a hand holding a faucet above a showerhead, enclosed in an oval frame (no text or symbols)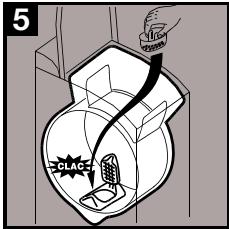
text_image
5 SLACE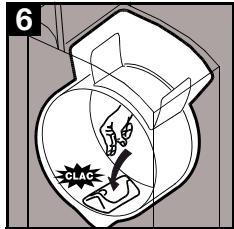
text_image
6 CLACnatural_image
Close-up of hands holding a blue and white plastic bag attached to a circular component (no text or symbols visible)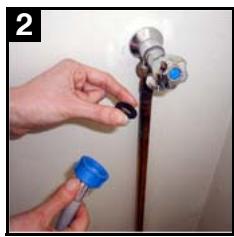
natural_image
Close-up of hands adjusting a wall-mounted pipe fitting with a blue plastic cap (no text or symbols visible)natural_image
Person assembling a white refrigerator with a curved arrow indicating rotation (no text or symbols visible)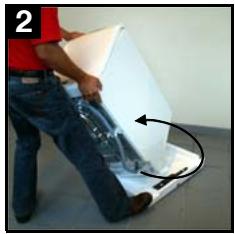
natural_image
Person installing or adjusting a white panel with a curved arrow indicating motion (no text or symbols visible)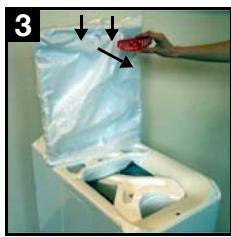
natural_image
Person placing a white plastic bag into a blue industrial machine (no text or symbols visible)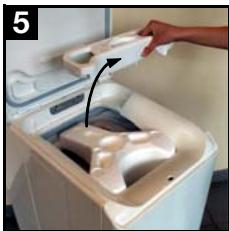
natural_image
Hand placing a plastic bag into a white recycling bin with a hand holding the top part (no text or symbols visible)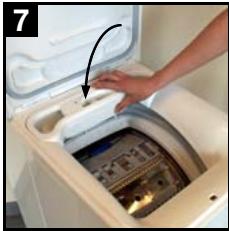
natural_image
Person placing a plastic bag into a washing machine (no text or symbols visible)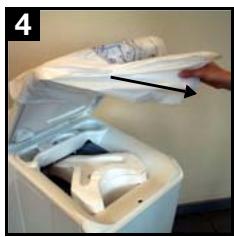
natural_image
Interior view of a trash bin with plastic bags and an open drawer, no visible text or symbols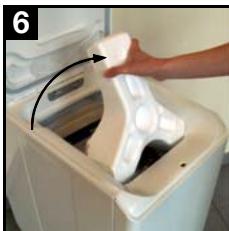
natural_image
Hand placing a white plastic bag into a white washing machine (no text or symbols visible)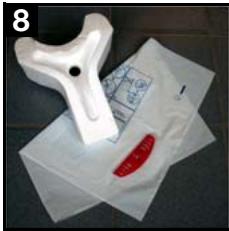
natural_image
White plastic mechanical component with a red clip, placed on a translucent sheet of paper (no text or symbols visible)Débridage
text_image
Labeled diagram of a refrigerator interior showing numbered components for identification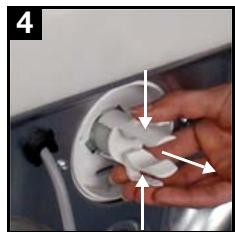
natural_image
Close-up of hands holding a white plastic electrical plug socket (no text or symbols visible)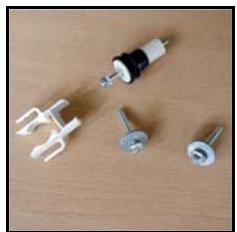
natural_image
Collection of white plastic electrical connectors and screws on a wooden surface (no text or symbols visible)natural_image
Close-up of a hand using a red tool to clean or adjust a wall-mounted component (no text or symbols visible)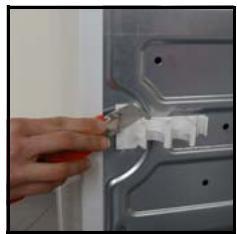
natural_image
Close-up of a hand inserting a plastic clip into a metal panel (no text or symbols visible)Arrivée d'eau
natural_image
A person washing a white appliance with a circular filter cover, no text or symbols visible.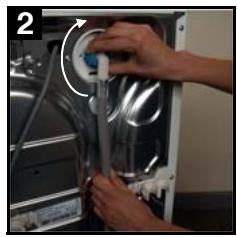
natural_image
Close-up of hands installing a mechanical component into a server rack (no visible text or symbols)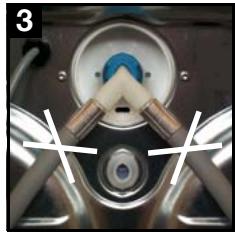
natural_image
Close-up of a mechanical component with metallic parts and a central blue component (no visible text or symbols)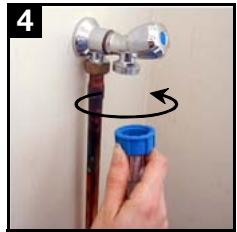
natural_image
Hand holding a blue plastic bottle with a curved arrow indicating rotation (no text or symbols)natural_image
Close-up of a hand using a tool to adjust or install a component, with no visible text or symbols.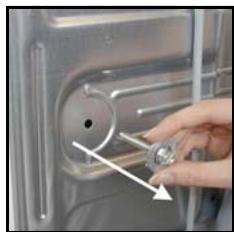
natural_image
Close-up of a hand adjusting a metal component with an arrow pointing to the dial (no text or symbols visible)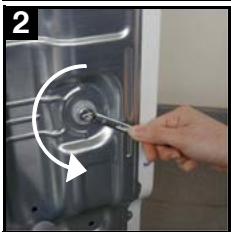
natural_image
Close-up of a hand using a tool to adjust or install a mechanical component, with no visible text or symbols.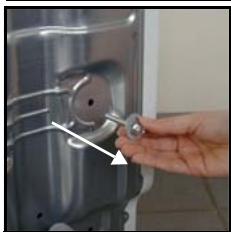
natural_image
Close-up of a hand holding a small metallic object with a white arrow pointing to it (no visible text or symbols)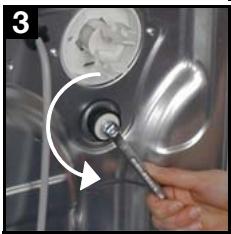
natural_image
Close-up of a hand using a tool to adjust or install a mechanical component, no visible text or symbols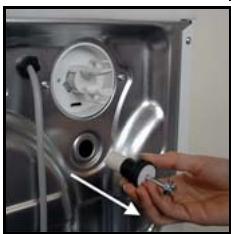
natural_image
Close-up of a hand inserting a plastic bulb into a stainless steel kitchen appliance (no text or symbols visible)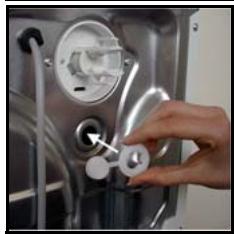
natural_image
Close-up of a hand adjusting a mechanical component with a white circular knob and metallic parts (no visible text or symbols)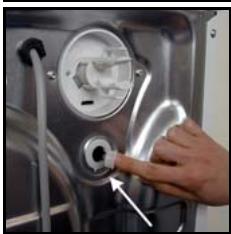
natural_image
Close-up of a hand inserting a plastic component into a stainless steel appliance (no visible text or symbols)Vidange

text_image
1natural_image
Close-up of a washing machine next to a blue PVC pipe with a white hose, no visible text or symbolsnatural_image
Close-up of a hand holding a small mechanical component with a circular annotation (no visible text or symbols)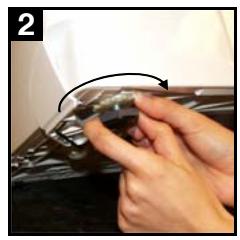
natural_image
Close-up of hands holding a small object with an arrow indicating rotation (no text or symbols visible)Environnement
Mise au rebut

Description of the appliance ....27
How to run a wash cycle? 28
Washing guide 32
Programmes table 34
Consumption 35
Care and cleaning 36
Operating problems 37
Technical specifications ....40
Installation 40
Environment 43
The following symbols have been used in this user guide :

Important information about concerning your safety and information on how to avoid damaging the appliance.

General information.

Information concerning the environment.
Warnings

These warnings are for the safety of you and others around you.
Please read these points carefully before installing and using your appliance. Thank you for your attention.
Keep this user manual with your appliance. If the appliance is sold or given to another person, please make sure this user manual is included. This way, the new user will have the relevant operating instructions and warnings.
General safety
- Do not modify or attempt to modify this appliance. This would put yourself in danger.
- Ensure that all coins, safety pins, brooches, screws etc have been removed before starting a washing programme. If left in washing, they can seriously damage the appliance.
- Use the amount of detergent recommended in the paragraph "Using the right amount of detergent".
- Put small items together (socks, belts etc.) in a small linen bag or pillow case.
- Unplug and close inlet hose tap after using appliance.
- Always disconnect the power supply from the appliance before cleaning or maintenance.
- Do not machine wash clothes with ribbing, unfinished or torn material.
Installation
- Unpack or ask for the appliance to be unpacked immediately upon delivery. Check the outside of the appliance is not damaged in any way. Report all transit damage to your retailer.
- Remove all transit bolts and packaging before installing the appliance.
- Connection to the water supply must be carried out by a qualified plumber.
- If your domestic electrical circuit needs adapting to allow the appliance to be plugged in, use a qualified electrician.
- Ensure that, after installation, the power cable is not trapped under the appliance.
- If the appliance is installed on carpeted floor, ensure that the carpet does not obstruct any ventilation ducts located at the base of the appliance.
- The appliance must be equipped with an earthed power plug which conforms to regulations.
- Before connecting your appliance to the power supply, carefully read the instructions in the chapter entitled “Electrical connection”.
- Replacing the power cable should only be carried out by an authorised service engineer.
- The manufacturer cannot be held responsible for any damage resulting from incorrect installation.
Precautions to be taken against frost
If your appliance is exposed to temperatures below 0^ C, the following precautions must be taken :
- Close the tap and disconnect the inlet hose.
- Place the end of this hose and the drain hose in a basin on the floor.
- Select the Drain programme let it run until the end of the cycle.
- Disconnect the appliance from the power supply by turning the program selector to "Stop".
- Unplug the appliance.
- Replace the inlet hose and drain hose.
This way, the water remaining in the hoses will be drained away, avoiding any ice formation which would damage your appliance.
Before turning your appliance on again, ensure that it is installed in an area where the temperature will not fall below freezing.
for use by adults. Ensure children do not tamper or play with it.
Use
- Your appliance is intended for normal domestic use. Do not use the appliance for commercial or industrial purposes or for any other purpose.
- Refer to the instructions on the label of each item before washing.
- Do not put items into the washing machine which have had stains removed with petrol, alcohol, trichlorethylne etc. If such stain removers have been used, wait until the product has evaporated before putting these items into the drum.
- Your appliance has been designed
Description of the appliance
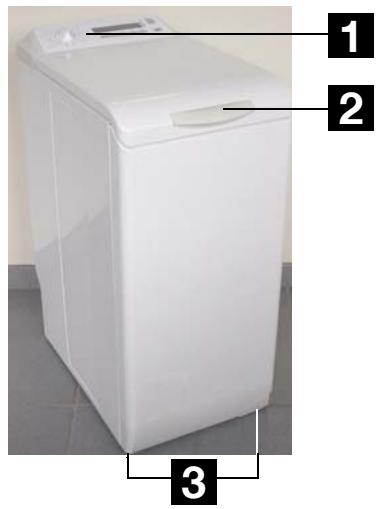
1 The control panel
2 Lid handle
3 Adjustable levelling feet
text_image
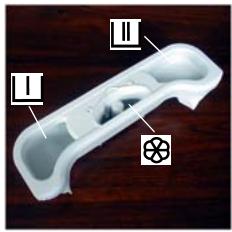
Image of a white disposable water dispenser with numbered labels pointing to its front panel.Dispenser box
Prewash
Wash
Softener (do not fill above the MAX symbol M)
natural_image
White plastic electronic component with labeled parts (II, III, and a small symbol) on a wooden surface (no text or symbols beyond labels)The control panel
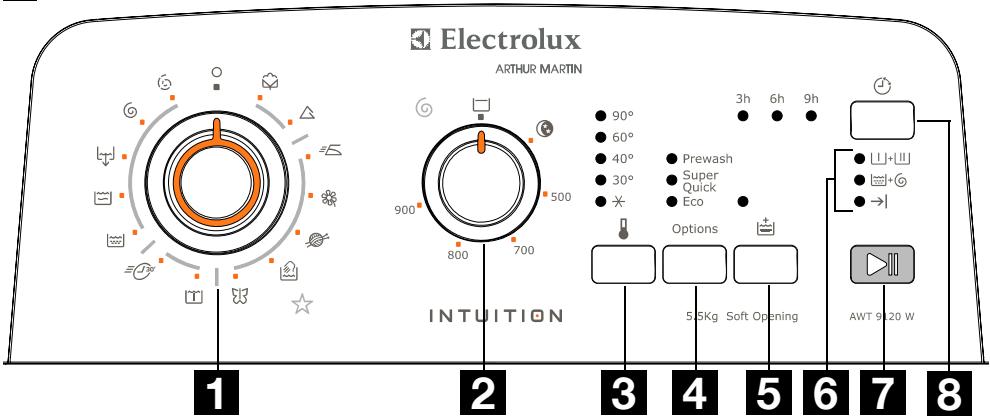
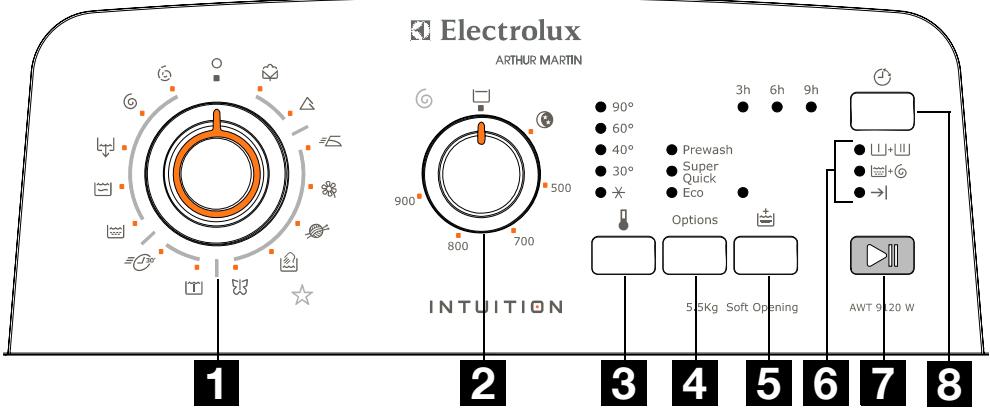
1 Programme selector
2 Spin speed selector
3 "Temperature" pushbutton
4 "Time Manager" pushbutton
5 "Extra rinse" pushbutton
6 Lights of cycle progress
7 "Start/Pause" pushbutton
8 "Delay start" pushbutton
text_image
Electrolux ARTHUR MARTIN INTUITION 1 2 3 4 5 6 7 8 90° 60° 40° 30° * Prewash Super Quick Eco Options 5.5Kg Soft Opening AWT 9x20 WHow to run a wash cycle? Using for the first time

- Ensure the electrical and water connections comply with the installation instructions.
- Remove the polystyrene insert and all other items inside the drum.
- Run an initial wash cycle at 90^ C, without any washing but with detergent to clean the water tank.
Daily use
Loading washing
- Open the lid of the appliance.
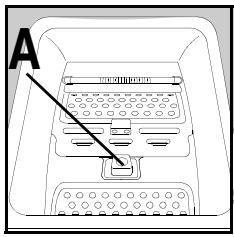
- Open the drum by depressing the locking button A : The two shutters unlock automatically.
- Load the washing, close the drum and the lid of your washing machine.
text_image
A
Before closing the lid of your appliance, ensure that the drum is properly closed :
- When the two shutters are closed,
- locking button A released.
Proportioning of detergents
Your washing machine has been designed to reduce your water and detergent consumption. You can therefore reduce the amounts recommended by detergent manufacturers.
Pour the amount of washing powder into the washing ⏚ and prewash ⏚ compartments if you have selected the "prewash" option. Pour fabric softener into the compartment if necessary ⚙.
If you use another detergent type, refer to the section “detergents and additives” in the washing guide.
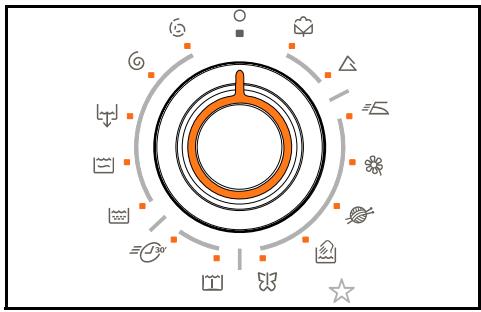
Selection of desired programme
You can find the right programme for different types of washing in the programme table (see “Programme table”).
flowchart
graph TD
    A["Start"] --> B{Decision}
    B -->|Yes| C["Process Step 1"]
    B -->|No| D["Process Step 2"]
    C --> E["Output"]
    D --> F["Feedback"]
    style A fill:#f9f,stroke:#333
    style B fill:#ccf,stroke:#333
Turn the programme selector to the required programme. The “Start/Pause” pushbutton flashes green.

If you turn the programme selector to another programme while a cycle is in progress, the appliance will ignore the new selected programme. The “Start/Pause” pushbutton flashes red for a few seconds.
Selecting the temperature

Press the “Temperature” pushbutton repeatedly to increase or decrease the temperature if you want your washing to be washed at a different temperature to the one selected by the appliance. The ✕ symbol means a cold wash.
Selecting the spin speed
text_image
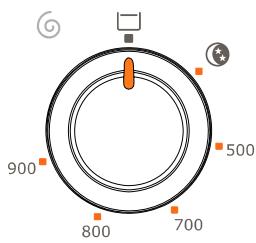
900 800 700 500Turn the spin speed selector on the desired speed. You can also select "No spin"*, "Rinse hold" □* or "Night silence plus" Ⓞ*.
The maximum speeds are :
for Cottons, Synthetics, Easy iron, Wool, Handwash : 900 rpm (AWT 9120W), 800 rpm (AWT 8120W), 700 rpm (AWT 7120W),
for Delicates, Silk, Flash 30 : 700 rpm.
At the end of the programme, if you have selected “Rinse hold” □ or “Night silence plus” Ⓤ, you then need to select a “Spin” Ⓐ/∅ or “Drain” ⌘ programme to finish the cycle.
"Night silence plus"
The washing machine does not empty the water after the final rinse which prevents the washing from creasing. Because there are no spin cycles, the
*depending on model
washing programme is very quiet and can be selected at night. In Cotton and Synthetics programmes, the rinsing cycle uses more water.
"Rinse hold"
The washing machine will not drain the water from the last rinse, so will not crease the laundry.
Selecting options

You must select the different options after selecting the programme and before pressing the "Start/Pause" pushbutton (see "Programme table").
Press the desired button(s) ; the corresponding lights come on. If pressed again, the lights go out. If one of the options is not compatible with the selected programme, the "Start/Pause" pushbutton flashes red.
"Eco" option
This option allows you to choose a lower temperature programme which is as effective as a higher temperature wash programme.
"Super quick" option
The washing time will be reduced depending on the programme selected.
"Prewash" option
The appliance runs a prewash at 30^ C max. The prewash finishes with a short spin cycle for cotton or synthetic programmes, and with an empty cycle for delicates programmes.
"Extra rinse" option 📋
The washing machine will add one or more rinses during the cycle. This option is recommended for people with sensitive skin and in soft water areas.
Temporary :
Press the “Extra rinse” 📋 pushbutton. The option is only active for the selected programme.
Permanent :
Hold down the “Temperature” 📁 and “Options” pushbuttons for a few seconds. The option is permanently activated, even if the appliance is switched off. To deactivate it, repeat the process.
"Delay start"

This option allows you to delay the start of a wash programme by 3, 6 or 9 hours by pressing the “Delay start” ⏻ push-button.
You can change or cancel the delayed start time at any time before you press the "Start/Pause" pushbutton, by pressing the "Delay start" ⏻ pushbutton again (when all indicators are off, the wash programme will start immediately). If you have already pressed the "Start/Pause" pushbutton and you want to change or cancel the delayed start, proceed as follows:
- To cancel the delayed start and start the cycle immediately, press "Start/Pause" and then "Delay start". Press "Start/Pause" to start the cycle.
- To change the timer delay period, you
must go through the "Off" ○ position and reprogram your cycle.

The lid will be locked during the delayed start time. If you need to open it, you must first pause the appliance by pressing the “Start/Pause” pushbutton. After closing the lid again, press the “Start/Pause” pushbutton.
Start of the programme

Press the “Start/Pause” pushbutton to start the cycle; the corresponding light will come on green.
It is normal for the programme selector to remain stationary during the cycle.
● ∪ + ∥
● +
● →
The light corresponding to the current cycle is illuminated.
+ : Prewash + Wash
+ : Rinse + Spin
→| : End cycle
Interrupting a programme
Adding washing during the first 10 minutes
Press the “Start/Pause” pushbutton : the corresponding light will flash green while the appliance is paused. The lid can only be opened around 2 minutes after the washing machine has come to a stop. Press the “Start/Pause” pushbutton again to continue the programme.
Modifying the programme in progress
Before making any changes to the current programme, you need to pause the washing machine by pressing the “Start/Pause” pushbutton. If the modification is not possible, the “Start/Pause” pushbutton flashes red for a few seconds. If you still decide to change the programme, you must cancel the current programme (see below).
Cancelling the programme
If you want to cancel the programme, turn the programme selector to the "Off" ○ position.
End of the programme
The washing machine stops automatically ; the “Start/Pause” pushbutton goes out and the light “End” →| comes on. The lid can only be opened around 2 minutes after the washing machine has come to a stop.
Turn the programme selector to the "Off" ○ position.
Remove washing
Unplug and close water inlet tap.

We recommend leaving the lid and drum open after use to ventilate the water tank.
Standby mode
If the appliance is on but no commands are selected for 10 min before or after a cycle, it goes into standby mode. All the lights go out and "Start/Pause" flashes slowly.
To exit standby mode, simply press any pushbutton or turn the programme selector.
Washing guide

Sorting and preparing the washing
- Sort washing by type and care label (refer to International symbols section below) : normal wash for tough fabrics which can withstand intense washing and spinning cycles ; delicate wash for delicate fabrics which need to be treated with care. For mixed loads, loads with items of different types of material, choose a programme and a temperature suitable for the most fragile material.
- Wash whites and colours separately : Otherwise, whites will be coloured or will turn grey.
- New coloured clothes often contain excess dye. It is recommended to wash such items separately the first time. Follow care instructions “wash separately” and “wash separately several times”.
• Empty pockets and unfold items. - Remove loose buttons, pins and fasteners. Close zip fasteners, tie ups laces and straps.
- Turn multilayered fabrics (sleeping bags, anoraks, etc.), coloured headwear, wool and material with printed designs inside out.
- Wash small fragile items (socks, tights, bras, etc) in a net bag.
- Take special care with curtains. Remove hooks and place net curtains in a net or bag.
Wash loads depending on type of materials
The amount of washing placed in the drum must not exceed the maximum capacity of the washing machine. This capacity can vary depending on the type of materials. Reduce the quantity if washing is heavily soiled or made of absorbant material.
Not all textiles have the same volume in the drum or the same water absorption levels. In general, the drum must therefore be filled :
- to full capacity but avoiding excessive pressure on cotton, linen and cotton/linen mixtures,
- to half capacity for processed cottons and synthetic fibres,
- to a third of its capacity for very fragile items such as net curtains and woollens.
For mixed loads, fill drum depending on most fragile materials.
Detergents and additives
Only use detergents and additives designed for use in a washing machine. Refer to manufacturer's recommendations and also Dispenser box and Using the right amount of detergent sections.
We do not recommend mixing different types of detergents. This may spoil the washing.
The amount of detergent to be used depends on the size of the load, the hardness of the water and how heavily soiled the washing is.
If the water is soft, reduce the amount slightly. If the water contains lime scale (a descaler is recommended) or if the washing is heavily soiled or stained, increase the amount slightly.
You can obtain information on the hardness level of water in your area by contacting your water company or other competent source.
There are no restrictions on the use of powder detergents.
Liquid detergents must not be used when a prewash has been selected. For cycles without prewash, they can be added either via means of a dosing ball, or in the detergent compartment. In either case, the wash cycle must be started immediately.
Detergent tablets or doses must be placed in the detergent compartment of your appliance's dispenser box.
For stain removal before a wash cycle, please refer to manufacturer's recommended amounts and instructions. If you use a detergent to remove stains, the wash cycle must be started immediately.
International symbols
| NORMAL WASH |  |  |  |  |  | ||
| Wash at 95°C | Wash at 60°C | Wash at 40°C | Wash at 30°C | Hand wash | Do not wash | ||
| DELICATE WASH |  |  |  | ||||
 |  |  | |||||
| BLEACHING | Whitewashing (bleach) allowed (cold only and in diluted solution) | No whitewashing (bleach) | |||||
 |  |  |  |  | |||
| IRONING | High temperature (max 200°C) | Mid temperature (max 150°C) | Low temperature (max 100°C) | Do not iron | |||
 |  |  |  |  | |||
| DRY CLEANING | Dry cleaning (all common solvents) | Dry cleaning (all common solvents except trichlorethylene | Dry cleaning (only oil-based solvents and R113) | Do not dry clean | |||
 |  |  |  | High temperature[0270]Mid temperature | [XH48] | ||
| DRYING | Dry flat | Hang dry | Dry on clothes hanger | Tumble drying permitted | Do not tumble dry | ||
Programmes table
| Programme / Type of washing | Load | Possible options |
| Cottons: White or colour, e.g., normally soiled work clothes, bed linen, table linen, body linen, towels. | 5,5 kg | PrewashSuper quickEco**Extra rinseRinse holdNight silence plusDelay start |
| Synthetics: Synthetic fabrics, body linen, coloured fabrics, non-iron shirts, blouses. | 2,5 kg | |
| Easy iron: Reduces creasing and makes ironing easier. | 1,0 kg | PrewashExtra rinseRinse holdDelay start |
| Delicates: For all delicate materials, for example, curtains. | 2,5 kg | PrewashSuper quickExtra rinseRinse holdNight silence plusDelay start |
| Wool: Machine washable wool carrying the labels “pure new wool, machine washable, does not shrink”. | 1,0 kg | Rinse holdNight silence plusDelay start |
| Handwash: Very delicate items carrying the “wash by hand” label. | 1,0 kg | |
| Silk: Fabric machine washable at 30°C. | 1,0 kg | |
| Soak: Soaking for very dirty washing. The drum stops full of water. | 5,5 kg | Delay start |
| Flash 30: For lightly soiled fabrics except for wool. | 2,5 kg | Delay start |
| Rinses: Hand washed items can be rinsed in this programme. | 5,5 kg | Extra rinseRinse holdNight silence plusDelay start |
| Delicate rinse: Hand washed items can be rinsed in this programme. | 2,5 kg | |
| Drain: Runs an empty cycle after a Rinse hold or (Night Silence Plus). | 5,5 kg | |
| Spin: A spin cycle from 500 to 900/800/700*** rpm after a Rinse hold (or Night silence plus). | 5,5 kg | Delay start |
| Delicate spin: A delicate spin cycle after a Rinse hold (or Night silence plus). | 2,5 kg | Delay start |
* Reference programme for test conforming to CEI 456 standard (Cottons 60° programme, Eco option).
** Not available with programmes with wash temperatures of 40°C and above.
*** Depending on model.
Consumption
| Programme Washing type | Temperatu-res °C | Average consumption** | ||
| Litres | kWh | Time | ||
| Cottons* | cold - 90 | 67 | 2,20 | 140-150 |
| Synthetics | cold - 60 | 48 | 0,85 | 90-100 |
| Easy iron | cold - 60 | 55 | 0,65 | 125-135 |
| Delicates | cold - 40 | 53 | 0,55 | 60-70 |
| Wool | cold - 40 | 48 | 0,45 | 55-65 |
| Handwash | cold - 40 | 48 | 0,45 | 55-65 |
| Silk | 30 | 40 | 0,30 | 25-35 |
| Soak | 30 | 20 | 0,20 | 15-25 |
| Flash 30 | 30 | 40 | 0,35 | 25-35 |
| Rinses | - | 32 | 0,05 | 50-60 |
| Delicate rinse | - | 45 | 0,04 | 35-45 |
| Drain | - | - | 0,002 | 0-10 |
| Spin | - | - | 0,015 | 10-20 |
| Delicate spin | - | - | 0,015 | 5-15 |
* Reference programme for test conforming to CEI 456 standard (Cottons 60° programme, Eco option) : 49 L / 1,04 kWh / 140 min.
** Average figures which can vary depending on conditions of use.
Consumptions shown refer to the maximum temperature for each programme.
Care and cleaning

Unplug the appliance before cleaning.
Descaling the appliance
To descale the appliance, use an appropriate non-corrosive product designed for washing machines. Read product label for recommended amounts and how often descaling should be carried out.
The exterior
Use warm soapy water to clean the exterior of the appliance. Never use alcohol, solvents or similar products.
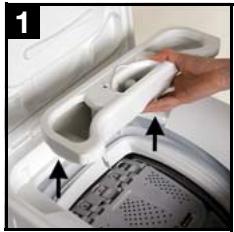
Dispenser box
To clean, proceed as follows :
natural_image
Close-up of a hand holding a white plastic container with arrows pointing to a device (no visible text or symbols)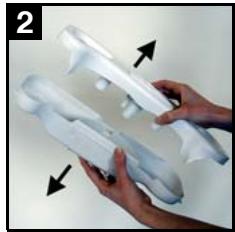
natural_image
Hands holding white plastic cylindrical objects with arrows indicating movement (no text or symbols visible)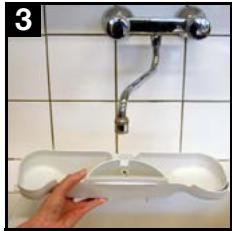
natural_image
Hand placing a small bowl into a sink on a tiled wall (no text or symbols visible)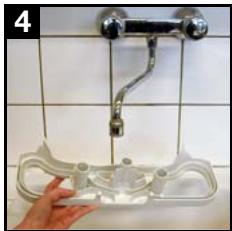
natural_image
Hand cleaning a wall-mounted kitchen sink with a faucet and handle (no text or symbols visible)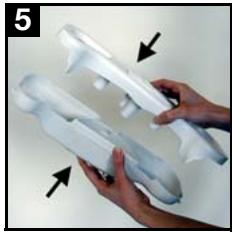
natural_image
Close-up of hands holding white plastic gaming equipment with arrows indicating part motion (no text or symbols visible)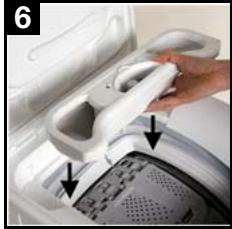
natural_image
Close-up of a hand holding a white appliance with a handle, next to a textured surface (no visible text or symbols)Object trap
Regularly clean out the object trap which is located at the bottom of the drum :
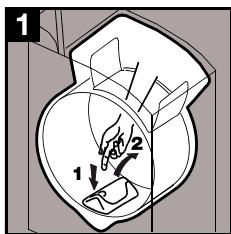
text_image
1 2 1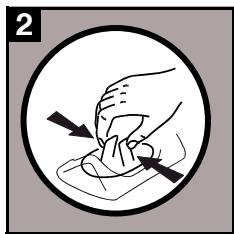
natural_image
Illustration of a hand holding a small object with arrows indicating motion or force (no text or symbols)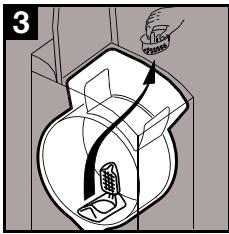
text_image
3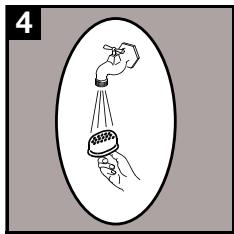
natural_image
Illustration of a hand holding a small object above it, with no visible text or symbols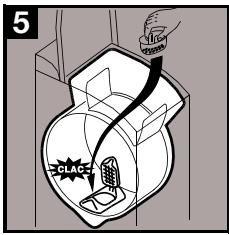
text_image
5 CLACS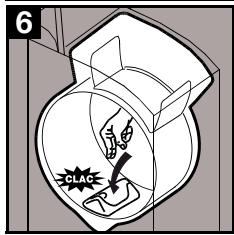
text_image
6 CLACWater inlet filters
To clean the 2 filters, proceed as follows :
natural_image
Close-up of hands holding a blue and white plastic bag inside a kitchen sink (no text or symbols visible)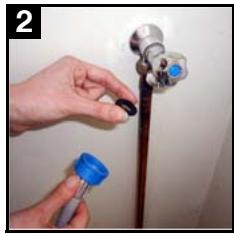
natural_image
Person adjusting a pipe fitting with blue plastic cap (no text or symbols visible)Operating problems
Numerous checks were carried out on your appliance before it left the factory. However, should you notice a malfunction, please refer to the sections below before contacting the after-sales service.
* Depending on model.
| Problems | Causes |
| The washing machine doesn’t start or doesn’t fill : | the appliance isn’t plugged in correctly, the electrical installation isn’t working,the lid of your appliance and the drum shutters aren’t closed firmly,the programme start command hasn’t been properly selected,there is a power failure,the water supply has been cut off,the water inlet tap is closed,the water inlet filters are dirty,a red tab appears on the water inlet hose. |
| The appliance fills but empties straight away : | the drainage U-piece is fixed too low (see installation section). |
| The washing machine doesn’t rinse or doesn’t empty : | the drain hose is blocked or bent,the drainage filter is obstructed,the out of balance detector has been activated: washing is unevenly distributed in the drum,the “Drain” programme or “Night Silence Plus” or “Rinse hold” option have been selected,the height of the drainage U-piece is unsuitable. |
| You have found water around the washing machine : | too much detergent has caused foam to overflow,the detergent is unsuitable for machine washing,the drainage U-piece isn’t attached correctly,the water inlet hose is leaking. |
| Wash is unsatisfactory : | the detergent is unsuitable for machine washing,there is too much washing in the drum,the wash cycle is unsuitable,there isn’t enough detergent. |
| The appliance vibrates, is noisy: | the appliance hasn't been untied properly (see untying section),the appliance isn't level and is unbalanced,the appliance is too close to the wall or furniture,washing is unevenly distributed in the drum,the load is too small. |
| the wash cycle is much too long: | the water inlet filters are dirty,the power or water supply has been cut off,the motor overheating detector has been activated,the water inlet temperature is lower than usual,the foam detection security system has been activated (too much detergent) and the washing machine has begun draining the foam,the out of balance detector has been activated:an extra phase has been added to distribute washing more evenly in the drum. |
| The washing machine stops during a wash cycle: | the water or electricity supply is defectivea Rinse hold has been selected,the drum shutters are open. |
| The lid doesn't open at the end of the cycle: | the "immediate opening" * light is not lit,the temperature inside the drum is too high,the lid unlocks 1 - 2 minutes after the end of the cycle*. |
| The “Start/Pause” pushbutton ** flashes red ***: | the lid isn't closed properly. |
| The “Start/Pause” pushbutton** flashes red***: | the drainage filter is obstructed,the drain hose is blocked or bent,the drain hose is fixed too high (see “Installation” section).the drainage pump is blocked,the standpipe is blocked. |
| The “Start/Pause” pushbutton** flashes red***: | the water inlet tap is closed,the water supply has been cut off. |
| Softener runs directly into the drum when filling the dispenser box : | • you have gone past the MAX indicator. |
**On some models, the audible signals can sound.
*** After solving any problems, press the ‘Start/Pause’ pushbutton to restart the interrupted programme.
Technical specifications
| DIMENSIONS | Height | 850 mm |
| Width | 400 mm | |
| Depth | 600 mm | |
| LINE VOLTAGE / FREQUENCY POWER CONSUMPTION | 230 V / 50 Hz | |
| 2300 W | ||
| WATER PRESSURE Connection to water supply | Minimum | 0,05 MPa (0,5 bar) |
| Maximum | 0,8 MPa (8 bar) | |
| 3/4" BSP |

This appliance conforms to the CEE 89-336 directive concerning the limiting of radio-electric interference and the 2006/95/CE directive concerning electrical safety.
Installation

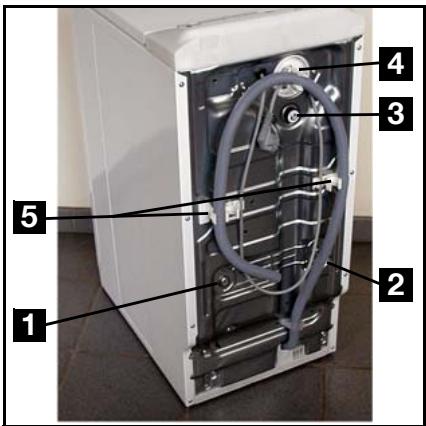
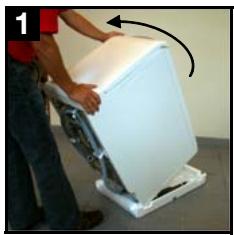
Remove all protective packaging for transit before using for the first time. Keep in case needed for future transit : Transporting a non-secured appliance may damage internal components and cause leakages and malfunctions. The appliance can also be damaged through physical contact.
Unpacking
natural_image
Person installing or adjusting a white appliance on a stand, no visible text or symbols
natural_image
Person installing a white panel with a curved arrow indicating motion (no text or symbols visible)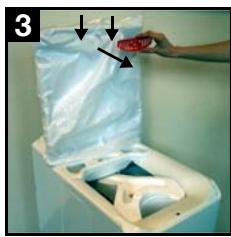
natural_image
Close-up of a hand placing a white plastic bag onto a blue industrial machine (no text or symbols visible)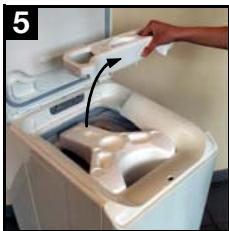
natural_image
Interior view of a hand placing a plastic bag into a white trash bin (no text or symbols visible)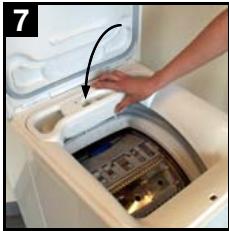
natural_image
Person opening a large appliance into a washing machine (no visible text or symbols)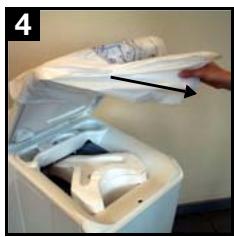
natural_image
Interior view of a trash bin with plastic bags and an open drawer, no visible text or symbols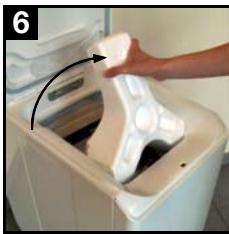
natural_image
Hand placing a white plastic bag into a white washing machine (no text or symbols visible)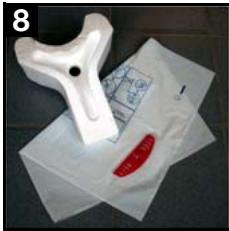
natural_image
White plastic mechanical component with a red clip, placed on a translucent sheet of paper (no text or symbols visible)Untying
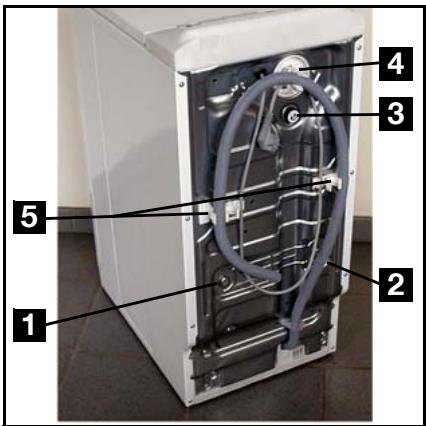
text_image
Labeled diagram of a refrigerator interior showing numbered components for identification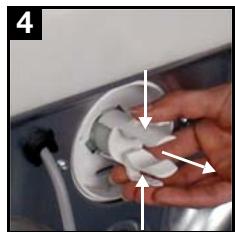
natural_image
Close-up of hands holding a white plastic electrical plug socket (no text or symbols visible)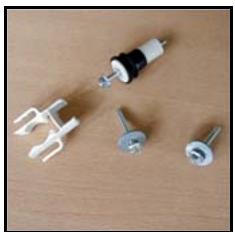
natural_image
Collection of white plastic connectors and screws on a wooden surface (no text or symbols visible)To install your washing machine at the same level as surrounding furniture, proceed as follows :
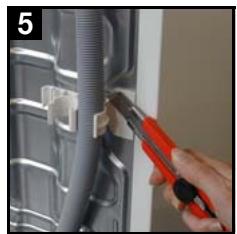
natural_image
Close-up of a hand using a red tool to clean or adjust a wall-mounted component (no text or symbols visible)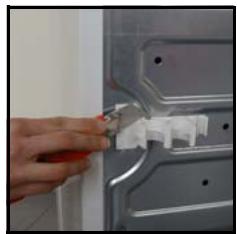
natural_image
Close-up of a hand inserting a plastic clip into a metal panel (no text or symbols visible)Water supply
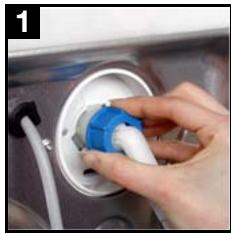
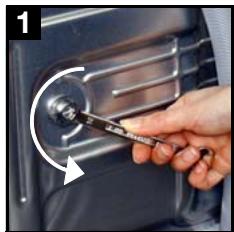
Install the supplied water inlet hose at the rear of your washing machine by proceeding as follows (Do not reuse an old hose):
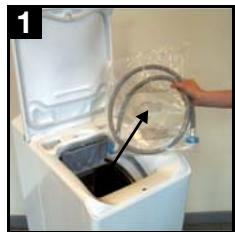
natural_image
A hand opening a white washing machine with a circular filter cover, containing liquid and a black liquid inside (no text or symbols visible)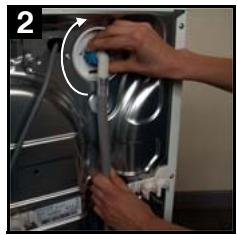
natural_image
Close-up of hands installing a mechanical component on a server rack (no visible text or symbols)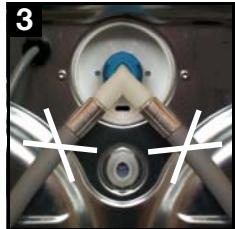
natural_image
Close-up of a mechanical component with metallic parts and a central blue circular feature (no visible text or symbols)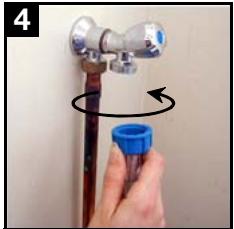
natural_image
Hand holding a blue plastic tube with a curved arrow indicating rotation (no text or symbols)Open the water inlet tap. Check there are no leaks
The water inlet hose can not be extended. If it is too short, please contact the after-sales service.
natural_image
Close-up of a hand using a tool to adjust a car interior panel (no visible text or symbols)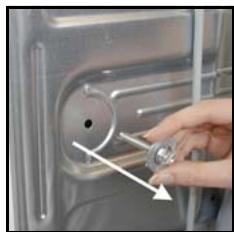
natural_image
Close-up of a hand pressing a button on a metallic door (no text or symbols visible)
natural_image
Close-up of a hand using a tool to adjust or install a mechanical component, with no visible text or symbols.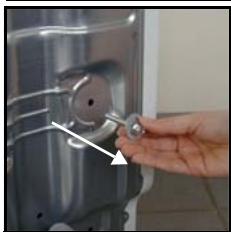
natural_image
Close-up of a hand holding a small metallic object with a white arrow pointing to it (no visible text or symbols)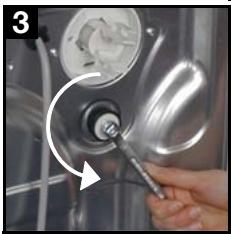
natural_image
Close-up of a hand using a tool to adjust or install a mechanical component, no visible text or symbols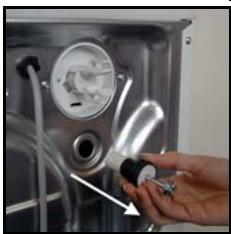
natural_image
Close-up of a hand adjusting a mechanical component inside a stainless steel appliance (no visible text or symbols)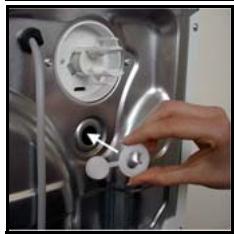
natural_image
Close-up of a hand adjusting a mechanical component with a white circular knob and metallic parts (no visible text or symbols)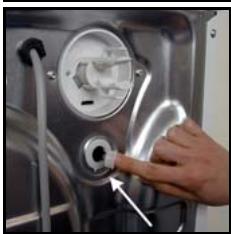
natural_image
Close-up of a hand inserting a plastic component into a stainless steel appliance (no visible text or symbols)Drainage
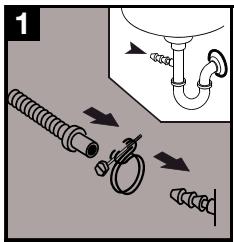
text_image
1- The connector at the end of the flexible hose can be attached to all common types of standpipe.
Attach the connector to the standpipe
with the hose clamp supplied with the appliance ^* .
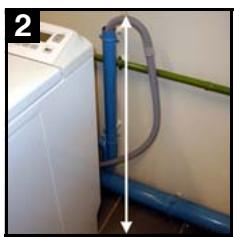
natural_image
Close-up of a washing machine with blue pipes and a white door, no visible text or symbols- Fit the U-piece on the drainage hose. Place everything in a drainage point (or in a sink) at a height of between 70 and 100 cm. Ensure it is positioned secu-
rely. Air must be able to enter the end of the hose, to avoid any risk of siphoning.

The drain hose must never be stretched. If it is too short, contact an engineer.
Electrical connection
This washing machine must only be connected in single-phased 230 V.
Check the fuse size : 10 A for 230 V.
The appliance must not be connected with an extension lead or multi-plug adaptor.
Ensure that the plug is earthed and that it is in accordance with current regulations.
Positioning
Position the appliance on a flat and hard surface in a ventilated location. Ensure the appliance does not come into contact with the wall or other furniture.
Accurate levelling avoids vibrations, noise and prevents the appliance from moving when running.
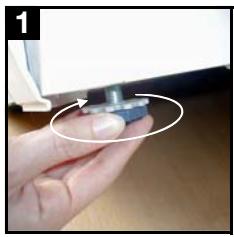
natural_image
Close-up of a hand holding a small mechanical component with a circular annotation (no visible text or symbols)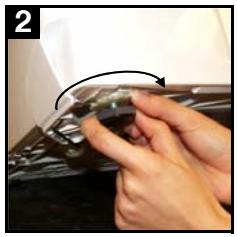
natural_image
Close-up of hands holding a small object with an arrow indicating rotation (no text or symbols visible)Environment
Disposing of the appliance

All materials carrying the ⚙ symbol are recyclable. Dispose of them at a waste collection site (enquire at your local council) for collection and recycling. When disposing of your appliance, remove all parts which could be dangerous to others: cut off the power supply cable at the base of the appliance.
The symbol 📋 on the product or on its packaging indicates that this product may not be treated as household waste. Instead it should be taken to the appropriate collection point for the recycling of electrical and electronic equipment. By ensuring this product is disposed of correctly, you will help prevent potential negative consequences for the environment and human health, which could otherwise be caused by inappropriate waste handling of this product. For more detailed information about recycling of this product, please contact your local council, your household waste disposal service or the shop where you purchased the product.
Protecting the environment

To save water and energy and therefore help protect the environment, we recommend the following :
- Whenever possible, use the appliance at full capacity and avoid partial loads.
- Only use the prewash and soak programmes for heavily soiled items.
- Use an appropriate amount of detergent for the hardness of the water (cf. section “Using the right amount of detergent”), the size of the load and how soiled the washing is.
www.electrolux.com