HBFU130K - Fridge HOOVER - Free user manual and instructions
Find the device manual for free HBFU130K HOOVER in PDF.

| Product Type | Freestanding Refrigerator |
| Model | HBFU130K |
| Capacity | 130 Liters (approx.) |
| Height | 85 cm |
| Width | 54 cm |
| Depth | 58 cm |
| Weight | 30 kg |
| Energy Rating | A+ (approx. 100 kWh/year) |
| Power Supply | 220-240V, 50Hz |
| Climate Class | N-ST (16°C to 38°C) |
| Defrosting | Manual defrost for freezer compartment |
| Adjustable Thermostat | Yes |
| Reversible Door | Yes (user convertible) |
| Shelves | Tempered glass shelves |
| Crisper Drawer | 1 for fruits and vegetables |
| Interior Light | Yes |
| Noise Level | 38 dB (approx.) |
| Refrigerant | R600a (isobutane) |
| Maintenance | Clean with mild detergent; defrost as needed |
| Safety Features | Overload protection, stable door hinge |
| Spare Parts | Available from Hoover service centers |
Frequently Asked Questions - HBFU130K HOOVER
User questions about HBFU130K HOOVER
0 question about this device. Answer the ones you know or ask your own.
Ask a new question about this device
Download the instructions for your Fridge in PDF format for free! Find your manual HBFU130K - HOOVER and take your electronic device back in hand. On this page are published all the documents necessary for the use of your device. HBFU130K by HOOVER.
USER MANUAL HBFU130K HOOVER
natural_image
Front view of a server rack with control panel and indicator lights (no text or symbols visible)INDEX
Page
Warnings and important advice 3
Installation....5
Description of the machine....6
Use 6
Advice 9
Maintenance / Defrosting 10
Changing the direction the door opens....12
Instructions for built-under installation....12
Fitting the door panel 13
Fitting the plinth.... 14
Troubleshooting 15
Regulations, Standards, Guidelines 16

WARNINGS AND IMPORTANT ADVICE
It is most important that you keep this instruction manual with the appliance for future consultation. If you sell the appliance or transfer it to someone else, ensure that the instruction manual is with the appliance so that the new user can familiarise himself with its operation and the warnings about using it.
These warnings are provided for your safety and that of others.
Please read them carefully before installing and using your appliance. I
SAFETY
Important safety instructions
These warnings are provided in the interests of your safety. Ensure you fully understand them before installing or using the appliance.
Your safety is paramount importance. If you are unsure about the meaning of these warnings contact the Customer Care Department for assistance.
Intended use
The refrigerator is intended for use in the home. It is suitable for the storage of food at low temperature. If the appliance is used for purposes other than those intended or used incorrectly, no liability can be accepted by the manufacturer for any damage that may be caused.
Alterations or changes to the refrigerator are not permitted for reasons of safety.
If you use the refrigerator in a commercial application or for purposes other than the cooling of foods, the manufacturer accepts no liability for any damages that may occur.
Prior to initial start-up
Check the appliance for transport damage. Under no circumstances should a damaged appliance be plugged in. In the event of damage, please contact your supplier.
Refrigerant
The refrigerant isobutene (R600a) is contained within the refrigerant circuit of the appliance, a natural gas with a high level of environmental compatibility, which is nevertheless flammable. During transportation and installation of the appliance, ensure that none of the components of the refrigerant circuit becomes damaged. The refrigerant (R600a) is flammable.
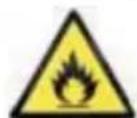
Caution:risk of fire
If the refrigerant circuit should become damaged:
- Avoid open flames and sources of ignition.
● Thoroughly ventilate the room in which the appliance is situated.
WARNING!—Keep ventilation openings, in the appliance enclosure or in the built-in structure, clear of obstruction.
WARNING!—Do not use mechanical devices or other means to accelerate the defrosting process, other than those recommended by the manufacturer.
WARNING!—Do not damage the refrigerant circuit.
WARNING!—Do not use electrical appliances inside the food storage compartments unless recommended by the manufacturer.
WARNING!—This appliance is not intended for use by persons (including children) with reduced physical, sensory or mental capabilities, or lack of experience and knowledge, unless they have been given supervision or instruction concerning use of the appliance by a person responsible for their safety.
WARNING!—Young children should be supervised to ensure that they do not play with the appliance.
WARNING!—If the supply cord is damaged, it must be replaced by the manufacturer, its service agent or similarly qualified persons in order to avoid a hazard.
WARNING!—When disposing of the appliance, do so only at an authorized waste disposal centre. Do not expose to flame.
WARNING!—Please keep the appliance away from substance, which can cause ignition.
WARNING!--- Before obtaining access to terminals, all supply circuits must be disconnected.
WARNING!--- Please remove all the doors before you dispose your refrigerator.
WARNING!--- The fridge is only applied with power supply of single phase alternating current of 220\~240V/50Hz. If fluctuation of voltage in the district of user is so large that the voltage exceeds the above scope, for safety sake, be sure to apply A.C. Automatic voltage regulator of more than 350W to the fridge. The fridge must employ a special power socket instead of common one with other electric appliances. Its plug must match the socket with ground wire.
WARNING!--- Necessity to allow disconnection of the appliance from the supply after installation. The disconnection may be achieved by having the plug accessible or by incorporating a switch in the fixed wiring in accordance with the wiring rules.
Safety of children
Packaging (e.g. wraps, polystyrene) can be dangerous for children.
There is a risk of suffocation! Keep packaging material away from children!
Make old appliances unusable prior to disposal. Pull out the mains plug, cut off the mains cable, break or remove spring or bolt catches, if fitted. By doing this you ensure that children cannot lock themselves in the appliance when playing (there is risk of suffocation!) or get themselves into other dangerous situations.
Often children cannot recognize the hazards present in household appliances. It is therefore important that you ensure adequate supervision and never let children play with the appliance!
INSTALLATION
If this appliance, fitted with a magnetic lock, is designed to replace another appliance with a mechanical lock, we recommend that you break the old lock before you dispose of your old appliance. This is designed to avoid children possibly becoming trapped inside the old appliance and consequently suffocating.
LOCATION
Position the appliance away from sources of heat such as stoves, radiators, direct sunlight etc. Maximum performance and safety are guaranteed by maintaining the correct indoor temperature for the class of unit concerned, as specified on the rating plate. This application perform well from N to ST. The Appliance may not work properly if it is left for a longer period at a temperature above or below the indicated range.
IMPORTANT! -There is a need of good ventilation around the fridge for easy dissipation of heat, high efficiency of refrigeration and low power consumption. For this purpose, sufficient clear space should be available around the fridge. It is advisable for there to be 75mm separating the back of the fridge to the wall, at least 100mm of space at its two sides, height of over 100mm from its top and a clear space upfront to allow the doors to open 160 .
| Climate class | Ambient temperature |
| SN | +10°C to +32°C |
| N | +16°C to +32°C |
| ST | +16°C to +38°C |
| T | +16°C to +43°C |
Appliances must not be exposed to rain. Sufficient air must be allowed to circulate in the lower rear section of appliances, as poor air circulation can affect performance. Built-in appliances should be positioned away from heat
ELECTRICAL CONNECTION
Before connecting your appliance, check that the voltage and the frequency shown on the information plate match those of your own electrical supply.
⚠️ Important: the appliance must be connected to a socket fitted with an effective Earth in accordance with the prevailing safety regulations. The plug on the power cord is provided with a specific earth pin for this purpose.
The manufacturer refuses to accept any liability if these accident prevention regulations are not observed.
After installing the appliance, ensure that it is not resting on the power cord. Important: if the power cord is damaged, it must be replaced with a special cable or a set available from the manufacturer or the After-Sales Service.
During transport, some oil contained in the compressor may have flowed into the refrigeration circuit. To avoid this risk, wait two hours before connecting your appliance to allow the oil to flow back into the compressor.

PROTECTION OF THE ENVIRONMENT
This appliance contains no refrigerant gases harmful to the ozone layer in its refrigeration circuit or its insulating materials. It must not be disposed of with the normal rubbish and scrap to avoid damaging the refrigeration circuit, particularly at the rear of the appliance. Please contact the local authority for information about the collection of these types of appliances.
The materials used in this appliance identified with the symbol 🌿 can be recycled.

DESCRIPTION OF THE APPLIANCE
① - Ventilation grill
② - Control panel
③ - Quick freezing drawers
④ - Drawer for frozen foods
⑤ - Adjustable feet

text_image
Technical diagram of a server rack with labeled components including front panel, rear panel, and internal control panel.
USE
This appliance is marked with the symbol which means that it is suitable for freezing fresh food, storing frozen food and making ice cubes.
CLEANING
Once the appliance has been appropriately installed, we recommend that you clean it carefully with warm soapy water to eliminate the characteristic "new" smell.

Do not use abrasives, scouring powders or metal sponges; these could damage or appliance.
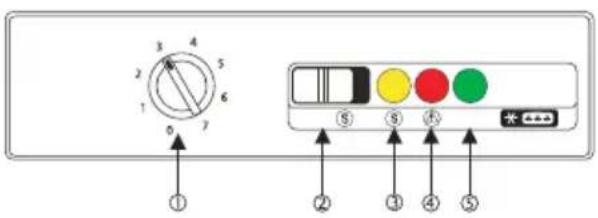
CONTROL PANEL
text_image
3 4 5 6 7 0 ① ② ③ ④ ⑤① - Thermostat
② - Quick Freeze switch
③ - Quick Freeze light (yellow)
④ - Alarm light (red)
⑤ - Power light (green)
STARTING
Connect the appliance to the socket. Light ⑤ comes on to show that the appliance is ON. Turn the thermostat knob ① clockwise beyond the 0 position (Stop). The appliance is now running.
To stop it, turn the knob ① to the 0 position.
SETTING THE TEMPERATURE
The various positions between 1 and 7 indicate increasingly cold temperatures. To preserve frozen products correctly, the temperature must be at least -12°C or less. Wait until the Alarm light ④ goes out: this means that the optimum temperature has been reached.
The temperature is adjusted automatically and can be increased (less cold) by setting the knob to a lower number or decreased (colder) by setting it to a higher number. A medium position is most commonly required.
The thermostat's position is likely to be modified taking into account the fact that the appliance's internal temperature depends on the following factors:
• The ambient temperature,
● How often the doors are opened,
● The amount of food being preserved,
- The appliance's location.
QUICK FREEZING
Press the switch ②. The Quick Freeze light ③ comes on. The Quick Freeze function can be interrupted manually by pressing the button ② again. The yellow light ③ goes out.
ALARM LIGHT
The Alarm light ④ comes on when the freezer's temperature rises above a certain level that may prejudice long-term preservation (over -12°C). It is normal for the Alarm light to remain on momentarily when the appliance is started, i.e. until the temperature reaches the optimum temperature for preserving the food.
FREEZING FOOD
Set your appliance to "Quick Freeze". Wait at least 3 hours before inserting fresh food if you have just switched the appliance on. If the freezer is already operating at storage temperature, for better results (corresponding to the weight of food freezable at a single time shown on the information plate), switch on 'Quick Freeze' 24 hours in advance. This time can be reduced, depending on the amount of food involved.
When your appliance is in "Quick Freeze" mode, the compressor runs continuously, utilising its refrigeration power to the full. Keep the appliance in this mode for 24 hours after introducing food for freezing and then switch to normal operation.
Place the food to be frozen in the appliance's 2 upper compartments to avoid them coming into contact with products that have already been frozen, which would raise their temperature. If there are only a few items to be frozen, always use the upper compartment.
The products can be piled up in the first compartment, ensuring that they do not stop the air from circulating.
The maximum amount of food that can be frozen in 24 hours is shown on the information plate inside the appliance.
After allowing sufficient time for the items to freeze, they can be redistributed among the freezer's drawers.
PRESERVING FROZEN FOOD
When you first switch the appliance on or after a prolonged stoppage, set the appliance to freeze and wait at last 2 hours before introducing any frozen foods. Then switch to normal storage mode.
These actions are not required if your freezer is already operating.
Warning: if there is a power cut, refrain from opening the door. If the power cut lasts only a short time (6-8 hours) and the freezer is full, there is no danger of the food spoiling. If the power cut lasts longer than 8 hours, you should eat the food as quickly as possible (an increase in temperature may reduce the food's storage time considerably).
To remove the drawers, pull them out to the end stop and then tilt them upwards.

natural_image
Simple line drawing of a two-hole drawer with an arrow indicating direction (no text or symbols)IMPORTANT! –In order to make the most of the volume of frozen-food storage compartment, the user can removed one or more drawers, out of the appliance, according to your daily use.
DEFROSTING
Before using frozen food, it must be defrosted in the refrigerator (meat, poultry, fish, etc.) or at room temperature (for other foodstuffs). If the products are thin or divided up, they can be cooked directly: in this case, the cooking time will be longer.

ADVICE
ADVICE ON FREEZING
- Products destined to be frozen must be fresh and of excellent quality. Each package must be proportioned to normal family consumption so that it is used all at one time.
- Small quantities enable the food to freeze quickly and uniformly. Never forget that once food has been defrosted, it deteriorates very quickly.
- Lean food keeps better than fatty food. Salt reduces storage times.
- To avoid any contamination between the different foods, store them separately from each other, well wrapped or protected in air-tight containers.
- Do not place bottles or fizzy drinks in the freezer; they could explode.
• Never introduce liquids or warm items
• Do not fill containers with a lid right to the top.
• DO not eat certain foods like ice pops immediately after taking them out of the freezer: the very low temperature they are at could cause burns. - Mark the freezing date on each package so that you can check on how long they have been stored.
- Do not freeze at any one time an amount of fresh food greater than that indicated on the appliance's information plate.
- Do not open the door and introduce new products to be frozen while the freezer is in freeze mode.
• Once a product has been defrosted it must not be refrozen.
MAKING ICE CUBES
Fill the tray 34 full of water to allow for the ice expanding. The ice cubes can be removed simply by twisting the plastic tray.

Do not use any metal object to release the ice cub tray from the freezer's wall.
ADVICE ON STORING FROZEN FOOD
- Note the date the frozen food was produced and keep to the storage dates indicated by the manufacturer.
- Avoid opening the door too often and do not leave it open any longer than necessary: An increase in temperature can significantly reduce the food's storage time.
- Ensure that the external packaging is intact. If not, the product may have spoiled.
- If a package is swollen or shows traces of humidity, this may mean that it has not been kept at a low enough temperature and has lost its original qualities
- Pay attention to the time that you purchase frozen food. Once the food has defrosted, even partially, it cannot be refrozen and, in this case, must be eaten within 24 hours.

MAINTENANCE

Warning!
Switching off the appliance.
To switch off the appliance, turn the temperature regulator to position "0".

Warning: this appliance contains hydrocarbons in its refrigeration circuit. It must be maintained and recharged by qualified engineers.
DEFROSTING
Why defrosting
Water contained in food or getting into air inside the fridge be opening doors may form a layer pf frost inside. It will weaken the refrigeration when the frost is thick.
While it is more than 4mm thick, youshould defrost.
Defrosting in frozen-food storage compartment
Defrosting in freezer chamber is operated manually. Before defrosting, take the food out; take the ice tray and drawers out or put them into the fresh food compartment temporarily, then set the knob of the temperature regulator to position "0"(where the compressor will stop working) and leave the door of the refrigerator open until ice and frost dissolve thoroughly and accumulation at the bottom of the freezer chamber. Wipe off the water with soft cloth. In the case of speeding up the process of defrosting, you may put a bowl of warm water (about 50^ ) into the freezer chamber, and scrape away the ice and rost with a defrosting spatula. After doing so, be sure to set the knob of the temperature regulator to the original position.
It is not advisable to heat the freezer chamber directly with hot water or hair dryer while defrosting to avoid deformation of the inner case.
It is also not advisable to scrape off ice and frost or separate food from the containers which have been congealed together with the food with sharp tools or wooden bars, so as not to damage the inner casing or the surface of the evaporator.
Important!
The fridge should be defrosted at least every one month. During the using process, if the door was opened
frequently or using the appliance in the extreme humidity, we advise the user to defrost every two weeks.

Never use a metal or pointed object to defrost or clean the appliance; there is a that you could cause irremediable damage to the evaporator. DO not use any hanical or artificial devices to accelerate the defrosting process.
Energy Saving tips
- Do not place warm foods into the appliance. Allow warm foods to cool first. Do not install the appliance near cookers, radiators or other sources of warmth. High ambient temperatures cause longer, more frequent operation of the compressor
- In order to make the cooling system work efficiently, please make sure the side plates and back plate of the product are with some distance from the wall. It is strongly recommended that its back is 75mm away from the wall, its sides at least have a space of 100mm separately and the height from over its top is not less than 100mm.
- When the product works, please do not open the door too often or leave the door open any longer than necessary.
- Do not set temperature any colder than necessary.
- The direct cooling refrigerator (with a freezer) needs to be defrosted when necessary. This will improve the cold transfer and reduce energy consumption.
- The sketch map shows the right combination of the drawers, crisper and shelves which can lead to the more energy efficiency. If users adjust the combination, it would result in the energy-consuming.
- Store food logically. Do not exceed the storage period specified.
PERIODIC CLEANING
You are recommended to clean and disinfect your freezer frequently.
The appliance is fitted with a ventilation grill. This must be regularly cleaned in order to ensure good ventilation to the back of the appliance and its optimum operation.

text_image
Front panel of a solar panel with control buttons and indicator lightsPROLONGED STOPPAGE
When the appliance must be switched off for a certain period of time, take the following precautions:
• Disconnect the appliance and remove all the food,
- Defrost it and clean it thoroughly. Leave the doors open to allow the air to circulate and avoid any bad smells
DOOR REVERSIBILITY
CHANGING THE DIRECTION THE DOOR OPENS
● This must be done before fitting the cabinet outer door.
● Ensure the fridge is unplugged and empty.
We recommend you have someone to assist you.
Tools required
Phillips style screwdriver.
Flat bladed screwdriver.
WARNING! Take care when opening the hinges, They are sprung and there is a risk of injury if they close on your hand.

natural_image
Line drawing of a hand holding a small object connected to a vertical rod, with no visible text or symbolsRemove the blanking plates from the outside of the Larder fridge door.

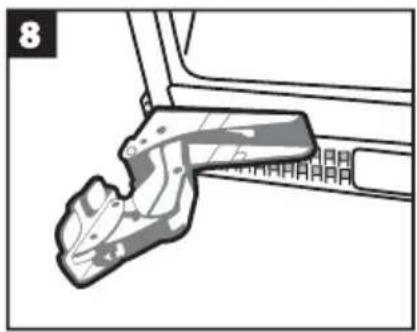
natural_image
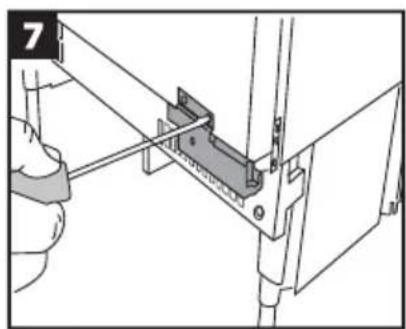
Diagram of a mechanical assembly with a bracket and connecting rods (no text or symbols)With the door closed remove the screws on the outside of the hinges.Start with the top hinge.

natural_image
Illustration of a hand holding a small object near a vertical structure (no text or symbols visible)Open the hinges away from the door.
text_image
4 0.0Supporting the bottom of the door as you do so. Be careful with the hinges. Remove the door.

natural_image
Illustration of hands using a tool to adjust or install a component, no text or symbols presentWith the top hinge open undo the screws holding it to the cabinet. Be careful with the hinge, use a long shafted screwdriver if you have one.

natural_image
Illustration of a hand inserting a cable into a device panel (no text or symbols visible)Remove the blanking plates for the cabinet.
natural_image
Diagram of a hand holding a mechanical component with a bracket and connecting rod (no text or symbols visible)Tum the hinge over and place it on the diagonally opposite corner of the cabinet. Screw back in place.
natural_image
Mechanical component diagram showing a bracket and gear assembly (no text or symbols)Tum the hinge over and place it on the diagonally opposite corner of the cabinet. Screw back in place.

natural_image
Line drawing of a simple refrigerator with front panel and side legs (no text or symbols)Check that the larder fridge door is aligned horizontally and vertically and that the door seals are secure on all sides before finally tightening the hinge bracket screws.
INSTRUCTIONS FOR BUILT-UNDER INSTALLATION
The furniture's dimensions must comply with those shown in Figure 1. The appliance can be inserted under the worktop between two units (a) or placed as a terminal unit (b).
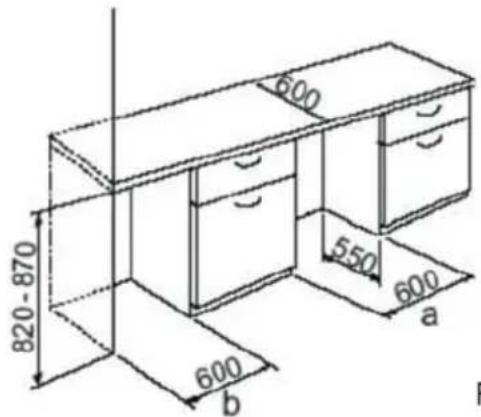
text_image
820-870 600 550 600 a 600 bFigure 1
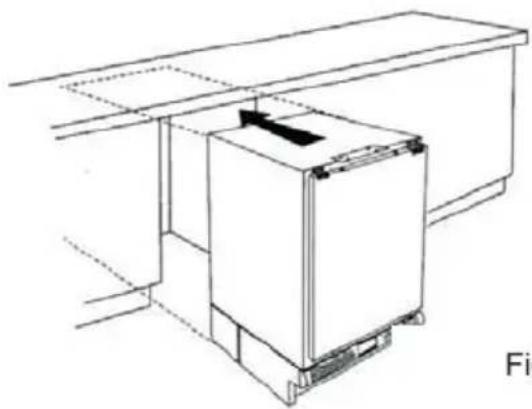
- After inserting the appliance in the appropriate furniture (Figure 2), you must adjust its height using the 4 adjustable feet (Figure 3). The height can be adjusted from 82 to 87 cm.
natural_image
Line drawing of a refrigerator mounted on a cabinet (no text or symbols)Figure 2

natural_image
Diagram of a refrigerant unit with a sloped roof and a magnified inset showing internal components (no text or symbols)Figure 3
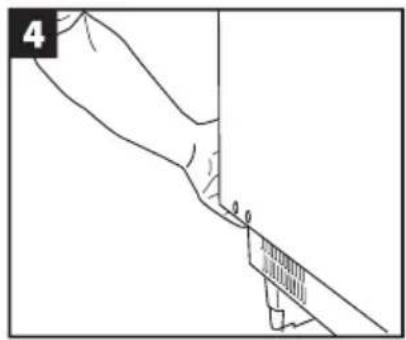
FITITNG THE DOOR PANEL
- Remove the upper fixing flanges from the appliance's door (Figure 4).
- Fasten the flanges onto the furniture's door, following the instructions mentioned in the diagram:
- Distance A is the one from the top edge of the appliance's door to the lower edge of the worktop.
- Distance B is the one from the top edge of the door on the furniture next to the lower edge of the worktop.
- Fasten the furniture's door on to the appliance by tightening the upper nuts (Figure 5 - A/B). Align the furniture's door to those on the neighbouring units by adjusting the position of the fixing flanges (Figure 5 - C1/C2). Complete the operation by screwing the lower fixing flanges to the furniture's door (Figure 5 - D).
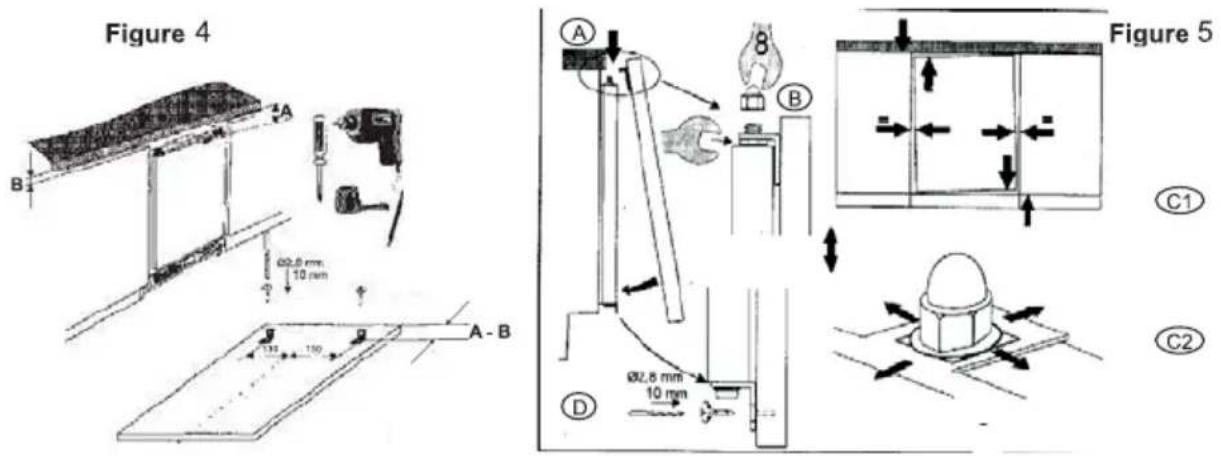
text_image
Figure 4 B A 602.8 mm 10 mm A-B C1 Figure 5 B 602.8 mm 10 mm D C2- Fasten the appliance to the worktop or at the sides to the adjacent units, using the upper or side fixing holes provided for this purpose (Figure 6).
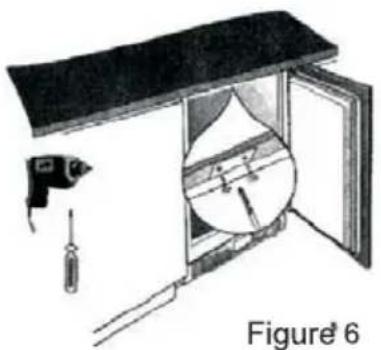
natural_image
Diagram of a door with a tool and magnified inset showing internal components (no text or symbols)FITTING THE PLINTH
Warning: the original ventilation grill must be used in order not to compromise the appliance's operation. The plinth must also be positioned at least 25mm way from the appliance's door.
- If the niche for the appliance ahs a height of A = 820 mm and a plinth height of a = 100 mm , the plinth can be fitted without any modification.
- If the plinth's height is greater than a = 100 mm , b = 150 mm , then it must be cut to a height of a = 100 mm and b = 150 mm with a width of a = 580 mm .
• Fasten the plinth to the kitchen block

text_image
A=820 B=870 a=100 b=150 580 25-80 25
TROUBLESHOOTING
Before contacting a technician, check the following points:
| Problem | Remedy |
| The appliance is not operating | - The appliance has not been started. Start it.- The appliance is not plugged in. Plug it in.- The fuse has blown or is defective. Check this and replace it, if necessary.- The socket is defective. Any problems with the electrical power supply must be repaired by an electrician. |
| The freeze temperature is not low enough, the red light is on and the temperature alarm is sounding. | - The temperature is too low; see the section on "Starting".- The door has been open too long. Only open it as long as necessary.- Too much food has been introduced over the past 24 hours. Activate the Quick Freeze function.- The appliance is next to a heat source. See the section on "Location". |
| Problem | Remedy |
| Significant frost forms in the appliance and/or on the door seal. | - The door seal is not tight (after changing the direction the door opens). Using a hairdryer, carefully heat it at the points where there are leaks (no higher than 50°C). At the same time, rework the shape of the seal by hand so that it is returned to the correct position |
| Abnormal noises | - The appliance is not plumb. Adjust the feet.- One part of the appliance (e.g. a pipe) is in contact with another part or the appliance's back wall. If necessary, bend this part carefully to distance it. |
| After you have switched on Quick Freeze or adjusted the temperature setting, the compressor does not start up | - This is normal: there is nothing wrong. The compressor starts automatically after a few moments. |
Once you have made these checks, if the operating anomaly still persists, contact your nearest After-Sales Service.
For quick service, when you make your request have the model reference and the serial number to hand. These can be found on the guarantee certificate or on the information plate inside your appliance.
Regulations, Standards, Guidelines
This appliance is in accordance with the following EU guidelines:
-2006/95/EC low voltage guidelines.
-2004/108/EC EMC Directive
-2009/125/EC framework for the settling of ecodesign requirements for energy-using
-EC.643/2009. requirements four household refrigerating appliances.
Disposal of the appliance
It is prohibited to dispose of this appliance in domestic household waste.
For disposal there are several possibilities:
a) The municipality has established collection systems, where electronic waste can be disposed of at least free of charge to the user.
b) The manufacturer will take back the old appliance for disposal at least free of charge to the user.
c) As old products contain valuable resources, they can be sold to scrap metal dealers.
Wild disposal of waste in forests and landscapes endangers your health when hazardous substances leak into the ground-water and fin their way into the food chain.
| Correct Disposal of this product | |
 | This marking indicates that this product should not be disposed with other household wastes throughout the EU. To prevent possible harm to the environment or human health from uncontrolled waste disposal, recycle it responsibly to promote the sustainable reuse of material resources. To return your used device, please use the return and collection systems or contact the retailer where the product was purchased. They can take this product for environmental safe recycling. |