
IOV6032DRVS - Oven INVENTUM - Free user manual and instructions
Find the device manual for free IOV6032DRVS INVENTUM in PDF.

| Product Type | Electric Built-in Oven |
| Brand | Inventum |
| Model | IOV6032DRVS |
| Energy Class | A |
| Oven Capacity | 60 L |
| Dimensions (HxWxD) | 595 x 595 x 575 mm |
| Weight | 30 kg |
| Power Supply | 230 V / 50 Hz / 3.0 kW |
| Cooking Functions | Conventional, Grill, Fan Forced, Bottom Heat, Defrost |
| Temperature Range | 50°C - 275°C |
| Timer | Yes, with alarm |
| Display | Digital LCD |
| Control Type | Push buttons and rotary knobs |
| Interior Material | Enamel |
| Cleaning Method | Manual cleaning with mild detergent |
| Cooling System | Cool door and ventilation |
| Child Lock | Yes |
| Safety Features | Automatic shut-off, residual heat indicator |
| Spare Parts Availability | Yes, through authorized service centers |
| Repairability Index | 7.5 / 10 |
| Warranty | 2 years |
Frequently Asked Questions - IOV6032DRVS INVENTUM
User questions about IOV6032DRVS INVENTUM
0 question about this device. Answer the ones you know or ask your own.
Ask a new question about this device
Download the instructions for your Oven in PDF format for free! Find your manual IOV6032DRVS - INVENTUM and take your electronic device back in hand. On this page are published all the documents necessary for the use of your device. IOV6032DRVS by INVENTUM.
USER MANUAL IOV6032DRVS INVENTUM
natural_image
Exterior view of a modern stainless steel oven with digital display and control knobs (no text or symbols on main body)- safety instructions page 16
- appliance description page 19
- before first use page 20
- setting the clock page 20
- setting the minute minder timer page 20
- setting the cooking time page 21
- setting the end of the cooking time page 21
- programming automatic cooking page 21
- adjusting the beep volume page 21
-
using the oven page 22
-
using the oven page 22
- cleaning & maintenance page 24
- problems & solutions page 25
- technical specifications page 25
Guarantee & after sales Service page 28
natural_image
Two views of a black plastic tray with internal grating, labeled 6 and 7 (no text or symbols on the tray itself)natural_image
Diagram of airflow or heat transfer through a rectangular chamber with central circular structure (no text or symbols)
natural_image
Diagram of a mechanical or electrical component with directional arrows indicating flow or movement (no text or symbols)
natural_image
Diagram of a double-bushe electrical enclosure with internal circuit lines and airflow arrows (no text or labels)
natural_image
Top-down schematic of a room interior with ceiling-mounted fixtures and a central circular vent (no text or symbols)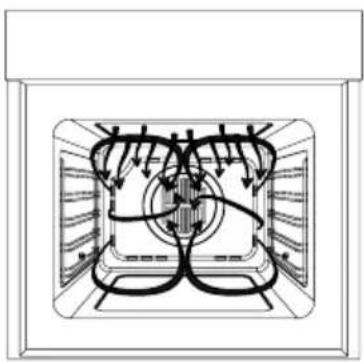
natural_image
Diagram of a room interior with ceiling-mounted pipes and ventilation ducts (no text or labels)
natural_image
Top-down schematic of a double-bushe kitchen appliance showing internal components and airflow paths (no text or labels)natural_image
Line drawing of a microwave oven with ventilation grille and side rack (no text or symbols)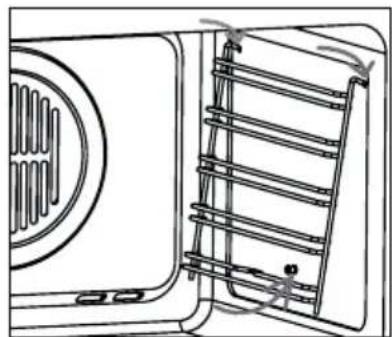
natural_image
Line drawing of a door with ventilation grilles and a vent, showing no text or symbolsOvenlamp vervangen
natural_image
Technical line drawing of a mechanical assembly with no visible text or symbolsnatural_image
Line drawing of an open oven with two panes (no text or symbols)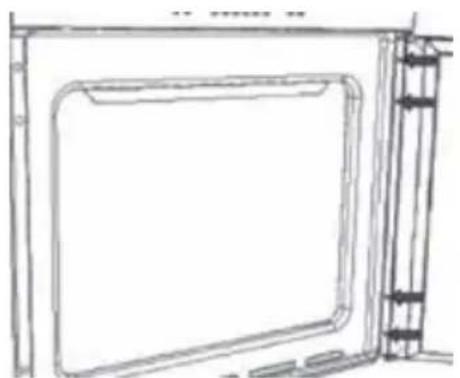
natural_image
Line drawing of a door frame with a side panel and vertical supports (no text or symbols)1 safety instructions
- Please read these instructions before operating the appliance and retain for future use.
- The appliance is intended solely for domestic use within the home. Do not use corrosive chemicals or vapors in this appliance. This oven is especially designed to prepare food. It is not designed for industrial or laboratory use.
- Do not place any object between the door of the oven. Don't allow soil or cleaner residue to accumulate on the sealing surfaces.
- Warning: Liquids and other foods must not be heated in sealed containers since they are liable to explode.
- It is hazardous for anyone other than a competent person to carry out any service or repairs that involve the removal of the cover.
- An electrical appliance is not a toy, and should therefore always be placed outside the reach of children. Children are not always able to understand potential risks. Teach children a responsible handling of electrical appliances.
- This appliance shall not be used by children from 0 to 8 years. This appliance can be used by children over the age of 8 and above if they are continuously supervised. This can be used by people with reduced physical, sensory or mental capabilities or lack of experience or knowledge, if they have been given supervision or instruction concerning use of the appliance in a safe way and understand the hazards involved. Keep the appliance and its cord out of reach of children aged less than 8 years.
- Cleaning and maintenance shall not be made by children.
• Children must not play with the appliance. - Only use utensils suitable for use in ovens.
- The oven should be cleaned regularly and any food deposits should be removed.
- The appliance may not be cleaned with a high-pressure cleaner or a steam cleaner.
- When you see smoke, switch off and unplug the oven. Keep the door closed in order to stifle any flames.
- Ensure that the appliance is switched off before replacing the lamp to avoid the possibility of electric shock.
- Do not place accessories on the open oven door.
- Never cover the bottom of the oven with aluminium foil. The foil
blocks the heat flow, which may result in inferior cooking results. This can also damage the enamel of the bottom of the oven.
- The oven has a fan that cools the oven casing. The fan may run for some time after the oven is switched off.
- The appliance should only be connected by a registered installer.
- Faulty parts may only be replaced by original parts. The manufacturer can only guarantee that original parts meet safety requirements.
- Damage caused by incorrect connection, incorrect fitting, or incorrect use is not covered by the warranty.
- If the connecting cable is damaged, it may only be replaced by the manufacturer, the manufacturer's service organisation or equivalently qualified persons, in order to avoid dangerous situations.
- The electrical connection must comply with national and local regulations.
- The wall plug socket and plug should always be accessible.
- The appliance should not be connected to the network via a multi-plug socket or extension lead, as the safe use of the appliance can then not be guaranteed.
- The appliance must always be earthed.
- If the connecting cable is damaged, it may only be replaced by the manufacturer, the manufacturer's service organisation or equivalently qualified persons, in order to avoid dangerous situations.
- Only use and store the appliance indoors.
- Do not use the oven near water, in a wet basement/ garage or near a swimming pool.
- Attention! Avoid touching hot surfaces, especially the inside of the appliance.
- Do not cover any vents of the oven.
- Do not let the cord hang over the edge of the table or counter and keep it away from the heated surface.
- Failure to maintain the oven clean could lead to deterioration of the surface that could adversely affect the life of the appliance and possible result in a hazardous situation.
- The appliance is not intended to be operated by means of an external timer or separate remote-control system.
- Before plugging into a socket, check that the voltage in your home corresponds with the voltage printed on the appliance.
- Never unplug it from the socket by pulling on the cable.
- Always ensure that your hands are dry before handling the plug, switch or power cord.
- Should you decide not to use the appliance anymore, make it inoperative by cutting the power cord after removing the plug from
the socket. We also recommend making all potentially dangerous parts of the appliance harmless, particularly for children who might be tempted to play with it.
- Never immerse any part of the main body, lid, power cord and plug in water or any other liquid to protect against electrical hazards.
- If the appliance is used for other purposes than intended, or is it not handled in accordance with the instruction manual, the full responsibility for any consequences will rest with the user. Any damages to the product or other things are not covered by the warranty.
- Legislation requires that all electrical and electronic equipment must be collected for reuse and recycling. Electrical and electronic equipment marked with the symbol indicating separate collection of such equipment must be returned to a municipal waste collection point.
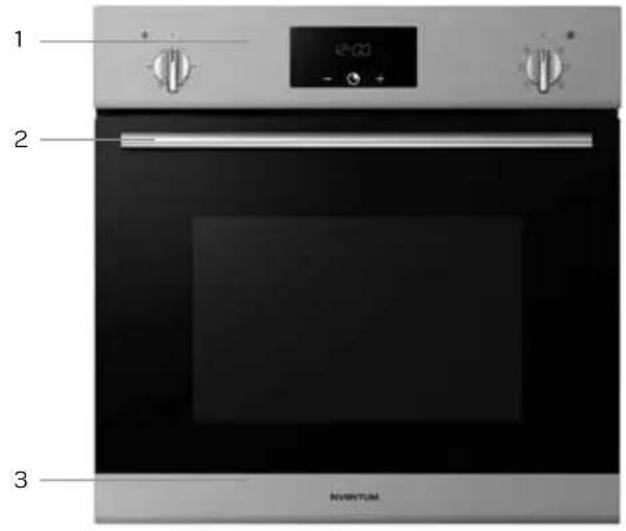
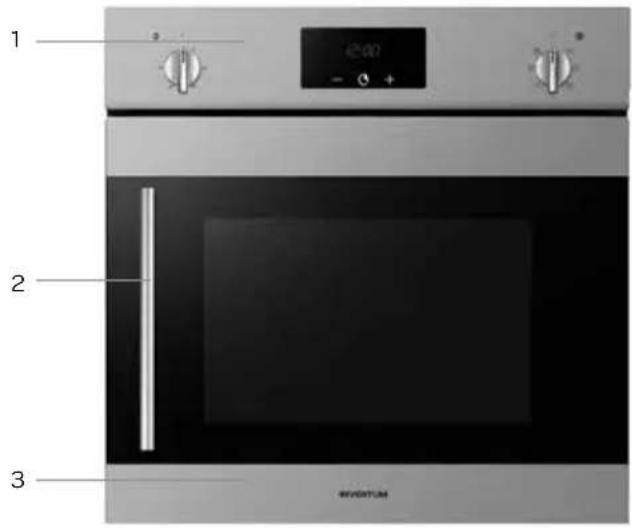
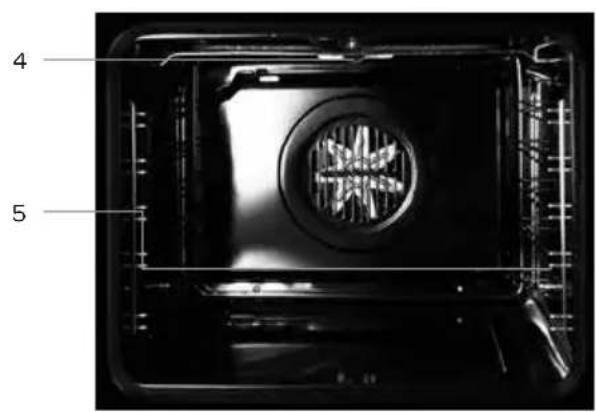
2 appliance description
IOV6032RVS IOV6032DRVS

natural_image
Two views of a black plastic tray with internal grating, labeled 6 and 7 (no text or symbols on the tray itself)- Control panel
- Handle
- Oven door
- Oven lamp
- Guide rails
- Baking tray
-
Rack
-
Thermostat control light
- Temperature knob
- MINUS key -
- CLOCK key
- PLUS key +
- Clock/display
- On/off and ovenfunction knob
- Control light

3 before first use
Before you use the appliance for the first time, please do as follows: Carefully unpack the appliance and remove all the packaging material. Keep the material (plastic bags and cardboard) out of reach of children. Check the appliance after unpacking for any damage, possible from transportation. Check that the voltage in your home corresponds with the voltage printed on the appliance and plug it in a socket. Follow the installation instructions in chapter 13 for installing the oven.
Clean the oven and the accessories with warm water and a mild detergent. Rinse well and dry thoroughly. Operate the oven for about 30 minutes at the maximum temperature to burn off all traces of grease which might otherwise create unpleasant smells when preparing food.
4 setting the clock
As soon as you plug the appliance in, AUTO and 0.00 will flash in the display.
- To set the clock for the first time, press the central key CLOCK for about 3 seconds. 📋 appears in the display and the dot between the time flashes.
- Press the [+] or [-] key to set the correct time (24 hours). Hold the [+] or [-] key for setting the time faster.
- Wait for a few seconds until a beep sounds. The clock is now set and the dot stops flashing.
- To adjust the time, press the keys [+] and [-] simultaneously for 3 seconds. 🏠 appears in the display and the dot between the time flashes.
- Press the [+] or [-] key to set the correct time (24 hours). Hold the [+] or [-] key for setting the time faster.
- Wait for a few seconds until a beep sounds. The clock is now set and the dot stops flashing.
5 setting the minute minder timer
The minute minder timer has no influence on the functioning of the oven and can be used without switching on the oven.
- Press the central key CLOCK for about 3 seconds until the 🔊 flashes in the display.
- Press the [+] or [-] key to set the timer. Hold the [+] or [-] key for setting the timer faster.
- Wait a few seconds until the beep sounds. This confirms the setting of the minute minder timer and the stops flashing.
- When the set time finishes, a beep sounds. Press any key to stop the beep.
• To adjust the time, press the central key CLOCK and adjust the time with the [+] or [-] keys.
• To check the remaining time of the minute minder timer, press the central key CLOCK.
6 setting the cooking time
Setting the duration of the cooking time after which the oven stops automatically when it ends.
- Press the central key CLOCK for about 3 seconds until the 🔒 appears flashing in the display and press the central key CLOCK again after which ♂ d ur appears in the display.
- Set the cooking time with the [+] and [-] keys. Hold the [+] or [-] key for setting the timer faster.
- Wait a few seconds until the beep sounds. This confirms the setting of the cooking time. The display shows the clock.
- When the cooking time finishes, a beep sounds. The oven switches off. Press any key to stop the beep.
- To adjust the duration of the cooking time, press the central key CLOCK again until the ⚠ flashes in the display and press the central key CLOCK again. Adjust the time with the [+] or [-] key.
• To check the remaining cooking time, press the central key CLOCK twice.
7 setting the end of the cooking time
The time which ends the functioning of the oven. The oven will function till the set end time on the preset temperature and oven function.
- Press the central key CLOCK for about 3 seconds until the 🔒 appears flashing in the display and press the central key CLOCK twice again after which ⚠ End appears in the display. If the clock is set correctly, the display shows the current time.
- Set the end of the cooking time with the [+] and [-] keys. Hold the [+] or [-] key for setting the timer faster.
- Wait a few seconds until the beep sounds. This confirms the setting of the end of the cooking time. The display shows the clock.
- When the end of the cooking time finishes, a beep sounds. The oven switches off. Press any key to stop the beep.
- To adjust the end of the cooking time, press the central key CLOCK again until the ⚠ flashes in the display and press the central key CLOCK twice. Adjust the time with the [+] or [-] key.
• To check the end of the cooking time, press the central key CLOCK thrice.
8 programming automatic cooking
Set the duration of the cooking and set the end of the cooking time. The oven will automatically switch on and off.
Example: the current time is 12:30. The cooking time is 75 minutes. The food has to be done by 17.30. The oven starts cooking at 16:15 (17:30 minus 75 minutes) on the preset temperature and oven function and will finish at 17:30.
- Press the central key CLOCK for about 3 seconds until the 🔒 appears flashing in the display and press the central key CLOCK again after which ♂ dur appears in the display.
- Set the cooking time with the [+] and [-] keys. Hold the [+] or [-] key for setting the timer faster.
- Wait a few seconds until the beep sounds. This confirms the setting of the cooking time. The display shows the clock.
- Press the central key CLOCK again for about 3 seconds until the 🔒 appears flashing in the display and press the central key CLOCK twice again after which ⚠ End appears in the display.
- Set the end of the cooking time with the [+] and [-] keys. Hold the [+] or [-] key for setting the timer faster.
- Wait a few seconds until the beep sounds. This confirms the setting of the end of the cooking time. The display shows the clock.
- Set the desired temperature and oven function. The oven will now automatically switch on and have the food ready on the set endtime.
- At the end of the cooking time a beep sounds. Press any key to stop the beep.
9 adjusting the beep volume
You can adjust the volume of the beep signal.
- Press the keys [+] and [-] simultaneously, then press the central key CLOCK. The preset blinks in the display ton1.
- Press the [-] key to select the desired volume.
-ton1:high volume
-ton2: medium volume
-ton3:low volume
- Press the central key CLOCK to confirm the selected volume.
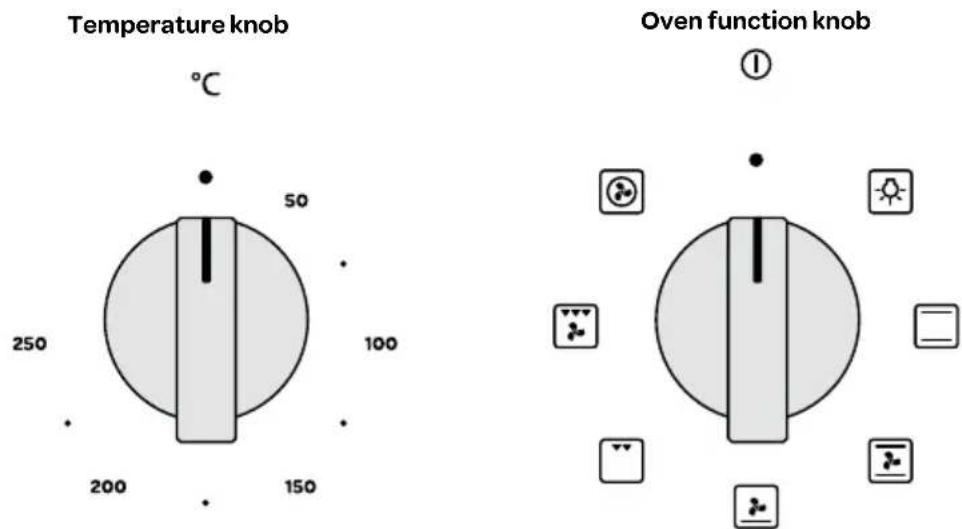
10 using the oven
To set the oven, use the two knobs. One knob is for setting the temperature and one knob for switching the oven on and off and for selecting an oven function.
SWITCHING ON
To switch the oven on, turn the oven function knob to the desired setting and the temperature knob to the right temperature. As soon as the oven has reached the set temperature, the thermostat light goes out. Preheating the oven takes about 5 minutes, depending on the desired temperature. If required, set the cooking time and the end of the cooking time with the central key CLOCK.
SWITCHING OFF
To switch the oven off, turn the oven function knob back to the setting ① and the temperature knob to ● When you have set the end of the cooking time, the oven will automatically switch off. Do not forget to turn back the knobs.
The oven has the following functions:
| Oven function Temperature setting | ||
| Oven lamp, can be switched on indepent from the oven. When selecting an oven function the lamp automatically switches on and stays on while oven is in use. | ||
| Top- and bottom heating element 50°C to 250°C | ||
| Top- and bottom heating element with fan 50°C to 250°C | ||
| Bottom heating element with fan 50°C to 250°C | ||
| Small grill element 50°C to 200°C | ||
| Large grill element with fan 50°C to 200°C | ||
| Hot air - circular heating element with fan 50°C to 250°C | ||
The tables below are indicative for preparing different dishes.
| Cake | Cupcakes & cookies | Pizza | Fish | Sausages | ||||
| Function |  |  |  |  |  |  |  |  |
| °C | 160-200 | 160-180 | 140-160 | 200-230 | 210-220 | 160-180 | 190 | 230-250 |
| 2-3 | 2 | 2 | 1-3 | 2 | 2-3 | 2-3 | 4-5 | |
| Time (min.) | 30-60 | 20-40 | 10-40 | 10-20 | 45-60 | 45-60 | 60-70 | 14-18 |
 | [x4x7] | [cc3y] | [cddy] | ||||||
| Beef Pork Poultry Vegetables | |||||||||
| Function | |||||||||
| °C 225-250 | 160-180 210- | 230 160-190 | 200-220 160- | 180 175-190 | 190-210 170-190 | ||||
| 22222-32223 | |||||||||
| Time (min.) | 120-150 120-160 90-120 | 90-120 50-60 | 45-60 60-70 | 40-50 40-50 | |||||
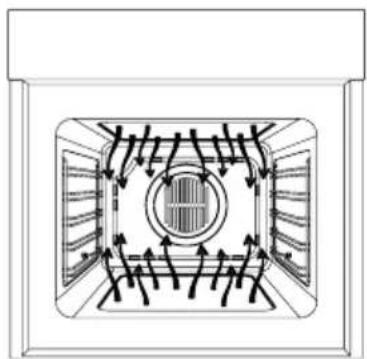
Functioning of the oven

The warmth of the elements ensure that the dish is warmed from above as well as from below.

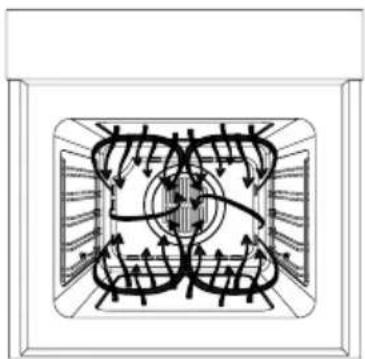
The heat from the elements and the fan ensure that the dish is surrounded by heat.

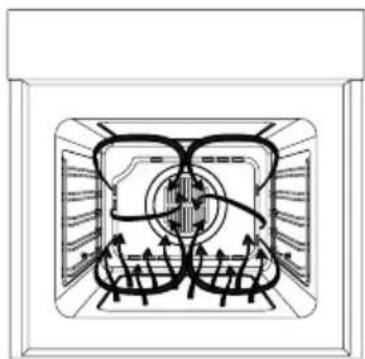
The heat of the element heats the food only from below. Ideal for among others, flans.
natural_image
Diagram of airflow or heat transfer through a rectangular chamber with central circular structure (no text or symbols)
The heat from the grill heats the food from the top. For grilling meat, fish, bread or gratin.
natural_image
Diagram of a mechanical or electrical component with symmetrical flow paths and directional arrows, no text or symbols present.
The heat from the grill element and the fan ensure that the dish is heated from the top and warmed through by the hot air.
natural_image
Diagram of a microwave oven interior with airflow lines and circuit traces (no text or labels)
The heat from the element and the fan ensure that the dish is surrounded by hot air. Ideal for cakes.

natural_image
Top-down schematic of a server room with ventilation ducts and a central circular vent (no text or labels)
natural_image
Diagram of a technical or mechanical assembly with internal flow paths and no visible text or symbols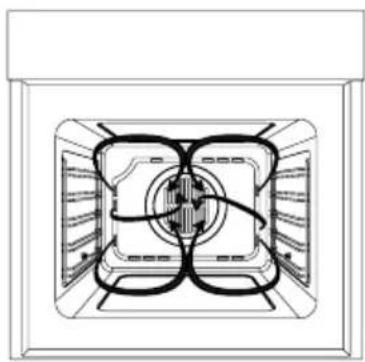
natural_image
Top-down schematic of a double-bushe kitchen appliance showing internal components and ventilation ducts (no text or labels)11
cleaining & maintenance
Switch the appliance off before cleaning and let it cool down. Do not clean the appliance with a pressure cleaner or steam cleaner.
Interior
Clean the inside of the appliance after every use. Use a damp cloth. To clean the oven thoroughly, an ovenspray may be used. Rinse well. Dry the inside will a dry cloth.
Accessories
Clean the accessories, such as the baking tray, the grid and the guide rails with warm water and a mild detergent. Dry thoroughly before reusing.
Exterior
Clean the exterior of the appliance with a damp cloth or sponge. If necessary, clean the exterior with warm water and a mild detergent. Also clean the oven door and the door seal.
For easy cleaning, the oven door and the guide rails can be removed.
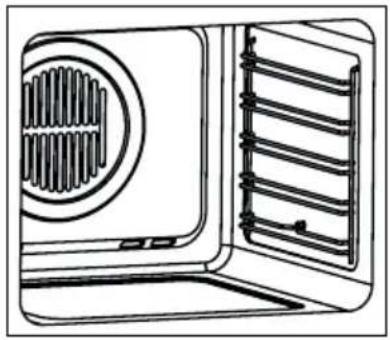
Removing and fitting the guide rails
To remove the guide rail, loosen the screw at the bottom of the rail and lift it from the side. Pay attention to the top of the guide rail when refitting. Place the guide rail in the holes and tighten the screw at the bottom.
natural_image
Line drawing of a microwave oven with ventilation grille and side rack (no text or symbols)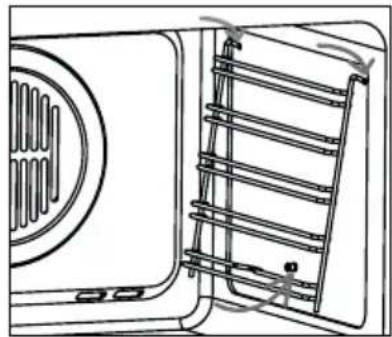
natural_image
Line drawing of a door with ventilation grille and side panel, showing no text or symbolsReplacing the oven lamp
Before proceeding, disconnect the appliance from the power line to avoid the possibility of electric shock.
- Unscrew the glass cover of the lamp.
- Replace the light bulb with a new equal bulb (25 W, 230V, E14 connection and must be resistant to high temperatures - upto 300°C).
- Refit the glass cover.
- Plug the appliance in.
Tips for cleaning
- Clean the oven after every use to prevent food residue to stain.
- Grease can be best removed when the oven is still a bit warm. Use warm water and a mild detergent.
- Use for stubborn stains a special ovencleaner. Rinse the residue of the cleaning agent with water.
- Never use any abrasive pads or corrosive cleaners.
- Make sure not to spray on the heating element when using a special ovenspray.
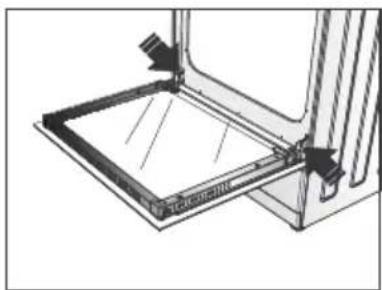
Removing and installing the oven door - IOV6032RVS
The oven door can be removed to clean the interior and the door easily.
• To remove the oven door, open it completely.
- Lift the two levers at the hinges. If necessary use a small screwdriver.
- Carefully close the door as far as the first stop, caused by the raised levers.
- Lift the door upwards and outwards, to remove it from the mountings.
- Place the hinges of the oven door in the mountings. Make sure the door is level.
- Lower the two levers at the hinges back.
- Close the oven door.
natural_image
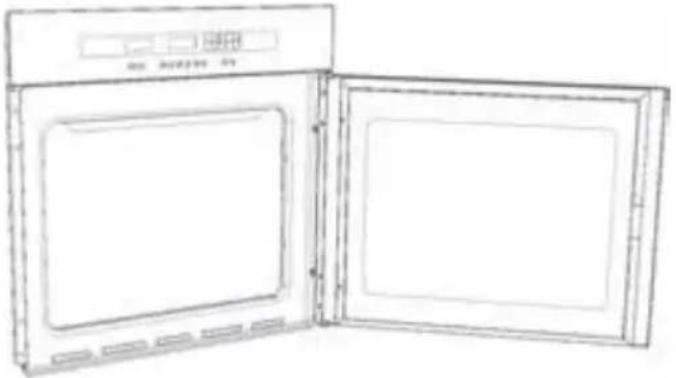
Technical line drawing of a mechanical assembly with no visible text or symbolsChanging the direction of the door - only possible for model IOV6032DRVS
Decide whether you want the oven door to open to the left or right before positioning the appliance in the kitchen cabinet. Follow the directions below to alter the opening direction of the door.
• Fully open the door.
natural_image
Line drawing of an open oven with two panes (no text or symbols)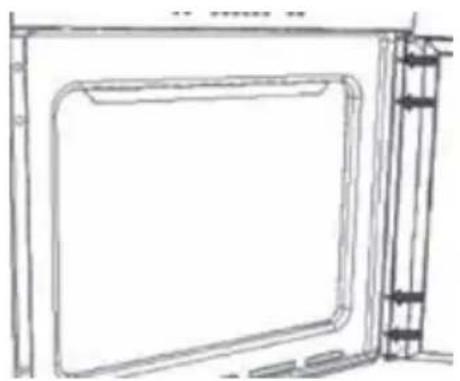
natural_image
Line drawing of a door frame with vertical supports and a side panel (no text or symbols)- Remove the four fixing screws from the door hinge. Hold the door.
- Remove the four plastic caps from the opposite side.
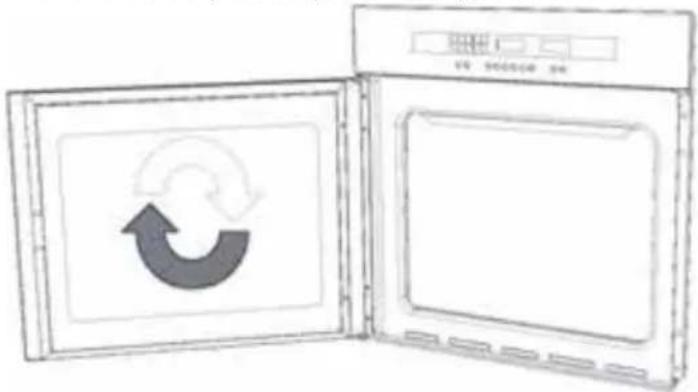
- Rotate the door 180^ .
- Secure the door in its new position using the 4 screws removed previously.
NOTE: Make sure that the oven door is perfectly parallel with the front panel. If it is not, adjust it by means of the screws you have just inserted.
• Install the oven according to the installation instructions.
12 problems & solutions
| Problem Solution | |
| The touch keys don’t respond. Un plug the appliance or remove the fuse in the fusebox. Wait a few minutes before plugging the appliance back in. | |
| The oven lamp is not lit. Replace the oven lamp according to the instructions. | |
| The oven is not heating up. - Has the correct temperature and oven function been set?- Is the door of the oven closed properly? | |
| The display of the clock is flashing. | - There has been a power failure. Reset the clock.- The oven is switched off because the set cooking time and/or end of the cooking time has passed. Press the central key CLOCK to end the function and reset the knobs. |
| The control light of the oven function is not lit up. | - Is an oven function selected?- Is the beginning of the cooking time delayed? The oven will not start until it reaches the set time. |
13 installation instructions
- The safety during use can only be guaranteed when the hob is installed correctly and according to the regulations. The installer is responsible for any damage caused by a faulty installation.
- The electrical connection must be made by a qualified electricien. This person is aware of the national and local regulations the installation must comply with.
- The appliance falls under protection class III and can only be used in combination with a grounding conductor connection. The manufacturer accepts no responsibility for any malfunction or damage caused by incorrect electrical installations.
- The appliance must be connected to a fixed installation and the means of disconnecting it from the fixed installation must be installed according to the installation instructions.
- The connection cable must hang freely. Do not tie the power cable or pass it along sharp edges. It must be positioned so that it does not touch any of the hot parts of the oven.
- The connection point, the wall socket and/or plug must always be accessible.
• The cabinet into which the oven is fitted, must be heat resistant (>75°C). - Ensure that the cabinet into which the oven is installed is secure. For example, by mounting it to the adjoining elements.
- Damage caused by incorrect connection, incorrect use or incorrect fitting is not covered by the guarantee.
Attention: any change to the appliance's interior, including fitting and changing the power cable, must only be performed by a qualified electricien.
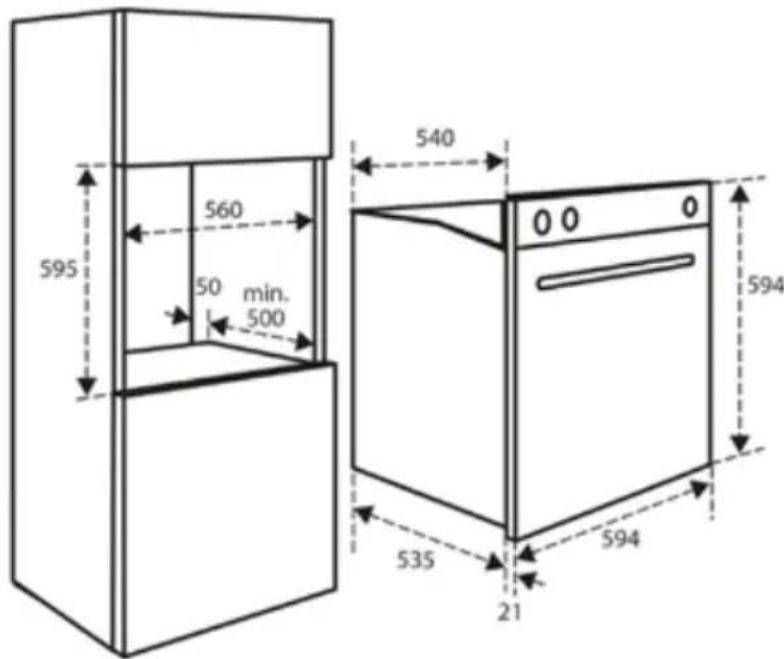
INSTALLATION DIMENSIONS
In the drawing below, all the dimensions are displayed in mm. Make sure you use the right drawing for the model you have.

ELECTRICAL CONNECTION
Check that the voltage in your home corresponds with the voltage printed on the appliance.
These groups in the meter must be secured with at least 16 amps each. The connection cable must have a cross-section of at least 2.5mm^2 and must have a length of at least 1.5m . When the cable is too short, you have no room to already connect the oven and place it against the wall before plugging it in.
THE FITTING OF THE APPLIANCE
- Check that the cabinet and the space for the oven meet the dimension and ventilation requirements.
- Slide the oven into the cabinet. Make sure the housing of the oven does not come in contact with the walls of the kitchen cabinet. Make sure there is at least 2 mm between the oven casing and the walls of the kitchen cabinet. Make sure the oven is centered between the walls of the kitchen cabinet. Note: Make sure the cable is not stuck and does not lie on top of the oven.
- Open the oven door and insert the bushings, provided, in the holes on the front.
- Use the provided screws to fasten the bushings to the cabinet. Take care not to over tighten and break the bushing.
- Close the oven door and plug the appliance in.
• The oven is now ready for use.
garantie & service
guarantee & after sales service
- INVENTUM guarantees this product for a period of 2 years starting from the date of purchase. The warranty covers proven defects in material, manufacturing and functioning of components and includes material costs, travel- or shipping costs and labor.
- INVENTUM provides not only the 2 years standard warranty, but also gives 3 years extended warranty on spare parts and labor costs. We only bill the travel- or shipping costs. This way, the quality of your INVENTUM equipment is 5 years guaranteed.
- To qualify for the extended 5 year warranty, please register your appliance within 45 days of purchase on www.inventum.eu
• Why is registration important for you?
- You get a 5-year warranty
- All details of your appliance are known by Inventum. No need to search for your model number when you contact us.
- Inventum can provide a faster and better service when you contact our service center.
- Guarantee can only be given if proof of purchase (e.g. till receipt or copy) can be shown. Therefore keep it in a safe place. The guarantee period starts at the date of purchase.
• Guarantee is not valid in case of:
- normal wear;
- damage through misuse use or when the instructions were not followed correctly;
- lack of maintenance;
- not following the operation- and safety instructions;
- incompetent montage or repairs made by yourself or others;
- using accessories and spare parts which are not suitable for the appliance;
for assessment by our technical department.
• The guarantee is not valid for:
- normal wear - such as baking tray, grill rack and removal handles;
- normal wear and tear – such as glass breakage, scratches on the equipment, discoloration of plastic or painted parts; Insufficient or incorrect maintenance can cause discolouration of surfaces and rubbers and plastics can deteriorate fast. This is also not covered under warranty.
- (interchangeable) signal- and controllamps;
- defects and consequential damage caused by strong contamination and incorrect maintenance;
for assessment by our technical department.
Defects which do not significantly influence the value or operation of the device asre excluded by free repair and / or replacement.
Transport damage is not guaranteed. Therefore, check your new equipment before use. If any damage is found, please contact your supplier within 5 working days after purchase. From warranty and/or replacement are excluded: defects, loss and damage to the appliance due to an event that usually is insured under the home contents insurance.
To whom can you turn to?
On www.inventum.eu you will find - besides advice on how to use the appliance and cleaning tips - all the answers to your service related questions. Please check the website before contacting our service center.
You can register your service request quickly and easily online at www.inventum.eu. It is also possible to do this by telephone via the INVENTUM service organization. INVENTUM Service Organization: 0900-INVENTUM (0900-468 36 88) (just for Holland).
To provide the best possible service and to process your service request as soon as possible, we recommend that you always first contact INVENTUM before returning your device.
Following the advice of our service organization, please send your appliance, including a copy of the original, printed proof of purchase and description of the complaint, stamped to our service address:
Attn. Service department
Generatorstraat 17
3903 LH VEENENDAAL
Website: www.inventum.eu
THE NETHERLANDS
Helpdesk: 0900-468 36 88
(just for Holland)
These warranty conditions only apply to the Netherlands. For local warranty please contact your dealer.
In countries where INVENTUM has a distributor, you can turn to them if you need the INVENTUM service organization. In other countries, contact your dealer.
When the guarantee is no longer valid or when the period of guarantee has passed, we will charge any costs that flow out of an assessment and/or repairing.
On request we will supply a statement before repairing. Without requesting a statement, we assume that you, by sending the appliance, automatically order to repair the appliance.
A guarantee period of two months is valid for repairs done by our technical department and the used spare parts, counting from the repairdate. When a malfunction occurs within this period which directly flows out of the repairs and the used spare parts, the consumer has the right of repairs without any costs.
Modification and printing errors reserved. The latest version of the deposited guarantee conditions can be obtained through our service organization.

klein huishoudelijk

witgoed vrijstaand

witgoed inbouw

twitter.com/inventum1908
facebook.com/inventum1908
youtube.com/inventum1908


- Ovenlamp vervangen
- safety instructions
- appliance description
- before first use
- setting the clock
- setting the minute minder timer
- setting the cooking time
- setting the end of the cooking time
- programming automatic cooking
- adjusting the beep volume
- using the oven
- SWITCHING ON
- SWITCHING OFF
- Functioning of the oven
- 11
- cleaining & maintenance
- Interior
- Accessories
- Exterior
- Removing and fitting the guide rails
- Replacing the oven lamp
- Tips for cleaning
- Removing and installing the oven door - IOV6032RVS
- Changing the direction of the door - only possible for model IOV6032DRVS
- problems & solutions
- installation instructions
- INSTALLATION DIMENSIONS
- ELECTRICAL CONNECTION
- THE FITTING OF THE APPLIANCE
- garantie & service
- guarantee & after sales service
- To whom can you turn to?
Brand : INVENTUM
Model : IOV6032DRVS
Category : Oven