
IOV6030RVS - Oven INVENTUM - Free user manual and instructions
Find the device manual for free IOV6030RVS INVENTUM in PDF.

| Product Type | Built-in Electric Oven |
| Brand | Inventum |
| Model | IOV6030RVS |
| Dimensions (H x W x D) | 595 x 595 x 550 mm |
| Weight | 30 kg |
| Power Supply | 230 V ~ 50 Hz |
| Energy Class | A |
| Oven Capacity | 65 L |
| Main Functions | Top Heat, Bottom Heat, Grill, Fan-Assisted, Defrost, Light |
| Temperature Range | 50 °C - 250 °C |
| Control Type | Knob and Touch |
| Cleaning | Enamel Interior, Easy Clean |
| Safety Features | Cool Touch Door, Child Lock, Automatic Shut-off |
| Spare Parts Availability | Available via Manufacturer |
| Repairability Index | 8.5/10 |
| Warranty | 2 Years |
Frequently Asked Questions - IOV6030RVS INVENTUM
User questions about IOV6030RVS INVENTUM
0 question about this device. Answer the ones you know or ask your own.
Ask a new question about this device
Download the instructions for your Oven in PDF format for free! Find your manual IOV6030RVS - INVENTUM and take your electronic device back in hand. On this page are published all the documents necessary for the use of your device. IOV6030RVS by INVENTUM.
USER MANUAL IOV6030RVS INVENTUM
natural_image
Black and white image of a kitchen appliance with multiple kitchen gauges (no visible text or symbols)- safety instructions page 14
- appliance description page 17
- before first use page 18
4a. using the oven IOV6010RVS page 18
4b. using the oven IOV6030RVS page 19 - cleaning & maintenance page 20
- problems & solutions page 21
- installation instructions page 21
- product fiche page 23
General terms and conditions of service and warranty page 26
natural_image
Two views of a black plastic tray with labeled parts (10 and 11), shown from top and side to front, respectively.natural_image
Diagram of a circular device with internal components and surrounding icons (no text or labels)Timer-knop

radar
| Position | Value | |---|---| | 0 | 10 | | 10 | 20 | | 20 | 30 | | 30 | 40 | | 40 | 50 | | 50 | 60 | | 60 | 70 | | 70 | 80 | | 80 | 90 | | 90 | 100 | | M | - |Temperatuurknop

natural_image
Technical line drawing of an open oven with internal grating and ventilation duct (no text or symbols)Ovenlamp vervangen
1 safety instructions
- Please read these instructions before operating the appliance and retain for future use.
- The appliance is intended solely for domestic use within the home. Do not use corrosive chemicals or vapors in this appliance. This oven is especially designed to prepare food. It is not designed for industrial or laboratory use.
- Do not place any object between the door of the oven. Don't allow soil or cleaner residue to accumulate on the sealing surfaces.
- Warning: Liquids and other foods must not be heated in sealed containers since they are liable to explode.
- It is hazardous for anyone other than a competent person to carry out any service or repairs that involve the removal of the cover.
- An electrical appliance is not a toy, and should therefore always be placed outside the reach of children. Children are not always able to understand potential risks. Teach children a responsible handling of electrical appliances.
- This appliance shall not be used by children from 0 to 8 years. This appliance can be used by children over the age of 8 and above if they are continuously supervised. This can be used by people with reduced physical, sensory or mental capabilities or lack of experience or knowledge, if they have been given supervision or instruction concerning use of the appliance in a safe way and understand the hazards involved. Keep the appliance and its cord out of reach of children aged less than 8 years.
- Cleaning and maintenance shall not be made by children.
• Children must not play with the appliance. - Only use utensils suitable for use in ovens.
- The oven should be cleaned regularly and any food deposits should be removed.
- The appliance may not be cleaned with a high-pressure cleaner or a steam cleaner.
- When you see smoke, switch off and unplug the oven. Keep the door closed in order to stifle any flames.
- Ensure that the appliance is switched off before replacing the lamp to avoid the possibility of electric shock.
- Do not place accessories on the open oven door.
- Never cover the bottom of the oven with aluminium foil. The foil
blocks the heat flow, which may result in inferior cooking results. This can also damage the enamel of the bottom of the oven.
- The oven has a fan that cools the oven casing. The fan may run for some time after the oven is switched off.
- The appliance should only be connected by a registered installer.
- Faulty parts may only be replaced by original parts. The manufacturer can only guarantee that original parts meet safety requirements.
- Damage caused by incorrect connection, incorrect fitting, or incorrect use is not covered by the warranty.
- If the connecting cable is damaged, it may only be replaced by the manufacturer, the manufacturer's service organisation or equivalently qualified persons, in order to avoid dangerous situations.
- The electrical connection must comply with national and local regulations.
- The wall plug socket and plug should always be accessible.
- The appliance should not be connected to the network via a multi-plug socket or extension lead, as the safe use of the appliance can then not be guaranteed.
- The appliance must always be earthed.
- If the connecting cable is damaged, it may only be replaced by the manufacturer, the manufacturer's service organisation or equivalently qualified persons, in order to avoid dangerous situations.
- Only use and store the appliance indoors.
- Do not use the oven near water, in a wet basement/ garage or near a swimming pool.
- Attention! Avoid touching hot surfaces, especially the inside of the appliance.
- Do not cover any vents of the oven.
- Do not let the cord hang over the edge of the table or counter and keep it away from the heated surface.
- Failure to maintain the oven clean could lead to deterioration of the surface that could adversely affect the life of the appliance and possible result in a hazardous situation.
- The appliance is not intended to be operated by means of an external timer or separate remote-control system.
- Before plugging into a socket, check that the voltage in your home corresponds with the voltage printed on the appliance.
- Never unplug it from the socket by pulling on the cable.
- Always ensure that your hands are dry before handling the plug, switch or power cord.
- Should you decide not to use the appliance anymore, make it inoperative by cutting the power cord after removing the plug from
the socket. We also recommend making all potentially dangerous parts of the appliance harmless, particularly for children who might be tempted to play with it.
- Never immerse any part of the main body, lid, power cord and plug in water or any other liquid to protect against electrical hazards.
- If the appliance is used for other purposes than intended, or is it not handled in accordance with the instruction manual, the full responsibility for any consequences will rest with the user. Any damages to the product or other things are not covered by the warranty.
- Legislation requires that all electrical and electronic equipment must be collected for reuse and recycling. Electrical and electronic equipment marked with the symbol indicating separate collection of such equipment must be returned to a municipal waste collection point.
2 appliance description
IOV6010RVS IOV6030RVS
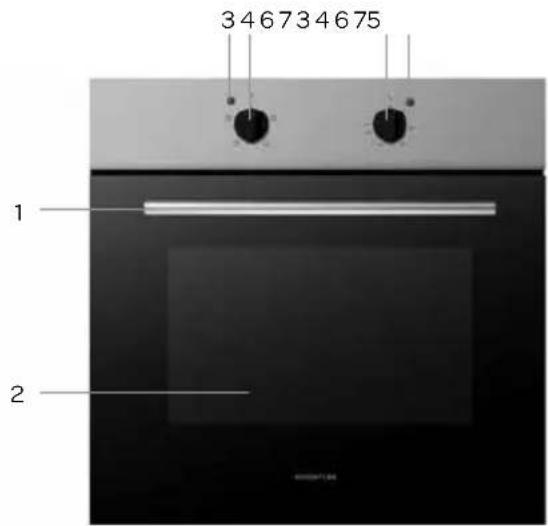
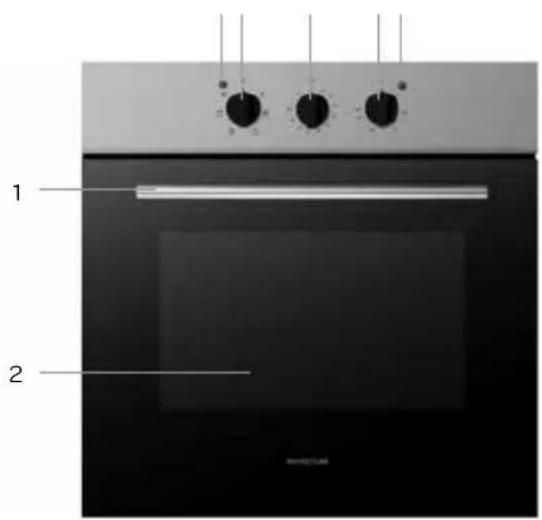
- Handle
- Oven door
- Controle light
- Oven function knob
- Timer knob (model IOV6030RVS)
- Temperature knob
- Thermostat control light
- Oven lamp
- Insertion slots
- Baking tray
- Rack

natural_image
Two views of a black plastic tray with labeled parts (10 and 11), shown from top and side to front, respectively.3 before first use
Before you use the appliance for the first time, please do as follows: Carefully unpack the appliance and remove all the packaging material. Keep the material (plastic bags and cardboard) out of reach of children. Check the appliance after unpacking for any damage, possible from transportation. Check that the voltage in your home corresponds with the voltage printed on the appliance and plug it in a socket. Follow the installation instructions in chapter 7 for installing the oven.
Clean the oven and the accessories with warm water and a mild detergent. Rinse well and dry thoroughly. Operate the oven for about 30 minutes at the maximum temperature to burn off all traces of grease which might otherwise create unpleasant smells when preparing food.
4a
using
the
oven
IOV6010RVS
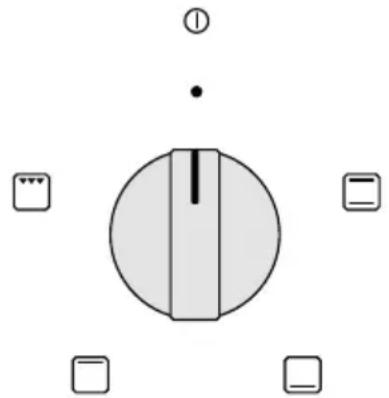
To set the oven, use the two knobs. One knob is for setting the temperature and one knob for switching the oven on and off and for selecting an oven function.
Oven function knob
natural_image
Simple diagram with a central vertical bar and surrounding icons (no text or labels)Temperature knob
The oven has the following functions:
| Oven function Description | ||
 | Top and bottom heating element | The dish is heated by the radiation heat of the top and bottom element. Always place the dish in the centre of the oven. For pizzas, meat, flans or cake. |
 | Bottom heating element Only the bottom heating element radiates heat. | |
 | Top heating element Only the top heating element radiates heat. | |
 | Grill element The grill element heats up. For grilling meat, fish, bread or gratin. | |
SWITCHING ON
To switch the oven on, turn the oven function knob to the desired setting and the temperature knob to the right temperature. As soon as the oven has reached the set temperature, the thermostat light goes out. Preheating the oven takes about 10 minutes, depending on the desired temperature.
SWITCHING OFF
To switch the oven off, turn the oven function knob back to the setting ① and the temperature knob to
To set the oven, use the three knobs. One knob is for setting the temperature, one knob is for switching the oven on and control the timer and one knob is for selecting an oven function.
Oven function knob
natural_image
Circular diagram with a central vertical line and surrounding icons (no text or labels)Timer knob
radar
| Position | Value | |---|---| | 0 | 10 | | 10 | 20 | | 20 | 30 | | 30 | 40 | | 40 | 50 | | 50 | 60 | | 60 | 70 | | 70 | 80 | | 80 | 90 | | 90 | 100 | | M | - |Temperature knob
The oven has the following functions
| Oven function Description | ||
 _ _ | Defrost | For slowly thawing food. The fan will blow air through the oven similar to room temperature which thaws the food. |
 _ _ | Turbo hot air | The heating element around the fan ensures a better circulation of the hot air. For preparing two dishes at the same time at two different levels. |
 _ _ | Top and bottom heating element | The dish is heated by the radiation heat of the top and bottom element. Always place the dish in the centre of the oven. For pizzas, meat, flans or cake. |
 _ _ | Hot air | The fan circulates the heat of the top and bottom heating element through the entire oven. |
| [5STY] _ | Grill element | The grill element heats up. For grilling meat, fish, bread or gratin. |
 _ _ | Grill element with fan | The heat of the grill element is circulated by the fan around the dish. |
SWITCHING ON
To switch the oven on, turn the oven function knob to the desired setting and the temperature knob to the right temperature. The oven will not function without setting the timer knob. The timer can be used in two ways.
- Turn the timer knob to the setting M - manual to use the oven without a time limit. You must switch the oven off yourself, when finished.
- Turn the timer knob to the desired time (0 to 100 minutes). As soon as the set time has past, the oven switches off. Do not forget to turn back the knobs.
As soon as the oven has reached the set temperature, the thermostat light goes out. Preheating the oven takes about 10 minutes, depending on the desired temperature.
SWITCHING OFF
To switch the oven off, turn the oven function knob back to the setting ① , the temperature knob to and the timer knob to 0 . When you have set the cooking time, the oven will automatically switch off. Do not forget to turn back the knobs.
The table below are indicative for preparing different dishes.
 |  |  |  |  |  | ||||||
| Cake Cupcakes & cookies | Sausages Beef Pork Poultry | ||||||||||
| Function |  |  |  |  |  |  |  |  |  |  |  |
| °C 170-190 | 170-190 | 170-190 | 200 225-250 | 160-180 | 210-230 | 160-190 | 200 200 | ||||
| Slot | 1-2 | 1-2-3 | 1-2 | 1-2-3 | 4 | 2 | 2 | 2 | 2 | 2-3 | 1-2 |
| Time (min.) | 35-45 | 35-45 | 20-40 | 10-40 | 10-15 | 120-150 | 120-160 | 90-120 | 90-120 | 50-60 | 45-60 |
5 cleaining & maintenance
Switch the appliance off before cleaning and let it cool down. Do not clean the appliance with a pressure cleaner or steam cleaner.
Interior
Clean the inside of the appliance after every use. Use a damp cloth. To clean the oven thoroughly, an ovenspray may be used. Rinse well. Dry the inside will a dry cloth.
Accessories
Clean the accessories, such as the baking tray and the grid with warm water and a mild detergent. Dry thoroughly before reusing.
Exterior
Clean the exterior of the appliance with a damp cloth or sponge. If necessary, clean the exterior with warm water and a mild detergent. Also clean the oven door and the door seal.
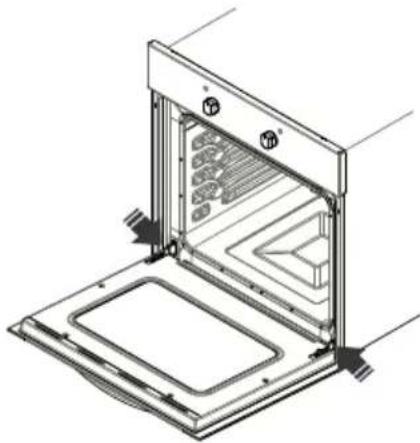
Removing and installing the oven door
The oven door can be removed to clean the interior and the door easily.
• To remove the oven door, open it completely.
- Lift the two levers at the hinges. If necessary use a small screwdriver.
- Carefully close the door as far as the first stop, caused by the raised levers.
- Lift the door upwards and outwards, to remove it from the mountings.
- Place the hinges of the oven door in the mountings. Make sure the door is level.
• Lower the two levers at the hinges back. - Close the oven door.
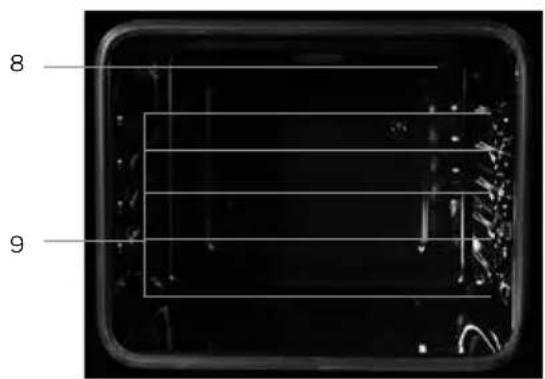
Replacing the oven lamp
Before proceeding, disconnect the appliance from the power line to avoid the possibility of electric shock.
natural_image
Technical line drawing of an open oven with internal grating and ventilation duct (no text or symbols)- Unscrew the glass cover of the lamp.
- Replace the light bulb with a new equal bulb (25 W, 230V, E14 connection and must be resistant to high temperatures - upto 300°C).
- Refit the glass cover.
- Plug the appliance in.
Tips for cleaning
- Clean the oven after every use to prevent food residue to stain.
- Grease can be best removed when the oven is still a bit warm. Use warm water and a mild detergent.
- Use for stubborn stains a special ovencleaner. Rinse the residue of the cleaning agent with water.
- Never use any abrasive pads or corrosive cleaners.
- Make sure not to spray on the heating element when using a special ovenspray.
6 problems & solutions
| Problem Solution | |
| The oven lamp is not lit. Replace the oven lamp according to the instructions. | |
| The oven is not heating up. - Has the correct temperature and oven function been set?- Is the door of the oven closed properly?IOV6030- Has the timer knob been set? To manual or on time? | |
| The control light of the oven function is not lit up. | - Is an oven function selected? |
7 installation instructions
- The safety during use can only be guaranteed when the hob is installed correctly and according to the regulations. The installer is responsible for any damage caused by a faulty installation.
- The electrical connection must be made by a qualified electricien. This person is aware of the national and local regulations the installation must comply with.
- The appliance falls under protection class III and can only be used in combination with a grounding conductor connection. The manufacturer accepts no responsibility for any malfunction or damage caused by incorrect electrical installations.
- The appliance must be connected to a fixed installation and the means of disconnecting it from the fixed installation must be installed according to the installation instructions.
- The connection cable must hang freely. Do not tie the power cable or pass it along sharp edges. It must be positioned so that it does not touch any of the hot parts of the oven.
- The connection point, the wall socket and/or plug must always be accessible.
- The cabinet into which the oven is fitted, must be heat resistant ( >100^ ).
- Ensure that the cabinet into which the oven is installed is secure. For example, by mounting it to the adjoining elements.
- Damage caused by incorrect connection, incorrect use or incorrect fitting is not covered by the guarantee.
Attention: any change to the appliance's interior, including fitting and changing the power cable, must only be performed by a qualified electricien.
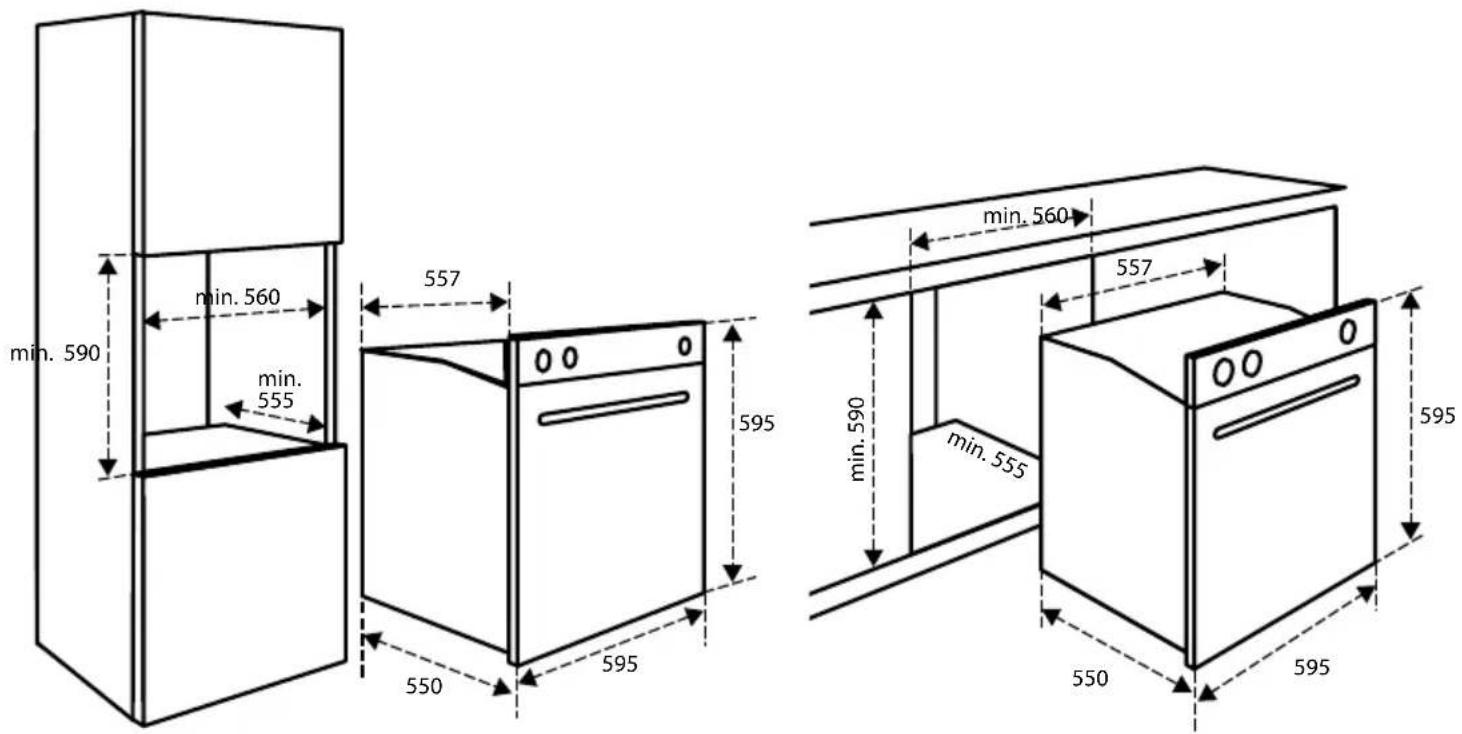
INSTALLATION DIMENSIONS
In the drawing below, all the dimensions are displayed in mm. Make sure you use the right drawing for the model you have.
Check that the voltage in your home corresponds with the voltage printed on the appliance.
These groups in the meter must be secured with at least 16 amps each. The connection cable must have a cross-section of at least 2.5mm^2 and must have a length of at least 1.5m . When the cable is too short, you have no room to already connect the oven and place it against the wall before plugging it in.
THE FITTING OF THE APPLIANCE
- Check that the cabinet and the space for the oven meet the dimension and ventilation requirements.
- Slide the oven into the cabinet. Make sure the housing of the oven does not come in contact with the walls of the kitchen cabinet. Make sure there is at least 2 mm between the oven casing and the walls of the kitchen cabinet. Make sure the oven is centered between the walls of the kitchen cabinet. Note: Make sure the cable is not stuck and does not lie on top of the oven.
- Open the oven door.
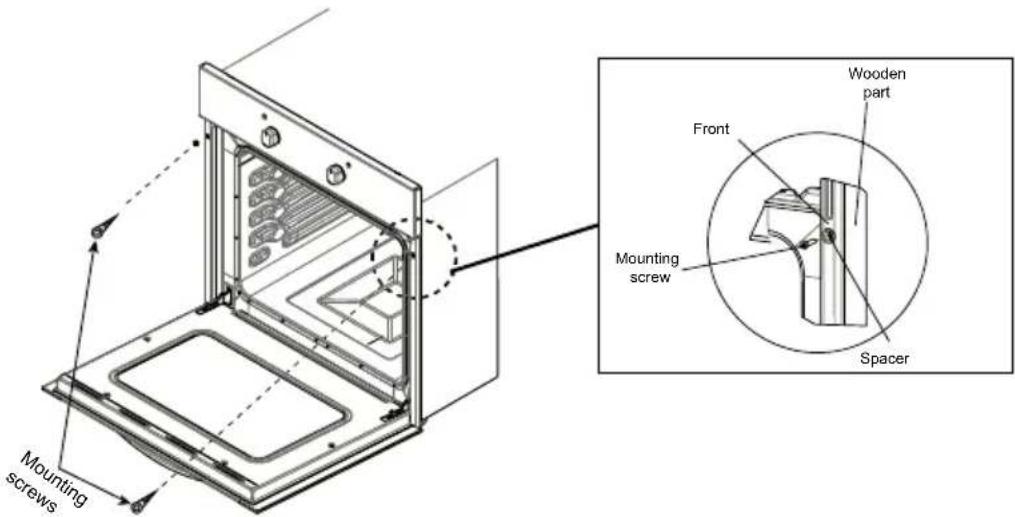
- Use the provided screws to fasten the oven to the cabinet. Take care not to over tighten and break the spacer.
- Close the oven door and plug the appliance in.
• The oven is now ready for use.
| Manufacturer INVENTUM INVENTUM | ||
| Model number IOV6010RVS IOV6030RVS | ||
| Type of appliance built-in oven built-in oven | ||
| Number of oven cavities 11 | ||
| Heat source per oven cavity electric electric | ||
| Volume per oven cavity 56-65 61-72 | ||
| Energy consumption according to the EN50304 0,85 kWh 0,94 kWh | ||
| Energy efficiency index per oven cavity 103,8 | 118,4 | |
| Execution | ||
| Material | glass and inox steel | glass and inox steel |
| Type of control | knobs | knobs |
| Accessories | baking tray rack | baking tray rack |
| Technical specifications | ||
| Dimensions (wxdxh) in mm | 595 x 595 x 575 | 595 x 595 x 575 |
| Nett weight in kg | 30,04 | 33,08 |
| Power consumption [W] | 2300 | 2300 |
| Rated voltage [V] / frequency [Hz] | 230V/50-60 | 230V/50-60 |
Remark: on the rating label - which can be found on the inside of the appliance - you will find the technical specifications of the appliance.
general terms and conditions of service and warranty
We do not need to remind you of the importance of service. After all, we develop our products to a standard so that you can enjoy them for many years, without any concerns. If, nevertheless, there is a problem, we believe you are entitled to a solution straight away. Hence our products come with an exchange service, on top of the rights and claims you are entitled to by law. By exchanging a product or part, we save you time, effort and costs.
2-year full manufacturer's warranty
- Customers enjoy a 2-year full manufacturer's warranty on all Inventum products. Within this period, a faulty product or part will always be exchanged for a new model, free of charge. In order to claim under the 2-year full manufacturer's warranty, you can either return the product to the shop you bought it from or contact the Inventum costumer service department via the form at www.inventum.eu/service-aanvraag.
- The 2-year warranty period starts from the date the product is bought.
- In order to claim under the warranty, you must produce a copy of the original receipt.
- The warranty applies only to normal domestic use of Inventum products within the Netherlands.
5-year Inventum warranty
- Inventum offers a 5-year warranty on most large domestic appliances and a selection of small domestic appliances. This 5-year Inventum warranty consists of a 2-year full manufacturer's warranty, extended by a further 3-year warranty. The only thing you need to do to qualify for the 3-year extended warranty is to register the product within 45 days of purchase. You can read more about registering the product in the following paragraph.
- In accordance with the 5-year Inventum warranty provisions, a faulty product or part will always be exchanged for a new model during the first 2 years under the warranty. During the 3rd to 5th year under the warranty, you will only pay the costs of exchange. The current costs of exchange are listed at www.inventum.eu/omruilkosten.
- In order to claim under the 5-year Inventum warranty, you can either return the product to the shop you bought it from or contact the Inventum costumer service department via the form at www.inventum.eu/service-aanvraag.
- The 5-year warranty period starts from the date the product is bought.
- In order to claim under the warranty, you must produce a copy of the original receipt.
- The warranty applies only to normal domestic use of Inventum products within the Netherlands.
Product registration
- The 3-year extended warranty is easy to obtain, free of charge, by registering the product within 45 days of purchase, via the website www.inventum.eu/garantie- registratie. If you did not register the product within 45 days of purchase, you can still do so up to 2 years after the purchase date. However, there will be a charge. The one-off registration charge is € 89 for each separate product. Registration is possible only for products that are subject to the 5-year Inventum warranty. Whether the product qualifies for the 5-year Inventum warranty is stated in the product user manual and in the product information sheet, on Inventum's website.
- The warranty period always starts from the date the product is bought. If the product is registered for the extended warranty at a later date, the warranty period still starts from the original date of purchase.
- The 3-year extended warranty can only be applied for if you are in the possession of a copy of the original receipt and the Inventum 5-year warranty certificate.
Large domestic appliances
- Breakdowns or faults in large domestic appliances (separate and built-in white goods) can be registered via the form at www.inventum.eu/service-aanvraag, by calling the Inventum costumer service department or in the store where you bought the device. The telephone number of the costumer service department can be found at www.inventum.eu.
- In the event of breakdowns or faults in large domestic appliances, Inventum will have the option to have a service engineer inspect the faulty device onsite at the customer in the Netherlands and to carry out repairs, there and then. The Inventum customer service department can also decide to have the device exchanged.
- If you suffer a breakdown or fault in a large domestic appliance during the first 2 years from the date of purchase, Inventum will not charge any costs for the exchange, call-out or for parts and labour.
- If you registered the product as described before at www.inventum.eu/garantie-registratie and you subsequently report a breakdown of a large domestic appliance in the 3rd to 5th year of the date of purchase, the 5-year Inventum warranty applies and the device will be repaired or exchanged, free of charge. In the event of a repair or exchange of the device, you only pay the costs of exchange. The current costs of exchange are listed at www.inventum.eu/omruilkosten. If you did not register the product, the 3-year extended warranty does not apply.
- When reporting a breakdown or fault, a service engineer will contact the customer within 1 working day in order to make an appointment. When the report is made in a weekend or during a public holiday, this will be the next working day.
- If you report a breakdown or fault via the form at www.inventum.eu/service-aanvraag, you will be kept informed of the progress via mobile messages and e-mail.
- The warranty period starts from the date the product is bought.
- In order to claim under the warranty, you must produce a copy of the original receipt and the Inventum 5-year warranty certificate.
- The warranty applies only to normal domestic use of Inventum products within the Netherlands.
Breakdowns or faults outside the warranty period
- Breakdowns or faults in small or large domestic appliances outside the warranty period, can be reported to the costumer services department via the form at www.inventum.eu/service-aanvraag or by calling the costumer services department.
- The costumer services department may ask you to send the product for inspection or repair. The costs of dispatch will be at your expense.
- The inspection to establish whether repair is possible involves a charge. You need to grant your permission for this, in advance.
- In the event of a large domestic appliance, Inventum, at your request, can send out a service engineer. In that case, you will be charged the call-out costs, as well as parts and labour.
- In the event of an instruction to repair, the repair costs must be paid in advance. In the event of a repair by a service engineer, the costs of the repair must be settled with the engineer onsite, preferably by means of PIN payment.
Warranty exclusions
- The following is excluded from the aforesaid warranties:
• normal wear and tear;
- improper use or misuse;
• insufficient maintenance;
- failure to comply with the operating and maintenance instructions;
- unprofessional installation or repairs by third parties or the customer himself;
• non-original parts used by the customer;
- use for commercial or business purposes;
- removal of the serial number and/or rating label.
-
In addition, the warranty does not apply to normal consumer goods, such as:
-
dough hooks, baking tins, (carbon) filters, etc.;
- batteries, bulbs, carbon filters, fat filters etc.;
• external connection cables; -
glass accessories and glass parts such as oven doors;
• and similar items. -
Transport damage not caused by Inventum is also excluded. Therefore, inspect your new device before starting to use it. If you detect any damage, you must report this to the store where you purchased the product within 5 working days, or to the Inventum customer service department via the form at www.inventum.eu/service-aanvraag. If transport damage is not reported within this period, Inventum does not accept any liability in this respect.
-
The following are excluded from warranty and/or replacement: faults, loss of and damage to the device as a result of an event that is normally insured under the home contents insurance.
Important to know
- The replacement or repair of a faulty product, or a part thereof, does not lead to an extension of the original warranty period.
- Parts that have been replaced, packaging material and exchanged devices are taken back by the service engineer and become the property of Inventum.
- If a complaint is unfounded, all costs arising from it will be at the customer's expense.
- Following expiry of the warranty period, all costs of repair or replacement, including administration costs, dispatch and call-out charges, will be charged to the customer.
- Inventum cannot be held liable for damage as a result of devices built in incorrectly.
- Inventum cannot be held liable for damage caused by external events, unless this liability arises from mandatory statutory provisions.
- These warranty and service provisions are governed by Dutch law. Disputes will be settled exclusively by the competent Dutch court.

klein huishoudelijk

witgoed vrijstaand

witgoed inbouw

twitter.com/inventum1908
facebook.com/inventum1908
youtube.com/inventum1908


- Ovenlamp vervangen
- safety instructions
- appliance description
- before first use
- SWITCHING ON
- SWITCHING OFF
- cleaining & maintenance
- Interior
- Accessories
- Exterior
- Removing and installing the oven door
- Replacing the oven lamp
- Tips for cleaning
- problems & solutions
- installation instructions
- INSTALLATION DIMENSIONS
- THE FITTING OF THE APPLIANCE
- general terms and conditions of service and warranty
- 2-year full manufacturer's warranty
- 5-year Inventum warranty
- Product registration
- Large domestic appliances
- Breakdowns or faults outside the warranty period
- Warranty exclusions
- Important to know
Brand : INVENTUM
Model : IOV6030RVS
Category : Oven