LW050UK - Router SWEEX - Free user manual and instructions
Find the device manual for free LW050UK SWEEX in PDF.

User questions about LW050UK SWEEX
0 question about this device. Answer the ones you know or ask your own.
Ask a new question about this device
Download the instructions for your Router in PDF format for free! Find your manual LW050UK - SWEEX and take your electronic device back in hand. On this page are published all the documents necessary for the use of your device. LW050UK by SWEEX.
USER MANUAL LW050UK SWEEX
LW050/LW050UK Sweex Wireless Broadband Router 54 Mbps
Introduction
First of all, many thanks for purchasing this Sweex Wireless Broadband Router 54 Mbps. The Sweex Wireless Broadband Router 54 Mbps enables you to share a broadband Internet connection and to set up your own wireless network.
To ensure this product operates correctly, we advise you to carefully read this manual first. If despite this manual you still experience problems during installation or operation of this product, go to www.sweex.com and look under the heading service & support.
In order to fully enjoy the Sweex Wireless Broadband Router 54 Mbps, it is important to observe a number of things:
- Do not expose the Sweex Wireless Broadband Router 54 Mbps to extreme temperatures.
Do not place the device in direct sunlight or in the direct vicinity of heating elements. - Do not use the Sweex Wireless Broadband Router 54 Mbps in extremely dusty or moist surroundings.
- Protect the device against powerful shocks or jolts - they may damage the internal electronics.
- Never attempt to open the device yourself - it will cause the warranty to lapse.
Contents of the box
Prior to using the Sweex Wireless Broadband Router 54 Mbps, check if all required parts are present. The following parts must be present in the box:
• Wireless broadband router 54 Mbps
- Antenna
• Power supply adaptor
• RJ-45 UTP Ethernet network cable
• CD-ROM with manual and Panda Anti-virus trial software
If one of the above parts is missing, please contact the shop or supplier.
Specifications
• Supports: IEEE 803.3 and IEEE 803.3u
• Supports: IEEE 802.11b, IEEE 802.11g
• Maximum wireless data transfer speed: 54Mbps
• Supports: DHCP (dynamic IP), PPTP, Static IP, PPPoE, L2TP
• 1 x WAN, 4 x LAN RJ-45 UTP ports
• Supports: WEP/WPA./WPA2/802.1X data encryption
• Built-in Firewall and Port Forwarding
• Removable reverse SMA Antenna 5 dBi
- 2 to 3 x Extended Range
• Supports: VPN pass through
- Web-based configuration
• Not operating system dependent
Front view
| SWEEXWIRELESS BRONOLAND ROITER SHIRPS | ||||||||
| LINE/ACT | ||||||||
| POWER | SYSTEM VAN | 1 | 2 | 3 | 4 | |||
| LAM | ||||||||
| Status Status Meaning | ||
| Power | Off The router is switched off | |
| Lit The router is switched on | ||
| System | Lit The router is starting up | |
| Blinking The router is operating correctly | ||
| Off The router has a hardware error | ||
| Link/Act WAN and 1 to 4 | Off No device is connected to this port | |
| Lit A computer or other network device is connected to this port | ||
| Blinking There is data traffic between the router and the connected device | ||
| WLAN | Off The wireless part is switched off | |
| Blinking The wireless part is active | ||
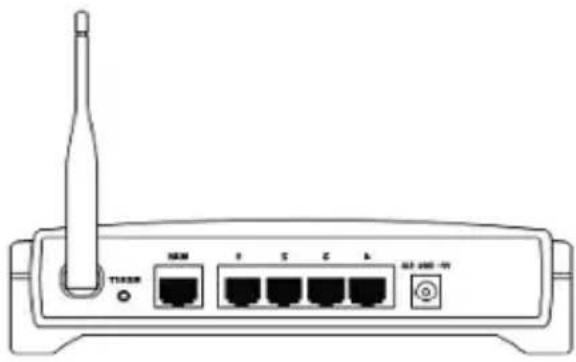
Rear view
natural_image
Line drawing of a wireless router with ports and antenna (no text or symbols)• Antenna with reverse SMA connector.
- Reset button to return to the factory settings
- WAN port for connecting a modem by means of a RJ-45 UTP Ethernet network cable.
• LAN ports 1, 2, 3 and 4 for connecting computers by means of an RJ-45 UTP Ethernet network cable.
• Power connector for connecting the power adaptor.
Connecting the Sweex Wireless Broadband Router 54 Mbps
- Connect the power adaptor (included) to the rear of the router and the mains socket. The light next to "Power" is lit. In the event the LED is not lit, check the connections of the power adaptor to the router and the mains socket.
- Switch on the computer and connect it to the rear of the modem using a network cable (RJ-45 UTP). You can select any of the ports 1, 2, 3 and 4. The corresponding light at the front will be lit. In the event the light fails to light up, check whether the network cable is properly connected to the computer and the router.
- Switch on the modem* again. Note: Here we do not refer to the Sweex router. Connect the modem to the rear of the router using a network cable (RJ-45 UTP). Do this via the WAN port The WAN light at the front of the router will light up. In the event the light fails to light up, check whether the network cable is properly connected to the router and the modem.
*In order to use the Sweex Wireless Broadband Router 54 Mbps you need an active Internet connection, which is established through a modem. This modem is usually supplied by the provider.
Configuring the computer to connect to the router
Windows XP
In the bottom left of your screen, go to "Start" "Control Panel"
Then go to "Network and Internet Connections".
Open "Network Connections".
Or, if the Windows classic style is used:
"Start" → "Settings" "Network Connections".
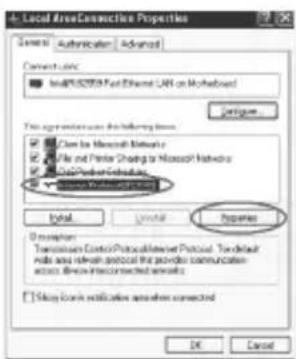
Right-click "LAN Connection" or "Wireless Network Connection" and select "Properties". The following screen appears:
text_image
Local Area Connection Properties System: Authentication Advanced Connecticut: In450000000000000000000000000000000000000000000000000000000000000000000000000000000000000000000000000000 Configure Use remote access for following items: Class for Microsoft Networks File and Printer Sharing to Microsoft Networks Data Protection Networks Microsoft Access Services Install Install Properties Description: Transmission Control Protocol Server Protocol. To default Note and link protocol the provider communication access Direct-Connected Services Stop key notification when connected OK CancelUnder the tab "General" select TCP/IP and click "Properties".

text_image
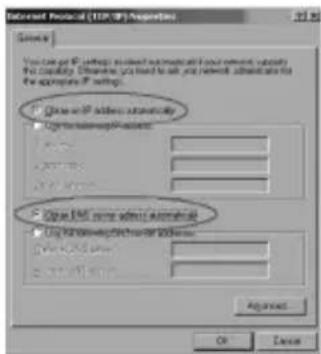
Internal Protocol (TCP/IP) Properties General Activate Configuration © Update on IP address automatics © Use the following IP address: IP address: Hyperlink user: Selected server: © Update on IP address automatics © Use the following IP address: UpdateTCP/IP address: UpdateTCP/IP address: Advanced... OK CancelSelect the options "Obtain an IP address automatically" and "Obtain DNS server address automatically".
Confirm the settings by clicking "OK". The network settings for Windows XP have now been configured correctly. The correct settings for the Internet browser will be discussed later in this manual.
Windows 2000
In the bottom left of your screen, go to "Start" "Control Panel".
Then go to "Network and Internet Connections".
Open "Network Connections".
Or, if the Windows classic style is used:
"Start" → "Settings" "Network Connections".
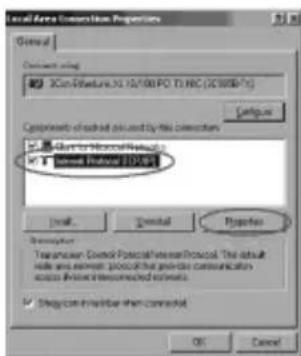
Right-click "LAN Connection" or "Wireless Network Connection" and select "Properties". The following screen appears:
text_image
Local Area Conversion Properties General Description using XCon-Feature.XI 16/100 PO T.HRC (IC58087) Configure Components of which used by file conversion • Corel Regional Networks • Corel Regional EDS Install... Cancel Properties Description Transmission Control Protocol/Internet Protocol: This default role area environment process that provides communication access before connected elements. • Design in monitor when connected OK CancelNow select "Internet Protocol (TCP/IP)" and click "Properties".
text_image
Onset Protocol (TOP IP) Properties Service: You can use IP setup to switch automatic network topology. To access IP address: automatic IP address Use IP address on the network Use IP address on the network Use IP address on the network Apply OK CancelSelect the options "Obtain an IP address automatically" and "Obtain DNS server address automatically". Click "OK" twice.
The network settings for Windows 2000 have now been configured correctly. The correct settings for the Internet browser will be discussed later in this manual.
Windows 98SE
Go to "Start", "Settings", "Control Panel" and click "Network".

text_image
Configuration Sub-Application Access Control File following: C:\Users\Complications\api3\api3\api3\api3\api3\api3\api3\api3\api3\api3\api3\api3\api3\api3\api3\api3\api3\api3\api3\api3\api3\api3\api3\api3\api3\api3\api3\api3\api3\api3\api3\api3\api3\api3 C:\Users\Complications\api3\api3\api3\api3\api3\api3\api3\api3\api3\api3\api3\api3\api3\api3\api3\api3\api3\api3\api3\api3\api3 C:\Users\Complications\api3\api3\api3\api3\api3\api3\api3\api3\api3\api2 C:\Users\Complications\api3\api3\api3\api3\api3\api3\api3\api3\api3\api3\api3\api3\api3\api3 C:\Users\Complications\api3\api3\api3\api3\api3\api3\api3\api3\api3\api3\api3 C:\Users\Complications\api3\api3\api3\api3\api3\api3\api3\api3\api3 C:\Users\Complications\api3\api3\api3\api3\api3\api3\api3 C:\Users\Complications\api3\api3\api3\api3\api3\nApi4 Api5 Api6 Api7 Api8 Api9 Api10 Api11 Api12 Api13 Api14 Api15 Api16 Api17 Api18 Api19 Api20 Api21 Api22 Api23 Api24 Api25 Api26 Api27 Api28 Api29 Api30 Api31 Api32 Api33 Api34 Api35 Api36 Api37 Api38 Api39 Api40 Api41 Api42 Api43 Api44 Api45 Api46 Api47 Api48 Api49 Api50 Api51 Api52 Api53 Api54 Api55 Api56 Api57 Api58 Api59 Api60 Api61 Api62 Api63 Api64 Api65 Api66 Api67 Api68 Api69 Api70 Api71 Api72 Api73 Api74 Api75 Api76 Api77 Api78 Api79 Api80 Api81 Api82 Api83 Api84 Api85 Api86 Api87 Api88 Api89 Api90 Api91 Api92 Api93 Api94 Api95 Api96 Api97 Api98 Api99 A&L Remove ExchangeSelect the line "TCP/IP →" which corresponds to your (wireless) network card and click "Properties".
text_image
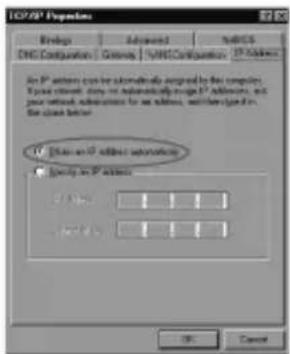
I2C/XP Properties Bindings Advanced Sales DNS Configuration Cancel/VNS Configuration IP Address An IP address can be automatically assigned to the computer. Type: wireless, store or automatically design IP address, and your network, administration for an address, which is given on: the class better. IP Address on IP address Specify in IP address 1.000 1 1 2.000 1 1 OK CancelUnder the tab "IP Address", select the option "Obtain an IP address automatically".

text_image
IOS/XP Properties Bindings Ad-acid NetOS CNC Configurations Software NetOS Configuration IP Address The new generation is the installed generation to be set to the default. The options are to be set out by the code in which these windows are used. New generation: ... ... Install generation: OK CancelUnder the tab "Gateway", the list of "Installed gateways" must be empty. If so required, select each gateway and click "Remove".
text_image
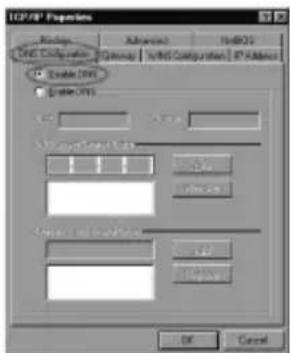
ICP/SP Properties Options Advanced HDDGS ICP/SP Configuration Group1 ICP/SP Configuration IP Address Enable I/O Enable O/S OK CancelUnder the tab "DNS Configuration", select the option "Disable DNS". Click "OK" twice.
The network settings for Windows 98SE have now been configured correctly. Now continue with the correct settings for the Internet browser below.
Internet browser settings for Windows 98SE, 2000 and XP
- In order to access the router, the browser settings must be correct. This is easy to check by starting up Internet Explorer and selecting "Tools" from the menu bar and then selecting the option "Internet Options".
- In this window, go to "Connections" and select "Never dial a connection" or remove all connections listed in the field above.
- At the bottom, click "LAN Settings", remove all ticks and click "OK".
- Restart the browser to activate the settings.
Setting the wireless network
How does it work?
In order to create a wireless network, you need a wireless router, wireless modem or access point. The wireless router, modem or access point transmits the wireless network. The name of this network, also referred to as SSID, depends on your wireless router, modem or access point and often differs per model or brand. You can often determine the name yourself and thus recognise your own wireless network.
Protection
You could compare a wireless network to radio signals. However, the range of a wireless network at home is not as big. Your home wireless network often has a range of 20 to 30 metres. This means that neighbours and passers-by too can make use of your network. As a result they can get away with surfing on your Internet connection, and they may gain access to your shared folders and files on your network. That is why it is recommended to secure your wireless network. This protection is set up on the device transmitting the network. In most cases that is the wireless router, modem or access point. By adding a WEP or WPA protection code, you secure the network. This code is also referred to as the network key. Enter this code on each computer that wants to connect to that secured network. You can only be part of that network if you enter this code. If you did not enter the network key into the router or modem yourself, ask the installer, manufacturer, supplier or provider for this code.
Connecting the computer to the wireless network
In the bottom left of your screen, go to "Start" "Control Panel".
Then go to "Network and Internet Connections".
Open "Network Connections".
Or, if the Windows classic style is used:
"Start" → "Settings" "Network Connections".
Right-click "LAN Connection" or "Wireless Network Connection" and select "View Available Wireless Networks".
text_image
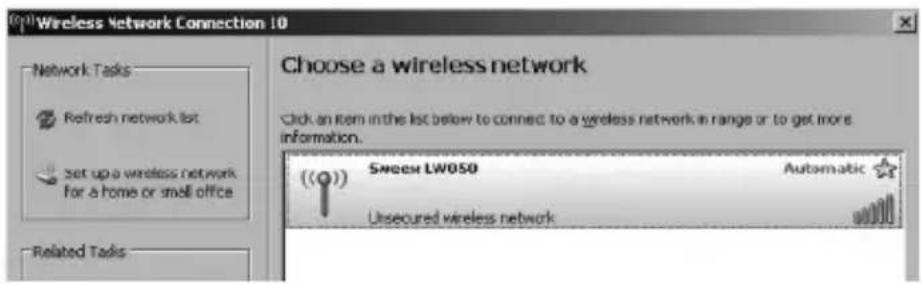
Wireless Network Connection 10 Choose a wireless network Click an item in the list below to connect to a wireless network in range or to get more information. ((Q)) Sweep LW050 Automatic Unsecured wireless networkAlways click "Refresh network list" top left in this window first, to obtain the most recent listing.
Select the name (also referred to as SSID) "Sweex LW050" by clicking it once. Now click "Connect".
If it has successfully connected to the wireless network, the notification "Connected" appears after a couple of seconds.
You now have an active wireless network.
If you receive a notification saying the wireless connection cannot be configured because it is managed by another programme, disable this software and start again.
We recommend securing the wireless part of the router. How to do this is described further down in this manual. Once secured, the network will show as "Sweex LW050" with a message below detailing "Security-enabled wireless network". When connecting to this secured network, you will be prompted for the "Network key". If the network key you have entered is incorrect, a notification saying "Limited or no network connection" appears after a couple of seconds. Your wireless connection is not satisfactory. Re-connect to the wireless network and check the network key.
If you change something in the wireless settings of the router causing you to lose the wireless connection, then complete these steps again.
Accessing the router (Login)
Open your web browser. In this example we use "Internet Explorer".
text_image
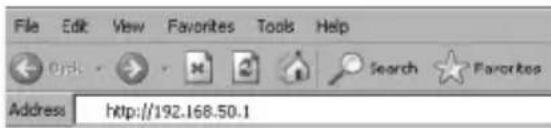
File Edit View Favorites Tools Help Address http://192.168.50.1The default router IP address is: 192.168.50.1
An IP address is a unique number required by each network device, including a computer or router, in order to be active within that network. Without an IP address you are unable to make connections within a network. Type the router IP address in the browser address bar. You can now access the router.
text_image
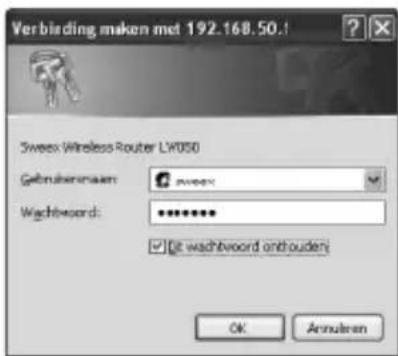
Verbirding maken met 192.168.50.1 Sweez Wireless Router LW050 Gebruikeraam: wweez Wachbeord: ******** ✓ @ wachbwoord onthouden OK AnoukarenThe router login screen appears. Fill out the login name and the corresponding password. The standard login is sweex and the corresponding password is mysweex.
If this login screen fails to appear, recheck the settings of your Internet browser as described above. Also check the IP address of your computer. In this IP address, only the digits after the last dot may deviate from the IP address of the router (e.g.: 192.168.200.xxx).
Where to find the IP address of the computer?
Win2000/WinXP: Click "Start" - "Run" - Type cmd - press "Enter". In the black window, type ipconfig - press "Enter" and your IP address is displayed.
Win98/Me: Click "Start" - "Run" -Type winipcfg - press "Enter". In the window, select your network adaptor. (Usually NOT the ppp adaptor) and your IP address is displayed.
Once logged in, the status screen of the router appears.
| Router Status | |
| Firmware Version | 3.20 Build M60822 Rel 331.0in |
| Hardware Version | LY050 08140201 |
| LAN | |
| MAC Address: | 0014-78-61-E6-B8 |
| IP Address: | 192.168.501 |
| Subset Mask: | 255.255.255.0 |
| Wireless | |
| Wireless Radio: | Enabled |
| Name (SSID): | Sweex LY050 |
| Channel: | 6 |
| Mode: | 548bps (BC2.11g) |
| MAC Address: | 0014-78-61-E6-B8 |
| IP Address: | 192.168.501 |
| WAN | |
| MAC Address: | 0014-78-61-E6-B8 |
| IP Address: | 0.0.0.0 PPTP |
| Subset Mask: | 0.0.0.0 |
| Default Gateway: | 0.0.0.0 |
| DNS Server: | 0.0.0.0, 0.0.0.0 |
| Online Time: | 0 day(s) 00:00:00 Connect |
This screen displays the current Internet connection and a variety of system information.
Setting the Internet Provider (ISP)
Prior to setting the provider, make sure that the Internet connection is active without the Sweex Breedband Router. If the modem without the router does not have an Internet connection, setting the router would be pointless. After all, the modem establishes the Internet connection and the Sweex Breedband Router forwards this existing Internet connection to one or more computers in your network.
A total of 6 different settings are possible. We have listed these together with instructions on how to enter these. In order to find out which settings correspond to your provider, you can consult the list with providers further down in this manual. The list consists of providers and corresponding subscriptions. The applicable settings are listed for each subscription form. In the event that your subscription is not listed, consult your Internet provider for the router settings which correspond to your subscription.
These settings need to be configured in your router only once. Regardless of the number of computers you connect to the router, the following settings only need to be done on one computer. That is because the settings are not stored on the computer, but on the router.
Setting 1 DHCP without hostname
- Left in the column, click "Network". Now click "WAN".
text_image
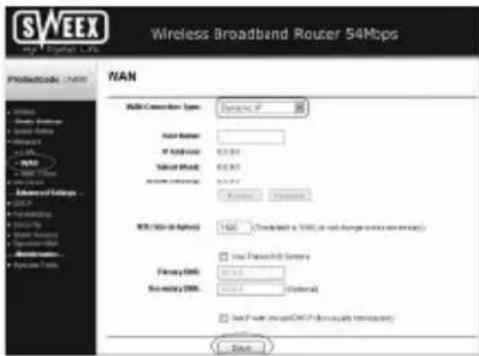
SWEEX Wireless Broadband Router 54Mbps PROTECHNOLOGY WAN LAN Connection Type: Windows XP Host Name: IP Network: 62.001 Subnet World: 62.001 Internet connection: 62.001 Network Connection: Windows I/O/USB-IR Applications: 100% (Standard & WINS, or with change service requirements) Primary Site: 10.001 Secondary Site: 10.001 (Optional) Primary Site: 10.001 (Optional) Primary Site: 10.001 (Optional) Primary Site: 10.001 (Optional) Primary Site: 10.001 (Optional) Primary Site: 10.001 (Optional) Primary Site: 10.001 (Optional) Primary Site: 10.001 (Optional) Primary Site: 10.00 Primary Site: 10.00 Primary Site: 10.00 Primary Site: 10.00 Primary Site: 10.00 Primary Site: 10.00 Primary Site: 10.00 Primary Site: 10.00 Primary Site: 10.00 Primary Site: 10.00 Primary Site: 10.00- Under "WAN Connection Type" select "Dynamic IP". This setting is for providers who use a DHCP connection.
- Click "Save" to save the settings.
In order to check whether the Internet connection has been set up successfully, go to the status screen by clicking "Status" left in the column. The "WAN" section will display your Internet IP address. It can sometimes take up to 1 minute for this IP address to appear. You have now completed the configuration and are ready to surf the Internet.
If after 1 minute your IP address continues to show as 0.0.0.0, check your settings again and complete the following steps:
- Switch off the router and the modem.
- Disconnect the network cable between the router and the modem at the "WAN" port.
- Switch on the router and wait until it is fully started up.
- Switch on the modem and wait until it is fully started up and until all the correct lights are lit.
- Reconnect the network cable between the modem and the router via the "WAN" port of the router.
- Connect the router via 192.168.50.1 and check your Internet connection in the status screen.
Setting 2 DHCP with hostname
Important: when configuring the router, always use the computer with which you were connected to the Internet prior to connecting the router.
- Left in the column, click "Network". Now click "WAN".
text_image
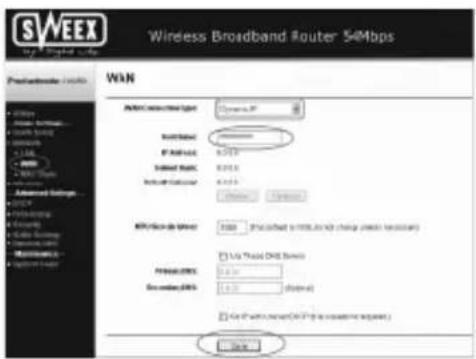
SWEEX Wireless Broadband Router 54Mbps Predecessor: 10000 WAN Aircraft connected light Switchback IP address: 6.273 Subway mode: 0.013 Auto switch button: 0.013 Network: 0.013 MPI/Video de GWA USB: (USB) or (USB) to switch the change needed. Primary: 0.013 Secondary: 0.013 USB: (USB) USB: (USB)- Under "WAN Connection Type" select "Dynamic IP". This setting is for providers who use a DHCP connection.
- Under "Hostname" enter the hostname you received from your provider.
- Click "Save" to save the settings.
- Left in the column, click "MAC Clone".
text_image
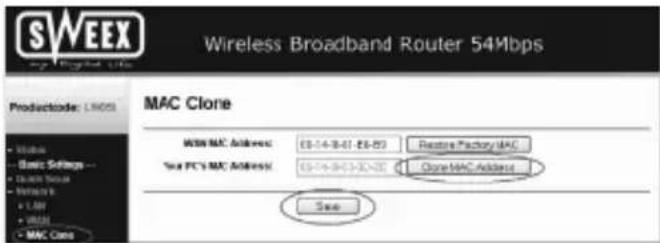
SWEEX Wireless Broadband Router 54Mbps Productcode: LINDS MAC Clone WBS MAC Address: 63-14-8-01 - 63-97 Store Factory MAC Web PC's MAC Address: 63-14-8-03-32-01 Close MAC Address See- In order to enter the MAC address of your computer into the router, click "Clone MAC Address" and then "Save" to save the settings.
- Click "OK" to confirm.
In order to check whether the Internet connection has been set up successfully, go to the status screen by clicking "Status" left in the column. The "WAN" section will display your Internet IP address. It can sometimes take up to 1 minute for this IP address to appear.
You have now completed the configuration and are ready to surf the Internet.
If after 1 minute your IP address continues to show as 0.0.0.0, check your settings again and complete the following steps:
- Switch off the router and the modem.
- Disconnect the network cable between the router and the modem at the "WAN" port.
- Switch on the router and wait until it is fully started up.
- Switch on the modem and wait until it is fully started up and until all the correct lights are lit.
- Reconnect the network cable between the modem and the router via the "WAN" port of the router.
- Connect the router via 192.168.50.1 and check your Internet connection in the status screen.
Setting 3 PPPoE
- Left in the column, click "Network". Now click "WAN".

text_image
SWEEX Wireless Broadband Router 54Mbps PROVINCER: 10000 WAN Wi-Fi Connection ports: Wireless User Name: Patient B: View Connection/Order: ● Consist on Demand Middle Time: 16 hours (3 seconds similar active at all times) ● Contad Automaticity ● Transmitted Connectivity P成品 Of Structure: 0 3448800 27 0 04-0988 ● Contad Microarray Intangible Times: 0 response (3 wireless network active at all times) ○ Continue ○ Continue ○ Continue ○ Continue ○ Continue ○ Continue ○ Continue ○ Continue ○ Continue- Under "WAN Connection Type" select "PPPoE". This setting is for providers who use a PPPoE connection.
- Under "User Name" enter the user name you received from your provider.
- Under "Password", enter the corresponding passport.
- Click "Save" to save the settings.
In order to check whether the Internet connection has been set up successfully, go to the status screen by clicking "Status" left in the column. The "WAN" section will display your Internet IP address. It can sometimes take up to 1 minute for this IP address to appear. You have now completed the configuration and are ready to surf the Internet.
If after 1 minute your IP address continues to show as 0.0.0.0, check your settings again and complete the following steps:
- Switch off the router and the modem.
- Disconnect the network cable between the router and the modem at the "WAN" port.
- Switch on the router and wait until it is fully started up.
- Switch on the modem and wait until it is fully started up and until all the correct lights are lit.
- Reconnect the network cable between the modem and the router via the "WAN" port of the router.
- Connect the router via 192.168.50.1 and check your Internet connection in the status screen.
Setting 4 PPTP
- Left in the column, click "Network". Now click "WAN".
text_image
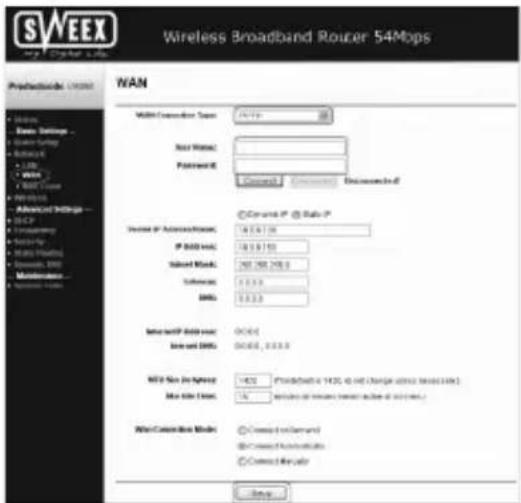
SWEEX Wireless Broadband Router 54Mbps Predecessor: WAN WAN Multi Connection Type: WiFi Real Website: Password: Comcast - Comcast - Documented Corporate IP - Site IP Internet IP Address: 16.0.0.16 IP Address: 16.0.0.16 Subnet Node: 267,288,298.0 Software: 13.3.3 DNS: 13.3.3 Internet IP Address: NONE Node and DNS: NONE, 0.0.0.0 MSI No. In-Space: None My Site ID: 14 Wire Connection Mode: Connected to Demand Connected to Security Connected to Router Setup- Under "WAN Connection Type" select "PPTP". This setting is for providers who use a PPTP or KPN Mxstream connection.
- Under "User Name" enter the user name you received from your provider.
- Under "Password", enter the corresponding passport.
- Click "Save" to save the settings.
- Click "Connect" to make the Internet connection. Next to this button, the message "Connected" will appear and your Internet IP address will be displayed under "Internet IP Address". It can sometimes take up to 1 minute for this to be shown. You have now completed the configuration and are ready to surf the Internet.
If after 1 minute the router continues to show as "Disconnected", check your settings again and complete the following steps:
- Switch off the router and the modem.
- Disconnect the network cable between the router and the modem at the "WAN" port.
- Switch on the router and wait until it is fully started up.
- Switch on the modem and wait until it is fully started up and until all the correct lights are lit.
- Reconnect the network cable between the modem and the router via the "WAN" port of the router.
- Connect the router via 192.168.50.1 and check your Internet connection in the status screen by clicking "Status" left in the column. The "WAN" section will display your Internet IP address.
Setting 5 L2TP
- Left in the column, click "Network". Now click "WAN".
text_image
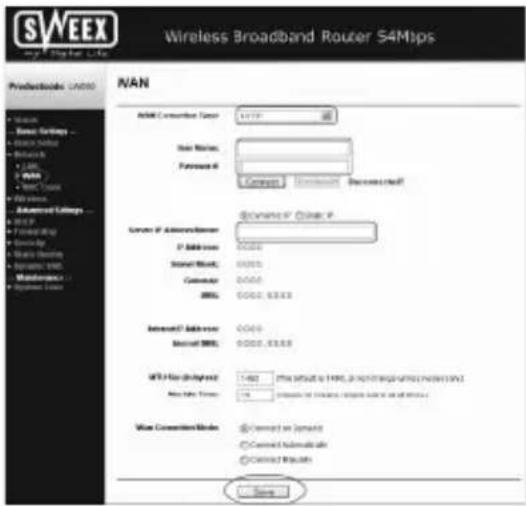
SWEEX Wireless Broadband Router S4Mips Predecessor: UNAN NAN Add/ Converter: Unan Add Numbers: Putative Wi: Connect Remove Remove Right Connect to Other Wi Connect to Administrator: 37 Address: Standard Work: Calculator: 0000 0000, 8333 Internet Address: Standard MRL: 0000, 8333 WIFI No. designated: 1-600 New Info Times: Connect to Windows Connect to Windows Connect to Windows Connect to Windows Connect to Windows Connect to Windows Connect to Windows Connect to Windows Connect to Windows Connect to Windows Connect to Windows Connect to Windows Connect to Windows Connect to Windows Connect to Windows Connect to Windows Connect to Windows Connect to Windows Connect to Windows Connect to Windows Connect to Windows Connect to Windows Connect to Windows Connect to Windows Connect to Windows Connect to Windows- Under "WAN Connection Type" select "L2TP". This setting is for providers who use an L2TP connection.
- Under "User Name" enter the user name you received from your provider.
- Under "Password", enter the corresponding passport.
- Click "Save" to save the settings.
- Click "Connect" to make the Internet connection. Next to this button the message "Connected" appears and your Internet IP address will be displayed under "Internet IP Address". It can sometimes take up to 1 minute for it to be shown. You have now completed the configuration and are ready to surf the Internet.
If after 1 minute the router continues to show as "Disconnected", check your settings again and complete the following steps:
- Switch off the router and the modem.
- Disconnect the network cable between the router and the modem at the "WAN" port.
- Switch on the router and wait until it is fully started up.
- Switch on the modem and wait until it is fully started up and until all the correct lights are lit.
- Reconnect the network cable between the modem and the router via the "WAN" port of the router.
- Connect the router via 192.168.50.1 and check your Internet connection in the status screen by clicking "Status" left in the column. The "WAN" section will display your Internet IP address.
Setting 6 Static IP
- Left in the column, click "Network". Now click "WAN".
text_image
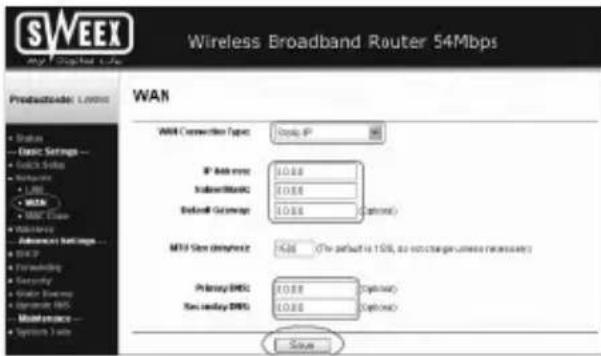
SWEEX Wireless Broadband Router 54Mbps Product Code: Windows WAN WAN Connection Type: Group IP IP Address: 0.0.00 Inbound/Network: 0.0.00 Default Grid Address: 0.0.00 (Optional) MTV Size (diameter): 14.66 (The default is 128, so we change unless necessary) Primary DMS: 0.0.00 (Optional) Two additional DMS: 0.0.00 (Optional) Save- Under "WAN Connection Type" select "Static IP". This setting is for providers who use a fixed Static IP address.
- Under "IP Address", enter the IP address you received from your provider.
- Also enter your "Subnet Mask", "Gateway", "Primary DNS" and possibly your "Secondary DNS" values.
- Click "Save" to save the settings.
In order to check whether the Internet connection has been set up successfully, go to the status screen by clicking "Status" left in the column. The "WAN" section will display your Internet IP address. It can sometimes take up to 1 minute for this IP address to appear. You have now completed the configuration and are ready to surf the Internet.
If after 1 minute your IP address continues to show as 0.0.0.0, check your settings again and complete the following steps:
- Switch off the router and the modem.
- Disconnect the network cable between the router and the modem at the "WAN" port.
- Switch on the router and wait until it is fully started up.
- Switch on the modem and wait until it is fully started up and until all the correct lights are lit.
- Reconnect the network cable between the modem and the router via the "WAN" port of the router.
- Connect the router via 192.168.50.1 and check your Internet connection in the status screen.
Wireless settings and security
We always recommend entering these settings with a computer connected to the Sweex Breedband Router by means of a cable. This is because you will lose the wireless connection with the Sweex Breedband Router while storing these settings.
Left in the column, click "Wireless".
text_image
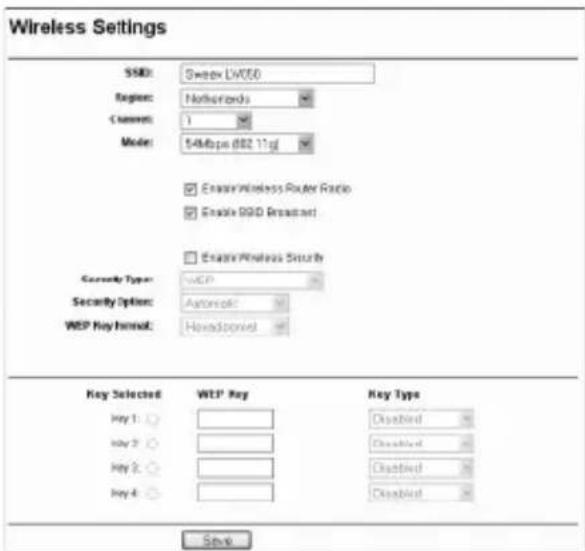
Wireless Settings SSB: Sweep LV050 Region: Netherlands Current: 1 Mode: 548bps dB2.11g Enable Wireless Router Ratio Enable GPIO Broadcast Enable Wireless Security Security Type: WCP Security Options: Automatic WCP Key format: Headspannel Key Selected WTP Key Key Type Key 1: Key 2: Key 3: Key 4: SaveThe default SSID is "Sweex LW050". We recommend not changing this so you can always recognise the router. Here you can also find other options such as "Channel" and "Mode". We again recommend maintaining the default values. You can enable or disable the wireless part by means of "Enable Wireless Router Radio". This feature is enabled by default.
Securing the wireless part
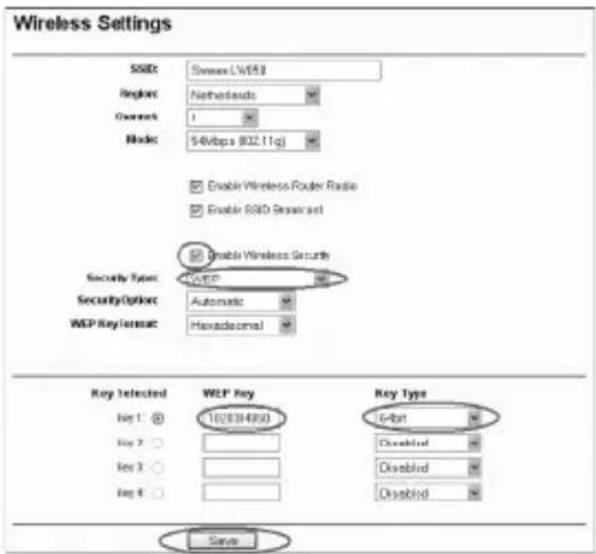
text_image
Wireless Settings SSID: Sweden LW651 Region: Netherlands Gnwick: 1 Mode: 54Wbps (822.11q) Enable Wireless Router Radio Enable SSD Security Disable Wireless Security Security Type: WEEP Security Option: Automatic WEP Key Format: Hexadosomal Key Detected WEP Key Key Type Log 1: 10(8384890) Log 2: Log 3: Log 4: Disable Disable Disable SaveComplete the following steps for setting WEP security:
- Tick "Enable Wireless Security"
- Under "Security Type" select "WEP".
- Under "Key Type" select "64bit".
- Under "WEP Key", enter the network key. In our example we use network key "1020304050". When using 64-bit encryption you can create your own 10-digit code, 128 bits require 26 digits.
- Click "Save" to save the settings.
- A small window appears. Click "OK" to restart the router.
The router is now secured. Reconnect your wireless computer.
Complete the following steps for setting WPA security:
- Tick "Enable Wireless Security"
- Under "Security Type" select "WPA-PSK/WPA2-PSK".

text_image
Wireless Settings SSD: Sweep (W050) Region: Netherlands Channel: 6 Mode: 5MHz (802.11g) Enable Wireless Router Radio Enable SSD Broadcast Enable Wireless Security Security Type: WPA-PSK/WPA2-PSK Security Options: Automatic Encryption: Automatic PSK Passphrase: ****** (The Passphrase is between 0 and 03 characters long) Group Key Update Period: 30 (on second, minimum is 30, 0 means no update) Says- Under "PSK Passphrase", enter your network key. You can create your own and it may contain 8 to 63 numbers and letters.
- Click "Save" to save the settings.
- A small window appears. Click "OK" to restart the router.
The router is now secured. Reconnect your wireless computer.
Opening ports in the router (Forwarding and DMZ)
The built-in firewall in this router cannot be disabled. However, ports can be opened for programmes and games which require this.
We recommend using a fixed IP address for computers for which ports are opened. This is to ensure that these computers always use the same IP address as registered in the router. The router may assign a different IP address to the computer so that the forwarding or DMZ command no longer applies to that computer.
By clicking "Forwarding" left in the column the port settings can be changed.

text_image
SWEEX Wireless Broadband Router 54Mbps Productcode: UNISO Virtual Servers ID Service Put IP Address Protocol Status Modify Add New Extable All Extable All Extable All Preprocessor About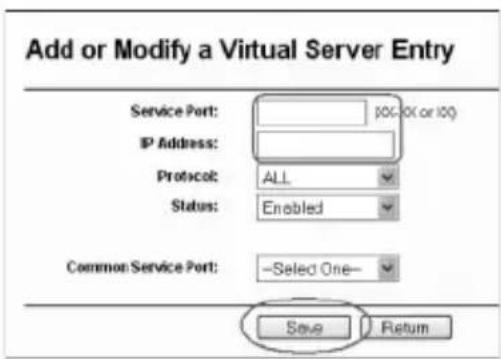
text_image
Add or Modify a Virtual Server Entry Service Port: 100/10 (or 100) IP Address: Protocol: ALL Status: Enabled Common Service Port: -Select One- Save Return- Under "Service Port", enter the port or the range of ports you want to open. For example: 3500-3600 opens all ports within that range.
- Under "IP Address", enter the IP address of the computer for which you want to open these ports.
- Tick "Enable" to activate this line.
- Click "Save" to save the settings.
You can complete 16 lines. Click "Next" to show lines 9 - 16.
DMZ
In some instances, or when a game console is used, you may opt to place a computer or game console entirely outside the firewall. This can be done in the so-called "demilitarized zone" ("DMZ"). This option can be found in the main screen of the port settings ("Port Forwarding") under ("Advanced".) Note however, you no longer take advantage of the protection offered by the firewall of the router. All ports to the computer placed in the DMZ are open. Only a single computer can be placed in the DMZ.
Left in the column, click "Forwarding" and then "DMZ".
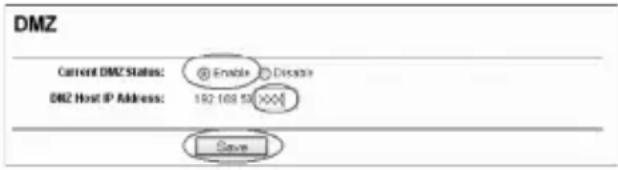
text_image
DMZ Current DMZ Status: @ Enable ○ Decide DMZ Host IP Address: 182 168 53 ××× SaveSet "Current DMZ Status" to "Enable" and under "DMZ Host IP Address", enter the IP address of the computer which you want to place in the DMZ.. Click "Save" to save the settings.
How to assign a fixed IP address to a computer
This is only required for computers for which you want to open ports by means of the function Forwarding or DMZ. Complete the steps in chapter "Configuring the computer to connect to the router". Instead of selecting "Obtain an IP address automatically" (Obtain an IP address automatically) you select "Use the following IP address" (Use the following IP address).
The IP address in our example is as follows (192.168.50.xxx). The final number you enter must be unique to your network. We recommend using a number ranging from 150 to 200. Thus an IP address could be (192.168.50.150). A subsequent computer would then be assigned (192.168.50.151) etc.
For "Subnetmask" (Subnetmask) you enter: 255.255.255.0
Both under "Default gateway" (Default gateway) and under "Preferred DNS-server" (Preferred DNS-server) you enter the IP address with which you log into the router. In our example: 192.168.50.1
Under "Alternative DNS-server" (Alternative-DNS-server), you can leave the field blank. Click "OK" twice to save the settings and to close the window.
LAN settings
The network settings of the router can be changed as follows. Left in the column, click "Network".

text_image
LAN MAC Address: 00-14-75-44-5A/CE IP Address: 192.168.93.1 Subcat Mask: 276.235.255.0Under "IP Address", the IP address of the router (192.168.50.1) is stated. Changing the number here, changes the IP address of the router. Note! When you assign the router a new IP address, the "Start IP" and "End IP" of the DHCP server must be changed to reflect that range.
Click "Save" to save the settings.
Changing the password
The standard login of the Sweex Breedband Router can be changed by clicking "System Tools" and then "Password", left in the column.

text_image
Password Old User Name: sample Old Password: New User Name: New Password: Confirm New Password: Save Clear AllIn order to change the user name and password settings, enter your current user name under "Old User Name" and your current password under "Old Password". Subsequently, enter your new user name under "New User Name", and your new password under "New Password". Confirm by once again entering your new password under "Confirm New Password".
Click "Save" to save the settings. A small login window appears. Log in twice, using your new user name and password.
Upgrading the firmware of the router (Firmware)
In order to provide the router with updates, the so-called 'firmware' needs updating. Left in the menu, click "System Tools" and then "Firmware".
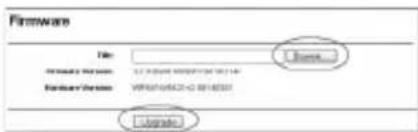
text_image
Firmware File: Primary Path: 02.3 (05/08) 00000714 061149 Hardware Path: WPSN010562-0 00145551 Browse... Browse...Here the firmware of the router can be upgraded. New firmware can be downloaded from the Sweex website under "Service en support". If the firmware file is zipped, make sure you select and extract the file first on a location in your computer where you can retrieve it easily.
Now click "Browse" and select the extracted firmware file. In many cases the name of this file will start with "Sweex_Firmware_LW050...". In order to start the firmware upgrade, click "Upgrade". Do not interrupt this procedure. This may harm the router. Wait for the upgrade to be completed which is confirmed by a message. The connection between the computer and the router will be briefly interrupted.
Resetting the router to its factory settings
The Sweex Breedband Router can be reset to its factory settings in two different ways.
Note! After the reset, all settings which apply to your connection and network need to be reconfigured. After the reset, the router will restart. During start-up, the factory settings are reloaded and the computer will lose connection with the router for around 30 seconds. After this, the router can be accessed via the default IP address (192.168.50.1).
Method 1: Switch off the router by disconnecting it from the mains. The reset button is located at the rear of the router. Use a small item to press the button. Press and hold the button while you switch on the router again. After switching on, press and hold the button another 10 seconds. The router will restart.
Method 2: Left in the column, click "System Tools" and then "Factory Defaults". Click "Restore" to start the reset. A message appears, click "OK" to continue.
Additional tips and further explanation to the remaining functions of the router can be found in the English manual on the CD-ROM.
Warranty
All products under the Sweex brand are warranted for a period of three years. We do not grant support or warranties for any software and/or (rechargeable) batteries included. Settlement of guarantee only takes place via the dealer where you have purchased the product in question.
The rightful owner has and retains title to all brand names and related rights mentioned in this manual.