ACPLR-01 - Uncategorized CRUX - Free user manual and instructions
Find the device manual for free ACPLR-01 CRUX in PDF.

User questions about ACPLR-01 CRUX
0 question about this device. Answer the ones you know or ask your own.
Ask a new question about this device
Download the instructions for your Uncategorized in PDF format for free! Find your manual ACPLR-01 - CRUX and take your electronic device back in hand. On this page are published all the documents necessary for the use of your device. ACPLR-01 by CRUX.
USER MANUAL ACPLR-01 CRUX
- Smart-Play Integration system allows connection of Android and other phones to the Jaguar and Land Rover infotainment system.
- Made for Android Auto and CarPlay.
- Uses the factory touch screen for Smart-Play controls.
- Uses the factory Aux Input for audio.
PARTS INCLUDED:

text_image
CRUX ACPLR-01 Smart Play Integration for Select Jaguar & Land Rover with 6" Screen MAIN
natural_image
Coiled black and red electrical connector with terminal connectors (no text or symbols visible)
natural_image
Coiled black cable with two blue connectors and a small white tag (no text or symbols visible)ACPLR-01 Module Vehicle Harnesses GVIF Video Cable
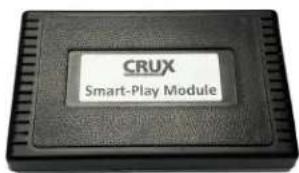
text_image
CRUX Smart-Play Module
natural_image
Coiled black cable with two connectors and a purple tag (no visible text or symbols)
natural_image
Close-up of a black audio earplifier with coiled cable and microphone, accompanied by a small clamp bracket (no text or symbols visible)Smart-Play Interface Module 4K HDMI Cable

natural_image
Coiled black cable with two connectors, no visible text or symbols
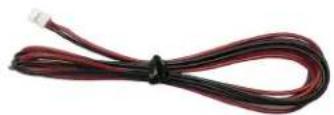
Microphone
USB Extension Cable 3.5mm Aux Cable Power Harness
WIRING DIAGRAM:
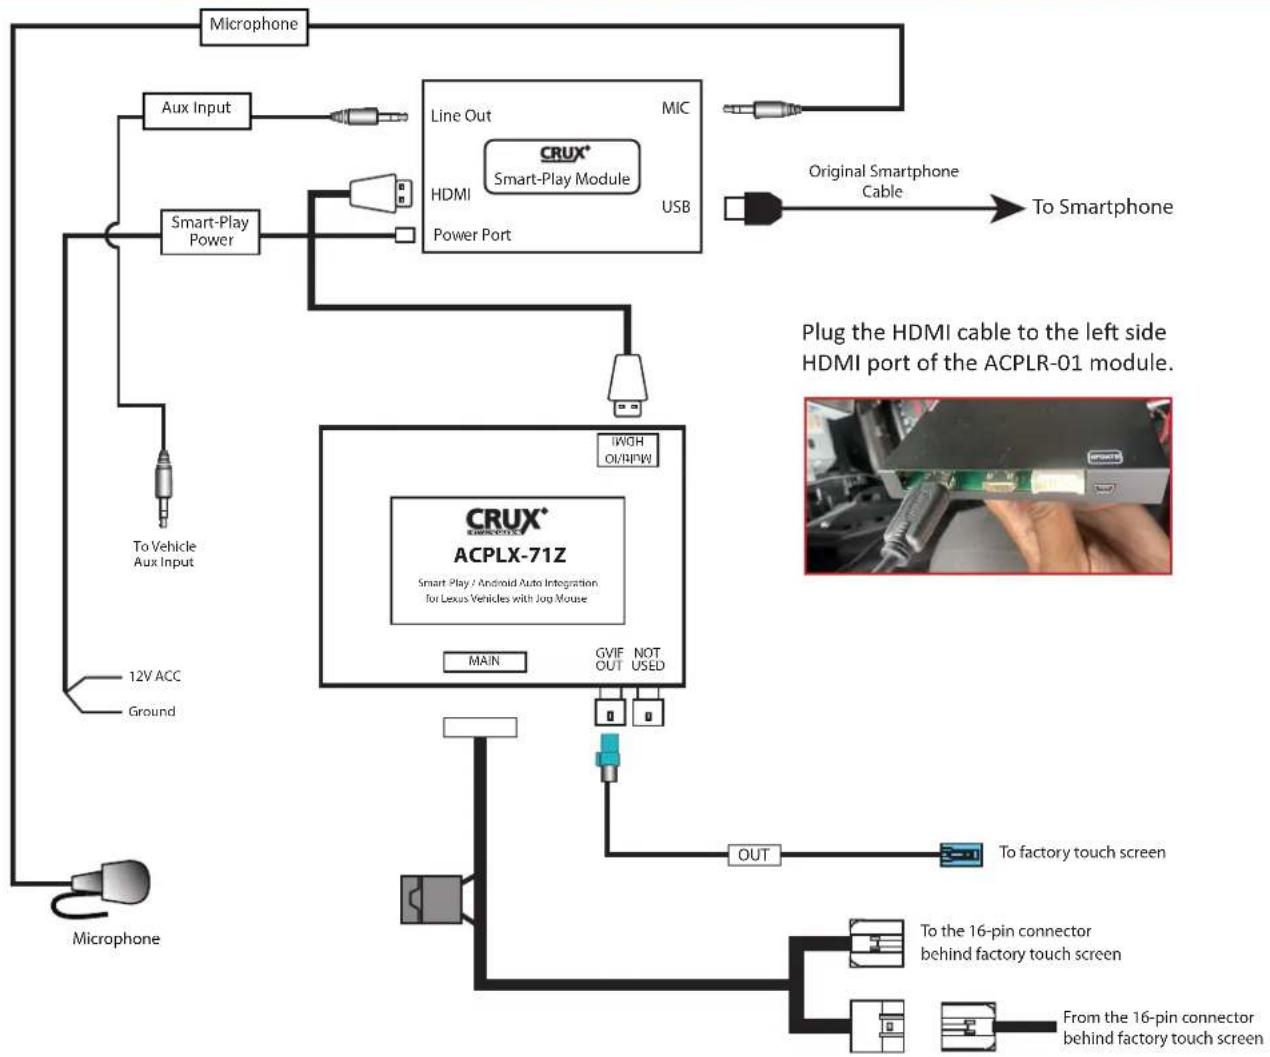
flowchart
graph TD
    A["Microphone"] --> B["Aux Input"]
    B --> C["Smart-Play Power"]
    C --> D["Line Out"]
    D --> E["HDMI"]
    E --> F["Power Port"]
    F --> G["CRUX+ Smart-Play Module"]
    G --> H["USB"]
    H --> I["Original Smartphone Cable"]
    I --> J["To Smartphone"]
    K["Microphone"] --> L["12V ACC Ground"]
    L --> M["To Vehicle Aux Input"]
    M --> N["Line Out"]
    N --> O["HDMI"]
    O --> P["Power Port"]
    P --> Q["CRUX+ ACPLX-71Z"]
    Q --> R["Main"]
    Q --> S["GVIF OUT NOT USED"]
    S --> T["OUT"]
    T --> U["To factory touch screen"]
    U --> V["To the 16-pin connector behind factory touch screen"]
    V --> W["From the 16-pin connector behind factory touch screen"]
DIP SWITCH SETTINGS:
| DIP SETTING VEHICLE | ____ | |
| 1 to 8 ALL | UP Range Rover Evoque, Range Rover Sport | |
| 1 DOWN | (rest UP) Discovery 4 | |
| 3 DOWN | (rest UP) Jaguar XF, XJ | |
| 4 DOWN | (rest UP) Range Rover | |
For vehicles without factory navigation, set DIP# 5 to ON (down) before powering the ACPLR-01 module. This creates a NAV icon on the screen which is used to select Smart-Play mode. See DIP SWITCH SETTING FOR NAVIGATION on page 6 for details.
For vehicles with factory navigation, set DIP#5 to OFF (up). See page 6 for more details.
INSTALLATION INSTRUCTIONS:
NOTE: Connections are made behind the touch screen.

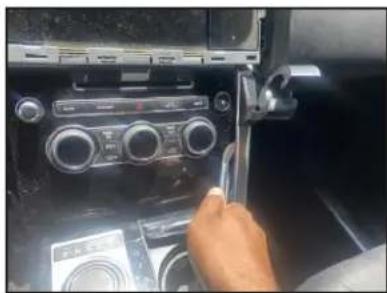
natural_image
Interior view of a car dashboard with air vent and control panel (no visible text or symbols)- Pop off the bezel around the touch screen with a trim tool.

natural_image
Close-up of a hand inserting a plastic clip into a CD-ROM drive compartment (no visible text or symbols)- Pop off the left trim cover to expose the screws.
natural_image
Interior view of a car showing the air condition control panel with a hand adjusting the dial (no visible text or symbols)- Pop off the right trim cover to expose the screws.

natural_image
Close-up of a car air conditioning unit with multiple dials and a hand adjusting the dashboard (no visible text or symbols)- Carefully remove the AC control panel using a pry tool.
natural_image
Interior view of a car dashboard with visible gauges and a hand inserting a cable (no text or symbols)- Remove the 4 Torx screws holding the AC control panel and unplug the connector.

natural_image
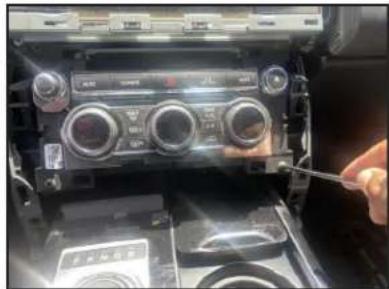
Close-up of a hand using a tool to adjust or install electronic components on a car chassis (no visible text or symbols)- Remove the Torx screws holding the left and right radio control panels.

natural_image
Interior view of a car showing a mounted electronic device with a hand interacting with it (no visible text or symbols)- Remove the radio control panels and unplug the connectors.

natural_image
Close-up of a computer monitor with a small display showing internal components, held by hands (no visible text or symbols)- Remove the 4 Torx screws holding the touch screen.
natural_image
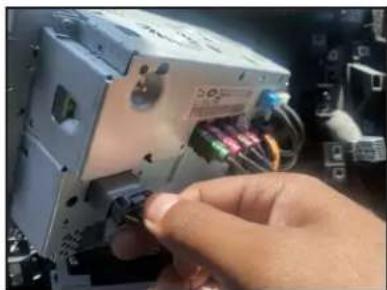
Close-up of a hand inserting into an electronic device into a computer case (no visible text or symbols)- Unplug the gray connector behind the touch screen.

natural_image
Close-up of a hand inserting cables into a computer motherboard with visible wiring and connectors (no text or symbols)- Mate the ACPLR-01 t-harness to the factory touch screen and OE harness.
natural_image
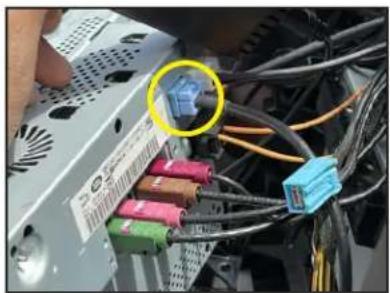
Close-up of a computer tower with cable and connectors, highlighting a blue connector (no text or symbols visible)- Unplug the blue GVIF connector from behind the touch screen and mate it to the ACPLR-01 GVIF video cable.
natural_image
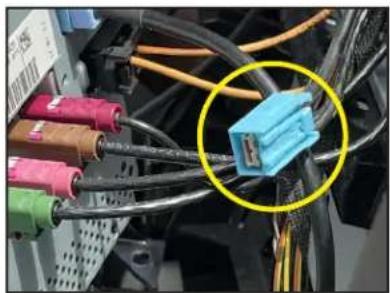
Close-up of a computer motherboard with cable connectors and a highlighted blue connector (no visible text or symbols)- The factory GVIF connector is not used and should be wrapped with tape.

natural_image
Close-up of a hand holding an electronic device with visible wiring and connectors (no readable text or symbols)- Set the DIP switches according to the chart on page 2.

natural_image
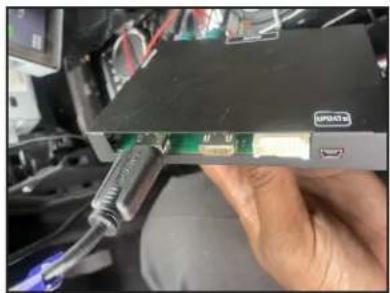
Close-up of a network device with black cables and connectors, labeled 'MAIN' and 'OUT' (no readable text beyond labels)- Plug the LVDS connector of the GVIF video cable to "OUT" port on the module.
natural_image
Close-up of a hand holding a computer motherboard with a USB drive tool inserted (no visible text or symbols)- Plug in one end of the HDMI cable to the left HDMI port on the module.

natural_image
Close-up of hands holding a black electronic device with a cable inserted (no visible text or symbols)- Plug in the other end of the HDMI cable to the HDMI port on the Smart-Play module.

natural_image
Close-up of electronic components with black connectors and red wires, no visible text or symbols- Plug in the 3.5mm to 3.5mm Aux cable to the Smart-Play module.
natural_image
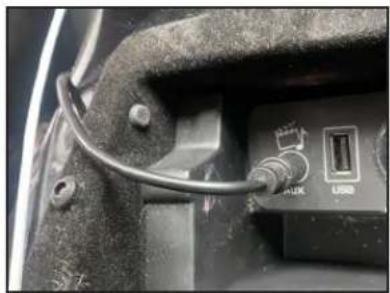
Close-up of a car's front panel showing cable, USB switch, and connector (no readable text or symbols)- Plug the other end of the 3.5mm Aux cable to the factory Aux input.
natural_image
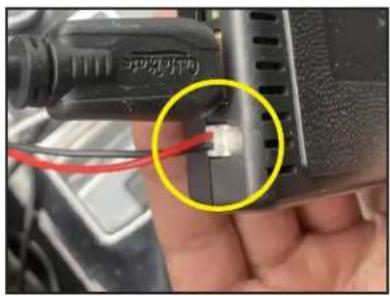
Close-up of a hand holding a black electronic device with a red cable and a small white connector, no visible text or symbols.- Plug in the Smart-Play power plug and tap to 12V ACC and Ground.

natural_image
Close-up of a hand holding a metallic connector, with a blurred background showing a screen (no visible text or symbols)- Mount the microphone to the desired location and run the cable towards the Smart-Play module. Plug it to the microphone input.

natural_image
Close-up of a hand holding a handheld device with a metallic clip, showing internal components (no visible text or symbols)- Plug in the USB extension cable and run it to an easily accessible location.
DIP SWITCH SETTING FOR NAVIGATION:
Vehicles without factory navigation will require a software update for the ACPLR-01 module. Please send an email to issues@cruxinterfacing.com to receive the software update. Once the module has been updated, set DIP#5 to ON (down) before powering the module. When the module is powered up, the screen will boot up then reboot. The navigation icon will show once the screen reboots.
For vehicles with factory navigation, set DIP# 5 to OFF (up).

text_image
Valet Home menu 15:21 4x4i Audio/Video Audio Off Ambient lighting iPad Phone Searching for IG8341 (480)... Phone Extra features Audio/Video FM 1 WSKQ - Ambient lighting 97.9 MHz Take me home On road Nav Current position Extra features Michael DR, SYOSSET... Phone Connect phone Destination entryFor vehicles without factory navigation set DIP#5 to ON (down) before powering the module.

text_image
Valet | Home menu 11:44 AM Audio settings Ambient lighting Take me home Extra features Audio/Video FM 1 WSKQ - 97.9 MHz On road Nav Current position MICHAEL DR. SYOSSET.... Destination entry Phone Please connect phone Valet | Home menu 11:44 AM Audio settings Ambient lighting Take me home Current position FM 1 WSKQ - 97.9 MHz On road Nav Current position MICHAEL DR. SYOSSET.... Destination entry Phone Please connect phoneFor vehicles with factory navigation set DIP#5 to OFF (up) before powering the module.
DIP SWITCH SETTING FOR NAVIGATION:
To toggle to Smart-Play mode, tap the navigation icon (On road Nav) or press the NAV button on the dash.

text_image
Valet | Home menu 11:44 AM Audio settings Ambient lighting Take me home Extra features Audio/Video FM 1 WSKQ - 97.9 MHz On road Nav Current position N ◎ MICHAEL DR, SYOSSET.... Destination entry Phone connect phone
natural_image
Interior view of a car dashboard with air conditioners and a digital display (no readable text or symbols)VEHICLE APPLICATIONS:
Compatible with Jaguar and Land Rover vehicles with 8" factory screen.
| Land Rover | |
| 2012-2016 | Freelander 2 |
| 2012-2016 | Discovery 4 |
| 2012-2016 | Range Rover Evoque |
| 2012-2016 | Range Rover Sport |
| 2012-2016 | Range Rover |
| Jaguar | |
| 2012-2016 | XE |
| 2012-2016 | XF |
| 2012-2016 | XJ |

natural_image
Interior view of a car dashboard with central touchscreen and steering wheel (no visible text or symbols)2016 Range Rover Evoque 2016 Jaguar XJ
