FS15GPSF0 - Air purifier LG - Free user manual and instructions
Find the device manual for free FS15GPSF0 LG in PDF.

User questions about FS15GPSF0 LG
0 question about this device. Answer the ones you know or ask your own.
Ask a new question about this device
Download the instructions for your Air purifier in PDF format for free! Find your manual FS15GPSF0 - LG and take your electronic device back in hand. On this page are published all the documents necessary for the use of your device. FS15GPSF0 by LG.
USER MANUAL FS15GPSF0 LG
Read this owner's manual thoroughly before operating the appliance and keep it handy for reference at all times.
FS15GP*F* Series
EN ENGLISH
MFL71825209
Rev.00_051122
www.lg.com
Copyright © 2022 LG Electronics Inc. All Rights Reserved
TABLE OF CONTENTS
This manual may contain images or content different from the model you purchased.
This manual is subject to revision by the manufacturer.
SAFETY INSTRUCTIONS ....03
INSTALLATION....10
Parts Instruction 10
Unpacking the Appliance.... 14
Installation Location Requirements 15
Transportation Requirements.... 15
OPERATION ....16
Status Display 16
Control Panel.... 17
Getting Started 21
Using Extra Functions 24
SMART FUNCTIONS....28
LG ThinQ Application 28
Smart Diagnosis.... 30
MAINTENANCE....32
Maintaining the Appliance 32
Cleaning the Appliance.... 33
Maintaining the Filter 34
TROUBLESHOOTING....36
Before Calling for Service.... 36
Appliance Specifications 41
WARRANTY......42


SAFETY INSTRUCTIONS
EN
READ AND SAVE THESE INSTRUCTIONS
The following safety guidelines are intended to prevent unforeseen risks or damage from unsafe or incorrect operation of the appliance.
The guidelines are separated into ‘WARNING’ and ‘CAUTION’ as described below.

This symbol is displayed to indicate matters and operations that can cause risk. Read the text marked with this symbol carefully and follow the instructions in order to avoid risk.

WARNING
This indicates that failure to follow the instructions can cause serious injury or death.

CAUTION
This indicates that failure to follow the instructions can cause minor injury or damage to the product.
IMPORTANT SAFETY INSTRUCTIONS

WARNING
To reduce the risk of explosion, fire, death, electric shock, injury or scalding to persons when using this product, follow basic precautions, including the following:
Children in the Household
- This appliance is not intended for use by persons (including children) with reduced physical, sensory or mental capabilities, or lack of experience and knowledge, unless they have been given supervision or instruction concerning use of the appliance by a person responsible for their safety. Children should be supervised to ensure that they do not play with the appliance.
Installation
- Do not install the appliance on an uneven or inclined surface.
- Do not install the appliance in an area exposed to direct sunlight or near heat-generating equipment.
- Do not install the product in a place where combustible gas may leak or industrial oil or metallic particulates are present.
- Do not allow the appliance to push against the power cord or plug.
- Do not touch the power plug with wet hands.
- When unplugging the power cord, always pull it by the plug.
- Unplug the appliance during thunder or lightning storms or when not in use for a long time.
- Do not bend the power cord excessively or place a heavy object on top of it.
- Do not extend the length of the power cord or alter it.
- Do not use several devices on a multi-socket extension outlet.
- Make the connection securely so that screw in terminals will not be loosened when the power cord is pulled.
- Make sure that the power cord cannot be pulled out or damaged during operation.
EN
- Do not operate any fan with a damaged cord or plug. Discard fan or return to an authorized service facility for examination and/or repair.
- Do not run cord under carpeting. Do not cover cord with throw rugs, runners, or similar coverings. Do not route cord under furniture or appliances. Arrange cord away from traffic area and where it will not be tripped over.
Operation
- If the appliance is immersed in water, stop using it and contact an LG Electronics Customer Information Center.
- If there is a gas leakage (isobutane, propane, LNG, etc.), do not touch the product or power plug and ventilate the area immediately.
- Do not clean the appliance with brushes, cloths or sponges which are abrasive or made of metal.
- If you detect any abnormal noise, odor or smoke, unplug the product immediately and contact an LG Electronics Customer Information Center.
- User Servicing Instructions
- Only an authorized repair person from an LG Electronics service center should disassemble, repair, or modify the product.
- Do not use or store fire, combustibles (ether, benzene, alcohol, drugs, propane, butane, combustible spray, insecticide, air freshener, cosmetics, etc.) or flammable materials (candles, lamps, etc.) near the product.
- Do not place the power cord under rugs, carpeting or mats.
- Do not allow animals or pets to chew on the power cord.
-
Do not move the appliance when it is in operation.
-
Do not hit the appliance.
- Do not insert hands or metal objects into the air inlet or outlet.
- Do not install and use broken parts.
- Do not put flammables into the appliance.
- Do not allow children to climb on or play with the appliance.
- Do not place anything on top of the appliance.
- The fan is not a toy. It should not be played with or placed where young children can reach it.
- Be careful that children do not get their hands caught in the vanes by putting their hands during the vanes operation.
- This product uses UVnano LED. Do not disconnect or replace the UVnano LED arbitrarily. LEDs must be replaced only by LG-approved service providers.
- Harmful UVnano radiation may leak if the device is used in an unintended way or if the wires are damaged. UVnano radiation, even in very small amounts, can harm the eyes and skin.
- Be careful not to let any part of your body put on between the vanes during the vane operation.
- Do not replace the UV Lamp while it is plugged in.
- Skin or eye damage may result from directly viewing the light produced by the lamp in this apparatus. Always disconnect power before relamping or servicing. Replace Lamp With Lamp CUD7GF1B, Manufactured by Seoul Viosys Co., LTD. Replace Lamp With Lamp LTPL-G35U275GC-TWA, Manufactured by Lite-On Technology Corporation.
Maintenance
- Dispose of the packing materials (vinyl, styrofoam, etc.) to keep them out of reach of children.
• Take care not to injure or pinch yourself when you detach and reattach parts of the appliance.
- Turn off and unplug the appliance before cleaning it or replacing the filter.

CAUTION
To reduce the risk of minor injury to persons, malfunction, or damage to the product or property when using this product, follow basic precautions, including the following:
Installation
- Do not tilt the appliance to pull or push it when transporting.
- Do not install the appliance in a vehicle, RV, or marine vessel.
- Do not place the appliance near a TV or stereo equipment.
- Do not place the appliance under bright light.
- The appliance must be installed in accordance with national wiring regulations.
- When moving or storing the appliance, wrap the power cord around the base of the appliance to prevent personal injury, damage to the cord or damage to floors.
- Do not place the appliance near curtains.
Operation
- Do not use the product for removal of toxic gas such as carbon monoxide.
- Do not use the product for ventilation purposes.
- Do not use the appliance for a long time in a region with unstable voltage.
- Do not place obstacles around the air inlet or outlet.
- For safe use of the appliance, children or others with reduced mental capabilities need to be closely monitored by a person who is responsible for their safety.
- Do not use the product for special purposes such as preserving plants, precision instruments, artworks, etc.
- Do not operate the appliance with wet hands.
- Do not let the moisture from a humidifier directly touch the appliance.
- Do not use the appliance while it is not in an upright position.
- Do not use the appliance near objects vulnerable to heat.
- Do not use detergents, cosmetics, chemicals, air fresheners, or disinfectants in the appliance.
- Do not touch any internal parts while the unit is operating or immediately after operation.
- Use the filter only for its intended purpose.
- The Deodorizing Care filter and True HEPA filter are assembled together. Do not try to detach them from each other.
- Do not insert any objects into the Air outlet.
EN
Maintenance
- Do not use strong detergents or solvents to clean the product. Use a soft cloth to clean.
- Do not clean the appliance with an alkaline detergent.
- Do not wipe the appliance surface using sulfuric acid, hydrochloric acid or organic solvents (thinner, kerosene etc.) or attach a sticker on the appliance.
- Do not allow water inside the appliance.
- Do not wash the filter with water.
- Be careful not to damage the ultra-fine filter when cleaning it with a vacuum cleaner.
INSTALLATION
- The appearance or functions of the appliance may differ depending on the model.
Parts Instruction
Front
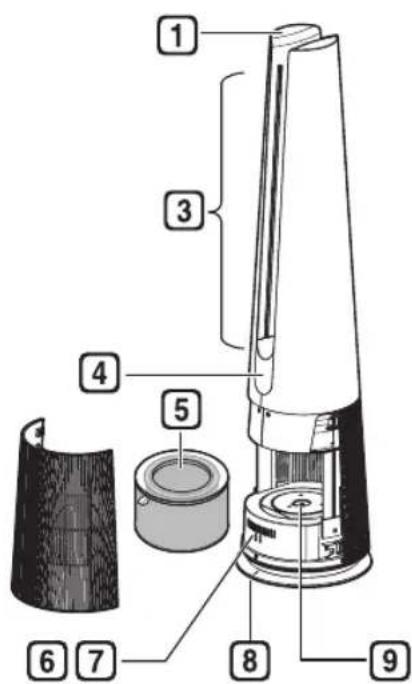

Rear
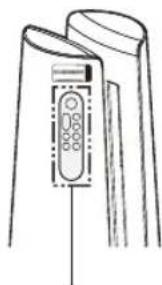
1 Controller
- Sets the product functions.
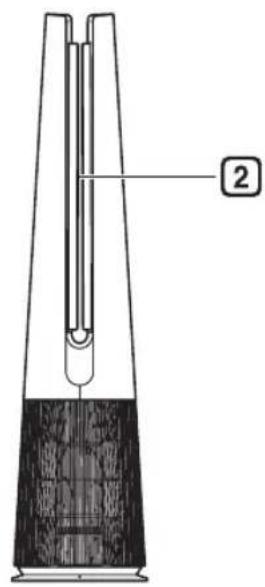
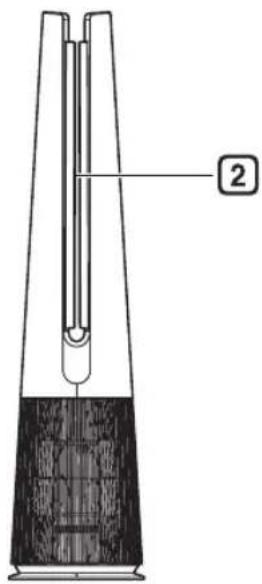
2 Vane
- Moves depending on the operating mode(Wide / Diffusion / Direct).
- Operates according to the mode to change the direction of the wind.
③ Air Outlet
- It discharges purified air through the filter.
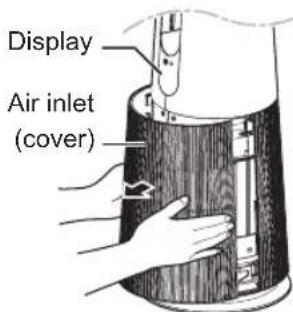
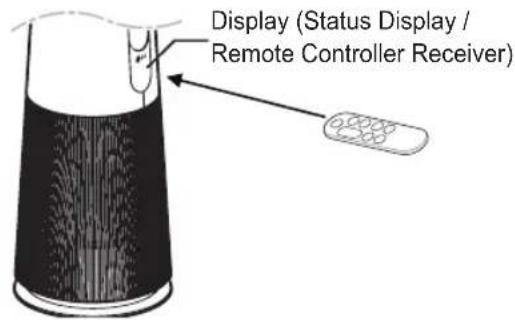
4 Display
(Status Display / Remote Controller Receiver)
• Displays the settings of the product and the air condition.
5 Filter
- Minimizes allergens, fine particulates, possible sources of sick house syndrome, smog, and other odors.
6 Smart Diagnosis
- If the product malfunctions, use Smart Diagnosis to check the product status. (See Smart Diagnosis in Smart Functions)
7 Sensor
- PM1.0 (particles with a diameter between 1.0 and 2.5 micrometers) Sensor: Detects the concentration levels of dust. (You do not need to clean the sensor lens separately.)
Odor(Gas) Sensor: Detects the concentration levels of odor(gas)
8 Product Center Line
• It is the center line of the product.
9 UVnano LED (Only models with UVnano applied)
- Remove the harmful bacteria at internal fan of the air purifier.
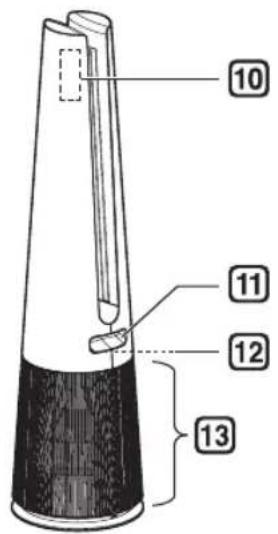
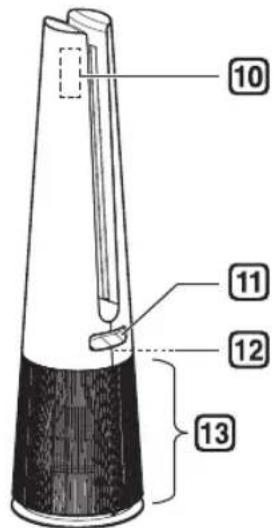
10 Remote Controller Holder
- Attach the remote controller to store it.
- Attach the rear part of the remote controller to the location marked on the product.
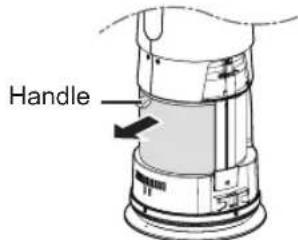
11 Handle
• Use when carrying the product.
12 Temperature/Humidity Sensor
• Detects temperature and humidity.
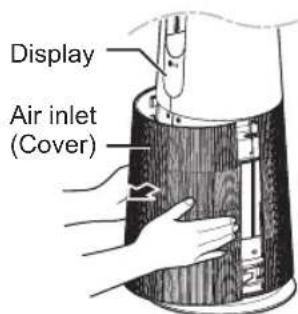
13 Air Inlet (Cover)
• Air goes into the purifier through the inlet.
- The front and rear covers may be removed separately.
CAUTION
- Be careful not to stick magnets or metal objects to the remote controller holder as it is attached with magnets.
- Be careful that children do not get caught by putting their hands during the Vane operation.
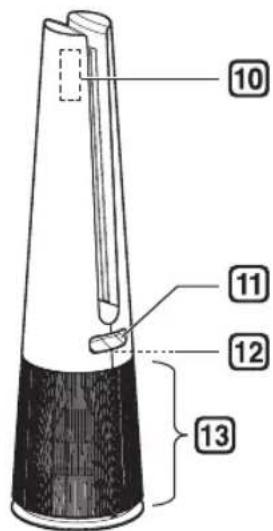
Filter System
① Deodorizing Care filter Minimizes odors from the bathroom, cigarettes, food and other common sources.
② True HEPA filter Minimizes PM1.0 and cigarette smoke from the air.
③ Filter Handle
Use it to remove the filter from the product.
4 Ultra Fine Filter Minimizes large particles floating in the air.
CAUTION
- Do not forcefully separate the Deodorizing Care Filter and True HEPA Filter as they are intergrated.
- Do not throw the filter or use it for any other purpose.
NOTE
- A slight odor may be emitted from the new filter at the beginning after purchase. The odor will disappear after a day or so of using the product, so you can use it without worry.
- The frequency of cleaning and filter replacement may vary depending on environment and usage time.
- Filters may be used for up to 1 year. The more polluted the indoor air, the shorter the life of the filter.
- If an excessive odor is present in the room, first ventilate the air to remove the odor, and then use the air purifier to remove the remaining odor.
- If the air purifier is used after not having been used for a long time and there is an odor, you can reduce the odor from the filter by operating it on fan speed 10 step in a ventilated area
- The filter may emit an odor when used continuously in a humid environment or where moisture from a humidifier is absorbed into the filter. If odor is generated due to moisture, dry the filter in sunlight before use.
- Carbon monoxide (CO) is a harmful gas that is mainly introduced from the outside, and cannot be removed with a filter.
- Keep the windows or doors closed while using the product. However, if you operate the product for a long time in a closed space, the carbon dioxide concentration may rise. So be sure to ventilate the indoor regularly.
- The deodorization function of the air purifier operates by trapping the odor in the filter. If you use the product for a long time in a room with excessive odor, the performance of the filter may decrease significantly.
Accessories
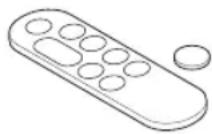
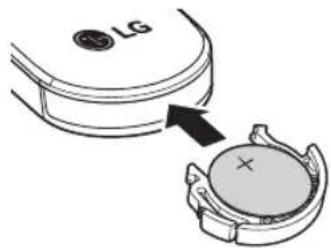
Remote Controller/Battery (CR2025, 1 Unit)
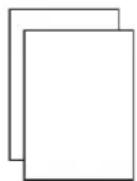
Owner's Manual / Quick Guide
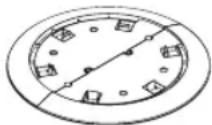
Safe Plate
Unpacking the Appliance
Remove the fixing tape and protective vinyl, packing material product and its filter before use.
Removing filter vinyl and packing material
1 Remove the product from the packaging and remove the fixing tape attached to the product.
2 Grab the cover and gently pull to separate it from the appliances.
- The direction with the LG logo on the product display is the front of the product.
3 After separating the filter, remove its protective vinyl.
- When removing the packaged filter, separate it from the protective vinyl.
natural_image
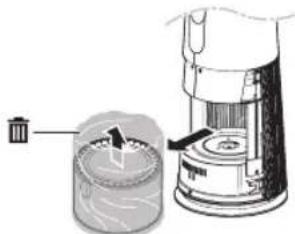
Illustration of a hand pouring liquid into a cylindrical container with a lid (no text or symbols)4 Install the filter in the product.
• Make sure that the handle is facing upward
5 Remove the packing material inserted at the bottom of the product.

natural_image
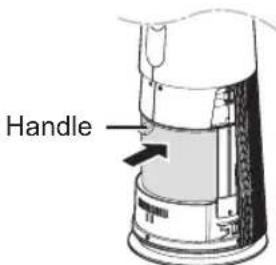
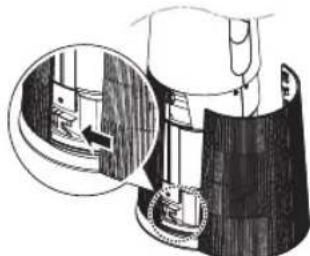
Technical line drawing of a mechanical device with directional arrows indicating movement or force (no text or symbols)6 Insert the tabs at the bottom of the cover into the slots in the base of the appliance and close the cover.
natural_image
Illustration of a hand holding a cylindrical object with a magnified inset showing a mechanical component (no text or symbols)CAUTION
- Be sure to remove the vinyl from the filter before using the product.
- Pay attention to the direction of the filter when installing the filter.
- Be sure to remove the cushioning material before using the product.
EN
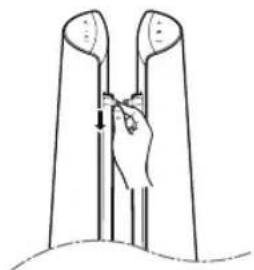
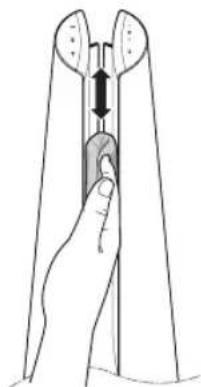
Removing vane vinyl
Use the product after removing the vane vinyl.
1 Operating product.
2 Press Mode button and select Diffusion Mode.
3 After vanes come out, grasp the vinyl at the top and remove it slowly in the downward direction.
CAUTION
- If you do not remove the vane vinyl, be aware that the vinyl may make noise while operating the product.
natural_image
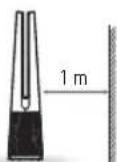
Simple line drawing of a hand pressing down on two vertical cylindrical objects (no text or symbols)Installation Location Requirements
Install at a distance of at least 3 14 ft (1 m) from a wall.
- If there is not enough space for air to be taken in, performance of the air purifier may be reduced.
The performance of the product may differ depending on the operating environment (such as temperature and humidity).
- Product performance may be slightly degraded when used outside of a humidity range of 40% to 70%.
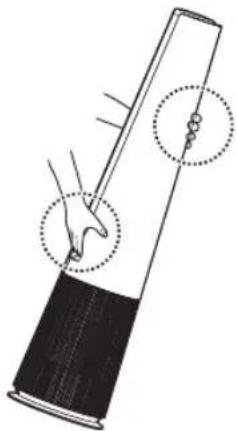
Transportation Requirements
Be careful not to drag the power cord on the floor when moving or storing the product.
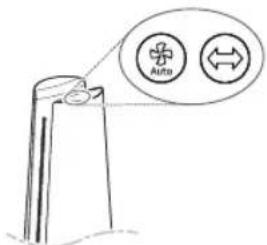
Transporting the Appliance
Carry the product safely by using the handles at the top and back of the product.
natural_image
Diagram of a tool with a handle and two circular annotations indicating specific points (no text or symbols present)CAUTION
- Do not move the product by holding the outer cover. The cover may open and the product may fall.
OPERATION
- The appearance or accessories of the product may differ depending on the model.
Status Display
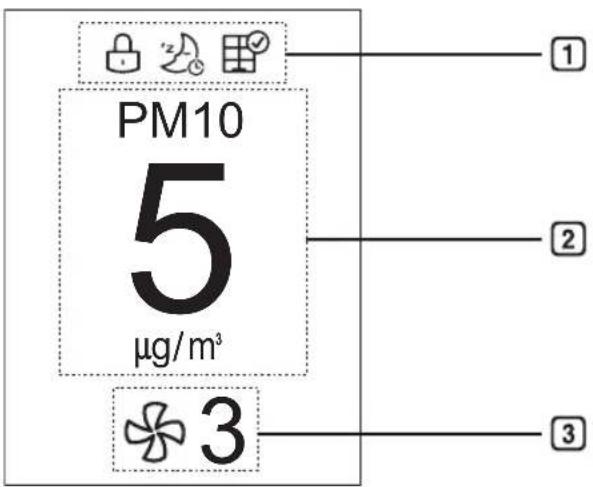
1 Add-on Display
- Up to three icons are displayed - Icons are shown or displayed according to display priority.
- Button Lock > Timer > Filter Replacement Notification > UVnano > Wi-Fi Connection
- UVnano function is applied only to models applied UVnano
| Icon Description | |
| Displays when the control panel is locked. | |
| Displayed when the sleep timer is set. | |
| Displays when it is time to replace the filter. | |
| UV | Displayed when the UVnano setting is enabled. |
| UV | Displayed when the UVnano is not working normally. (Check if the filter and air intake cover are properly installed.) |
| Displays when connected to Wi-Fi. | |
② Status display
• Air quality, PM10/PM2.5/PM1.0 dust concentration, odor, temperature, humidity, and operation status are displayed.
3 Fan Speed Display
• Displays Fan speed from Auto, Steps 1 to 10 and Turbo.
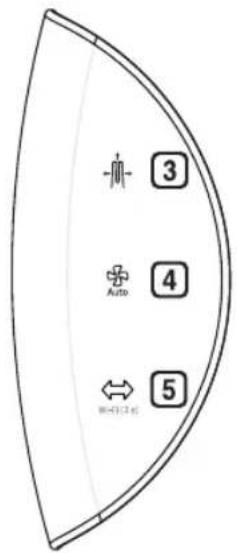
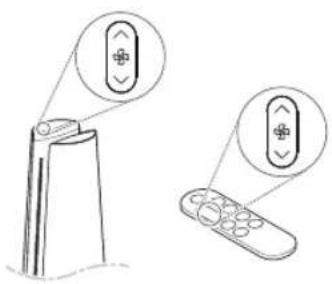
Control Panel
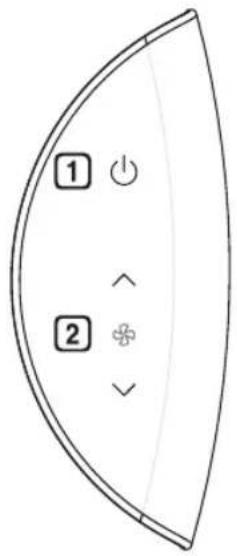
Standby On/Off Button
Can start or stop operation.
2 Speed Button
Allows you to adjust the fan speed of the product.
3 Mode Button
Use it to set the operation mode of the product.
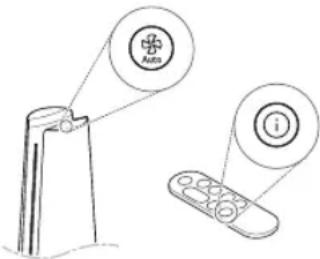
4 Auto Fan Button
Sets the product's fan speed automatically.
5 Rotation Button
Sets the rotation of the product. (45°, 60°, 90°, 140°, Stop)
NOTE
- You can use extra functions by pressing the button on the control panel for longer than 3 seconds. (Example: Press the + Mode button and the Auto Fan button at the same time for 3 seconds or longer.) ※ UVnano fuction is applied only to models applied Uvnano
| Long press (more than 3 seconds) | Function |
| Control Panel Lock/Unlock | |
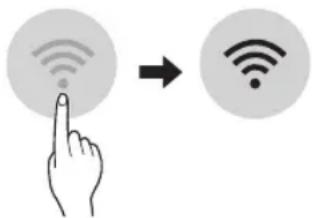
| Connect Wi-Fi | |
| Product sound On/Off | |
| UVnano On/Off | |
| Smart Diagnosis | |
| Filter Replacement Notification Reset |
- Press and hold the button
| Press and hold the button | Function |
| ^ | Continuous change of Fan speed |
| ∨ | Continuous change of Fan speed |
| Auto | Continuous change of standby screen |
Remote Controller
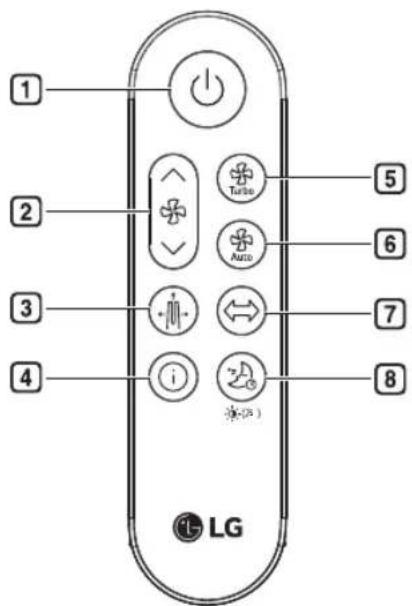
1 Standby On/Off button Can start or stop operation.
2 Speed button
Allows you to adjust the fan speed of the product.
③ Mode button Sets the operation mode. (Wide Mode, Diffusion Mode, Direct Mode)
4 Show Info button
Use to set the standby screen.
(Air quality, Fine dust information,
Odor, Temperature, Humidity,
Operating status)
5 Turbo button Sets fan speed to Turbo.
6 Auto Fan button Sets the fan speed automatically.
7 Rotation button Sets the rotation of the product. (45°, 60°, 90°, 140°, Stop)
8 Sleep Timer button Sets the sleep schedule. (1 \~ 12 - Off)
NOTE
- You can use extra functions by pressing the buttons on the remote controller for longer than 2 seconds.
| Long press (more than 2 seconds) | Function |
| ^ | Continuous change of Fan speed |
| ∨ | Continuous change of Fan speed |
| Product sound On/Off | |
| Setting Display brightness |
EN
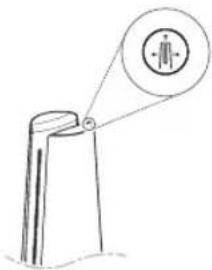
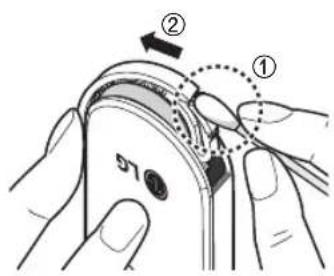
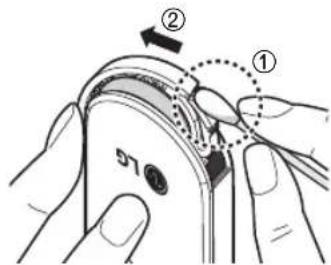
Preparing to Use the Remote Controller
1 With the front side of the remote controller facing up, remove the battery tray by pushing in the direction of number 2 while pressing part 1 with a simple tool (cotton swab, etc.).

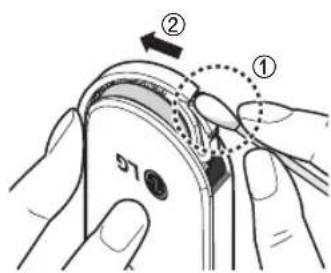
2 Insert the battery provided with the appliance into the tray. Place it with the + mark facing up.
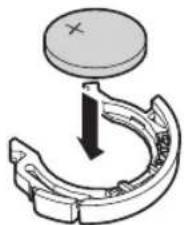
natural_image
Mechanical component diagram showing a curved bracket with a circular top and downward arrow indicating motion (no text or symbols)3 Insert the battery tray back into the remote controller.
NOTE
- If the remote controller is not operating properly, check the polarity (+, -) of the battery or replace the battery before contacting the service center.
- Separately collect exhausted batteries.
- When using the remote controller, point the remote controller transmitter toward the display(status panel / remote controller receiver) on the product.
- The remote controller is not received properly at a distance of more than 7 m from the product.
- The remote controller signal reception may be interrupted when strong lights such as fluorescent lamps or neon signs are present. In this case, use the remote controller in front of the remote signal receiver of the indoor unit.

WARNING
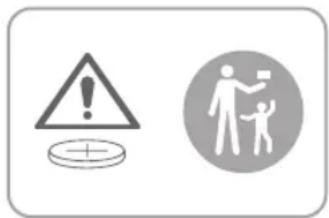
- The remote controller uses button/coin type batteries (CR2025).
- Swallowing batteries may cause serious injury or death. Go to hospital emergency room immediately to seek medical attention.
- Keep the battery out of reach of children.
- If the battery tray is not secured firmly, stop using the appliance immediately and keep it away from children.

CAUTION
- Do not arbitrarily modify the battery.
- Do not recharge or disassemble the battery.
- Do not throw the battery into a fire for disposal or leave it near heat.
- Do not press multiple buttons at the same time.
- Do not use it near a lot of water or moisture.
- Do not use it near flames or heat.
- Remove and store the battery in a safe location if you do not intend to use the remote controller for a long time.
Getting Started
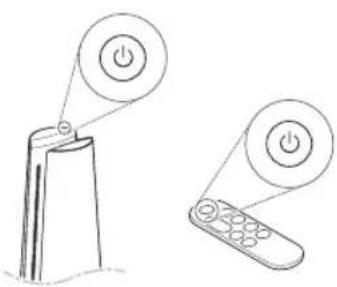
Press the Standby On/Off button to start operation.
natural_image
Line drawing of a remote control device with two buttons and a power button (no text or symbols)NOTE
- When starting operation for the first time after installing the product, it will operate in Wide mode and with step 5 of fan speed.
- If you stop operation and resume it, it will start cleaning with the mode you last selected.
- Even if power is lost due to a blackout, the product will remember the mode(Fan speed, Mode, Display brightness) you used last.
- When you start driving, the dust concentration is displayed after sensor stabilization (about 15 seconds). While sensor stabilization is in progress, the clean stabilization screen 📋 appears on the status display.
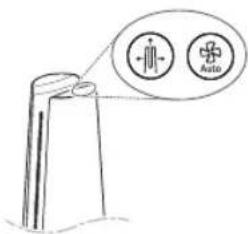
Using the Mode
Sets the operation mode of the air purifier.

natural_image
Line drawing of a refrigerator and a remote control with two circular icons pointing to the speaker (no text or symbols)• Each time the Mode button is pressed during operation, the sequence of Wide Mode – Direct Mode – Diffusion Mode is repeated.
NOTE
- Wide Mode - In operation mode, you can feel cool and comfortable with clean wind discharged to the front.
- Direct Mode - As the vane closes slightly, the air is intensively discharged.
- Diffusion Mode - Operation mode in which the vane changes the direction of the wind to clean the indoor space in various directions and to use it without being cold even in winter.
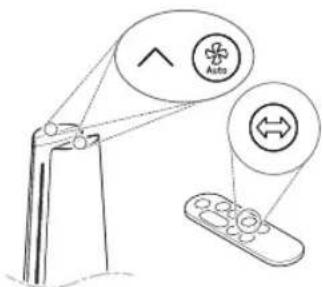
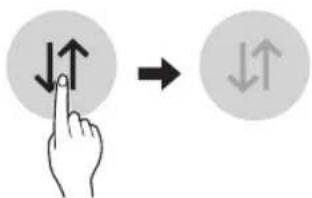
Adjusting the Fan Speed
Adjusts the fan speed of the air purifier.
natural_image
Line drawing of a remote control device with two buttons and a scroll (no text or symbols)• Each time the Speed button is pressed during operation, it changes in the order of steps 1 to 10.
- Press and hold the Speed button to change the fan speed in a row.

NOTE
- The stronger the wind, the faster the space is cleaned.
Using Turbo
Sets the fan speed to Turbo.
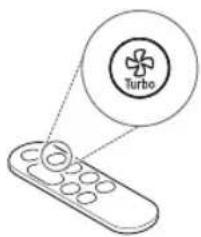

NOTE
• After running on Turbo, if you turn "Turbo" off before 20 minutes, it will switch to the previous fan speed.
• After 20 minutes of turbo operation, the fan speed automatically changes to Auto Fan.
Using Auto Fan
Sets the air purifier's fan speed automatically.
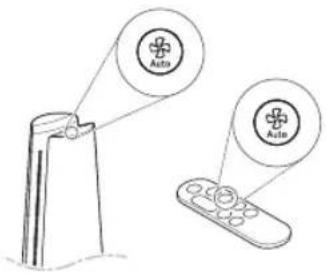

NOTE
- When set to Auto Fan, appropriate Fan speed is automatically set according to the pollution level (dust concentration and odor) of the indoor air.
EN
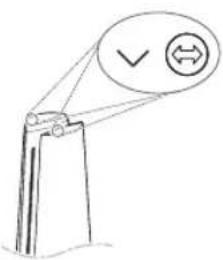
Using Rotation
Sets the rotation of the air purifier.
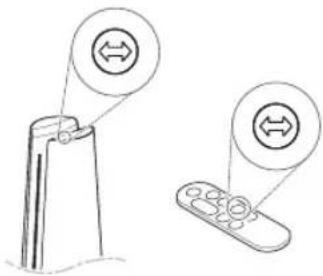
- Each time the Rotation button is pressed during operation, the sequence of 45°-60°-90°-140°-Stop is repeated.

NOTE
- It rotates at 140^ during the initial rotation and starts rotating from the center of the product after position initialization.
- When the Rotation button is pressed while the product is rotating, it will set to 'Stop'.
- When the function is changed while using the rotation, the rotation stops for a while so that the display status can be checked, and then the rotation operates again after the setting is completed.
- When using rotation mode: When the product is turned off, the product rotates to the center and stops.
-
When the rotation mode is not in use: When the product is turned off, the product turns off at a stationary position.
• Product rotation rotates around the center of the product. -
Do not forcefully rotate the product by holding it.
- If you hold the product and force it to rotate, you will need to re-center the product.
- To center the product, turn off the product, unplug the power cord, wait for a while, and then plug in the power cord again. After that, if you turn on the rotation, the initialization proceeds automatically.
- If the product is rotated arbitrarily, noise may occur during initial rotation.
- After one initial rotation, the product operates normally.
Using Extra Functions
Setting standby display
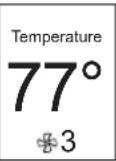
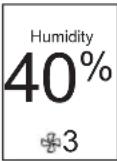
Displays air quality, air quality circulation, odor, temperature, humidity and operation information.
- Press and hold the Auto Fan button in the control panel.
- Press the show Show Info button on the remote controller.
- The order of Air Quality - PM10 - PM2.5 - PM1.0 - Odor - Temperature - Humidity - Operating status is repeated.
| 1 Air Quality PM10 PM2.5 PM1.0 | 3 | 4 | |||
| • Displays the overall air quality status | • Displays fine dust information | • Displays Ultra-fine dust information | • Displays Super ultra-fine dust information | ||
| [A]YACD | 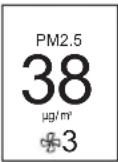 | 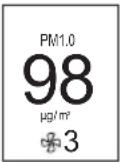 | |||
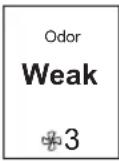
| 5 Odor Temperature Humidity Mode status 8 | |||||||
| • Displays indoor odor information. | • Displays room temperature information. | • Displays indoor humidity information. | • Displays operation status information. | ||||
 |  |  |  |  | |||
NOTE
- Overall Air quality is calculated based on the concentrations of dust and odor(gas) is categorized into 4 levels: green, yellow, orange, and red, depending on the contamination of the air.
| Color | Overall air quality | Concentration of PM ( g/m^3 ) | Concentration of Odor(Gas) | |||
| State PM1 | 0 PM2.5 PM1. | 0 State Level | ||||
| Red | Poor | 255 or more | 56 or more | 56 or more | Very Strong | 4 |
| Orange | Unhealthy | 155 ~ 254 | 36 ~ 55 | 36 ~ 55 | Strong | 3 |
| Yellow | Moderate | 55 ~ 154 | 13 ~ 35 | 13 ~ 35 | Normal | 2 |
| Green | Good | 54 or less | 12 or less | 12 or less | Weak | 1 |
- Overall air quality can be seen by the color of the air quality indicator and the text indicating the concentration of dust and odor.
- The color of overall air quality is determined based on the worst condition among dust concentration and odor(gas) concentration.
Checking air condition on the Status Display
You can check the overall air quality and dust/odor(gas) concentration on the Status display of the product.
- Overall air quality : Overall air quality can be seen by the color of the air quality indicator and the text indicating the dust concentration and odor(gas) concentration.
- Dust concentration: The dust concentration is indicated with the color displayed with specific figures, depending on particle size. Displays the dust concentration of PM10/PM2.5/PM1.0.
- Odor(Gas) concentration : You can check through the odor(gas) concentration text and color of the status display.

NOTE
- The color of overall air quality is determined based on the worst condition among dust concentration and odor(gas) concentration.
- Dust concentration is displayed in units of 1 from 4 to 999. For dust concentration, refer to the sensor manufacturer's data sheet.
- The fine dust/ultra-fine dust concentration displayed on the product may be different from the measurement standards of other instruments and other products.
- If the dust concentration is high, the difference between the displayed dust concentration and the actual dust concentration may be large.
-
Temperature and humidity may vary depending on the surrounding environment, such as doorways, windows, and vents.
-
Temperature and humidity may appear differently depending on air circulation in the same room. Also, the temperature and humidity may be different from other products and thermo-hygrometers.
- If different or identical products are used in the same space, there may be differences in the concentration readings due to air circulation.
- Unlike odor (gas), fine dust spreads slowly, delaying the time when dust concentration is measured.
- If the product is used in the following environments, the dust concentration may be displayed differently from the actual value.
- Around fabric sofas and beds, around deep pile carpets, when shaking out blankets/ clothes, when using a vacuum cleaner, in places with bugs and pets, or places with high humidity.
- Places where outside air enters, such as around construction sites, roadsides, factories, doorways, windows, and ventilation openings
- Places where products that generate steam and fine particles (humidifiers, cooking utensils, sprays, etc.) are used.
- Even if dust is generated by activity such as dusting or cleaning, the sensor may not respond if large dust of PM10 or higher is generated, but the dust is removed by the filter.
- The odor (gas) concentration can be changed by products that cause odor (gas), such as air fresheners, odor remover, cleaning agents, cosmetics, perfumes, etc.
- The odor (gas) sensor will not stabilize until two minutes after starting driving. During the stabilization time, the odor (gas) concentration is not reflected in the overall air quality.
Setting a Sleep Timer
It is set to automatically stop operation after operation for a set period of time.
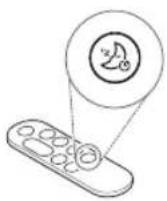
- Press the Sleep Timer button while the appliance is operation.
- Each time the Sleep Timer button is pressed, it repeats in the order of 1\~12- Off.
- If the sleep schedule is set, the display brightness level 1 and rotation are operated at stop. (However, if you set the display brightness to off before setting the sleep mode, the display brightness will remain off.)
NOTE
- When you make a sleep reservation, the fan speed is set to level 1, and after a certain period of time, it is automatically adjusted according to the air condition.
- You can change the fan speed, display brightness, and rotation even when the sleep timer is set.
- If you press the Sleep Timer button once more while the sleep schedule is set, the sleep schedule is canceled.
Setting Display Brightness
Adjusts display brightness.

- Press the Sleep Timer button for more than 2 seconds to enter the display brightness setting screen.
- Each time the button is pressed once or for more than 2 seconds, it changes in the order of Brightness 3 - Brightness 2 - Brightness 1 - Off.
- Press any other key on the remote controller to exit the display brightness setting screen.
NOTE
- When setting the display brightness to off, if you press the button, it turns on at brightness 1 for a while, and then the screen on the display turns off.
-
The default display brightness is set to Brightness 2.
-
Brightness 3: 100%
- Brightness 2: 60%
- Brightness 1: 10%
Using button lock
You can lock the buttons on the control panel to prevent unwanted operation by children or other factors.
natural_image
Simple line drawing of a person standing on a platform with a magnified circular icon (no text or symbols)- Press the Mode button for 3 seconds.
• is displayed on the status display.

NOTE
- The remote controller can be used even when locked.
- You can use the LG ThinQ application to change modes even when the device is locked.
- To unlock, press the Mode button again for at least 3 seconds.
Setting the Product sound
Turns On/Off the sound of the air purifier.
- Press the Speed up and Auto Fan buttons on the control panel at the same time for 3 seconds.
- Press and hold the Rotation button on the remote controller for 2 seconds.
Using UVnano (Only models with UVnano applied)
Remove the harmful bacteria the fan inside the air purifier to circulate cleaner air.
- Press the Speed down and Rotation buttons on the control panel at the same time for 3 seconds.

NOTE
- To disable UVnano, press the Speed down and Rotation buttons button on the control panel again for at least 3 seconds.
- UVnano is a compound of UV (ultraviolet light) and nanometer (unit of length).
- If there is dust of foreign matter inside the UVnano LED, wipe with a soft cloth.
- Do not operate the product if damage to the UVnano LED is evident.
- Be sure to turn off the product before cleaning and performing other maintenance.
- If the product cover is opened or the filter is removed, the UVnano operation status may not be displayed normally.
- UV icon on the status display is a display that guides UVnano on/off, not a UV nano operation on/off indicator.
- UV ^® Displayed when UVnano does not operate normally. (Check that the filter and air intake (cover) are installed in the correct position.)
- When using the product for the first time, the UVnano function is turned on.
SMART FUNCTIONS
LG ThinQ Application
The LG ThinQ application allows you to communicate with the appliance using a smartphone.
LG ThinQ Application Features
Smart Diagnosis
If you experience a problem while using the appliance, this smart diagnosis feature will help you diagnose the problem.
Settings
Allows you to set various options on the appliance and in the application.

NOTE
- If you change your wireless router, Internet service provider, or password, delete the connected appliance from the LG ThinQ application and connect it again.
- The application is subject to change for appliance improvement purposes without notice to users.
• Functions may vary by model.
Before using LG ThinQ Application
This feature is only available on models with Wi-Fi function.
1 Check the distance between the appliance and the wireless router (Wi-Fi network).
- If the appliance is too far from the wireless router, the signal strength becomes weak. It may take a long time to connect or installation may fail.
2 Turn off the Mobile data or Cellular Data on your smartphone.
3 Connect your smartphone to the wireless router.

NOTE
- To verify the Wi-Fi connection, check that the Wi-Fi 🔊 icon on the status display is lit.
- The appliance supports 2.4 GHz Wi-Fi networks only. To check your network frequency, contact your Internet service provider or refer to your wireless router manual.
- LG ThinQ is not responsible for any network connection problems or any faults, malfunctions, or errors caused by network connection.
- If the appliance is having trouble connecting to the Wi-Fi network, it may be too far from the router.
- The Wi-Fi connection may not connect or may be interrupted because of the home network environment.
- The network connection may not work properly depending on the Internet service provider.
- The surrounding wireless environment can make the wireless network service run slowly.
- If the appliance cannot be connected due to problems with the wireless signal transmission, unplug the appliance and wait about a minute before trying it again.
- If the firewall on your wireless router is enabled, disable the firewall or add an exception to it.
- The wireless network name (SSID) should be a combination of English letters and numbers. (Do not use special characters.)
- Smartphone user interface (UI) may vary depending on the mobile operating system (OS) and the manufacturer.
- If the security protocol of the router is set to WEP, the network setup may fail. Change the security protocol (WPA2 is recommended) and connect the product again.
Installing the LG ThinQ Application
Search for the LG ThinQ application from the Google Play Store or Apple App Store on a smartphone. Follow instructions to download and install the application.
Open Source Software Notice Information
To obtain the source code that is contained in this product, under GPL, LGPL, MPL, and other open source licenses that have the obligation to disclose source code, and to access all referred license terms, copyright notices and other relevant documents, please visit https://opensource.lge.com.
LG Electronics will also provide open source code to you on CD-ROM for a charge covering the cost of performing such distribution (such as the cost of media, shipping, and handling) upon email request to opensource@lge.com.
This offer is valid to anyone in receipt of this information for a period of three years after our last shipment of this product.
Smart Diagnosis
This is a function that can diagnose the cause of product failure.

NOTE
- Service may be suspended due to external factors (such as unavailability of Wi-Fi, disconnection of Wi-Fi, app store policy, app unavailability, etc.) that are not due to the negligence of LG Electronics.
- This is subject to change without prior notice, and the service method may vary depending on local circumstances.
Using LG ThinQ to Diagnose Issues
If a problem occurs with a Wi-Fi-equipped product, you can diagnose the problem by sending data to your smartphone using LG ThinQ.
- After launching LG ThinQ, select Smart Diagnosis from the menu. Diagnose the product according to procedure provided by LG ThinQ.

NOTE
- When diagnosing with Wi-Fi, you can diagnose the product with a beep sound when the Wi-Fi connection with the product is disconnected.
Using Audible Diagnosis to Diagnose Issues
If Smart Diagnosis using the app continues to fail, click the Use Diagnosis with 'Go to Audible Diagnosis' button of the ThinQ App and follow the instructions that appear.
1 Press the Mode and Auto Fan buttons on the control panel at the same time for 3 seconds.
2 Place your phone near the product. • Make sure the phone's microphone is facing the front of the product.
natural_image
Diagram of a mechanical device with a lever and base component (no text or symbols)3 The results of Smart Diagnosis will be displayed in the LG ThinQ application.

NOTE
- For accurate diagnosis, do not move the smartphone away from the product until the beep stops.
- Please be quiet around the product during Smart Diagnosis.
MAINTENANCE
WARNING
- Stop operation of the product and unplug the power plug or cord from the outlet before cleaning and replacing the filter.
- Do not spray water directly on the product.
Maintaining the Appliance
Frequency of Cleaning and Filter Replacement
| Type | Cleaning frequency | Replacement cycle |
 Filter Filter | Ultra Fine FilterIf it is contaminated, use a vacuum cleaner or a soft brush to clean it. | 1 year |
NOTE
- The operating environment and operation hours may affect the cleaning frequency. Clean more often if operating in a dusty environment.
- Failure to clean the product following the recommended schedule may result in it smelling bad or not working properly.
- The filter must be replaced at the end of its lifespan, and the cost of replacement filters is not covered under the warranty. To purchase new filters, contact an LG Electronics Customer Information Center or visit the website at www.lg.com
-
You can also have the filter cleaned or replaced by the Service Center. You will be charged a nominal fee for filter cleaning and replacement services.
-
The upper and lower parts of the filter are made of paper instead of plastic. Repeated removal of the filter may cause scratches on the top and bottom of the filter.
- Even if there are scratches on the top and bottom of the filter, there is no problem in use.
Alerts on the Status Display
| Notification | Corrective action |
 | Replace the filter. |
NOTE
- Filter replacement alerts appear based on the maximum usage time, taking into account the operating hours of the product. The replacement frequency is determined by the operating hours and environment.
Cleaning the Appliance
Cleaning the Exterior of the Product
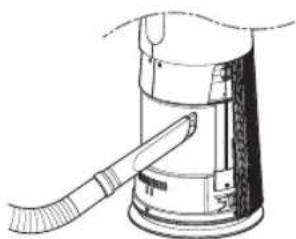
1 Use a vacuum cleaner to remove dust from the air inlet.
2 Wipe the air outlet and the exterior of the product with a soft cloth.

natural_image
Line drawing of a hand holding a cylindrical object with a dotted circle highlighting the part (no text or symbols)3 Press the -Mode button to select the diffusion mode. When the vane is finished, wipe the front and back of the vane with a soft cloth.
natural_image
Line drawing of a hand holding a tool with a double-headed arrow indicating compression or insertion (no text or symbols)Back
CAUTION
- Do not clean the product with alkaline detergent.
- Do not wipe the product surface using sulfuric acid, hydrochloric acid, or an organic solvent (thinner, kerosene, acetone, etc.) or attach stickers to the product. This may damage the product surface.
- Do not let water enter into the product.
NOTE
- If you find it difficult to remove dust from the front and rear covers, remove the filters and wash them with water. Then, dry them completely in the shade.
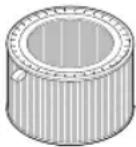
Maintaining the Filter
Cleaning the Filters
1 Remove the front and rear covers of the product.
Grab both sides of the top of the air inlet (cover) from the front of the product and pull gently to separate it.
- The direction with the LG logo on the product display is the front of the product.
2 Remove dust surrounding the Ultra-fine filter with a vacuum cleaner or soft brush.
natural_image
Line drawing of a mechanical device with a handle and lever (no text or symbols)
CAUTION
- Do not wash the Deodorizing Care filter or True HEPA filter with water. This shortens the filter's life.
- Be careful not to damage the ultra fine filter when using a vacuum cleaner.
- Be careful not to damage the filter if liquid gets on the filter.
Replacing the Filter
1 Remove the front and rear covers of the product and pull the handle to replace the filter.
- To avoid polluting the surroundings when replacing the filter, place newspaper on the floor before you remove the filter.
2 Once you have replaced the filter, turn off the filter replacement alert.
Reset filter replacement notification
(Filter replacement notification) on the status display is canceled and the replacement notification time is reset
- Press Auto Fan and Rotation buttons at the same time for at least 3 seconds.
• Use when replacing with a new filter.

NOTE
- A notification is displayed when a filter replacement is required.
- When the filter is installed, scratches may occur on the upper and lower surfaces, but there is no problem in operation.
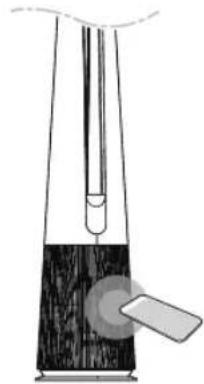
Storing the Product
If the product will not be used for a long period of time, store in a dry, shaded place without moisture.
1 Operate the product for at least 1 hour on a sunny day.
• This removes moisture and prevents mold from building up inside the product.
2 Turn off the power and unplug it from the electrical outlet.
3 Package the product to prevent dust or foreign substances from entering the product. Store the packaged product in a shaded place.
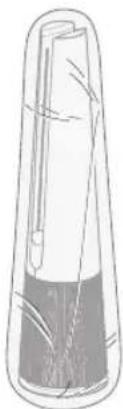
natural_image
Simple line drawing of a cylindrical container with a submerged object inside (no text or symbols)Storing the Remote Controller
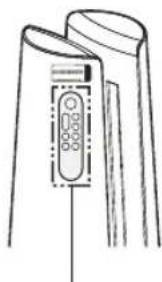
natural_image
Line drawing of a handheld device with a control panel (no text or symbols)Remote Controller Holder
- The Remote Controller can be stored by attaching it to the magnet at the location marked on the product.
- Attach the rear part of the Remote Controller under the Remote Controller attachment location label.

CAUTION
Do not store the product in a humid place or in a place exposed to the direct sunlight.
TROUBLESHOOTING
Before Calling for Service
Please check the following before you contact the service center.
If the problem persists, contact your local service center.
| Symptom Cause | Remedy | |
| It does not operate at all. | Is the power cord unplugged from the outlet? | ·Insert it into the socket correctly. |
| The amount of wind is small and there is a noise. | Did dust accumulate in the ultra fine filter? | ·Clean the ultra fine filter thoroughly. |
| Did dust accumulate in the True HEPA filter? | ·Replace the filter. | |
| The air inside is not purified well enough. | Is the indoor pollution severe? | ·Ventilate the indoors before using the product. |
| Did dust accumulate in the ultra fine filter? | ·Clean the ultra fine filter thoroughly. | |
| Did dust accumulate in the True HEPA filter? | ·Replace the filter. | |
| Are you using it in a place that is too spacious or too open? | ·Use a product that suits the size of the room. ·Avoid well-ventilated places such as doors, windows, etc. | |
| Is there any obstacle nearby? | ·Remove the obstacle. | |
| Is the product installed at a corner? | ·Move the product and install it again. | |
| There is a smell, but the overall air quality color does not change. | Doesn't the overall air quality change to red and orange? | ·The color of overall air quality is determined based on the worst condition among dust concentration and odor(gas) concentration. Make sure the dust concentration is not worse. ·Since the odor(gas) sensor is a sensor that detects contaminated gases, it may not react to the smell of food. But the Deodorizing Care filter removes the odor. |
| The overall air quality color is still in red. | Does the color not change even if it is moved to a clean room? | ·Display status may not change when the amount of odor is greater than the product's ability to handle.·Remove the power cord from the outlet and reconnect after 1 minute. |
| Did you use a spray near the product? | ·Do not use a spray near the product. | |
| The buttons on the control panel do not work. | Is displayed on the status display? | ·To unlock, press the Mode button on the control panel for 3 seconds. |
| The concentration of the fine dust does not change. | Is the product used in a closed space? | ·In closed spaces, the Air Quality level may continue to stay the same without change. |
| The concentration of fine dust continues to remain high. | Does the air continue to flow in from the outside to the location where the product is installed? | ·In an environment where there is an inflow of outside air, the concentration may continue to remain high. |
| The overall air quality color and dust concentration value are different. | Is the overall air quality color the same as the color indicating the odor concentration? | ·The overall air quality is expressed by comprehensively evaluating the odor and dust concentration.·Even if the dust concentration is low, if the odor is strong, the overall odor color may change. |
| Symptom Cause | Use Remedy | |
| A strange odor comes out from the air outlet as well as the filter. | Did you purchase the product recently? | ·This is the odor of activated charcoal, and is not harmful. This is similar to the odor you may experience in a brand new car. It will go away within a day after use. |
| Is the product used in a place with a lot of smoke or odors? | ·If the air purifier is operated after an air freshener, diffuser, or scented candle has been used, or interior work or wallpaper replacement have occurred, the filter may absorb and emit the odor. Ventilate the room first before using the product. | |
| Does the filter have a bad smell? | ·The filter replacement frequency may differ depending on the usage environment. If there is an odor, replace with a new filter. | |
| Is it in an environment where food is prepared? | ·If you use the product for a long period of time where you cook or broil fish/meat, the filter lifespan may be significantly decreased. ·If possible, open a window for ventilation while cooking, and use the product to remove the odor left after the ventilation. | |
| Is it a humid environment? | ·The filter may emit an odor if used in a humid environment. Dry the filter in sunlight before use. | |
| The dust concentration levels are different between the product and the LG ThinQ app. | Are you looking at the same type of dust particle? | ·Make sure that the levels of the PM1.0/PM2.5/PM10 dust are displayed consistently between the LG ThinQ app and your product. ·A difference in values could be caused by the difference in update time between the LG ThinQ app and the product. |
| Symptom Cause | Remedy | |
| The appliance and smartphone cannot be connected via Wi-Fi. | The password for the Wi-Fi that you are trying to connect to is incorrect. | · Find the Wi-Fi network connected to your smartphone and remove it, then connect your appliance in LG ThinQ. |
| Mobile data for your smartphone is turned on. | · Turn off the Mobile data of your smartphone and connect the appliance using the Wi-Fi network. | |
| The wireless network name (SSID) I set incorrectly. | · The wireless network name (SSID) should be a combination of English letters and numbers. (Do not use special characters.) | |
| The router frequency is not 2.4 GHz. | · Only a 2.4 Ghz router frequency is supported. Set the wireless router to 2.4 GHz and connect the appliance to the wireless router. To check the router frequency, check with your Internet service provider or the router manufacturer. | |
| The appliance is too far from the router. | · If the appliance is too far from the router, the signal may be weak and the connection may not be configured correctly. Move the router closer to the appliance. | |
| The display does not appear. | Is the display brightness set to off? | · To change the display brightness, press the Sleep Timer button on the remote controller for more than 2 seconds. |
| I set UVnano, but the UV icon is not displayed on the status display. (Only models with UVnano applied) | Is there no indication of UV / UV on the status display? | · Only 3 icons are displayed according to priority. · Reset the UVnano by pressing the Speed down and Rotation buttons on the control panel at the same time for 3 seconds. |
| Is UV on the status indicator? | · Displayed when UV does not operate normally. (Check if the filter and air intake (cover) are installed in the correct position.) | |
| The temperature/humidity is displayed differently from other products. | Is outside air continuously coming into the place where the product is installed? | ·Temperature and humidity values may fluctuate continuously in an environment where outside air is introduced.·Temperature and humidity may vary depending on the surrounding environment such as doorways, windows, and ventilation holes.·Temperature and humidity may appear differently depending on air circulation in the same room. Also, the temperature and humidity may be different from other products and thermo-hygrometers. |
| Temperature/humidity remains at outliers for a long time. | Is the product installed in an enclosed space from the outside? | ·Depending on the indoor environment, the temperature and humidity values may remain unchanged for a long time.·Unplug the power cord from the outlet and plug it in again after a minute.·If you determine that the temperature and humidity values are abnormal, try Smart Diagnosis. |
EN
Appliance Specifications
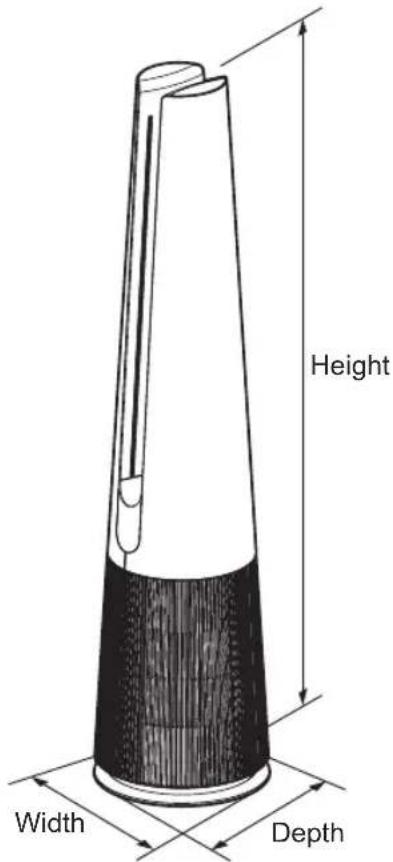
The external appearance and dimensions of the product are subject to change without prior notice.
| Model Name | FS15GP Series |
| Power | AC 220 - 240V~ 50/60Hz |
| Exterior dimensions(width x depth x height) | 265 mm x 265 mm x 1,120 mm |
WARRANTY

Life's Good
Customer Information Center
15 F. Legaspi St., Maybunga, Pasig City
Manila : (02)7902-55-44
Toll Free : 1-800-8-902-55-44(Globe)
1-800-10-640-25-25(PLDT)
Name
Address
(No text)
| Tel. No. Mobile No. | ||
| E-mail Address | ||
| Product Purchase date | ||
| Model No. Sales Invoice No. | ||
| Serial No. Store Name | ||
Customer Information Center
15 F. Legaspi St., Maybunga, Paslg City
Manila : (02)7902-55-44
Toll Free: 1-800-8-902-55-44(Globe)
1-800-10-640-25-25(PLDT)
| Name | ||
| Address | ||
| Tel. No. Mobile No. | ||
| E-mail Address | ||
| Product Purchase date | ||
| Model No. Sales Invoice No. | ||
| Serial No. Store Name | ||
| Mode of payment Cash | ||
| Card | months 0% Interest | |
| FPS Name | ||
| Remarks (Marketing initiated program / promo / premium / w / product) | ||
Customer Information Center
15 F. Legaspi St., Maybunga, Paslg City
Manila : (02)7902-55-44
Toll Free: 1-800-8-902-55-44(Globe)
www.lg.com
The Ground Truth image displays a single, solid horizontal line. According to Rule 2 (UNDERSCORE & LINE RULES), if the GT contains lines used for stylistic emphasis or as background (like ruled paper), the OCR result must ignore them. The provided OCR content is "____", which consists of four underscores. This is incorrect because underscores are not equivalent to a solid line and are not permitted under the “Stylistic/Background Lines (Ignore)” rule. The OCR has hallucinated underscores where none should exist in the GT, violating the “Stylistic/Background Lines (Ignore)” rule. Therefore, the OCR result is inconsistent with the Ground Truth.
(1)
The Ground Truth image displays a single, solid horizontal line. According to Rule 2 (UNDERSCORE & LINE RULES), if the GT contains lines used for stylistic emphasis or as background (like ruled paper), the OCR result must ignore them. The provided OCR content is "____", which consists of four underscores. This is an incorrect interpretation of the line as a placeholder symbol, violating the rule that stylistic lines must be ignored. Therefore, the OCR output hallucinated symbols where none should exist. Hence, the result is inconsistent with the Ground Truth.
(No text)
(No text)
(1)
(No text)
(No text)
(No text)
(1)
Reply
TBP 3853 NCR Nordat
(二)本报告书摘要
[EMPTY]
This image contains no text. The visible element is a stylistic or background line, which must be ignored according to the rules.
The Ground Truth image displays a single, solid horizontal line, which is a stylistic or background element (like a rule line on paper). According to Rule 2, such lines must be ignored by the OCR result. The provided OCR content is "____", which consists of underscores. Underscores are not equivalent to a solid line and are not permitted under the “Stylistic/Background Lines (Ignore)” rule. Outputting underscores for a stylistic line is incorrect because it misinterprets the line as a placeholder fill-in-the-blank area. Since the OCR output incorrectly rendered a stylistic line as underscores (which should be ignored), this violates the rule. Therefore, the OCR result is inconsistent with the Ground Truth.
This image contains no text. The visible element is a stylistic or background line, which must be ignored according to the rules.
m = 311
The Ground Truth image displays a single, solid horizontal line. According to Rule 2 (UNDERSCORE & LINE RULES), this is a stylistic or background line, not a placeholder underscore. Therefore, the OCR result must ignore it and output nothing or only meaningful text. The provided OCR content is "____", which consists of four underscores. This is an incorrect interpretation of the line as a placeholder, violating the rule that stylistic lines must be ignored. The OCR has hallucinated underscores where none should exist based on the GT's visual context. Hence, the OCR result is inconsistent with the Ground Truth.
The Ground Truth image displays a single, solid horizontal line. According to Rule 2 (UNDERSCORE & LINE RULES), this is a stylistic or background line, not a placeholder underscore. Therefore, the OCR result must ignore it and output nothing or only meaningful text. The provided OCR content is "____", which consists of four underscores. This is an incorrect interpretation of the line as a placeholder, violating the rule that stylistic lines must be ignored. The OCR has hallucinated underscores where none should exist based on the GT's visual context. Hence, the OCR result is inconsistent with the Ground Truth.
to us, we collect
set out in our
com/ph/privacy.
store and
sure of overseas
ect if we do not
ccess, correct,
omplain if there er you may email
, you may email data privacy and
(2) 1.1.1 可比关系
e Product
workmanship
workmanship th below LGF
upon receipt of
y to the original
retail purchaser of bilippinco by LCE
. The warranty
the territory.
The Ground Truth image displays a single, solid horizontal line. According to Rule 2 (UNDERSCORE & LINE RULES), this is a stylistic or background line, not a placeholder underscore. Therefore, the OCR result must ignore it and output nothing or only meaningful text. The provided OCR content is "____", which consists of four underscores. This is an incorrect interpretation of the line as a placeholder, violating the rule that stylistic lines must be ignored. The OCR has hallucinated underscores where none should exist based on the GT's visual context. Hence, the OCR result is inconsistent with the Ground Truth.
be (1) year *
(1) 12 = 13 + 14
Two (2)
years *
ar*
T
(No text)
One (1) year *
(No text)
| SPECIFIC PARTS | SPECIFIC PARTS | SPECIFIC PARTS | ||||||
| Refrigerator & Split typeRoom Air Condition*(Inverter Models only) | Compressor | Ten (10) years ** | Refrigerator & Split typeRoom Air Condition*(Inverter Models only) | Compressor | Ten (10) years ** | Refrigerator & Split typeRoom Air Condition*(Inverter Models only) | Compressor | Ten (10) years ** |
| Air Conditioner Inverter Compressor | Air Conditioner Inverter Compressor | Air Conditioner Inverter Compressor | ||||||
| Refrigerator | Inverter Compressor,Linear Compressor | Refrigerator | Inverter Compressor,Linear Compressor | Refrigerator | Inverter Compressor,Linear Compressor | |||
| Compressor | Five (5) years ** | Compressor | Five (5) years ** | Compressor | Five (5) years ** | |||
| Air Conditioner(Window & Split) | Compressor | Air Conditioner(Window & Split) | Compressor | Air Conditioner(Window & Split) | Compressor | |||
| Washing Machine Direct Drive Motor Ten (10) years ** | Washing Machine Direct Drive Motor Ten (10) years ** | Washing Machine Direct Drive Motor Ten (10) years ** | ||||||
| Dryer | Dual InverterCompressor & Motor | Ten (10) years ** | Dryer | Dual InverterCompressor & Motor | Ten (10) years ** | Dryer | Dual InverterCompressor & Motor | Ten (10) years ** |
| Air Purifier Inverter Motor Ten (10) years ** | Air Purifier Inverter Motor Ten (10) years ** | Air Purifier Inverter Motor Ten (10) years ** | ||||||
| * The ten (10) year warranty offer on Compressor is applicable for LG Single Split Inverter Air Conditioners 2015 models** Warranty on parts onlyWHAT THIS WARRANTY DOES NOT COVERService trips to deliver, pick up, install, or repair the product; instruct the customer on operation of the product; repair or replace fuses or correct wiring or plumbing, or correction of unauthorized repairs installation.Failure of product to perform during power failures and interruptions or inadequate electrical service.Damage caused by leaky or broken water pipes, frozen water pipes, restricted drain lines, inadequate or interrupted water supply or inadequate supply of air.Damage resulting from operating the product in a corrosive atmosphere or contrary to the instructions outlined in the product owner's manualDamage to the product caused by accidents, pests and vermin, lightning, wind, fire, floods or acts of God.Defects or damage from abnormal use, abnormal conditions, improper storage, exposure to moisture or dampness, unauthorized modification, unauthorized connections, unauthorized repair, misuse, abuse, accident, alteration, Improper installation, or other act are which are not the fault of LG, including damage caused by shipping, blown fuses, spills of food and liquids. Improper repair includes use of parts not approved or specified by LG.Damage or failure caused by unauthorized modification or alteration, or if it is used for other than the intended purpose, or any water leakage where the unit was not properly installed.Damage or failure caused by incorrect electrical current, voltage, or plumbing codes, commercial or industrial use, or use of accessories, components, or consumable cleaning products that are not approved by LG.Damage caused by transportation and handling, including scratches, dents, chips, and/or other damage to the finish of your product, unless such damage results from defects in materials or workmanship and is reported within one (1) week of delivery.Damage or missing items to any display, open box, discounted, or refurbished product.Tampering or removal of serial number.Unit has been serviced by anyone other than a duly authorized service center.Damaged accessories like remote control, antenna, glass tray, plastic shelves, microphone, promo disc, etc.THIS WARRANTY IS NOT TRANSFERABLE AND APPLIES TO ORIGINAL PURCHASER ONLY. | * The ten (10) year warranty offer on Compressor is applicable for LG Single Split Inverter Air Conditioners 2015 models** Warranty on parts onlyWHAT THIS WARRANTY DOES NOT COVERService trips to deliver, pick up, install, or repair the product; instruct the customer on operation of the product; repair or replace fuses or correct wiring or plumbing, or correction of unauthorized repairs installation.Failure of product to perform during power failures and interruptions or inadequate electrical service.Damage causing by leaky or broken water pipes, frozen water pipes, restricted drain lines, inadequate or interrupted water supply or inadequate supply of air.Damage resulting from operating the product in a corrosive atmosphere or contrary to the instructions outlined in the product owner's manualDamage to the product caused by accidents, pests and vermin, lightning, wind, fire, floods or acts of God.Defects or damage from abnormal use, abnormal conditions, improper storage, exposure to moisture or dampness, unauthorized modification, Unauthorized connections, Unauthorized repair, misuse, abuse, accident, alteration, Improper installation, or other act are which are not the fault of LG, including damage caused by shipping, blown fuses, spills of food and liquids. Improper repair includes use of parts not approved or specified by LG.Damage or failure caused by unauthorized modification or alteration, or if it is used for other than the intended purpose, or any water leakage where the unit was not properly installed.Damage or failure caused by incorrect electrical current, voltage, or plumbing codes, commercial or Industrial use, or use of accessories, components, or consumable cleaning products that are not approved by LG.Damage caused by transportation and handling, including scratches, dents, chips, and/or other damage to the finish of your product, unless such damage results from defects in materials or workmanship and is reported within one (1) week of delivery.Damage or missing items to any display, open box, discounted, or refurbished product.Tampering or removal of serial number.Unit has been serviced by everyone other than a duly authorized service center.Damaged accessories like remote control, antenna, glass tray, plastic shelves, microphone, promo disc, etc.THIS WARRANTY IS NOT TRANSFERABLE AND APPLIES TO ORIGINAL PURCHASER ONLY. | * The ten (10) year warranty offer on Compressor is applicable for LG Single Split Inverter Air Conditioners 2015 models** Warranty on parts onlyWHAT THIS WARRANTY DOES NOT COVERService trips to deliver, pick up,, install, or repair the product; instruct the customer on operation of the product; repair or replace fuses or correct wiring or plumbing, or correction of unauthorized repairs installation.Failure of product to perform during power failures and interruptions or inadequate electrical service.Damage caused by leaky or broken water pipes, frozen water pipes, restricted drain lines, inadequate or interrupted water supply or inadequate supply of air.Damage resulting from operating the product in a corrosive atmosphere or contrary to the instructions outlined in the product owner's manulDamage to the product caused by accidents, pests and vermin, lightning, wind, fire, floods or acts of God.Defects or damage from abnormal use, abnormal conditions, improper storage, exposure to moisture or dampness, unauthorized modification, Unauthorized connections, Unauthorized repair, misuse, abuse, accident, alteration, Improper installation, or other act are which are not the fault of LG, including damage caused by shipping, blown fuses, spills of food and liquids. Improper repair includes useof parts not approved or specified by LG.Damage or failure caused by unauthorized modification or alteration, or if it is used for other than the intended purpose, or any water leakage where the unit was not properly installed.Damage or failure caused by incorrect electrical current, voltage, or plumbing codes, commercial or Industrial use, or use of accessories, components, or consumable cleaning products that are not approved by LG.Damage caused by transportation and handling, including scratches, dents, chips, and/orother damage to the finish of your product, unless such damage results from defects in materials or workmanship and is reported within one (1) week of delivery.Damage or missing items to any display, open box, discounted, or refurbished product.Tampering or removal of serial number.Unit has been serviced by anyone other than a duly authorized service center.Damaged accessories like remote control, antenna, glass tray, plastic shelves, microphone, promo disc, etc.THIS WARRANTY IS NOT TRANSFERABLE AND APPLICES TO ORIGINAL PURCHASER ONLY. | ||||||
Memo
Belakang
1 Pengontrol
natural_image
Diagram of a portable device with a cylindrical container and a battery inserted, showing internal components (no text or symbols)natural_image
Technical line drawing of a mechanical device with directional arrows indicating movement (no text or symbols)natural_image
Illustration of a hand holding a cylindrical device with a magnified inset showing internal components (no text or symbols)PERHATIAN
natural_image
Line drawing of a hand holding a tool inside a U-shaped structure (no text or symbols)natural_image
Diagram of a pen-like object with two circular dotted arrows indicating force or movement, no text or symbols present.
PERHATIAN
natural_image
Mechanical component diagram showing a curved bracket with a circular top and downward arrow indicating motion (no text or symbols)
PERHATIAN
natural_image
Line drawing of a remote control with two buttons (no text or symbols)CATATAN
natural_image
Simple line drawing of a device with a cylindrical component and a remote control (no text or symbols)- Setiap kali tombol Mode ditekan selama pengoperasian, urutan Mode Lebar – Mode Langsung – Mode Difusi akan diulang.
CATATAN
natural_image
Line drawing of a remote control device with two buttons (no text or symbols)CATATAN
natural_image
Simple line drawing of a vertical structure with a circular icon containing a human figure (no text or symbols)- Tekan tombol Mode selama 3 detik.
• ditampilkan di tampilan status.
CATATAN
3 Hubungkan ponsel cerdas Anda ke router nirkabel.
CATATAN
2 Letakkan ponsel Anda di dekat produk ini.
natural_image
Simple line drawing of a laboratory apparatus with a funnel and bulb (no text or symbols)natural_image
Line drawing of a hand holding a vertical object with a dotted circle highlighting the part (no text or symbols)natural_image
Illustration of a hand holding a tool with a double-headed arrow indicating compression or insertion (no text or symbols)Kembali
ID
PERHATIAN
natural_image
Line drawing of a mechanical device with a tool inserted, no text or symbols present
PERHATIAN
natural_image
Simple line drawing of a cylindrical object with internal structure and no visible text or symbolsMenyimpan Remote Kontrol
natural_image
Line drawing of a handheld device with control panel and buttons (no text or symbols)Dudukan Remote Kontrol
| Aath | J. C. Vanda Syngang Surat Masasa No. 16, Desert Wana Swast Mawas, Doharama | Lamung | S. Pajmung-Kanapang Surat No. 24, Coda Sabik Bar, New Tenggung Bank | Neming | 8, Mampath No. 7, Namaayu |
| Ceritas | B. Bury Kana No. 43, Kugangar, Bata Huyang Pajmung-Matanak - KTS | Sino | 10, Sengyuan (Pays Bank), No. 49, -50 | ||
| Belcom | J. Mabang Pringkang Surat Bercara Surat Bercara Surat Bercara | Mahan | Sungang | Sungang | 10, Sengyuan (Pays Bank), No. 49, -50 |
| Bangkok | Kumala Chama No. 27, KTA 78, Kaoyi Rupay Nao, Bokabang Surat | Mahan | Kua Luhung Yaya, Pajmung-Bandan | Sungang | 10, Sengyuan (Pays Bank), No. 49, -50 |
| Bangkok | J. Talya Khayu Surat No. 27, Kaoyi Rupay Nao, Bokabang Surat | Mahan | J. A. Bokabang Subramang Surat No. 27, Bokabang Surat Kua Cun Cun Cababa | Singang | 10, Sengyuan (Pays Bank), No. 49, -50 |
| Bangkok | J. Bemang Surat No. 27, Kaoyi Rupay Nao, Bokabang Surat | Mahan | Bok LTI 128 Gua, Maiman, Surat Bemang | Singang | 10, Sengyuan (Pays Bank), No. 49, -50 |
| Bangkok | J. Bemang Pringkang Surat | Mahan | Singang Pringkang | Singang Pringkang | 10, Sengyuan (Pays Bank), No. 49, -50 |
| Bangkok | J. Bemang Surat No. 27, Kaoyi Rupay Nao, Bokabang Surat | Mahan | Singang Pringkang | Singang Pringkang | 10, Sengyuan (Pays Bank), No. 49, -50 |
| Bangkok | J. Amad, Talya Khayu Pringkang Surat Anggar Surat Anambahan, Bokabang Surat, Bokabang Surat | Mahan | J. B. Ring Road Surat No. 27, Bokabang Surat Bokabang Surat | Tension | 11, Camaayu, Kita Lepura, Menkar Surat Maha, Bokabang Surat |
| Bangkok | J. A. Bemang Surat No. 27, Kaoyi Rupay Nao, Bokabang Surat | Mahan | J. B. Ring Road Surat No. 27, Bokabang Surat Bokabang Surat | Tension | 11, Camaayu, Kita Lepura, Menkar Surat Maha, Bokabang Surat |
| Bangkok | J. A. Bemang Surat No. 27, Kaoyi Rupay Nao, BOKABU Surat, Bokabang Surat, Bokabang Surat | Mahan | J. B. Ring Road Surat No. 27, Bokabang Surat Bokabang Surat | Tension | 11, Camaayu, Kita Lepura, Menkar Surat Maha, Bokabang Surat |
| Bangkok | J. A. Bemang Surat No. 27, Kaoyi Bokabang Surat Anggar Surat Anambahan, Bokabang Surat, Bokabang Surat | Mahan | J. B. Ring Road Surat No. 27, Bokabang Surat Bokabang Surat | Tension | 11, Camaayu, Kita Lepura, Menkar Surat Maha, Bokabang Surat |
| Bangkok | J. A. Bemang Sur at No. 27, Kaoyi Bokabang Surat Anggar Surat Anambahan, Bokabang Surat, Bokabang Surat | Mahan | J. B. Ring Road Surat No. 27, Bokabang Surat Bokabang Surat | Tension | 11, Camaayu, Kita Lepura, Menkar Surat Maha, Bokabang Surat |

LG
Life's Good
AIR PURIFIER
www.lg.com/id/support
14010
Lumbarer 3. Paltigem-Heidinger Nr 107/104, Latim Salb Grn. Wink Nefang Chara
Lumbari 6. Burg Harnel Nr 42 Grupkungl Beta Praking Regular Mietern - 103
Lumbar Ungano 8. Vass Sotlerer Nr 20 Nr 04 Kat. Tria pagin-Em. Lokubreggen Solaton, 2015 in Lutam, 2015.
Mallener 2. La Maral Bank (Promoting Bank), Ioregality, Ruto Cria Lamb Cabanon
Bark L27 L28 Cotton - Minnesota (summed) facility
Mazek: 12.30.2018, 465-479, 465-479, Mazek
Mazek: 12.30.2018, 465-479, 465-479, Mazek
Machan: E. Ring Road War, T. B dan S (Samsung Wharf) Net Tanjung San
for Market Securing Markets 2011
Metho Churgo
Naring
1. Raya Kermouy Yalani : Smp Garmouy Kasari M. A. Tanung Adi Fass : 1st Company
6w.Kurang Auto Peking/2013d
Peking Subway: A. Wawar (Lurg No. 34) Facting Subway
- 1. A new version of the 2013, an opening for the 2014, 2015, and 2016.
Peter Huang (A) Harberg, 1204 No. 2017; 2018 International Society, Inc. 3, Peter Huang
Polo: U. Chenax, Linke, Klempleen, Polo, Plaza Bank Of Nai 1-3 Nat, Ljagunjafar, Prisu Barre, Arora Prisu,
Konzern Kozern Verge (2013)
Servicing Service: R. Srlolga No. 21; Servicing Service
Peter's
Firang 2. Jané, Sadman No. 1432/Jan
Società: 28 da Ussichefford Avviano
- Per-district: 12 March 2016, the public health sector was at 30, 40, and private groups. Among 14, 15, 20, and 25 persons. Portela River Section – All American Board
Konzernitz 12. Marital Society for E.P. (A) and Engineering for Software Manufacturers - Hangzhou 2018
Natta Project: A-Turboveda No 10, Zhongding KG-RSUS Natta Project
Sachovia: Hold-Avg Sutkran-Center, S.Avg Sutkran's 6.5. (Conservative Policy for Family
S. Stock Open Closing Price (Mil.)
Jarmott 1.4.13. Aiming Jarmott State No.26, Jarmott
(1) Muppert No. 2017, University
(2) Dr. Carrefino (VII), (3) Elegia (IIdA) (SAR) A 7012-9918 - Cachov
Tangyineng Subtotal: Tangyineng
Long Priority: A. Fuzzing-Lertha, 28, Nishyamara, Tel. Karnataka Inc., Tungong (Wang Street),
- Group B102
in an open. (2) Milling Prcure Chemical No. 81 Stock Mologues Lardan 1 NRD/032503 Sdn 50074812
- Pala Raya No 27A/Fb 21, BucO, Ait, Magasari, Dauri Rac, Kwanat, RaS, Tagal
(1) Seneca Madrid St. Tax LLC's Return
6 Software No.2011 Long Bars - Max
polarica | A. Morgan No. 1981-1982, 312, 700-62, Desa Brook and Desi Willet, Salo Searve
(Shimov-Schikar/Matsever) 1. Dr. Watndu, Inc. (75% Vio
Lay, Laryo Tucaneyi Benin Born John 2 Box 13 10 Markton, Invest Trust
Amerg 3 Sering Real, STN Ory Narmi: Elegometry
ghu: A 7 basis of the first class of a
CIC
Website
TEMPEL PERANGKO
KEPADA:
CUSTOMER SERVICE CENTRE
PT. LG ELECTRONICS SERVICE INDONESIA
JL. PANGLIMA POLIM RAYA NO.69
KEL. MELAWAI, KEC. KEBAYORAN BARU
JAKARTA SELATAN -12160
TANDA PENDAFTARAN
PETUNJUK PENGGUNAAN MANUAL
JAMINAN/GARANSI
DALAM BAHASA INDONESIA BAGI PRODUK ELEKTRONIK
- Model : FS15GP Series
ID

LG
Life's Good
www.ig.com/id/support
Pemasang
Tanda tangan
Konsumen
Tanda tangan
Konsumen

LG
Life's Good
Pemasang
www.lg.com/id/support
Pemasang
Tanda tangan
Konsumen
Tanda tangan
Memo
คู่มือการใช้งาน
เครื่องฟอกอากาศ

ด้านหลัง
natural_image
Diagram of a hand pouring liquid into a cylindrical container with a tool, no text or symbols presentnatural_image
Technical line drawing of a mechanical device with directional arrows indicating movement or force (no text or symbols)natural_image
Illustration of a hand holding a cylindrical device with a magnified inset showing internal components (no text or symbols)ข้อควรระวัง
natural_image
Simple line drawing of a hand adjusting a vertical tube with arrows, no text or symbols presentnatural_image
Diagram of a handheld device with a handle and spool, showing motion lines and contact points (no text or symbols)ข้อควรระวัง
natural_image
Mechanical component diagram showing a curved housing with a circular top and downward arrow indicating force or direction (no text or symbols)⚠️ ข้อควรระวัง
natural_image
Line drawing of a remote control with two buttons and a power button (no text or symbols)การใช้งานโหมด
natural_image
Line drawing of a remote control with two circular icons pointing to the top (no text or symbols)หมายเหตุ
natural_image
Line drawing of a remote control with two buttons and a scroll (no text or symbols)หมายเหตุ
natural_image
Simple line drawing of a person standing on a chair with a magnified circular icon showing a person (no text or symbols)√หมายเหตุ
natural_image
Simple line drawing of a laboratory apparatus with a funnel and base (no text or symbols)natural_image
Line drawing of a hand holding a vertical object with a dotted circle highlighting the area (no text or symbols)natural_image
Illustration of a hand holding a tool or device with a double-headed arrow indicating compression or insertion (no text or symbols present)ด้านหลัง
ข้อควรระวัง
natural_image
Line drawing of a mechanical device with a tool inserted, no text or symbols presentข้อควรระวัง
natural_image
Simple line drawing of a cylindrical container with liquid inside, no text or symbols presentnatural_image
Line drawing of a handheld device with a control panel (no text or symbols)ที่วางรีโมทดสอบโทรล
FREE on-site service for in warranty product as below.

Air-Conditioner
ADDITIONAL WARRANTY PERIOD FOR B2B PRODUCTS
| Digital Signage(Monitor Signage) | 3 year warranty for Professional Display series3 year for Enhanced Display series or 17,520 hours of usage, whichever comes first. |
| Commercial TV(TV Signage & Hotel TV) | 2 year warranty or 11,680 hours of warranty, whichever comes first |
| OLED Signage | 55° OLED Signage is 3 years (AVG 18 Hours/day)65° OLED Signage is 3 years (AVG 12 Hours/day)** Contents Type : Dynamic Contents Only** |
| Media Player | 1 year |
| Set-Top Boxfor Hotel TV | 2 year |
| AD Box | 1 year |
"Notice
- The other series can be added in each product classification as above. Therefore, if customer does not know about warranty period exactly, please contact help desk for detail information.
- Typically LCD / OLED products will follow ISO 9241 -307 Class 2, but the Transparent OLED Signage's pixel policy is class 3.

LG
Life's Good
- Free Service including spare parts for 1 year after purchased under LG Conditions it bring the product to all LG Service Centers or authorize service centers. Please contact LG Call Center at 0-2878-5757 or www.lg.com/th for nearby service center
- For additional warranty of some spare parts which more than 1 year, please check more details at Sales Point, LG Call Center at 0-2578-5757, or www.lg.com/th. Warranty will apply only spare parts and not include for labor fee, visit fee, and other materials in case of product is in out of warranty condition
- To obtain warranty protection, customers have to show proof of purchased (tax invoice/receipt) with completely information and no erased to our service representative every time
- In case of lost of proof of purchased or purchased date is not shown on proof of purchased, LG Electronics (Thailand) Co., Ltd reserves all right to use manufacturing date as purchased date which is verified on the serial no. on the product.
- For the special sales conditions: products are sold as in condition outlook (scratch/bert/dent/others), LG will provide warranty only for functional problem only. Premium or complimentary gift if belong to LG brands which sell in current market also have 1 year warranty from purchased date. For display sets, warranty period only 6 months for both product and spare parts and unable to replace for new set in any cases
- Only defected caused by production from manufacturing process are warranted
- Within warranty period, LG will not charge for visiting fee for the product with large size TV/Monitor from 29" up, Refrigerator, Washing Machine, Dryer, and Air-Conditioner or others which customer can check at LG Contact Center. Warranty condition will apply for all LG products sold by LG Electronics (Thailand) Co., Ltd and sell in Thailand, Myanmar, Laos, and Cambodia. Therefore Customers have to request for service in country which product purchased.
- LG Electronics (Thailand) Co., Ltd reserves all right to charge the labor and visit fee for out of warranty service even if problem could not be found at first time or came from nature
- LG Electronics (Thailand) Co., Ltd reserves all right to refuse to service for inaccessible, crisis, dangerous area, or other areas which may not safe
- The consideration of LG's employee under terms and conditions hear of shall be final
- LG Electronics (Thailand) Co., Ltd reserves all right to change warranty conditions at any time with or without any notices.
- For warranty of product or parts over standard 1 year, please check more information from Sales Point.
WARRANTY EXCLUSION AND UNCOVERAGES
- This warranty does not cover for dam the accident, broken, wrong usage, demonstration, test, maintenance, adjust or modify part or product or any accidents which is arising out of the customers or third party
- Product defected or damage resulting from external factor, environment or disaster such as remainder material, sweat, liquid foods, humidity, thunderbolt, unstable electricity in some area, earthquake, flooding or wrong voltage system
- Has been damaged by wear and tear, corrosion, scratches, dirty, rusty or stains on outer surface areas, external exposed parts and defects caused by animals or insects
- Claim for damage parts or accessories last after 7 days from the date of purchased
- Has been tampered, checked, or repaired by using tools or spare parts which not be sold by LG or approved by LG Electronics (Thailand) Co., Ltd or take action by anyone not from LG Electronics (Thailand) Co., Ltd or LG Authorized Service Center
- Detected or damage by using for the commercial business, industrial environment, or wrong purpose of household general usage
- Defected or damaged cause from lack of maintenance undertake on schedule that effect to product dirty, wrong installation site or method, wrong spec or not in standard of plug type, lever, electric wire, or circuit breaker size
- For TV problem caused from wrong installation, wrong antenna, or connected with other system that caused product defected
- No warranty for speaker, speaker accessories for audio products
- Remote Control of all products not included in warranty condition except magic remote which came along with the product box which is 1 year warranty
- If any equipment and products which has its product label or serial number removed or made illegible and warranty card is being altered defaced or erased in any manner whatsoever
- The products are sold as in condition of functional damage, premium/gift (Not LG Products) is not in warranty condition
(b) US opac#####abogaboum (bagh (Factory Fault/ Production Fault) songfrom search (Warranty) songfrom search
(e) Customer Service Center up/oz LG Service Center up/oz LG Service Center up/oz LG Service Center up/oz LG Service Center up/oz LG Service Center up/oz LG Service Center up/oz LG Service Center up/oz LG Service Center up/oz LG Service Center up/oz LG Service Center up/oz LG Service Center up/oz LG Service Center up/oz LG Service Center up/oz LG Service Center up/oz LG Service Center up/oz LG Service Center up/oz LG Service Center up
S### Service (Out of Wainma) ### Service Center & ### Service (In-Home Service) ### Service Center
(a) credit card Customer (a+b+c) LG Master Service of customer and customer with a credit card and a credit card customer with a credit card customer with a credit card customer with a credit card customer with a credit card customer with a credit card customer with a credit card customer with a credit card customer with a credit card customer with a credit card customer with a credit card customer with a credit card customer with a credit card customer with a credit card customer with a credit card customer with a credit card customer with a credit card customer with a credit card customer with a credit card customer with a credit card customer with a credit card customer
(1) Cambodia, Cambodia, Indonesia, Myanmar, Bangladesh, Pakistan, Bangladesh, Bangladesh, Bangladesh, Bangladesh, Bangladesh, Bangladesh, Bangladesh, Bangladesh, Bangladesh, Bangladesh, Bangladesh, Bangladesh, Bangladesh, Bangladesh, Bangladesh, Bangladesh, Bangladesh, Bangladesh, Bangladesh, Bangladesh, Bangladesh, Bangladesh, Bangladesh, Bangladesh, Bangladesh, Bangladesh, Bangladesh, Bangladesh, Bangladesh, Bangladesh, Bangladesh, Bangladesh, Bangladesh, Bangladesh, Bangladesh, Bangladesh, Bangladesh, Bangladesh, Bangladesh, Bangladesh, Bangladesh, Bangladesh, Bangladesh, Bangladesh, Bangladesh, Bangladesh, Bangladesh, Bangladesh, Bangladesh, Bangladesh,
(2) Cambodia, Cambodia, Myanmar, Indonesia, Thailand, Philippines, Vietnam, Malaysia, Singapore, Singapore, Singapore, Singapore, Singapore, Singapore, Singapore, Singapore, Singapore, Singapore, Singapore, Singapore, Singapore, Singapore, Singapore, Singapore, Singapore, Singapore, Singapore, Singapore, Singapore, Singapore, Singapore, Singapore, Singapore, Singapore, Singapore, Singapore, Singapore, Singapore, Singapore, Singapore, Singapore, Singapore, Singapore, Singapore, Singapore, Singapore, Singapore, Singapore, Singapore, Singapore, Singapore, Singapore, Singapore, Singapore, Singapore, Singapore, Singapore, Singapore,
Date Of Purchase (Reference from tax invoice/receipt)
Stamp of Dealer's Name
Date Of Purchase (Reference from tax invoice/receipt)
Stamp of Dealer's Name
STAMP
nanc. totals Canvas
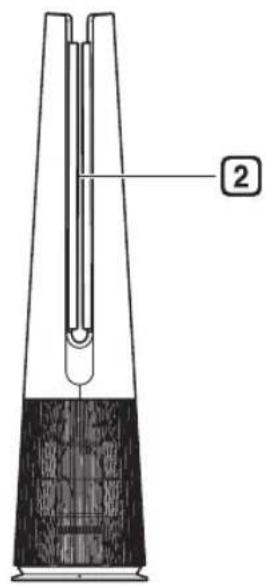
Sau
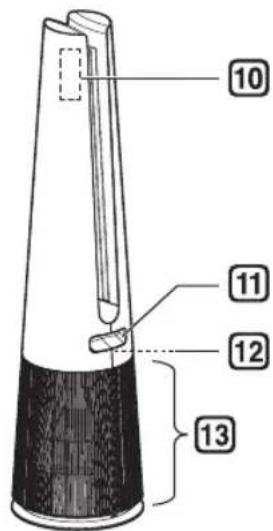
1 Bộ điều khiển
natural_image
Diagram of a mechanical device with a cylindrical component and a separate cylindrical device, showing internal components without any text or symbols.natural_image
Technical line drawing of a mechanical device with directional arrows indicating movement or force (no text or symbols)natural_image
Illustration of a hand holding a wooden block with a magnified inset showing a close-up of the mechanism (no text or symbols)THÂN TRỌNG
natural_image
Simple line drawing of a hand pressing down on two vertical cylindrical objects (no text or symbols)natural_image
Diagram of a tool with a handle and two circular annotations indicating contact points (no text or symbols present)THÂN TRỌNG
natural_image
Mechanical component diagram showing a curved bracket with a circular top and downward arrow indicating motion (no text or symbols)
THÂN TRỌNG
natural_image
Line drawing of a remote control device with two buttons (no text or symbols)Chú y
natural_image
Line drawing of a remote control device with two buttons and a scroll (no text or symbols)
Chú y
natural_image
Simple line drawing of a person standing on a pole with a magnified circular icon showing a person (no text or symbols)Chú y
natural_image
Simple line drawing of a laboratory apparatus with a funnel and bulb (no text or symbols)natural_image
Line drawing of a hand holding a cylindrical object with a dotted circle highlighting the part (no text or symbols)natural_image
Line drawing of a hand holding a tool with a double-headed arrow indicating compression or insertion (no text or symbols)Quay lại
THÂN TRỌNG
natural_image
Line drawing of a mechanical device with a tool inserted, no text or symbols presentTHÂN TRỌNG
natural_image
Simple line drawing of a cylindrical container with a submerged object inside, no text or symbols present.THÂN TRỌNG
natural_image
Line drawing of a handheld device with control panel and buttons (no text or symbols)Giá dō bō dièu khiên tù xa