
Philishave HQ7740 - Electric razor PHILIPS - Free user manual and instructions
Find the device manual for free Philishave HQ7740 PHILIPS in PDF.


| Product Type | Electric razor with integrated gel/lotion dispenser |
| Brand | Philips |
| Model | Philishave HQ7740 |
| Power Supply | 100-240V AC powerplug (HQ8500/8000) with safe low voltage <24V |
| Charging Time | Approximately 8 hours |
| Cordless Shaving Time | Up to 45 minutes |
| Cartridge Type | Philips NIVEA FOR MEN Cool Skin (HQ170 Moisturising Lotion, HQ171 Extra Fresh Gel) |
| Cartridge Capacity | Approximately 10 shaves per cartridge |
| Shaving Heads | Replaceable, model HQ177; replace every 2 years for optimal performance |
| Trimmer | Detachable pop-up trimmer for sideburns and moustache |
| Cleaning | Watertight, rinse shaving unit under hot tap after each use; deep clean weekly |
| Waterproof | Yes, can be used in bath or shower; charging stand must not be immersed |
| Storage | Charging stand, pouch, or hanging cord included; store at 5°C to 35°C |
| Safety Features | Automatic shut-off when placed in charging stand; do not use damaged adapter |
| Skin Care | Dispenses NIVEA FOR MEN gel/lotion; skin adapts in 2-3 weeks |
| Battery Indicator | Red light when low; green light during charging |
| Accessories Included | Powerplug, charging stand, pouch, hanging cord, 2 trial cartridges, brush |
| Weight (approx.) | Not specified in manual, typical for similar models ~200 g |
Frequently Asked Questions - Philishave HQ7740 PHILIPS
User questions about Philishave HQ7740 PHILIPS
0 question about this device. Answer the ones you know or ask your own.
Ask a new question about this device
Download the instructions for your Electric razor in PDF format for free! Find your manual Philishave HQ7740 - PHILIPS and take your electronic device back in hand. On this page are published all the documents necessary for the use of your device. Philishave HQ7740 by PHILIPS.
USER MANUAL Philishave HQ7740 PHILIPS
The shaver comes with two different kinds of NIVEA FOR MEN cartridges: Extra Fresh Shaving Gel for a fresh sensation during and after shaving and Moisturising Shaving Lotion for sensitive skin. This gives you the opportunity to try them out and discover which one suits your skin type best.
Important
Read this user manual carefully before you use the appliance and save it for future reference.
- This appliance is not intended for use by persons (including children) with reduced physical, sensory or mental capabilities, or lack of experience and knowledge, unless they have been given supervision or instruction concerning use of the appliance by a person responsible for their safety.
- Children should be supervised to ensure that they do not play with the appliance.
- Only use the powerplug and the charging stand supplied.
- The powerplug transforms 100-240 volts to a safe low voltage of less than 24 volts.
- The powerplug contains a transformer. Do not cut off the powerplug to replace it with another plug, as this causes a hazardous situation.
- Do not use a damaged powerplug or charging stand.
- If the powerplug or charging stand is damaged, always have it replaced with one of the original type in order to avoid a hazard.
- Charge, store and use the appliance at a temperature between 5°C and 35°C.
- Make sure the powerplug does not get wet.
natural_image
Illustration of a hand holding a pipe with a faucet symbol (no text or labels)
natural_image
Simple line drawing of a bathtub with showerhead (no text or symbols)- Never immerse the charging stand in water nor rinse it under the tap.
- Do not leave the shaver in the plugged-in charging stand for more than 24 hours.
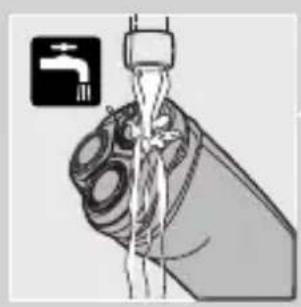
- The appliance is watertight and can be cleaned under the tap.
Be careful with hot water. Always check if the water is not too hot, to prevent your hands from getting burnt.
- The appliance complies with the internationally approved IEC safety regulations and can be safely used in the bath or shower.
- Check if the gel and lotion supplied with the appliance contain ingredients (see back of cartridge) to which you are allergic before you start using the appliance. Do not use the gel and/or lotion if you are allergic to one or more ingredients.
Electromagnetic fields (EMF)
This Philips appliance complies with all standards regarding electromagnetic fields (EMF). If handled properly and according to the instructions in this user manual, the appliance is safe to use based on scientific evidence available today.
Charging
Charging takes approx. 8 hours.
Do not leave the shaver in the plugged-in charging stand for more than 24 hours.
Charge indications
natural_image
Simple line drawing of a target with concentric circles and radiating lines, no text or symbols present.Battery running low
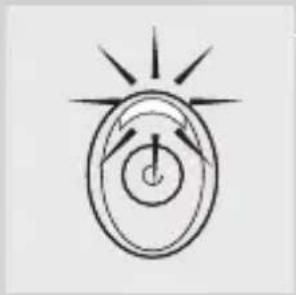
When the battery is running low, the charging light burns red during shaving. When you switch off the shaver, the charging light flashes red for a few seconds.
When you start charging the shaver while the battery is running low, the charging light flashes red for max. 24 minutes.
During charging
During charging the charging light burns green.
Charging the appliance

natural_image
Illustration of a hand holding a small electric shaver with a downward arrow indicating compression (no text or symbols present)Charge the shaver before using it for the first time and when the shaver indicates that the battery is running low.
1 Insert the small plug into the charging stand and put the powerplug in the wall socket.
2 Place the shaver in the charging stand.
The shaver automatically switches off when it is placed in the charging stand.
3 Remove the powerplug from the wall socket and pull the small plug out of the charging stand when the battery has been fully charged. You can then leave the appliance in the charging stand.
Cordless shaving time
A fully charged shaver has a cordless shaving time of up to 45 minutes.
Cartridges
Cartridges with NIVEA FOR MEN shaving gel/lotion are available in boxes containing five cartridges and one small plastic pump.
The NIVEA FOR MEN shaving gel/lotion in the cartridges will keep for 32 months when stored at temperatures between 0 °C and +40 °C.
Only use Philips NIVEA FOR MEN Cool Skin (HQ170 and HQ171) cartridges.
One Philips NIVEA FOR MEN Cool Skin cartridge contains enough gel/lotion for approx. 10 shaves.
For hygienic reasons, we advise you to insert a new pump when you start using a new set of five cartridges.
Do not throw the pump away when you replace an empty cartridge. You will need it for all five cartridges.
Remove the shaving gel/lotion cartridge from the appliance when you are not going to use the shaver for more than one week.
When you have run out of shaving gel/lotion cartridges and you do not know where to buy them, contact the Customer Care Centre in your country (see ‘Guarantee & service’).
Inserting cartridges
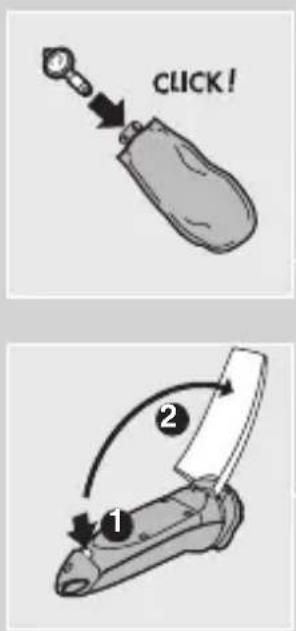
1 When you start using a new set of cartridges, take the pump out of its bag and push it into a cartridge until it locks into position with a click.
2 Press the release button (1) and open the cover of the cartridge compartment (2).
ENGLISH8
natural_image
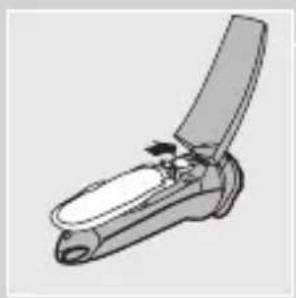
Illustration of a mechanical tool or device with a handle and lever mechanism (no text or symbols)3 Slide the cartridge with the pump into the shaver. It only fits properly if the white side of the pump is pointing upwards.
4 Close the cover (you will hear a click).
5 Press the yellow pump button a few times until the NIVEA FOR MEN shaving gel/lotion appears. The shaver is now ready for use.
Replacing cartridges
Do not throw the pump away when you replace an empty cartridge. You will need it for the other cartridges.

1 Press the release button and open the cover of the cartridge compartment.
2 Remove the empty cartridge and pull out the pump.
3 Push the pump into a new cartridge until it locks into position with a click.

4 Slide the cartridge with the pump into the shaver. It only fits properly if the white side of the pump is pointing upwards. Close the cover.

natural_image
Illustration of a mechanical device with a lever and handle (no text or symbols)Storing cartridges
You can conveniently store the other cartridges by attaching them to the wall holder supplied. The holder has suction caps which allow you to attach it to the wall easily. In this way you always have the cartridges close at hand, which is very convenient, especially when you shave in the shower.
The wall holder is only suitable for storing cartridges. Never hang or place the shaver on the wall holder. If you do, the shaver may fall!
Using the appliance
Shaving
Switching on the shaver
natural_image
Diagram of a mechanical component with a knob and arrow indicating direction (no text or symbols)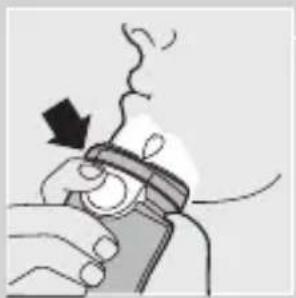
natural_image
Illustration of a hand holding a device with a magnifying glass and smoke, no text or symbols present1 Press the on/off button once to switch on the shaver.
2 Press the yellow pump button to apply NIVEA FOR MEN shaving gel/lotion to your skin.
3 Move the shaving heads over your skin, making both straight and circular movements.
4 While shaving, press the pump button frequently to apply more NIVEA FOR MEN shaving gel/lotion so that the shaver keeps gliding smoothly over your face.
Do not press the shaver too hard against your skin while shaving. If you prefer, you can wet your face before shaving.
For the best shaving results, shaving gel/lotion should be pumped up frequently.
The shaver will not perform optimally when used without shaving gel/lotion.
Your skin may need 2 or 3 weeks to get accustomed to the Philips shaving system.
Switching off the shaver
1 Press the on/off button once to switch off the shaver.
2 Clean the shaver (see chapter ‘Cleaning and maintenance’).
ENGLISH10

natural_image
Diagram of a mechanical component with a downward arrow indicating force or movement (no text or symbols present)Rinse the shaver after each shave. Remove the cartridge if you are not going to use the appliance for more than one week.
3 Put the protection cap on the shaver every time you have used it, to prevent damage.
Trimming
For grooming sideburns and moustache.
Attaching the trimmer
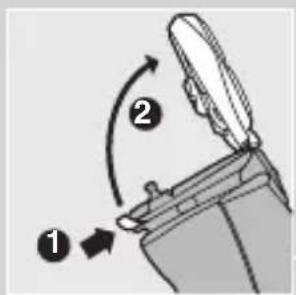
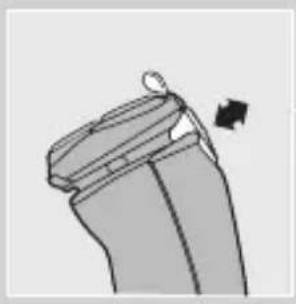
1 Switch off the shaver. Clean the shaver before you attach the trimmer (see chapter 'Cleaning and maintenance').
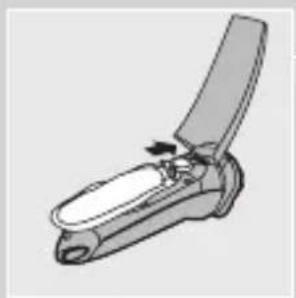
2 Press the release button (1) and pull the shaving unit off the shaver (2).
3 Tilt the trimmer slightly backwards.

natural_image
Line drawing of a mechanical component with a lid and base (no text or symbols)
4 Fit the trimmer onto the shaver (you will hear a click). The trimmer is now ready for use.
5 Activate the trimmer by pressing the on/off button once.
Removing the trimmer
1 Switch off the shaver.
2 Remove the trimmer by pressing the release button again and pulling the trimmer off the shaver.
3 Put the shaving unit back onto the shaver.
Cleaning and maintenance
Regular cleaning guarantees better shaving performance.
To maintain optimal shaving performance and to keep the shaver clean, you have to thoroughly rinse the shaving unit and hair chamber with hot water after every shave.
Be careful with hot water. Always check if the water is not too hot, to prevent your hands from getting burnt.
Cleaning

natural_image
Diagram of a mechanical or fluidic component with no visible text, numbers, or symbolsShaving unit: Quick Clean after every shave
1 Make sure the appliance is switched on.
2 Keep the shaving unit closed.
3 Rinse the shaving unit and the hair chamber under a hot tap by letting the water run through the openings below the shaving unit for at least 30 seconds.
4 Shake off excess water.
Never dry the shaving unit with a towel or tissue, as this may damage the shaving heads.
Shaving unit and hair chamber: every week
We advise you to clean the appliance thoroughly at least once a week to maintain optimal shaving performance.
ENGLISH12
natural_image
Diagram of a mechanical device with a lever and arrow indicating direction (no text or symbols)You can also follow this procedure when the shaving heads have to be cleaned.
1 Switch off the shaver.
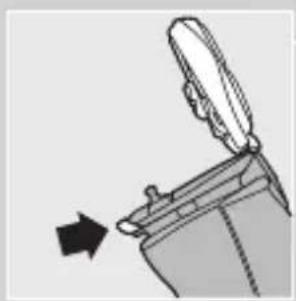
2 Press the release button to open the shaving unit.

natural_image
Anatomical illustration of abdominal organs and spinal cord (no text or labels)3 Rinse the inside of the shaving unit.

natural_image
Illustration of a mechanical device with flowing liquid and a handle (no text or symbols)4 Rinse the outside of the shaving unit.

natural_image
Illustration of a mechanical device with a lever and handle, no visible text or symbols5 Rinse the hair chamber.
6 Make sure the inside of the shaving unit and the hair chamber have been cleaned properly.
7 Close the shaving unit and shake off excess water.
8 Open the shaving unit again and leave it open to let the appliance dry completely.
Charging stand
1 Unplug the charging stand.
2 Clean the charging stand with a moist cloth.
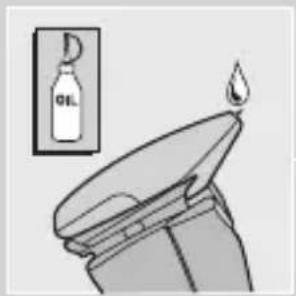
Trimmer
1 Clean the outside of the trimmer with the brush supplied after every use.
The trimmer can also be cleaned by rinsing it under the tap.
2 If the trimmer is used frequently, lubricate the trimmer teeth with a drop of sewing machine oil every six months.
Storage

natural_image
Illustration of a hand holding a multi-pin electric shaver with a downward arrow indicating compression (no text or symbols)Charging stand
The shaver can be stored in the charging stand, even when it is wet.
Always unplug the charging stand before storing the wet or dry shaver in it.
Pouch
The shaver can be stored in the pouch supplied. There is also room for two NIVEA FOR MEN Cool Skin cartridges. The pouch will provide extra protection during travel.
Hanging cord
The shaver can also be stored by hanging it from the hanging cord supplied. Storing the shaver by means of the hanging cord ensures optimal drying conditions.
Replacement
Replace the shaving heads every two years for optimal shaving results.
Replace damaged or worn shaving heads with HQ177 Philips Cool Skin shaving heads only.
Replacing the shaving heads
natural_image
Diagram of a mechanical device with a lever and arrow indicating direction (no text or symbols)1 Switch off the shaver.
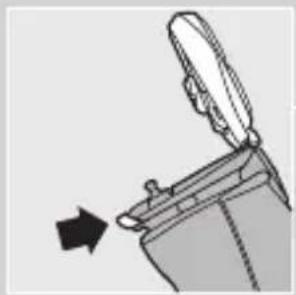
2 Press the release button to open the shaving unit.

3 Turn the wheel anticlockwise (1) and remove the retaining frame (2).
natural_image
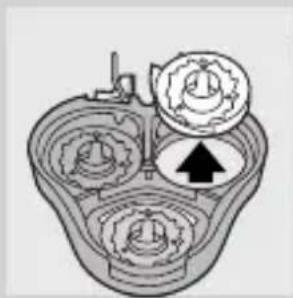
Cross-sectional diagram of a mechanical device with internal gears and a directional arrow (no text or labels)4 Remove the shaving heads and place new ones in the shaving unit.
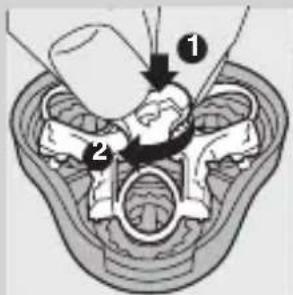
5 Put the retaining frame back into the shaving unit, press the wheel (1) and turn it clockwise (2).
Accessories
The following accessories are available:
- HQ8500/8000 powerplug.
- HQ177 Philips Cool Skin shaving heads.
- HQ170 NIVEA FOR MEN Cool Skin Moisturising Shaving Lotion.
- HQ171 NIVEA FOR MEN Cool Skin Extra Fresh Shaving Gel.
Environment

natural_image
Symbol of a trash bin crossed with a diagonal line, no text or numbers present- Do not throw away the appliance with the normal household waste at the end of its life, but hand it in at an official collection point for recycling. By doing this, you help to preserve the environment.
- The built-in rechargeable shaver battery contains substances that may pollute the environment. Always remove the battery before you discard and hand in the shaver at an official collection point. Dispose of the battery at an official collection point for batteries. If you have trouble removing the battery, you can also take the shaver to a Philips service centre. The staff of this centre will remove the battery for you and will dispose of it in an environmentally safe way.
Disposal of the battery

natural_image
Illustration of a medical or laboratory device with multiple pins inserted, no visible text or symbolsOnly remove the battery if it is completely empty.
1 Let the shaver run until it stops, undo the screws and open the shaver.
2 Remove the battery.
Do not put the shaver back into the charging stand after the battery has been removed.
Guarantee & service
If you need information or if you have a problem, please visit the Philips website at www.philips.com or contact the Philips Customer Care Centre in your country (you find its phone number in the worldwide guarantee leaflet). If there is no Customer Care Centre in your country, go to your local Philips dealer or contact the Service
Department of Philips Domestic Appliances and Personal Care BV.
Troubleshooting
1 The shaving heads do not move smoothly over the skin.
- Cause: not enough shaving gel/lotion has been applied.
Press the pump button a few times until sufficient NIVEA FOR MEN shaving gel/lotion has been released to allow the shaving heads to move smoothly over your face again.
2 Reduced shaving performance
- Cause 1: the shaving heads are dirty.
The shaver has not been cleaned immediately after use and/or has not been rinsed long enough and/or the water used to rinse the shaver was not hot enough.
Clean the shaver thoroughly before you continue shaving. See chapter ‘Cleaning and maintenance’.
- Cause 2: long hairs are obstructing the shaving heads.
Press the release button to open the shaving unit. Turn the wheel anticlockwise (1) and remove the retaining frame (2).
Clean the cutters and guards.
Do not clean more than one cutter and guard at a time, since they are all matching sets. If you accidentally mix up the cutters and guards, it may take several weeks before optimal shaving performance is restored.
Remove the hairs with the brush supplied.
Put the shaving heads back into the shaving unit. Put the retaining frame back into the shaving unit and turn the lock clockwise.
To prevent long hairs from obstructing the shaving heads, remove the shaving heads once a month and clean them with the brush supplied.
- Cause 3: the shaving heads are damaged or worn. Replace the shaving heads. See chapter 'Replacement'.
3 The shaver does not work when the on/off button is pressed.
- Cause 1: the battery is empty.
Recharge the battery. See chapter 'Charging'.
- Cause 2: dried-up shaving gel/lotion is blocking the shaving heads.
Clean the shaving heads thoroughly. See chapter 'Cleaning and maintenance'.
- Cause 3: the shaving heads are damaged.
Replace the shaving heads. See chapter 'Replacement'.
4 The cover of the cartridge compartment cannot be closed
- Cause 1: the cartridge has not been inserted correctly.
Insert the cartridge correctly. It only fits properly into the shaver if the white side of the pump is pointing upwards.
- Cause 2: the cartridge has not been pushed far enough into the shaver.
Press the cartridge until it is properly seated.
5 The NIVEA FOR MEN shaving gel/lotion has changed colour or has turned watery.
- Cause: the NIVEA FOR MEN shaving gel/lotion has not been stored at the right temperature. Insert a new cartridge.
6 Skin irritation occurs
- Cause 1: your skin has not yet become accustomed to this shaving system.
Allow 2-3 weeks for your skin to get accustomed to this shaving system. - Cause 2: the shaving gel/lotion irritates your skin. Try the other type of NIVEA FOR MEN cartridge. Wet your face before shaving with the shaving gel/lotion.
If the irritation does not disappear within 24 hours, we advise you to stop using the shaving gel/lotion.
Pendahuluan
natural_image
Illustration of a hand holding a pipe with a valve symbol (no text or labels)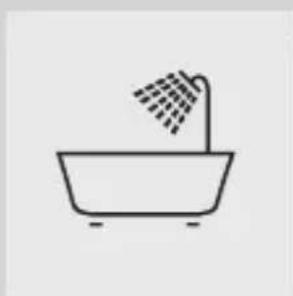
natural_image
Simple line drawing of a bathtub with a showerhead (no text or symbols)natural_image
Simple line drawing of a target with concentric circles and radiating lines, no text or symbols present.Baterai hampir habis
Apabila baterai lemah, lampu pengisian warna merah menyala sewaktu mencukur. Jika Anda mematikan alat cukur, lampu pengisian warna merah berkedip selama beberapa detik.
Apabila Anda mengisi baterai alat cukur ketika baterai mulai melemah, lampu pegnisian warna merah berkedip-kedip selama 24 menit, maksimum.
Sewaktu pengisian
natural_image
Illustration of a hand holding a three-pin electric shaver with a downward arrow indicating compression (no text or symbols)natural_image
Mechanical component diagram showing a lever mechanism with a handle and lever (no text or symbols)1 Tekan tombol pelepas dan buka penutup wadah kartrid.

natural_image
Illustration of a mechanical tool or device with a handle and lever mechanism (no text or symbols)natural_image
Diagram of a mechanical lever system with rotating wheels and a suspended container (no text or symbols)Menyimpan kartrid
natural_image
Diagram of a mechanical component with an arrow indicating rotation (no text or symbols)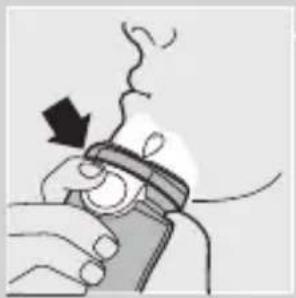
natural_image
Illustration of a hand holding a device with a magnifying glass and smoke, no text or symbols present
natural_image
Diagram of a mechanical component with a downward arrow indicating force or direction (no text or symbols present)Mematikan alat cukur
1 Mematikan alat cukur.
natural_image
Simple line drawing of a mechanical component with a lid and base (no text or symbols)natural_image
Diagram of a mechanical or fluidic component with no visible text or symbols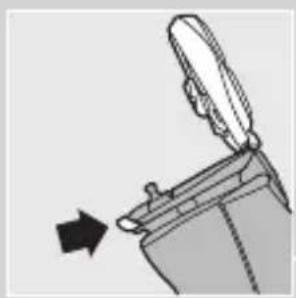
natural_image
Diagram of a mechanical device with a lever and arrow indicating motion (no text or symbols)
natural_image
Anatomical illustration of pelvic organs and spinal cord (no text or labels)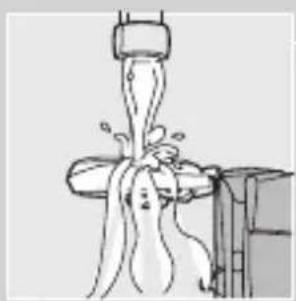
natural_image
Illustration of a person pouring liquid from a bottle into a container (no text or symbols)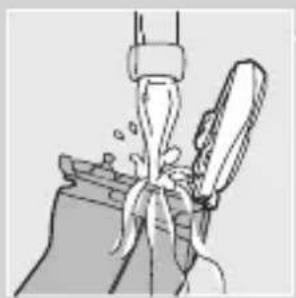
natural_image
Illustration of a hand pouring liquid into a container with a knife inserted (no text or symbols)natural_image
Diagram of a mechanical device with a lever and directional arrow (no text or symbols)1 Mematikan alat cukur.
natural_image
Mechanical gear assembly diagram showing three components with a black arrow indicating direction (no text or labels)
natural_image
Symbol of a trash bin with crossed lines indicating no waste or discharge (no text or labels)natural_image
Illustration of a medical or surgical device with pins inserted, no visible text or symbolsnatural_image
Illustration of a hand holding a cable with a pipe outlet symbol (no text or labels)
natural_image
Simple line drawing of a target with concentric circles and radiating lines, no text or symbols present.배터리 전력 부족
natural_image
Illustration of a hand holding a cylindrical device with a black arrow indicating downward motion (no text or symbols)
natural_image
Illustration of a mechanical tool or device with a handle and lever mechanism (no text or symbols)
natural_image
Illustration of a mechanical device with a lever and handle (no text or symbols)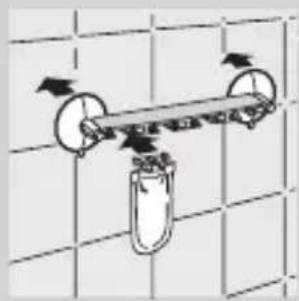
natural_image
Diagram of a mechanical lever system with pulleys and a container, no text or symbols presentnatural_image
Simple line drawing of a mechanical component with an arrow indicating direction (no text or symbols)
natural_image
Illustration of a hand holding a device with a magnifying glass, emitting smoke (no text or symbols)면도기 전원 켜기
natural_image
Diagram of a mechanical component with a downward arrow indicating force or direction (no text or symbols present)natural_image
Simple line drawing of a mechanical component with a flat top and base (no text or symbols)natural_image
Illustration of a human head with a device attached, showing internal components (no text or symbols)natural_image
Diagram of a mechanical device with a lever and arrow indicating motion (no text or symbols)1 면도기를 끄십시오.
natural_image
Anatomical illustration of pelvic organs and spinal cord (no text or labels)4 쇋이빙유닛의 외부를 했구십시오.

natural_image
Illustration of a medical procedure with tubing and a device (no text or symbols)5 수염받이를 세척하십시오.
natural_image
Illustration of a mechanical device with a lever and handle, showing motion or force application (no text or symbols)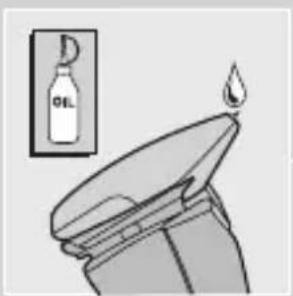
natural_image
Illustration of a candle flame inside a container with an inset showing a bottle labeled 'OIL' (no text or symbols on the main subject)트리머
natural_image
Illustration of a hand holding a three-pin electric shaver with a downward arrow indicating compression (no text or symbols)충전대
natural_image
Diagram of a mechanical device with a lever and arrow indicating direction (no text or symbols)natural_image
Cross-sectional diagram of a mechanical device with internal gears and a directional arrow (no text or labels)natural_image
Mechanical component diagram showing a lever and base with pins (no text or symbols)natural_image
Illustration of a hand holding a pipe with a valve, showing internal components and tubing (no text or symbols)
natural_image
Simple line drawing of a bathtub with showerhead (no text or symbols)natural_image
Simple line drawing of a clock with radiating lines and concentric circles (no text or symbols)Kuasa bateri rendah
Apabila bateri semakin lemah, lampu pandu menyala merah semasa mencukur. Apabila anda mematikan pencukur, lampu pandu berkelip merah selama beberapa saat.
Apabila anda mula mengecas pencukur ketika bateri semakin lemah, lampu pengecasannya berkelip merah selama maksimum 24 minit.
Semasa mengecas
natural_image
Illustration of a hand holding a cylindrical device with a black arrow pointing to it (no text or symbols present)natural_image
Illustration of a mechanical tool or device with a handle and lever mechanism (no text or symbols)
natural_image
Illustration of a mechanical tool or device with a handle and lever mechanism (no text or symbols)natural_image
Diagram of a mechanical lever system with rotating wheels and a hanging container, set against a grid background (no text or symbols)Menyimpan kartrij
natural_image
Simple line drawing of a mechanical component with a knob and arrow indicating direction (no text or symbols)
natural_image
Illustration of a hand holding a device with a black arrow indicating motion (no text or symbols)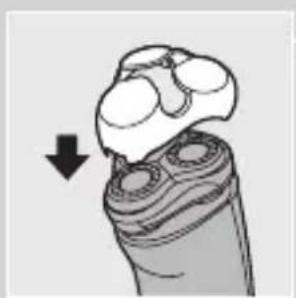
natural_image
Diagram of a dental implant or implant component with a downward arrow indicating compression (no text or symbols present)natural_image
Line drawing of a mechanical component with a lid and base (no text or symbols)4 Muatkan alat perapi ke alat pencukur (anda akan mendengar bunyi klik). Alat perapi kini sedia digunakan.
natural_image
Diagram of a human head with a mechanical component inserted, showing no text or symbolsBAHASA MELAYU58

natural_image
Diagram of a mechanical device with a lever and arrow indicating motion (no text or symbols)natural_image
Anatomical illustration of abdominal organs and pelvic structures (no text or labels)natural_image
Illustration of a mechanical device with a lever and handle, showing motion lines (no text or symbols)natural_image
Illustration of a mechanical device with a lever and handle, showing motion or force (no text or symbols)natural_image
Illustration of a hand holding a three-pin electric shaver with a downward arrow indicating compression (no text or symbols)Penegak cas
natural_image
Diagram of a mechanical device with a lever and arrow indicating direction (no text or symbols)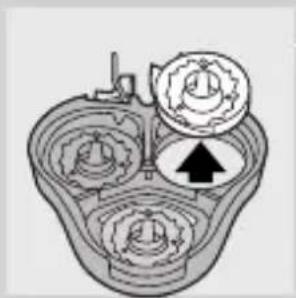
natural_image
Diagram of a mechanical gear assembly with three gears and a central rotating component (no text or labels)natural_image
Symbol of a trash bin crossed out by two crossed lines, with no text or numbers present.natural_image
Illustration of a medical or anatomical device with multiple pins inserted, no text or symbols presentnatural_image
Illustration of a hand holding a cable with a pipe outlet, showing internal components (no text or symbols)
Electro Magnetic Fields (EMF)
natural_image
Simple line drawing of a clock with radiating lines and concentric circles (no text or symbols)แบตเตอรี่ไกลหมด
natural_image
Illustration of a hand holding an electric shaver with a downward arrow indicating compression (no text or symbols)
natural_image
Illustration of a mechanical device with a lever and handle (no text or symbols)ภาษาไทย68

natural_image
Illustration of a mechanical device with a lever and handle (no text or symbols)natural_image
Diagram of a mechanical lever system with rotating wheels and a suspended container (no text or symbols)การใส่โลขั้น
natural_image
Diagram of a mechanical component with a knob and arrow indicating motion (no text or symbols)natural_image
Illustration of a hand holding a device with a smokestack and arrow indicating motion (no text or symbols)natural_image
Diagram of a dental implant or implant component with a downward arrow indicating compression (no text or symbols present)natural_image
Line drawing of a mechanical component with a lid and base (no text or symbols)natural_image
Illustration of a human shoulder joint with visible muscle fibers and cartilage (no text or labels)natural_image
Diagram of a mechanical device with a lever and arrow indicating motion (no text or symbols)natural_image
Anatomical illustration of pelvic organs and spinal cord (no text or labels)natural_image
Illustration of a mechanical device with flowing liquid and a handle (no text or symbols)natural_image
Illustration of a hand holding a stylus device with a downward arrow indicating compression (no text or symbols)แทนขาร์ไฟ
natural_image
Diagram of a mechanical device with a lever and arrow indicating direction (no text or symbols)natural_image
Cross-sectional diagram of a mechanical device with internal gears and a highlighted section (no text or symbols)natural_image
Symbol of a trash bin with crossed lines indicating no waste or restriction, plus a solid black rectangle below (no text or symbols)natural_image
Illustration of a medical or anatomical device with pins inserted, no visible text or symbolsnatural_image
Illustration of a hand holding a cable with a pipe inserted, showing no text or symbols.
natural_image
Simple line drawing of a bathtub with a showerhead (no text or symbols)natural_image
Simple line drawing of a target with concentric circles and radiating lines, no text or symbols present.Pin yêu.
natural_image
Illustration of a hand holding a cylindrical device with a black arrow indicating downward motion (no text or symbols)
natural_image
Illustration of a mechanical tool or device with a handle and lever mechanism (no text or symbols)

natural_image
Illustration of a mechanical device with a lever and handle (no text or symbols)
natural_image
Diagram of a mechanical lever system with rotating wheels and a hanging container, set against a grid background (no text or symbols)natural_image
Simple line drawing of a mechanical component with an arrow indicating direction (no text or symbols)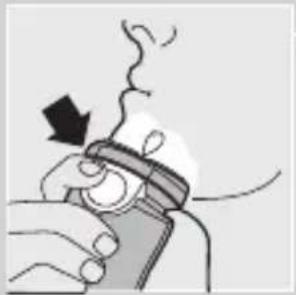
natural_image
Illustration of a hand holding a device with a magnifying glass, emitting smoke (no text or symbols)Bật máy cạo râu.
natural_image
Diagram of a mechanical component with a downward arrow indicating force or direction (no text or symbols present)natural_image
Simple line drawing of a mechanical component with a lid and base (no text or symbols)natural_image
Diagram of a mechanical or fluidic component with no visible text or symbolsnatural_image
Diagram of a mechanical device with a lever and arrow indicating motion (no text or symbols)natural_image
Anatomical illustration of abdominal organs including urethrit and esophagus (no text or labels)natural_image
Illustration of a mechanical device with flowing liquid and a lever (no text or symbols)natural_image
Illustration of a mechanical device with a lever and handle, no visible text or symbolsnatural_image
Illustration of a hand holding a cylindrical device with three leads, showing a downward arrow (no text or symbols)Đế sạc pin
natural_image
Diagram of a mechanical component with an arrow indicating direction (no text or symbols present)natural_image
Cross-sectional diagram of a mechanical device with internal components and an upward arrow (no text or symbols)natural_image
Symbol of a trash bin crossed with a diagonal line and a horizontal bar below (no text or numbers present)natural_image
Illustration of a medical or surgical device with multiple pins inserted (no text or symbols visible)1 publicly may play, do you think that you are doing so.
2 Tháo pin.
natural_image
Illustration of a hand holding a tool with a pipe fitting, no text or symbols presentnatural_image
Simple line drawing of a bathtub with a showerhead (no text or symbols)natural_image
Simple line drawing of a sun with concentric circles and radiating lines, no text or symbols present.電池電力不足
natural_image
Illustration of a hand holding a cylindrical device with three leads, showing a downward arrow (no text or symbols)
natural_image
Mechanical component diagram showing a lever and handle assembly (no text or symbols)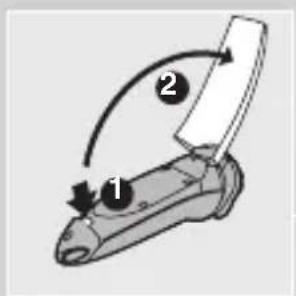
natural_image
Illustration of a mechanical device with a lever and handle (no text or symbols)natural_image
Diagram of a mechanical lever system with rotating components and directional arrows (no text or labels)存放補充包
natural_image
Diagram of a mechanical component with a knob and arrow indicating direction (no text or symbols)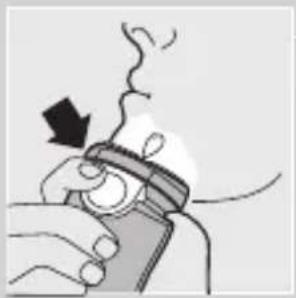
natural_image
Illustration of a hand holding a device with a wavy line above indicating motion or airflow (no text or symbols)
natural_image
Illustration of a dental implant or implant component with a downward arrow indicating compression (no text or symbols present)natural_image
Line drawing of a mechanical component with a lid and base (no text or symbols)3 將鬢角刀稍微向後傾斜。

4 將鬢角刀套在電鬍刀上 (您會聽見「喀噠」一聲)。鬢角刀可馬上使用。
5 按一下開/關 (on/off) 按鈕來啟動鬢角刀。
拆下鬢角刀
natural_image
Anatomical illustration of a human head and neck with labeled parts (no text or symbols present)電鬍刀組:每次使用後快速清潔
natural_image
Diagram of a mechanical device with a lever and arrow indicating motion (no text or symbols)natural_image
Anatomical illustration of internal organs and structures, no text or labels present4 沖洗電鬍刀組的外側。

natural_image
Simple line drawing of a mechanical device with a handle and lever (no text or symbols)繁體中文100

natural_image
Illustration of a mechanical device with a lever and handle, no visible text or symbolsnatural_image
Illustration of a hand holding a three-pin electric shaver with a downward arrow indicating compression (no text or symbols)充電座
natural_image
Diagram of a mechanical device with a lever and arrow indicating motion (no text or symbols)

natural_image
Cross-sectional diagram of a mechanical device showing internal gears and housing (no text or labels)
natural_image
Symbol of a trash bin crossed with a diagonal line, no text or numbers presentnatural_image
Technical line drawing of a mechanical component with multiple inserted pins (no text or symbols)必須將電池電力完全耗盡後才能拆卸電池。
natural_image
Illustration showing a hand washing a shower and a pool with a showerhead (no text or symbols)natural_image
Simple line drawing of a sun with concentric circles and radiating lines, no text or symbols present.电池电量不足
natural_image
Illustration of a hand holding a cylindrical device with a black arrow pointing to it (no text or symbols present)
natural_image
Mechanical component diagram showing a lever mechanism with a handle and lever (no text or symbols)


natural_image
Illustration of a mechanical tool or device with a handle and lever mechanism (no text or symbols)
natural_image
Diagram of a mechanical lever system with rotating wheels and a test tube, set against a grid background (no text or symbols)natural_image
Simple line drawing of a mechanical component with a knob and arrow (no text or symbols)natural_image
Illustration of a hand holding a device with a magnifying glass, emitting smoke (no text or symbols)关闭剃须刀

natural_image
Diagram of a dental implant or implant component with a downward arrow indicating compression (no text or symbols present)安装修发器
natural_image
Line drawing of a mechanical component with a lid and base (no text or symbols)natural_image
Illustration of a human head with a mechanical component, possibly a valve or pump, showing no text or symbols.剃须刀头部件:每次剃须后迅速清洁
natural_image
Diagram of a mechanical device with a lever and arrow indicating direction (no text or symbols)natural_image
Anatomical illustration of internal organs and structures, possibly intestinal or vascular system (no text or labels)3 冲洗剃须刀头部件内侧。

natural_image
Illustration of a mechanical device with a lever and clamped components (no text or symbols)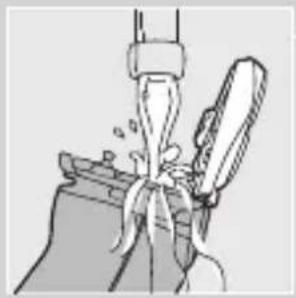
natural_image
Illustration of a mechanical device with a lever and handle, showing motion or force (no text or symbols)
natural_image
Illustration of a candle flame inside a container with a bottle labeled 'D' (no text or symbols on the object itself)4 冲洗剃须刀头部件外侧。
natural_image
Illustration of a hand holding a cylindrical device with three leads, showing a downward arrow (no text or symbols)充电座
natural_image
Diagram of a mechanical device with a lever and arrow indicating motion (no text or symbols)natural_image
Mechanical gear assembly diagram showing internal components and a directional arrow (no text or labels)natural_image
Symbol of a trash bin crossed with a diagonal line and a horizontal bar below (no text or numbers present)natural_image
Illustration of a mechanical device with pins inserted, no text or symbols present仅在电池电量完全耗尽后方可取出电池。
- Important
- Electromagnetic fields (EMF)
- Charging
- Charge indications
- Battery running low
- During charging
- Charging the appliance
- Cordless shaving time
- Cartridges
- Inserting cartridges
- ENGLISH8
- Replacing cartridges
- Storing cartridges
- Using the appliance
- Shaving
- Switching on the shaver
- Switching off the shaver
- ENGLISH10
- Trimming
- Attaching the trimmer
- Removing the trimmer
- Cleaning and maintenance
- Cleaning
- Shaving unit: Quick Clean after every shave
- Shaving unit and hair chamber: every week
- ENGLISH12
- Charging stand
- Trimmer
- Storage
- Pouch
- Hanging cord
- Replacement
- Replacing the shaving heads
- Accessories
- Environment
- Disposal of the battery
- Guarantee & service
- Troubleshooting
- The shaver does not work when the on/off button is pressed.
- The cover of the cartridge compartment cannot be closed
- The NIVEA FOR MEN shaving gel/lotion has changed colour or has turned watery.
- Skin irritation occurs
- Pendahuluan
- Baterai hampir habis
- Sewaktu pengisian
- Menyimpan kartrid
- Mematikan alat cukur
- 배터리 전력 부족
- 면도기 전원 켜기
- 트리머
- 충전대
- Kuasa bateri rendah
- Semasa mengecas
- Menyimpan kartrij
- BAHASA MELAYU58
- Penegak cas
- Electro Magnetic Fields (EMF)
- แบตเตอรี่ไกลหมด
- ภาษาไทย68
- การใส่โลขั้น
- แทนขาร์ไฟ
- Pin yêu.
- Bật máy cạo râu.
- Đế sạc pin
- 電池電力不足
- 存放補充包
- 電鬍刀組:每次使用後快速清潔
- 繁體中文100
- 充電座
- 电池电量不足
- 关闭剃须刀
- 安装修发器
- 剃须刀头部件:每次剃须后迅速清洁
- 充电座
- 仅在电池电量完全耗尽后方可取出电池。
Brand : PHILIPS
Model : Philishave HQ7740
Category : Electric razor