
KDC-MP243SW - Car Radio KENWOOD - Free user manual and instructions
Find the device manual for free KDC-MP243SW KENWOOD in PDF.


| Brand | Kenwood |
| Model | KDC-MP243SW |
| Product Type | Car Radio / CD Receiver |
| Dimensions (W x H x D) | 182 x 53 x 155 mm |
| Weight | 1.30 kg |
| Operating Voltage | 14.4 V (11-16 V allowable) |
| Current Consumption | 10 A |
| Maximum Output Power | 50 W x 4 |
| Full Bandwidth Power (<1% THD) | 22 W x 4 |
| Speaker Impedance | 4 - 8 Ω |
| FM Tuner Frequency Range | 87.5 - 108.0 MHz (50 kHz steps) or 87.9 - 107.9 MHz (200 kHz steps) |
| AM Tuner Frequency Range | 531 - 1611 kHz (9 kHz steps) or 530 - 1700 kHz (10 kHz steps) |
| CD Playback | CD, CD-R, CD-RW; MP3/WMA files |
| Auxiliary Input | 3.5 mm stereo mini-jack, max 1200 mV |
| Security Code Function | Yes, 4-digit user-defined code |
| Subwoofer Control | On/Off, level adjustment (-15 to +15) |
| Audio Control | Bass, Middle, Treble (±8 dB), Balance, Fader |
| Maintenance | Clean faceplate with dry soft cloth; lens fogging: remove disc and wait |
| Safety Features | Short circuit protection, reset button, proper fuse (10A) |
| Installation | DIN size, negative ground 12V DC |
Frequently Asked Questions - KDC-MP243SW KENWOOD
User questions about KDC-MP243SW KENWOOD
0 question about this device. Answer the ones you know or ask your own.
Ask a new question about this device
Download the instructions for your Car Radio in PDF format for free! Find your manual KDC-MP243SW - KENWOOD and take your electronic device back in hand. On this page are published all the documents necessary for the use of your device. KDC-MP243SW by KENWOOD.
USER MANUAL KDC-MP243SW KENWOOD
Manual Clock Adjustment
Tuner Operation 8
Frequency Step Setting
Music disc/Audio file Operation 9
Direct Music Search
Direct Disc Search
Music Search (Function of Audio file)
Music Search (Function of Music CD)
Menu Operation 10
Menu System
Activating Security Code
Deactivating Security Code
Auxiliary Input Display Setting
Demonstration mode Setting
Basic Operations of remote control 13
Appendix 14
Accessories/ Installation Procedure 16
Connecting Wires to Terminals 17
Installation 18
Troubleshooting Guide 19
Specifications 20
Before use
WARNING
To prevent injury or fire, take the following precautions:
- To prevent a short circuit, never put or leave any metallic objects (such as coins or metal tools) inside the unit.
Before using this unit for the first time
This unit is initially set on the Demonstration mode. When using this unit for the first time, cancel the
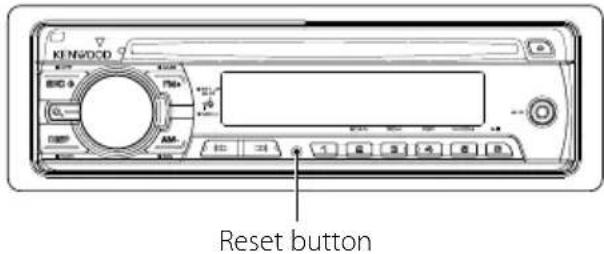
How to reset your unit
- If the unit fails to operate properly, press the Reset button. The unit returns to factory settings when the Reset button is pressed. - Press the reset button if the disc auto changer fails to operate correctly. Normal operation should be restored.
Cleaning the Unit
If the faceplate of this unit is stained, wipe it with a dry soft cloth such as a silicon cloth. If the faceplate is stained badly, wipe the stain off with a cloth moistened with neutral cleaner, then wipe it again with a clean soft dry cloth.

- Applying spray cleaner directly to the unit may affect its mechanical parts. Wiping the faceplate with a hard cloth or using a volatile liquid such as thinner or alcohol may scratch the surface or erases characters.
Cleaning the Faceplate Terminals
If the terminals on the unit or faceplate get dirty, wipe them with a clean soft dry cloth.
Lens Fogging
When you turn on the car heater in cold weather, dew or condensation may form on the lens in the CD player of the unit. Called lens fogging, this condensation on the lens may not allow CDs to play. In such a situation, remove the disc and wait for the condensation to evaporate. If the unit still does not operate normally after a while, consult your Kenwood dealer.
- If you experience problems during installation, consult your Kenwood dealer.
- When you purchase optional accessories, check with your Kenwood dealer to make sure that they work with your model and in your area.
- The characters which can be displayed by this unit are A-Z 0-9 @"^ % & * + - = , . / \ < > [ ] ( ) : ; ^ - { } | \~.
- The illustrations of the display and the panel appearing in this manual are examples used to explain more clearly how the controls are used. Therefore, what appears on the display in the illustrations may differ from what appears on the display on the actual equipment, and some of the illustrations on the display may be inapplicable.
Handling CDs
- Do not touch the recording surface of the CD.
- Do not stick tape etc. on the CD, or use a CD with tape stuck on it.
- Do not use disc type accessories.
- Clean from the center of the disc and move outward.
- When removing CDs from this unit, pull them out horizontally.
- If the CD center hole or outside rim has burrs, use the CD only after removing the burrs with a ballpoint pen etc.
CDs that cannot be used
• CDs that are not round cannot be used.


• CDs with coloring on the recording surface or CDs that are dirty cannot be used.
- This unit can only play the CDs with disc disc disc This unit may not correctly play discs which do not have the mark.
- You cannot play a CD-R or CD-RW that has not been finalized. (For the finalization process refer to your CD-R/CD-RW writing software, and your CD-R/CD-RW recorder instruction manual.)
Basic Operation
![[SRC] Release Display [EM+] [AM-] Disc slot [▲] Auxiliary input KENWOOD SRC φ FM+ AM- SCAN HOSP HELP NAVSTM Search [DISP] [2A3D4] [5] [6] [▶▶] [1] button knob](/content/2026/06/1150468/images/62777755b1d971da28131b40cc6b71ba103bd07c6d38d58d5e350da19c7fdab9.jpg)
General functions
Power/Source select button : [SRC]
Turns on the power.
When the power is on, the source switches between Tuner ("TUNER"), CD ("CD"), Auxiliary input ("AUX"), and Standby ("STANDBY") each time this button is pressed.
Press at least 1 second to turn off the power.
![KENWOOD KDC-MP243SW - Power/Source select button : [SRC] - 1](/content/2026/06/1150468/images/26adca4b1ca4104a0b8f342f7b787dde2e1fcd8f78c0bc12969bd852daef533c.jpg)
- When an optional accessory is connected, the source name for each device appears (KDC-MP443 only).
Volume control : [AUD] knob
Turn the knob to adjust the volume.
Faceplate release : Release
Releases the faceplate lock so that it can be removed. Refer to the following diagram when reattaching the faceplate.


- The faceplate is a precision piece of equipment and can be damaged by shocks or jolts.
- Do not place the faceplate (and the faceplate case) in areas exposed to direct sunlight, excessive heat or humidity. Also avoid places with too much dust or the possibility of water splashing.
• To prevent deterioration, do not touch the terminals of the unit or faceplate with your fingers.
Auxiliary input
Connect a portable audio device with mini-plug cable (3.5 ).

- Use the mini-plug cable which is stereo type and does not have any resistance.
Muting volume upon reception of phone call
When there is a call, "CALL" is displayed and the audio system is paused.
When the call ends, "CALL" disappears and the audio system comes back on.
The audio system comes back on when [SRC] is pressed during a call.
Subwoofer output : [AM-]
Switches between ON ("SW ON") and OFF ("SW OFF") each time the bottom side is pressed for at least 2 seconds.
Switching display : [DISP]
Changing the information displayed. Refer to page 6 for the details of the display setting.
Tuner functions
FM Band : [FM+]
Switches between FM1, FM2, and FM3 each time the [FM+] button is pressed.
AM Band : [AM-]
Switches to AM.
Switches between MW, SW1, and SW2 each time the [AM-] button is pressed. (KDC-MP243SW only)
Tuning: [◀◀] / [▶▶]
Changes the frequency.
![KENWOOD KDC-MP243SW - Tuning: [◀◀] / [▶▶] - 1](/content/2026/06/1150468/images/09836ee61b85c8a32b8095a8561d837f7fcd425374c6813630393c83dc6f2532.jpg)
- During reception of stereo stations the "ST" indicator is ON.
Auto memory entry : [FM+]
Memorizes 6 stations with good reception automatically when pressed for at least 2 seconds.
Preset memory : [1] - [6]
Memorize the station selected when pressing for at least 2 seconds.
Preset tuning : [1] - [6]
Recalls the memorized station.
Disc play functions
Disc play : Disc slot
Starts playing when a disc is inserted.
When a CD is inserted, the "IN" indicator is ON.

- 3 inch (8 cm) CD cannot be used. Attempt to insert using an adapter can cause malfunction.
- Refer to
(page 14) for the Audio file by models you can play.
Pause and play : [6]
Switches between pause and play each time this button is pressed.
Disc ejection : [▲]
![KENWOOD KDC-MP243SW - Disc ejection : [▲] - 1](/content/2026/06/1150468/images/39e99073aa3ed8dd00096d31e94f801766a3febbefc70aab9449ece56d38c0c2.jpg)
- You can eject the disc for 10 minutes after switching off the engine.
Music search : [|◀◀]/[▶▶]
Changes the music when this button is pressed. Fast reverses or forwards the music while pressing.
Folder/Disc search : [FM+]/[AM-]
Switches the folder containing the audio file or the disc in the disc changer.
Track/ File/ Disc/ Folder repeat play : [4]
Switches between Track Repeat ("TRAC REP"), Disc Repeat ("DISC REP") (In Disc Changer), and OFF ("REP OFF") when pressed while playing a CD.
Switches between File Repeat ("FILE REP"), Folder Repeat ("FOLD REP"), and OFF ("REP OFF") when pressed while playing an audio file.
Scan play : [2]
Successively plays the intro of the music in the disc or folder.
"TRAC SCN"/ "FILE SCN" is displayed during Scan Play.
Random play : [3]
Randomly plays the music in the disc or folder. "DISC RDM"/ "FOLD RDM" is displayed during Random Play.
Magazine random play (KDC-MP443) : [5]
Randomly plays the music in the disc changer. "MGZN RDM" is displayed during Magazine Random Play.
Text/Title scroll : [DISP]
Scrolls the CD and audio file text display when pressing the top side for at least 1 second.
Audio Control
1 Select the source to adjust Press the [SRC] button.
2 Enter Audio Control mode
Press the [AUD] knob.
3 Select the Audio item to adjust Press the [AUD] knob.
| Adjustment Item | Display Range | |
| Subwoofer level “SW L” —15 — +15 | ||
| Bass Boost “B.BOOST”/“B.B” “1”/“2”/“OFF” (The indicator turns on according to the setting.) | ||
| System Q “NATURAL/ “ROCK”/ “POPS”/“EASY”/ “TOP40/“JAZZ”/ “GAME”/“USER” | Natural/Rock/Pops/Easy/ Top 40/Jazz/Game/User setting | |
| Bass level “BAS L” —8 — +8 | ||
| Middle level “MID L” —8 — +8 | ||
| Treble level “TRE L” —8 — +8 | ||
| Balance | “BAL” | Left 15 — Right 15 |
| Fader | “FAD” | Rear 15 — Front 15 |
| Exit Audio Control mode (Volume control mode) | ||

- "USER": This appears when Bass level, Middle level, and Treble level are adjusted. When "USER" is selected, these levels are recalled.
4 Adjust the Audio item Turn the [AUD] knob.
5 Exit Audio Control mode Press any button.
Press a button other than the [AUD] knob.
Audio Setup
Setting the Sound system.
1 Select the source to adjust Press the [SRC] button.
2 Enter Audio Setup mode
Press the [AUD] knob for at least 1 second.
3 Select the Audio Setup item to adjust Press the [AUD] knob.
| Adjustment Item | Display | Range |
| Low Pass Filter “LPF” | 80/120/160/Through(OFF) Hz | |
| Volume offset | “V-OFF” | -8 — ±0 (AUX: -8 — +8) |

- Volume offset: Sets each source's volume as a difference from the basic volume.
4 Adjust the Audio setup item Turn the [AUD] knob.
5 Exit Audio Setup mode
Press the [AUD] knob for at least 1 second.
Speaker Setting
Fine-tuning so that the System Q value is optimal when setting the speaker type.
1 Enter Standby
Press the [SRC] button.
Select the "STANDBY" display.
2 Enter Speaker Setting mode
Press the [AUD] knob.
3 Select the Speaker type
Turn the [AUD] knob.
| Speaker type | Display |
| OFF | "SP OFF" |
| For 5 & 4 in. speaker "SP 5/4" | |
| For 6 & 6x9 in. speaker | "SP 6*9/6" |
| For the OEM speaker "SP OEM" |
4 Exit Speaker Setting mode Press the [AUD] knob.
Switching Display
Changes displayed information on each source following;
In Tuner source
| Information | Display |
| Frequency | “FREQ” |
| Clock | “CLOCK” |
In CD & External disc source
| Information | Display |
| Disc title | “D-TITLE” |
| Track title | “T-TITLE” |
| Play time & Track number | “P-TIME” |
| Clock | “CLOCK” |
In Audio file source
| Information Display | |
| Music title & Artist name “TITLE” | |
| Album name & Artist name “ALBUM” | |
| Folder name “FOLDER” | |
| File name “FILE” | |
| Play time & Music number “P-TIME” | |
| Clock “CLOCK” |
In Standby/ Auxiliary input source
| Information Display | |
| Source name "SRC NAME" | |
| Clock "CLOCK" |

- When you select the clock display, the display setting of each source will be changed to the clock display.
- Album name cannot be displayed in WMA file.
- If the selected display item does not have any information, alternative information is displayed.
Manual Clock Adjustment
1 Select the Clock display
Press the [DISP] button.
2 Enter Clock Adjust mode
Press the [DISP] button for at least 1 second.
The clock display blinks.
3 Adjust the hours
Press the [FM+] or [AM-] button.
Adjust the minutes
Press the [I◄◄] or [►►I] button.
4 Exit Clock adjustment mode
Press the [DISP] button.
Tuner Operation
Frequency Step Setting
Changing the tuning frequency step.
The original setting is FM band 50 kHz, and AM band 9 kHz.
1 Turn the power OFF
Press the [SRC] button for at least 1 second.
2 Switch the frequency step
While pressing the [1] and [5] buttons, press the [SRC] button.
Release your fingers from the button after the display appears.
The frequency step changes to FM band 200 kHz, and AM band 10 kHz.

- When the same operation is repeated, the frequency step returns to the original setting.
- When the frequency step is changed, the frequencies in the memory are deleted.
Music disc/Audio fi le Operation
Function of KDC-MP443/KDC-MP3043/KDC-MP343 Function of remote control
Direct Music Search
Doing Music Search by entering the music number.
1 Enter the music number Press the number buttons on the remote control.
2 Do music Search Press the [I◄◄] or [►►I] button.
Cancelling Direct Music Search Press the [▶II] button.
Function of KDC-MP443
Function of disc changers with remote control
Direct Disc Search
Doing Disc Search by entering the disc number.
1 Enter the disc number Press the number buttons on the remote control.
2 Do Disc Search Press the [+] or [-] button.
Cancelling Direct Disc Search Press the [▶II] button.

- Input "0" to select disc 10.
Music Search (Function of Audio file)
Search for the song you want to listen to by tracing the media file structure.
1 Enter Music Search mode Press the Search button.
"SEARCH" is displayed.
Displays the current Audio file name.
2 Searching for and playing a song
| Operation type Operation | |
| Movement between folders/files | Turn the [AUD] knob, or press the [FM+]/[AM-] button. |
| Selection of folder/flie | Press the [AUD] knob or [▶▶▶] button. |
| Return to previous folder Press the [I◀◀] button. | |
| Return to root folder Press the [I◀◀] button for at least 1 second. | |
(ON): Indicates that a folder exists above the currently selected folder.
C (OFF): Indicates that no folder exists above the currently selected folder.
(ON) : Indicates that a folder exists under the currently selected folder.
(Blinking) : Indicates that your selection is a file.
Cancelling the Music Search mode Press the Search button.

- Music Search cannot be performed during Random play or scan play.
Music Search (Function of Music CD)
Select the song you want to listen to by turning the [AUD] knob.
1 Enter Music Search mode Press the Search button.
"SEARCH" is displayed.
Displays the current music No.
2 Select the music Turn the [AUD] knob.
3 Play the selected song Press the [AUD] knob.
The Music Search mode is canceled and the selected song is played.
Returning to the first song Press the [◀◀] button for at least 1 second.
Cancelling the Music Search mode Press the Search button.

- Music Search is available only during playing of the built-in CD player.
- Music Search cannot be performed during Random play or scan play.
Menu System
Setting various functions.
1 Enter Menu mode
Press the Search button for at least 1 second.
"MENU" is displayed.
2 Select the menu item
Press the [FM+] or [AM−] button.
| Display Setting Setting overview | Source | ||
| "CODE SET"/"CODE CLR" | Refer to page 10/11 | Sets/Resets security code. (Function of KDC-MP443) | SB |
| "DIM" ON/OFF* | Adjusts the brightness of the display according to the surrounding illumination. | — | |
| "ICON" ON1/ON2*/OFF | Sets the Graphics mode of the display. | SB | |
| "SWPRE" R*/ SW Sets the preout output. | SB | ||
| "SPRM" ON*/OFF Turns ON/OFF the Supreme function. | AF | ||
| "LO.S"* | ON/OFF* Only stations whose reception is good are searched in auto seek tuning. | AM | |
| "AUTO1"/"AUTO2"/"MANUAL" | AUTO1*/ AUTO2/ MANUAL | Selects the tuning mode of the radio. | TUN |
| "CRSC" OFF/ON* Switches to Monaural to decrease noise when reception is poor. | FM | ||
| "NAME SET" Refer to page 11 | Sets the display when switched to AUX source. | AUX | |
| "SCL" AUTO*/MANU | Specifies whether the text is scrolled automatically. | — | |
| "AUX" OFF/ON1*/ON2 | Sets whether to display AUX during source selection. | SB | |
| "CD READ" 1*/2 Sets the CD read mode. | SB | ||
| "DEMO" Refer to page 12 | Specifies whether to enable demonstration. | — | |
*Factory setting
*1Function of KDC-MP243SW
Displayed item is depending on currently selected source. The mark in Source column shows the source to which the item is displayed.
SB : Can be set in other than standby state.
SB : Can be set in standby state.
AF : Can be set while Audio file source.
TUN : Can be set while Tuner source.
FM : Can be set during FM reception.
AM : Can be set during AM reception.
AUX : Can be set while accessing AUX source.
: Can be set during all sources.

- Refer to the respective page for information on how to set the items with reference page number.
- Refer to the
3 Set the menu item
Press the [I◄◄] or [►►I] button.
4 Exit Menu mode
Press the Search button.
Function of KDC-MP443
Activating Security Code
When Security Code is set, possibility of theft is reduced because input of Security Code is prompted to turn on the unit once it is turned off.

- You can set the Security Code with a 4 digit number of your choice.
- The Security Code cannot be displayed or referenced. Make a note of the Security Code and treasure it up.
1 Enter Standby
Press the [SRC] button.
Select the "STANDBY" display.
2 Enter Menu mode
Press the Search button for at least 1 second.
When "MENU" is displayed, "CODE SET" is also displayed.
3 Enter Security Code mode
Press the [AUD] knob for at least 1 second.
When "ENTER" is displayed, "CODE" is also displayed.
4 Select the digits to enter
Press the [◀◀] or [▶▶] button.
5 Select the Security Code numbers
Press the [FM+] or [AM-] button.
6 Repeat steps 4 and 5, and complete the Security Code.
7 Confirm the Security Code
Press the [AUD] knob for at least 3 seconds.
When "RE-ENTER" is displayed, "CODE" is also displayed.
8 Do the step 4 through 7 operation, and reenter the Security Code.
"APPROVED" is displayed.
The Security Code function activates.

- If you enter the wrong Code in steps 4 through 6, repeat from step 4.
9 Exit Security Code mode Press the Search button.
Resetting the Security Code function when the audio unit is first used after removed from the battery power source or the Reset button is pressed
1 Turn the power ON.
2 Do the step 4 through 7 operation, and enter the Security Code.
"APPROVED" is displayed. Now, you can use the unit.
- When the Security Code function is activated, "CODE SET" changes to "CODE CLR".
- To deactivate the Security Code function, see the next section

Function of KDC-MP443
Deactivating Security Code
To deactivate the Security Code function.
1 Enter Standby
Press the [SRC] button.
Select the "STANDBY" display.
2 Enter Menu mode
Press the Search button for at least 1 second. "MENU" is displayed.
3 Select Security Code mode
Press the [FM+] or [AM-] button.
Select the "CODE CLR" display.
4 Enter Security Code mode
Press the [AUD] knob for at least 1 second.
When "ENTER" is displayed, "CODE CLR" is also displayed.
5 Select the digits to enter
Press the [|◀◀] or [▶▶] button.
6 Select the Security Code numbers
Press the [FM+] or [AM-] button.
7 Repeat steps 4 and 5, and complete the Security Code.
8 Press the [AUD] knob for at least 3 seconds.
"CLEAR" is displayed.
The Security Code function deactivates.
9 Exit Security Code mode Press the Search button.

- If a wrong security code is entered, "ERROR" is displayed. Enter a correct security code.
Auxiliary Input Display Setting
Selecting the display when changing to Auxiliary input source.
1 Select Auxiliary input source Press the [SRC] button.
Select the "AUX" display.
2 Enter Menu mode
Press the Search button for at least 1 second. "MENU" is displayed.
3 Select Auxiliary input display setting mode Press the [FM+] or [AM-] button.
Select the "NAME SET" display.
4 Enter Auxiliary input display setting mode Press the [AUD] knob for at least 1 second.
The presently selected Auxiliary input display is displayed.
5 Select the Auxiliary input display
Press the [I◄◄] or [►►I] button.
Each time you push the knob, the display alternates as listed below.
• "AUX"
• "DVD"
- "PORTABLE"
• "GAME"
• "VIDEO"
• "TV"
6 Exit Auxiliary input display setting mode Press the Search button.

- When operation stops for 10 seconds, the name at that time is registered, and the Auxiliary input display setting mode closes.
- The Auxiliary input display can be set only when the built-in auxiliary input or the auxiliary input of optional KCA-S220A is used. On the KCA-S220A, "AUX EXT" is displayed by default.
Menu Operation
Demonstration mode Setting
Sets the demonstration mode.
1 Enter Menu mode
Press the Search button for at least 1 second.
"MENU" is displayed.
2 Select the Demonstration mode
Press the [FM+] or [AM−] button.
Select the "DEMO" display.
3 Set the Demonstration mode
Press the [AUD] knob for at least 2 seconds.
Each time you press the knob at least 2 seconds, the Demonstration mode alternates between the settings shown in the table below.
Display Setting
"DEMO ON" The Demonstration mode function is ON.
"DEMO OFF" Exit Demonstration mode (Normal mode).
Basic Operations of remote control

General control
Volume control : [VOL]
Source select : [SRC]
Volume reduce : [ATT]
When the button is pressed again, the volume returns to the previous level.
In Audio control
Audio item select : [AUD]
Adjusts the Audio item : [VOL]

- Refer to
In Tuner source
Band select : [FM+]/[AM-]
Station select: [|◄◄►]/[►►►]
Recall preset stations : [1] — [6]
In Disc source
Music select: [|◀◀]/[▶▶]
Folder/Disc select : [FM+]/[AM-]
Pause/Play:[▶II]

About [] (DC-MP443)
This button is used when Bluetooth HANDS FREE BOX is connected. For more information, refer to the instruction manual of Bluetooth HANDS FREE BOX.
About [ * ] (KDC-MP3043/KDC-MP343)
Not used.
About [DIRECT]
Not used.

- Do not set the remote control in hot places such as on the dashboard.
Loading and Replacing the battery
Use two "AA"/"R6"-size batteries.
Slide the cover while pressing downwards to remove it as illustrated.
Insert the batteries with the + and - poles aligned properly, following the illustration inside the case.

natural_image
Diagram of a car's internal battery pack assembly with two batteries and an open casing, showing internal components and battery polarity (no text or labels)Appendix
About Audio file
- Playable Audio file
MP3 (.mp3), WMA (.wma)
- Playable disc media
CD-R/RW/ROM
- Playable disc file format
ISO 9660 Level 1/2, Joliet, Romeo, Long file name.
Although the audio files are complied with the standards listed above, the play may be impossible depending on the types or conditions of media or device.
- Playing order of the Audio file
In the example of folder/file tree shown below, the files are played in the order from ① to ⑩.

flowchart
graph TD
    A["CD (1)"] --> B["1"]
    A --> C["2"]
    A --> D["3"]
    A --> E["4"]
    A --> F["5"]
    A --> G["..."]
    B --> H["10"]
    C --> I["2"]
    C --> J["3"]
    D --> K["4"]
    D --> L["5"]
    E --> M["..."]
    E --> N["10"]
    F --> O["..."]
    F --> P["10"]
    style A fill:#f9f,stroke:#333
    style B fill:#ccf,stroke:#333
    style C fill:#cfc,stroke:#333
    style D fill:#fcc,stroke:#333
    style E fill:#cff,stroke:#333
    style F fill:#ffc,stroke:#333
    style G fill:#fcc,stroke:#333
    style H fill:#fff,stroke:#333
    style I fill:#fff,stroke:#333
    style J fill:#fff,stroke:#333
    style K fill:#fff,stroke:#333
    style L fill:#fff,stroke:#333
    style M fill:#fff,stroke:#333
    style N fill:#fff,stroke:#333
An online manual about audio files is put on the site, www.kenwood.com/audiofile/. On this online manual, detailed information and notes which are not written in this manual are provided. Make sure to read through the online manual as well.
For operating KCA-BT200 (optional)
For operation refer to Model-A-1 in the Instruction Manual of KCA-BT200, and the table below. The [AUTO]/[TI] button should be replaced with [SRC] button for
| Notation used in the KCA-BT200 Instruction Manual | Operation |
| [▶■] button [AUD] knob | |
| Control knob [AUD] knob | |
| [AUTO]/[TI] button [DISP] button | |
| Control knob towards up or down [FM+] or [AM−] button | |
| Control knob towards left or right | [I◀◀] or [▶▶I] button |
For operating KCA-BT100 (optional)
To control KCA-BT100, operate as follows;
To make setting for
To make
Moreover, some displays are different from the description of KCA-BT100 Instruction Manual.
| Displays of KCA-BT100 Instruction Manual | Actual displays on this unit | |
| “DISCONCT” | “HF | D-CON” |
| “CONNECT” | “HF | CON” |
| “PHN-DEL” | “DVC-DEL” | |
| “P-STATUS” | “D-STATUS” | |
| “BT-CON Y” “HF-CON Y” | ||
| “BT-CON N” | “HF-CON N” | |
Menu Glossary
- SWPRE (Switching Preout)
Switches the preout between rear output ("R") and subwoofer output ("SW").
- SPRM (Supreme)
Technology to extrapolate and supplement with proprietary algorithm, the high-frequency range that is cut off when encoding at low bit rate. Supplementing is optimized by compression format (MP3 or WMA) and processed according to bit rate.
The effect is negligible with music that is encoded at high bit rate, variable bit rate or has minimal high frequency range.
- CD READ
Sets the method for reading CD.
When unable to play special format CD, set this function to "2" to force playing. Note that some music CD may be unplayable even when set to "2". In addition, audio files cannot be played when set to "2". Normally, keep this set to "1".
1: Automatically distinguishes between audio file disc and music CD when playing disc.
2: Forces playing as music CD.
- AUX
When this is set to ON, AUX source can be selected.
ON1: Outputs the sound of external unit connected to the AUX terminal when switched to AUX source.
ON2: Activates the attenuator function when switched to AUX source. Turn off the attenuator function when listening to output from external unit. This prevents the noise when no external unit is connected to AUX terminal.
OFF: Disables the selection of AUX source. Set to OFF when not using the AUX terminal.
• AUTO1, AUTO2, MANUAL (Tuning mode select)
Select a tuning mode of the radio.
Tuning mode Display Operation
Auto seek "AUTO1" Automatic search for a station.
Preset station seek "AUTO2" Search in order of the stations in the Preset memory.
Manual "MANUAL" Normal manual tuning control.
• LO.S
When this function is turned on the auto seek turning automatically searches for station with good reception.
It is especially useful searching station with SW1 band or SW2 band.
- ICON
Sets the Graphics mode of the display during normal playback condition.
ON1: Turns on.
ON2: Displays an animation.
OFF: Turns off.
The marking of products using lasers (Except for some areas)
CLASS 1 LASER PRODUCT
The label is attached to the chassis/case and says that the component uses laser beams that have been classified as Class 1. This means that the unit is utilizing laser beams that are of a weaker class. There is no danger of hazardous radiation outside the unit.
Accessories/ Installation Procedure
Accessories
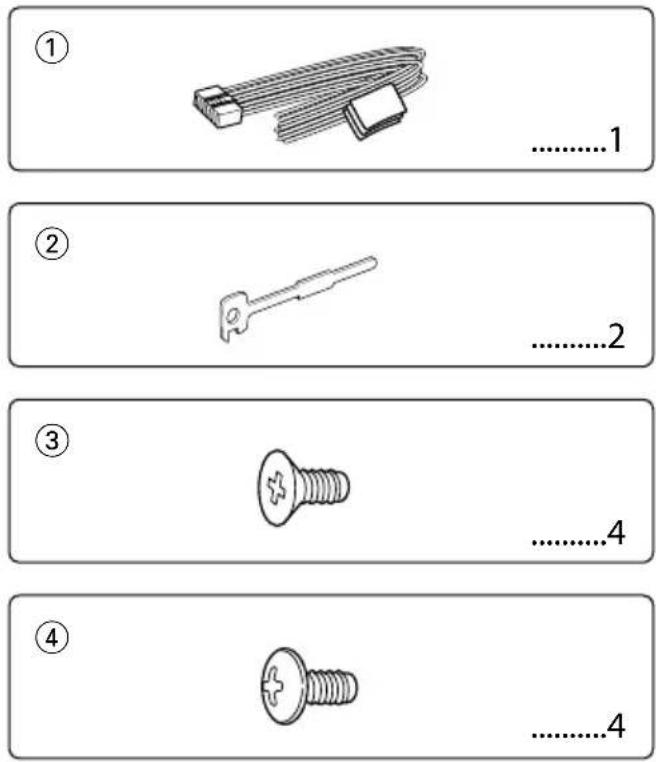
Installation Procedure
- To prevent a short circuit, remove the key from the ignition and disconnect the ⊖ battery.
- Make the proper input and output wire connections for each unit.
- Connect the speaker wires of the wiring harness.
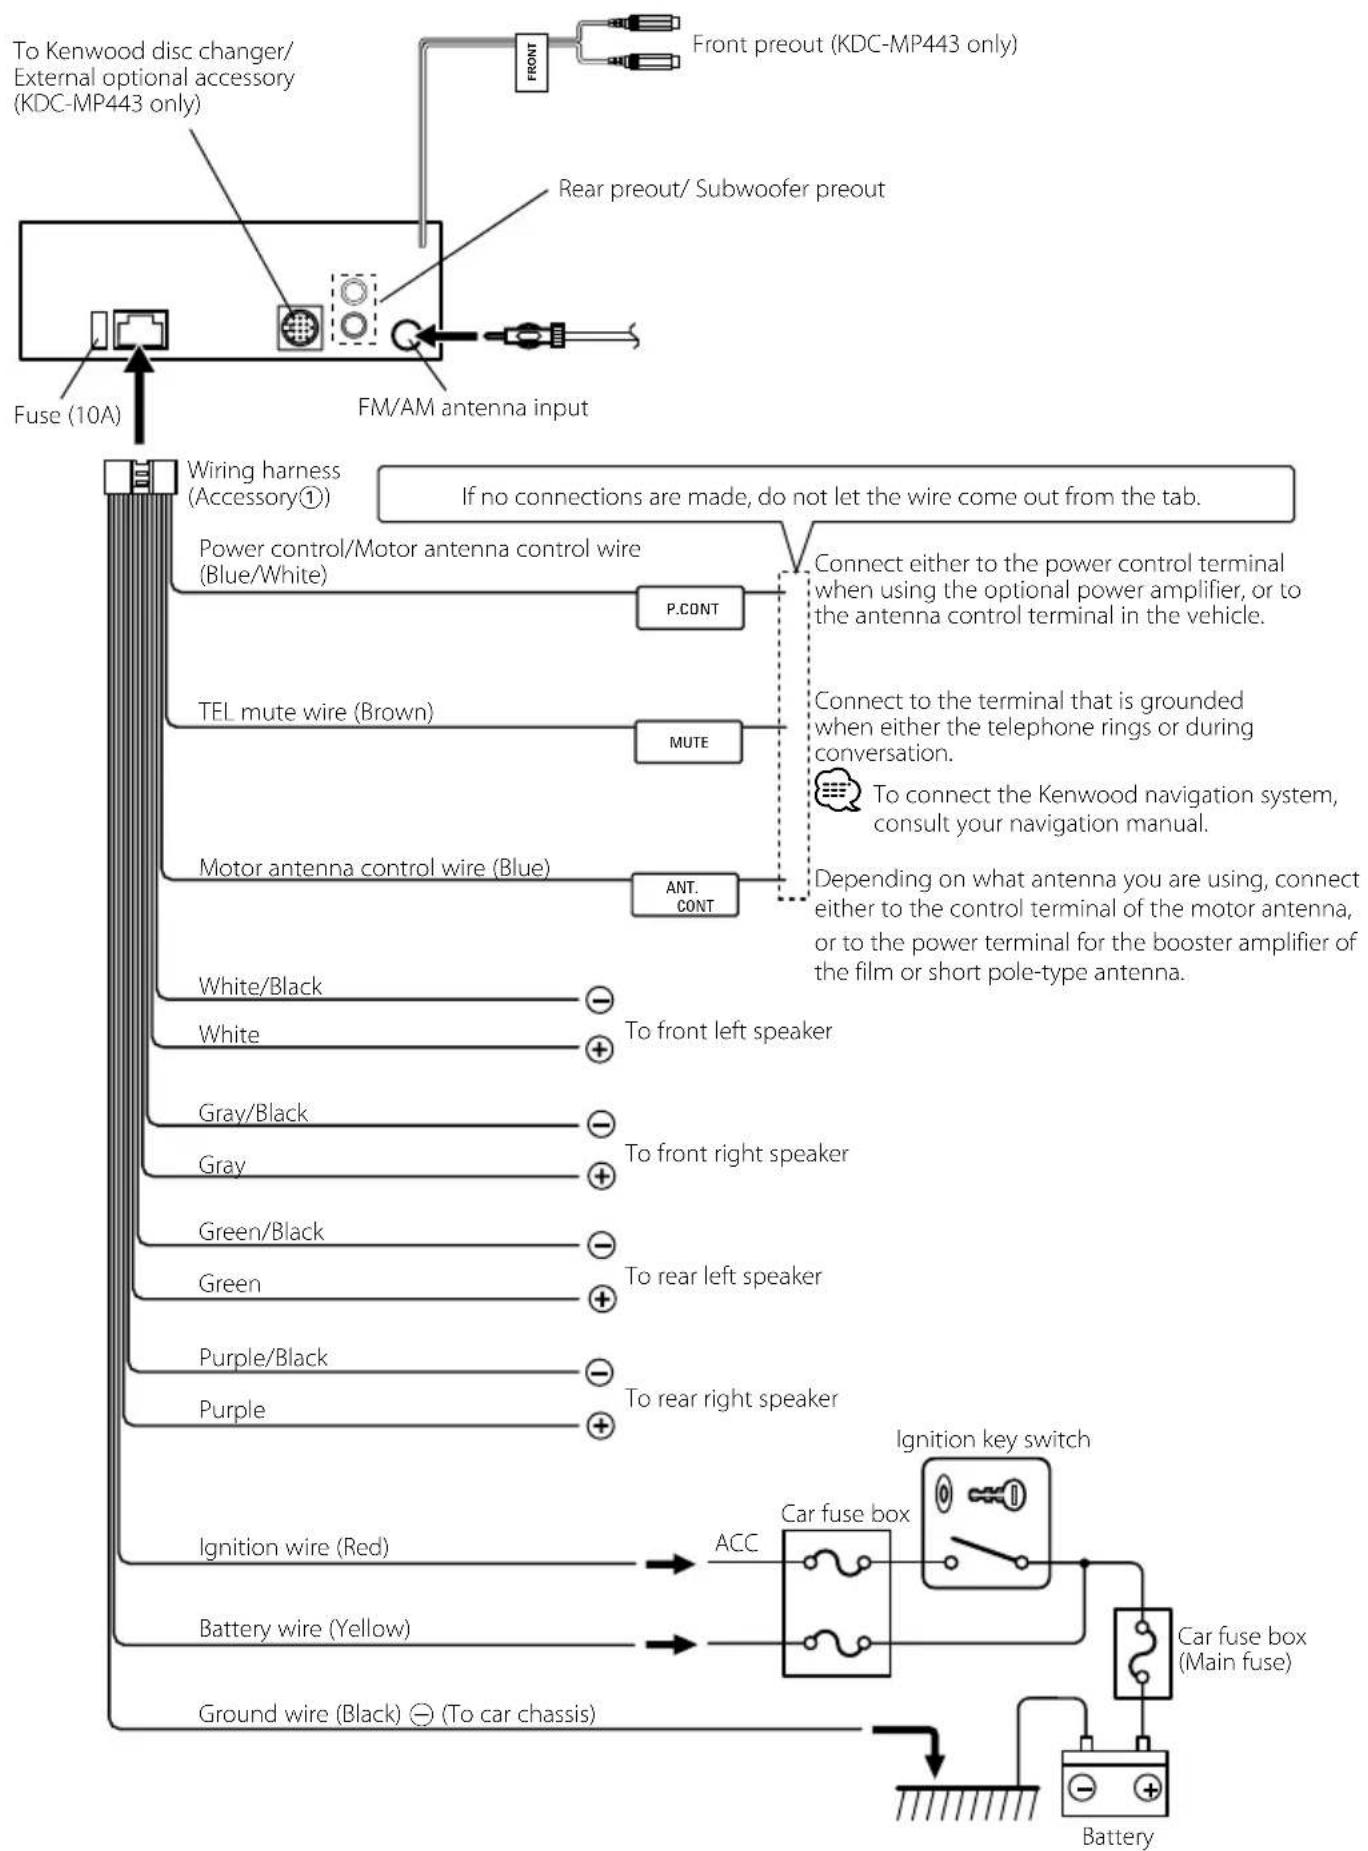
- Connect the wiring harness wires in the following order: ground, battery, ignition.
- Connect the wiring harness connector to the unit.
- Install the unit in your car.
- Reconnect the ⊖ battery.
- Press the reset button.
WARNING
If you connect the ignition wire (red) and the battery wire (yellow) to the car chassis (ground), you may cause a short circuit, that in turn may start a fire. Always connect those wires to the power source running through the fuse box.

- Mounting and wiring this product requires skills and experience. For safety's sake, leave the mounting and wiring work to professionals.
- Make sure to ground the unit to a negative 12V DC power supply.
-
Do not install the unit in a spot exposed to direct sunlight or excessive heat or humidity. Also avoid places with too much dust or the possibility of water splashing.
-
Do not use your own screws. Use only the screws provided. If you use the wrong screws, you could damage the unit.
- If the power is not turned ON ("PROTECT" is displayed), the speaker wire may have a short-circuit or touched the chassis of the vehicle and the protection function may have been activated. Therefore, the speaker wire should be checked.
- If your car's ignition does not have an ACC position, connect the ignition wires to a power source that can be turned on and off with the ignition key. If you connect the ignition wire to a power source with a constant voltage supply, as with battery wires, the battery may die.
- If the console has a lid, make sure to install the unit so that the faceplate will not hit the lid when closing and opening.
- If the fuse blows, first make sure the wires aren't touching to cause a short circuit, then replace the old fuse with one with the same rating.
• Insulate unconnected wires with vinyl tape or other similar material. To prevent a short circuit, do not remove the caps on the ends of the unconnected wires or the terminals. - Connect the speaker wires correctly to the terminals to which they correspond. The unit may be damaged or fail to work if you share the wires or ground them to any metal part in the car.
- When only two speakers are being connected to the system, connect the connectors either to both the front output terminals or to both the rear output terminals (do not mix front and rear). For example, if you connect the ④ connector of the left speaker to a front output terminal, do not connect the ⊖ connector to a rear output terminal.
• After the unit is installed, check whether the brake lamps, blinkers, wipers, etc. on the car are working properly. - Mount the unit so that the mounting angle is 30irc or less.
About CD players/disc changers connected to this unit
If the CD player/ disc changer has the "O-N" switch, set it to the "N" position.
The functions you can use and the information that can be displayed may differ depending on the models being connected.
Connecting Wires to Terminals
flowchart
graph TD
    A["To Kenwood disc changer/External optional accessory (KDC-MP443 only)"] --> B["Fuse (10A)"]
    B --> C["FM/AM antenna input"]
    C --> D["Front preout (KDC-MP443 only)"]
    C --> E["Rear preout/ Subwoofer preout"]
    D --> F["Wiring harness (Accessory①)"]
    E --> G["Power control/Motor antenna control wire (Blue/White)"]
    G --> H["P.CONT"]
    H --> I["If no connections are made, do not let the wire come out from the tab."]
    G --> J["TEL mute wire (Brown)"]
    J --> K["MUTE"]
    K --> L["Connect either to the power control terminal when using the optional power amplifier, or to the antenna control terminal in the vehicle."]
    L --> M["To connect the Kenwood navigation system, consult your navigation manual."]
    G --> N["Motor antenna control wire (Blue)"]
    N --> O["ANT. CONT"]
    O --> P["Depending on what antenna you are using, connect either to the control terminal of the motor antenna, or to the power terminal for the booster amplifier of the film or short pole-type antenna."]
    N --> Q["White/Black"]
    N --> R["White"]
    N --> S["Gray/Black"]
    N --> T["Gray"]
    N --> U["Green/Black"]
    N --> V["Green"]
    N --> W["Purple/Black"]
    N --> X["Purple"]
    N --> Y["Ignition key switch"]
    Y --> Z["Car fuse box"]
    Z --> AA["ACC"]
    AA --> AB["Battery wire (Red)"]
    AA --> AC["Battery wire (Yellow)"]
    AA --> AD["Ground wire (Black) ⊖ (To car chassis)"]
    Z --> AE["Car fuse box (Main fuse)"]
    AE --> AF["Battery"]
Installation
non-Japanese cars

Bend the tabs of the mounting sleeve with a screwdriver or similar utensil and attach it in place.

- Make sure that the unit is installed securely in place. If the unit is unstable, it may malfunction (for example, the sound may skip).
Japanese cars
1 Refer to the section
2 Align the holes in the unit (two locations on each side) with the vehicle mounting bracket and secure the unit with the accessory screws.

Accessory③...for Nissan car Accessory④...for Toyota car
Removing the hard rubber frame
1 Engage the catch pins on the removal tool and remove the two locks on the upper level. Upper the frame and pull it forward as shown in the figure.

2 When the upper level is removed, remove the lower two locations.

- The frame can be removed from the bottom side in the same manner.
Removing the Unit
1 Refer to the section
2 Insert the two removal tools deeply into the slots on each side, as shown.
3 Lower the removal tool toward the bottom, and pull out the unit halfway while pressing towards the inside.


- Be careful to avoid injury from the catch pins on the removal tool.
4 Pull the unit all the way out with your hands, being careful not to drop it.
Troubleshooting Guide
Some functions of this unit may be disabled by some settings made on this unit.
! Cannot display the user of System Q.
▶
! • Cannot set up the subwoofer.
- No output from the subwoofer.
- Cannot set up the low pass filter.
- Preout is not set to subwoofer. "SWPRE" of
(page 4) is not set to On.
! • Cannot register a security code.
- Cannot set up Display.
▶
What might seem to be a malfunction in your unit may just be the result of slight misoperation or miswiring. Before calling service, first check the following table for possible problems.
Tuner source
? Radio reception is poor.
√ The car antenna is not extended.
Pull the antenna out all the way.
Disc source
? The specified disc does not play, but another one plays instead.
√ The specified CD is quite dirty.
Clean the CD, referring to the CD cleaning of the section on
√ The disc is loaded in a different slot from that specified.
Eject the disc magazine and check the number for the specified disc.
√ The disc is severely scratched.
Try another disc instead.
Audio file source
? The sound skips when an Audio file is being played.
√ The media is scratched or dirty.
Clean the media, referring to the CD cleaning of the section on
√ The recording condition is bad.
Record the media again or use another media.
The messages shown below display your systems condition.
TOC ERR: • No disc has been loaded in the disc magazine.
- The CD is quite dirty. The CD is upside-down. The CD is scratched a lot.
E-05: The disc is unreadable.
E-15: Media was played that doesn't have data recorded that the unit can play.
E-77: The unit is malfunctioning for some reason.
Press the reset button on the unit. If the "E-77" code does not disappear, consult your nearest service center.
E-99: Something is wrong with the disc magazine.
Or the unit is malfunctioning for some reason.
Check the disc magazine. And then press the reset button on the unit. If the "E-99" code does not disappear, consult your nearest service center.
READING: The unit is reading the data on the disc.
IN (Blink): The CD player section is not operating properly.
Reinsert the CD. If the CD cannot be ejected or the display continues to flash even when the CD has been properly reinserted, please switch off the power and consult your nearest service center.
PROTECT: The speaker wire has a short-circuit or touches the chassis of the vehicle, and then the protection function is activated.
- Wire or insulate the speaker cable properly and press the reset button. If the "PROTECT" code does not disappear, consult your nearest service center.
NA FILE: An Audio file is played with a format that this unit can't support.
→----
COPY PRO: A copy-protected file is played.
→ ----
Specifications
FM tuner section
Frequency range
200 kHz space : 87.9 MHz - 107.9 MHz
50 kHz space : 87.5 MHz - 108.0 MHz
Usable sensitivity (S/N = 30dB)
: 9.3dBf (0.8 μV/75 Ω)
Quieting Sensitivity (S/N = 50dB)
15.2dBf (1.6 μV/75 Ω)
Frequency response (±3 dB)
30 Hz - 15 kHz
Signal to Noise ratio (MONO)
70 dB
Selectivity (±400 kHz)
≥ 80 dB
Stereo separation (1 kHz)
: 40 dB
AM tuner section
Frequency range
10 kHz space : 530 kHz - 1700 kHz
9 kHz space : 531 kHz - 1611 kHz
Usable sensitivity (S/N = 20dB)
: 28 dBμ (25 μV)
AM tuner section (KDC-MP243SW)
Frequency range
Band1 (MW): 530 kHz - 1700 kHz (10 kHz space)
: 531 kHz - 1611 kHz (9 kHz space)
Band2 (SW1): 2940 kHz - 7735 kHz (5 kHz space)
Band3 (SW2): 9500 kHz - 10135 kHz / 11580 kHz
- 18135 kHz (5 kHz space)
Usable sensitivity (S/N = 20dB)
: 28 dBμ (25 μV)
CD player section
Laser diode
: GaAlAs
Digital filter (D/A)
: 8 Times Over Sampling
D/A Converter
: 24 Bit
Spindle speed
: 500 - 200 rpm (CLV)
Wow & Flutter
: Below Measurable Limit
Frequency response (±1 dB)
: 20 Hz - 20 kHz
Total harmonic distortion (1 kHz)
: 0.01 %
Signal to Noise ratio (1 kHz)
: 105 dB
Dynamic range
: 93 dB
MP3 decode
: Compliant with MPEG-1/2 Audio Layer-3
WMA decode
: Compliant with Windows Media Audio
Audio section
Maximum output power
: 50 W × 4
Full Bandwidth Power (at less than 1% THD)
: 22 W × 4
Speaker Impedance
: 4 - 8 Ω
Tone action
Bass : 100 Hz ±8 dB
Middle : 1 kHz ±8 dB
Treble : 10 kHz ±8 dB
Preout level / Load (CD)
: 2000 mV/10 kΩ
Preout impedance
: ≤ 600 Ω
Auxiliary input
Frequency response (±1 dB)
: 20 Hz - 20 kHz
Input Maximum Voltage
: 1200 mV
Input Impedance
: 10 kΩ
General
Operating voltage (11 - 16V allowable)
: 14.4 V
Current consumption
: 10 A
Installation Size (W x H x D)
: 182 × 53 × 155 mm
Weight
: 1.30 kg
- Tuner Operation 8
- Music disc/Audio file Operation 9
- Menu Operation 10
- Basic Operations of remote control 13
- Appendix 14
- Accessories/ Installation Procedure 16
- Connecting Wires to Terminals 17
- Installation 18
- Troubleshooting Guide 19
- Specifications 20
- Before use
- WARNING
- To prevent injury or fire, take the following precautions:
- Before using this unit for the first time
- How to reset your unit
- Cleaning the Unit
- Cleaning the Faceplate Terminals
- Lens Fogging
- Handling CDs
- CDs that cannot be used
- Basic Operation
- General functions
- Power/Source select button : [SRC]
- Volume control : [AUD] knob
- Faceplate release : Release
- Auxiliary input
- Muting volume upon reception of phone call
- Subwoofer output : [AM-]
- Switching display : [DISP]
- Tuner functions
- FM Band : [FM+]
- AM Band : [AM-]
- Tuning: [◀◀] / [▶▶]
- Auto memory entry : [FM+]
- Preset memory : [1] - [6]
- Preset tuning : [1] - [6]
- Disc play functions
- Disc play : Disc slot
- Pause and play : [6]
- Disc ejection : [▲]
- Music search : [|◀◀]/[▶▶]
- Folder/Disc search : [FM+]/[AM-]
- Track/ File/ Disc/ Folder repeat play : [4]
- Scan play : [2]
- Random play : [3]
- Magazine random play (KDC-MP443) : [5]
- Text/Title scroll : [DISP]
- Audio Control
- Audio Setup
- Speaker Setting
- Switching Display
- Manual Clock Adjustment
- Tuner Operation
- Frequency Step Setting
- Turn the power OFF
- Switch the frequency step
- Music disc/Audio fi le Operation
- Direct Music Search
- Direct Disc Search
- Music Search (Function of Audio file)
- Music Search (Function of Music CD)
- Menu System
- Enter Menu mode
- Select the menu item
- Set the menu item
- Exit Menu mode
- Activating Security Code
- Enter Standby
- Enter Menu mode
- Enter Security Code mode
- Select the digits to enter
- Select the Security Code numbers
- Repeat steps 4 and 5, and complete the Security Code.
- Confirm the Security Code
- Do the step 4 through 7 operation, and reenter the Security Code.
- Deactivating Security Code
- Auxiliary Input Display Setting
- Menu Operation
- Demonstration mode Setting
- Select the Demonstration mode
- Set the Demonstration mode
- Display Setting
- Basic Operations of remote control
- General control
- In Audio control
- In Tuner source
- In Disc source
- Loading and Replacing the battery
- Appendix
- About Audio file
- For operating KCA-BT200 (optional)
- For operating KCA-BT100 (optional)
- Menu Glossary
- - SWPRE (Switching Preout)
- - SPRM (Supreme)
- - CD READ
- - AUX
- • AUTO1, AUTO2, MANUAL (Tuning mode select)
- Tuning mode Display Operation
- • LO.S
- - ICON
- The marking of products using lasers (Except for some areas)
- CLASS 1 LASER PRODUCT
- Accessories/ Installation Procedure
- Accessories
- Installation Procedure
- About CD players/disc changers connected to this unit
- Connecting Wires to Terminals
- Installation
- non-Japanese cars
- Japanese cars
- Removing the hard rubber frame
- Removing the Unit
- Troubleshooting Guide
- ! Cannot display the user of System Q.
- ! • Cannot set up the subwoofer.
- ! • Cannot register a security code.
- Tuner source
- ? Radio reception is poor.
- Disc source
- ? The specified disc does not play, but another one plays instead.
- Audio file source
- ? The sound skips when an Audio file is being played.
- The messages shown below display your systems condition.
- Specifications
- FM tuner section
- AM tuner section
- AM tuner section (KDC-MP243SW)
- CD player section
- Audio section
- General
Brand : KENWOOD
Model : KDC-MP243SW
Category : Car Radio