HRD-442P - Dictaphone Hanwha - Free user manual and instructions
Find the device manual for free HRD-442P Hanwha in PDF.

| Product Type | Digital Voice Recorder |
| Brand | Hanwha |
| Model | HRD-442P |
| Dimensions | 4.2 x 1.8 x 0.6 in (approx.) |
| Weight | 2.5 oz (with battery) |
| Power Supply | 2 x AAA batteries (not included) |
| Battery Life | Up to 20 hours of recording |
| Recording Format | WAV or MP3 (user-selectable) |
| Recording Modes | High Quality, Standard, Long Play |
| Internal Memory | 4 GB (approx. 280 hours in LP mode) |
| Expansion Slot | microSD card (up to 32 GB) |
| Interface | USB 2.0 for file transfer |
| Microphone | Built-in omnidirectional |
| Speaker | Built-in 80 mW |
| Playback Controls | Play, Pause, Stop, Skip, Volume |
| Voice Activation | Yes (VOR - Voice Operated Recording) |
| Display | LCD with backlight |
| Password Protection | File and device lock |
| Operating System | Windows / Mac compatible (no driver needed) |
| Cleaning Instructions | Wipe with a dry, soft cloth. Do not use liquids. |
| Safety Warnings | Do not expose to moisture. Keep away from magnets. |
| Spare Parts & Repairability | Battery compartment cover and USB port replaceable by service center. |
| General Information | User manual available for free download in PDF. |
Frequently Asked Questions - HRD-442P Hanwha
User questions about HRD-442P Hanwha
0 question about this device. Answer the ones you know or ask your own.
Ask a new question about this device
Download the instructions for your Dictaphone in PDF format for free! Find your manual HRD-442P - Hanwha and take your electronic device back in hand. On this page are published all the documents necessary for the use of your device. HRD-442P by Hanwha.
USER MANUAL HRD-442P Hanwha
Please take note of the followings before using this product.
- Do not use the product outdoor.
- Do not spill water or liquid in the connection part of the product.
- Do not impose the system to excessive shock or force.
- Do not pull out the power plug forcefully.
- Do not disassemble the product on your own.
- Do not exceed the rated input/output range.
- Use a certified power cord only.
- For the product with an input ground, use a grounded power plug.
Package Contents
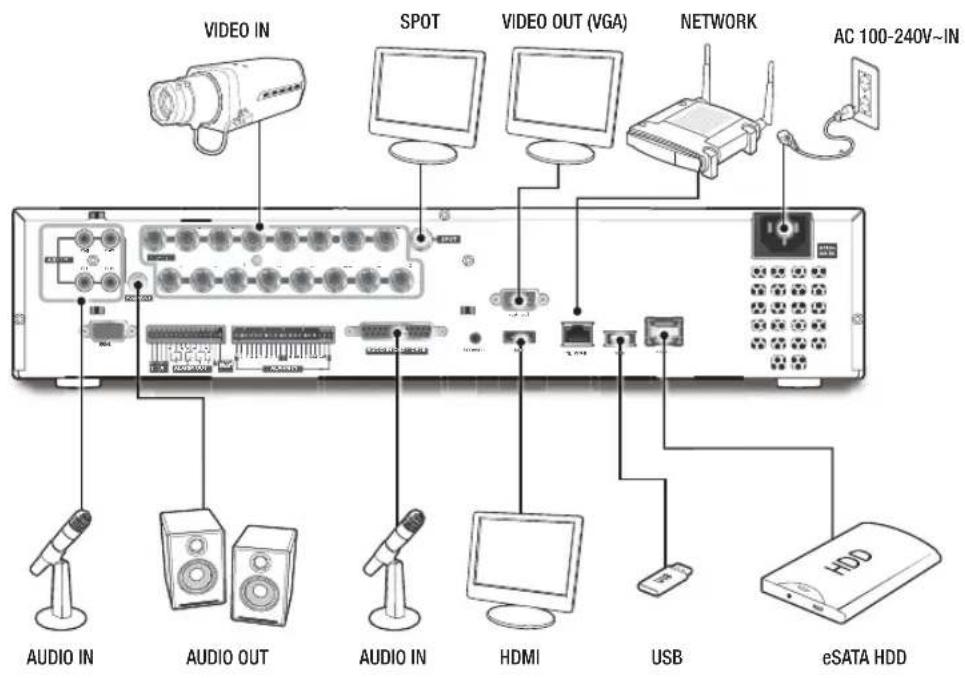
Please unwrap the product, and place the product on a flat place or in the place to be installed. Check if the main unit and all the following accessories are included in the product package.

■ The appearance of the components may differ from the image shown.
■ Accessory category and quantity may differ depending on sales region.
For some regions, HDD is not pre-installed. HDD Fixing Screw, SATA Power Cable, SATA data cable and SATA power/data cable quantity vary depending on the model.


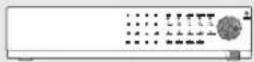
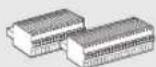
DVR (HRD-442) DVR (HRD-842) DVR (HRD-1642)
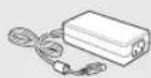

Adapter (HRD-442) Power Cable Mouse

User Manual or Quick Manual

Network Viewer Software / User Manual CD
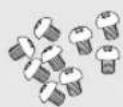
HDD Fixing Screw (HRD-842/1642) (For models having no installed HDD)

Bracket Fixing Screw
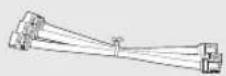
SATA Data Cable (HRD-842/1642) (For models having no installed HDD)
SATA Power Cable (HRD-842) (For models having no installed HDD)

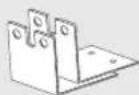
Bracket Rack (HRD-442)
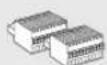
Terminal Block (10 pin) (HRD-442)
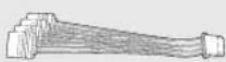
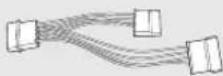
SATA Power Cable (HRD-1642) (For models having no installed HDD)

Remote Control / Remote Control Battery (AAA)
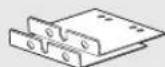
Bracket Rack (HRD-842/1642)
Terminal Block (15/20 pin)
(HRD-842/1642)
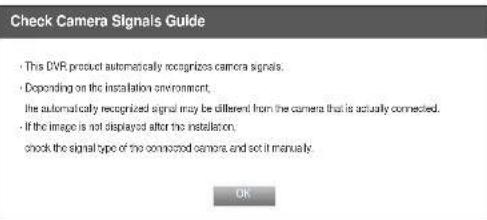
Check Camera Signals Guide
This DVR product automatically recognizes camera signals. Depending on the installation environment, the automatically recognized signal may be different from the camera that is actually connected. If the image is not displayed after the installation, check the signal type of the connected camera and set it manually.
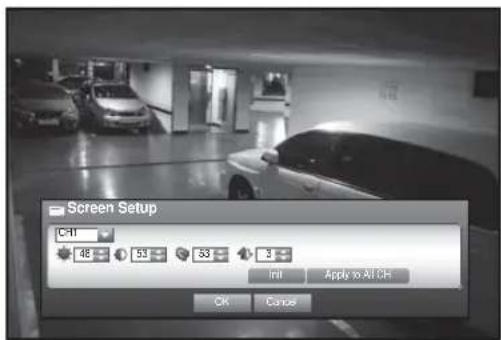
Video Quality
In order to get better picture quality, it is necessary to choose different EQ value when connecting different distance cable.
- Press the [MENU] button on the remote control or front panel.
- Use the left/right button (◀▶) to select
. Device setting menu is selected. - Use the up/down buttons (▲▼) to move to
, and press [ENTER] button. - Use the up/down buttons (▲▼) to move to
, and press [ENTER] button.
Recording Schedule
- Press the [MENU] button on the remote control.
-
Use the left/right button (◀▶) to select
. Record menu is selected. -
Use the up/down buttons (▲▼) to move to
, and press [ENTER] button. - Select
. A window of scheduled recording setup appears. - Use direction buttons (▲▼◀▶) to move to a desired item, and set the value.
- Apply to All CH : If selected
, "Apply to All CH" window appears. Press to apply the setup to all channels. - When the recording schedule setup is done, press
.
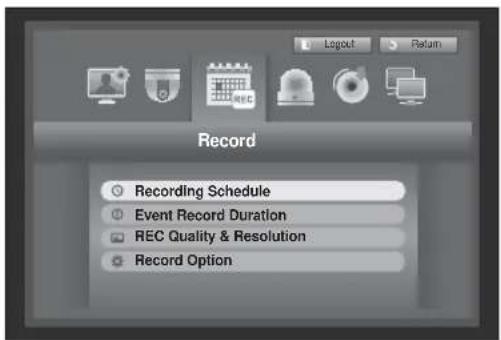

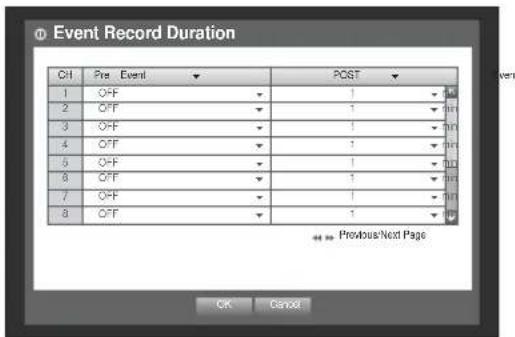
Event Record Duration
- Use the up/down buttons (▲▼) in
window to move to , and press [ENTER] button. - Use direction buttons (▲▼◀▶) to move to a desired item, and set the value.
- Pre Event: The recording of an event will start at a pre-determined time prior to the actual occurrence of the event. If it is set to 5 seconds, the recording begins from 5 seconds before the event.
- POST Event: The recording will continue for a pre-determined time after the actual end of an event. If it is set to 5 seconds, the recording ends in 5 seconds after an event.
- When the event recording duration setup is done, press
.
Setting the Backup
-
Press the [MENU] button on the remote control or front panel.
-
Use the left/right button (◀▶) to select
. Backup menu is selected. -
Press the [ENTER] button. A backup window appears. You can directly access it from the "Live screen menu".
-
Use direction buttons (▲▼◀▶) to move to a desired item, and set the value.
-
When the backup setup is done, press
. If no available device is recognized for backup, button is not activated.
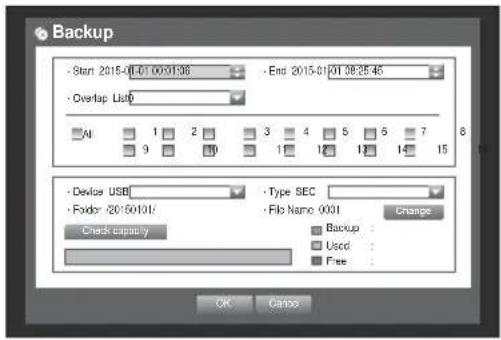
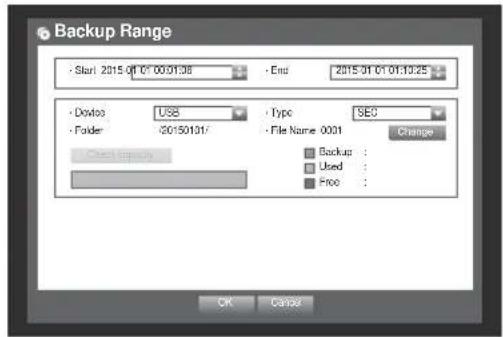
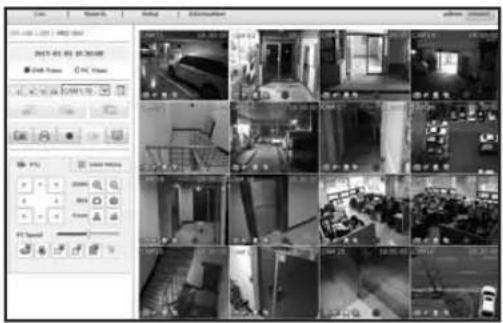
Backup
- Select a data item and click
in the Search menu. The selected data is played and the play launcher appears on the screen.
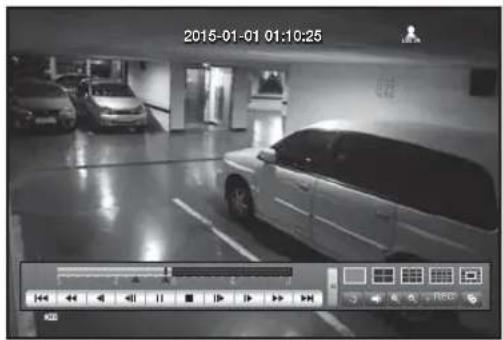
-
Click < 📄 > to set the current time to the start time of backup; you can specify a backup area using the mouse (yellow triangle).
-
Click < 📄> again to set the current time to the end time of the backup and the "Backup Range" window appears.
-
If you want to return to the Live screen in Play mode, click < ■ > in the launcher menu or press the [■] button on the remote control.
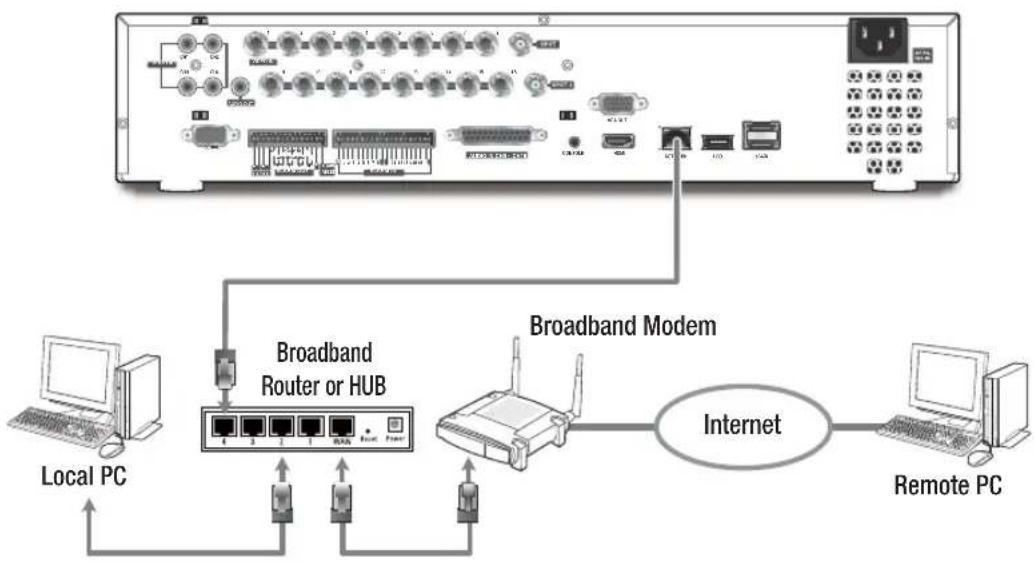
flowchart
graph TD
    A["Local PC"] --> B["Broadband Router or HUB"]
    C["Remote PC"] --> D["Broadband Modem"]
    B --> E["Internet"]
    D --> E
    E --> F["Local PC"]
    style A fill:#f9f,stroke:#333
    style C fill:#ccf,stroke:#333
    style B fill:#cfc,stroke:#333
    style D fill:#fcc,stroke:#333
    style E fill:#ffc,stroke:#333
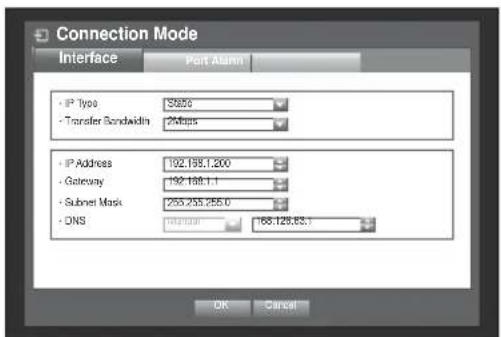
Port forwarding
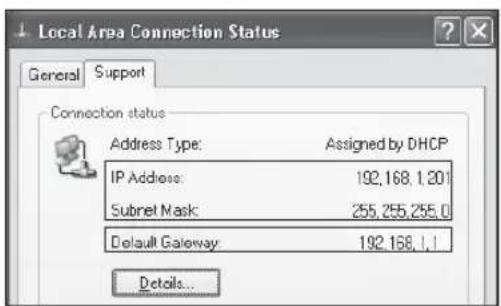
- Check the "Default Gateway" from the network properties of the PC connected through the router.
- From
- , select . A window of connection mode setup appears. - Use direction buttons (▲▼◀▶) to move to a desired item, and set the value.
-
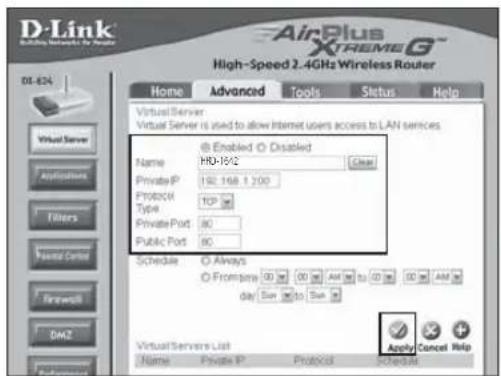
Enter the gateway address found in step 1 into the browser's address field to display the router settings.
-
Select the "Advanced" tab in the "Virtual Server" menu, enter the IP address and port and click the
button.

- Above instructions are based on D-LINK DI-624 router. Port forwarding setup may differ from the router's manufacturer.
6\_ English
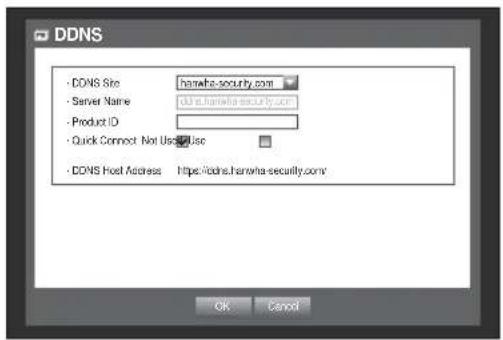
DDNS
-
Use the up/down buttons (▲▼) in
window to move to , and press [ENTER] button. -
Use virtual keyboard to enter user inputs.
If selected
If selected
- When the DDNS setup is done, press
.
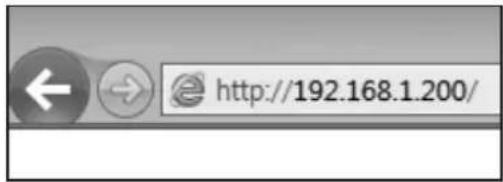
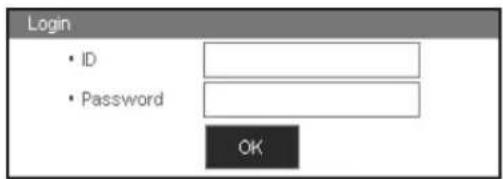
Connecting to the web viewer
- Open your web browser and type the IP address or URL of DVR into the URL address box.
- Set the Admin ID and password same to those of the DVR Admin. For general users, enter the DVR user ID and password.

- The initial administrator ID is "admin" and the password should be set when logging in for the first time.
- Set password for your wireless network if you use the product with a wireless router. Being not protected with password or using the default wireless router password may expose your video data to potential threat.
Please change your password every three months to safely protect personal information and to prevent the damage of the information theft. Please, take note that it's a user's responsibility for the security and any other problems caused by mismanaging a password.
If there are more than one LAN cards for the PC, you can use a LAN card with a smaller interface matrix.
- Click
.
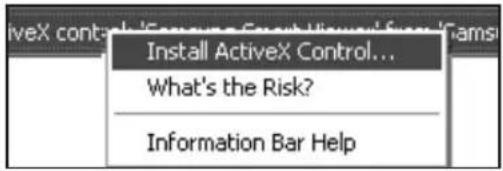
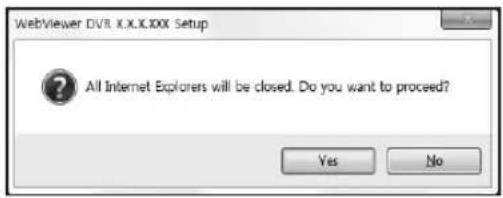
- When the installation confirm message appear, click [Yes] button. All windows will be closed(IE).
- When a program installation wizard window appears, press the [Install] button to install the program.
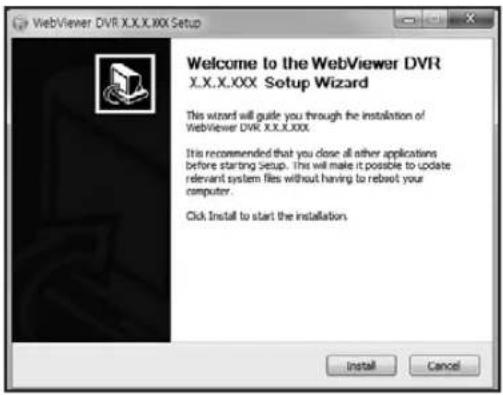
- When the program is installed, open the web viewer again to login. Live Viewer's main screen appears when you log in successfully after installing the program.

Any changes or modifications in construction of this device which are not expressly approved by the party responsible for compliance could void the user's authority to operate the equipment.
This device complies with part 15 of the FCC Rules. Operation is subject to the following two conditions: (1) This device may not cause harmful interference, and (2) this device must accept any interference received, including interference that may cause undesired operation.
This equipment has been tested and found to comply with the limits for a Class A digital device, pursuant to part 15 of the FCC Rules. These limits are designed to provide reasonable protection against harmful interference when the equipment is operated in a commercial environment.
This equipment generates, uses, and can radiate radio frequency energy and, if not installed and used in accordance with the instruction manual, may cause harmful interference to radio communications. Operation of this equipment in a residential area is likely to cause harmful interference in which case the user will be required to correct the interference at his own expense.

Hanwha Techwin cares for the environment at all product manufacturing stages, and is taking measures to provide customers with more environmentally friendly products.
The Eco mark represents Hanwha Techwin's devotion to creating environmentally friendly products, and indicates that the product satisfies the EU RoHS Directive.

natural_image
Symbol of a trash bin with crossed lines indicating no waste or restriction (no text or labels)Correct Disposal of This Product (Waste Electrical & Electronic Equipment)
(Applicable in the European Union and other European countries with separate collection systems)
This marking on the product, accessories or literature indicates that the product and its electronic accessories (e.g. charger, headset, USB cable) should not be disposed of with other household waste at the end of their working life. To prevent possible harm to the environment or human health from uncontrolled waste disposal, please separate these items from other types of waste and recycle them responsibly to promote the sustainable reuse of material resources.
Household users should contact either the retailer where they purchased this product, or their local government office, for details of where and how they can take these items for environmentally safe recycling.
Business users should contact their supplier and check the terms and conditions of the purchase contract. This product and its electronic accessories should not be mixed with other commercial wastes for disposal.

Correct disposal of batteries in this product
(Applicable in the European Union and other European countries with separate battery return systems.)
This marking on the battery, manual or packaging indicates that the batteries in this product should not be disposed of with other household waste at the end of their working life. Where marked, the chemical symbols Hg, Cd or Pb indicate that the battery contains mercury, cadmium or lead above the reference levels in EC Directive 2006/66. If batteries are not properly disposed of, these substances can cause harm to human health or the environment.
To protect natural resources and to promote material reuse, please separate batteries from other types of waste and recycle them through your local, free battery return system.
Head Office
6, Pangyo-ro 319 beon-gil, Bundang-gu, Seongnam-si,
Gyeonggi-do, 463-400 Rep. of KOREA
Tel : +82.70.7147.8753 Fax : +82.31.8018.3740
www.hanwha-security.com
Hanwha Techwin America
500 Frank W. Burr Blvd. Suite 43 Teaneck, NJ 07666
Toll Free +1.877.213.1222 Direct +1.201.325.6920
Fax +1.201.373.0124
www.hanwha-security.com
Hanwha Techwin Europe
Heriot House, Heriot Road, Chertsey, Surrey, KT16 9DT, United Kingdom
Tel +44.1932.57.8100 Fax +44.1932.57.8101
www.hanwha-security.eu
Hanwha Techwin(Tianjin) Co.Ltd
No.11, Weiliu Rd., Micro-Electronic Industrial Park, Jingang Road Tianjin 300385, China
Tel: +86.22.2388.7788
www.hanwha-security.cn
Hanwha Techwin Middle East FZE
JAFZA View 18, 20th floor, office 2001, 2002, 2003, Downtown Jebel Ali,
Dubai, United Arab Emirates
http://hanwha-security.com
