Off Road Bundle - Radio COBRA - Free user manual and instructions
Find the device manual for free Off Road Bundle COBRA in PDF.

User questions about Off Road Bundle COBRA
0 question about this device. Answer the ones you know or ask your own.
Ask a new question about this device
Download the instructions for your Radio in PDF format for free! Find your manual Off Road Bundle - COBRA and take your electronic device back in hand. On this page are published all the documents necessary for the use of your device. Off Road Bundle by COBRA.
USER MANUAL Off Road Bundle COBRA
natural_image
Top-down view of a camera lens with concentric rings and central aperture (no text or symbols)drive HD™
Record your Ride
Table of Contents
INTRODUCTION .... 3
DRIVE HD DASH CAM FEATURES 3
PRODUCT SERVICE AND SUPPORT 4
YOUR DEVICE....5
WHAT'S IN THE BOX....5
OPTIONAL ACCESSORIES – available at www.cobra.com ....5
CONTROLS AND CONNECTIONS....6
INSTALLATION....7
DUAL CAM INSTALLATION 8
BASIC OPERATION....9
INITIAL SETUP....10
LED FUNCTIONALITY 10
VIDEO SCREEN....11
VIDEO SETTINGS....13
GENERAL SETTINGS....15
iRADAR SETTINGS (DASH2308/DASH2316D, CCDC4500/CCDC4500AUS)....16
LANGUAGE SETTINGS....16
VIDEO AND PHOTO PLAYBACK MODE 16
GPS OPERATION....17
Cobra iRadar® APP CONNECTION ....18
DOWNLOADING IRADAR APP AND CONNECTING TO DASH CAM....18
CONNECTING TO A COMPUTER OR TV....19
DOWNLOAD DRIVE HD PLAYER....19
DASH CAM SOFTWARE UPDATE INSTRUCTIONS....20
CAMERA SPECIFICATIONS 21
TROUBLESHOOTING 22
TRADEMARKS ACKNOWLEDGEMENT, WARNINGS, and REGULATORY INFORMATION ......23
INTRODUCTION
Congratulations! You've made a smart choice by purchasing a Drive HD Dash Cam from Cobra. Drive HD DASH Series cameras provide peace of mind by continuously recording the road in beautiful 1296P Super HD video. With cutting edge features, phenomenal video quality, and an industry-leading focus on user experience, Drive HD Dash Cams are the best solution to Record Your Ride. This User Manual covers the following Drive HD models which share a common video platform but include varying add-on features:
DASH2208 – Drive HD® Super HD Dash Cam
DASH2308 – Drive HD® Super HD Dash Cam with iRadar®
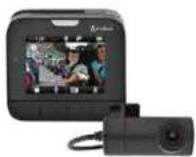
DASH2216D – Drive HD® Dual View Dash Cam System
DASH2316D – Drive HD® Dual View Dash Cam with iRadar®
CCDC4500 – Drive HD® Dual View Dash Cam with iRadar® Costco Club Pack
CCDC4500AUS – Drive HD® Dual View Dash Cam with iRadar® Costco Australia Club Pack
DRIVE HD DASH CAM FEATURES
1296P Super HD - All Drive HD DASH Series cameras record the road ahead in 1296P Super HD featuring excellent image quality, nighttime performance, and advanced dynamic range
2.0" LCD Screen - Large LCD Display with video playback directly on the device as well as on your TV or computer
160° Viewing Angle - Ultra wide-angle view gives you a full view of the road and your peripherals while at the same time minimizing edge distortion.
Continuous Loop Recording - Footage is stored in 3, 5, or 10 minute clips. When the memory card fills up, the camera automatically deletes the oldest segment to make room for new ones.
Emergency Recording - Automatic or Manual - If you don't want a clip to be overwritten, simply click the Emergency Recording button and the clip will be protected. Clips are automatically protected if an impact is detected.
G-Sensor - 3-axis accelerometer senses sudden accelerations, stops, and collisions and automatically protects footage surrounding the incident.
Parking Mode - While in Parking Mode, Drive HD cameras will only record video when motion is detected. This feature is helpful for vehicles that have an always-on accessory port or units that are hardwired to power.
Dynamic Range - Optimized to automatically maximize video clarity in daylight or nighttime conditions
Simple Installation - Mount the unit on the windshield, apply power, and forget about it. Drive HD cameras will automatically start recording without the need for complex configuration.
Ready to Use - Includes a MicroSD memory card, vehicle power adapter, and adhesive windshield mount so the unit is ready to use out-of-the-box.
SnapShot - The SnapShot button is always available so that you can capture a still image at any time.
Built-in Microphone & Speaker - Records and plays back audio along with video. The microphone can easily be toggled off if you prefer not to record audio.
Auto-Record and Auto-Power Off - As soon as power is applied the dash cam turns on and starts recording. When power is removed the dash cam will safely stop recording and shut down.
Screen Saver - Turns the screen off after a set time of no activity to prevent driver distraction. The unit continues recording and the screen can be woken up by pressing any button.
Supports 9 Languages:
o English
o German
o Russian
o Spanish
o Dutch
o Simplified Chinese
o French
o Portuguese
o Traditional Chinese
PRODUCT SERVICE AND SUPPORT
For any questions about operating or installing this new Cobra product, PLEASE CONTACT COBRA FIRST...do not return this product to the retail store. The contact information for Cobra will vary depending on the country in which you purchased and utilize the product. For the latest contact information, please go to www.cobra.com/support. For products purchased in the U.S.A. you may also call 1-800-262-7212 (1-800-COBRA-12).
For products purchased in the U.S.A., if your product should require factory service, please go to www.cobra.com/support and follow the instructions for returning your product to the Cobra Factory Service Department.
For products purchased in Australia, you may call (03) 96867866, email to wr.consumer@causa.com or visit www.who-rae.com.au
For products purchased in Europe, you may call 0333 1212252 or visit www.snooperneo.co.uk
YOUR DEVICE
WHAT'S IN THE BOX
- All Models
- Dash Cam
- MicroSD Card (size varies by model)
• Adhesive Windshield Mount
• 12V Vehicle Power Adapter
• 10ft Micro USB Cable (for power only)
• 1.5ft Micro USB Cable (for connection to computer)
- Dual View Models Only
- CAM2 2 ^nd Camera
• 13ft Extender Cable for CAM2 - Y-Splitter Cable
OPTIONAL ACCESSORIES – available at www.cobra.com
- Low Profile Adhesive Mount: CA-Mount-001 – Great for discreet and semi-permanent installations.
- Suction Cup Mount: CA-Mount-005 – Removeable windshield mount that you can take on-the-go.
- GPS Mount: CA-Mount-002 – Enables dash cams to embed GPS location, speed, G-sensor, and compass information into videos.
- Hardwire Kit: CA-MicroUSB-001 – Wires your dash cam directly into the fuse box for a quick and clean installation without any dangling wires
- Extended USB Cable: CA-MicroUSB-002 (for power only) – 20ft USB->Micro USB cable helps with hiding wire and/or mounting further from a power source.
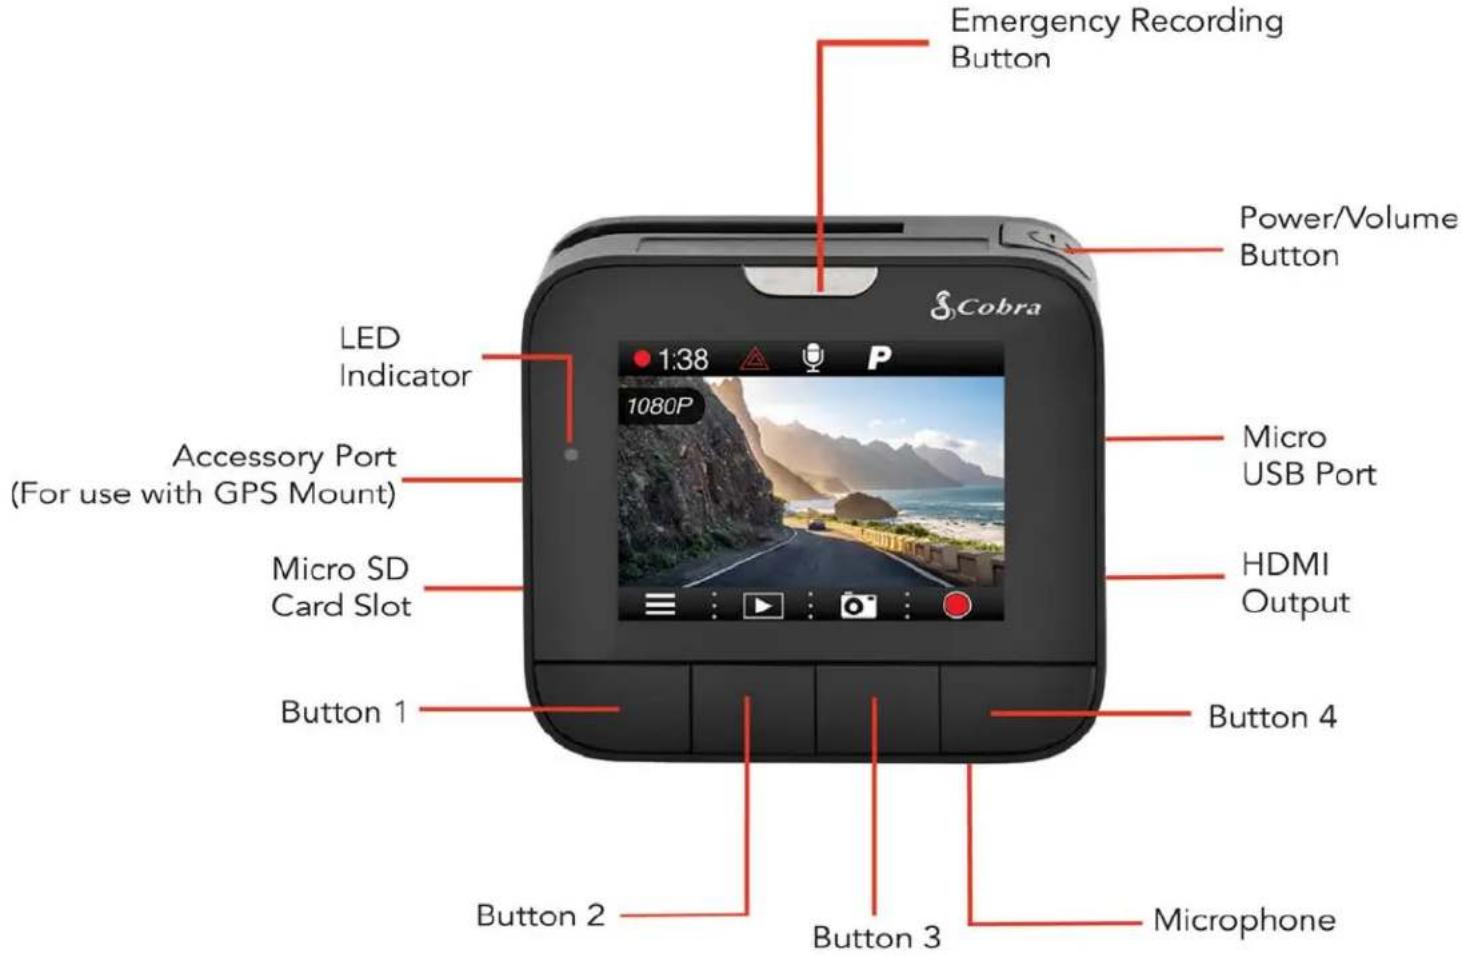
CONTROLS AND CONNECTIONS
Silver for Non-Bluetooth (DASH2200 Series) Models Blue for Bluetooth (DASH2300 Series/CCDC4500/CCDC4500AUS) Models

text_image
Emergency Recording Button Power/Volume Button LED Indicator Accessory Port (For use with GPS Mount) Micro SD Card Slot Button 1 Button 2 Button 3 Micro USB Port HDMI Output Button 4 MicrophoneThe functions of Buttons 1-4 are indicated by the icon directly above each button and change depending on the state of the unit.
SINGLE CAM INSTALLATION
1 MOUNT
To install the Adhesive Windshield Mount, slide the dash cam onto the mount and twist to tighten the cam in desired location. Find the spot on your windshield where you would like to mount the camera and confirm the placement. Reminder, this is an adhesive mount so it is important to mount correctly the first time. Next, peel the plastic film off the 3M adhesive and press the mount FIRMLY onto the windshield.
2 POWER

text_image
Cobra 1:38 P 1080PPlug one end of the supplied 12V Vehicle Power Adapter into your vehicle's cigarette lighter, and the other end into the micro USB port. The unit will automatically turn on and start recording. To manually power on the device PRESS AND HOLD the Power button until the display activates. When the power button is used to power on the unit recording must be started manually.
Note: A Hardwire Kit (CA-MicroUSB-001) is available at www.cobra.com for a more permanent installation that allows for discrete routing of the power cable.
③ DRIVE!
Drive HD Dash Cams are designed to set and forget. After initial setup the unit will turn on and start recording as soon as power is applied. When the Micro SD Card is full the oldest footage will be deleted to make way for the new. If you witness something that you don't want to be deleted simply press the Emergency Record button and it will be saved forever.
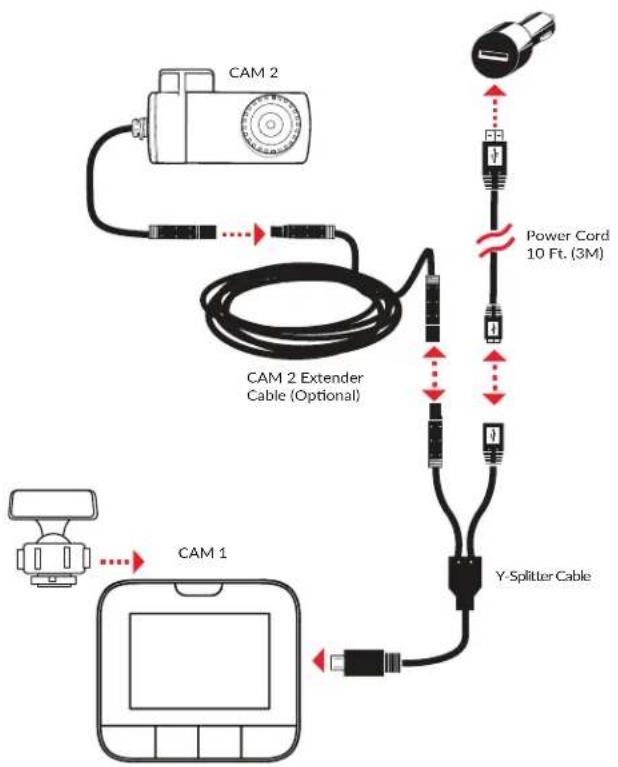
DUAL CAM INSTALLATION
MOUNT
CAM 1 - Slide the dash cam onto the adhesive mount and twist to tighten the cam in desired location. Find the spot on your windshield where you would like to mount the camera and confirm the placement.
Reminder, this is an adhesive mount so it is important to mount correctly the first time. Next, peel the plastic film off the 3M adhesive and press the mount FIRMLY onto the windshield.
CAM 2 – Attach CAM 2 to the windshield using the adhesive tape. CAM 2 is most commonly installed facing out the rear on the top center of the rear windshield. It can also be mounted on the front windshield to record the interior of the vehicle.
2 POWER
flowchart
graph TD
    A["Cam 1"] -->|Signal| B["Cam 2"]
    B --> C["Cam 2 Extender Cable (Optional)"]
    C --> D["Y-Splitter Cable"]
    D --> E["Power Cord 10 Ft. (3M)"]
    E --> F["Camera"]
    style A fill:#f9f,stroke:#333
    style B fill:#ccf,stroke:#333
    style C fill:#cfc,stroke:#333
    style D fill:#fcc,stroke:#333
    style E fill:#cff,stroke:#333
    style F fill:#ffc,stroke:#333
The Dual View Models utilize a Y-Splitter and CAM 2 Extender Cable to offer maximum flexibility and clean installation without dangling wires.
- Plug the Y-Splitter into the Micro USB Port on CAM 1. - Connect the Micro USB end of the power cord into the Y-Splitter. Connect the USB end of the power cord in the Cigarette Lighter Adapter and then plug into your vehicle.
- Plug CAM 2 into the Y-Splitter. Use the Extender Cable if necessary.
- Organize and tuck away cables to make sure that the driver's view is not obstructed. In most vehicles it's possible to tuck Y-Splitter and cables into the headliner and cleanly hide the extender cable along the top wall all the way to the rear of the vehicle.
Professional installation is recommended.

natural_image
Interior view of a car dashboard with steering wheel, dashboard, and steering wheel (no visible text or symbols)Windshield

natural_image
Interior view of a modern living room with three furniture seats and a red ceiling fixture (no text or symbols visible)Back Window
If CAM 2 videos appear upside-down enter the Video Settings Menu on CAM 1 and turn Flip Cam 2 to ON.
If you have mounted CAM 2 facing forward enter the Video Settings Menu on CAM 1 and turn Mirror CAM 2 to OFF.

DRIVE!
Drive HD Dash Cams are designed to set and forget. After initial setup the unit will turn on and start recording as soon as power is applied. When the Micro SD Card is full the oldest footage will be deleted to make way for the new. If you witness something that you don't want to be deleted simply press the Emergency Record button and it will be saved forever.
BASIC OPERATION
POWERING ON THE DEVICE
The device will power on automatically when plugged in and can also be powered by PRESSING AND HOLDING the On/Off button until the display activates (when connected to power).
THE MICRO SD MEMORY CARD
The device comes with a Micro SD memory card. To remove the SD card, press firmly on the SD card to push it further into the slot. There will be a click and the SD card will pop out on release. Extract the card and replace as necessary by inserting a card into the slot and pressing until it locks in place. These cameras are compatible with Micro SD cards up to 64GB. Please be sure to format the card in-camera before use. Class 10 high endurance cards from reputable brands are recommended for constant video recording of a dash camera.
CONTINUOUS LOOP RECORDING:
Once the memory card is full, the camera will continuously overwrite the oldest footage recorded. To protect a clip so that it will not be overwritten, press the Emergency Record Button. The emergency record icon will show on the screen. Files can also be locked from the playback menu in Video Playback Mode.
EMERGENCY RECORDING
An Emergency Recording is triggered when the Emergency Record Button at the top of the unit is pressed or when the G-Sensor registers an impact. Emergency Recordings create locked files that are not overwritten by Continuous Loop Recording. To ensure that important footage isn't lost surrounding an incident, adjacent video clips are locked if the incident happens within 30 seconds of the beginning or end of a clip.
NAVIGATING MENUS
When in a menu, press ▼ or ▲ to navigate to the menu item you want to select or change and then press Ⓞ to select or change the option associated with that item. Pressing ← at any time will exit the menu without saving changes.
VOLUME ADJUST
Briefly press the Power/Volume button to enter the volume menu. There are 5 volume settings and mute (no Volume)
INITIAL SETUP
When the Dash Cam is powered on for the first time it will ask you to enter basic setup information.
You will be asked to set the Year, Month, Day, Time Zone, Daylight Saving Time, and Time. This information is needed so that file names will be created correctly and time stamps will be accurate in your videos.
On subsequent startups the unit will proceed directly to the Video Screen
LED FUNCTIONALITY
The LED Indicator, located near the top left of the screen, communicates power and recording status even if the screen is off. LED operation is detailed in the table below:
| Camera State | LED |
| Unit ON/Recording | Blinking Red/GreenAlternating (1s on-1s off) |
| Unit ON/Not Recording | Solid Red |
| Unit OFF/Power Connected | Solid Green |
| Unit OFF/Power Disconnected | No LED |
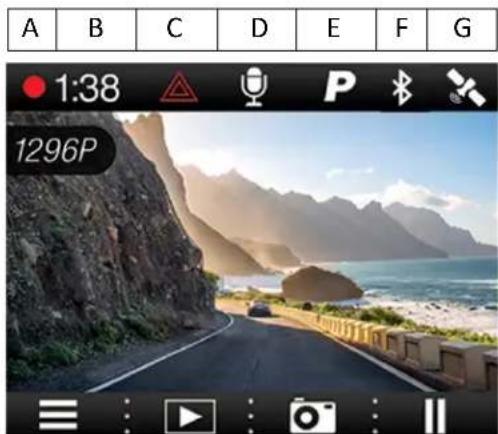
VIDEO SCREEN
The Video Screen is the home screen for the device and allows you to easily record HD video of the road ahead of you.
STATUS BAR ICONS:
text_image
A B C D E F G 1:38 1296PA. Recording Icon. When recording dual camera videos the 📄 icon will appear.
B. Indicates the recording time of the current clip.
C. The hazard icon appears if an Emergency Recording is active.
D. Indicates whether the mic is active or muted.
E. Shows if Parking Mode is on.
F. Bluetooth indicator shows gray if Bluetooth is turned on and white if Bluetooth is on and connected to the Cobra iRadar app.
G. If GPS is plugged in a gray GPS icon will appear. The GPS icon will turn white when GPS lock is achieved.
VIDEO SCREEN BASICS:
When first powered on, the device will start on the video screen and automatically begin recording.
Press the Record/Pause button to stop and start recording.
Note that the button functions are different depending on whether the unit is currently recording or not.
Also note that the unit must be paused to enter the Settings Menu.
BUTTON OPTIONS (While Recording):

For the Single Cam Models, this button simply turns the screen off or on. Turning the screen off does not interrupt video recording. The red/green LED on the top left of the unit will flash to indicate that the unit is recording.

For the Dual Cam Models, Button 1 cycles through CAM 1 view, CAM 2 view, Screen Off, and Split Screen View.

Toggles the microphone on/off. Note that the icon on the button indicates the action that will be taken when the button is pushed, not the current setting. The current setting is shown on the status bar at the top of the screen.

Takes a snapshot and stores it as a .JPEG file.

Pauses the video. While in an emergency recording you will have to press pause once to cancel the emergency recording and then a second time to pause the video.
BUTTON OPTIONS (While Paused):

Enters the settings menu to change the video settings, general settings, iRadar app settings (Bluetooth Models only), and language settings.

Enters the playback menu to review previous recordings and photos.

Takes a snapshot and stores it as a .JPEG file.

Starts a recording.
VIDEO SETTINGS
Video Resolution:
This setting allows you to set one of three available video recording resolutions: Higher resolutions will give you a sharper image, but take up more memory on the card.
The available resolutions are:
1296P Super HD 2304x1296 30 Frames per Second
1080P Full HD 1920x1080 30 Frames per Second
720P HD 60fps 1280x720 60 Frames per Second
720P HD 30fps 1280x720 30 Frames per Second
Dual View Models Only – For dual camera models, Video Resolution is broken down into Cam1 Resolution and Cam2 Resolution. Note that 720P 30fps is the only resolution option for Cam2. When in Dual Cam Mode, Cam1 is limited to 1080P Full HD.
Loop Clip Time:
This setting allows you to control the duration of each individual movie clip on the device. Movie clips can be set to durations of 3 minutes, 5 minutes, 10 minutes, or off. In general, 3-minute clips are preferred because the file size is much more manageable when transferring to a computer for editing.
G-Sensor:
The Drive HD Dash Cam includes a built in G-Sensor which allows the device to determine when the car has been in a collision. If it detects a collision, it automatically locks the recording being made at the time of the accident. You can use this setting to set the sensitivity of the G-Sensor from 1-3 or turn it off. Level 1 is the easiest to activate the G-sensor and the G-Sensor may lock files due to smaller bumps like potholes and the SD card may fill up with protected files. Level 3 is the hardest to activate the G-sensor.
Parking Mode:
Parking Mode uses the Motion Sensor and G-Sensor to optimize recording functionality while your vehicle is parked. The idea is that when you are parked, the dash cam will be “sleeping” but it will monitor the video image for motion and it will also monitor the G-sensor. If it detects motion or if it detects an impact then the unit will wake up and start recording.
There are two time settings for Parking Mode: 5 minutes and 10 minutes. This is the timeout for going into Parking Mode. If no motion is detected for the chosen timeout, then the display will turn off and the recording will stop (it is now sleeping). If motion is detected or if the G-sensor is triggered then the unit will wake up and start recording. It will continue recording until the timeout again triggers Parking Mode.
NOTES:
- Parking Mode only works properly if the dash cam is powered. Either the accessory socket must remain on with the ignition off, or the dash cam must be hardwired to a constant power source (use optional hardwire cord CA-MicroUSB-001).
- If you are driving on a lonely stretch of highway where the scenery is not changing much then it might trigger Parking Mode and the unit will unexpectedly go to sleep.
- If you park where there is lots of activity which keeps triggering the motion sensor, then the unit might never time out and enter Parking Mode.
Cobra Watermark, Date/Time Stamp, & Time Stamp Format:
These menu options change the watermark & time stamp that will appear on the saved video files. Photo files do not contain a watermark.
Flip Cam2 (Dual View Models Only)
Depending on how you mount Cam2 the video may be upside down. Select Flip Cam2 to flip the video vertically so that it appears correctly on the screen and in recorded files.
Mirror Cam2 (Dual View Models Only)
Selecting Mirror Cam2 flips the video horizontally so that left is right and right is left. This is important for when Cam2 is mounted facing backwards. Mirrored video appears correctly on the dash cam screen because it mimics what you see in the rear-view mirror. Unselecting Mirror Cam2 will look incorrect on the dash cam screen, but appears correct to your brain when viewing recordings on a computer or TV. Note that Mirror Cam2 is selected as OFF by default.
Lane Departure
The Lane Departure Warning System (LDWS) provides audible and visual warnings as you approach a lane boundary. It will indicate whether you are departing the lane to the left or to the right. Note that this feature relies solely on analyzing video of the road ahead and, therefore, works best on clearly marked roads with good visibility. This feature is for information purposes only. See the Trademark Acknowledgement, Warnings, and Regulatory Information section below for the full legal disclaimer for using this feature.
Forward Collision Warning
The Frontal Collision Warning System (FCWS) provides audible and visual warnings if you are quickly approaching an obstacle in the road ahead. Note that this feature relies solely on analyzing video of the road ahead and, therefore, works best with good visibility. This feature is for information purposes only. See the Trademark Acknowledgement, Warnings, and Regulatory Information section below for the full legal disclaimer for using this feature.
GENERAL SETTINGS
Volume:
Allows you to raise and lower the volume of sound playback on the device.
Date/Time:
Allows you to set the date and time on the device and for use with the timestamp.
Screen Saver:
Allows you to set a duration after which the device's display will go dark. This setting is useful to avoid distracted driving and having a bright LED screen when driving at night. Select 1 minute or 3 minutes.
Beep Sound:
Turns the sound on or off for each time a button is pressed. Note: this only affects normal button presses. Error messages or iRadar alert audio (Bluetooth Models only) are not affected by this setting.
Format SD Card:
Allows you to format the inserted SD Card. NOTE: This action will permanently delete all data on the card. It is recommended to format any new card and periodically format existing cards.
Restore Defaults:
Resets the device to factory settings. Note that restoring defaults will NOT erase data on your memory card.
Firmware Version:
Displays the device firmware version.
iRADAR SETTINGS (Bluetooth Models only)
Bluetooth:
Turns Bluetooth on/off so the camera can/cannot connect to a smartphone running iRadar.
iRadar Alerts:
Select whether alerts from the iRadar app will be displayed on the dash cam or not.
Speed Units:
Changes the units between mph and km/h.
LANGUAGE SETTINGS
Allows you to set the language for the device from among the 9 supported languages.
- English
- Spanish
- French
- German
- Dutch
- Portuguese
- Russian
- Chinese (traditional)
- Chinese (simplified)
VIDEO AND PHOTO PLAYBACK MODE
This device stores video and pictures on its removable Micro SD Card Memory. Playback mode will allow you to review the saved video and photos and play back the video with sound. To select a video or photo for playback navigate with the arrows and select with Enter key. The Back key will return you to the previous screen.
When viewing a video it can be locked, unlocked, or deleted.
During video playback pressing the >> or << keys will advance to the next/previous video. Pressing and holding these keys will playback the video in fast forward or fast rewind mode
Photos can be viewed and deleted. It is not necessary to lock photo files – they are not overwritten by continuous loop recording.
GPS OPERATION
GPS functionality embeds Location, Speed, Heading, and G-Sensor information into video footage recorded on the dash cam. GPS data can be received either through the iRadar App (for Bluetooth enabled models) or a GPS Mount (CA-Mount-002).
All models covered in this manual are compatible with the GPS Mount.
Operation is simple. Plug the 3.5mm plug from the GPS mount into the Accessory Port on the left side of the unit. A gray GPS icon will appear indicating that GPS is plugged in. The icon will turn white when GPS lock has been achieved, indicating that information is now being stored in recorded videos.
In addition to embedding information into videos, connecting to GPS or the iRadar App automatically updates the unit's clock so that time stamps are always accurate.
See Download Drive HD Player below for instructions on how to view embedded GPS information.

natural_image
Close-up of a black camera lens with attached cable and connector (no visible text or symbols)
text_image
1:38 1296PCobra iRadar® APP CONNECTION
The DASH2308, DASH2316D, CCDC4500 and CCDC4500AUS use a Bluetooth ^® connection to the Cobra iRadar ^® smartphone app. Smartphone integration allows for:
- Embedding Location, Speed, Heading, and G-Sensor Information into video footage recorded on the dash cam.
- Displaying iRadar driver awareness alerts including:

Red Light Cameras

Live Police

Speed Cameras

Caution Areas

Speed Traps
DOWNLOADING IRADAR APP AND CONNECTING TO DASH CAM
Download the app from the App Store or Google Play.

compatible


For iPhone ^® 4s and later with Bluetooth ^® :
• Power on your dash cam and be sure that Bluetooth is enabled
- Make sure your iPhone's Bluetooth is ON. The dash cam will NOT APPEAR in the iPhone's Bluetooth Settings Menu.
- Start the Cobra iRadar App. Press the Menu button in the upper left of the app and select Devices. Follow the onscreen instructions to complete the pairing and connection.
- When complete, a “connected” chime will sound and the Bluetooth icon will turn white on the dash cam display.
For Android™ Devices with Bluetooth®:
• Power on your dash cam.
- Enter your Android device's Bluetooth Settings Menu.
- Scan for Devices and select Drive HD to pair.
- Enter the Cobra iRadar App. A “connected” chime will sound, and the Bluetooth icon will turn white on the dash cam display.
CONNECTING TO A COMPUTER OR TV
This device can connect to a computer or television via the USB or HDMI ports located on the side of the unit.

text_image
Laptop screen displaying a video call interface with multiple video thumbnails and system status indicators
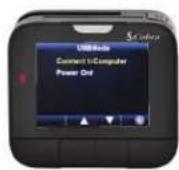
- Use the USB port on the side of the device to connect the device to your computer. When connected you will be given two options: Connect to Computer or Power Only.
- Select Connect to Computer to access the device via your computer. Your device connects to your computer in Mass Storage mode, and acts like a flash drive. Videos can be viewed with any standard video player that supports .mov files.
- Select Power Only to turn the unit on for normal operation
- Alternatively, you can remove the Micro SD Card and directly plug it into your computer or use and adapter (not included) to plug into your computer.
Use the HDMI Port to connect the device to a TV or monitor using a mini HDMI cable (Only included with CCDC4500/CCDC4500AUS).
Drive HD Player lets you view your dash cam footage along with GPS and G-Sensor data. To download Drive HD Player visit http://www.cobra.com/pages/drive-hd-dash-cam-player
DASH CAM SOFTWARE UPDATE INSTRUCTIONS
For optimal performance, check www.cobra.com periodically for software updates.
- Connect the Dash Cam to your computer using the included USB to Micro-USB cable.
- Power on the Dash Cam and select Connect to Computer using the record/select button.
- The camera will be listed as DRIVEHD in Windows Explorer.
- Download the update file from www.cobra.com and save it somewhere you will remember it. It will be called SD_CarDV.bin. Note: You do not need to double click or open this file on the computer.
- Copy/paste or drag the update file you downloaded (SD_CarDV.bin) into the root directory of the DRIVEHD folder. Note: the file name must be SD_CarDV.bin in order to update the firmware.
- Wait for the file to transfer and then safely disconnect the Dash Cam from the computer. The Dash Cam will turn off.
- Plug the Micro USB cord into the Micro USB port. The Dash Cam will turn on and automatically boot into the Firmware Update Menu.
- Use the Up/Down arrows to highlight YES and then select it with the Select Button. The unit will update for 10-15 seconds and then turn off.
- Power the unit on. You will again be automatically booted into the Firmware Update Menu. You can now select DELETE to delete the update file off of your unit. Alternatively, you can connect to your computer and manually delete the SD_CarDV.bin file from the Micro SD card. This will prevent the unit from booting into the Firmware Update Menu in future power cycles. Your Dash Cam is now updated.
CAMERA SPECIFICATIONS


| Model# | DASH2208 | DASH2308 | DASH 2216D | DASH2316D/CCDC4500/CCDC4500AUS |
| Dual Channel |  | [84YX] | [HCBV] | [S222] |
| Max Video Resolution | 1296P | 1296P | 1080P Front, 720P Rear (1296P while in single cam mode) | 1080P Front, 720P Rear (1296P while in single cam mode) |
| Supercapacitor (Extreme Reliability) | [###] | [###] | [###] | [###] |
| Video Format | .MOV | .MOV | .MOV | .MOV |
| Picture Format | .JPEG | .JPEG | .JPEG | .JPEG |
| Image Sensor | 4 MP CMOS (OV4689) | 4 MP CMOS (OV4689) | 4 MP CMOS (OV4689) | 4 MP CMOS (OV4689) |
| Lens | 7 Layer Glass Lens | 7 Layer Glass Lens | 7 Layer Glass Lens | 7 Layer Glass Lens |
| Continuous Loop Recording | [###] | [###] | [###] | [###] |
| Motion Detection | Parking Mode | Parking Mode | Parking Mode | Parking Mode |
| Date/Time Stamp | [###] | [###] | [###] | [###] |
| Media Supported | Micro SD Card 8GB (64GB Max) | Micro SD Card 8GB (64GB Max) | Micro SD Card 16GB (64GB Max) | DASH2216D: Micro SD Card 16GB (64GB Max) CCDC4500/4500AUS: Micro SD Card 32GB (64GB Max) |
| LCD Size | 2.0" | 2.0" | 2.0" | 2.0" |
| Viewing Angle | 160° | 160° | Front: 160° Rear:130° | Front: 160° Rear:130° |
| Snapshot | [###] | [###] | [###] | [###] |
| GPS | Optional | Via Bluetooth® | Optional | Via Blueooth® |
| iRadar® Camera Alerts | [SXAD] | [47Y4] | [37AH] |  |
| iRadar® Live Community Alerts | [CSW3] | [47H6] |  | |
| Lane Departure Warning (LDWS) | [1052] | [277H] | [WYHX] | [DDHX] |
| Frontal Collision Warning System (FCWS) | [8026] | [177D] | [19H6] | [CDHX] |
| HDMI Output | [0707] | [XH6V] | [XZZV] | [STXY] |
| Supported Languages | English, Spanish, French, German, Dutch, Portuguese, Russian, Chinese (traditional), Chinese (simplified) | English, Spanish, French, German, Dutch, Portuguese, Russian, Chinese (traditional), Chinese (simplified) | English, Spanish, French, German, Dutch, Portuguese, Russian, Chinese (traditional), Chinese (simplified) | English, Spanish, French, German, Dutch, Portuguese, Russian, Chinese (traditional), Chinese (simplified) |
TROUBLESHOOTING
If your unit does not appear to be operating properly, please follow these troubleshooting steps:
• Make sure the power cord is properly connected.
- Make sure the socket of your vehicle's cigarette lighter is clean and free of corrosion.
- Make sure the power cord's cigarette lighter adapter is firmly seated in your cigarette lighter, and the Status LED is on.
For detailed and up-to-date FAQ's, please visit www.cobra.com/pages/frequently-asked-questions
TRADEMARKS ACKNOWLEDGEMENT, WARNINGS, and REGULATORY INFORMATION
Cobra, the snake design, Drive HD™, the d design, and Record your ride™ are proprietary trademarks of Cobra Electronics Corporation, USA. Other trademarks and trade names are those of their respective owners.
Cobra Electronics Corporation™ is a trademark of Cobra Electronics Corporation, USA.
HDMI, the HDMI logo, and High-Definition Multimedia Interface are trademarks or HDMI registered trademarks of HDMI licensing LLC in the United States and other countries.
The Bluetooth ^® word mark is a registered trademark owned by Bluetooth SIG, Inc. and any use of such marks by Cobra Electronics Corporation is under license. Other trademarks and trade names are those of their respective owners.
The Driver Awareness Alert display feature is subject to US Patent Numbers 8,842,004 and 8,970,422 and additional pending US Patent Applications.
Warning ! The forward collision warning system (FCWS) feature, when turned on, is for limited informational purposes only. The FCWS does NOT replace a driver's responsibility to use safe driving judgment, comply with all traffic regulations and observe all road and driving conditions at all times. The FCWS uses the camera to provide a warning of upcoming vehicles [and large objects] and, as a result, may have reduced or no functionality in low visibility or certain weather conditions.
Driver is responsible for the safe operation and control of the vehicle. Do not substitute your driving judgment with the information provided by this feature. Cobra disclaims liability for injuries, damages, or death arising from use of this feature.
Warning ! The Lane Departure Warning System (LDWS) feature, when turned on, is for limited informational purposes only. The LDWS does NOT replace a driver's responsibility to use safe driving judgment, comply with all traffic regulations and observe all road and driving conditions at all times. The LDWS uses the camera to provide a determine if the vehicle is drifting toward or departing from designated lane markings and, as a result, may have limited functionality in low visibility or certain weather conditions or when driving on unmarked or poorly marked roads."
Driver is responsible for the safe operation and control of the vehicle. Do not substitute your driving judgment with the information provided by this feature. Cobra disclaims liability for injuries, damages, or death arising from use of this feature.
NOTE: This device complies with part 15 of FCC rules: Operation is subject to the following two conditions: (1) This device may not cause harmful interference, and (2) This device must accept any interference received including interference that may cause undesired operation.
CAUTION: Modifications or parts not approved by Cobra Electronics Corporation may violate FCC Rules and void authority to operate this equipment. This device complies with RSS-310 of Industry Canada. Operation is subject to the condition that this device does not cause harmful interference.
CAN ICES-3B/NMB-3B.
DISPOSAL OF ELECTRONICS EQUIPMENT: This product may contain hazardous substances that could impact health and the environment if not disposed of properly.
The crossed out wheeled bin symbol indicates that the product should not be disposed of along with household waste. It should be handed over to an applicable collection point for the recycling of electrical equipment. By ensuring that this product is disposed of correctly you will help/prevent potential negative impact on the environment.
If you need more information on the collection, reuse and recycling systems, please contact your local civic office or the shop where it was originally purchased.
