AXFX - Audio software MARTINIC - Free user manual and instructions
Find the device manual for free AXFX MARTINIC in PDF.


| Product Type | Audio Effects Software (VST/AU/AAX Plugin) |
| Developer | MARTINIC |
| Model | AXFX |
| Platform | Windows (VST2/VST3), macOS (VST2/VST3/AU), AAX (Pro Tools) |
| Minimum OS Version | Windows 7 SP1 / macOS 10.12 Sierra |
| Processor | Intel Core 2 Duo or AMD equivalent (2 GHz or faster) |
| RAM | 4 GB (8 GB recommended) |
| Disk Space | 200 MB |
| Sample Rate Support | 44.1 kHz, 48 kHz, 88.2 kHz, 96 kHz |
| Bit Depth | 32-bit float, 64-bit float |
| Plugin Formats | VST2, VST3, AU, AAX |
| MIDI Support | Yes (MIDI CC mapping) |
| Preset Management | Built-in preset browser with user presets |
| Main Features | Multi-mode filter, distortion, delay, reverb, modulation effects, EQ |
| Update Policy | Free updates for version lifetime |
| License Type | Perpetual license per user (iLok or machine authorization) |
| Demo Version | Fully functional 15-day trial |
| User Manual | PDF included in installation folder |
| Support | Email support with 48-hour response time |
| Maintenance & Cleaning | None required; keep software updated |
| Safety | Standard computer safety; keep antivirus active |
Frequently Asked Questions - AXFX MARTINIC
User questions about AXFX MARTINIC
0 question about this device. Answer the ones you know or ask your own.
Ask a new question about this device
Download the instructions for your Audio software in PDF format for free! Find your manual AXFX - MARTINIC and take your electronic device back in hand. On this page are published all the documents necessary for the use of your device. AXFX by MARTINIC.
USER MANUAL AXFX MARTINIC
System Requirements 5
Windows Installation 5
Mac Installation 7
Loading the AXFX in your DAW 9
Getting Around 10
Using the controls (plus fine-tuning and value entry) 10
FX view and Settings view 10
Preset Browser 11
Default Presets 13
Set Preset as Default 13
Bypass 14
Master 14
Volume 14
Mix 14
FX 14
Compressor 15
Phaser 16
Flanger 16
Chorus 16
Delay 17
Reverb 17
Distortion 18
EQ 18
FX Chain 18
Presets and Collections 19
Presets 19
Saving Presets (Save buttons) 19
My Presets, Factory and Favorites Collections 20
Creating and saving collections 21
Importing and exporting collections 22
Backing up your preset data 23
Introduction
Thank you for purchasing or downloading the Martinic AXFX. This 8-unit Effect Rack plugin is a direct descendant of the External Effects present in the iconic AX73 Synthesizer.
Harnessing the power of Martinic's ACE (Advanced Circuitry Emulation) Technology, we've meticulously created both the analog and digital effects units of the AXFX, making these cherished 80s effect characteristics available for any synthesizer. It's no surprise that our AXFX also exhibits extraordinary versatility in enhancing the sonic depth and richness of both vocals and guitars.
Features
The 8-unit Effect Rack includes: Compressor, Phaser, Flanger, Chorus, Delay, Reverb, Distortion and EQ. The effects can be arranged in any order using the FX Chain.
The AXFX includes over 100 presets designed by renowned sound designers such as Daniel Stawczyk, Charis Linos, and Solidtrax.
Installation
System Requirements
AXFX is available as an AAX, AU (Audio Units), CLAP (CLever Audio Plugin), or VST2 / VST3 effect plugin, which means it needs to run inside AAX, AU, CLAP, or VST hosting software, e.g. Pro Tools, Ableton Live, Cubase, GarageBand, Logic Pro, REAPER, Studio One, etc.
Although AXFX should be able to run at any sample rate the host provides, a rate of at least 44.1kHz is recommended.
The plugin is designed to run on Windows 7 or newer as a 32-bit or 64-bit plugin, or Mac OS X 10.9 (Mavericks) or newer as a 64-bit plugin.
Windows Installation
To install AXFX on Windows, download the Windows 32/64-bit AAX/CLAP/VST2/VST3 installer, and save it on your computer (e.g. in your Downloads folder).
Navigate to this folder, locate the installer double-click on it, and then click on the Next button to start the installation process.

Carefully read the license, and then click on the I Agree button to continue. Next, select which formats of the plugin you want to install. Select Customize GUI Scale to manually
override the scaling factor of the plugin on a later screen. You can select Reset Preset Database to undo any previous changes to the database and return it to factory defaults. Before you do this, make sure you have backups.
Optionally you can select License Key if you have purchased a license. Click on the Next button to continue.
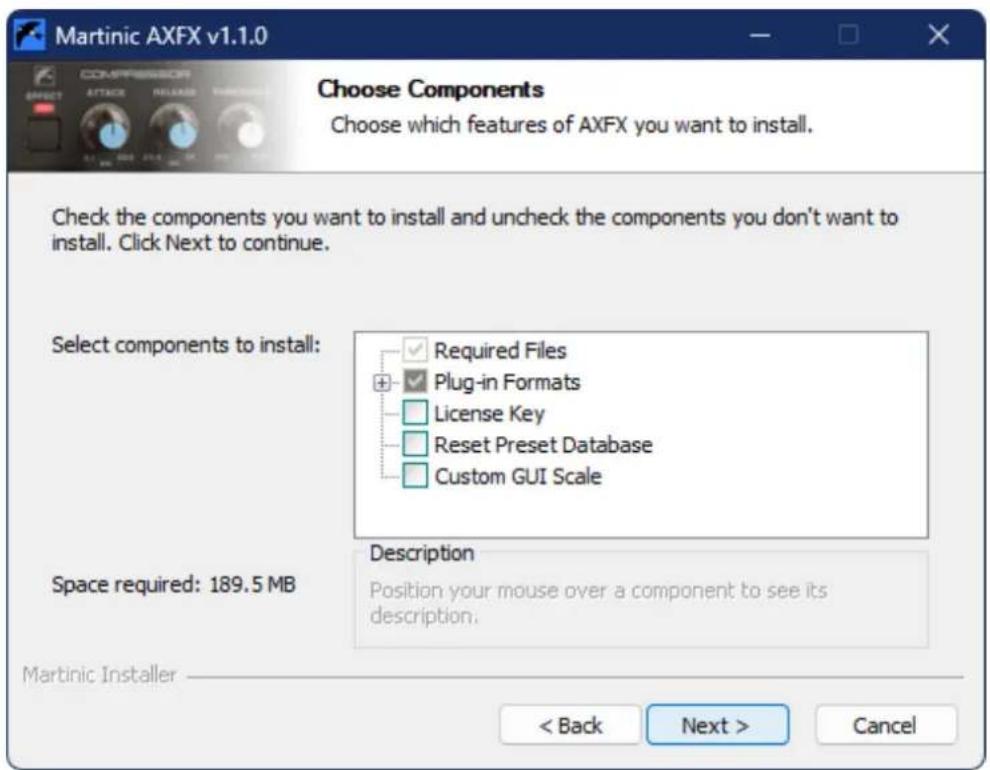
Optionally change the install location, and again click on the Next button. Then select your VST2 32-bit and/or 64-bit plugin folder, and optionally select your license key file (if you have purchased a license), confirming each selection by clicking on the Next button.
If you have previously chosen to customize the GUI scale, you will be able to select different options before selecting Next to begin installation.

Now wait for the installation to complete (this should take only a few seconds), click on the Close button, and you are ready.
Mac Installation
To install AXFX on Mac OS X or macOS, download the Mac AAX/AU/CLAP/VST2/VST3 installer disk image (DMG), and save it on your computer (e.g. in your Downloads folder).
If you have purchased a license, you should copy your license key file to the same folder where you placed the installer disk image (DMG) so that it can be installed along with the plugin. Optionally, place the license key file on the desktop in case the installer cannot find it.
Martinic AXFX

natural_image
Illustration of an AXFX Installer package with two stacked cardboard boxes (no text or symbols on the boxes)Navigate to the folder in which you have saved the installer, locate the installer disk image (DMG) and double-click on it, and then double-click on the AXFX Installer.pkg icon. Click on the Continue or Allow button to confirm that the installation package will run a program, and then click on Continue (in the bottom right corner of the installation window) to start the installation process.
Carefully read the license, click on the Continue button, and then click on Agree. Next, select which formats of the plugin you want to install (it is recommended that you install the AAX, AU, CLAP, and VST formats, just to be sure). You can select Reset Preset
Database to undo any previous changes to the database and return it to factory defaults. Before you do this, make sure you have backups.
Optionally select License Key if you have purchased a license, and click on the Continue button. Optionally change the install location, and then click on the Install button.

Now wait for the installation to complete (this should take only a few seconds), click on the Close button, and you are ready.
Loading the AXFX in your DAW
Once the plugin has been installed, start or restart your DAW. The plugin should be available in AAX, Audio Units, CLAP, VST2, and VST3 formats (if all five have been installed).
The plugin may be named AXFX or Martinic AXFX. This may be different between plugin formats.
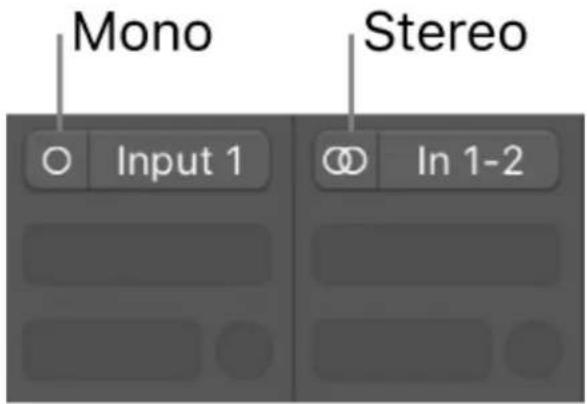
The plugin is exclusively a stereo plugin, which means that Apple Logic users will have to switch the preferred track from Mono to Stereo by clicking on the ○ symbol of the track, to be able to load the AX Chorus:
Getting Around
Using the controls (plus fine-tuning and value entry)
You can adjust controls by clicking and dragging them up or down using the mouse. To fine-tune a parameter to a more exact value, hover your cursor over it, hold the Ctrl key (Mac and Windows), and scroll the mouse wheel. You can also right-click on a knob to enter a value using the computer keyboard.
Double-clicking a knob or fader will reset it to its default value.
FX view and Settings view
The AXFX can be used in either FX view or Settings view.

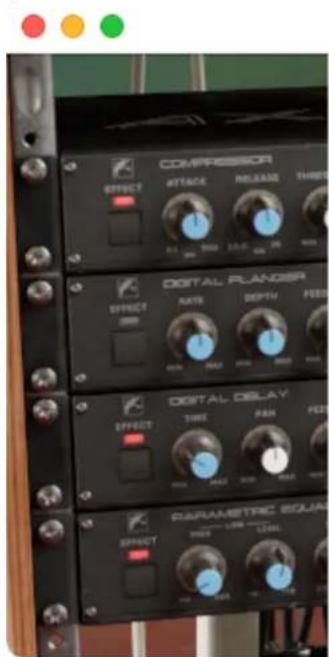
FX view allows you to control some of the AXFX's parameters, as you would on a physical effect rack.

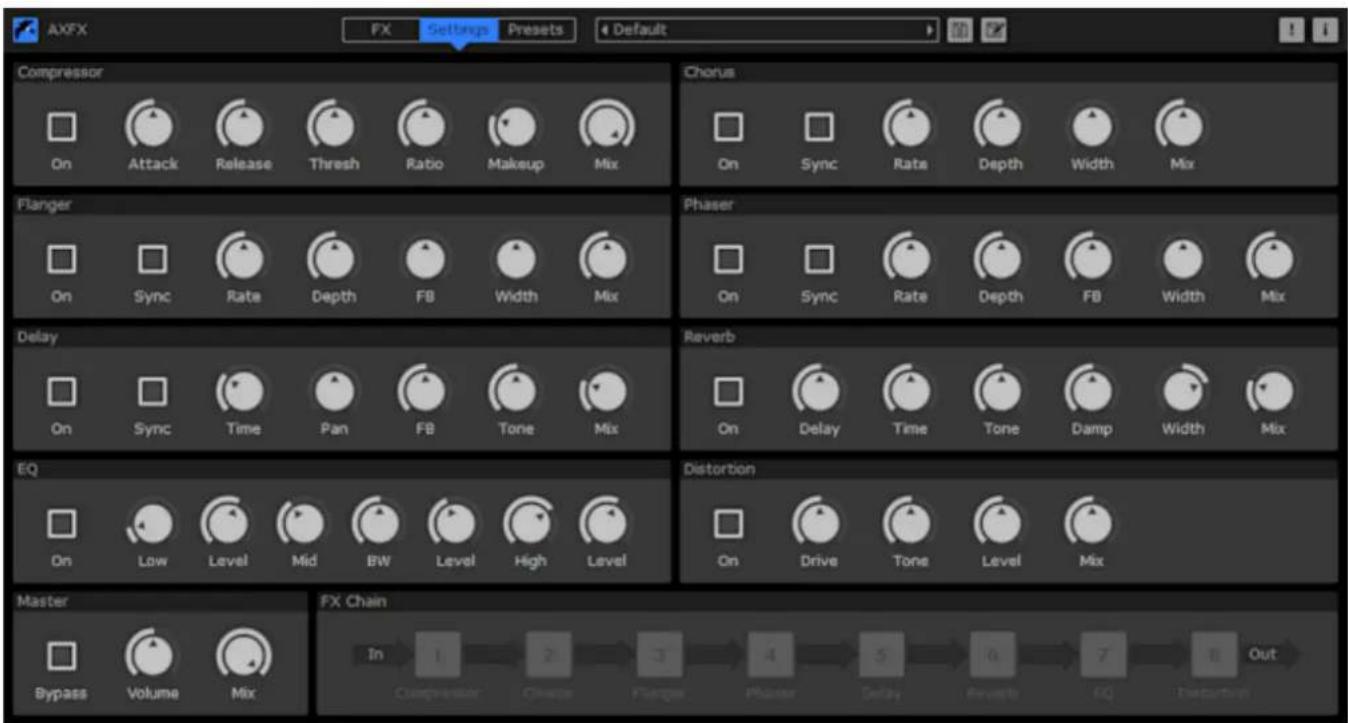
Settings view provides an abstracted set of controls for the effects, giving you control over every parameter on the AXFX. Here you can access all the controls, including master volume, Mix, Sync and the arrange the order of the FX Chain.

Preset Browser
The AXFX's preset browser allows you to select, find and organise presets with ease. This is accessed using the Presets button alongside the FX and Settings view buttons. Here you
can find over 100 presets that come with the AXFX as well as save your own presets and create exportable collections which you can share or sell online.
We cover how to use the preset browser more in detail in the Presets and Collections section towards the end of this manual.
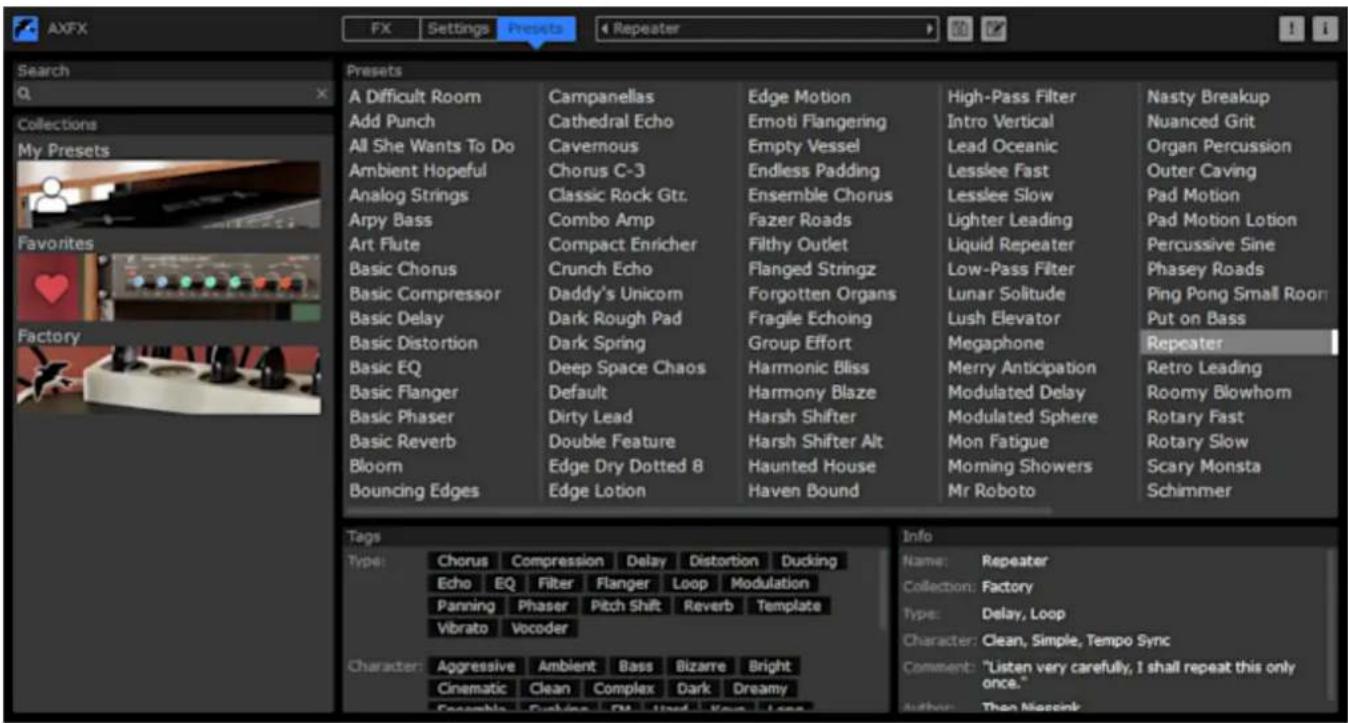
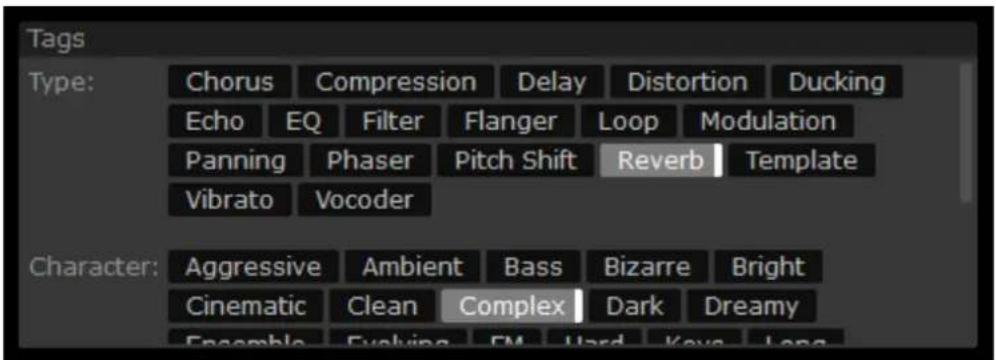
To load a preset, simply click on its name once. You can also filter presets by Type, Category and Author using the Tags panel.

You can search through presets using the Search bar, and select from a Collection (Factory presets, Favorites and My Presets) on the left-hand side of the browser. Collections are discussed in more detail in the Presets and Collections section of this manual.
Default Presets
In the AAX, AU, VST2 plugin formats, the top bar allows you to navigate between the Default Presets, which can also be selected from your DAW's interface. You can navigate between these 32 presets by clicking the left and right arrows on either side of the name. In the CLAP and VST3 plugin format, the arrows also work, but there are no Default Presets displayed in your DAW.

Selecting a preset from the preset browser will replace the selection currently in your default presets with the new one. Through this, it is possible to have the same preset selected multiple times within the 32 Default Presets.
The Default Presets can be useful for quickly accessing the "Default" patch: a starting-point for programming the AXFX that will set all settings to neutral, default positions.
If you have a DAW that uses the CLAP or VST plugin format, the Default Presets are saved in your DAW project.
Set Preset as Default
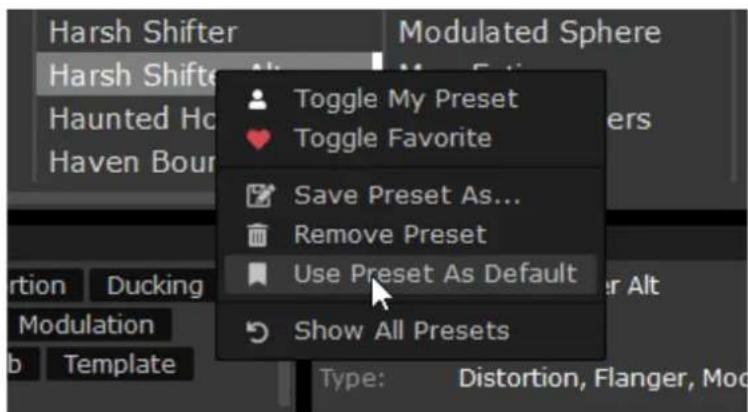
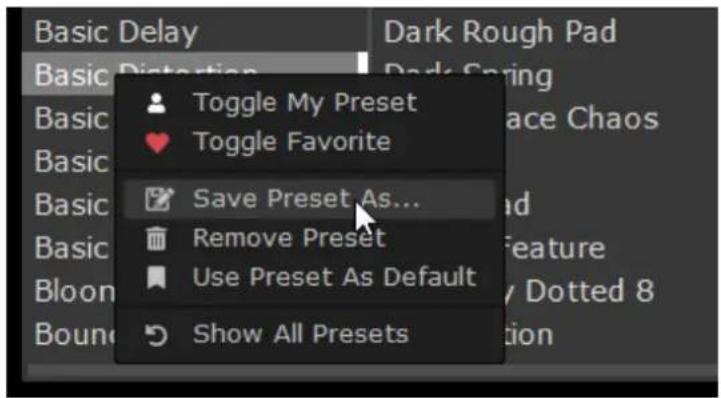
You can replace each of those 32 Default Presets with the presets of your own choice and they'll be there next time you open the AXFX. You can right-click a preset in the preset browser, click on Use Preset As Default and the Default Preset you were currently on will be replaced by the one you chose.

Bypass
You can bypass the AXFX output by clicking the Martinic logo in the top left-hand corner of the interface. The logo's blue color will turn to gray when the AXFX is bypassed.
Master
The master section offers a global set of parameters – ie, settings that are applied independently of the AXFX's effects.
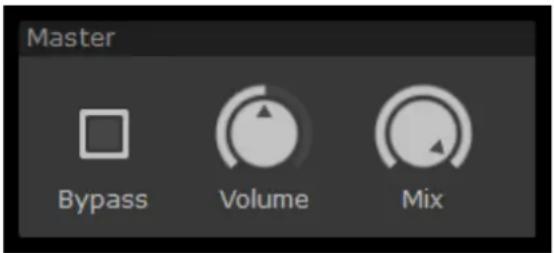
Volume
Determines the global output Volume of the plugin.
Mix
The MIX knob controls the global dry/wet mix.
FX

The Martinic AXFX comes with eight effects that can be run in serial in any order.
Available processors are Compressor, Chorus, Flanger, Phaser, Delay, Reverb, EQ and Distortion. Below we explain how each effect works.
Compressor
Turn the compressor on with the On switch. Set the onset time of the compressor with the Attack dial. The release of the compressor is controlled by the Release dial.

The Threshold knob determines the minimum volume at which the compressor begins to take effect.
The Ratio knob controls the degree to which sound crossing the threshold level is reduced back towards that threshold level. Increase the gain of the compressor's outgoing signal with the Makeup dial. Finally, control the dry/wet mix of the outgoing signal with the Mix knob.
Phaser
Activate the phaser with the On switch. The rate of the phaser can be synchronized to the DAW with the Sync button. When synchronized, the range is 16/1 to 1/64.
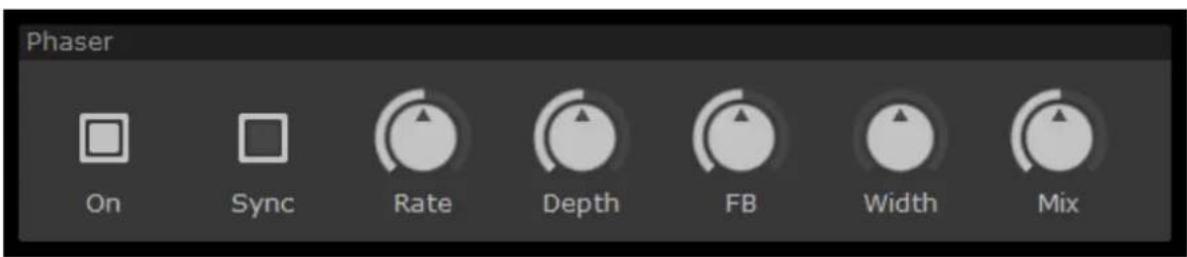
The depth of the phaser is controlled by the Depth dial, FB controls the level of feedback, Width the stereo image of the sound and Mix the dry/wet balance.
Flanger
Turn the flanger on with the On button. Synchronize the rate of the flanger to your DAW with the Sync button. Set the rate with the Rate dial. When synchronized, the range is 16/1 to 1/64.
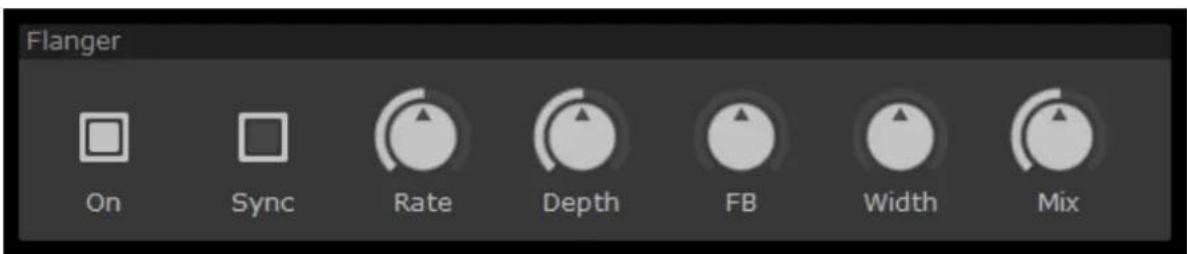
Control the depth of the flanger with the Depth dial, the Feedback with the FB dial, the stereo image of the flanger with the Width dial and the dry/wet mix with the Mix knob.
Chorus
Use the On button to activate the chorus unit. The chorus unit has very similar controls to the phaser and flanger units. Synchronize the rate of the chorus to your DAW with the Sync and adjust the rate with the Rate dial. When synchronized, the range is 16/1 to 1/64.

Delay
The delay unit acts like a standard delay. Turn it on with the On switch. The delay time is altered with the Time knob and can be synchronized to your DAW with the Sync button.

The Pan button introduces ping pong delay. Turning the dial right will pan the first tap right, turning the dial left will pan the first tap left. The more you turn this dial left or right, the more both left/right delays will be spread out to their side of the stereo image.
Reduce the Tone dial to apply a low-pass filter to the delayed (wet) signal. Alter the tonal properties of the delay signal and the Mix knob to control the dry/wet balance.
Reverb
Activate the reverb with the On button. You can delay the start of the reverb tail with Delay knob and adjust the length of the reverb tail with the Time knob. Use the Tone dial to adjust the sound of the reverb, effectively applying a low-pass filter to the wet reverb signal.

The Damp dial fades out high frequencies more quickly than low frequencies, to greater or smaller extents. The Width knob alters the stereo image of the reverb (with values below 50 reversing the channels) and the Mix dial dictates the dry/wet balance.
Distortion
Turn the distortion unit on with the On button. The distortion unit acts like standard distortion: Drive controls the drive amount, Tone controls the tone of the distortion and Level the output level pre Mix.
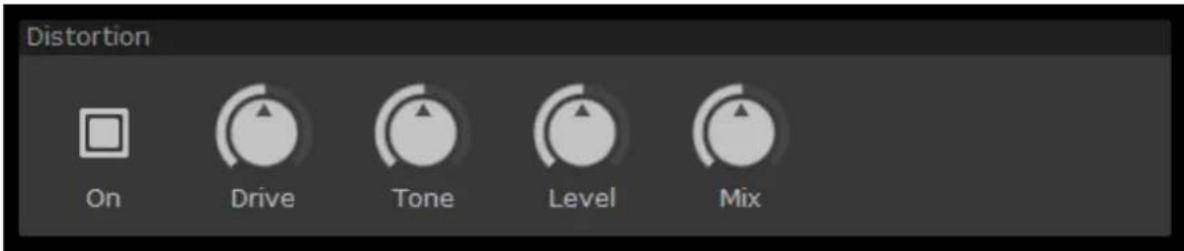
Set the dry/wet amount with the Mix dial.
EQ
The final effect is the EQ. The EQ has three bands: a low shelf, a bell filter for the mid-range frequencies, and a high shelf.
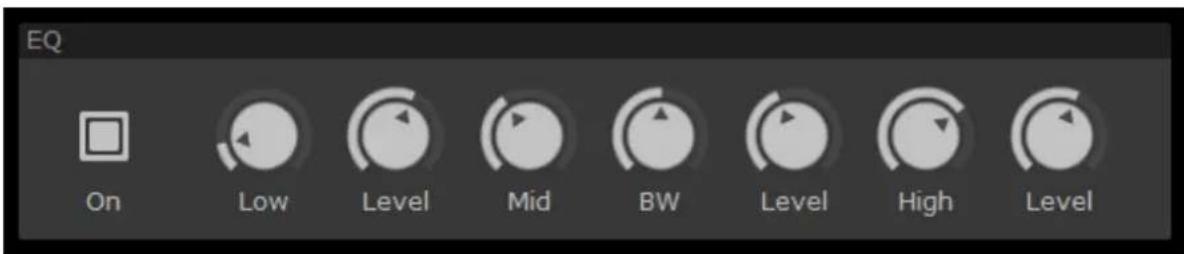
Turn the EQ on with the On switch.
The Low dial sets the frequency of the low shelf and the Level dial sets its gain.
The Mid dial controls the frequency of the bell filter, the BW knob sets its Q and Level controls its gain.
High sets the frequency of the high shelf and Level controls its gain.
FX Chain
The AXFX's onboard effects run in sequence and can be placed in any order. Drag the units around in the FX Chain section to place them in the desired order. The signal runs from left to right.

flowchart
graph LR
    A["In"] --> B["Chorus"]
    B --> C["Phaser"]
    C --> D["Compressor"]
    D --> E["Flanger"]
    E --> F["Delay"]
    F --> G["Reverb"]
    G --> H["EQ"]
    H --> I["Distortion"]
    I --> J["Out"]
Presets and Collections
Presets
The AXFX comes loaded with more than 100 presets designed by renowned sound designers such as Daniel Stawczyk, Charis Linos, and Solidtrax.
To find the presets, click the presets tab at the top of the AXFX interface. You will be presented with a list of all the presets. Choose one by clicking it a single time.
You can search for specific presets with the search bar in the top left hand-corner of the UI.
The Tags box lets you filter by type of Sound, Character and Author. Click on a tag to filter the available presets in the Presets window.
Saving Presets (Save buttons)
The Save button (disk icon) will save the current settings, overwriting the preset that is selected in the Presets view.

Note that the selected preset has to be in My Presets for this to work, as this keeps Factory presets and other Collection presets from being overwritten. If overwriting a Factory or
Collection preset is attempted, a dialogue will appear offering to Save As instead.
The Save As button (disk and pen icon) allows you to save the current settings automatically in My Presets, rather than overwriting anything.
My Presets, Factory and Favorites Collections
To the left of the preset browser you'll find at least three default Collections: My Presets, Factory and Favorites.
My Presets is where presets that you create and save are stored. To save a preset to My Presets click Save Preset As in the top toolbar of the AXFX, or right-click on the preset you've adjusted in the browser and select Save Preset As.


When in My Presets, add tags, rename presets and change the author by right clicking on either Name, Collection, Type, Character, Comment or Author in the Info panel in the bottom right of the interface.
Factory is where you will find over 100 presets that come with the AXFX.

You can add presets that you use a lot to the Favorites collection. To add a preset to the Favorites collection, right-click on it and select Toggle Favorite.
Creating and saving collections
To create a new collection, right-click in the collection window on the left hand side of the interface and select New Collection.
You can name your collection anything you like, add Overlay Text and upload an image to go with your collection. This is a useful feature if you plan to sell presets and want to add a personal touch to your collections.

Once a collection is created, it's easy to add premade presets to it. Find a preset you want to add to your new collection and select it. Right click on your new collection and select Add Selected Preset.
It is advisable to remove any presets from My Presets after adding them to a Collection that you are creating. Presets in the My Presets category can be saved over, so to keep the Collection consistent and protected, remove any presets you wish to lock from My Presets.
Importing and exporting collections

To import a collection, right-click anywhere in the Collections box and select *Import Collection. Select the .mcoll file you downloaded and the collection will be added below the other Collections.

To export a collection, right-click on the collection and select Export Collection. Choose where you would like your Collection to be saved. The collection will be saved as a .mcoll file which you can share as you like.
Backing up your preset data
To back up your presets (for example, when migrating to a new system), there are two ways to work. Firstly, you can add all the presets you wish to keep to a Collection and export it as a .mcoll file, re-importing that into the new system (see above).
The other way to back up or restore your entire preset library is to back up the presets.data file that can be found in your system's file browser. On Windows, this file is found in C:\Users\Your Username\AppData\Roaming\Martinic\AXFX, and on Mac, in \~/Library/Application Support/Martinic/AXFX.
© 2023 - 2024 Martinic


- Loading the AXFX in your DAW 9
- Getting Around 10
- Master 14
- FX 14
- FX Chain 18
- Presets and Collections 19
- Introduction
- Features
- Installation
- System Requirements
- Windows Installation
- Mac Installation
- Loading the AXFX in your DAW
- Getting Around
- Using the controls (plus fine-tuning and value entry)
- FX view and Settings view
- Preset Browser
- Default Presets
- Set Preset as Default
- Bypass
- Master
- Volume
- Mix
- FX
- Compressor
- Phaser
- Flanger
- Chorus
- Delay
- Reverb
- Distortion
- EQ
- FX Chain
- Presets and Collections
- Presets
- Saving Presets (Save buttons)
- My Presets, Factory and Favorites Collections
- Creating and saving collections
- Importing and exporting collections
- Backing up your preset data
Brand : MARTINIC
Model : AXFX
Category : Audio software