
MAC200DN - Camera Brinno - Free user manual and instructions
Find the device manual for free MAC200DN Brinno in PDF.

| Product Type | Motion Activated Security Camera |
| Model | MAC200 DN |
| Brand | Brinno |
| Dimensions (DxWxH) | 106 x 110 x 78 mm (4.13" x 4.29" x 3.04") |
| Weight (without batteries) | 275 g |
| Power Source | 2 x D cell batteries |
| External Power | DC IN 5V (Micro USB) |
| Battery Life | Up to 14 months (Time Lapse mode, 5-min interval) |
| Display | 1.44" TFT LCD |
| Water Resistance | IPX4 |
| Image Sensor | 1/4" CMOS, 1.3 Megapixel |
| Lens Aperture | F2.0 |
| Field of View | 70° |
| Focal Length (35mm equiv.) | 28 mm |
| Minimum Focus Distance | 60 cm |
| Memory Storage | SD card up to 32 GB |
| Capture Modes | Motion Activated, Time Lapse, Hybrid |
| Motion Sensor (PIR) | Detect distance: 6 m, Detect angle: 100° |
| Night Vision | Optional Brinno Night Vision LED accessory; Auto mode with latitude setting |
| Output Video Format | AVI, 720P (1280x720) |
| Playback Rate (FPS) | 1–30 FPS (selectable) |
| Package Contents | Camera, Tree strap, Rubber strap, Wall mount, User manual |
| Operating Temperature | -20°C to 50°C (-4°F to 122°F) |
Frequently Asked Questions - MAC200DN Brinno
User questions about MAC200DN Brinno
0 question about this device. Answer the ones you know or ask your own.
Ask a new question about this device
Download the instructions for your Camera in PDF format for free! Find your manual MAC200DN - Brinno and take your electronic device back in hand. On this page are published all the documents necessary for the use of your device. MAC200DN by Brinno.
USER MANUAL MAC200DN Brinno
Motion Activated Camera MAC200 DN
User Manual
natural_image
Close-up of a black smartphone camera with dual lens and circular head (no text or symbols visible)www.brinno.com
Register@online
http://www.brinno.com/support/register.html
contact us: customerservice@brinno.com
more information: www.brinno.com


natural_image
Close-up of a smartphone camera face showing lens and aperture (no text or symbols visible)WEL COME TO THE BRINNO FAMILY!
Follow Brinno to receive the latest product news

facebook.com/Brinnolnc

natural_image
Close-up of a smartphone camera with dual lens and aperture (no text or symbols visible)Thank you for purchasing this Brinno Motion Activated Camera!
The Brinno Motion Activated Camera (MAC200 DN) is a battery powered, motion activated security camera.
Forget the power cord, Ethernet line or DVR system, it is your 100% DIY, 100% Wire-free, 100% portable security anywhere anytime camera. Brinno's new Hybrid Mode® provides 10 X's the Outlook Range over comparable motion activated cameras.
The dual functionality of a fixed capture interval + Motion Activation provides you with an unprecedented portable level of protection. Brinno's exceptional power saving technology, provides super long lasting standby time, combined with our "Rapid Wake Up" functionality, means you will never miss a shot!
Contents
Motion Activated Camera Features 01
Parts of the Camera 03
Display Icons 05
LED indicator 07
Installation 08
Initial Set Up 09
• Motion Activated Mode 12
• Time Lapse Mode 14
• Hybrid Mode 15
• Motion Activated Mode 17
• Time Lapse Mode & Hybrid Mode 18
• To Stop Recording 19
Basic Installation 20
Capture Mode
Start Recording
MENU Setting
• SD card capacity 24
• Capture Mode 25
• Overwrite 26
- Timer 27
- Playback Rate 30
• Image Quality 31
• Time Stamp 33
• LED Display 34
• Band Filter 35
• Night Vision Mode 36
- Set Latitude 37
- Set Date and Time 39
- FW version 40
- Reset 41
- Default Setting 42
What Size SD Card Should I Use 43
Battery Life 44
Specification 45
Motion Activated Camera Features

14 Months Battery Life
The Brinno MAC200 DN needs only 2D batteries for up to fourteen months of power. No need for external power = truly portable.

Dual Protection
Brinno' new Hybrid Mode® provides the dual functionality of a fixed capture interval + flexible Motion Activation, providing you with an unprecedented level of portable protection.

10x Outlook Range
Motion Activation Mode provides coverage up to 6 meters. Time Lapse Mode provides over 100 meters of coverage. Images captured at a Fixed Capture Rate in the Time Lapse mode cover over 10 times the area of a standard Motion Activated Camera.

< 1 Sec. Rapid Wake Up
All Brinno products have excellent power saving technology, providing super long standby time. Combined with our "Rapid Wake Up" technology, Brinno ensures you will never miss a shot!

Instant Video/ Fast Playback
The Brinno MAC200 DN captures and converts thousands of photos into a Time Lapse video inside the camera. Review your daily activity with the push of a button.

100% DIY
The Brinno MAC200 DN is a battery powered, motion activated security camera. Forget the power cord, Ethernet line or DVR system, it is your 100% DIY, 100% Wire-free, 100% portable security, anywhere, anytime.
- Output file format
Fast Playback Time Lapse Video, AVI format, resolution is 720P (1280x720).
• Package Contents
- Motion Activated Camera x 1
- Tree strap x 1
- Rubber strap x 1
- Wall Mount x 1
- User Manual x 1
1
2

3

4

5

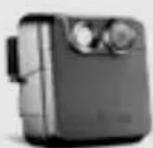
Parts of the Camera


Front B
- Lens
- Motion Sensor
- LED Indicator
- Operation Control Zone Latch
-
Operation Control Zone Cover
-
Battery Cover
- Tree Strap Hole
- Locking Hole
- External Power Port (DC IN 5V)

Inside Operation Control Zone
- SD Card Slot
- OK button
- Micro USB port
- Power Switch
- LCD Panel
- TIME / Next (▶) button
- MENU / Previous (◀) button
Display Icons
Set Up screen Preview Screen
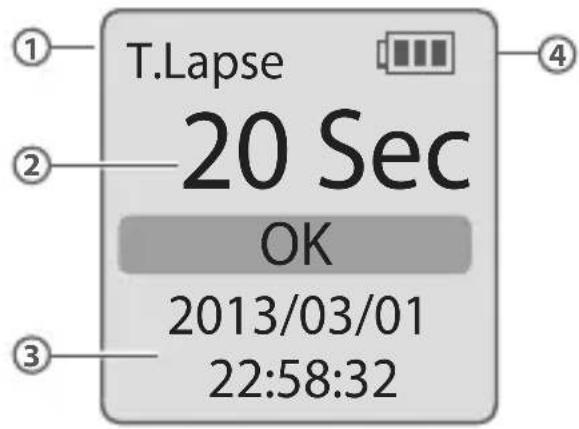
At Set Up screen
1. Capture mode:
- Motion mode
- Time Lapse
-
Hybrid
-
Capture Interval/ Capture Rate Displayed in Time Lapse Mode/ Hybrid Mode
-
System date and time
-
Battery level
| Icon | Description |
| (green) | Battery full charged. |
| (green) | Battery partially charged. |
| (yellow) | Low battery-Replace as soon as possible. |
| (red) | Out of battery-Replace battery immediately. |
11

BATTERY EMPTY
13

ERROR
O

12

FULL
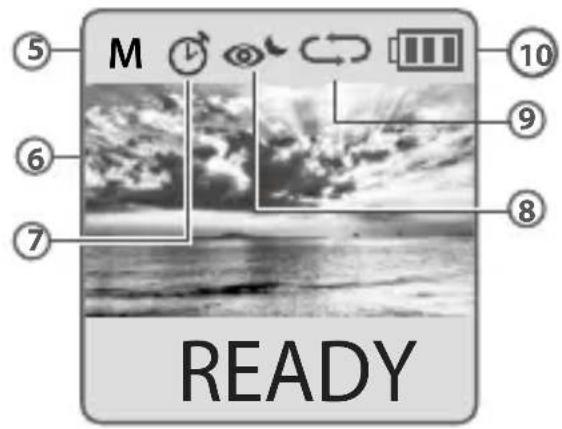
At Preview screen
5. Capture Mode:
• M (Motion mode)
• T (Time Lapse mode)
• H (Hybrid mode)
6. Preview Screen
7. Timer
8. Night Vision Mode
Please replace battery immediately.
12. SD Card Full
Please download files to clear SD card space.
13. SD Card Error
Please replace SD card.
14. Connected to computer via micro USB camera.
LED indicator

Green light :
• Indicates image capture in process.
Red light:
- Low battery.
- Low recording memory on your SD card.
Orange light:
- PIR sensor is warming up.
Installation
Initial Set Up
Initial Step-1

natural_image
Close-up of two batteries with positive and negative charge indicators (no text or symbols visible)Installing the Batteries
Open battery door, insert 2 D batteries and close battery door.

Initial Step-2

natural_image
Close-up of a black plastic bag attached to a wall-mounted device, with no visible text or symbols.Installing SD Card
Insert the SD card.

We support up to 32GB SD cards. And we recommend you use the maximum SD card to save your files.
Initial Step-3
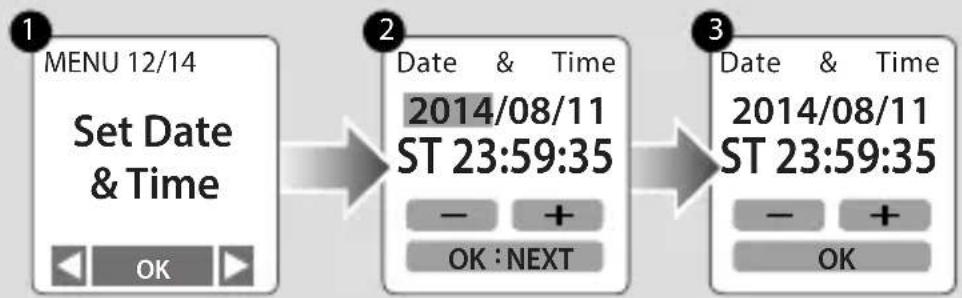
flowchart
graph LR
    A["1 MENU 12/14<br>Set Date & Time"] --> B["2 Date & Time<br>2014/08/11<br>ST 23:59:35<br>- + OK : NEXT"]
    B --> C["3 Date & Time<br>2014/08/11<br>ST 23:59:35<br>- + OK"]
- To turn on the camera as a Motion Activated Camera, press
- The number with the red background is the number you are setting. Press
- When finished press OK to exit and return to the Set Up Screen.
- ST: Standard Time DT: Daylight Saving Time
How Our Power Saving Technology Works
At Set Up Screen At Preview Screen
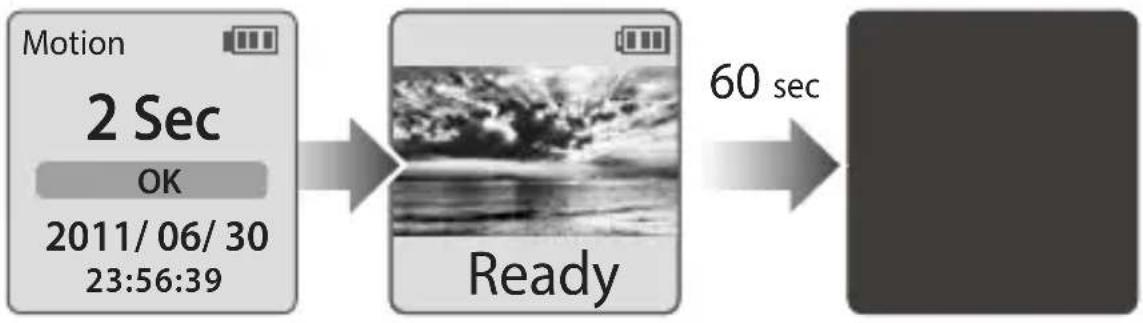
flowchart
graph LR
    A["Motion 2 Sec\nOK\n2011/06/30\n23:56:39"] --> B["Ready"]
    B --> C["60 sec"]
• At Set Up Screen
After 10 seconds without activity on the set up screen, the camera will go to preview screen automatically. You can press
- Stand by time: 427 days
- Frames captured to low battery: 1,845,000 frames
Specification
| Camera | |
| Model MAC200 DN | |
| LCD Screen 1.44" TFT LCD | |
| Waterproof IPX4 | |
| Capture Mode | |
| Motion Activated PIR motion detection | |
| Time Lapse Fixed Capture Rate | |
| Hybrid | Combine Time Lapse and Motion Activated mode |
| PIR Sensor | |
| Detect distance 6M | |
| Detect Angle 100° | |
| Image Sensor | |
| Type 1/4" CMOS sensor | |
| Resolution 1.3 Mega pixel | |
| Pixel size 2.8 μm | |
| Sensitivity | 2500mV/lux-sec(Good low light quality) |
| Optics Lens | |
| Aperture F2.0 | |
| Field of View 70° | |
| Optics Lens | |
| Focal Length 28 mm (35mm equivalent) | |
| Focus Distance 60 cm (Minimum) | |
| Recording | |
| Video Fast Playback Time Lapse Video | |
| Format AVI | |
| 720P(1280x720) | |
| Memory Storage SD Card ( Supported up to 32GB) | |
| Power | |
| Power source 2 x D cell Batteries | |
| Battery Life 14 months* | |
| External Power DC IN: 5V | |
| Dimension | |
| Size(DxWxH) 106x1 | 10x78 mm (4.13"x4.29"x3.04") |
| Weight 275g (without batteries) | |
| Color Black | |
| Operation Temperature | |
| - 20°C ~ 50°C- 4°F ~ 122°F | |
- Batteries last 14 months usage under time lapse mode. (time interval setting: 5 minutes.)
brinno
brilliant innovation


- Motion Activated Camera MAC200 DN
- Register@online
- WEL COME TO THE BRINNO FAMILY!
- Thank you for purchasing this Brinno Motion Activated Camera!
- Contents
- Capture Mode
- Start Recording
- MENU Setting
- What Size SD Card Should I Use 43
- Battery Life 44
- Specification 45
- Motion Activated Camera Features
- Months Battery Life
- Dual Protection
- 10x Outlook Range
- < 1 Sec. Rapid Wake Up
- Instant Video/ Fast Playback
- 100% DIY
- - Output file format
- • Package Contents
- Parts of the Camera
- Front B
- Inside Operation Control Zone
- Display Icons
- At Set Up screen
- Capture mode:
- At Preview screen
- Capture Mode:
- Preview Screen
- Timer
- Night Vision Mode
- SD Card Full
- SD Card Error
- Connected to computer via micro USB camera.
- LED indicator
- Green light :
- Red light:
- Orange light:
- Installation
- Initial Set Up
- Initial Step-1
- Installing the Batteries
- Initial Step-2
- Installing SD Card
- Initial Step-3
- How Our Power Saving Technology Works
- • At Set Up Screen
- • At Preview Screen
- Motion Activated Mode
- Time Lapse Mode
- Hybrid Mode
- Hybrid Time Lapse Mode
- Hybrid Motion Mode
- Time Lapse Mode & Hybrid Mode
- Stop Recording
- To Stop Recording
- Basic Installation
- ways to mount the camera
- A-2 Wall Mount
- ways to secure the camera safety
- SD card capacity
- Go to the MENU setting
- SD card capacity
- Capture Mode
- Overwrite
- Overwrite
- Timer
- Timer
- Playback Rate
- Playback Rate
- Image Quality
- Image Quality
- Time Stamp
- Time Stamp
- LED Display
- LED Display
- Band Filter
- Band Filter
- Night Vision Mode
- Night Vision Mode
- Set Latitude
- Set Latitude
- How to find your location latitude? Please go to: www.latlong.net
- To know your correct sunrise and sunset time?
- Set Date and Time
- Set Date and Time
- FW version
- FW version
- Reset
- Reset
- Default setting
- What Size SD Card Should I Use
- Battery Life
- Motion mode & Hybrid mode
- Specification
- brinno
- brilliant innovation
Brand : Brinno
Model : MAC200DN
Category : Camera