EJ 802 E - Dishwasher BRU - Free user manual and instructions
Find the device manual for free EJ 802 E BRU in PDF.

User questions about EJ 802 E BRU
0 question about this device. Answer the ones you know or ask your own.
Ask a new question about this device
Download the instructions for your Dishwasher in PDF format for free! Find your manual EJ 802 E - BRU and take your electronic device back in hand. On this page are published all the documents necessary for the use of your device. EJ 802 E by BRU.
USER MANUAL EJ 802 E BRU
Programme Chart and Quick Reference Card
GB
How to cancel the washing programme
To cancel a programme while the machine is operating:
Press start/stop button for 5 seconds. The indicator light will start flashing. The machine will drain the water inside the machine for 45 seconds. The programme is cancelled when start/stop indicator light goes off. Then, you can choose and start a new programme.
! Important: Depending on the stage of the programme you have cancelled, there may be detergent residue or rinse aid inside the machine and on the load. Make sure the items in the dishwasher are not used before washing properly.
How to change the washing programme
To change the programme selection while the machine is operating:
Press start/stop button. The indicator light will go off.
Select the new programme. Press start/stop button. The indicator light will be on and new programme will start.
! Important: The new programme will NOT start right from the beginning. It will start from the stage last carried out by the previous programme selection.
| Programme symbols and temperatures | 1Prewash | 230°35°C | 3Delicate40°C | 4eEco50°C | 5Normal55°C | 6Daily60°C | 7Intensive70°C | 8AutoAutomatic55°C-65°C |
| For rinsing dishes that will not be washed immediately | Glasses, lightly soiled dishes and short programme | Glasses, lightly soiled dishes | Soiled dishes that have been kept in the machine | Soiled dishes | Soiled or heavily soiled dishes | Heavily soiled dishes that have been kept in the machine OR Heavily soiled dishes requiring pre-wash. 1 | Automatically senses water dirtiness level and washes until dishes are completely cleaned. 2 | |
| Detergent compartment A=25 cm ^3 / 15 cm ^3 B=5 cm ^3 | - | A | A | A+B | A+B | A+B | A+B | A |
| programme sequence | Prewash ▼Stop | 35 °C wash ▼Cold rinse ▼Hot rinse ▼Drying | Prewash ▼40 °C wash ▼Cold rinse ▼Hot rinse ▼Drying | Prewash ▼50 °C wash ▼Cold rinse ▼Hot rinse ▼Drying | Prewash ▼55 °C wash ▼Cold rinse ▼Hot rinse ▼Drying | Prewash ▼60 °C wash ▼Cold rinse ▼Hot rinse ▼Drying | 50°C Prewash ▼70 °C wash ▼Cold rinse ▼50 °C rinse ▼Hot rinse ▼Drying | Programme sequence is adjusted automatically according to the dirtiness of the dishes. |
| Consumption figuresWater (Liter)Energy (kWh)Duration (min) | 4-15 | 10,20,7530 | 13,20,9071 | 131,05170 | 13,61,2096 | 13,61,35106 | 18,81,70124 | 10,2-19,61,18-1,60112-160 |
* Values declared on the product or in the operating instruction booklet / programme chart and quick reference card supplied with the product are obtained in tests performed under controlled laboratory conditions and these tests are as defined in relevant standards
** Reference programme for the Testing Institute and energy labeling.
Testing program: Eco 50°C as compliant to EN 50242 international norms.
18 9819 01 00 -05

Operating the dishwasher


Turn the tap on. Open the door of the machine.
- Check that the upper and lower spray arms can rotate freely. Pour (Put in) the detergent.
- Close the door of the machine.
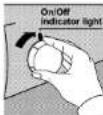
- Push in the on/off button and check that the indicator light comes on.
Check the salt and rinse aid level indicators before you start the machine. If necessary add salt and rinse aid.
Select the required programme by referring to the programme chart.
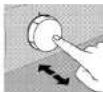
Press the programme selection knob and it pops out. You will see the starting positions of the programmes. Select the desired programme by turning the selector knob. Push in the knob to prevent accidental operation. Then select from available options, if required. The display shows the Total Duration / Remaining Time of the selected programme in minutes.
- Press start / stop button and check that the function indicator light comes on.
It will not affect the sequence if you leave the programme selection knob pushed in or out. Keep the knob pushed in to prevent children from tampering with the machine. Do not open the dishwasher door whilst the appliance is in operation. However, in case the door is opened while the machine is working, then a safety mechanism ensures the machine immediately stops. Water may be very hot, so be careful.
Care must be taken if opening the door, as steam and water will escape.
- Press the on/off button after the programme is completed. The indicator light will go off.
- Turn of the water tap, unload the baskets.
Options
Half Load (1/2)
Select Half Load when using any wash programme (Except Pre-wash) to save on water, electricity and time if the machine is only half full. You can place dishes anywhere in the machine; some upper and some lower basket.
If this option is selected, programme starts from the Main Wash step and Progress Indicator lights for both Pre-wash and Main Wash programmes come on and remain on at the same time.
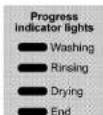
Programme Sequence
The programme sequence throughout the washing process can be monitored from the progress indicator lights on the control panel.
! Dry progress indicator light will not come on when using the Rapid programme.
Following the rinsing stage, in order to drain and remove water from inside the machine completely, the machine will pause for approximately 35 minutes. Do not worry this is not a fault. Then, drving stage will start and dry progress indicates light will come on
a fault. Then drying stage will start and dry progress indicator light will come on.
Do not switch the machine off before End light comes on.
Display
Water hardness level, Time Delay and Remaining Time for the selected programme are displayed. You can turn on Key Lock and change Time Delay if required.
Time Delay
This option enables you to start the selected programme with a delay of 1 - 24 hours. Time Delay is adjusted by pressing plus (+) and minus (-) buttons below the display. After adjusting the required Time Delay, press Start / Stop button. At the end of the delay set, the programme starts automatically.
During a programme, Time Delay option does not function.
⑥Key Lock
Key Lock function is used to lock keys so that a selected Programme, Time Delay cannot be changed as keys will not function. However Key Lock function will not lock the dishwasher door.
If you want to activate Key Lock, then press both (+) plus and (-) minus buttons below the display simultaneously for 3 seconds. "Key Lock" symbol indicator light on the display will light. To deactivate the function, press same buttons simultaneously for 3 seconds. "Key Lock" symbol indicator light will go off.
Remaining Time
Immediately after you press Start/Stop button to start a Programme, the display will show Total Duration of the selected Programme in minutes. As the programme progresses, Remaining Time is displayed in 1 minute decrements. At the end of the selected programme, the display shows 00.
Programme Chart and Quick Reference Card
GB
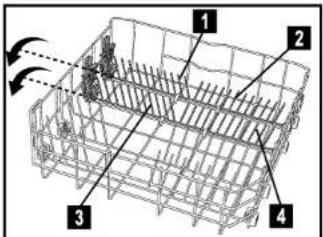
Loading the dishwasher
There are three separate baskets, in which you can put your dinnerware, in your machine. The shelves on the rack are made adjustable to accommodate tall pieces.
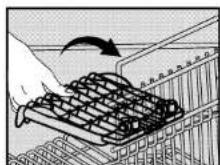
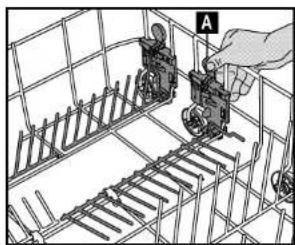
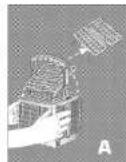
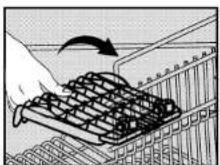
Folding Plate Support Rods (If applicable)
There are four separate "folding plate support rods" in the lower basket of your dishwasher designed to allow you more space to accommodate saucepans and large bowls in the lower basket. You can either fold each section (1,2,3,4) individually or, all at once, to create a large empty space. Simply press the handgrips (A) and fold them down"


Long cutlery, such as ladles and long knives, etc must be placed horizontally on top of the full cutlery basket or on the racks to prevent accidental injury.
Place spoons and forks in the cutlery basket with handles down and knives with handles up to prevent accidental injury.
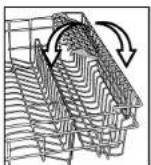
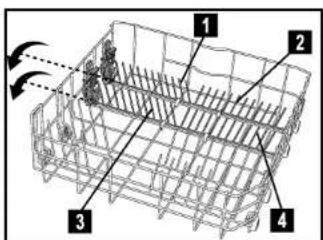
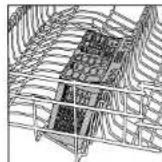
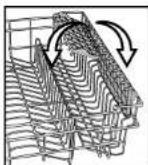
Upper Basket Height Adjustment
The default position of the upper basket of your machine is adjusted at the higher position. According to the size of the dishes you can change the position of the upper basket. To do this, Release the latches on both the right and left tracks by turning them sideways. Remove the basket. Change the position of the rollers and place the basket back on the track then shut the latches.
(if provided)
Programme Chart and Quick Reference Card
CB
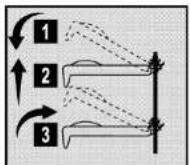
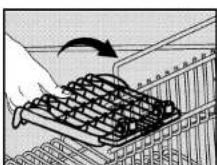
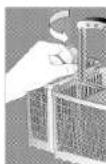
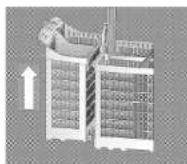
THE ACROBAT SYSTEM (If provided)
The upper basket is designed with a built in elevator system which allows you to move the upper basket up or down even when its fully loaded, without having to take it out of the machine. 1
The upper basket is set at the "low" position at production. To bring the upper basket to the "high" position, hold from the side one of the upper basket and gently pull upwards.
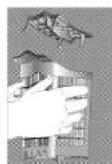
To raise the other end of the basket hold from the other side and do the same 2. To lower the upper basket, hold from the lever on one side of the basket and gently lower the basket without removing your hand from the lever 2. Do the same holding the lever on the other side of the basket. Always ensure both sides of the elevator mechanism are level.

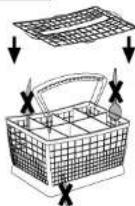
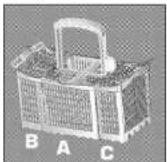
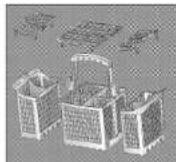
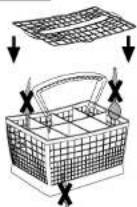
Three-way split cutlery basket (if provided)
Depending on the amount of load and load type, three-way split cutlery basket can be split into three parts. Part B and/or part C can be placed in the upper basket.
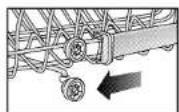
To dismantle the three-way split cutlery basket follow the below instructions and see the diagrams supplied.
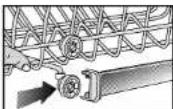
Rotate handgrip which is at the bottom of handle.
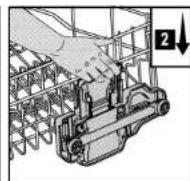
Remove top and bottom hangers by sliding each part in opposite direction. If you want to reassemble the cutlery basket, the reverse of the above operations should be carried out.
Part A can not be placed into the upper basket.
Long cutlery, such as ladles and carving knives, should not be placed in the upper basket parts B or C. They can be placed on the side racks on the upper basket.
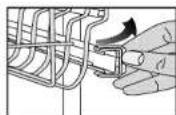
In order to obtain the best cleaning and drying performance in cutlery basket, use the separators of parts A, B and C.
To remove the separators follow the below instructions
For Part A; Press from the sides and the separators can be removed easily. For Parts B and C; Press from the sides where handle is placed and the separators can be removed easily.


natural_image
Illustration of a mechanical assembly with gears and a hand holding a component (no text or symbols)