PKG-TAB-APP3 - Docking Station Havis - Free user manual and instructions
Find the device manual for free PKG-TAB-APP3 Havis in PDF.


| Product Type | Rugged Protective Case with Docking Station |
| Brand | Havis |
| Model | PKG-TAB-APP3 |
| Compatible Devices | Apple iPad Pro 11-inch (all generations with USB-C) |
| Material | High-impact plastic, zinc-nickel plated steel screws |
| Dimensions (approx.) | 10.5 x 7.5 x 1.5 inches (estimated, based on iPad Pro 11 size) |
| Weight (approx.) | 1.2 lbs (estimated) |
| Mounting | Designed for vehicle or fixed mounting (brackets included) |
| Charging Port | USB Type-C (cable not included) for charging when tablet is not docked with DS-TAB-100 |
| Apple Pencil Support | Wireless charging port for compatible Apple Pencil (1st or 2nd gen) |
| Installation | Screw-in design with 8 M2.5x6mm screws, T8 Torx bit included |
| Screw Torque | 4 in-lbs ±10% |
| Snap Fits | 4 snap fits for secure closure |
| Hardware Kit Contents | 12 screws (extra), 1 T-8 pin-in Torx bit |
| Safety Warning | Must be professionally installed; do not obstruct driver view or interfere with vehicle safety devices |
| Usage | Indoor and vehicle use; stow device before driving |
| Maintenance | Clean with mild soap and water; inspect screws periodically |
| Repairability | Spare screws included; case can be disassembled for tablet removal |
| Certifications | Meets applicable safety standards (not specified) |
Frequently Asked Questions - PKG-TAB-APP3 Havis
User questions about PKG-TAB-APP3 Havis
0 question about this device. Answer the ones you know or ask your own.
Ask a new question about this device
Download the instructions for your Docking Station in PDF format for free! Find your manual PKG-TAB-APP3 - Havis and take your electronic device back in hand. On this page are published all the documents necessary for the use of your device. PKG-TAB-APP3 by Havis.
USER MANUAL PKG-TAB-APP3 Havis
natural_image
Technical diagram of an electronic device interior with labeled components (no readable text or symbols)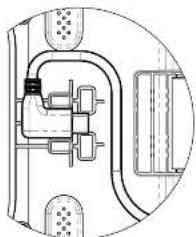
natural_image
Technical line drawing of a mechanical assembly with no visible text or symbolsDETAIL A SCALE 2:3
IMAGE 2
natural_image
Cross-sectional diagram of a device casing with internal components and wiring (no text or labels)USB TYPE C CABLE (NOT INCLUDED) CAN BE USED FOR CHARGING WHEN TABLET IS NOT DOCKED WITH THE DS-TAB-100.
IMAGE 3
natural_image
Top-down schematic of a computer room layout with no visible text or symbolsIMAGE 4
natural_image
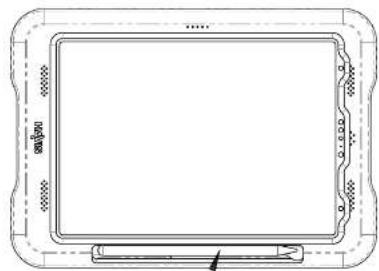
Front view of a rectangular electronic device with mounting brackets and a central screen (no text or symbols visible)APPLE PENCIL DOCKING PORT FOR WIRELESS CHARGING
INSTALLATION INSTRUCTIONS:
- Note the cable routing detailed in Image 1, Detail A.
- Insert the connector from the Protective Case into the Apple iPad Pro 11, maintaining the orientation shown in Detail A.
- Place the iPad Pro into the Rear Protective Case and ensure that the cable routing matches that shown in Detail A. Be careful not to pinch the cable.
- Place Front Protective Case onto the rear, noting that the Havis logo should be positioned on the bottom side (connector side) of the iPad Pro. Ensure that the cable is not pinched when placing the two halves together.
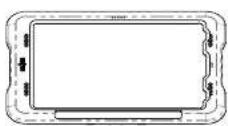
- Your Protective Case includes four (4) snap fits located in the areas circled in Image 2. Apply light pressure until all the snaps are interlocked.
- Holding the two pieces together, carefully turn the Protective Case over.
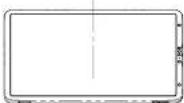
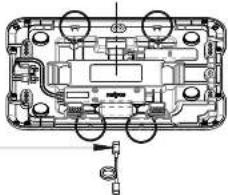
- Fasten all eight (8) of the M2.5 x 6mm screws (Item #1) with the supplied T8 torx bit (Item #2) into the locations shown in Image 3. Torque to 4 in-lbs +/- 10%. Do not over-tighten screws.
NOTE: Hardware kit includes extra screws in the event of loss or damage.
NOTE: Protective case will allow for storage and charging of compatible Apple Pencil in location noted in Image 4.
HARDWARE KIT CONTENTS
| ITEM # | DESCRIPTION | QTY. | FINISH | DRIVE STYLE/ SIZE |
| 1 | THREAD-FORMING SCREW, WASHER HEAD, M2.5 STS+ THREAD, 6MM LONG, T8 DRIVE, STEEL, ZINC-NICKEL PLATED, BLACK | 12 | ZINC-NICKEL PLATED, BLACK | T8 |
| 2 | T-8 PIN-IN TORX BIT | 1 | ———— | 1/4" HEX |
| PRODUCT ID.TC-106 | DATE04-04-19 |
| PRODUCT NAMEINSTALLATIONINSTRUCTIONS FOR TC-106 | |
 =1-800-534-0000WWW.HAVIS.COM =1-800-534-0000WWW.HAVIS.COM | WIGHT: [LBS]-REV. DATE04 04 19 |
DRAWING NUMBER: TC-106_INST_04-19
WARNING: ALL HAVIS INC. PRODUCTS ARE DESIGNED WITH SAFETY OF USE AND INSTALLATION IN MIND. HOWEVER, PRODUCT DESCRIPTION IT IS THE SOLE RESPONSIBILITY OF THE OWNER/OPERATOR OF A VEHICLE USING HAVIS INC. MOUNTING AND INSTALLATION TO THE SEVER ACTIVITY. INSTALLATION IS INSTALLED BY THE EQUIPERS FROM VEHICLE OPERATION, INTERFERE WITH SAFETY DEVICES. OBSTRUCT VIEW OF DRIVING CONDITIONS, OR IN ANY WAY DEGRADE OCCUPANT SAFETY. IMPROPER INSTALLATION CAN CAUSE SERIOUS INJURY IN THE EVENT OF AN ACCIDENT. INSTALLATION SHOULD ONLY BE PERFORMED BY QUALIFIED PROFESSIONALS. COMPUTERS AND MOTION DEVICES ARE MOVED TO AND STOWED/SECURED IN THEIR SAFE DRIVING POSITIONS BEFORE OPERATING VEHICLE.
1-800-524-9990 WWW.HAVIS.COM
-2017年10月3日
natural_image
Blank rectangular electronic device with mounting flanges and control buttons (no text or symbols)IMAGE 1
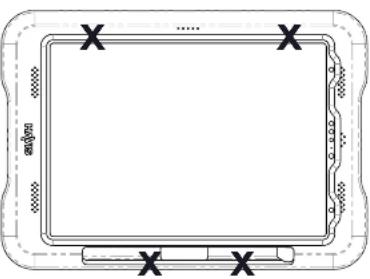
LOCATION OF SNAP FITS
natural_image
Diagram of a tablet device with two arrows indicating movement or flow, no text or symbols presentIMAGE 2
natural_image
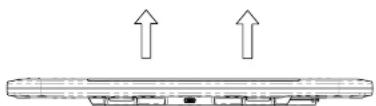
Diagram of a device with two upward arrows indicating motion or orientation (no text or symbols)IMAGE 3
REMOVING TABLET FROM PROTECTIVE CASE:
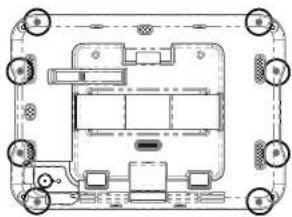
- Remove all eight (8) of the screws that secure the front and back case together. Reference Image 3 of the installation instructions.
- Protective case contains four snap fits that must be detached to remove the front case. Image 1 shows the locations of the snap fits.
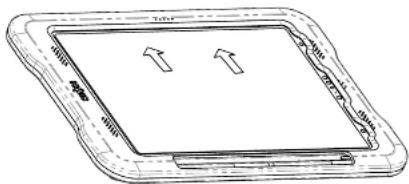
- Detach the snap fits on one side first applying light pressure on the snap fit locations in the directions indicated to detach the snaps (Reference Image 2).
- While maintaining light pressure lift up the one side of the case to completely detach the snaps.
- Repeat steps 3 and 4 to release the snaps on the opposite side. Once snap fits are detached you can then remove the front case.
- Detach the connector from the tablet.
- Tablet can now be removed from the protective case.
| DRAWING NUMBER:TC-106_INST_04-19 | WARNING: ALL HAVIS INC. PRODUCTS ARE DESIGNED WITH SAFETY OF USE AND INSTALLATION IN MIND. HOWEVER,IT IS THE SOLE RESPONSIBILITY OF THE OWNER/OPERATOR OF A VEHICLE USING HAVIS INC. MOUNTING ANDDOCKING EQUIPMENT TO INSURE THAT THE EQUIPMENT IS INSTALLED SO THAT IT WILL NOT INTERFERE WITH VEHICLEOPERATION, INTERFERE WITH SAFETY DEVICES, OBSTRUCT VIEW OF DRIVING CONDITIONS, OR IN ANY WAYDEGRADE OCCUPANT SAFETY. IMPROPER INSTALLATION CAN CAUSE SERIOUS INJURY IN THE EVENT OF ANACCIDENT. INSTALLATION SHOULD ONLY BE PERFORMED BY QUALIFIED PROFESSIONALS. COMPUTERS ANDMOTION DEVICES MUST BE MOVED TO AND STOWED/SECURED IN THEIR SAFE DRIVING POSITIONS BEFOREOPERATING VEHICLE. | PRODUCT DESCRIPTIONINSTALLATION INSTRUCTIONS FOR TC-106,APPLE iPad PRO 11" PROTECTIVE CASE. |  |
Brand : Havis
Model : PKG-TAB-APP3
Category : Docking Station