QX 78 - Tablet WOXTER - Free user manual and instructions
Find the device manual for free QX 78 WOXTER in PDF.

User questions about QX 78 WOXTER
0 question about this device. Answer the ones you know or ask your own.
Ask a new question about this device
Download the instructions for your Tablet in PDF format for free! Find your manual QX 78 - WOXTER and take your electronic device back in hand. On this page are published all the documents necessary for the use of your device. QX 78 by WOXTER.
USER MANUAL QX 78 WOXTER
natural_image
Abstract pink logo shape resembling the letter 'W' (no text or symbols)woxter
Startup and Shutdown....2
Usage of the Touch Screen....2
Interface Introduction....3
- Desktop....3
2.Screen Lock....3
Program Operation Instruction....4
1.Player....4
2.Music 5
3.Sound Recor....6
- Camera....7
5.Browser....8
6.Play Store....9
- Calendar 9
8.Clock....9
9.Calculator....10
-
Downloads....11
-
Maps....11
-
Email....11
-
File Manager/Explorer....14
Settings....15
3G Network Settings....17
Usage of the Extended Memory....17
-
Usage of the U Disk....17
-
Usage of the SD Card....17
Download/Unload Application Programs....18
Connect to PC....19
Charging....19
Precautions....20
Startup and Shutdown
Startup: Please press and hold the Power Key for 5s.
Shutdown: Press and hold the Power Key for 5s → Click Shutdown → and Confirm Locking and Unlocking the Screen: Press the Power Key very quickly to lock or unlock the Screen.
Forced Shutdown: If the device has not responded for quite a while, please press and hold the Power Key or the Reset Key to reboot the device.
Note: If not necessary, please do not try forced shutdown, and the User shall shut down the device according to relevant procedures.
Reset Key: Please press the Reset Key to conduct rebooting.
Usage of the Touch Screen
Click: Click and select the Icon or option you need.
Press and hold for a while: Select and press one icon for a while and move it to the Desktop for display.
Pull and Move: Pull and Move one Icon to shift between two different interfaces.
In order to protect the Touch Screen from scratches or crush risk, please do not place other objects on the Screen.
Interface Introduction
1. Desktop
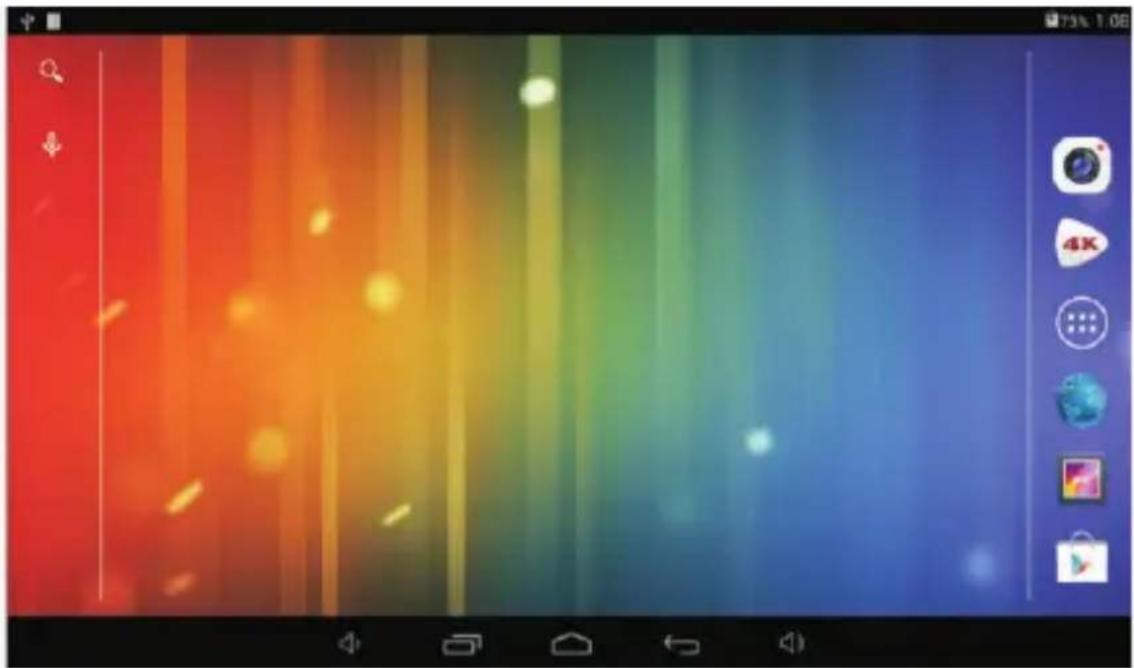
natural_image
Colorful abstract background with vertical streaks and glowing spots, no readable text or symbols1:USB Connection Icon\2:USB Debugging Connection Icon which shall be selected through setting operation\3:google search\4: Voice Search shortcut function\5:Shortcut Key for Volume Down\6:Multitask Selection Key \7:Back to the Desktop from the Program Interface \8Shortcut Key for Back to the Previous Interface\9:Shortcut Key for Volume Up\10:Battery Power Status\11:Time Display\12: View all Application Programs
2. Screen Lock

The device will enter stand-by status if there is no operation for quite a while or the User has pressed the Power Key. There are two stand-by statuses: Deep Sleep and Light Sleep --- under the Deep Sleep mode, the Touch Screen is locked and dark, and it will wake up and enter the Light Sleep mode after the User has pressed the Power Key. The default Stand-by Interface (Light Sleep) is shown in then Diagram.
Please press and hold the Unlock Key to pull it to the Point A to unlock the
Screen and press ⬆ and hold on to the Point B to Open the GOOGLE Browser for surfing the Internet.
Program Operation Instructions
1. Player
The Picture and Video formats shall be in conformity with the designated formats provided by the Supplier including AVI, WMV, RM, RMVB, 3GP, MP4 and VOB. Please confirm that with the Supplier.
- Click the Icon

to enter the Playing interface.
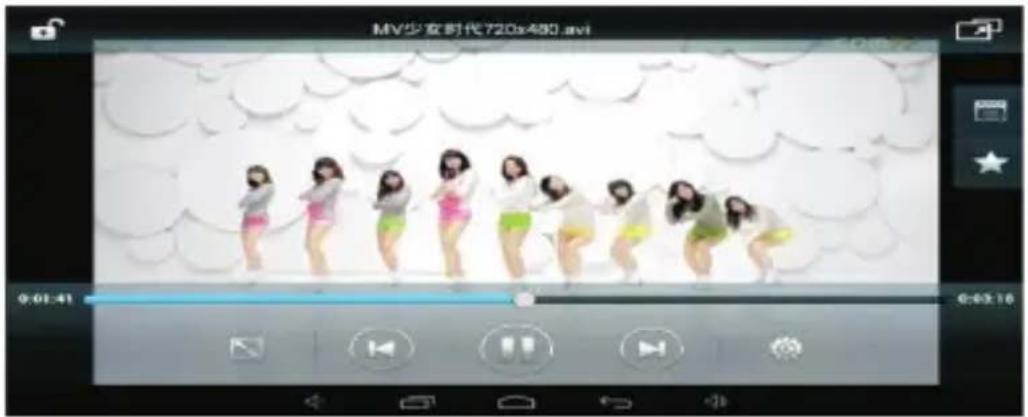
- The device will enter the Video Playing Interface if the User has selected a video file to play. The Control Menu as shown in the following Diagram will appear on the Screen, and then the User can properly adjust the Videos (including Volume Down and Volume Up, Progress Bar, Video Brightness Up and Down, Previous, Pause/Play, Next, Screen Size, Small Window Playing, Playing Mode, Subtitle, Locking, Add a Video and Settings).
2.Music
** Please consult the Supplier for available Audio formats including Mp3, WMA, OGG, FLAC, WAV, and AAC

- Click the Icon 📁 to enter the Playing Interface.
- Please select the Music you want to play according to the Route: Songs/Album/Artist/Playlist.
- Click the Icon for Previous → Pause → Next.
Click the Icon ↩ or 🔒 to go back to the Desktop while the device is still playing music. By means of the Menu Key, the User can edit the music the device is playing. Relevant interface is shown as follow:

3. Sound Recorder
to enter the Recording Interface (as shown in the following
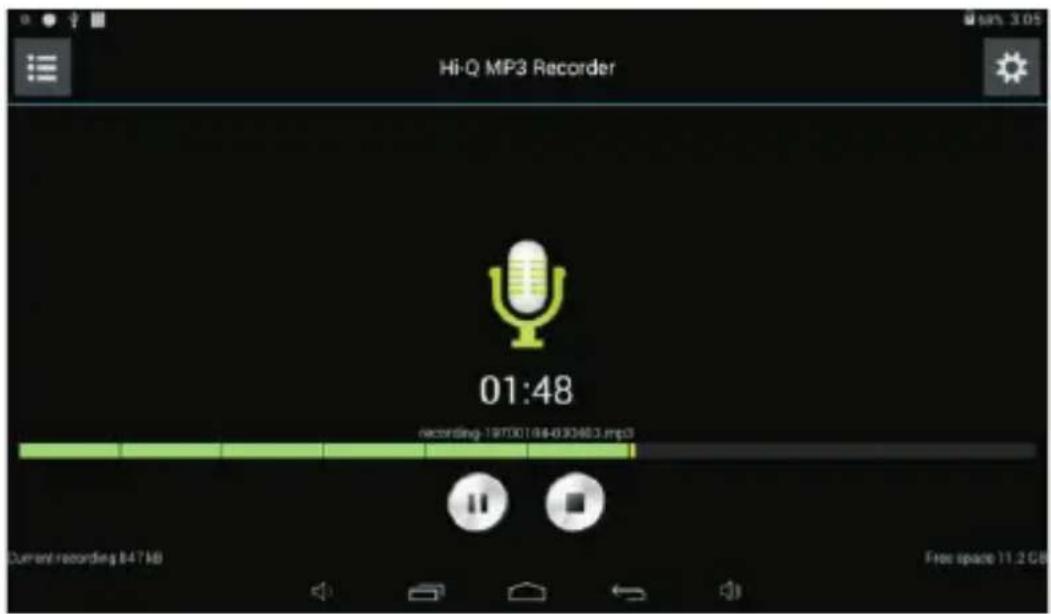
Click the Icon to start recording and click and click the Icon to finish
recording. Please click the Icon to play the recording file the User just finished. The recording files will be named according to the time, and the User can randomly select one recording file to play; as shown in the above Diagram, the green part of the Progress Bar represents the sound wave and the recording time is being displayed on the bottom right corner.
4. Camera
Click the Icon to enable the Camera and the Interface will be shown as follow:

Take a Picture
- After the Camera has been enabled, please click the Icon take a picture, and the picture will be automatically saved.

to
-
It is possible for the User to move the Picture into the Photo Album. Under the Camera Mode, the User can enter the Photo Album and view various photos in the form of Sudoku, and 3 pictures can be displayed at the same time at most.
-
If the User wants to go back to the Camera Interface, please directly pull the interface to the most front end and the device will come back to the Camera Interface without pressing other keys, continuing to take pictures.
-
Respectively click the Icons , and to conduct relevant settings.
-
Press the Back Key or Desktop Key to quit.
Record a Video

- Click the Icon record a video.
to enter the Video mode, and you can start to

- Click the Icon recording.
to start recording and click it again to stop
- Relevant Video files will be saved.

- Click the Icon
on the bottom right corner to play the video,
- Press the Back

- Click the Icon
and go back to the Camera Interface.

.>> Note: You can click the Icon

to shift between the Front
Camera and Rear Camera for taking a picture or recording a
5. Browser
Click the Icon

to enter the Browser webpage:
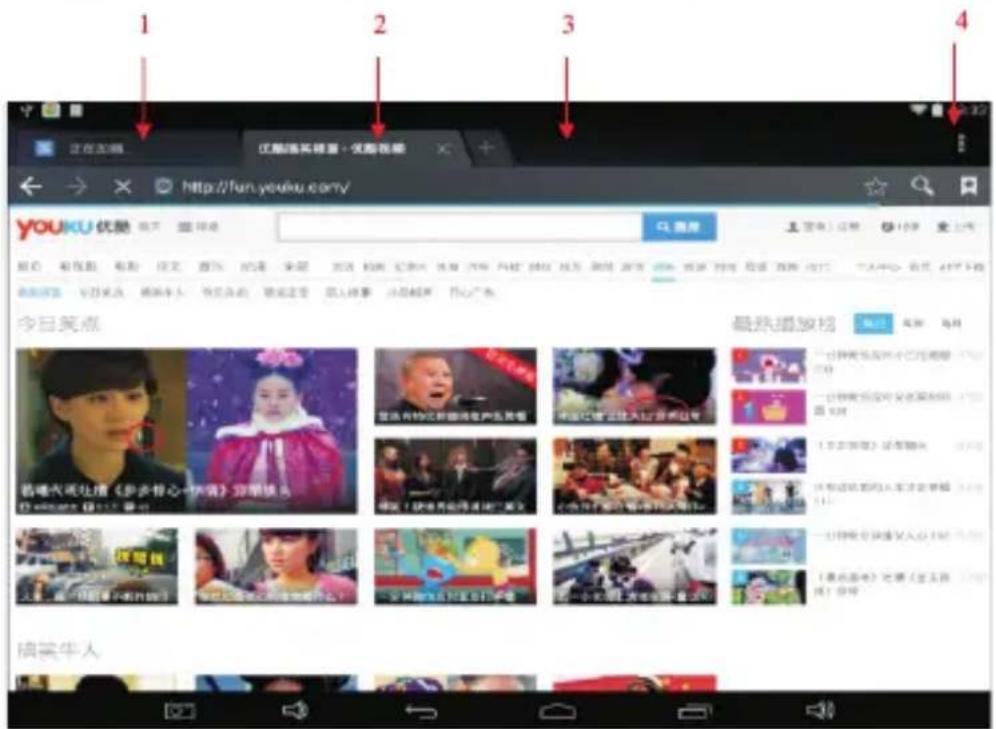
1: Previous webpage you have browsed and you can view it again as you like; 2:
- Play Store

Open PayTime to search and download relevant application programs.
Enter the Play Store for the first time and the System will ask you to log in google account (if you do not have a Email account, please apply for one account in http://gmail.google.com).
- Calendar
Click the Calendar Icon

It is necessary for you to log in if you are using the Calendar for the first time. Please correctly input the Email address and password. Then, please click Next and finish the account configuration. After that, you can finally use the Calendar.
- In the Calendar, please click and select the date you want for your new activity.
- Select the activity time → Input relevant information for the new activity in detail.
- Click FINISH.
-
Please press the Menu Key to select a Calendar Interface you want.
Note: The Date in gray means that there is a new activity on that day.
-
Clock
Click the Clock Icon

to reveal the current date and time.
Alarm Clock
It is possible for you to set up several alarm clocks at the same time.
.>> Note: When the Icon appears on the Screen, at least one alarm clock will sound.
Add an Alarm Clock
- Click the Clock Icon

-
Press the Menu Key → Add an Alarm Clock.
-
Set the Alarm Clock you need.
Note: If the User do not select Repetition, the Alarm Clock will sound for once and then be automatically deleted.
- Click Enable the Alarm Clock.
- Click FINISH.
Close the Alarm Clock Prompt
When the Alarm Clock Time is up. A window with the Alarm Clock name will eject.
If you want the Alarm Clock to sound 10s later, please click and choose Pause & Sound Again.
Click Cancel to eliminate such prompt.
Enable an Alarm Clock
With respect to the repeated Alarm Clock you have set, you can temporarily cancel the
Alarm Clock rather than deleting it.
- Click the Icon
to enable the Alarm Clock you want again. - Click the Icon
to enable the paused Alarm Clock again.
Edit An Alarm Clock
-
Click the Icon and then Click the Alarm Clock Icon.
-
Click the Alarm Clock you want and then conduct relevant editing operation.
Delete An Alarm Clock
- Click the Clock Icon

→ click the Icon

- Click the Alarm Clock you want to delete and pull it to

- Click Delete the Alarm Clock.
Click the Icon

to go back to the Desktop.
9. Calculator
- Click the Calculator Icon

Click and select the numbers and symbols to conduct calculation.
-
Click Clear to eliminate the numbers and symbols one by one, and press
-
Clear for a while to eliminate all numbers and symbols.
10. Downloads

- Click the Icon
- View the software programs which have been downloaded at present and select the software application you want to conduct installation.
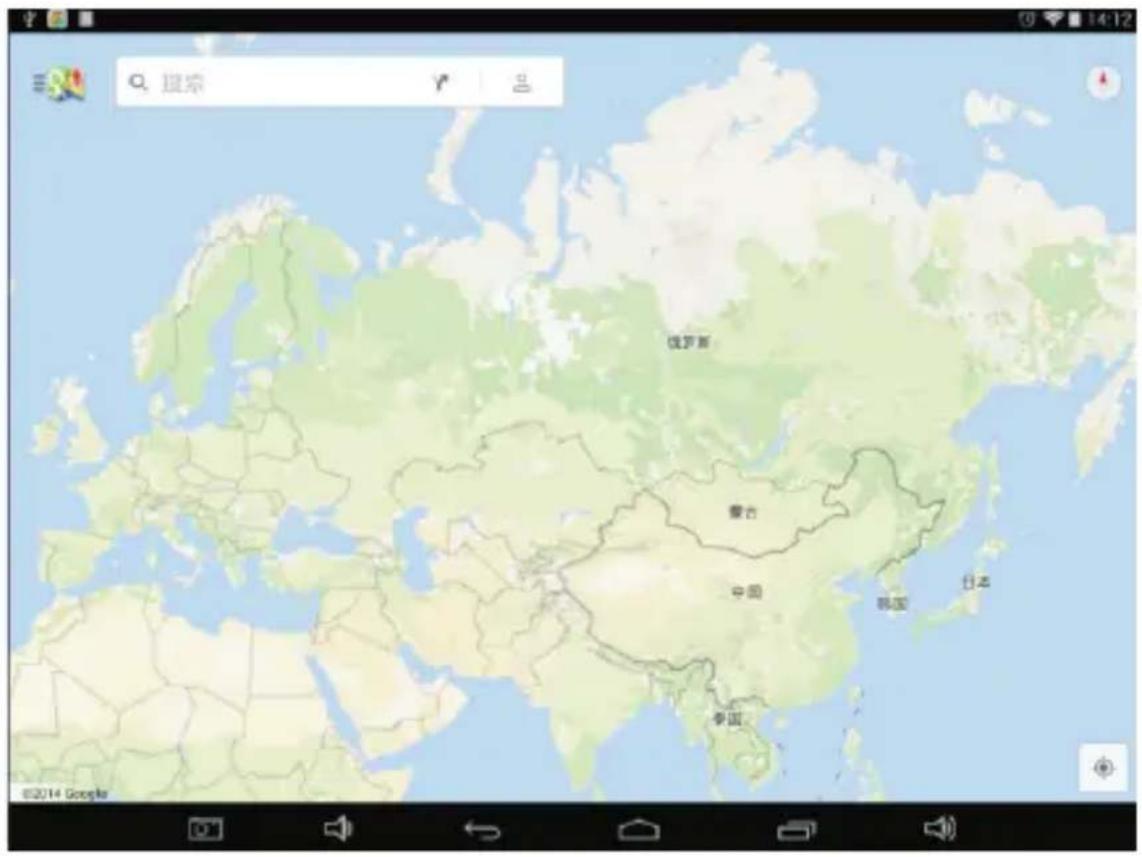
11. Maps
Note: In order to enable this function, your device must be connected with the Internet.
When the device has been connected with the Internet, please click the Maps

Icon to automatically locate the place where you stand; as shown in the following Diagram, please find the information you need;
[ ]» Note: This device supports POP3 and SMTP Email Accounts.
Add one (more than one) Email Account
You can input one or more than one Email address as you like in this device.
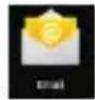
- Click the Email Program Icon
- In the YOUR ACCOUNT Interface, please click NEXT.
- Click the Options for Email Addresses, and then input your Email address.
- And then correctly input your Email password.
- Click FINISH.
- Manual Settings(optional): The Server Configuration is to automatically fill the Supplier according to the User's Email Account (namely gmail.com and so on). However, if you want to change the Server Configuration, please click Manual Settings and conduct relevant settings.
- Click NEXT.
- Optional: Input the Account Name.
- 8.Input the Name for sending e-mails, and then click FINISH.
Note: Upon the completion of settings, please confirm with your Email Supplier whether their server supports POP and SMTP transport protocol if your device cannot connect to a free Email Account.
My Messages

- Click the Email Icon
- If the User has only configured one Email Account, the User can open it very quickly; if the User has configured more than one Email Account, the list of Email Accounts will be displayed.
- Click the Email Account you need, and then click My Messages.
View an E-mail
- In My Messages, click and view the e-mail you want.
- For attachments, please click and enable relevant application program; or you can click and save them to your SD Card.
- If you want to reply an e-mail, please click REPLY or REPLY All. a. Input the words you want to reply; b. Click SEND to immediately send your reply e-mail; click SAVE to save your reply e-mail without sending or deleting it.
- If you want to delete an e-mail immediately, please click DELETE.
Write a New Message
- In My Messages, click MENU and select WRITE A NEW MESSAGE.
- Click SEND TO, and then input the Receiver's e-mail address.
- Or, if you want to copy a message or send a BCC (Blind Curtesy Copy) to the Receiver, please click MENU→add a copy of message or a BCC, and then input the Receiver's e-mail address.
- Please input one Title for the message you want to send in the Title Bar.
- Click WRITE A NEW MESSAGE and then input your personal
- information.
- If necessary, please click MENU→ ADD AN ATTCHMENT to add the attachment you want to send.
When you finish writing the message, please click MENU and SEND.
Edit the Email Account

- Click the Email Icon
- In My Messages, click MENU and select Account Settings.
-
Please set your Gmail account as you like.
-
Click the Icon and go back to My Messages.
Delete An Email Account
.>> Note: If you have configured more than one Email Account and have deleted the default account, the next account in order will then be the default account in your system.

- Click the Email Icon
- In My Messages, click Menu→Accounts.
- Click and delete the Account as you like.
- In the Account Options, please click and Delete the Account you want.
- Click Confirm to successfully delete the account.
Set a Default Email Account
Since you shall have a default Email Account, you need select one from your different accounts as the default Email Account.
- Click the Email Icon
- In My Messages, click Menu→ Account Settings.
- Click Default Account for confirmation.
If you have deleted the Default Account, the next Account in order will then be the Default Account in your system.
13. File Manager/Explorer
Click the Icon to view all files saved in the Memory Devices (including NAND FLASH, SD Card, and USB Storage) and to conveniently install relevant Android application programs for your device.

- Home: Directly go back to the Home to display the SD Card, NAND FLASH and USB storage;
- Local: Local Files;
- TF Card: TF Card Files;
- OTG: Read Files by means of OTG;
- Picture: Picture Files;
- Video: Video Files;
- Memory Management
- File Editor: Paste, Delete, Copy and Cut
Copy Files between Different Devices
By means of File Explorer, files can be copied and pasted between the external storage and the internal storage/PC. If files need to be copied into this device, please firstly copy that to the SD Card or USB Storage.
- Click the Icon or the Icon to open relevant storage device and display the files saved in your storage devices.
- Click the file or folder you want and hold on for a while, and then select COPY.
- Click the Icon and go back to Home to find the Storage Device Symbol → Click the Storage Device Symbol you want → Click Editor → Select Paste.
Delete the Files
Press the file or folder you need and select DELETE.
Settings
| Wi-Fi and Network | ||
| Wi-Fi | Configure and manage the wireless access point. (See WIFI Network Settings for details.) | |
| Bluetooth | Optional | Please turn on the Bluetooth and click the Bluetooth device name, making it detectable and available for nearby Bluetooth devices. |
| Data Traffic Usage | Configure and manage the data traffic. | |
| Más.. | Airplane Mode | On/Off |
| Portable Hot Spot | Able to configure the WIFIHot Spot | |
| Ethernet | Configure the Wired Network | |
| VPN | Configure the VPN | |
| DEVICE | ||
| Voice | Volume | Adjust the Media Volume, Alarm Clock Volume and Notice Volume. Click and Move the sliding block , and then click CONFIRM. |
| Touch Prompt Tone | ||
| Screen Lock Prompt Tone | Prompt Tone for locking and unlocking the screen. | |
| Pantalla | Brightness | Click and move the sliding block to adjust the Screen's brightness, and then click CONFIRM. |
| Wallpaper | Wallpaper Settings | |
| Dormant Status | Adjust the time for Dormant Status | |
| Font Size | Adjust the font size. | |
| Storage | Memory Usage Condition |  |
| Application | Application Occupation Condition | |
| Private Settings | ||
| Location Information | Configure the Google Location-based service and Google search application. | |
| Security | Screen Lock | Safeguard the Screen. |
| User's Information | To display the User's information on the Screen | |
| Device Management | 1. Add or delete a Device Manager.2. Unknown APK Installation Settings. | |
| Credential Storage Password | Mange the application program to access the security credential and other credentials. | |
| Language and Input methods | Language | Configure the default language. |
| Keyboard and Input methods | Configure the default Keyboard and Input methods | |
| Voice | Configure relevant voice parameters | |
| Mouse/Touchpad | Adjust the mouse pointer's speed | |
| Backup and Resetting | Option Settings | 1. Backup/Restore the Device Data2. Restore Factory Settings. |
| SYSTEM | ||
| Date and Time | Option Settings | Configure or Adjust the Date and Time for the device. |
| Auxiliary Function | Option Settings | Enable various functions including Screen Autorotation, Font Size Display and Touch Effect. |
| Connect to the Printer | Install a Driver and connect with a Printer to print local and Internet files. | |
| Developer's Options | Option Settings | The Developer's Basic Application Settings. |
| About the Tablet PC | View your PC's information | View the Status Information, Battery Service Condition, Legal Information, Model, Android Version, Kernel Version and Version Number. |
Wi-Fi Network Settings
As the Wi-Fi connection is important to enable various functions of this device, please firstly configure the Wi-Fi network for your device.
-
Click the Icon → Settings → Wireless and Network.
-
Please turn ON Wi-Fi.
The device will automatically search all available Wi-Fi networks. If the Icon appears, the User shall correctly input the password before he conducts Wi-Fi connection.
- Click the Wi-Fi Network you want → if necessary, please correctly
input the password → click Connect, and the Icon will appear on the Desktop when the Wi-Fi network has been successfully connected.
- Click the Icon and go back to the Desktop.
Note: If the Wi-Fi Network has been hidden, your device will not automatically search it out. You shall click Add Wi-Fi Network, and then input relevant information to add the Wi-Fi Network.
Usage of the Extended Memory
- Usage of the U Disk
Please insert the U Disk to the OTG Port → Then insert the OTG Connection Cable into the HOST USB Port. When the U Disk has been well connected, you can start to use it.
.>> Note: Please do not frequently insert and pull the U Disk; otherwise, the U Disk and even the Device may be damaged.
- Usage of the SD Card
Note: This device can support 32GB Memory Card at most. Please insert the memory card into the slot, and push it with your finger. At that moment, the main screen will appear Preparing SD Card, and finally the TF Card will be well prepared for your service.
Remove the SD Card
Please firstly close all programs or files in the SD card. Click the Icon

→ Storage → SD Card → Unload the SD Card. Gently push the SD Card, and it will be ejected. Finally, you can take it out.
Note: Please do not quickly repeat inserting and pulling the SD Card; otherwise, the SD Card may be damaged.
★ Memory Card of famous brand is suggested so as to avoid Incompatibleness with the device.
Download/Unload Application Programs
It is convenient for you to install your purchased or downloaded Android application programs by means of the File Manager.
-
Copy the .apk files you want to the SD Card or USB Storage device → Insert the SD Card into this device, or connect it with this device by means of the U Disk.
-
Click the File Manager Icon

-
Click the Icon or the Icon to find the .apk files or folder.
-
Select one .apk file → Install. When such application program has been installed, its Icon will display itself among other application programs.
-
Click and directly run relevant program; or click and go back to the File Explorer.
Install Application Programs through Online Downloading
It is possible for you to download Android application programs from the Internet or other Android stores, and to quickly install them into your device.
- Click the Browser Icon to connect with the Internet.
- nput the URL and click the download link of the application program you want.
- Upon the completion of downloading, please press the downloaded file (downloading records) for a while → Click OPEN → Install.
Unload Application Programs
You can unload the Android program very quickly.
- Click MENU → Settings → Application Programs → Application Program Management.
- Click the Application Program you want to unload → Unload.
- Click CONFIRM and finish unloading.
Connect to PC
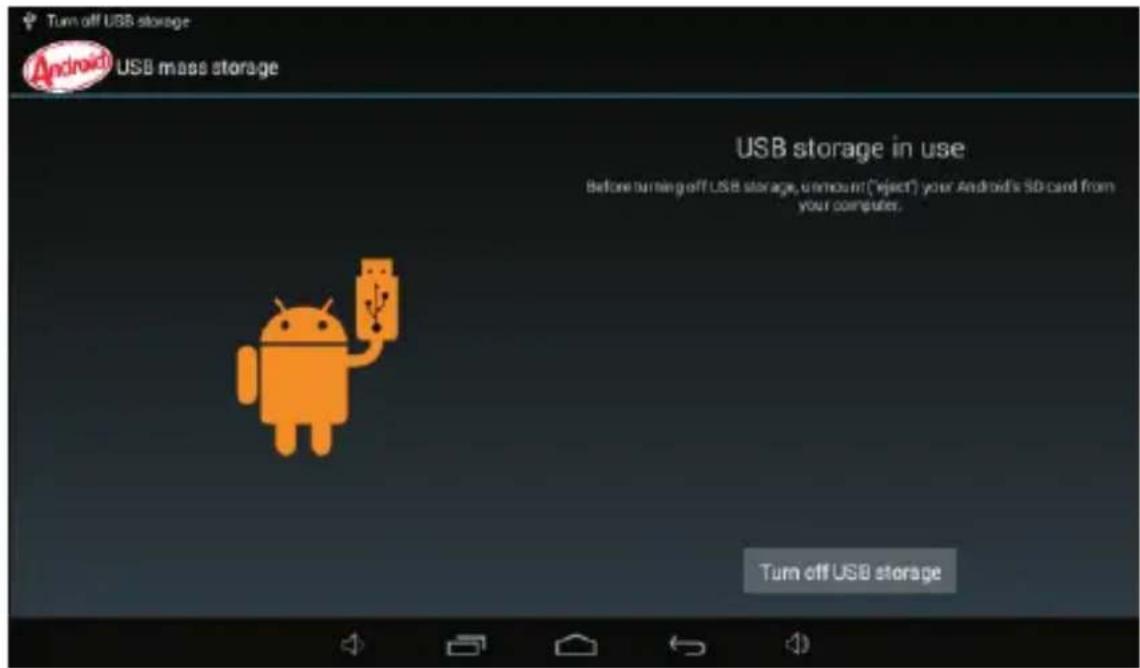
- When the Tablet PC has been connected with your PC, the tablet PC can serve as a portable storage device. Please use the USB cable to connect it to your PC with one end to the USB OTG port and another end to the USB port of PC;
- With successful connection, the Icon will appear on the screen
of the Tablet PC; please click the Icon
of the Tablet PC; please click the Icon ☐, and then select Turn on the USB Storage. After that, it is possible for the User to conduct Data Storage between your PC and the Tablet PC, as shown below:


Charging
This device can be charged by means of the Power Adapter with one end connecting to the Power Supply and the other end to the supply hub of this device.
During the charging process, the Battery Icon will display itself as

; when this device has been fully charged, the Battery Icon will display 100%.
- Although you can use this device during charging process, the charging time will become longer.
• IUse this device once a week at least. - Please fully charge this device at regular intervals.
- IPlease do not keep this device powered off for quite a long time.
Precautions
Please pay special attention to the following notes for the sake of safety:
- IPlease do not expose this device to rain or humid environment.
- IPlease keep this device away from sunlight and heat sources.
- IPlease protect the Power Cable. When it has been connected with the power supply, please do not tread on it or place other objects above it. Please pay special attention to the joint of the Power Cable Connection Device.
- IPlease use the original power adapter to conduct charging for this device. Other chargers may cause damages to this device.
- IPlease do not disassemble the casing or repair this device by yourself.
- IPlease take good care of the Display Screen. Please use soft cloth to clean the fingerprint or dust on the screen rather than hard and rough cloth.
- IPictures in this document are only for demonstration. Please refer to the actual situation.