ThermoCharge 10 - Power bank CELESTRON - Free user manual and instructions
Find the device manual for free ThermoCharge 10 CELESTRON in PDF.

| Product Type | External Battery Pack (Power Bank) |
| Brand | Celestron |
| Model | ThermoCharge 10 |
| Battery Capacity | 10000 mAh |
| Battery Type | Lithium-ion |
| Input Port | Micro USB (5V/2A) |
| Output Port | USB-A (5V/2.1A) |
| Charging Time | Approximately 5-6 hours with 2A charger |
| Number of Outputs | 1 |
| LED Indicators | 4-level power indicator |
| Protection Features | Overcharge, over-discharge, short circuit, overcurrent |
| Operating Temperature | 0°C to 40°C |
| Storage Temperature | -10°C to 50°C |
| Material | ABS plastic with rubberized coating |
| Dimensions (L x W x H) | 5.7 x 2.8 x 0.8 inches (145 x 71 x 20 mm) |
| Weight | 7.4 oz (210 g) |
| Additional Features | Built-in LED flashlight; pass-through charging |
| Compatibility | Smartphones, tablets, cameras, GPS devices |
| Included Accessories | Micro USB cable, user manual |
| Certifications | CE, FCC, RoHS |
Frequently Asked Questions - ThermoCharge 10 CELESTRON
User questions about ThermoCharge 10 CELESTRON
0 question about this device. Answer the ones you know or ask your own.
Ask a new question about this device
Download the instructions for your Power bank in PDF format for free! Find your manual ThermoCharge 10 - CELESTRON and take your electronic device back in hand. On this page are published all the documents necessary for the use of your device. ThermoCharge 10 by CELESTRON.
USER MANUAL ThermoCharge 10 CELESTRON
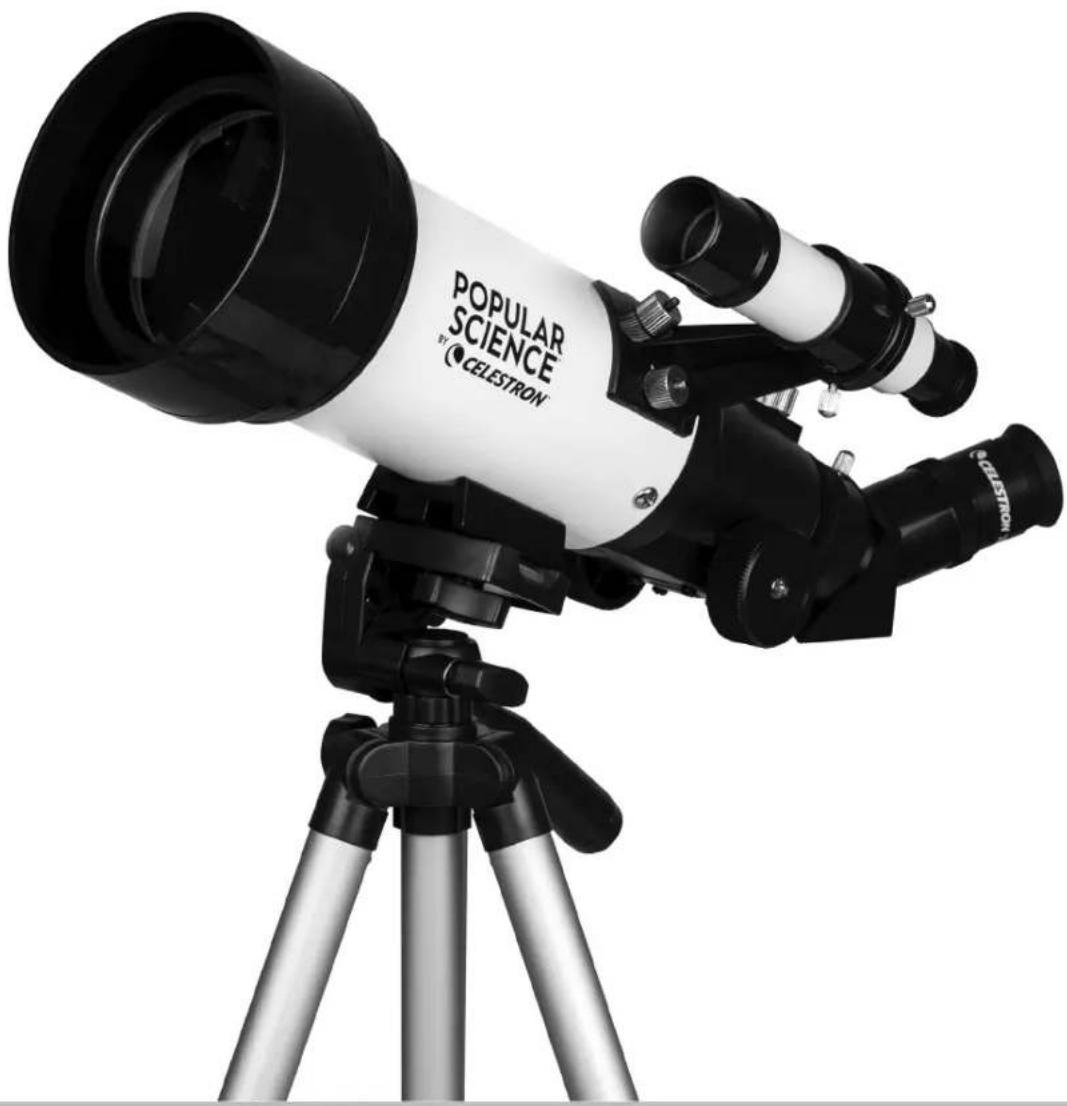
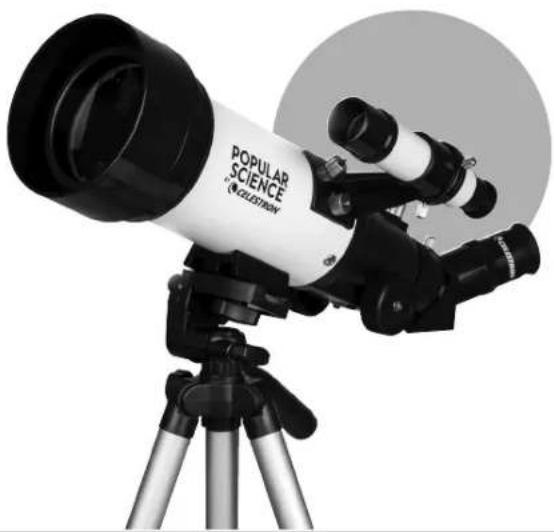
TRAVEL SCOPE™ 70 WITH SMARTPHONE ADAPTER AND BLUETOOTH REMOTE
natural_image
Black and white photo of a CELESTRON telescope on a tripod, no visible text or symbols on the instrument body.POPULAR SCIENCE™
BY

CELESTRON
TRAVEL SCOPE™ 70 WITH SMARTPHONE ADAPTER AND BLUETOOTH REMOTE
QUICK SETUP GUIDE
21135
natural_image
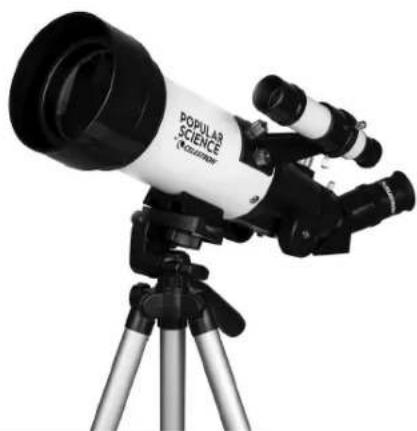
Black and white photo of a telescope on a tripod, no visible text or symbols on the instrument body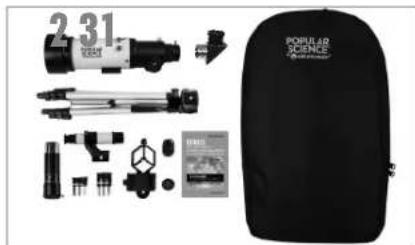
natural_image
Product display of a popular science backpack with various optical and mechanical components (no visible text or labels)Unpack your telescope and verify that all parts are present. Your Travel Scope 70 includes: a telescope tube, a tripod and mount head, two eyepieces, a 3x Barlow lens, a finderscope, an erect image diagonal, a smartphone adapter, a Bluetooth shutter remote, and a Moon filter.
natural_image
tripod-mounted camera setup with tripod base and tripod legs (no text or symbols visible)To set up the tripod, spread the legs outward until they are fully extended and push down on the center leg brace.
natural_image
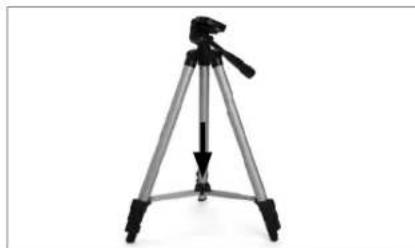
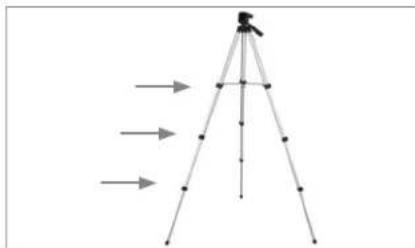
tripod diagram with directional arrows indicating measurement or navigation (no text or symbols)Extend the legs of the tripod by unlocking the three tripod lock levers on each leg. Pull each leg section all the way out and push the lever on each lock downward to secure it in place.
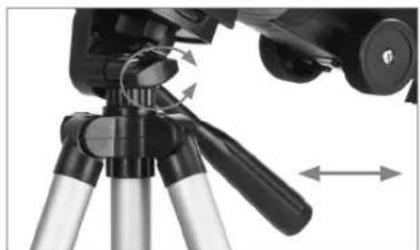
natural_image
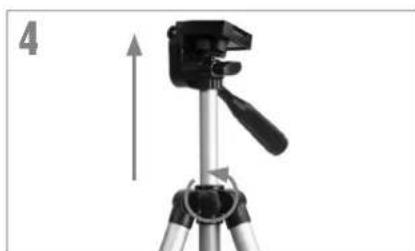
tripod-mounted camera setup with a tripod-mounted tripod and a mounted tripod-mounted device (no text or symbols visible)To extend the tripod's central column, turn the locking knob counterclockwise, lift up the tripod head until it is at the desired height and turn the locking knob clockwise to secure.
natural_image
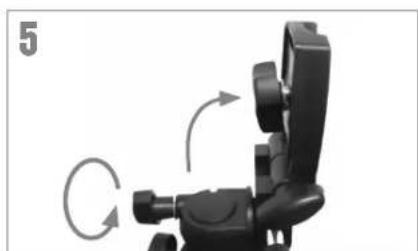
Mechanical device with rotating arm and directional arrows indicating motion (no text or symbols)Loosen the knob on the side of the tripod head mounting platform and rotate the platform 90 degrees so it is standing vertically.
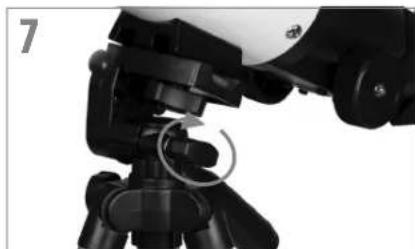
natural_image
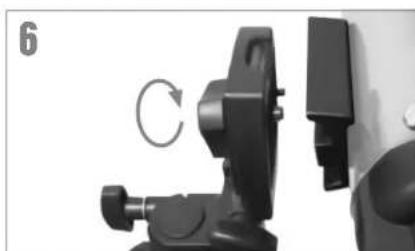
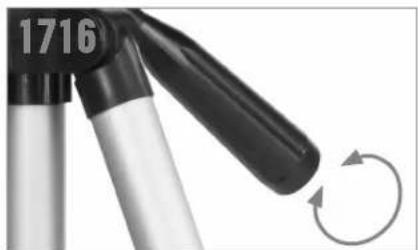
Close-up of a black mechanical clamp device with a circular arrow indicating rotation (no text or symbols visible)Match the threaded bolt in the mounting platform to the threaded hole on the bottom of the telescope tube and thread the two together. Do not overtighten. This should be snug, but not tight.
natural_image
Close-up of a camera setup with tripod-mounted sensors and a mechanical component (no visible text or symbols)Rotate the mounting platform so it is horizontal and tighten the knob to secure it.
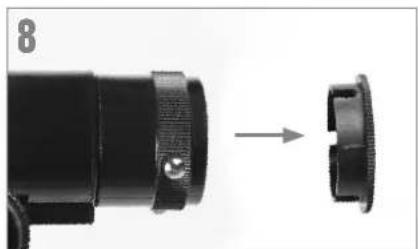
natural_image
Close-up of a black mechanical component with a circular end, showing a transformation from an external part to a close-up (no text or symbols visible)Remove the cap from the focuser end of the telescope tube and make sure the two thumbscrews do not protrude into the opening.
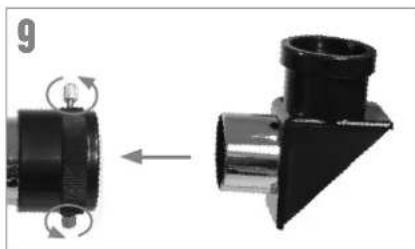
natural_image
Mechanical component diagram showing a left-hand tool transforming into a right-hand tool (no text or symbols present)Locate the erect image diagonal and remove the plastic covers. Insert the barrel of the diagonal into the focuser and secure in place by tightening the set screws.

natural_image
Close-up of a mechanical optical device with a metallic component and a curved arrow indicating rotation (no text or symbols)Insert the barrel of the 20mm eyepiece into the diagonal and tighten the set screw.
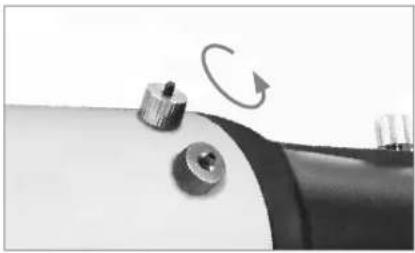
natural_image
Close-up of a mechanical component with a knob and rotating arrow (no text or symbols visible)Remove the knurled nuts on the threaded posts at the focuser end of the telescope tube.

natural_image
Close-up of a telescope with visible lens and adjustment knobs (no text or symbols)Locate the finderscope and remove the plastic caps on the front and back lens. Orient the finderscope so that the larger lens is facing towards the front of the tube as shown. Place the finderscope over the posts on the tube and replace the knurled nuts to secure it in place.
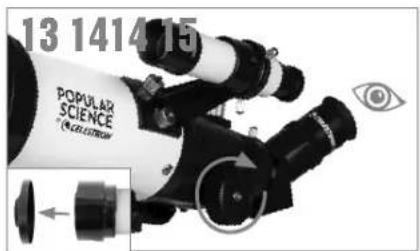
text_image
13 1414 15 POPULAR SCIENCE * (S. CLAUDITUM)Remove the lens cap from the front of the telescope. To observe, look through the eyepiece as shown. Focus the image by turning the knobs below the focuser.
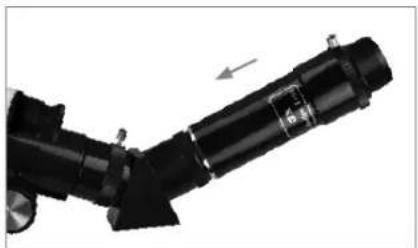
natural_image
Close-up of a mechanical component with a black lever and metallic parts, no visible text or symbolsFor additional magnification, you can use the included 3x Barlow lens. Place the Barlow lens between the diagonal and the eyepiece.
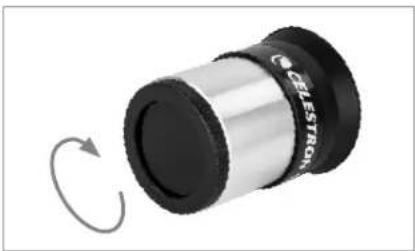
natural_image
Close-up of a cylindrical mechanical component with a black and silver body, showing rotational motion indicated by a curved arrow (no text or symbols)To use the Moon filter, remove the eyepiece from the diagonal or Barlow lens. Thread the filter onto the bottom of the eyepiece and re-insert the eyepiece into the diagonal or Barlow.
natural_image
Close-up of a tripod-mounted camera with adjustable arm and motion arrows indicating movement (no text or symbols)To move the scope right and left, hold a tripod leg with one hand while the other hand uses the panning handle to move the scope. The azimuth locking screw can be loosened or tightened to adjust the tension to your preference.
natural_image
Close-up of a mechanical device with a black handle and curved arrow indicating rotation (no text or symbols)To move the scope up and down, rotate the entire pan handle counterclockwise and use the handle to point the scope in the direction you want to view. Rotate the pan handle clockwise to lock it in place.
For more information on this product or to download the instruction manual, please visit the respective product page on celestron.com

SOLAR WARNING: Never attempt to view the sun through any telescope without a proper solar filter.
NEED ASSISTANCE?
Contact Celestron Technical Support celestron.com/pages/technical-support 07-21
USING THE SMARTPHONE ADAPTER
natural_image
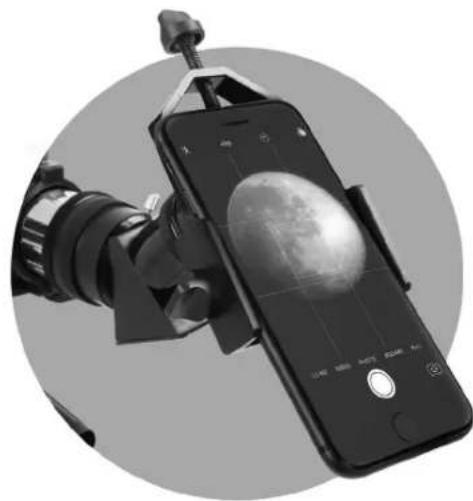
Close-up of a smartphone mounted on a tripod stand with a camera lens, showing the moon's view (no text or symbols visible)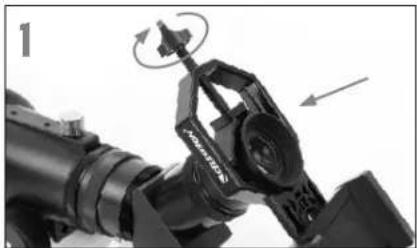
natural_image
Close-up of a mechanical device with rotating components and directional arrows (no visible text or symbols)Open the eyepiece clamp and place it around the body of the eyepiece. Tighten the clamp until it's secure.
natural_image
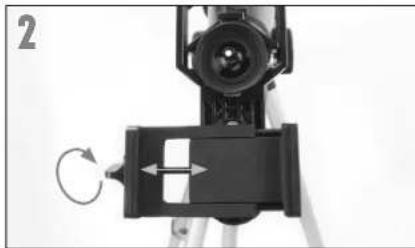
Close-up of a camera setup with an optical lens and mounted device (no visible text or symbols)Use the phone clamp knob to open the phone holder so that your phone fits inside. Tighten it to secure your phone in place.
natural_image
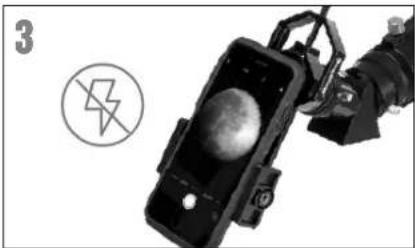
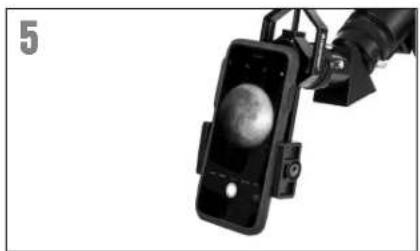
Black-and-white photo of a robotic device with a spherical object inside, accompanied by a circular symbol and a number 3 (no readable text or symbols on the device itself)Turn on the phone and open your camera app. Make sure the flash is turned off.
natural_image
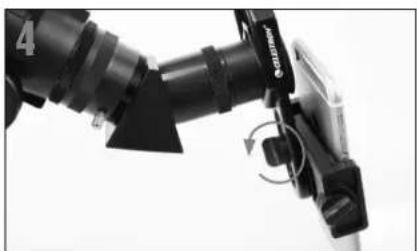
Close-up of a black robotic arm with a curved handle and directional arrows indicating motion (no text or symbols visible)Loosen the knob on the bottom of the adapter that secures the phone clamp to the eyepiece clamp. Slide the phone clamp up and down and rotate it left and right until your camera is looking down through the eyepiece of the telescope. Tighten the knob on the bottom of the adapter to secure it in place.
natural_image
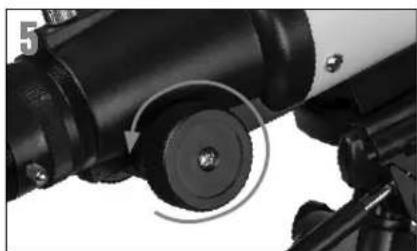
Close-up of a telescope's optical components, showing lens, eyepiece, and tripod (no text or symbols visible)Use the telescope's focuser to adjust focus of your camera. Snap the image using your app.
USING THE BLUETOOTH REMOTE
natural_image
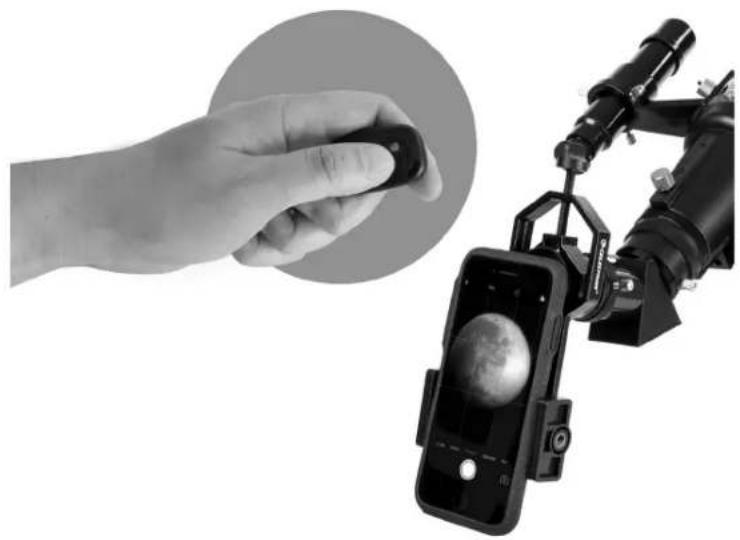
Hand holding a small object next to a smartphone displaying a planet image, with a camera rig visible nearby (no text or symbols)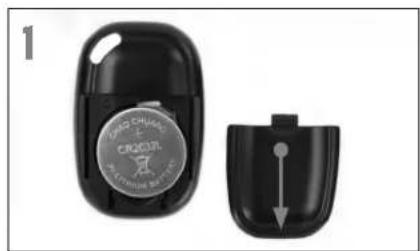
natural_image
Close-up of a black car key with a circular logo and a separate open lid showing a downward arrow (no text or symbols visible)To insert or replace the battery, place your thumb in the center of the back cover, pressing inward and sliding downward remove the battery door. The CR2032 battery should be inserted with the positive (+) side facing upward. Replace the cover.
text_image
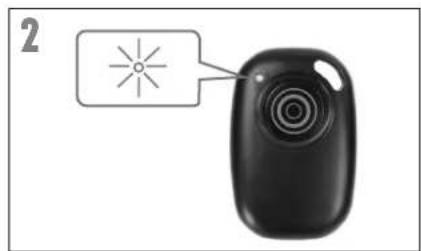
2Press and hold the button on the remote for 5 seconds. A blue light will turn on and, after a few seconds, start to blink. The remote is now in pairing mode.
text_image
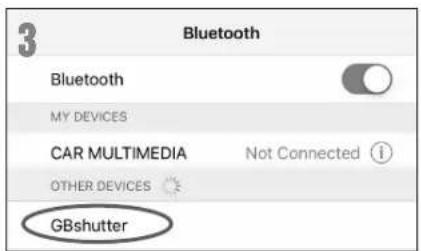
3 Bluetooth Bluetooth MY DEVICES CAR MULTIMEDIA Not Connected ① OTHER DEVICES GBshutterUsing the Bluetooth settings on your phone, pair the device called "GBshutter".
natural_image
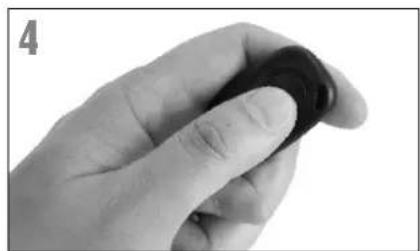
Close-up of a hand holding a dark circular object (no text or symbols visible)Open your camera app. Press the button on the remote to trigger the shutter on your phone.
natural_image
Close-up of a smartphone mounted on a mechanical device with a spherical object visible (no text or symbols)If your camera is in video mode, you can press the button once to start recording and again to stop the recording.
ALIGNING THE FINDERSCOPE
The finder is one of the most important parts of your telescope. It helps you locate objects and center them in the eyepiece. The first time you assemble your telescope, you need to align the finder to the telescope's main optics. It's best to do this during the day*.

* SOLAR WARNING! Never attempt to view the Sun through any telescope without a proper solar filter!
natural_image
Black and white photo of a popular science telescope on a tripod, no visible text or symbols on the instrument body.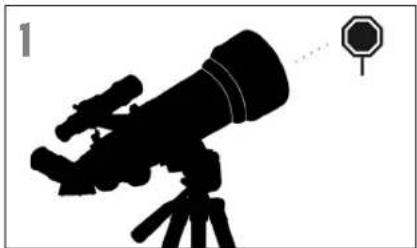
natural_image
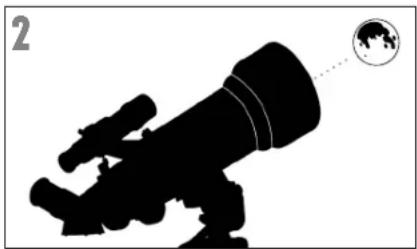
Silhouette of a telescope on a tripod with an octagonal target nearby (no text or symbols)CHOOSE A TARGET
Take the telescope outside during the day and find an easily recognizable object, like a streetlight, license plate or sign. The object should be as far away as possible, but at least a quarter mile away.
text_image
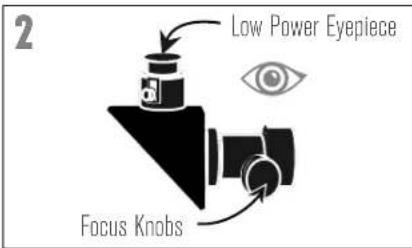
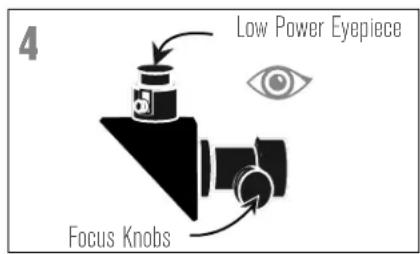
2 Low Power Eyepiece Focus KnobsCENTER THE TARGET IN THE EYEPIECE
Look through the telescope using your lower powered eyepiece. Move the telescope until the object you chose lies in the center of the view. If the image is blurry, gently turn the focus knobs until it comes into sharp focus.
natural_image
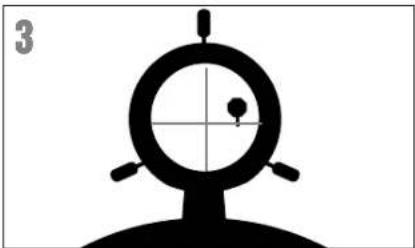
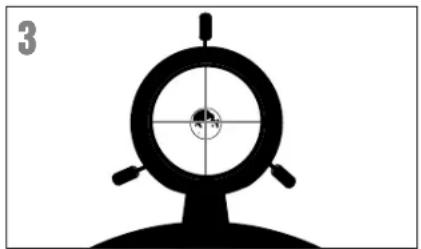
Silhouette of a target with a circular target and crosshair, no text or symbols presentLOOK THROUGH FINDERSCOPE
Once the object is centered in your 20mm eyepiece, look through the finderscope and locate the crosshair reticle.
natural_image
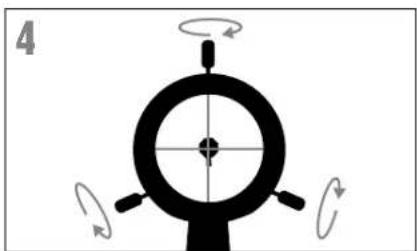
Diagram of a mechanical or optical component with rotational arrows indicating motion (no text or symbols)ADJUST THE FINDERSCOPE
Without moving the telescope, use the three finger knobs on the finderscope bracket to move the finder around in the bracket until the crosshair appears over the same object you are observing in the telescope's 20mm eyepiece.
natural_image
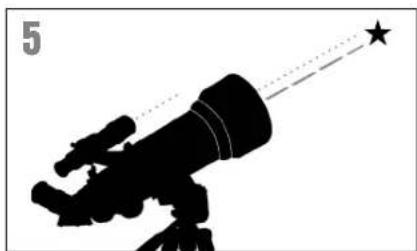
Silhouette of a telescope with a star pointer and dotted line, labeled '5' in top-left corner (no other text or symbols)YOUR FINDERSCOPE IS NOWALIGNED!
It should not require realignment unless it is bumped or dropped.
TIP: Try adjusting one screw at a time. Loosen one screw by half a turn and tighten another by the same amount to ensure the finderscope is securely held in place.
The best and easiest target for you to try to view first is the Moon. Try observing the Moon at different points in its phase cycle. The best time to view the Moon is from two days after a New Moon up to a few days before a Full Moon. During this period, you will be able to see the most detail in the craters and lunar mountain ranges.

natural_image
Simple circular icon with abstract gray shapes inside, resembling a stylized biological or geological symbol (no text or symbols)
natural_image
Silhouette of a telescope on a tripod with a globe icon in the corner (no text or symbols)With the Moon visible in the sky, set up your telescope with the 20mm eyepiece installed.
natural_image
Silhouette of a telescope with a globe icon pointing to it (no text or symbols)Move the telescope so that it is roughly pointing toward the Moon.
natural_image
Silhouette of a target with concentric circles and crosshairs, no text or symbols presentLook through the finderscope and locate the crosshair reticle. Continue moving the telescope until the crosshair appears over the Moon.
text_image
4 Low Power Eyepiece Focus KnobsLook through the telescope's 20mm eyepiece. Gently turn the focus knobs to adjust the sharpness of the image.
text_image
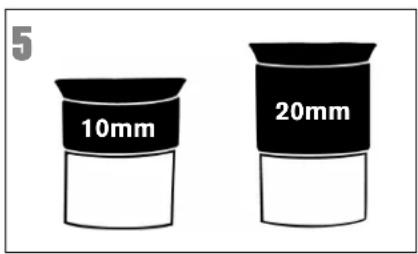
5 10mm 20mmCONGRATULATIONS!
YOU HAVE NOW OBSERVED YOUR FIRST CELESTIAL OBJECT!
To get a closer view of the Moon, loosen the set screws on the focuser and remove the 20mm eyepiece. Replace it with your 10mm eyepiece and tighten the set screws to secure it in place. The 10mm eyepiece will give you significantly more magnification, making the Moon appear much larger.
NOTE: You may need to adjust the focus knobs when you change eyepieces, to make sure you are getting the sharpest image possible.
natural_image
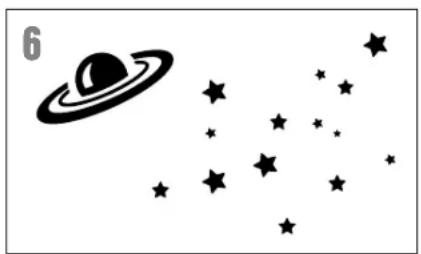
Illustration of a planet with rings and stars, no text or symbols presentYou can view many other celestial objects, such as planets, star clusters and nebulae using this same technique if you know where to find them in the night sky.

text_image
CELESTRON® SkyPORTAL™Celestron's free SkyPortal app for iOS and Android can help you locate and identify a wide array of celestial objects quickly and easily.
SAFETY INSTRUCTIONS
- Risk of explosion if battery is replaced by an incorrect type.
• The included battery is not rechargeable. - Please use the battery in its original purpose to avoid causing the battery to short circuit. When the conductive material is connected directly to the battery positive and negative will cause a short circuit.
- Do not use a damaged battery.
- Keeping the battery in an extremely cold or very hot location can result in shortened battery life.
- When replacing the battery, please refer to the instruction manual and pay attention to the positive and negative direction of battery.
- Do not put the battery in the fire. Dispose of the battery according to local regulations.
This device complies with Part 15 of the FCC Rules. Operation is subject to the following two conditions: (1) This device may not cause harmful interference, and (2) this device must accept any interference received, including interference that may cause undesired operation.
FCC IDENTIFIER: 2A2FG-X9
CAUTION: Changes or modifications not expressly approved by the party responsible for compliance could void the user's authority to operate the equipment.
NOTE: This equipment has been tested and found to comply with the limits for a Class B digital device, pursuant to part 15 of the FCC Rules. These limits are designed to provide reasonable protection against harmful interference in a residential installation.
This equipment generates, uses and can radiate radio frequency energy and, if not installed and used in accordance with the instructions, may cause harmful interference to radio communications. However, there is no guarantee that interference will not occur in a particular installation.
If this equipment does cause harmful interference to radio or television reception, which can be determined by turning the equipment off and on, the user is encouraged to try to correct the interference by one or more of the following measures:
- Reorient or relocate the receiving antenna.
- Increase the separation between the equipment and receiver.
- Connect the equipment into an outlet on a circuit different from that to which the receiver is connected.
- Consult the dealer or an experienced radio/TV technician for help.
Product design and specifications are subject to change without prior notification. This product is designed and intended for use by those 14 years of age and older.

CELESTRON®
©2021 Celestron, Celestron and Symbol are trademarks of Celestron, LLC • All Rights Reserved • celestron.com
• Torrance CA 90503 USA
Popular Science is a trademark of Camden Media, Inc. and used under license.

SOLAR WARNING: Never attempt to view the sun through any telescope without a proper solar filter.
NEED ASSISTANCE?
Contact Celestron Technical Support
celestron.com/pages/technical-support
Printed in China
07-21