
COSMOS FirstScope - Telescope CELESTRON - Free user manual and instructions
Find the device manual for free COSMOS FirstScope CELESTRON in PDF.


| Product type | Tabletop Dobsonian reflecting telescope |
| Brand | Celestron |
| Model | COSMOS FirstScope |
| Aperture | 76 mm (3 inches) |
| Focal length | 300 mm |
| Focal ratio | f/3.95 |
| Mirror type | Parabolic primary glass mirror |
| Mount | Manual Dobsonian (altitude-azimuth) |
| Included eyepieces | 20 mm (15x) and 4 mm (75x) |
| Finder | Red dot finder |
| Tripod | No, integrated tabletop base |
| Weight | Approximately 2.5 kg |
| Tube dimensions | 30 cm long, 8 cm diameter |
| Material | Steel tube, fiberboard base |
| Power | None (fully manual) |
| Main functions | Astronomical observation (Moon, planets) and terrestrial |
| Maintenance and cleaning | Clean optics with blower and anti-static brush; do not touch the mirror |
| Safety | Never observe the sun directly; use an appropriate solar filter |
| Spare parts and repairability | Eyepieces and finder available online; mirror not user-repairable |
| General information | Instructions available in multiple languages; 40-page manual |
Frequently Asked Questions - COSMOS FirstScope CELESTRON
User questions about COSMOS FirstScope CELESTRON
0 question about this device. Answer the ones you know or ask your own.
Ask a new question about this device
Download the instructions for your Telescope in PDF format for free! Find your manual COSMOS FirstScope - CELESTRON and take your electronic device back in hand. On this page are published all the documents necessary for the use of your device. COSMOS FirstScope by CELESTRON.
USER MANUAL COSMOS FirstScope CELESTRON
FIRSTSCOPE 76 TELESCOPE
INSTRUCTION MANUAL
MoDEI # 22023

WHAT'S IN THE BOX
We recommend saving your telescope box so it can be used to store the telescope when it is not in use. Unpack the box carefully as some parts are small. Use the parts list below to verify that all parts and accessories are present.
PARTS LIST

Fig. 1

SOLAR WARNING
Never look directly at the Sun with the naked eye or with a telescope unless you have the proper solar filter. Permanent and irreversible eye damage may result
Never use your telescope to project an image of the Sun onto any surface. Internal heat build-up can damage the telescope and any accessories attached to it.
Never use an eyepiece solar filter or a Herschel wedge. Internal heat build-up inside the telescope can cause these devices to crack or break, allowing unfiltered sunlight to pass through to the eye.
Do not leave the telescope unsupervised, especially when children or adults unfamiliar with the correct operating procedures of your telescope are present.
ASSEMBLING YOUR TELESCOPE
THE MOUNT & TELESCOPE TUBE
Your FirstScope's mount and telescope tube are fully assembled. Simply remove the telescope and mount from the box and set it on a stable surface, such as a table or picnic bench. Be sure to use a support that allows you easy access to the eyepiece as you move the telescope around the sky.
Your FirstScope's altazimuth mount was designed to rotate smoothly up, down, left or right with just a gentle push from your fingers, making it easy to track celestial objects as they appear to drift across the night sky.
The tension in the up and down direction is adjustable to accommodate different weights of eyepieces. Turning the knob counter-clockwise decreases the tension making it easier to move, while turning the knob clockwise increases tension. Set the tension at a comfortable level so the telescope will not move downward in response to gravity.
Unlike fixed targets on the ground, astronomical targets move across the sky. This is caused by Earth's rotation. When you look at a celestial target in your telescope, such as the Moon or a planet, it will appear to slowly drift across the field of view of your eyepiece. In order to keep the object centered in the field of view, you will have to nudge the mount in altitude and azimuth.
THE EYEPIECES
The FirstScope comes with two eyepieces, one low power (20 mm eyepiece) and one higher power (10 mm eyepiece). Whenever you set up your telescope, always start with the 20 mm eyepiece. Once you have your target centered in the 20 mm eyepiece, you can switch to your higher power 10 mm eyepiece to get a more detailed view.
Note that because your telescope is designed for astronomical use, images of terrestrial objects will appear upside-down. This is perfectly normal.
To install an eyepiece:
- Loosen the two silver setscrews on the focuser and pull out the small plastic dust cap.
- Insert the silver barrel on the bottom of the eyepiece into the focuser.
- Tighten the two setscrews to secure the eyepiece.
- To see the sharpest image possible, you need to focus the eyepiece. To focus, look through the eyepiece and slowly turn the focusing

Fig. 2
THE STARPOINTER FINDERSCOPE
The FirstScope comes with a StarPointer red-dot fi nderscope that you will use as a sighting tool when aiming the telescope at a target.
To install your StarPointer finderscope:
- Remove the two silver nuts from the threaded posts at the top of the tube, near the focuser.
- Place the two holes in the base of the finderscope over the threaded posts so the finderscope base sits flush on the telescope tube. Make sure that the round window on the finderscope is pointed toward the top of the tube (the end of the telescope tube with the focuser).
- Thread the two nuts back onto the threaded posts.
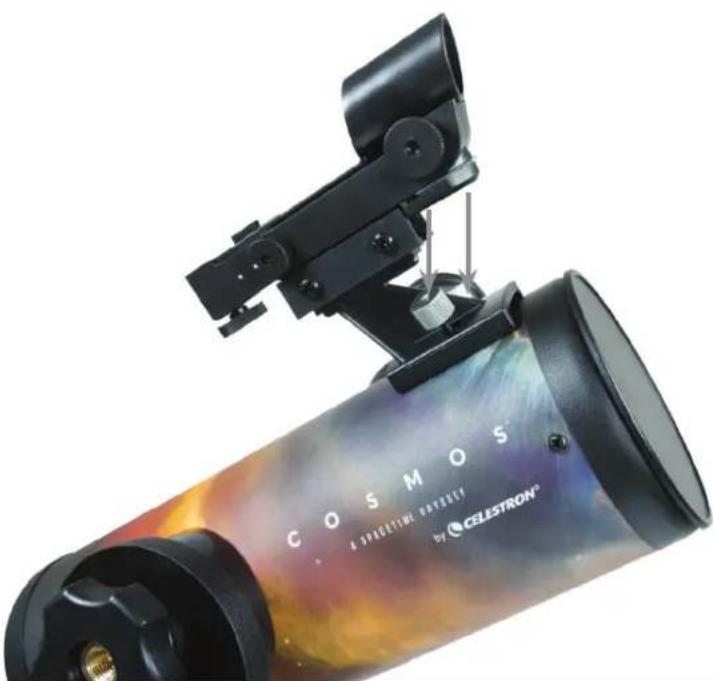
Fig. 3
ALIGNING THE STARPOINTER FINDERSCOPE
The StarPointer finderscope helps you aim your telescope by looking through its round glass window and covering your target with the red dot projected in the window.
The first time you assemble your telescope, you'll need to align the StarPointer with the main optics of the telescope. Although this step can be done at night, it is significantly easier during the day. Once you have completed the finderscope alignment, you should not have to repeat this step unless the finderscope is bumped or dropped.
To align the StarPointer:
- Take the telescope outside during the day. Using your naked eye, find an easily recognizable object, such as a streetlight, car license plate, or tall tree. The object should be as far away as possible, but at least a quarter mile away.
- Remove the main dust cover from the telescope and make sure your 20 mm eyepiece in installed in the focuser.
- Move the telescope left and right or up and down so that it is roughly pointing toward the object you chose in step 1.
- Look through the telescope using your 20 mm eyepiece and manually move the telescope until the object you chose lies in the center of the view. If the image is blurry, gently turn the focus knobs until it comes into sharp focus.
NOTE: The image in the telescope eyepiece will appear upside-down. This is perfectly normal in an astronomical telescope.
-
Once the object is centered in your 20 mm eyepiece, turn on the finderscope by turning the power switch knob clockwise as far as it will go.
-
With your head positioned about a foot behind the finder, look through the round window and locate the red dot. It will probably be close to, but not on top of, the object you see when you are looking through the 20 mm eyepiece.
-
Without moving the telescope, use the two adjustment knobs on the side and underneath the StarPointer. One controls the left-right motion of the dot, while the other controls the up-down motion. Adjust both until the red dot appears over the same object you are observing in the 20 mm eyepiece.
Now choose some other distant targets to practice aiming your telescope. Look through the StarPointer window and place the red dot on the target you are trying to view and verify that it is the 20mm eyepiece of the scope.
With your StarPointer finderscope aligned, your telescope is fully assembled and you are ready to observe!
NOTE: Be sure to turn off the StarPointer finderscope when not in use to conserve battery power.

Fig. 4
YOUR FIRST ASTRONOMICAL OBSERVING SESSION
the Moon
Now you are ready to take your telescope out at night and do some real observing!
Let's start with the Moon. The Moon takes about one month go through a complete phase cycle, from New Moon to Full Moon and back again. Try observing it at different points during this cycle.
While you can observe the Moon any time it is visible in the night sky, the best time to view it is from two days after a New Moon up to a few days before a Full Moon. During this period, you will be able to see the most detail in craters and lunar mountain ranges. Consult a calendar to find out when the next New Moon will be.
- With a clear view of the Moon, set up your telescope with the 20 mm eyepiece.
- Turn on the StarPointer finderscope and look through it to find the red dot.
- Move the telescope until you can see the Moon through the finderscope's window and the red dot is centered on the Moon.
- Look through the 20 mm eyepiece. Gently turn the focus knobs to adjust the sharpness of the image.
congratulationS! you haVe noW obSerVed your FirSt celeStial object!
To get a closer view of the Moon, replace the 20 mm eyepiece with the 10 mm eyepiece. It will give you more magnification, making the Moon appear much larger. You may need to adjust the focus knobs when you change eyepieces to ensure you are getting the sharpest image.
You can view many other celestial objects, such as planets, star clusters and nebulae using this same basic technique.
For more tips for astronomical observing please visit celestron.com/cosmos
There you will find comprehensive tips to help you get the most from your new telescope including:
• How to observe the planets
• How to locate and observe stars, double stars, star clusters
- How to observe deep-sky objects such as nebulae and galaxies
• How to choose a good location for astronomical observing
• How to evaluate sky conditions
CELESTRON TWO YEAR LIMITED WARRANTY
A. Celestron warrants your telescope to be free from defects in materials and workmanship for two years. Celestron will repair or replace such product or part thereof which, upon inspection by Celestron, is found to be defective in materials or workmanship. As a condition to the obligation of Celestron to repair or replace such product, the product must be returned to Celestron together with proof-of-purchase satisfactory to Celestron.
B. The Proper Return Authorization Number must be obtained from Celestron in advance of return. Call Celestron at (310) 328-9560 to receive the number to be displayed on the outside of your shipping container.
All returns must be accompanied by a written statement setting forth the name, address, and daytime telephone number of the owner, together with a brief description of any claimed defects. Parts or product for which replacement is made shall become the property of Celestron.
The customer shall be responsible for all costs of transportation and insurance, both to and from the factory of Celestron, and shall be required to prepay such costs.
Celestron shall use reasonable efforts to repair or replace any telescope covered by this warranty within thirty days of receipt. In the event repair or replacement shall require more than thirty days, Celestron shall notify the customer accordingly. Celestron reserves the right to replace any product which has been discontinued from its product line with a new product of comparable value and function.
This warranty shall be void and of no force of effect in the event a covered product has been modified in design or function, or subjected to abuse, misuse, mishandling or unauthorized repair. Further, product malfunction or deterioration due to normal wear is not covered by this warranty.
CELESTRON DISCLAIMS ANY WARRANTIES, EXPRESS OR IMPLIED, WHETHER OF MERCHANTABILITY OF FITNESS FOR A PARTICULAR USE, EXCEPT AS EXPRESSLY SET FORTH HEREIN. THE SOLE OBLIGATION OF CELESTRON UNDER THIS LIMITED WARRANTY SHALL BE TO REPAIR OR REPLACE THE COVERED PRODUCT, IN ACCORDANCE WITH THE TERMS SET FORTH HEREIN. CELESTRON EXPRESSLY DISCLAIMS ANY LOST PROFITS, GENERAL, SPECIAL, INDIRECT OR CONSEQUENTIAL DAMAGES WHICH MAY RESULT FROM BREACH OF ANY WARRANTY, OR ARISING OUT OF THE USE OR INABILITY TO USE ANY CELESTRON PRODUCT. ANY WARRANTIES WHICH ARE IMPLIED AND WHICH CANNOT BE DISCLAIMED SHALL BE LIMITED IN DURATION TO A TERM OF TWO YEARS FROM THE DATE OF ORIGINAL RETAIL PURCHASE.
Some states do not allow the exclusion or limitation of incidental or consequential damages or limitation on how long an implied warranty lasts, so the above limitations and exclusions may not apply to you.
This warranty gives you specific legal rights, and you may also have other rights which vary from state to state.
Celestron reserves the right to modify or discontinue, without prior notice to you, any model or style telescope.
If warranty problems arise, or if you need assistance in using your telescope contact:
Celestron
Customer Service Department
2835 Columbia Street
Torrance, CA 90503
Tel. (310) 328-9560
Fax. (310) 212-5835
Monday-Friday 8AM-4PM PST
NOTE: This warranty is valid to U.S.A. and Canadian customers who have purchased this product from an authorized Celestron dealer in the U.S.A. or Canada. Warranty outside the U.S.A. and Canada is valid only to customers who purchased from a Celestron's International Distributor or Authorized Celestron Dealer in the specific country. Please contact them for any warranty service.
CE FC


FCC NOTE: This equipment has been tested and found to comply with the limits for a Class B digital device, pursuant to part 15 of the FCC Rules. These limits are designed to provide reasonable protection against harmful interference in a residential installation. This equipment generates, uses, and can radiate radio frequency energy and, if not installed and used in accordance with the instructions, may cause harmful interference to radio communications. However, there is no guarantee that interference will not occur in a particular installation. If this equipment does cause harmful interference to radio or television reception, which can be determined by turning the equipment off and on, the user is encouraged to try to correct the interference by one or more of the following measures:
- Reorient or relocate the receiving antenna.
- Increase the separation between the equipment and receiver.
- Connect the equipment into an outlet on a circuit different from that to which the receiver is connected.
- Consult the dealer or an experienced radio/TV technician for help.
Product design and specifications are subject to change without prior notification. This product is designed and intended for use by those 14 years of age and older.

CELESTRON
© 2014 Celestron • All rights reserved
www.celestron.com
2835 Columbia Street • Torrance, CA 90503 U.S.A.
Telephone: 800.421.9649
22023
12-13
TM and © 2014 COSMOS™ Studios, Inc. All rights reserved.
Printed in China
C O S M O S™
A SPACETIME ODYSSEY
FIRSTSCOPE 76 TÉLESCOPE
MODE D'EMPLOI
MoDèlE n° 22023

CONTENU DE LA BOÎTE
Fig. 2
LE CHERCHEUR STARPOINTER
Fig. 3
ALIGNEZ LE CHERCHEUR STARPOINTER
C O S M O S
A SPACETIME ODYSSEY
FIRSTSCOPE 76 TELESKOP
LIEFERUMFANG
Abb. 2
STARPOINTER-SUCHERFERNROHR
Abb. 3
AUSRICHTEN DES STARPOINTER-SUCHERFERNROHRS
FIRSTSCOPE 76 TELESCOPIO
CONTENIDO DE LA CAJA
Fig. 2
NOTE: The image in the telescope eyepiece will appear upside-down. This is perfectly normal in an astronomical telescope.
Fig. 4
FIRSTSCOPE 76 TELESCOPIO
Fig. 2
IL MIRINO STARPOINTER
Fig. 3


- FIRSTSCOPE 76 TELESCOPE
- INSTRUCTION MANUAL
- WHAT'S IN THE BOX
- PARTS LIST
- SOLAR WARNING
- ASSEMBLING YOUR TELESCOPE
- THE MOUNT & TELESCOPE TUBE
- THE EYEPIECES
- TO INSTALL AN EYEPIECE
- THE STARPOINTER FINDERSCOPE
- TO INSTALL YOUR STARPOINTER FINDERSCOPE
- ALIGNING THE STARPOINTER FINDERSCOPE
- TO ALIGN THE STARPOINTER
- YOUR FIRST ASTRONOMICAL OBSERVING SESSION
- THE MOON
- FOR MORE TIPS FOR ASTRONOMICAL OBSERVING PLEASE VISIT CELESTRON.COM/COSMOS
- CELESTRON TWO YEAR LIMITED WARRANTY
- CE FC
- CELESTRON
- C O S M O S™
- FIRSTSCOPE 76 TÉLESCOPE
- MODE D'EMPLOI
- CONTENU DE LA BOÎTE
- LE CHERCHEUR STARPOINTER
- ALIGNEZ LE CHERCHEUR STARPOINTER
- LIEFERUMFANG
- STARPOINTER-SUCHERFERNROHR
- AUSRICHTEN DES STARPOINTER-SUCHERFERNROHRS
- FIRSTSCOPE 76 TELESCOPIO
- CONTENIDO DE LA CAJA
- IL MIRINO STARPOINTER
Brand : CELESTRON
Model : COSMOS FirstScope
Category : Telescope