
DSC-34W70N - Television DAEWOO - Free user manual and instructions
Find the device manual for free DSC-34W70N DAEWOO in PDF.


| Product Type | Television |
| Brand | Daewoo |
| Model | DSC-34W70N |
| Screen Size (Diagonal) | 34 inches |
| Aspect Ratio | 16:9 (Widescreen) |
| Display Technology | CRT (Cathode Ray Tube) |
| Resolution | 1080i (HD Ready) |
| Dimensions (W x H x D) | Approx. 800 x 600 x 500 mm |
| Weight | Approx. 45 kg |
| Power Supply | 110-240V AC, 50/60Hz |
| Power Consumption | 150W (Max) |
| Audio Output | 2 x 10W Speakers |
| Connectivity | SCART, Composite (RCA), S-Video, RF In |
| Teletext | Yes |
| Sleep Timer | Yes |
| Child Lock | Yes |
| Cleaning Instructions | Use a soft dry cloth; avoid liquids and abrasives |
| Safety Features | V-Chip, auto power-off |
| User Manual Pages | 61 |
Frequently Asked Questions - DSC-34W70N DAEWOO
User questions about DSC-34W70N DAEWOO
0 question about this device. Answer the ones you know or ask your own.
Ask a new question about this device
Download the instructions for your Television in PDF format for free! Find your manual DSC-34W70N - DAEWOO and take your electronic device back in hand. On this page are published all the documents necessary for the use of your device. DSC-34W70N by DAEWOO.
USER MANUAL DSC-34W70N DAEWOO
The lightning flash with arrowhead symbol, within an equilateral triangle, is intended to alert the user to the presence of uninsulated “dangerous voltage” within the product’s enclosure that may be of sufficient magnitude to constitute a risk electric shock.

The exclamation point within an equilateral triangle is intended to alert the user to the presence of important operating and servicing instructions in the literature accompanying the appliance.
WARNING
TO PREVENT FIRE OR SHOCK HAZARD, DO NOT EXPOSE THIS APPLIANCE TO RAIN OR MOISTURE.
NOTE TO CATV SYSTEM INSTALLER
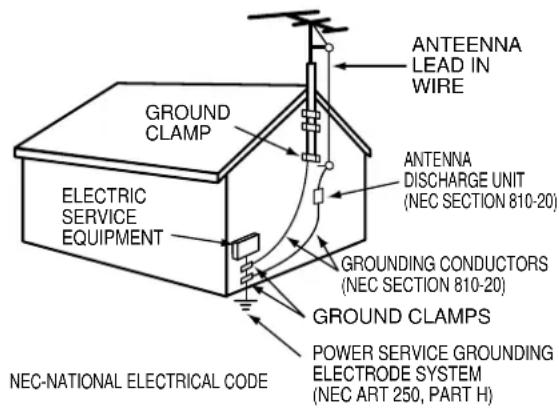
THIS REMINDER IS PROVIDED TO CALL THE CATV SYSTEM INSTALLER'S ATTENTION TO ARTICLE 820-40 OF THE NEC THAT PROVIDES GUIDELINES FOR PROPER GROUNDING AND, IN PARTICULAR, SPECIFIES THAT THE CABLE GROUND SHALL BE CONNECTED TO THE GROUNDING SYSTEM OF THE BUILDING, AS CLOSE TO THE POINT OF CABLE ENTRY AS PRACTICAL.
CAUTION
The AC power cord provided with this product is polarized (one blade wider than the other).
To prevent electrical shock, match wide blade of plug to wide slot, fully insert the AC plug into a standard 120V\~60Hz polarized outlet.
NOTE
Never connect the plug to an electrical source other than one providing 120V\~60Hz power. Use only the attached power cord. If the polarized AC cord does not fit into a non-polarized outlet, do not cut or file the blade. You are responsible for having the obsolete outlet replaced with a polarized outlet.
If you feel a static discharge when touching the unit, and the unit does not function, simply unplug the unit from the outlet. When you plug the unit back in, it should work normally.
Do not install power cords near any heating element or cooking appliances.
IMPORTANT SAFEGUARDS
PLEASE READ ALL THESE INSTRUCTIONS REGARDING YOUR TELEVISION EQUIPMENT AND RETAIN FOR FUTURE REFERENCE. FOLLOW ALL WARNINGS AND INSTRUCTIONS MARKED ON THE TV RECEIVER.
1 Read all of these instructions.
2 Save these instructions for later use.
3 Unplug this television equipment from the wall outlet before cleaning. Do not use liquid cleaners or aerosol cleaners. Use a damp cloth for cleaning.
4 Do not use attachments not recommended by the television equipment manufacturer as they may result in the risk of fire, electric shock or other personal injury.
5 Do not use this television equipment near water, for example, near a bathtub, washbowl, kitchen sink, or laundry tub, in a wet basement, or near a swimming pool, or the like.
6 Do not place this television equipment on an unstable cart, stand, or table. The television equipment may fall, causing serious injury to a child or adult, and serious damage to the equipment. Use only with a cart or stand recommended by the manufacturer, or sold with the television equipment. Wall or shelf mounting should follow the manufacturer's instructions, and should use a mounting kit approved by the manufacturer.
6A An appliance and cart combination should be moved with care. Quick stops, excessive force, and uneven surface may cause the appliance and cart combination to overturn.

natural_image
Symbolic icon of a person pushing a cart with a large box, enclosed in a circle (no text or symbols)7 Slots and openings in the cabinet and the back or bottom are provided for ventilation and to ensure reliable operation of the television equipment; and to protect it from overheating, these opening, must not be blocked or covered. The opening should never be blocked by placing the television equipment on a bed, sofa, rug, or other similar surface. (This equipment should never be placed near or over a radiator or heat register.) This television equipment should not be placed in a built-in installation such as a bookcase unless proper ventilation is provided.
8 This television equipment should be operated only from the type of power source indicated on the marking label. If you are not sure of the type of power supplied to your home, consult your television dealer or local power company.
9 This television equipment is equipped with a polarized alternating current line plug (a plug having one blade wider than the other). This plug will fit into the power outlet only one way. This is a safety feature. If you are unable to insert the plug fully into the outlet, try reversing the plug. If the plug should still fail to fit, contact your electrician to replace your obsolete outlet. Do not defeat the safety purpose of the polarized plug.
10 Do not allow anything to rest on the power cord. Do not locate this television equipment where the cord will be abused by persons walking on it.
11 Follow all warnings and instructions marked on the television equipment.
12 For added protection for this television equipment during a lightning storm, or when it is left unattended and unused for long periods of time, unplug it from the wall outlet and disconnect the antenna or cable system. This will prevent damage to the equipment due to lightning and power-line surges.
13 An outside antenna system should not be located in the vicinity of overhead power lines or other electric light or power circuits, or where it can fall into such power lines or circuits. When installing an outside antenna system, extreme care should be taken to keep from touching such power lines or circuits as contact with them might be fatal.
14 Do not overload wall outlets and extension cords as this can result in fire or electric shock.
15 Never push objects of any kind into this television equipment through openings as they may touch dangerous voltage points or short-out parts that could result in a fire or electric shock. Never spill liquid of any kind on the television equipment.
16 Do not attempt to service this television equipment yourself as opening or removing covers may expose you to dangerous voltage or other hazards. Refer all servicing to qualified service personnel.
17 Unplug this television equipment from the wall outlet and refer servicing to qualified service personnel under the following conditions:
(a) When the power-supply cord or plug is damaged or frayed.
(b) If liquid has been spilled, or objects have fallen into the television equipment.
(c) If the television equipment has been exposed to rain or water.
(d) If the television equipment does not operate normally by following the operating instructions. Adjust only those controls that are covered by the operating instructions as an improper adjustment of other controls may result in damage and will often require extensive work by a qualified technician to restore the TV receiver to its normal operation.
(e) If the television equipment has been dropped or the cabinet has been damaged.
(f) When the television equipment exhibits a distinct change in performance - this indicates a need for service.
18 When replacement parts are required, be sure the service technician has used replacement parts specified by the manufacturer that have the same characteristics as the original part. Unauthorized substitutions may result in fire, electric shock or other hazards.
19 Upon completion of any service or repairs to this television equipment, ask the service technician to perform safety checks to determine that the television is in a safe operating condition.
20 If an outside antenna or cable system is connected to the television receiver, be sure the antenna or cable system is grounded so as to provided some protection against voltage surges and built-up static charges.
EXAMPLE OF ANTENNA GROUNDING
PREPARATION
- CONNECTING ANTENNA. 6
•NAME OF EACH PART 7
CONNECTING OTHER EQUIPMENT TO THE SET
•CONNECTING EQUIPMENTS 53
OTHER TIPS
•PROGRAMMING THE REMOTE CONTROL 56
•COMPONENT CODES 57
•TROUBLESHOOTING....59
SPECIFICATIONS 60
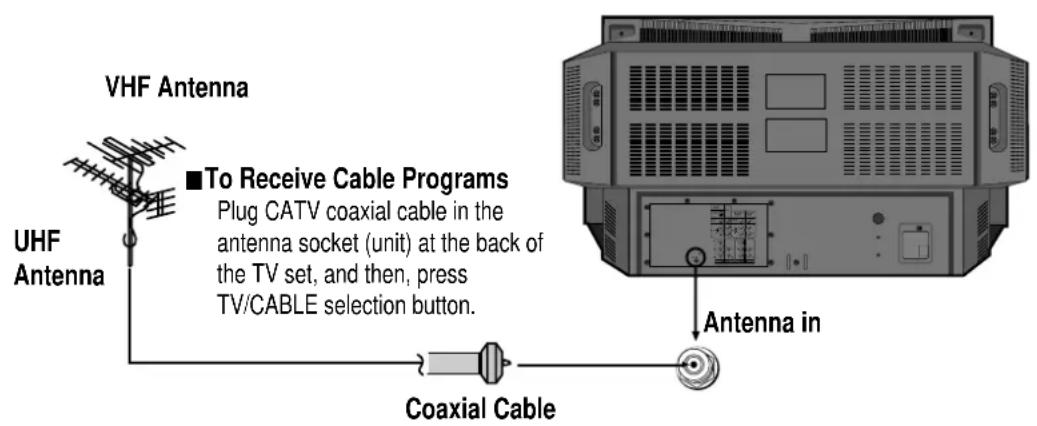
VHF/UHF OUTDOOR ANTENNAS
NOTE:
Bad picture reception could often be caused by bad antenna connection.
Be sure to check the antenna direction, its height, etc.
In case of using single antenna cable
In case of using two separate antenna cables
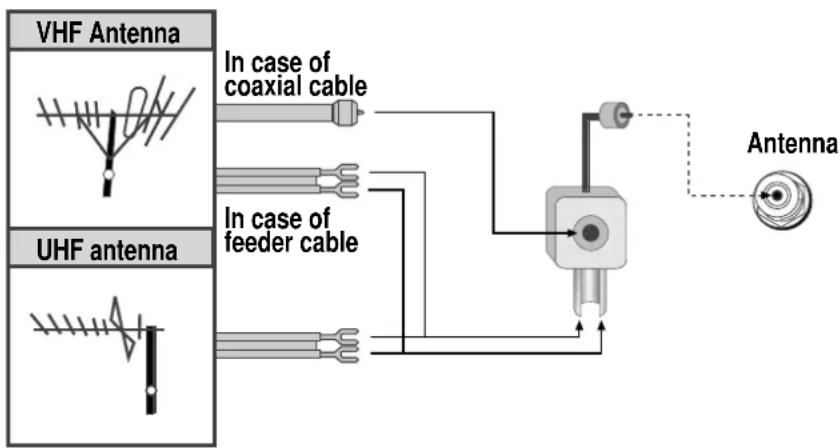
flowchart
graph TD
    A["VHF Antenna"] --> B["In case of coaxial cable"]
    C["UHF Antenna"] --> D["In case of feeder cable"]
    B --> E["Antenna"]
    D --> E
■Connecting Antenna and Cable TV
Observe the following three common sources of input. [You have the option to connect one source, or as many as all three, at the same time, when using a combiner-adapter, included with this HDTV Monitor.]
Three Sources of Input;
1) Coaxial Cable Feed [from cable company]
2) VHF Antenna [for local air reception of channels, 2\~13]
3) UHF Antenna [for local air reception of channels, 14\~69]
The included adapter allows for the most common combination of connections;
1) An "F connector" provides a connection for "Coaxial Cable"
2) A "Screw Terminal" provides connections for "VHF and UHF Antenna" sources, which commonly use "twin lead flat wire".
Special Notes;
Some "VHF or UHF Antennas" may be using "coaxial cable" instead of a "twin lead flat cable". In the event of connecting more than one source using "coaxial cable", you may obtain a "coaxial cable combiner" (available at your local electronics store).
Front and Side of TV set
•The buttons installed on the front of the TV set is functioning as same as those on the Remote Control.
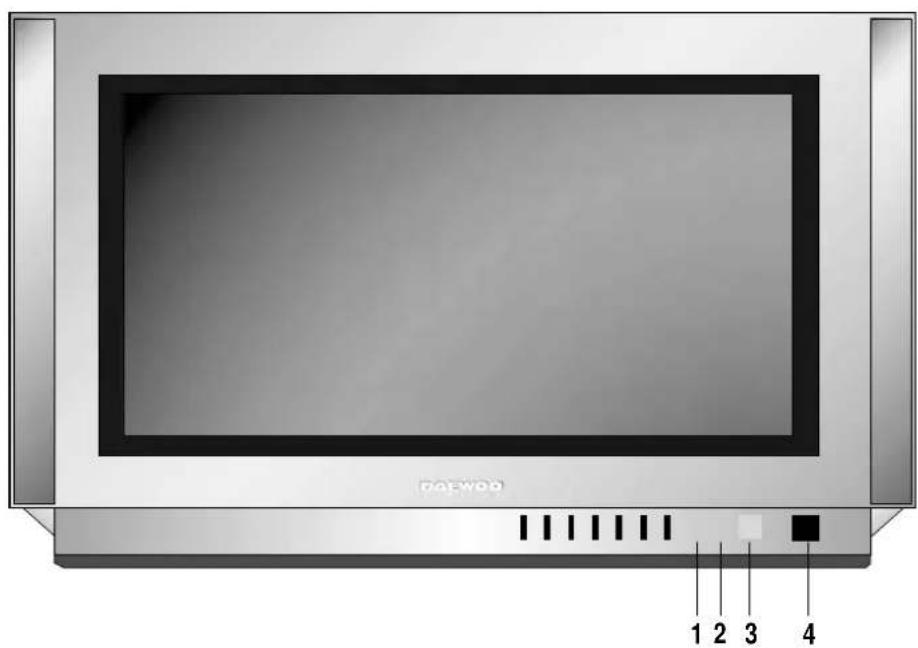
- Timer Indicator
Lights up red when you have set the HDTV Monitor's automatic timers.
- Power Indicator
Lights up green when you have turned the HDTV Monitor on.
- Remote Control Signal Sensor
Receives signals from the remote control.
- Power Button
Turns your HDTV monitor on or off.
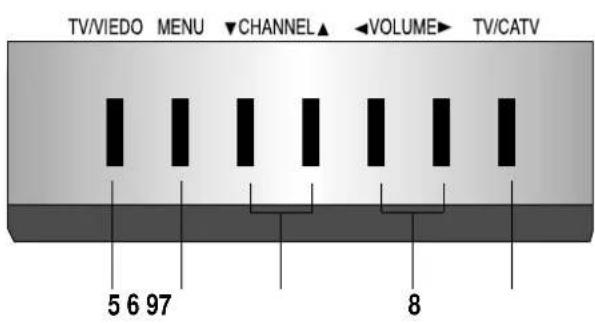
- TV/VIDEO button
Each time you press the TV/VIDEO button, the HDTV Monitor will cycle through:
TV VIDEO1 VIDEO2 VIDEO3 DVD TV
- MENU button
Enter and exit the MENU.
- CHANNEL buttons
Changes channels on your HDTV Monitor or/and moves the cursor and/or changes the setting in the menu screen.
- VOLUME buttons
Changes your HDTV Monitor's volume or/and moves the cursor and/or changes the setting in the menu screens.
- TV/CATV button
Each time you press the TV/CATV button, the HDTV Monitor will cycle through: TV-CATV TV →
Side panel inputs
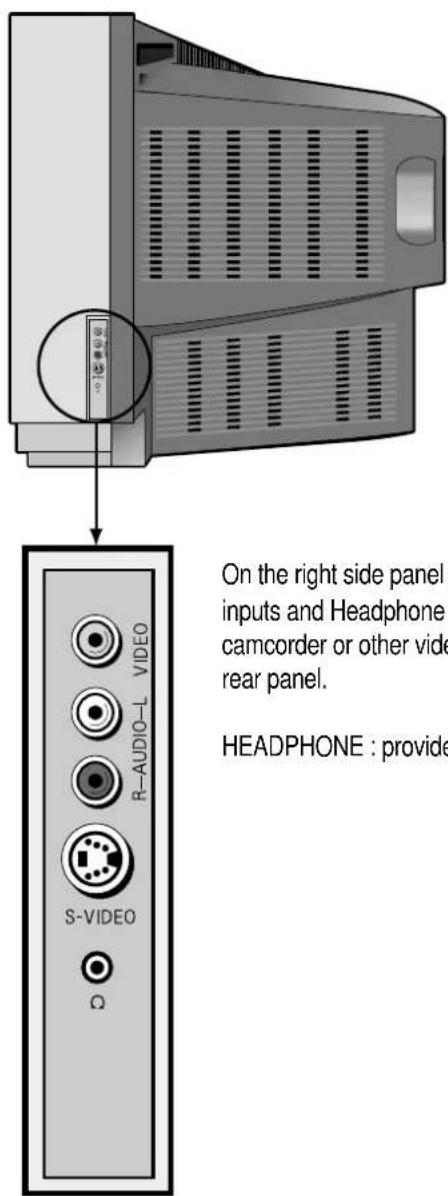
On the right side panel of the HDTV Monitor, you will find the Video 3 inputs and Headphone jack. These are provided to connect a camcorder or other video equipment without reaching around to the rear panel.
HEADPHONE : provides a connection for headphones.
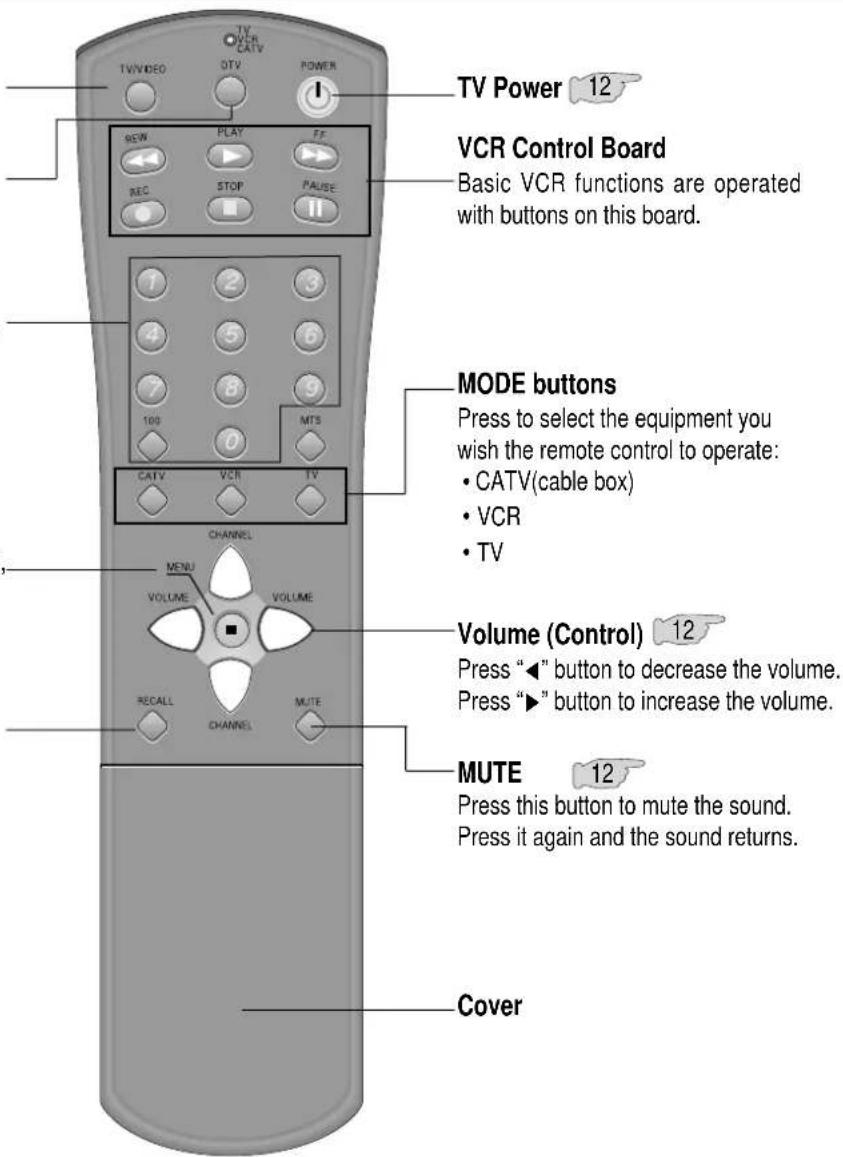
Remote Control
• ( )Number in the blank serves as an address; it shows the page number containing a detailed information on the functions of each button.
TV/VIDEO 17
(Conversion button)
DTV 17
(Conversion button)
Direct Channel
Selection Board 16
Pressing the numbers on this board, you can select program channels of the screen directly.
MENU 13
You can adjust the picture, sound, and many other functions.
RECALL 12
The present modes of channel, video, transmission signal, and equalizer can be checked through this button.
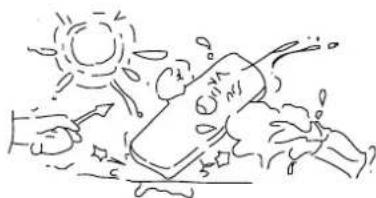
Caution!
- Do not drop.
- Avoid moisture, heat, and dust.
natural_image
Simple line drawing of a person relaxing under a sun, with another person standing nearby (no text or symbols)■ Installation of batteries:
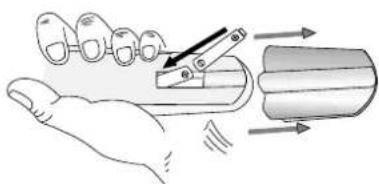
- Push to open the cover of the Remote Control.
- Set the batteries in the battery (cell), compartment after checking the electrodes(+,-), and then, shut the cover.
natural_image
Illustration of a hand holding a tool with arrows indicating movement or force direction (no text or symbols)Under the Cover of Remote Control
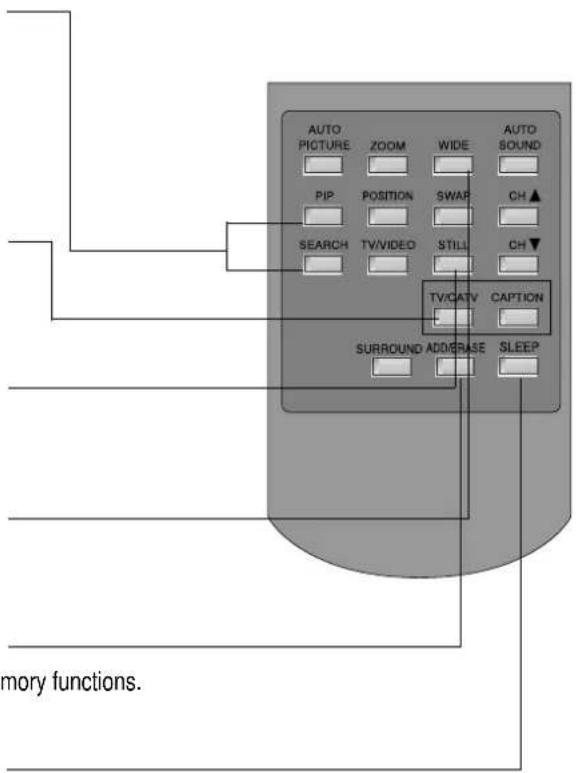
To use the buttons under the cover
Note:
-When batteries are low, the Remote Control may not
work. Change them immediately when they get weak.
- Be sure to use two 1.5V size AAA batteries.
- Do not use new batteries together with the old ones.
PIP SEARCH
18-26
Simultaneous window selection is possible through the buttons of this board, and various layouts of the windows can be selected according to the user's need or desire.
TV/CATV
16
This button is used to convert reception modes between aerial and cable transmission systems.
STILL
26
The screen pauses temporarily with a "STILL" picture.
WIDE
16
This button converts screen aspect ratios between 4:3 and 16:9 and vice versa.
ADD/ERASE
15
This button is used to operate channel memory functions.
SLEEP
40
This button is used to set up time memory for an automatic turn off.
To Watch TV Program
Buttons on the front of the TV set have the same functions as those of the REMOTE CONTROL.
▶Press two number buttons of the Remote Control to select a channel directly. The numbers should be in digits. Examp.) To select channel 9, press "0" and "9" It may take some time to get to the channel when only "9" is pressed.
To Mute the Sound Instantly
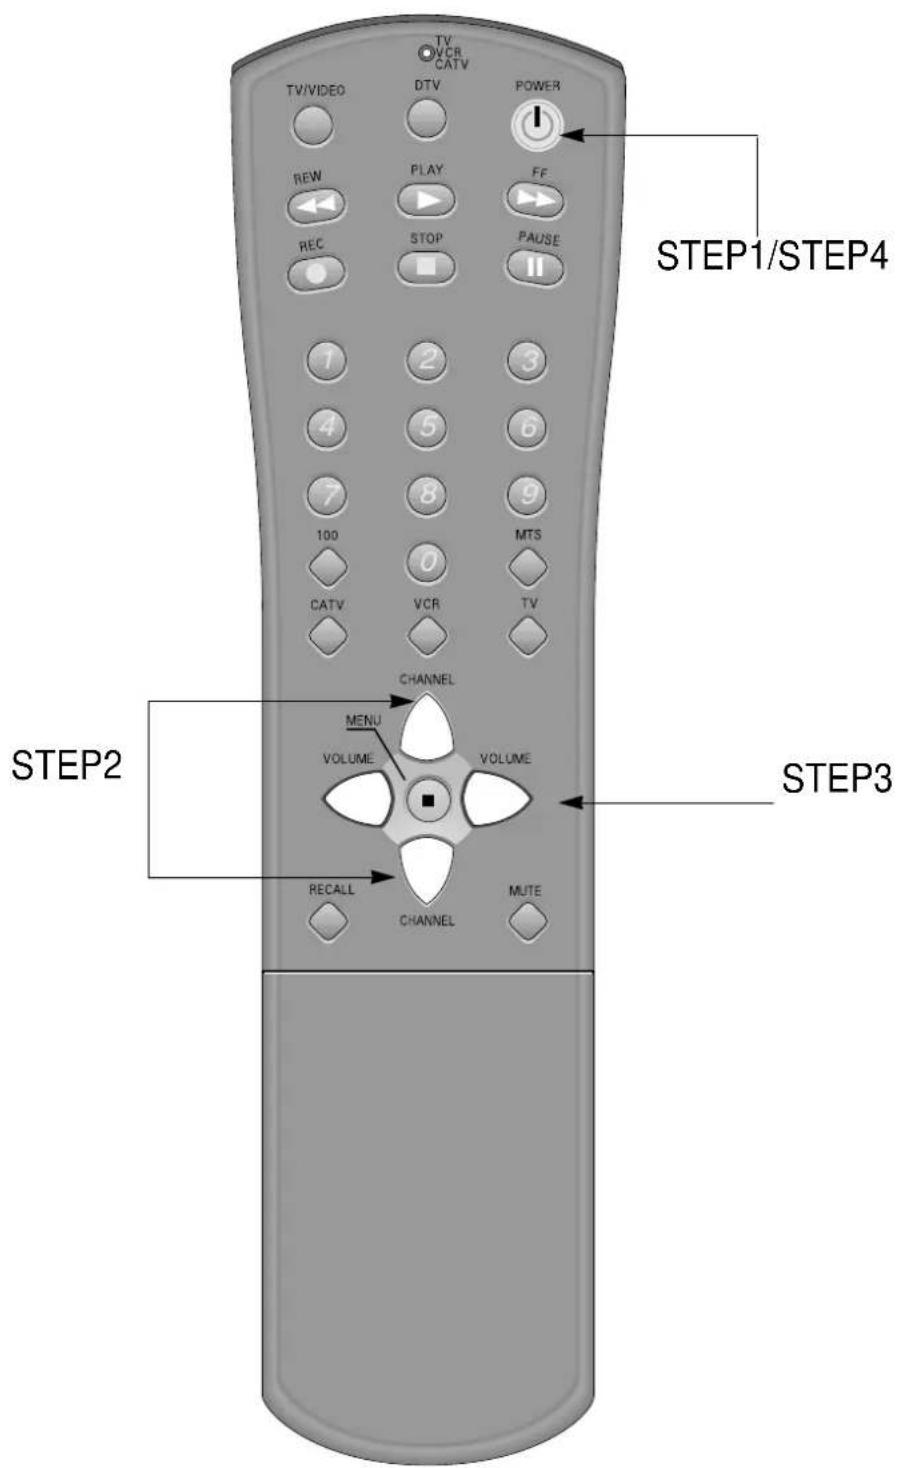
1. Press the "TV POWER" button.
•The TV screen will illuminate, and the power indicator lamp will light up green.
2. Press the "CHANNEL" buttons.
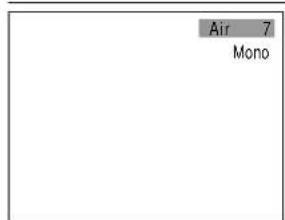
- Press the "CHANNEL▲/▼" or number buttons to select the channel you want. Ex) Ch 7
3. Adjust the Volume.
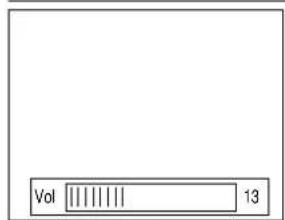
- When the "VOLUME◀" button is pressed, the volume decreases. - When the "VOLUME▶" button is pressed, the volume increases.
4. Press the "TV POWER" button to turn off the TV program.
- When the TV is turned off, the power indicator lamp lights up red.
■This function is used when there is a phone call or a visitor.
■Press "MUTE" button, to stop the sound of the program.
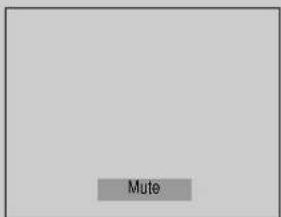
- When this button pressed the sound goes off with the word "MUTE" displayed on the screen.
- Press it again, and the sound returns.
Checking Performance Status of TV Set
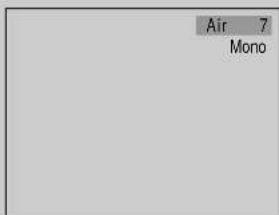
■The status of channel, broadcasting condition, and video connection will appear on the screen.
■Press "RECALL" button to get the status information on the screen. Press "RECALL" again, and the status displayed will disappear from the screen.
Automatic Memory of Channel
■Actual broadcasting channels can be set up in the "Memory" of the TV set through this function. With an automatic channel setup memory, desired channels can be selected easily with "CHANNEL▲/▼" buttons. Such inconvenience as pressing channel numbers one by one is not necessary.
■MENU mode automatically disappears in 20 seconds when there is no button operation. If you want to get out of the Menu mode yourself, press "MENU" button several times.
■When setting up an automatic channel memory, only the channels with a signal get memorized. The other channels go into erased status.
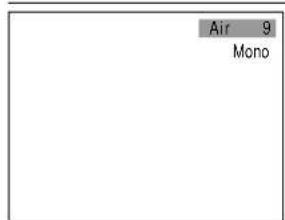
■When a TV program is on the signal, "Air" appears on the screen; while CATV program is on the signal, "Cable TV" appears on the screen. Select the desired Source by using "VOLUME◄/►" buttons to set up the Automatic Channel Memory.
1. Press "MENU" button.
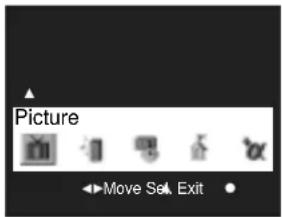
•The main menu will appear.
2. Select "Setup".
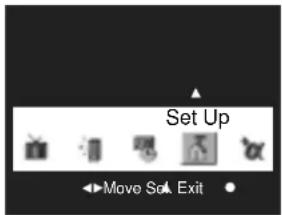
- Move the cursor to the "Setup" menu by using "VOLUME◄/►" buttons. - Select "Setup" sub-menu by using "CHANNEL▲" button.
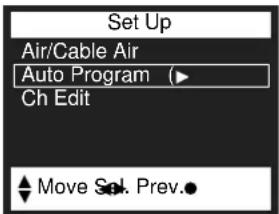
3. Select Auto Program by using "CHANNEL ▲/▼" buttons.
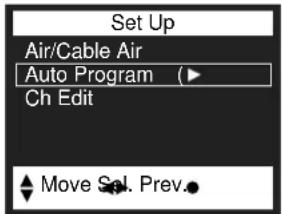
•The following picture will appear on the screen
- Use "CHANNEL▲/▼" buttons to select Auto Program.
4. Press "VOLUME◄/►" buttons. Automatic Channel Memory function (Auto Program) starts.
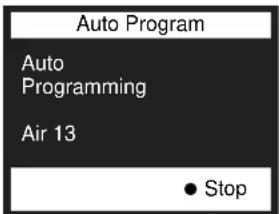
- Checking from channel 2 to channel 69,(Cable1\~125) this function automatically memorizes only those channels which are actually broadcasting. - When "MENU" button is pressed during the setup process, the setup operation quits.
- When the memory function is completed, a picture will appear on the screen as follows:
- At this moment, keep pressing "MENU" button till the menu window disappears.
5. Check the memorized status by pressing "CHANNEL ▲/▼" buttons.
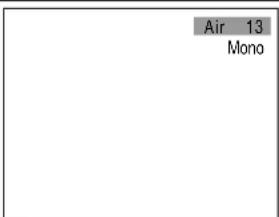
- Only memorized channels are selected.
Special Note: In the event of having only one channel in memory, the channel can be selected, but the searching process will still scan all other channels until at least 2 channels occupy the memory.
Add or Remove Channel from Memory
■ This function is another way to include a channel when cannot be a channel memorized due to a low broadcasting signal.
1. Select a channel.
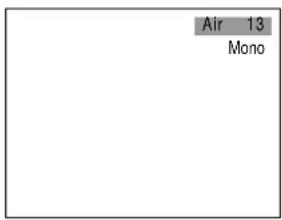
- Select a channel by pressing number buttons. Ex) Ch 13
2. Choose to add or erase from memory.
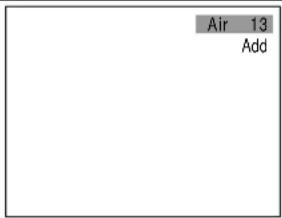
- Press the "ADD/ERASE" Button. - Whenever this button is pressed, the color of channel sign changes from green to red, and vice versa. Capture the Channel sign on green color - When a channel is memorized, its color turns green. When erased, it turns red.
- In an auxiliary window, memorized channels will appear to be white; erased channels to be red.
- Press "CHANNEL ▲/▼" button to check. NOTE : In an auxiliary window, the "ADD/ERASE" function does not work.
Watching CATV Programs
- Press "TV/CATV" button.
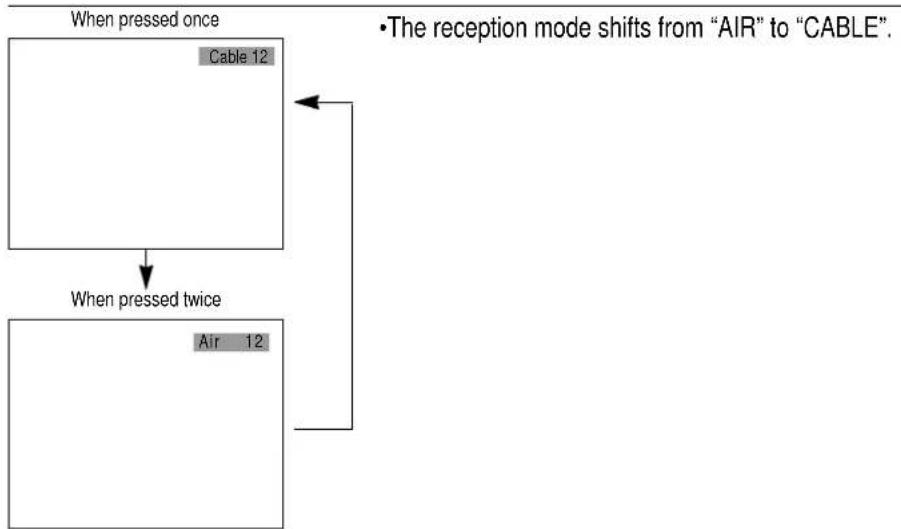
flowchart
graph TD
    A["When pressed once"] --> B["Cable 12"]
    B --> C["When pressed twice"]
    C --> D["Air 12"]
    style A fill:#f9f,stroke:#333
    style B fill:#ccf,stroke:#333
    style C fill:#cfc,stroke:#333
    style D fill:#fcc,stroke:#333
-
Select a channel.
-
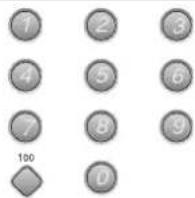
Select a channel by pressing either number buttons 0 - 9 or 100.
- When the channel number is bigger than 100, use the following example:
Ex) If the number is 125, press number buttons: 100, 2, and 5 in sequence.
■Watching CATV programs is possible only in areas where CATV services are provided.
Adjusting Screen Size
■Select one of the two screen ratios - 16:9 and 4:3 as you desire, and you can enjoy the mood of a cinema house at home.
Press "WIDE" button.
- When "WIDE" button is pressed, the aspect ratio of the screen shifts cyclically as follows: (16:9) → (4:3) → (Panorama) → (16:9)
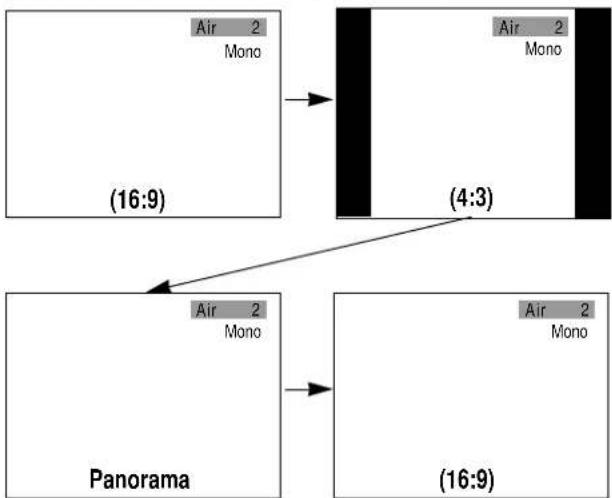
flowchart
graph TD
    A["Air 2 Mono (16:9)"] --> B["Air 2 Mono (4:3)"]
    B --> C["Panorama"]
    C --> D["Air 2 Mono (16:9)"]
Watching Video Programs
- Connect the video cable to the VIDEO socket at the back or the side of TV set, and press "TV/VIDEO" button on the remote control.
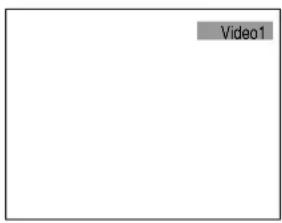
•The screen changes to video mode as follows:
- Whenever this button is pressed, the screen shifts
in sequence : TV Video1
Video2

Video3→DVD→TV
- When this button is pressed, the screen changes to "DTV" mode from any other mode. To return to the previous mode, press "TV/VIDEO" button.
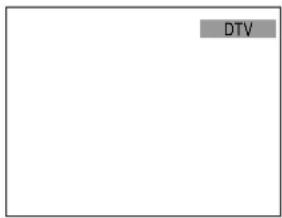
Operating Two Program Windows
1. Press "PIP" button once.
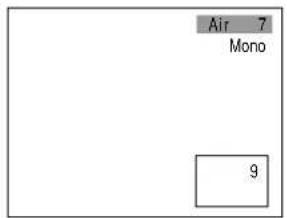
- Single PIP appears on the screen.
2. Press "PIP" button once more.
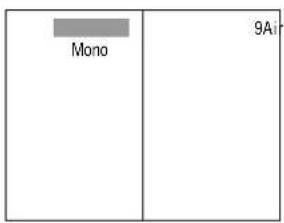
The operating program window becomes the main window and moves to the left side of the screen; an auxiliary window appears on the right side at the same time.
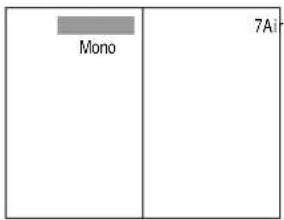
Use "CHANNEL▲/▼" buttons to control the left window.
- Use the "CHANNEL▲/▼" buttons of Simultaneous Window Selection board under the cover of Remote Control to control the right window (an auxiliary window).
- The same channel can not be received in both windows at the same time.
- Press "SWAP" button, and the windows exchange their locations: the left one to the right, and the right one to the left.
■The sound of TV set is available only in the main program window (the left one).
■ If you want to listen to the sound of an auxiliary window (the right one), use Headphones.
■ Whenever "PIP" button is pressed, the screen changes cyclically as follows:
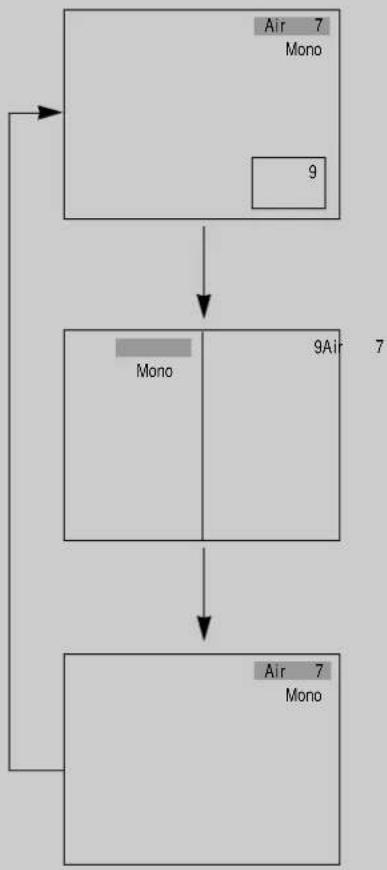
flowchart
graph TD
    A["Air 7\nMono"] --> B["9"]
    B --> C["9Air 7"]
    C --> D["Air 7\nMono"]
    D --> E[" "]
Various Functions of Simultaneous Window Mode
■Select and enjoy programs you want to watch by using various functions of Simultaneous Window mode.
1. Press "MENU" button.
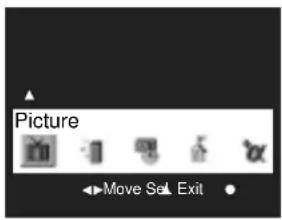
- Then the screen appears as follows:
2. Select "Funtion" button.
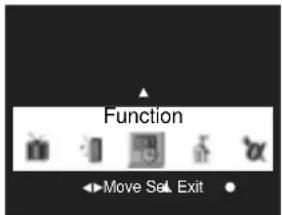
- Move the cursor to the "Funtion" menu by using "VOLUME◄/►" buttons. - Select "Funtion" Sub-menu by using "CHANNEL▲" button.
3. Select "PIP".
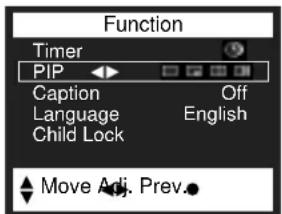
- Move the blue bar to the PIP menu by using "CHANNEL ▲/▼" buttons. Then the screen appears as the next page.
4. Press "VOLUME◄/►" buttons, and select the window mode you want.
- When the "VOLUME◄/►" buttons are pressed, the screen shifts in the following order: Single PIP Picture ←→ Twin picture ←→ Multi-picture(4) ←→ Off, and vice versa.
Single PIP Picture Twin Picture
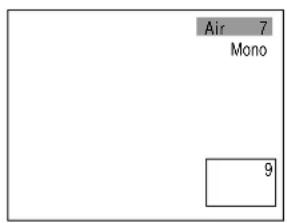
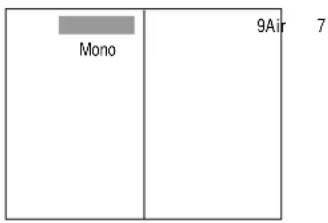
Multi-Picture(4)
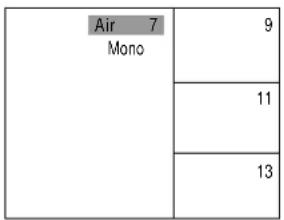
other
| Category | Value | |---|---| | Air | 7 | | Mono | | | Air | 9 | | Mono | 11 | | Mono | 13 |- The MENU mode disappears in 15 seconds automatically when there is no "MENU" button operation, and you can enjoy the selected Simultaneous Window programs.
5. Press "MENU" button twice.
•The MENU mode will disappear.
Selecting Simultaneous Windows
■ You can enjoy two window programs at the same time. Along with the main window program, you can have another TV channel program or a Video program simultaneously. In addition, you can have the sound of the auxiliary window program through headphones. Simultaneous window Program is very convenient.
1. Press "PIP" button.
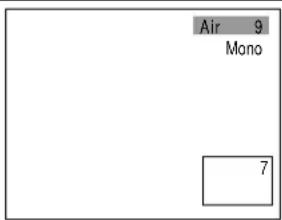
- You can enjoy two window programs simultaneously.
- The same channel or child lock channel can not be operated in both windows of the screen.
2. Select a channel you want to watch in the auxiliary window.
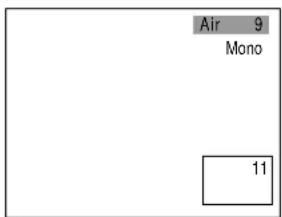
- Select a channel you want to watch in the auxiliary window by using "CHANNEL▲/▼" buttons on the Simultaneous Window Control panel under the Remote Control cover. Ex)Ch11
- In the auxiliary window, only a memorized channel will be selected.
3. Select VIDEO mode with the auxiliary window.
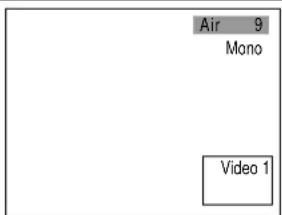
- To operate VIDEO mode in the auxiliary window, connect the video cable to the VIDEO IN socket at the back of TV set, and press "TV/VIDEO" button on the auxiliary Window control panel under the Remote Control cover. - Now the auxiliary window operates in the VIDEO mode, the connected video program will play.
Ex) Connect VIDEO 1 and then, press the "TV/VIDEO" button. The mode will be changed in a following sequence:
:TV→Video1→Video2→Video3→DVD→TV
- When "SWAP" button is pressed, the window modes alternate.
4. Press "PIP" button again.
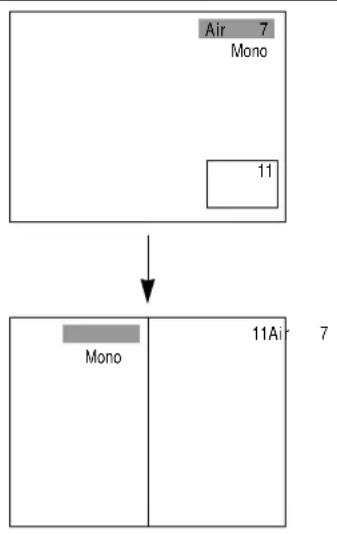
flowchart
graph TD
    A["Air 7\nMono"] --> B["11"]
    B --> C["Mono 11Air"]
- PIP mode changes to twin windows.
5. Press "PIP" button again, and the auxiliary window disappears.
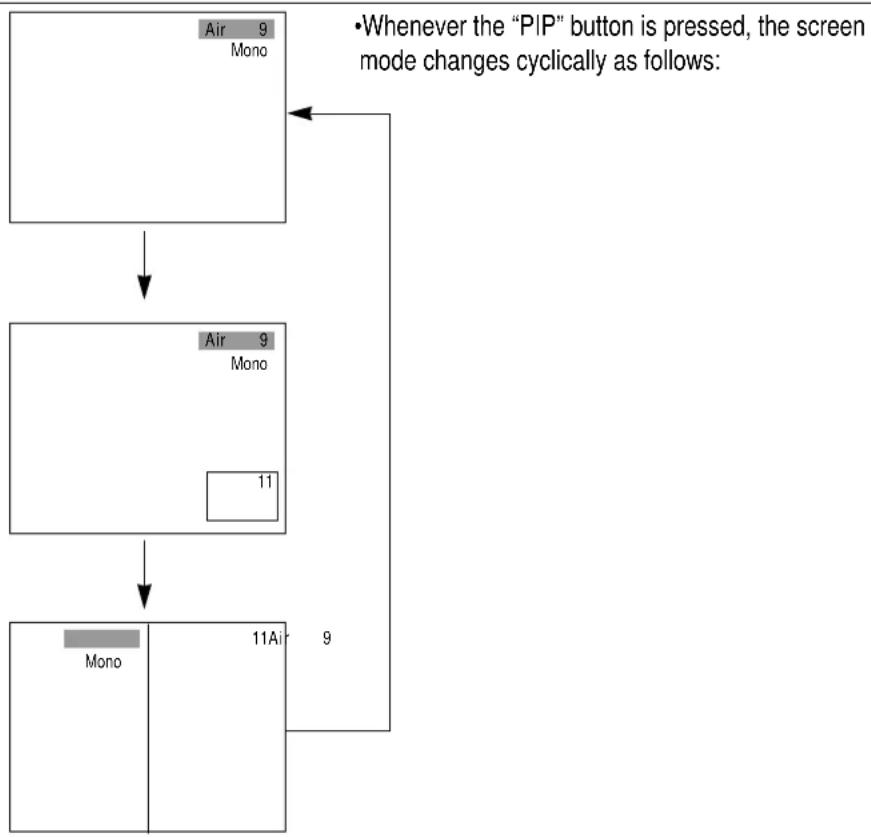
flowchart
graph TD
    A["Air 9\nMono"] --> B["Air 9\nMono"]
    B --> C["11"]
    C --> D["Mono 11A"]
    D --> E["9"]
    style A fill:#f9f,stroke:#333
    style B fill:#ccf,stroke:#333
    style C fill:#cfc,stroke:#333
    style D fill:#fcc,stroke:#333
    note right of A
        • Whenever the "PIP" button is pressed, the screen mode changes cyclically as follows:
    end
Searching Functions of Memorized Channels through 4 Windows Mode
■Memorized channels could be checked easily by selecting 4 windows mode.
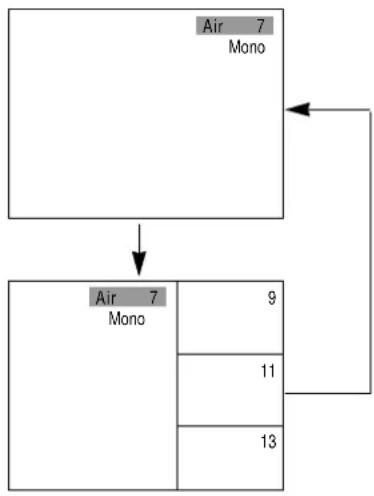
1. Press "SEARCH" button.
- Four windows appear on the screen. Memorized channels are connected one-by-one to each window in sequence; thus it is easy to check the contents of the programs on air.
- Whenever the "SEARCH" button is pressed, the screen changes cyclically as follow:
flowchart
graph TD
    A["Air 7 Mono"] --> B["Air 7 Mono"]
    B --> C["9"]
    B --> D["11"]
    B --> E["13"]
- Press "SEARCH" button. Then, four windows will appear on the screen, each with a memorized channel in sequence. It is simple to check the programs on air.
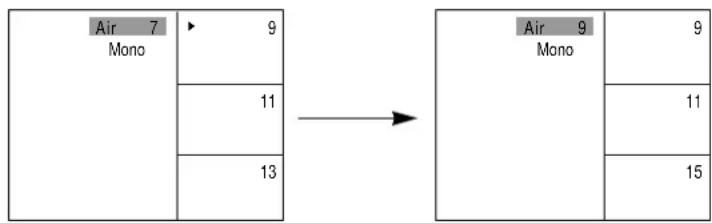
- Whenever the "POSITION" button is pressed, "▶" sign moves from one window to another in sequence.
- When "SWAP" button is pressed, the window with "▶" sign converts to a new main window.
flowchart
graph LR
    A["Air 7\nMono"] --> B["9"]
    A --> C["11"]
    A --> D["13"]
    E["Air 9\nMono"] --> F["9"]
    E --> G["11"]
    E --> H["15"]
Changing Location of Auxiliary Windows
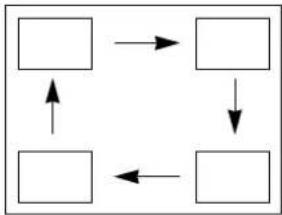
1. Press "POSITION" button.
- Display auxiliary windows on the screen by pressing "PIP" buttons. - Press "POSITION" button. Every time it is pressed, the locations of auxiliary windows change as follows:
flowchart
graph TD
    A[" "] --> B[" "]
    B --> C[" "]
    C --> D[" "]
    D --> A
    A -->|↑| A
    B -->|↓| B
    C -->|←| C
    D -->|←| D
- The search sign “▶” in 4 Windows mode shifts its location as follows:
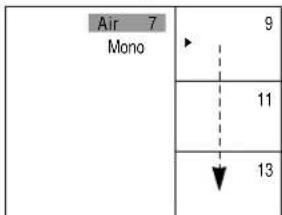
- In Twin Windows mode, the "POSITION" button does not work.
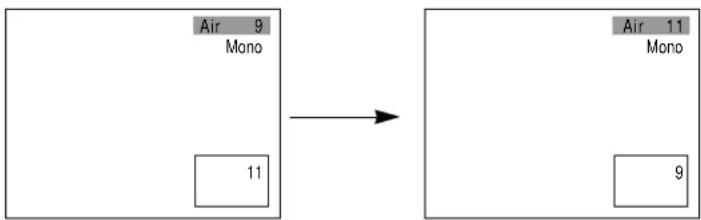
Window Mode SWAP
Press "SWAP" button.
- View the auxiliary window by pressing "PIP" button.
- Press "SWAP" button. Every time it is pressed, the mode of the main and that of the auxiliary windows will swap locations as follows:
flowchart
graph TD
    A["Mono"] --> B["11"]
    C["Air 9"] --> D["11"]
    E["Air 11"] --> F["9"]
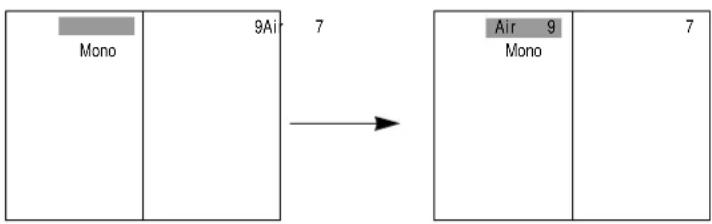
This function also operates in Twin Windows mode.
- When the system is in Twin Windows mode 1 (4:3), the Twin Windows will appear as follows:
flowchart
graph LR
    A["Mono"] --> B["9Air"]
    B --> C["Air 9 Mono"]
    C --> D["7"]
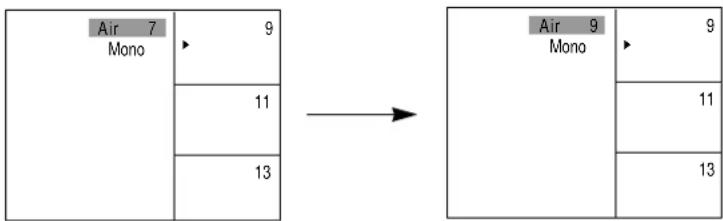
This function works in Multi-Windows mode too.
- The window with “▶” sign shifts into the main window.
- The movement of “▶” sign is adjusted by pressing the “POSITION” button.
flowchart
graph LR
    A["Air 7 Mono"] --> B["9"]
    A --> C["11"]
    A --> D["13"]
    E["Air 9 Mono"] --> F["9"]
    E --> G["11"]
    E --> H["13"]
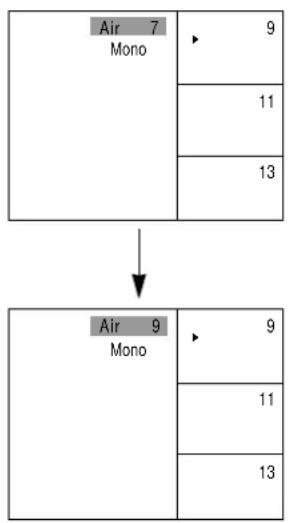
Changing Window Modes is also Possible in Multi-Windows Search.
- The window with “▶” sign not only becomes the new main window, but also the auxiliary window.
flowchart
graph TD
    A["Air 7 Mono"] --> B["Air 9 Mono"]
    A --> C["9"]
    A --> D["11"]
    A --> E["13"]
    B --> F["9"]
    B --> G["11"]
    B --> H["13"]
Making Pause Auxiliary Windows.
- This function makes the auxiliary window programs pause temporarily.
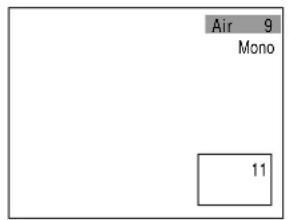
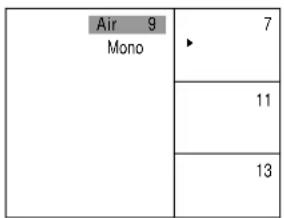
- When "STILL" button is pressed one time, the programs pause. When it is pressed again, the programs resume their operations.
• In case only one program is playing:
• In case two window programs are playing:
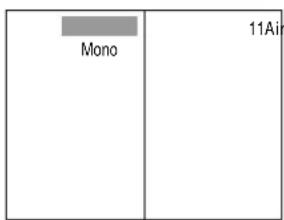
9
- In case multi-window search programs are playing: (When "STILL" button is pressed, the programs pause temporarily.)
Adjustable Headphone Volume Levels
■ Sound of either the main window or an auxiliary window is available through headphones.
■Volume control of an auxiliary window is possible only with headphones.
■Sound of an auxiliary window program is available only through headphones.
■ In case of Twin Windows mode, the sound of the right window program is available through headphones.
1. Press "MENU" button.
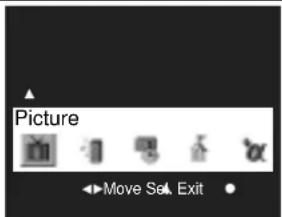
•The screen appears as follows:
2. Select "Sound" menu by using "VOLUME◀/▶" buttons.
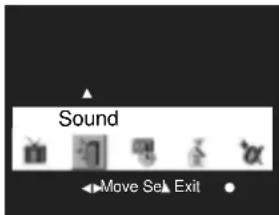
- Move the cursor to the "Sound" menu by using "VOLUME◄/►" buttons.
- Press "Channel ▲" button.
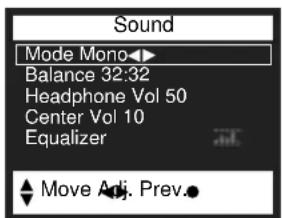
•The following picture will appear on the screen.
3. Press "CHANNEL ▲/▼" buttons and select "Headphone Vol."
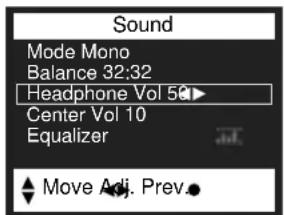
- In menu mode, sound of an auxiliary window is available through this function.
- In case of main window and single/twin/multi-windows, sound of main window is available through this function.
- Adjust the volume of headphones to a proper level.
- Even when the sound of the main window is mute, the sound is available through the headphones.
Accessing to "Sound" Sub-menu
1. Press "MENU" button.
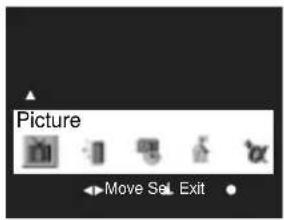
•The screen appears as shown:
2. Select "Sound" menu by using "VOLUME◄/►" buttons.
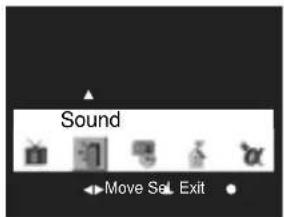
- Move the cursor to the "Sound" menu by using "VOLUME◄/►" buttons. - Press "Channel▲" button.
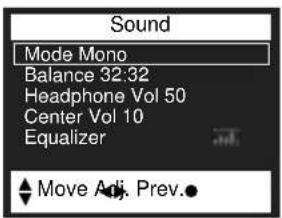
•The following picture will appear on the screen:
3. Press "CHANNEL ▲/▼" buttons.
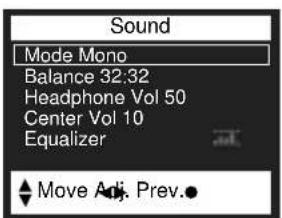
- "Sound" mode is selected, and the sub-menu appears. - Continue to press "CHANNEL▲/▼" buttons, and the selected sub-menu sign changes into blue color in the following sequence: Mode ←→ Balance ←→ Headphone Vol ←→ Center Vol ←→ Equalizer - Continue to press "VOLUME◄/►" buttons at a sub menu you want.
4. Press "MENU" button twice.
- Press this button one time, and menu window appears. Press it again, and you will get the previous menu window status. (Menu disappears)
■Enjoy programs with selected modes by using various functions.
■Sound reception of the main or an auxiliary window is available through headphones.
Adjusting Picture Quality
■Users do not need to handle many operation units in adjusting the picture on the screen. Just make one of the selections already built in by the company's experts.
1. Press "AUTO PICTURE" button.
- The following pictures appear on the screen in sequence, and the picture adjustment state is changed.
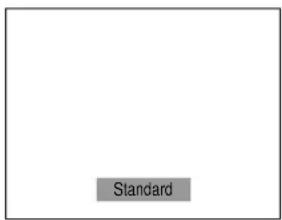
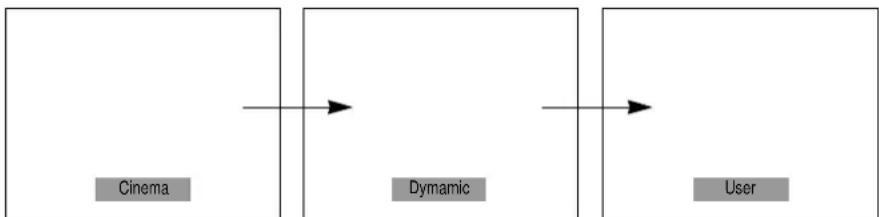
flowchart
graph LR
    A["Cinema"] --> B["Dynamic"]
    B --> C["User"]
2. Use this mode and get quality pictures on the screen.
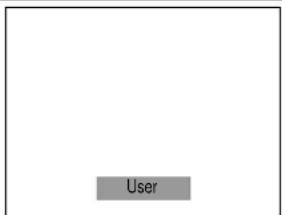
- Starting from the picture above, choose the appropriate picture quality you want by using "VOLUME◄/►" buttons.
•Picture adjustment is also available in each "Video" mode.(Video1, Video2, Video3, DVD)
•Picture adjustment is also available in each "S-Video" mode.(S-Video1,3)
Picture Noise Reduction
1. Press "MENU" button.
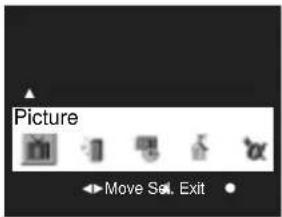
•The screen appears as follows :
2. Select "Picture" by using "CHANNEL▲" button.
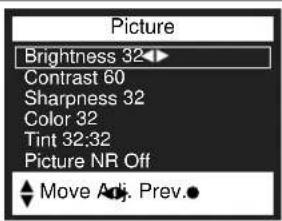
- Move the cursor to the "Picture" menu by using "CHANNEL ▲" button.
3. Press "CHANNEL▲/▼" buttons.
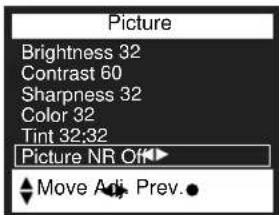
- When "Picture" mode is selected, its sub-menu appears on the screen.
- Continue to press "CHANNEL▲/▼" buttons, and the entries of this sub-menu turn blue in the sequence as follows: Brightness Contrast Sharpness
←→ Color ←→ Tint ←→ Picture NR
- Select "Picture NR" function by using "VOLUME◄/►" buttons, and then, "On" and "Off" repeat in turn.
- Select "On".
4. Press "MENU" button twice.
- Press this button one time, and the menu window appears.
Press it again, and you will get the previous status of the menu window.
(Menu disappears)
■ Low transmission signals may cause bad picture or noise.
■This function corrects this type of problem.
■To eliminate or reduce picture noise, press to select "On" in "Picture NR" mode of "Function" sub-menu.
Adjusting the Picture Screen to Your Preference
According to the user's preference, brightness, contrast, sharpness, color, and tint can be adjusted for each of Video1, Video 2, Video3, DVD, and TV mode.
Brightness:
- Adjusts the degree of brightness or darkness of the whole screen.
Contrast:
- Adjusts (controls) the degree of brightness between the objects and background of the picture.
Sharpness:
- Adjusts the shapes of objects in the picture, making them appear softer (blurred) or sharper (clean).
Color:
- Adjusts the degree of color saturation.
Tint:
- Adjusts to produce the proper natural color of objects.
1. Press "MENU" button.
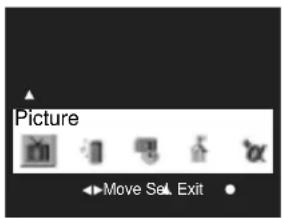
- Then the screen appears as follows:
2. Select "Picture" by using "CHANNEL ▲" button.
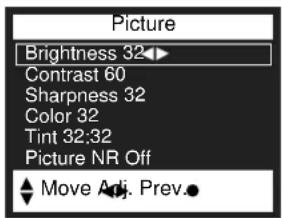
- "Picture" mode is selected, and its sub-menu appears.
- Continue to press "CHANNEL▲/▼" buttons, and the selected sub-menu sign changes into a blue bar in the following sequence: Brightness ←→ Contrast
- Press the "CHANNEL ▲/▼" buttons, and capture "Tint" on the blue bar.

3. Adjust "Tint" by using "VOLUME◄/►" buttons.
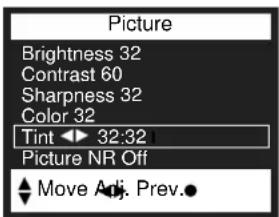
- Press "VOLUME◀" button, and the green tint increases.
- Press "VOLUME▶" button, and the red tint increases.
- To adjust other functions such as brightness, etc., select the function you want by using "CHANNEL▲/▼" buttons, and adjust the mode as above.
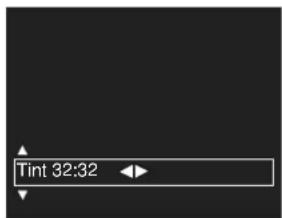
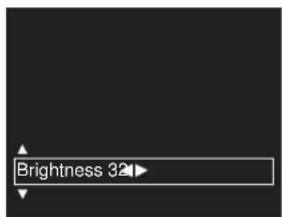
4. Adjust "Brightness" by using "VOLUME◄/►" buttons
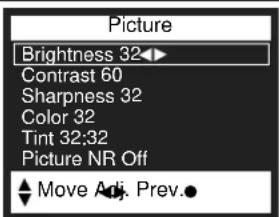
- Press "VOLUME▶" button for the Brightness to in crease.
- Press "VOLUME◀" button for the Brightness to decrease.
5. Press "MENU" button twice.
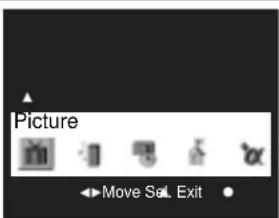
- Press this button one time, and the menu window appears.
- Press it again, and the previous status of the menu window appears.
- To adjust other functions such as brightness, etc., select the function by using "CHANNEL▲/▼" buttons, and adjust them by using
"VOLUME◄/►" buttons.
Customizing the Audio
"Balance"
■ This function balances the volume between left and right speakers.
■ "Balance" adjusting screen appears as follows:
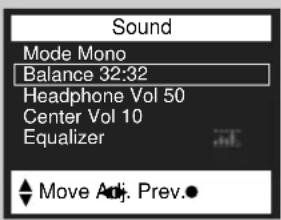
■ "VOLUME UP▶" keeps the volume of the right speaker as it is, but decreases the volume of the left one. "VOLUME DOWN◀" keeps that of the left one as it is, but decreases that of the right one.
"Equalizer"
■ This function adjusts the range of quality sound of speakers.
1. Press "MENU" button.
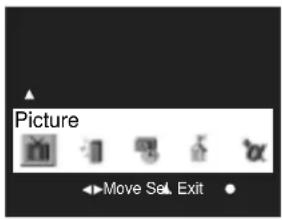
- Then, the screen appears as follows :
2. Select "Sound" menu by using "VOLUME◀/▶" buttons.
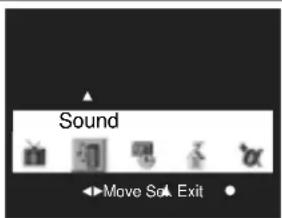
- Move the cursor to the "Sound" menu by using "VOLUME◄/►" buttons. - Press "CHANNEL▲" button.
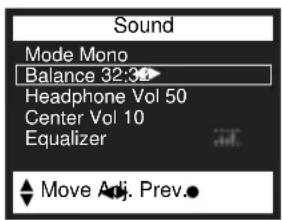
- Then, "Sound" menu and its sub-menu appears.
3. Select "Equalizer" by using "CHANNEL ▲/▼" buttons.
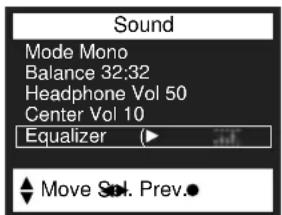
- Capture "Equalizer" on the blue bar by using "CHANNEL▲/▼" buttons.
4. Select Range of Sound by using "VOLUME◄/►" buttons.
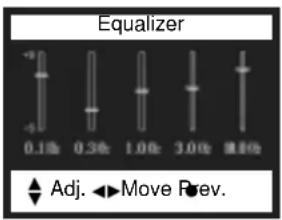
- "CHANNEL▲" strengthens the selected range of sound.
- "CHANNEL▼" weakens the range of sound.
- Signal bar (-) moves up and down showing the selected sound range.
- The selected range of sound looks pale blue, and the range not selected looks white.
Receiving Stereo or SAP Mode Programs
■When transmission signal is low or broadcasting condition is not good, sound might be cut off temporarily. This type of malfunctioning is not caused by the TV set. In this case, press "MTS" button, and shift the mode into "Mono".
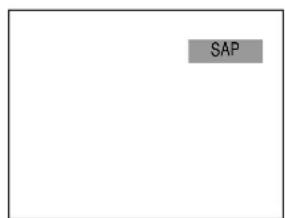
■The Second Audio Program (SAP) settings offers you the option of listening to either of two separate audio programs, such as a second language broadcast.
1. Press "MTS" button.
- Whenever this button is pressed the mode status shifts in the following sequence: Mono → Stereo → SAP.
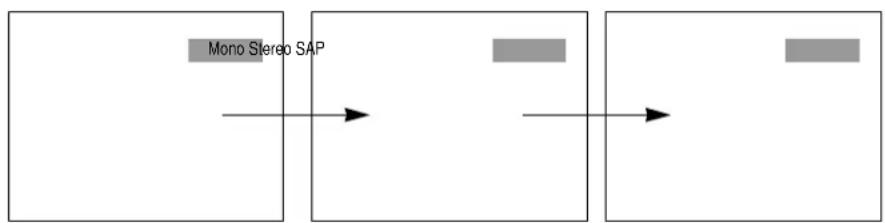
flowchart
graph LR
    A["Mono Stereo SAP"] --> B["Single Component"]
    B --> C["Final Component"]
- Press "RECALL" button on the Remote Control to check the program transmission mode.
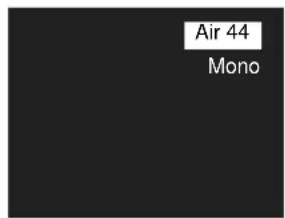
- When the program transmission is in stereo mode, select "Stereo" to receive the stereo sound.
- If the quality of stereo sound is not clear, set it in "Mono", then you should have less noise.
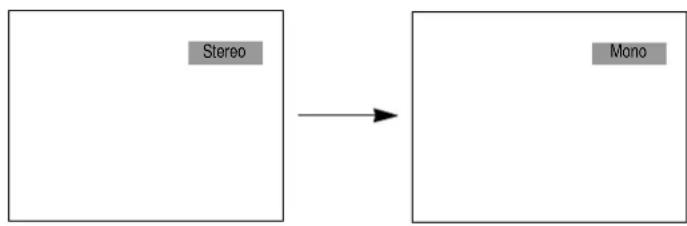
flowchart
graph LR
    A["Stereo"] --> B["Mono"]
- When the program transmission is in "SAP" mode, select "SAP" to receive "SAP" broadcasting.
Setting up Present Time
1. Press "MENU" button.
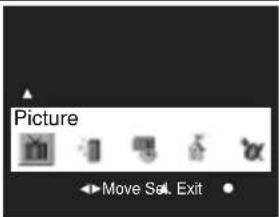
•The screen appears as shown :
2. Select "Function" by using "VOLUME◀/▶" buttons.
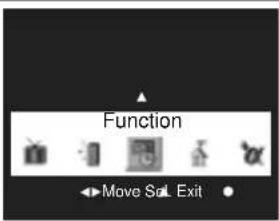
- Move the cursor to the "Function" menu by using
"VOLUME◄/►" buttons.
- Press "CHANNEL▲" button.
3. Press "CHANNEL ▲/▼" buttons.
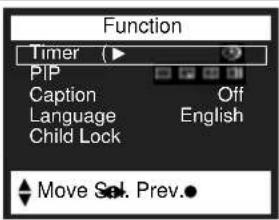
- "Function" mode is selected, and the sub-menu appears.
- Press "CHANNEL ▲/▼" buttons until the blue bar indicates "Timer".
■Before setting up the Automatic "On" / "Off" mode, the clock "must have the current time entered in the clock setting."
4. Set up the Curent Time.
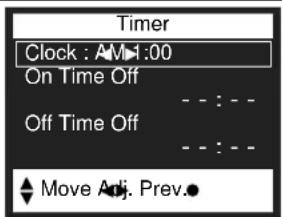
- Press "VOLUME◄/►" buttons, and the screen appears as shown in the left figure:
- Press "CHANNEL▲/▼" buttons, and the letters "AM 1:00" will turn in blue.
- Set up the present time by using "VOLUME◄/►" buttons.
- Keep pressing the "CHANNEL ▲/▼" buttons. The set up time will continue to change by one minute until the button is released.
Activating/Deactivating Automatic "On" and "Off
1. Press "MENU" button.
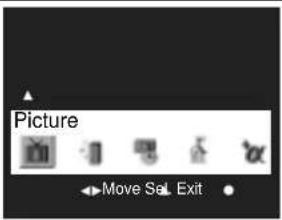
- Then, the screen will appear as follows :
2. Select "Function" by using "VOLUME◀/▶" buttons.
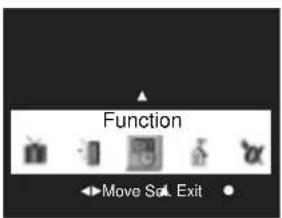
- Move the cursor to the "Function" menu by using
"VOLUME◄/►" buttons.
- Press "CHANNEL▲" button.
3. Press "CHANNEL ▲/▼" buttons.
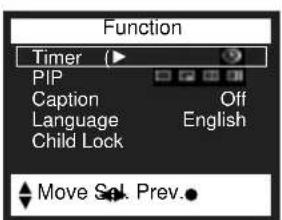
- Then "Function" mode is selected, and its sub-menu appears.
- Continue to press "CHANNEL▲/▼" buttons until the blue bar indicates "Timer".
This time memory function automatically turns the TV set "On" or "Off" at a planned time. Once set up, this function works every day unless the set time is canceled or the TV set is unplugged. Therefore this function could be used for a "Get Up" alarm (Morning Call) by setting up the time for "On" in the morning. The "present time (local time)" must be set up ahead of setting up other time memories.
4. Select "On Time" to turn the TV set "On".
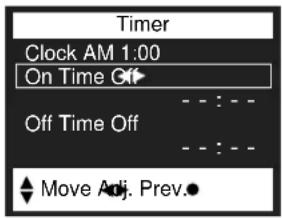
- Press "CHANNEL▲/▼" buttons, and the screen appears as follows:
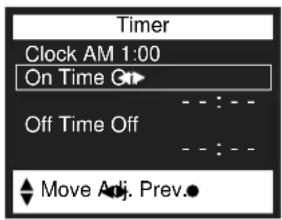
- Press "VOLUME◄/►" buttons until "Off" sign turns "On".
- Keep pressing the "VOLUME◄/►" buttons, and then, the set up time will continue to change by unit of one minute until the button is released. Select the time for an automatic turn "On".
5. Set up "On Timer".
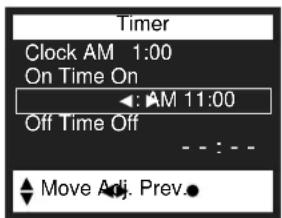
- Press "CHANNEL ▲/▼" buttons, and the letters AM - - : - - will turn blue.
- Set up "On Timer" by using "VOLUME◄/►" buttons
- Keep pressing the "VOLUME◄/►" buttons, then, the set up time will continue to change by unit of one minute until the button is released.
Ex) Set up the time to turn on the TV automatically at 11:00 in the morning
6. Select "Off Time" to turn TV set "On".
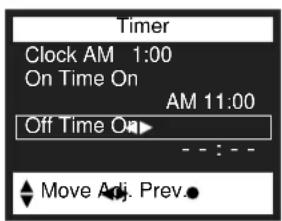
- Press "VOLUME◄/►" buttons until "Off" turns to "On".
- Keep pressing the "VOLUME◄/►" buttons. Then, the set up time will continue to change by unit of one minute until the button is released.
7. Set up the "Off Timer".
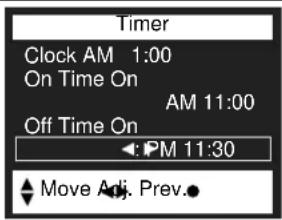
- Press "CHANNEL▲/▼" buttons, and the letters "AM - - : - -" will turn blue.
- Set up "Off Timer" by using "VOLUME◄/►" buttons.
- Keep pressing the "VOLUME◄/►" buttons, then the set up time will continue to change by unit of one minute until the button is released.
Ex) Set up the time to turn off the TV automatic at 11:30 in the evening.
8. Finish Setting up Time Memory.
- Leave the menu mode by using "MENU" button.
Setting up "SLEEP" Time
Control of "SLEEP" function with the Remote Control.
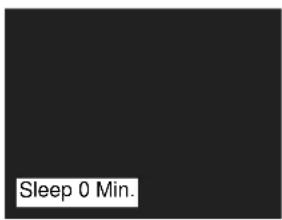
- Press "SLEEP" button, and the screen appears as follows:
- Every time the button is pressed, the mode changes in the following sequence: Sleep off →
Sleep 10 → Sleep 20 → Sleep 30
Sleep 60 → Sleep 90 → Sleep off
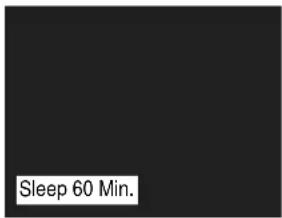
- Select the time period by releasing the button. Ex) To set the automatic turn off in 60 minutes.
- The "Sleep 0 Min" sign means that the time to automatic
turn off is not set up in the memory.
■This function is used to set up the time period from now until the TV set turns off automatically. (10 - 90 minutes).
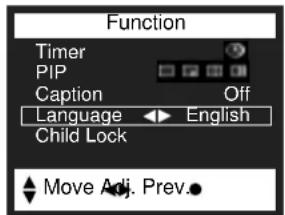
Selecting the On-Screen Language
■The language of the program on the screen can be changed to one of the following On-Screen languages : English, French, and Spanish.
1. Press "MENU" button.
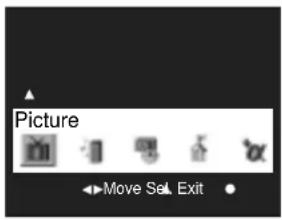
- The main menu will appear as shown in this example:
2. Select "Function".
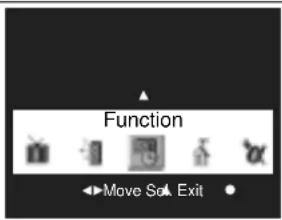
- Move the cursor to the "Function" menu using "VOLUME◄/►" buttons. - Press "CHANNEL▲" button to select function, and the sub menu will appear.
3. Press "CHANNEL ▲/▼" buttons.
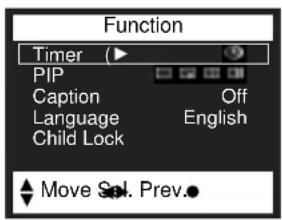
- Select language (as shown) highlighted with the blue function indicator bar.
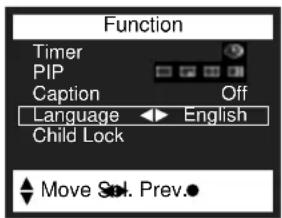
4. Select the language using "VOLUME◀/▶" buttons.
- Press this button, and the On-Screen language changes in the following order :
English → Francais → Español → English
natural_image
Simple directional arrows forming a zigzag pattern (no text or symbols)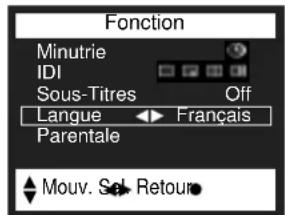
- Press this button once, and the main menu window will appear.
- Press it again, and the previous menu window returns.
Fine Tuning Channels
1. Press "MENU" button.
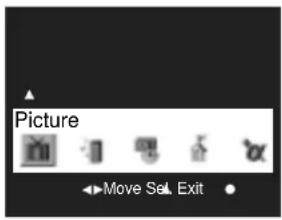
•The main menu will appear.
2. Select "Set Up".
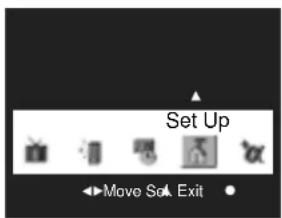
- Move the cursor to the "Set Up" menu using "VOLUME◄/►" buttons. - Press "CHANNEL▲" button to select set up, and the sub menu will appear.
3. Press "CHANNEL ▲/▼" buttons.
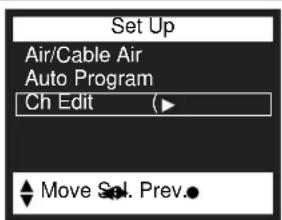
- Highlight Ch Edit(as shown).
4. Select "Fine" to fine tune.
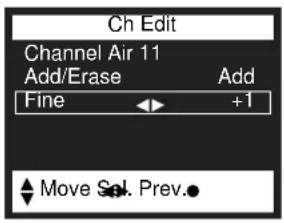
- Highlight "Fine".
- Press "VOLUME◄/►" buttons to fine the channel.
- Keep pressing "VOLUME◄/►" buttons until the channel is as clear as possible.
- To fine tune another channel, first, select the channel, then repeat the steps above. When finished, press the "Menu" button until the menus disappear from the screen.
Setting up "Caption" Function
■ "Caption" is a display of words that can substitute for the audio of the TV. This function provides a narration plus a written version of dialogue and sound effects. "Text" is not usually related to the action on-screen, often providing information such as news or weather.
1. Press "MENU" button.
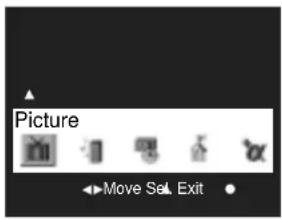
•The main menu will appear.
2. Select "Function" by using "VOLUME◀/▶" buttons.
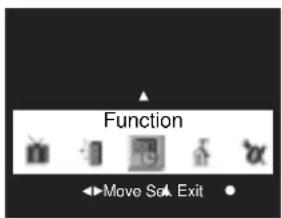
- Move the cursor to the "Function" menu using "VOLUME◄/►" buttons. - Press "CHANNEL▲" button to select function, and the sub menu will appear.
3. Press "CHANNEL ▲/▼" buttons.
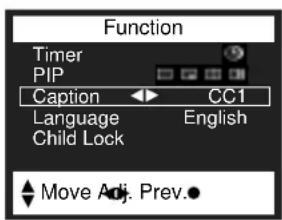
- Highlight "Caption".
4. Select an appropriate mode.
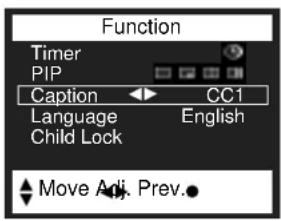
- Press "VOLUME ►" button, and the mode will change in the following order: Off → CC1 → CC2 → CC3 → CC4 → Off
5. Press "MENU" button twice.
- Press this button once, and the menu window will appear.
- Press it again, and you will get the previous status of the menu window.
Setting up "Child Lock" Function
■Users can lock channels by entering with a 4-digit password.
■When "Child Lock" is set up, the channels locked are not available on the screen.
1. Press "MENU" button.
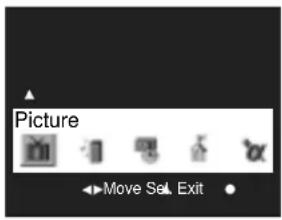
•The main menu will appear.
2. Select "Function".
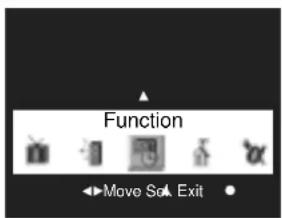
- Move the cursor to the "Function" menu using "VOLUME◄/►" buttons.
- Press "CHANNEL▲" button to select "Function", and the sub menu will appear.
3. Select "Child Lock".
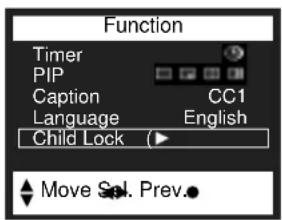
- Highlight "Child Lock".
- Press "VOLUME▶" to select.
4.Enter your password.
![Parental Control Enter The Password ### [0-9] Adjust Exit ●](/content/2026/06/1146793/images/56b59e93db6dde0e3a890347f2ac3a78bd787791a1a5ef03538ac4f19c8a4ebb.jpg)
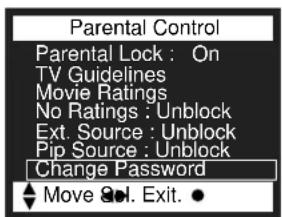
- Use the number buttons(0-9) to enter your password. Note, if this is the your time using the "Parental Control" menu, be certain to remember it, after entering your password, or keep a written copy stored as you would with any confidential info.
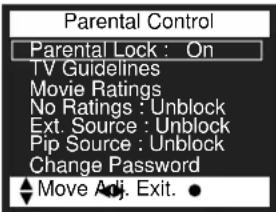
- The "Parental Lock" feature will be selected. Use the "◀VOL▶" buttons to toggle "On" or "Off".
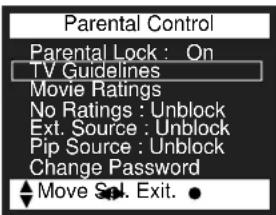
- The TV Guidelines set the standard for TV programs excluding sports and news. Use the “▲CH▼” buttons to select, “◀VOL▶” buttons to adjust. You can set individual setting with “◀VOL▶” buttons.
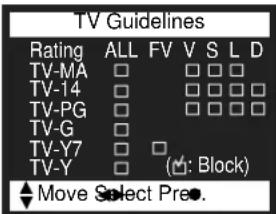
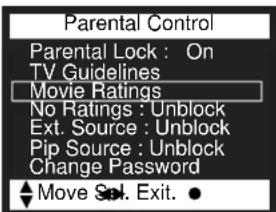
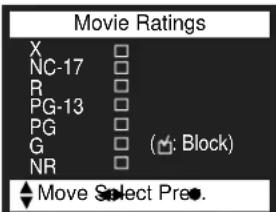
- The Move Ratings set the standard for movie, video, and other media excluding TV programs. Use the “▲CH▼” buttons to select, “◀VOL▶” buttons to adjust.
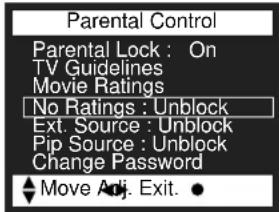
- The "No Rating" item toggles between "Unblock" and "Block".
This item determines whether or not to block the programs which are not rated by
"Movie Ratings" and "TV Guidelines".
Use "VOL◄/►" buttons to change the settings.
- The "Set Password" item lets you change the password for entering "Parental Control" item. You want to change the initial password "2211", use "VOL◄/►" buttons to enter the password input display, and use the number buttons(0-9) to enter the new password. After you have entered the new password, a confirmation display will appear. Type again the password.
![Parental Control Enter The New Password ### [0-9] Adjust Exit ●](/content/2026/06/1146793/images/f24d4e2431380681b612e273041d3a93705c9f979380a5d6433879a6ea44d5e2.jpg)
![Parental Control Repeat Password ### [0-9] Adjust Exit ●](/content/2026/06/1146793/images/fd154784fc9965ce807db60ff39b56d584b101f7746c260d4886413ea5f13ea2.jpg)
5. Press "MENU" button twice.
- Press this button once, and the menu window will appear.
Press it again, and you will get the previous status of the menu window.
Pro Logic Settings
1. Press "MENU" button.
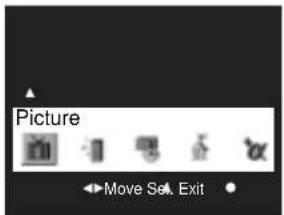
•The main menu will appear.
2. Select "Special".
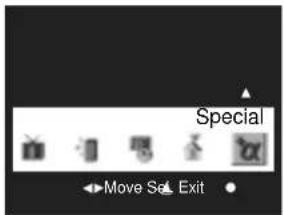
- Move the cursor to the "Special", menu using "VOLUME◄/►" buttons.
- Press "CHANNEL▲" button to select "Special", and the sub menu will appear.
3. Select "Pro Logic".
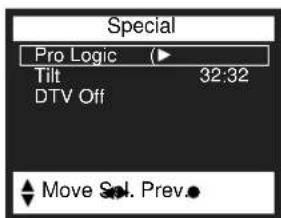
- "Pro Logic" should be highlighted.
- Press "VOLUME▶" button to select "Pro Logic".
4.Choose from the list.
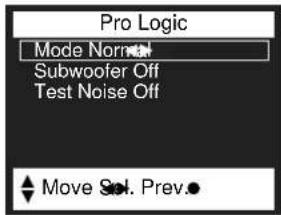
- Press "VOLUME◄/►" buttons to choose one of the "Pro Logic" modes.
NORMAL→WIDE→3 STEREO→OFF
• To adjust for a subwoofer:
Press "CHANNEL▲/▼" buttons until the blue bar indicates "Subwoofer".
"VOLUME◄/►" buttons will turn the Subwoofer on or off.
■ "Test Noise"
To hear a test tone that lets you hear the volume of your surround sound system, move the cursor to "Test Noise", and press the "VOLUME▶" button. You will hear a test tone between the left, center, right, and rear surround speakers.
When you enable the noise sequencer, it will continue in all channels until you disable it.
For the best surround quality, DAEWOO recommends that you adjust the sound equally among between all speakers. For example, the volume of the front speakers should match the volume of the rear speakers.
■ "Pro Logic" mode
Normal:
This mode is used when the Center speaker cannot easily and accurately reproduce the low frequencies. The bass from the Center channel is reproduced by the Left and Right (or Subwoofer).
This is the default mode for your HDTV Monitor.
WIDE:
This mode is used when the Center speaker is able to reproduce the low frequencies.
3 STEREO:
This mode should be selected when no Surround speakers are used. The Surround channel information will be reproduced by the Left and Right speakers.
Manufactured under license from Dolby Laboratories. "Dolby", "Pro Logic", and the double D symbol □□ are trademarks of Dolby Laboratories.
Tilt Picture
1. Press "MENU" button.
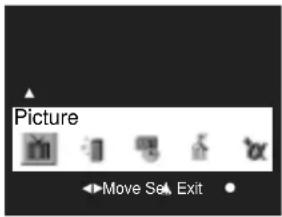
- The main menu will appear.
2. Select "Special".
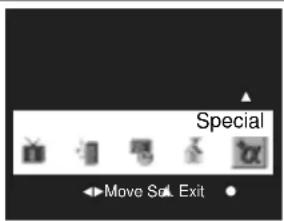
- Move the cursor to the "Special" menu using "VOLUME◄/►" buttons.
- Press "CHANNEL▲" button.
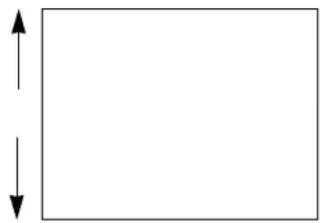
3. Select "Tilt"
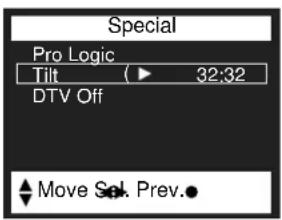
- Press "CHANNEL▲/▼" buttons to select "Tilt"
4. Adjust "Tilt" functions using "VOLUME◀/▶" buttons.
natural_image
Empty rectangular frame with two vertical arrows pointing up and down (no text or symbols)- Press "VOLUME◄/►" buttons to level a tilted picture. - Note: The effect of the earth's magnetic field can vary with location. As a result, the picture may project on a slight tilt, or out of square alignment with the face of the picture tube.
DTV Input Selection
1. Press "MENU" button.
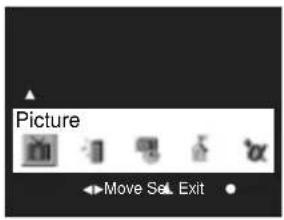
•The main menu will appear.
2. Select "Special".
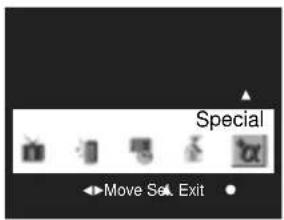
- Move the cursor to the "Special" menu using "VOLUME◄/►" buttons.
- Press "CHANNEL▲" button to select "Special", and the sub menu will appear.
3. Select "DTV".
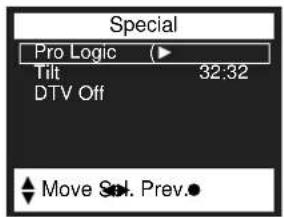
- Press "CHANNEL▲/▼" buttons until the blue bar indicates "DTV".
- "VOLUME◄/►" buttons will turn DTV input on or off.
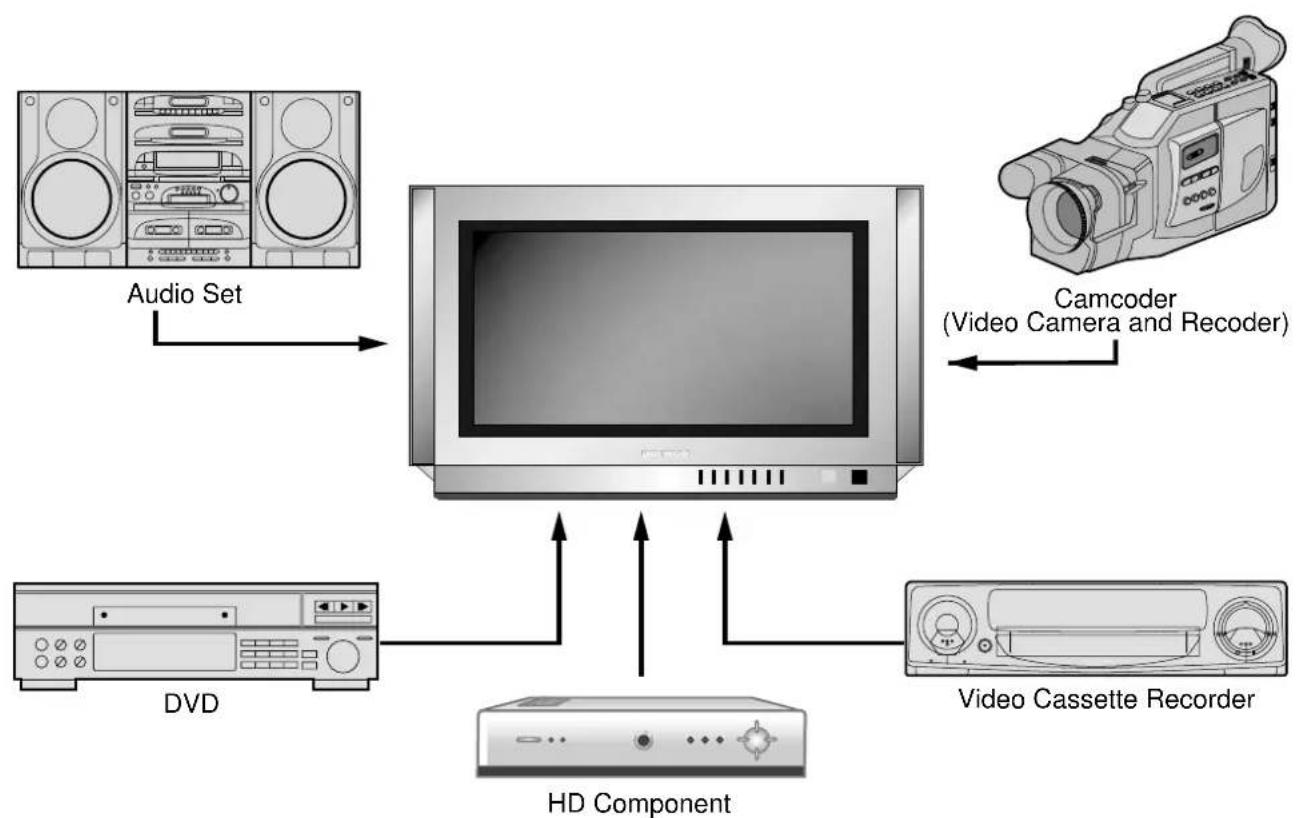
flowchart
graph TD
    A["Audio Set"] --> B["Monitor"]
    C["Camcoder (Video Camera and Recorder)"] --> B
    D["DVD"] --> B
    E["Video Cassette Recorder"] --> B
    F["HD Component"] --> B
Rear Panel Connections
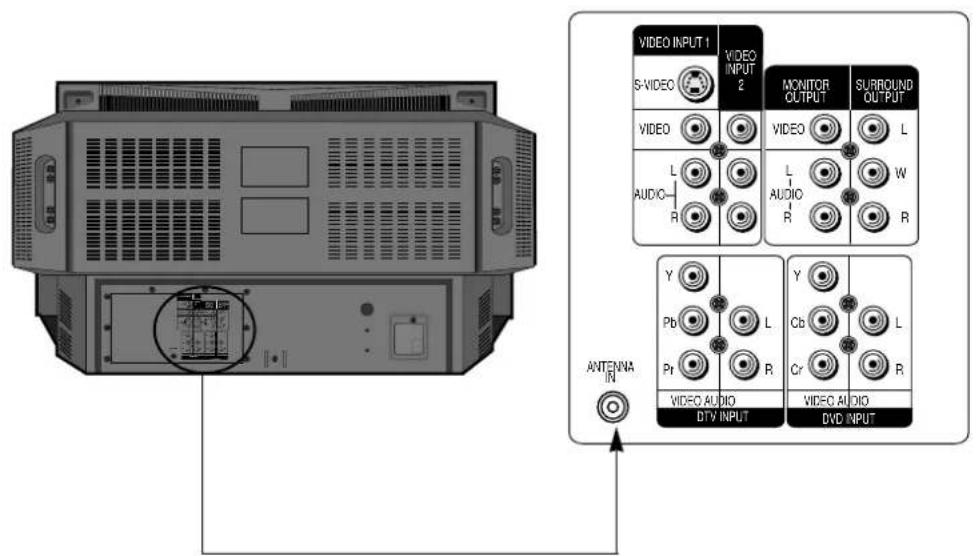
- When the HDTV monitor is in Video Mode, the monitor transmits Video Signal out.
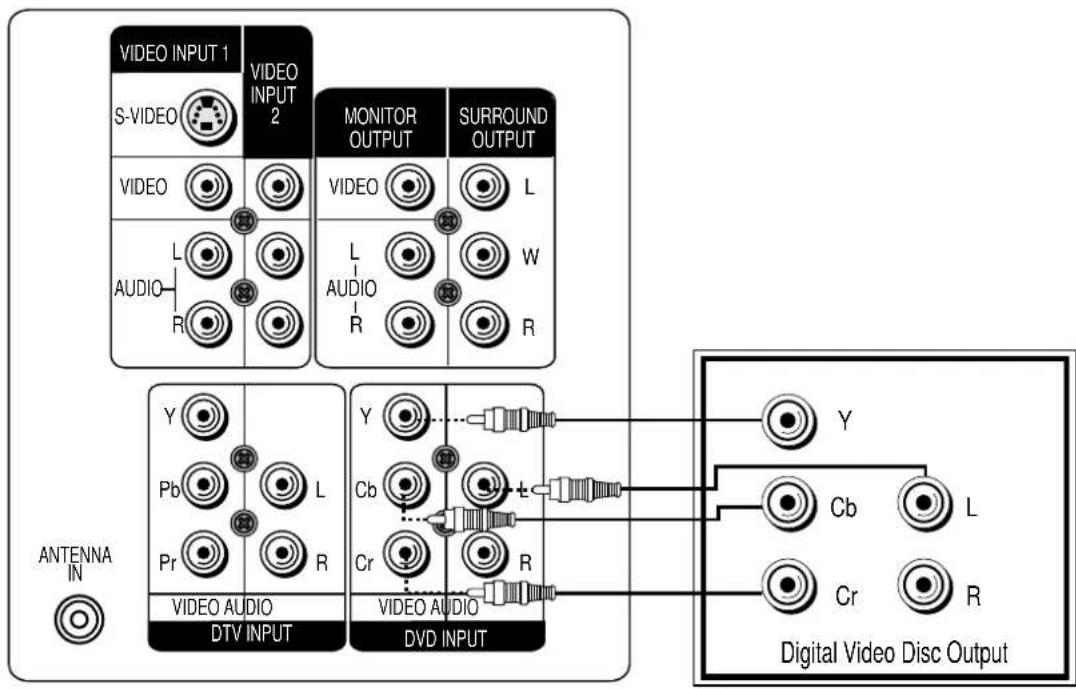
DVD
To connect a digital video disc (DVD), follow the diagram below.
flowchart
graph TD
    A["VIDEO INPUT 1"] --> B["S-VIDEO"]
    C["VIDEO INPUT 2"] --> D["MONITOR OUTPUT"]
    E["VIDEO OUTPUT"] --> F["SURROUND OUTPUT"]
    G["VIDEO OUTPUT"] --> H["MONITOR OUTPUT"]
    I["VIDEO OUTPUT"] --> J["SURROUND OUTPUT"]
    K["VIDEO OUTPUT"] --> L["MONITOR OUTPUT"]
    M["VIDEO OUTPUT"] --> N["SURROUND OUTPUT"]
    O["VIDEO OUTPUT"] --> P["MONITOR OUTPUT"]
    Q["VIDEO OUTPUT"] --> R["SURROUND OUTPUT"]
    S["VIDEO OUTPUT"] --> T["MONITOR OUTPUT"]
    U["VIDEO OUTPUT"] --> V["SURROUND OUTPUT"]
    W["VIDEO OUTPUT"] --> X["MONITOR OUTPUT"]
    Y["VIDEO OUTPUT"] --> Z["SURROUND OUTPUT"]
    AA["VIDEO OUTPUT"] --> AB["MONITOR OUTPUT"]
    AC["VIDEO OUTPUT"] --> AD["SURROUND OUTPUT"]
    AE["VIDEO OUTPUT"] --> AF["MONITOR OUTPUT"]
    AG["VIDEO OUTPUT"] --> AH["SURROUND OUTPUT"]
    AI["VIDEO OUTPUT"] --> AJ["MONITOR OUTPUT"]
    AK["VIDEO OUTPUT"] --> AL["SURROUND OUTPUT"]
    AM["VIDEO OUTPUT"] --> AN["MONITOR OUTPUT"]
    AO["VIDEO OUTPUT"] --> AP["SURROUND OUTPUT"]
    AQ["VIDEO OUTPUT"] --> AR["MONITOR OUTPUT"]
    AS["VIDEO OUTPUT"] --> AT["SURROUND OUTPUT"]
    AU["VIDEO OUTPUT"] --> AV["MONITOR OUTPUT"]
    AW["VIDEO OUTPUT"] --> AX["SURROUND OUTPUT"]
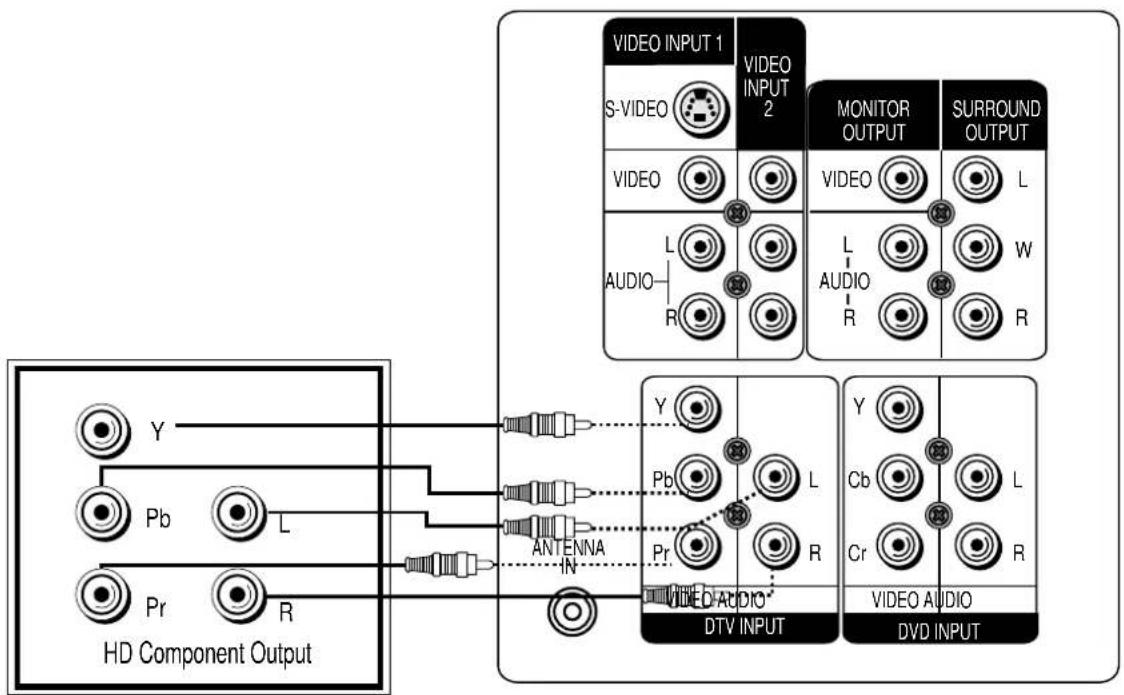
HD component
To connect a HD component, follow the diagram below.
flowchart
graph TD
    A["HD Component Output"] --> B["Y"]
    A --> C["Pb"]
    A --> D["L"]
    A --> E["Pr"]
    A --> F["R"]
    B --> G["Antenna IN"]
    C --> G
    D --> G
    E --> G
    F --> G
    G --> H["VIDEO INPUT 1"]
    G --> I["VIDEO INPUT 2"]
    G --> J["MONITOR OUTPUT"]
    G --> K["SURROUND OUTPUT"]
    H --> L["VIDEO"]
    I --> M["VIDEO"]
    J --> N["L"]
    K --> O["W"]
    L --> P["VIDEO"]
    M --> Q["VIDEO"]
    N --> R["R"]
    O --> S["R"]
    P --> T["VIDEO"]
    Q --> U["VIDEO"]
    R --> V["DTV INPUT"]
    S --> V
    T --> V
    U --> V
    V --> W["VIDEO AUDIO"]
    V --> X["DVD INPUT"]
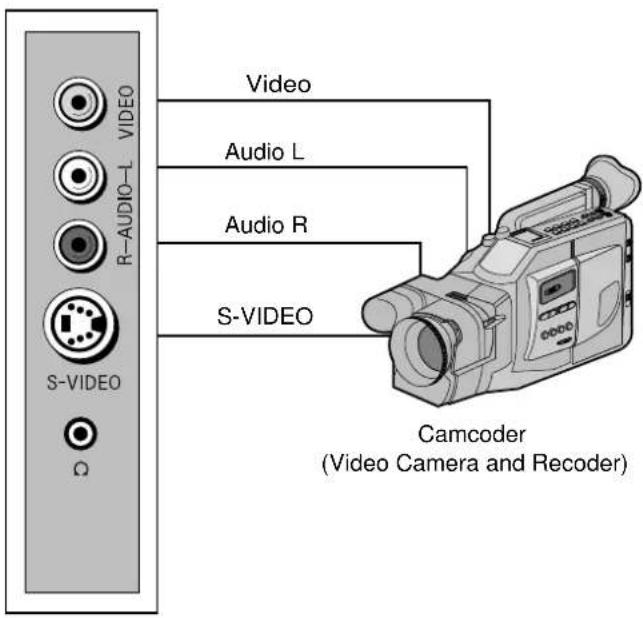
Camcorder
The Video3 inputs on the side of the HDTV Monitor make it easier to connect a camcorder. To do this, follow the diagram below.
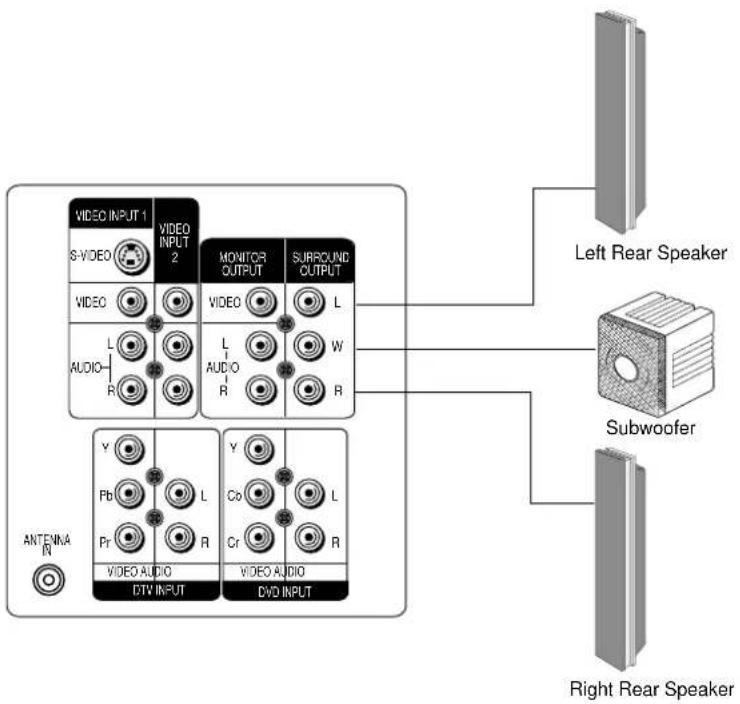
Speakers
To connect standard speakers with amplifier, follow the diagram below.
flowchart
graph TD
    A["Left Rear Speaker"] --> B["Subwoofer"]
    B --> C["Right Rear Speaker"]
    D["Video INPUT 1"] --> E["MONITOR OUTPUT"]
    D --> F["VIDEO OUTPUT"]
    G["Video INPUT 2"] --> H["MONITOR OUTPUT"]
    G --> I["VIDEO OUTPUT"]
    J["VIDEO Audio"] --> K["VIDEO AUDIO"]
    L["VIDEO Audio"] --> M["VIDEO AUDIO"]
    N["VIDEO Audio"] --> O["VIDEO AUDIO"]
    P["VIDEO Audio"] --> Q["VIDEO AUDIO"]
    R["VIDEO Audio"] --> S["VIDEO AUDIO"]
    T["VIDEO Audio"] --> U["VIDEO AUDIO"]
    V["VIDEO Audio"] --> W["VIDEO AUDIO"]
    X["VIDEO Audio"] --> Y["VIDEO AUDIO"]
    Z["VIDEO Audio"] --> AA["VIDEO AUDIO"]
    AB["ANTENMA IN"] --> AC["VIDEO AUDIO"]
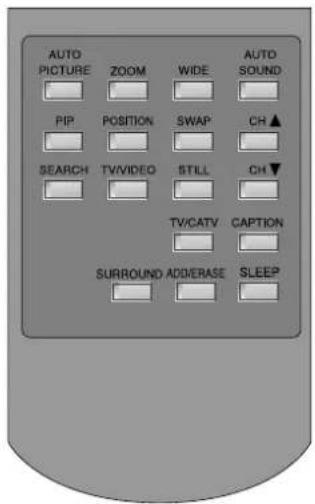
The HDTV Monitor is remote control is pre-programmed to operate your HDTV Monitor. However, you can also program the HDTV Monitor's remote control to operate other components, such as Cable TV BOX, or VCR.
- Confirm that the external component is plugged in and turned off.
- Find your component's list of code numbers from the manufacturers Code List. (Refer to Component Codes)
- Press and hold the "MODE" button (CATV, VCR) for the component you are setting up until the Mode selection button flashes.
- Enter the 3-digit component code using the remote control number buttons, (0\~9) pointing the remote control toward the component. If a correct code was entered, the component will turn on. (If the component does not turn on, repeat the step 4 using another code.)
- Press the "Mode" button, and then, LED lamp will blink three times and go out.
NOTE : Your component may not be compatible with the HDTV Monitor's remote control. If this happens, you have to use your component's own remote control to operate it.
Cable TV Box Brand Code
| ABC 004 006 007 041 POST NEWS WEEK 019 | |||
| 044 048 055 PRUCER | 094 | ||
| ANTRONIX 017 PTS 014 050 070 071 | |||
| ARCHER 008 010 017 027 095 096 | |||
| CABLE STAR 029 PULSAR 054 | |||
| CENTURION | 084 | RCA | 049 |
| CENTURY 010 | REGAL | 051 052 057 091 | |
| CITIZEN | 010 | 092 093 | |
| COLOR VOICE | 064 083 | REGENCY | 059 |
| COMBANO | 076 077 | REMBRANT | 028 |
| COMTRONICS | 022 033 | SAMSUNG | 001 033 067 |
| DIAMOND | 026 SCIENTIFIC ATLANTA | 006 014 043 044 | |
| EAGLE | 023 033 042 | 045 047 048 | |
| EASTERN | 059 061 065 SHERITECH | 025 | |
| ELECTRICORD | 035 SIGNAL | 033 | |
| G.I | 004 006 007 011 | SIGNATURE | 004 |
| 013 085 087 088 | SL MARX | 033 | |
| 089 096 | SPRUCER | 049 074 | |
| GE | 071 STARCOM | 005 007 011 012 | |
| GEMINI | 011 025 028 056 | STARGATE | 011 033 |
| GOLDEN CHANNEL | 033 SYLVANIA | 066 | |
| HAMLIN | 051 052 057 091 | TADIRAN | 033 |
| 092 093 | TANDY | 020 | |
| HITACHI | 004 057 | TELECAPATION | 024 |
| HOSPITALITY 069 073 | TEXSCAN | 032 066 | |
| JERROLD | 004 005 006 007 | TOCOM | 041 042 058 |
| 011 012 013 068 | TOSHIBA | 054 | |
| 085 087 088 089 | UNIKA | 010 017 027 | |
| 096 UNITED CABLE | 007 055 | ||
| M-NET | 039 UNIVERSAL | 008 010 017 027 | |
| MACOM | 036 | 029 030 035 038 | |
| MAGNAVOX | 013 015 063 075 | VIEWSTAR | 015 018 021 079 |
| MEMOREX 054 | 080 081 082 | ||
| MOVIE TIME | 031 035 | ZENITH | 054 060 090 |
| NSC 018 031 040 070 | |||
| 095 | |||
| OAK 019 034 039 055 | |||
| 086 | |||
| PANASONIC | 046 049 | ||
| PARAGON | 054 | ||
| PHILIPS | 009 015 016 023 | ||
| 064 078 083 | |||
| PIONEER 004 037 053 072 | |||
VCR Brand Code
| ADMIRAL | 164 |
| AIWA 033 | |
| AKAI 017 040 042 100 | 101 115 158 |
| AMPRO | 068 |
| ANAM 030 032 081 | |
| AUDIO DYNAMICS 013 | 023 037 040 |
| 166 | |
| BROKSONIC 034 036 102 | |
| CALIFORNIA AUDIO | 123 |
| CANON 027 030 032 | |
| CAPEHART 086 | |
| CRAIG 005 038 108 | |
| CURTIS MATHES 030 | 032 155 159 |
| DAEWOO 001 007 009 | 012 |
| 060 061 086 088 | |
| 090 094 095 096 | |
| DAYTRON 086 | |
| DBX 013 023 037 040 | |
| 166 | |
| DENON 124 141 144 | |
| DIMENSIA 159 | |
| DYNATECH 033 049 | |
| ELECTROHOME | 055 |
| EMERSON | 008 018 025 026 |
| 028 030 033 034 | |
| 035 036 042 079 | |
| 102 104 111 | |
| FISHER | 005 010 011 012 |
| FUNAI | 033 |
| GE | 030 032 059 068 |
| 085 087 113 116 | |
| 125 126 | |
| GO VIDEO | 105 109 |
| GOLDSTAR 013 014 020 079 | |
| 084 092 099 127 | |
| HARMAN KARDON | 013 041 |
| HITACHI | 006 033 040 059 |
| 110 119 154 159 | |
| INSTANTREPLAY 030 032 | |
| JCL | 030 032 |
| JCPENNY | 013 014 016 032 |
| 038 062 079 159 | |
| 166 | |
| JENSEN | 040 |
| JVC | 013 030 032 040 |
| 044 046 051 056 | |
| 103 119 121 128 | |
| 166 | |
| KENWOOD | 015 037 040 044 |
| 129 166 | |
| LLOYD | 033 |
| LOTTE | 130 |
| LXI | 014 015 033 079 |
| MAGIN | 038 |
| MAGNAVOX | 030 032 033 063 |
| 064 131 155 161 | |
| MARANTZ 013 030 032 | 063 |
| 065 166 | |
| MARTA | 079 |
| MATSUI | 026 029 |
| MEI | 030 032 |
| MEMOREX | 005 012 015 030 |
| 032 033 049 068 | |
| 079 107 112 | |
| MGA | 041 042 055 |
| MINOLTA | 014 020 159 |
| MITSUBISHI | 014 020 041 042 |
| 045 047 055 057 | |
| 120 145 158 | |
| MULTITECH | 024 033 163 |
| NAD | 132 |
| NEC | 013 023 037 040 |
| 044 166 | |
| NORDMENDE | 040 |
| ONKYO 137 | |
| OPTIMUS 133 | |
| OPTONICA | 049 050 |
| PANASONIC | 062 066 070 078 |
| 106 114 122 146 | |
| 147 156 160 161 | |
| PENTAX | 014 020 030 032 |
| 059 159 |
| PHILCO | 030 032 033 063 |
| PHILIPS | 030 032 033 050 |
| 063 067 079 | |
| PILOT 079 | |
| PIONEER | 014 021 044 134 |
| 142 | |
| PORTLAND 086 | |
| PROSCAN | 159 162 |
| PULSAR | 068 |
| QUARTZ | 004 015 |
| QUASAR | 032 062 071 114 |
| 161 | |
| RCA | 014 020 032 058 |
| 059 085 087 113 | |
| 114 116 140 155 | |
| 156 159 162 | |
| REALISTIC | 005 010 012 015 |
| 030 032 033 038 | |
| 049 050 079 | |
| RICO | 054 |
| RUNCO | 117 149 |
| SALORA | 015 |
| SAMSUNG | 031 038 080 082 |
| 083 085 087 090 | |
| 091 093 097 098 | |
| 101 153 163 | |
| SANSUI | 022 040 044 108 |
| SANYO | 005 009 012 015 |
| 107 135 | |
| SCOTT | 018 036 090 102 |
| 104 162 | |
| SEARS | 005 010 011 012 |
| 014 015 020 030 | |
| 039 069 076 079 | |
| SHARP | 030 050 118 143 |
| 150 164 | |
| SHINTOM | 024 |
| SIGNATURE 200 | 164 |
| SONY | 005 011 030 048 |
| 052 053 054 072 | |
| 073 074 118 136 | |
| 151 | |
| SOUNDESIGN | 033 |
▶Before Asking for Service:
TOMS
SYMP
Neither picture nor sound:
•Is power code plugged in?
INSPECT
ACTION
- Press power button on the front of TV.
- If the red power light is on, press the remote control power button. Red power light should be green.
Picture is OK, but no sound:
- Check if "Volume Down" is pressed.
- Check if the "Volume Control" is set to the minimum position.
- Adjust the volume with "Volume Up" button.
Sound is OK, but no color:
- Check if the "Color Control" is set to the minimum position.
- Check if the program on air is in color, or in black and white.
- Check if the antenna installation and its connection are OK.
- Check the antenna again.
- Check by turning on other channel programs.
• Refer to the color section again, and readjust the color.
Overlapped Picture Image:
- Check if the antenna direction is correct.
- Check if the "Fine Tuning" function is set up correctly.
- Direct the antenna toward the broadcasting station.
- Adjust the "Fine Tuning" function.



Troublesho t i n g:
SYMP TOMS
INSPECT HANDLING
Picture has "Snow":
- Check if the antenna is damaged or its connection is all right.
- Check if there is an interference from car traffic or neon signs.
- Correct the antenna faults or replace the connection cable.
Stripes on picture:
- Check if there is an interference by other electronic devices, such as radio, telephone, etc.
- Keep magnetic or electronic devices away from the set.
Bad stereo sound:
- Long distance from the station or other radio waves could cause bad sound reception.
- Shift the mode into "Mono" by using "MTS" button.
Operation disorder of Remote Control:
- Check if the batteries are low.
- Check "Remote Control Sensor" window.
• Get rid of objects blocking the TV sensor and Remote Control
-Replace batteries or check if the electrodes are fitted properly in the compartment.
General
| BROADCASTING HDTV ReadyNTSC System | |
| Sound System Dolby Pro Logic, R(8W)/L(8W)/Center(5W) | |
| Screen Size 34"(diagonal), 16:9 Aspect ratio | |
| Display Format DTV : 1080i @ 33.75KHzNTSC/DVD :480p @ 31.5KHz | |
| Power Source AC 120V 60Hz | |
| Power Consumption 210watts | |
| Dimension 41"W x 26.2"H x 24.6"D (1042x666x625mm) | |
| Weight | 178.6lbs(81Kg) |
Inputs/Outputs
| Rear | |
| RF Antenna Input | |
| NTSC A/V In (Video/L/R) 2each | |
| NTSC A/V In (S-Video/Video/L/R) 1each | |
| NTSC A/V Monitor Out (Video/L/R) 1each | |
| HD Component In (Y/Pb/Pr/L/R) 1each | |
| DVD Component In (Y/Cb/Cr/L/R) 1each | |
| Surround Channel Outputs (SL/SR) 1each | |
| Sub Woofer Output 1each | |
| Side | |
| NTSC A/V In (S-Video/Video/L/R) 1each | |
| Headphone (L/R) 1each |
Features
| 36"(34"Viewable) Real Flat Tube |
| Digital 3D Comb Filter |
| Video Noise Reduction |
| Line doubled to 480p(NTSC) |
| 2-Tuner Twin Picture (Zoom/Panorama) |
| POP(Picture out picture) |
| Velocity Modulation Scanning |
| Dynamic Focus System |
| Closed Caption Decoder |
| Auto Channel Programming |
| Parental Channel Lock Control (V-Chip) |
| Black Level Expender |
| 3 Language OSD (Eng/Fren/Span) |
- WARNING
- NOTE TO CATV SYSTEM INSTALLER
- CAUTION
- NOTE
- IMPORTANT SAFEGUARDS
- PREPARATION
- CONNECTING OTHER EQUIPMENT TO THE SET
- OTHER TIPS
- VHF/UHF OUTDOOR ANTENNAS
- In case of using single antenna cable
- In case of using two separate antenna cables
- ■Connecting Antenna and Cable TV
- Special Notes;
- Front and Side of TV set
- Remote Control
- Caution!
- ■ Installation of batteries:
- Under the Cover of Remote Control
- Note:
- PIP SEARCH
- TV/CATV
- STILL
- WIDE
- ADD/ERASE
- SLEEP
- To Watch TV Program
- To Mute the Sound Instantly
- Press the "TV POWER" button.
- Press the "CHANNEL" buttons.
- Adjust the Volume.
- Press the "TV POWER" button to turn off the TV program.
- Checking Performance Status of TV Set
- Automatic Memory of Channel
- Press "MENU" button.
- Select "Setup".
- Select Auto Program by using "CHANNEL ▲/▼" buttons.
- Press "VOLUME◄/►" buttons. Automatic Channel Memory function (Auto Program) starts.
- Check the memorized status by pressing "CHANNEL ▲/▼" buttons.
- Add or Remove Channel from Memory
- Select a channel.
- Choose to add or erase from memory.
- Watching CATV Programs
- Adjusting Screen Size
- Watching Video Programs
- Operating Two Program Windows
- Press "PIP" button once.
- Press "PIP" button once more.
- Various Functions of Simultaneous Window Mode
- Select "Funtion" button.
- Select "PIP".
- Press "VOLUME◄/►" buttons, and select the window mode you want.
- Press "MENU" button twice.
- Selecting Simultaneous Windows
- Press "PIP" button.
- Select a channel you want to watch in the auxiliary window.
- Select VIDEO mode with the auxiliary window.
- Press "PIP" button again.
- Press "PIP" button again, and the auxiliary window disappears.
- Searching Functions of Memorized Channels through 4 Windows Mode
- Press "SEARCH" button.
- Changing Location of Auxiliary Windows
- Press "POSITION" button.
- Window Mode SWAP
- Press "SWAP" button.
- This function also operates in Twin Windows mode.
- This function works in Multi-Windows mode too.
- Changing Window Modes is also Possible in Multi-Windows Search.
- Making Pause Auxiliary Windows.
- Adjustable Headphone Volume Levels
- Select "Sound" menu by using "VOLUME◀/▶" buttons.
- Press "CHANNEL ▲/▼" buttons and select "Headphone Vol."
- Accessing to "Sound" Sub-menu
- Select "Sound" menu by using "VOLUME◄/►" buttons.
- Press "CHANNEL ▲/▼" buttons.
- Press "MENU" button twice.
- Adjusting Picture Quality
- Press "AUTO PICTURE" button.
- Use this mode and get quality pictures on the screen.
- Picture Noise Reduction
- Select "Picture" by using "CHANNEL▲" button.
- Press "CHANNEL▲/▼" buttons.
- Adjusting the Picture Screen to Your Preference
- Brightness:
- Contrast:
- Sharpness:
- Color:
- Tint:
- Select "Picture" by using "CHANNEL ▲" button.
- Adjust "Tint" by using "VOLUME◄/►" buttons.
- Adjust "Brightness" by using "VOLUME◄/►" buttons
- Customizing the Audio
- "Balance"
- "Equalizer"
- Select "Equalizer" by using "CHANNEL ▲/▼" buttons.
- Select Range of Sound by using "VOLUME◄/►" buttons.
- Receiving Stereo or SAP Mode Programs
- Press "MTS" button.
- Setting up Present Time
- Select "Function" by using "VOLUME◀/▶" buttons.
- Set up the Curent Time.
- Activating/Deactivating Automatic "On" and "Off
- Select "On Time" to turn the TV set "On".
- Set up "On Timer".
- Select "Off Time" to turn TV set "On".
- Set up the "Off Timer".
- Finish Setting up Time Memory.
- Setting up "SLEEP" Time
- Control of "SLEEP" function with the Remote Control.
- Selecting the On-Screen Language
- Select "Function".
- Select the language using "VOLUME◀/▶" buttons.
- Fine Tuning Channels
- Select "Set Up".
- Select "Fine" to fine tune.
- Setting up "Caption" Function
- Select an appropriate mode.
- Setting up "Child Lock" Function
- Select "Child Lock".
- 4.Enter your password.
- Pro Logic Settings
- Select "Special".
- Select "Pro Logic".
- 4.Choose from the list.
- ■ "Test Noise"
- ■ "Pro Logic" mode
- Normal:
- WIDE:
- STEREO:
- Tilt Picture
- Select "Tilt"
- Adjust "Tilt" functions using "VOLUME◀/▶" buttons.
- DTV Input Selection
- Select "DTV".
- DVD
- HD component
- Camcorder
- Speakers
- ▶Before Asking for Service:
- Neither picture nor sound:
- Picture is OK, but no sound:
- Sound is OK, but no color:
- Overlapped Picture Image:
- Troublesho t i n g:
- Picture has "Snow":
- Stripes on picture:
- Bad stereo sound:
- Operation disorder of Remote Control:
Brand : DAEWOO
Model : DSC-34W70N
Category : Television