StreetPilot 2620 - Gps GARMIN - Free user manual and instructions
Find the device manual for free StreetPilot 2620 GARMIN in PDF.

User questions about StreetPilot 2620 GARMIN
0 question about this device. Answer the ones you know or ask your own.
Ask a new question about this device
Download the instructions for your Gps in PDF format for free! Find your manual StreetPilot 2620 - GARMIN and take your electronic device back in hand. On this page are published all the documents necessary for the use of your device. StreetPilot 2620 by GARMIN.
USER MANUAL StreetPilot 2620 GARMIN
portable car navigation owner's manual
text_image
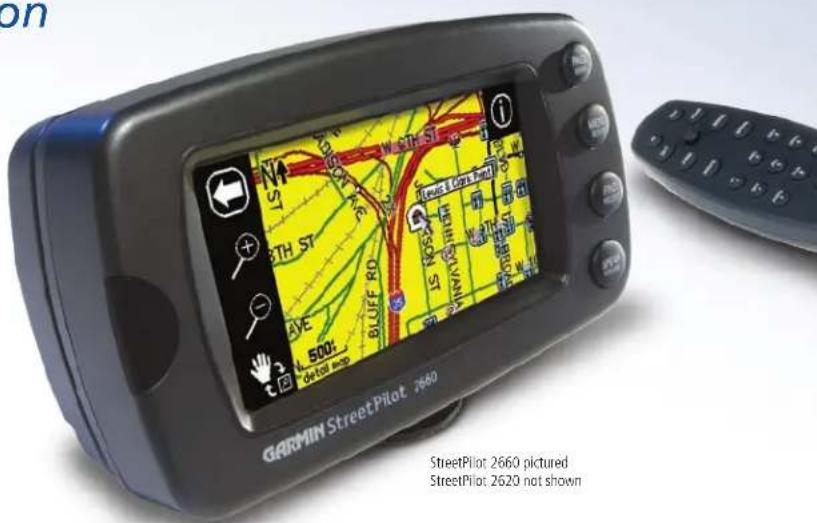
on GARMIN StreetPilot 7660 StreetPilot 2660 pictured StreetPilot: 2620 not shownStreetPilot 2660 pictured StreetPilot 2620 not shown
© Copyright 2004, 2005 Garmin Ltd. or its subsidiaries
Garmin International, Inc.
1200 East 151 ^st Street, Olathe, Kansas 66062, U.S.A.
Tel. 913/397.8200 or 800/800.1020
Fax 913/397.8282
Garmin (Europe) Ltd.
Unit 5, The Quadrangle, Abbey Park Industrial Estate, Romsey, SO51 9DL, U.K.
Tel. 44/1794.519944
Fax 44/1794.519222
Garmin Corporation
No. 68, Jangshu 2 ^nd Road, Shijr, Taipei County, Taiwan
Tel. 886/2.2642.9199
Fax 886/2.2642.9099
All rights reserved. Except as expressly provided herein, no part of this manual may be reproduced, copied, transmitted, disseminated, downloaded or stored in any storage medium, for any purpose without the express prior written consent of Garmin. Garmin hereby grants permission to download a single copy of this manual and of any revision to this manual onto a hard drive or other electronic storage medium to be viewed and to print one copy of this manual or of any revision hereto, provided that such electronic or printed copy of this manual must contain the complete text of this copyright notice and provided further that any unauthorized commercial distribution of this manual or any revision hereto is strictly prohibited.
Information in this document is subject to change without notice. Garmin reserves the right to change or improve its products and to make changes in the content without obligation to notify any person or organization of such changes or improvements.
Visit the Garmin Web site (www.garmin.com) for current updates and supplemental information concerning the use and operation of this and other Garmin products. Garmin ^® , AutoLocate ^® , and StreetPilot ^® are registered trademarks of Garmin Ltd. or its subsidiaries and may not be used without the express permission of Garmin.
Preface
Congratulations on choosing one of the most advanced GPS navigation systems available! The Garmin StreetPilot 2620/2660 utilizes the proven performance of Garmin GPS and full-featured mapping to create an unsurpassed mobile navigation system.
This manual covers instructions for the StreetPilot 2620 and Street Pilot 2660. Unit operation and specifications are the same on both models, unless otherwise specified. To get the most out of your new navigation system, take the time to go through this owner's manual and learn the operating procedures for your unit. This manual is arranged to teach you how to use, customize, and care for your StreetPilot.
- Introduction: The introductory material contains a wealth of information that shows you how to operate, clean, and store your StreetPilot. If you have never operated a StreetPilot or any type of GPS navigation unit, try the "Tutorial" on page iv.
- Reference: The reference material begins with introductory mapping basics and then moves toward learning how to find places and create routes with your StreetPilot. Learn what the Map page looks like as you are navigating a route or if you are just moving around the Map page for fun. After you learn the basics, read the sections on customizing your StreetPilot to suit your navigational and personal needs. Lastly, learn the basics of GPS navigation as well as how to understand the features on the StreetPilot's GPS Information Page.
- Appendix: Read the special sections on vehicle installation as well as other important information. Read the Safety and Regulatory section to learn how to use your StreetPilot responsibly.
- Index: Use the handy Index as a key word search to help you find information more quickly.
Customer Service Product Registration
Help us better support you by completing our online registration today! Have the serial number of your StreetPilot 2620/2660 handy and connect to our Web site (www.garmin.com). Look for the Product Registration link on the Home page. Also, be sure to record your serial number in the right-hand column for a quick reference.
Introduction
Product Registration
Serial Number
Use this area to record the serial number (8-digit number located on the bottom of the unit) in case it is lost, stolen, or needs service. Be sure to keep your original sales receipt in a safe place or attach a photocopy inside the manual.
Serial Number:


The Garmin StreetPilot 2620/2660 has no user-service able parts. Should you ever encounter a problem with your unit, please take it to an authorized Garmin dealer for repairs.
The StreetPilot 2620/2660 is fastened shut with screws. Any attempt to open the case to change or modify the unit in any way voids your warranty and may result in permanent damage to the equipment.
IntroductionIntroducti
Packing List
Before installing and getting started with your unit, please check to see that your package includes the following items. If any parts are missing, please contact your Garmin dealer immediately.
Packing List
Standard Package:
• StreetPilot 2620 or 2660
- Dash Mount
- Portable Bean Bag Mount (Friction Mount)
• External Speaker with 12/24-volt Adapter Cable (vehicle adapter)
• A/C Power Adapter
• PC/USB Interface Cable
• DR (Dead Reckoning) Installation Cable (2660 Only)
- Owner's Manual
- Quick Reference Guide
- Alphanumeric Remote Control (Requires two alkaline AAA batteries; not included)
Optional Accessories:
- Remote GPS Antenna (GA 27C) and antenna mounts
- Deluxe Carrying Case
View our Web site at www.garmin.com for a complete list of StreetPilot 2620/2660 accessories.
Preface ....i
Customer Service Product Registration ....i
Packing List ...... ii
TABLE OF CONTENTS ...... III
GETTING STARTED: A TUTORIAL ....iv
Manual Conventions ......vi
INTRODUCING THE STREETPILOT 2620/2660 .....1
Front and Rear View of the StreetPilot ....1
Caring for your StreetPilot 2
Turning the StreetPilot On and Off ....3
Using the Keypad 3
Using the Touchscreen 4
Calibrating the Touchscreen 4
Using the Remote Control 4
Adjusting the Speaker Volume 5
LEARNING HOW TO USE THE MAP PAGE ....6
Viewing the Map Page for the First Time 6
Using the Map Page Features 7
Viewing the Map Page While Driving .....12
DRIVING WITH DEAD RECKONING (2660 ONLY) .....18
FINDING PLACES ....19
Finding a City 19
Finding an Address or Intersection 21
Finding an Exit 23
Finding a Waypoint 24
Advanced Find Features 25
Planning a Trip 26
Finding "Recently-Found" Places 27
CREATING YOUR OWN ROUTES 28
Creating your First Route 29
Setting a HOME Waypoint 30
Saving a Route 32
Deleting or Renaming a Saved Route ....32
Modifying a Route 33
Measuring Distances Between Two Places ....36
CUSTOMIZING YOUR STREETPILOT 2620/2660 .....38
Adjusting the Backlight and Contrast ....38
Turning off Satellite Reception for Indoor Use .....38
Customizing your Map Page 39
Hiding/Showing Data Tabs on your Map Page .....41
Customizing the Overall Setup of Your StreetPilot 44
Obtaining the latest Software Upgrades .....55
UNDERSTANDING THE GPS INFORMATION PAGE ....56
What is GPS? 56
The GPS Information Page 56
IntroductionIntroduction
Table of Contents
APPENDIX A: VEHICLE INSTALLATION ....61
APPENDIX B: DR CABLE WIRING (2660 ONLY) .....65
APPENDIX C: USING DIACRITICAL MARKS ......66
APPENDIX D: ADDING MAPS TO YOUR STREETPILOT.68
APPENDIX E:MESSAGES 71
APPENDIX F: SPECIFICATIONS ....73
APPENDIX G: SAFETY AND REGULATORY INFORMATION .....75
Limited Warranty 79
INDEX 80
Introduction
Where to find it
• To learn how to attach your vehicle adapter to your StreetPilot, see page 64.
- Learn how to create and customize routes, beginning on page 28.
- Learn more about GPS navigation beginning on page 56.

• To find a city, address, intersection, park, or other point of interest, see Finding Places, beginning on page 19.
• To learn how to use the keypad on your StreetPilot as well as the remote control unit, see page 4.
• To change the street detail level on your StreetPilot, see page 39 (map detail).
- If you do not want your StreetPilot to automatically switch to "night" colors at sunset, see page 39 (color mode).
- Learn about the Map page and its many features, beginning on page 6.
GETTING STARTED: A Tutorial
The tutorial below guides you through the steps for finding a restaurant in your area and then creating a route to it. If you have never used a StreetPilot or a GPS navigation unit before, try this simple task. You'll see that using your StreetPilot is fast and easy.
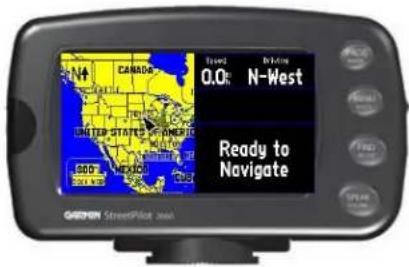
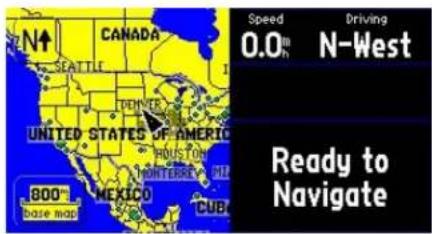
Step 1: If you have not already done so, attach the vehicle adaptor to your StreetPilot and plug it in to your vehicle's cigarette lighter. Turn on the StreetPilot so that it can find satellites. When your StreetPilot has established a satellite fix, your screen should display a "Ready to Navigate" message, as shown
Note: Make certain your StreetPilot's view is unobstructed as it looks for satellites. For example, it cannot establish a satellite fix if your vehicle is parked in a garage.
text_image
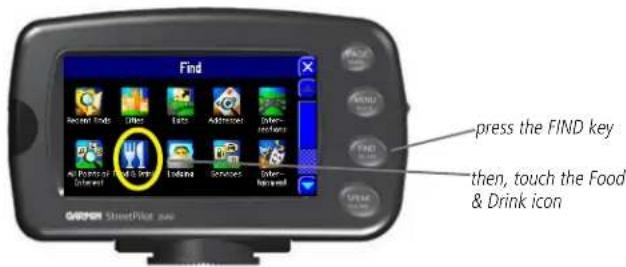
N CANADA 0.0° N-West UNITED STATES OF AMERICA 600 MEXICO 2014 2015 Ready to Navigate GEPEN StreetPilot 2009Step 2: Press the FIND key on the StreetPilot. The Find menu will appear:
text_image
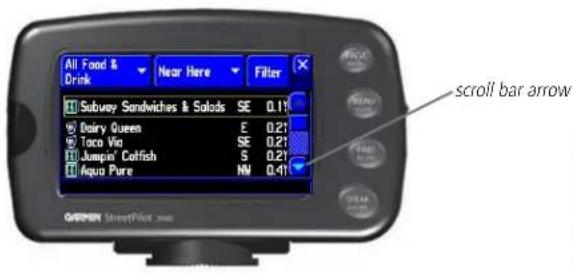
Find Press the FIND key then, touch the Food & Drink iconStep 3: Touch the Food & Drink icon located on the Find menu (from Step 2). The list of restaurants in your area will appear on a page similar to the one shown below:
text_image
All Food & Drink Near Here Filter Subway Sandwiches & Salads SE 0.1% Dairy Queen E 0.21 Taco Via SE 0.21 Jumpin' Catfish S 0.21 Aqua Pure NN 0.41 scroll bar arrow GREEN StreetPilot 200Step 4: Scroll down the list of restaurants by tapping the down arrow on the scroll bar, shown above. When you see a restaurant you like, touch its name. Information about the restaurant will appear on a Food/Drink page similar to the one shown below:
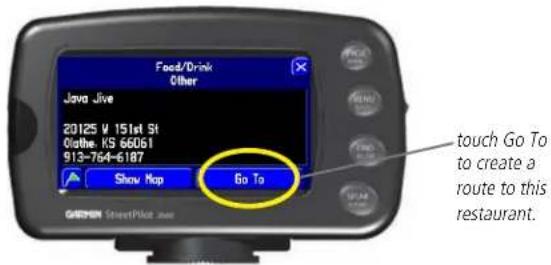
text_image
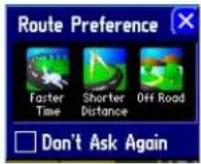
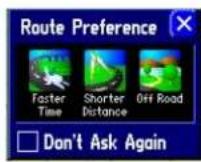
Food/Drink Other Java Jive 20125 V 151st St Olathe KS 66061 913-764-6187 Show Map Go To touch Go To to create a route to this restaurant.Step 5: To create a route to this restaurant, touch the Go To button located at the bottom of the Food/Drink page. A Route Preference window will appear. Touch the Faster Time icon:

text_image
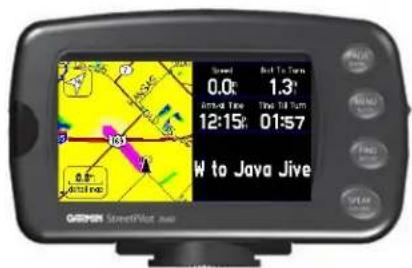
IntroductionStep 6: View your route to the restaurant:
text_image
Speed 0.0' 1.3' Arrival Time Time 10 Tums 12:15' 01:57' W to Java Jive OFFICE Street/Post.exeWhat's Next?
Read the manual to learn how to use your StreetPilot accurately, efficiently, and responsibly.

Introduction
USING THE STREETPILOT IN SIMULATOR MODE

text_image
Do you want to simulate driving this route? Yes No Restart when finishedThoroughly familiarize yourself with the routing features of the StreetPilot by practicing creating routes in simulator mode.
Simulator mode only works when the GPS navigation is turned off. To do this, press the MENU key on the StreetPilot. When the Menu page appears, select the 'Use Indoors' icon. GPS will be turned off. Now, when you create a route, the unit asks if you want to simulate driving the route. Select Yes, and the StreetPilot gives driving instructions for the entire route.
Manual Conventions
- This manual refers to the StreetPilot as a "StreetPilot," "unit," or "GPS receiver." It makes no distinction between these terms. "StreetPilot" refers to both the 2620 and 2660 models unless specifically stated.
- This manual uses the term "Map page" when referring to pages that have maps. In all other instances, the terms "page," "screen," and "window" are used interchangeably.
- This manual uses the words "button" and "key" interchangeably.
- This manual uses the term "press" when you need to activate the keys on the StreetPilot or on the remote control.
- Although you can either touch the screen to activate commands or use the remote control, most instructions in this manual assume that you are using the touchscreen.
- This manual uses "touch" and "select" interchangeably. When asked to touch or select an icon or tab, simply tap the icon or tab with your finger. Or, press in on the thumb stick that is located on your remote control. Practice using the remote control unit to improve your accuracy when activating commands. See page 4 to learn how to use it.
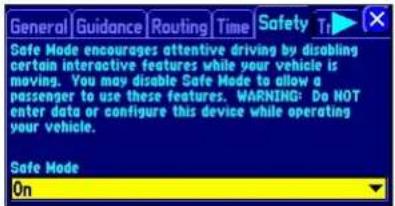
OPERATE YOUR STREETPILOT IN "SAFE MODE" WHILE DRIVING
text_image
General Guidance Routing Time Safety T Safe Mode encourages attentive driving by disabling certain interactive features while your vehicle is moving. You may disable Safe Mode to allow a passenger to use these features. WARNING: Do NOT enter data or configure this device while operating your vehicle. Safe Mode OnYour StreetPilot is equipped with a 'Safe Mode' feature to improve driver safety. By default, this feature is enabled, but it can be turned off to allow a passenger to operate the unit. When your vehicle is moving, Safe Mode disables certain StreetPilot functions which require significant operator attention and may become a distraction to use while driving.

NOTE: If you have previously registered a Garmin product purchase, we invite you to re-register using our online system. Many services provided by our new product registration system are now being automated and re-registering your purchase ensures you the best possible support from Garmin.
Front and Rear View of the StreetPilot
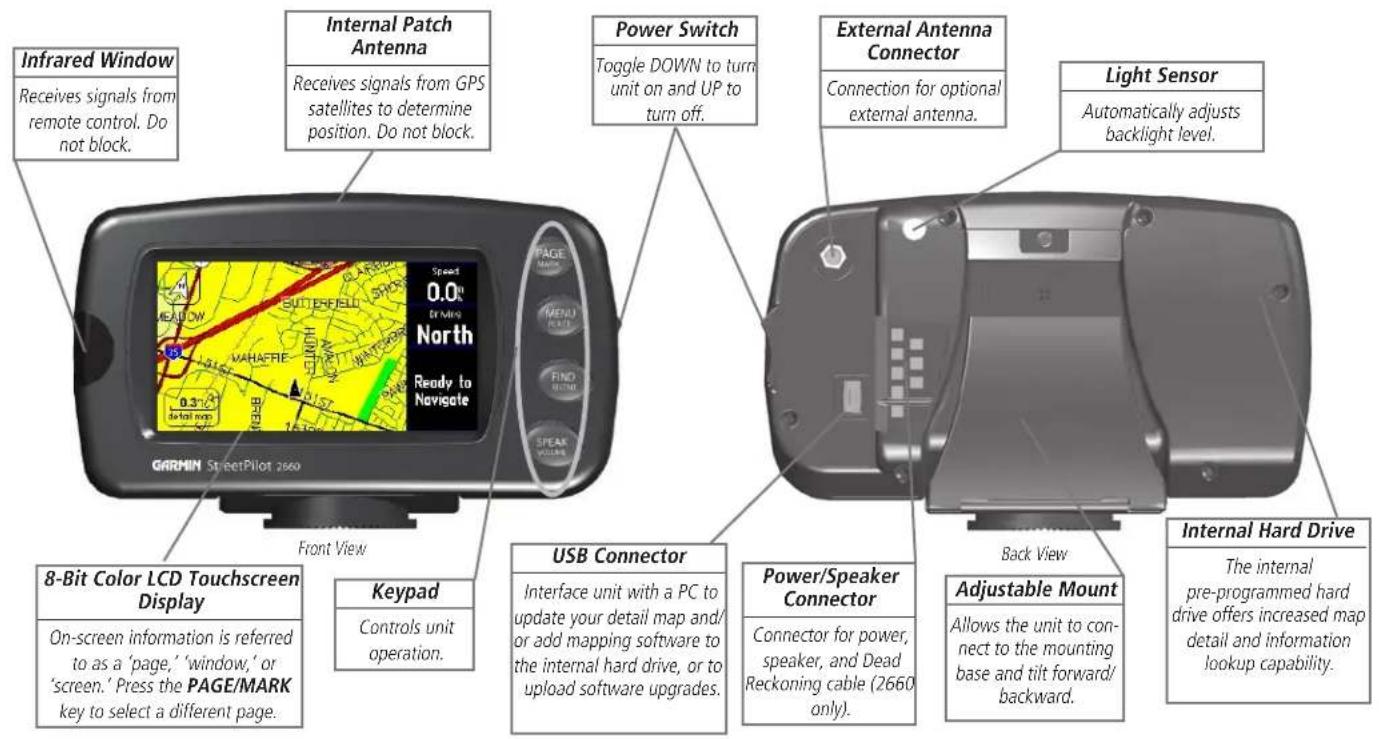
text_image
Infrared Window Receives signals from remote control. Do not block. Internal Patch Antenna Receives signals from GPS satellites to determine position. Do not block. Power Switch Toggle DOWN to turn unit on and UP to turn off. External Antenna Connector Connection for optional external antenna. Light Sensor Automatically adjusts backlight level. 8-Bit Color LCD Touchscreen Display On-screen information is referred to as a 'page,' 'window,' or 'screen.' Press the PAGE/MARK key to select a different page. Front View Keypad Controls unit operation. USB Connector Interface unit with a PC to update your detail map and/or add mapping software to the internal hard drive, or to upload software upgrades. Power/Speaker Connector Connector for power, speaker, and Dead Reckoning cable (2660 only). Back View Adjustable Mount Allows the unit to connect to the mounting base and tilt forward/backward. Internal Hard Drive The internal pre-programmed hard drive offers increased map detail and information lookup capability.Introduction
Maintenance
Caring for your StreetPilot
Cleaning the Case and Remote Control
The StreetPilot 2620/2660 case and remote are constructed of high quality materials and do not require user maintenance other than cleaning. Clean the unit's outer casing (except for the touchscreen) using a cloth dampened with a mild detergent solution and then wipe dry. Avoid chemical cleaners and solvents that may damage plastic components.
Cleaning the Touchscreen
The StreetPilot 2620/2660 touchscreen is intended primarily for finger operation. Although a PDA stylus may also be used to operate touchscreen, never attempt this while operating a vehicle. Never use a hard or sharp object to operate the touchscreen or damage may result. The touchscreen should be cleaned using a soft, clean, lint-free cloth. Water, isopropyl alcohol, or eyeglass cleaner can be used if needed. If these are used, apply the liquid to the cloth and then gently wipe the touchscreen with the moistened cloth.
Storage
Do not store the StreetPilot 2620/2660 where prolonged exposure to temperature extremes may occur (such as in the trunk of a car) as permanent damage may result.
Storing alkaline batteries in the remote control for extended periods is not recommended. In order to reduce the chance for battery leakage in the battery compartment, remove the batteries when storing the remote control for more than six months.
Caring for the Pre-Programmed Hard Drive
Your StreetPilot 2620/2660 comes with an internal pre-programmed hard drive. As with any hard drive, excessive shock and vibration may cause permanent damage. To minimize the risk of damage to your hard drive, avoid dropping your unit or operating it in high shock/vibration environments.
Turning the StreetPilot On and Off
Toggle the power switch on the right side down to turn the unit ON and up to turn it OFF. When turned on, the Welcome screen appears briefly, followed by the Map Information and Copyright page. Touch OK on the screen to acknowledge, or wait briefly until the Safe Driving Warning Message page appears. Touch OK once more or wait until the Map page appears.
Using the Keypad
Use the StreetPilot's keypad to select specific tasks such as finding places or creating routes. Each keypad button's primary function appears in larger text above the secondary function. Always press and release a key to perform its primary function. Press and hold a key to activate its secondary function (if available). For example, if you press the MENU/ROUTE key, a Menu page will appear. If you press and hold the MENU/ROUTE key for more than two seconds, a Routes page will appear.
- PAGE/MARK Key — PAGE switches between a variety of pages that you can view on your StreetPilot. It also returns you to a main page if you have previously selected an option window. Thus, if you want to exit out of a current page option, press PAGE. MARK captures your present position and saves it as a waypoint.
- MENU/ROUTE Key — MENU displays a menu of options for your current page. It also displays sub-menu options. ROUTE displays a menu of available route navigation features.
- FIND/RECENT Key — FIND allows you to search for cities, hotels, restaurants, banks, and a host of other places. RECENT allows you to view a list of places you have recently found.
- SPEAK/VOLUME Key — SPEAK triggers your StreetPilot's "voice" to repeat the next turn or current destination while you are navigating a route. VOLUME displays an adjustment slide on the page to change the speaker volume.
Introduction
Keypad Usage

Activate the primary functions (PAGE, MENU, FIND, SPEAK) by pressing the key once.

Activate the secondary functions (MARK, ROUTE, RECENT, VOLUME) by pressing and holding down the key.


Introduction
Remote Usage
text_image
IN OUT ZOOM QUIT PAGE FIND MENU ROUTE SPEAK 1 ABO 2 DEF 3 GHI 4 JKL 5 MINO 6 PGRS 7 TUV 8 WXYZ 9 0thumb stick
To disable the remote (the IR port), press MENU and select 'Options.' Select the 'General' tab and press the MENU key. Select 'Disable Remote.'
To enable the remote again, press MENU and select 'Options.' Select the 'General' tab and press the MENU key. Select 'Enable Remote.'
Using the Touchscreen
The StreetPilot 2620/2660's touchscreen features allow you to make menu selections, position the map pointer, scroll through menu selections, and enter data with the touch of your finger.
To use the touchscreen control, touch the desired object on the screen with your finger, applying just enough pressure to activate the function. It is not necessary to apply excessive pressure to the touchscreen. If the Touchscreen Tone setting is set to ON, you will hear a click from the speaker with every finger press. If you sense that the touchscreen is not responding properly, it may need to be calibrated.
Calibrating the Touchscreen
To calibrate the touchscreen:
- Press the remote or unit MENU key. Select 'Display.'
- Press the remote or unit FIND key to begin calibration. Follow the on-screen instructions.
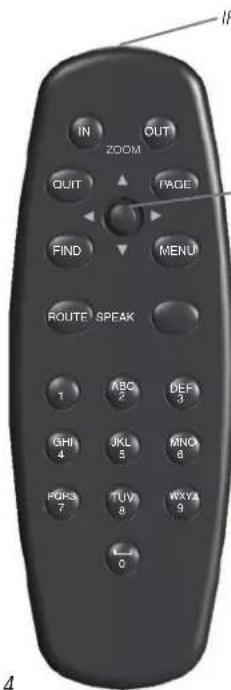
Using the Remote Control
The StreetPilot 2620/2660's alphanumeric remote control allows you to perform functions similar to the unit's keypad controls. You will notice only subtle differences between the two. As on the keypad, the remote control features PAGE, MENU, FIND, and SPEAK keys. Thus, you can use them the same way you use the keypad. Similarly, press and hold each key in order to use each key's secondary function (MARK, ROUTE, RECENT, and VOLUME).
The remote differs from the keypad in that it has additional function keys that allow you to quickly enter data and perform other operations on the unit:
• (ZOOM) IN Key — Zooms in to adjust the Map page scale to show a smaller area with more detail.
• (ZOOM) OUT Key — Zooms out to adjust the Map page scale to show a larger area with less detail.
- QUIT Key — Returns the display to your previous page (much like the "Back" button on an Internet browser window). Also, when you are entering data, pressing QUIT restores the previous value (cancels data entry).
- ROUTE Key—Displays a menu of available route navigation features.
- THUMB STICK — Selects menu options, changes settings, and enters data. Also it controls movement of the map pointer on the Map page. Press in (or down) on the thumb stick to select or activate a highlighted item or to begin data entry. Move the thumb stick from side to side for moving around the Map page. Use this feature as an alternative to using your finger on the touchscreen. Practice using it to increase your accuracy.
- ALPHANUMERIC KEYS — Used when you wish to enter numbers for values such as an address or waypoint name. These keys can be used in conjunction with the thumb stick. For letters, press the appropriate number key as many times as necessary to get to the correct letter. The number will appear after the last letter option has been shown. For example, if you wish to input the letter B, press the number 2 key twice. If you wish to input the number 2, press the number 2 key four times. When you have selected the correct letter or number, pause, and the unit will automatically advance the cursor to the next character. Note that the 1 key only accepts one press and SPACE/0 only accepts two key presses.
In order for the remote to operate properly, be sure to point the IR (infrared) window on the remote towards the unobstructed IR window on the left front of the StreetPilot.
Adjusting the Speaker Volume
To adjust the external speaker volume:
- Press and hold the SPEAK/VOLUME key. A speaker volume adjustment page appears.
- Adjust the speaker volume by moving the slider's thumb up or down with either your finger (on the touchscreen) or by pressing the thumb stick up or down once the scroll box appears. The loudest setting is ten; the softest setting is one. Each press activates the audio number. All the way down turns off the speaker. (Alternatively, volume can be cycled between three settings by repeatedly pressing the SPEAK/VOLUME key from this screen. The three settings are volume off, user setting, and maximum volume.)
- When finished, touch the X on the touchscreen or press in once on the thumb stick.
IntroductionIntroduction
Installing the Remote Control Batteries

The remote control requires two AAA alkaline batteries. To install the batteries, press up on the battery door clip, then pull the battery door away from the remote. Install the batteries, observing the correct polarity (see the inside compartment). Replace the cover.
Adjusting the Volume
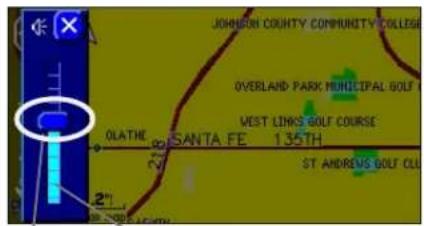
text_image
JOHNSON COUNTY COMMUNITY COLLEGE OVERLAND PARK MUNICIPAL GOLF WEST LINKS GOLF COURSE OLATHE SANTA FE 135TH ST ANDREUS GOLF CL 2" 2"slider thumb
speaker volume
slider
Reference
Using the Map Page
USING YOUR STREETPILOT INDOORS

Your StreetPilot unit cannot acquire satellites from inside a building. Thus, you may want to consider setting your unit to 'Use Indoor' status. To do this, press the MENU key on your unit. You will see a Menu page that includes a variety of setup options. Select the Use Indoors icon.

Learning how to use the Map Page
The Map page is your StreetPilot's main operating page. This page is the first image you see after the startup screens, and it's what you view as you navigate to a destination. Many features make up the Map page. Whether you're navigating a route or simply driving with your StreetPilot turned on, you will see a map that displays your current location as well as surrounding street detail. Additionally, depending on your current driving mode, tabs that appear on the Map page will provide such information as your current speed, your driving direction, and names of upcoming streets. You can look beyond your current position by "panning," or moving around the Map page. You can also zoom into locations to view greater street detail or you can zoom out to see what's ahead on your route.
This section shows the many types of Map page views as well as how to use the features on the Map page. Practice using these features before navigating an actual route so that you can quickly understand what you are seeing on the Map page and thus limit time looking away from the road while driving.
Viewing the Map Page for the First Time
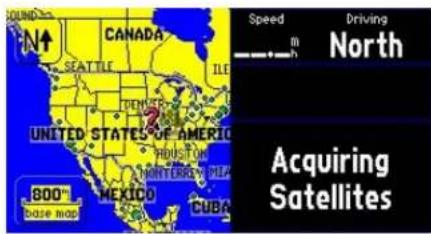
When you turn on your StreetPilot for the first time, you see a map image as well as a tab which shows that the StreetPilot is attempting to locate satellites. Once your StreetPilot locates the satellites, it establishes a "fix" on your location. It is then ready to navigate and you are ready to begin.
text_image
SOUND N↑ CANADA SEATTLE ILL UNITED STATES OF AMERICA HOLIDATE NORTUNESE ATL 800° BASE MAP MEXICO CUBA Speed m Driving North Acquiring SatellitesWhen you turn on your StreetPilot, it searches for satellites.
text_image
N↑ CANADA 0.0m Driving N-West UNITED STATES OF AMERICA HOUSTON MINNESOTA 800° MEKICO CUBA Ready to Navigate base mapOnce the satellites have been acquired, your StreetPilot is ready to navigate.
text_image
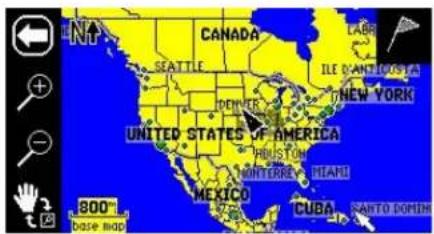
NT CANADA LABS SEA TLE ILE CANTICOSTA DENVER NEW YORK UNITED STATES OF AMERICA PHOUSTON MINISTERE HEAVI MEXICO CUBA PANTO DOMING 800 base mapTouch the screen anywhere with your finger and move it around to view a variety of locations on your StreetPilot.
Using the Map Page Features
The Map page comes with many useful features that can help you as you view cities or places, and as you navigate routes. If you are a new StreetPilot owner, practice using these features while your vehicle is stationary.
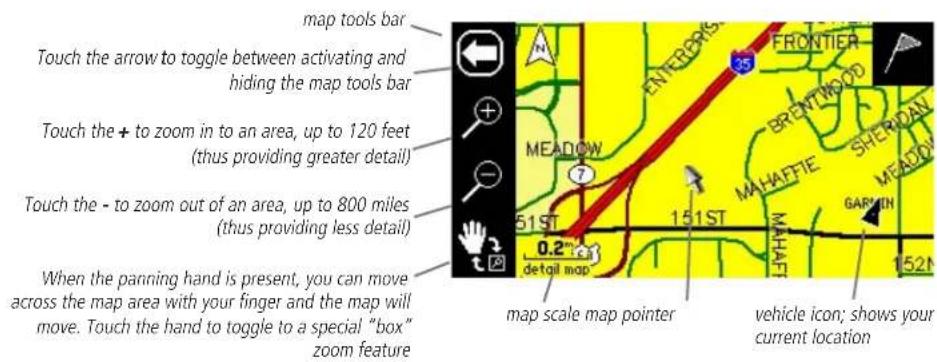
Map Tools Bar
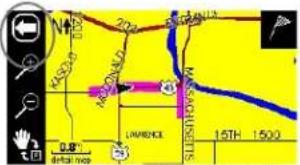
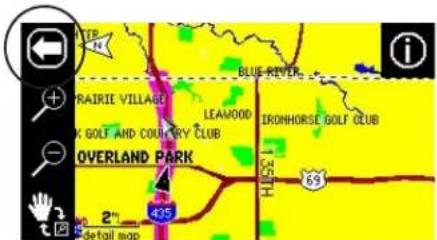
The StreetPilot comes with a "map tools" bar, which is a series of icons on the left-hand side of the Map page that enable you to zoom in to and out of the current areas shown on your Map page. To activate the map tools bar, simply touch any part of the Map page and the map tools bar will appear:
text_image
map tools bar Touch the arrow to toggle between activating and hiding the map tools bar Touch the + to zoom in to an area, up to 120 feet (thus providing greater detail) Touch the - to zoom out of an area, up to 800 miles (thus providing less detail) When the panning hand is present, you can move across the map area with your finger and the map will move. Touch the hand to toggle to a special "box" zoom feature Map scale map pointer vehicle icon; shows your current locationThe white arrow at the top of the map tools bar allows you to toggle between activating and hiding the map tools bar. The zoom icons feature a "+" magnifying glass that allows you to zoom in to an area on your Map page, and a "-" magnifying glass that lets you zoom out of an area. The panning hand allows you to move around the Map page by touching the screen (touchscreen) with your finger; this action is called "panning." Panning allows you to "move" the viewing area on the Map page in order to view areas beyond the
Reference
Using the Remote or the Touchscreen
text_image
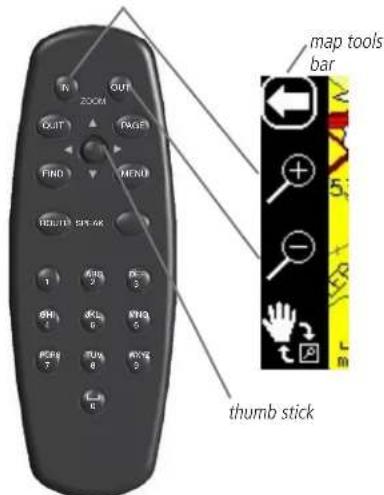
map tools bar thumb stickAn alternative to using the touchscreen for zooming in and out of an area on the Map page is to use the IN and OUT zoom buttons located at the top of your remote control. An alternative to "panning," or touching the map with your finger and moving the map, is to use the thumb stick on your remote control.
Reference
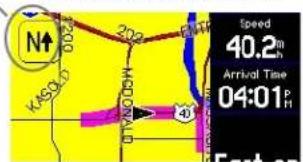
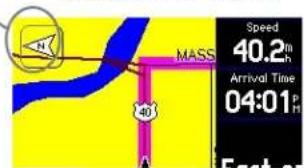
'North Up' versus 'Track Up'
The presence of the arrow shown at right indicates that the map tools bar is activated. Touch the arrow, and the map tools bar disappears. An orientation icon will appear.
The middle image shows an N with an arrow pointing upwards, or 'North Up.' Touch the N and the direction changes to 'Track Up.'
text_image
LAVERDELL LAVERDELL 15TH 1500Map page showing map tools bar
text_image
322 KASSD 322 140 40 Speed 40.2m Arrival Time 04:01hMap page showing 'North Up'
text_image
Speed 40.2m Arrival Time 04:01 P Fast orMap page showing 'Track Up'
displayed area. The white arrow, or "map pointer," serves as a target marker and provides information for a specific location or object if any is available. The black triangle, or "vehicle icon," shows your current physical location on the Map page. While in panning mode, the data tabs on the right of the screen are hidden.
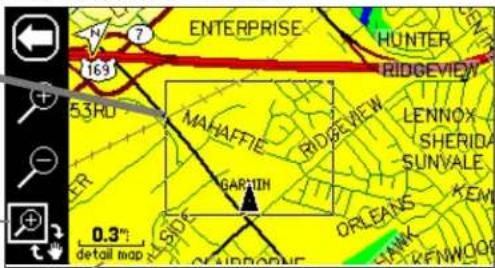
In addition to zooming in to or out of the Map page, you can also define a particular area to enlarge on the Map page by drawing a "box" on the touchscreen, then lifting your finger from the screen. Before you can do this, make certain the boxed magnifying glass icon is showing at the bottom of the map tools bar, as shown in the diagram below. If the map tools bar displays a hand, simply touch the hand and the boxed magnifying glass icon will appear.
Use your finger to draw a box on the Map page. The boxed-in area will be zoomed in to show greater detail.
boxed magnifying glass icon
text_image
ENTERPRISE HUNTER RIDGEVIEW 53RD MAHAFFIE GARTIN LENNOX SHERIDA SUNVALE ORLEANS KEM 0.3" detail mapmap scale
North Up and Track Up
Map orientation icons appear at the top left side of the Map page. They show how roads appear on your Map page. North Up shows your Map page with North always at the top, as if you were reading a paper map. Thus, as you are driving, the vehicle icon on your Map page will move to the left if you are going West, right if you are going East, and so forth. With Track Up, your Map page shifts so that your direction of travel always appears at the top of the Map page. Thus, if you are headed South, the Map page will shift so that South appears at the top of the Map page. Change the orientation from North Up
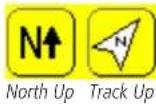
to Track Up (or vice versa) by touching the orientation icon. Note that the map tools bar must be hidden before you can change these icons.
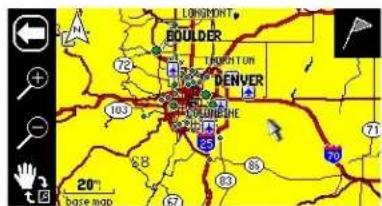
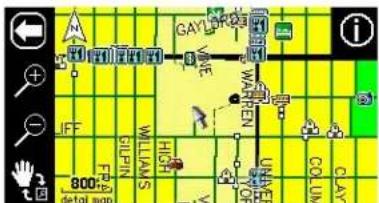
Map Scale
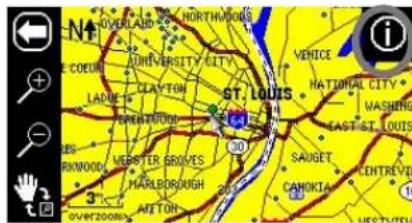
A map scale appears on the lower left of the Map page. It shows you the current zoom level showing on the Map page (such as 500 miles, .8 miles, or 200 feet) as well as what map your StreetPilot is using to create the current image. Your StreetPilot includes a "base map" and a "detail map." The base map provides only general information such as city names and highway exits. The detail map includes specific details such as businesses, parks, and other points of interest. Thus, if you are viewing Denver at a map scale of 800 feet, your StreetPilot will display information from its base map. The map scale will switch from "base map" to "detail map" as you continue to zoom in to Denver.
If you continue to zoom in to Denver or any city, "overzoom" will appear on the map scale. Displaying at around 500 - 300 feet, "overzoom" indicates that the current scale exceeds the optimum resolution of available map detail. Some detail, such as roads, are drawn using widely-spaced points and the actual layout of these details may differ from the map presentation.
text_image
LONGMONT BOULDER TORTERTUR DENVER 103 25 70 71 20° base mapbase map of Denver at 20-mile zoom
text_image
GAY WATER JIFF GULIAMS HIGHS DR UNICEE COLUMB CLAY 800: detail mapdetail map of Denver at 800-foot zoom

text_image
University of Denver—Denver WARREN CIR 300 everzomdetail map of Denver at 300-foot "overzoom"
Reference
Using the Map Scale
Reference
Information Icon
text_image
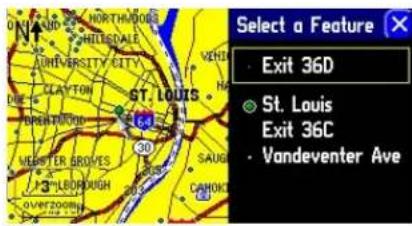
N OVERLAND HORTHWINDS COCON JHIVERSITY CITY CLAYTON LAIDNE BRENTWOOD ST. LOUIS VEHICLE NATIONAL CITY WASHING EAST-ST. LOUIS RES ARKWOOD WEBSTER GROVES MARLBOROUGH 2013 SAUGET CENTREVIL CAMOKIA 3- OVERZOOING 10 iWhen multiple Points of Interest appear at one point (shown above) a selection list will display (shown below).
text_image
Select a Feature Exit 36D St. Louis Exit 36C Vandeventer AveInformation Icon "i"
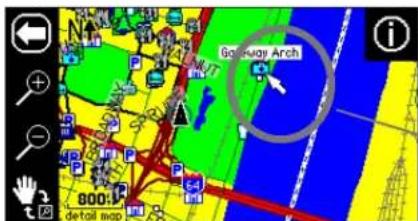
As was discussed earlier in this section, you can pan across the Map page by using the touchscreen with your finger or by using your remote control. As you pan, the map pointer appears. It serves as a target marker for the map. If you change the scale, the map is redrawn with the pointer at the center. When the pointer is placed on a map object, the name of that object is highlighted and an "1" (Information) icon appears in the upper right corner.
text_image
Go-Rung Arch 800:1 detail mapWhen the "i" icon appears, touch it and information about the object or location to which your are pointing will appear.
The Map page shows the panning arrow (circled) which is highlighting a point of interest.
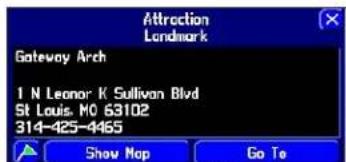
In the example above, the Gateway Arch in St. Louis has been highlighted. Touch the "i" icon, and the information page at right appears. The page displays information about the Gateway Arch as well as feature options.
text_image
Attraction Landmark Gateway Arch 1 N Leano: K Sullivan Blvd St Louis: M0 63102 314-425-4465 Show Map Go Toinformation page
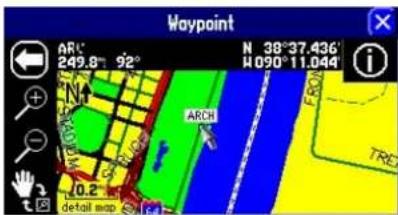
From the information page, you can touch Show Map to show a different Map page, as shown below. This page includes coordinates as well as the Arch's distance and bearing from your current physical location.
text_image
Waypoint ARC 249.8° 92° N 38°37.436' W090°11.044' ARCH DETAIL MAP i TREThis view of the Gateway Arch appears when you touch Show Map. The coordinates of the Arch appear at top right. The Arch's distance and bearing from your current physical location appear at top left.
From the information page, you can also touch Go To to create a route to the Arch. A Route Preference window will appear. Once you select a preference, your StreetPilot will create a route to the Arch. (See Creating your own Routes, page 28, for more information on creating routes)
Waypoints
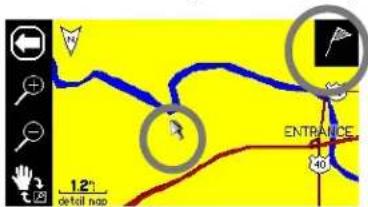
As was discussed on the previous page, an "i" icon appears as the Map pointer hovers over an existing map object such as a business, park, lake, church, or other point of interest. When the Map pointer points to an area where no map data exists, a flag icon appears in the upper right side of the Map page:
text_image
DETAIL MAP 12° ENTRANCE 40°When the map pointer is not placed on an object, a flag icon appears in the upper right-hand corner. Touch the icon to create a new waypoint. You can also create a route to it.
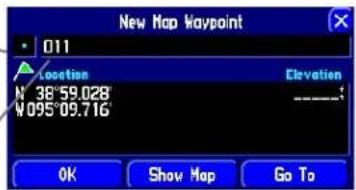
If you decide that this is an area you want to remember (perhaps it is a particular location on a lake or in a National Park), you can mark this area by creating a waypoint for it. Touch the flag icon and a New Map Waypoint will appear, as shown below. The coordinates for the marked area are displayed. A random number also appears. If you wish to name it something else, touch the current name (011) and a mini keyboard page will appear, allowing you to type in a new name. You can also touch the icon to the left of the name to change the icon.
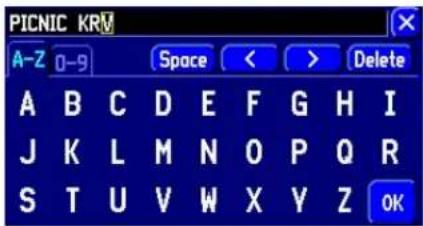
Touch the blue dot icon to reveal a scroll-lable list of colorful icons to use to mark your waypoint.
Touch the 011 text to display a new screen that serves as a mini keyboard. Use this keyboard to enter a new name for the waypoint.
text_image
New Map Waypoint 011 Location Elevation N 38°59.028 W095°09.716 OK Show Map Go ToReference
Using the Mini Keyboard
text_image
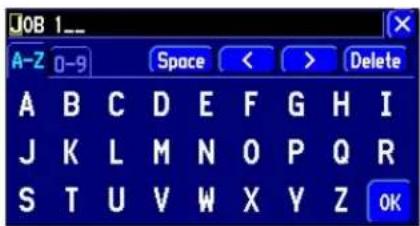
PICNIC KRM A-Z 0-9 Space < > Delete A B C D E F G H I J K L M N O P Q R S T U V W X Y Z OKThe mini keyboard shown above appears when you wish to change the name of the waypoint as discussed in this section. Touch the letters to spell out a name. To use numbers, touch the 0-9 tab and numbers will appear. The Space, <, >, and Delete keys use standard word processing functions. When you have entered all text, touch OK.
The mini keyboard is used in a variety of places with your StreetPilot. It's appearance may alter, depending on your purpose for using it. On some mini keyboards, letters or numbers that are not needed will not appear on your keyboard.
Reference
Viewing the Map Page
text_image
N↑ E SHERIDAN BRDN 40.0m North 1562 S Ridgeview Rd E Sheridan Bridge Ln ahead 300: OVER200mMap page in driving mode
text_image
N↑ S E S E E F I N T A R D E S E S E F I N T A R D S E S E F I N T A R D S E S E F I N T A R D 500: detail map Speed 40.2m 0.4m Arrival Time 09:20m Time Till Turn 00:56 Ridgeview Rd to 1227 S Ridgeview RdMap page in routing mode
Although the information varies slightly between a Map page in driving mode and one in routing mode, you can use the features discussed in this section for both Map page types. Note that the Next Turn page and Current Route pages only appear when you are in routing mode.
Viewing the Map Page While Driving
Map Pages in Driving and Routing Mode
While driving, you will see one of two types of Map pages: a Map page in "driving" mode, which appears when you have the StreetPilot turned on but you are not navigating a route, and a Map page in "routing" mode, which appears when you have created a route and are currently navigating to it.
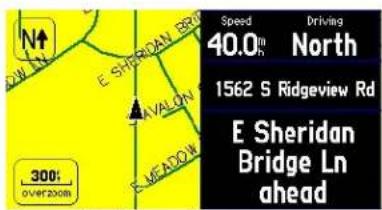
In driving mode, the Map page shows map details, the map scale, and your current location. Customizable data tabs are pre-set to show your speed, current direction of travel, address of your current position, and the name of the next road ahead.
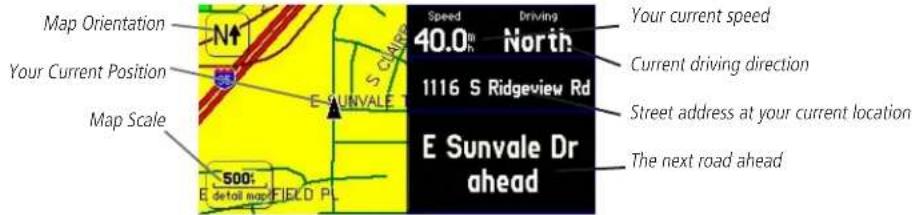
text_image
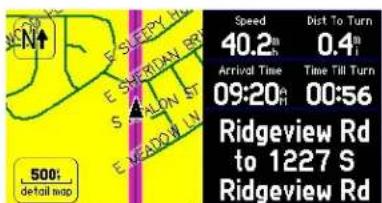
Map Orientation Your Current Position Map Scale 500: E detail map FIELD PL N↑ S CLEMS E SUNVALE Speed Driving 40.0° North 1116 S Ridgeview Rd E Sunvale Dr ahead Your current speed Current driving direction Street address at your current location The next road aheadIn routing mode, the Map page displays more information. It graphically shows you map details and your current location, and it marks your route to a destination with a magenta-colored route line. It tells you what direction to go as well as the direction in which you are traveling. Customizable data tabs are pre-set to display information such as your speed, the distance you have traveled, distance to the next turn, time remaining before reaching the next turn, and more.
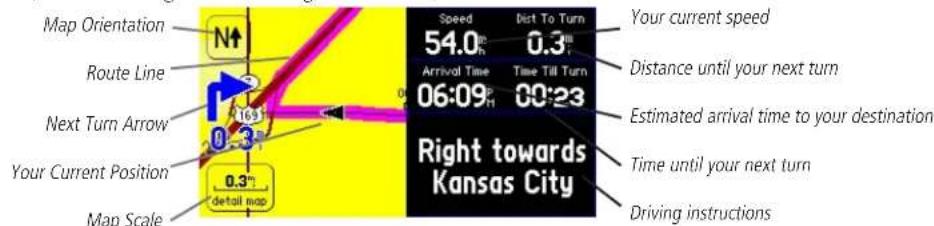
text_image
Map Orientation Route Line Next Turn Arrow Your Current Position Map Scale 0.3" detail map 163 0.3" 06:09 Speed 54.0° Arrival Time 06:09 Dist To Turn 0.3" Time Till Turn 00:23 Right towards Kansas City Your current speed Distance until your next turn Estimated arrival time to your destination Time until your next turn Driving instructionsBoth types of Map pages display a vehicle icon which indicates your present position and direction of movement as a triangular icon in the center of the map. Depending upon your map scale setting, you can see a variety of geographic detail such as lakes, rivers, highways, and towns.
If you would like to see more detail at your current driving position, or if you would like to see a broader view of the area, you can change the Map scale to zoom in to or out of your current position as the Map page continues to follow the vehicle icon. Simply touch the map scale and the map tools bar will appear. Use the zoom icons (+ or - magnifying glasses) to select your new detail level. To return to the previous page, simply touch the white arrow at the top of the map tools bar. Note that you can use this feature whether you are in driving or in routing mode.

text_image
Speed 69.0m Arrival Time 03:33h I-35 S to Exit 202: Sunflower Rd 0.8" detail map INDUSTRUM SE HA NEW CENTR Dist To Turn 7.3m Time Till Turn 06:22Touch the map scale to activate the map tools bar and hide the data tabs.
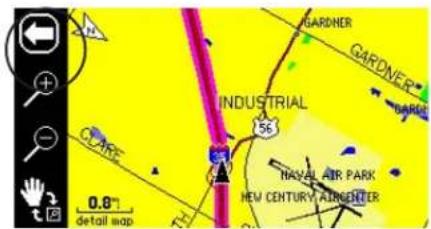
text_image
GARDNER GARDNER INDUSTRIAL 56 NAVYAL AIR PARK NEV CENTURY AIR CENTER 0.8" detail mapUse the zoom icons to view a new level of detail. Touch the arrow to return to the Map page in routing mode.
In the example above, your current driving position always appears on the Map page. Another StreetPilot feature allows you to "look ahead" on the Map page so that you can view areas beyond your current position, but without interrupting the function of the Map page. Simply touch any area on the Map page EXCEPT for the map scale. As in the example above, the map tools bar will appear. The differences are that the map pointer will also appear on the Map page, and the Map page itself will stay stationary until you move (pan) the Map page. The vehicle icon will continue to move along your route, but you will be able to move beyond your current position as you pan.
Reference
Viewing the Map Page
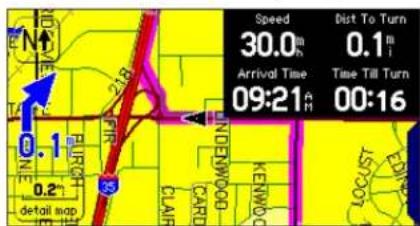
text_image
Speed 30.0m 0.1m Arrival Time 09:21 Time Till Turn 00:16 DETAIL MAP 0.1 0.2 DETAIL MAP CARD LENDWOOD KENDWOOD KENDWOOD LOCATION LOCUST ADARKSFor maximum map display, hide some or all of the data tabs. Simply touch the tab to make it disappear.

text_image
N↑ 218 AIRIE- BURD 0.2 DETAIL MAP INDUENOOO KENTWOOD CLAIR LAISOT EDLINE BURD LENT FRIDICEAs shown above, the Map page viewing area is greater with the data tabs hidden. Touch the tab placeholders to show the tabs again.
See page 42 for more information on hiding/showing data tabs.
Reference
Next Turn Page
text_image
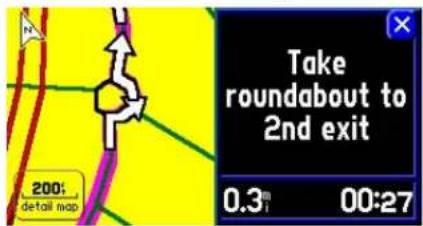
Take roundabout to 2nd exit 0.3 00:27Your StreetPilot safely navigates you through roundabouts, interstate traffic, and all other types of road navigation.
The NEXT TURN page announces the same instructions for an upcoming turn 3 times:
- Immediately after you make a turn, the Next Turn page announces the next upcoming turn, as well as the distance to that turn. Thus, if the next turn is not for 20 miles, you do not need to worry about navigation instructions for quite a while.
- As you are close to approaching the upcoming turn, the Next Turn page appears again. This message is announced in order to alert you to change lanes if necessary and start looking for signs in anticipation of the upcoming turn.
- Just before the upcoming turn, the Next Turn page appears one last time for that particular turn. You should be in view of the turn.
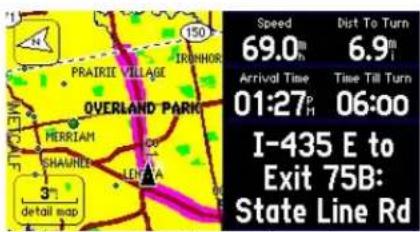
text_image
PRAIRIE VILLAGE OVERLAND PARK MERRIAM SHAUNDE 3° detail map 150 IRONHOR 69.0m Arrival Time 01:27p 6.9m Time Till Turn 06:00 I-435 E to Exit 75B: State Line RdTouch anywhere on the Map page (except the map scale) to activate the map tools bar and map pointer, and hide the data tabs.
text_image
N YER N RAIRIE VILLAGE LEAMOOD GOLF AND COUNTRY CLUB OVERLAND PARK 435 BLUE RIVER IRONHORSE GOLF CLUB 69 2" detail mapTouch the arrow to return to the previous Map page.
Use this feature whether you are simply driving with your StreetPilot turned on (driving Map page) or navigating a route (routing Map page). To return to the Map page with the original navigation so that you can see the vehicle icon, touch the arrow in the top left corner.
Next Turn Page
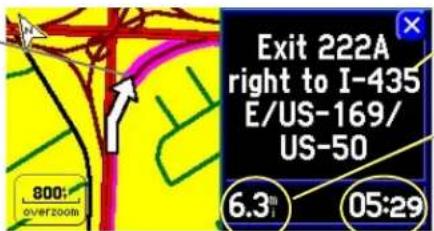
As you are driving during an active route, the Map page continues to display in routing mode until your StreetPilot alerts you that you are near a turn. When this happens, a Next Turn page appears. It provides a graphic visual and gives text instructions, as shown below:
Route Line
text_image
Exit 222A right to I-435 E/US-169/ US-50 6.3° 05:29An upcoming turn is placed here. This screen disappears after a few seconds. If you need to see it again, simply press SPEAK and it will reappear.
Shows how many miles until you reach the upcoming turn.
Shows the approximate time left until you reach the upcoming turn.
An added bonus to the Next Turn feature is that the StreetPilot "voice" announces upcoming turns. Thus, if you cannot safely view the Next Turn page, you can hear the directions.
The Next Turn page above disappears after a few seconds and then the page which you were previously viewing will reappear. If you wish to clear the Next Turn page and return to the previous page, press PAGE (you can also press QUIT on the remote). If you wish to see the Next Turn page again, simply press SPEAK and it will reappear. You will also be able to hear the announcement.
When you are not navigating a route, the Next Turn page is no longer available.
Current Route Page
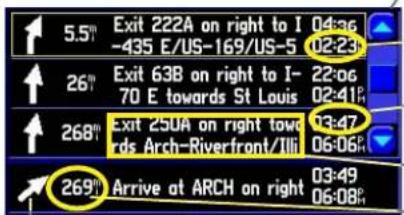
Still another bonus while navigating a route is the Current Route page, which provides step-by-step route instructions, all on one page. Simply press PAGE from your StreetPilot (or from the remote control) and the Current Route page appears:
Scroll bar
text_image
5.5" Exit 222A on right to I -435 E/US-169/US-5 26" Exit 63B on right to I-70 E towards St Louis 268" Exit 250A on right towards Arch-Riverfront/TiLi 269" Arrive at ARCH on right 03:47 03:49 06:08The bottom number gives the approximate time that you should reach the next turn.
The top number shows how much time (in minutes or in hours) until the next turn.
The text column explains the upcoming driving instructions.
The numbered column shows how many miles until the next turn.
Direction of turn
The Current Route page keeps a log of your entire route. Thus, you can look beyond the next turn and even get an estimated idea of what time you will reach an upcoming turn provided you don't make stops along the way.
You can scroll through the entire list by moving the scroll bar up or down. Highlight and touch any of the turns on the list to view the Next Turn page for that turn.
Reference
Current Route Page
text_image
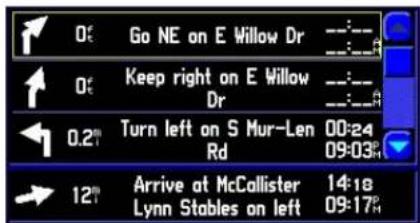
Go NE on E Willow Dr Keep right on E Willow Dr Turn left on S Mur-Len Rd Arrive at McCallister Lynn Stables on left 02:24 09:03R 12:18 14:18 09:17RThe Current Route page keeps a log of your entire route. It keeps the directions even when you have completed the turn.
When you are not navigating a route, the Current Route page is no longer available.
Reference
Trip Information Page
text_image
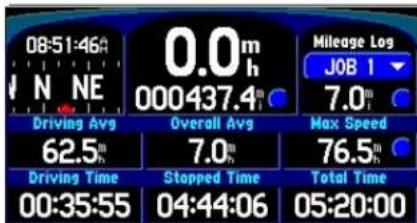
08:51:46 N NE 0.0m 000437.4 Driving Avg Overall Avg 62.5m 7.0m Driving Time Stopped Time 00:35:55 04:44:06 Mileage Log JOB 1 7.0m Max Speed 76.5m Total Time 05:20:00Access the Trip Information page anytime during an active route by pressing PAGE on your StreetPilot.
text_image
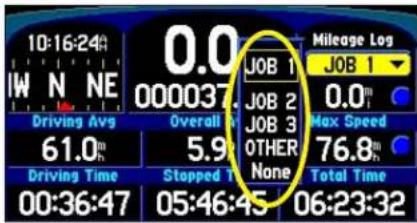
10:16:24A IWNNE 0.0 000037. Driving Avg 61.0m Driving Time 00:36:47 Overall 5.9% Stopped Time 05:46:45 Mileage Log JOB 1 JOB 2 JOB 3 OTHER None 0.0m Max Speed 76.8m Total Time 06:23:32Select from different Mileage Logs.
Trip Information Page
While navigating a route, you can access yet another page, the Trip Information page. If you are making a long trip, you may find the Trip Information page to be very useful. It indicates your current speed and many helpful statistics about your trip.
Be certain to reset the Trip Computer before beginning a trip (see next page). If you make frequent stops, leave the StreetPilot powered on in order to receive satellites. This allows the unit to accurately measure elapsed time during the trip. Note, however, that this might be impossible since some vehicles disconnect power to the cigarette lighter when the ignition is turned off.
The following trip information is displayed on the Trip Information page:
Time of Day - Current time. This appears at the top left-hand side of the page.
Compass Ribbon – Shows your current compass heading while moving with a red indicator arrow.
Speed - This is the current vehicle speed, displayed in miles or kilometers per hour.
Odometer - A running total of distance traveled, based upon the distance between second-by-second location readings, since the Trip Computer was last reset.
Mileage Log – Allows you to use up to four different mileage odometers for recording trip distances. You can also rename each mileage log (see next page).
Driving Avg - Your average speed of travel during the time the vehicle has been in motion since the Trip Computer was last reset.
Overall Avg - Your average speed of travel (including time stopped) during the time the StreetPilot has been tracking your location since, the Trip Computer was last reset.
Max Speed - The maximum speed recorded since the Trip Computer was last reset. Max Speed can also be reset individually without resetting other Trip Computer information.
Driving Time - The length of time that the vehicle has been in motion since the Trip Computer was last reset.
Stopped Time – The length of time that the vehicle has been stopped (or stationary) during the time the StreetPilot has been tracking your location since the Trip Computer was last reset.
Total Time - The total length of time that the StreetPilot has been tracking your location since the Trip Computer was last reset. This is always equal to Driving Time plus Stopped Time.
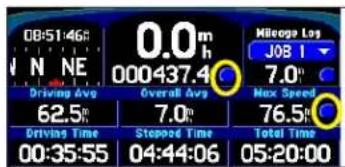
To reset the Trip Computer or the Maximum Speed:
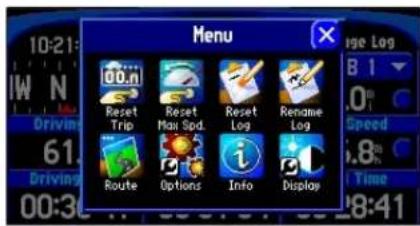
- Press the unit or remote MENU key to display a 'Menu' page. You can also select the blue round buttons to the right of the main odometer or Max Speed (in which case you can skip to step 3).
- From the 'Menu' page, select 'Reset Trip' to reset the Trip Computer or 'Reset Max Spd' to reset the Maximum Speed.
- Select 'Yes' at the verification page to complete the reset.
text_image
08:51:46: N N E Driving Avg 62.5% Driving Time 00:35:55 0.0m 000437.4 Overall Avg 7.0m Stepped Time 04:44:06 Nilcope Log J08 1 7.0m Max Speed 76.5m Total Time 05:20:00Touch the appropriate blue button above to reset the Trip Computer or Maximum Speed.
To select a Mileage Log:
- Select the 'Job 1' (or 'None') field on the Trip Information page. A box containing various log names (Job 1, Job 2, Job 3, OTHER, None) will appear.
- Select the desired Mileage Log name. All mileage will be recorded in this log.
To rename a Mileage Log:
- Make certain the desired Mileage Log name is displayed. Then, press the unit or remote MENU key to display a 'Menu' page.
- Select 'Rename Log.'
- Enter the new name by using the mini keyboard that will appear.
To reset a Mileage Log:
- Make certain the desired Mileage Log name is displayed. Then, press the unit or remote MENU key to display a 'Menu' page. You can also select the round blue button to the right of the Mileage log.
- Select 'Reset Log' and select 'Yes' at the verification page to complete the reset.
Reference
Trip Information Page
text_image
Menu Reset Trip Reset Max Sod. Reset Log Rename Log Route Options Info DisplayYou can reset the Maximum Speed or the Trip Computer by pressing MENU while on the Trip Information page.
text_image
JOB 1._ A-Z 0-9 Space < > Delete A B C D E F G H I J K L M N O P Q R S T U V W X Y Z OKUse the mini keyboard to rename a Mileage Log.
Reference
Driving with Dead Reckoning
text_image
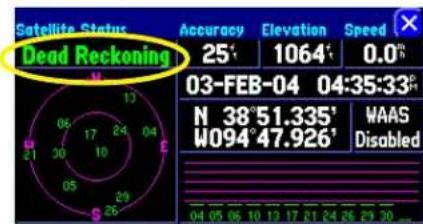
Satellite Status Dead Reckoning Accuracy 25° Elevation 1064° Speed 0.0" 03-FEB-04 04:35:33" N 38°51.335' WAAS W094°47.926' Disabled 04 05 06 10 13 17 21 24 26 29 30 ...The only way you can tell that your StreetPilot is using Dead Reckoning is to view the GPS Information page. See page 56 for more information on GPS.
Driving with Dead Reckoning (2660 Only)
The StreetPilot 2660 comes with dead reckoning capabilities, which means that you continue to get navigation guidance even if you lose GPS reception, such as when you are travelling in dense urban environments with tall buildings and tunnels.
To achieve dead reckoning, the 2660 utilizes an internal angular rate sensor, an external speed sensor input, and an external reverse light sensor input. A special dead reckoning cable is connected to your vehicle's speedometer and backup lights (it must be professionally installed by an authorized Garmin installer). Thus, when you lose GPS reception, your StreetPilot can acknowledge your turns as well as your distance travelled while you are driving. In this way, it can continue to accurately give navigation guidance until your GPS reception returns. Driving with dead reckoning capabilities is so seamless, you will not even know that you do not have GPS reception.
You can simply unplug the dead reckoning cable from the vehicle adapter if you want to use the StreetPilot 2660 in another vehicle. It will navigate the same way as the StreetPilot 2620.
Finding Places
Use the FIND feature on your StreetPilot unit (or remote) to take the guess work out of locating a city street, restaurant, or hotel. You can even use FIND to see what rest areas are approaching as you near an exit on the Interstate.
Finding a City
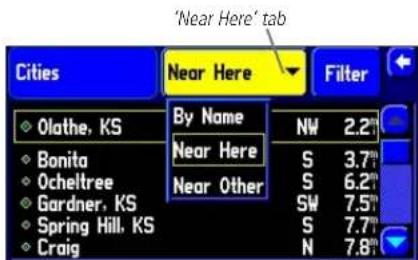
Select the Cities icon from the Find menu. A list of cities will appear, as well as each city's direction and distance from your current position as indicated by the Near Here tab. Use the scroll bar on the right side of the page to view the entire list of cities. The Near Here tab lists cities that are closest to your current physical location or, if you have panned to an area away from your current location, to your map pointer.
You can find cities in many ways. Touch the down arrow (▼) on the Near Here tab and you will see a variety of options. (Note that these options appear depending upon whether you are currently navigating a route or panning your Map page).
- By Name: Use By Name if you want to spell out the name of the city you seek; use the mini keyboard that appears when you select By Name. Note that when you use By Name, all city names that are loaded in your mapping software will be searched. For example, if you are searching for Greensboro, N.C., your search (using By Name) will return a list of all Greensboros in the U.S.
- Near Other: Use Near Other to find a city that is not in your immediate location. For example, of you are physically in Kansas and you want to find a city in Colorado, select Near Other and a map of the U.S. will appear. Touch an area in Colorado that is close to the city you wish to identity, and then touch the check mark that appears in the upper right-hand corner of your Map page. A new list of cities in Colorado will appear. (Note that when the list of cities appears, the tab will change from Near Other to Near Map Pointer. This is because the StreetPilot is searching for cities that are located near the current position of your map pointer, not your current physical location.)
If your search returns a large list of cities, you can narrow the search by touching the Filter tab. For example, if you are looking for Fort Collins, Colorado, type "Fort" on the Filter page and touch OK. The
Reference
Finding Places
text_image
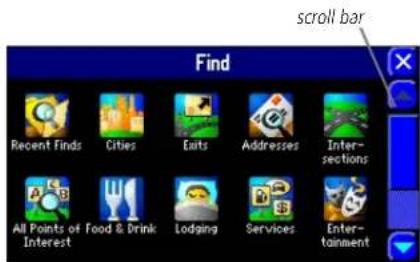
Find Recent Finds Cities Exits Addresses Inter- sections All Points of Food & Drink Lodging Services Entert- tainmentAccess this menu by selecting FIND on your StreetPilot unit or remote. Use the scroll bar to see the third line of options, which are not shown above.
text_image
'Near Here' tab Cities Near Here Filter Olathe, KS By Name NW 2.2" Bonita Near Here S 3.7" Ocheltree Near Other S 6.2" Gardner, KS SW 7.5" Spring Hill, KS S 7.7" Craig N 7.8"In this example, nearest cities are listed in order according to their respective mileage from your present position.
Reference
Finding Places
list will include names like Fort Morgan and Fort Collins, Colorado, but it will also include names like Glen Comfort. The more letters you enter in the Filter page, the fewer the amount of names that will be returned.
Advanced feature: As a alternative to panning and then touching an area in Colorado when using By Other, you can enter the coordinates of a specific area if you know them. Press the MENU key and then select the Enter As Text icon. Then, enter your coordinates.
- Near Map Pointer: Use Near Map Pointer to find cities that are near the area to which you have placed the map pointer while panning.
- Near [Destination]: Use Near [Destination] if you are currently navigating a route and you want to view a list of cities that are near your destination. For example, if you are currently navigating a route from Denver to Salt Lake City (Near Salt Lake City), your StreetPilot will return a list of all cities near Salt Lake City.
Once you find the city you seek, touch the name and an information page will appear. Touch the green flag on the lower left-hand side of the page if you want to mark the city as a waypoint, or Show Map if you want to see the city on the Map page (see page 10 for an example), or Go To if you want your StreetPilot to navigate to this city.
Finding an Address or Intersection
Touch the Addresses or Intersections icon from the Find menu. In both cases, a page appears that allows you to enter pertinent street information
To enter the number or street name, touch the black text field that appears to the right of the Number and Street fields. A mini keyboard will appear; touch the pertinent numbers/letters to complete the street names.
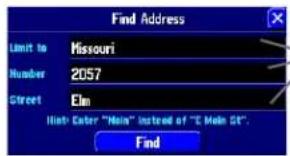
The StreetPilot initially limits its searches to addresses or intersections within the state/province in which you are currently physically located, or where the map pointer is located if you have panned to an area away from your current location. Thus, to narrow your search, particularly if you are trying to locate a street or intersection in another city or state/province, touch the Limit to box and select one of the Limit To options: No Limit, Enter a City, Enter a State/Province, or Enter a Postal Code. Try to narrow your search as much as possible to return fewer results. Entering the city name or zip code will significantly narrow your list.
When you enter street names, do not enter directional words such as "West" or types of streets such as "Avenue" or "Parkway." For example, if you are looking for "E. 205 Elm Ave," enter "205" in the Number field and "Elm" in the Street field. Then press Find. A list of possible matches will appear on a Select Address page. Touch the address you are seeking, and it will appear on an Address page.
Touch the green flag on the lower left-hand side of the Address page if you want to mark the location as a waypoint, or Show Map if you want to see the address/intersection on the Map page (see page 10 for an example), or Go To if you want your StreetPilot to navigate to the address/intersection.
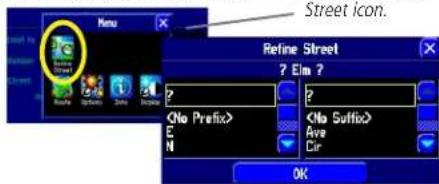
Note: If your search returns a large list of possible matches, narrow the list by adding directional words and types of streets ("West," "Ave") via the Refine Street feature. From the Find Address page, press the StreetPilot's MENU key. A Menu page will appear. Select the Refine Street icon. Add the additional information. Select OK, and all information will appear on the Find Address (or Find Intersection) page. Select Find, and the address or intersection you are seeking will appear on an information page.
Reference
Finding Places
text_image
Find Address Limit to Missouri Number 2057 Street Elm High: Enter "Main" instead of "C Main St". FindTouch the text fields to enter data. Then, select Find to reveal a Select Address list.
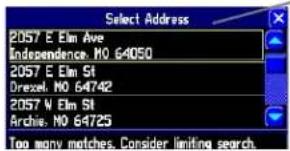
text_image
Select Address 2057 E Elm Ave Independence: M0 64050 2057 E Elm St Drexel: M0 64742 2057 W Elm St Archies: M0 64725 Too many matches. Consider limiting searchTo narrow the list, press MENU while on the Find Address page and then select the Refine Street icon.
text_image
Menu Refine Street ? Elm ? P P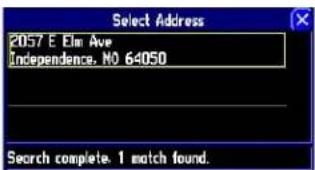
text_image
Select Address 2057 E Elm Ave Independence, NO 64050 Search complete. 1 match found.Only one entry appears after the list is refined.
Reference
Finding Places
text_image
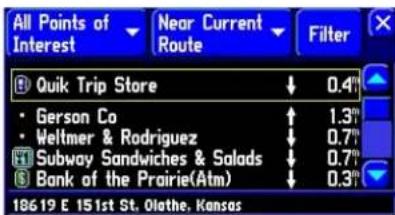
All Points of Interest Near Current Route Filter Quik Trip Store ↓ 0.4" Gerson Co ↑ 1.3" Weltmer & Rodriguez ↓ 0.7" Subway Sandwiches & Salads ↓ 0.7" Bank of the Prairie(Atm) ↓ 0.3" 18619 E 151st St. Olathe, KansasWhile navigating a route, select Food & Drink from the Find menu to view a list of eating places near your current position. The Near Current Route tab will display places that are located along your entire route.
text_image
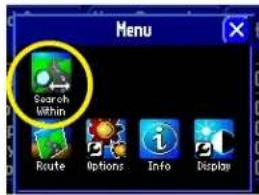
Menu Search Within Route Options Info DisplayTo adjust how far off-route your StreetPilot will search, press the unit's MENU key and select Search Within.
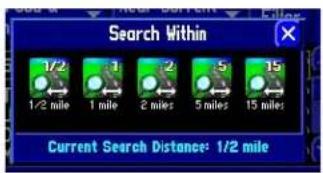
text_image
Search Within 1/2 1 mile 1 mile 2 miles 5 miles 15 miles Current Search Distance: 1/2 mileFinding Interesting Places to Eat, Sleep, Shop, and Visit
A fun feature of your StreetPilot is being able to locate interesting and exciting places all over the U.S. without having to ask for directions to get there. If you are new to a town and you need to find a bank or car wash, touch the Services icon from the Find menu. If you are driving through town on vacation and you want to stop and eat, touch the Food & Drink icon. If you are planning a camping trip in North Carolina and want to find campgrounds that are nearest to the Outer Banks, touch the Lodging icon.
You can use the following icons (options) when you want to search for businesses, parks, and other points of interest: Food & Drink, Lodging, Services, Entertainment, Attractions, Shopping, Transportation, and Emergency & Government. All of these options are subgroups of the All Points of Interest option, which returns the largest list of places. Your StreetPilot searches for places the same way for all options listed above.
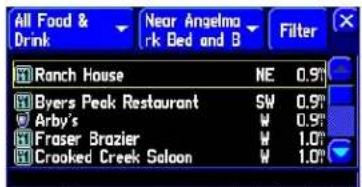
Assume, for example, that you are currently navigating a route from Kansas City to St. Louis. As you are driving along the Interstate, you decide that you want to look for a place to eat along the route. To do this, press the unit's FIND key, and then select the Food & Drink icon from the Find menu. A list of places to eat that are along your entire route from Kansas City to St. Louis (and within a 1/2 mile corridor width of any point on your route) will appear under the Near Current Route tab. The list displays places that are located ahead of or a short distance behind you. This is useful information if you are in a part of the country where eating places are sparse; you can see how many miles away the nearest restaurant is on your route. You may have to backtrack if you discover that you just passed the nearest restaurant for many miles. Or, you can view the list to see if your favorite restaurant happens to be located on or near your route, and how far away it is. To reduce the number of results, use the Filter tab to type in the entire name or part of the name of the restaurant.
If your search does not reveal very many restaurants because you are in a sparsely-populated area, consider widening the search area (corridor width) along your route. From the list of places that appeared under the Near Current Route tab, press the unit's MENU key. From the Menu page that appears, select the Search Within icon. You can then elect to expand your search for restaurants that are up to 1, 2, 5, or 15 miles along your current route. A new list will appear.
In addition to the Near Current Route tab, here are additional tab options for finding places:
- Near Here: Whereas Near Current Route lists places along your entire route, Near Here finds places that are near your current physical location.
- Near [Destination]: Use Near [Destination] to find places that are located at the end of your route. Thus, if you are travelling to Phoenix, the Near Phoenix tab will return places that are only within the vicinity of Phoenix.
- Near Map Pointer: Use Near Map Pointer to find places that are near the area to which you have placed the map pointer while panning.
- By Name: Use By Name to spell out the name of the place you seek; use the mini keyboard that appears when you select By Name. Note that when you use By Name, all places that are loaded in your mapping software will be searched. For example, if you are searching for McDonald's, your search will return a list of all McDonald's in the U.S.
- Near Other: Use Near Other to find a place that is not in your immediate location. See the discussion on using Near Other in the Finding a City topic in this section of the manual.
When you find the name of the restaurant or other place you seek (no matter which search method you used), touch the name of the restaurant and its address and telephone number will appear. Touch the green flag in the lower left-hand side of the screen if you want to mark the eatery as a waypoint, or Show Map if you want to see it on the Map page (see page 10 for an example), or Go To if you want your StreetPilot to navigate to the restaurant.
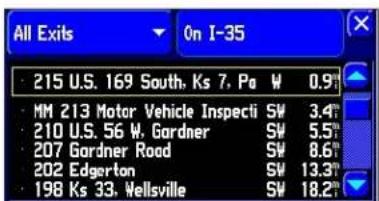
Finding an Exit
Select Exits from the Find menu to locate exits on highways, freeways, and interstates throughout the U.S. This is useful information if you are travelling and need to stop at an exit with a service station or when you need to find the nearest rest area. When you initially select Exits, your StreetPilot lists all exits on the highway or interstate that are closest to your current location. If you are driving on Interstate 40 near Albuquerque, for example, your StreetPilot will list all upcoming exits on I-40. Use the scroll bar on the
Reference
Finding Places
text_image
All Exits 215 U.S. 169 South, Ks 7, Pa W 0.9° MM 213 Motor Vehicle Inspecti SW 3.4° 210 U.S. 56 W. Gardner SW 5.5° 207 Gardner Road SW 8.6° 202 Edgerton SW 13.3° 198 Ks 33, Wellsville SW 18.2°Once you locate the exit of your choice, select it to display an information page for that item.
text_image
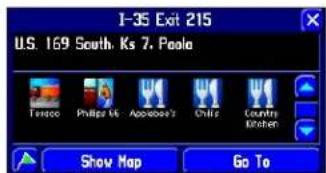
I-35 Exit 215 U.S. 169 South. Ks 7. Peolo Tessco Philips 6k Applebee's Chile Country kitchen Show Map Go ToThis particular exit indicates that many services exist. Touch the icon to view information about a service.
text_image
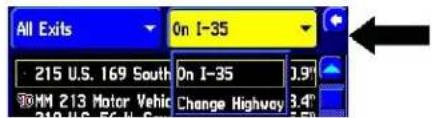
All Exits On I-35 215 U.S. 169 South On I-35 MM 213 Motor Vehic Change Highway 3.9" 3.4"Change the highway or interstate by selecting the 'On I-35' tab and selecting Change Highway.
Reference
Finding Places
right side of the screen to select an exit.
You can narrow the number of exits by touching the down arrow (▼) on the All Exits tab to view only a list of Exits with Services, Rest Areas, or Other Exits such as weigh stations and Welcome centers. If you want to see what exits are available on upcoming highways or intersections, touch the down arrow (▼) on the On [Current Interstate/Hwy] tab and touch Change Highway. You can then spell out the name of the interstate or highway you seek on the mini keyboard.
Touch the name of the exit you wish to view and a list of places that are located at this exit will appear. Touch the green flag on the lower left-hand side of the page if you want to mark the location as a waypoint, or Show Map if you want to see the exit on the Map page (see page 10 for an example), or Go To if you want your StreetPilot to navigate to this exit.
Finding a Waypoint
Waypoints that you have created and stored in the StreetPilot can be found by touching the Waypoints icon from the Find menu. (See page 11 for more information on creating waypoints.) Here are the possible tab options that might appear:
- Near Here: Use Near Here to find waypoints that are near your current physical location.
- Near [Destination]: Use Near [Destination] to find waypoints that are located at the end of your route if you are in "routing" mode. Thus, if you are travelling to Phoenix, the Near Phoenix tab will return waypoints you have created that are within the vicinity of Phoenix.
- Near Map Pointer: Use Near Map Pointer to find waypoints that are near the area to which you have placed the map pointer while panning.
- By Name: Use By Name if you want to spell out the name of the waypoint you seek; use the mini keyboard that appears when you select By Name. Note that when you use By Name, all waypoints you have created will be searched.
- Near Other: Use Near Other to find a waypoint that is not in your immediate location. See the discussion on using Near Other in the Finding a City topic in this section of the manual.
When you find the name of the waypoint you seek (no matter which search method you used), touch the waypoint name and a Waypoint Review page will appear, displaying the longitude and latitude coordinates of the waypoint. Touch Show Map if you want to see the waypoint on the Map page, or Go To if you want your StreetPilot to navigate to the waypoint. Touch Delete if you want to remove this waypoint from your StreetPilot's memory.
Advanced Find Features
Main Map Feature: As was discussed above, you can view a selected location (an eatery, a hotel, waypoint, or city, for example) on the Map page when you select Show Map. The Map page will include additional information such as current coordinates, current location name, and miles from your current position (see the examples in the right-hand column on this page). If you would like to see the location on a cleaner Map page, press the unit's MENU key and then select the Locate on Main Map icon. All extraneous information will disappear.
Measuring Distance to a Place: When you select Show Map to view a place, city, and street you have found on the Map page, you can also perform a straight-line measurement of that place to see the distance from it to your current position or any other location. To view this measuring tool, press the unit's MENU key and then select the Measure Distance icon. A new Map page will appear, showing the place, city, or street, with a line pointing back to your current physical location. See Measuring Distances Between Two Places, page 36, for more information.
text_image
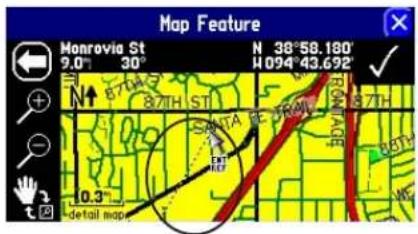
Map Feature Nonrovia St 9.0° 30° N 38°58.180' H094°43.692' 0.3° detail mapOnce you select a location through the Find feature, select Show Map to display this new location on the Map page. To activate the "measuring tool," press the MENU key and then select the Measure Distance icon. You can then take straight-line measurements from the new location to your current location or other places you select. See page 36 for more information on using the measuring tool.
Reference
Finding Places
USING THE "SHOW MAP" FEATURE
text_image
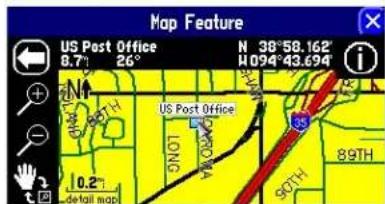
Map Feature US Post Office 8.71 26° N 38°58.162 W094°43.694 US Post Office N 0.2° DETAIL MAP ONOT WROWN SOUTH 89THThe type of view shown above appears when you select Show Map for any feature/location you find. On the left side of the top bar, the name of the found feature ("US Post Office") is displayed. It is 8.9 miles and 30^ from your current physical location. The right side of the top bar displays the Post Office's coordinates.
To view a cleaner display, press the unit MENU key and select the Locate on Main Map icon. A view much like the one shown below will appear.
text_image
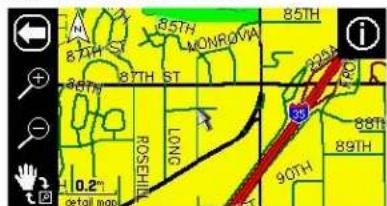
85TH 87TH ST MONROVA 85TH 86TH 87TH ST 10.2 DETAIL MAP 90TH 89TH i 88TH 87TH 86TH 85TH 84TH 83TH 82TH 81TH 80TH 79TH 78TH 77TH 76TH 75TH 74TH 73TH 72TH 71TH 70TH 69TH 68TH 67TH 66TH 65TH 64TH 63TH 62TH 61TH 60TH 59TH 58TH 57TH 56TH 55TH 54TH 53TH 52TH 51TH 50TH 49TH 48TH 47TH 46TH 45TH 44TH 43TH 42TH 41TH 40TH 39TH 38TH 37TH 36TH 35TH 34TH 33TH 32TH 31TH 30TH 29TH 28TH 27TH 26TH 25TH 24TH 23TH 22TH 21TH 20TH 19TH 18TH 17TH 16TH 15TH 14TH 13TH 12TH 11TH 10TH 9TH 8TH 7TH 6TH 5TH 4TH 3TH 2TH 1THReference
Finding Places
Planning a Trip
As you have discovered while reading this section, you can search for places by using a variety of "find" methods. If you are planning a trip and would like to find lodging, restaurants, and interesting places ahead of time, consider using the "chain find" method below. (Note: Follow these instructions while you are in a stationary position and are not in "routing" mode.)
- Find the city which you plan to visit. See 'Finding a City' in this section of this manual for more instructions if necessary. Touch the name of the city so that the information about it will appear. In our example, Fraser, CO is chosen.
- While still on the information page for Fraser, press your StreetPilot's FIND key and select the Lodging icon to look for a place to stay in Fraser. Your StreetPilot will return the names of places to lodge. Touch the name of your desired lodging place to view the information page about it and so that the lodge will be saved in your Recent Finds list. In our example, Angelmark Bed and Breakfast is the lodging place.
- From the information page for Angelmark Bed and Breakfast, press the FIND key and select the Food & Drink icon. A list of all eating establishments near Angelmark Bed and Breakfast will display. Touch the name of your desired eating place to view the information page about it and so that the restaurant will be saved in your Recent Finds list.
text_image
All Food & Drink Near Angelma rk Bed and B Filter Ranch House NE 0.9% Byers Peak Restaurant SW 0.9% Arby's W 0.9% Fraser Brazier W 1.0% Crooked Creek Saloon W 1.0%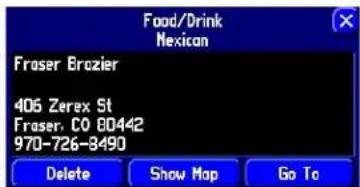
text_image
Food/Drink Mexican Fraser Brozier 406 Zerex St Fraser. CO 80442 970-726-8490 Delete Show Map Go To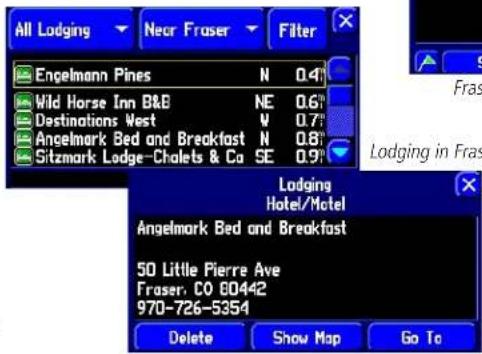
text_image
All Lodging Engelmann Pines Wild Horse Inn B&B Destinations West Angelmark Bed and Breakfast Sitzmark Lodge-Chalets & Co NE V N SE 0.4% 0.6% 0.7% 0.8% 0.9% Lodging Hotel/Motel Angelmark Bed and Breakfast 50 Little Pierre Ave Fraser. CO 80442 970-726-5354 Delete Show Map Go To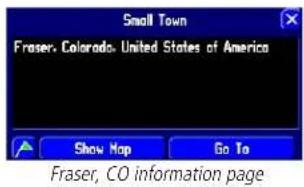
text_image
Small Town Fraser, Colorado, United States of America Show Map Go To Fraser, CO information pageLodging in Fraser
You can also find entertainment, services, and a host of other places near your chosen lodging area in the city of your choice. When you are ready to take your trip, simply find these places in your Recent Finds list, discussed on the next page.
Restaurants near your Lodging choice in Fraser
Finding "Recently-Found" Places
Your StreetPilot keeps track of the places you find and stores the 30 most recent finds in its memory. Thus, if you want to create a route to a place you have recently found, touch Recent Finds from the Find menu. Or, press down and hold the FIND key on your StreetPilot or remote control.
Your 30 most recent finds will appear. The most recently-reviewed item will be at the top of each list. If you cannot find your sought-after place quickly, touch the All tab and narrow your search by selecting Points of Interest, Addresses & Intersections, or Other. If necessary, scroll down the new list to find your place.
Note that the StreetPilot only stores places that you actually view. Let's say, for example, that you do a search for restaurants and five names appear. If you view information on two of them, then these two restaurants will be stored in your Recent Finds list.
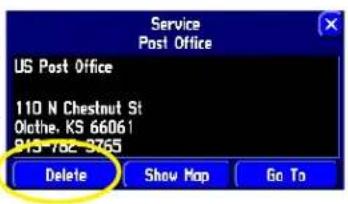
Deleting "Recently-Found" Places
If you wish to delete a place from the Recent Finds list, simply touch the place's name and an information page for that place will appear. Then, touch Delete, as shown at right.
Alternatively, while you are on the Recent Finds list page, press MENU from your StreetPilot or remote to reveal a new Menu page, shown below. From this menu, you can delete the current highlighted recent find, or you can delete the entire list that includes this recent find. You can also completely delete all recent
text_image
Service Post Office US Post Office 110 N Chestnut St Olothe, KS 66061 913-752-8755 Delete Show Map Go To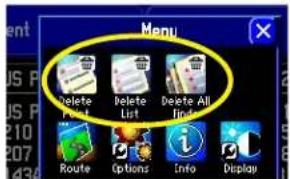
text_image
Menu Delete Point Delete List Delete All Options Info DisplayReference
Finding "Recently-Found" Places
text_image
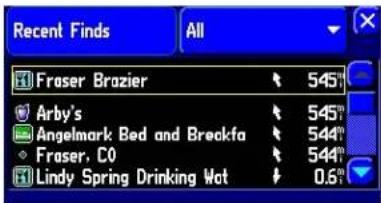
Recent Finds All Fraser Brazier 545° Arby's 545° Angelmark Bed and Breckfa 544° Fraser, C0 544° Lindy Spring Drinking Wat 0.6°Recent finds above display the places we found in the Planning a Trip tutorial on the previous page.
Note: Deleting information from the Recent Finds list merely removes the city name, address, restaurant, or waypoint from this list. It does not delete the actual city from your detail map nor does it remove waypoints you created.
Reference
Creating Routes
text_image
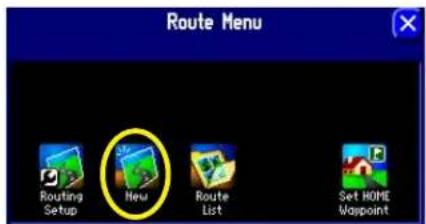
Route Menu Routing Setup New Route List Set HOME WappointAccess the Route Menu above by pressing and holding down on the MENU/ROUTE key from your StreetPilot or remote control. The first time you access this menu, you will see limited options. Your first step, then, is to select New to create a route.

text_image
Active Route: Kansas Speedway from E 151st St Recalculate Stop Route Add/Edit Vias Detour Return to Start Routing Setup New Route List Save Route HOMEThe options shown above appear while you are navigating or simulating a route.
Creating your own Routes
Use the ROUTE feature on your StreetPilot unit to create vacation routes, routes to a job interview or garage sale, or anywhere! Once you create and save the route, you can retrieve it when you need it and you won't have to stop to ask for directions or consult a map.

NOTE: Creating and/or changing routes while driving is dangerous and is not encouraged. Consider creating and running routes in "simulated mode." Set your StreetPilot to indoor use by pressing MENU on the unit and selecting the 'Use Indoors' icon. This will turn off GPS capability and allow you to run your routes in simulated mode. To further ensure safety, consider creating and saving routes before you travel. See Saving a Route in this section of the manual.
The Route Menu lists many options for creating routes. To access the Route Menu, press and hold the MENU/ROUTE key on your StreetPilot or remote for two seconds. You can also press MENU, then select the Route icon. The options below are available, although all may not appear when you view this page for the first time or if you have not yet created a route. When you create a route and activate it, the following options appear:
Recalculate - Recalculates the active route for faster time or shorter distance. This option is available only when you are viewing an active (or simulated) route.
Stop or Resume Route – Stops the current active (or simulated) route or resumes a stopped route.
Add/Edit Vias – Adds or removes an extra stop to be reached on the way to a final destination. A list of via points can also be sorted by their closest distance from you, creating an optimal route that intersects all vias. This option is available only when you are viewing an active (or simulated) route.
Detour - Calculates a new route to a destination by avoiding part of the current route. This option is available only when you are viewing an active (or simulated) route.
Return to Start – Reverses the route and returns you to the point from which you initiated the route.
Routing Setup – Allows you to control routing preference settings.
New – Allows you to create and activate an entirely new route.
Route List – Selects a route to start from a list of saved routes.
Save – Saves the active route, or the last route you activated.
Creating your First Route
Creating routes are fast and easy once you become familiar with and understand the various steps and options.
To start a new Route:
- From the 'Route Menu,' select 'New.' A 'Start Point' window appears.
- From the 'Start Point' window, select one of the three options: Current Location, Use Map, or Find.
-
Once you select an option, the 'Start Point' window disappears and an 'End Point' window appears. Note that the same options mentioned in Step 2 appear here. Select the appropriate option.
-
The 'End Point' window disappears and a 'Route Preference' window appears. Select one of the three options: Faster Time, Shorter Distance, or Off Road.
-
A thumbnail route map appears in the lower left-hand corner of the Map page as the unit calculates the route, as shown on the diagram at right. A voice prompt sounds and a magenta route line appears. The unit is now ready to navigate the new route.
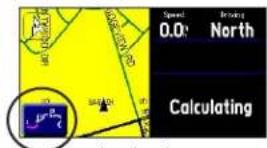
text_image
Speed 0.0' North CalculatingThumbnail route map
Current Location, Use Map, and Find
Your StreetPilot attempts to help you find your starting and ending points for creating routes as quickly and as easily as possible. Thus, it allows you three options for building your route:
Current Location — Choose this option if you want the route to begin (or end) at your current physical location (you are at work, home, at an out-of-town conference, for example).
Use Map — Choose this option if you want to find your location by panning on the Map page. When the
Reference
Creating Routes
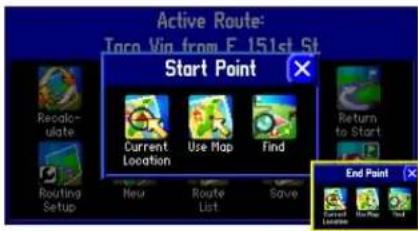
text_image
Active Route: Taco Vin from F. 151st St Start Point Recalc- ulate Routing Setup Current Location Use Map Find Return to Start New Route List Save End PointFrom the Route Menu, select New. A Start Point window shown above will appear. Pick your start point and the End Point window (inset) will appear.
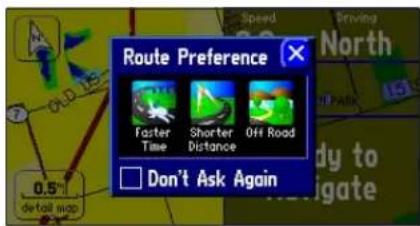
text_image
Route Preference Faster Time Shorter Distance Off Road Don't Ask AgainOnce you select a Start Point and End Point, pick your Route Preference, as shown above.
Reference
Creating Routes
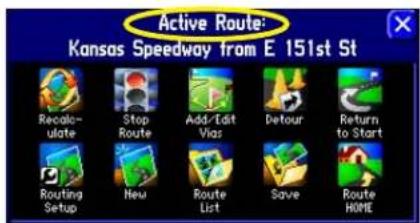
text_image
Active Route: Kansas Speedway from E 151st St Recalculate Stop Route Add/Edit Vias Detour Return to Start Routing Setup New Route List Save Route HOMEThe appearance of the Route menu depends on if you are currently navigating a route (top) or if you have recently completed a route (bottom).
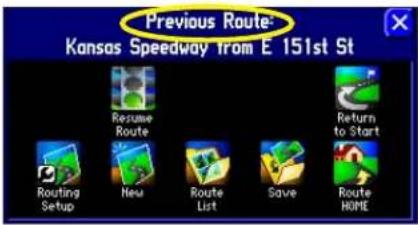
text_image
Previous Route: Kansas Speedway from E 151st St Resume Route Return to Start Routing Setup New Route List Save Route HOMEMap page appears, move around it until you find your destination point. Then, tap the check mark that's located at the top right-hand corner of the Map page.
Find — Choose this option if you want to find a known place such as a restaurant, hotel, waypoint, or an address. Use the Find option in the same way that it is discussed in the last section, Finding Places by Using the FIND Menu.
Route Preference Window
Once you mark your start and end points for a route, you can decide how you want the route to be calculated: by using the fastest time, by taking the shortest distance, or by travelling off route.
Faster Time — Choose this option if you want your StreetPilot to use time as the criteria for calculating your route. This means that the driving time will be shorter but the distance might be longer.
Shorter Distance — Choose this option if you want your StreetPilot to use distance as the criteria for calculating your route. This means that the distance might be shorter but you may have to drive longer.
Off Road — Choose this option to view a direct-line route to your destination. This option does not provide a turn-by-turn route. It merely displays a straight line from your end point to your start point; the voice guidance tells you the direction and distance to your destination. Use this option if you are travelling where obscure roads (or no roads) might be.
As soon as your route is created, your StreetPilot begins to navigate the route. If at any time you wish to STOP a route, select Stop Route from the Route menu. To RESUME the route, select Resume Route.


Setting a HOME Waypoint
Your StreetPilot includes a special feature that allows you to set a HOME waypoint that can be your home, office, or any other place to which you return most often. Once set, you can opt to go "HOME." For example, if you are driving in a new city or down an unknown street and you want to easily find your way home, simply press your StreetPilot's FIND key two times. A window asking you to verify that you want to
route home will appear. Select Yes, and your StreetPilot will then direct you to your HOME location.
To set a HOME Waypoint:
- Press down and hold the MENU key from your StreetPilot or remote control. A 'Route Menu' page appears. (As an alternative, simply press your StreetPilot's FIND key two times. Then, go to Step 3 below.)
- From the 'Route Menu' page, select 'Set HOME Waypoint.' A 'Set HOME Waypoint' page appears.
- Select one of the three options: Current Location, Use Map, and Find (these options are discussed on page 29).
- Once you select an option, find your location using this option. Touch 'OK' when you have found your location. A 'New Waypoint' page appears.
- From the 'New Waypoint' page, touch 'OK.' Your Home waypoint is set.
At your request, your StreetPilot will create a route for you to go to your HOME location while you are on the road. Simply press your StreetPilot's FIND key two times. A window asking you to verify that you want to route home will appear. Select Yes, and your StreetPilot will then redirect you to your HOME location.
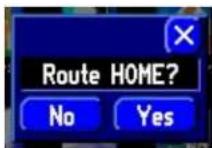
Changing your HOME Waypoint
If you travel frequently, you may want to change your HOME waypoint to the hotel at the conference you are attending or to the relative's house at which you are vacationing. Then, as you explore the surrounding area, you can use the Route HOME feature to return you to your lodging place. To change your HOME waypoint, you must first delete the existing HOME waypoint. Do this by pressing FIND from your StreetPilot, and then selecting the Waypoints icon. Find and select your HOME waypoint. When the Waypoint Review page appears, touch Delete. Select Yes to confirm that you really want to delete your HOME waypoint. Create a new HOME waypoint by following instructions above.
Reference
Creating Routes
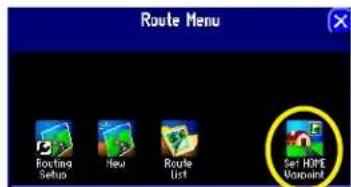
text_image
Route Menu Routing Setup New Route List Set HOME NonpointGet to the Route Menu page shown above by pressing and holding down the MENU key from your StreetPilot. A Set Home Waypoint window will appear, as shown below.
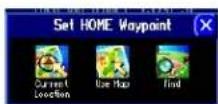
Once you find your location, the New Waypoint page shown below will appear. It includes the coordinates of your chosen HOME location. Touch OK to accept the location.
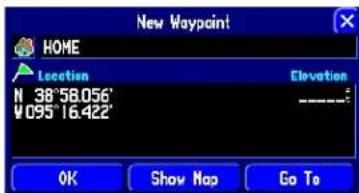
text_image
New Waypoint HOME Location Elevation N 38°58.056' V095°16.422' OK Show Map Go ToReference
Creating Routes

text_image
Route List 3 Routes Kansas Speedway from E 151st St SAN ANTONIO FROM LAWRENCE KS HOME TO BEACH 23.5 mi, 22 minView your list of saved routes by selecting Route List from the Route Menu. Touch a route to highlight its information, as shown above. You can then rename, delete, or activate the route, as shown in the example below.
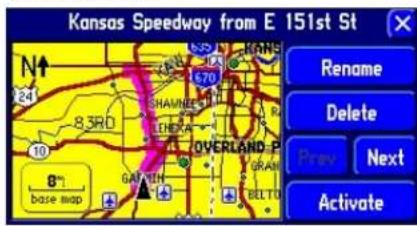
text_image
Kansas Speedway from E 151st St Rename Delete Prev Next ActivateSaving a Route
Your StreetPilot always remembers the last route you created. Thus, you can save the route either during the navigation or after the route is complete. In either case, simply press and hold the MENU/ROUTE key on your StreetPilot or remote control to access the Route menu. The name of your current/completed route will appear at the top of the Route menu. Select the Save icon and a Route Saved page will appear. If necessary, change the name of the route to something more meaningful to you by touching the route's current name. Enter your new name by using the mini keyboard that will appear. Touch OK to save the route.

text_image
Route Saved Kansas Speedway from E 151st St OKYour StreetPilot can hold up to 50 saved routes. Thus, if you have saved routes prior to taking a trip, you only need to retrieve the appropriate route and activate it as you prepare to leave. To select a route from a list of saved routes, select Route List from the Route menu. A list of your saved routes will appear. Touch the name of your desired route. A new page will appear which gives you the opportunity to rename, delete, or activate the route. You can also advance to the next route or move back to your previous route on the route list.
Deleting or Renaming a Saved Route
You can delete a single route or all of the saved routes that exist in your StreetPilot. You can also rename a saved route. To do this, select Route List from the Route Menu. A Route List page will appear.
To delete or rename a single route, highlight the intended route from the Route List page. Information about that route will appear. Select Rename to personalize the route name (if necessary) by using the mini keyboard. Select Delete to remove the route from your Route List. Select Next to view information on the next route in your Route List. Select Activate to navigate this route.
Should you decide to delete all routes you have created (particularly if they are merely practice routes), select Route List from the Route Menu. When the Route List page appears, press the MENU key from your
StreetPilot or remote control. A Menu page, shown at right, will appear:
Select Delete All to delete all routes in your Route List.
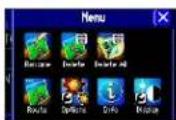
Modifying a Route
After you have practiced creating and saving simple routes, then you are ready to learn how to modify them to suit more specific needs.
Recalculating a Route
If you decide to temporarily part from your current route, you can select Recalculate from the Route menu to calculate a new route from your current location to your destination. The StreetPilot will recalculate and update your route.

Adding a Detour
While you are navigating a route, you might come to a roadblock or other obstruction that will create a need for you to take a detour from your current route. If this happens, simply select the Detour icon from the Route menu. A Detour Distance window will appear. You can alter your route for either 1/2, 1, 2, 5, or 15 miles. If you are in New York City, for example, and you see that the next few blocks are unusually congested with traffic, you might want to opt for a 1/2-mile detour.
Once you select a distance, your StreetPilot will calculate a new route and provide you with new instructions. Note that, on some routes, the route you are currently taking might be the only reasonable option. In this case, you will not be able to take a detour. Also, your StreetPilot makes every possible attempt to get you back on the original route at your requested distance; however, the distance may be longer if no other roads exist that can get you back to the original route.
Your StreetPilot remembers detours you set each time this route is calculated until you stop the current navigation or until you turn off the unit.
Reference
Creating Routes
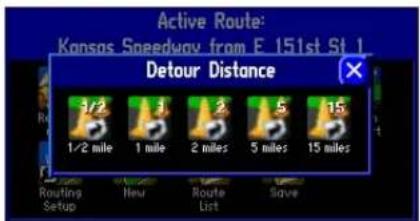
text_image
Active Route: Kansas Speedway from E 151st St 1 Detour Distance 1/2 mile 1 mile 2 miles 5 miles 15 miles Routing Setup New Route List SaveSelect a distance from which to detour from your current route.
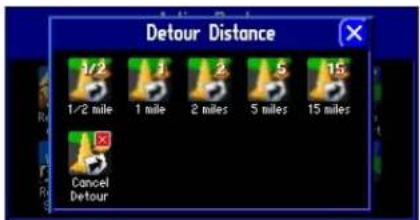
text_image
Detour Distance 1/2 1 mile 2 miles 5 miles 15 miles Cancel DetourTo cancel a detour, select Detour from the Route menu.
Reference
Creating Routes

text_image
Active Route: Kansas Speedway from E 151st St Recalculate Stop Route Add/Edit Vias Detour Return to Start Routing Setup New Route List Save Route HOMEYou can add a via point in order to add an extra stop to your route. Select the Add/Edit Vias icon from the Active Route menu shown above. An Edit Vias page will appear (below) that lists your final destination.
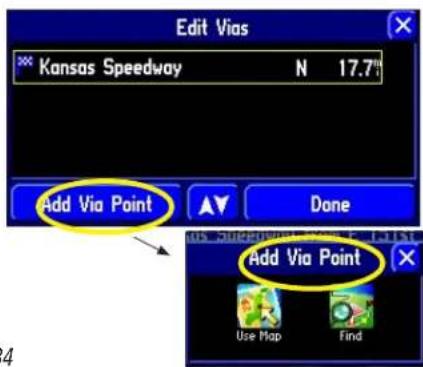
text_image
Edit Vias Kansas Speedway N 17.7# Add Via Point Done Add Via Point Use Map FindAdding Via Points
Via points are extra stops you'd like to make on your way to a final destination. You can add up to 250 via points. When you have entered all of them, your StreetPilot can arrange them in the most efficient order (called auto arrange) so that you can visit each point without a lot of extra driving.
Before you can add via points to a particular route, you must first activate that route. Remember, you don't have to be in your vehicle to activate a route; you can activate it in your home or at the office. Also, you can add via points to a route that you have previously saved (which you can retrieve and activate from the Route List), or one that you have just created.
Once the route is activated, follow the instructions below.
To add a Via Point to the Active Route:
- Press and hold the unit or remote MENU key for two seconds to view the 'Active Route' menu. Select 'Add/Edit Vias.' An 'Edit Vias' page appears. Note that your current destination appears on this page.
- Select 'Add Via Point.' An 'Add Via Point' page appears with two options for finding your location: 'Use Map' or 'Find.'
- Select an option from the 'Add Via Point' page. For more help on using these options, see Finding Places Using the FIND Menu in the previous section of this manual. When you have entered the desired location, an information page about this location appears.
- Select 'Add As Via' on the information page. The new via point is added to the 'Edit Vias' page.
- Select 'Done' on the 'Edit Vias' page. Your original route is automatically recalculated to include the newly added via point. (Note: If you touch the X in the top right corner of the 'Edit Vias' page, your StreetPilot will remove the newly-created via point and continue to use the original route.)
- To add more via points, select 'Add Another' from the 'Edit Vias' page and repeat steps 3-5 above.
Arranging Via Points
If you add more than one via point, you may want to arrange the order of the stops (or points) on the route to minimize route length. In the example at right, numerous stops have been added to a trip to the Kansas Speedway. The order is random because all via points have just been added. Note that the highlighted via point, Olathe J, is fourth on the list.
If you have a definite order for the places you would like to visit, you can arrange the order by highlighting a via point and moving it up or down by using the up/down arrows on the Edit Vias page. Thus, if you wish to make Olathe J second on your route, move it accordingly, as shown at right. Note that you can also change the final destination (Kansas Speedway) by manually moving a via point into the final position that displays the blue checkered flag.
To create a route through all via points that is optimized for distance, simply select Auto Arrange from the Edit Vias page (as shown at right). A window appears that asks if you also want your destination point to be reordered. Answer Yes, and the unit arranges all of your stops, including the destination point. Answer No, and the unit arranges all of your stops EXCEPT the destination point.
Deleting Via Points
If you decide that you no longer want to visit one of your via points, simply touch that point to reveal information about the selected via point. Select Remove and then select Yes to verify, and the via point will be removed from your route.
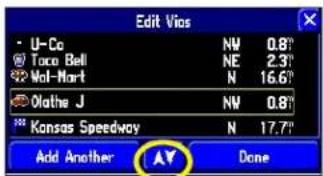
text_image
Edit Vios U-Co NW 0.8° Torco Bell NE 2.3° Vol-Mart N 16.6° Olathe J NW 0.8° Kansas Speedway N 17.7° Add Another Done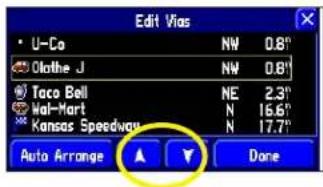
text_image
Edit Vias U-Co NW 0.8° Olathe J NW 0.8° Taco Bell NE 2.3° Wal-Mart N 16.6° Kansas Speedway N 17.7° Auto Arrange Done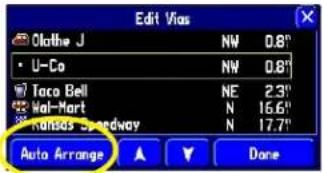
text_image
Edit Vias Olathe J U-Co Taco Bell Wal-Mart Kansas Speedway Auto Arrange Done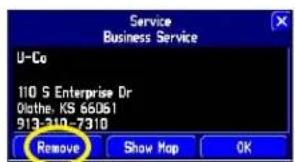
text_image
Service Business Service U-Co 110 S Enterprise Dr Olothe, KS 65061 913-210-7310 Remove Show Map OKReference
Creating Routes
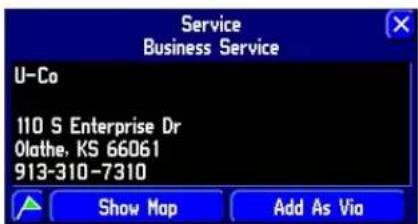
text_image
Service Business Service U-Co 110 S Enterprise Dr 0lathe. KS 66061 913-310-7310 Show Map Add As ViaOnce you find the location that you would like to add (by using Use Map or Find), select the location, and information about it will appear. Select Add As Via, and the location will appear as a via point, shown below.
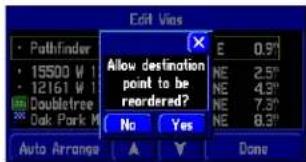
text_image
Edit Vias Pathfinder 15500 W 1 Doubletree Oak Park M Allow destination point to be reordered? No Yes Auto Arrange E 0.9" NE 2.5" NE 4.3" NE 7.3" NE 8.3" DoneWhen you opt to have the StreetPilot auto arrange your via points, a window will appear that will ask you if you want your destination point to be reordered. If you answer yes, your destination point will be reordered, but only if doing so creates the shortest route.
Reference
Measuring Distances
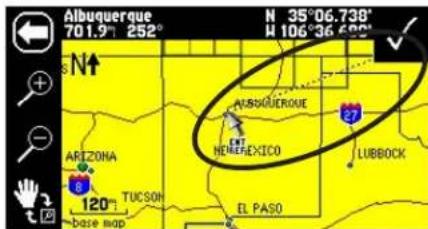
text_image
Albuquerque 701.9° 252° N 35°06.738' H 106°36 482° √ ARIZONA TUCSOI ALBORQUEGUE NEJMEXICO LUBBOCK EL PASO base mapYou can use the Measure Distance feature to do straight-line distancing for places that are miles away from your current location. In the example above, the current location is Olathe, Kansas, and the new point is Albuquerque, New Mexico.
Measuring Distances Between Two Places
You can get an idea of how far two points are from each other by using the Measure Distance feature. This feature measures from point to point in a straight line. It does not consider roads.
To measure the distance between two points, make sure you are currently viewing the Map page. Then, press the unit or remote MENU key. A Menu page will appear. Select Measure Distance from this page. An on-screen pointer (a blue thumb tack) at your current physical location (or current point) will appear on the Map page. In our example below, the current location is the Midland Theater.
Item under your map pointer
Distance and direction from the thumb tack to the map pointer
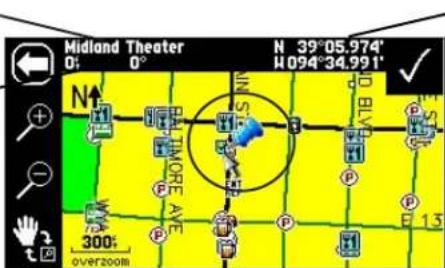
text_image
Midland Theater N 39°05.974' W094°34.991' N S MORE AVE BLYD P P P P P P 300° overzoom- Coordinates of your map pointer
Touch a point anywhere on line that extends from the on-screen pointer to your new point will appear:
the Map page. A dotted
The new location, the Bistro, is .1 miles and 244° from the thumb tack.
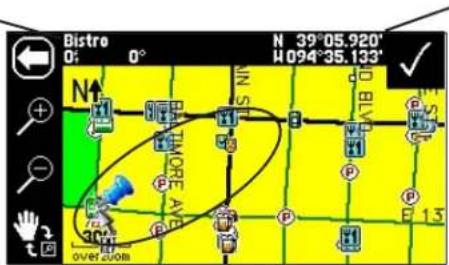
text_image
Bistro 0° 0° N 39°05.920' 4 094°35.133' N IN S BLV P P P P P P over zoomThe coordinates of the new location you selected (the Bistro).
To move the thumb tack to the new location (Bistro), touch the check mark at the top right of the Map page. The on-screen pointer (blue thumb tack) will appear at the new location. In our example below, then, the Bistro becomes the current point.
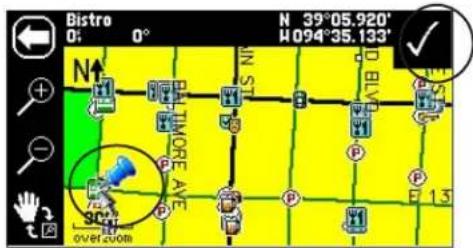
text_image
Bistro 0° N 39°05.920' W 094°35.133' N TIME AVE P P P P P F 13 over.comYou can measure distances from the Bistro to other locations:
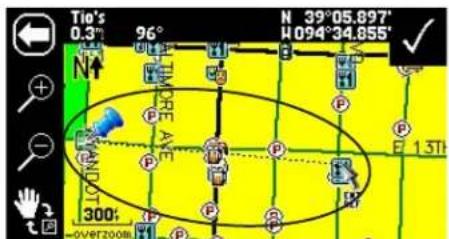
text_image
Tio's 0.3° 96° N 39°05.897' H094°34.855' N↑ P RE AVE P P P P P F 1.5TH 300: OVERZOOMTo stop measuring points, press the MENU key and then select the Stop Measuring icon. Or, simply touch the white arrow in the top left side of the Map page.
Reference
Measuring Distances
The Measure Distance feature provides general information and measures distances in a straight line. It is best used if you are in an area where no roads are available.
Reference
Adjusting Backlight/Contrast
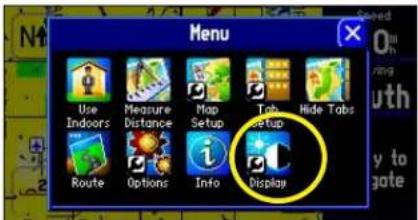
text_image
Menu Use Indoors Measure Distance Map Setup Tab Hide Tabs Route Options Info Setup DisplayAdjust your StreetPilot's backlight and contrast by pressing the Display icon on the Menu page, shown above. Access the Menu page by pressing the MENU key on your StreetPilot.
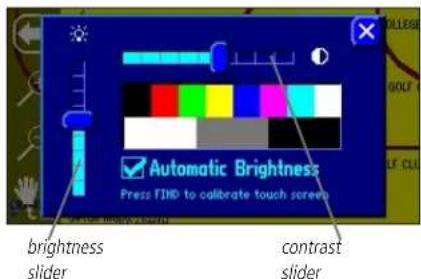
text_image
Automatic Brightness Press FIND to calibrate touch screen brightness slider contrast sliderCustomizing your StreetPilot 2620/2660
If you've experimented with creating routes and finding places using your StreetPilot, you may feel you're ready to customize it to suit your navigational needs. Take a moment to look at the options in this section and decide which features you'd like to customize.
Adjusting the Backlight and Contrast
The StreetPilot touchscreen display and keys are illuminated for operation at night or in bright sunlight. Backlight intensity and screen contrast are adjustable. When operating the StreetPilot at extreme temperatures, you may find that minor adjustments are needed to obtain the clearest screen.
To adjust screen backlighting and contrast:
- Press the remote or unit MENU key. Select 'Display' from the 'Menu' page.
- Adjust the backlight and the contrast to the desired level by experimenting with various bright and contrast combinations. To have the unit automatically adjust the brightness, place a check in the 'Automatic Brightness' box. For optimum Automatic Brightness results, set the brightness to a middle level. If Automatic Brightness is checked, the lower the brightness slide level is set, the sooner the unit reaches a minimum brightness level. The unit automatically adjusts the level depending on ambient light conditions. (Note: If Auto Brightness is checked and you move the 'brightness' slider bar to its highest setting, the brightness for the unit will not be able to automatically adjust itself.)
Turning off Satellite Reception for Indoor Use
Use Indoors (or) Use Outdoors — The Use Indoors option stops satellite reception, speeds Map page drawing, and is used for practicing with the unit. The 'Use Outdoors' option receives satellites for real-time navigation.
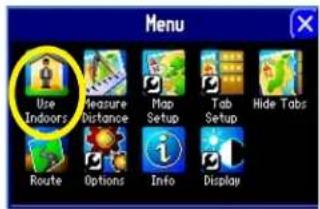
text_image
Menu Use Indoors Feature Distance Map Setup Tab Setup Hide Tabs Route Options Info DisplayCustomizing your Map Page
You can customize they way information appears on the Map page in order to make your viewing experience more pleasurable. For example, you can change the color of the Map page, show more or less detail on the Map page, or even prevent items such as railroads from appearing on the Map page.
Many of your changes to the Map page can be made by pressing the Map Setup icon on the Menu page. Access the Menu page by pressing the MENU key on your StreetPilot. A Map Setup page appears, which features five tabbed sections: Map, Line, Point, City, and Area.
Note that your StreetPilot's factory settings (or default settings) do not need to be changed in order for your unit to function completely. Experiment with a variety of settings as you become more familiar with your StreetPilot. If you do not like your trial settings, you can change some or all of them. See the following page for instructions on resetting all of your customized settings on the Map Setup page.
Map tab
Map Detail — Adjusts the amount of detail that will be displayed on your Map page. Most shows maximum detail and Least shows minimum detail. The higher the detail level, the slower the map redrawing time. Select Most once you have focused in on a small map area and wish to view lots of detail in that area.
Orientation — Selecting North Up displays the map with North at the top. Selecting Track Up automatically rotates the map to keep your current direction of travel at the top of the page. A white North indicator is displayed on the map when in the Track Up mode. The indicator always points to North. An 'N' with a black arrow pointing up displays while in North Up. To quickly change the map orientation, touch the Orientation icon in the upper left to toggle between North Up and Track Up.
Color Mode — Select between Day, Night, or Automatic for best viewing conditions. Day shows a mostly yellow background. Night shows a black background for less intensity in a dark environment, which provides easier viewing while driving at night. Automatic allows your StreetPilot to automatically switch between the two (depending on the time of day as well as the StreetPilot's calculation of sunrise and sunset).
Reference
Customizing the Map Page
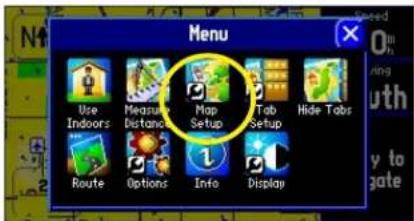
text_image
Menu Use Indoors Measure Distance Map Setup Tab Setup Hide Tabs Route Options Info DisplayMany of your changes to the Map page can be made by pressing the Map Setup icon on the Menu page, shown above. Access the Menu page by pressing the MENU key on your StreetPilot.
The Orientation icon indicates Track Up. Touch it again to switch to North Up.
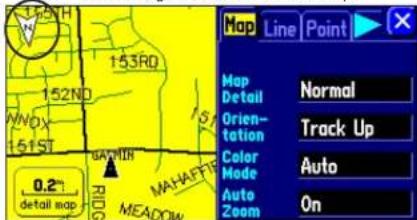
text_image
Map Line Point 153RD 152ND 151ST 0.2" detail map MAHAFFR MEADOW Map Detail Orientation Color Mode Auto Zoom Normal Track Up Auto OnA series of "file tabs" allow you to change page viewing options on the Map Setup page, shown above.
Reference
Customizing the Map Page
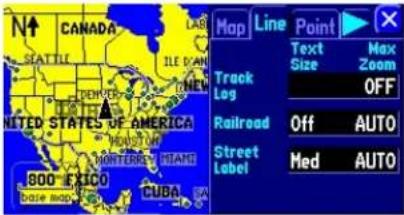
text_image
N↑ CANADA SEATTLE UNITED STATES OF AMERICA MINNESOTA HIANS 800° EXICO CUBA Track Log Railroad Street Label Text Size Max Zoom OFF Off AUTO Med AUTOThe Map Setup page shown above shows the Line tab settings. You can change one or all of the settings. To restore them to their original settings, press your StreetPilot's MENU key. A Menu page will appear, as shown below.
To restore the Line tab settings, select the Reset Settings icon below. To restore all Map Setup settings, select Reset All Settings.
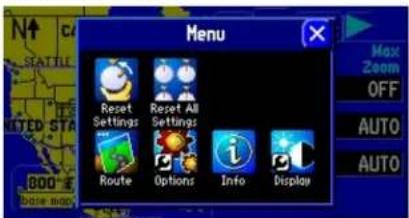
text_image
Menu Reset All Settings Route Options Info Display Max Zoom OFF AUTO AUTOAutoZoom — When On, the Map page zooms in and out as you travel. As you approach a turn, the Map page progressively zooms in. After the turn is completed, it will zoom out to show you the entire route.
Line, Point, City, and Area tabs
Line tab — Controls how the track log, railroads, and street labels are displayed on the Map page. By default, railroad names are not displayed.
Point tab — Controls how waypoints, exits, and POIs (points of interest) are displayed on the Map page.
City tab — Controls how cities of various sizes are displayed on the Map page.
Area tab — Controls how rivers, lakes, parks, and other areas such as airports, shopping malls, and hospitals are displayed on the Map page.
Each of the tabs above contain two common settings: Text Size and Max Zoom;
Text Size — Specifies how large or small the names of items on your Map page will display. For example, you may want names of lakes to appear in medium letters and names of large cities to be in tall letters. You may want the names of parks to appear in short letters or not appear at all. If you do not want the name of an item to appear on the Map page, select Off in the Text Size field.
Max Zoom — Specifies the maximum map scale at which a map item displays. If AUTO is selected, the maximum map scale is determined by the Detail setting to prevent your Map page from becoming too cluttered. If OFF is selected, the item will not be shown.
Some map data is only visible at certain zoom scale ranges. For example, you may set Street Label (from the Line tab) to a Max Zoom of 200 miles, but the street names would not show above a 0.8 mile zoom scale. Setting the Max Zoom to Auto generally gives the best display performance.
Resetting Map Setup Default Settings
You may reset (restore) map settings for each individual setup tab or for all tabs. First, make certain you are on the Map Setup page. If you want to reset one tab setting, make certain that tab is highlighted on the Map Setup page. Then, press the MENU key from your StreetPilot or remote. A Menu page appears. From
the Menu page, select the Reset Settings icon. All settings for that tab will reset to its original settings. Select the Reset All Settings icon if you want to restore every original setting on the Map Setup page.
Hiding/Showing Data Tabs on your Map Page
As you have discovered while using your StreetPilot, the data tabs on the Map page display offer a variety of useful information. You can also customize what type of information appears in each data tab and you can change the color of the data fields. You can even hide the data tabs if you do not want them to appear while you are driving. Before you customize the tabs, recall that your StreetPilot uses two different sets of display tabs, depending on your navigation mode. When you are simply driving down the road with your StreetPilot turned on but you are not navigating a route (driving mode), you will see Mapping tabs. When you are navigating an active route (routing mode), you will see Routing tabs.
Mapping tabs are displayed when you are merely driving down the road with your StreetPilot turned on (driving mode).
Routing tabs are displayed when you are navigating a route (routing mode).
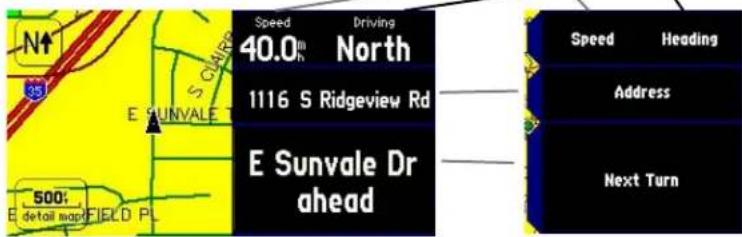
text_image
Speed Driving 40.0m North 1116 S Ridgeview Rd E Sunvale Dr ahead 500: detail map FIECD PL Speed Heading Address Next Turn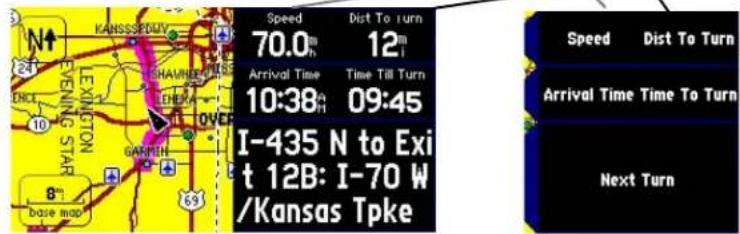
text_image
Speed Dist To Turn 70.0 m 12 m Arrival Time Time Till Turn 10:38 m 09:45 I-435 N to Exi t 12B: I-70 W /Kansas Tpke Speed Dist To Turn Arrival Time Time To Turn Next TurnReference
Hiding/Showing Data Tabs
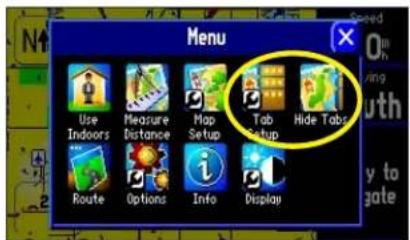
text_image
Menu Use Indoors Measure Distance Map Setup Tab Setup Hide Tabs Route Options Info DisplayUse the Tab Setup and Hide Tab icons to customize and display/hide your data tabs. Access the Menu page, shown above, by pressing the MENU key from your StreetPilot.
When you select Tab Setup, a page showing Mapping and Routing tabs will appear, as shown below.
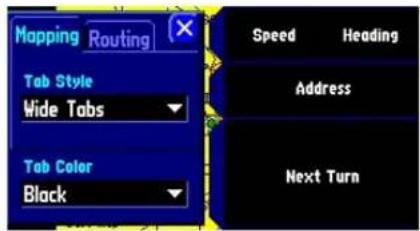
text_image
Mapping Routing Tab Style Wide Tabs Tab Color Black Speed Heading Address Next TurnReference
Hiding/Showing Data Tabs
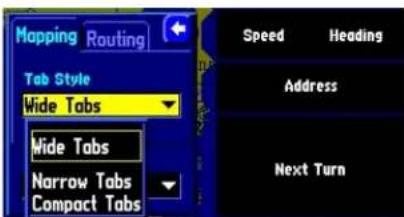
text_image
Mapping Routing Tab Style Wide Tabs Wide Tabs Narrow Tabs Compact Tabs Speed Heading Address Next TurnYour StreetPilot includes three tab styles that contain pre-set information that will appear in each data tab. Note the difference between information displayed in the 'Wide Tabs' setting above and the 'Narrow Tabs' setting below.
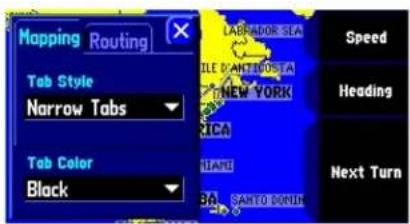
text_image
Mapping Routing Tab Style Narrow Tabs Tab Color Black ABRADOR SEA FILE DANTHOSETA NEW YORK KICA LEANE BGA SANTO BOLDEN Speed Heading Next TurnYour StreetPilot includes three tab styles that contain pre-set information that will appear in each data tab (see the examples at left). You can choose from one of these three tab styles, or you can create your own customized tab style.
To change the information that appears in the data tabs, press MENU from your StreetPilot (or remote) to access a Menu page. At the Menu page, select Tab Setup. A Tab Setup page that displays both a Mapping and a Routing tab will appear. Follow the instructions below
To choose from one of the three pre-set data tabs:
- From the 'Tab Setup' page, select either the 'Mapping' or 'Routing' tab.
- Select the 'Tab Style' drop-down box to reveal a list of styles: Wide Tabs, Narrow Tabs, or Compact Tabs.
- Choose one of the three styles. A preview of the layout shows on the right side of the page as well as the type of data that is displayed with the style you selected. Select a style for the 'Mapping' tab, and then for the 'Routing' tab.
To create your own customized data tabs:
- From the 'Tab Setup' page, select either the 'Mapping' or 'Routing' tab.
- Press MENU on the unit or remote. A 'Menu' page will appear.
- From the 'Menu' page, select 'Custom Setup.'
- Select the tab button you wish to customize (Tab 1, Tab 2...). A 'Select Info list will appear. It includes the name of the data you can include in a tab.
- Select the name of data you wish to display. A 'Select Tab' page will appear. It shows a variety of tab sizes (if available) from which to select as well as other data types that can be displayed (if possible) with the data type you selected.
- Select 'Prev' (Previous) or 'Next' to cycle through the available tab types.
- When the desired tab appears, select 'OK.' When you have selected types for all tabs, pressQUIT on the remote or touch the X in the upper right corner.
Note: When creating customized tabs, experiment with a variety of options. If you wish to return to the original tab setting, select Wide Tabs in the Tab Style box.
Menu page
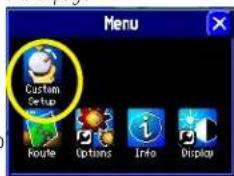
text_image
Menu Custom Setup Route Options Info DisplayPossible Data Tab Customizations
The following types of navigational data can be displayed on the Mapping and Routing data tabs:
Address – Street address at your current location.
Elevation, Feet or Elevation, Meter – Elevation of your current location.
Heading – Current direction of travel.
Next Turn – Shows GPS status when stationary, the next intersection when driving, and driving instructions for the next turn when navigating a route.
Odometer - Running total of distance traveled, based upon the distance between second-by-second location readings, since the Trip Computer was last reset.
Satellite Status – Indicates your StreetPilot's current position fix with GPS satellites.
Speed - Your rate of travel, which can be displayed in miles or kilometers per hour.
Time of Day – Current time.
None - No tab will be displayed.
The Routing data tabs can use the same type of navigational data as 'Mapping' in addition to:
Arrival Distance - Distance to final destination.
Arrival Time – Estimated time of arrival at final destination.
Distance To Turn - Distance remaining to reach the next turn.
Time to Turn – Estimated time to go before reaching the next turn.
To show/hide all data tabs:
From the Map page, press MENU on the unit or remote. Select 'Hide Tabs' or 'Show Tabs' (depending on the current setting).
To change the data tab color:
From the 'Tab Setup' page, select the color box to display a list of optional tab colors. Note that the 'Mapping' and 'Routing' tabs must be the same shade.

Reference
Hiding/Showing Data Tabs
RESTORING ORIGINAL TAB SETTINGS
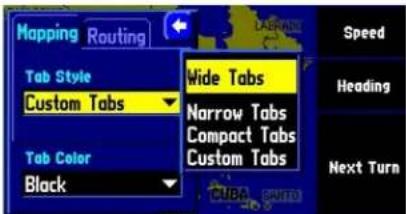
text_image
Mapping Routing Tab Style Custom Tabs Tab Color Block Wide Tabs Narrow Tabs Compact Tabs Custom Tabs CUBA Speed Heading Next TurnThe Wide Tabs setting for both the Mapping and Routing tabs contain the original tab settings. Thus, if you wish to view the original tab settings, select Wide Tabs for both tabs.
To show/hide one or all data tabs using the touchscreen:
From the Map page, touch the individual tab to hide it. The tab is replaced by a blue placeholder on the right side of the display. Touch the placeholder to show the tab again. A tab turns red when it is selected.
To show/hide more multiple tabs, touch and hold on the left side of the topmost group of tabs you wish to hide, hold and slide your finger in an 'L' shape down and right to the side of the display. Repeat the process in reverse to redisplay the tabs.
Reference
Customizing the Overall Setup
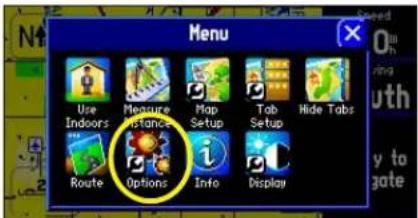
text_image
Menu Use Indoors Measure Instance Map Setup Tab Setup Hide Tabs Route Options Info DisplaySelect the Options icon from the Menu page to display a System Setup Options page. Access the Menu page by pressing your unit's MENU key.
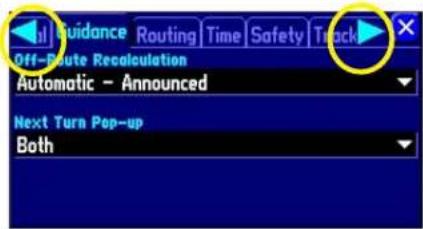
text_image
Guidance Routing Time Safety Track Off-Route Recalculation Automatic - Announced Next Turn Pop-up BothThe System Setup Options page features a variety of customizable tabs. To bring hidden tabs into view, or to scroll left or right, touch the arrows at the top of either side of the System Setup Options page. You can also touch and drag a tab name left or right
Customizing the Overall Setup of Your StreetPilot
Your StreetPilot allows you to make customizations within the unit's overall system. Even though your unit is designed to perform well without changing any of these settings, feel free to make customizations as you become more familiar with your StreetPilot.
Customize the overall setup by pressing your StreetPilot'sMENU key. A Menu page will appear. From the Menu page, select the Options icon. A System Setup Options page will appear. This page shows a number of tabs which contain a variety of features that you can customize. Tab names and their functions begin on the following page of this manual.
Select any tab by touching the desired tab's name (such as General or Safety). To change a setting within each tab, simply touch the down arrow associated with that setting. A drop-down box of options will appear. Touch the option you desire and the change will take effect immediately.
Restoring your StreetPilot's Original Settings
At some point, you may desire to restore the default settings for one or more tabs on the System Setup Options menu. You can restore the original settings by following the instructions below. Note that you can only restore the original settings one tab at a time (such as all settings for the Time tab or all settings for the Tracking Log tab).
To restore the original settings:
- From the 'System Setup Options' page, select the desired tab whose original settings you wish to restore by touching the tab name.
- Press the unit or remote MENU key. A 'Menu' page will appear.
- Select 'Reset Settings.' The original settings for that particular tab will be restored.
- If desired, repeat steps 1-3 to restore original settings to other tabs.
Menu page
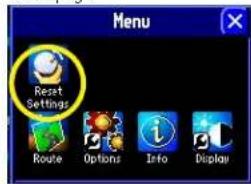
text_image
Menu Reset Settings Route Options Info DisplayTabs Included on the System Setup Options Page
The tab headings and associated subheadings on the System Setup Options page are:
General - Color Scheme, Units, Voice, Touchscreen Tone, Attention Tone, Keypress Tone
Guidance - Off-Route Recalculation, Next Turn Pop-Up
Routing – Route Preference, Ask Me My Preference, Calculation Method, Calculate Routes for Avoidance – Avoid (U-Turns, Toll Roads, Highways, Unpaved Roads), Custom Avoids
Custom Road Prefs – Major, Medium, Minor
Time - Time Format, Time Zone, Daylight Savings, Time, Date, Sunrise, Sunset
Safety – Switches 'Safe Mode' On and Off
Track Log - Recording, Percentage Full, Clear Track
Language - Text Language, Voice Language
Interface (2660 Only) - USB Format, Serial Format
The following describes, in more detail, the available settings for each tab item.
General tab
Color Scheme – Allows you to change the colors of the background and letters:
• Dark: Displays a black background with white letters.
• Bright: Displays a white background with black letters.
- Auto: Automatically adjust switches to 'Dark' at sunset and 'Bright' at sunrise.
Units – Allows you to measure distance in miles (Statute) or kilometers (Metric). If you select Statute, speed is shown in miles per hour and elevation is shown in feet. Metric shows speed in kilometers per hour and elevation in meters. Note: If you customize your Data Tabs to show Elevation, Feet or Elevation, Meter, these settings will still appear despite your Units setting (see page 43).
Reference
Customizing the Overall Setup
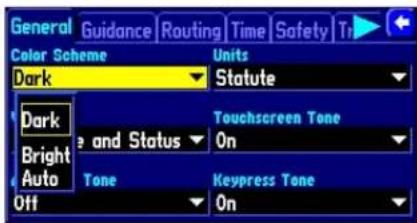
text_image
General Guidance Routing Time Safety Tr Color Scheme Units Dark Statute Dark Bright Status Touchscreen Tone Auto Tone Keypress Tone Off OnCustomize a setting by simply touching the white arrow associated with that setting. Choose from the options that will appear in the drop-down box.

text_image
Guidance and Status Route Guidance SPEAK Key Only Guidance and Status Units Statute Touchscreen Tone On Attention Tone Off Keypress Tone OnBy selecting SPEAK Key Only, the unit only talks when the SPEAK key is pressed.
Reference
Customizing the Overall Setup
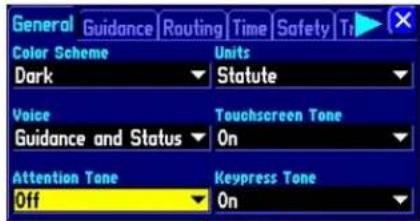
text_image
General Guidance Routing Time Safety T1 Color Scheme Units Dark Statute Voice Touchscreen Tone Guidance and Status On Attention Tone Keypress Tone Off OnThe Attention Tone field determines whether voice prompts are preceded by a chime.
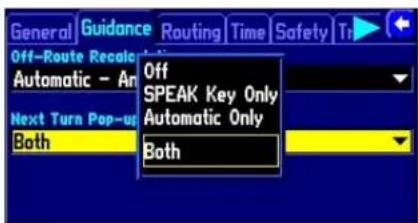
text_image
General Guidance Routing Time Safety Tr Off-Route Recalc Automatic - An Next Turn Pop-up Both Off SPEAK Key Only Automatic Only BothSelect Both on the Guidance tab, and the Next Turn page will automatically appear as you approach a turn. If you wish to hear the instructions again, press the unit's SPEAK key.
Voice - This setting determines when the StreetPilot "speaks."
- Guidance and Status: The unit speaks guidance messages during route navigation, as well as status messages. Guidance messages include such route navigation messages as "drive point eight miles west, then turn right." For each turn on a route, the voice gives instructions three times: after you have completed a turn and are starting a new leg of the route; as you are approaching the next new turn; and just before you reach the next turn. Status messages include phrases such as "lost satellite reception."
- Route Guidance: The unit speaks guidance messages during route navigation, as described above. It does not give status messages.
- SPEAK Key Only: The unit only speaks when the SPEAK key is pressed (it will not talk otherwise).
Touchscreen Tone – Allows you to turn the touchscreen click sounds On or Off.
Attention Tone–Determines whether the voice prompts are preceded by a chime. This is turned off by default.
Keypress Tone – Allows you to turn the keypress beeper sounds On or Off. A beep confirms that a key (such as MENU, FIND, SPEAK) on the unit or remote has been pressed.
Guidance tab
Off-Route Recalculation – Controls how the StreetPilot recalculates the route when you depart from its original instructions.
- Prompted: You will be asked if you want the unit to recalculate the route.
- Automatic - Announced: The unit will automatically recalculate and announce to the user it is recalculating.
- Automatic - Silent: The unit will automatically recalculate the route, but it will not announce to the user it is recalculating.
- Off: The unit does not recalculate when you go off route.
Next Turn Pop-Up – Controls when the Next Turn page is displayed. Recall that the Next Turn page only appears during an active (or simulated) route as you are approaching a turn.
- Off: The Next Turn page will never appear.
- SPEAK Key Only: The Next Turn page will only appear when you press the SPEAK key.
• Automatic Only: The Next Turn page will automatically appear as you approach a turn. - Both: The Next Turn page will automatically appear as you approach a turn, and if you wish to hear the instructions again, you can press the unit's SPEAK key.
Routing tab
The Routing tab allows you to customize the StreetPilot's routing features.
Route Preference – Determines which criteria are used for calculating your route. The following options are available:
- Faster Time: Time is used as the criterion for calculating your route. Routes calculated with this setting are faster to drive but may be longer in distance.
- Shorter Distance: Distance is used as the criterion for calculating your route. Routes calculated with this setting are shorter in distance but may take more time to drive.
- Off Road: A direct line from your current physical location to your destination is displayed. This may be useful when you are travelling outside of detailed map coverage areas, or where no roads exist.
- Custom: Route calculations are based on the settings you create on the Custom Road Preferences page. Select the Custom Roads Prefs button on the Routing tab to view the Custom Road Preferences page. For information on customizing this page, see page 51.
Ask Me My Preference – Determines whether you will be asked to select a Route Preference (Faster Time, Shorter Distance, Off Road, or Custom) before route calculations. Your options are Yes or No:
- Yes: The Route Preference page will be displayed before route calculations. This setting is recommended if you frequently have a different preference for your routes.
- No: The Route Preference page will not appear. Instead, your StreetPilot will use your current Route
Reference
Customizing Route Settings

text_image
General Guidance Routing Time Safety T Route Preference Ask Me My Preference Faster Time Yes Calculation Method Calculate Routes for Better Route Car/Motorcycle Avoidance Custom Road PrefsThe Routing tab allows you to customize the StreetPilot's many routing features.

text_image
Route Preference Faster Time Shorter Distance Off Road Don't Ask Again Route Preference Faster Time Shorter Distance Off Road Custom Don't Ask AgainThe Custom option only appears on the Route Preference page if you customize the settings on the Custom Road Preferences page. See page 51.
Reference
Customizing Route Settings
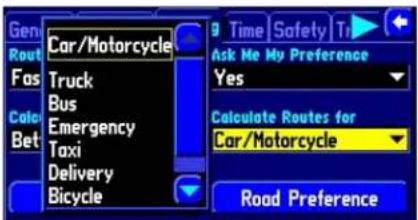
text_image
Gen Route Fas Color Bet Car/Motorcycle Truck Bus Emergency Taxi Delivery Bicycle Time | Safety | Time Ask Me My Preference Yes Calculate Routes for Car/Motorcycle Road PreferenceUsing the 'Calculate Routes for' option allows you to take full advantage of the routing information contained in the StreetPilot's mapping software for planning the most efficient route for your type of vehicle.
The following options are available:
- Car/Motorcycle
• Truck (large semi-tractor/trailer/lorry)
• Bus
• Emergency (ambulance, fire department, police, etc.)
• Taxi
• Delivery (delivery vehicles) - Bicycle (avoids routing through interstates and major highways)
- Pedestrian
Preference setting for all route calculations. This setting is recommended if you usually have the same preference for your routes.
Calculation Method – Allows you to control how thoroughly the StreetPilot searches for the perfect route. A trade-off exists between the length of time the unit takes to find a route and the quality of that route (given the calculation criterion selected under Route Preference settings). The following options are available:
- Quickest Calculation: This calculation returns the fastest results, but it might not find the best route.
- Quick Calculation: This takes a bit more time to calculate than the 'Quickest Calculation' method, but generates a better quality route.
- Better Route: This generates an even better quality route, but uses a longer calculation time than the 'Quick Calculation' method.
- Best Route: This generates the most optimal route, but takes the longest time to calculate.
Calculate Routes for – Lets you take full advantage of the routing information built into the StreetPilot's mapping software. Some roads have vehicle-based restrictions. For example, a street or gate may be accessible by emergency vehicles only, or a residential street may not allow commercial trucking traffic. By specifying which vehicle type you are driving, you optimize the route for your vehicle type. Likewise, the StreetPilot may give you access to roads or turns that wouldn't be available to normal traffic.
Avoidance button
The Avoidance button appears on the Routing tab and allows you to avoid certain road types that may be undesirable on your route. The StreetPilot will use these road types only if alternative routes take you too far out of your way or if no other road is available.
- U-Turns: If checked, the StreetPilot does not direct you to make a U-turn on non-divided highways.
- Toll Roads: If checked, the StreetPilot avoids entering toll roads.
• Highways: If checked, the StreetPilot avoids routing you along interstates and major highways. - Unpaved Roads: If checked, the StreetPilot avoids unpaved surfaces.
- Custom Avoids: You can create a list of roads or areas you would like to avoid. Select Custom Avoids and an Avoid List page will appear. Select Add Avoid. From there, choose Avoid Road or Avoid Area.
- Avoid Road: Choose this option if you want to map out a few sections of a road or even an entire road to avoid. A Map page appears, enabling you to mark a "start point" on a road. Simply move the map pointer onto the beginning section of a road you wish to avoid and touch the check box in the top right-hand corner of the page. Once you touch the check box, an "end point" Map page appears. Notice that a blue thumb tack has marked your "start point." Position your map pointer onto the end section of a road and touch the check box in the top right-hand corner of the page. A map of the avoided roads appears, along with a default name (usually street names). You can change this name by touching it and entering a new name by using the mini keyboard that appears.
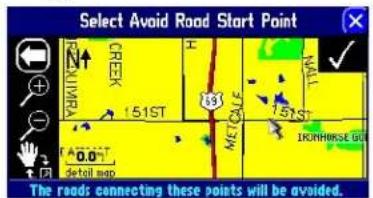
text_image
Select Avoid Road Start Point CREEK 151ST METALS 151ST METALS 0.0" detal map The roads connecting these points will be avoided.Place the map pointer over the "start point" as shown at left. Then, touch the check box in the top right corner.
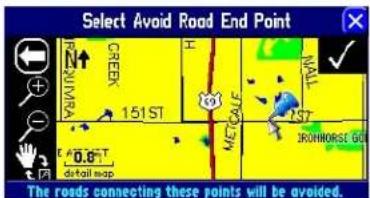
text_image
Select Avoid Road End Point CREED 151 ST METCALF JROHHORSE GO 0.0 T detail snap The roads connecting these points will be avoided.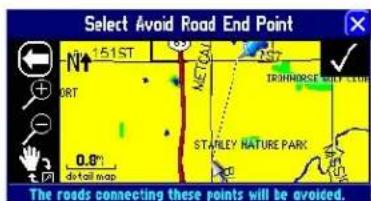
text_image
Select Avoid Road End Point N1 151ST PORT 0.8' detail map STAWLEY NATURE PARK NST TRIHNORSE CITY CLUB The roads connecting these points will be avoided.Once you touch the check box in the top right corner, a blue thumb tack marker will appear.
Move the map pointer over the "end point" as shown above. Then, touch the check box in the top right corner.
Reference
Customizing Route Settings
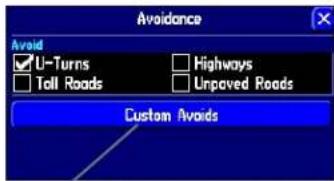
text_image
Avoidance Avoid ✓ U-Turns □ Toll Roads Highways □ Unpaved Roads Custom AvoidsSelect Custom Avoids to display the Avoid List page, shown below.

text_image
0 Avoids Avoid List Add Avoid Clear ListSelect Add Avoid, and an Add Avoid page will appear, shown below.
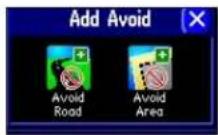
You can opt to avoid parts of roads (or entire roads), or you can block out entire areas to avoid.
Reference
Customizing Route Settings
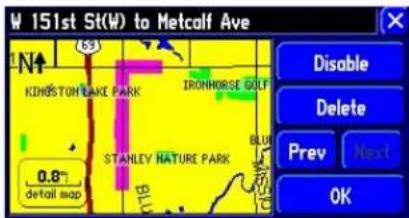
text_image
W 151st St(W) to Metcalf Ave N↑ 69 KINGSTON LAKE PARK IRONHORSE GOLF 0.8" DETAIL MAP STAHLEY HATURE PARK BLUE OK Disable Delete Prev NextYou can specify which roads or areas you would prefer not to take when navigating a route. Go to the Avoidance tab on the Routing Setup page. The example above shows two parts of a road that the driver wishes to avoid. The example below shows an entire area that the driver wishes to avoid.
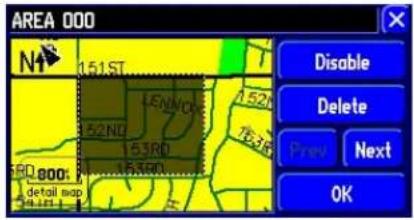
text_image
AREA 000 N 151ST LEN/CK 52ND 153RD 15300 60 800: detail map Disable Delete Prev Next OK- Avoid Area: Choose this option if you want to map out an entire rectangular area--that can include numerous roads--to avoid. A Map page appears, enabling you to mark the first corner of your designated area to avoid. Simply move the map pointer onto the beginning section of an area you wish to avoid and touch the check box in the top right-hand corner of the page. Once you touch the check box, a "second corner" Map page appears. Notice that a blue thumb tack has marked your "first corner." Position your map pointer onto the ending section of an area and touch the check box in the top right-hand corner of the page. A map of the avoided area appears, along with a default name (usually AREA 000). You can change this name by touching it and entering a new name by using the mini keyboard that appears.
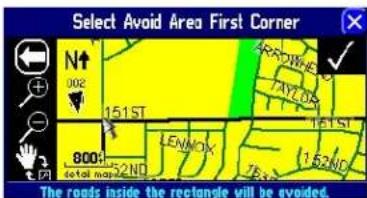
text_image
Select Avoid Area First Corner N↑ 002 151ST 800 52ND LENNOX 151ST 1.62ND ZB The roads inside the rectangle will be avoided.Place the map pointer over the "first corner" as shown above. Then, touch the check box in the top right corner.
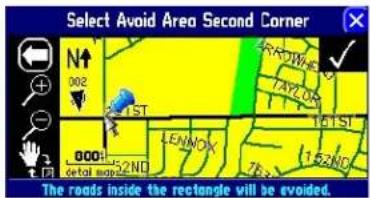
text_image
Select Avoid Area Second Corner 002 001 0001 LENDOK 76.5 1.52ND 101ST TAYZOR TAYZOR 001 002 metal map 52ND The roads inside the rectangle will be avoided.Once you touch the check box in the top right corner, a blue thumb tack will appear.
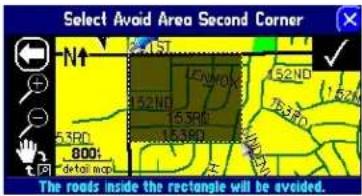
text_image
Select Avoid Area Second Corner N1 4.57 LENMO 1.62ND 1.62ND 1.63RD 1.63RD 800 detail map The roads inside the rectangle will be avoided.Move the map pointer over the "second corner" as shown at left. Then, touch the check box in the top right corner.
Once entered, your StreetPilot will avoid these roads/areas unless no other roads are available or until you remove them from the Avoid List or uncheck them.
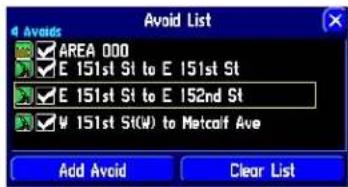
text_image
Avoid List 4 Avoids AREA 000 E 151st St to E 151st St E 151st St to E 152nd St W 151st St(W) to Metcalf Ave Add Avoid Clear ListCustom Road Preferences button
The Custom Road Preferences button appears on the Routing tab and allows you create a customized preference for route calculation. For example, if you plan to take a trip that includes scenic routes, move the Medium Road Category preference bar towards Prefer and the Major Road Category towards Avoid. Your unit attempts to create routes that primarily use medium roads over larger roads. If you do not change any of the Road Category settings (Major, Medium, Minor), the overall Custom Road Preferences setting is equivalent to the Shorter Time setting on the Route Preference window (see page 47).
As you continue to drive with your StreetPilot, it remembers and stores your driving habits. Thus, if you want your unit to automatically optimize the custom route preferences based on your driving habits; simply select the Auto Set button. For example, if you tend to drive slower than expected on minor roads, then the Auto Set option should move the Minor Road Category preference bar towards Avoid to cause the unit to avoid these roads even more than normal.
Select the Reset button if you want the original settings to display.
Note: When you customize this page or use Auto Set, these settings appear as a Custom option on the Route Preference window (see page 47). If you choose to select the Custom option, the Custom Road Preferences page will reappear, giving you an opportunity to further customize the settings.
Reference
Customizing Route Settings
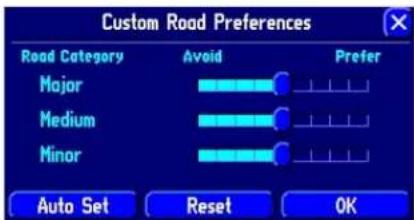
text_image
Custom Road Preferences Road Category Avoid Prefer Major Medium Minor Auto Set Reset OKThe example above indicates that you have no preference in terms of which type of roads your StreetPilot uses when calculating a route. If you desire one type of road, move the slider bar towards Prefer.
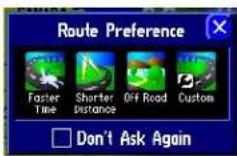
When you customize the Custom Road Preferences page or use Auto Set, these settings appear as a Custom option on the Route Preference window.
The Custom option icon will appear on the Route Preference window--even if you no longer want to use it as an option--until you delete the icon. The next time the Route Preference window appears, press the unit's MENU key and select the Hide Custom icon.
Reference
Customizing the Overall Setup
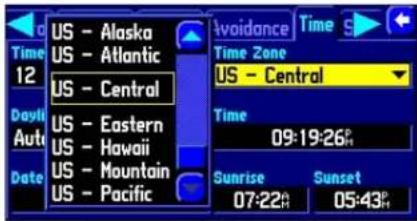
text_image
US - Alaska US - Atlantic US - Central US - Eastern US - Hawaii US - Mountain US - Pacific Avoidance Time S Time Zone US - Central Time 09:19:26' Sunrise 07:22' 05:43'Many time zones are pre-programmed into your StreetPilot, which makes displaying the local time simple.
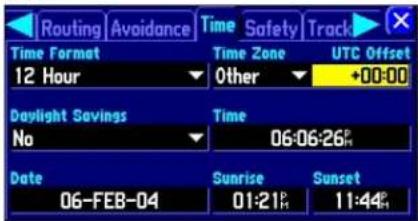
text_image
Routing Avoidance Time Safety Track Time Format Time Zone UTC Offset 12 Hour Other +00:00 Daylight Savings Time No 06:06:26 Date Sunrise Sunset 06-FEB-04 01:21 11:44If the desired time zone is not pre-programmed, select Other and enter the offset from UTC to the local time.
Time tab
Time Format – Allows you to choose either a 12- or 24-hour time format. When you select the 12-hour time format, the clock reads like a standard clock with 12-hour AM and PM cycles. The 24-hour option sets the clock to display a 24-hour cycle (military time).
Time Zone – Can be set to one of the U.S. time zones, or you can choose from a list of cities all over the world. If your time zone is not on the list, select Other. If you select Other, a UTC Offset field appears in the Time Zone field. Touch UTC Offset and then manually enter the difference between UTC and the local time zone by using the mini keyboard that will appear. If you are not certain what the offset is between UTC and the local time zone, experiment. Simply enter incremental offset values until the correct local time appears. Keep in mind that as you move West of the Prime Meridian (0° longitude) the offset is negative (-), and as you move East of the Prime Meridian the offset is positive (+). In other words, it is earlier in the day when you move West and later in the day when you move East.
Daylight Savings – Can be turned On. Off, or set to Automatic.
Time, Date, Sunrise, Sunset – Determined by the satellite information being received; these settings cannot be changed.
Safety tab
Your StreetPilot is equipped with a Safe Mode feature to improve driver safety. By default, this feature is enabled, but can be turned off to allow a passenger to operate the unit. When your vehicle is moving, Safe Mode disables all StreetPilot functions that require significant operator attention and could become a distraction while driving such as map panning, all FIND key functions (except Recent List), all MENU key functions, and creating new routes.

text_image
General Guidance Routing Time Safety T Safe Mode encourages attentive driving by disabling certain interactive features while your vehicle is moving. You may disable Safe Mode to allow a passenger to use these features. WARNING: Do NOT enter data or configure this device while operating your vehicle. Safe Mode OffSafe Mode
When you come to a complete stop, these features are automatically re-enabled.
Track Log tab
The StreetPilot automatically records a history of your locations in the Track Log, creating an electronic "bread crumb" trail of the path you have traveled. Once the log is full, new track points replace the oldest track points. The beginning of the track contains the earliest point while the end contains the most recent ones. The display of the track log on the map can be turned on and off from the Map Setup page (the default is Off). This is primarily for users who are driving off road.
Recording - Select On to record tracks or Off to stop tracks from being recorded.
Percentage Full – Shows the percentage of track memory used.
Clear Track – Clears all of the points of the track log from memory. To clear the track, select Clear Track and then select Yes.
Language tab
The StreetPilot language setup feature allows you to change the languages used for on-screen text and for voice prompting.
Text Language – This changes all on-screen text on all pages and menus to the selected language. The StreetPilot offers text language in the following 14 languages: English, German, French, Italian, Spanish, Swedish, Danish, Portuguese, Dutch, Norwegian, Finnish, Polish, Czech, and Hungarian. Changing the Text Language setting does not affect the display of map data or user-entered data. Map data such as city, street, and point of interest names is always displayed in the language in which it is stored in the map. See Appendix C for information on using diacritical marks commonly used in many European languages.
Voice Language – This changes the language for all voice prompts and messages to the selected language.
Reference
Customizing the Overall Setup
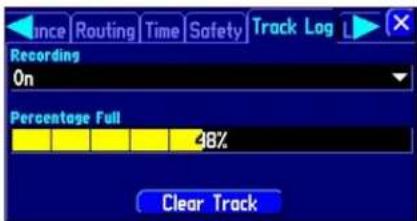
text_image
Balance Routing Time Safety Track Log Recording On Percentage Full 48% Clear TrackPress the Clear Track button on the Track Log page to clear all of the stored track points.
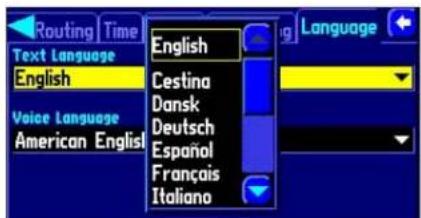
text_image
Routing Time Text Language English Voice Language American English English Cestina Dansk Deutsch Español Français Italiano LanguageYou can change the language for on-screen text and voice prompts separately.
Reference
Setting USB/Serial Formats StreetPilot 2660 Only

text_image
Safety Track Log Language Interface Odometer Wave Type Pulse rate Status Square Wave Calibration Reverse Light Polarity Status High Simulating USB Format Serial Format GARMIN NoneYou can change the USB and serial format settings from the Interface tab. Do not change any of the other settings unless you are an authorized Garmin installer for the StreetPilot 2660.
Interface tab--StreetPilot 2660 Only
The Interface tab only appears on the StreetPilot 2660 with Dead Reckoning (DR) sensors. Most of the information included in this tab is provided for and should be used only by authorized Garmin installers who must install the Dead Reckoning (DR) cable for your StreetPilot 2660. If necessary, you can customize the bottom-row settings on this tab (USB Format and Serial Format).
Your StreetPilot 2660 is set up to transfer data via a USB connection. If you need to use a serial port connection, change the settings below as necessary:
USB Format – If you are using the Garmin USB cable to transfer data, keep USB Format set to Garmin. Change it to None only if you plan to use a serial cable instead of USB.
Serial Format - If you are using the Garmin USB cable to transfer data, keep Serial Format set to None. If you plan to use a serial cable, choose from one of the available settings below:
- Garmin: The proprietary format used to exchange waypoint, route, track log data with a PC via serial connection. Use this format for software updates and to save mapping software to the StreetPilot's pre-programmed hard drive.
• NMEA: Supports the input/output of standard NMEA 0183 version 3.01 data. - Text Out: Supports a standardized, fixed-column ASCII output with data for position, track, speed, etc.
• None: Provides no interfacing capabilities.
Note: Only the USB or the serial cable can be used at one time; you cannot use both at once. Thus, either USB Format or Serial Format must be set to None.
Obtaining the latest Software Upgrades
The System Info page displays the software version that is currently loaded in the StreetPilot. It also shows the StreetPilot's unit ID number, which is used for registration and identification purposes. To access this page, press the StreetPilot MENU key; a Menu page will appear. From the Menu page, select the Info icon, and an Info page will appear. Select the System Info icon and the System Info page will appear.
Software updates for your StreetPilot can be found periodically at our Web site at www.garmin.com. Always check to make sure the version you wish to download is more current than the one you are presently using.
Reference
Software Updates
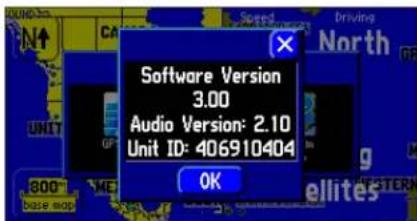
text_image
Software Version 3.00 Audio Version: 2.10 Unit ID: 406910404 OKView your StreetPilot's current software version as well as the unit's identification number on the System Info page.
Reference
GPS Info Page
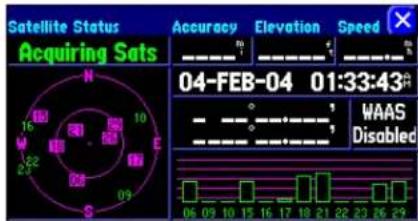
text_image
Satellite Status Acquiring Sats Accuracy Elevation Speed 04-FEB-04 01:33:43# WAAS DisabledA hollow bar (such as satellite numbers 6, 15, and 17) indicates the StreetPilot has found the satellite(s) and is collecting data. Note how the StreetPilot has not yet found satellites 9, 10, 16, 22, and 23.
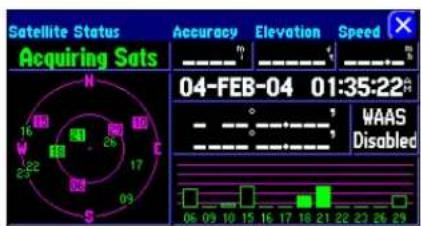
text_image
Satellite Status Acquiring Sats Accuracy Elevation Speed 04-FEB-04 01:35:22 WAAS DisabledSolid green bars indicate the StreetPilot has collected the necessary information and that satellites 18 and 21 are ready for use.
Understanding the GPS Information Page
What is GPS?
The Global Positioning System (GPS) is a satellite-based navigation system made up of a network of 24 satellites placed into orbit by the U.S. Department of Defense. GPS was originally intended for military applications, but the government made the system available for civilian use in the 1980s. GPS works in any weather condition, anywhere in the world, 24 hours a day. There are no subscription fees or setup charges to use GPS.
GPS satellites circle the earth twice a day in a very precise orbit and transmit signal information to Earth. The GPS receiver that is located in your StreetPilot takes this information and uses triangulation to calculate your exact location. Essentially, the GPS receiver compares the time a signal was transmitted by a satellite with the time it was received. The time difference tells the GPS receiver how far away the satellite is. Now, with distance measurements from a few more satellites, the receiver can determine your position and display it on the StreetPilot's Map page.
A GPS receiver must be locked on to the signal of at least three satellites to calculate a 2D position (latitude and longitude) and track movement. With four or more satellites in view, the receiver can determine your 3D position (latitude, longitude and altitude). Once your position has been determined, the GPS unit can calculate other information, such as speed, bearing, track, trip distance, distance to destination, sunrise and sunset, time, and more.
The GPS Information Page
The GPS Information page provides a visual reference of GPS receiver functions, including current satellite coverage, receiver status, and position accuracy. To access this page, press the StreetPilot MENU key; a Menu page will appear. From the Menu page, select the Info icon, and an Info page will appear. Touch the GPS Info icon and the GPS Information page will appear.
GPS satellites are positioned throughout the sky. As soon as you turn on your StreetPilot, it attempts to acquire satellite reception. From the sky view area on the GPS Information page, you can see which satellites are currently in your area; each satellite has its own number (from 1-31).
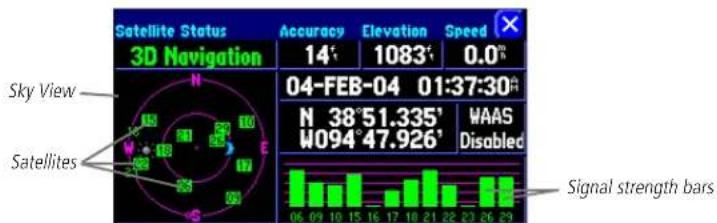
text_image
Satellite Status 3D Navigation Accuracy 14° Elevation 1083° Speed 0.0m Sky View N 04-FEB-04 01:37:30A N 38°51.335° W094°47.926° WAAS Disabled Satellites Signal strength barsA signal strength bar appears for each satellite in view; the satellite's number appears beneath each bar. The progress of satellite acquisition is shown in three stages:
- No signal strength bar: The GPS receiver in your StreetPilot is looking for the satellite(s) indicated. The corresponding number(s) on the sky view is not highlighted.
- Hollow signal strength bar: The GPS receiver has found the satellite and is collecting data. The corresponding number(s) on the sky view is highlighted in pink.
- Solid green signal strength bar: The GPS receiver has collected the necessary data and the satellite(s) is ready for use. The corresponding number(s) on the sky view is highlighted in green.
Each satellite has a 30-second data transmission that must be collected (hollow signal strength bar, as described above) before that satellite can be used for navigation (solid green signal strength bar). Once a fix has been calculated, the StreetPilot then updates your position, ground track, and ground speed by selecting and using the best satellites in view.
Sky View and Signal Strength Bars
The sky view and signal strength bars give you an indication of which satellites are currently visible, which satellites are being used to calculate a position fix, and the signal quality. The sky view provides a "bird's eye" view of each satellite position relative to your unit's last known position. The outer circle represents the horizon in all directions (with cardinal heading references). The inner circle represents an elevation of 45^ above the horizon. Any satellite depicted near the center is directly overhead. You can use the sky view to help determine whether any satellites are being blocked and whether you have a current position fix (indicated by 2D Navigation or 3D Navigation in the Satellite Status field). You can also set the
Reference
GPS Info Page
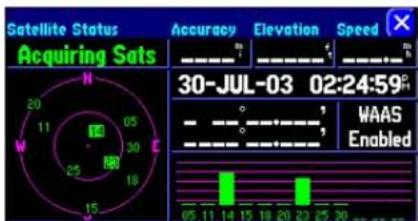
text_image
Satellite Status Acquiring Sats Accuracy Elevation Speed 30-JUL-03 02:24:59# WAAS Enabled'Acquiring Sats' means the receiver is collecting data from available satellites but has not collected enough data to calculate a position fix.
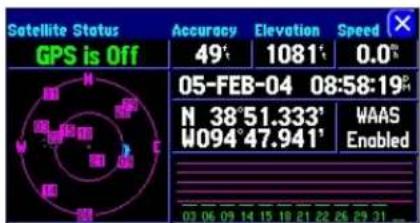
text_image
Satellite Status GPS is Off Accuracy Elevation Speed 49° 1081° 0.0° 05-FEB-04 08:58:19° N 38°51.333° WAAS W094°47.941° Enabled'GPS is Off' tells you the unit is being used indoors and cannot be used for navigation.
Reference
GPS Info Page
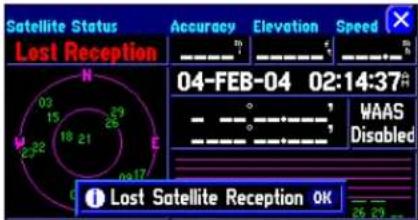
text_image
Satellite Status Lost Reception Accuracy Elevation Speed 04-FEB-04 02:14:37# WAAS Disabled Lost Satellite Reception OKYou can temporarily lose satellite reception if no satellite information is received for a few minutes, or if the number of satellites received to determine a position fix is insufficient.
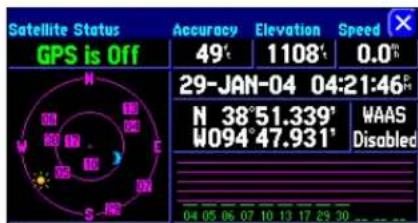
text_image
Satellite Status GPS is Off Accuracy Elevation Speed 49° 1108° 0.0° 29-JAN-04 04:21:46° N 38°51.339° WAAS W094°47.931° Disabled 04 05 06 07 10 13 17 29 30The sun and moon icons on the satellite sky view are for reference (note that the icons are a bluish color if the sun/moon is below the horizon). You can see the sunrise and sunset times for your current location and date on the Time Setup page under System Setup.
sky view to a Track Up instead of North Up (default setting) orientation; this will cause the top of the sky view to align to your current track heading.
Satellite Status
As soon as the GPS receiver in your StreetPilot has collected the necessary data to calculate a fix, the status field indicates a 2D or 3D status (for 2D, you may need to enter your elevation). Satellite Status is indicated at the top left corner of the page. The status is shown as one of the following conditions:
Searching Sky – The GPS receiver is looking for any available satellites in view.
AutoLocate – The GPS receiver is initializing and collecting new almanac data. This process can take up to five minutes, depending on the satellites currently in view.
Acquiring Sats - The GPS receiver is collecting data from available satellites but has not collected enough data to calculate a position fix.
2D Navigation – At least three satellites with good geometry have been locked onto; a two-dimensional position fix (latitude and longitude) is being calculated. (Reads 2D Diff Nav if WAAS-enabled)
3D Navigation – At least four satellites with good geometry have been locked onto; your position is now being calculated in latitude, longitude, and elevation. (Reads 3D Diff Nav if WAAS-enabled)
Lost Reception – The GPS receiver has temporarily lost satellite reception.
Poor GPS Coverage – The GPS receiver isn't tracking enough satellites for a 2D or 3D fix due to bad satellite geometry or due to a shaded antenna (such as driving between buildings)
Not Usable – The StreetPilot is unusable, possibly due to incorrect initialization or abnormal satellite conditions. Turn the unit off and back on to reset and re-initialize the receiver if necessary.
GPS is Off – The StreetPilot is being used indoors and cannot be used for navigation.
Dead Reckoning (2660 only) – The StreetPilot 2660 isn't tracking enough satellites for a 2D or 3D fix due to bad satellite geometry or a shaded antenna (such as driving between buildings), and is using Dead Reckoning.
'Poor Satellite Reception' Menu
If no satellites are received for several minutes (or if too few satellites are received to determine a position fix), a Poor Satellite Reception message appears. You can: turn off the GPS for using the unit indoors for practice; update your approximate location (quicker); or have the unit automatically search for the satellites (takes longer). Updating your approximate location ensures that the StreetPilot is searching for the correct satellites and is useful if you have traveled over 500 miles with the unit turned off. If the unit has been stored for a few months and the displayed date is incorrect, the StreetPilot does not know the current positions of the GPS satellites. Additionally, the Poor Satellite Reception message may appear when you first use your StreetPilot. The prompt may also appear during normal use if the antenna is shaded or when the unit is used indoors.
Accuracy
The GPS Information page indicates the accuracy of the position fix. See Appendix F for the StreetPilot's performance specifications which include accuracy.
GPS Information Page Options
To display the GPS Information page options, press MENU (with the GPS Information page displayed). The following options are available: Track Up/North Up, New Elevation, New Location, and Enable WAAS.
Track Up/North Up – Changes the sky view display from a North Up orientation to Track Up, which aligns the Map page to the current direction of travel (ground track). You can also touch the sky view on the GPS Information page to toggle between Track Up and North Up.
New Location – Forces the StreetPilot to search for any available satellite to determine its position. This option can be used only if you don't have a GPS fix. It is useful if you've relocated a long distance (greater than 500 miles) from where the StreetPilot was last used. In such instances, without initialization, the StreetPilot may be looking for the wrong group of satellites.
Reference
GPS Info Page
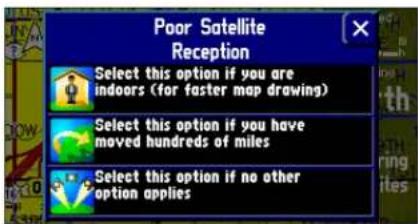
text_image
Poor Satellite Reception Select this option if you are indoors (for faster map drawing) Select this option if you have moved hundreds of miles Select this option if no other option appliesThe 'Poor Satellite Reception' menu gives you several options when an insufficient number of satellites is received to determine a position fix.
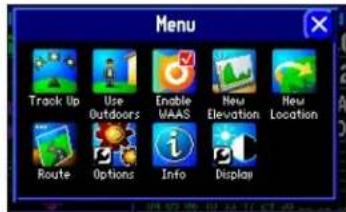
text_image
Menu Track Up Use Outdoors Enable WAAS New Elevation New Location Route Options Info DisplayA variety of options can be performed via the Menu page shown above. Access this page by pressing your unit's MENU key while you are on the GPS Information page.
Reference
GPS Info Page
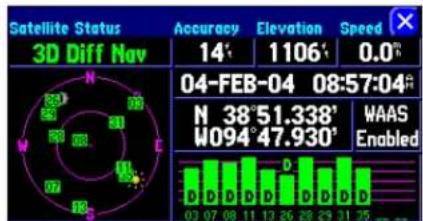
text_image
Satellite Status 3D Diff Nov Accuracy 14° 1106° 0.0° 04-FEB-04 08:57:04 N 38°51.338' W094°47.930' WAAS EnabledA 'D' on various signal strength bars above indicate which GPS satellites are being differentially corrected via WAAS satellites. Note that if the signal strength bar is too short, the 'D' will appear above the bar, as with satellite 26.

text_image
Satellite Status 3D Diff Nov Accuracy 7° Elevation 1107° Speed 0.0° 06-FEB-04 06:30:15° N 38°51.338' W094°47.930' WAAS EnabledGPS satellites can be differentially corrected via WAAS satellites even before your StreetPilot communicates with the GPS satellites, as is the case with Satellite 5, above.
To select a new location:
- Select 'New Location.' A window appears with two options ('Automatic' and 'Use Map').
- Select either 'Automatic' or 'Use Map.' Selecting 'Automatic' puts the unit in Autolocate mode and begins searching the sky for satellites. For 'Use Map,' a 'New Location' map page appears.
- If 'Use Map' is selected, pan and zoom the map pointer on the map to find your approximate location. Then touch the checkmark in the upper right-hand side of the page.
New Elevation – Allows you to designate your approximate elevation when the StreetPilot is acquiring satellites or navigating within a two-dimensional position. By default, 2D navigation attempts to use the last known elevation. If the elevation shown is off by several hundred feet (or more), manually entering your approximate elevation enables the receiver to more accurately determine a position fix. Once the unit has a 3D position, you cannot enter an elevation.
Enable WAAS – Allows you to improve position accuracy by using Wide Area Augmentation System (WAAS) capability. WAAS is a system of satellites and ground stations that provide GPS signal corrections, giving you even better position accuracy. WAAS corrects for GPS signal errors caused by ionospheric disturbances, timing, and satellite orbit errors, and it provides vital integrity information regarding the health of each GPS satellite.
View the GPS Information page to see which GPS satellites are receiving position corrections from the WAAS satellites. A "D" will appear on the signal strength bar for GPS satellites that have been "Differentially corrected" via the WAAS satellites.
Note: Because WAAS information is broadcast from fixed satellites over the equator, it is possible for obstructions commonly found in vehicles to block the view of these satellites. When this occurs, WAAS reception may be unavailable even though normal GPS reception remains unaffected and fully operational. To improve WAAS reception under all conditions, consider using an external GPS antenna such as a Garmin GA 27C. Mount it in an unobstructed location.
Vehicle Installation
The StreetPilot 2620/2660 is portable, allowing you to easily carry the unit from vehicle to vehicle or take it with you once you reach your destination. A permanent dash mount (consisting of a mounting base and adhesive pads) is included with the StreetPilot. Also included is a non-skid friction mount which is designed for convenient temporary mounting for your StreetPilot. When mounting your StreetPilot, keep in mind the following safety warnings:
Do not mount where the driver's field of vision is blocked
Do not mount over airbag panels
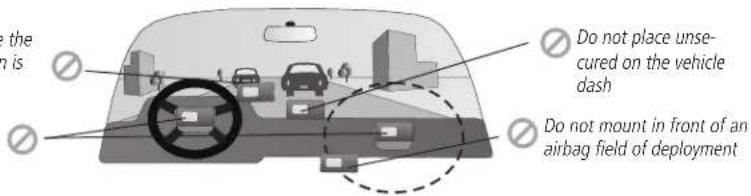
text_image
Do not place unsecured on the vehicle dash Do not mount in front of an airbag field of deploymentSelect a suitable location for installation that allows routing of an external power cord and/or antenna cable (if needed) to the StreetPilot. If you are NOT using a remote antenna, be certain to select a location where the StreetPilot's antenna has a relatively unobstructed view of the sky.
Appendix
Appendix A: Vehicle Installation
WARNING: For use in vehicles, it is the sole responsibility of the owner/operator to place and secure the StreetPilot so that is does not interfere with the vehicle operating controls and safety devices, obstruct the driver's view of driving conditions, or cause damage or personal injury in the event of an accident. Do not place the mounting bracket over airbag panels or in the field of airbag deployment. Airbags expand with a rapid fire force that can propel objects in their paths toward the driver or passengers, causing possible injury. Refer to airbag safety precautions contained in the vehicle's owner's manual. Do not place the mounting bracket where the driver or passengers are likely to impact it in an accident or collision. The mounting hardware provided by Garmin is not warranted against collision damage or the consequences thereof.
Note: An optional external remote antenna (Garmin GA 27C) may be needed when operating the unit in a vehicle with a coated windshield or an in-screen heating system which can block the GPS signals.
Appendix
Vehicle Installation
Note: Allow the permanent adhesive to set 24 hours before using the dash mount. If permanent adhesive is later removed, use rubbing alcohol to clean any adhesive residue. Repositionable adhesive should only be used on clean, dust-free surfaces.
Installing the Dash Mount to your Vehicle
To secure the mounting base to the dash of the vehicle, choose either the permanent adhesive disk (hole in disk) or the repositionable adhesive disk (no hole in disk).
- Carefully clean the area where the base is to be placed using an alcohol-dampened cloth. Wipe the area dry with a clean, dry cloth. Remove one side of the protective backing from the adhesive, and place the adhesive on the bottom of the mounting base.
- Remove the remaining backing from the adhesive and position the base on the cleaned area. Be certain the locking lever on the base faces forward for easy access.
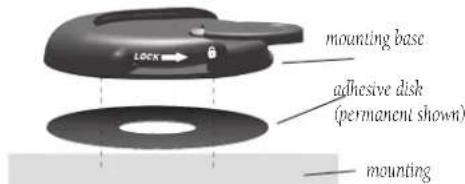
text_image
mounting base adhesive disk (permanent shown) mountingSecure Mounting Base with Disk Adhesive
Installing the Non-Skid Friction Mount Base to your Vehicle
The non-skid friction mount base is designed to fit an uneven surface. Each of the four weighted tabs can be bent to fit the shape of your vehicle's dash. By fitting the base to your vehicle's dash, you maximize the contact area and minimize the likelihood that the StreetPilot will slide when making sharp turns.
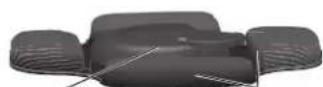
mounting base
weighted tabs
locking lever release tab
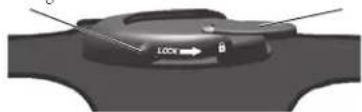
natural_image
Close-up of a mechanical component with arrows and a '1.00x' indicator (no readable text or symbols)Attaching the StreetPilot to the Base
These steps apply to both the non-skid friction mount base and the adhesive dash mount.
- Slide the locking lever on the mounting base, to the left (unlocked position).
- Attach the StreetPilot to the mounting base by sliding the disk on the bottom of the StreetPilot into the base until it clicks into place.
- Rotate the StreetPilot left or right until the desired angle is achieved. Slide the locking lever to the right (lock) to secure the StreetPilot to the base.
Adjusting the StreetPilot's Viewing Angle
- Tilt the StreetPilot forward or backward as needed. The mounting bracket clicks as you adjust the tilt.
- Rotate the entire StreetPilot by sliding the locking lever to the left (unlocked position). Adjust the angle as desired and move the lever back (right) to the locked position.
Removing the StreetPilot from the Base
- Slide the locking lever (on the mounting base) to the left (unlocked position).
- Press the release tab downward and slide the StreetPilot to the right.
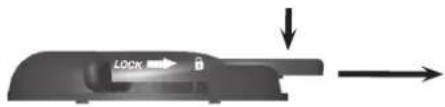
natural_image
Close-up of a black door handle with 'LOCK' label and directional arrows indicating movement (no text or symbols on the object itself)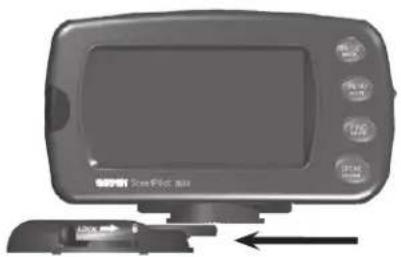
natural_image
Front view of a GPS GPS feed prompt device with control buttons and an arrow indicating left-hand position (no text or symbols on device body)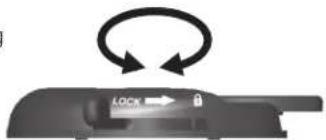
natural_image
Close-up of a device's lock mechanism with circular arrows indicating rotation (no text or symbols)Unlock to adjust left/right
Appendix
Vehicle Installation
Appendix
Vehicle Installation
The vehicle adapter comes with an external speaker system that enables you to hear directions from your StreetPilot.
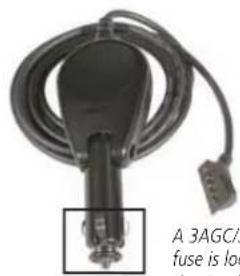
natural_image
Close-up of a black electrical plug with coiled cable and connector (no visible text or symbols)A 3AGC/3AG 1 amp fuse is located at the tip of the vehicle adapter
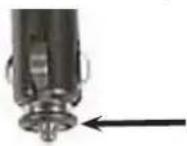
Periodically, you may need to change the fuse that's located at the tip of the vehicle adapter. Simply unscrew the black, round end piece and remove/replace the fuse.
Attaching the Vehicle Adapter to the StreetPilot 2620/2660
Your vehicle adapter is a 12/24 volt DC adapter with an external speaker system. This adapter is your StreetPilot's power source when you are in a vehicle (the StreetPilot does not use batteries). Use the AC adapter (included) when using the StreetPilot indoors.
- Locate the power connector on the rear of the StreetPilot. The connector is "keyed" with a notch located towards the bottom of the plug.
- Mate the power plug on the vehicle adapter to this connector by aligning the notches and sliding the plug into the connector until fully seated, as shown below.
- Plug the cigarette lighter portion of the vehicle adapter into an available cigarette lighter receptacle in your vehicle. Use care when routing the adapter cable to ensure that it does not interfere with vehicle operation in any way.
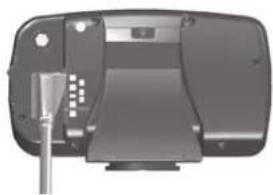
natural_image
3D rendered image of a mechanical device with a cylindrical component inserted (no visible text or symbols)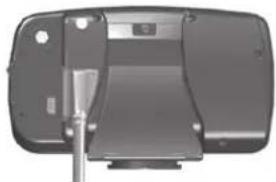
natural_image
Exterior view of a modern office building (no signage)Attach the vehicle adapter to the back of your StreetPilot as shown above.
DR Cable Wiring - For Dealer Installation Only (StreetPilot 2660 only)
The StreetPilot 2660 includes Dead Reckoning (DR) cable connections that must be installed by a Garmin-authorized licensed installer. The DR connection consists of a 2-wire harness that connects to the VSS (Vehicle Speed Sensor) and Reverse Light Switch on the bare wire end, and connects to the StreetPilot's vehicle adapter on the 2-prong molded connector end.
The Orange DR 1 cable wire attaches to the VSS. The unit software option Odometer Wave Type must be set to either Square Wave or Sine Wave. This can be determined either by contacting the vehicle manufacturer or by using an oscilloscope. Square Wave is the most common type. Do not connect the DR Cable into the vehicle speed sensor signal from the ABS control.
The Green DR 2 cable wire attaches to the Reverse Light Switch. The unit software option Reverse Light Polarity must be set to either High or Low. Contact the vehicle manufacturer for polarity or check with a voltmeter. Set to High (most common) if a positive, high voltage is detected when the reverse lights are illuminated. Set to Low if no or a low voltage is detected when the reverse lights are illuminated.

text_image
DR 2 - GREEN DR 1 - ORANGE OK to cut or splice past limiter. Do NOT cut or splice the cable between the limiter and plug. DR 1 DR 2 GARMINAttaching the Dead Reckoning Cable to the Vehicle Adapter (StreetPilot 2660 only)
- Locate the DR connector on the side of the vehicle adapter. The connector is "keyed" with a large and small receptacle.
- Mate the DR plug to the connector on the vehicle adapter and push the plug into the connector until fully seated.
Appendix
Appendix B: DR Cable Wiring (2660 Only)
text_image
Safety Track Log Language Interface Odometer Wave Type Pulse rate Status Square Wave Calibration Reverse Light Polarity Status High Simulating USB Format Serial Format GARMIN NoneInterface Tab (2660 Only)

WARNING: the terms of the Garmin Warranty require that the DR (Dead Reckoning) Cable with bare wire leads be installed by Garmin-authorized licensed installers. The user should not attempt installation.
Appendix
Appendix C: Using Diacritical Marks
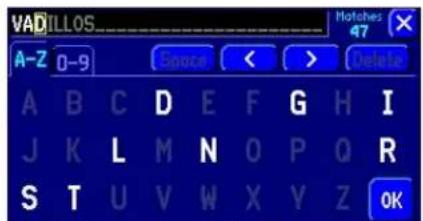
text_image
VADILLOS A-Z 0-9 Source < > Delete A B C D E F G H I J K L M N O P Q R S T U V W X Y Z OKWhen finding cities, enter each character using the base letter (or whatever corresponding letter with diacritical marks appears), then proceed to the next character.

text_image
VÄSTERÄS A-Z 0-9 Space < > Delete A B C D E F G H I J K L M N O P Q R S T U V W X Y Z OKAs you continue to enter each character, previously entered characters may change to appear with or without diacritical marks. Once the desired name is displayed, select OK, and then select the desired name. An information page will appear.
Using Diacritical Marks
The European version of the StreetPilot 2620/2660 supports diacritical marks commonly used in many European languages. Diacritical marks are added to letters to indicate a special phonetic value that distinguishes it from an otherwise identical letter. The following letter/diacritic combinations, and special characters, are supported in your StreetPilot:
Ligatures are not displayed, but are instead converted to separate characters. For example, “Æ” or “æ” appears on the StreetPilot as “AE.” Similarly, “Œ” or “œ” appears on the StreetPilot as “OE.” The “ß” character is displayed as “SS” on the StreetPilot.
Letters with diacritical marks are sorted together with those without diacritics. For example, the “C” is sorted in the StreetPilot’s alphabet as a “C,” and the “D” is sorted as a “D.” This means that sorted lists may contain a mix of diacritic marks for a given letter. Also note that the “P” character appears at the end of the alphabet on the StreetPilot.
When searching for a city or point of interest (POI) that includes these special characters in its name, your search proceeds as if the base letter and the same letter with diacritical marks are identical. In other words, when searching for a city/POI that includes E, , , or in the name, simply enter “E” or whichever diacritic version appears and proceed to the next character in the name. As you continue to enter additional characters, the appropriate character appears when the correct city/POI name is selected. You can observe this by using the FIND key to select the following cities:
To FIND Västerås, Sweden:
- Press the unit or remote FIND key then select 'Cities.'
- Touch the 'Filter' tab to display the mini keyboard. On the keyboard, select 'V' as the first character. The next field is automatically highlighted
- Select the 'A' as the second character.
- Select the 'S' as the third character. As you enter letters, notice how the 'A' character in the preceding step changes from 'A' to an 'A' with diacritical marks.
- Continue entering the next three characters 'T,' 'E,' and 'R' in the same manner.
- Select 'Å' as the seventh character. Notice that the diacritic letter appears first, not 'A,' because 'VÄSTERÅS' is the only matching entry remaining in the city database.
- Try this same exercise with København, Denmark; Logroño, Spain; or Genève, Switzerland.
For other special characters, try searching for the following cities: Bragança, Portugal (appears as shown here); or Meißen, Germany (appears as “MEISSEN” in your StreetPilot).
If you wish to save a city/POI as a waypoint, the StreetPilot assigns a waypoint name to this location. Keep in mind that, although diacritical marks appear when using the FIND key, they are not supported in most other StreetPilot functions. Therefore, Våsterås, Sweden appears as "VASTERAS" when saved as a waypoint.
Appendix
Using Diacritical Marks
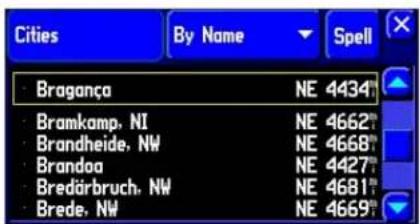
text_image
Cities By Name Spell Braganca NE 4434 Bramkamp, NI NE 4662 Brandheide, NW NE 4668 Brandoa NE 4427 Bredärbruch, NW NE 4681 Brede, NW NE 4669Other special characters appear on the European version of your StreetPilot 2620/2660.
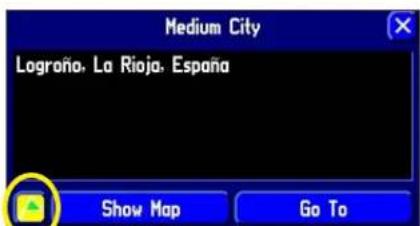
text_image
Medium City Logroño, La Rioja, España Show Map Go ToTo save a city or point of interest as a waypoint, select the flag icon located on the lower left side of the page.
Appendix
Appendix D: Adding Maps to your StreetPilot
Access the Info page pressing the unit's MENU key two times. Select the Map Info icon to access the Detail Maps Info page.
Adding Mapping Software to your StreetPilot
You can purchase additional MapSource mapping software from Garmin such as City Navigator Europe or MetroGuide Canada. Information from these maps will appear on the StreetPilot's Map page just like the current detail maps that are pre-installed in your unit. Follow the instructions that came with your new mapping software to ensure proper installation of the maps to your computer and StreetPilot. In order to transfer maps to the pre-programmed hard drive in your unit, use the Garmin USB cable that came with your StreetPilot. Open the USB kit and use the enclosed CD-ROM to install the USB drivers onto your computer. These drivers must be installed before you connect the USB cable to your computer.
Controlling Map Views on the Map Page
You can view a list of your maps, which includes the pre-installed map as well as ones you have added, on the Detail Maps Info page. To access this page, press the StreetPilot MENU key two times; an Info page will appear. Touch the Map Info icon and the Detail Maps Info page will appear:
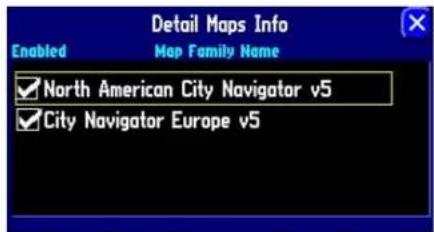
text_image
Detail Maps Info Enabled Map Family Name ✓ North American City Navigator v5 ✓ City Navigator Europe v5In the example above, North American City Navigator v5 is the mapping software that came pre-installed in the StreetPilot while City Navigator Europe v5 is the newly-added mapping software. A box appears to the immediate left of each map name (directly under Enabled). When the Enabled box is checked, your StreetPilot will draw the map data from these maps to your StreetPilot. To disable a map, uncheck the box by touching the map name. If the maps loaded in your StreetPilot do not overlap, you should not need to disable maps. If you load two maps that cover the same area, however, you may want to disable one of the maps so that you can view detail from the other one.
The pre-installed and purchased maps are actually made up of numerous smaller maps. You can see what smaller maps make up the larger map family by pressing your unit's MENU page while you are on the Detail Maps Info page. From the new Menu page that will appear, select the Show Map Families icon. A list of all maps within all map families will appear. In the example below, a partial list of maps that make up the North American City Navigator map family are shown.
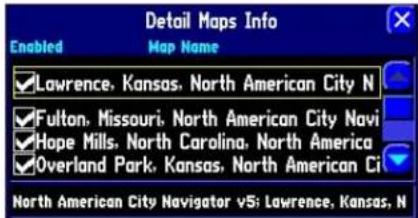
text_image
Detail Maps Info Enabled Map Name ✓Lawrence, Kansas, North American City N ✓Fulton, Missouri, North American City Navi ✓Hope Mills, North Carolina, North America ✓Overland Park, Kansas, North American Ci North American City Navigator v5: Lawrence, Kansas, NYou can disable these maps and the map detail for that area will no longer appear on the Map page.
Changing Map Families when Finding Places
If you have loaded additional map families into your StreetPilot (such as City Select Europe or MetroGuide Canada), you can specify which map family the StreetPilot uses while searching for cities and/or places. Recall that you search for cities and places by pressing the unit's FIND key and then selecting the appropriate Find icon (Lodging, Services, Cities, etc.). The StreetPilot returns a list of results from one map family. For example, if you are searching for a restaurant in Paris, the StreetPilot will search from the City Select Europe map family and not the North American City Navigator map family. In this case, you do not need to change the map family because the map families do not share overlapping information. Thus, the StreetPilot knows which map family to use for this particular search.
If your StreetPilot contains map families that might have overlapping information, you may need to specify a different map family. If you are searching for a restaurant in Ontario, for example, your StreetPilot might search from the North American City Navigator map family when you really want it to search from the MetroGuide Canada map family. Change the map family by pressing the unit'sMENU key. From the
Appendix
Adding Maps to your StreetPilot
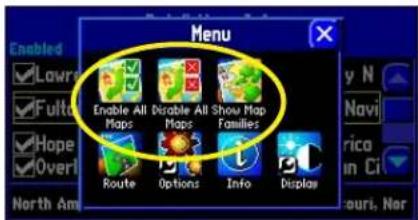
text_image
Menu Enable All Maps Disable All Maps Show Map Families Route Options Info DisplaySelect Enable All Maps or Disable all Maps to display or hide detail map information on your Map page. Select Show Map Families to display a list of smaller maps that make up a map family.
Reference
Adding Maps to your StreetPilot
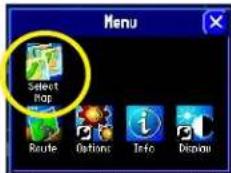
text_image
Menu Select Pop Route Options Info DisplayIf information for a particular search is indeed available in another map family, a Select Map icon will appear on the Menu page. If this icon does not appear, then search information is not available in the other map family (or families).
Menu page, touch the Select Map icon. A list of your installed maps that contains searchable cities or places will appear on a Select Map page. Touch the map family you want the StreetPilot to use for the search, and it will return a list of cities or places only from this map family.
Purchasing Additional MapSource Maps
You can purchase additional MapSource mapping software from Garmin and download the maps to your pre-programmed hard drive. Your pre-installed detail maps are protected from overwriting so you don't have to worry about accidentally deleting them.
Your pre-programmed hard drive contains approximately 512 MB of available space for your additional maps. This amount may be reduced as data updates occur.
In order to enable additional maps, you will need your Unit ID # (see page 55) and serial # (see page i).
Messages
The StreetPilot 2620/2660 uses an on-screen message system to alert you to unit operating characteristics. To acknowledge a message, press the remote IN key or simply touch the message on the touchscreen.
Data Transfer Complete – Transfer of data to the unit from the PC software has been completed.
Database Error - A waypoint or route failed to store in memory. If the problem persists, return the unit to Garmin for service.
Map Storage Error - Error with data on the internal disk drive. Return for repair.
Map Storage Error: Bad Format – Unrecognized data format. Return for repair.
Map Storage Error: File not Found – No map data on internal drive. Return for repair.
Map Storage Error: Too Many Maps – The internal disk drive contains more maps than the unit software can process. Not all maps on disk will be shown.
Detail Maps Don't Support Routing – Maps that are loaded on the internal disk drive do not support automatic route calculation.
GPS Turned Off for Indoor Use – GPS satellite reception has been disabled for indoor use.
Lost Satellite Reception - The unit has lost satellite signals. Check antenna connections or try moving it to a location with a clear view of the sky.
Memory is Full – The unit's memory is full. To reduce the amount of memory used, delete unused routes, waypoints, or track log data.
Route Data Transfer Complete - Route data has successfully been transferred to the unit.
Route Memory is Full – Route memory is full and no more routes can be saved or added (from another GPS unit or a PC).
Route Truncated - The route has been truncated because it was too long. There are turns missing prior to the destination.
Reference
Appendix E: Messages
Appendix
Messages
Route Waypoint Memory is Full – The unit has no more space for map-based route waypoints (used for turns).
Sunrise, Switching to Day Mode – The map is switching to the Day Mode display.
Sunset, Switching to Night Mode – The map is switching to the Night Mode display.
That Route Name is Already Used – The route name you have entered is already being used by another route.
Track Data Transfer Complete – Track data has successfully been transferred to the unit.
Track Memory is Full – Track log memory is full. No additional track log data can be stored without deleting old data to create memory space.
Track Truncated - A complete uploaded track will not fit in memory. The oldest track log points were deleted to make space for the most recent data.
Waypoint Data Transfer Complete – Waypoint data has successfully been transferred to the unit.
Waypoint Memory is Full – You have used all available waypoints. Delete unwanted waypoints to make space for new entries.
Waypoint Name Already Used:
Physical Specifications
Size: 5.6"W x 3.2"H x 2.0"D (14.3 x 8.0 x 5.0 cm)
Weight: .93 pounds (420 g)
Display: 3.3"W x 1.7"H (8.4 x 4.4 cm), (305 x 160 pixels), automotive-grade 8-bit, 256-color LCD with automatic dimming backlight and touchscreen; compatible with polarized sunglasses
Case: Rugged; fully gasketed; IPX-7 waterproof (does not include the remote control)
Antenna: Built-in patch; MCX-type connector for optional GPS antenna connection
Temp. Range: 32° to 140°F (0° to 60°C)
Infrared: Remote control, IR port
Photo Sensor: Senses lighting conditions for automatic backlight dimming
Data Storage: Indefinite; no memory battery required
Map Storage: Pre-Programmed Hard Drive
Performance
Receiver: 12 parallel channel receiver
Acquisition Times*
Warm: Approximately 15 seconds
Cold: Approximately 45 seconds
AutoLocate: Approximately 2 minutes
Update Rate: Once per second, continuous
GPS Accuracy
Position**: <15 meters (49 feet), 95% typical
Velocity: 0.05 meter/sec steady state
Dynamics: Performs to specifications to 6 g
Interface: USB 1.1 device
Appendix
Appendix F: Specifications
Appendix
Specifications
Power
Source: 12/24v DC
Usage: 12 watts maximum
@ 13.8v DC
Fuse: AGC/3AG - 1.0 Amp
Remote Control: Two AAA alkaline batteries (not included)
Features
Waypoints: 500 with name and graphic symbol
Routes: Up to 50 stored
Track Log: 2000 track log points
Dead Reckoning: (StreetPilot 2660 only) Internal angular rate sensor, external speed sensor input, and external reverse light sensor input (installed by dealer)
* Warm = all data known; Cold = position, time and almanac known; AutoLocate = almanac known, position and time unknown; Skysearch = no data known.
** Subject to accuracy degradation to 100m 2DRMS under the U.S. DOD-imposed Selective Availability Program.
Product Safety and Regulatory Information
FCC Compliance
The StreetPilot 2620/2660 complies with Part 15 of the FCC interference limits for Class B digital devices FOR HOME OR OFFICE USE. These limits are designed to provide more reasonable protection against harmful interference in a residential installation, and are more stringent than “outdoor” requirements.
Operation of this device is subject to the following conditions: (1) This device may not cause harmful interference, and (2) this device must accept any interference received, including interference that may cause undesired operation.
This equipment generates, uses, and can radiate radio frequency energy and, if not installed and used in accordance with the instructions, may cause harmful interference to radio communications. However, there is no guarantee that interference will not occur in a particular installation. If this equipment does cause harmful interference to radio or television reception, which can be determined by turning the equipment off and on, you are encouraged to try to correct the interference by one of the following measures:
- Reorient or relocate the receiving antenna.
- Increase the separation between the equipment and the receiver.
- Connect the equipment into an outlet on a circuit different from that to which the receiver is connected.
- Consult your Garmin dealer or an experienced radio/TV technician for help.
The StreetPilot 2620/2660 does not contain any user-serviceable parts. Repairs should only be made by an authorized Garmin service center. Unauthorized repairs or modifications could result in permanent damage to the equipment, and void your warranty and your authority to operate this device under Part 15 regulations.
Appendix
Appendix G: Safety and Regulatory Information

text_image
FEDERAL COMMUNICATIONS COMMISSIONAppendix
Warnings and Cautions

Warnings and Cautions
CAUTION: Use the StreetPilot 2620/2660 at your own risk. To reduce the risk of unsafe operation, carefully review and understand all aspects of this owner's manual. Thoroughly practice operation using the simulator mode prior to actual use. When in actual use, carefully compare indications from the StreetPilot 2620/2660 to all available navigation sources, including the information from other street signs, visual sightings, and maps. For safety, always resolve any discrepancies before continuing navigation.
CAUTION: IT IS THE USER'S RESPONSIBILITY TO USE THIS PRODUCT PRUDENTLY. THIS PRODUCT IS INTENDED TO BE USED ONLY AS A NAVIGATIONAL AID AND MUST NOT BE USED FOR ANY PURPOSE REQUIRING PRECISE MEASUREMENT OF DIRECTION, DISTANCE, LOCATION OR TOPOGRAPHY.
MAP DATA INFORMATION: One of the goals of Garmin is to provide customers with the most complete and accurate cartography that is available to us at a reasonable cost. We use a combination of governmental and private data sources which we identify as required in product literature and copyright messages displayed to the consumer. Virtually all data sources contain inaccurate or incomplete data to some degree. This is particularly true outside the United States, where complete and accurate digital data is either not available or prohibitively expensive. Because the map data may not be perfect, consider verifying the unit's map with your actual surroundings to confirm that you are arriving at the exact destination.
WARNING: The Global Positioning System (GPS) is operated by the United States government, which is solely responsible for its accuracy and maintenance. The system is subject to changes which could affect the accuracy and performance of all GPS equipment. Although the Garmin StreetPilot 2620/2660 is a precision navigation system any navigation system can be misused or misinterpreted and, therefore, become unsafe.
WARNING: For use in vehicles, it is the sole responsibility of the owner/operator of the StreetPilot 2620/2660 to secure the unit so that it will not interfere with the vehicle's operating controls, obstruct the driver's view of driving conditions, or cause damage or personal injury in the event of an accident. Do not mount the StreetPilot 2620/2660 over air bag panels or in the field of air bag deployment. Air bags expand with a rapid force that can propel objects in their path toward the driver or passengers causing possible injury. Refer to air bag safety precautions contained your vehicle's owner's manual. Do not mount the StreetPilot 2620/2660 in a place where the driver or passengers are likely to impact it in an accident or collision. The mounting hardware provided by Garmin is not warranted against collision damage or the consequences thereof.
WARNING: For use in vehicles, it the sole responsibility of the driver of the vehicle to operate the vehicle in a safe manner, maintain full surveillance of all driving conditions at all times, and not become distracted by the StreetPilot 2620/2660 to the exclusion of safe driving practices. It is unsafe to operate the controls of the StreetPilot 2620/2660 while you are driving. Failure by the driver of a vehicle equipped with a StreetPilot 2620/2660 to pay full attention to operation of the vehicle and road conditions while the vehicle is in motion could result in an accident or collision with property damage and personal injury.
WARNING: This product, its packaging, and its components contain chemicals known to the State of California to cause cancer, birth defects, or reproductive harm. This Notice is being provided in accordance with California's Proposition 65. If you have any questions or would like additional information, please refer to our Web site at www.garmin.com/prop65.
Appendix
Warnings and Cautions
Appendix
Software License Agreement
Software License Agreement
BY USING THE STREETPILOT 2620/2660, YOU AGREE TO BE BOUND BY THE TERMS AND CONDITIONS OF THE FOLLOWING SOFTWARE LICENSE AGREEMENT. PLEASE READ THIS AGREEMENT CAREFULLY.
Garmin grants you a limited license to use the software embedded in this device (the "Software") in binary executable form in the normal operation of the product. Title, ownership rights, and intellectual property rights in and to the Software remain in Garmin.
You acknowledge that the Software is the property of Garmin and is protected under the United States of America copyright laws and international copyright treaties. You further acknowledge that the structure, organization, and code of the Software are valuable trade secrets of Garmin and that the Software in source code form remains a valuable trade secret of Garmin. You agree not to decompile, disassemble, modify, reverse assemble, reverse engineer, or reduce to human readable form the Software of any part thereof or create any derivative works based on the Software. You agree not to export or re-export the Software to any country in violation of the export control laws of the United States of America.
Limited Warranty
This Garmin product is warranted to be free from defects in materials or workmanship for one year from the date of purchase. Within this period, Garmin will, at its sole option, repair or replace any components that fail in normal use. Such repairs or replacement will be made at no charge to the customer for parts or labor, provided that the customer shall be responsible for any transportation cost. This warranty does not cover failures due to abuse, misuse, accident, or unauthorized alteration or repairs.
THE WARRANTIES AND REMEDIES CONTAINED HEREIN ARE EXCLUSIVE AND IN LIEU OF ALL OTHER WARRANTIES EXPRESS OR IMPLIED OR STATUTORY, INCLUDING ANY LIABILITY ARISING UNDER ANY WARRANTY OF MERCHANTABILITY OR FITNESS FOR A PARTICULAR PURPOSE, STATUTORY OR OTHERWISE. THIS WARRANTY GIVES YOU SPECIFIC LEGAL RIGHTS, WHICH MAY VARY FROM STATE TO STATE.
IN NO EVENT SHALL GARMIN BE LIABLE FOR ANY INCIDENTAL, SPECIAL, INDIRECT OR CONSEQUENTIAL DAMAGES, WHETHER RESULTING FROM THE USE, MISUSE, OR INABILITY TO USE THIS PRODUCT OR FROM DEFECTS IN THE PRODUCT. Some states do not allow the exclusion of incidental or consequential damages, so the above limitations may not apply to you.
Garmin retains the exclusive right to repair or replace the unit or software or offer a full refund of the purchase price at its sole discretion. SUCH REMEDY SHALL BE YOUR SOLE AND EXCLUSIVE REMEDY FOR ANY BREACH OF WARRANTY.
To obtain warranty service, call your local Garmin-authorized dealer. Or call Garmin Customer Service at one of the numbers listed on the right for shipping instructions and for an RMA tracking number. The unit should be securely packed with the tracking number clearly written on the outside of the package. The unit should be sent, freight charges prepaid, to any Garmin warranty service station. A copy of the original sales receipt is required as the proof of purchase for warranty repairs.
Products sold through online auctions are not eligible for rebates or other special offers from Garmin. Online auction confirmations are not accepted for warranty verification. To obtain warranty service, an original or copy of the sales receipt from the original retailer is required. Garmin will not replace missing components from any package purchased through an online auction.
Appendix
Warranty
GARMIN ADDRESSES
Garmin International, Inc.
1200 E. 151st Street
Olathe, KS 66062, U.S.A.
Phone: 800/800.1020
FAX: 913/397.0836
Garmin (Europe) Ltd.
Unit 5, The Quadrangle,
Abbey Park Industrial Estate
Romsey, SO51 9DL, U.K.
Phone: 44/1794.519944
FAX: 44/1794.519222
www.garmin.com
Index
Symbols
2D Navigation 58
3D Navigation 58
A
Acquiring Sats 58
AC Adapter 64
Address 43
Addresses, Finding 21
Antenna, External Remote 61
Antenna, Internal 1
Area Tab 40
Arrival Distance 43
Arrival Time 43
Ask Me My Preference 47
Attention Tone 46
AutoLocate 58
AutoZoom 40
Auto Set 51
Avoidance Button 48
Avoid Area 50
Avoid Road 49
B
Backlight, Adjusting 5, 38
Base Map 9
Batteries, Installing 5
Black Triangle 8
Boxed Magnifying Glass 8
By Name Tab 19, 23, 24
C
Calculate Routes for 48
Calculation Method 48
Calibrating the Touchscreen 4
Cautions 76
City, Finding a 19
Cleaning 2
Color Mode 39
Color Scheme 45
Compass Ribbon 16
Contrast, Adjusting 38
Conventions, Manual vi
Current Location 29
Current Route Page 15
Custom Avoids 49
Custom Routing Tab 47
D
Dash Mount 61
Installing 62
Data Tabs 41
Date 52
Daylight Savings 52
DC Adapter 64
Dead Reckoning 65
Attaching DR Cable to Vehicle Adapter 65
Cable Wiring Installation 65
Driving With 18
Satellite Status 58
Defaults 44
Detail Map 9
Detail Maps Info 68
Detour 28
Detours, Adding 33
Diacritical Marks 66, 67
Differentially Corrected 60
Disable the Remote 4
Disable WAAS 60
Distance to Turn 43
Driving Avg 16
Driving Mode 12
Driving Time 16
DR Cable 65
E
Elevation, Feet or Meter 43
Elevation, New 60
Enable WAAS 60
Enter As Text 20
Exits, Finding 23
F
Faster Time 30,47
FCC Compliance 75
Finding
Addresses 21
Cities 19
Exits 23
Interesting Places 22
Intersections 21
Recently-Found Places 27
Waypoints 24
FIND Key 3
Friction Mount 61
Installing 62
Fuse, Vehicle Adapter 64
G
Garmin Web Site 79
General Tab 45
Getting Started Tutorial iv
GPS Info Page 56, 57, 58, 59, 60
GPS is Off 58
Guidance Tab 46
H
Hard Drive 1
Available Space In 70
Caring For 2
Heading 43
HOME Waypoint 30
I
Information Icon "i" 10
Infrared Window 1,5
Installation 61, 62, 63, 64, 65
Interesting Places, Finding 22
Interface Tab 54
Intersections, Finding 21
IN Key 4
1R port 4
K
Keyboard 11
Keypad Usage 3
Keypress Tone 46
L
Language Tab 53
Locate on Main Map 25
Lost Reception 58
M
Magnifying Glass, + and - 7
Maintenance 2
Manual Conventions vi
Mapping Software, Adding 68
Mapping Tabs 41
Map Detail, Changing 39
Map Families, Changing 69
Map Page 7,8
Features 7
Boxed Magnifying Glass 8
Index
Information Icon "i" 10
Magnifying Glass, + and - 7
Map Pointer 8
Map Scale 9
Map Tools Bar 7
North Up and Track Up 8
Panning Hand 7
Vehicle Icon 8
Zoom Icons 7
Learning How To Use 6
Viewing 6
Viewing While Driving 12
Map Pages
Driving Mode 12
Routing Mode 12
Map Pointer 8
Map Scale 9
Map Setup 39
Map Tools Bar 7
MARK Key 3
Max Speed 16
Resetting 17
Measuring Distances 25, 36
MENU Key 3
Messages 71, 72
Mileage Log 16, 17
Rename 17
Reset 17
Select 17
Index
Mini Keyboard, Using 11
N
Near [Destination] Tab 20, 23, 24
Near Current Route Tab 22
Near Here Tab 19, 23, 24
Near Map Pointer Tab 20, 23, 24
Near Other Tab 19
New Elevation 60
New Location 59
Next Turn Page 14, 43, 46
North Up 8,39,59
Not Usable 58
0
Odometer 16,43
Off-Route Recalculation 46
Off Road 30,47
Orientation 39
Orientation Icons 8
OUT Key 4
Overall Avg 16
Overzoom 9
P
Packing List ii
PAGE Key 3
Panning 7
Panning Hand 7
Places, Finding 19
Planning a Trip 26
Poor GPS Coverage 58
Poor Satellite Reception 59
Power On/Off 5
Pre-Programmed Hard Drive. See Hard Drive
Preface i
Product Registration i
Product Safety Information 75
R
Recalculating a Route 33
Receiver Status 58
Recently-Found Places, Finding 27
Recent Finds 27
RECENT Key 3
Regulatory Information 75
Remote Control 2,4
Remote Control, Using 4
Remote Usage 4
Resume Route 28
Return to Start 28
Routes
Creating 29
Current Location 29
Deleting 32
Detours 33
End Point 29
Find 29
Modifying 33
New 29
Recalculating 33
Renaming 32
Resuming 30
Saving 32
Start Point 29
Stopping 30
Use Map 29
Via Points 34
ROUTE Key 3
Route List 29
Route Preference 30, 47
Custom 47
Faster Time 30,47
Off Road 30,47
Shorter Distance 30,47
Routing Mode 12
Routing Setup 29
Routing Tab 47
S
Safety Tab 52
Safe Mode vi, 52
Searching Sky 58
Search Within 22
Select Map 70
Serial Format 54
Serial Number i
Shorter Distance 30,47
Show Map 25
Signal Strength Bars 57
Simulator Mode vi
Sky View 57
Software License Agreement 78
Software Upgrades 55
Software Version 55
Speaker Adapter 64
Speaker Volume 5
SPEAK Key 3
Specifications 74
Speed 16,43
Stop Route 28
Storage 2
StreetPilot
Caring For 2
Front and Rear View 1
Keypad Usage 3
Specs 73
Turning On or Off 3
Using Indoors 6
Sunrise 52
Sunset 52
System Info 55
System Setup Options 44
T
Tabs
Changing Colors 43
Customizing 42
Hiding/Showing 42
Tab Setup 42
Thumb Stick 5
Time 52
Time Format 52
Time of Day 16, 43
Time Tab 52
Time to Turn 43
Time Zone 52
Total Time 17
Touchscreen
Calibrating 4
Cleaning 2
Using 4
Touchscreen Tone 46
Track 53
Track Log Tab 53
Track Percentage Full 53
Track Recording 53
Track Up 8, 39, 59
Trip, Planning a 26
Trip Computer 16
Resetting 17
Trip Information Page 16
Tutorial, Getting Started iv
U
Units 45
Unit ID Number 55
Upgrading Software 55
USB Format 54
Use Indoors 38
Index
Use Map 29
Use Outdoors 38
V
Vehicle Adapter 64
Vehicle Adapter Fuse 64
Vehicle Icon 8
Vehicle Installation 61
Via Point 28
Adding 34
Arranging 35
Deleting 35
Voice 46
Volume, Adjusting 5
VOLUME Key 3
W
WAAS 60
Warnings and Cautions 76
Warranty 79
Waypoints 11
Finding 24
HOME 30
Web Site, Garmin 79
Z
Zoom Icons 7
For the latest free software updates (excluding map data) throughout the life of your Garmin products, visit the Garmin Web site at www.garmin.com.

GARMIN®
Copyright 2004, 2005 Garmin Ltd. or its subsidiaries
Garmin International, Inc.
1200 East 151 ^st Street, Olathe, Kansas 66062, U.S.A.
Garmin (Europe) Ltd.
Unit 5, The Quadrangle, Abbey Park Industrial Estate, Romsey, SO51 9DL, U.K.
Garmin Corporation
No. 68, Jangshu 2 ^nd Road, Shijr, Taipei County, Taiwan
www.garmin.com
Part Number 190-00342-00 Rev. B