MV2500U-250 - Media player Mvix - Free user manual and instructions
Find the device manual for free MV2500U-250 Mvix in PDF.

| Product Type | Media Player |
| Brand | Mvix |
| Model | MV2500U-250 |
| Dimensions (Approx.) | 20 x 15 x 3 cm |
| Weight (Approx.) | 0.5 kg |
| Power Supply | 5V DC via USB or AC adapter (1A) |
| Supported Media | USB flash drives, external hard drives (FAT32, NTFS) |
| Video Playback | AVI, MP4, MKV, XviD up to 1080p |
| Audio Playback | MP3, WMA, AAC, OGG |
| Photo Viewing | JPEG, BMP, PNG |
| Output | Composite Video / Stereo Audio (RCA), HDMI (optional?) |
| Maintenance | Wipe with a soft dry cloth; avoid liquids |
| Safety | Do not expose to moisture; keep away from heat sources |
| Spare Parts & Repairs | Not user-serviceable; contact Mvix support |
| General Information | Portable media player with USB host function |
Frequently Asked Questions - MV2500U-250 Mvix
User questions about MV2500U-250 Mvix
0 question about this device. Answer the ones you know or ask your own.
Ask a new question about this device
Download the instructions for your Media player in PDF format for free! Find your manual MV2500U-250 - Mvix and take your electronic device back in hand. On this page are published all the documents necessary for the use of your device. MV2500U-250 by Mvix.
USER MANUAL MV2500U-250 Mvix
- Do's and Don'ts 03
- Limitations and Usage Precautions 04
7) Hard disk formatting and partition
3) Features 05
4) Specifications 06
5) Front and Rear Panel 07
6) Remote Control 08
- Making partition and Formatting the HDDs under Windows 98SE/ME 09
- Making partition and formatting the HDDs under Windows 2000/XP 13
8) Installation and Connection
- Connection with ordinary (Composite) TV output 16
- Connection to Component output 16
- Connection to Coaxial output 17
- Connection to Optical output 17
- Connection to Computer 17
9) MVIX Setup Menu
- Audio/Video Setup 18
- Setup/Various 19
- Firmware Setup 20
- Driver installation for Windows 98SE 21
- Driver installation for Windows ME/XP/2000 21
- Video Files Playback 22
- Audio Files Playback 23
- Photo Files Playback 24
- All Files Playback 25
- Playlist 26
10) Troubleshooting 27
1 Important Information
Congratulations for having bought this product. We are sure that you will be entirely satisfied with this multi-media player. Please take some time to read thoroughly this manual of Instruction so that you can use the unit to its best possibilities. Keep carefully this instruction manual and refer to it any time when you will need it.
□ Important Information
 | In case of a faulty operation, do not attempt to repair the unit yourself. Opening the unit have you exposed to electrocution hazards. Please refer to a qualified person. |
 | Do not use this unit near any heating source, especially hot air vents, stove or any other appliance producing heat. Do not Expose this unit to temperatures lower than 5°C or higher than35°C |
 | Do not use this unit near a humid area as a bath, sink, swimming pool or a flowerpot. |
 | Do not handle the supply cable if you have wet hands. Do not use a damaged power cable. |
 | Do not place your unit in front of a light projector or near a heating source. |
 | Do not use any substance containing alcohol, gasoline, detergent or any other flammable products to clean the surface of the unit. |
 | Do not drop the unit or let it be subjected to impacts that could seriously damage your unit or the hard drive. |
 | During the installation of the hard drive, please assure yourself to unload the unit of any electrostatic charge. |
 | Do not let any liquid or foreign substance be inserted inside the unit that could result in a short circuit with fire or electrocution hazards. |
 | Do not cut, deteriorate, or place any heavy object on the power cable that could result in a short circuit with fire or electrocution hazards. |
2 Safety & Precautions
Do's and Don'ts
Do's
◆ Unplug the player during lightning storms or when unused for long periods of time.
Do not defeat the safety purpose of the polarized or grounding-type plug. A polarized plug has two blades with one wider than the other. The wide blade is provided for your safety. If the provided plug does not fit into your outlet, consult an electrician for replacement of the obsolete outlet.
◆ Protect the power cord from being walked on or pinched, particularly at plugs, or at the point where they exit from the player.
When connecting or disconnecting AV cables, disconnect the power first.
Do read all safety information and follow all instructions in this user manual.
When cleaning the Mvix product, disconnect the power and then wipe the unit with a soft piece of dry cloth. Do not use any chemicals or sprays for cleaning.
Visit mvixusa.com for additional product information & for troubleshooting.
Don'ts
- Don't expose your MVIX unit to heat sources or high temperatures.
- Don't expose your MVIX unit to water, oil, dust or magnetic materials.
- Don't block the vents. Free airflow should be maintained around the unit.
- Don’t attempt disassembling or remodeling the unit.
- Don't drop the MVIX unit. This might cause irreversible damage to the unit and the Hard Drive.
Do not touch the power plug with wet hands or use defective power cables & electric outlets. Doing so might result in electric shock or fire. Only use attachments accessories specified by the manufacturer.
Do not mix batteries (old and new or carbon and alkaline, etc.) in the Mvix Remote Control. Remove batteries when the unit is not used for a long time.
2 Safety & Precautions
■ Limitations and Usage Precautions
Please read the following Limitations and Usage Precautions before using your Mvix player.
While Mvix players support dozens of file formats and codec, they are not intended to work with every codec-variation. Mvix players provide limited support to standardized versions of codec as stated in the Technical Specifications of this manual.
◆ Turn off your Mvix player when connecting or disconnecting USB devices. Failure to do so may result in malfunction and/or loss of data on your USB device.
We strongly recommend backing-up your data or media files stored on the Mvix-HDD. Power surge, HDD-failure, accidental deletions are common causes of data loss. Place your Mvix player away from magnetic sources.
Mvix supports 2.5" Hard Disk Drives only. Kindly ensure that the jumper setting on your Hard-disk Drive (HDD) is set to MASTER or SINGLE before installing it in the Mvix Player. Some HDDs (depending on the manufacturer) may work with the SLAVE or CABLE SELECT (CS) jumper combination. If your PC fails to recognize Mvix as an external storage device, try changing the setting to SLAVE or CS. Do not forget to format and partition your HDD after installing it in the Mvix player. "Primary Partition" is recommended when creating two or more partitions within a single Hard Disk Drive.
When connected to the computer through the USB cable the Mvix player works like an external USB storage device (During this operation, there is no video/audio playback). To resume playback mode, disconnect the USB cable connected to your PC and turn on the Mvix player.
◆ The supplied cables and accessories are recommended for customized best performance of the Mvix Media Player. Using any other (after-market) cables or accessories may not provide best performance
In order to unplug your Mvix Media Player, press the STOP button before removing cables or turning off the power.
Do NOT open the unit and service or modify the basic assembly. Do NOT modify the firmware of the Myix unit. Improper or unauthorized repair will VOID your warranty coverage.
3 Feature
natural_image
Two film reel-like objects, one silver and one yellow, with no visible text or symbols.Enjoy your Movie and Video Files on TV!
Supports a variety of digital video files like DivX® 3/4/5, Xvid, MPEG1, MPEG2, MPEG4, DVD(IFO, VOB), VCD(DAT). Ideally suited for backing up all your DVD movies on a hard-Disk for easy access.
natural_image
Illustration of a multi-tiered audio amplifier with two speakers and a central control unit (no text or symbols visible)Digital Music Box
A perfect companion for the music junkies. Play variety of audio files like MP3, OGG, WMA etc. Advanced in-built Jukebox supports customized playlists and music shuffle/repeat functions.

natural_image
Illustration of a globe resting on an open book (no text or symbols visible)Multilanguage Subtitles
Supports multi-language .SMI, .SRT, .SUB subtitle files (for use with DivX®, XviD, AVI video and movie files)
natural_image
Illustration of a digital camera with green and gray casing (no text or symbols)Digital Photo Album
Now enjoy your vacation photos with the family. Store and Playback all your digital photos. Enjoy customized Slideshows with background Music.
natural_image
3D rendering of a mechanical component with metallic and purple surfaces (no visible text or symbols)Portable HDD Storage
Quite simply, an ideal mass-storage device for all your backup and digital storage needs. (Note: HDD-Hard Disk Drive NOT INCLUDED)
natural_image
Illustration of a computer monitor displaying a downward-trending red arrow on a blue screen (no text or symbols)Easy Firmware Upgrading
A Simple and Efficient firmware upgrade process. (Download: www.eunicorn.co.kr, www.mvix.net). Firmware Upgrades provide continuous support to new codec and formats.
natural_image
Illustration of a red sports car with silver wheels (no text or symbols)Car Media Center (Optional)
Mvix can also be used in a car with its optional car pack. The Car Pack bundle contains Car Power Adapter, Ext IR Extender, Compact Remote Control and Audio Cable
4 Specifications
| Supported File Formats | Video | MPEG1/2, Div3.11, Div4.0, Div5.0, Divx, Xvid, DVD(IFO, VOB), VCD(DAT), M2V, ISO |
| Audio AC8 | MP2, MP3, DTS pass through, Ogg, WMA, MPGA, MPA | |
| Photo JPEG | ||
| Supported Languages | SMI, SRT, SUB, Multi-Subtitle | |
| Input & Output | USB 2.0 (Cypress chipset) | |
| A/V port | ||
| HDTV : Component Video | ||
| Audio : Coaxial, Optical | ||
| IR-Ext | ||
| User Interface | Full Featured IR-Remote controlButton : Power, OK, Stop, Setup, Up/down/left/right Navigation | |
| Operating System | Windows 98se, ME, 2000, XP, Vista or later | |
| Partition Type FAT32, NTFS | ||
| Power External 5V/2A DC adapter | ||
| Dimensions 78mm(W) X 136mm(H) X 20mm(L) | ||
| Retail Kit Includes | MVIX Media Player(MV-2500U) , Remote Control, A/V Cable, Component Cable, USB Cable (for PC), 5V Adaptor, Manual, Driver CD | |
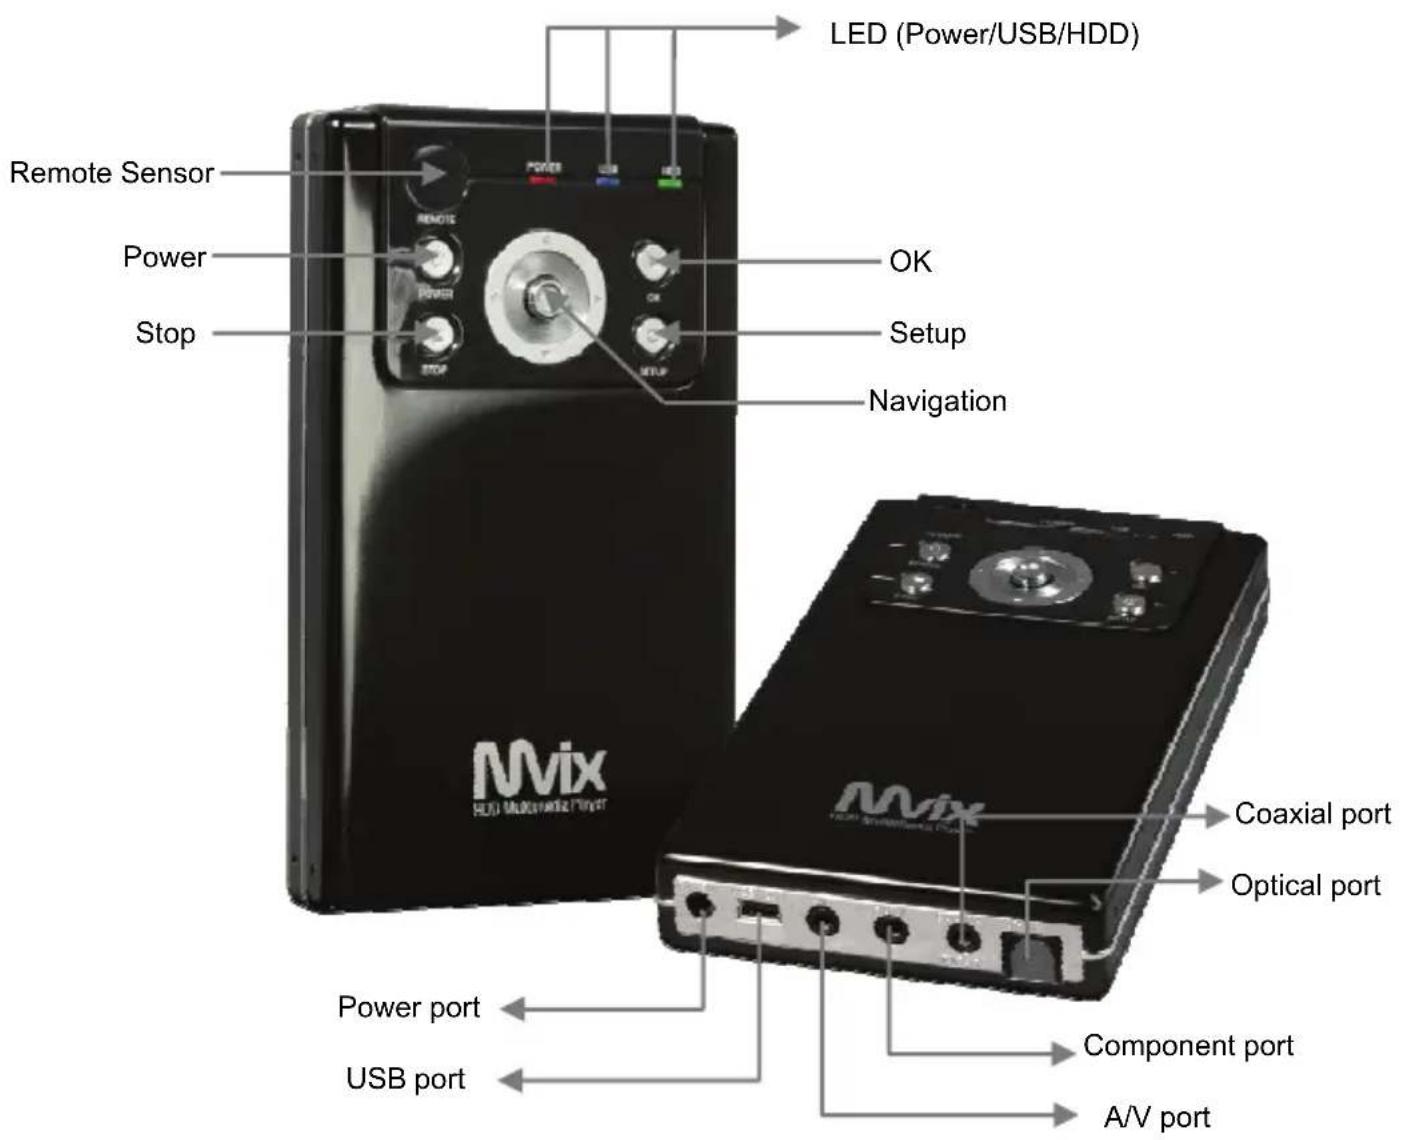
5 Front and Rear Panel

Front and Rear Panel
6 Remote Control
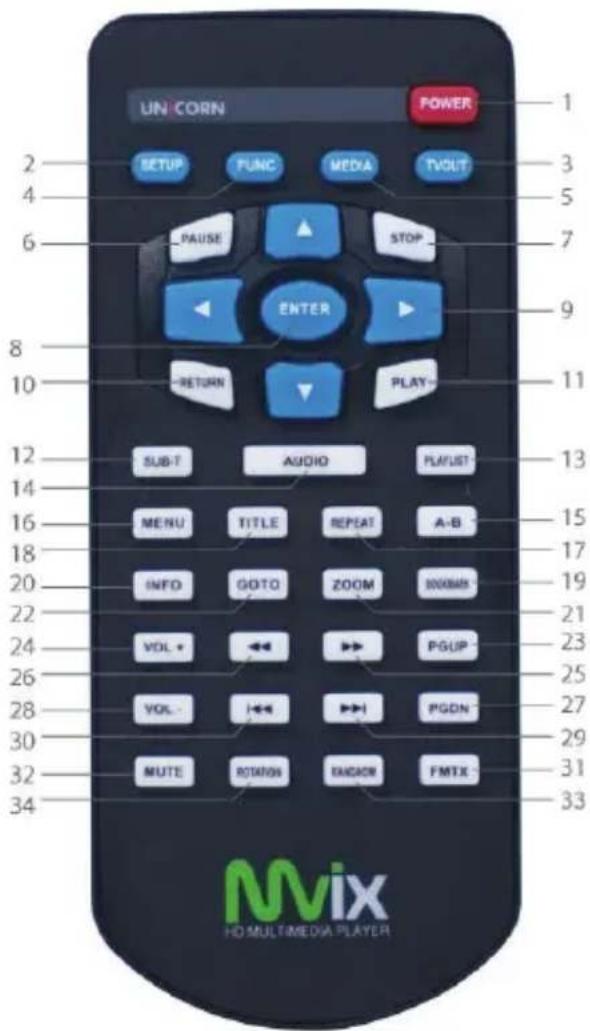
1.Power
-
Setup
-
Change the TV OUT mode
-
Function Key
-
MEDIA switch from MIXED→VIDEO → AUDIO → PHOTO → MIXED
-
Pause
-
Stop
-
Enter to confirm the selection
-
Navigation-Arrow Keys
-
Return to the last folder
-
Play
-
SUB-T select the subtitles
-
Play list
-
Audio select the subtitles
-
A-B setup repeat segment
-
Menu for DVD
-
Repeat
-
Title for DVD
-
Bookmark
-
Show the info for file playing
-
Zoom
-
Goto
-
Page up
-
Volume up
-
Fast Forward
-
Fast Reverse
-
Page down
-
Volume down
-
Skip forward
-
Skip backward
-
FMTX
-
Mute
-
Random
-
Rotation to rotate the picture
7 Hard disk formatting and partition

Making partition and Formatting the HDDs under Windows 98SE/ME
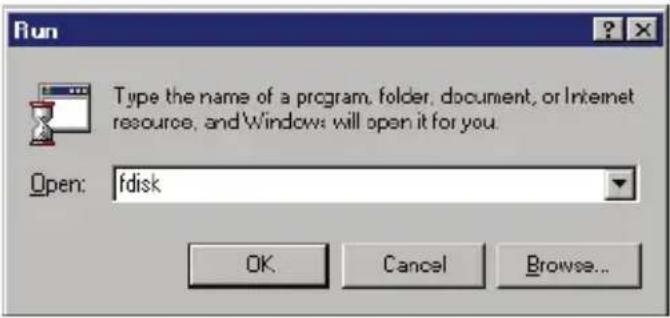
Click "Start" and select "Run" and the "Run" window will appear as shown below. Type "fdisk" in the text box of the "Run" window then click the "OK" button
![MS-DOS - FDISK Microsoft Windows 90 Fixed Disk Setup Programs (C) Copyright Microsoft Corp. 1993 - 1998 FDISK Options Current fixed disk drive: 4 Choose one of the following: 1. Create 100 partition or Logiwal 100 drive 2. Set active partition 3. Release partition or Logiwal 100 drive 4. Display partition information 5. Change current fixed disk drive Enter choice! [5] Press Esc to exit FDISK](/content/2026/06/1145959/images/0619cb6824b6e4d390b62b62923662aadb535546ca50afc9c325f85522b40386.jpg)
1) Select "5. Chang current fixed disk drive" and press [Enter].
![MS-DOS - FDISH Change Current Fixed Disk Drive Disk Day Mytes Free Usage 1 20000 1004 C: 10000 D: 10000 2 11500 11500 % [1 MByte = 1048576 bytes] Enter Fixed Disk Drive Bladder (1-2)....[2] Please Enter to return to FDISH Options](/content/2026/06/1145959/images/8d7ba5a41e76f032ce0e367f06a6223346d30f2e5abdf729c89821043f8e4ad8.jpg)
2) Type the last Disk number in 0% usage.
7 Hard disk formatting and partition

Making partition and Formatting the HDDs under Windows 98SE/ME
![MS-DCS - FDSK FDISK Options Current fixed disk drive: 2 Choose one of the following: 1. Create DOS partition or logical DOS drive 2. Set active partition 3. Do not partition or logical DOS drive 4. Display partition information 5. Change current fixed disk drive Enter choice: [1] Press Far to exit FDSK](/content/2026/06/1145959/images/5923a6bb588e08a8a4623ed24576e82c22e5b0ba52344d9408b20ebceb641590.jpg)
3) Select "1. Create DOS partition or Logical DOS Drive" and press [Enter].
![Create DOS Partition or Logical DOS Drive Current fixed disk drive: 4 Choose one of the following: 1. Create Primary DOS Particles 2. Create Extended DOS Particles 3. Create Logical DOS Particles in the Extended DOS Particles Enter choice: [1] Please Enter to return to FDISK Options](/content/2026/06/1145959/images/226eec1308f78c9266e7e3c8abd7c538cef7d21361a3d32c0f6646f7f4e9e911.jpg)
4) Select "1. Create Primary DOS Partition" and press [Enter]
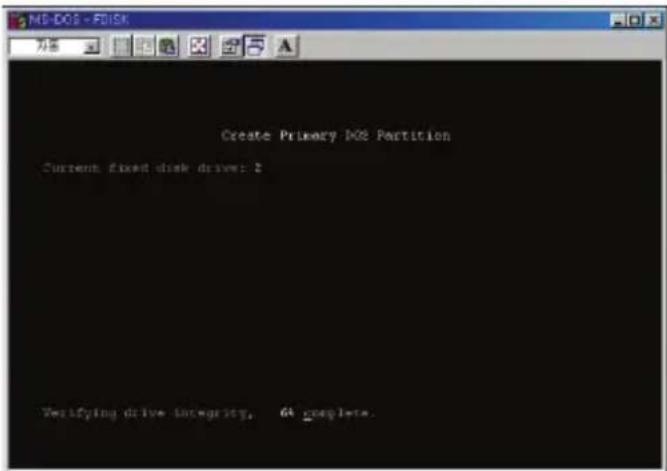
5) Wait until finishing verifying the drive integrity.
7 Hard disk formatting and partition

Making partition and Formatting the HDDs under Windows 98SE/ME
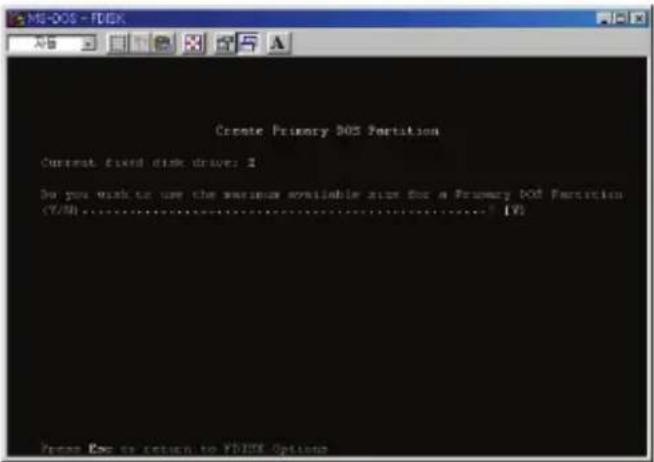
6) After finishing drive integrity verification, type "Y" at "Do you wish to use the maximum available size for a Primary DOS Partition (Y/N)"
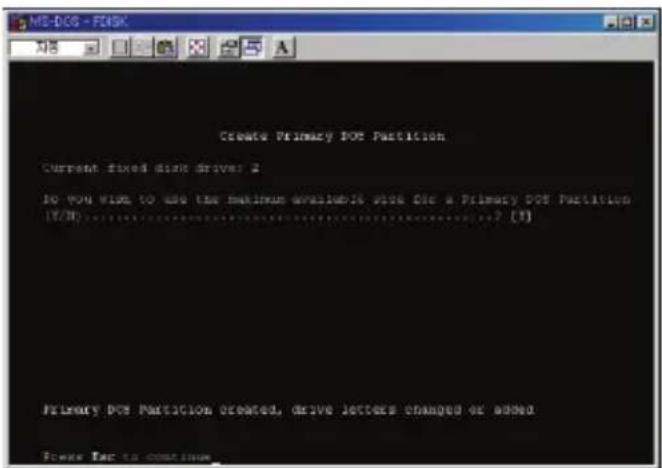
7) Type the capacity or % which you want to use and press [Enter].
8) Drive integrity verification will start again. After finishing that, press [ESC] key when the "Primary DOS Partition created, drive letters changed or added" message displays.
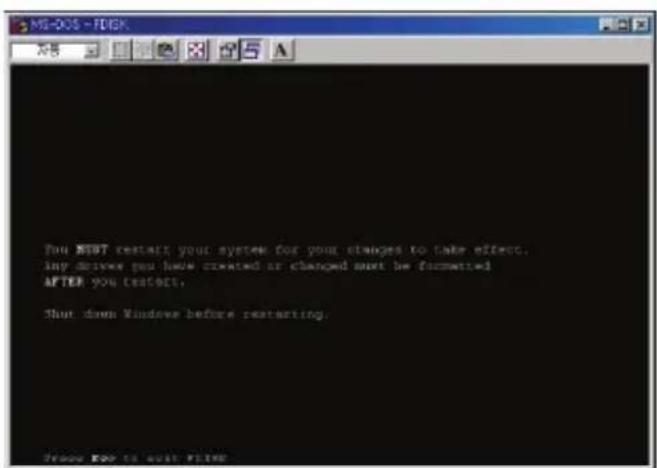
9) Press [ESC] key again. "Shut down Windows before restarting" message will be displayed. Press [ESC] key finally for exiting FDISK.
10) Type "exit" command at "C:\WINDOWS>" and press [Enter] for returning to windows screen.
7 Hard disk formatting and partition

Making partition and Formatting the HDDs under Windows 98SE/ME
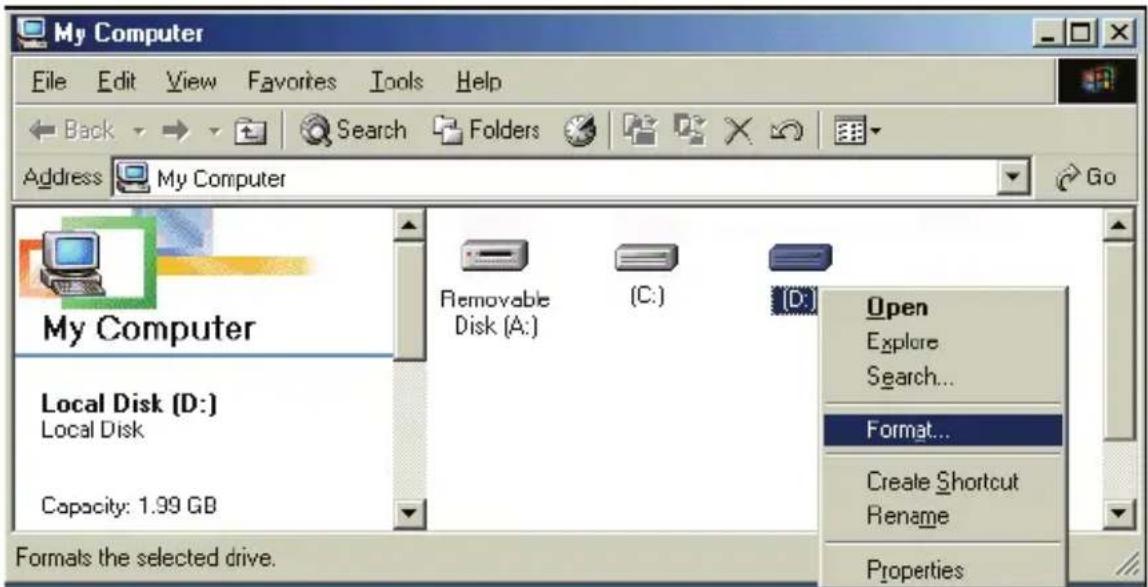
11) Unplug the MviX and plug again. New volume will be appeared at [My Computer]. Click mouse right button at the new volume and select [Format]
7 Hard disk formatting and partition

Making partition and formatting the HDDs under Windows 2000/XP
The drive is initially not visible in Windows Explorer. For the drive to been seen in Windows Explorer it needs to be configured via the disk management Utility. Win-XP will normally recognize the unformatted /unpartitioned drive when you open disk management and start the wizard.
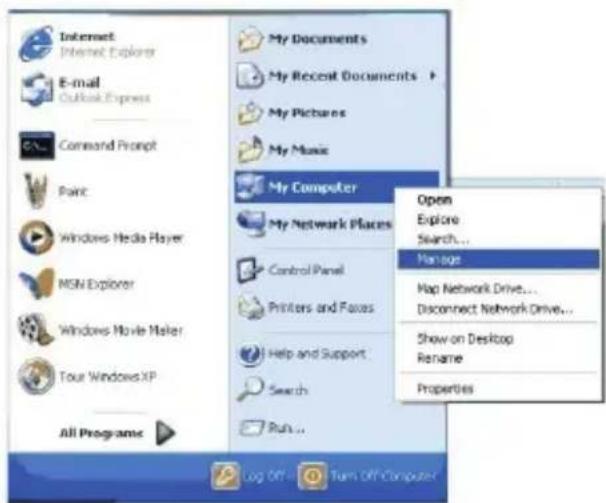
- Right click on "My Computer". Choose "Manage" from the pop up menu and "Computer Management" window will appear. Under "Storage", choose the "Disk Management" folder.
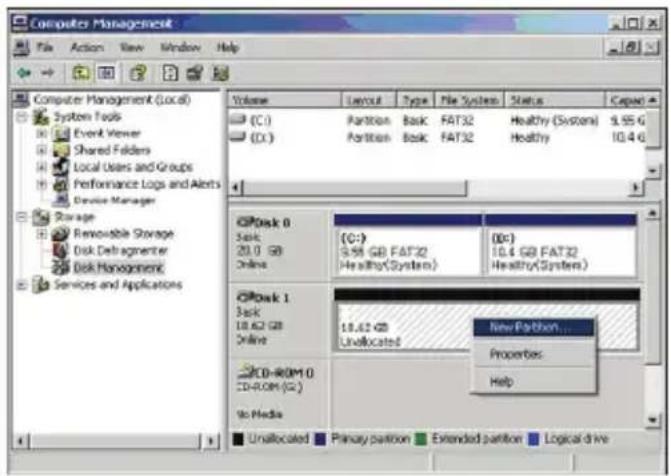
- The disk list will appear on the right side of the "Computer Management" windows. Right click the Mvix HDD (marked as "Unallocated HDD") from the list and from the pop up menu choose "New Partition" to make partitions on the chosen disk.
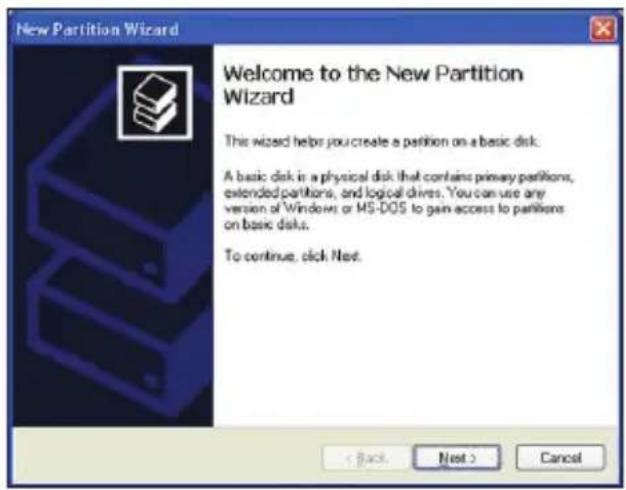
- The New Partition Wizard opens up. Click Next.
7 Hard disk formatting and partition

Making partition and formatting the HDDs under Windows 2000/XP
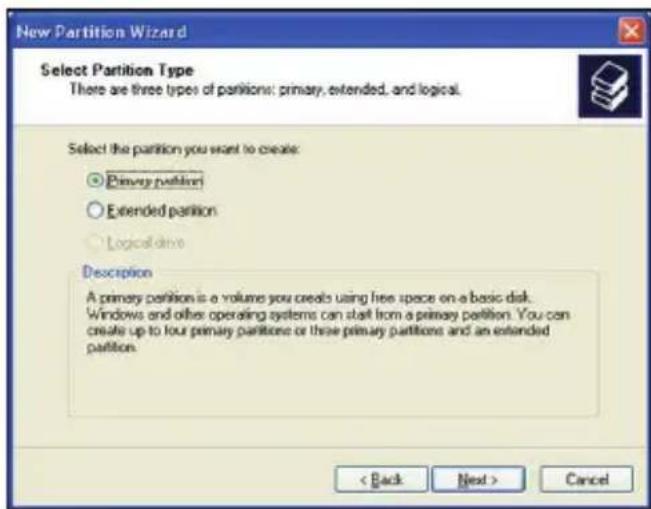
- Select the appropriate Partition Type. Choose Primary partition.
Primary – Normal selection for less than 4 partitions. Extended – Used for 4 or more partitions.
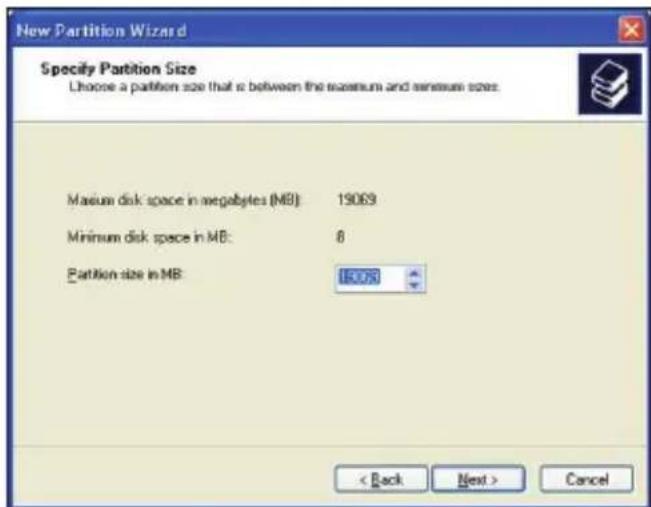
- Select the Partition Size. If you want one partition, simply click "Next".
Set the size of the partition (The full drive capacity is the default). If the full Partition Size is not used, right click on the remaining free space once the wizard has completed to partition that space. Repeat the Partition Wizard until the drive is how you want it.
Remember: For the FAT32 Formatting, Partition Size is limited to 32GB
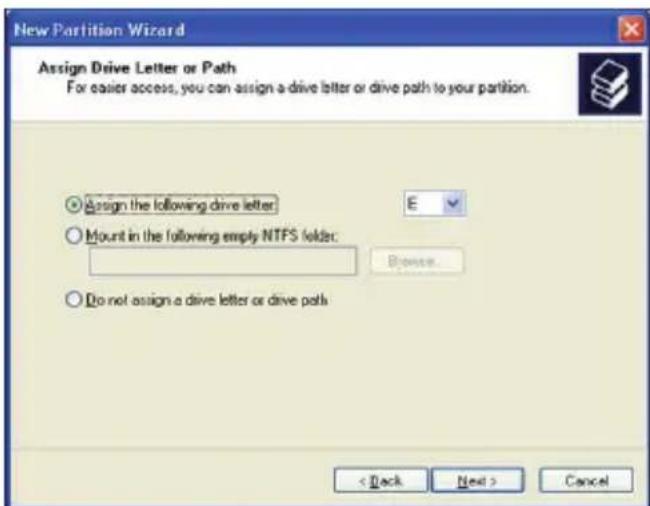
- Select the Driver letter. This allows you to select the drive letter for this partition. This will be the identification label of your Mvix HDD on your PC. We recommend that you do not change anything on this screen and simply press "Next".

Making partition and formatting the HDDs under Windows 2000/XP
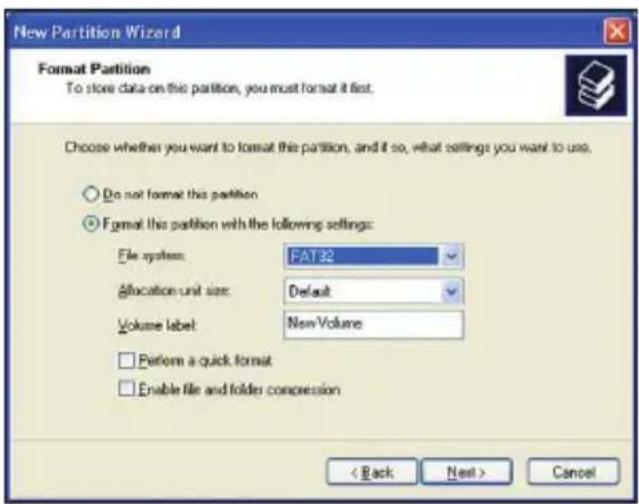
- Select the Partition Format. NTFS is the default format type in Windows XP, but FAT32 is popular for users that dual boot between XP and 9X. There is a limit that Windows XP cannot create a partition larger than 32 GB using FAT32. If you want the FAT32, Partition Size is limited to 32GB.
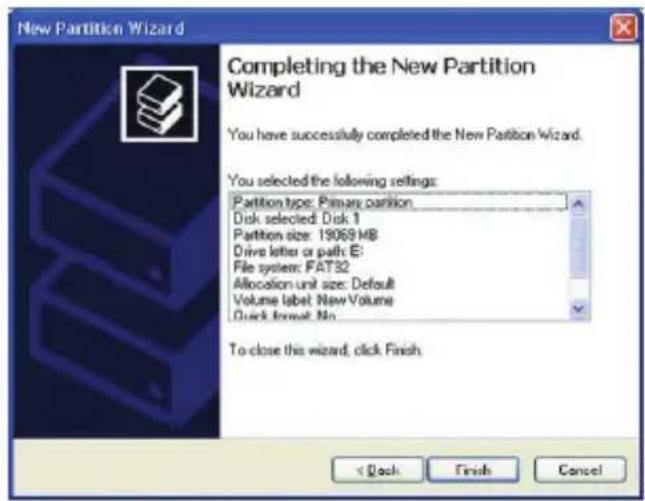
- When the formatting is completed, detailed information will appear as shown. Click the "FINISH" button to complete the work.
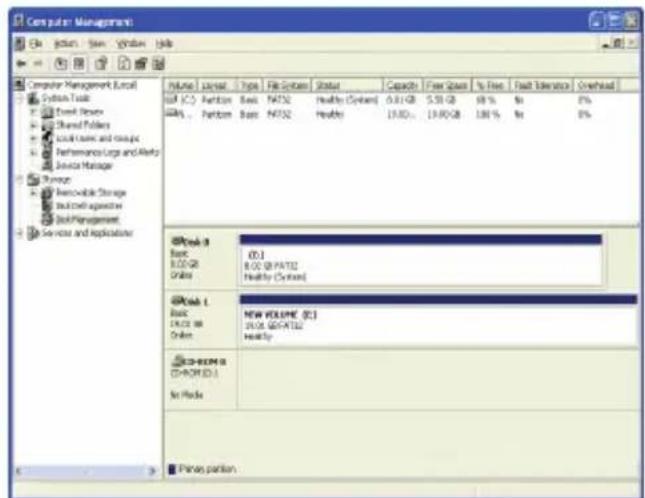
- Once the drive has been initialized, partitioned, and formatted it will display as a healthy drive with the size and type of partition below the volume name and drive letter.
8 Installation and Connection
Video and Audio Connections
Your MviX multimedia player supports Composite, S-Video or Component connections. Depending on the capabilities of your TV, you only need to make one video connection from these options. To hear sound through your TV, use audio connectors (RCA 2-CH) to connect the MviX multimedia player to the corresponding AUDIO-IN jacks on your TV or Hi-Fi Device.

Connection with ordinary (Composite) TV output
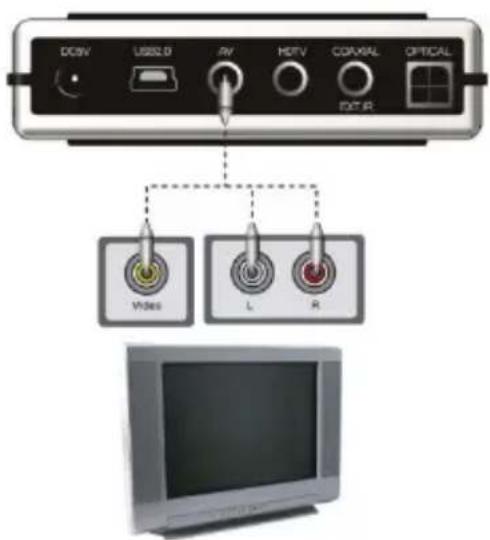
- Connect MviX and your TV using the yellow video cable (cable supplied).
- Connect your MviX Multimedia player and your TV to a power.
-Select appropriate video input mode on your TV until you get the initial MviX screen.
- Connect left (white), right (red) sound output to the appropriate terminal of your TV or Hi-Fi Device using the 2-CH RCA cable (cable supplied).

Connection to Component Output
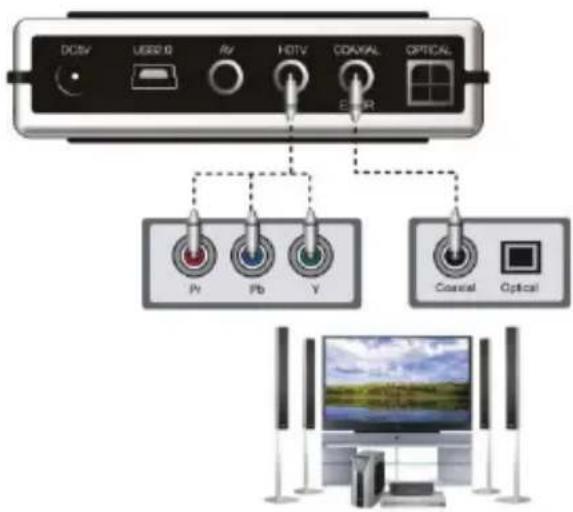
- Connect the MviX media player to your TV using a component cable as shown in the image above.
- Turn on the MviX and TV.
- Select appropriate video input mode on your TV (in this case, Component input mode) (cable not supplied).
-Component connection is commonly used on most HDTV's, DLP-TVs, Plasma TVs etc.
-When you have a multi channel decoder/amplifier with coaxial input, you can enjoy 5.1CH high quality sound through coaxial cable.
The above illustration shows how to connect with coaxial cable (cable not supplied).
8 Installation and Connection

Connection to Coaxial output
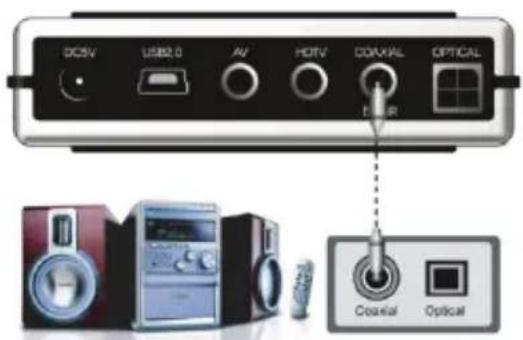
When you have a multi channel decoder/amplifier with coaxial input, you can enjoy 5.1CH high quality sound through coaxial cable.
The above illustration shows how to connect with coaxial cable (cable not supplied).

Connection to Optical output
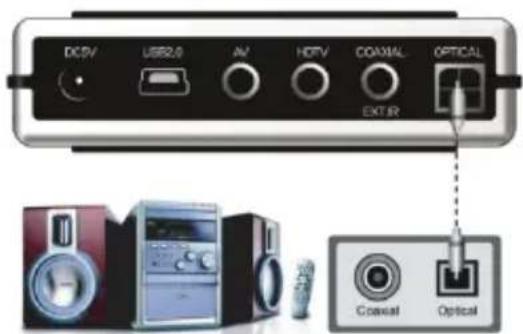
When you have a multi channel decoder/amplifier with optical input, you can enjoy 5.1CH high quality sound via optical cable.
The above illustration shows how to connect with optical cable. (cable not supplied).

Connection to Computer
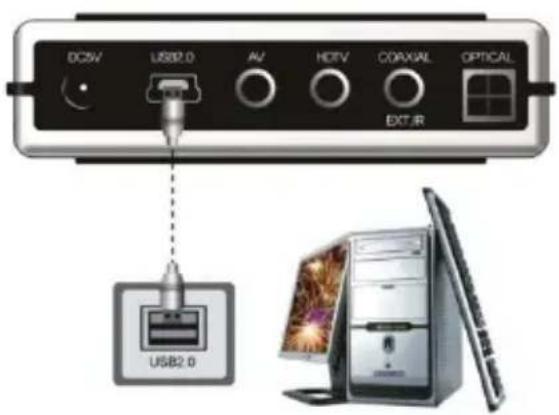
To transfer data or files from pc to your Mvix Multimedia Player. Connect MviX Multimedia Player to your computer using the USB cable (cable supplied). Ensure that your MviX player is powered-on.
Upon connection your PC (Win-ME/2000/XP) should recognize the new USB connected drive without installing driver. (Windows 98SE requires Driver installation. Look for the Driver software CD in your package.)

Audio/Video Setup
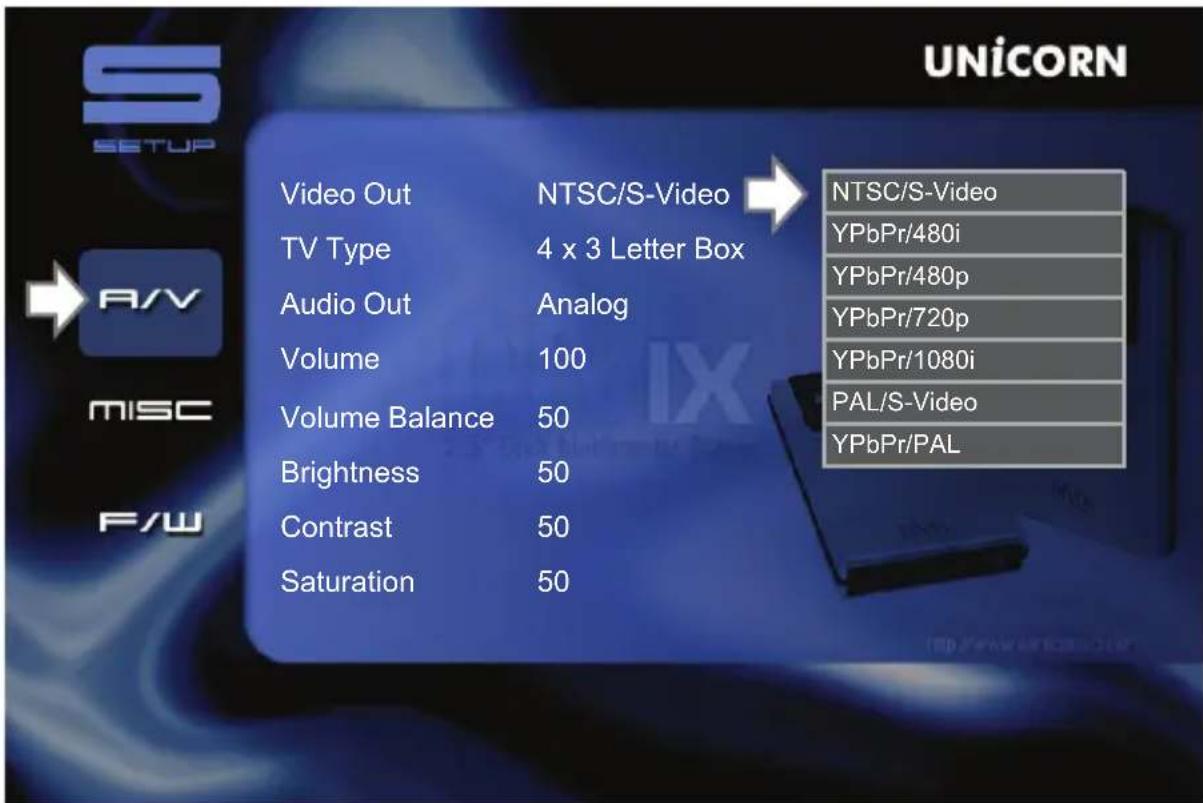
1) Video Out :
Supports NTSC/S-Video, YPbPr/480i, YPbPr/480p, YPbPr/720p, YPbPr/1080i, PAL/S-Video, YPbPr/PAL
2) TV Type :
Supports 4 X 3 Letter Box (Ordinary TV), 16:9 (HDTVs)
3) Audio Out :
Supports Analog, or Digital Audio
4) Volume :
You can control the volume in the range 0\~100
5) Volume Bal :
You can control the volume balance in the range 0\~100
6) Brightness :
You can control the brightness in the range 0\~100
7) Contrast :
You can control the contrast in the range 0\~100
8) Saturation :
You can control the saturation in the range 0\~100
9 MVIX Setup Menu

Setup/Various
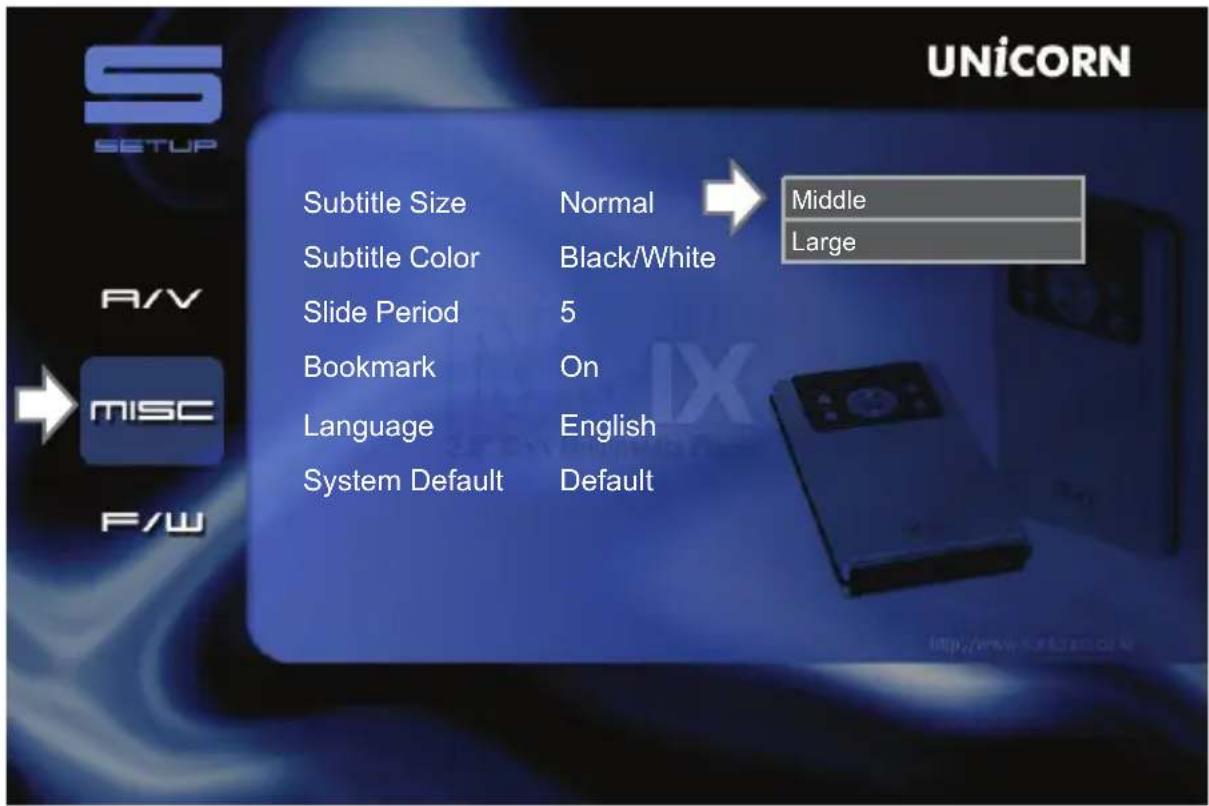
1) Subtitle Size :
You can select the subtitle font size (Normal/Large)
2) Subtitle Color :
You can change the color of the subtitle and its outline (Black/White, Black/Yellow, White/Yellow)
3) Slide Period :
You can set the slide show time interval (3 \~100sec)
4) Bookmark :
You can turn On/Off bookmark while you playback or load a file
5) Language:
Select the language you prefer to use with your MviX Multimedia player. Currently it supports English and Korean
6) LCD Bright :
You can control the LCD bright in the range 0\~100
7) Sys Default :
You can change the setting of the sys default
9 MVIX Setup Menu

Firmware Setup
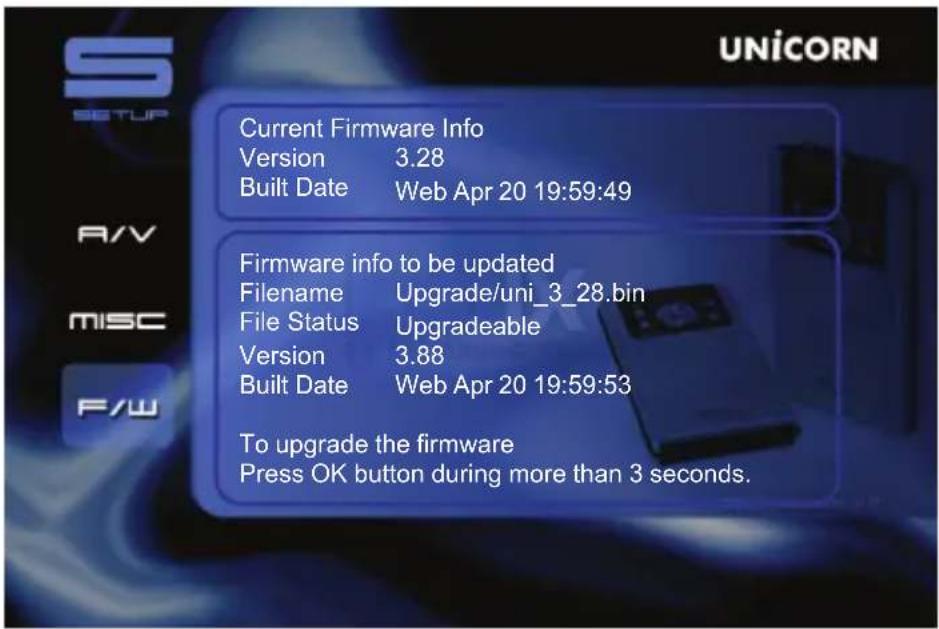
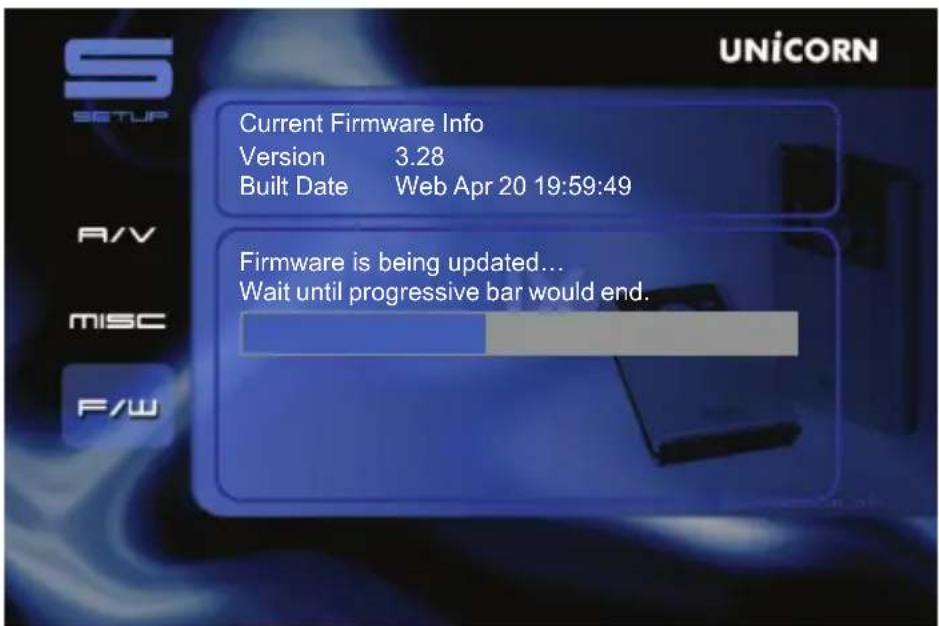
1) Connect your MVIX to your PC with the USB cable and turn it on.
2) Your PC recognizes your MVIX as an external hard disk.
3) Create a folder 'UPGRAD' at the root of the hard disk.
4) Download the new firmware (on www.mvix.net and www.mvix.co.kr)
5) Copy the new firmware that you just have downloaded in the 'UPGRAD' folder.
6) Turn off your MVIX and plug it on your TV.
7) Browse in the SETUP Menu firmware.
8) Press and hold OK button for more than 3 seconds.
9 MVIX Setup Menu

Driver installation for Windows 98SE
1) Execute the run setup file located in the installation CD supplied with the MVIX.
2) Follow the instructions on the screen.
3) Reboot your PC at the end of the installation.
4) You should see the new Hard disk in Windows explorer.

Driver installation for Windows ME/XP/2000
1) Windows ME/XP/2000 already have a preinstalled version of the USB driver.
2) Your PC will automatically recognise your MVIX as soon as you have plugged in the USB cable (check if your MVIX is on during its plug in).
3) You should have the new hard disk in Windows explorer.

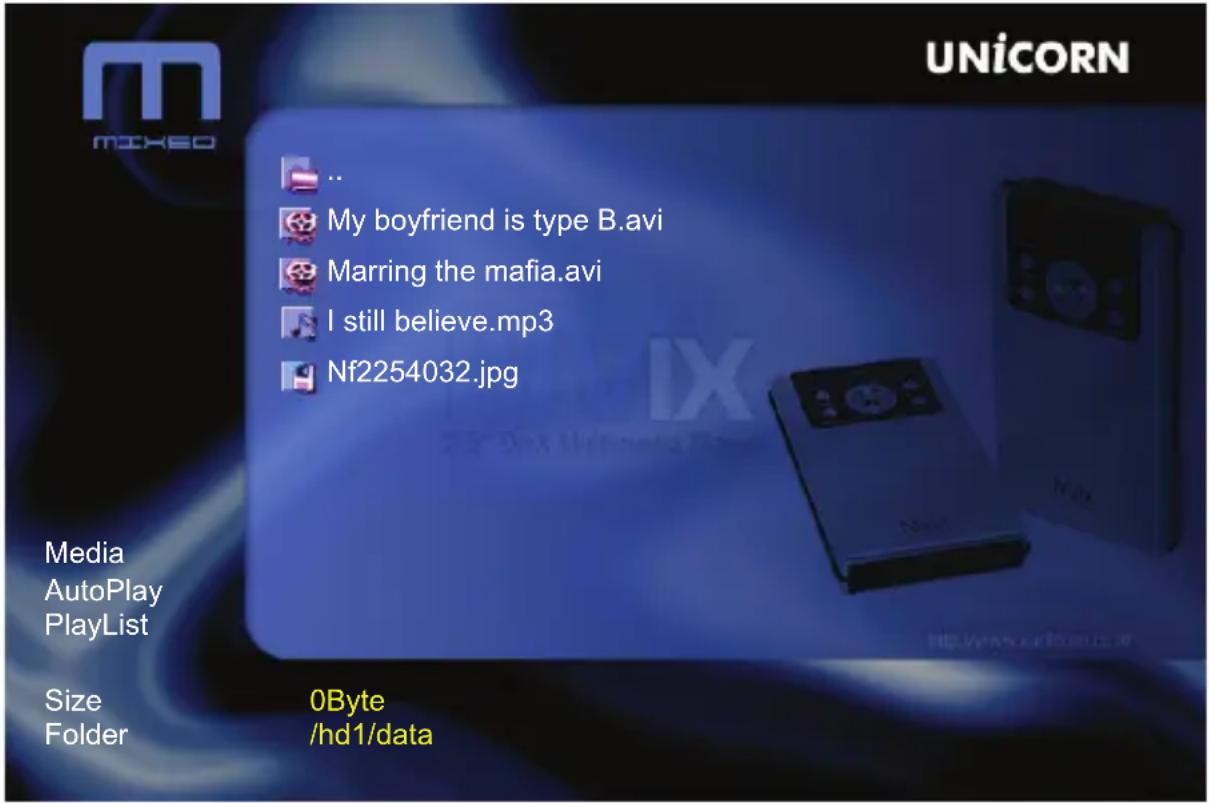
Video Files Playback
Press several times on “Media” key on the remote control to choose multimedia files. According to the type of media (Video, Audio, Picture, Mix).
On Video mode, only Video Files will be visible in the current directory.
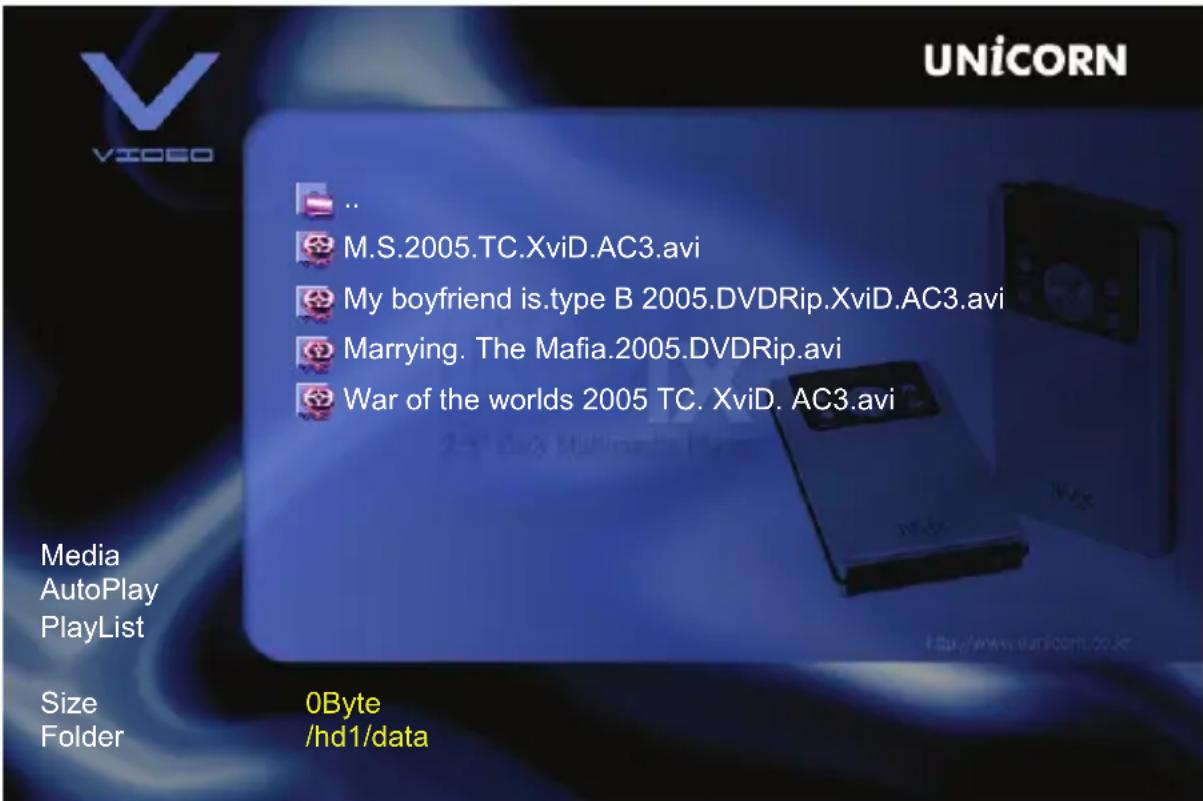
1) Select "Video" with "MEDIA" key on your remote control. You will see the list of your Video files displayed.
2) Select the Video file you want to read with ▼ or ▲ keys on the remote control, then click "OK".
To position yourself on the left menu, press browser key ◀ on the remote control. With
▼ or ▲ keys you can select : Media, Auto Playback, Playlist.
Media : This function enables you to launch the complete playback of the current directory, on the media selected (see on the figure below, the video files).
Playlist : (see playlist function).
9 MVIX Setup Menu

Audio Files Playback
Press several times on "Media" key on the remote control to choose multimedia files. According to the type of media (Video, Audio, Picture, Mix).
On Audio mode, only Audio Files will be visible in the current directory.
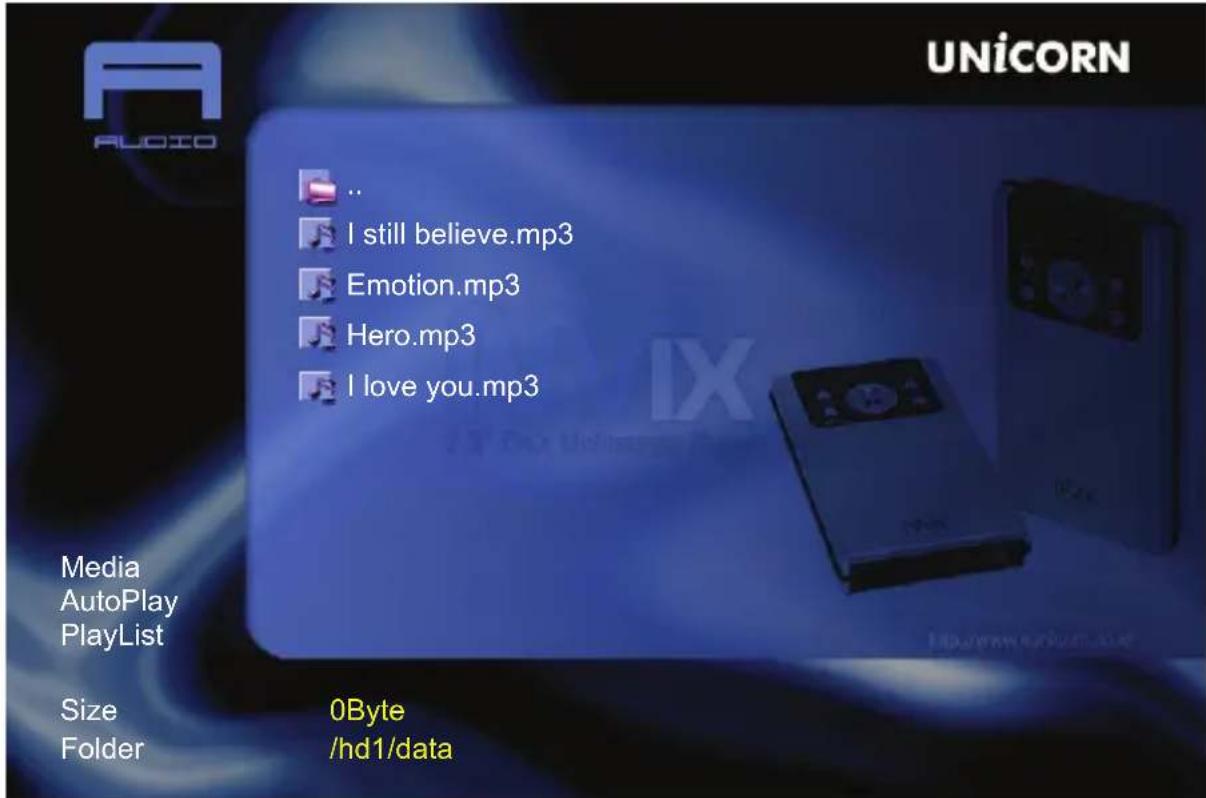
1) Select "Audio" with "MEDIA" key on your remote control. You will see the list of your Audio files displayed.
2) Select the Audio file you want to read with ▼ or ▲ keys on the remote control, then click "OK".
To position yourself on the left menu, press browser key ◀ on the remote control. With ▼ or ▲ keys you can select : Media, Auto Playback, Playlist.
Media : This function enables you to launch the complete playback of the current directory, on the media selected (see on the figure below, the audio files).
Playlist : (see playlist function).

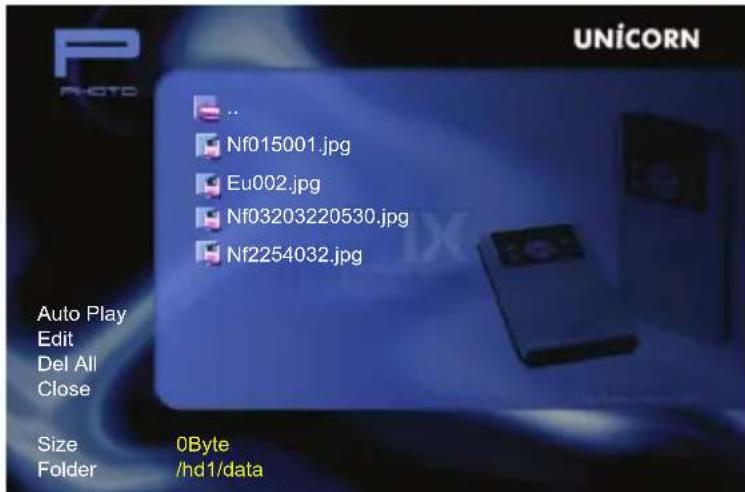
Photo Files Playback
Press several times on “Media” key on the remote control to choose multimedia files. According to the type of media (Video, Audio, Picture, Mix).
On Photo mode, only Photo Files will be visible in the current directory.
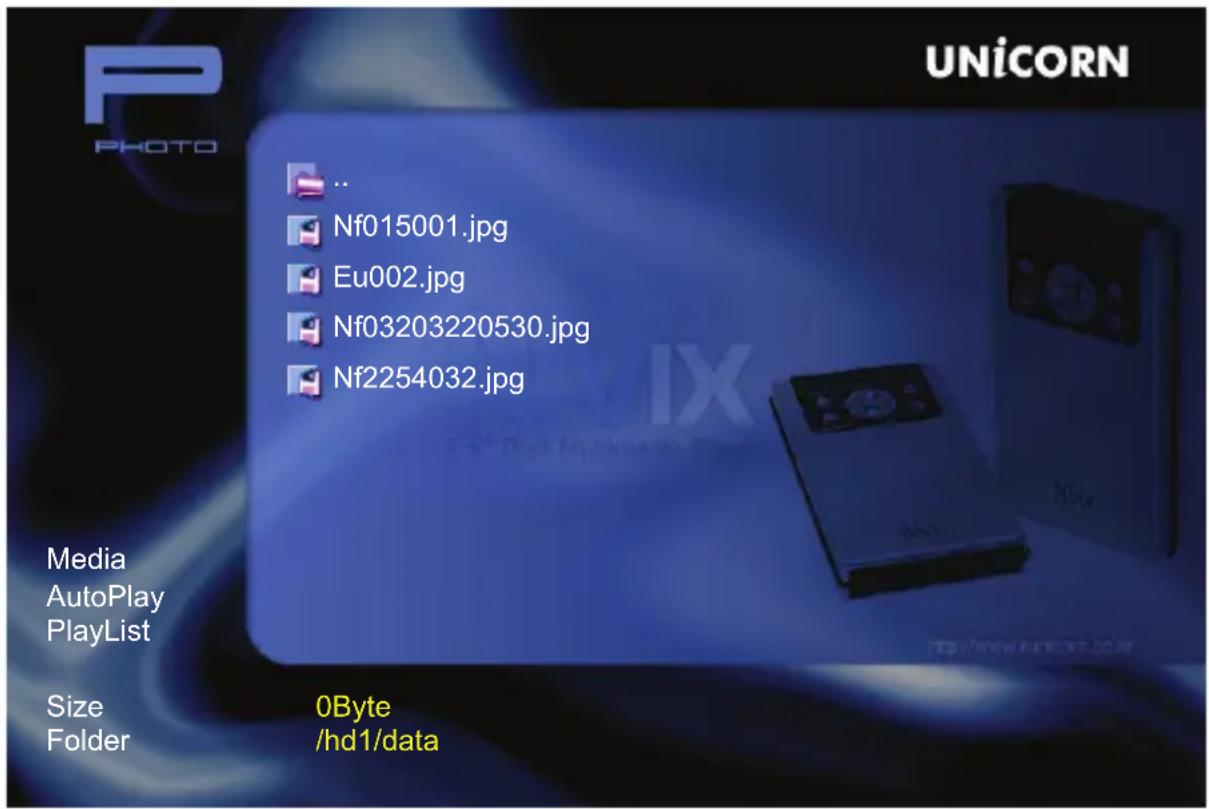
1) Select "Photo" with "MEDIA" key on your remote control. You will see the list of your Photo files displayed.
2) Select the Photo file you want to read with ▼ or ▲ keys on the remote control, then click "OK".
To position yourself on the left menu, press browser key ◀ on the remote control. With ▼ or ▲ keys you can select : Media, Auto Playback, Playlist.
Media : This function enables you to launch the complete playback of the current directory, on the media selected (see on the figure below, the photo files).
Playlist : (see playlist function).

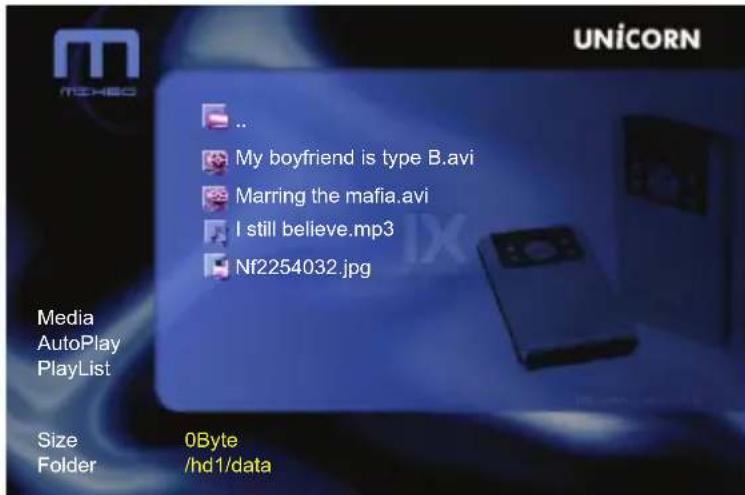
All Files Playback
Press several times on “Media” key on the remote control to choose multimedia files. According to the type of media (Video, Audio, Picture, Mix).
On Mix mode, only all Files will be visible in the current directory.
1) Select "Mix" with "MEDIA" key on your remote control. You will see the list of your all your files displayed.
2) Select the media you want to read with ▼ or ▲ keys on the remote control, then click "OK".
To position yourself on the left menu, press browser key ◀ on the remote control. With
▼ or ▲ keys you can select : Media, Auto Playback, Playlist.
Media : This function enables you to launch the complete playback of the current directory, on the media selected (see on the figure below, the all files).
Playlist : (see playlist function).
9 MVIX Setup Menu
Mix

Playlist
With your MVIX, it is possible to create a playlist. Creation of your playlist

1) Press browser ◀ key on the remote control, so that you position yourself on the left menu.
2) Press twice on ▼ key on the remote control to select “ Playlist” then “OK”.
3) The screen displays "MIX". All the media files in the current directory appear. *With browser keys ▲ or ▼ on the remote control, choose the media to include in your playlist, then click "OK". Repeat from the star step(*) until you come to the end of your choice. At this time, with this ◀ key on the remote control, you can return to the left menu and with ▼ key, choose "Close"
The list of all selected files appear in the left window.
Auto Playback : launches the playback of your Playlist.
Edit : make you return to the previous menu so that you can add or delete files from your Playlist.
Delete All : delete your playlist
Close : closes your playlist
10 Troubleshooting
Under no circumstances should you try to repair the system yourself, as this will invalidate the warranty. Do not open the system as there is a risk of electric shock. If a fault occurs, first check the points listed below before taking the system for repair.
| No Screen Display.Video Output not working. | 1. Press the TVOUT button on Mvix remote to toggle between TVOUT settings.2. Check the TV-OUT settings and cable-type on the Mvix player and ensure that it is consistent with the VIDEO-IN settings of the TV.3. Ensure that the Video Cable is securely connected to the Mvix player and to the TV. |
| The Player does not respond to the Remote Control. Menu Items cannot be selected. | 1. Reduce the distance between the Remote and the Mvix Player and try again.2. Replace remote batteries3. Perform a Hardware Reset Procedure |
| Mvix player does not recognize the HDD. | 1. Check the IDE / USB connection to the Hard Disk Drive (HDD).2. Check to ensure that the HDD has been correctly partitioned and formatted.3. Try changing the jumper settings to MASTER or SINGLE. If that does not work, try SLAVE or CABLE SELECT (CS) jumpers. |
| Unable to Play DivX®, or Xvid, or MPEG, or AVI video files etc.(or Black Screen problem) | 1. Ensure that the selected video file contains supported video codec.2. Defragmenter the Mvix-HDD.3. If playing a file from a Network-shared PC, there may be too much traffic on the network (check for virus). Try to reboot your PC and establish connection again. |
WARNING:
To reduce the risk of fire or electric shock, do not expose your Mvix Media player to rain or moisture.
For any further assistance please visit our support site at www.mvix.net / support