DL4305D - Router Netis - Free user manual and instructions
Find the device manual for free DL4305D Netis in PDF.

| Product Type | Wireless Router |
| Model | DL4305D |
| Brand | Netis |
| Wireless Standard | IEEE 802.11a/b/g/n/ac |
| Maximum Wireless Speed | 1200 Mbps (2.4GHz: 300Mbps + 5GHz: 867Mbps) |
| Frequency Band | Dual Band (2.4 GHz and 5 GHz) |
| LAN Ports | 4 x 10/100/1000 Mbps Gigabit Ethernet |
| WAN Port | 1 x 10/100/1000 Mbps Gigabit Ethernet |
| USB Ports | None |
| Antennas | 4 x External Fixed Antennas |
| Dimensions (W x D x H) | 200 x 150 x 30 mm |
| Weight | 0.3 kg |
| Power Supply | 5V DC, 1A (via micro USB or adapter) |
| Power Consumption | Maximum 5 W |
| Security Features | WPA/WPA2-PSK, WPA2-Enterprise, MAC Address Filtering, SPI Firewall |
| Management | Web-based GUI, Quick Setup Wizard |
| VPN Support | PPTP, L2TP, IPSec Pass-through |
| Operation Modes | Router, Access Point, Repeater, Bridge |
| Standards | IEEE 802.3, 802.3u, 802.3ab |
| Cleaning and Maintenance | Wipe with a soft, dry cloth. Do not use liquid cleaners. |
| Repairability | No user-serviceable parts. Contact support for repairs. |
Frequently Asked Questions - DL4305D Netis
User questions about DL4305D Netis
0 question about this device. Answer the ones you know or ask your own.
Ask a new question about this device
Download the instructions for your Router in PDF format for free! Find your manual DL4305D - Netis and take your electronic device back in hand. On this page are published all the documents necessary for the use of your device. DL4305D by Netis.
USER MANUAL DL4305D Netis
natural_image
Abstract pattern of gray squares on white background with no text or symbols1. Hardware Installation
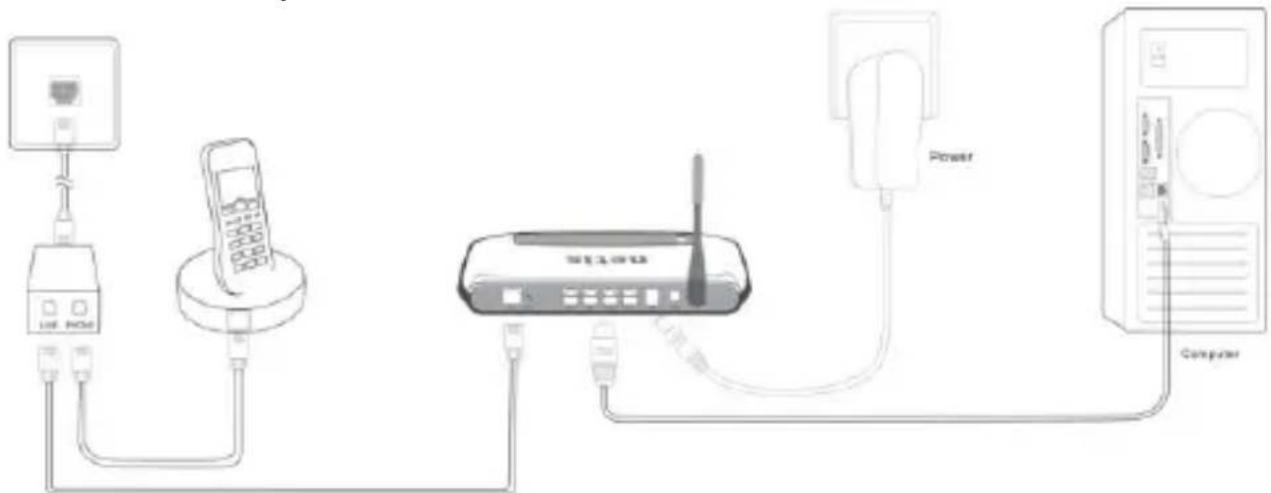
Step 1: Connect the ADSL Line.
Method one: Plug one end of the twisted-pair ADSL cable into the ADSL LINE port on the rear panel of the router, and insert the other end into the wall socket.
Method two: You can use a separate splier. The external splier has three ports:
• Line: Connect to the wall jack
• Phone: Connect to the phone sets
- Modem: Connect to the ADSL LINE port of the router
Step 2: Connect the Ethernet cable. Each one end of a network cable to your computer's Ethernet port or a regular hub/switch port, and the other end to the LAN port on the router.
Step 3: Power on the computers and LAN devices.
Step 4: Aach the power adapter. Connect the power adapter to the power connector on the rear of the device and plug in the adapter to a wall outlet or power extension.
text_image
Diagram showing connections between a router, mobile phone, wireless router, power unit, and computer via cable routing.Figure 1
| Name Status Indicaon | |
| PWR On Power is on | |
| O Power is o | |
| ADSL | Flash The ADSL negoaon is in progress |
| On The LINE port is linked up. | |
| O The LINE port is linked down. | |
| Internet | Flash Data is being transferred over the Internet. |
| On A successful PPP conncon has been built. | |
| O There is no successful PPP conncon or the Router works on Bridge mode. | |
| WLAN | Flash There is wireless data being transmied. |
| On The wireless funcon is enabled but no data is being transmied. | |
| O The wireless funcon is disabled. | |
| LAN(1-4) | Flash Data is being transferred over the 1-4 (LAN) port. |
| On There is a successful conncon on the corresponding 1-4 (LAN) port but no acvity. | |
| O There is no conncon on the corresponding 1-4 (LAN) port or the conncon is abnormal. |
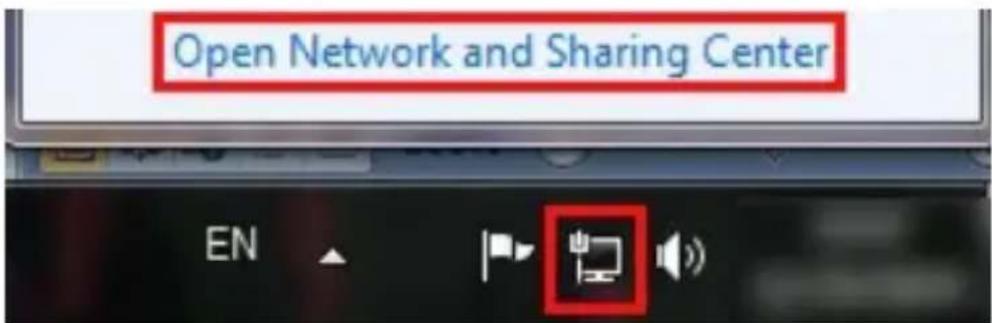
2. Configure PC
For Windows 7 or Windows Vista as below.
Step 1: Click 📋, then select the Open Network and Sharing Center.
text_image
Open Network and Sharing Center ENFigure 2
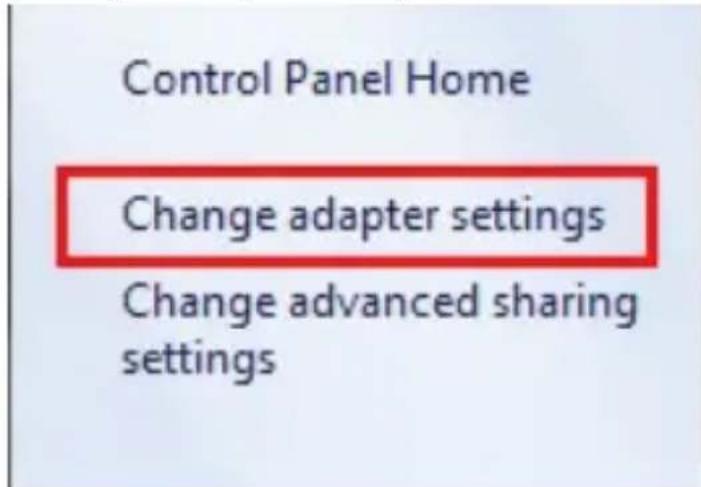
Step 2: Click the Change adapter sengs.
text_image
Control Panel Home Change adapter settings Change advanced sharing settingsFigure 3
Step 3: Click Local Area Connecon with the right buon of your mouse. Then select Properes.

text_image
Local Area Connection Disable Status Diagnose Bridge Connections Create Shortcut Delete Rename PropertiesFigure 4
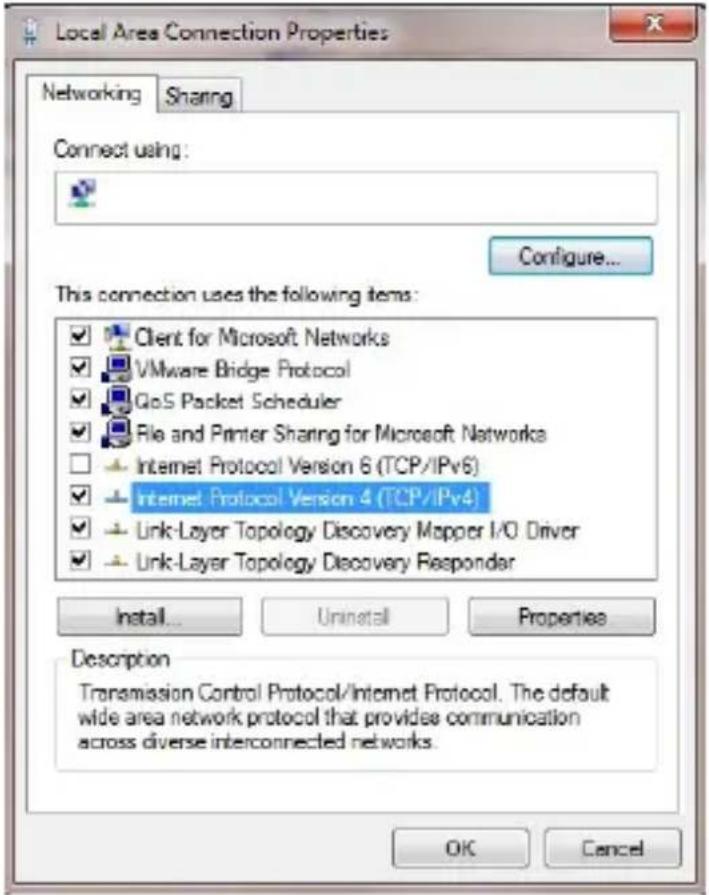
Step 4: Double click the "Internet Protocol Version 4(TCP/IPv4)".
text_image
Local Area Connection Properties Networking Sharing Connect using: Configure... This connection uses the following items: ✓ Client for Microsoft Networks ✓ VMware Bridge Protocol ✓ GoS Packet Scheduler ✓ File and Printer Sharing for Microsoft Networks □ Internet Protocol Version 6 (TCP/IPv6) ✓ Internet Protocol Version 4 (TCP/IPv4) ✓ Link-Layer Topology Discovery Mapper I/O Driver ✓ Link-Layer Topology Discovery Responder Install... Uninstall Properties Description Transmission Control Protocol/Internet Protocol. The default wide area network protocol that provides communication across diverse interconnected networks. OK CancelFigure 5
Step 5: Select the “Obtain an IP address automacally” as below. Then click “OK”.
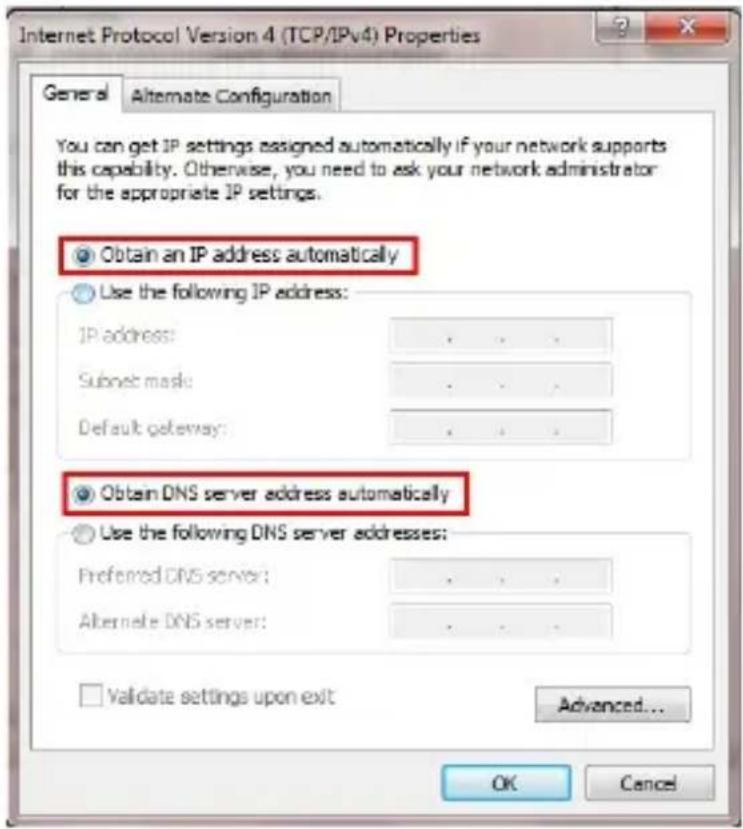
text_image
Internet Protocol Version 4 (TCP/IPv4) Properties General Alternate Configuration You can get IP settings assigned automatically if your network supports this capability. Otherwise, you need to ask your network administrator for the appropriate IP settings. Obtain an IP address automatically Use the following IP address: IP address: . Subset mask: . Default gateway: . Obtain DNS server address automatically Use the following DNS server addresses: Preferred DNS server: . Alternate DNS server: . Validate settings upon exit Advanced... OK CancelFigure 6
3. Login
Start your web browser and type the private IP address of the Router in the URL eld: 192.168.1.1.

text_image
Blank Page - Windows Internet Explorer http://192.168.1.1/Figure 7
Then, enter the default User Name admin and the default Password admin
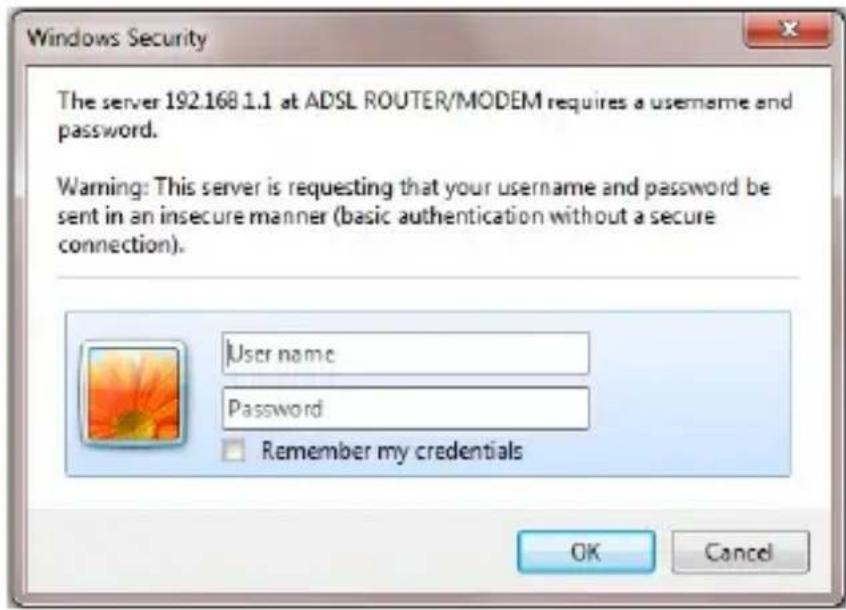
text_image
Windows Security The server 192.168.1.1 at ADSL ROUTER/MODEM requires a username and password. Warning: This server is requesting that your username and password be sent in an insecure manner (basic authentication without a secure connection). User name Password Remember my credentials OK CancelFigure 8
And then click OK to access to the Wireless Modem Management Panel screen.
4. Modem Management
This webpage provides you the convenient and simplest way to conjure your Modem to access the internet.
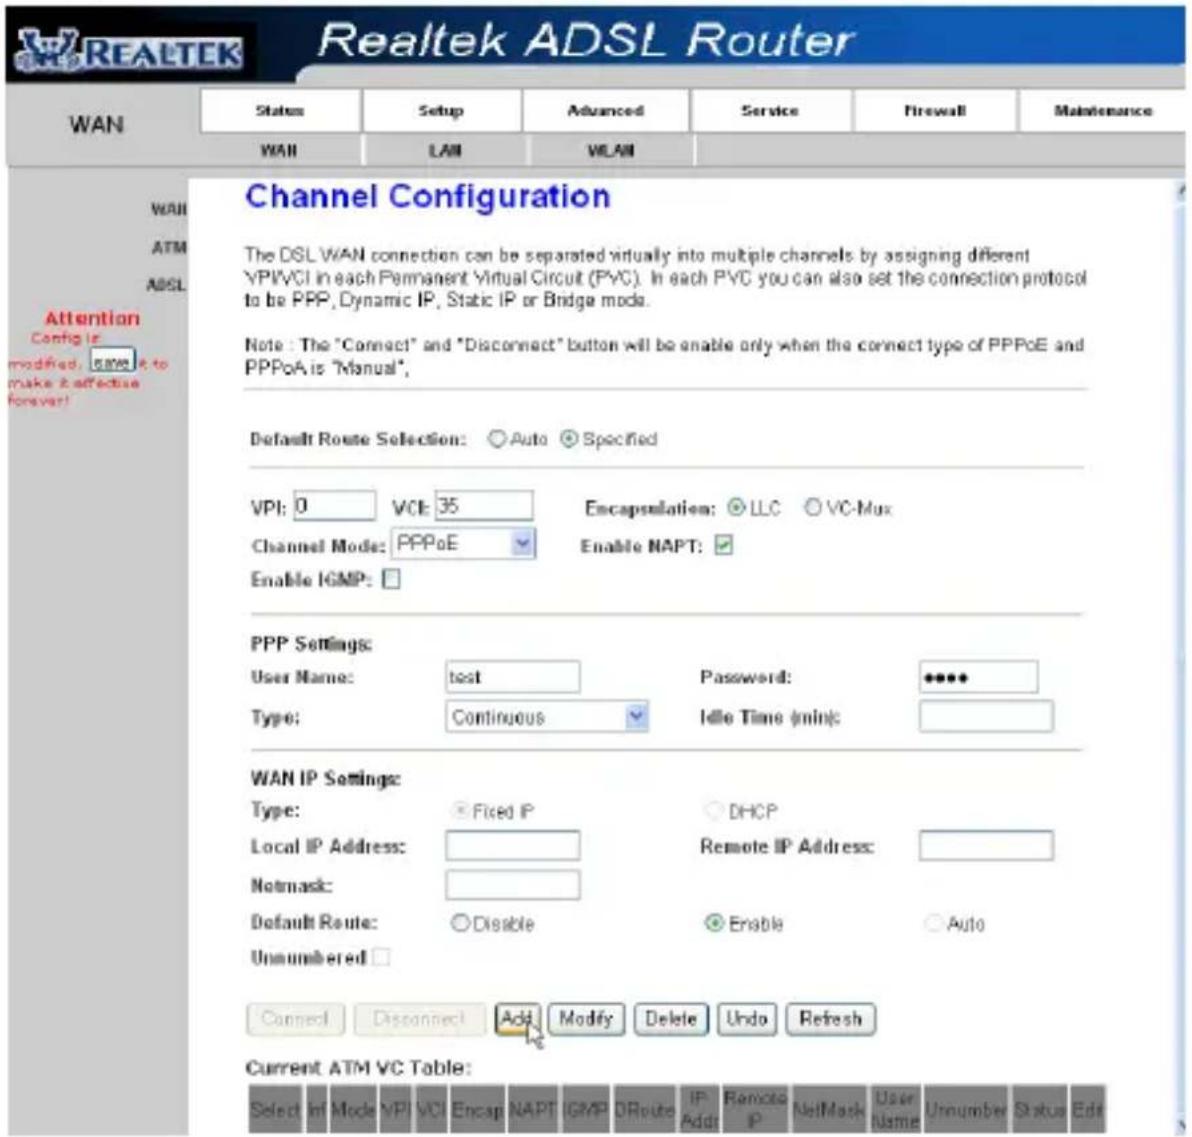
Firstly. Click and go to "Setup"->"WAN", Page is showing below: (we are taking PPPoE for example)
Secondly. Enter the VPI and VCI provided by your ISP and select the Channel mode as PPPoE
Third: Enter the Fixed IP address which provided by your ISP then click “Add”
Fourth: Click "Save" boon to make it eeve.
text_image
REALTEK Realtek ADSL Router WAN Status Setup Advanced Service Firewall Maintenance WAN LAN VLAN Channel Configuration The DSL WAN connection can be separated virtually into multiple channels by assigning different VPI/VCI in each Permanent Virtual Circuit (PVC). In each PVC you can also set the connection protocol to be PPP, Dynamic IP, Static IP or Bridge mode. Note: The "Connect" and "Disconnect" button will be enable only when the connect type of PPPoE and PPPoA is "Manual". Default Route Selection: Auto Specified VPI: 0 VCE 35 Encapsulation: LLC VC-Mux Channel Mode: PPPoE Enable NAPT: Enable IGMP: PPP Settings User Name: test Password: ***** Type: Continuous Idle Time (mins): WAN IP Settings: Type: Fixed IP DHCP Local IP Address: Remote IP Address: Notmask: Default Route: Disable Enable Auto Unnumbered: Connect Disconnect Add Modify Delete Undo Refresh Current ATM VC Table: Select Inf Mode VPI VCI Encap NAPT IGMP ORoute IP Addr Remote IP NetMask User Name Unnumber Status EditFigure 9
5. Wireless Network & Security
To connect to the Wireless AP, we should have the most basic
configuration of the router at first. In this section, you can set the wireless network parameters required to access the AP of your WLAN interface.
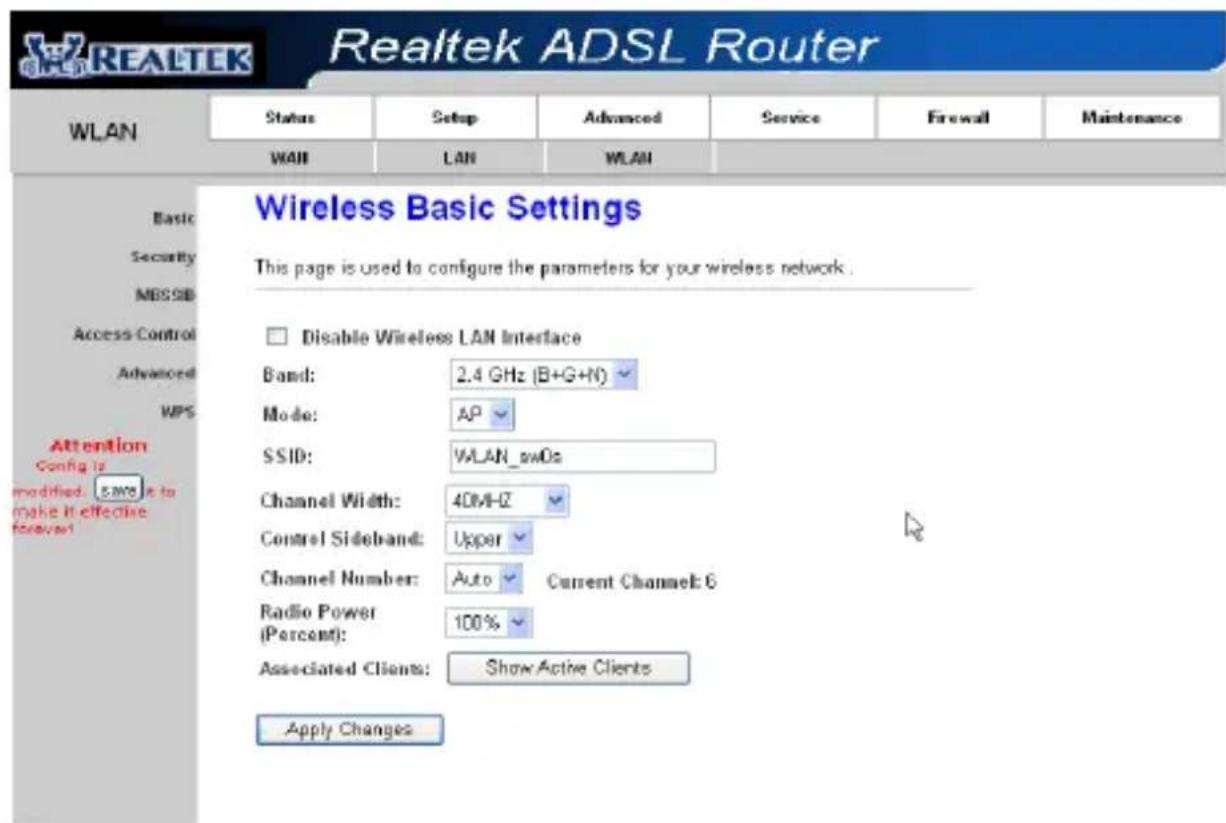
Go to Setup->WLAN->Basic page, you can configure the wireless parameters.
Here you may enable or disable the wireless function. You can also change the wireless parameters, such as Band, SSID, Channel Width, Control Sideband, Channel Number and Radio Power.
text_image
Realtek ADSL Router WLAN Status Setup Advanced Service Firewall Maintenance WAN LAN WLAN Basic Security MSSID Access Control Advanced WPS Attention Config is modified. save it to make it effective forever Wireless Basic Settings This page is used to configure the parameters for your wireless network. Disable Wireless LAN Interface Band: 2.4 GHz (B+G+N) Mode: AP SSID: VLAN_swOs Channel Width: 40M-0Z Control Sideband: Upper Channel Number: Auto Current Channel: 6 Radio Power (Percent): 100% Associated Clients: Show Active Clients Apply ChangesFigure 10
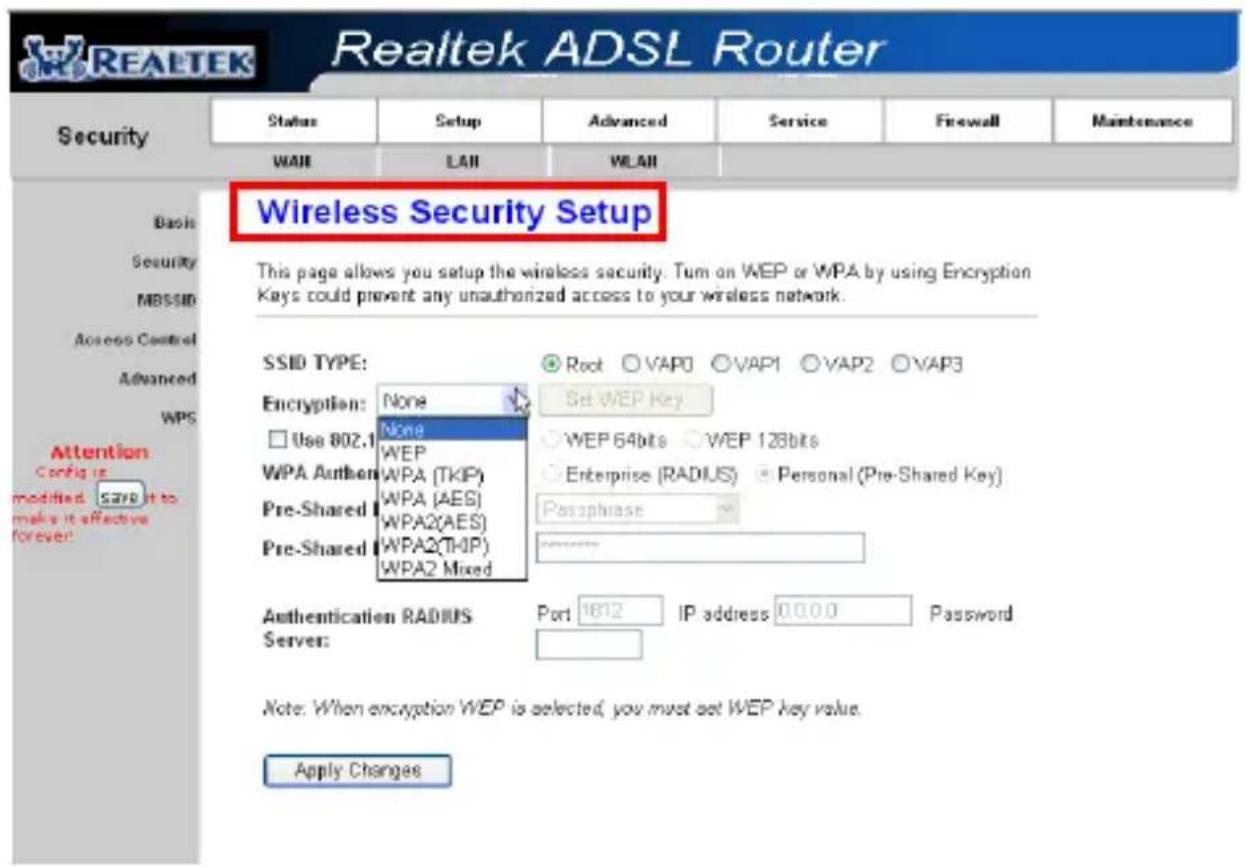
Step 2: Go to Setup->WLAN-> Security page, you can configure the wireless security parameters.
Here you can choose the encryption method to prevent any unauthorized access to your wireless network.
There are three most commonly used encryption method (a total of six encryption support), including the WEP encryption, WPA-Personal, WPA2-Personal, etc.
Click "Apply Changes" to make it effective
text_image
Realtek ADSL Router Security Status Setup Advanced Service Firewall Maintenance WAI LAI WLAII Basis Security MBSSID Access Control Advanced WPS Attention Config is modified. SAVE it to make it effective forevert Wireless Security Setup This page allows you setup the wireless security. Tum on WEP or WPA by using Encryption Keys could prevent any unauthorized access to your wireless network. SSID TYPE: None Use 802.1 None WEP WPA Author WPA (TKIP) WPA (AES) WPA2(AES) Pre-Shared WPA2(TKIP) WPA2 Mixed Root VAP0 VAP1 VAP2 VAP3 Set WEP Key WEP 64bits WEP 128bits Enterprise (RADIUS) Personal (Pre-Shared Key) Passphrase Authentication RADIUS Server: Port 1812 IP address 0.0.0.0 Password Note: When encryption WEP is selected, you must set WEP key value. Apply ChangesFigure 11
Step 3: Click “My Network Places” with the right buon of your mouse. Then select “Properes”.
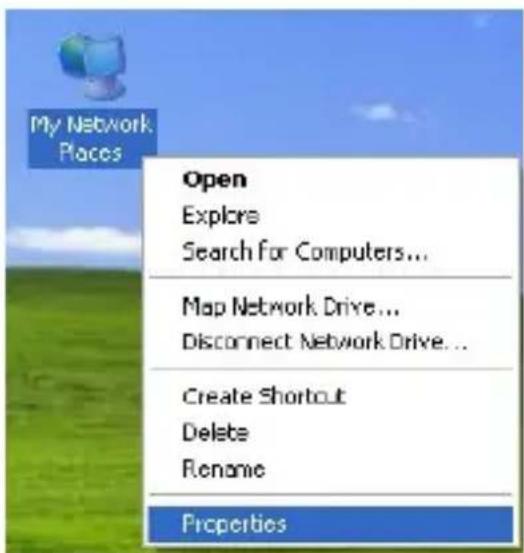
text_image
My Network Places Open Explore Search for Computers... Map Network Drive... Disconnect Network Drive... Create Shortcut Delete Rename PropertiesFigure 12
Step 4: Click “Wireless Network Connecon” with the right buon of your mouse. Then select “View Available Wireless Networks”.
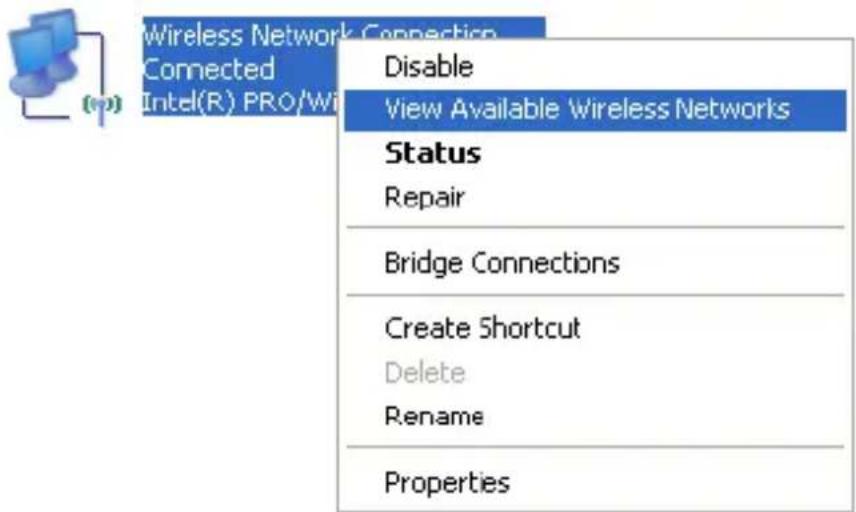
text_image
Wireless Network Connection Connected Intel(R) PRO/Wi Disable View Available Wireless Networks Status Repair Bridge Connections Create Shortcut Delete Rename PropertiesFigure 13
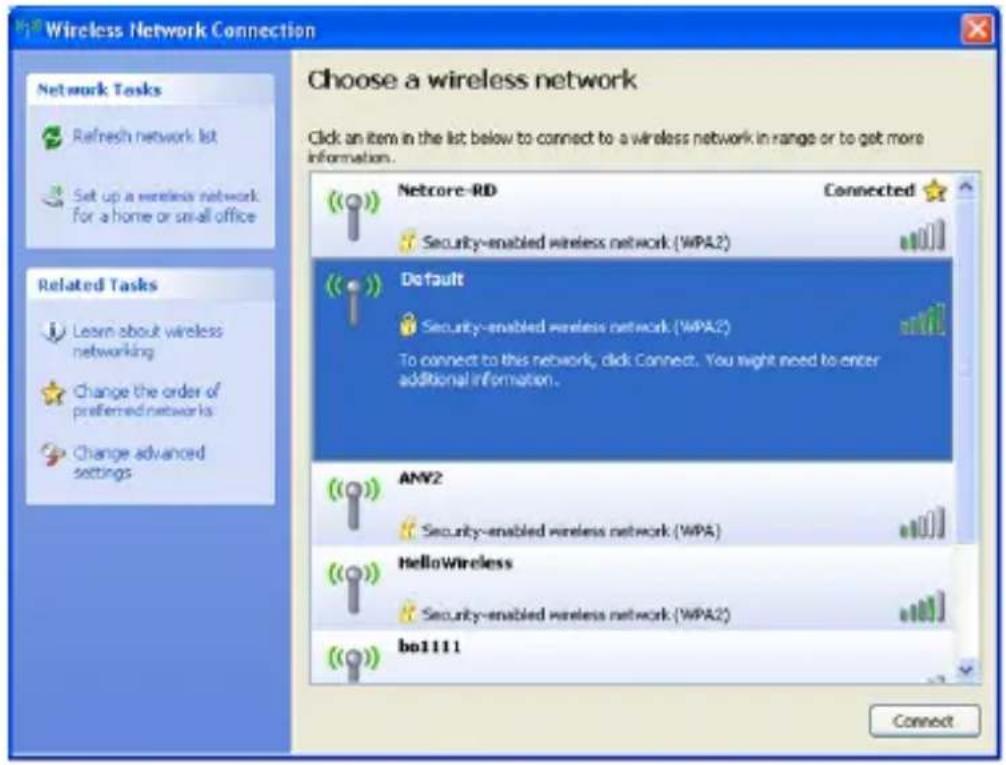
Step 5: Double click the wireless network your product provided.
text_image
Wireless Network Connection Choose a wireless network Click an item in the list below to connect to a wireless network in range or to get more information. Network Tasks Refresh network list Set up a wireless network for a home or small office Related Tasks Learn about wireless networking Change the order of preferred networks Change advanced settings Netcore-RD Connected Security-enabled wireless network (WPA2) Default Security-enabled wireless network (WPA2) To connect to this network, click Connect. You might need to enter additional information. ANY2 Security-enabled wireless network (WPA) HelloWireless Security-enabled wireless network (WPA2) bo1111 ConnectFigure 14
Step 6: Input the key you steed before if the wireless network you connecng to requests password.
USA/Canada Technical Support:
Phone (toll free in USA& Canada):
1-866-71-network or 1-866-716-3896
Email: usa_support@netis-systems.com
For North America only
Netis SYSTEMS CO., LTD
http://www.netis-systems.com
MADE IN CHINA