
MO1250TW - Microwave Avanti - Free user manual and instructions
Find the device manual for free MO1250TW Avanti in PDF.


| Product Type | Countertop Microwave Oven |
| Brand | Avanti |
| Model | MO1250TW |
| Capacity | 1.2 cu. ft. (34 L) |
| Power Output | 1250 Watts |
| Power Consumption | 1400 Watts |
| Voltage | 120 V / 60 Hz |
| Dimensions (W x D x H) | 20.5 x 17.3 x 12.2 inches |
| Weight | 35.3 lbs (16 kg) |
| Control Type | Digital Touchpad |
| Door Type | Push-Button Open |
| Turntable | Yes, 12.5 inch glass |
| Display | LED Digital Clock |
| Defrost Function | Auto Defrost by Weight |
| Preset Menus | 10 Auto Cook Menus |
| Child Lock | Yes |
| Interior Light | Yes |
| Cleaning | Wipe with damp cloth; mild detergent |
| Replaceable Parts | Turntable, roller ring, fuse |
| Repairability | Modular design; authorized service recommended |
| Color | White |
Frequently Asked Questions - MO1250TW Avanti
User questions about MO1250TW Avanti
0 question about this device. Answer the ones you know or ask your own.
Ask a new question about this device
Download the instructions for your Microwave in PDF format for free! Find your manual MO1250TW - Avanti and take your electronic device back in hand. On this page are published all the documents necessary for the use of your device. MO1250TW by Avanti.
USER MANUAL MO1250TW Avanti
Avanti has a policy of continuous improvement on its products and reserves the right to change materials and specifications without notice.
Avanti Products, A Division of The Mackle Co., Inc.
P.O. Box 520604 - Miami, Florida 33152
www.avantiproducts.com
TABLE OF CONTENTS
| Help Us Help You | 3 |
| Parts and Features | 4 |
| Important Safety Instructions | 5 |
| Installation Instructions | 6 |
| Before Using Your Microwave Oven | 6 |
| Installation of Your Microwave Oven | 6 |
| Safety Precautions | 6 – 7 |
| Electrical Connection | 8 |
| Operating Your Microwave Oven | 8 |
| Control Panel 9 | |
| Operation Procedure 10 – 15 | |
| Cooking Techniques | 16 |
| Care and Maintenance | 16 |
| Cleaning Your Microwave Oven | 16 |
| Problems with Your Microwave Oven? | 17 |
| Troubleshooting Guide | 17 |
| Service for Your Microwave Oven | 17 |
| Avanti Microwave Oven Warranty | 18 |
| Instrucciones en Español | 19 – 30 |
| Registration Information and Registration Card | 31 |
HELP US HELP YOU...
Read this guide carefully.
It is intended to help you operate and maintain your new microwave oven properly.
Keep it handy to answer your questions.
If you don't understand something or you need more assistance, please call:
Avanti Customer Service 800-220-5570
Keep proof of original purchase date (such as your sales slip) with this guide to establish the warranty period.
Write down the model and serial numbers.
You'll find them on a label located on the rear wall of the microwave oven.
Please write these numbers here:
Date of Purchase
Model Number
Serial Number
Use these numbers in any correspondence or service calls concerning your microwave oven.
If you received a damaged microwave oven, immediately contact the dealer (or builder) that sold you the microwave oven.
Save time and money. Before you call for service, check the Troubleshooting Guide. It lists causes of minor operating problems that you can correct yourself.
IF YOU NEED SERVICE
We're proud of our service and want you to be pleased. If for some reason you are not happy with the service you receive, here are some steps to follow for further assistance.
FIRST, contact the people who serviced your microwave oven. Explain why you are not pleased. In most cases, this will solve the problem.
NEXT, if you are still not pleased, write all the details, including your telephone number, and send it to:
Customer Service
Avanti Products
10880 NW 30 Street
Miami, FL 33172 USA
Parts and Features
MO1250TW
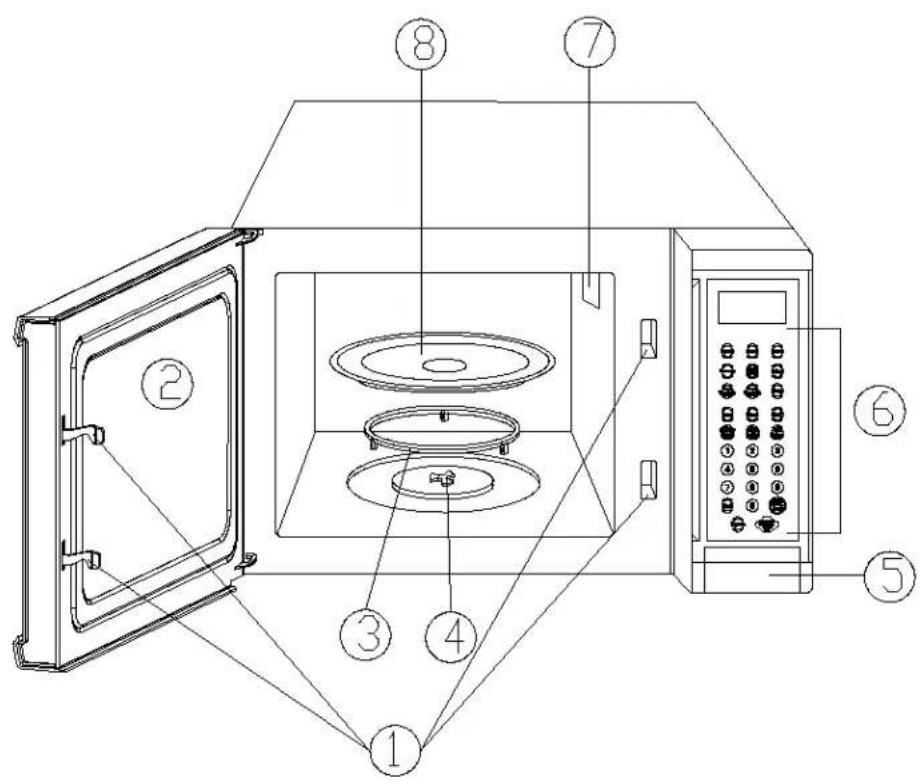
| 1 | Door Safety Lock System |
| 2 | Oven Window |
| 3 | Roller Ring |
| 4 | Turntable Shaft |
| 5 | Door Release Button |
| 6 | Control Panel |
| 7 | Oven Air Vent |
| 8 | Glass Tray |
IMPORTANT SAFETY INSTRUCTIONS
| When using electrical appliances basic safety precautions should be followed, including the following: | |
| ~WARNING~ | To reduce the risk of burns, electrical shock, fire, injury to persons, or exposure to excessive microwave energy when using your appliance, follow these basic precautions: |
| Read all instructions before using the appliance.Read and follow the specific “PRECAUTIONS TO AVOID POSSIBLE EXPOSURE TO EXCESSIVE MICROWAVE ENERGY” found on page 6.This appliance must be grounded. Connect only to properly grounded outlet.SEE GROUNDING INSTRUCTIONS found on page 8.Install or locate the appliance only in accordance with the provided installation instructions.When cleaning surfaces of door and oven that comes together on the closing door, use only mild, nonabrasive soaps, or detergents applied with a sponge or soft cloth.Liquids, such as water, coffee, or tea are able to be overheated beyond the boiling point without appearing to be boiling. Visible bubbling or boiling when the container is removed from the microwave oven is not always present. THIS COULD RESULT IN VERY HOT LIQUIDSSUDDENLY BOILING OVER WHEN THE CONTAINER IS DISTURBED OR A UTENSIL IS INSERTED INTO THE LIQUID.Some products such as whole eggs and sealed containers-(for example, closed glass jars) may explode and should not be heated in microwave oven.Use this microwave oven only for its intended use as described in this manual.Do not use corrosive chemicals or vapors in this appliance. This type of oven is specifically designed to heat, cook, or dry food. It is not designed for industrial or laboratory use.As with any appliance, close supervision is necessary when used by children.Do not operate this microwave oven if it has a damaged cord or plug, if it is not working properly, or if it has been damaged or dropped.To reduce the risk of fire in the oven cavity:Do not overcook food. Carefully attend microwave oven if paper, plastic, or combustible materials are placed inside the oven to facilitate cooking.Remove wire twist-ties from bags before placing bag in oven.If materials inside the oven should ignite, keep oven door closed, turn oven off at the wall switch, or shut off power at the fuse or circuit breaker panel.Do not use the cavity for storage purposes. Do not leave paper products, cooking utensils, or food in the cavity when not in use.Only qualified service personnel should service this appliance. Contact the nearest authorized service facility for examination, repair or adjustment.Do not cover or block any openings on this appliance.Do not use this microwave oven to heat corrosive chemicals (for example, sulfides and chlorides). Vapors from such corrosive chemicals may interact with the contact and springs of the safety interlock switches thereby rendering them inoperable.Do not immerse cord or plug in water.Keep cord away from heated surfaces.Do not let cord hang over edge of table or counter.Never clean appliance parts with flammable fluids. The fumes can create a fire hazard or explosion.Do not store or use gasoline or any other flammable vapors and liquids in the vicinity of this or any other appliance. The fumes can create a fire hazard or explosion.Do not store this appliance outdoors. Do not use this product near water – for example near a kitchen sink, in a wet basement, near a swimming pool, or similar locations-SAVE THESE INSTRUCTIONS- | |
INSTALLATION INSTRUCTIONS
- Remove the exterior and interior packing.
- Check to be sure you have all of the following parts:
- Glass Tray
• Turntable Roller Assembly (Roller or Roller Ring) - Instruction Manual
• Inspect the oven after unpacking for any visual damage such as:
- Misaligned Door
- Damaged Door
• Dents or Holes in Door Window and Screen - Dents in Cavity
If any of the above is visible, DO NOT use the oven.
- When positioning the microwave oven, it should be set on a flat, steady surface.
- Do not block air vents. If they are blocked during operation, the oven may overheat and eventually cause oven failure.
- Poor television reception and radio interference may result if the oven is located close to a TV, radio, antenna, or antenna wire. Position the oven as far from them as possible.
- Clean the interior surface with lukewarm water using a soft cloth.
- Keep the oven away from hot air, steam or splashing liquids when choosing a place to locate it, otherwise, the unit's operation may be adversely affected, causing it to break down.
- Direct sunlight may affect the acrylic coating and heat sources may increase electrical consumption.
- Plug the appliance into an exclusive properly installed-grounded wall outlet. Do not under any circumstances cut or remove the third (ground) prong from the power cord. Any questions concerning power and or grounding should be directed toward a certified electrician or an authorized Avanti Products service center.
- DO NOT place anything on the top of the oven.
- Keep the oven at least 5 inches away from both sidewalls and away from rear wall to ensure the proper ventilation.
• DO NOT remove the turn-table drive shaft.
- SAFETY PRECAUTIONS
PRECAUTIONS TO AVOID POSSIBLE EXPOSURE TO EXCESSIVE MICROWAVE ENERGY
(a) Do not attempt to operate this oven with the door-open since open-door operation can result in harmful exposure to microwave energy. It is important not to defeat or tamper with the safety interlocks.
(b) Do not place any object between the oven front face and the door or allow soil or cleaner residue to accumulate on sealing surfaces.
(c) Do not operate the oven if it is damaged. It is particularly important that the oven door close properly and that there is no damage to the : (1) Door ( bent ), (2) Hinges and latches ( broken or loosened ), (3) Door seals and sealing surfaces.
(d) The oven should not be adjusted or repaired by anyone except properly qualified service personnel.
- DO NOT attempt to tamper with or make any adjustments or repairs to door, control panel or any other part of the oven. Do NOT remove outer panel from oven. Repairs should only be done by qualified service personnel.
- DO NOT operate the oven empty. The microwave energy will reflect continuously throughout the oven if no food or water is present to absorb energy.
- If a fire occurs in the oven, touch the STOP/RESET pad and LEAVE THE DOOR CLOSED. Disconnect the power cord, or shut off power at the fuse or circuit breaker panel.
• DO NOT attempt to dry clothes, newspapers or other materials in oven. They may catch on fire. - DO NOT use recycled paper products, as they may contain impurities, which may cause sparks and/or fires when used.
• DO NOT hit or strike control panel. Damage to controls may occur.
• METAL CONTAINERS or dishes with metallic rims should not be used. Arcing may occur.
• METAL TWIST-TIES may not be used in the microwave oven.
- DO NOT use SEALED JARS or NARROW NECK bottles for cooking or reheating. They may shatter.
- DO NOT use CONVENTIONAL THERMOMETERS in the microwave oven. They may cause arcing. Use only those labeled “Microwave Safe” and follow all directions. Check the food in several places.
- Remove PLASTIC STORE WRAPS before cooking or defrosting in the oven. RECOMMENDED
- Microwave browning dish – Use to brown exterior of small items such as steaks, chops, or pancakes. Follow the directions provided with your browning dish.
- Microwaveable plastic wrap – Use to retain steam. Leave a small opening for some steam to escape and avoid placing it directly on the food.
- Paper towels and napkins – Use for short-term heating and covering; these absorb excess moisture and prevent splattering. Do not use recycled paper towels, which may contain metal and could ignite.
- Never use your microwave oven for HOME CANNING. The oven is not designed to permit proper canning. Improperly canned food may spoil and be dangerous to consume.
- COOKING TIMES are approximate. Factors that may affect cooking are starting temperature, altitude, volume, size and shape of food and utensils used. As you become familiar with the oven, you will be able to adjust for these factors.
- It is better to UNDERCOOK RATHER THAN OVERCOOK foods. If food is undercooked, it can always be returned to the oven for further cooking. If food is overcooked, nothing can be done. Always start with minimum cooking times.
- SMALL QUANTITIES of food or foods with LOW MOISTURE content can burn, dry out or catch on fire if cooked too long.
• DO NOT boil eggs in their shell. Pressure may build up and the eggs will explode. - Potatoes, apples, egg yolks, whole acorn squash and sausage are examples of food with NONPOROUS SKINS. These must be pierced before cooking to prevent bursting.
- POPCORN must be popped in a microwave corn popper. Microwave popped corn produces a lower yield than conventional popping. DO NOT use oven for popcorn unless popped in a microwave approved popcorn utensil or unless it's commercially packaged and recommended especially for microwave ovens. DO NOT use oil unless specified by the manufacturer.
• DO NOT attempt to deep fat fry in your oven.
• HEATED LIQUIDS can ERUPT if not mixed with air. DO NOT heat liquids in your microwave
GROUNDING INSTRUCTIONS
This appliance must be grounded. In the event of an electrical short circuit, grounding reduces the risk of electrical shock by providing an escape wire for the electric current. This appliance is equipped with a cord having a grounding wire with a grounding plug. The plug must be inserted into an outlet that is properly installed and grounded.
\~Warning\~
Improper use of the grounded plug can result in the risk of electrical shock. Consult a qualified electrician or service person if the grounding instructions are not completely understood, or if doubt exists as to whether the appliance is properly grounded.
The power cord of this appliance is equipped with a three-prong plug which mates with standard three prong wall outlets to minimize the possibility of electrical shock.
Do not under any circumstances cut or remove the third ground prong from the power cord supplied.
Do not use the extension cord. If the power supply cord is too short, have a qualified electrician or serviceman to install an outlet near the appliance.
This appliance requires a standard 115/120 Volts A.C. \~/60Hz electrical outlet with three-prong ground.
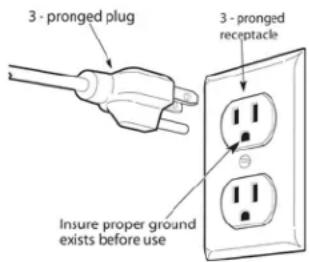
The cord should be secured behind the appliance and not left exposed or dangling to prevent accidental injury.
Although your oven is provided with safety features, it is important to observe the following:
• It is important not to defeat or tamper with safety interlocks.
- Do not place any object between the oven front face and the door or allow residue to accumulate on sealing surfaces. Wipe the sealing area frequently with a mild detergent, rinse and wipe dry. Never use abrasive powders or pads.
- When opened, the door must not be subjected to strain, for example, a child hanging on an opened door or any load which could cause the oven to fall forward and cause injury and damage the door. Do not operate the oven if it is damaged, until it has been repaired by a qualified service person. It is particularly important that the oven closes properly and that there is no damage to the:
- Door (bent)
• Hinges and latches (broken or loosened)
- Door seals and sealing surfaces
• The oven should not be adjusted or repaired by anyone except properly qualified service personnel.
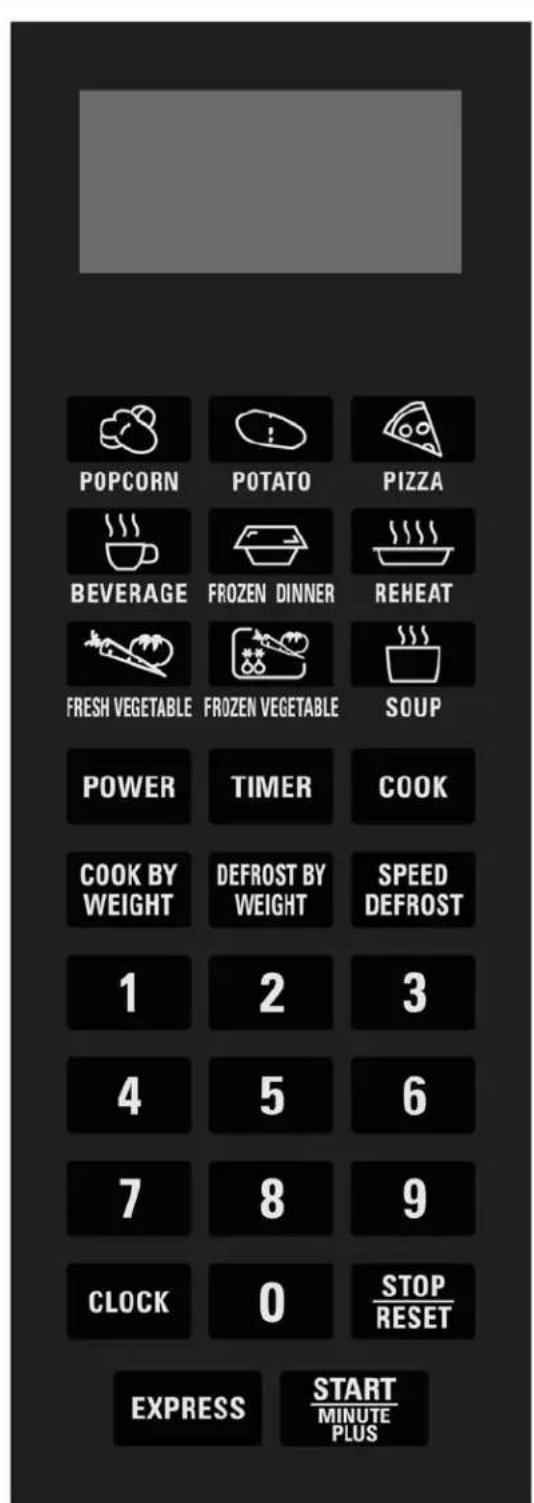
UNIT FEATURES
| Pre-Programmed Cooking Modes |
| Popcorn |
| Baked Potato |
| Pizza |
| Beverage |
| Frozen Dinner |
| Reheat |
| Fresh Vegetable |
| Frozen Vegetable |
| Soup |
| Cook By Weight |
| Defrost By Weight |
| Speed Defrost |
| Express |
| Clock: 12 Hour |
| Kitchen Timer |
UNIT SPECIFICATIONS
| Power Consumption: | 120V ~ 60Hz, 1450W |
| Output (Watts): | 1000W |
| Operation Frequency: | 2450MHz |
| Unit Dimensions (HxWxD): | 1134" × 2114" × 1734" |
| Oven Cavity Dimensions (HxWxD): | 9716" × 14316" × 1578" |
| Oven Capacity: | 1.2 cu. Ft. |
| Cooking Uniformity: | Turntable |
| Net Weight: | Approx. 39 Lbs |
| CONTROL PANEL FEATURE DISPLAY | DESCRIPTIONElectronic display shows Cooking Time, Cooking Power, Time Remaining in Cooking Cycle, and the Present Time. |
| PRE-PROGRAMMED COOKING MODES | POPCORN POTATO PIZZABEVERAGE FROZEN DINNER REHEATFRESH VEGETABLE FROZEN VEGETABLE SOUPOllow you to reheat or cook food automatically without entering power level or time. |
| POWER | Use to set power level |
| COOK BY WEIGHT | Touch to set the weight of the food to be cooked. The oven automatically sets the cooking time and power level. |
| DEFROST BY WEIGHT | Touch to set the weight of the food to be defrosted. The oven automatically sets the defrosting time and power level. |
| SPEED DEFROST | Touch to set defrosting time. The oven automatically divides the defrosting time into periods of alternating defrost and stand times by cycling on and off. |
| TIMER | You can use the TIMER function independently, even while a cooking program is going on in the oven. |
| NUMBER PADS (0-9) | Touch to set times or amounts. |
| CLOCK | Touch to set the clock. |
| STOP / RESET | Stops the cooking cycle and clears all previous settings if touched before cooking starts. |
| START / MINUTE PLUS | Touch to start the cooking cycle press again to add cooking time in one (1) minute intervals. |
| EXPRESS | One touch option to set the cooking cycle on full power in intervals of 30 seconds. You can add additional time in 30 second intervals by pressing the EXPRESS button. |
- Plug the power supply cord into a standard 3-pronged 15 Amps, 120Volts A.C.\~/60Hz.
- After placing the food in a suitable container, open the oven door and put it on the glass tray. The glass tray and roller guide must always be in place during cooking.
- Shut the door. Make sure that it is firmly closed.
• The oven door can be opened at any time during operation by pulling on the door handle. - The oven will automatically shut off. To restart the oven, close the door and then touch START/MINUTE PLUS.
- Each time a pad is touched, a BEEP will sound to acknowledge the touch. One of the function pads must be touched before the number pads. Two BEEPS indicates the oven does not accept the entry, check and try again.
• The oven automatically cooks on high power and defrosts on low power. - When the oven is first plugged in the display will show a flashing “:”, if you prefer not to have the clock displayed, touch reset.
- When the STOP/RESET pad is touched during the oven operation, the oven stops cooking. If the oven door is opened during the oven operation, all information is retained.
- If the START/MINUTE PLUS pad is touched and the oven does not operate, check the area between the door and door seal for obstructions and make sure the door is closed securely. The oven will not start cooking until the door is completely closed and the program has been set.
SPEED DEFROST: Used to defrost frozen foods by time.
This cycle starts at medium – high power, then automatically reduces to medium – low and then to low as the food thaws. DEFROST indicator light and cook indicator light will both come on during the defrost
cycle.
TIMER: Use for timing things without oven function. A long beep will sound at the end of the elapsed time.
AUTO TIMER: After a DEFROST or COOK PROGRAM has completed, the oven will automatically continue to sound four beeps every two minutes until the oven door is opened or the STOP/RESET pad is touched.
CHILD PROOF LOCK: Use to prevent unsupervised operation of the oven by children. The word LOCK will be shown in the display and the oven cannot be operated while the CHILD PROOF LOCK is set.
SETTING CHILD LOCK: To set, press and hold STOP/RESET for 3 seconds. LOCK is indicated on the display. To cancel, press and hold STOP/RESET for 3 seconds. LOCK indication disappears.
TIMER: Use to set cooking time. Allows you to set up to 99 minutes and 99 seconds
STOP/RESET: Touch to cancel the selected power level, cook or defrost times previously programmed. The time of day clock is not cancelled.
START/MINUTE PLUS: Touch to start the defrost or cook programs. The cook indicator light and the oven light will come on and the cooling fan will operate.
NOTE: END OF OPERATION- Display will show "END".
- Four beeps will sound, the cook indicator light will go out and will show "END" on display window until the door is opened and the time of day will return to the display window. The oven light and cooking fan will turn off.
- The oven will automatically continue to sound four beeps every two minutes until the oven door is opened or the RESET pad is touched.
NOTE: TO INTERRUPT OPERATION – Open the oven door.
• The oven immediately stops.
- If no further cooking is required, touch the RESET pad.
• To continue cooking, close the oven door and touch the START/STOP pad. The oven will restart.
| HOW TO SET THE OVEN CONTROLS | |
| AUDIBLE SIGNALSDURING OVEN SETTINGS | ONE SIGNAL: Oven accepts the entry.TWO SIGNALS: Oven does not accept the entry, check and try again. |
SETTING THE CLOCK
- Touch CLOCK pad. This is a 12 hour clock.
-
Use the number pads to enter the correct time. If you selected 12 hour clock system, the digital clock allows you to set from 1:00 to 12:59. You must touch at least three numbers to set the clock (one for hour and two for minutes).
-
Touch CLOCK pad again.
NOTE: When the oven is first plugged in or when power resumes after a power interruption, the display will show "ENTER CLOCK TIME". If you prefer to not have the clock displayed, touch the STOP /RESET button.
- Touch TIMER.
- Enter the amount of time by touching the number pads. Digit time is in minutes and seconds and set left to right. Set one digit (a 5 for 5 seconds) or up to four digits (2405 for 24 minutes, 5 seconds).
- Touch the START/MINUTE PLUS button.
NOTE: Time countdown can be seen in display for 3 seconds before clock or cooking time is returned to display.
Touch TIMER and then touch STOP / RESET to
| You can check the clock time while cooking is in progress by touching the CLOCK pad.NOTE: ONCE THE TIME HAS BEEN SET IT WILL CONTINUE TO SHOW UNTIL THE UNIT IS UNPLUGGED OR POWER LOST. | cancel TIMER during timing process. |
| SETTING A COOKING PROGRAM | |
A. One-stage Cooking1. Use the number pads to set a cooking time.You can set a cooking time from one second to 99 minutes and 99 seconds.2. If you want to set a power level other than 100% power, touch POWER, then use the number pads to enter the power level. You can set the power level from 1 to 9.Use single digits to set a cooking power level: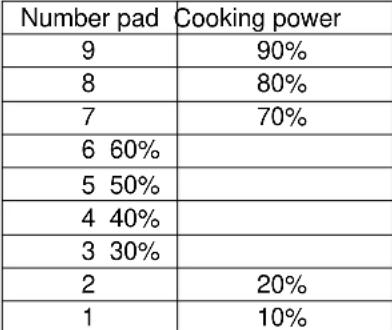 3. Touch START/MINUTE PLUS to start cooking. 3. Touch START/MINUTE PLUS to start cooking. | B. Multi-stage CookingFor added convenience your oven offers the ability to operate in a “Multi-Stage” cooking cycle. Each cycle or stage can be set with a separate cooking time and or power level.a) To set the oven in Multi-Stage cooking model, simply set the time and power level of the first stage (as described in Section One-Stage Cooking to the left).b) To set the second cooking stage, press the COOK key (“MEM” will appear in the display window).c) Select the desired cooking time and power level for the second stage.d) Press “Start/MINUTE PLUS” to begin the cooking process.NOTE:After cooking stage 1 has elapsed, you will hear one “beep” sound, signaling the beginning of stage 2. After the total time (selected cooking times for both stages) has elapsed, 4 “beeps” will sound and “END” will appear in the display window. Touch the “STOP/RESET” button or open the oven door to clear or end the cooking program before starting another cooking function. |
| SPEED DEFROST1. Touch SPEED DEFROST.2. Enter desired defrosting time by touching correct number pads. Digital timer sets minutes and seconds from left to right so a single digit can be set (5 for 5 seconds ) or up to 4 digits (2405 for 24 minutes 5 seconds).3. Touch START/MINUTE PLUS.NOTE:After time has elapsed four signals sound and END appears in display. Touch STOP/RESET pad or open door to clear END before starting another cooking function. During defrosting program, the system will pause and sound beeps to remind user to turn food over, and then press START/MINUTE PLUS to resume the defrosting. | COOK BY WEIGHT1. Touch COOK BY WEIGHT.2. Enter the one digit code by touching the correct number 1~3 (shown below) pad.3. Enter weight.4. Touch START/MINUTE PLUS pad.Cook By Weight Code DescriptionCODE TYPE MAX WEIGHT1 Beef 5 lb. 16 oz.2 Mutton 5 lb. 16 oz.3 Pork 5 lb. 4 oz.Note:Weight must be in pounds and ounces. |
| DEFROST BY WEIGHT5. Touch DEFROST BY WEIGHT pad. | |
NOTE:
COOK BY WEIGHT
Cook By Weight Code Description
| CODE | TYPE | MAX | WEIGHT |
| 1 | Beef | 5 lb. 16 | oz. |
| 2 | Mutton | 5 lb. | 16 oz. |
| 3 | Pork | 5 lb. | 4 oz. |
| 6. Enter weight.7. Touch START/MINUTE PLUS pad.Note:Weight must be in pounds and ounces.Ounce weights less than 10 must be preceded by a 0. If label gives weight in pounds only, change the fraction of a pound to ounces using the following chart (See page 14). | For weights less than 10 ounces you must precede the number with a 0. . If label gives weight in pounds only, change the fraction of a pound to ounces using the following chart (See page 14). |
QUICK COOK (PRE-PROGRAMMED) SETTINGS
The QUICK COOK settings allow you to cook or reheat food automatically without entering power level or time.
For smaller portions, simply touch the applicable pad and start. For larger portions, push the pad twice. FROZEN DINNER, BAKED POTATO and BEVERAGE allow you to cook multiple amounts of the same food. Simply touch pad once, and ENTER AMOUNT
IMPORTANT INFORMATION ABOUT THE MICROWAVE POPCORN FEATURE
- In order for microwave popcorn to "POP" evenly and to avoid burning, the bag must be able to rotate freely inside the oven while cooking.
- Some brands of microwave popcorn bags are larger than others and these larger bags may get stuck inside the oven in one position even though the platter is turning properly. This will result in uneven cooking or burning of the popcorn.
- To avoid this, please watch the bag until popping is completed. If the bag gets stuck and does not rotate, open the door, reposition the bag and restart the oven.
** CAUTION **
Use an oven mitt or pot holder when moving the bag, as the contents can be very hot.
** The POPCORN touch button on this microwave is designed for use with three different sizes of popcorn bags. See instructions for proper use.
For best results, we recommend that you follow all instructions and cooking times as indicated on the packaging supplied with your popcorn.
** DO NOT pop popcorn in your microwave oven unless in a special microwave popcorn accessory or unless you are using popcorn specifically labeled for use in microwave ovens.
POPCORN
- Touch POPCORN.
- Press the POPCORN button once for the 1.2 oz bag. For larger bags, press the POPCORN button again and enter the appropriate amount of time as indicated on the package
| Bag Size | Cooking Time | |
| 1 | 1.2 oz | 1 min. 40 sec. |
| 2 | Enter the cook time | |
- Touch START/MINUTE PLUS.
For best results we recommend that you follow all instructions and cooking times as indicated on the popcorn packaging.
BAKED POTATO
For 4 to 6 oz. potatoes:
- Touch POTATO once.
- Enter number of potatoes by touching number pads from 1 to 4. Cooking times for small-medium potatoes are as follows:
| 1 potato | 3 min. 00 sec. |
| 2 potatoes | 4 min. 50 sec. |
| 3 potatoes | 7 min. 40 sec. |
| 4 potatoes | 9 min. 30 sec. |
- Touch START/MINUTE PLUS.
| PIZZAReheating a slice (or two thin ones) of pizza:1. Touch PIZZA once.2.CODE and 1:30 (1 minute and 30 sec.)appears.3. Touch START/MINUTE PLUS.Heating a whole frozen pizza:1. Touch PIZZA twice.2.CODE and 2:30 (2 minutes and 30 sec..)appears.3. Touch START/MINUTE PLUS. | For the large 8 to 10 oz. potatoes:1. Touch POTATO twice.2. Enter number of potatoes by touching number pads from 1 to 4. Cooking times for large potatoes are as follows:1 potato 3 min. 40 sec.2 potatoes 7 min. 00 sec.3 potatoes 10 min. 20 sec.4 potatoes 13 min. 40 sec.3. Touch START/MINUTE PLUS. |
| BEVERAGEFor 5 to 7 oz. coffee cups:1. Touch BEVERAGE once.2.Enter number of cups by touching number pads from 1 to 4. Cooking times are as follows:1 cup. 1 min. 10 sec2 cups. 1 min. 50 sec3 cups. 2 min. 30 sec4 cups. 3 min. 10 sec3. Touch START/MINUTE PLUS.For the larger 9 to 11 oz. coffee mugs:1. Touch BEVERAGE twice.2.Enter number of mugs by touching number pads from 1 to 4. Cooking times are as follows:1 mug 1 min. 40 sec.2mugs 2 min. 50 sec.3mugs 4 min. 00 sec.4mugs 5 min. 10 sec.3. Touch START/MINUTE PLUS. | FROZEN DINNERFor one or two small (7-9 oz.) frozen dinners:1. Touch FROZEN DINNER once.2. For 1 entree, touch the number pad “1” and then touch START/MINUTE PLUS.For 2 entrees, touch the number pad “2”.Cooking times for small-size entrees are as follows:1 entree 5 min. 15 sec.2 entrees 7 min. 30 sec.3. Touch START/MINUTE PLUS pad.Microwaving one large (10-12 oz.) frozen dinner:1. Touch FROZEN DINNER twice.2. For 1 entree, touch the number pad “1” and then touch START/MINUTE PLUS.For 2 entrees, touch the number pad “2”.Cooking times for larger entrees are as follows:1 entree 6 min. 00 sec.2 entrees 11 min. 00 sec.3. Touch START/MINUTE PLUS. |
| REHEAT1. Touch REHEAT and2.CODE and 3:00 (3 minutes.00 sec) appears.3. Touch START/MINUTE PLUS.Note: place in dish or casserole slightly larger than the amount indicated. Continue to heat with variable power and time if at the end of sensor reheat the food is not sufficiently hot.NOTE:This setting lets you reheat a dinner plate of chilled leftovers with good results. | Converting Fractions of a Pound to OuncesFractions of a pound OuncesLess than .03 0.03 to .09 1.10 to .15 2.16 to .21 3.22 to .27 4.28 to .34 5.35 to .40 6.41 to .46 7.47 to .53 8.54 to 59 9.60 to .65 10 |
| .66 to .71 11 | ||
| .72 to .78 12 | ||
| .79 to .84 | 13 | |
| .85 to .90 14 | ||
| .91 to .97 15 | ||
| above .97 | go to next even | |
| Maximum weight for defrosting is 6 lbs.Turn food over when oven signals twice. Touch START/MINUTE PLUS to resume defrosting.After total defrosting time, 4 signals sound and END appears in display. Touch STOP / RESET or open oven door to clear END before starting another cooking function. | ||
| FRESH VEGETABLEUse this option to cook portions (4 to 9 oz) of fresh vegetables:1. Press the FRESH VEGETABLE button2. Enter number of portions by touching number pads from 1 to 6. Cooking times are as follows:1 portion. 3 min. 00 sec2 portions. 5 min. 30 sec3 portions. 8 min. 00 sec4 portions. 10 min. 30 sec5 portions 13 min. 00 sec6 portions 15 min. 30 sec3. Touch START/MINUTE PLUS. | FROZEN VEGETABLEUse this option to cook portions (4 to 9 oz) of fresh vegetables:1. Press the FROZEN VEGETABLE button2. Enter number of portions by touching number pads from 1 to 6. Cooking times are as follows:1 portion. 4 min. 00 sec2 portions. 7 min. 00 sec3 portions. 10 min. 00 sec4 portions. 13 min. 00 sec5 portions 16 min. 00 sec6 portions 19 min. 00 sec3. Touch START/MINUTE PLUS. | |
| SOUPUse this option to cook portions (7 to 9 oz) of soup:1. Press the SOUP button2. Enter number of portions by touching number pads from 1 to 4. Cooking times are as follows:1 portion. 2 min. 00 sec2 portions. 3 min. 00 sec3 portions. 4 min. 00 sec4 portions. 5 min. 00 sec3. Touch START/MINUTE PLUS. | EXPRESSThis is a QUICK Cook option that will allow you to cook or reheat items with the touch of 1 button.Press the EXPRESS button the microwave will immediately start cooking at 100% Power for 30 seconds, to add additional time press the EXPRESS button again. Additional time will be added in 30 second intervals with each press of the EXPRESS button up to a maximum cook time of 10:30 (10 minutes 30 seconds). | |
COOKING TECHNIQUES
Your microwave makes cooking easier than conventional cooking, provided you keep these considerations in mind.
Stirring
Stir foods such as casseroles and vegetables while cooking to distribute heat evenly. Food at the outside of the dish absorbs more energy and heats more quickly, so stir from the outside to the center. The oven will turn off when you open the door to stir your food.
Arrangement
Arrange unevenly shaped foods, such as chicken pieces or chops, with the thicker, meatier parts toward the outside of the turntable where they receive more microwave energy. To prevent overcooking, place delicate areas, such as asparagus tips, toward the center of the turntable.
Turning
Turn foods over midway through cooking to expose all parts to microwave energy. This is especially important with large foods such as roasts.
Standing
Foods cooked in the microwave build up internal heat and continue to cook for a few minutes after heating stops. Let foods stand to complete cooking, especially foods such as cakes and whole vegetables. Roasts need this time to complete cooking in the center without overcooking the outer areas. All liquids, such as soup or hot chocolate, should be shaken or stirred when cooking is complete. Let liquids stand a moment before serving. When heating baby food, stir well at removal and test the temperature before serving.
Adding Moisture
Microwave energy is attracted to water molecules. Food that is uneven in moisture content should be covered or allowed to stand so that the heat disperses evenly. Add a small amount of water to dry food to help them cook.
CARE AND MAINTENANCE
- CLEANING YOUR APPLIANCE
- Turn the oven off and remove the power plug from the wall socket before cleaning.
- Keep the inside of the oven clean. When food splatters or spilled liquids adhere to oven walls, wipe with a damp cloth. Mild detergent may be used if the oven gets very dirty. The use of harsh detergent or abrasives is not recommended.
- The outside oven surfaces should be cleaned with a damp cloth. To prevent damage to the operating parts inside the oven, water should not be allowed to seep into the ventilation openings.
- Do not allow the control panel to become wet. Clean with a soft, damp cloth. Do not use detergents, abrasives or spray-on cleaners on the control panel. When cleaning the control Panel, leave oven door open to prevent oven from accidentally turning on.
- If steam accumulates inside or around the outside of the oven door, wipe with a soft cloth. This may occur when the microwave oven is operated under high humidity conditions and in no way indicates malfunction of the unit.
- It is occasionally necessary to remove the glass tray for cleaning. Wash the tray in warm sudsy water or in a dishwasher.
- The roller ring and oven cavity floor should be cleaned regularly to avoid excessive noise. Simply wipe the bottom surface of the oven with mild detergent, water or window cleaner and dry. The roller ring may be washed in mild sudsy water or dishwasher. Cooking vapors collect during repeated use but in no way affect the bottom surface or roller ring wheels. When removing the roller ring from cavity floor for cleaning, be sure to replace it in the proper position.
- Remove odors from your oven by combining a cup of water with the juice and skin of one lemon in a deep microwavable bowl. Microwave for 5 minutes. Wipe thoroughly and dry with a soft cloth.
- When it becomes necessary to replace the oven light, please consult a dealer to have it replaced.
PROBLEMS WITH YOUR APPLIANCE?
You can solve many common appliance problems easily, saving you the cost of a possible service call. Try the suggestions below to see if you can solve the problem before calling the servicer.
TROUBLESHOOTING GUIDE
| PROBLEM | POSSIBLE CAUSE |
| Appliance does not operate. | Not plugged in.The circuit breaker tripped or a blown fuse.The door is not closed properly. |
| The light does not work. | The circuit breaker tripped or a blown fuse.The appliance is unplugged.The bulb has burned out (see the maintenance section for the replacement procedure). |
| Vibrations. | Check to assure that the appliance is level. |
SERVICE FOR YOUR APPLIANCE
We are proud of our customer service organization and the network of professional service technicians that provide service on your Avanti appliances. With the purchase of your Avanti appliance, you can be confident that if you ever need additional information or assistance, the Avanti Products Customer Service team will be here for you. Just call us toll-free.
AVANTI PRODUCTS CUSTOMER SERVICES
| Product Information800-323-5029 | Whatever your questions are about our products, help is available. |
| Part Orders800-220-5570 | You may order parts and accessories that will be delivered directly to your home by personal check, money order, Master Card, or Visa. |
| In-Home Repair Service800-220-5570 | An Avanti Products authorized service center will provide expert repair service, scheduled at a time that is convenient for you. Our trained servicers know your appliance inside and out. |
| YOUR AVANTI PRODUCTSWARRANTY | Staple your sales receipt here. Proof of original purchase date is needed to obtain service under warranty. |
| WHAT IS COVERED – LIMITED ONE-YEAR WARRANTYAvanti Products warrants that the product is free from defects in materials and/or workmanship for a period of twelve (12) months from the date of purchase by the original owner. The foregoing timeline begins to run upon the date of purchase, and shall not be stalled, tolled, extended, or suspended for any reason whatsoever unless described in detail in the warranty document. For one year from the date of purchase by the original owner, Avanti products will, at its option, repair or replace any part of the product which proves to be defective in material or workmanship under normal use. Avanti Products will provide you with a reasonably similar product that is either new or factory refurbished. During this period Avanti Products will provide all parts and labor necessary to correct such defects free of charge, so long as the product has been installed and operated in accordance with the written instructions in this manual. In rental or commercial use, the warranty period is 90 days. All Avanti appliances of 3.5 cubic feet capacity or less must be brought/sent to the appliance service center for repair. | |
| LIMITED TWO YEAR WARRANTYDuring the second year of use, Avanti Products will furnish, as needed a replacement part at no charge in exchange for any original part, which fails due to a defect in material or workmanship. All labor and transportation charges are the responsibility of the consumer.LIMITED SEVEN YEAR WARRANTYFor an additional 6-year period beyond the first year of the general coverage of this warranty, Avanti Products will replace a magnetron tube, which fails due to a defect in material or workmanship. All labor and transportation charges are the responsibility of the consumer. | |
| WARRANTY EXCLUSIONS / WHAT IS NOT COVERED:The warranty coverage described herein excludes all defects or damage that are not the direct fault of Avanti Products, including without limitation, one or more of the following: | |
| A failure to comply with any applicable state, local, city, or county electrical, plumbing and/or building codes, regulations, or laws, including failure to install the product in strict conformity with local fire and building codes and regulations.Any external, elemental and/or environmental forces and factors, including without limitation, rain, wind, sand, floods, fires, mud slides, freezing temperatures, excessive moisture or extended exposure to humidity, lightning, power surges, structural failures surrounding the appliance, and acts of God. | |
| Content losses of food or other content due to spoilage.Incidental or consequential damagesParts and labor costs for the following will not be considered as warranty:Evaporator doors, door springs, and/or frames.Inner door panels, door shelves, door rails, and/or door supports.Chest freezer lid liners.Vegetable crispers.Light bulbs and/or plastic housing.Plastic cabinet liners.Punctured evaporator that voids the warranty on the complete sealed system. | Shipping and handling costs associated with the replacement of the unit.Repairs performed by unauthorized servicers.Service calls that are related to external problems, such as abuse, misuse, inadequate electrical power, accidents, fire, floods, or any other acts of God.Failure of the product if it is used for other than it intended purpose.The warranty does not apply outside the Continental USA.Surcharges including but not limited to, any after hour, weekend, or holiday service calls, tolls, ferry trip charges, or mileage expense for service calls to remote areas. |
| In no event shall Avanti Products have any liability or responsibility whatsoever for damage to surrounding property, including cabinetry, floors, ceilings, and other structures and/or objects around the product. Also excluded from this warranty are scratches, nicks, minor dents, and other cosmetic damages on external surfaces and exposed parts; Products on which the serial numbers have been altered, defaced or removed; service visits for customer education, or visits where there is nothing wrong with the product; correction of installation problems (you are solely responsible for any structure and setting for the product, including all electrical, plumbing and/or other connecting facilities, for proper foundation/flooring, and for any alterations including without limitation cabinetry, walls, floors, shelving etc., as well as the resetting of breakers or fuses. | |
OUT OF WARRANTY PRODUCT
Avanti Products is under no obligation, at law or otherwise, to provide you with any concessions, including repairs, pro-rates, or product replacement, once this warranty has expired.
Warranty - Microwave Ovens
Thank you for purchasing this fine Avanti product. Please fill out this form and return it to the following address within 100 days from the date of purchase and receive these important benefits:
Avanti Products, A Division of The Mackle Co., Inc.
P.O.Box 520604 - Miami, Florida 33152
- Protect your product:
We will keep the model number and date of purchase of your new Avanti product on file to help you refer to this information in the event of an insurance claim such as fire or theft.
- Promote better products:
We value your input. Your responses will help us develop products designed to best meet your future needs.
-(detach here)-
Avanti Registration Card
| Name | Model # | Serial # | ||
| Address | Date Purchased | Store / Dealer Name | ||
| City | State | Zip | E-mail Address | |
| Area Code | Phone Number | Occupation | ||
| Did You Purchase An Additional Warranty | As your Primary Residence, Do You: | |||
| ≤ Extended | ≤ Own | ≤ Rent | ||
| ≤ None | Your Age: | |||
| Reason for Choosing This Avanti Product: Please indicate the most important factors That influenced your decision to purchase this product: | ≤ under 18 | ≤ 18-25 ≤ 26-30 | ||
| ≤ 31-35 | ≤ 36-50 ≤ over 50 | |||
| Marital Status: | ||||
| ≤ Married | ≤ Single | |||
| ≤ Price | Is This Product Used In The: | |||
| ≤ Product Features | ≤ Home | ≤ Business | ||
| ≤ Avanti Reputation | ||||
| ≤ Product Quality | How Did You Learn About This Product: | |||
| ≤ Salesperson Recommendation | ≤ Advertising | |||
| ≤ Other: | ≤ In-Store Demo | |||
| ≤ Friend / Relative Recommendation | ≤ Personal Demo | |||
| ≤ Warranty | ||||
| ≤ Other: | ||||
| Comments: | ||||
| MO1250TW-01182012 | PRINTED IN CHINA |
- HELP US HELP YOU...
- Read this guide carefully.
- Avanti Customer Service 800-220-5570
- Write down the model and serial numbers.
- IF YOU NEED SERVICE
- Customer Service
- Parts and Features
- INSTALLATION INSTRUCTIONS
- - SAFETY PRECAUTIONS
- PRECAUTIONS TO AVOID POSSIBLE EXPOSURE TO EXCESSIVE MICROWAVE ENERGY
- GROUNDING INSTRUCTIONS
- \~Warning\~
- Although your oven is provided with safety features, it is important to observe the following:
- NOTE: END OF OPERATION- Display will show "END".
- NOTE: TO INTERRUPT OPERATION – Open the oven door.
- SETTING THE CLOCK
- NOTE:
- COOK BY WEIGHT
- QUICK COOK (PRE-PROGRAMMED) SETTINGS
- IMPORTANT INFORMATION ABOUT THE MICROWAVE POPCORN FEATURE
- POPCORN
- BAKED POTATO
- For 4 to 6 oz. potatoes:
- COOKING TECHNIQUES
- Stirring
- Arrangement
- Turning
- Standing
- Adding Moisture
- CARE AND MAINTENANCE
- - CLEANING YOUR APPLIANCE
- PROBLEMS WITH YOUR APPLIANCE?
- SERVICE FOR YOUR APPLIANCE
- OUT OF WARRANTY PRODUCT
- - Protect your product:
- - Promote better products:
Brand : Avanti
Model : MO1250TW
Category : Microwave